Instant Connection for Pixel Streaming
— New Feature Automated Setup
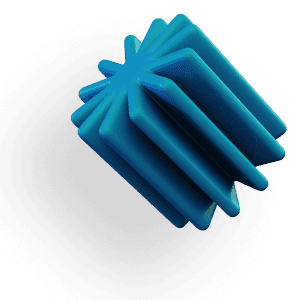
Reduce Rendering Times in 3Ds Max
Reduce Rendering Times in 3Ds Max
Reduce Rendering Times in 3Ds Max
Published on August 11, 2021
Updated on December 10, 2023
Table of Contents
What is 3Ds Max?
Autodesk 3Ds Max is a 3D modeling software used for architectural visualizations, product modeling, character development and animation. So, whether you are an architect, a product designer or an illustrator, 3Ds Max is a great software option for you.
3D software packages, including Autodesk 3Ds Max, generally convert 3D models into CGIs through a rendering process. Even though, rendering process is the provider of all the cool stuff we see that is generated with 3Ds Max, as you know, rendering in 3Ds Max may take too long sometimes. It is frustrating especially since there’s nothing much to do with your system while it renders your work.
A lot of things may be contributing to these long rendering times from low-end hardware to large files. If you are a creative that uses 3Ds Max, this must be relatable for you and for the newbies, hang in there. Long rendering times reduce efficiency every time.
Hence, faster rendering times can be a huge relief for creatives that use 3Ds Max as a major tool. With little tips here and there, faster rendering times can be achieved, even without changing your PC’s hardware. How great is that? Here are a few of those tips on how to render faster on 3Ds Max!
1. Use Low Poly Models
When time is a priority over quality, rendering low poly models can be a great option rather than high poly models. High poly models require enormous CPU calculations. As a result, more calculation leads to longer rendering times.
To check your polycount, you can click the “+” sign on the top right of your viewport. After that, you can go to “x view” and tick the “show statistics” option. Or you can press 7 directly.
2. Improve the Preparatory Phase
Use small size for test renders; I know: big is beautiful, but too much time is wasted rendering every time at minimum of 800 x 600…
Use the Rendering Region, focusing only on what interests you, to check - for example - the reaction of the materials to the small changes that, from time to time, you will make in search of the desired result. Also, do not add Glossy effects, except in the finishing phase, when we are convinced that the scene is already working. (I know, glossy is beautiful, but glossy is also time … lost)
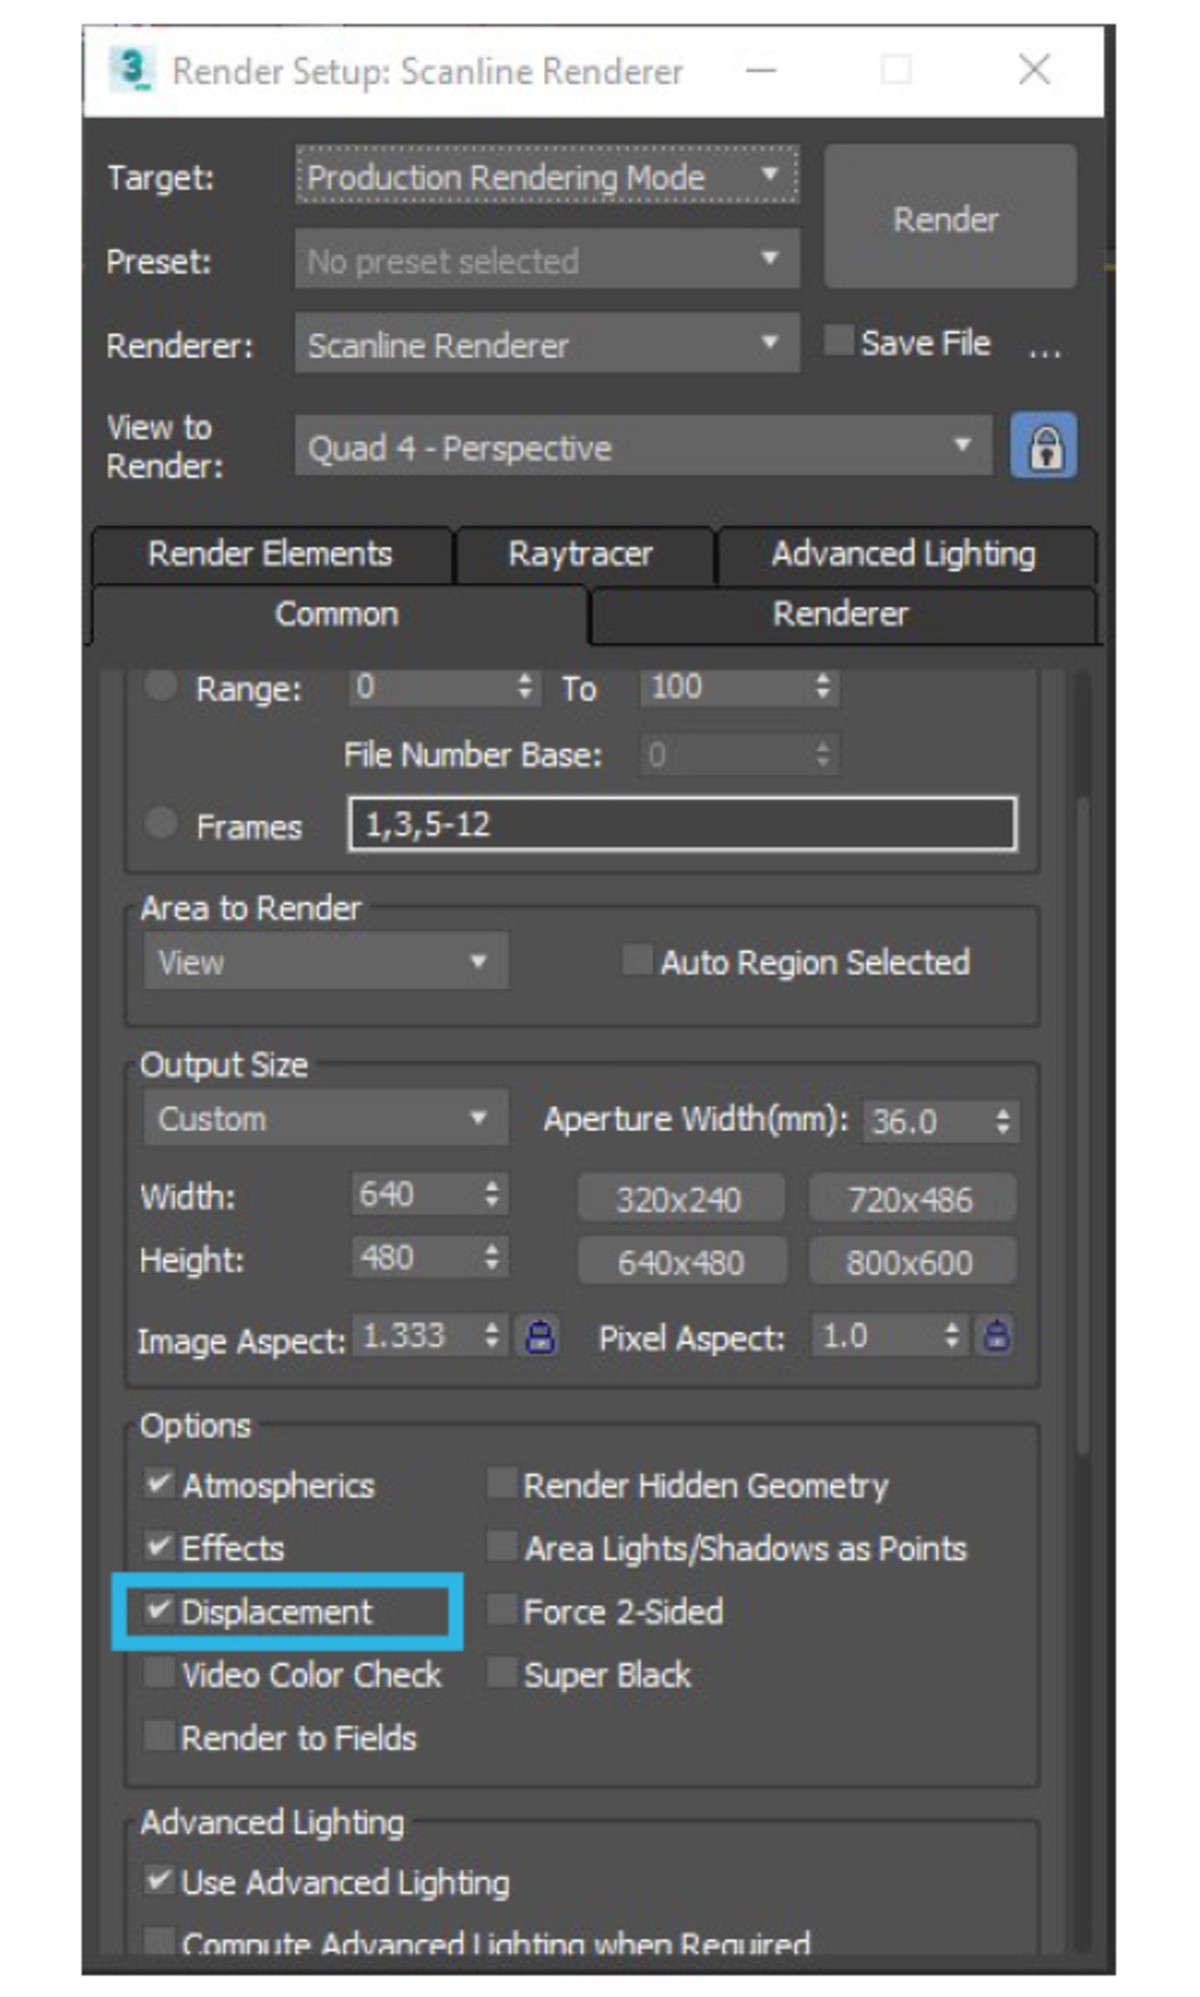
3. Turn Off Displacement
Displacement maps work to complement bum maps. They give an illusion of depth, aiding realistic render output. Although using displacement maps add a lot of value to quality, displacement maps are not necessary where time is the essence. Turning off the displacement map and rendering in the geometric bump map can help achieve shorter rendering times.
To turn off displacement, you can check the “rendering/render set-up” sections and scroll down until you find the “displacement” option. When you untick the box, the displacement will be turned off.
4. Reduce The Render Output Resolutions
Smaller resolutions for your output mean less work for your CPU. It is one of the easiest ways to have rendered images. 2000 x 1500px is an average resolution size. Rendering in a lower resolution will be faster. With higher resolution, it would be vice versa.
5. Boost Your Rendering Speeds Effortlessly with Vagon
Vagon is your go-to solution when it comes to overcoming the hardware limitations of your device. Even on a modest laptop, switching to GPU rendering from CPU rendering with Vagon is quick and effortless. In just a few clicks, you’ll have 4 x 16GB of CUDA activated Nvidia GPUs at your workspace, ready to speed up your rendering tasks.
With Vagon, your existing laptop transforms into a supercomputer in a cost-effective and affordable way.
You don’t need to buy an expensive workstation, you can speed-up your workflow with vagon, from your own laptop without investing too much.
6. Save Some Memory
The pc can crash because it does not have much memory in which to store information during the rendering phase. We can adopt some strategies:
Buy a super-new pc with plenty of Gb of memory
Render into pieces, maybe in 2 halves
Isolate the calculation of the global illumination
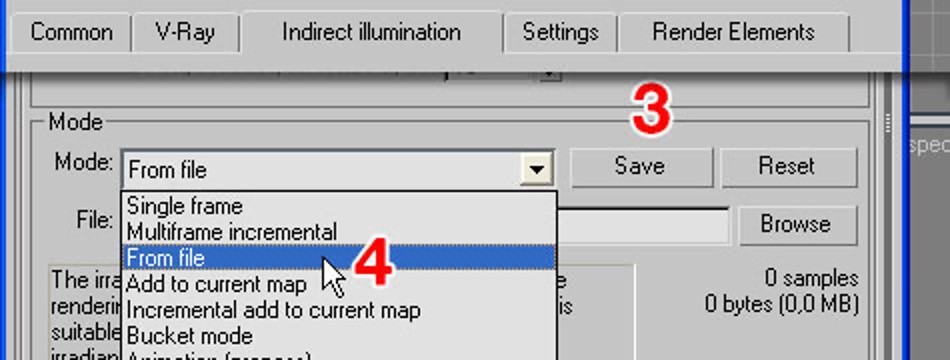
During the rendering phase, the information relating to global illumination is stored and reused shortly afterwards for the actual rendering. We can easily calculate only the first part related to global illumination and then load the data as external files. All memory will be spared.
Here’s how it’s done:
1.Check “don’t render final image”
2.Click render and wait for the calculation to finish
3.Go to irradiance map and click “SAVE” and save
4.Choose “FROM FILE” and select the file you just saved
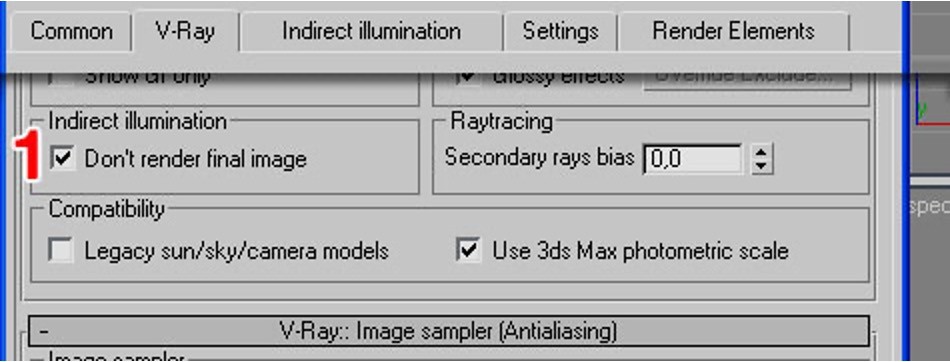
Do the same to save the light cache data: The procedure is identical.
Then remove the tick on “don’t render ..” and run the final render
7. Use a Denoiser
With the denoiser function turned on, 3Ds Max decreases rendering times significantly. The denoiser as the name implies removes the grain in your render output. With denoiser on, you do not need to render all the passes before you get a desirable output. With a denoiser, at render pass 30, your render is ready to go.
Denoisers work directly with render engines, so they can be easily turned on accordingly when rendering.
8. Reduce the Number of High-Resolution Textures
For average renders, 2k textures do a pretty awesome job. Using 4k textures in most cases will be unnecessary and will also create more work for your system. Remember that more work means more time. Tone down the 4k textures and see how you reduce your render times.
2k textures might as well be high-resolution textures in some context and so, based on the scope of your project, reducing the high-resolution textures is totally up to you.
9. Scale Down Scene Detail
For large scenes where the camera is at a considerable distance, precision detailing may not be necessary as these details will not be visible in the render. However, these detailed models will contribute to the render time.
This also applies to close up shots. Objects not in the camera viewport can be deleted to lighten the model and render faster in 3Ds Max.
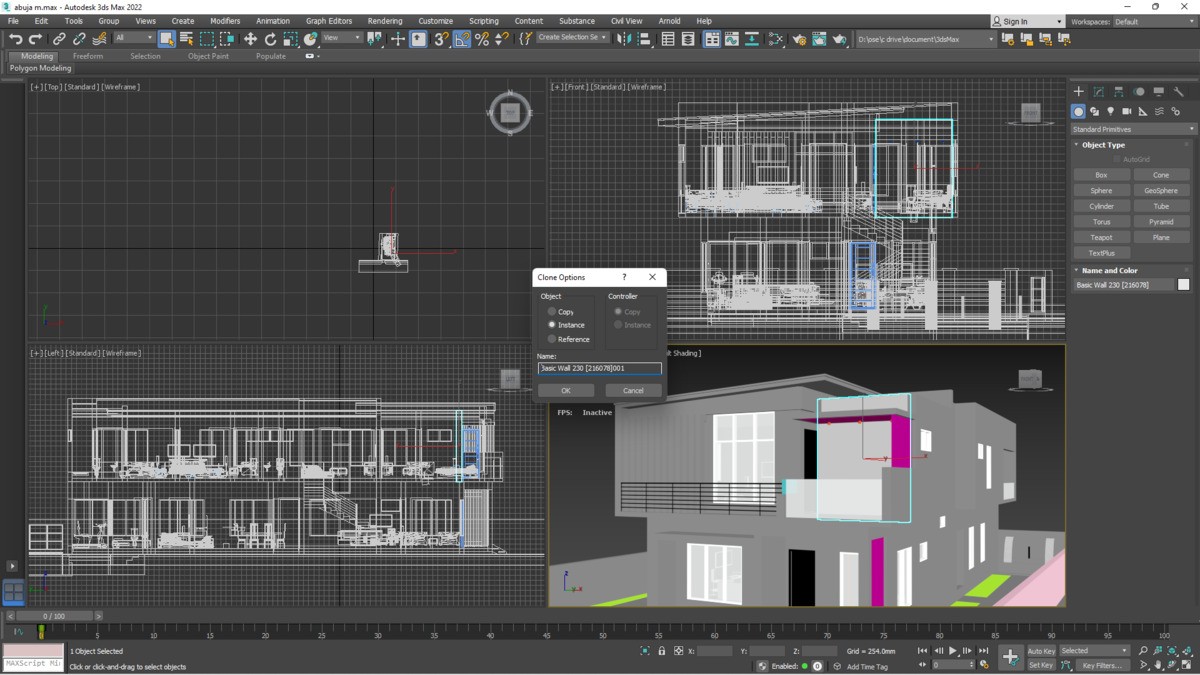
10. Copy Components as an Instance
Here’s what happens when you copy as an instance; your computer transfers all the detail from the copied model to another position while still occupying the disk space of just one entity.This is very helpful when working with populations and duplicates. The only disadvantage is that you cannot alter the properties of the copies.
To copy components as an instance; right click on your object and go to “clone”. Then, tick the “instance” option and now, you can copy it as an instance.
11. Optimize Your Model
Model optimization can reduce render times in 3Ds max. There are a couple of plug-ins that help to optimize models. They ultimately make the workflow in 3Ds Max faster and of course, reduce render times. These plug-ins are optimizing modifiers.
For example, you can check out Turbosmooth Modifier, Optimize Modifier, ProOptimizer Modifier and MultiRes Modifier for reducing your rendering times.
12. Reduce The Reflections and Gloss in Your Scenes
Having reflections in your render scenes increases total rendering times. This is because glossy elements need to be cleaned or denoised to the last detail to be as glossy as portrayed. For renders where these reflection effects do not do much, turning them off would do you a big favor by reducing the rendering time.
13. For Vray Users:
In the draft phase, use “cheap” settings such as:
Primary bounces: Irradiance map / -4 -4
Secondary bounces: Light Cache / 100
In the Vray Global Switches rollout, use Override Mtl with a light grey type material, to quickly test the light effects on the scene, before inserting all the materials.
In the DMC Sampler rollout, bring Adaptive amount 0,85 to 1,0. The quality goes down, of course .. but also the times! And in the setup phase it’s all about gain.
With regard to Vray Lights, where you can, check the “store with irradiance map” option. Here too, you will lose some shadows but the times will be much lower.
Exclude Antialiasing from the calculation: Render panel> Image sampler> Type: Fixed
All these attentions will allow us to lower the setting times a lot. The final render time will only be a small fraction in comparison!
Rendering in 3Ds Max takes a lot of time and over the years, discussions around how to reduce render times have always come up. We have highlighted a few optimization tips to achieve faster render times and a smoother workflow without having to improve your hardware in this post.
We have also not considered the quality of the rendering here, just the render time. With the tips that we have put up, if speed is more primary than quality for your project then, you would find this information useful.
You can also check out our GPU Guide for tips to use GPU, along with speed up and acceleration tips for Autodesk 3DS Max.
What is 3Ds Max?
Autodesk 3Ds Max is a 3D modeling software used for architectural visualizations, product modeling, character development and animation. So, whether you are an architect, a product designer or an illustrator, 3Ds Max is a great software option for you.
3D software packages, including Autodesk 3Ds Max, generally convert 3D models into CGIs through a rendering process. Even though, rendering process is the provider of all the cool stuff we see that is generated with 3Ds Max, as you know, rendering in 3Ds Max may take too long sometimes. It is frustrating especially since there’s nothing much to do with your system while it renders your work.
A lot of things may be contributing to these long rendering times from low-end hardware to large files. If you are a creative that uses 3Ds Max, this must be relatable for you and for the newbies, hang in there. Long rendering times reduce efficiency every time.
Hence, faster rendering times can be a huge relief for creatives that use 3Ds Max as a major tool. With little tips here and there, faster rendering times can be achieved, even without changing your PC’s hardware. How great is that? Here are a few of those tips on how to render faster on 3Ds Max!
1. Use Low Poly Models
When time is a priority over quality, rendering low poly models can be a great option rather than high poly models. High poly models require enormous CPU calculations. As a result, more calculation leads to longer rendering times.
To check your polycount, you can click the “+” sign on the top right of your viewport. After that, you can go to “x view” and tick the “show statistics” option. Or you can press 7 directly.
2. Improve the Preparatory Phase
Use small size for test renders; I know: big is beautiful, but too much time is wasted rendering every time at minimum of 800 x 600…
Use the Rendering Region, focusing only on what interests you, to check - for example - the reaction of the materials to the small changes that, from time to time, you will make in search of the desired result. Also, do not add Glossy effects, except in the finishing phase, when we are convinced that the scene is already working. (I know, glossy is beautiful, but glossy is also time … lost)
3. Turn Off Displacement
Displacement maps work to complement bum maps. They give an illusion of depth, aiding realistic render output. Although using displacement maps add a lot of value to quality, displacement maps are not necessary where time is the essence. Turning off the displacement map and rendering in the geometric bump map can help achieve shorter rendering times.
To turn off displacement, you can check the “rendering/render set-up” sections and scroll down until you find the “displacement” option. When you untick the box, the displacement will be turned off.
4. Reduce The Render Output Resolutions
Smaller resolutions for your output mean less work for your CPU. It is one of the easiest ways to have rendered images. 2000 x 1500px is an average resolution size. Rendering in a lower resolution will be faster. With higher resolution, it would be vice versa.
5. Boost Your Rendering Speeds Effortlessly with Vagon
Vagon is your go-to solution when it comes to overcoming the hardware limitations of your device. Even on a modest laptop, switching to GPU rendering from CPU rendering with Vagon is quick and effortless. In just a few clicks, you’ll have 4 x 16GB of CUDA activated Nvidia GPUs at your workspace, ready to speed up your rendering tasks.
With Vagon, your existing laptop transforms into a supercomputer in a cost-effective and affordable way.
You don’t need to buy an expensive workstation, you can speed-up your workflow with vagon, from your own laptop without investing too much.
6. Save Some Memory
The pc can crash because it does not have much memory in which to store information during the rendering phase. We can adopt some strategies:
Buy a super-new pc with plenty of Gb of memory
Render into pieces, maybe in 2 halves
Isolate the calculation of the global illumination
During the rendering phase, the information relating to global illumination is stored and reused shortly afterwards for the actual rendering. We can easily calculate only the first part related to global illumination and then load the data as external files. All memory will be spared.
Here’s how it’s done:
1.Check “don’t render final image”
2.Click render and wait for the calculation to finish
3.Go to irradiance map and click “SAVE” and save
4.Choose “FROM FILE” and select the file you just saved
Do the same to save the light cache data: The procedure is identical.
Then remove the tick on “don’t render ..” and run the final render
7. Use a Denoiser
With the denoiser function turned on, 3Ds Max decreases rendering times significantly. The denoiser as the name implies removes the grain in your render output. With denoiser on, you do not need to render all the passes before you get a desirable output. With a denoiser, at render pass 30, your render is ready to go.
Denoisers work directly with render engines, so they can be easily turned on accordingly when rendering.
8. Reduce the Number of High-Resolution Textures
For average renders, 2k textures do a pretty awesome job. Using 4k textures in most cases will be unnecessary and will also create more work for your system. Remember that more work means more time. Tone down the 4k textures and see how you reduce your render times.
2k textures might as well be high-resolution textures in some context and so, based on the scope of your project, reducing the high-resolution textures is totally up to you.
9. Scale Down Scene Detail
For large scenes where the camera is at a considerable distance, precision detailing may not be necessary as these details will not be visible in the render. However, these detailed models will contribute to the render time.
This also applies to close up shots. Objects not in the camera viewport can be deleted to lighten the model and render faster in 3Ds Max.
10. Copy Components as an Instance
Here’s what happens when you copy as an instance; your computer transfers all the detail from the copied model to another position while still occupying the disk space of just one entity.This is very helpful when working with populations and duplicates. The only disadvantage is that you cannot alter the properties of the copies.
To copy components as an instance; right click on your object and go to “clone”. Then, tick the “instance” option and now, you can copy it as an instance.
11. Optimize Your Model
Model optimization can reduce render times in 3Ds max. There are a couple of plug-ins that help to optimize models. They ultimately make the workflow in 3Ds Max faster and of course, reduce render times. These plug-ins are optimizing modifiers.
For example, you can check out Turbosmooth Modifier, Optimize Modifier, ProOptimizer Modifier and MultiRes Modifier for reducing your rendering times.
12. Reduce The Reflections and Gloss in Your Scenes
Having reflections in your render scenes increases total rendering times. This is because glossy elements need to be cleaned or denoised to the last detail to be as glossy as portrayed. For renders where these reflection effects do not do much, turning them off would do you a big favor by reducing the rendering time.
13. For Vray Users:
In the draft phase, use “cheap” settings such as:
Primary bounces: Irradiance map / -4 -4
Secondary bounces: Light Cache / 100
In the Vray Global Switches rollout, use Override Mtl with a light grey type material, to quickly test the light effects on the scene, before inserting all the materials.
In the DMC Sampler rollout, bring Adaptive amount 0,85 to 1,0. The quality goes down, of course .. but also the times! And in the setup phase it’s all about gain.
With regard to Vray Lights, where you can, check the “store with irradiance map” option. Here too, you will lose some shadows but the times will be much lower.
Exclude Antialiasing from the calculation: Render panel> Image sampler> Type: Fixed
All these attentions will allow us to lower the setting times a lot. The final render time will only be a small fraction in comparison!
Rendering in 3Ds Max takes a lot of time and over the years, discussions around how to reduce render times have always come up. We have highlighted a few optimization tips to achieve faster render times and a smoother workflow without having to improve your hardware in this post.
We have also not considered the quality of the rendering here, just the render time. With the tips that we have put up, if speed is more primary than quality for your project then, you would find this information useful.
You can also check out our GPU Guide for tips to use GPU, along with speed up and acceleration tips for Autodesk 3DS Max.
Get Beyond Your Computer Performance
Run applications on your cloud computer with the latest generation hardware. No more crashes or lags.
Trial includes 1 hour usage + 7 days of storage.
Get Beyond Your Computer Performance
Run applications on your cloud computer with the latest generation hardware. No more crashes or lags.
Trial includes 1 hour usage + 7 days of storage.
Get Beyond Your Computer Performance
Run applications on your cloud computer with the latest generation hardware. No more crashes or lags.
Trial includes 1 hour usage + 7 days of storage.
Get Beyond Your Computer Performance
Run applications on your cloud computer with the latest generation hardware. No more crashes or lags.
Trial includes 1 hour usage + 7 days of storage.
Get Beyond Your Computer Performance
Run applications on your cloud computer with the latest generation hardware. No more crashes or lags.
Trial includes 1 hour usage + 7 days of storage.
Ready to focus on your creativity?
Vagon gives you the ability to create & render projects, collaborate, and stream applications with the power of the best hardware.
Vagon Blog


Run heavy applications on any device with
your personal computer on the cloud.
San Francisco, California
Solutions
Vagon Teams
Vagon Streams
Use Cases
Resources
Vagon Blog
The Best Render Settings for Blender 3D
Arcware vs Vagon Streams: Best Pixel Streaming Alternatives
How To Use FL Studio on a Cloud Computer
Reducing Latency in Virtual Desktops: 11 Fixes That Actually Work
PureWeb vs Vagon Streams: Best Alternative Pixel Streaming Platform
How To Use Photoshop On iPad
How To Fix Slow & Laggy Performance on AWS Workspaces VDIs?
Arcane Mirage vs Vagon Streams: Best Alternative Pixel Streaming Platform
The Best Unity Shortcuts
Vagon Blog
Run heavy applications on any device with
your personal computer on the cloud.
San Francisco, California
Solutions
Vagon Teams
Vagon Streams
Use Cases
Resources
Vagon Blog