Instant Connection for Pixel Streaming
— New Feature Automated Setup

Blender Tips and Shortcuts to Speed up 3D Workflow
Blender Tips and Shortcuts to Speed up 3D Workflow
Blender Tips and Shortcuts to Speed up 3D Workflow
Published on September 30, 2023
Updated on August 15, 2024
Table of Contents
Blender is a free and open-source 3D graphics program perfect for 3D modeling, sculpting, and animation. It’s one of the most accessible programs available for digital artists and offers tools and functionality on par with high-end paid software. When it comes to learning, there are various top-notch Blender courses and classes available online, packed with Blender tips and tricks for beginners and pros alike.
If you're just starting out, you might want to check out our Complete Guide to Blender 3D for Beginners for a comprehensive overview of the basics.
In the hands of a seasoned user, Blender is capable of producing top-notch renders and animations. The key to mastering Blender is accumulating enough experience and knowledge of the countless features that the program offers. We’ve compiled some essential Blender tips and tricks that should help you on your journey of becoming a Blender expert. Whether you’re a novice or a seasoned user, these Blender techniques and tricks will undoubtedly enhance your workflow.
1. Repeat the Last Action
Sometimes you need to repeat the same task over and over. This might not be a problem if you have to do it three or four times, but it can cost you a lot of time if you repeat it dozens of times without knowing the proper shortcut.
Blender Quick Tip: Press Shift + R and Blender automatically repeats your last action. This shortcut works not only in the 3D viewport but in almost every editor and can be very helpful for modeling, shading, compositing, and animating. This is one of those essential Blender quick tips that can speed up your workflow tremendously.
Use the shortcut Shift + R to repeat the last action.
2. Get to the Current Directory
Navigating in Blender’s file browser can be really laborious, especially if your file system is as messy as mine used to be!
Modeling Tips: One of the most underrated Blender tips for beginners is learning how to quickly get to the current directory. Quickly getting to the current directory (folder where your .blend file is stored) shouldn’t be a problem, however. Just type // in the file path, and Blender brings you there immediately!
Unfamiliar with Color Management in Blender 3D? Learn all the Blender 3D terms from our Blender 3D Glossary.
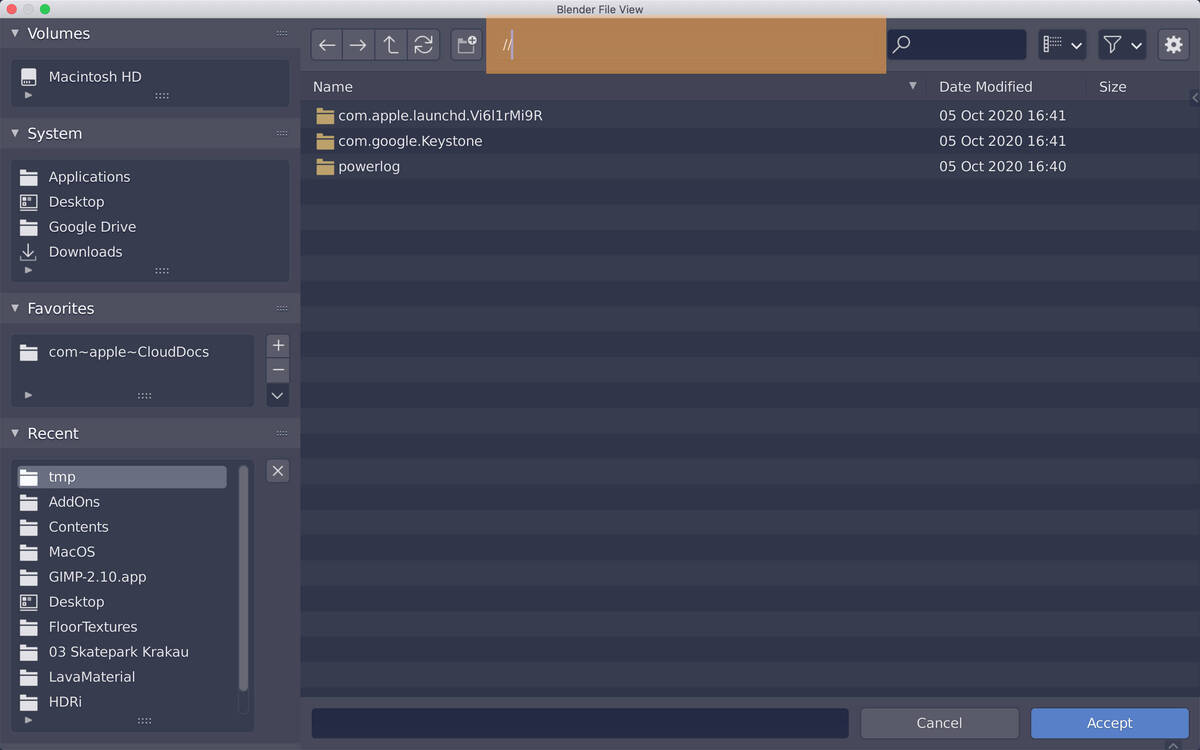
Enter // in the file path to directly get to the current directory.
3. Open Data Path in the File Browser
There’s another helpful shortcut for quicker file navigation.
Hold down Alt while pressing on any data path in Blender to quickly open it up with your default file manager.
Alt click on the file path to open it with your file browser.
4. Add Motion Blur in the Compositor
I am a big fan of motion blur. It gives a lot of realism to your renders, especially if you are using cycles. Unfortunately, enabling this feature adds a lot of render time. There is a solution, however: adding the motion blur in compositing instead of rendering it out. Yes, this is possible!
Before you start rendering, make sure the vector render pass is turned on. In the compositor, add a vector blur node, connect the depth to the Z, and plug the vector into speed.
Now you can play around with the samples and blur sliders until you are happy with the result. This motion blur is faster than rendering it directly, but keep in mind that you also won’t get the same amount of quality. The vector pass is currently only available in cycles, but Eevee’s motion blur is pretty fast anyway.
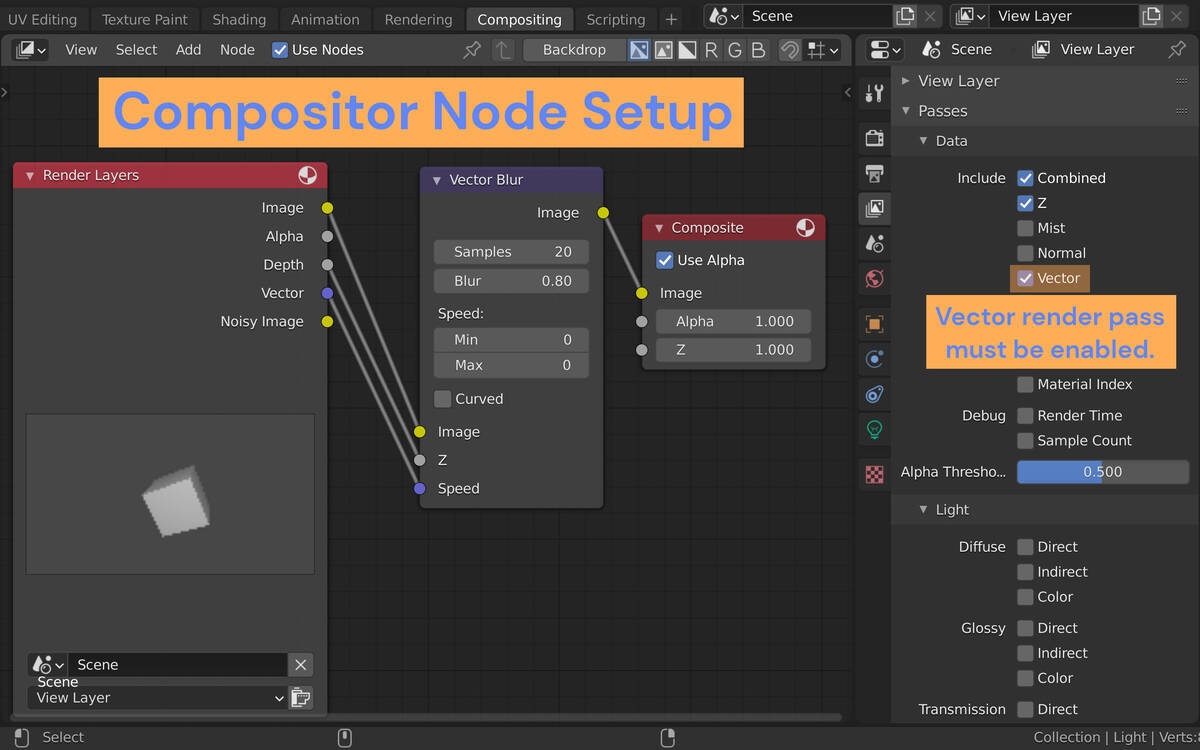
Compositor node setup and vector pass which has to be enabled.
5. Supercharge Your Blender Projects with Vagon
Often, when working on complicated Blender projects, the rendering process can feel like it’s taking an eternity, especially on a low-end device. But it doesn’t have to be this way.
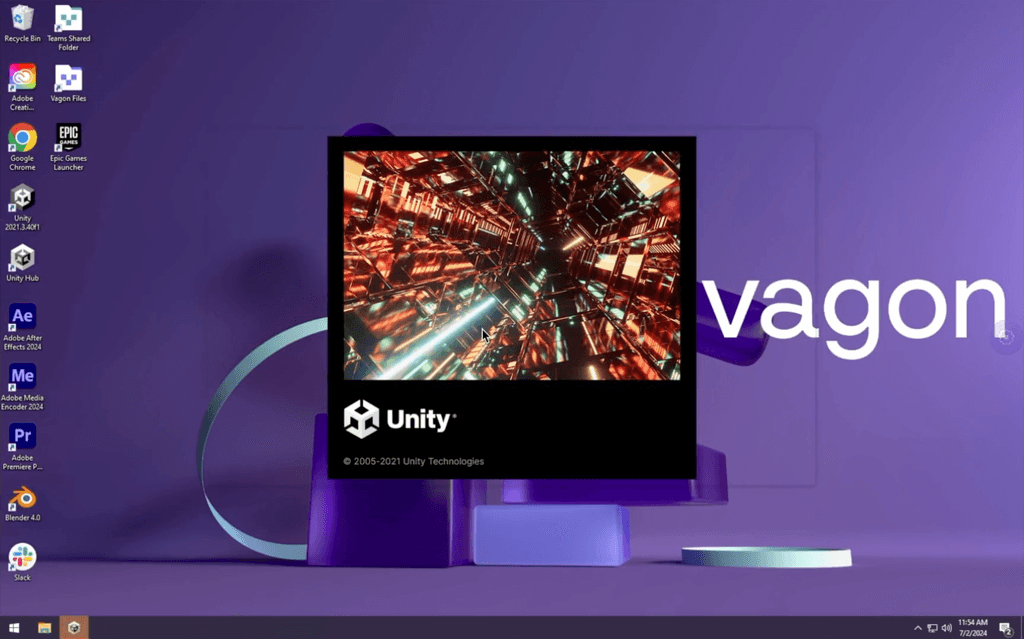
Pro Tips for Rendering: By shifting your rendering tasks to Vagon’s high-performance cloud PCs, you get to experience a significant boost in speed. It’s not just about rendering; whether you are modeling or animating, Vagon is here to provide the next-gen computing power you need whenever you need it.
No more staring at the progress bar, it’s time to unleash your creativity without any holdups. You can check it yourself within just a few clicks.
Elevate your Blender projects by leveraging Vagon's high-performance cloud PCs. Whether you're a beginner working on basic models or a professional tackling intricate animations, Vagon offers the computing power you need to streamline your workflow and reduce rendering times. Experience seamless, faster Blender performance from anywhere. Try Vagon today and unlock the full potential of your 3D creations.
You can also check out our GPU Guide for tips to use GPU, along with speed up and acceleration tips for Blender 3D.
6. Transform the Origin
That little orange point you can see when selecting any object is the origin. This point determines the location, rotation, and scale of the corresponding object in 3D space. Sometimes you need to move this origin point to a specific location.
In most tutorials I’ve watched, they do it the hard way, by first placing the 3D cursor at the desired location and then going to Object > Set Origin > Origin to 3D Cursor to place it.
A quicker variation to complete this task is to just press Ctrl + . to enter origin edit mode. Now all transformations (move, rotate, and scale) you make affect only the origin.
You can additionally enable the snapping mode to make the placement even easier. Just press Ctrl + . again to return to the normal object mode.
Transforming the origin with the snapping tool enabled.
7. Improve Render Times
The most boring and time-consuming part of the 3D workflow is rendering. Fortunately, there are some things you can implement to speed up this process, which is definitely worth reading. In this list, you can find tested and proven tips to reduce rendering times in Blender 3D.
8. Stay Organized
Make use of Blender’s Outline and Collections feature to make sure all the elements, cameras, and scenes are neatly accessible and indexed whenever you need to tweak them. In the same vein, make sure that everything is named appropriately and that the hierarchy between elements and collections is easily understood.
A Blender file can quickly get more and more complex as the project gets closer to completion. Best Practices for Blender Users: Stay organized and your future self and anyone else that might be working on your project files will thank you.
9. Use References
When creating 3D graphics, it’s standard practice to use 2D images as references. If you’re trying to model or sculpt something based on existing objects, find appropriate images of these that you can use to create accurate depictions of your object. Photos are also great references for when you’re trying to create a certain mood or feel in your renders.
Make use of the Orthographic views available in Blender. You can search for or even create your own 2D sketches or blueprints of the top, side, bottom, and rear views of your object which you can then import as references in your Blender file.
10. Master Modifiers
When modeling geometry, one thing users can do to speed up their workflow is to master the use of Blender’s numerous Modifiers. Two of the more commonly used ones are the Boolean Modifiers and the Mirror Modifier.
Modelling Tips and Tricks: Blender’s boolean tools make creating complex geometry a breeze. It can take the combination of various basic geometric volumes and create more complex models out of their Union, Intersection, or Difference.
The Mirror Modifier effectively cuts the amount of modeling or sculpting you need to do by half. If your object is symmetrical about an axis, set up a mirror at the halfway point such that anything that is modeled or sculpted on one side is automatically copied on the other.
11. Lights as Active Cameras
You probably know that you can make a camera active by using the shortcut Ctrl + 0. But did you know that this works with any kind of object, not only with cameras?
This is especially useful for positioning and aligning lights. Make a light the active camera by pressing Ctrl + 0.
Now you can place the light out of first-person perspective.
Use the shortcut RR to rotate in any direction or just lock the camera to view (N-Panel > View > View Lock > Camera to View) to place it exactly where you want. And yes, it is possible to make the default cube the active camera, I just haven’t found any practical use for that yet!
Have you used the Camera Proxy in Blender 3D? Check out our Blender 3D Glossary to learn all the Bleder 3D terminology.
Aligning the light from first person perspective with the light/camera locked to the view.
12. Be Updated
Blender boasts a passionate and engaged community of developers worldwide. As such, it receives constant updates and upgrades. Tips for Staying Updated: To be able to use Blender to its fullest potential, make sure that you keep up to date about the latest versions of Blender and what new features they bring to the table.
This also rings true to the hardware that you use on your machine. There are plenty of ways to maximize your use of Blender even on lower-end machines. But if your time and your budget allow, make sure you use as much RAM, CPU, and GPU power as you can afford. Or avail of cloud computing services such as Vagon to use high-end computing power at affordable costs.
Conclusion
Blender has several amazing features that make it not only the cheapest option available but also the go-to software for 3D graphics. You can model and animate anything on Blender, given that you’ve spent enough time testing out its different tools and various available plug-ins.
Hopefully, the basic Blender secrets we’ve covered in this article helped give you an idea of just how robust a tool it can be. Try out the tips we’ve discussed the next time you fire up the program and see how they can enhance your workflow.
FAQs:
What are some essential Blender tips for beginners?
Beginners should focus on mastering shortcuts, staying organized with Blender's Outliner and Collections, and exploring basic modifiers like Boolean and Mirror to streamline their workflow.
How can I speed up rendering times in Blender?
You can speed up rendering times by using compositing techniques like adding motion blur post-render, optimizing your scene’s lighting, and leveraging high-performance cloud PCs like Vagon for more intensive tasks.
What are some useful Blender tricks for modeling?
Key modeling tricks include using the
Ctrl + .shortcut for origin editing, mastering Blender’s Modifiers, and using reference images in orthographic views to create accurate models.
How do I stay updated with the latest Blender features?
To stay updated, regularly check Blender’s official website, join community forums, and follow Blender-related content online. Keeping your hardware up-to-date or using cloud computing services can also help you take full advantage of new features.
What are the best practices for using Blender on a low-end device?
On a low-end device, you should minimize viewport overlays, reduce the number of subdivisions in models, and use Eevee for faster real-time rendering. Consider cloud computing options like Vagon for more demanding tasks.
How can I improve my Blender workflow?
Improving your workflow involves mastering shortcuts, using collections to stay organized, experimenting with different rendering techniques, and continually learning from tutorials and community resources.
Blender is a free and open-source 3D graphics program perfect for 3D modeling, sculpting, and animation. It’s one of the most accessible programs available for digital artists and offers tools and functionality on par with high-end paid software. When it comes to learning, there are various top-notch Blender courses and classes available online, packed with Blender tips and tricks for beginners and pros alike.
If you're just starting out, you might want to check out our Complete Guide to Blender 3D for Beginners for a comprehensive overview of the basics.
In the hands of a seasoned user, Blender is capable of producing top-notch renders and animations. The key to mastering Blender is accumulating enough experience and knowledge of the countless features that the program offers. We’ve compiled some essential Blender tips and tricks that should help you on your journey of becoming a Blender expert. Whether you’re a novice or a seasoned user, these Blender techniques and tricks will undoubtedly enhance your workflow.
1. Repeat the Last Action
Sometimes you need to repeat the same task over and over. This might not be a problem if you have to do it three or four times, but it can cost you a lot of time if you repeat it dozens of times without knowing the proper shortcut.
Blender Quick Tip: Press Shift + R and Blender automatically repeats your last action. This shortcut works not only in the 3D viewport but in almost every editor and can be very helpful for modeling, shading, compositing, and animating. This is one of those essential Blender quick tips that can speed up your workflow tremendously.
Use the shortcut Shift + R to repeat the last action.
2. Get to the Current Directory
Navigating in Blender’s file browser can be really laborious, especially if your file system is as messy as mine used to be!
Modeling Tips: One of the most underrated Blender tips for beginners is learning how to quickly get to the current directory. Quickly getting to the current directory (folder where your .blend file is stored) shouldn’t be a problem, however. Just type // in the file path, and Blender brings you there immediately!
Unfamiliar with Color Management in Blender 3D? Learn all the Blender 3D terms from our Blender 3D Glossary.
Enter // in the file path to directly get to the current directory.
3. Open Data Path in the File Browser
There’s another helpful shortcut for quicker file navigation.
Hold down Alt while pressing on any data path in Blender to quickly open it up with your default file manager.
Alt click on the file path to open it with your file browser.
4. Add Motion Blur in the Compositor
I am a big fan of motion blur. It gives a lot of realism to your renders, especially if you are using cycles. Unfortunately, enabling this feature adds a lot of render time. There is a solution, however: adding the motion blur in compositing instead of rendering it out. Yes, this is possible!
Before you start rendering, make sure the vector render pass is turned on. In the compositor, add a vector blur node, connect the depth to the Z, and plug the vector into speed.
Now you can play around with the samples and blur sliders until you are happy with the result. This motion blur is faster than rendering it directly, but keep in mind that you also won’t get the same amount of quality. The vector pass is currently only available in cycles, but Eevee’s motion blur is pretty fast anyway.
Compositor node setup and vector pass which has to be enabled.
5. Supercharge Your Blender Projects with Vagon
Often, when working on complicated Blender projects, the rendering process can feel like it’s taking an eternity, especially on a low-end device. But it doesn’t have to be this way.
Pro Tips for Rendering: By shifting your rendering tasks to Vagon’s high-performance cloud PCs, you get to experience a significant boost in speed. It’s not just about rendering; whether you are modeling or animating, Vagon is here to provide the next-gen computing power you need whenever you need it.
No more staring at the progress bar, it’s time to unleash your creativity without any holdups. You can check it yourself within just a few clicks.
Elevate your Blender projects by leveraging Vagon's high-performance cloud PCs. Whether you're a beginner working on basic models or a professional tackling intricate animations, Vagon offers the computing power you need to streamline your workflow and reduce rendering times. Experience seamless, faster Blender performance from anywhere. Try Vagon today and unlock the full potential of your 3D creations.
You can also check out our GPU Guide for tips to use GPU, along with speed up and acceleration tips for Blender 3D.
6. Transform the Origin
That little orange point you can see when selecting any object is the origin. This point determines the location, rotation, and scale of the corresponding object in 3D space. Sometimes you need to move this origin point to a specific location.
In most tutorials I’ve watched, they do it the hard way, by first placing the 3D cursor at the desired location and then going to Object > Set Origin > Origin to 3D Cursor to place it.
A quicker variation to complete this task is to just press Ctrl + . to enter origin edit mode. Now all transformations (move, rotate, and scale) you make affect only the origin.
You can additionally enable the snapping mode to make the placement even easier. Just press Ctrl + . again to return to the normal object mode.
Transforming the origin with the snapping tool enabled.
7. Improve Render Times
The most boring and time-consuming part of the 3D workflow is rendering. Fortunately, there are some things you can implement to speed up this process, which is definitely worth reading. In this list, you can find tested and proven tips to reduce rendering times in Blender 3D.
8. Stay Organized
Make use of Blender’s Outline and Collections feature to make sure all the elements, cameras, and scenes are neatly accessible and indexed whenever you need to tweak them. In the same vein, make sure that everything is named appropriately and that the hierarchy between elements and collections is easily understood.
A Blender file can quickly get more and more complex as the project gets closer to completion. Best Practices for Blender Users: Stay organized and your future self and anyone else that might be working on your project files will thank you.
9. Use References
When creating 3D graphics, it’s standard practice to use 2D images as references. If you’re trying to model or sculpt something based on existing objects, find appropriate images of these that you can use to create accurate depictions of your object. Photos are also great references for when you’re trying to create a certain mood or feel in your renders.
Make use of the Orthographic views available in Blender. You can search for or even create your own 2D sketches or blueprints of the top, side, bottom, and rear views of your object which you can then import as references in your Blender file.
10. Master Modifiers
When modeling geometry, one thing users can do to speed up their workflow is to master the use of Blender’s numerous Modifiers. Two of the more commonly used ones are the Boolean Modifiers and the Mirror Modifier.
Modelling Tips and Tricks: Blender’s boolean tools make creating complex geometry a breeze. It can take the combination of various basic geometric volumes and create more complex models out of their Union, Intersection, or Difference.
The Mirror Modifier effectively cuts the amount of modeling or sculpting you need to do by half. If your object is symmetrical about an axis, set up a mirror at the halfway point such that anything that is modeled or sculpted on one side is automatically copied on the other.
11. Lights as Active Cameras
You probably know that you can make a camera active by using the shortcut Ctrl + 0. But did you know that this works with any kind of object, not only with cameras?
This is especially useful for positioning and aligning lights. Make a light the active camera by pressing Ctrl + 0.
Now you can place the light out of first-person perspective.
Use the shortcut RR to rotate in any direction or just lock the camera to view (N-Panel > View > View Lock > Camera to View) to place it exactly where you want. And yes, it is possible to make the default cube the active camera, I just haven’t found any practical use for that yet!
Have you used the Camera Proxy in Blender 3D? Check out our Blender 3D Glossary to learn all the Bleder 3D terminology.
Aligning the light from first person perspective with the light/camera locked to the view.
12. Be Updated
Blender boasts a passionate and engaged community of developers worldwide. As such, it receives constant updates and upgrades. Tips for Staying Updated: To be able to use Blender to its fullest potential, make sure that you keep up to date about the latest versions of Blender and what new features they bring to the table.
This also rings true to the hardware that you use on your machine. There are plenty of ways to maximize your use of Blender even on lower-end machines. But if your time and your budget allow, make sure you use as much RAM, CPU, and GPU power as you can afford. Or avail of cloud computing services such as Vagon to use high-end computing power at affordable costs.
Conclusion
Blender has several amazing features that make it not only the cheapest option available but also the go-to software for 3D graphics. You can model and animate anything on Blender, given that you’ve spent enough time testing out its different tools and various available plug-ins.
Hopefully, the basic Blender secrets we’ve covered in this article helped give you an idea of just how robust a tool it can be. Try out the tips we’ve discussed the next time you fire up the program and see how they can enhance your workflow.
FAQs:
What are some essential Blender tips for beginners?
Beginners should focus on mastering shortcuts, staying organized with Blender's Outliner and Collections, and exploring basic modifiers like Boolean and Mirror to streamline their workflow.
How can I speed up rendering times in Blender?
You can speed up rendering times by using compositing techniques like adding motion blur post-render, optimizing your scene’s lighting, and leveraging high-performance cloud PCs like Vagon for more intensive tasks.
What are some useful Blender tricks for modeling?
Key modeling tricks include using the
Ctrl + .shortcut for origin editing, mastering Blender’s Modifiers, and using reference images in orthographic views to create accurate models.
How do I stay updated with the latest Blender features?
To stay updated, regularly check Blender’s official website, join community forums, and follow Blender-related content online. Keeping your hardware up-to-date or using cloud computing services can also help you take full advantage of new features.
What are the best practices for using Blender on a low-end device?
On a low-end device, you should minimize viewport overlays, reduce the number of subdivisions in models, and use Eevee for faster real-time rendering. Consider cloud computing options like Vagon for more demanding tasks.
How can I improve my Blender workflow?
Improving your workflow involves mastering shortcuts, using collections to stay organized, experimenting with different rendering techniques, and continually learning from tutorials and community resources.
Get Beyond Your Computer Performance
Run applications on your cloud computer with the latest generation hardware. No more crashes or lags.
Trial includes 1 hour usage + 7 days of storage.
Get Beyond Your Computer Performance
Run applications on your cloud computer with the latest generation hardware. No more crashes or lags.
Trial includes 1 hour usage + 7 days of storage.
Get Beyond Your Computer Performance
Run applications on your cloud computer with the latest generation hardware. No more crashes or lags.
Trial includes 1 hour usage + 7 days of storage.
Get Beyond Your Computer Performance
Run applications on your cloud computer with the latest generation hardware. No more crashes or lags.
Trial includes 1 hour usage + 7 days of storage.
Get Beyond Your Computer Performance
Run applications on your cloud computer with the latest generation hardware. No more crashes or lags.
Trial includes 1 hour usage + 7 days of storage.
Ready to focus on your creativity?
Vagon gives you the ability to create & render projects, collaborate, and stream applications with the power of the best hardware.
Vagon Blog


Run heavy applications on any device with
your personal computer on the cloud.
San Francisco, California
Solutions
Vagon Teams
Vagon Streams
Use Cases
Resources
Vagon Blog
The Best Render Settings for Blender 3D
Arcware vs Vagon Streams: Best Pixel Streaming Alternatives
How To Use FL Studio on a Cloud Computer
Reducing Latency in Virtual Desktops: 11 Fixes That Actually Work
PureWeb vs Vagon Streams: Best Alternative Pixel Streaming Platform
How To Use Photoshop On iPad
How To Fix Slow & Laggy Performance on AWS Workspaces VDIs?
Arcane Mirage vs Vagon Streams: Best Alternative Pixel Streaming Platform
The Best Unity Shortcuts
Vagon Blog
Run heavy applications on any device with
your personal computer on the cloud.
San Francisco, California
Solutions
Vagon Teams
Vagon Streams
Use Cases
Resources
Vagon Blog