Instant Connection for Pixel Streaming
— New Feature Automated Setup

Optimization Tips to Boost Performance in Unity
Optimization Tips to Boost Performance in Unity
Optimization Tips to Boost Performance in Unity
Published on August 29, 2023
Updated on February 3, 2025
Table of Contents
Imagine a game that stutters, hangs, or freezes just as you’re about to make a crucial move. In such moments, the importance of Unity performance optimization becomes obvious. When creating a project on Unity, its performance directly impacts the user experience. Your project’s performance also determines the ultimate success of your creation, so knowing how to optimize performance in Unity is key.

Unity performance optimization is the magic wand that transforms your Unity creation from a potential laggy project into a masterpiece. It ensures that your game plays smoothly, maintaining stellar frame rates, brief load times, and a responsive interface. By applying effective Unity optimization techniques, each user enjoys gameplay fluidity and an immersive experience.
In this article, we’ll explore 10 practical Unity optimization tips useful for enhancing the performance of Unity projects. Whether you’re crafting immersive games, interactive simulations, or cutting-edge virtual reality experiences, these tips will guide you in delivering a captivating experience.
Profile Your Project
While the points are not arranged in a particular order, profiling your Unity project is the crucial first step in optimization in Unity. Unity provides powerful profiling tools, with the Unity Profiler being a standout choice. While optimizing, you may also encounter common Unity problems that can be easily resolved with the right approach.
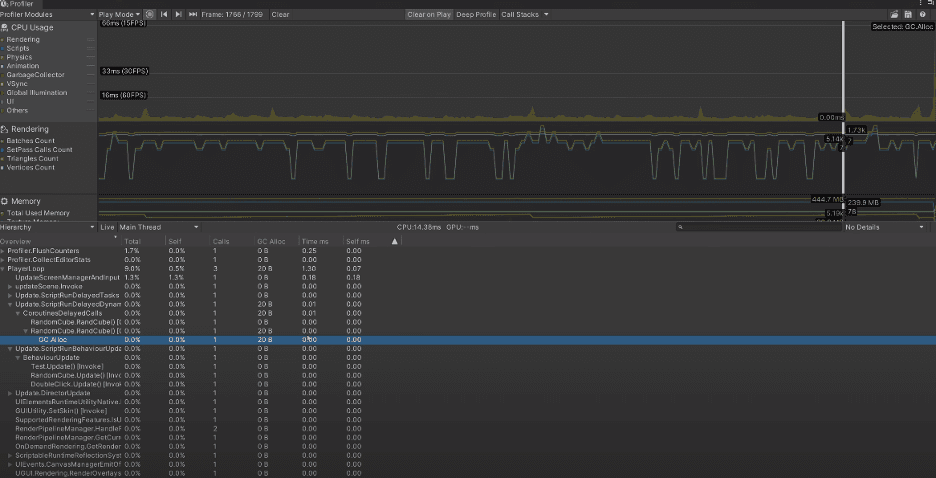
Profiling involves tracking elements such as frame rate, CPU and GPU usage, memory allocation, and more. By carefully analyzing these metrics, you can figure out areas where your project is struggling. For example, you might discover that rendering is taking up too much GPU time. Without profiling, you may spend time optimizing areas that don’t significantly impact performance.
With Unity’s built-in Profiler: Open the Profiler window (Window -> Analysis -> Profiler) and attach it to your running game to start analyzing. Then focus on areas with the highest resource usage, or areas that cause an issue to prioritize Unity performance efforts.
If visual representation helps you to understand better, checking the video below might be helpful:
Unity Profiler Walkthrough & Tutorial by Unity
Asset Bundling
Assets are crucial in Unity projects. Unity has many built-in assets that can improve performance. If you’re working with large projects, grouping related assets into bundles will reduce load times. Efficient Unity asset management not only improves performance but also streamlines your workflow, making it easier to collaborate and maintain your project as it grows in complexity. You can see how creators behind inspiring Unity projects manage similar challenges.
Beyond Asset Bundles, optimizing textures, meshes, and memory usage is essential for maintaining smooth performance. Compressed textures and lower-polygon models reduce GPU load without sacrificing quality, while Level of Detail (LOD) techniques ensure that high-detail assets are only used when necessary. Unused assets should be cleared from memory using Resources.UnloadUnusedAssets(), preventing unnecessary resource consumption.
For dynamic asset loading, Unity’s Addressable Asset System provides a flexible way to manage and optimize assets efficiently, making it especially useful for mobile and multiplayer games. With the right asset management strategies, you can reduce load times, improve frame rates, and create a more seamless experience for players.
Optimize Scripts and Code
A large part of Unity code optimization focuses on improving CPU performance by reducing unnecessary calculations and memory usage. Object pooling, also known as caching, is one of the several ways of optimization in Unity scripting.
Taking it step by step, first profile your scripts to identify parts of your code that consume the most CPU time.
Next, avoid frequent updates. Minimize the use of the Update() method for scripts that don’t require continuous updates. Consider using FixedUpdate() or event-driven programming instead.
Then, implement caching for frequently used and instantiated objects. Instead of instantiating and destroying objects repeatedly, reuse them from a pre-allocated pool to reduce memory allocation overhead. Also, pay attention to Unity memory management. Avoid creating unnecessary objects or using excessive memory in your scripts, especially in Unity open-world optimization scenarios where these techniques are even more critical.
For more tips, you can check out this video:
20 Advanced Coding Tips For Big Unity Projects by Tesseract
Vagon - Your Go-To Solution for Unity Optimization
Facing limitations with your current setup while working on Unity? Vagon has got your back! With Vagon’s cloud-based remote desktops, say goodbye to those laggy experiences and hello to smooth, swift project executions. In fact, many developers have started using Unity on cloud computers for better performance and flexibility.
Our cloud PCs come equipped with 4 x 16GB CUDA-activated Nvidia GPUs, ensuring your Unity projects run without interruption. Dive into a world where your creativity isn’t hindered by hardware limitations. Curious about choosing the ideal hardware for your own setup? Our guide on the best GPU for Unity 3D will help you make an informed choice for top-notch performance. You can even use Unity 3D on iPad tablets for a portable and flexible development experience.
No more staring at the progress bar, it’s time to unleash your creativity without any holdups. You can check it yourself within just a few clicks.
Utilize Level of Detail (LOD) Systems
LOD systems reduce the level of detail for objects far away from the camera. For example, in an open-world Unity game, distant trees can use lower-polygon models. This can save GPU resources without affecting visual quality up close.
Simply attach the LOD group component to objects that need LOD, such as distant objects. Then, create multiple levels of detail for each object, specifying the distance ranges at which each level should be used. Ensure to test and adjust LOD settings to balance performance and visual quality. Implementing LOD helps to improve frame rates while reducing memory consumption since lower-detail models require less VRAM.
Physics Optimization
Effective Unity physics optimization can prevent performance drops in your game. Physics simulations can be resource-intensive, and optimizing these simulations can free up computational resources for other aspects of your project. This involves managing rigidbodies and colliders to ensure efficient physics simulations.
Physics Optimization Considerations
Rigidbody Considerations
When you’re choosing a Rigidbody Interpolation, choose one based on the object’s behavior to balance realism and performance.
Collider Complexity
Simplify colliders when possible, using primitive shapes for basic collisions. The more complex colliders are, the higher your computational load for collision detection and resolution. Perhaps an object doesn’t require collision physics, use trigger colliders. Trigger colliders within your project generate fewer calculations as they don’t trigger collision responses.
Physics Materials
Apply physics materials to control friction, bounciness, and other properties. Finding the right balance can improve realism while maintaining performance.
Batching
You can combine static objects with rigidbodies in a single layer. Ensure to utilize physics layers to selectively control object interactions.
Shader and Material Optimization
Shaders and materials control how objects are rendered in Unity. It determines the visual experience of your project. For shader optimization, minimize the number of shader variants by using fewer shader features. Unity allows you to batch objects with the same materials to reduce draw calls. Avoid excessive material changes, as this can break batching. For more advanced techniques, you might also want to explore Unity plugins that can enhance performance and streamline workflows. If your project targets mobile devices, use shaders optimized for mobile GPUs. You can also adjust material quality settings to control texture resolution and other properties based on the target platform. This monitors Unity memory management.
Audio Optimization
Audio assets can consume memory and processing power. Large, uncompressed audio files can increase loading times and memory usage. Hence, optimizing audio is crucial, especially for mobile and VR platforms. Here’s how to optimize audio:
Compress audio assets using appropriate formats (e.g., OGG for Android, AAC for iOS). This reduces file size and loading times.
Use audio streaming for longer soundtracks or ambient audio. Streaming loads audio data dynamically, reducing memory usage.
Implement audio occlusion and attenuation. This means that sounds are quieter or muffled when they are obstructed by objects or at a distance. Unity’s Audio Mixer allows for precise control over these effects.
Consider using audio object pools for frequently played sounds. This reduces the overhead of creating and destroying audio sources.
Culling Techniques
Culling techniques help Unity determine what’s visible and needs rendering. They prevent Unity from rendering objects that are not visible to the camera. Without culling, Unity might render objects located behind the camera, wasting GPU resources. Two essential Unity culling techniques are Occlusion and Frustum Culling.
Occlusion Culling prevents rendering of objects that are hidden by other objects. Unity automatically generates occlusion data, but you can enhance it manually for better results.
Frustum Culling is a technique that prevents the rendering of objects that are outside the camera’s view frustum. Unity handles frustum culling automatically. However, you can adjust the camera’s far and near clipping planes and use layers to fine-tune what shows up in the camera’s frustum.
Mobile and VR Optimization
Mobile and VR platforms have unique optimization requirements due to their limited hardware capabilities. Mobile devices, for example, may struggle with high-resolution textures and complex shaders. Some useful tips and tutorials for learning Unity include:
Implement dynamic resolution scaling to adjust the rendering resolution based on the device’s capabilities. This ensures smoother performance on a wide range of mobile devices.
Use simpler shaders designed for mobile GPUs and VR headsets. Avoid complex graphical effects that may strain the hardware.
Reduce the polygon count of 3D models to meet the performance constraints of mobile and VR devices. Adjust VR-specific settings in Unity, such as enabling VR rendering, configuring tracking, and setting up VR camera rigs.
Project Testing
Implementing these steps without testing makes it incomplete. Testing and iteration are ongoing processes throughout your Unity project’s development cycle. Without continuous testing and iteration, optimizations may become outdated or lose effectiveness as your project evolves.
Before the end of your project development, test your project on mobile devices, VR headsets, or any specific hardware regularly. Benchmarking tools help in measuring and comparing performance on different platforms. For a more comprehensive overview of best practices, you can refer to this complete guide to Unity. Keep a record of changes made and their impact on performance. Stay up to date with user feedback, Unity updates, documentation, and best practices for optimization.
And if you want to ensure your hardware setup supports these optimization efforts, check out the best PC build for Unity — a guide to building a machine that can handle demanding Unity projects with ease.
Conclusion
Optimization in Unity is a continuous process, and it’s crucial to stay updated with the latest Unity optimization techniques. Whether you're working on a simple game or a highly complex open-world Unity project, these Unity performance tips will guide you in enhancing your project’s performance. By applying strategies like Unity physics optimization, code optimization, and proper asset management, you can ensure your project meets the highest performance standards. Keep testing, iterating, and improving, and you’ll consistently deliver high-quality, immersive experiences to your users.
This article has explored ten optimization tips tailored to enhance the performance of your Unity projects. From profiling to asset management, script optimization to culling techniques, these strategies are your toolkit for a performance boost. Remember, optimization is not a one-time effort but a continuous journey. Performance requirements evolve as your Unity projects evolve.
So, as you embark on your next Unity project, implement these Unity performance optimization strategies. Certainly, you will create high-quality interactive projects that meet and exceed your audience’s expectations.
FAQs:
What is Unity performance optimization, and why is it important?
Unity performance optimization involves making adjustments to improve a game's frame rate, loading time, and overall performance. It's essential because poor performance can negatively affect the user experience, leading to a less immersive and enjoyable game.
How do I optimize my Unity project for better performance?
Start by profiling your project with Unity’s built-in profiler to identify bottlenecks. Then, implement optimization techniques like asset bundling, code and script optimization, physics adjustments, and shader/material management.
What are the best Unity optimization tips for mobile platforms?
For mobile platforms, focus on reducing the polygon count, using mobile-friendly shaders, implementing dynamic resolution scaling, and optimizing textures. These Unity mobile optimization strategies will help your game run smoothly on lower-end devices.
What is object pooling in Unity, and how does it improve performance?
Object pooling, also known as caching, is a technique where frequently used objects are stored in a pool and reused rather than created and destroyed repeatedly. This reduces memory usage and CPU load, significantly improving performance.
How can I improve GPU optimization in Unity?
You can improve Unity GPU optimization by reducing the number of draw calls, using fewer shader variants, implementing Level of Detail (LOD) systems for distant objects, and batching objects that share the same materials.
What are some common Unity performance issues, and how can I solve them?
Common Unity performance issues include low frame rates, high memory usage, and slow loading times. Profiling your project, optimizing scripts, and reducing the complexity of physics simulations are some effective solutions.
Imagine a game that stutters, hangs, or freezes just as you’re about to make a crucial move. In such moments, the importance of Unity performance optimization becomes obvious. When creating a project on Unity, its performance directly impacts the user experience. Your project’s performance also determines the ultimate success of your creation, so knowing how to optimize performance in Unity is key.
Unity performance optimization is the magic wand that transforms your Unity creation from a potential laggy project into a masterpiece. It ensures that your game plays smoothly, maintaining stellar frame rates, brief load times, and a responsive interface. By applying effective Unity optimization techniques, each user enjoys gameplay fluidity and an immersive experience.
In this article, we’ll explore 10 practical Unity optimization tips useful for enhancing the performance of Unity projects. Whether you’re crafting immersive games, interactive simulations, or cutting-edge virtual reality experiences, these tips will guide you in delivering a captivating experience.
Profile Your Project
While the points are not arranged in a particular order, profiling your Unity project is the crucial first step in optimization in Unity. Unity provides powerful profiling tools, with the Unity Profiler being a standout choice. While optimizing, you may also encounter common Unity problems that can be easily resolved with the right approach.
Profiling involves tracking elements such as frame rate, CPU and GPU usage, memory allocation, and more. By carefully analyzing these metrics, you can figure out areas where your project is struggling. For example, you might discover that rendering is taking up too much GPU time. Without profiling, you may spend time optimizing areas that don’t significantly impact performance.
With Unity’s built-in Profiler: Open the Profiler window (Window -> Analysis -> Profiler) and attach it to your running game to start analyzing. Then focus on areas with the highest resource usage, or areas that cause an issue to prioritize Unity performance efforts.
If visual representation helps you to understand better, checking the video below might be helpful:
Unity Profiler Walkthrough & Tutorial by Unity
Asset Bundling
Assets are crucial in Unity projects. Unity has many built-in assets that can improve performance. If you’re working with large projects, grouping related assets into bundles will reduce load times. Efficient Unity asset management not only improves performance but also streamlines your workflow, making it easier to collaborate and maintain your project as it grows in complexity. You can see how creators behind inspiring Unity projects manage similar challenges.
Beyond Asset Bundles, optimizing textures, meshes, and memory usage is essential for maintaining smooth performance. Compressed textures and lower-polygon models reduce GPU load without sacrificing quality, while Level of Detail (LOD) techniques ensure that high-detail assets are only used when necessary. Unused assets should be cleared from memory using Resources.UnloadUnusedAssets(), preventing unnecessary resource consumption.
For dynamic asset loading, Unity’s Addressable Asset System provides a flexible way to manage and optimize assets efficiently, making it especially useful for mobile and multiplayer games. With the right asset management strategies, you can reduce load times, improve frame rates, and create a more seamless experience for players.
Optimize Scripts and Code
A large part of Unity code optimization focuses on improving CPU performance by reducing unnecessary calculations and memory usage. Object pooling, also known as caching, is one of the several ways of optimization in Unity scripting.
Taking it step by step, first profile your scripts to identify parts of your code that consume the most CPU time.
Next, avoid frequent updates. Minimize the use of the Update() method for scripts that don’t require continuous updates. Consider using FixedUpdate() or event-driven programming instead.
Then, implement caching for frequently used and instantiated objects. Instead of instantiating and destroying objects repeatedly, reuse them from a pre-allocated pool to reduce memory allocation overhead. Also, pay attention to Unity memory management. Avoid creating unnecessary objects or using excessive memory in your scripts, especially in Unity open-world optimization scenarios where these techniques are even more critical.
For more tips, you can check out this video:
20 Advanced Coding Tips For Big Unity Projects by Tesseract
Vagon - Your Go-To Solution for Unity Optimization
Facing limitations with your current setup while working on Unity? Vagon has got your back! With Vagon’s cloud-based remote desktops, say goodbye to those laggy experiences and hello to smooth, swift project executions. In fact, many developers have started using Unity on cloud computers for better performance and flexibility.
Our cloud PCs come equipped with 4 x 16GB CUDA-activated Nvidia GPUs, ensuring your Unity projects run without interruption. Dive into a world where your creativity isn’t hindered by hardware limitations. Curious about choosing the ideal hardware for your own setup? Our guide on the best GPU for Unity 3D will help you make an informed choice for top-notch performance. You can even use Unity 3D on iPad tablets for a portable and flexible development experience.
No more staring at the progress bar, it’s time to unleash your creativity without any holdups. You can check it yourself within just a few clicks.
Utilize Level of Detail (LOD) Systems
LOD systems reduce the level of detail for objects far away from the camera. For example, in an open-world Unity game, distant trees can use lower-polygon models. This can save GPU resources without affecting visual quality up close.
Simply attach the LOD group component to objects that need LOD, such as distant objects. Then, create multiple levels of detail for each object, specifying the distance ranges at which each level should be used. Ensure to test and adjust LOD settings to balance performance and visual quality. Implementing LOD helps to improve frame rates while reducing memory consumption since lower-detail models require less VRAM.
Physics Optimization
Effective Unity physics optimization can prevent performance drops in your game. Physics simulations can be resource-intensive, and optimizing these simulations can free up computational resources for other aspects of your project. This involves managing rigidbodies and colliders to ensure efficient physics simulations.
Physics Optimization Considerations
Rigidbody Considerations
When you’re choosing a Rigidbody Interpolation, choose one based on the object’s behavior to balance realism and performance.
Collider Complexity
Simplify colliders when possible, using primitive shapes for basic collisions. The more complex colliders are, the higher your computational load for collision detection and resolution. Perhaps an object doesn’t require collision physics, use trigger colliders. Trigger colliders within your project generate fewer calculations as they don’t trigger collision responses.
Physics Materials
Apply physics materials to control friction, bounciness, and other properties. Finding the right balance can improve realism while maintaining performance.
Batching
You can combine static objects with rigidbodies in a single layer. Ensure to utilize physics layers to selectively control object interactions.
Shader and Material Optimization
Shaders and materials control how objects are rendered in Unity. It determines the visual experience of your project. For shader optimization, minimize the number of shader variants by using fewer shader features. Unity allows you to batch objects with the same materials to reduce draw calls. Avoid excessive material changes, as this can break batching. For more advanced techniques, you might also want to explore Unity plugins that can enhance performance and streamline workflows. If your project targets mobile devices, use shaders optimized for mobile GPUs. You can also adjust material quality settings to control texture resolution and other properties based on the target platform. This monitors Unity memory management.
Audio Optimization
Audio assets can consume memory and processing power. Large, uncompressed audio files can increase loading times and memory usage. Hence, optimizing audio is crucial, especially for mobile and VR platforms. Here’s how to optimize audio:
Compress audio assets using appropriate formats (e.g., OGG for Android, AAC for iOS). This reduces file size and loading times.
Use audio streaming for longer soundtracks or ambient audio. Streaming loads audio data dynamically, reducing memory usage.
Implement audio occlusion and attenuation. This means that sounds are quieter or muffled when they are obstructed by objects or at a distance. Unity’s Audio Mixer allows for precise control over these effects.
Consider using audio object pools for frequently played sounds. This reduces the overhead of creating and destroying audio sources.
Culling Techniques
Culling techniques help Unity determine what’s visible and needs rendering. They prevent Unity from rendering objects that are not visible to the camera. Without culling, Unity might render objects located behind the camera, wasting GPU resources. Two essential Unity culling techniques are Occlusion and Frustum Culling.
Occlusion Culling prevents rendering of objects that are hidden by other objects. Unity automatically generates occlusion data, but you can enhance it manually for better results.
Frustum Culling is a technique that prevents the rendering of objects that are outside the camera’s view frustum. Unity handles frustum culling automatically. However, you can adjust the camera’s far and near clipping planes and use layers to fine-tune what shows up in the camera’s frustum.
Mobile and VR Optimization
Mobile and VR platforms have unique optimization requirements due to their limited hardware capabilities. Mobile devices, for example, may struggle with high-resolution textures and complex shaders. Some useful tips and tutorials for learning Unity include:
Implement dynamic resolution scaling to adjust the rendering resolution based on the device’s capabilities. This ensures smoother performance on a wide range of mobile devices.
Use simpler shaders designed for mobile GPUs and VR headsets. Avoid complex graphical effects that may strain the hardware.
Reduce the polygon count of 3D models to meet the performance constraints of mobile and VR devices. Adjust VR-specific settings in Unity, such as enabling VR rendering, configuring tracking, and setting up VR camera rigs.
Project Testing
Implementing these steps without testing makes it incomplete. Testing and iteration are ongoing processes throughout your Unity project’s development cycle. Without continuous testing and iteration, optimizations may become outdated or lose effectiveness as your project evolves.
Before the end of your project development, test your project on mobile devices, VR headsets, or any specific hardware regularly. Benchmarking tools help in measuring and comparing performance on different platforms. For a more comprehensive overview of best practices, you can refer to this complete guide to Unity. Keep a record of changes made and their impact on performance. Stay up to date with user feedback, Unity updates, documentation, and best practices for optimization.
And if you want to ensure your hardware setup supports these optimization efforts, check out the best PC build for Unity — a guide to building a machine that can handle demanding Unity projects with ease.
Conclusion
Optimization in Unity is a continuous process, and it’s crucial to stay updated with the latest Unity optimization techniques. Whether you're working on a simple game or a highly complex open-world Unity project, these Unity performance tips will guide you in enhancing your project’s performance. By applying strategies like Unity physics optimization, code optimization, and proper asset management, you can ensure your project meets the highest performance standards. Keep testing, iterating, and improving, and you’ll consistently deliver high-quality, immersive experiences to your users.
This article has explored ten optimization tips tailored to enhance the performance of your Unity projects. From profiling to asset management, script optimization to culling techniques, these strategies are your toolkit for a performance boost. Remember, optimization is not a one-time effort but a continuous journey. Performance requirements evolve as your Unity projects evolve.
So, as you embark on your next Unity project, implement these Unity performance optimization strategies. Certainly, you will create high-quality interactive projects that meet and exceed your audience’s expectations.
FAQs:
What is Unity performance optimization, and why is it important?
Unity performance optimization involves making adjustments to improve a game's frame rate, loading time, and overall performance. It's essential because poor performance can negatively affect the user experience, leading to a less immersive and enjoyable game.
How do I optimize my Unity project for better performance?
Start by profiling your project with Unity’s built-in profiler to identify bottlenecks. Then, implement optimization techniques like asset bundling, code and script optimization, physics adjustments, and shader/material management.
What are the best Unity optimization tips for mobile platforms?
For mobile platforms, focus on reducing the polygon count, using mobile-friendly shaders, implementing dynamic resolution scaling, and optimizing textures. These Unity mobile optimization strategies will help your game run smoothly on lower-end devices.
What is object pooling in Unity, and how does it improve performance?
Object pooling, also known as caching, is a technique where frequently used objects are stored in a pool and reused rather than created and destroyed repeatedly. This reduces memory usage and CPU load, significantly improving performance.
How can I improve GPU optimization in Unity?
You can improve Unity GPU optimization by reducing the number of draw calls, using fewer shader variants, implementing Level of Detail (LOD) systems for distant objects, and batching objects that share the same materials.
What are some common Unity performance issues, and how can I solve them?
Common Unity performance issues include low frame rates, high memory usage, and slow loading times. Profiling your project, optimizing scripts, and reducing the complexity of physics simulations are some effective solutions.
Get Beyond Your Computer Performance
Run applications on your cloud computer with the latest generation hardware. No more crashes or lags.

Trial includes 1 hour usage + 7 days of storage.
Get Beyond Your Computer Performance
Run applications on your cloud computer with the latest generation hardware. No more crashes or lags.
Trial includes 1 hour usage + 7 days of storage.
Get Beyond Your Computer Performance
Run applications on your cloud computer with the latest generation hardware. No more crashes or lags.
Trial includes 1 hour usage + 7 days of storage.
Get Beyond Your Computer Performance
Run applications on your cloud computer with the latest generation hardware. No more crashes or lags.
Trial includes 1 hour usage + 7 days of storage.
Get Beyond Your Computer Performance
Run applications on your cloud computer with the latest generation hardware. No more crashes or lags.
Trial includes 1 hour usage + 7 days of storage.
Ready to focus on your creativity?
Vagon gives you the ability to create & render projects, collaborate, and stream applications with the power of the best hardware.

Vagon Blog


Run heavy applications on any device with
your personal computer on the cloud.
San Francisco, California
Solutions
Vagon Teams
Vagon Streams
Use Cases
Resources
Vagon Blog
The Best Render Settings for Blender 3D
Arcware vs Vagon Streams: Best Pixel Streaming Alternatives
How To Use FL Studio on a Cloud Computer
Reducing Latency in Virtual Desktops: 11 Fixes That Actually Work
PureWeb vs Vagon Streams: Best Alternative Pixel Streaming Platform
How To Use Photoshop On iPad
How To Fix Slow & Laggy Performance on AWS Workspaces VDIs?
Arcane Mirage vs Vagon Streams: Best Alternative Pixel Streaming Platform
The Best Unity Shortcuts
Vagon Blog
Run heavy applications on any device with
your personal computer on the cloud.
San Francisco, California
Solutions
Vagon Teams
Vagon Streams
Use Cases
Resources
Vagon Blog