Instant Connection for Pixel Streaming
— New Feature Automated Setup

A Beginner's Complete Guide to Unity
A Beginner's Complete Guide to Unity
GameDev
A Beginner's Complete Guide to Unity
Table of Contents
Unity is more than just a game engine—it's the foundation behind some of the most iconic games and interactive experiences of our time. From indie developers to major studios, Unity powers creativity across the globe, shaping everything from mobile games to AAA titles, and even virtual reality worlds.
"'Unity is the canvas where imagination comes to life,' many in the industry say." But what makes Unity so universally loved? It’s the engine’s versatility and accessibility. Whether you're just starting out or are a seasoned developer, Unity provides the tools to bring your ideas to life—without needing to be a coding expert.
Developers worldwide trust Unity for its cross-platform capabilities, intuitive interface, and robust community support. Companies like Niantic with Pokémon GO, Supercell with Clash of Clans, and Ubisoft with Assassin’s Creed Identity have all leveraged Unity to create games that captivate millions. To see how widespread Unity's use is, you can check out some of the top game development companies using Unity.
This guide is designed to take you from your first steps in Unity to creating your very own project. We’ll cover everything from understanding the basics of Unity to building, deploying, and even streaming your game creations. Ready to dive in? Let's start with what Unity is and why it’s your best choice for game development.
What is Unity?
Understanding Unity
Unity is a powerful, versatile game engine that has revolutionized game development. At its core, Unity is a real-time 3D development platform that allows developers to create interactive experiences across various platforms—from games and simulations to AR (Augmented Reality) and VR (Virtual Reality) environments. Its intuitive design makes it accessible to beginners, yet robust enough for seasoned professionals.
Unity's influence extends well beyond the gaming industry, with wide usage in architecture, automotive design, film production, and training simulations. For instance, architects use Unity to create immersive walkthroughs of their building designs, while automotive companies leverage it to develop virtual prototypes and simulations. Unity’s versatility is what sets it apart—whatever your vision, Unity provides the tools to bring it to life.
One of Unity's greatest strengths lies in its community-driven ecosystem. The Unity Asset Store is a prime example, offering thousands of ready-made assets to jumpstart your project. Whether you need character models, environmental assets, or special effects, the Asset Store has you covered. For those looking to enhance their projects with high-quality assets, check out our blog for our recommendations.
Key Features of Unity
Unity stands out in the crowded field of game engines due to its unique blend of features that cater to both beginners and experts.
Cross-Platform Support: Unity enables developers to build once and deploy across more than 25 platforms, including iOS, Android, PC, consoles, AR/VR, and even the web. This flexibility ensures that your project reaches the widest possible audience with minimal extra effort.
User-Friendly Interface: Unity’s interface is designed with the user in mind. Its layout is intuitive, allowing for drag-and-drop functionality and easy navigation. Whether you're arranging objects in the Scene view or tweaking properties in the Inspector, everything is designed to keep you focused on creation, not configuration.
Access to the Unity Asset Store: The Unity Asset Store is a goldmine for developers, offering everything from 3D models and animations to plugins and scripts. It’s particularly helpful for small teams or solo developers who need quality assets without the time or resources to create them from scratch. If you’re ready to dive into the Asset Store, start with some of the best Unity plugins to see what’s available.
Real-Time Development and Iteration: One of Unity’s standout features is its ability to make changes and see the results in real-time. Whether you're adjusting lighting, tweaking physics, or fine-tuning animations, Unity’s real-time development environment lets you see exactly how your changes affect the game, speeding up the development process and improving iteration efficiency.
These features combine to make Unity a powerful, flexible tool for any developer, whether you’re building the next big game or exploring new frontiers in VR. Now that you understand what Unity is and what it offers, let’s move on to getting it set up on your machine.
Getting Started with Unity
Installing Unity

Unity makes it easy to start creating, but first, let's get it up and running on your machine. Before you dive in, it’s essential to ensure your setup meets Unity’s requirements.
System Requirements:
Operating System: Windows 10+, macOS 10.14+, Ubuntu 18.04+.
CPU: Intel Core i5+, AMD Ryzen 5+.
GPU: DX12-capable graphics card, like NVIDIA GTX 970 or higher.
RAM: Minimum 8GB, recommended 16GB.
Storage: 15GB+ of available space, SSD recommended.
For optimal performance, especially when working on complex projects or using demanding assets, consider a cloud solution like Vagon. Vagon ensures that your development environment is optimized, no matter your local hardware.
Step-by-Step Installation Guide
Download Unity Hub:
Visit the Unity website and download Unity Hub. This is your gateway to all things Unity—installing versions, managing licenses, and accessing your projects.
Install Unity Editor:
Open Unity Hub, and head to the Installs tab. Click on Add, select the latest Unity version, and choose the modules you need (like iOS, Android, or WebGL support). Click Next to begin the installation.
Activate Your License:
In Unity Hub, go to Preferences > License Management. If you're just starting, choose the free Personal license, which is perfect for beginners.
Create Your First Project:
Once Unity is installed, switch to the Projects tab, hit New Project, and pick a template (like 3D, 2D, or URP). Give your project a name, select the location, and click Create.
That’s it! You’re now ready to explore Unity.
Unity Interface Breakdown
Welcome to Unity’s interface—a clean, powerful space where your ideas take shape. Understanding the layout will make your workflow smoother and more intuitive.
Overview of Main Panels
Hierarchy: This is your project’s structure. Every GameObject in your scene is listed here, from lights to cameras to models. Think of it as your project’s family tree.
Scene: This is where the magic happens. The Scene view is your canvas, allowing you to position, scale, and rotate objects in 3D space. Use the tools at the top—hand, move, rotate, scale—to manipulate objects.
Game: This is your preview window. It shows you what your players will see. Hit the play button to test your game in real-time.
Inspector: Context-sensitive and powerful. When you select an object in the Hierarchy, the Inspector shows you all its properties—transform, materials, scripts. This is where you tweak the details.
Tips for Efficient Navigation
Hotkeys: Mastering a few key shortcuts can save you a ton of time. For example, press F to focus on a selected object in the Scene view.
Layouts: Customize your workspace. Drag and drop panels to fit your workflow. You can save your layout for quick access.
Gizmos: Use Gizmos in the Scene view to see hidden components like lights, cameras, and audio sources. Toggle them on/off as needed.
Now that you’re comfortable navigating Unity, let’s dive into creating your first project.
Creating Your First Project
Setting Up a New Project
Starting your first project in Unity is both exciting and straightforward. The right foundation will make the rest of your development journey smoother, so let’s get it right from the start.
Selecting a Project Template
When you create a new project in Unity, the first decision is choosing the right project template. Unity offers several templates tailored to different types of projects, from 2D and 3D to more advanced options like Universal Render Pipeline (URP) or High Definition Render Pipeline (HDRP). If you’re unsure where to start, go with the 3D template—it’s versatile and great for beginners.
If you’re looking for inspiration or want to explore more tailored starting points, check out these must-try Unity project templates. These templates can save you time and help you hit the ground running with the right settings.
Configuring Basic Project Settings
After selecting your template, it’s time to configure the basic settings. Unity will prompt you to name your project and choose a location on your computer where the project will be saved. Pick a clear, descriptive name that reflects the essence of your game or project—this will make it easier to manage multiple projects later on.
Next, choose the target platform for your game. While this can be changed later, setting it now ensures your project is optimized from the start. Common choices include PC, Mac & Linux Standalone, iOS, or Android. If you’re developing for multiple platforms, Unity makes it easy to switch and optimize for each one.
Once your settings are in place, click Create. Unity will generate your new project, setting up everything you need to get started.
Building Your First Scene
With your project ready, it’s time to bring it to life by building your first scene. Think of the scene as your game’s world—where all the action happens.
Adding and Manipulating GameObjects
A GameObject is the basic building block of a Unity scene. Anything you add to your scene, from characters to lights, is a GameObject. To add one, simply right-click in the Hierarchy window, choose 3D Object, and select an option like Cube, Sphere, or Plane.
Once added, you can manipulate GameObjects using the tools in the Scene view. Use the Move tool to change its position, the Rotate tool to adjust its angle, and the Scale tool to resize it. These basic manipulations are crucial for positioning objects precisely in your game world.
Introduction to Components and Their Roles
GameObjects are empty containers until you add Components. Components give GameObjects their functionality. For example, a Transform component controls position, rotation, and scale, while a Mesh Renderer component makes the object visible by rendering its geometry. You can add components via the Inspector window by clicking Add Component and choosing from Unity’s extensive list.
Each component you add enhances your GameObject, giving it more complex behavior, like physics interactions or sound. Understanding how to mix and match components is key to unlocking Unity’s full potential.
Using Prefabs for Reusable Objects
Once you’ve created and configured a GameObject, you might want to reuse it across multiple scenes or instances. This is where Prefabs come in. A Prefab is a blueprint of a GameObject with all its components and settings saved.
To create a Prefab, drag your GameObject from the Hierarchy to the Project window. This saves it as a Prefab, allowing you to drag it into any scene as many times as needed. The beauty of Prefabs is that any changes you make to the original Prefab automatically apply to all instances, ensuring consistency across your game.
Now that you’ve built your first scene, you’re ready to explore more advanced topics like scripting and animation.
The Basics of Scripting in Unity
Introduction to C#
To truly harness the power of Unity, you'll need to get comfortable with C#—the language that breathes life into your games. C# is a versatile, object-oriented programming language that’s widely used in game development. But why C#? Unity uses C# because it’s efficient, easy to learn, and powerful enough to handle everything from simple scripts to complex game mechanics.
Why C# is Used in Unity
C# was chosen by Unity for several reasons. First, it integrates seamlessly with Unity’s engine, allowing developers to manipulate game objects, respond to player input, and control game flow with precision. Its object-oriented nature means you can build modular, reusable code—perfect for game development where efficiency is key. Moreover, C# is well-documented and supported by a vibrant community, making it easier for beginners to find resources and troubleshoot issues.
Basic C# Syntax Overview
Let’s dive into the basics of C# syntax. Here are some fundamental elements you’ll encounter in your Unity scripts:
Variables: Store data like numbers, text, or GameObjects. Example:
int score = 0;Methods: Blocks of code that perform specific tasks. Example:
void Start() { /* code here */ }Classes: Define objects and their behaviors. In Unity, you’ll often extend the MonoBehaviour class to create scripts.
Control Structures: Direct the flow of your code. For instance, if statements and loops (for, while) allow you to execute code based on conditions or repeatedly.
Here’s a simple example to illustrate these concepts:
public class PlayerMovement : MonoBehaviour
{
public float speed = 5f;
void Update()
{
float move = Input.GetAxis("Horizontal") * speed * Time.deltaTime;
transform.Translate(move, 0, 0);
}
}
This script moves a player horizontally based on input. It introduces the Update method, which Unity calls once per frame, and demonstrates how to manipulate a GameObject's transform using C#.
If you're looking to deepen your understanding of C# and its applications in Unity, consider exploring some of the top Unity courses that dive deeper into scripting and game development.
Writing Your First Script
With a basic understanding of C# under your belt, it’s time to write your first script in Unity. Don’t worry—Unity makes this process intuitive and straightforward.
Steps to Create and Attach a Script
Create a New Script:
In the Project window, right-click on the Assets folder, select Create > C# Script, and name it (e.g., "PlayerController").
Open the Script:
Double-click the script to open it in your code editor (Visual Studio is the default editor for Unity).
Write Your Code:
Unity automatically generates a template for you, including using directives and the Start and Update methods. You can start adding your own code here.
Attach the Script to a GameObject:
Drag your script from the Project window onto the GameObject in the Hierarchy or use the Inspector window by clicking Add Component and selecting your script.
Overview of MonoBehaviour and Its Importance
In Unity, most scripts are derived from the MonoBehaviour class. This class is the foundation of all scripts in Unity, providing essential methods like Start(), Update(), OnCollisionEnter(), and many others that control how your GameObjects behave.
Start(): This method is called once when the script is first executed. It’s perfect for initialization tasks like setting variables or starting coroutines.
Update(): Called once per frame, Update() is where you’ll handle real-time actions like input or movement. For example, if you want your player character to move left and right based on user input, you’ll write that code here.
Understanding and utilizing MonoBehaviour is crucial because it integrates your script with Unity’s event-driven architecture, ensuring your game responds correctly to player actions and in-game events.
Basic Debugging Techniques
Debugging is an essential part of scripting. Even the best code can have bugs, but Unity provides tools to help you track them down and fix them.
Console Log: Use
Debug.Log("Your message here");to print messages to Unity’s console. This is invaluable for checking if certain parts of your code are executing as expected.Breakpoints: In Visual Studio, you can set breakpoints to pause execution and inspect the state of your game at specific lines of code. This helps you understand what’s happening at each step of your script.
Error Messages: Pay attention to errors and warnings in Unity’s console. Unity’s error messages are usually informative, telling you what went wrong and often providing a line number where the problem occurred.
By now, you should have a basic understanding of C#, know how to write and attach scripts, and be equipped with some initial debugging tools. With these skills, you're ready to start bringing dynamic interactions into your Unity projects. Let’s move forward and explore how to enhance your game with assets.
Enhancing Your Game with Assets
Working with Assets
One of the fastest ways to bring your game to life is by utilizing the rich library of resources available on the Unity Asset Store. From detailed 3D models to immersive audio tracks, the Asset Store offers a treasure trove of content that can significantly boost the quality of your project.
How to Import Assets from the Asset Store
Importing assets into your Unity project is a breeze:
Access the Asset Store:
Within Unity, click on Window > Asset Store to browse the store directly. Alternatively, visit the Unity Asset Store website in your browser.
Search for Assets:
Use the search bar to find specific assets like 3D models, textures, or audio files. You can filter results by category, price, or popularity to find exactly what you need.
Purchase or Download:
Many assets are free, while others require purchase. Once you’ve found what you need, click Add to My Assets.
Import into Unity:
In Unity, go to the Package Manager (Window > Package Manager). From there, you can view and import any assets you've acquired by selecting them and clicking Import.
Using 3D Models, Textures, and Audio Assets
Once your assets are imported, integrating them into your game is straightforward:
3D Models: Drag and drop 3D models from the Project window into your scene. Adjust their position, scale, and rotation using the Scene view tools. For example, you might import a character model to serve as the player avatar or environment objects to build your game world.
Textures: Apply textures to your 3D models to give them color and detail. You can assign textures by selecting a material in the Inspector and dragging the texture file into the appropriate slot (e.g., Albedo, Normal Map).
Audio Assets: Add background music, sound effects, or voiceovers by dragging audio files into the Project window. Attach these audio clips to GameObjects or trigger them through scripts, enhancing your game’s atmosphere and immersion.
Incorporating these assets effectively can transform a basic prototype into a polished, engaging experience. For a curated list of high-quality assets to get started, explore some of the best Unity assets available today.
Best Practices for Asset Management
As you begin to accumulate assets in your project, maintaining organization and optimizing performance become increasingly important. Good asset management not only streamlines your workflow but also ensures your game runs smoothly.
Organizing Asset Folders
A well-organized project is essential for efficiency. Here’s how to keep your assets tidy:
Create a Folder Structure: Start by creating folders for different types of assets—Models, Textures, Audio, Scripts, and Prefabs. This hierarchy makes it easy to find what you need when you need it.
Name Assets Clearly: Use descriptive names for your assets. Instead of generic names like Model1 or Texture2, use names that indicate their purpose, such as PlayerCharacter_Model or ForestGround_Texture.
Group Related Assets: If you have assets that are used together, consider grouping them in subfolders. For instance, all assets related to a specific level or character could be stored in a dedicated folder.
Tips for Optimizing Assets for Better Performance
Efficient asset management also involves optimizing assets to ensure your game performs well, especially on lower-end hardware:
Reduce Texture Sizes: Large textures can consume significant memory. Use lower resolution textures where possible, especially for distant objects or less critical elements.
Optimize 3D Models: Simplify models by reducing polygon counts. Tools like Mesh Simplify or LOD (Level of Detail) can help maintain visual quality while improving performance.
Compress Audio Files: Use compressed formats like .ogg or .mp3 for background music and sound effects to reduce file size without sacrificing too much quality.
By following these best practices, you’ll maintain a smooth workflow and ensure your game remains optimized, even as it grows in complexity. Now that your assets are in place and organized, you're ready to tackle lighting and rendering to make your game truly shine.
Lighting and Rendering
Mastering Unity’s Lighting System
Lighting in Unity is more than just a way to illuminate your scene—it's a powerful tool that can dramatically affect the mood, tone, and overall visual quality of your game. Understanding how to use Unity's lighting system is key to creating immersive and visually stunning environments.
Types of Lights in Unity
Unity offers several types of lights, each with its own characteristics and use cases:
Directional Light: Simulates sunlight and affects all objects in the scene equally, regardless of their distance from the light source. It’s ideal for outdoor scenes or any scenario where you need consistent lighting across large areas.
Point Light: Emits light in all directions from a single point, much like a light bulb. Point lights are perfect for adding localized light sources, such as lamps or torches, within your scene.
Spotlight: Projects a cone of light, much like a flashlight or a stage spotlight. Spotlights are useful for focusing attention on specific areas or creating dramatic lighting effects.
Area Light: Illuminates a scene from a rectangular area, providing soft, even lighting. While more resource-intensive, area lights are excellent for achieving realistic indoor lighting.
Each light type can be customized with different settings, such as intensity, color, and range, allowing you to fine-tune the look and feel of your scene.
Basics of Global Illumination
Global Illumination (GI) in Unity is a technique that simulates how light bounces off surfaces and interacts with the environment, adding depth and realism to your scenes. GI can be either Precomputed Realtime or Baked, depending on your needs:
Precomputed Realtime GI: Ideal for dynamic environments where lighting conditions change, such as a day/night cycle. This method updates the GI in real-time, though it may be more demanding on performance.
Baked GI: Used for static environments where lighting doesn't change. Baked GI precomputes the light interactions and stores them in lightmaps, which can significantly improve performance.
Proper use of GI can transform flat, lifeless environments into rich, believable spaces. It’s particularly effective for creating realistic shadows and subtle lighting effects that enhance the mood of your game.
Importance of Lighting in Setting the Mood
Lighting isn’t just about visibility—it’s about atmosphere. The right lighting can evoke emotions, create tension, or highlight important gameplay elements. For example:
Warm, soft lighting can create a cozy, inviting atmosphere in a home or village setting.
Cold, harsh lighting can build suspense and make environments feel eerie or dangerous.
High-contrast lighting with deep shadows can add drama and focus the player’s attention on specific areas or objects.
Experiment with different lighting setups to find the right mood for your game, and don’t be afraid to play with color, intensity, and shadows to achieve the desired effect.
Rendering Settings
Rendering is the final step in the visual pipeline, where your scene is processed into the images that players see. Unity’s rendering settings allow you to optimize graphics across different platforms and enhance the visual quality of your game with post-processing effects.
Overview of Graphics Settings for Various Platforms
Unity’s flexibility shines when it comes to rendering across multiple platforms. You can customize graphics settings to ensure your game looks great whether it’s running on a high-end gaming PC or a mobile device.
Quality Settings: Unity allows you to define different quality levels (e.g., Low, Medium, High) that players can choose based on their hardware. These settings control parameters like texture resolution, shadow quality, and anti-aliasing, balancing performance and visual fidelity.
Platform-Specific Optimizations: For each platform (PC, console, mobile), you can tweak the rendering settings to optimize performance. For instance, you might reduce the resolution of textures and disable certain post-processing effects on mobile devices to ensure smooth gameplay.
How to Use Post-Processing Effects for a Polished Look
Post-processing effects are applied after your scene has been rendered, adding the finishing touches that make your game look polished and professional:
Bloom: Adds a glow to bright areas of your scene, mimicking how light bleeds in the real world. It’s great for creating a dreamy or intense atmosphere.
Ambient Occlusion: Enhances shadows in corners and crevices, giving objects more depth and grounding them in the scene.
Depth of Field: Blurs objects that are out of focus, drawing attention to the player’s current focal point and adding a cinematic quality to your game.
Color Grading: Adjusts the overall color tone of your game. Whether you’re aiming for a vintage look, a vibrant fantasy world, or a bleak dystopia, color grading can help set the tone.
Using these effects sparingly and with purpose can elevate the visual quality of your game, making it stand out in a crowded market. With lighting and rendering in place, your game will look sharp and feel immersive, ready for final tweaks and deployment.
Introduction to Physics and Animation
Unity’s Physics Engine
In Unity, physics is what brings the virtual world to life. With the right components, you can make objects behave in a way that mimics real-world physics, adding depth and realism to your game.
Colliders and Rigidbodies
At the core of Unity’s physics engine are Colliders and Rigidbodies.
Colliders: These are invisible shapes that define the physical boundaries of an object. They ensure that objects interact with each other in a realistic manner—whether it’s a character walking on the ground, a ball bouncing off a wall, or a car crashing into a barrier. Unity offers various types of colliders like Box Collider, Sphere Collider, and Mesh Collider, each suited to different shapes and scenarios.
Rigidbodies: While colliders define the shape, Rigidbodies add mass, gravity, and other physical properties to an object. By attaching a Rigidbody to a GameObject, you enable it to be influenced by forces like gravity or user-controlled inputs. This is crucial for creating anything that needs to move or be affected by physical interactions, like a rolling ball or a flying projectile.
These two components work together to create dynamic, interactive environments. For example, a ball with a Sphere Collider and Rigidbody will roll down a slope, bounce when it hits the ground, and respond to forces like wind or explosions—all thanks to Unity’s physics engine.
Basic Physics Interactions
Once you have Colliders and Rigidbodies in place, you can start setting up basic physics interactions in your game:
Collision Detection: Unity automatically detects when two colliders touch, triggering a collision event. This allows you to create reactions, like causing damage to a character when they collide with an enemy or triggering a sound effect when a ball hits the ground.
Forces and Impulses: You can apply forces to Rigidbody objects to simulate pushes, pulls, or explosive effects. For instance, applying an upward force to a Rigidbody can simulate a jump, while a lateral force might simulate a gust of wind pushing an object to the side.
Joints: Unity provides different types of joints (e.g., Hinge Joint, Spring Joint) to connect GameObjects, allowing them to move relative to each other. This is useful for creating doors, wheels, or even complex machinery.
With physics, you can achieve "realism through interaction," making your game world behave in ways that players intuitively understand.
Animation Basics
Animations are what breathe life into your characters and objects, making them move, act, and react in a way that’s believable and engaging.
Animator Controller Overview
The Animator Controller is the brain behind animations in Unity. It organizes and controls how different animations blend together and transition from one to another, based on parameters like player input or in-game events.
States: Each animation you create is a state within the Animator Controller. For example, a character might have idle, walk, run, and jump states.
Transitions: These define how your character moves from one state to another. For instance, you can set a transition from idle to walk when a certain input is detected, like pressing the "W" key.
Parameters: These are variables (like speed, health, or triggers) that control the transitions. By tweaking these parameters, you can make your animations respond dynamically to gameplay.
Creating Simple Animations
Creating animations in Unity is intuitive, thanks to the Animation Window:
Select Your GameObject: Choose the object you want to animate.
Open the Animation Window: Go to Window > Animation > Animation.
Create a New Animation Clip: Click the Create button, name your animation (e.g., "WalkCycle"), and start recording.
Record Keyframes: Move your object or character to different positions or poses at various points in time, and Unity will automatically generate the in-between frames, known as tweening.
Preview and Save: Play back your animation in the Animation Window to see how it looks, then save your work.
Using Blend Trees for Smooth Transitions
Blend Trees allow you to create smooth transitions between animations based on a parameter, such as speed. For instance, a character’s movement can seamlessly transition from walking to running as the speed parameter increases.
Setting Up a Blend Tree: Within the Animator Controller, you can create a Blend Tree by right-clicking and selecting Create State > From New Blend Tree. Add your animations (e.g., walk and run) and define the blend parameter.
Adjusting the Blend: Drag sliders or set thresholds to determine how your animations blend based on the parameter’s value.
Using Blend Trees, you can achieve fluid and natural-looking animations, making your characters and objects move more believably.
With a solid grasp of Unity's physics and animation systems, you're well on your way to creating interactive, engaging, and visually stunning games. Next, we'll explore how to build and deploy your game, bringing all these elements together into a finished product.
Building and Deploying Your Game
Preparing for Build
After putting in countless hours of design, scripting, and testing, it’s time to prepare your Unity game for deployment. Whether you're targeting mobile, PC, or consoles, understanding Unity’s build settings is crucial for optimizing your game across platforms.
Explanation of Build Settings
The Build Settings window in Unity is your launchpad for creating a final version of your game. Here’s how to navigate it:
Accessing Build Settings:
Open the File menu and select Build Settings. This brings up a window where you can choose your target platform, such as Windows, macOS, iOS, Android, or WebGL.
Choosing the Target Platform:
Select your target platform from the list on the left. Once selected, you can configure platform-specific options, such as resolution, scripting backend (IL2CPP or Mono), and compression settings.
Scenes in Build:
The Scenes in Build section lists all the scenes that will be included in your final build. Ensure that all the necessary scenes are checked. The order of the scenes in this list can also dictate the flow of your game, starting from the first scene in the list.
Build Options:
The Player Settings button allows you to configure various options like company name, product name, default icon, and splash screen. These details help polish the final product.
Finally, click Build to start the process. Choose a directory to save your build, and Unity will create the executable files for your selected platform.
Platform-Specific Optimizations
Optimizing your game for different platforms is essential to ensure smooth performance and a good user experience:
Mobile Optimization: Mobile devices have limited resources compared to PCs and consoles. Reduce texture sizes, minimize the use of real-time shadows, and optimize scripts to improve performance. Consider using Adaptive Performance to dynamically adjust game quality based on the device's capabilities.
PC and Console Optimization: Here, you can take advantage of higher-end hardware. Enable higher resolution textures, increase shadow quality, and use advanced post-processing effects. Unity’s Quality Settings allow you to set different levels of graphical fidelity, giving players the option to adjust settings based on their hardware.
WebGL Optimization: Web-based games require special attention to performance and loading times. Compress assets, use lightweight shaders, and optimize scripts to reduce memory usage. WebGL builds often benefit from using Unity’s Memory Profiler to track and minimize memory consumption.
For more detailed guidance on optimizing your game, check out these optimization tips for Unity. These strategies can help you get the best performance out of your game, regardless of the platform.
Testing and Debugging
Before you release your game to the world, thorough testing and debugging are critical. Skipping this step can lead to bugs, crashes, and a poor user experience.
Methods for In-Editor Testing
Unity provides robust tools for testing your game within the editor:
Play Mode: The simplest way to test your game is by clicking the Play button in the Unity Editor. This allows you to experience your game in real-time and spot any immediate issues.
Debugging with Console Logs: Use
Debug.Log()to output messages to the console. This is useful for checking the flow of your code, verifying variable values, and identifying where issues might be occurring.Scene Reloading: Test different scenes by manually reloading them in Play Mode. This helps ensure that all scenes transition smoothly and that there are no issues with loading or saving states.
Profiling and Optimizing Game Performance
Performance is a key factor in a game’s success. Unity’s Profiler is an invaluable tool for identifying performance bottlenecks:
CPU Usage: Monitor how much processing power your game is using. High CPU usage could indicate inefficient scripts or too many active GameObjects.
Memory Allocation: Track how much memory your game is consuming. Large spikes in memory usage can lead to crashes, especially on mobile devices. Use the Memory Profiler to pinpoint excessive memory usage and optimize accordingly.
Rendering: The Profiler also tracks rendering performance. Issues here could be related to complex shaders, excessive draw calls, or unoptimized lighting.
Common Issues and Solutions
Despite your best efforts, issues may arise during testing. Some common problems include:
Missing References: Errors related to missing GameObjects or scripts can often be traced back to incorrectly set references in the Inspector.
Performance Drops: Sudden drops in frame rate might be caused by expensive operations in your scripts, unoptimized assets, or too many active GameObjects in a scene.
Physics and Collisions: Problems with physics interactions can often be fixed by adjusting collider sizes, Rigidbody settings, or physics layers.
For more in-depth solutions to common Unity problems, explore this guide on common Unity issues and how to solve them. This resource provides practical advice for troubleshooting a variety of issues.
Streaming Your Unity 3D Creations
As game development evolves, cloud streaming is becoming an increasingly popular way to deliver interactive experiences. It allows you to run resource-intensive games on powerful servers, then stream the output to players’ devices, enabling high-end graphics and smooth gameplay on even low-powered hardware.
Overview of Cloud Streaming and Its Advantages
Cloud streaming offers several benefits:
Accessibility: Players can access your game from virtually any device with an internet connection, without needing powerful hardware.
Instant Updates: Update your game on the server side, and all players instantly experience the changes—no downloads or installations required.
Scalability: Cloud streaming platforms can dynamically allocate resources based on player demand, ensuring smooth performance even during peak times.
Steps to Set Up Cloud Streaming
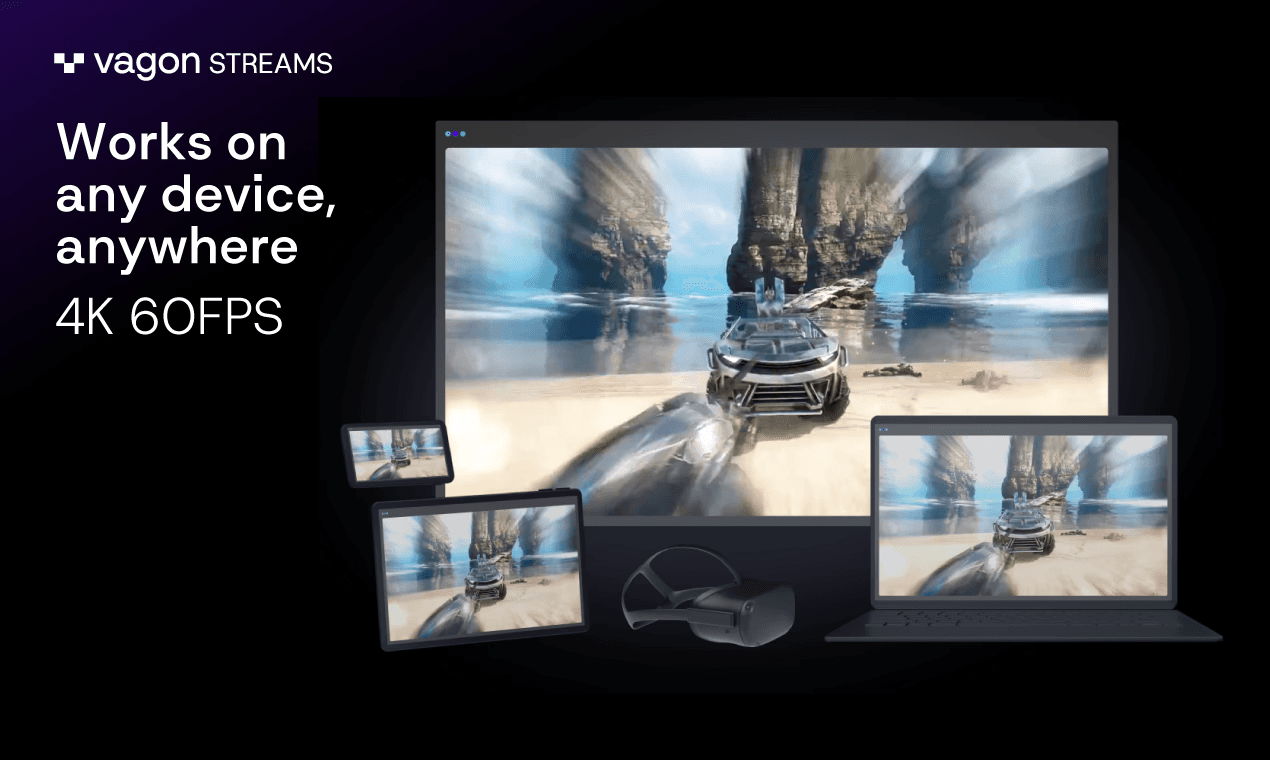
With Vagon Streams, setting up cloud streaming for your Unity game is effortless. Simply upload your Unity application, and Vagon handles the rest. Powered by RTX-enabled NVIDIA GPUs and supported by 21 datacenters worldwide, Vagon Streams ensures your game runs smoothly on any device, anywhere. Enjoy enhanced control options, and deliver a high-quality experience to your players with minimal setup.
For more detailed insights on how to set up cloud streaming and overcome common challenges, check out this guide on Unity render streaming with Vagon Streams.
By mastering these steps, you’ll ensure that your Unity game is not only built and deployed efficiently but also accessible to a wider audience through cutting-edge streaming technology.
Expanding Your Skills: Where to Go Next
Intermediate and Advanced Learning
Now that you’ve built a solid foundation in Unity, it’s time to take your skills to the next level. Whether you’re interested in mastering advanced scripting, perfecting your animation techniques, or exploring Unity’s more complex features, continuous learning is key to your development as a game creator.
Recommended Courses and Tutorials
To deepen your knowledge, consider enrolling in some of the top Unity courses available online. These courses cover a range of topics, from advanced C# scripting to sophisticated game design patterns. If you prefer more specific guidance, check out tutorials tailored for learning Unity, which offer step-by-step instructions on everything from shader creation to AI implementation.
Joining the Unity Community
Engaging with the Unity community is another great way to expand your skills. Participate in forums, join local Unity meetups, or contribute to open-source Unity projects. The community is a treasure trove of shared knowledge, inspiration, and support. Plus, connecting with other developers can lead to new opportunities and collaborations.
For those who enjoy learning through reading, there’s also a wealth of resources in the form of books. Explore the top books for mastering Unity software to find titles that will help you refine your skills and discover new techniques.
Unity's Latest Features
Staying up-to-date with Unity’s latest features and tools is crucial for keeping your projects innovative and competitive. Unity is constantly evolving, with regular updates that introduce new functionalities, performance enhancements, and cross-platform capabilities.
Overview of New Tools and Updates
Unity’s development team is always pushing the boundaries of what’s possible. Recent updates have introduced powerful new tools like the Shader Graph, Cinemachine, and enhanced 2D Animation tools. These tools open up new creative possibilities and streamline the development process.
Unity’s Roadmap and Future Trends
Looking ahead, Unity’s roadmap includes exciting developments that will shape the future of game development. From advancements in DOTS (Data-Oriented Technology Stack) to expanded support for emerging platforms, Unity is poised to remain at the forefront of interactive technology. One of the most notable recent developments is Unity’s support for creating content for Apple Vision Pro and visionOS. To learn more about how Unity is adapting to these new platforms, check out the guide on creating for Apple Vision Pro and visionOS with Unity.
By continuously expanding your skills and staying current with Unity’s latest features, you’ll be well-equipped to take on more ambitious projects and bring your most creative ideas to life.
Inspiring Unity Projects
Get Inspired by the Community
The Unity community is brimming with creativity, and countless projects showcase the power and versatility of the Unity engine. Exploring these projects can spark new ideas and push the boundaries of what you can achieve in your own work.
One standout example is "Cuphead," a visually stunning, award-winning game that mimics the look of 1930s cartoons. Developed using Unity, its unique art style and challenging gameplay have captivated millions of players worldwide. Another inspiring project is "Ori and the Blind Forest," a beautifully crafted platformer that combines breathtaking visuals with an emotional storyline, also built on Unity’s robust framework.
Beyond games, Unity has been used in virtual reality experiences, architectural visualizations, and interactive installations. For instance, "Tilt Brush," originally developed by Google, allows users to paint in 3D space using virtual reality, showcasing Unity’s potential in creative, non-traditional applications.
If you're looking for more inspiration, check out this collection of inspiring Unity projects. These examples highlight the endless possibilities Unity offers, whether you’re aiming to create the next big game or a groundbreaking interactive experience.
Using Unity on Cloud
Vagon - Your Go-To Solution for Unity Optimization
Are hardware limitations slowing down your Unity projects? With Vagon, you can elevate your game development experience to new heights. Vagon’s cloud-based remote desktops provide the power and performance you need, eliminating those frustrating lags and delays.
Introduction to Cloud Computing for Unity
Imagine working on your Unity project without the constraints of your local hardware. With Vagon’s cloud PCs, equipped with 4 x 16GB RTX-enabled NVIDIA GPUs, you can dive into complex, resource-heavy tasks with ease. Whether you’re rendering high-quality graphics, running intensive simulations, or collaborating with a global team, Vagon ensures your projects run smoothly and efficiently. Additionally, you can leverage Unity Render Streaming to stream your Unity games directly to browsers, expanding accessibility and enabling seamless experiences across various devices.
You can also check out our GPU Guide for tips to use GPU, along with speed up and acceleration tips for Unity.
Benefits of Using Vagon for Unity
Uninterrupted Performance: With Vagon, say goodbye to progress bars and slowdowns. Your Unity projects will run faster and smoother, allowing you to focus solely on bringing your creative visions to life.
Global Collaboration: Work seamlessly with team members around the world. Vagon’s cloud environment allows everyone to access the same powerful tools, regardless of their location, enabling real-time collaboration without the usual limitations.
Effortless Setup: Getting started with Vagon is quick and simple. Within just a few clicks, you can tap into a high-performance cloud PC and start working on your Unity projects without any hardware constraints.
By choosing Vagon, you’re not just optimizing your workflow—you’re unleashing your full creative potential. Ready to experience the difference? Explore how Vagon can transform your Unity development and take your projects to the next level.
What is Unity, and why is it popular among game developers?
Unity is a versatile and widely-used game engine that allows developers to create interactive 3D and 2D content across various platforms. Its popularity stems from its user-friendly interface, cross-platform capabilities, and a robust community that supports both beginners and professionals.
Do I need to know how to code to use Unity?
While having some coding knowledge is beneficial, Unity is designed to be accessible even for those without extensive coding experience. Its visual scripting tools, tutorials, and community resources make it easier for beginners to start creating without deep programming skills.
What platforms can I deploy my Unity game to?
Unity supports deployment across more than 25 platforms, including iOS, Android, PC, Mac, consoles like PlayStation and Xbox, and even AR/VR devices and web platforms. This cross-platform capability makes it a powerful tool for reaching a wide audience.
How do I start a new project in Unity?
To start a new project, download and install Unity Hub, then select "New Project." Choose a template (like 2D or 3D), name your project, and specify a save location. After that, Unity will set up your project environment, and you can begin building your game or application.
What resources are available to help me learn Unity?
Unity offers a wealth of resources, including official tutorials, documentation, community forums, and the Unity Learn platform. Additionally, there are numerous third-party courses, books, and online tutorials available to help you master Unity at your own pace.
Can I use Unity for non-gaming projects?
Absolutely! Unity is widely used in industries beyond gaming, including architecture, automotive design, film production, and education. It’s ideal for creating simulations, visualizations, VR/AR experiences, and interactive training programs.
Unity is more than just a game engine—it's the foundation behind some of the most iconic games and interactive experiences of our time. From indie developers to major studios, Unity powers creativity across the globe, shaping everything from mobile games to AAA titles, and even virtual reality worlds.
"'Unity is the canvas where imagination comes to life,' many in the industry say." But what makes Unity so universally loved? It’s the engine’s versatility and accessibility. Whether you're just starting out or are a seasoned developer, Unity provides the tools to bring your ideas to life—without needing to be a coding expert.
Developers worldwide trust Unity for its cross-platform capabilities, intuitive interface, and robust community support. Companies like Niantic with Pokémon GO, Supercell with Clash of Clans, and Ubisoft with Assassin’s Creed Identity have all leveraged Unity to create games that captivate millions. To see how widespread Unity's use is, you can check out some of the top game development companies using Unity.
This guide is designed to take you from your first steps in Unity to creating your very own project. We’ll cover everything from understanding the basics of Unity to building, deploying, and even streaming your game creations. Ready to dive in? Let's start with what Unity is and why it’s your best choice for game development.
What is Unity?
Understanding Unity
Unity is a powerful, versatile game engine that has revolutionized game development. At its core, Unity is a real-time 3D development platform that allows developers to create interactive experiences across various platforms—from games and simulations to AR (Augmented Reality) and VR (Virtual Reality) environments. Its intuitive design makes it accessible to beginners, yet robust enough for seasoned professionals.
Unity's influence extends well beyond the gaming industry, with wide usage in architecture, automotive design, film production, and training simulations. For instance, architects use Unity to create immersive walkthroughs of their building designs, while automotive companies leverage it to develop virtual prototypes and simulations. Unity’s versatility is what sets it apart—whatever your vision, Unity provides the tools to bring it to life.
One of Unity's greatest strengths lies in its community-driven ecosystem. The Unity Asset Store is a prime example, offering thousands of ready-made assets to jumpstart your project. Whether you need character models, environmental assets, or special effects, the Asset Store has you covered. For those looking to enhance their projects with high-quality assets, check out our blog for our recommendations.
Key Features of Unity
Unity stands out in the crowded field of game engines due to its unique blend of features that cater to both beginners and experts.
Cross-Platform Support: Unity enables developers to build once and deploy across more than 25 platforms, including iOS, Android, PC, consoles, AR/VR, and even the web. This flexibility ensures that your project reaches the widest possible audience with minimal extra effort.
User-Friendly Interface: Unity’s interface is designed with the user in mind. Its layout is intuitive, allowing for drag-and-drop functionality and easy navigation. Whether you're arranging objects in the Scene view or tweaking properties in the Inspector, everything is designed to keep you focused on creation, not configuration.
Access to the Unity Asset Store: The Unity Asset Store is a goldmine for developers, offering everything from 3D models and animations to plugins and scripts. It’s particularly helpful for small teams or solo developers who need quality assets without the time or resources to create them from scratch. If you’re ready to dive into the Asset Store, start with some of the best Unity plugins to see what’s available.
Real-Time Development and Iteration: One of Unity’s standout features is its ability to make changes and see the results in real-time. Whether you're adjusting lighting, tweaking physics, or fine-tuning animations, Unity’s real-time development environment lets you see exactly how your changes affect the game, speeding up the development process and improving iteration efficiency.
These features combine to make Unity a powerful, flexible tool for any developer, whether you’re building the next big game or exploring new frontiers in VR. Now that you understand what Unity is and what it offers, let’s move on to getting it set up on your machine.
Getting Started with Unity
Installing Unity
Unity makes it easy to start creating, but first, let's get it up and running on your machine. Before you dive in, it’s essential to ensure your setup meets Unity’s requirements.
System Requirements:
Operating System: Windows 10+, macOS 10.14+, Ubuntu 18.04+.
CPU: Intel Core i5+, AMD Ryzen 5+.
GPU: DX12-capable graphics card, like NVIDIA GTX 970 or higher.
RAM: Minimum 8GB, recommended 16GB.
Storage: 15GB+ of available space, SSD recommended.
For optimal performance, especially when working on complex projects or using demanding assets, consider a cloud solution like Vagon. Vagon ensures that your development environment is optimized, no matter your local hardware.
Step-by-Step Installation Guide
Download Unity Hub:
Visit the Unity website and download Unity Hub. This is your gateway to all things Unity—installing versions, managing licenses, and accessing your projects.
Install Unity Editor:
Open Unity Hub, and head to the Installs tab. Click on Add, select the latest Unity version, and choose the modules you need (like iOS, Android, or WebGL support). Click Next to begin the installation.
Activate Your License:
In Unity Hub, go to Preferences > License Management. If you're just starting, choose the free Personal license, which is perfect for beginners.
Create Your First Project:
Once Unity is installed, switch to the Projects tab, hit New Project, and pick a template (like 3D, 2D, or URP). Give your project a name, select the location, and click Create.
That’s it! You’re now ready to explore Unity.
Unity Interface Breakdown
Welcome to Unity’s interface—a clean, powerful space where your ideas take shape. Understanding the layout will make your workflow smoother and more intuitive.
Overview of Main Panels
Hierarchy: This is your project’s structure. Every GameObject in your scene is listed here, from lights to cameras to models. Think of it as your project’s family tree.
Scene: This is where the magic happens. The Scene view is your canvas, allowing you to position, scale, and rotate objects in 3D space. Use the tools at the top—hand, move, rotate, scale—to manipulate objects.
Game: This is your preview window. It shows you what your players will see. Hit the play button to test your game in real-time.
Inspector: Context-sensitive and powerful. When you select an object in the Hierarchy, the Inspector shows you all its properties—transform, materials, scripts. This is where you tweak the details.
Tips for Efficient Navigation
Hotkeys: Mastering a few key shortcuts can save you a ton of time. For example, press F to focus on a selected object in the Scene view.
Layouts: Customize your workspace. Drag and drop panels to fit your workflow. You can save your layout for quick access.
Gizmos: Use Gizmos in the Scene view to see hidden components like lights, cameras, and audio sources. Toggle them on/off as needed.
Now that you’re comfortable navigating Unity, let’s dive into creating your first project.
Creating Your First Project
Setting Up a New Project
Starting your first project in Unity is both exciting and straightforward. The right foundation will make the rest of your development journey smoother, so let’s get it right from the start.
Selecting a Project Template
When you create a new project in Unity, the first decision is choosing the right project template. Unity offers several templates tailored to different types of projects, from 2D and 3D to more advanced options like Universal Render Pipeline (URP) or High Definition Render Pipeline (HDRP). If you’re unsure where to start, go with the 3D template—it’s versatile and great for beginners.
If you’re looking for inspiration or want to explore more tailored starting points, check out these must-try Unity project templates. These templates can save you time and help you hit the ground running with the right settings.
Configuring Basic Project Settings
After selecting your template, it’s time to configure the basic settings. Unity will prompt you to name your project and choose a location on your computer where the project will be saved. Pick a clear, descriptive name that reflects the essence of your game or project—this will make it easier to manage multiple projects later on.
Next, choose the target platform for your game. While this can be changed later, setting it now ensures your project is optimized from the start. Common choices include PC, Mac & Linux Standalone, iOS, or Android. If you’re developing for multiple platforms, Unity makes it easy to switch and optimize for each one.
Once your settings are in place, click Create. Unity will generate your new project, setting up everything you need to get started.
Building Your First Scene
With your project ready, it’s time to bring it to life by building your first scene. Think of the scene as your game’s world—where all the action happens.
Adding and Manipulating GameObjects
A GameObject is the basic building block of a Unity scene. Anything you add to your scene, from characters to lights, is a GameObject. To add one, simply right-click in the Hierarchy window, choose 3D Object, and select an option like Cube, Sphere, or Plane.
Once added, you can manipulate GameObjects using the tools in the Scene view. Use the Move tool to change its position, the Rotate tool to adjust its angle, and the Scale tool to resize it. These basic manipulations are crucial for positioning objects precisely in your game world.
Introduction to Components and Their Roles
GameObjects are empty containers until you add Components. Components give GameObjects their functionality. For example, a Transform component controls position, rotation, and scale, while a Mesh Renderer component makes the object visible by rendering its geometry. You can add components via the Inspector window by clicking Add Component and choosing from Unity’s extensive list.
Each component you add enhances your GameObject, giving it more complex behavior, like physics interactions or sound. Understanding how to mix and match components is key to unlocking Unity’s full potential.
Using Prefabs for Reusable Objects
Once you’ve created and configured a GameObject, you might want to reuse it across multiple scenes or instances. This is where Prefabs come in. A Prefab is a blueprint of a GameObject with all its components and settings saved.
To create a Prefab, drag your GameObject from the Hierarchy to the Project window. This saves it as a Prefab, allowing you to drag it into any scene as many times as needed. The beauty of Prefabs is that any changes you make to the original Prefab automatically apply to all instances, ensuring consistency across your game.
Now that you’ve built your first scene, you’re ready to explore more advanced topics like scripting and animation.
The Basics of Scripting in Unity
Introduction to C#
To truly harness the power of Unity, you'll need to get comfortable with C#—the language that breathes life into your games. C# is a versatile, object-oriented programming language that’s widely used in game development. But why C#? Unity uses C# because it’s efficient, easy to learn, and powerful enough to handle everything from simple scripts to complex game mechanics.
Why C# is Used in Unity
C# was chosen by Unity for several reasons. First, it integrates seamlessly with Unity’s engine, allowing developers to manipulate game objects, respond to player input, and control game flow with precision. Its object-oriented nature means you can build modular, reusable code—perfect for game development where efficiency is key. Moreover, C# is well-documented and supported by a vibrant community, making it easier for beginners to find resources and troubleshoot issues.
Basic C# Syntax Overview
Let’s dive into the basics of C# syntax. Here are some fundamental elements you’ll encounter in your Unity scripts:
Variables: Store data like numbers, text, or GameObjects. Example:
int score = 0;Methods: Blocks of code that perform specific tasks. Example:
void Start() { /* code here */ }Classes: Define objects and their behaviors. In Unity, you’ll often extend the MonoBehaviour class to create scripts.
Control Structures: Direct the flow of your code. For instance, if statements and loops (for, while) allow you to execute code based on conditions or repeatedly.
Here’s a simple example to illustrate these concepts:
public class PlayerMovement : MonoBehaviour
{
public float speed = 5f;
void Update()
{
float move = Input.GetAxis("Horizontal") * speed * Time.deltaTime;
transform.Translate(move, 0, 0);
}
}
This script moves a player horizontally based on input. It introduces the Update method, which Unity calls once per frame, and demonstrates how to manipulate a GameObject's transform using C#.
If you're looking to deepen your understanding of C# and its applications in Unity, consider exploring some of the top Unity courses that dive deeper into scripting and game development.
Writing Your First Script
With a basic understanding of C# under your belt, it’s time to write your first script in Unity. Don’t worry—Unity makes this process intuitive and straightforward.
Steps to Create and Attach a Script
Create a New Script:
In the Project window, right-click on the Assets folder, select Create > C# Script, and name it (e.g., "PlayerController").
Open the Script:
Double-click the script to open it in your code editor (Visual Studio is the default editor for Unity).
Write Your Code:
Unity automatically generates a template for you, including using directives and the Start and Update methods. You can start adding your own code here.
Attach the Script to a GameObject:
Drag your script from the Project window onto the GameObject in the Hierarchy or use the Inspector window by clicking Add Component and selecting your script.
Overview of MonoBehaviour and Its Importance
In Unity, most scripts are derived from the MonoBehaviour class. This class is the foundation of all scripts in Unity, providing essential methods like Start(), Update(), OnCollisionEnter(), and many others that control how your GameObjects behave.
Start(): This method is called once when the script is first executed. It’s perfect for initialization tasks like setting variables or starting coroutines.
Update(): Called once per frame, Update() is where you’ll handle real-time actions like input or movement. For example, if you want your player character to move left and right based on user input, you’ll write that code here.
Understanding and utilizing MonoBehaviour is crucial because it integrates your script with Unity’s event-driven architecture, ensuring your game responds correctly to player actions and in-game events.
Basic Debugging Techniques
Debugging is an essential part of scripting. Even the best code can have bugs, but Unity provides tools to help you track them down and fix them.
Console Log: Use
Debug.Log("Your message here");to print messages to Unity’s console. This is invaluable for checking if certain parts of your code are executing as expected.Breakpoints: In Visual Studio, you can set breakpoints to pause execution and inspect the state of your game at specific lines of code. This helps you understand what’s happening at each step of your script.
Error Messages: Pay attention to errors and warnings in Unity’s console. Unity’s error messages are usually informative, telling you what went wrong and often providing a line number where the problem occurred.
By now, you should have a basic understanding of C#, know how to write and attach scripts, and be equipped with some initial debugging tools. With these skills, you're ready to start bringing dynamic interactions into your Unity projects. Let’s move forward and explore how to enhance your game with assets.
Enhancing Your Game with Assets
Working with Assets
One of the fastest ways to bring your game to life is by utilizing the rich library of resources available on the Unity Asset Store. From detailed 3D models to immersive audio tracks, the Asset Store offers a treasure trove of content that can significantly boost the quality of your project.
How to Import Assets from the Asset Store
Importing assets into your Unity project is a breeze:
Access the Asset Store:
Within Unity, click on Window > Asset Store to browse the store directly. Alternatively, visit the Unity Asset Store website in your browser.
Search for Assets:
Use the search bar to find specific assets like 3D models, textures, or audio files. You can filter results by category, price, or popularity to find exactly what you need.
Purchase or Download:
Many assets are free, while others require purchase. Once you’ve found what you need, click Add to My Assets.
Import into Unity:
In Unity, go to the Package Manager (Window > Package Manager). From there, you can view and import any assets you've acquired by selecting them and clicking Import.
Using 3D Models, Textures, and Audio Assets
Once your assets are imported, integrating them into your game is straightforward:
3D Models: Drag and drop 3D models from the Project window into your scene. Adjust their position, scale, and rotation using the Scene view tools. For example, you might import a character model to serve as the player avatar or environment objects to build your game world.
Textures: Apply textures to your 3D models to give them color and detail. You can assign textures by selecting a material in the Inspector and dragging the texture file into the appropriate slot (e.g., Albedo, Normal Map).
Audio Assets: Add background music, sound effects, or voiceovers by dragging audio files into the Project window. Attach these audio clips to GameObjects or trigger them through scripts, enhancing your game’s atmosphere and immersion.
Incorporating these assets effectively can transform a basic prototype into a polished, engaging experience. For a curated list of high-quality assets to get started, explore some of the best Unity assets available today.
Best Practices for Asset Management
As you begin to accumulate assets in your project, maintaining organization and optimizing performance become increasingly important. Good asset management not only streamlines your workflow but also ensures your game runs smoothly.
Organizing Asset Folders
A well-organized project is essential for efficiency. Here’s how to keep your assets tidy:
Create a Folder Structure: Start by creating folders for different types of assets—Models, Textures, Audio, Scripts, and Prefabs. This hierarchy makes it easy to find what you need when you need it.
Name Assets Clearly: Use descriptive names for your assets. Instead of generic names like Model1 or Texture2, use names that indicate their purpose, such as PlayerCharacter_Model or ForestGround_Texture.
Group Related Assets: If you have assets that are used together, consider grouping them in subfolders. For instance, all assets related to a specific level or character could be stored in a dedicated folder.
Tips for Optimizing Assets for Better Performance
Efficient asset management also involves optimizing assets to ensure your game performs well, especially on lower-end hardware:
Reduce Texture Sizes: Large textures can consume significant memory. Use lower resolution textures where possible, especially for distant objects or less critical elements.
Optimize 3D Models: Simplify models by reducing polygon counts. Tools like Mesh Simplify or LOD (Level of Detail) can help maintain visual quality while improving performance.
Compress Audio Files: Use compressed formats like .ogg or .mp3 for background music and sound effects to reduce file size without sacrificing too much quality.
By following these best practices, you’ll maintain a smooth workflow and ensure your game remains optimized, even as it grows in complexity. Now that your assets are in place and organized, you're ready to tackle lighting and rendering to make your game truly shine.
Lighting and Rendering
Mastering Unity’s Lighting System
Lighting in Unity is more than just a way to illuminate your scene—it's a powerful tool that can dramatically affect the mood, tone, and overall visual quality of your game. Understanding how to use Unity's lighting system is key to creating immersive and visually stunning environments.
Types of Lights in Unity
Unity offers several types of lights, each with its own characteristics and use cases:
Directional Light: Simulates sunlight and affects all objects in the scene equally, regardless of their distance from the light source. It’s ideal for outdoor scenes or any scenario where you need consistent lighting across large areas.
Point Light: Emits light in all directions from a single point, much like a light bulb. Point lights are perfect for adding localized light sources, such as lamps or torches, within your scene.
Spotlight: Projects a cone of light, much like a flashlight or a stage spotlight. Spotlights are useful for focusing attention on specific areas or creating dramatic lighting effects.
Area Light: Illuminates a scene from a rectangular area, providing soft, even lighting. While more resource-intensive, area lights are excellent for achieving realistic indoor lighting.
Each light type can be customized with different settings, such as intensity, color, and range, allowing you to fine-tune the look and feel of your scene.
Basics of Global Illumination
Global Illumination (GI) in Unity is a technique that simulates how light bounces off surfaces and interacts with the environment, adding depth and realism to your scenes. GI can be either Precomputed Realtime or Baked, depending on your needs:
Precomputed Realtime GI: Ideal for dynamic environments where lighting conditions change, such as a day/night cycle. This method updates the GI in real-time, though it may be more demanding on performance.
Baked GI: Used for static environments where lighting doesn't change. Baked GI precomputes the light interactions and stores them in lightmaps, which can significantly improve performance.
Proper use of GI can transform flat, lifeless environments into rich, believable spaces. It’s particularly effective for creating realistic shadows and subtle lighting effects that enhance the mood of your game.
Importance of Lighting in Setting the Mood
Lighting isn’t just about visibility—it’s about atmosphere. The right lighting can evoke emotions, create tension, or highlight important gameplay elements. For example:
Warm, soft lighting can create a cozy, inviting atmosphere in a home or village setting.
Cold, harsh lighting can build suspense and make environments feel eerie or dangerous.
High-contrast lighting with deep shadows can add drama and focus the player’s attention on specific areas or objects.
Experiment with different lighting setups to find the right mood for your game, and don’t be afraid to play with color, intensity, and shadows to achieve the desired effect.
Rendering Settings
Rendering is the final step in the visual pipeline, where your scene is processed into the images that players see. Unity’s rendering settings allow you to optimize graphics across different platforms and enhance the visual quality of your game with post-processing effects.
Overview of Graphics Settings for Various Platforms
Unity’s flexibility shines when it comes to rendering across multiple platforms. You can customize graphics settings to ensure your game looks great whether it’s running on a high-end gaming PC or a mobile device.
Quality Settings: Unity allows you to define different quality levels (e.g., Low, Medium, High) that players can choose based on their hardware. These settings control parameters like texture resolution, shadow quality, and anti-aliasing, balancing performance and visual fidelity.
Platform-Specific Optimizations: For each platform (PC, console, mobile), you can tweak the rendering settings to optimize performance. For instance, you might reduce the resolution of textures and disable certain post-processing effects on mobile devices to ensure smooth gameplay.
How to Use Post-Processing Effects for a Polished Look
Post-processing effects are applied after your scene has been rendered, adding the finishing touches that make your game look polished and professional:
Bloom: Adds a glow to bright areas of your scene, mimicking how light bleeds in the real world. It’s great for creating a dreamy or intense atmosphere.
Ambient Occlusion: Enhances shadows in corners and crevices, giving objects more depth and grounding them in the scene.
Depth of Field: Blurs objects that are out of focus, drawing attention to the player’s current focal point and adding a cinematic quality to your game.
Color Grading: Adjusts the overall color tone of your game. Whether you’re aiming for a vintage look, a vibrant fantasy world, or a bleak dystopia, color grading can help set the tone.
Using these effects sparingly and with purpose can elevate the visual quality of your game, making it stand out in a crowded market. With lighting and rendering in place, your game will look sharp and feel immersive, ready for final tweaks and deployment.
Introduction to Physics and Animation
Unity’s Physics Engine
In Unity, physics is what brings the virtual world to life. With the right components, you can make objects behave in a way that mimics real-world physics, adding depth and realism to your game.
Colliders and Rigidbodies
At the core of Unity’s physics engine are Colliders and Rigidbodies.
Colliders: These are invisible shapes that define the physical boundaries of an object. They ensure that objects interact with each other in a realistic manner—whether it’s a character walking on the ground, a ball bouncing off a wall, or a car crashing into a barrier. Unity offers various types of colliders like Box Collider, Sphere Collider, and Mesh Collider, each suited to different shapes and scenarios.
Rigidbodies: While colliders define the shape, Rigidbodies add mass, gravity, and other physical properties to an object. By attaching a Rigidbody to a GameObject, you enable it to be influenced by forces like gravity or user-controlled inputs. This is crucial for creating anything that needs to move or be affected by physical interactions, like a rolling ball or a flying projectile.
These two components work together to create dynamic, interactive environments. For example, a ball with a Sphere Collider and Rigidbody will roll down a slope, bounce when it hits the ground, and respond to forces like wind or explosions—all thanks to Unity’s physics engine.
Basic Physics Interactions
Once you have Colliders and Rigidbodies in place, you can start setting up basic physics interactions in your game:
Collision Detection: Unity automatically detects when two colliders touch, triggering a collision event. This allows you to create reactions, like causing damage to a character when they collide with an enemy or triggering a sound effect when a ball hits the ground.
Forces and Impulses: You can apply forces to Rigidbody objects to simulate pushes, pulls, or explosive effects. For instance, applying an upward force to a Rigidbody can simulate a jump, while a lateral force might simulate a gust of wind pushing an object to the side.
Joints: Unity provides different types of joints (e.g., Hinge Joint, Spring Joint) to connect GameObjects, allowing them to move relative to each other. This is useful for creating doors, wheels, or even complex machinery.
With physics, you can achieve "realism through interaction," making your game world behave in ways that players intuitively understand.
Animation Basics
Animations are what breathe life into your characters and objects, making them move, act, and react in a way that’s believable and engaging.
Animator Controller Overview
The Animator Controller is the brain behind animations in Unity. It organizes and controls how different animations blend together and transition from one to another, based on parameters like player input or in-game events.
States: Each animation you create is a state within the Animator Controller. For example, a character might have idle, walk, run, and jump states.
Transitions: These define how your character moves from one state to another. For instance, you can set a transition from idle to walk when a certain input is detected, like pressing the "W" key.
Parameters: These are variables (like speed, health, or triggers) that control the transitions. By tweaking these parameters, you can make your animations respond dynamically to gameplay.
Creating Simple Animations
Creating animations in Unity is intuitive, thanks to the Animation Window:
Select Your GameObject: Choose the object you want to animate.
Open the Animation Window: Go to Window > Animation > Animation.
Create a New Animation Clip: Click the Create button, name your animation (e.g., "WalkCycle"), and start recording.
Record Keyframes: Move your object or character to different positions or poses at various points in time, and Unity will automatically generate the in-between frames, known as tweening.
Preview and Save: Play back your animation in the Animation Window to see how it looks, then save your work.
Using Blend Trees for Smooth Transitions
Blend Trees allow you to create smooth transitions between animations based on a parameter, such as speed. For instance, a character’s movement can seamlessly transition from walking to running as the speed parameter increases.
Setting Up a Blend Tree: Within the Animator Controller, you can create a Blend Tree by right-clicking and selecting Create State > From New Blend Tree. Add your animations (e.g., walk and run) and define the blend parameter.
Adjusting the Blend: Drag sliders or set thresholds to determine how your animations blend based on the parameter’s value.
Using Blend Trees, you can achieve fluid and natural-looking animations, making your characters and objects move more believably.
With a solid grasp of Unity's physics and animation systems, you're well on your way to creating interactive, engaging, and visually stunning games. Next, we'll explore how to build and deploy your game, bringing all these elements together into a finished product.
Building and Deploying Your Game
Preparing for Build
After putting in countless hours of design, scripting, and testing, it’s time to prepare your Unity game for deployment. Whether you're targeting mobile, PC, or consoles, understanding Unity’s build settings is crucial for optimizing your game across platforms.
Explanation of Build Settings
The Build Settings window in Unity is your launchpad for creating a final version of your game. Here’s how to navigate it:
Accessing Build Settings:
Open the File menu and select Build Settings. This brings up a window where you can choose your target platform, such as Windows, macOS, iOS, Android, or WebGL.
Choosing the Target Platform:
Select your target platform from the list on the left. Once selected, you can configure platform-specific options, such as resolution, scripting backend (IL2CPP or Mono), and compression settings.
Scenes in Build:
The Scenes in Build section lists all the scenes that will be included in your final build. Ensure that all the necessary scenes are checked. The order of the scenes in this list can also dictate the flow of your game, starting from the first scene in the list.
Build Options:
The Player Settings button allows you to configure various options like company name, product name, default icon, and splash screen. These details help polish the final product.
Finally, click Build to start the process. Choose a directory to save your build, and Unity will create the executable files for your selected platform.
Platform-Specific Optimizations
Optimizing your game for different platforms is essential to ensure smooth performance and a good user experience:
Mobile Optimization: Mobile devices have limited resources compared to PCs and consoles. Reduce texture sizes, minimize the use of real-time shadows, and optimize scripts to improve performance. Consider using Adaptive Performance to dynamically adjust game quality based on the device's capabilities.
PC and Console Optimization: Here, you can take advantage of higher-end hardware. Enable higher resolution textures, increase shadow quality, and use advanced post-processing effects. Unity’s Quality Settings allow you to set different levels of graphical fidelity, giving players the option to adjust settings based on their hardware.
WebGL Optimization: Web-based games require special attention to performance and loading times. Compress assets, use lightweight shaders, and optimize scripts to reduce memory usage. WebGL builds often benefit from using Unity’s Memory Profiler to track and minimize memory consumption.
For more detailed guidance on optimizing your game, check out these optimization tips for Unity. These strategies can help you get the best performance out of your game, regardless of the platform.
Testing and Debugging
Before you release your game to the world, thorough testing and debugging are critical. Skipping this step can lead to bugs, crashes, and a poor user experience.
Methods for In-Editor Testing
Unity provides robust tools for testing your game within the editor:
Play Mode: The simplest way to test your game is by clicking the Play button in the Unity Editor. This allows you to experience your game in real-time and spot any immediate issues.
Debugging with Console Logs: Use
Debug.Log()to output messages to the console. This is useful for checking the flow of your code, verifying variable values, and identifying where issues might be occurring.Scene Reloading: Test different scenes by manually reloading them in Play Mode. This helps ensure that all scenes transition smoothly and that there are no issues with loading or saving states.
Profiling and Optimizing Game Performance
Performance is a key factor in a game’s success. Unity’s Profiler is an invaluable tool for identifying performance bottlenecks:
CPU Usage: Monitor how much processing power your game is using. High CPU usage could indicate inefficient scripts or too many active GameObjects.
Memory Allocation: Track how much memory your game is consuming. Large spikes in memory usage can lead to crashes, especially on mobile devices. Use the Memory Profiler to pinpoint excessive memory usage and optimize accordingly.
Rendering: The Profiler also tracks rendering performance. Issues here could be related to complex shaders, excessive draw calls, or unoptimized lighting.
Common Issues and Solutions
Despite your best efforts, issues may arise during testing. Some common problems include:
Missing References: Errors related to missing GameObjects or scripts can often be traced back to incorrectly set references in the Inspector.
Performance Drops: Sudden drops in frame rate might be caused by expensive operations in your scripts, unoptimized assets, or too many active GameObjects in a scene.
Physics and Collisions: Problems with physics interactions can often be fixed by adjusting collider sizes, Rigidbody settings, or physics layers.
For more in-depth solutions to common Unity problems, explore this guide on common Unity issues and how to solve them. This resource provides practical advice for troubleshooting a variety of issues.
Streaming Your Unity 3D Creations
As game development evolves, cloud streaming is becoming an increasingly popular way to deliver interactive experiences. It allows you to run resource-intensive games on powerful servers, then stream the output to players’ devices, enabling high-end graphics and smooth gameplay on even low-powered hardware.
Overview of Cloud Streaming and Its Advantages
Cloud streaming offers several benefits:
Accessibility: Players can access your game from virtually any device with an internet connection, without needing powerful hardware.
Instant Updates: Update your game on the server side, and all players instantly experience the changes—no downloads or installations required.
Scalability: Cloud streaming platforms can dynamically allocate resources based on player demand, ensuring smooth performance even during peak times.
Steps to Set Up Cloud Streaming
With Vagon Streams, setting up cloud streaming for your Unity game is effortless. Simply upload your Unity application, and Vagon handles the rest. Powered by RTX-enabled NVIDIA GPUs and supported by 21 datacenters worldwide, Vagon Streams ensures your game runs smoothly on any device, anywhere. Enjoy enhanced control options, and deliver a high-quality experience to your players with minimal setup.
For more detailed insights on how to set up cloud streaming and overcome common challenges, check out this guide on Unity render streaming with Vagon Streams.
By mastering these steps, you’ll ensure that your Unity game is not only built and deployed efficiently but also accessible to a wider audience through cutting-edge streaming technology.
Expanding Your Skills: Where to Go Next
Intermediate and Advanced Learning
Now that you’ve built a solid foundation in Unity, it’s time to take your skills to the next level. Whether you’re interested in mastering advanced scripting, perfecting your animation techniques, or exploring Unity’s more complex features, continuous learning is key to your development as a game creator.
Recommended Courses and Tutorials
To deepen your knowledge, consider enrolling in some of the top Unity courses available online. These courses cover a range of topics, from advanced C# scripting to sophisticated game design patterns. If you prefer more specific guidance, check out tutorials tailored for learning Unity, which offer step-by-step instructions on everything from shader creation to AI implementation.
Joining the Unity Community
Engaging with the Unity community is another great way to expand your skills. Participate in forums, join local Unity meetups, or contribute to open-source Unity projects. The community is a treasure trove of shared knowledge, inspiration, and support. Plus, connecting with other developers can lead to new opportunities and collaborations.
For those who enjoy learning through reading, there’s also a wealth of resources in the form of books. Explore the top books for mastering Unity software to find titles that will help you refine your skills and discover new techniques.
Unity's Latest Features
Staying up-to-date with Unity’s latest features and tools is crucial for keeping your projects innovative and competitive. Unity is constantly evolving, with regular updates that introduce new functionalities, performance enhancements, and cross-platform capabilities.
Overview of New Tools and Updates
Unity’s development team is always pushing the boundaries of what’s possible. Recent updates have introduced powerful new tools like the Shader Graph, Cinemachine, and enhanced 2D Animation tools. These tools open up new creative possibilities and streamline the development process.
Unity’s Roadmap and Future Trends
Looking ahead, Unity’s roadmap includes exciting developments that will shape the future of game development. From advancements in DOTS (Data-Oriented Technology Stack) to expanded support for emerging platforms, Unity is poised to remain at the forefront of interactive technology. One of the most notable recent developments is Unity’s support for creating content for Apple Vision Pro and visionOS. To learn more about how Unity is adapting to these new platforms, check out the guide on creating for Apple Vision Pro and visionOS with Unity.
By continuously expanding your skills and staying current with Unity’s latest features, you’ll be well-equipped to take on more ambitious projects and bring your most creative ideas to life.
Inspiring Unity Projects
Get Inspired by the Community
The Unity community is brimming with creativity, and countless projects showcase the power and versatility of the Unity engine. Exploring these projects can spark new ideas and push the boundaries of what you can achieve in your own work.
One standout example is "Cuphead," a visually stunning, award-winning game that mimics the look of 1930s cartoons. Developed using Unity, its unique art style and challenging gameplay have captivated millions of players worldwide. Another inspiring project is "Ori and the Blind Forest," a beautifully crafted platformer that combines breathtaking visuals with an emotional storyline, also built on Unity’s robust framework.
Beyond games, Unity has been used in virtual reality experiences, architectural visualizations, and interactive installations. For instance, "Tilt Brush," originally developed by Google, allows users to paint in 3D space using virtual reality, showcasing Unity’s potential in creative, non-traditional applications.
If you're looking for more inspiration, check out this collection of inspiring Unity projects. These examples highlight the endless possibilities Unity offers, whether you’re aiming to create the next big game or a groundbreaking interactive experience.
Using Unity on Cloud
Vagon - Your Go-To Solution for Unity Optimization
Are hardware limitations slowing down your Unity projects? With Vagon, you can elevate your game development experience to new heights. Vagon’s cloud-based remote desktops provide the power and performance you need, eliminating those frustrating lags and delays.
Introduction to Cloud Computing for Unity
Imagine working on your Unity project without the constraints of your local hardware. With Vagon’s cloud PCs, equipped with 4 x 16GB RTX-enabled NVIDIA GPUs, you can dive into complex, resource-heavy tasks with ease. Whether you’re rendering high-quality graphics, running intensive simulations, or collaborating with a global team, Vagon ensures your projects run smoothly and efficiently. Additionally, you can leverage Unity Render Streaming to stream your Unity games directly to browsers, expanding accessibility and enabling seamless experiences across various devices.
You can also check out our GPU Guide for tips to use GPU, along with speed up and acceleration tips for Unity.
Benefits of Using Vagon for Unity
Uninterrupted Performance: With Vagon, say goodbye to progress bars and slowdowns. Your Unity projects will run faster and smoother, allowing you to focus solely on bringing your creative visions to life.
Global Collaboration: Work seamlessly with team members around the world. Vagon’s cloud environment allows everyone to access the same powerful tools, regardless of their location, enabling real-time collaboration without the usual limitations.
Effortless Setup: Getting started with Vagon is quick and simple. Within just a few clicks, you can tap into a high-performance cloud PC and start working on your Unity projects without any hardware constraints.
By choosing Vagon, you’re not just optimizing your workflow—you’re unleashing your full creative potential. Ready to experience the difference? Explore how Vagon can transform your Unity development and take your projects to the next level.
What is Unity, and why is it popular among game developers?
Unity is a versatile and widely-used game engine that allows developers to create interactive 3D and 2D content across various platforms. Its popularity stems from its user-friendly interface, cross-platform capabilities, and a robust community that supports both beginners and professionals.
Do I need to know how to code to use Unity?
While having some coding knowledge is beneficial, Unity is designed to be accessible even for those without extensive coding experience. Its visual scripting tools, tutorials, and community resources make it easier for beginners to start creating without deep programming skills.
What platforms can I deploy my Unity game to?
Unity supports deployment across more than 25 platforms, including iOS, Android, PC, Mac, consoles like PlayStation and Xbox, and even AR/VR devices and web platforms. This cross-platform capability makes it a powerful tool for reaching a wide audience.
How do I start a new project in Unity?
To start a new project, download and install Unity Hub, then select "New Project." Choose a template (like 2D or 3D), name your project, and specify a save location. After that, Unity will set up your project environment, and you can begin building your game or application.
What resources are available to help me learn Unity?
Unity offers a wealth of resources, including official tutorials, documentation, community forums, and the Unity Learn platform. Additionally, there are numerous third-party courses, books, and online tutorials available to help you master Unity at your own pace.
Can I use Unity for non-gaming projects?
Absolutely! Unity is widely used in industries beyond gaming, including architecture, automotive design, film production, and education. It’s ideal for creating simulations, visualizations, VR/AR experiences, and interactive training programs.
Get Beyond Your Computer Performance
Run applications on your cloud computer with the latest generation hardware. No more crashes or lags.

Trial includes 1 hour usage + 7 days of storage.
Summarize with AI

Ready to focus on your creativity?
Vagon gives you the ability to create & render projects, collaborate, and stream applications with the power of the best hardware.

Vagon Blog


Run heavy applications on any device with
your personal computer on the cloud.
San Francisco, California
Solutions
Vagon Teams
Vagon Streams
Use Cases
Resources
Vagon Blog
How to Run Inkscape on a Cloud Ubuntu Desktop (2026 Guide)
How to Run Krita on a Cloud Ubuntu Desktop for Digital Painting (2026 Guide)
How to Run GIMP on a Cloud Ubuntu Desktop (2026 Guide)
How to Run Jupyter on a Cloud GPU Linux Desktop (2026 Guide)
Vagon vs GitHub Codespaces: Cloud Dev Environments Compared (2026)
Vagon vs RunPod: Which Cloud GPU Is Right for You? (2026 Comparison)
How to Watch Your AI Agent Work on a Cloud Ubuntu Desktop (2026 Guide)
How to Run a Local LLM on Ubuntu in the Cloud (2026 Guide)
How to Run Blender on a Cloud GPU (Ubuntu): The Complete 2026 Guide
Vagon Blog
Run heavy applications on any device with
your personal computer on the cloud.
San Francisco, California
Solutions
Vagon Teams
Vagon Streams
Use Cases
Resources
Vagon Blog