Instant Connection for Pixel Streaming
— New Feature Automated Setup
Reduce Rendering Times in Premiere Pro
Reduce Rendering Times in Premiere Pro
VideoProduction
Reduce Rendering Times in Premiere Pro
Table of Contents
You just spent hours, maybe days, making that video perfect in Adobe Premiere Pro. Good cuts, great colors, sound just right. You hit "Export" to share it, and then... your computer sounds like a jet taking off, and that bar barely moves. Know the feeling? I do. We all do. That endless wait isn't just annoying; it kills your vibe and wastes time. Especially when your video export optimization just stops dead.
"Why is Premiere Pro so slow to render?" It's a question I hear all the time. Yeah, sometimes it's your computer. But often, it's just about knowing a few smart tricks inside the software. You don't always need to buy a whole new setup to fix those Premiere Pro bottlenecks. If you're running into bigger headaches than just slow renders, you might want to check out some common Premiere Pro problems and their solutions first.
So, in this guide, I'm going to cut straight to it. I'll share the real, hands-on ways I use to really speed up Premiere Pro exports and boost your render performance. We'll look at what's slowing you down and how to fix it, with the newest features and tips. If you're considering upgrading your hardware or building a more powerful setup, here’s a great guide that walks you through the ultimate PC build and buying guide specifically for Premiere Pro. Whether you're a beginner at video editing or you've been doing this for years, this guide will help you beat those long export times. And hey, this info is fully updated for Adobe Premiere Pro v25.2 (April 2025 release), so it's fresh and tested. Let's get that render bar moving fast.
What's Really Slowing Down Your Renders?
If you're frustrated by slow exports, trust me, you're not alone. I've spent countless hours troubleshooting this exact problem for myself and for clients. From my experience, it usually boils down to a few core culprits that impact Premiere Pro rendering speed.
Your Hardware: CPU and GPU
First up, your computer's power. This one's obvious, but it's often misunderstood. Premiere Pro absolutely loves CPU cores and threads. A weaker processor means longer processing times for every frame, every effect. And without a solid GPU, especially for GPU-accelerated effects or if you're using render engines like Cycles, your system is just leaving render performance on the table. I've seen video rendering projects that take hours on a laptop finish in minutes on a machine with a powerful NVIDIA RTX card. That's not just a coincidence; it's the graphics card doing the heavy lifting to speed up exports.
Slow Storage Speeds
This is a silent killer for render times. Are your project files, media cache, and source footage sitting on a slow hard drive? If Premiere Pro has to constantly wait for data to load, it doesn't matter how fast your CPU or GPU is. It's like having a supercar stuck in traffic. In my editing setup, moving from a standard SSD to an NVMe drive for my scratch disk and media cache made a noticeable difference in export speed. It’s definitely one of those "behind the scenes" upgrades that pays off for video export optimization.
Heavy Footage: Resolution and Codec
Not all video files are created equal. Trying to edit and export highly compressed 4K or 8K footage straight out of the camera, especially H.264 or HEVC, can bring even powerful systems to their knees. These video codecs are great for delivery but horrible for editing. Premiere Pro has to decode every single frame on the fly, which eats up tons of CPU cycles and impacts rendering efficiency. I always recommend transcoding to a more editing-friendly format like ProResor DNxHR for heavy projects if you’re not using proxies.
Project Complexity: Effects and Layers
Every single effect, every layer you stack, every color grade you apply – it all adds to the rendering burden. Ray-traced effects, heavy noise reduction, Lumetri adjustments, warp stabilizer... these are incredibly demanding. I've personally watched Premiere Pro render times double, triple, or even quadruple just by adding a few complex adjustments. It's not that you shouldn't use them, but understanding their impact on export duration is key.
Incorrect Export Settings
This is where many people accidentally shoot themselves in the foot. Choosing the wrong export codec, excessively high bitrates, or unnecessary "Maximum Render Quality" settings can dramatically inflate your export times. You might think "higher settings, better quality," but often, it just means "longer render, no visible difference." I've learned that striking the right balance here is crucial for fast rendering.
While all these causes are frustrating, the good news is that with a combination of smart workflow habits and optimized settings, you can significantly speed up your editing process and dramatically cut down on export times. While you're optimizing your main system, it's also worth exploring how Premiere Pro works on other devices, like an iPad. Here’s a great guide that breaks down the best ways to use Adobe Premiere Pro on an iPad for efficient mobile editing. Let's dive into the essential tips that professional editors use to conquer slow renders and boost their productivity.
Tip #1: Use Adobe Media Encoder for Background Renders
This tip is a lifesaver, honestly. If you're looking to render faster in Premiere Pro and still get work done, Adobe Media Encoder (AME) is your best friend.
Here's the deal: When you export directly from Premiere Pro, it locks up your whole editing software. You can't do anything else. But AME lets you push your exports into a separate queue. Think of it like this: I just finished a cut, so I send it to AME to render in the background. Then, I immediately jump back into Premiere Pro to start working on the next project, or even just clean up my timeline. It frees up my main editing application.
It's pretty simple to do: just hit File > Export > Media in Premiere Pro, then instead of hitting "Export" in the export window, click "Queue." That sends your project straight over to AME. This "background rendering" capability is a huge time-saver. I've literally saved hours on projects because I could multitask. It's truly a game-changer for staying productive.
Tip #2: Turn On GPU Acceleration
Alright, this is hands down one of the most important things you can do to speed up your Premiere Pro renders without spending any money on new hardware. I've seen it time and time again: editors struggling with slow exports, and the culprit? Their GPU isn't pulling its weight.
Your computer's GPU (Graphics Processing Unit) is built for parallel processing – essentially, doing a ton of calculations all at once. That's exactly what Premiere Pro needs when it's handling complex effects, scaling footage, or processing heavy video. When you enable GPU acceleration in Premiere Pro, you're telling your powerful graphics card to jump in and help your CPU. This teamwork is handled by something called the Mercury Playback Engine. If your system is set to "Software Only," your CPU is doing all the heavy lifting, which is like trying to lift a car by yourself when you have a crane available. It's just not efficient. (You can learn more about how Premiere Pro leverages your GPU in Adobe's official documentation).
Here's how to make sure your GPU is working for you:
Head up to
File > Project Settings > General.Look for the "Renderer" dropdown menu under "Video Rendering and Playback."
From that dropdown, select
Mercury Playback Engine GPU Acceleration.If you're on a Windows PC with an NVIDIA card, you'll typically see (CUDA).
For macOS users (or Windows with AMD cards), you'll likely see (OpenCL) or (Metal).
Pro Tip: If this option is grayed out, or if you only see "Software Only," it usually means your graphics drivers are outdated. Go update them directly from NVIDIA, AMD, or Apple. Seriously, do it. It's a common Premiere Pro bottleneck I run into.
Making sure this is turned on is the first step towards truly cutting down your render times and getting smoother playback. It's foundational.
Tip #3: Increase Memory Allocation
If there's one thing Premiere Pro absolutely loves, it's RAM – your computer's short-term memory. Think of RAM as Premiere Pro's workspace or desk. The more space it has, the more files, effects, and bits of your project it can keep readily available without constantly fetching them from your slower hard drive. That direct access really speeds up rendering in Premiere Pro.
This setting lets you tell your system how much of its available RAM Premiere Pro can hog, versus how much is reserved for other applications running in the background. My philosophy? Give Premiere Pro as much as you possibly can while still keeping your operating system happy.
Here's how to adjust your RAM allocation:
Go to
Edit > Preferences > Memory(on Mac, it'sPremiere Pro > Settings > Memory).You'll see a setting for "RAM reserved for other applications." I typically aim to leave just enough for the operating system and essential background stuff – maybe 6-8GB if I have 32GB total RAM, leaving the rest for Premiere Pro and other Adobe apps. If you have less RAM, you might leave less, but be careful not to starve your OS. The more you give Premiere Pro, the better your export speed and overall render performance will likely be. (Adobe provides general RAM recommendations based on your media resolution).
Now, a quick word of caution: when you tell Premiere Pro to take up a huge chunk of your system's memory resources, especially on machines with less RAM, you might push things too far. I've seen it. Sometimes, trying to squeeze every last drop out of your RAM can lead to crashes or instability, even if your settings seem correct. If you're frequently dealing with Premiere Pro freezing or shutting down right after cranking up the memory, you might want to check out some ways to stop Premiere Pro from crashing and keep your workflow smooth. It's all about finding that sweet spot and understanding that sometimes, the issue isn't just a setting, but perhaps a project-specific bug.
Tip #4: Run Premiere Pro Alone
Alright, this might sound super basic, but it's genuinely one of those "duh" moments that people often overlook, especially when they're troubleshooting slow Premiere Pro renders. If you want Premiere Pro to export faster, you need to give it all the resources your computer has.
Think about it: Every other app you have open – Chrome with 50 tabs, Spotify streaming music, Discord, Photoshop in the background – they're all quietly munching on your system's RAM and CPU power. When you hit render, Premiere Pro needs all of that power. If it's constantly fighting with other programs for those precious system resources, your render times will suffer.
So, my advice is pretty simple: when you're about to hit that export button for a big project, just close everything else down. Seriously. Shut down the browser, pause the music, quit all those background apps. It frees up a surprising amount of processing power and optimizes performance specifically for Premiere Pro.
Yeah, it means you can't really use your computer for anything else during the export. But hey, that's a perfect excuse to grab a fresh cup of coffee, stretch your legs, or just take a quick break. It's a small inconvenience for a potentially much faster render.
Tip #5: Speed Up Your Rendering with Vagon Cloud Computers
So far, we've talked about a bunch of smart tweaks you can make on your local machine to speed up rendering in Premiere Pro. And honestly, they make a huge difference. But let's be real: sometimes, your local hardware just hits a wall. Maybe you're working with seriously heavy 8K footage, or you've got a ton of complex effects, or you're just on an older machine. That's where I often look beyond my desk for more power.
This is where Vagon Cloud Computers come into play. Imagine getting instant access to a powerful machine with top-tier specs, specifically built for demanding tasks like video editing, without having to buy all that expensive hardware yourself. That's exactly what Vagon offers.
I've found Vagon's remote desktops to be incredibly useful when Adobe Premiere Pro rendering is slow on my own machine, or when I have a tight deadline and just can't afford to wait. You literally switch to a cloud PC, connect to it, and suddenly you're harnessing the power of multiple NVIDIA GPUs with massive CUDA cores – like 4 x 16GB GPUs, instead of relying purely on your local CPU. This means incredibly faster rendering and less of that frustrating waiting game. It lets your creativity flow without unnecessary delays.
It's a different way to work, but it really solves that "my computer isn't fast enough" problem. You can also check out our GPU Guide for tips to use GPU, along with speed up and acceleration tips for Adobe Premiere Pro.
Tip #6: Render & Replace Dynamically Linked Components
Working with multiple software while creating a project is business as usual, but it can also contribute to slow rendering in Premiere Pro. After Effects, Photoshop, Media Encoder, and others—we are all linked with multiple apps. However, if you are gathering too many components in your project from different sources, it will also affect your project rendering times in Premiere Pro.
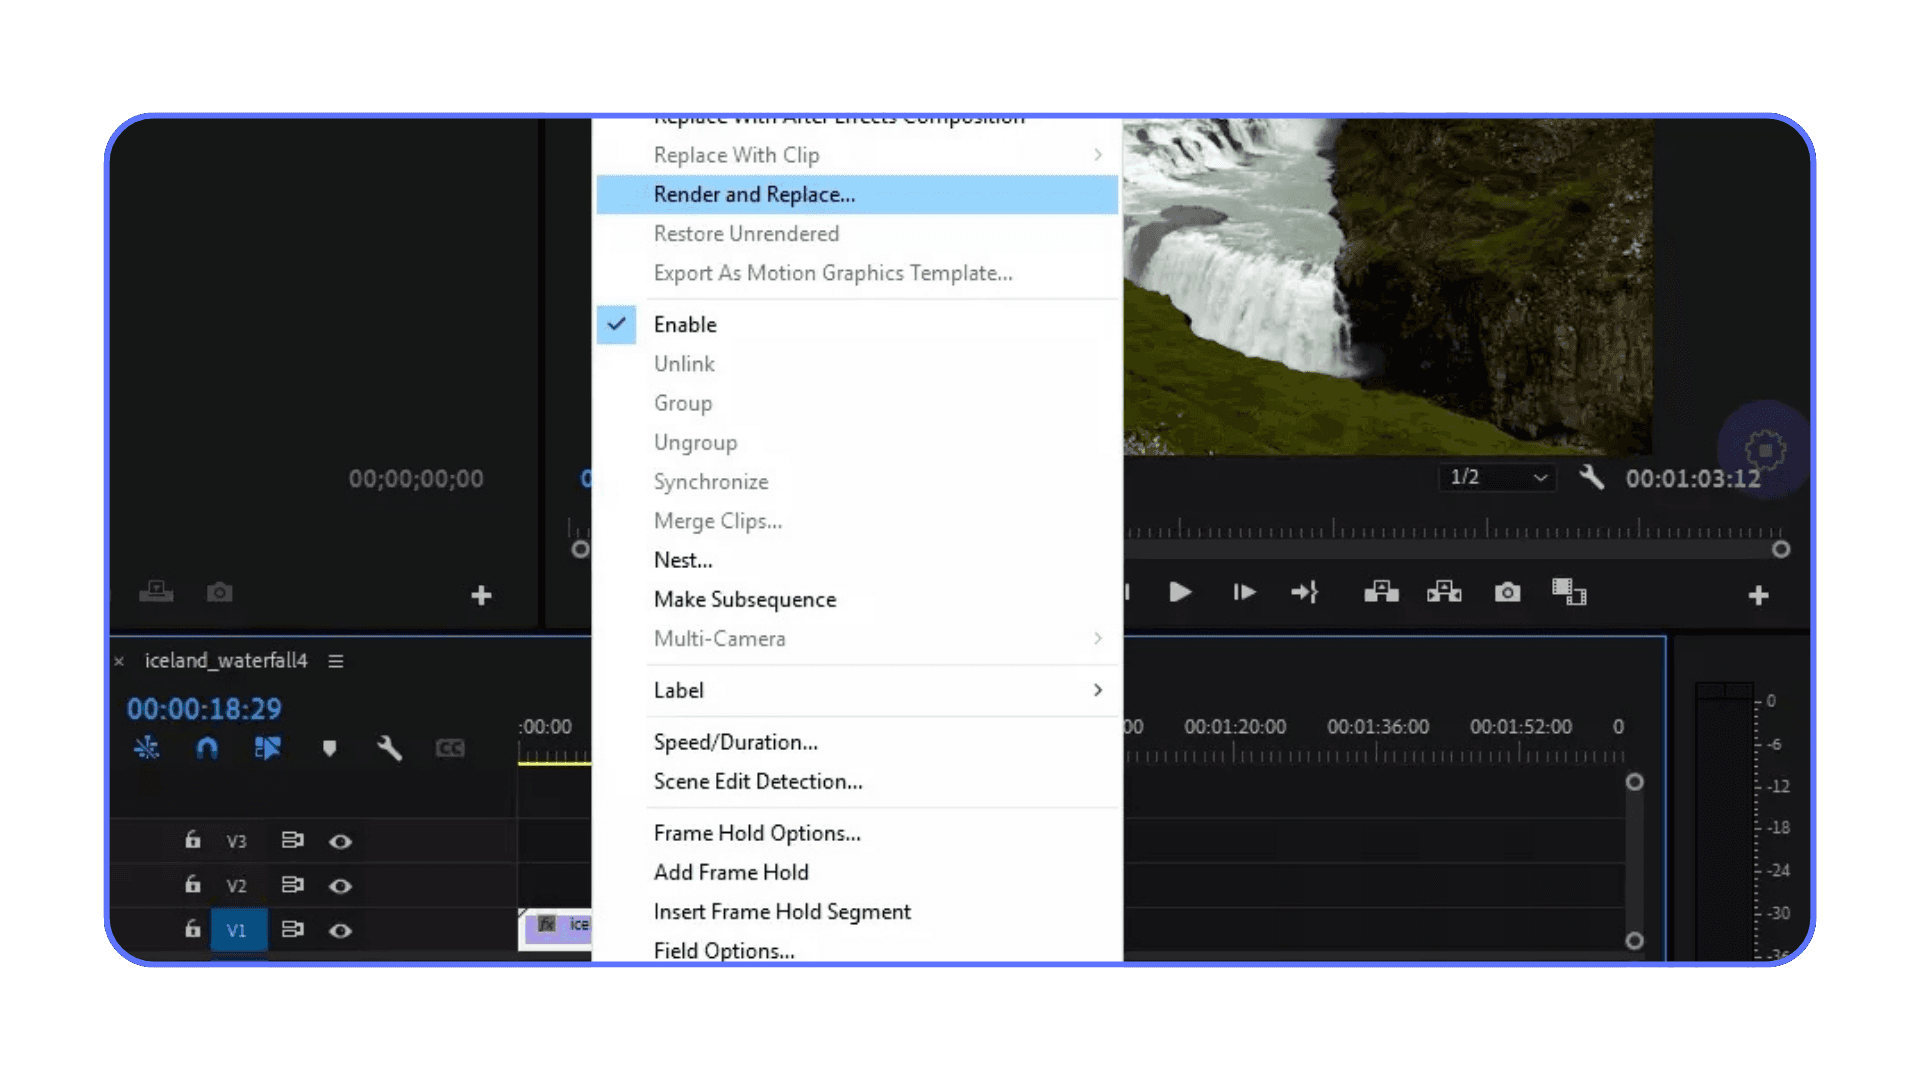
Before starting your project output, be sure that all your essential components like fonts, effects, videos, music, etc. are working fine and without any sync issues to your project.
If everything is alright and good to go, you can also Render & Replace your dynamically linked components to speed up your project.
Right-click on the component, and click the ‘Render and Replace’ button to enable it.
Tip #7: Reduce Rendering Time by Optimising Imports
Alright, here's a big one that many editors skip, and it can cost you serious time during both editing and rendering: optimizing your source footage.
See, most cameras shoot in highly compressed formats like H.264 or HEVC. They're fantastic for small file sizes and delivery, but they are an absolute nightmare for your computer to edit. Premiere Pro has to constantly decompress those files on the fly, frame by frame, just to show them to you. This hammers your CPU, leads to choppy playback, and seriously drags down your rendering speed, especially if you're piling on effects.
I've learned that you can save yourself a ton of headaches by transcoding your footage into an editing-friendly formatbefore you even start cutting. We call this optimized media or using intermediate codecs.
What kind of optimized formats are we talking about?
ProRes: This is my go-to if I'm on a Mac, or even on Windows if I'm working with Apple users. It's a fantastic professional format.
DNxHR/DNxHD: Avid's answer to ProRes. It's free to download for both Mac and Windows and works great.
Cineform: Maybe less common, but another solid option that's generally available for free. (You can find more detail on supported formats and codecs in Adobe's official documentation).
How do you do this "pre-optimization"?
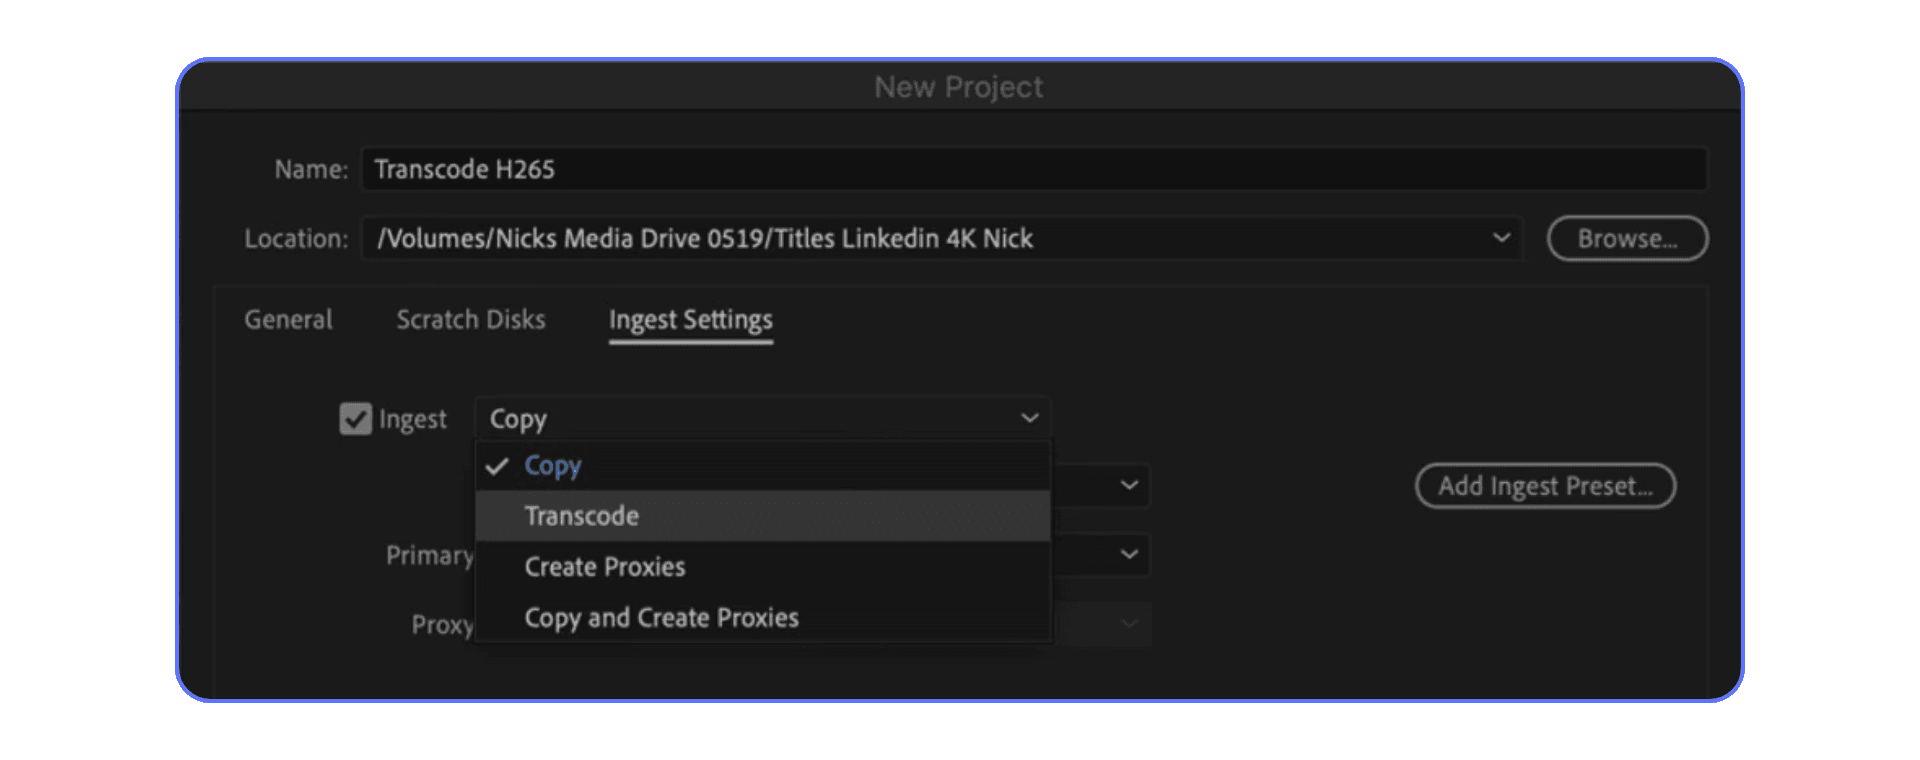
You can use a dedicated tool like Adobe Media Encoder to transcode your files. My favorite way to do this right inside Premiere Pro is by using the Ingest Settings when you import your footage.
When you're importing files (via
File > Importor the Media Browser), look for the "Ingest" checkbox.Tick it, and then select "Transcode" from the dropdown menu.
Choose your desired format (like ProRes or DNxHR).
This clever feature lets Premiere Pro start editing with the native, compressed files while Media Encoder works in the background to transcode them into those lovely, optimized files. Once the transcoding is done, Premiere Pro automatically swaps out the original files with the optimized versions on your timeline. It's seamless! Working with these optimized files will make your playback smoother, your editing snappier, and your final Premiere Pro exports much, much faster.
Tip #8: Use Less Effects in Your Project
Look, we all love throwing cool effects on our footage. After all, what's video editing without a little magic? But here's the cold, hard truth: every single effect, every fancy transition, and every third-party plugin you add to your timeline piles on more work for your computer. They can drastically hit your rendering performance.
Think about it: Premiere Pro has to calculate all those complex visual changes for every single frame. If you've got dozens of demanding effects stacked up, your CPU and GPU are going to be working overtime, slowing down your preview and, you guessed it, dragging out your Premiere Pro rendering times.
My advice? Be intentional. Do you really need that heavy noise reduction filter on every clip, or can you get away with something simpler? If you can simplify or reduce the number of effects you're using, especially those complex ones, you'll see a dramatic improvement in export speed.
And speaking of plugins, they're not all created equal. Some are built super efficiently, and some are just plain resource hogs. To optimize performance, I always recommend sticking with only the best plugins for Premiere Pro – the ones designed to run smoothly without crippling your system. Choosing wisely here can make a real difference.
Tip #9: Set Up and Use Previews
Here's a trick that can seriously cut down your export times, especially for projects with lots of effects: smart rendering using high-quality previews.
Think of it like this: when you render parts of your timeline (you know, when you see that green or yellow bar appear), Premiere Pro is basically pre-calculating those sections and saving them as temporary video files. By default, these previews are often low-quality, designed for smooth playback while you're editing. But we can make Premiere Pro create high-quality previews, and then tell it to use those previews during the final export. It's like pre-rendering only the parts that need it.
Here's how to set this up for maximum export speed:
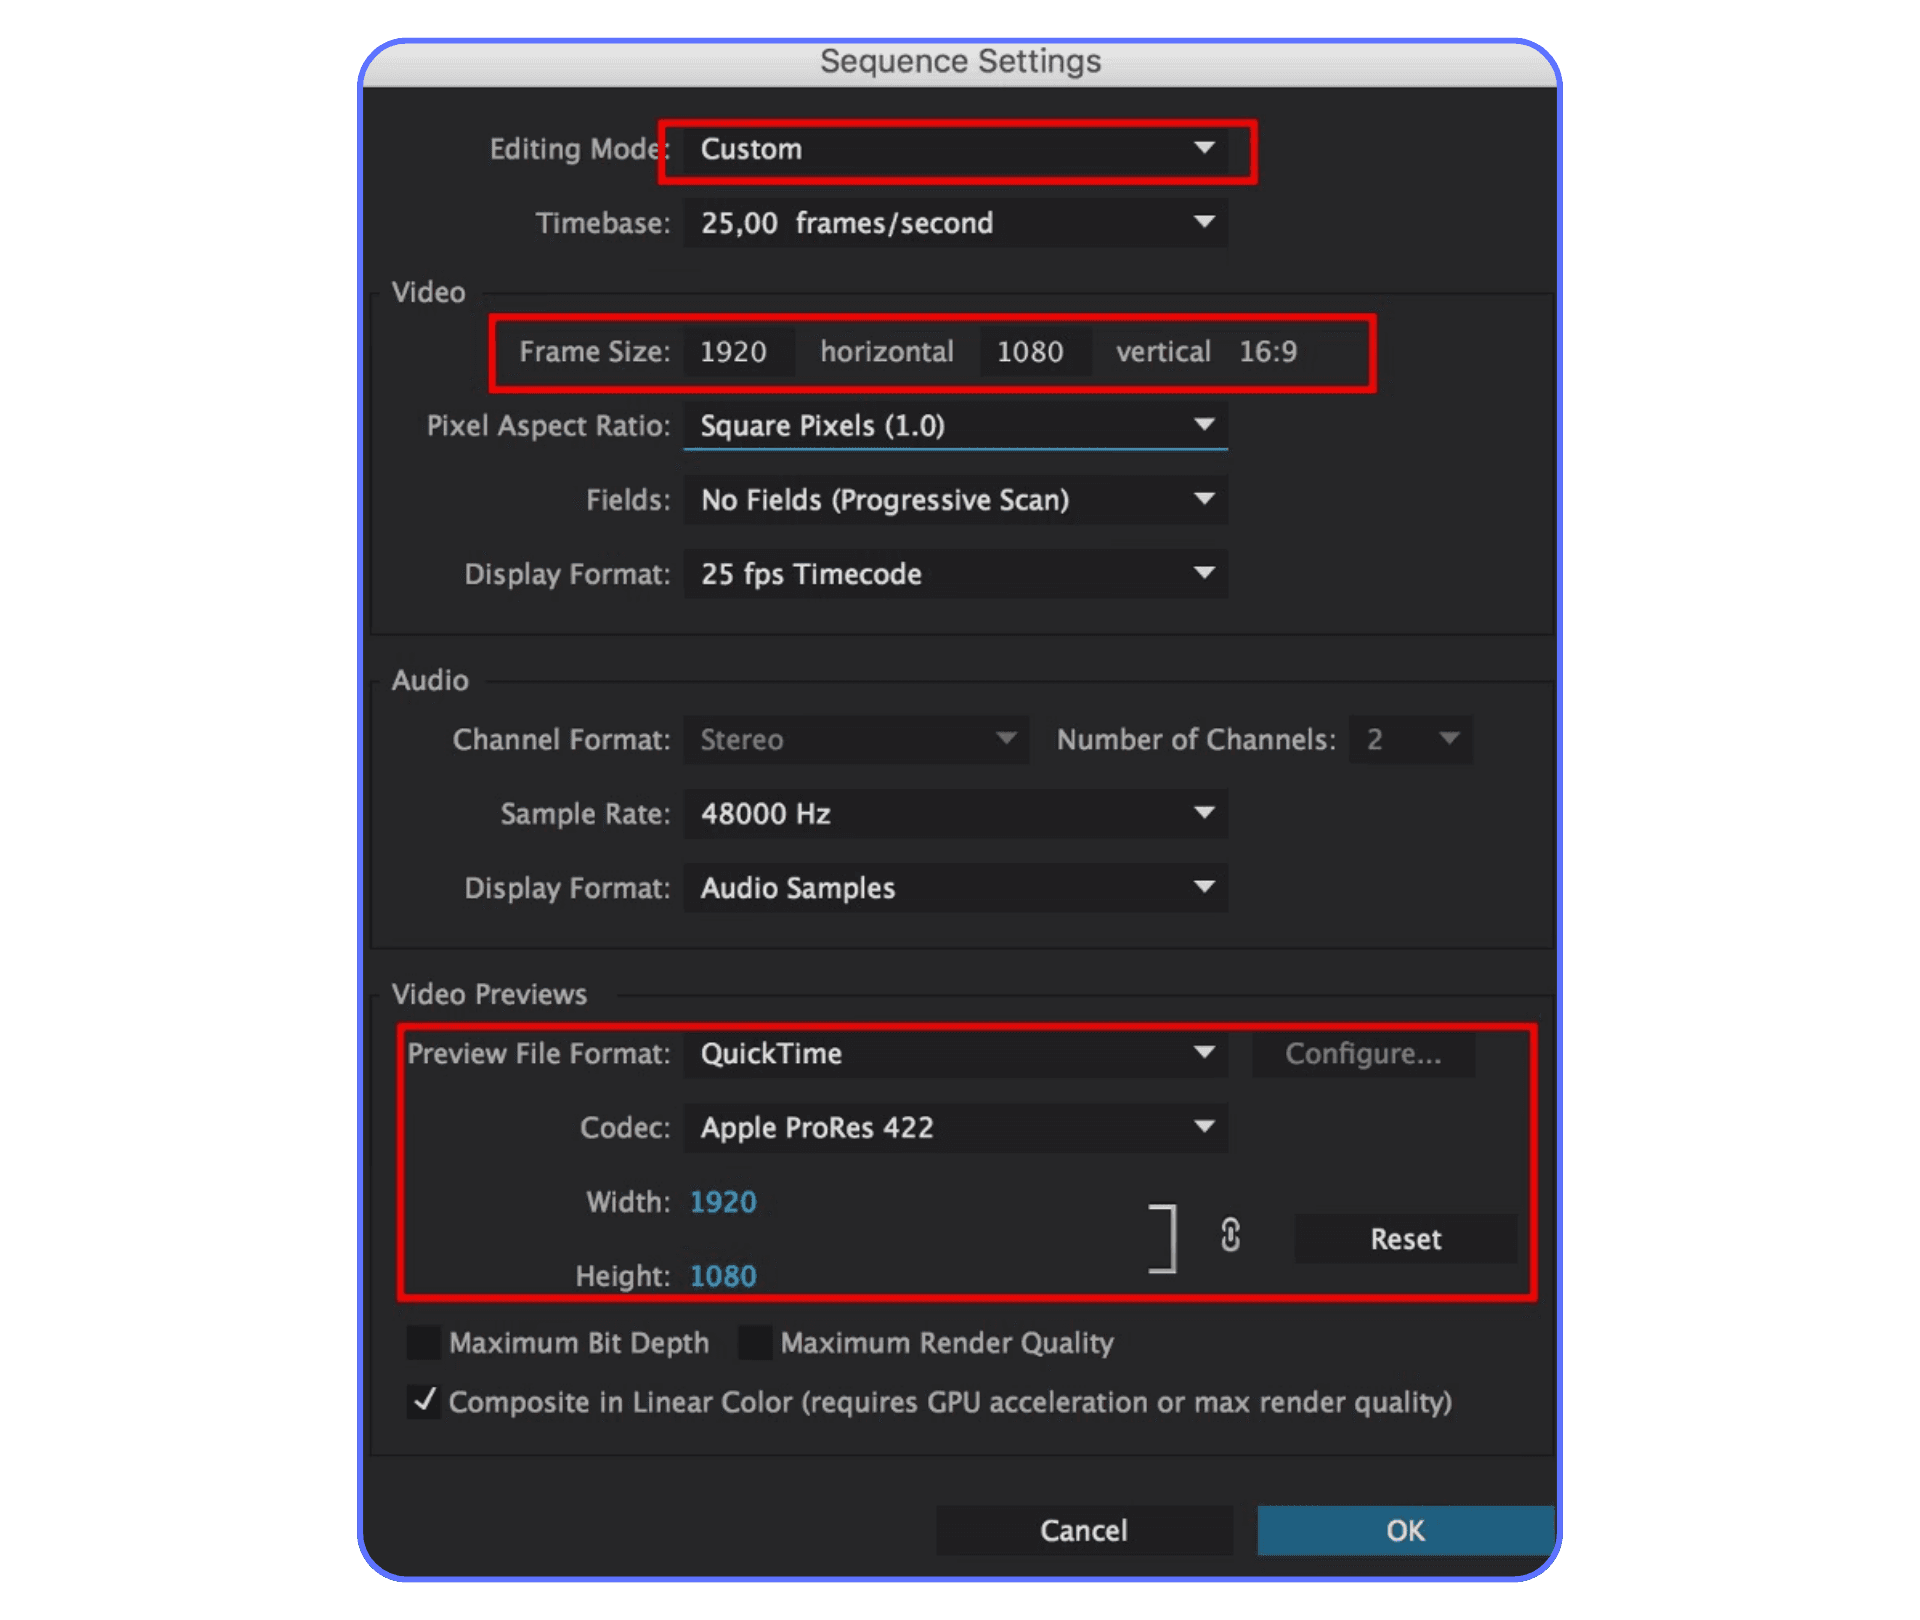
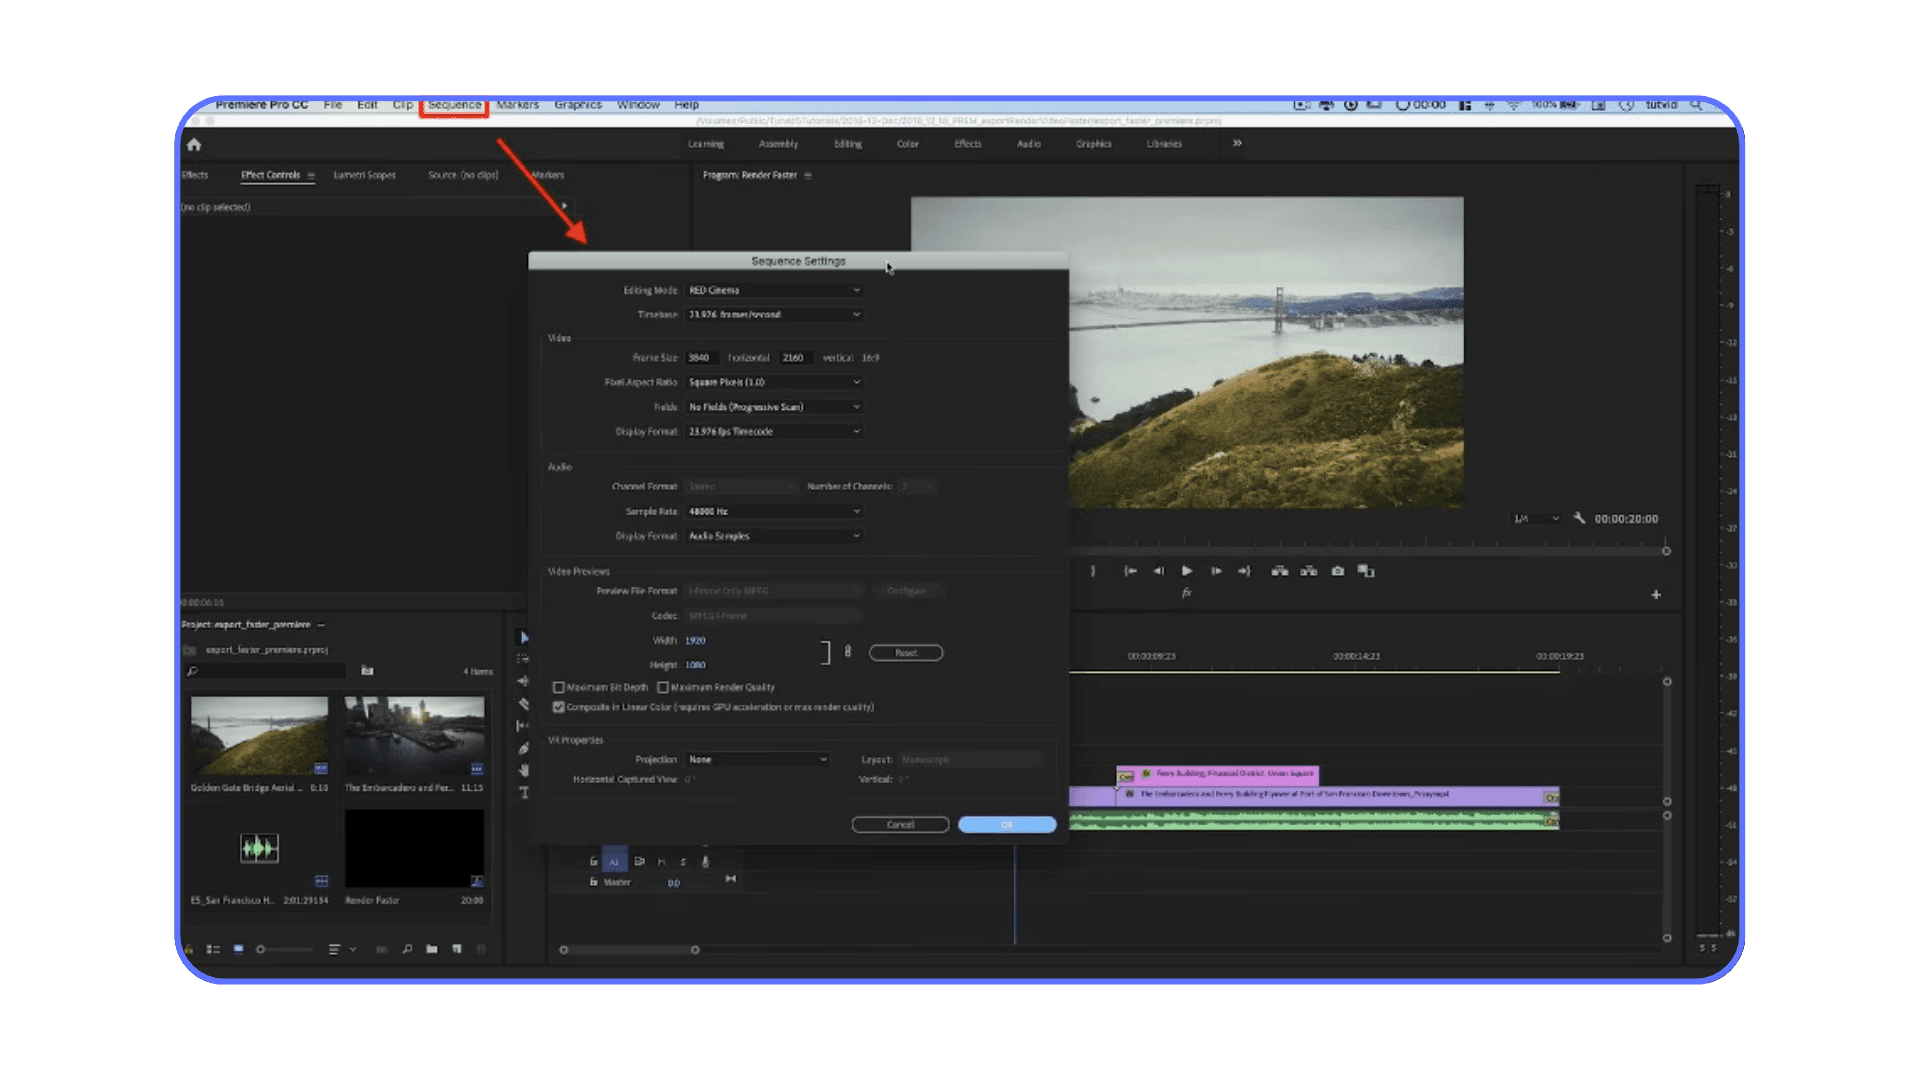
Customize Your Sequence Settings: Go to
Sequence > Sequence Settings.Choose a "Custom" Editing Mode: This lets you manually control the preview codec.
Pick a High-Quality Codec: Instead of the default MPEG, choose something like ProRes (if you're on a Mac) or DNxHR. Set the resolution to match your sequence.
Save as a Preset: Click "Save Preset" so you can easily reuse these settings on other projects.
Render Your Timeline: Hit
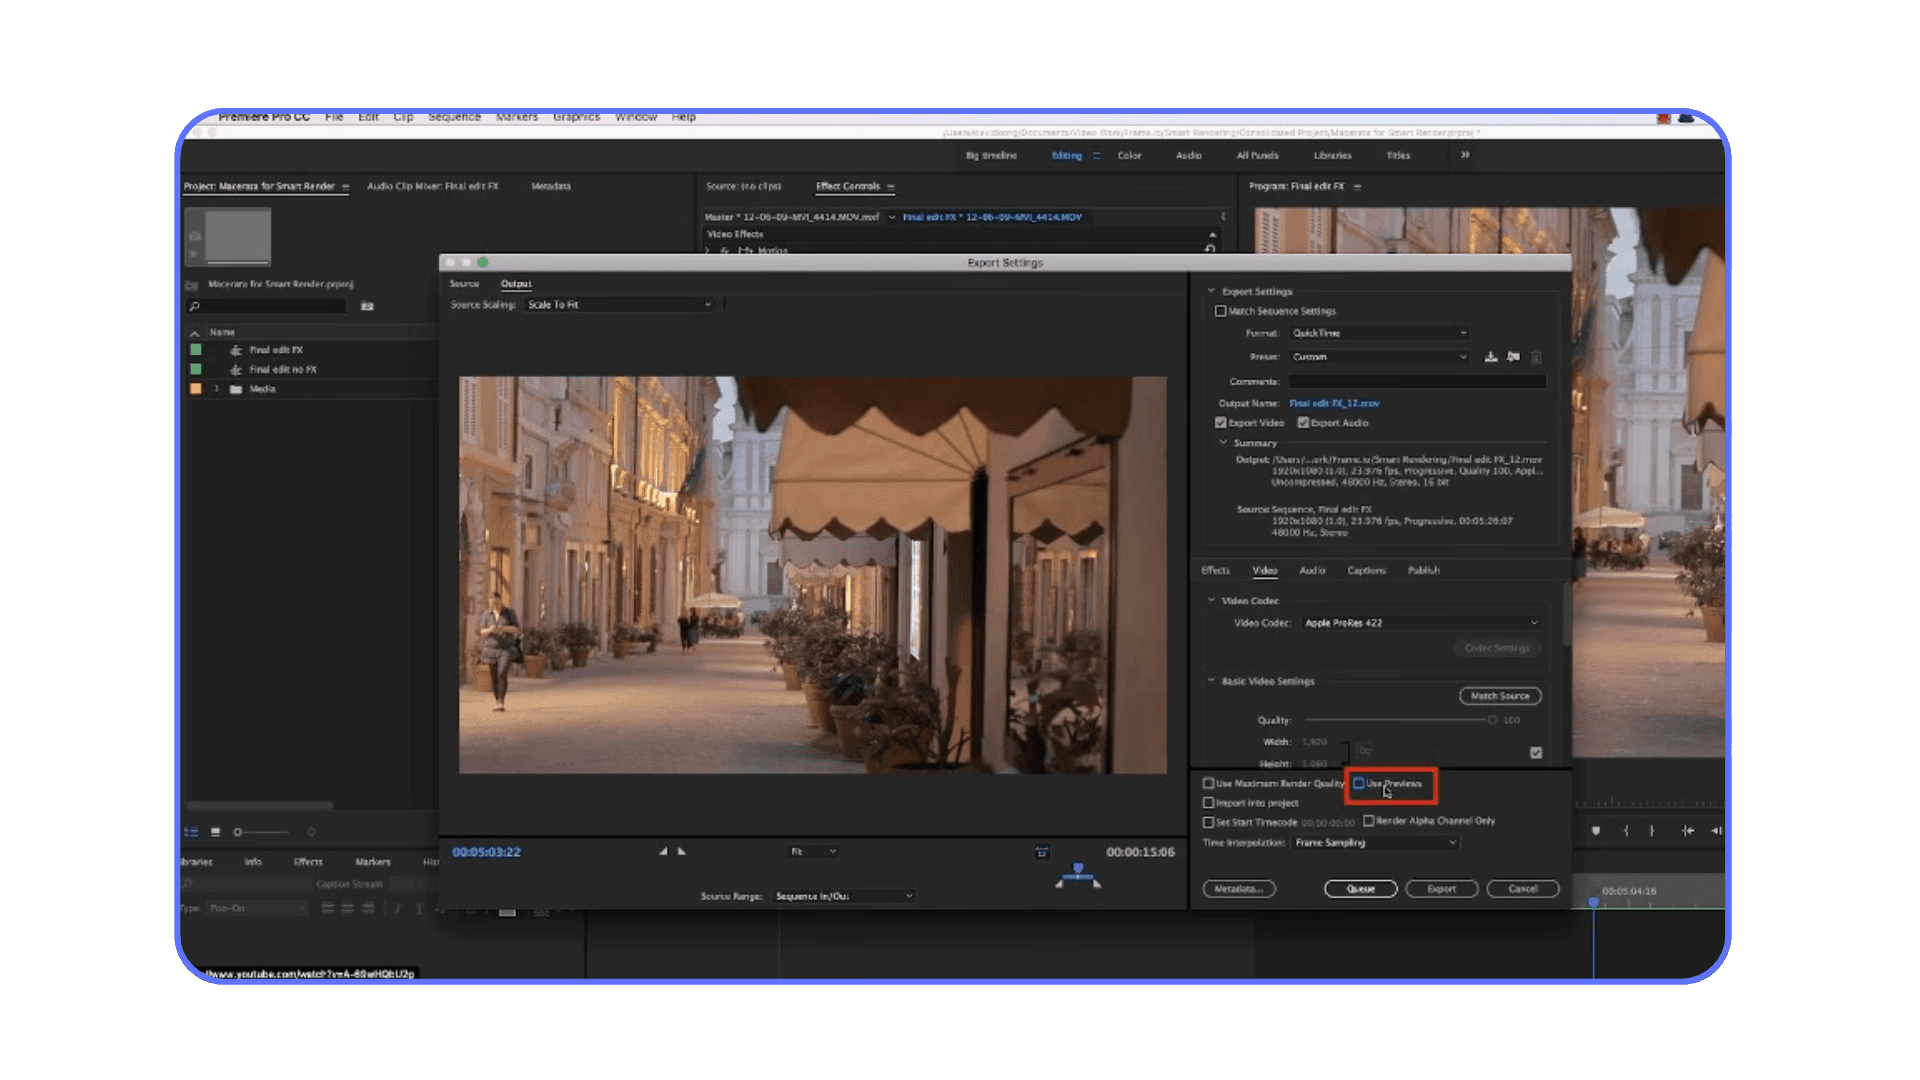
Sequence > Render In to Out(orRender Selection). Let Premiere Pro do its thing. I often do this overnight or during a lunch break.Enable "Use Previews" on Export: When you go to export (
File > Export > Media), in the "Video" tab, make sure the "Use Previews" box is checked.
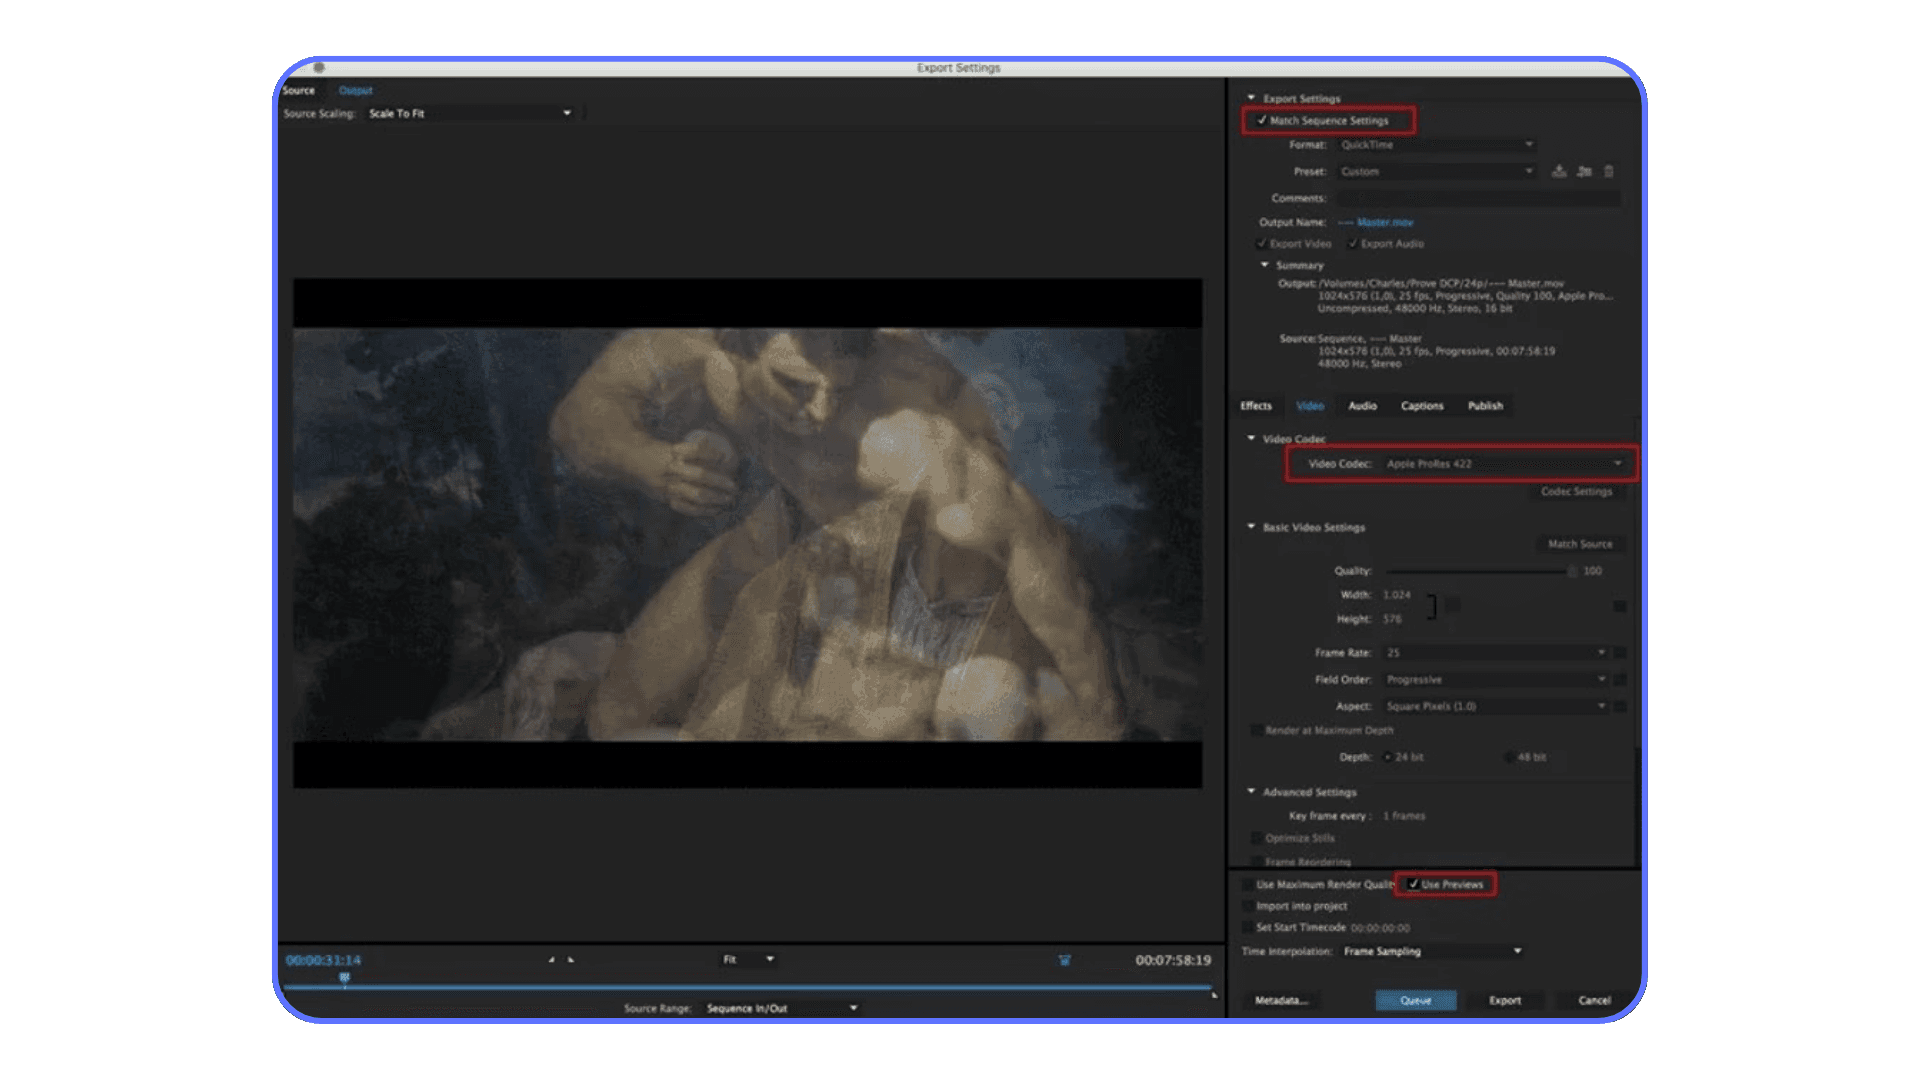
If your export settings match the preview settings (for example, exporting to ProRes at the same resolution), Premiere Pro can essentially just stitch together those high-quality preview files, bypassing a lot of re-rendering. This smart rendering technique can save you a ton of time, especially on complex projects.
Tip #10: Adjust Playback Resolution
Dealing with choppy, stuttering video playback in Premiere Pro? It's incredibly annoying and can really mess with your editing flow. Especially when you're working with high-resolution footage or piling on effects. Good news: there's a super quick fix that doesn't affect your final export quality: adjusting your playback resolution.
See, Premiere Pro constantly has to decode your video files and effects to show them to you in real-time. If you're working with 4K or 8K footage, that's a massive amount of data. By lowering the playback resolution, you're telling Premiere Pro, "Hey, don't worry about showing me every single pixel right now. Just give me a decent preview so I can get my edits done." This significantly reduces the decoding speed burden on your system.
Here's how to do it:
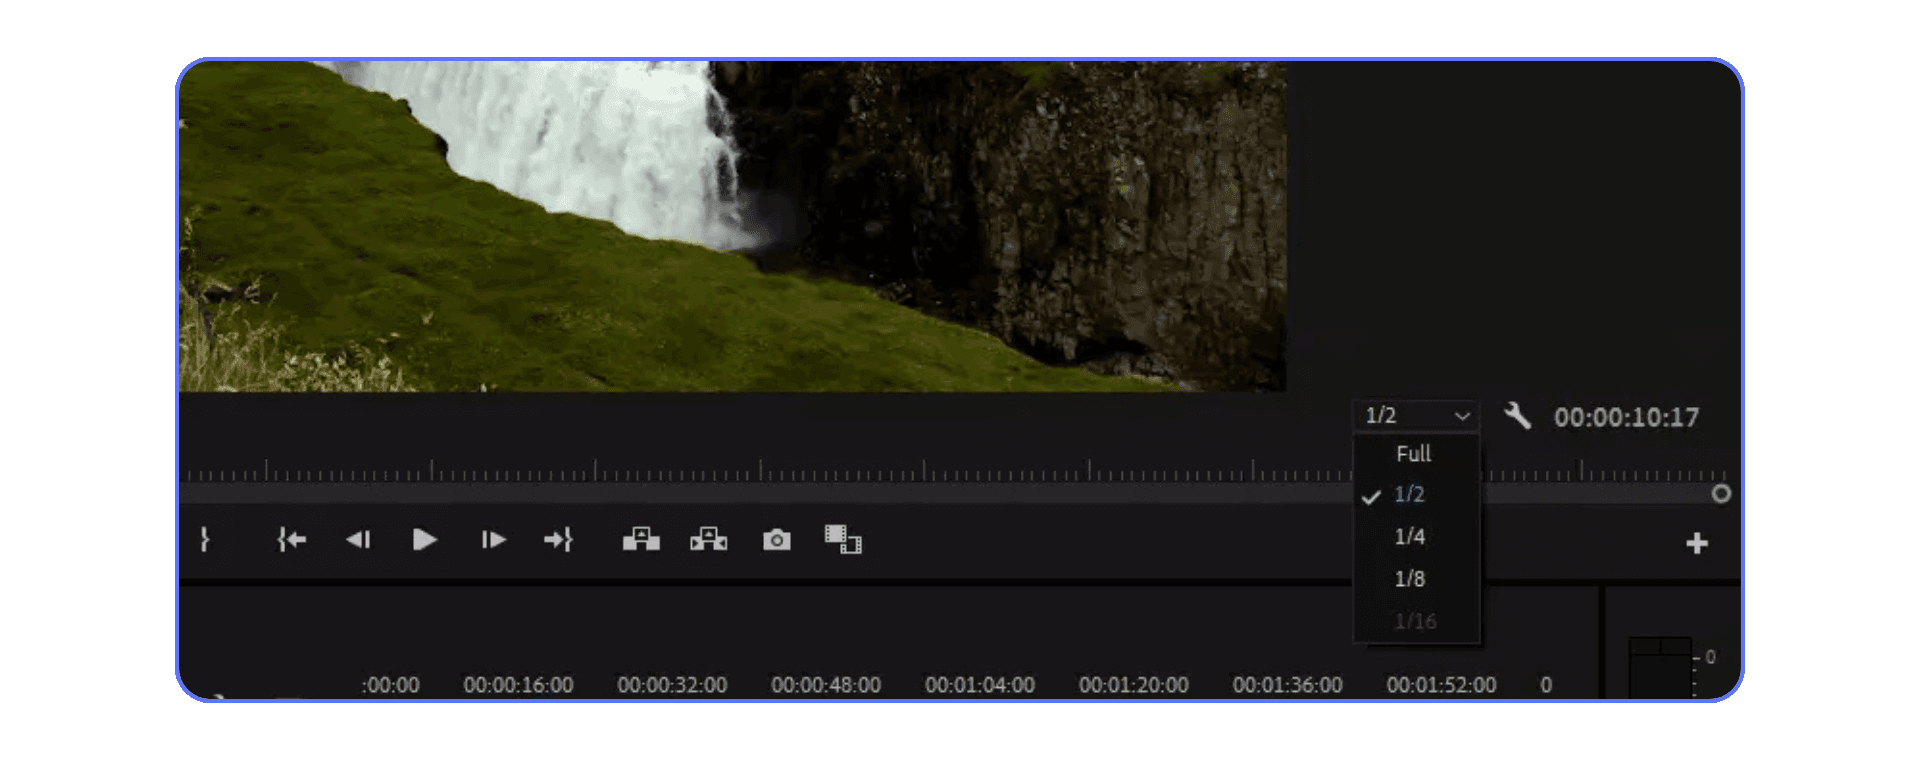
Look at your Program Monitor (where you see your video playing).
In the bottom-right corner of the Program Monitor, you'll see a dropdown menu that probably says "Full" or "1/2."
Click on it and choose a lower resolution, like 1/2, 1/4, or even 1/8.
You'll notice the video quality in your monitor drops, but your real-time playback should become much smoother. This won't affect the quality of your final exported video at all – it's purely for your editing experience. It helps you avoid those annoying Premiere Pro slow rendering issues during actual work, making your whole editing workflow feel faster and more responsive. It's a quick way to keep your creative momentum going!
Tip #11: Activate the All GPUs
You've got a powerful GPU, maybe even one of the latest NVIDIA or AMD cards, and you've followed the steps to enable GPU acceleration. But sometimes, even with the best hardware, Premiere Pro just... doesn't seem to "see" it properly. It's incredibly frustrating when your expensive graphics card isn't being utilized!
This is where Adobe's secret weapon, GPUSniffer.exe, comes into play. It's a small, integrated tool found within Premiere Pro's program files. Its job is to sniff out and identify all the GPUs on your system and report their capabilities back to Premiere Pro. Running it can sometimes nudge Premiere Pro into properly detecting your GPU, especially if you've just updated your drivers or encountered a recognition issue.
How to give GPUSniffer a quick nudge:
First, make sure Premiere Pro is completely closed.
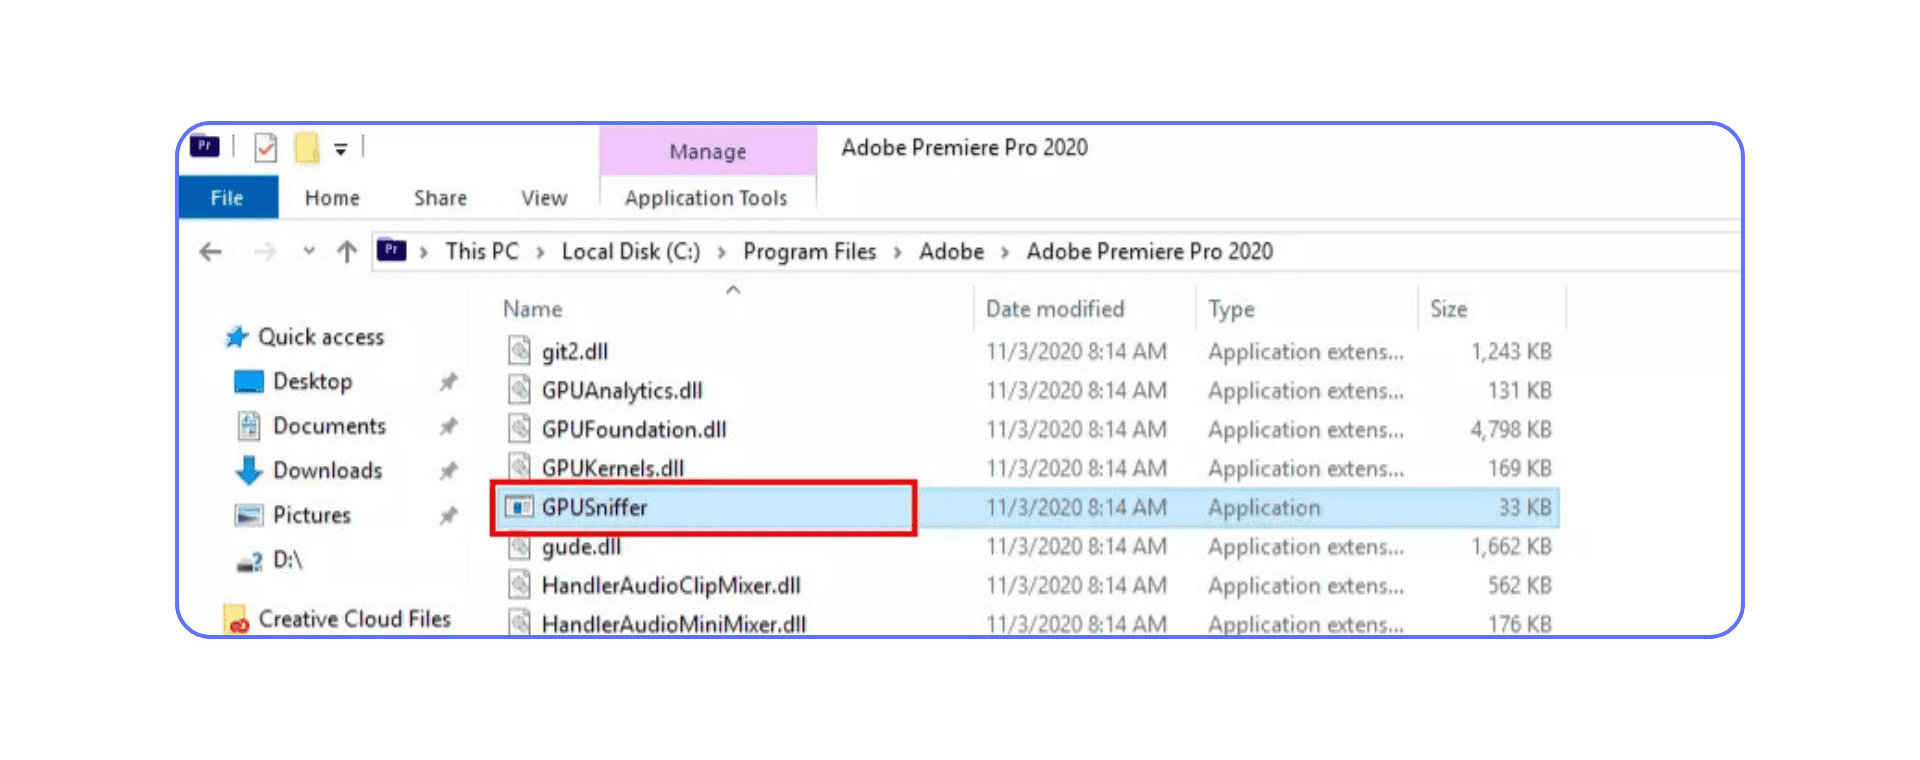
Navigate to your Premiere Pro installation folder. You'll usually find
GPUSniffer.exehere:Windows:
C:\Program Files\Adobe\Adobe Premiere Pro [Your Version]\GPUSniffer.exemacOS:
Applications/Adobe Premiere Pro [Your Version]/Adobe Premiere Pro.app/Contents/GPUSniffer(you'll need to right-click on the app and select "Show Package Contents" to find it)
Double-click
GPUSniffer.exe(orGPUSnifferon Mac) to run it. A command-line window will pop up and quickly run through its process. It usually closes itself after a few seconds.
That's it! Once it's done, restart Premiere Pro. Go back to File > Project Settings > General and check your "Renderer" dropdown again. You should now hopefully see "Mercury Playback Engine GPU Acceleration" (CUDA, OpenCL, or Metal) available and selected. This simple step can sometimes be the key to unlocking your GPU's full potential and significantly boosting your Premiere Pro render speed.
Tip #12: Use the Two Methods at the Same Time
We've talked about transcoding your footage to optimized formats and how to set up high-quality previews for "smart rendering." Now, here's the secret sauce: using these two methods together is how you unlock the absolute best editing efficiency and rendering speed in Premiere Pro.
Think about it:
Transcoding makes your raw footage super easy for Premiere Pro to chew on from the start, dramatically speeding up general editing responsiveness.
High-quality previews then allow Premiere Pro to essentially pre-render any complex sections or effects you've added, making the final export of those parts incredibly fast, especially if your export settings match your preview settings.
When I combine these, I find my workflow feels incredibly smooth – no more constant waiting or slowdowns. It's an upfront investment of time (transcoding can take a while), but it's all time you gain back, and then some, during your actual editing and final export.
The Reality Check: Disk Space
Now, there's a trade-off, and it's a big one: disk space. An hour of optimized footage in something like ProRes 422 HQwill take up significantly more room on your hard drive than, say, the original H.264 file from your DSLR. This "optimized media" can eat up gigabytes quickly.
What if you don't have unlimited storage?
No worries. If you're short on disk space, you don't have to transcode all your original files. You can still import your native, compressed footage (like H.264) and then take advantage of the high-quality previews feature for rendering and export. You'll still get a good chunk of that render speed benefit, especially for effects-heavy sections, and your overall project size will be smaller (though the preview files themselves will still be larger than your original H.264s). It's a compromise, but it definitely helps optimize your work.
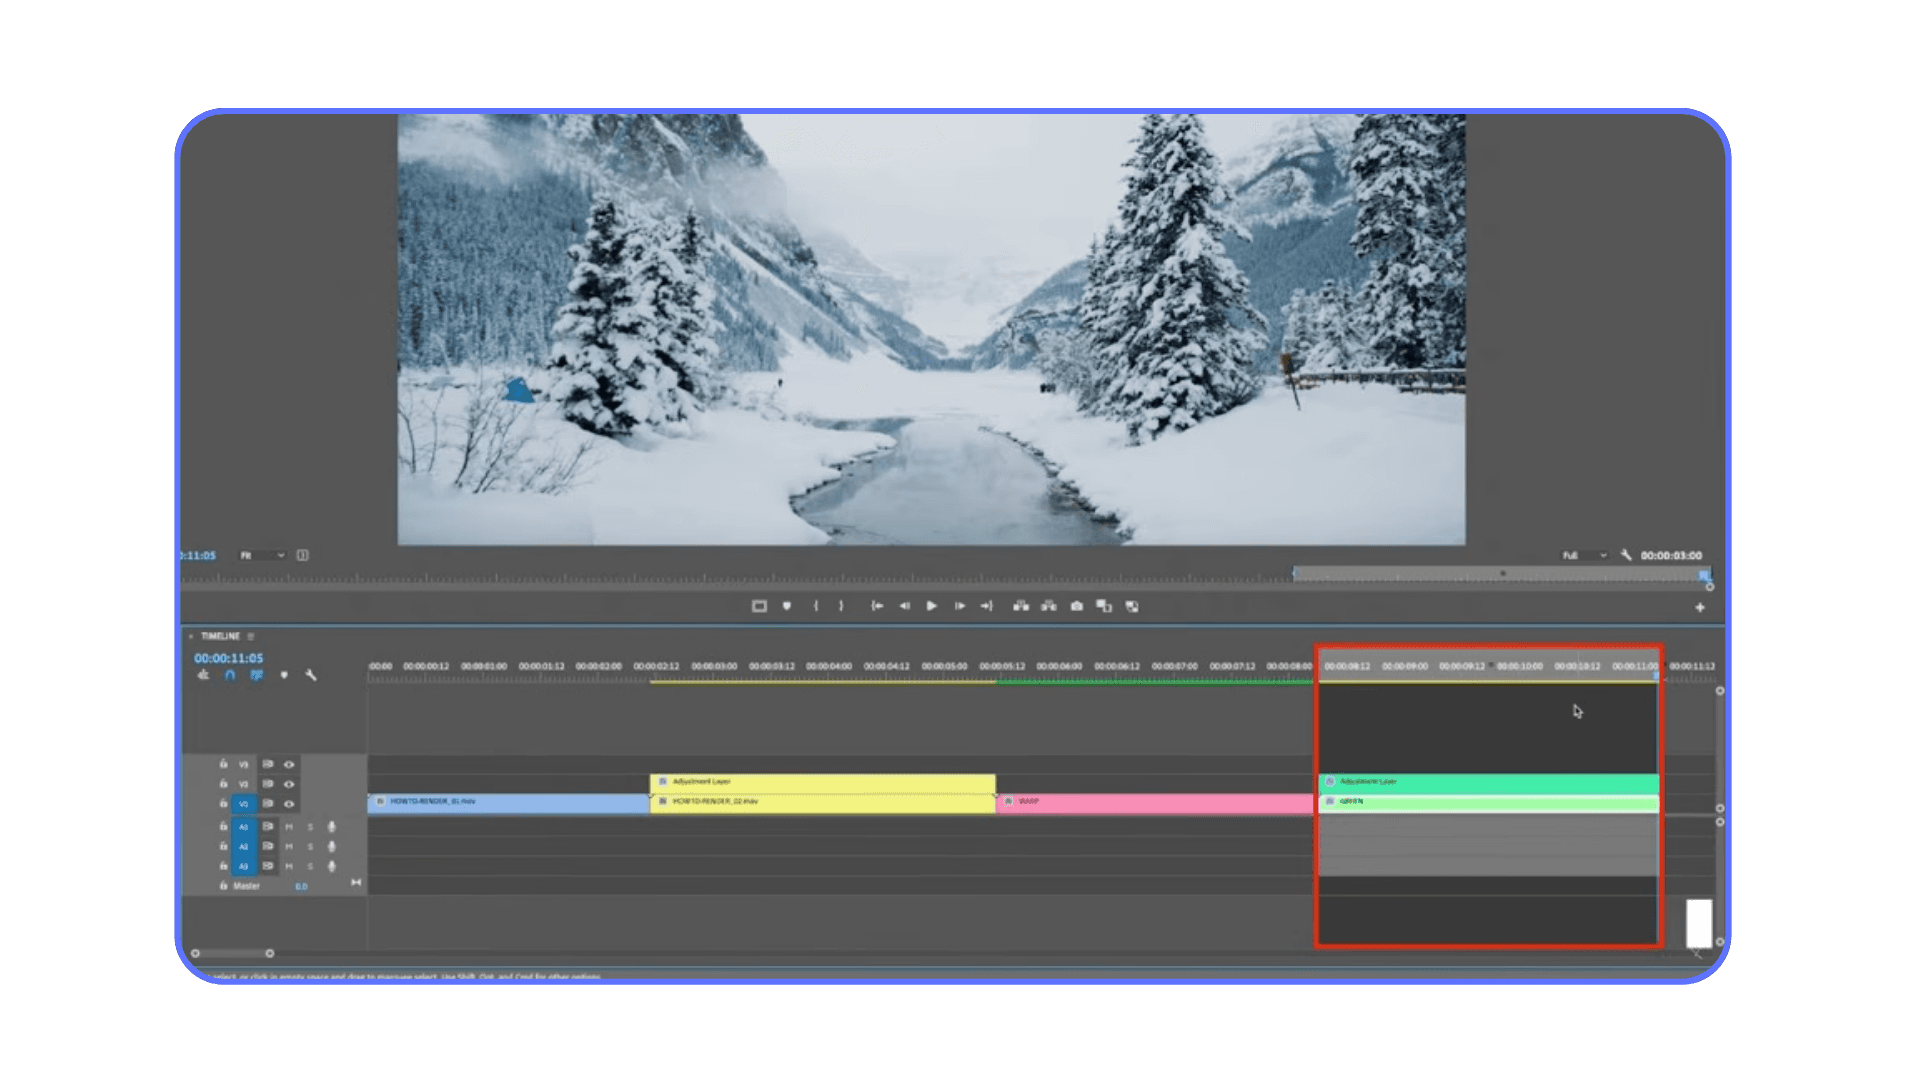
Tip #13: Make use of Smart Rendering
Another great way to reduce your rendering times in Premiere Pro is by using smart rendering. Smart rendering is used with certain formats and avoids compressing data to create a better-quality export. Unfortunately, smart rendering only works with specific source codec sizes, frame rates, and bitrates. You can find all this information in the sequence settings. You can find the supported codecs here. You can find these settings in the sequence settings.
To use smart rendering, first, check that all of your settings are correct and in line with the supported codecs. The yellow line at the top of your timeline shows your rendering process. If you go from sequence to render, this will begin rendering everything in your timeline. A bonus is that you can exit the render while it’s busy, and it will maintain your rendering process when you start it again. Once your whole timeline is pre-rendered, you can export, and the heavy lifting should already be done, making your rendering time faster.
Tip #14: Use “Render In to Out”
We've already talked about the magic of "smart rendering" by setting up high-quality previews for your whole timeline, which is awesome for final exports. But what about when you're just editing and hit a particularly stubborn section – maybe a complex effect, a tricky transition, or a really dense stack of layers – and your playback just grinds to a halt?
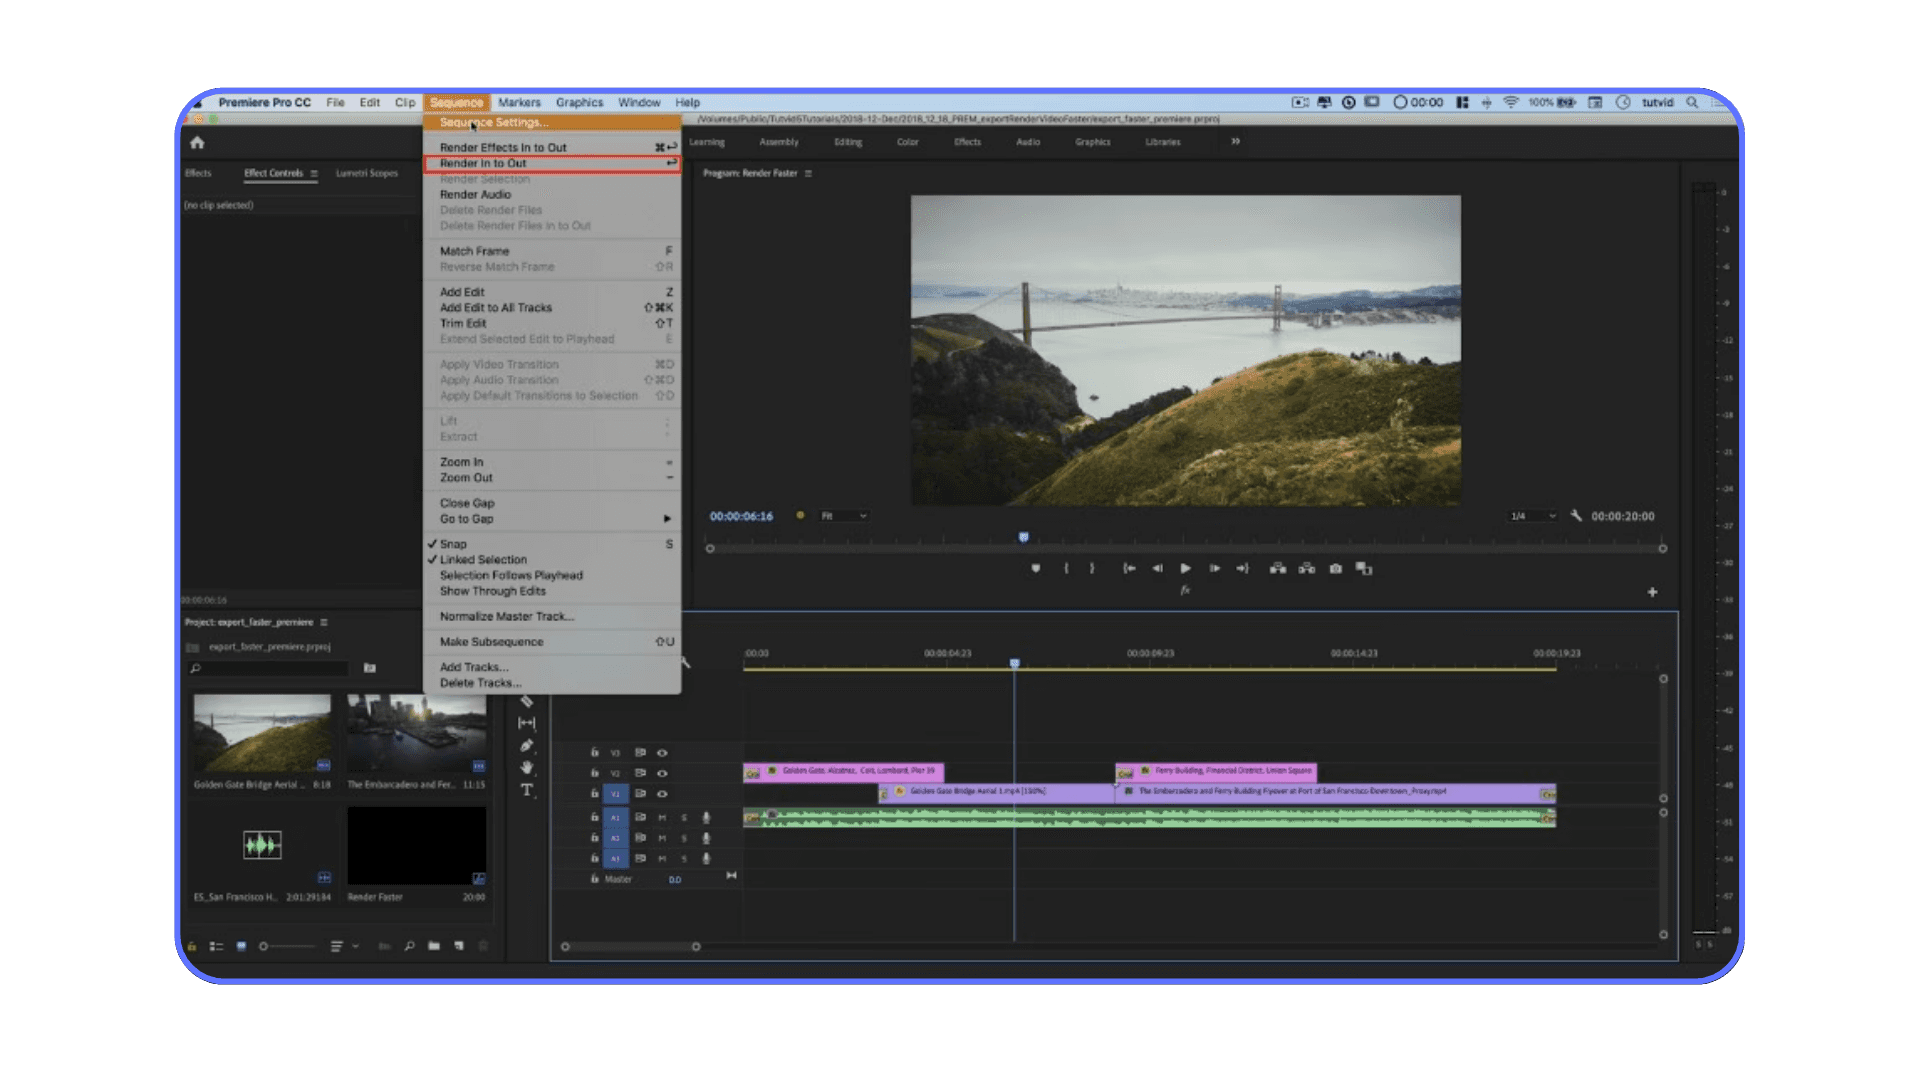
This is where the "Render In to Out" function becomes your best friend for real-time editing optimization. Instead of rendering your entire sequence, you can tell Premiere Pro to just render that specific, problematic section of your timeline. It creates those temporary preview files for just that segment, instantly giving you smooth playback so you can continue editing without interruption.
Here's how to use "Render In to Out" effectively:
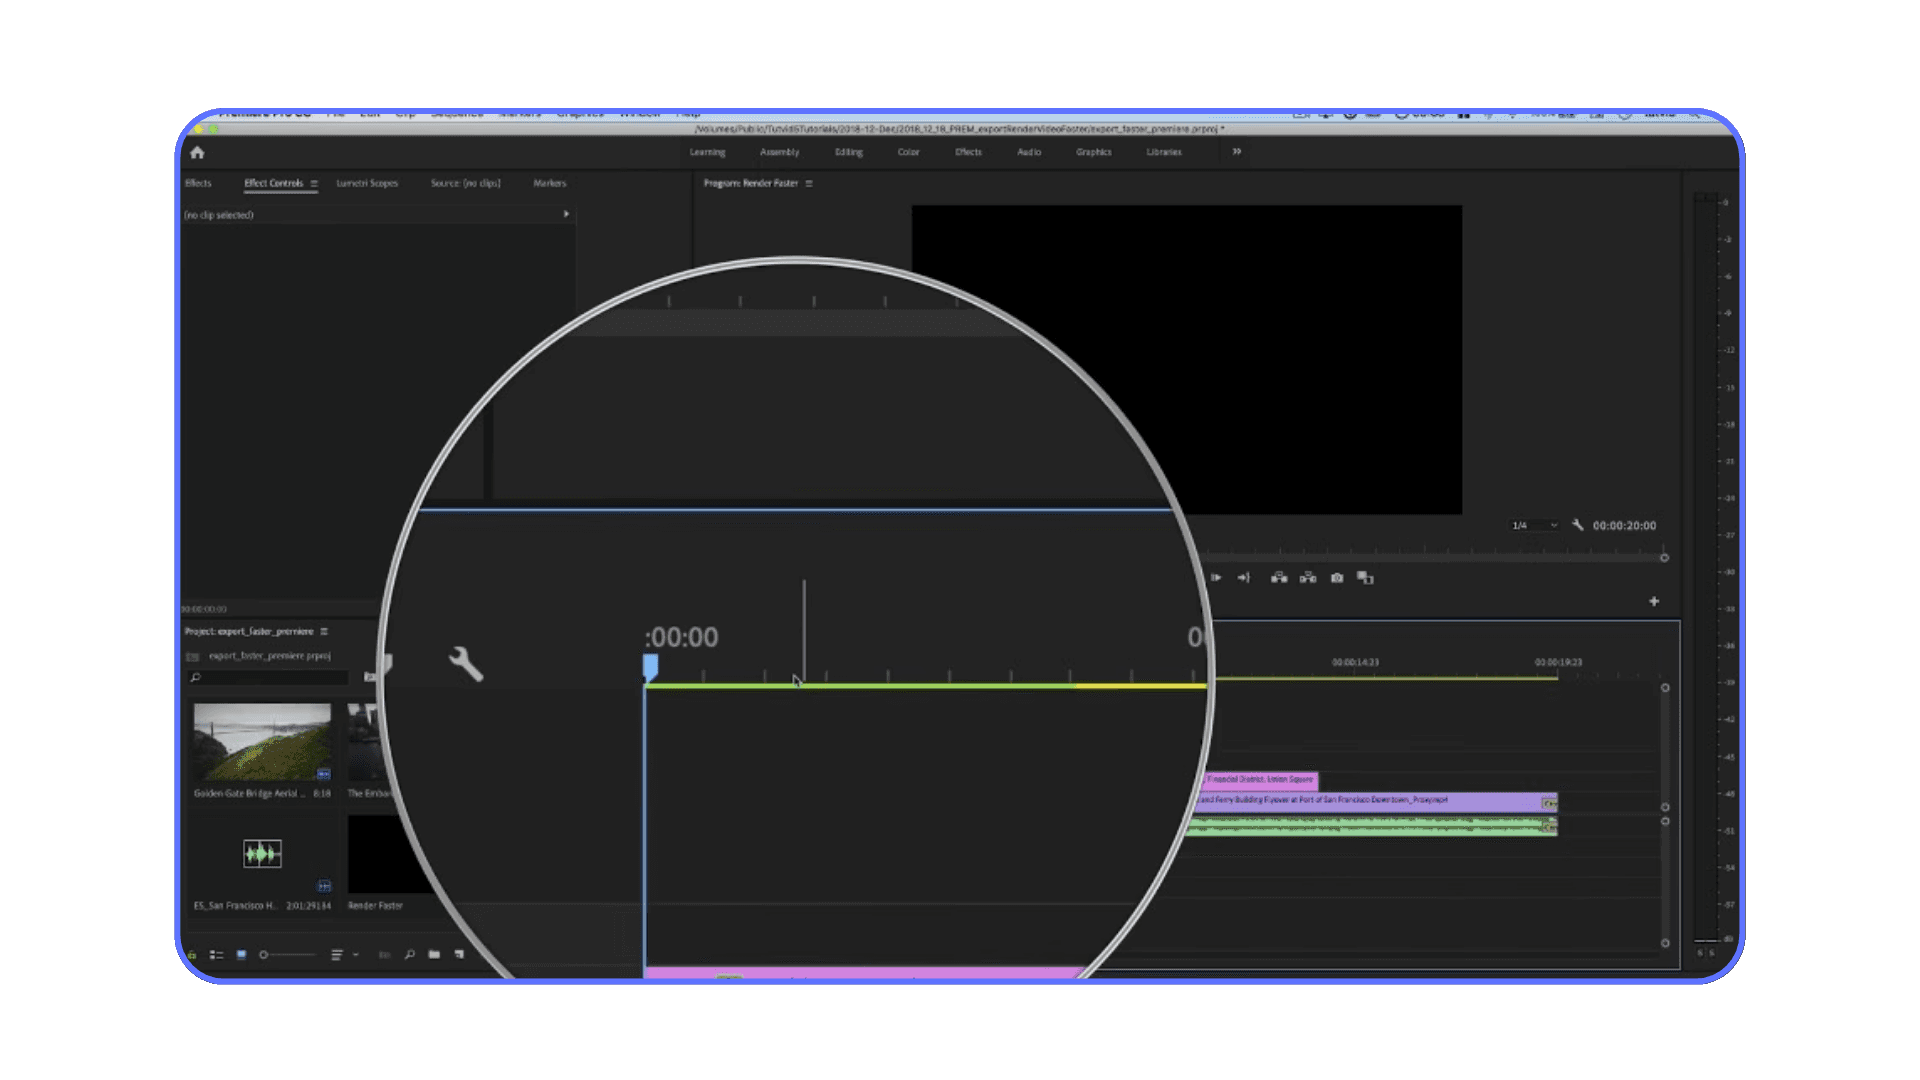
Set Your In and Out Points: Navigate to the beginning of the problematic section on your timeline and press
I(for In point). Then, move to the end of that section and pressO(for Out point). This defines the specific segment you want to render.Initiate the Render: Go to
Sequence > Render In to Out. Premiere Pro will quickly pre-render only that marked portion.Shortcut for Efficiency: This is a step I highly recommend: set up a custom keyboard shortcut for "Render In to Out" (you can find it in
Edit > Keyboard Shortcuts). I keep mine super handy, because I use it constantly throughout my editing day.
This technique is incredibly valuable for maintaining a fluid workflow. It's not necessarily for your final export optimization (though it helps build those previews), but for keeping your Premiere Pro editing experience smooth and responsive, especially when you're working with those demanding sections that otherwise cause constant stuttering or dropped frames.
Tip #15: Avoid Rendering Multiple Times
As a professional video editor, I can tell you this for sure: you're rarely going to get a project approved on the first export. Client feedback, producer notes, last-minute tweaks – it's all part of the process. And having to re-render your entire timeline from scratch for every single change can be a massive time sink, especially with long videos, complex color grades, or heavy special effects.
This is where the power of your pre-rendered previews really shines. By strategically rendering sections of your timeline (either specific tricky spots with "Render In to Out," or your entire sequence if you're building high-quality previews), Premiere Pro saves those pre-computed segments.
Here's how to leverage this for faster revisions:
Pre-Render Strategically: Use the "Render In to Out" feature on specific sections of your timeline that are heavy with effects or color grading. This saves a preview file.
When Exporting for Revisions: Go to your export settings (
File > Export > Media).Check "Use Previews": Make sure the "Use Previews" box is checked.
What happens next is awesome: Premiere Pro will use all those pre-rendered segments you've already created, avoiding the need to recalculate them during the final export. This means all that heavy lifting for your color grading and special effects that haven't changed will already be done, dramatically speeding up subsequent exports. Of course, any clips or sections where you've made new changes or added new effects will still need to be rendered, but you'll save a huge amount of time on everything else!
Tip #16: Consolidate Clips or Use Nesting
It's easy for your Premiere Pro timeline to become a sprawling mess of clips spread across dozens of tracks. While having multiple tracks is essential for complex edits and layering, a cluttered timeline can sometimes create hidden inefficiencies or just make it harder to manage your project. You might think fewer tracks directly means faster rendering, but the reality is a bit more nuanced.
Premiere Pro's rendering engine processes all active video and audio layers regardless of how many tracks they are on. However, a well-organized timeline with intentional consolidation can indirectly contribute to better performance and stability.
Here’s what I mean by 'consolidating' for efficiency:
Remove Unnecessary Overlaps: Sometimes, clips are left on tracks above others even if they're not visible or serving a purpose. Regularly reviewing your timeline to remove any truly unused or hidden layers can reduce unnecessary processing.
Streamline Complex Sections with Nesting: This is where true 'consolidation' happens for performance. If you have a section with many overlapping clips, effects, and layers (e.g., a complex title animation or a multi-layered composite), you can nest that entire section.
Select all the clips and layers within that complex section.
Right-click and choose "Nest..."
Give your new nested sequence a clear name.
Nesting essentially turns that complex stack of layers into a single, manageable clip on your main timeline. Premiere Pro only has to render that single nested sequence once. This can significantly reduce the processing burden for those dense areas, leading to smoother playback and faster rendering for that specific portion of your project. It's a great way to simplify the information Premiere Pro needs to process, making your overall rendering process much faster for complex sequences.
Keeping your timeline tidy, and wisely using tools like nesting to manage complexity, is a powerful habit for any professional editor aiming for peak Premiere Pro rendering speed and a more stable workflow.
Tip #17: Use Proxies
If you're dealing with demanding high-resolution footage—think 4K, 6K, 8K, or even higher—you know the struggle: choppy playback, dropped frames, and a generally sluggish editing experience. Your computer might be a beast, but decoding all that information in real-time can still be a heavy lift. This is precisely why proxies are one of the most effective ways to speed up rendering in Premiere Pro and significantly improve your playback performance.
So, what exactly are proxies? They're simply much smaller, lower-resolution versions of your original clips. For example, if you're working with a massive 4K file, you can create a proxy copy at 1080p or even 720p. You then edit with these lightweight proxy files, making your timeline incredibly responsive. When it's time to export your final masterpiece, you just toggle them off, and Premiere Pro automatically links back to your original, full-resolution media for the best quality output.
This proxy workflow is a game-changer for editing efficiency, especially when you're working with taxing media.
Here’s how to quickly get started with proxies:
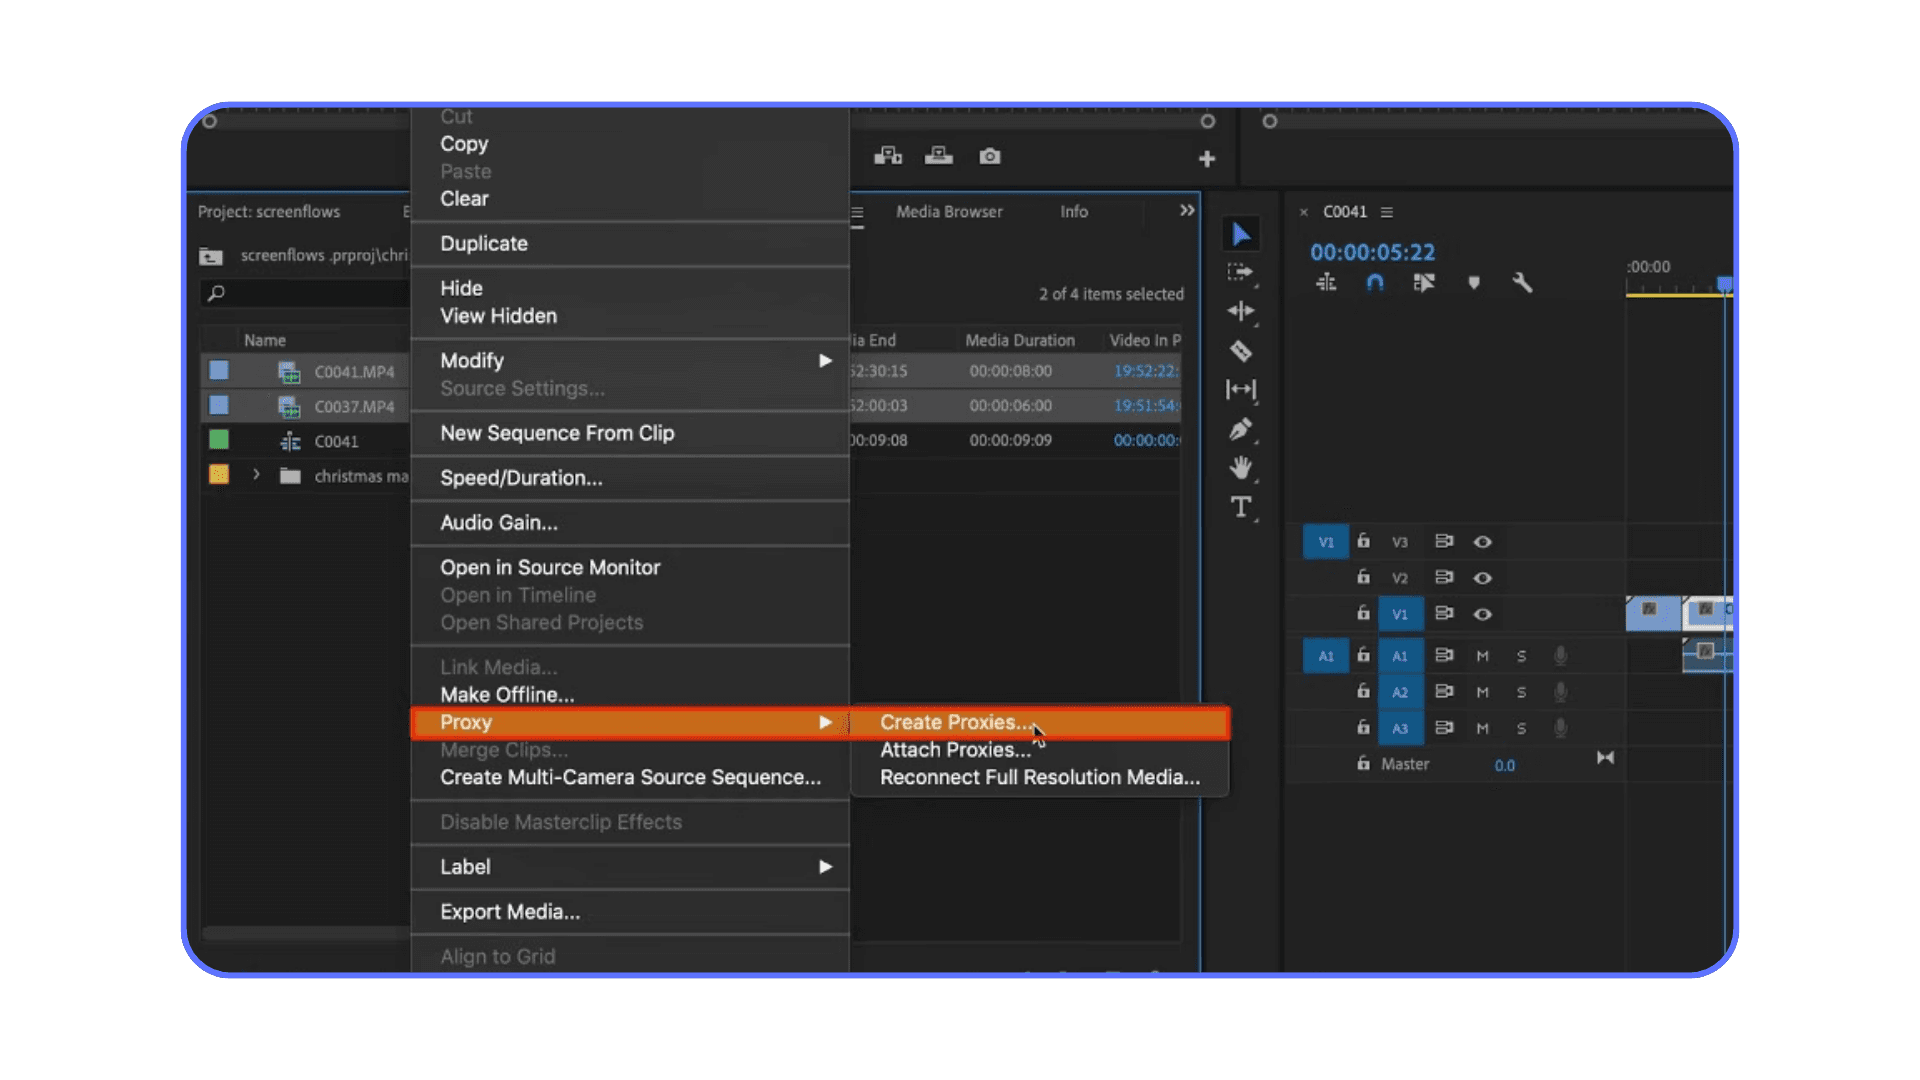
Select Your Clips: In your Project panel, highlight all the clips you plan to use in your edit.
Create Proxies: Right-click on the highlighted clips, then go to
Proxy > Create Proxies. Premiere Pro will use Media Encoder (which typically launches automatically) to generate these smaller files for you.Toggle Proxies On/Off: Once your proxies are created (you'll see a green "Attached" status if you add a Proxy column in your Project panel), find the "Toggle Proxy" button in your Program Monitor. It looks like a small square with two arrows. Click it to switch between your high-res originals and your low-res proxies during editing.
Using proxies will dramatically improve your Premiere Pro playback performance and make your editing experience buttery smooth. When combined with strategies like smart rendering (where you use high-quality previews for efficient exports), you'll find that your entire process, from rough cut to final export, becomes much, much faster.
Tip #18: Clear Media Cache
Here's a quick and often overlooked maintenance tip that can really help your Premiere Pro performance, especially if you're working with limited storage: regularly clearing your media cache.
Premiere Pro, much like a meticulous housekeeper, saves temporary project information and components in a dedicated "media cache" folder. This is actually a good thing! It's designed to speed up your regular processes, make playback smoother, and help Premiere Pro quickly access parts of your project without re-calculating them every time. Every time you create a new project or work on an existing one, your cache will be filled with these temporary project items.
However, if this cache folder gets too large and consumes too much of your available disk space, it can actually start to work against you. A cluttered cache, particularly on systems with limited hardware capacity, can affect your rendering performance by potentially blocking other hardware acceleration processes due to a lack of available memory or storage. It's like trying to run a marathon with too much stuff in your backpack – it just slows you down.
Luckily, clearing your Media Cache is incredibly easy:
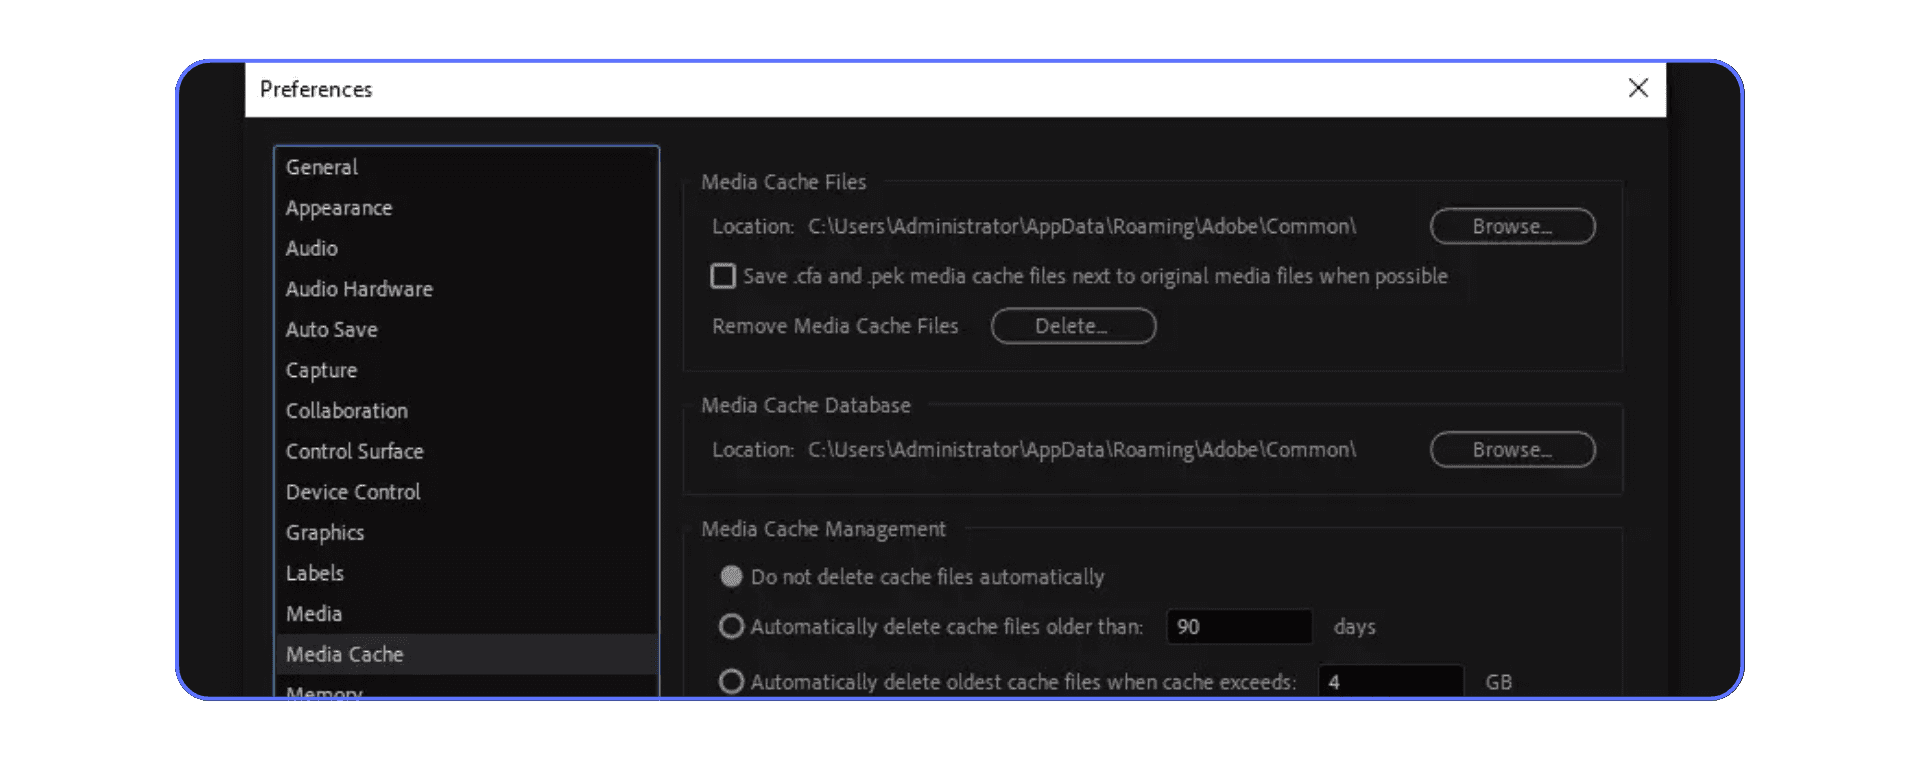
Go to
Edit > Preferences > Media Cache(on Mac, it'sPremiere Pro > Settings > Media Cache).You'll see options to delete cache files. I usually click "Delete" next to "Remove Media Cache Files."
If you have tons of available space on your computer, a full cache might not dramatically affect your overall performance. However, if you have limited capacity, making this a regular habit is absolutely necessary for maintaining optimal Premiere Pro optimization and ensuring smoother rendering. It's a simple step that can free up resources and keep your system running smoothly.
Tip #19: Optimize Sequence and Timeline Settings
Did you know that some of the biggest slowdowns in Premiere Pro can come from your sequence settings? It's true! These often-overlooked details can significantly impact your rendering times and overall performance. When your sequence isn't set up correctly, Premiere Pro has to constantly work extra hard to process everything.
Here’s what I always check to make sure my sequences are optimized for speed:
Resolution and Frame Rate: Match or Adapt.
Match your source: The golden rule for smooth editing and faster rendering is to make sure your sequence's resolution (e.g., 1920x1080, 3840x2160) and frame rate (e.g., 24fps, 30fps) are identical to your original footage. This avoids unnecessary scaling or frame interpolation, which are huge performance drains.
Strategic downscaling: If you shot in 4K but your final video only needs to be 1080p, consider creating a 1080p sequence right from the start. Editing in a lower-resolution sequence dramatically reduces the strain on your system, leading to smoother playback and quicker renders, especially on less powerful computers. This is about working smarter, not harder.
Bit-Depth and Color Space: Only When Necessary.
Higher bit-depths (like 10-bit or 12-bit color) and advanced HDR color spaces are fantastic for high-fidelity projects, but they demand a lot more computational power. Unless your project absolutely requires this extreme color accuracy, stick with standard 8-bit color. It provides excellent quality for most projects without crippling your editing and rendering speeds.
Preview Resolution (for Editing Playback):
Remember, we talked about this earlier, but it's worth revisiting in the context of your sequence. While your sequence settings dictate your final output quality, adjusting your playback resolution in the Program Monitor to Half or Quarter (instead of Full) will make your editing experience much smoother. This specifically helps with faster scrubbing and real-time playback of complex sections, without affecting your final export quality. It's a quick tweak to prevent unnecessary rendering strain while you work.
By dialing in these sequence settings, you're essentially telling Premiere Pro exactly how to process your footage most efficiently. This proactive step ensures faster rendering, reduces your system's processing load, and gives you a much more responsive and efficient Premiere Pro workflow.
Tip #20: Keep Premiere Pro and Drivers Updated
Adobe regularly releases updates for Premiere Pro that optimize performance, enhance stability, and fix rendering-related bugs, making it crucial to keep the software up to date. Many performance issues, including slow rendering, crashes, and export errors, can often be resolved simply by installing the latest version of Premiere Pro. Each update includes important improvements, such as better hardware acceleration, enhanced codec support, and general performance enhancements that allow the software to run more efficiently. By failing to update, users risk missing out on these optimizations, which can lead to longer rendering times and compatibility issues with newer file formats or hardware configurations. Additionally, outdated software versions may not fully support the latest graphics cards, processors, or operating system updates, further contributing to sluggish performance.
To ensure that you are always using the most optimized version of Premiere Pro, regularly check for updates through Adobe Creative Cloud. To do this, open the Creative Cloud app, navigate to Premiere Pro, and check for any available updates. If an update is available, install it to gain access to the latest performance improvements and bug fixes. Additionally, it is equally important to keep your GPU drivers updated, especially for NVIDIA and AMD users. Premiere Pro relies heavily on hardware acceleration, and outdated graphics drivers can lead to slow rendering times, crashes, or even missing GPU acceleration options. To update your GPU drivers, visit the official NVIDIA GeForce Experience or AMD Radeon Software tool, download the latest drivers, and install them. By keeping both Premiere Pro and your graphics drivers up to date, you ensure optimal performance, faster rendering, and a more stable editing workflow, allowing you to work more efficiently without unnecessary slowdowns or technical issues.
Key Takeaways: Unlock Faster Premiere Pro Renders
Achieving lightning-fast renders in Premiere Pro is about adopting a holistic approach, combining smart workflow habits with a finely tuned system. Here are the 20 essential strategies to get you there:
1. Optimize Your Footage: Start strong by transcoding your raw footage to optimized codecs (like ProRes or DNxHR) or by creating lightweight proxies for smoother editing, especially with high-resolution media.
2. Use Proxies: Leverage proxy files for a super responsive editing experience, then seamlessly switch back to originals for final export.
3. Fine-Tune Sequence Settings: Match your sequence's resolution, frame rate, and color space to your source footage, or intentionally downscale the sequence for performance gains.
4. Optimize Effects and Plugins: Be mindful of resource-heavy effects and third-party plugins; render complex sections as needed.
5. Leverage High-Quality Previews: Set up your sequence to generate high-quality preview files that Premiere Pro can reuse for "smart rendering", dramatically speeding up exports.
6. Adjust Playback Resolution: Reduce your Program Monitor's playback resolution (e.g., to 1/2 or 1/4) for smoother real-time editing without affecting final quality.
7. Use "Render In to Out": Selectively render specific, troublesome sections of your timeline for immediate smooth playback during editing.
8. Avoid Redundant Renders During Revisions: Utilize pre-rendered segments and the "Use Previews" option during export to save immense time on subsequent export iterations.
9. Streamline Your Workspace: Keep your interface responsive by disabling or closing unused panels (like Lumetri Scopes) when not actively needed.
10. Master Dynamic Link with "Render and Replace": For After Effects compositions, "Render and Replace"them in Premiere Pro to convert dynamic links into performant video files once finalized.
11. Don't Forget to Clear Your Media Cache: Regularly purge your media cache to free up disk space and prevent performance bottlenecks.
12. Minimize Background Processes & Applications: Close all unnecessary software and background apps to dedicate maximum system resources to Premiere Pro.
13. Keep Software & Drivers Up-to-Date: Regularly update your operating system, Premiere Pro, and especially your GPU drivers for bug fixes and performance enhancements.
14. Optimize RAM Allocation: Adjust Premiere Pro's preferences to allocate the vast majority of your system's RAM to Adobe applications.
15. Optimize Your Hardware & Storage Setup: Invest in fast SSDs or NVMe drives for your OS, applications, project files, and crucial media/cache files. Ideally, use separate fast drives for different data types.
16. Activate Your GPU with GPUSniffer: Use this built-in Adobe tool to help Premiere Pro properly detect and utilize your graphics card for GPU hardware acceleration.
17. Master Your Export Settings: Carefully choose the right codec, understand and set appropriate bitrates, and always prefer hardware encoding over software encoding for speed.
18. Consolidate Clips (Nesting): For complex, layered sections, nesting clips can simplify the processing burden for Premiere Pro, leading to smoother playback and faster rendering of those segments.
19. Efficient Project Management (Remove Unused Media): Regularly clean up your Project Panel by removing unused clips and sequences, which can help keep project files lighter and improve stability.
20. Utilize Adobe Media Encoder for Batch Exporting: For multiple exports or background rendering, offload the task to Media Encoder, allowing you to continue working in Premiere Pro.
If you need more speed or smoother workflow without all these configurations, Vagon Cloud Computer offers an incredible solution.
Vagon provides instant access to high-performance virtual workstations, allowing you to bypass local hardware limitations and achieve professional-grade rendering speeds on demand, ensuring you always have the horsepower you need to meet deadlines and deliver stunning results.
Frequently Asked Questions (FAQs):
How to speed up my computer when I run Premiere Pro?
There are a few ways to get your PC to become a beast when running high-end apps such as Adobe Premiere Pro. You could improve your computer hardware or buy a new one. In addition to the internal settings of the application, still there are some alternative methods that you can apply to speed up the overall performance of your computer, or you can try using additional resources to run performance demanding applications on your low end device.
Why is Premiere Pro rendering so slow on my computer?
Premiere Pro rendering can be slow due to insufficient CPU power, lack of GPU acceleration, or running multiple applications simultaneously. Optimizing these factors can help improve rendering speed.
What are the best settings for faster rendering in Premiere Pro?
For faster rendering in Premiere Pro, ensure GPU acceleration is enabled, reduce playback resolution, and consider using high-quality previews and smart rendering.
How can I reduce export time in Premiere Pro?
To reduce export time in Premiere Pro, try clearing the media cache, using proxies, and closing other programs to free up system resources.
Is it possible to make Premiere Pro render faster without upgrading hardware?
Yes, you can make Premiere Pro render faster without upgrading hardware by optimizing software settings, such as memory allocation, and using features like Media Encoder or smart rendering.
Which video editor is the best?
Even Premiere Pro is among the best video editors on the market, Final Cut Pro and Blender are some other well-known video editors in the Video Production industry as well. Of course, the preferred solution can vary according to the unique needs of the projects and requirements of it.
In addition to the listed video editor alternatives, if the project has more VFX components in it, you can use Adobe After Effects to utilize video effects in your project. Or, if it’s a simple one such as a social media video, you can use Premiere Rush with its’ user-friendly design and ready-to-use templates.
How do I get started on Premiere Pro?
Premiere Pro is a video editing program used all over the world and many people have released great YouTube tutorials, created courses for all level of expertises and Adobe published official tutorials on Premiere Pro as well.
You just spent hours, maybe days, making that video perfect in Adobe Premiere Pro. Good cuts, great colors, sound just right. You hit "Export" to share it, and then... your computer sounds like a jet taking off, and that bar barely moves. Know the feeling? I do. We all do. That endless wait isn't just annoying; it kills your vibe and wastes time. Especially when your video export optimization just stops dead.
"Why is Premiere Pro so slow to render?" It's a question I hear all the time. Yeah, sometimes it's your computer. But often, it's just about knowing a few smart tricks inside the software. You don't always need to buy a whole new setup to fix those Premiere Pro bottlenecks. If you're running into bigger headaches than just slow renders, you might want to check out some common Premiere Pro problems and their solutions first.
So, in this guide, I'm going to cut straight to it. I'll share the real, hands-on ways I use to really speed up Premiere Pro exports and boost your render performance. We'll look at what's slowing you down and how to fix it, with the newest features and tips. If you're considering upgrading your hardware or building a more powerful setup, here’s a great guide that walks you through the ultimate PC build and buying guide specifically for Premiere Pro. Whether you're a beginner at video editing or you've been doing this for years, this guide will help you beat those long export times. And hey, this info is fully updated for Adobe Premiere Pro v25.2 (April 2025 release), so it's fresh and tested. Let's get that render bar moving fast.
What's Really Slowing Down Your Renders?
If you're frustrated by slow exports, trust me, you're not alone. I've spent countless hours troubleshooting this exact problem for myself and for clients. From my experience, it usually boils down to a few core culprits that impact Premiere Pro rendering speed.
Your Hardware: CPU and GPU
First up, your computer's power. This one's obvious, but it's often misunderstood. Premiere Pro absolutely loves CPU cores and threads. A weaker processor means longer processing times for every frame, every effect. And without a solid GPU, especially for GPU-accelerated effects or if you're using render engines like Cycles, your system is just leaving render performance on the table. I've seen video rendering projects that take hours on a laptop finish in minutes on a machine with a powerful NVIDIA RTX card. That's not just a coincidence; it's the graphics card doing the heavy lifting to speed up exports.
Slow Storage Speeds
This is a silent killer for render times. Are your project files, media cache, and source footage sitting on a slow hard drive? If Premiere Pro has to constantly wait for data to load, it doesn't matter how fast your CPU or GPU is. It's like having a supercar stuck in traffic. In my editing setup, moving from a standard SSD to an NVMe drive for my scratch disk and media cache made a noticeable difference in export speed. It’s definitely one of those "behind the scenes" upgrades that pays off for video export optimization.
Heavy Footage: Resolution and Codec
Not all video files are created equal. Trying to edit and export highly compressed 4K or 8K footage straight out of the camera, especially H.264 or HEVC, can bring even powerful systems to their knees. These video codecs are great for delivery but horrible for editing. Premiere Pro has to decode every single frame on the fly, which eats up tons of CPU cycles and impacts rendering efficiency. I always recommend transcoding to a more editing-friendly format like ProResor DNxHR for heavy projects if you’re not using proxies.
Project Complexity: Effects and Layers
Every single effect, every layer you stack, every color grade you apply – it all adds to the rendering burden. Ray-traced effects, heavy noise reduction, Lumetri adjustments, warp stabilizer... these are incredibly demanding. I've personally watched Premiere Pro render times double, triple, or even quadruple just by adding a few complex adjustments. It's not that you shouldn't use them, but understanding their impact on export duration is key.
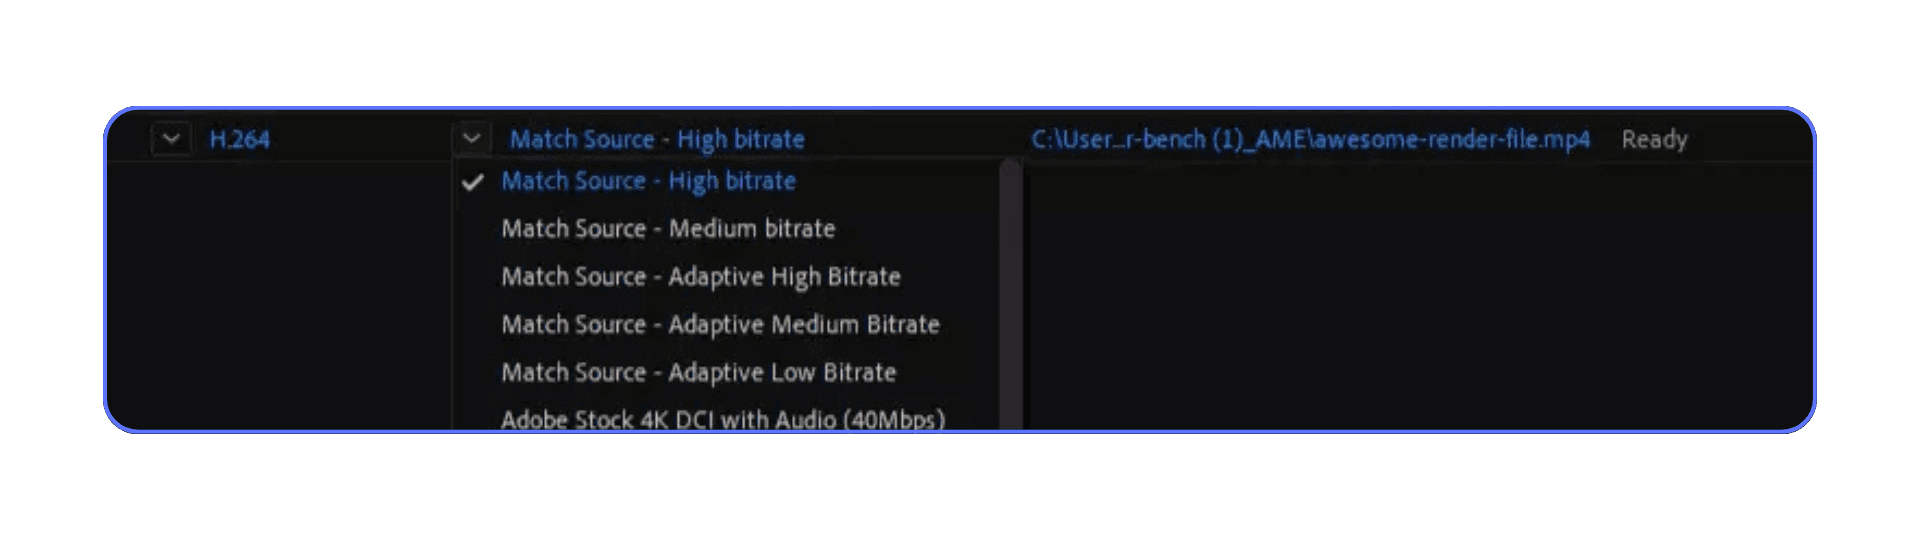
Incorrect Export Settings
This is where many people accidentally shoot themselves in the foot. Choosing the wrong export codec, excessively high bitrates, or unnecessary "Maximum Render Quality" settings can dramatically inflate your export times. You might think "higher settings, better quality," but often, it just means "longer render, no visible difference." I've learned that striking the right balance here is crucial for fast rendering.
While all these causes are frustrating, the good news is that with a combination of smart workflow habits and optimized settings, you can significantly speed up your editing process and dramatically cut down on export times. While you're optimizing your main system, it's also worth exploring how Premiere Pro works on other devices, like an iPad. Here’s a great guide that breaks down the best ways to use Adobe Premiere Pro on an iPad for efficient mobile editing. Let's dive into the essential tips that professional editors use to conquer slow renders and boost their productivity.
Tip #1: Use Adobe Media Encoder for Background Renders
This tip is a lifesaver, honestly. If you're looking to render faster in Premiere Pro and still get work done, Adobe Media Encoder (AME) is your best friend.
Here's the deal: When you export directly from Premiere Pro, it locks up your whole editing software. You can't do anything else. But AME lets you push your exports into a separate queue. Think of it like this: I just finished a cut, so I send it to AME to render in the background. Then, I immediately jump back into Premiere Pro to start working on the next project, or even just clean up my timeline. It frees up my main editing application.
It's pretty simple to do: just hit File > Export > Media in Premiere Pro, then instead of hitting "Export" in the export window, click "Queue." That sends your project straight over to AME. This "background rendering" capability is a huge time-saver. I've literally saved hours on projects because I could multitask. It's truly a game-changer for staying productive.
Tip #2: Turn On GPU Acceleration
Alright, this is hands down one of the most important things you can do to speed up your Premiere Pro renders without spending any money on new hardware. I've seen it time and time again: editors struggling with slow exports, and the culprit? Their GPU isn't pulling its weight.
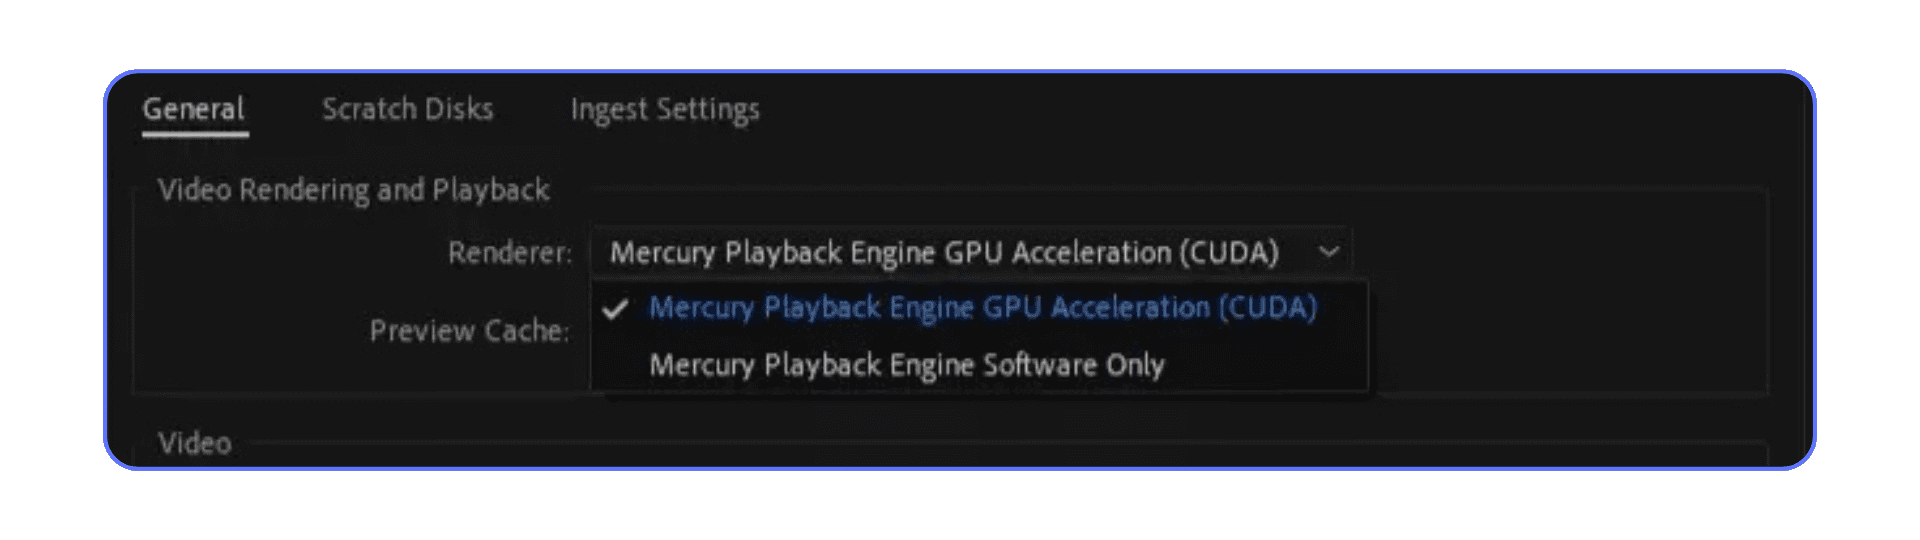
Your computer's GPU (Graphics Processing Unit) is built for parallel processing – essentially, doing a ton of calculations all at once. That's exactly what Premiere Pro needs when it's handling complex effects, scaling footage, or processing heavy video. When you enable GPU acceleration in Premiere Pro, you're telling your powerful graphics card to jump in and help your CPU. This teamwork is handled by something called the Mercury Playback Engine. If your system is set to "Software Only," your CPU is doing all the heavy lifting, which is like trying to lift a car by yourself when you have a crane available. It's just not efficient. (You can learn more about how Premiere Pro leverages your GPU in Adobe's official documentation).
Here's how to make sure your GPU is working for you:
Head up to
File > Project Settings > General.Look for the "Renderer" dropdown menu under "Video Rendering and Playback."
From that dropdown, select
Mercury Playback Engine GPU Acceleration.If you're on a Windows PC with an NVIDIA card, you'll typically see (CUDA).
For macOS users (or Windows with AMD cards), you'll likely see (OpenCL) or (Metal).
Pro Tip: If this option is grayed out, or if you only see "Software Only," it usually means your graphics drivers are outdated. Go update them directly from NVIDIA, AMD, or Apple. Seriously, do it. It's a common Premiere Pro bottleneck I run into.
Making sure this is turned on is the first step towards truly cutting down your render times and getting smoother playback. It's foundational.
Tip #3: Increase Memory Allocation
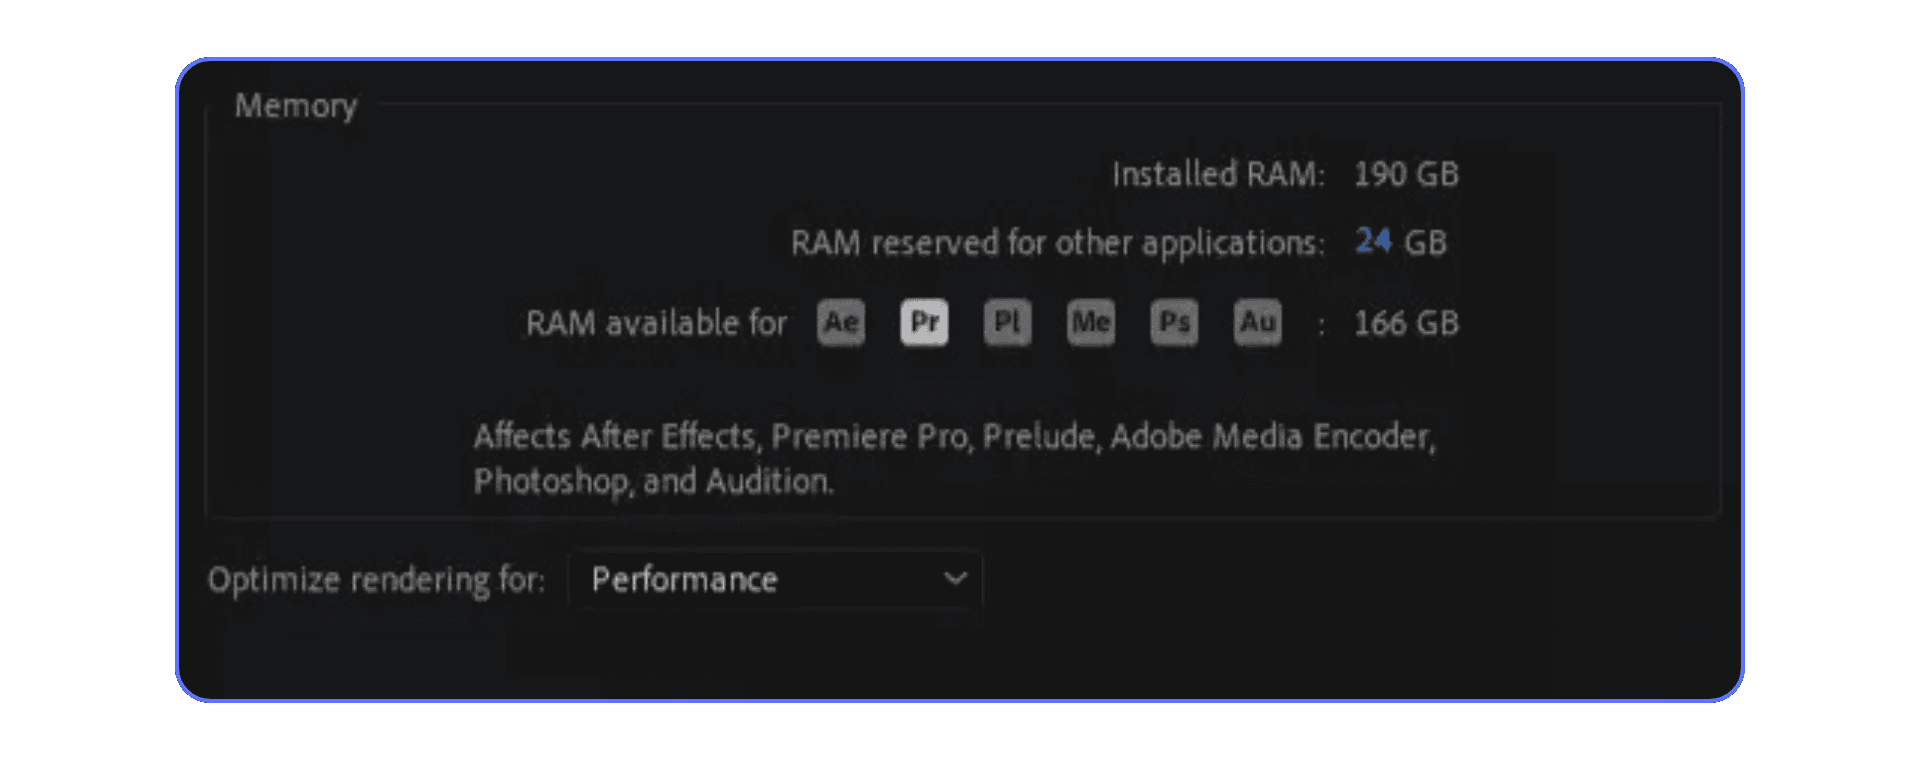
If there's one thing Premiere Pro absolutely loves, it's RAM – your computer's short-term memory. Think of RAM as Premiere Pro's workspace or desk. The more space it has, the more files, effects, and bits of your project it can keep readily available without constantly fetching them from your slower hard drive. That direct access really speeds up rendering in Premiere Pro.
This setting lets you tell your system how much of its available RAM Premiere Pro can hog, versus how much is reserved for other applications running in the background. My philosophy? Give Premiere Pro as much as you possibly can while still keeping your operating system happy.
Here's how to adjust your RAM allocation:
Go to
Edit > Preferences > Memory(on Mac, it'sPremiere Pro > Settings > Memory).You'll see a setting for "RAM reserved for other applications." I typically aim to leave just enough for the operating system and essential background stuff – maybe 6-8GB if I have 32GB total RAM, leaving the rest for Premiere Pro and other Adobe apps. If you have less RAM, you might leave less, but be careful not to starve your OS. The more you give Premiere Pro, the better your export speed and overall render performance will likely be. (Adobe provides general RAM recommendations based on your media resolution).
Now, a quick word of caution: when you tell Premiere Pro to take up a huge chunk of your system's memory resources, especially on machines with less RAM, you might push things too far. I've seen it. Sometimes, trying to squeeze every last drop out of your RAM can lead to crashes or instability, even if your settings seem correct. If you're frequently dealing with Premiere Pro freezing or shutting down right after cranking up the memory, you might want to check out some ways to stop Premiere Pro from crashing and keep your workflow smooth. It's all about finding that sweet spot and understanding that sometimes, the issue isn't just a setting, but perhaps a project-specific bug.
Tip #4: Run Premiere Pro Alone
Alright, this might sound super basic, but it's genuinely one of those "duh" moments that people often overlook, especially when they're troubleshooting slow Premiere Pro renders. If you want Premiere Pro to export faster, you need to give it all the resources your computer has.
Think about it: Every other app you have open – Chrome with 50 tabs, Spotify streaming music, Discord, Photoshop in the background – they're all quietly munching on your system's RAM and CPU power. When you hit render, Premiere Pro needs all of that power. If it's constantly fighting with other programs for those precious system resources, your render times will suffer.
So, my advice is pretty simple: when you're about to hit that export button for a big project, just close everything else down. Seriously. Shut down the browser, pause the music, quit all those background apps. It frees up a surprising amount of processing power and optimizes performance specifically for Premiere Pro.
Yeah, it means you can't really use your computer for anything else during the export. But hey, that's a perfect excuse to grab a fresh cup of coffee, stretch your legs, or just take a quick break. It's a small inconvenience for a potentially much faster render.
Tip #5: Speed Up Your Rendering with Vagon Cloud Computers
So far, we've talked about a bunch of smart tweaks you can make on your local machine to speed up rendering in Premiere Pro. And honestly, they make a huge difference. But let's be real: sometimes, your local hardware just hits a wall. Maybe you're working with seriously heavy 8K footage, or you've got a ton of complex effects, or you're just on an older machine. That's where I often look beyond my desk for more power.
This is where Vagon Cloud Computers come into play. Imagine getting instant access to a powerful machine with top-tier specs, specifically built for demanding tasks like video editing, without having to buy all that expensive hardware yourself. That's exactly what Vagon offers.
I've found Vagon's remote desktops to be incredibly useful when Adobe Premiere Pro rendering is slow on my own machine, or when I have a tight deadline and just can't afford to wait. You literally switch to a cloud PC, connect to it, and suddenly you're harnessing the power of multiple NVIDIA GPUs with massive CUDA cores – like 4 x 16GB GPUs, instead of relying purely on your local CPU. This means incredibly faster rendering and less of that frustrating waiting game. It lets your creativity flow without unnecessary delays.
It's a different way to work, but it really solves that "my computer isn't fast enough" problem. You can also check out our GPU Guide for tips to use GPU, along with speed up and acceleration tips for Adobe Premiere Pro.
Tip #6: Render & Replace Dynamically Linked Components
Working with multiple software while creating a project is business as usual, but it can also contribute to slow rendering in Premiere Pro. After Effects, Photoshop, Media Encoder, and others—we are all linked with multiple apps. However, if you are gathering too many components in your project from different sources, it will also affect your project rendering times in Premiere Pro.
Before starting your project output, be sure that all your essential components like fonts, effects, videos, music, etc. are working fine and without any sync issues to your project.
If everything is alright and good to go, you can also Render & Replace your dynamically linked components to speed up your project.
Right-click on the component, and click the ‘Render and Replace’ button to enable it.
Tip #7: Reduce Rendering Time by Optimising Imports
Alright, here's a big one that many editors skip, and it can cost you serious time during both editing and rendering: optimizing your source footage.
See, most cameras shoot in highly compressed formats like H.264 or HEVC. They're fantastic for small file sizes and delivery, but they are an absolute nightmare for your computer to edit. Premiere Pro has to constantly decompress those files on the fly, frame by frame, just to show them to you. This hammers your CPU, leads to choppy playback, and seriously drags down your rendering speed, especially if you're piling on effects.
I've learned that you can save yourself a ton of headaches by transcoding your footage into an editing-friendly formatbefore you even start cutting. We call this optimized media or using intermediate codecs.
What kind of optimized formats are we talking about?
ProRes: This is my go-to if I'm on a Mac, or even on Windows if I'm working with Apple users. It's a fantastic professional format.
DNxHR/DNxHD: Avid's answer to ProRes. It's free to download for both Mac and Windows and works great.
Cineform: Maybe less common, but another solid option that's generally available for free. (You can find more detail on supported formats and codecs in Adobe's official documentation).
How do you do this "pre-optimization"?
You can use a dedicated tool like Adobe Media Encoder to transcode your files. My favorite way to do this right inside Premiere Pro is by using the Ingest Settings when you import your footage.
When you're importing files (via
File > Importor the Media Browser), look for the "Ingest" checkbox.Tick it, and then select "Transcode" from the dropdown menu.
Choose your desired format (like ProRes or DNxHR).
This clever feature lets Premiere Pro start editing with the native, compressed files while Media Encoder works in the background to transcode them into those lovely, optimized files. Once the transcoding is done, Premiere Pro automatically swaps out the original files with the optimized versions on your timeline. It's seamless! Working with these optimized files will make your playback smoother, your editing snappier, and your final Premiere Pro exports much, much faster.
Tip #8: Use Less Effects in Your Project
Look, we all love throwing cool effects on our footage. After all, what's video editing without a little magic? But here's the cold, hard truth: every single effect, every fancy transition, and every third-party plugin you add to your timeline piles on more work for your computer. They can drastically hit your rendering performance.
Think about it: Premiere Pro has to calculate all those complex visual changes for every single frame. If you've got dozens of demanding effects stacked up, your CPU and GPU are going to be working overtime, slowing down your preview and, you guessed it, dragging out your Premiere Pro rendering times.
My advice? Be intentional. Do you really need that heavy noise reduction filter on every clip, or can you get away with something simpler? If you can simplify or reduce the number of effects you're using, especially those complex ones, you'll see a dramatic improvement in export speed.
And speaking of plugins, they're not all created equal. Some are built super efficiently, and some are just plain resource hogs. To optimize performance, I always recommend sticking with only the best plugins for Premiere Pro – the ones designed to run smoothly without crippling your system. Choosing wisely here can make a real difference.
Tip #9: Set Up and Use Previews
Here's a trick that can seriously cut down your export times, especially for projects with lots of effects: smart rendering using high-quality previews.
Think of it like this: when you render parts of your timeline (you know, when you see that green or yellow bar appear), Premiere Pro is basically pre-calculating those sections and saving them as temporary video files. By default, these previews are often low-quality, designed for smooth playback while you're editing. But we can make Premiere Pro create high-quality previews, and then tell it to use those previews during the final export. It's like pre-rendering only the parts that need it.
Here's how to set this up for maximum export speed:
Customize Your Sequence Settings: Go to
Sequence > Sequence Settings.Choose a "Custom" Editing Mode: This lets you manually control the preview codec.
Pick a High-Quality Codec: Instead of the default MPEG, choose something like ProRes (if you're on a Mac) or DNxHR. Set the resolution to match your sequence.
Save as a Preset: Click "Save Preset" so you can easily reuse these settings on other projects.
Render Your Timeline: Hit
Sequence > Render In to Out(orRender Selection). Let Premiere Pro do its thing. I often do this overnight or during a lunch break.Enable "Use Previews" on Export: When you go to export (
File > Export > Media), in the "Video" tab, make sure the "Use Previews" box is checked.
If your export settings match the preview settings (for example, exporting to ProRes at the same resolution), Premiere Pro can essentially just stitch together those high-quality preview files, bypassing a lot of re-rendering. This smart rendering technique can save you a ton of time, especially on complex projects.
Tip #10: Adjust Playback Resolution
Dealing with choppy, stuttering video playback in Premiere Pro? It's incredibly annoying and can really mess with your editing flow. Especially when you're working with high-resolution footage or piling on effects. Good news: there's a super quick fix that doesn't affect your final export quality: adjusting your playback resolution.
See, Premiere Pro constantly has to decode your video files and effects to show them to you in real-time. If you're working with 4K or 8K footage, that's a massive amount of data. By lowering the playback resolution, you're telling Premiere Pro, "Hey, don't worry about showing me every single pixel right now. Just give me a decent preview so I can get my edits done." This significantly reduces the decoding speed burden on your system.
Here's how to do it:
Look at your Program Monitor (where you see your video playing).
In the bottom-right corner of the Program Monitor, you'll see a dropdown menu that probably says "Full" or "1/2."
Click on it and choose a lower resolution, like 1/2, 1/4, or even 1/8.
You'll notice the video quality in your monitor drops, but your real-time playback should become much smoother. This won't affect the quality of your final exported video at all – it's purely for your editing experience. It helps you avoid those annoying Premiere Pro slow rendering issues during actual work, making your whole editing workflow feel faster and more responsive. It's a quick way to keep your creative momentum going!
Tip #11: Activate the All GPUs
You've got a powerful GPU, maybe even one of the latest NVIDIA or AMD cards, and you've followed the steps to enable GPU acceleration. But sometimes, even with the best hardware, Premiere Pro just... doesn't seem to "see" it properly. It's incredibly frustrating when your expensive graphics card isn't being utilized!
This is where Adobe's secret weapon, GPUSniffer.exe, comes into play. It's a small, integrated tool found within Premiere Pro's program files. Its job is to sniff out and identify all the GPUs on your system and report their capabilities back to Premiere Pro. Running it can sometimes nudge Premiere Pro into properly detecting your GPU, especially if you've just updated your drivers or encountered a recognition issue.
How to give GPUSniffer a quick nudge:
First, make sure Premiere Pro is completely closed.
Navigate to your Premiere Pro installation folder. You'll usually find
GPUSniffer.exehere:Windows:
C:\Program Files\Adobe\Adobe Premiere Pro [Your Version]\GPUSniffer.exemacOS:
Applications/Adobe Premiere Pro [Your Version]/Adobe Premiere Pro.app/Contents/GPUSniffer(you'll need to right-click on the app and select "Show Package Contents" to find it)
Double-click
GPUSniffer.exe(orGPUSnifferon Mac) to run it. A command-line window will pop up and quickly run through its process. It usually closes itself after a few seconds.
That's it! Once it's done, restart Premiere Pro. Go back to File > Project Settings > General and check your "Renderer" dropdown again. You should now hopefully see "Mercury Playback Engine GPU Acceleration" (CUDA, OpenCL, or Metal) available and selected. This simple step can sometimes be the key to unlocking your GPU's full potential and significantly boosting your Premiere Pro render speed.
Tip #12: Use the Two Methods at the Same Time
We've talked about transcoding your footage to optimized formats and how to set up high-quality previews for "smart rendering." Now, here's the secret sauce: using these two methods together is how you unlock the absolute best editing efficiency and rendering speed in Premiere Pro.
Think about it:
Transcoding makes your raw footage super easy for Premiere Pro to chew on from the start, dramatically speeding up general editing responsiveness.
High-quality previews then allow Premiere Pro to essentially pre-render any complex sections or effects you've added, making the final export of those parts incredibly fast, especially if your export settings match your preview settings.
When I combine these, I find my workflow feels incredibly smooth – no more constant waiting or slowdowns. It's an upfront investment of time (transcoding can take a while), but it's all time you gain back, and then some, during your actual editing and final export.
The Reality Check: Disk Space
Now, there's a trade-off, and it's a big one: disk space. An hour of optimized footage in something like ProRes 422 HQwill take up significantly more room on your hard drive than, say, the original H.264 file from your DSLR. This "optimized media" can eat up gigabytes quickly.
What if you don't have unlimited storage?
No worries. If you're short on disk space, you don't have to transcode all your original files. You can still import your native, compressed footage (like H.264) and then take advantage of the high-quality previews feature for rendering and export. You'll still get a good chunk of that render speed benefit, especially for effects-heavy sections, and your overall project size will be smaller (though the preview files themselves will still be larger than your original H.264s). It's a compromise, but it definitely helps optimize your work.
Tip #13: Make use of Smart Rendering
Another great way to reduce your rendering times in Premiere Pro is by using smart rendering. Smart rendering is used with certain formats and avoids compressing data to create a better-quality export. Unfortunately, smart rendering only works with specific source codec sizes, frame rates, and bitrates. You can find all this information in the sequence settings. You can find the supported codecs here. You can find these settings in the sequence settings.
To use smart rendering, first, check that all of your settings are correct and in line with the supported codecs. The yellow line at the top of your timeline shows your rendering process. If you go from sequence to render, this will begin rendering everything in your timeline. A bonus is that you can exit the render while it’s busy, and it will maintain your rendering process when you start it again. Once your whole timeline is pre-rendered, you can export, and the heavy lifting should already be done, making your rendering time faster.
Tip #14: Use “Render In to Out”
We've already talked about the magic of "smart rendering" by setting up high-quality previews for your whole timeline, which is awesome for final exports. But what about when you're just editing and hit a particularly stubborn section – maybe a complex effect, a tricky transition, or a really dense stack of layers – and your playback just grinds to a halt?
This is where the "Render In to Out" function becomes your best friend for real-time editing optimization. Instead of rendering your entire sequence, you can tell Premiere Pro to just render that specific, problematic section of your timeline. It creates those temporary preview files for just that segment, instantly giving you smooth playback so you can continue editing without interruption.
Here's how to use "Render In to Out" effectively:
Set Your In and Out Points: Navigate to the beginning of the problematic section on your timeline and press
I(for In point). Then, move to the end of that section and pressO(for Out point). This defines the specific segment you want to render.Initiate the Render: Go to
Sequence > Render In to Out. Premiere Pro will quickly pre-render only that marked portion.Shortcut for Efficiency: This is a step I highly recommend: set up a custom keyboard shortcut for "Render In to Out" (you can find it in
Edit > Keyboard Shortcuts). I keep mine super handy, because I use it constantly throughout my editing day.
This technique is incredibly valuable for maintaining a fluid workflow. It's not necessarily for your final export optimization (though it helps build those previews), but for keeping your Premiere Pro editing experience smooth and responsive, especially when you're working with those demanding sections that otherwise cause constant stuttering or dropped frames.
Tip #15: Avoid Rendering Multiple Times
As a professional video editor, I can tell you this for sure: you're rarely going to get a project approved on the first export. Client feedback, producer notes, last-minute tweaks – it's all part of the process. And having to re-render your entire timeline from scratch for every single change can be a massive time sink, especially with long videos, complex color grades, or heavy special effects.
This is where the power of your pre-rendered previews really shines. By strategically rendering sections of your timeline (either specific tricky spots with "Render In to Out," or your entire sequence if you're building high-quality previews), Premiere Pro saves those pre-computed segments.
Here's how to leverage this for faster revisions:
Pre-Render Strategically: Use the "Render In to Out" feature on specific sections of your timeline that are heavy with effects or color grading. This saves a preview file.
When Exporting for Revisions: Go to your export settings (
File > Export > Media).Check "Use Previews": Make sure the "Use Previews" box is checked.
What happens next is awesome: Premiere Pro will use all those pre-rendered segments you've already created, avoiding the need to recalculate them during the final export. This means all that heavy lifting for your color grading and special effects that haven't changed will already be done, dramatically speeding up subsequent exports. Of course, any clips or sections where you've made new changes or added new effects will still need to be rendered, but you'll save a huge amount of time on everything else!
Tip #16: Consolidate Clips or Use Nesting
It's easy for your Premiere Pro timeline to become a sprawling mess of clips spread across dozens of tracks. While having multiple tracks is essential for complex edits and layering, a cluttered timeline can sometimes create hidden inefficiencies or just make it harder to manage your project. You might think fewer tracks directly means faster rendering, but the reality is a bit more nuanced.
Premiere Pro's rendering engine processes all active video and audio layers regardless of how many tracks they are on. However, a well-organized timeline with intentional consolidation can indirectly contribute to better performance and stability.
Here’s what I mean by 'consolidating' for efficiency:
Remove Unnecessary Overlaps: Sometimes, clips are left on tracks above others even if they're not visible or serving a purpose. Regularly reviewing your timeline to remove any truly unused or hidden layers can reduce unnecessary processing.
Streamline Complex Sections with Nesting: This is where true 'consolidation' happens for performance. If you have a section with many overlapping clips, effects, and layers (e.g., a complex title animation or a multi-layered composite), you can nest that entire section.
Select all the clips and layers within that complex section.
Right-click and choose "Nest..."
Give your new nested sequence a clear name.
Nesting essentially turns that complex stack of layers into a single, manageable clip on your main timeline. Premiere Pro only has to render that single nested sequence once. This can significantly reduce the processing burden for those dense areas, leading to smoother playback and faster rendering for that specific portion of your project. It's a great way to simplify the information Premiere Pro needs to process, making your overall rendering process much faster for complex sequences.
Keeping your timeline tidy, and wisely using tools like nesting to manage complexity, is a powerful habit for any professional editor aiming for peak Premiere Pro rendering speed and a more stable workflow.
Tip #17: Use Proxies
If you're dealing with demanding high-resolution footage—think 4K, 6K, 8K, or even higher—you know the struggle: choppy playback, dropped frames, and a generally sluggish editing experience. Your computer might be a beast, but decoding all that information in real-time can still be a heavy lift. This is precisely why proxies are one of the most effective ways to speed up rendering in Premiere Pro and significantly improve your playback performance.
So, what exactly are proxies? They're simply much smaller, lower-resolution versions of your original clips. For example, if you're working with a massive 4K file, you can create a proxy copy at 1080p or even 720p. You then edit with these lightweight proxy files, making your timeline incredibly responsive. When it's time to export your final masterpiece, you just toggle them off, and Premiere Pro automatically links back to your original, full-resolution media for the best quality output.
This proxy workflow is a game-changer for editing efficiency, especially when you're working with taxing media.
Here’s how to quickly get started with proxies:
Select Your Clips: In your Project panel, highlight all the clips you plan to use in your edit.
Create Proxies: Right-click on the highlighted clips, then go to
Proxy > Create Proxies. Premiere Pro will use Media Encoder (which typically launches automatically) to generate these smaller files for you.Toggle Proxies On/Off: Once your proxies are created (you'll see a green "Attached" status if you add a Proxy column in your Project panel), find the "Toggle Proxy" button in your Program Monitor. It looks like a small square with two arrows. Click it to switch between your high-res originals and your low-res proxies during editing.
Using proxies will dramatically improve your Premiere Pro playback performance and make your editing experience buttery smooth. When combined with strategies like smart rendering (where you use high-quality previews for efficient exports), you'll find that your entire process, from rough cut to final export, becomes much, much faster.
Tip #18: Clear Media Cache
Here's a quick and often overlooked maintenance tip that can really help your Premiere Pro performance, especially if you're working with limited storage: regularly clearing your media cache.
Premiere Pro, much like a meticulous housekeeper, saves temporary project information and components in a dedicated "media cache" folder. This is actually a good thing! It's designed to speed up your regular processes, make playback smoother, and help Premiere Pro quickly access parts of your project without re-calculating them every time. Every time you create a new project or work on an existing one, your cache will be filled with these temporary project items.
However, if this cache folder gets too large and consumes too much of your available disk space, it can actually start to work against you. A cluttered cache, particularly on systems with limited hardware capacity, can affect your rendering performance by potentially blocking other hardware acceleration processes due to a lack of available memory or storage. It's like trying to run a marathon with too much stuff in your backpack – it just slows you down.
Luckily, clearing your Media Cache is incredibly easy:
Go to
Edit > Preferences > Media Cache(on Mac, it'sPremiere Pro > Settings > Media Cache).You'll see options to delete cache files. I usually click "Delete" next to "Remove Media Cache Files."
If you have tons of available space on your computer, a full cache might not dramatically affect your overall performance. However, if you have limited capacity, making this a regular habit is absolutely necessary for maintaining optimal Premiere Pro optimization and ensuring smoother rendering. It's a simple step that can free up resources and keep your system running smoothly.
Tip #19: Optimize Sequence and Timeline Settings
Did you know that some of the biggest slowdowns in Premiere Pro can come from your sequence settings? It's true! These often-overlooked details can significantly impact your rendering times and overall performance. When your sequence isn't set up correctly, Premiere Pro has to constantly work extra hard to process everything.
Here’s what I always check to make sure my sequences are optimized for speed:
Resolution and Frame Rate: Match or Adapt.
Match your source: The golden rule for smooth editing and faster rendering is to make sure your sequence's resolution (e.g., 1920x1080, 3840x2160) and frame rate (e.g., 24fps, 30fps) are identical to your original footage. This avoids unnecessary scaling or frame interpolation, which are huge performance drains.
Strategic downscaling: If you shot in 4K but your final video only needs to be 1080p, consider creating a 1080p sequence right from the start. Editing in a lower-resolution sequence dramatically reduces the strain on your system, leading to smoother playback and quicker renders, especially on less powerful computers. This is about working smarter, not harder.
Bit-Depth and Color Space: Only When Necessary.
Higher bit-depths (like 10-bit or 12-bit color) and advanced HDR color spaces are fantastic for high-fidelity projects, but they demand a lot more computational power. Unless your project absolutely requires this extreme color accuracy, stick with standard 8-bit color. It provides excellent quality for most projects without crippling your editing and rendering speeds.
Preview Resolution (for Editing Playback):
Remember, we talked about this earlier, but it's worth revisiting in the context of your sequence. While your sequence settings dictate your final output quality, adjusting your playback resolution in the Program Monitor to Half or Quarter (instead of Full) will make your editing experience much smoother. This specifically helps with faster scrubbing and real-time playback of complex sections, without affecting your final export quality. It's a quick tweak to prevent unnecessary rendering strain while you work.
By dialing in these sequence settings, you're essentially telling Premiere Pro exactly how to process your footage most efficiently. This proactive step ensures faster rendering, reduces your system's processing load, and gives you a much more responsive and efficient Premiere Pro workflow.
Tip #20: Keep Premiere Pro and Drivers Updated
Adobe regularly releases updates for Premiere Pro that optimize performance, enhance stability, and fix rendering-related bugs, making it crucial to keep the software up to date. Many performance issues, including slow rendering, crashes, and export errors, can often be resolved simply by installing the latest version of Premiere Pro. Each update includes important improvements, such as better hardware acceleration, enhanced codec support, and general performance enhancements that allow the software to run more efficiently. By failing to update, users risk missing out on these optimizations, which can lead to longer rendering times and compatibility issues with newer file formats or hardware configurations. Additionally, outdated software versions may not fully support the latest graphics cards, processors, or operating system updates, further contributing to sluggish performance.
To ensure that you are always using the most optimized version of Premiere Pro, regularly check for updates through Adobe Creative Cloud. To do this, open the Creative Cloud app, navigate to Premiere Pro, and check for any available updates. If an update is available, install it to gain access to the latest performance improvements and bug fixes. Additionally, it is equally important to keep your GPU drivers updated, especially for NVIDIA and AMD users. Premiere Pro relies heavily on hardware acceleration, and outdated graphics drivers can lead to slow rendering times, crashes, or even missing GPU acceleration options. To update your GPU drivers, visit the official NVIDIA GeForce Experience or AMD Radeon Software tool, download the latest drivers, and install them. By keeping both Premiere Pro and your graphics drivers up to date, you ensure optimal performance, faster rendering, and a more stable editing workflow, allowing you to work more efficiently without unnecessary slowdowns or technical issues.
Key Takeaways: Unlock Faster Premiere Pro Renders
Achieving lightning-fast renders in Premiere Pro is about adopting a holistic approach, combining smart workflow habits with a finely tuned system. Here are the 20 essential strategies to get you there:
1. Optimize Your Footage: Start strong by transcoding your raw footage to optimized codecs (like ProRes or DNxHR) or by creating lightweight proxies for smoother editing, especially with high-resolution media.
2. Use Proxies: Leverage proxy files for a super responsive editing experience, then seamlessly switch back to originals for final export.
3. Fine-Tune Sequence Settings: Match your sequence's resolution, frame rate, and color space to your source footage, or intentionally downscale the sequence for performance gains.
4. Optimize Effects and Plugins: Be mindful of resource-heavy effects and third-party plugins; render complex sections as needed.
5. Leverage High-Quality Previews: Set up your sequence to generate high-quality preview files that Premiere Pro can reuse for "smart rendering", dramatically speeding up exports.
6. Adjust Playback Resolution: Reduce your Program Monitor's playback resolution (e.g., to 1/2 or 1/4) for smoother real-time editing without affecting final quality.
7. Use "Render In to Out": Selectively render specific, troublesome sections of your timeline for immediate smooth playback during editing.
8. Avoid Redundant Renders During Revisions: Utilize pre-rendered segments and the "Use Previews" option during export to save immense time on subsequent export iterations.
9. Streamline Your Workspace: Keep your interface responsive by disabling or closing unused panels (like Lumetri Scopes) when not actively needed.
10. Master Dynamic Link with "Render and Replace": For After Effects compositions, "Render and Replace"them in Premiere Pro to convert dynamic links into performant video files once finalized.
11. Don't Forget to Clear Your Media Cache: Regularly purge your media cache to free up disk space and prevent performance bottlenecks.
12. Minimize Background Processes & Applications: Close all unnecessary software and background apps to dedicate maximum system resources to Premiere Pro.
13. Keep Software & Drivers Up-to-Date: Regularly update your operating system, Premiere Pro, and especially your GPU drivers for bug fixes and performance enhancements.
14. Optimize RAM Allocation: Adjust Premiere Pro's preferences to allocate the vast majority of your system's RAM to Adobe applications.
15. Optimize Your Hardware & Storage Setup: Invest in fast SSDs or NVMe drives for your OS, applications, project files, and crucial media/cache files. Ideally, use separate fast drives for different data types.
16. Activate Your GPU with GPUSniffer: Use this built-in Adobe tool to help Premiere Pro properly detect and utilize your graphics card for GPU hardware acceleration.
17. Master Your Export Settings: Carefully choose the right codec, understand and set appropriate bitrates, and always prefer hardware encoding over software encoding for speed.
18. Consolidate Clips (Nesting): For complex, layered sections, nesting clips can simplify the processing burden for Premiere Pro, leading to smoother playback and faster rendering of those segments.
19. Efficient Project Management (Remove Unused Media): Regularly clean up your Project Panel by removing unused clips and sequences, which can help keep project files lighter and improve stability.
20. Utilize Adobe Media Encoder for Batch Exporting: For multiple exports or background rendering, offload the task to Media Encoder, allowing you to continue working in Premiere Pro.
If you need more speed or smoother workflow without all these configurations, Vagon Cloud Computer offers an incredible solution.
Vagon provides instant access to high-performance virtual workstations, allowing you to bypass local hardware limitations and achieve professional-grade rendering speeds on demand, ensuring you always have the horsepower you need to meet deadlines and deliver stunning results.
Frequently Asked Questions (FAQs):
How to speed up my computer when I run Premiere Pro?
There are a few ways to get your PC to become a beast when running high-end apps such as Adobe Premiere Pro. You could improve your computer hardware or buy a new one. In addition to the internal settings of the application, still there are some alternative methods that you can apply to speed up the overall performance of your computer, or you can try using additional resources to run performance demanding applications on your low end device.
Why is Premiere Pro rendering so slow on my computer?
Premiere Pro rendering can be slow due to insufficient CPU power, lack of GPU acceleration, or running multiple applications simultaneously. Optimizing these factors can help improve rendering speed.
What are the best settings for faster rendering in Premiere Pro?
For faster rendering in Premiere Pro, ensure GPU acceleration is enabled, reduce playback resolution, and consider using high-quality previews and smart rendering.
How can I reduce export time in Premiere Pro?
To reduce export time in Premiere Pro, try clearing the media cache, using proxies, and closing other programs to free up system resources.
Is it possible to make Premiere Pro render faster without upgrading hardware?
Yes, you can make Premiere Pro render faster without upgrading hardware by optimizing software settings, such as memory allocation, and using features like Media Encoder or smart rendering.
Which video editor is the best?
Even Premiere Pro is among the best video editors on the market, Final Cut Pro and Blender are some other well-known video editors in the Video Production industry as well. Of course, the preferred solution can vary according to the unique needs of the projects and requirements of it.
In addition to the listed video editor alternatives, if the project has more VFX components in it, you can use Adobe After Effects to utilize video effects in your project. Or, if it’s a simple one such as a social media video, you can use Premiere Rush with its’ user-friendly design and ready-to-use templates.
How do I get started on Premiere Pro?
Premiere Pro is a video editing program used all over the world and many people have released great YouTube tutorials, created courses for all level of expertises and Adobe published official tutorials on Premiere Pro as well.
Get Beyond Your Computer Performance
Run applications on your cloud computer with the latest generation hardware. No more crashes or lags.

Trial includes 1 hour usage + 7 days of storage.
Summarize with AI

Ready to focus on your creativity?
Vagon gives you the ability to create & render projects, collaborate, and stream applications with the power of the best hardware.

Vagon Blog


Run heavy applications on any device with
your personal computer on the cloud.
San Francisco, California
Solutions
Vagon Teams
Vagon Streams
Use Cases
Resources
Vagon Blog
How to Run Inkscape on a Cloud Ubuntu Desktop (2026 Guide)
How to Run Krita on a Cloud Ubuntu Desktop for Digital Painting (2026 Guide)
How to Run GIMP on a Cloud Ubuntu Desktop (2026 Guide)
How to Run Jupyter on a Cloud GPU Linux Desktop (2026 Guide)
Vagon vs GitHub Codespaces: Cloud Dev Environments Compared (2026)
Vagon vs RunPod: Which Cloud GPU Is Right for You? (2026 Comparison)
How to Watch Your AI Agent Work on a Cloud Ubuntu Desktop (2026 Guide)
How to Run a Local LLM on Ubuntu in the Cloud (2026 Guide)
How to Run Blender on a Cloud GPU (Ubuntu): The Complete 2026 Guide
Vagon Blog
Run heavy applications on any device with
your personal computer on the cloud.
San Francisco, California
Solutions
Vagon Teams
Vagon Streams
Use Cases
Resources
Vagon Blog