Instant Connection for Pixel Streaming
— New Feature Automated Setup

How to Stop Premiere Pro from Crashing in 2026
How to Stop Premiere Pro from Crashing in 2026
VideoProduction
How to Stop Premiere Pro from Crashing in 2026
Table of Contents
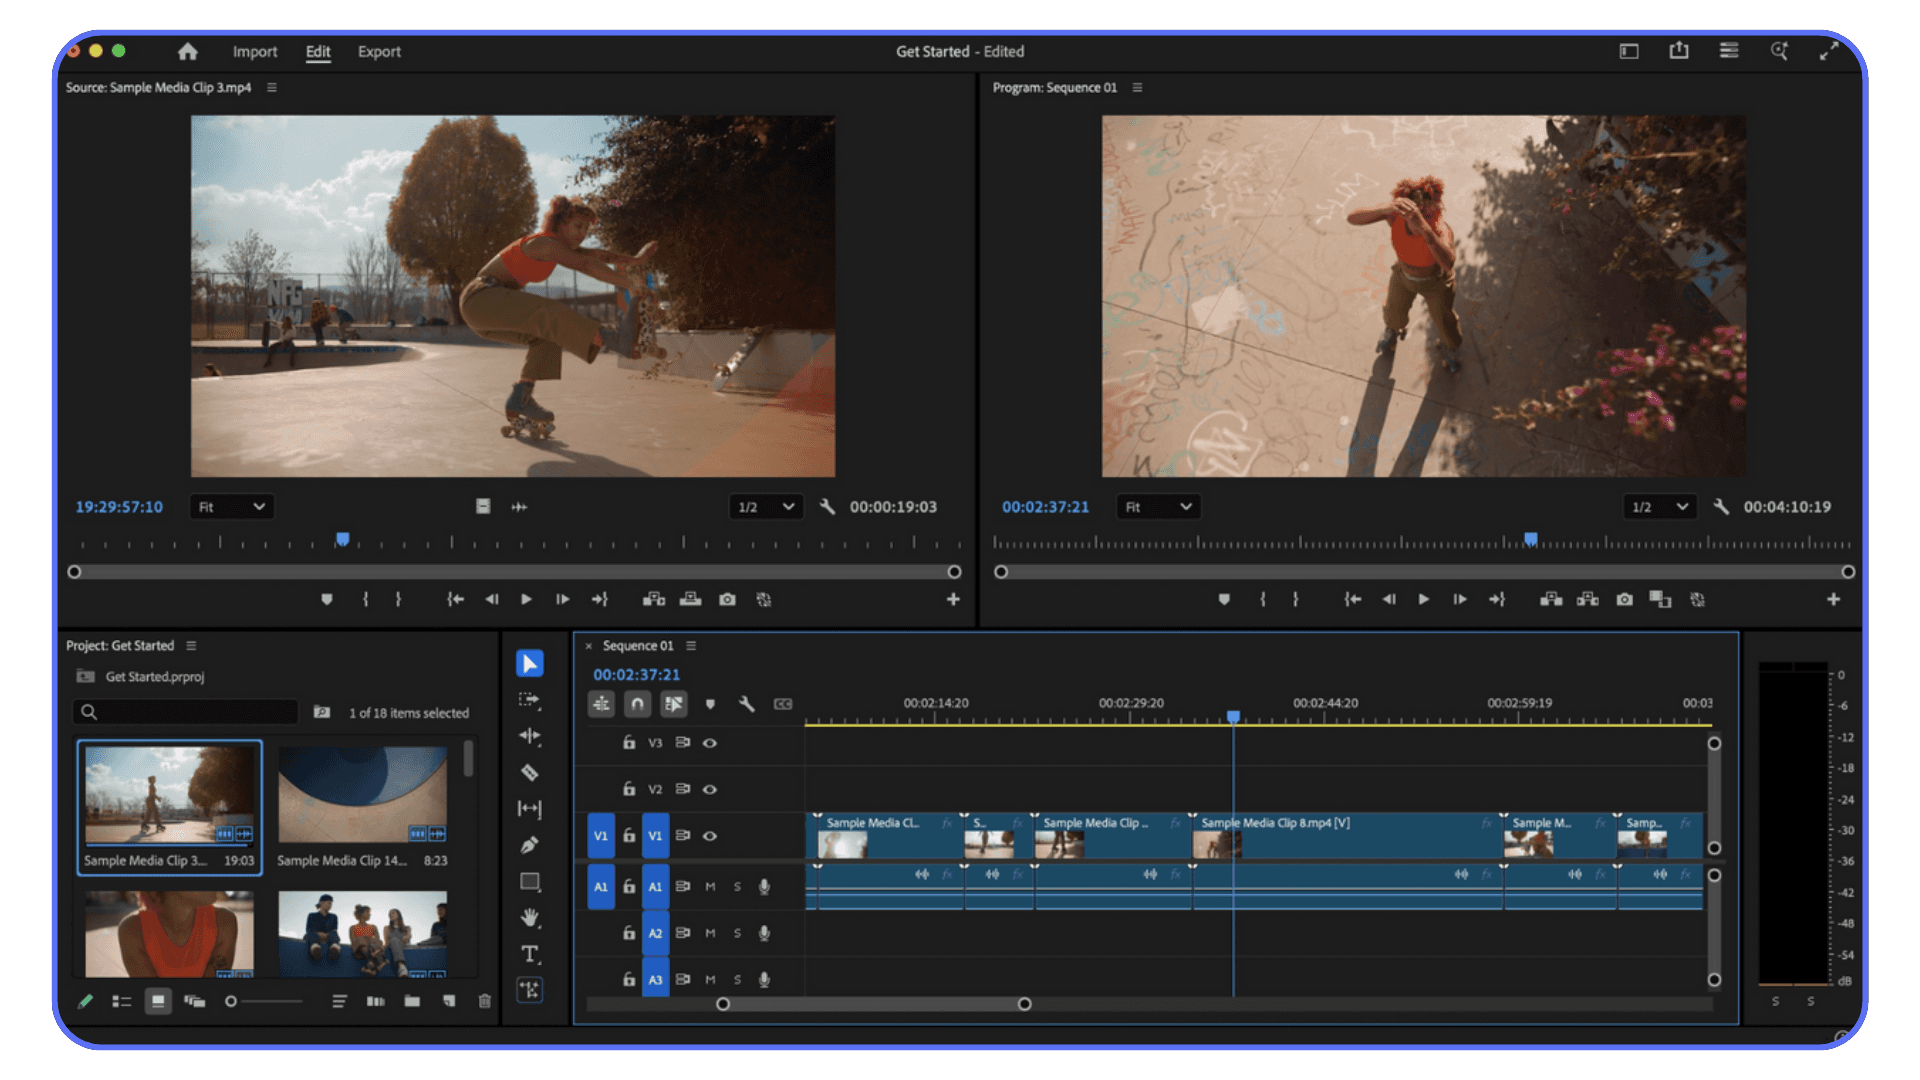
You’re in the zone. Playback is smooth. Cuts are landing exactly where you want them.
Then everything stops.
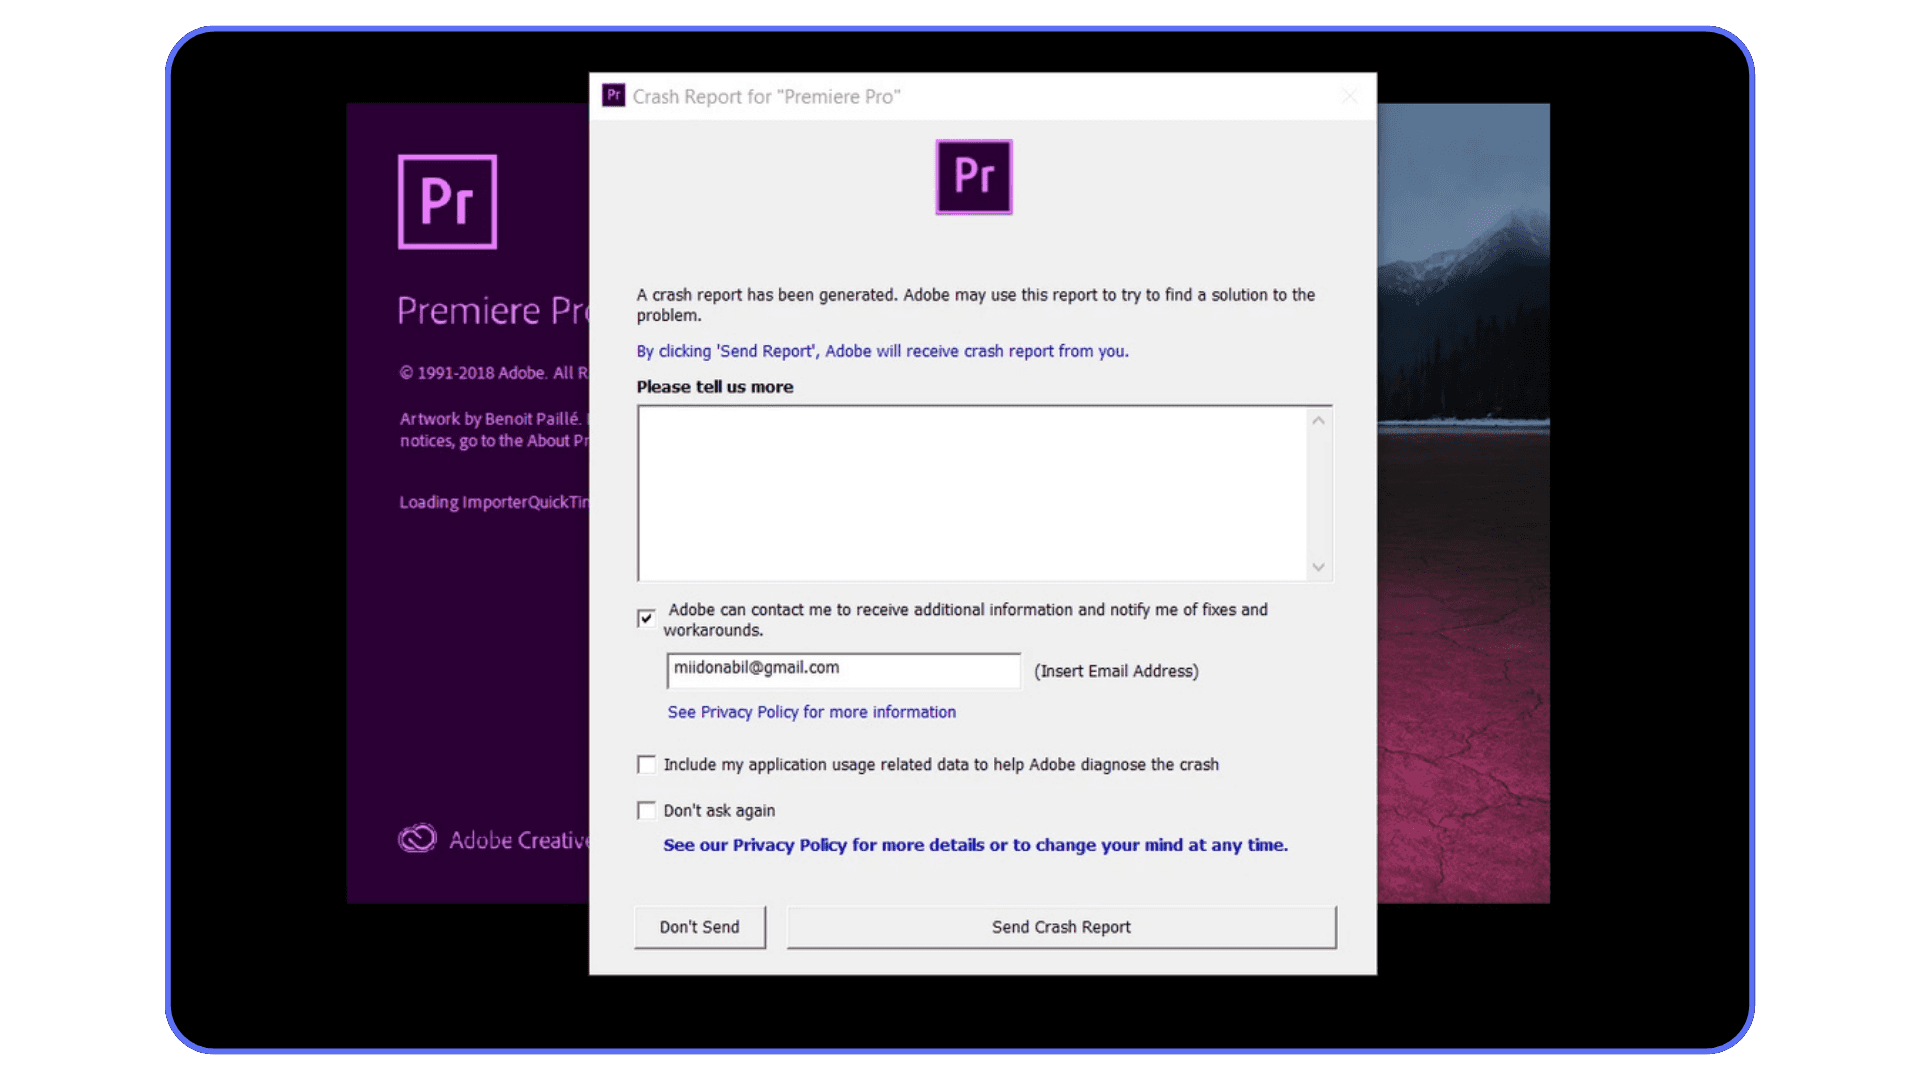
Premiere freezes for a second. Maybe two. Then it’s gone. No warning. No error message. Just your desktop staring back at you like nothing happened.
You reopen the project. Autosave helps, sort of. But it didn’t catch the last stretch. The rhythm you had, that quiet momentum where editing feels effortless, is gone. You try to get it back. It’s not the same.
If you’ve edited long enough, you’ve lived this moment more times than you’d like. Premiere Pro crashes are frustrating, disruptive, and weirdly random. But here’s the thing most people don’t hear enough. They’re also usually fixable.
And when they’re not, there’s a reason for that too.
First, Figure Out How Premiere Pro Is Crashing
Before you touch a single setting, pause for a moment.
Not everything that looks like a crash is the same problem.
This is where a lot of editors lose time. Premiere crashes, frustration spikes, and the instinct is to start flipping switches. Clear cache. Reinstall. Restart. Repeat. Sometimes that works. Often it doesn’t.
The difference is in how Premiere fails.
If Premiere crashes on launch, or right after the splash screen, that usually points to corrupted preferences, damaged cache files, or a plug-in Premiere tries to load immediately. This kind of crash often shows up right after an update or after installing something new.
If Premiere opens fine but crashes during playback or scrubbing, you’re probably dealing with media or GPU issues. Heavy codecs. Variable frame rate footage. A driver that doesn’t play nicely with hardware acceleration. This is the classic crash that shows up the moment you start moving fast.
Freezes are a little different. Premiere doesn’t close, but nothing responds. Panels lock up. The spinning cursor appears. Sometimes it recovers. Sometimes you’re forced to quit. This usually means Premiere is waiting on resources your system can’t deliver fast enough. RAM fills up. Disk cache slows down. Everything stalls.
Export crashes are their own kind of pain. Playback looks fine. Timeline previews render. Then the export fails at the same percentage every time. That’s often a single clip, effect, or encoding choice causing the issue, not the entire project.
One last question that matters more than people realize. Does every project crash, or just one?
If only one project is unstable, the problem is likely inside that project. A corrupt clip. A broken sequence. Years of accumulated complexity. If everything crashes, you’re almost certainly dealing with a system-level issue.
This step isn’t exciting. There’s nothing to fix yet. But once you can say, “Premiere crashes when I do this,” instead of “Premiere just crashes,” the rest of the process gets a lot easier.
If you’re noticing crashes the moment you stack effects, work with AI tools, or push color grading harder, chances are the GPU is the real bottleneck, and understanding how Premiere actually uses graphics cards can make a big difference.
#1. The Fast Fixes That Solve More Than Half of Crashes
This is the part most people rush through. Or worse, skip entirely because it sounds too simple to matter. Don’t.
I’ve seen these fixes stabilize Premiere more times than any deep, technical tweak. They’re boring. They’re not clever. And they work far more often than they should.
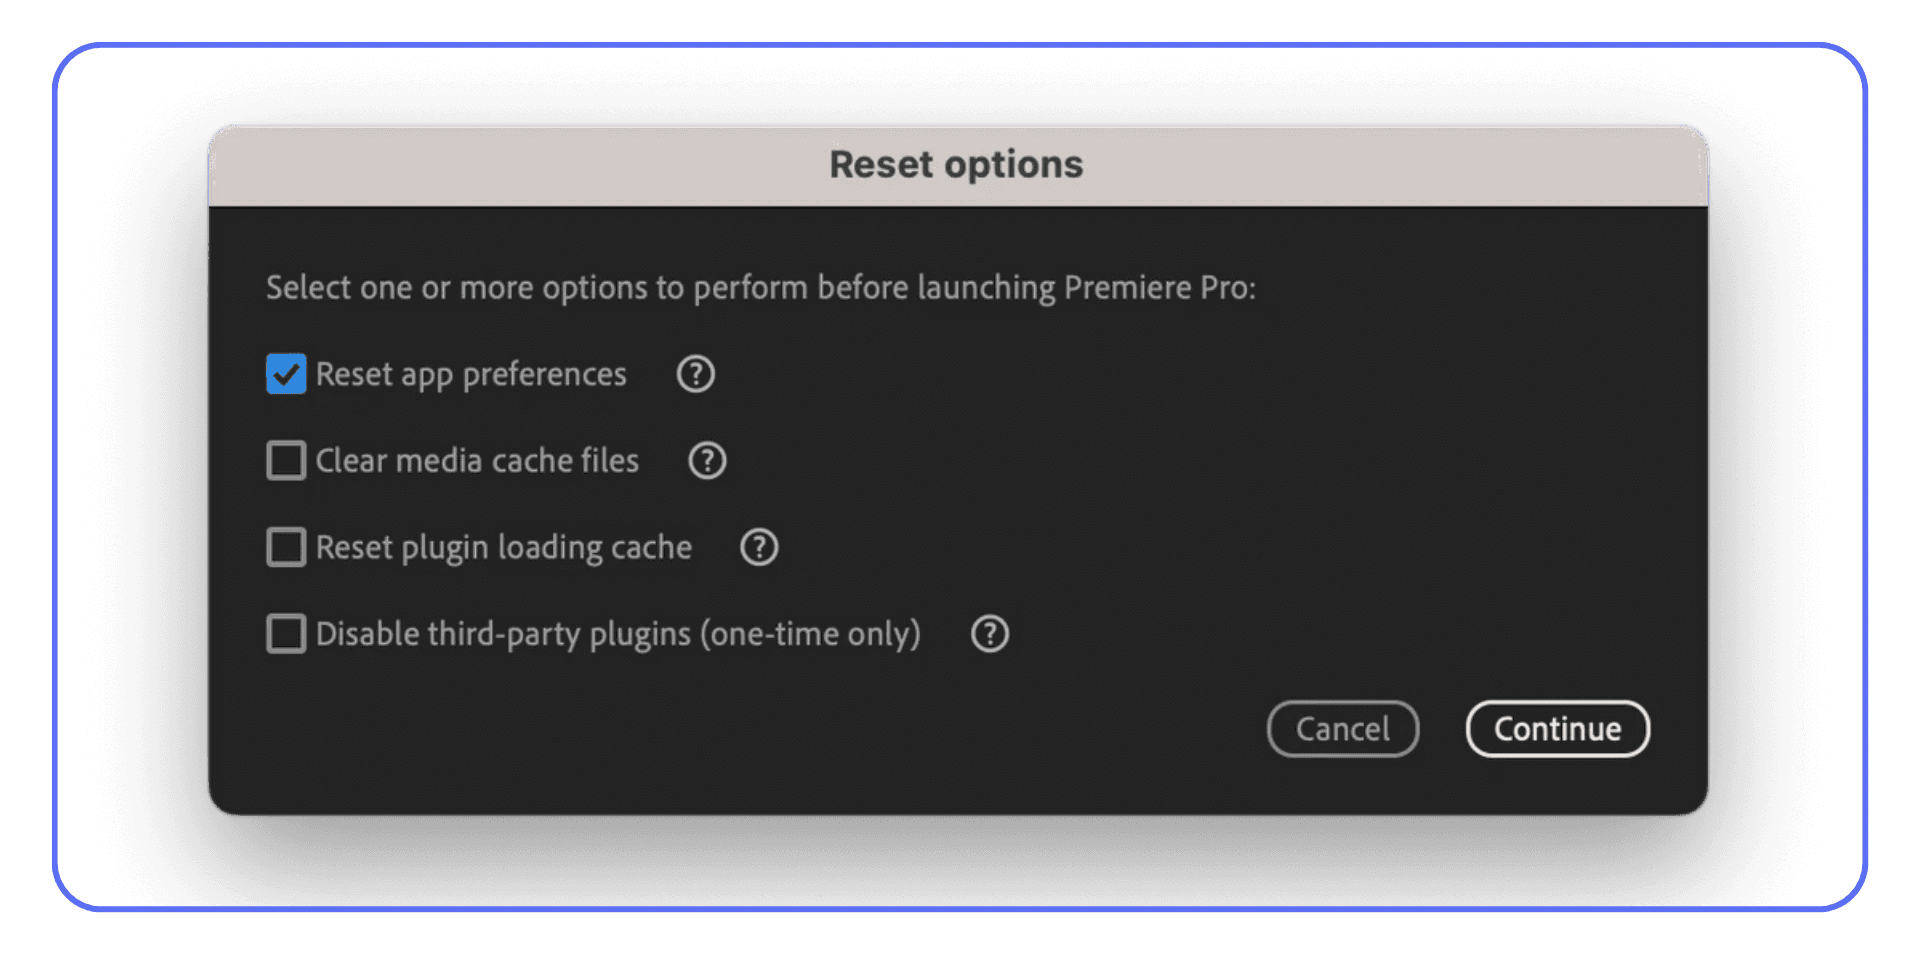
Reset Preferences and Clear the Cache
Premiere carries a lot of baggage from project to project. Preferences, cache files, previews, database entries. Over time, some of that gets corrupted. Not visibly. Just enough to cause weird behavior and sudden crashes.
Resetting preferences forces Premiere to rebuild its configuration from scratch. Clearing the media cache wipes temporary files Premiere relies on during playback and rendering. When those files go bad, Premiere goes with them.
The key mistake here is doing this halfway. Clearing cache but keeping old preferences. Or resetting preferences without restarting properly. Do both. Then relaunch Premiere and let it rebuild everything clean.
Will you lose custom shortcuts and workspace layouts? Yes. Is that annoying? Absolutely. Is it worth it if it stops daily crashes? Also yes.
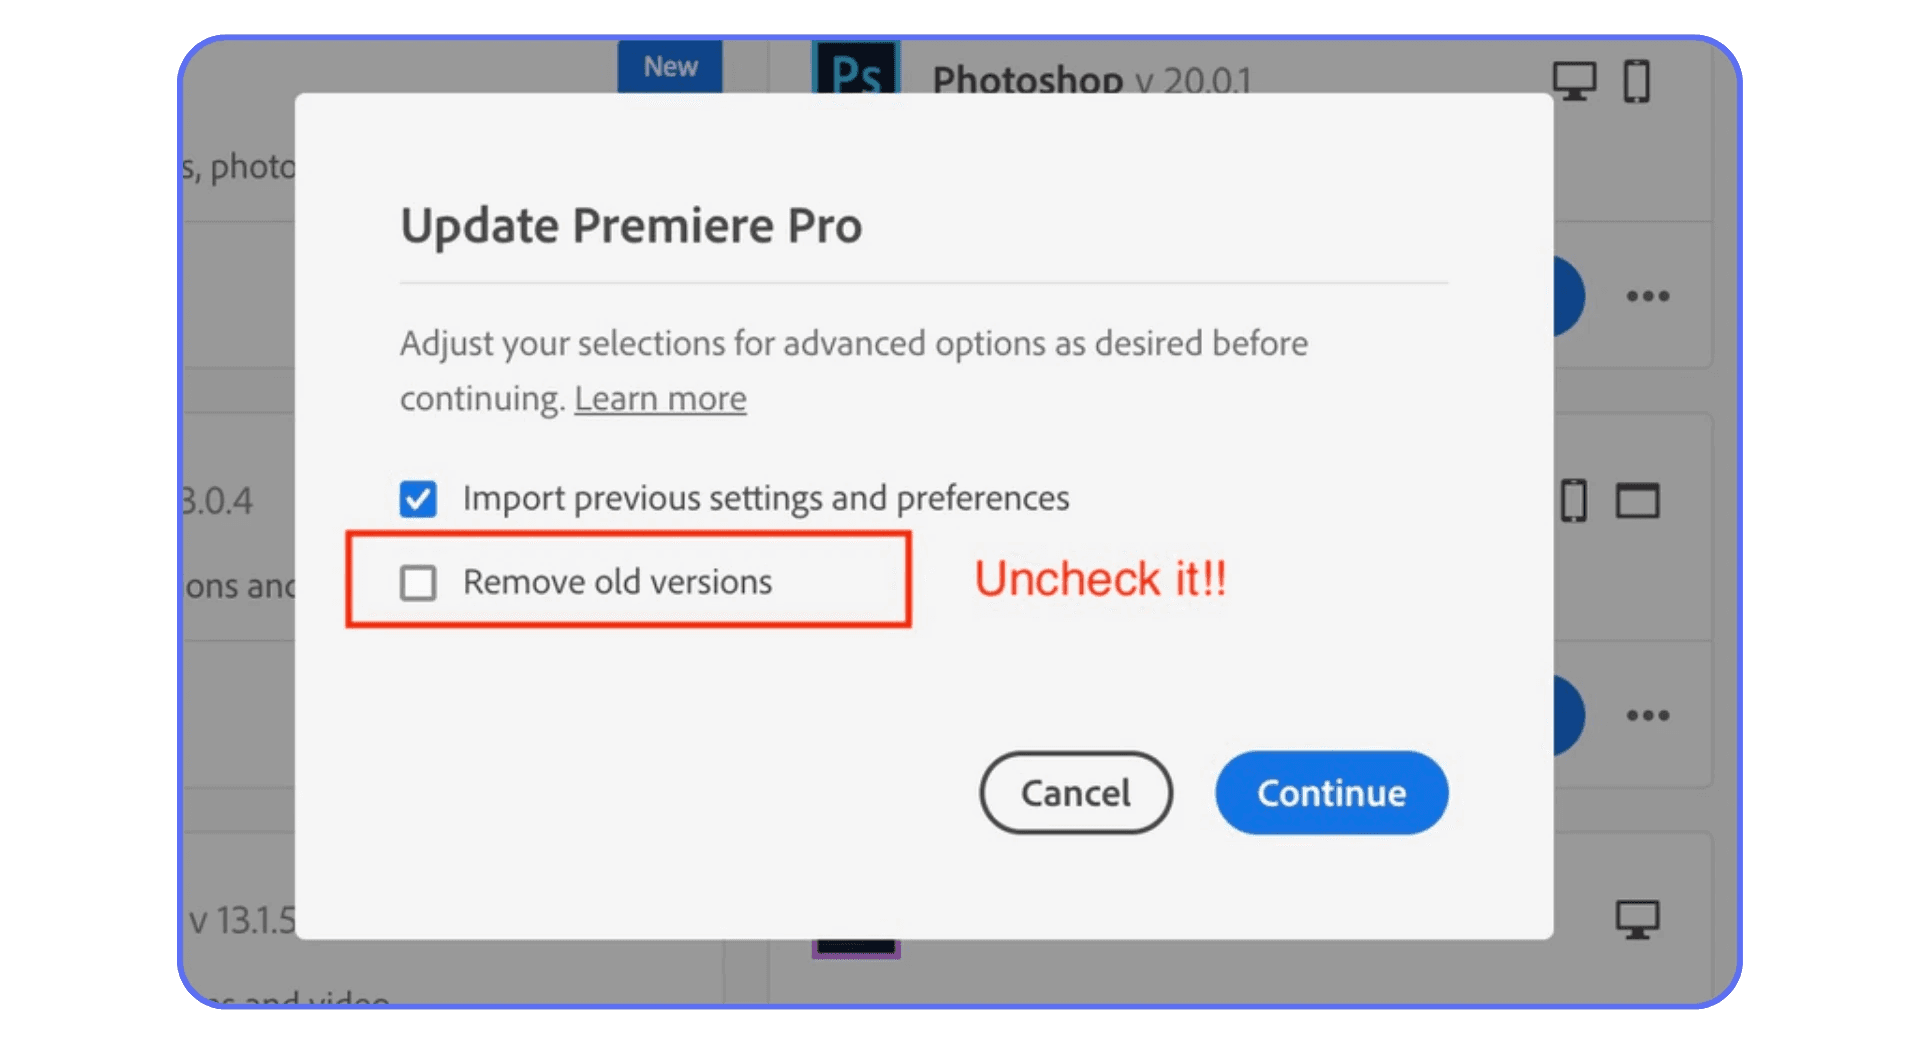
Update Premiere Pro and Your GPU Drivers Carefully
Updates are a double-edged sword.
Sometimes an update fixes the exact bug that’s been crashing your project. Other times, it introduces a brand new one you didn’t ask for. Same story with GPU drivers.
If you’re behind several versions, updating Premiere can genuinely improve stability. Especially if you’re dealing with newer codecs or camera formats. But updating mid-project without checking known issues is risky.
GPU drivers deserve even more caution. Newer is not always better. If crashes started right after a driver update, rolling back one version is often smarter than pushing forward. Editors forget this all the time.
My rule is simple. If your system is stable, don’t update out of boredom. If it’s unstable, updates are a tool, not a reflex.
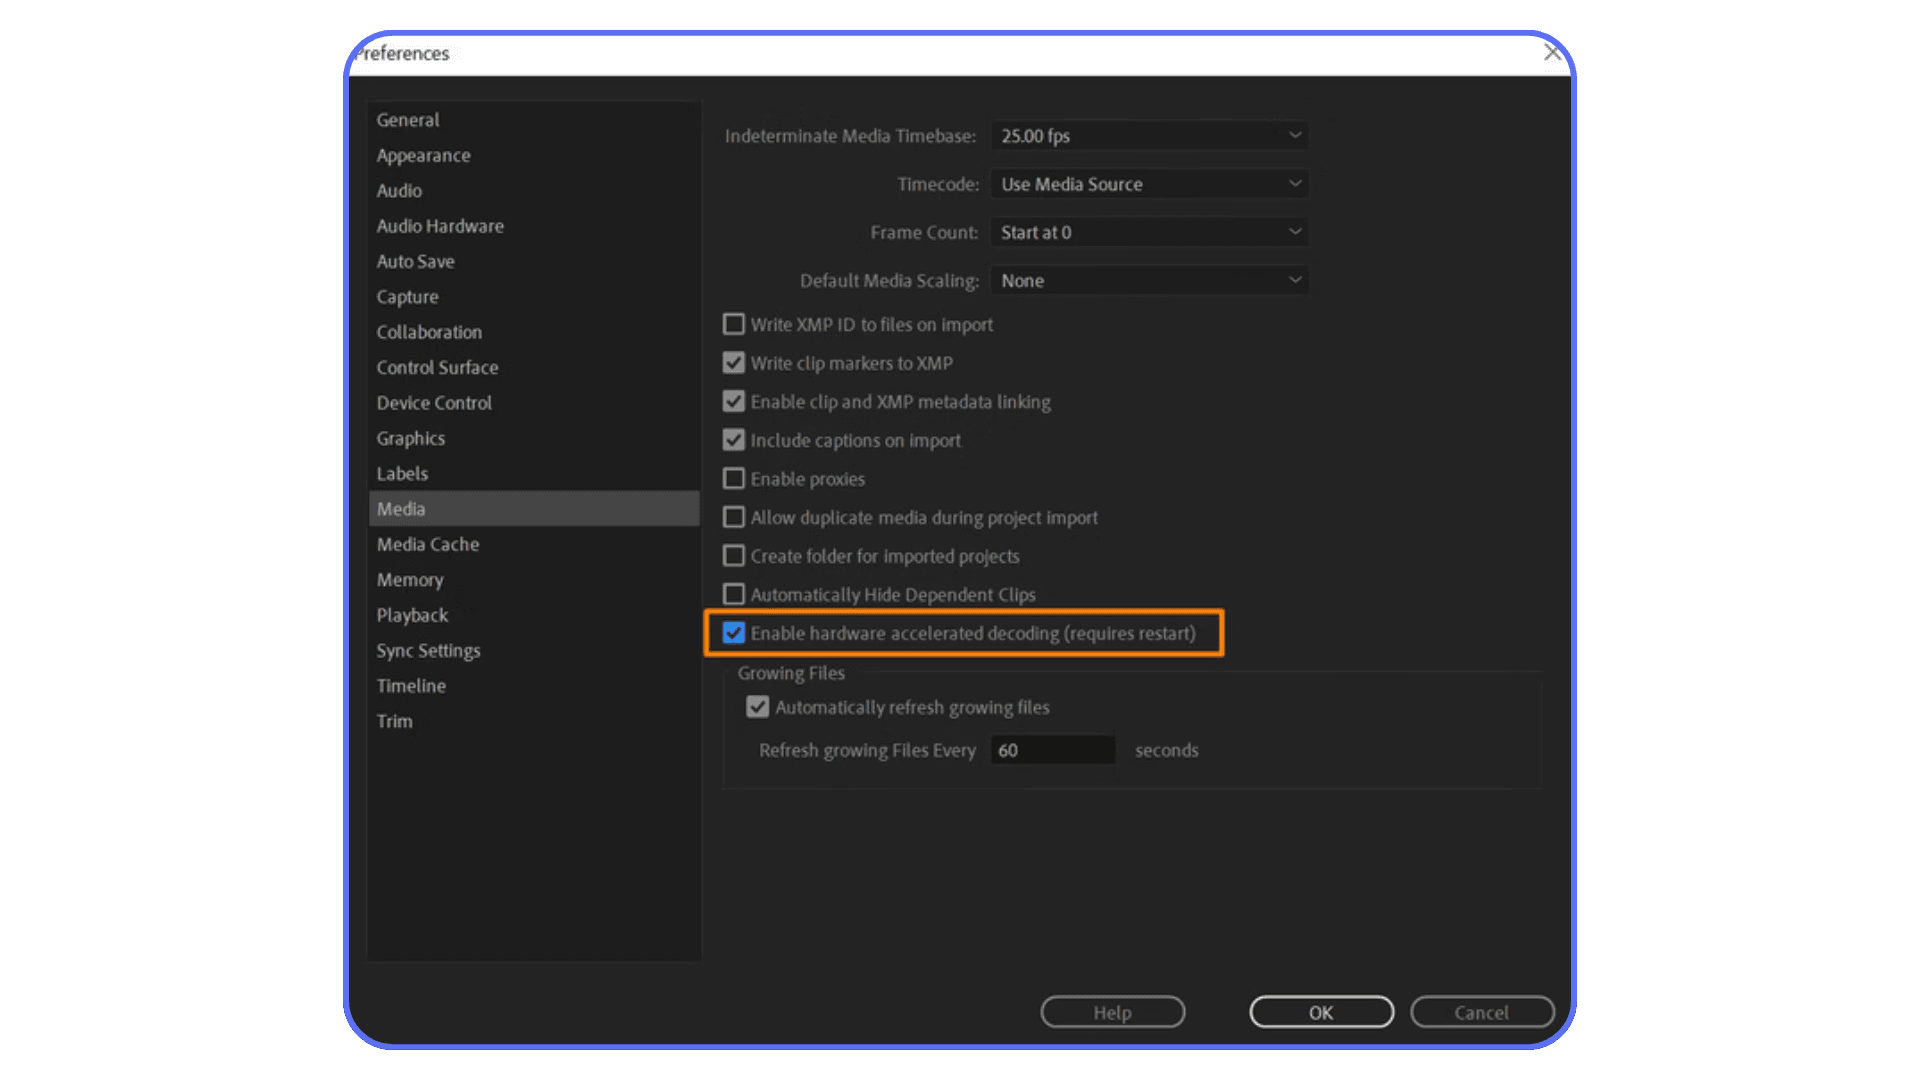
Test GPU Acceleration Instead of Guessing
GPU acceleration is great. Until it isn’t.
Many Premiere crashes trace back to GPU-related features. Effects. Transitions. Playback acceleration. Encoding. Turning GPU acceleration off temporarily is one of the fastest ways to confirm whether the GPU or its driver is involved.
This isn’t a permanent solution. Editing everything on software rendering is slower and defeats the point of modern hardware. But as a test, it’s incredibly useful.
If crashes disappear with GPU acceleration off, you’ve learned something important. Either the driver is unstable, the GPU is struggling, or a specific effect doesn’t behave well with hardware acceleration. From there, you can decide whether to update, roll back, or change how you work.
None of these fixes require deep technical knowledge. That’s the point. They remove variables. They clean up hidden problems. And more often than not, they turn an unusable project back into something you can actually finish.
If Premiere is still crashing after this, it’s time to look at what you’re feeding it.
If you’re trying to stay productive away from your main machine, whether that’s reviewing edits or making changes on the go, there are workflows that make using Premiere Pro from an iPad surprisingly practical.
#2. Media Problems That Quietly Destroy Stability
If Premiere crashes feel random, media is often why.
Not settings. Not bugs. The actual files on your timeline.
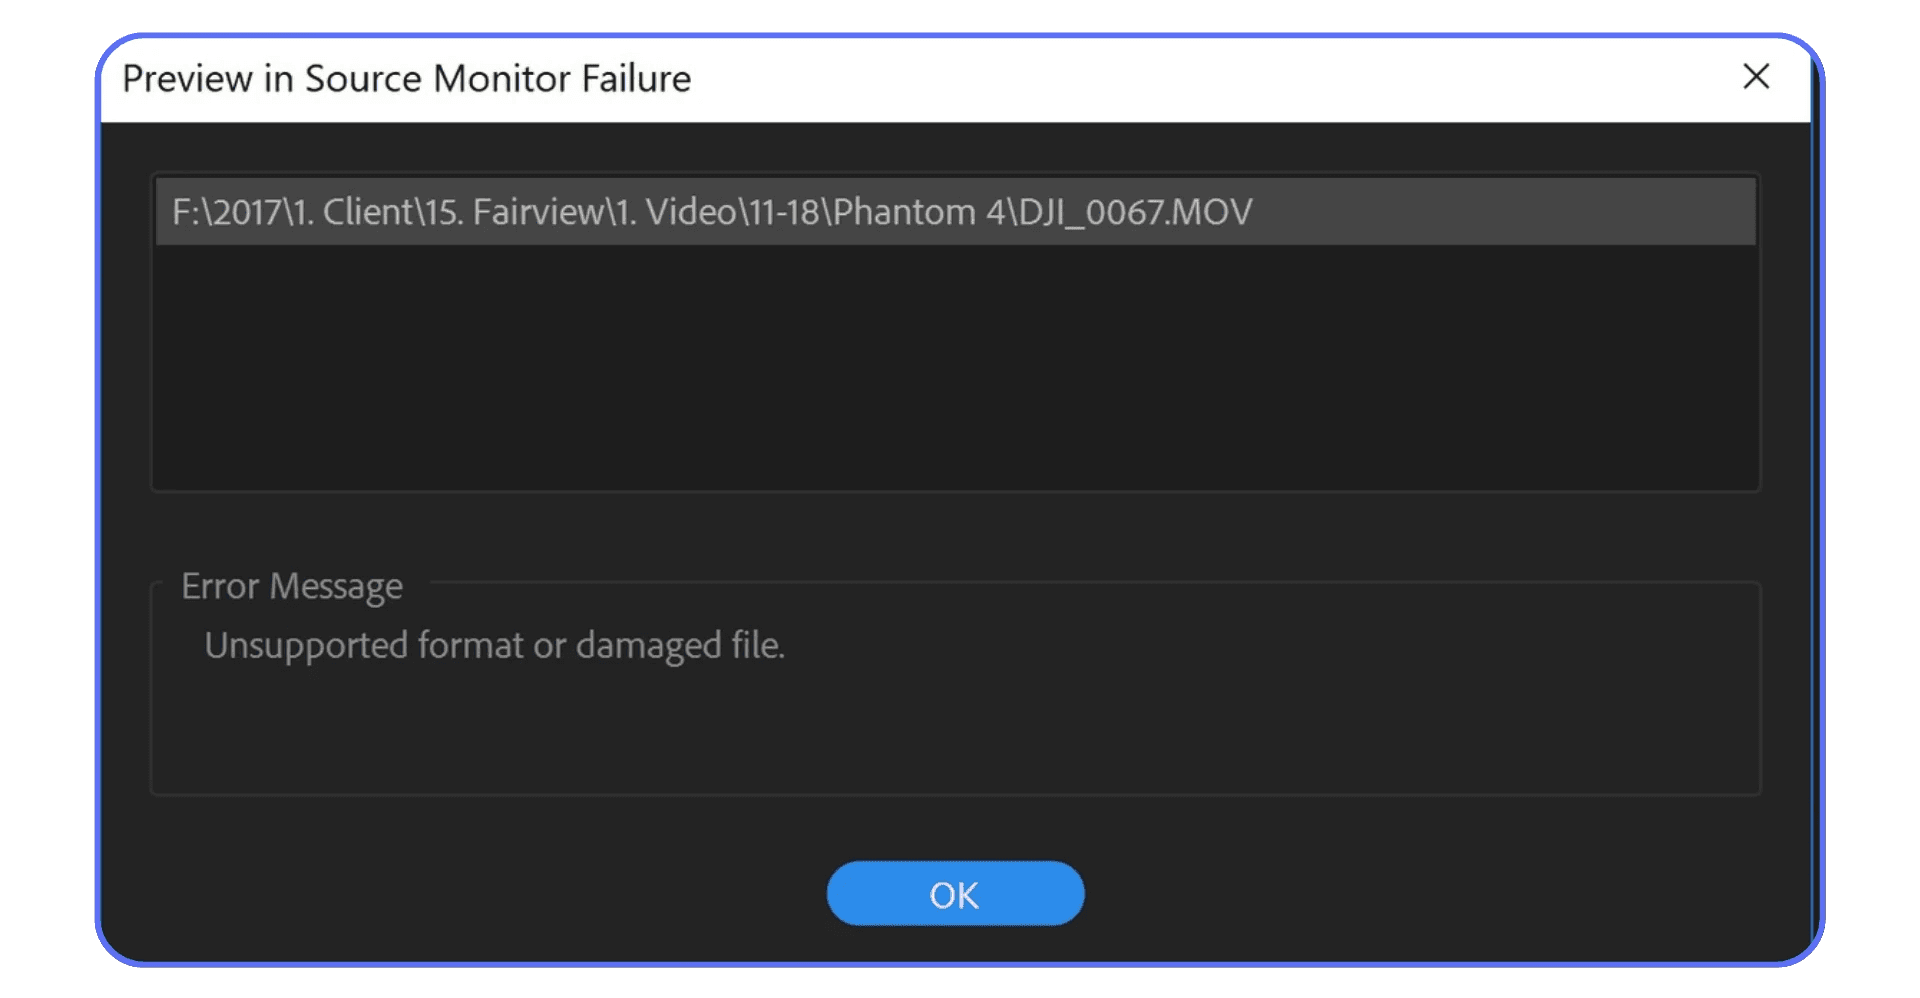
This catches a lot of people off guard because the footage plays. It imports fine. It scrubs. Sometimes it even edits smoothly for hours. Then out of nowhere, Premiere falls apart. That’s usually a sign that the footage is technically supported, but practically hostile.
Problem Footage and Unfriendly Codecs
Footage from phones and screen recordings is one of the biggest offenders. Especially anything recorded with a variable frame rate. The frame rate shifts on the fly to save space or battery life. Premiere hates that. It can play it, sure, but under pressure it becomes unstable fast.
Screen recordings are just as bad. They often mix odd frame rates, strange audio sample rates, and nonstandard encoding. Everything works until you stack effects or start scrubbing aggressively.
Delivery codecs make things worse. H.264 and H.265 are designed for playback, not editing. They’re highly compressed and force Premiere to do extra work just to decode every frame. On small projects, that’s manageable. On longer timelines or older machines, it’s a crash waiting to happen.
If your timeline is built mostly from these formats, you’re asking Premiere to juggle too much at once.

Corrupt Clips, Proxies, and Transcoding
Sometimes it’s not the format. It’s the file.
One corrupt clip can destabilize an entire project. The frustrating part is that Premiere won’t tell you which one. You’ll just notice crashes happening at similar points in the timeline or when you scroll past a certain section.
A quick test is to duplicate the sequence and remove chunks of footage until the crashes stop. It’s not elegant, but it works. Once the problem clip is gone, everything suddenly behaves.
Proxies can help, but they’re not magic. They reduce the load during playback, which helps with performance and sometimes stability. But if the original media is fundamentally broken or wildly inconsistent, proxies won’t fix that.
Transcoding does.
Converting problematic footage into an edit-friendly format like ProRes or DNx sounds like extra work. It is. But it also removes an entire category of crashes from your life. Stable frame rates. Predictable decoding. Cleaner playback. Fewer surprises.
This is one of those fixes that feels unnecessary until you try it. Then you wonder why you didn’t do it sooner.
If your media is clean and Premiere still struggles, the next place to look is how your project is built.
If you’ve reached the point where optimization isn’t helping anymore and you’re wondering what kind of hardware Premiere actually needs to stay stable, breaking down the right components can save a lot of guesswork.
#3. Timeline and Project Setup Mistakes
Even with clean media, Premiere can still trip over its own feet.
Usually because the project itself has become heavier and more complicated than it needs to be.
This sneaks up on people. You don’t start a project planning to make it fragile. It just happens over time. More sequences. More nests. More effects. More “I’ll clean this up later.” Premiere remembers all of it.
Inconsistent Sequences and Overbuilt Timelines
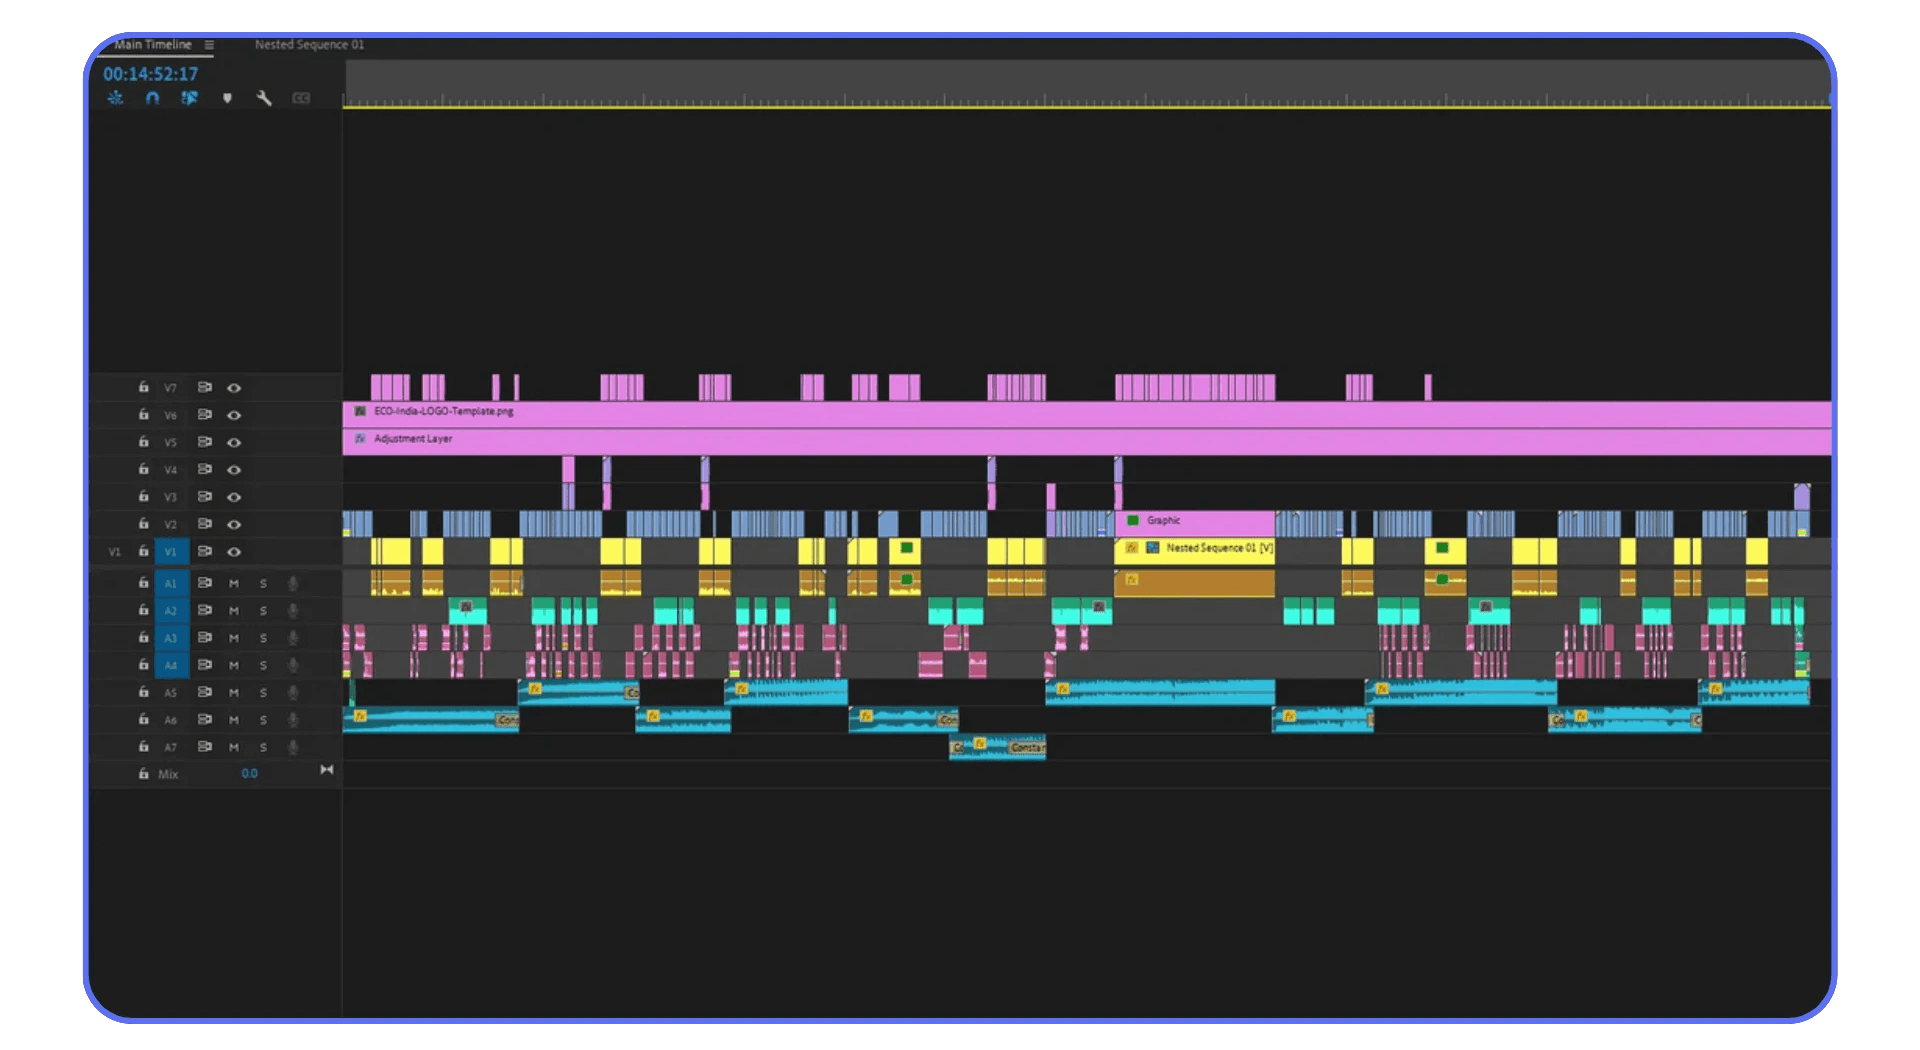
Mixed frame rates and resolutions are a quiet source of instability. A 24fps clip here, a 30fps screen recording there, a random 60fps b-roll shot dropped into the same sequence. Premiere will adapt, but it’s doing extra work every second to make that timeline function.
Long timelines make this worse. The longer and denser a sequence gets, the more Premiere has to manage at once. Multicam sequences add another layer of complexity. Everything might play fine until it suddenly doesn’t.
This is why some projects feel cursed while others behave. It’s not the footage alone. It’s the accumulation.
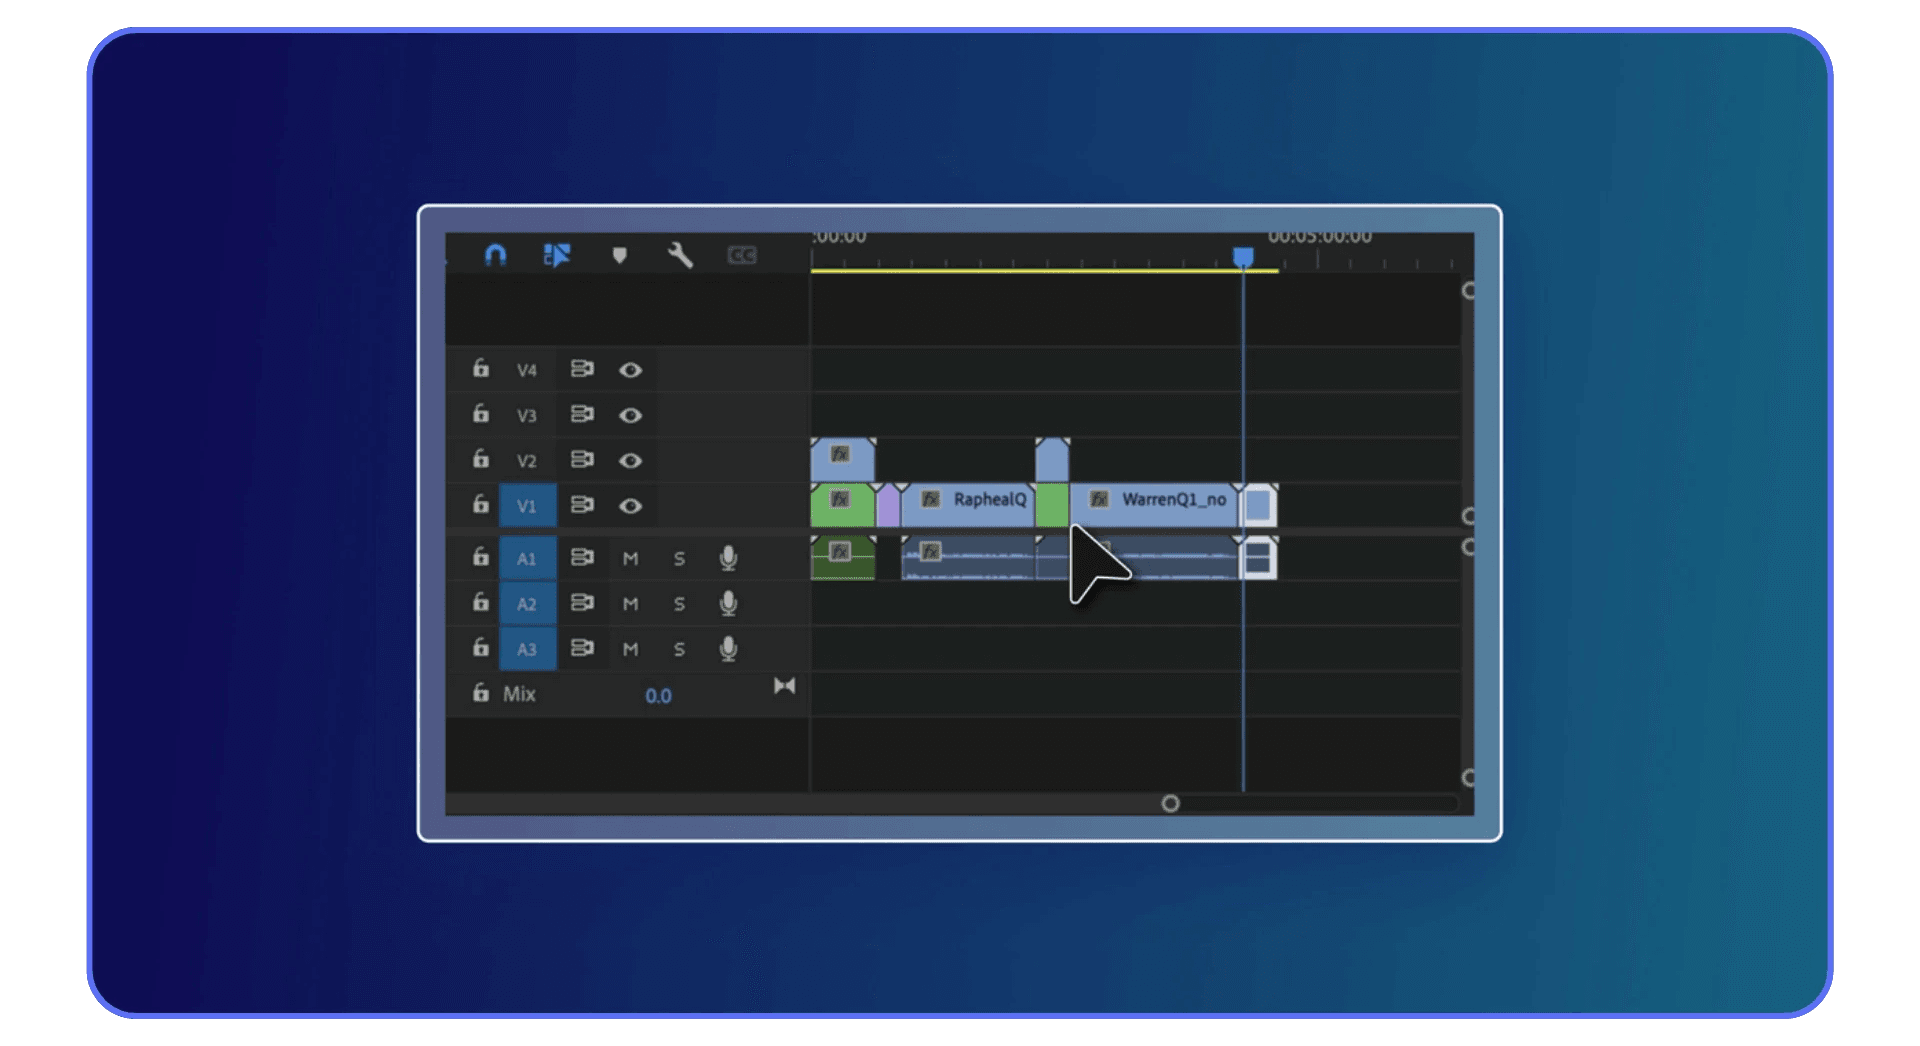
Nesting, Adjustment Layers, and Heavy Effects
Nesting is useful. Adjustment layers are powerful. Used carefully, they’re great. Used everywhere, they become a nightmare.
Deep nests hide problems. A single unstable effect buried three levels down can crash Premiere, and tracking it becomes painful. Adjustment layers stacked with color correction, blurs, sharpening, and AI effects push GPU and memory usage hard, even if playback looks okay.
If crashes happen when you enable or disable layers, or when you scrub past effect-heavy sections, this is a strong signal.
Simplifying doesn’t mean flattening everything immediately. It means being intentional. Fewer nests. Effects applied where they’re actually needed. Pre-rendering heavy sections instead of letting Premiere calculate them endlessly.
When Rebuilding a Project File Is the Smart Move
This is the part people resist the most. Sometimes the project file itself is the problem.
Old projects accumulate cruft. Broken references. Disabled sequences. Half-deleted assets. Premiere keeps all of it. Over time, that can destabilize even clean media and strong hardware.
Rebuilding sounds drastic, but it doesn’t mean starting from zero. Creating a fresh project and importing only the sequences and assets you actually need can instantly make crashes disappear. I’ve seen projects go from unusable to stable in minutes.
If your timeline is lean and Premiere still crashes, the next suspect is often what you’ve added on top of it. Plug-ins, effects, and extensions.
#4. Plug-Ins, Effects, and Extensions
Plug-ins are one of those things editors love to blame and underestimate at the same time. They’re powerful. They save time. They also crash Premiere more often than most people want to admit.
The tricky part is that plug-in crashes don’t always look like plug-in crashes. Premiere just disappears. No error. No warning. And unless you changed something recently, it’s easy to assume the problem lives somewhere else.
If constant crashes are making you question whether Premiere is the right tool for your workflow at all, it’s worth understanding how other professional editing options compare before committing to a long-term setup.
Third-Party Plug-Ins and Stability Risks
Any plug-in that runs inside Premiere is sharing space with the application itself. When Premiere updates, that relationship can break. Even if the plug-in technically loads, small incompatibilities can cause instability under load.
Color tools, noise reduction, motion effects, AI-powered features. These are some of the biggest offenders, simply because they push the GPU and memory hard. A plug-in might behave fine on a short clip, then crash Premiere the moment you apply it across a full sequence.
Adobe won’t always warn you about this. And plug-in developers can’t always keep up with Premiere’s update cycle. That gap is where crashes live.
Finding the Culprit Without Nuking Your Setup
The mistake most people make is uninstalling everything at once. That’s overkill and usually unnecessary.
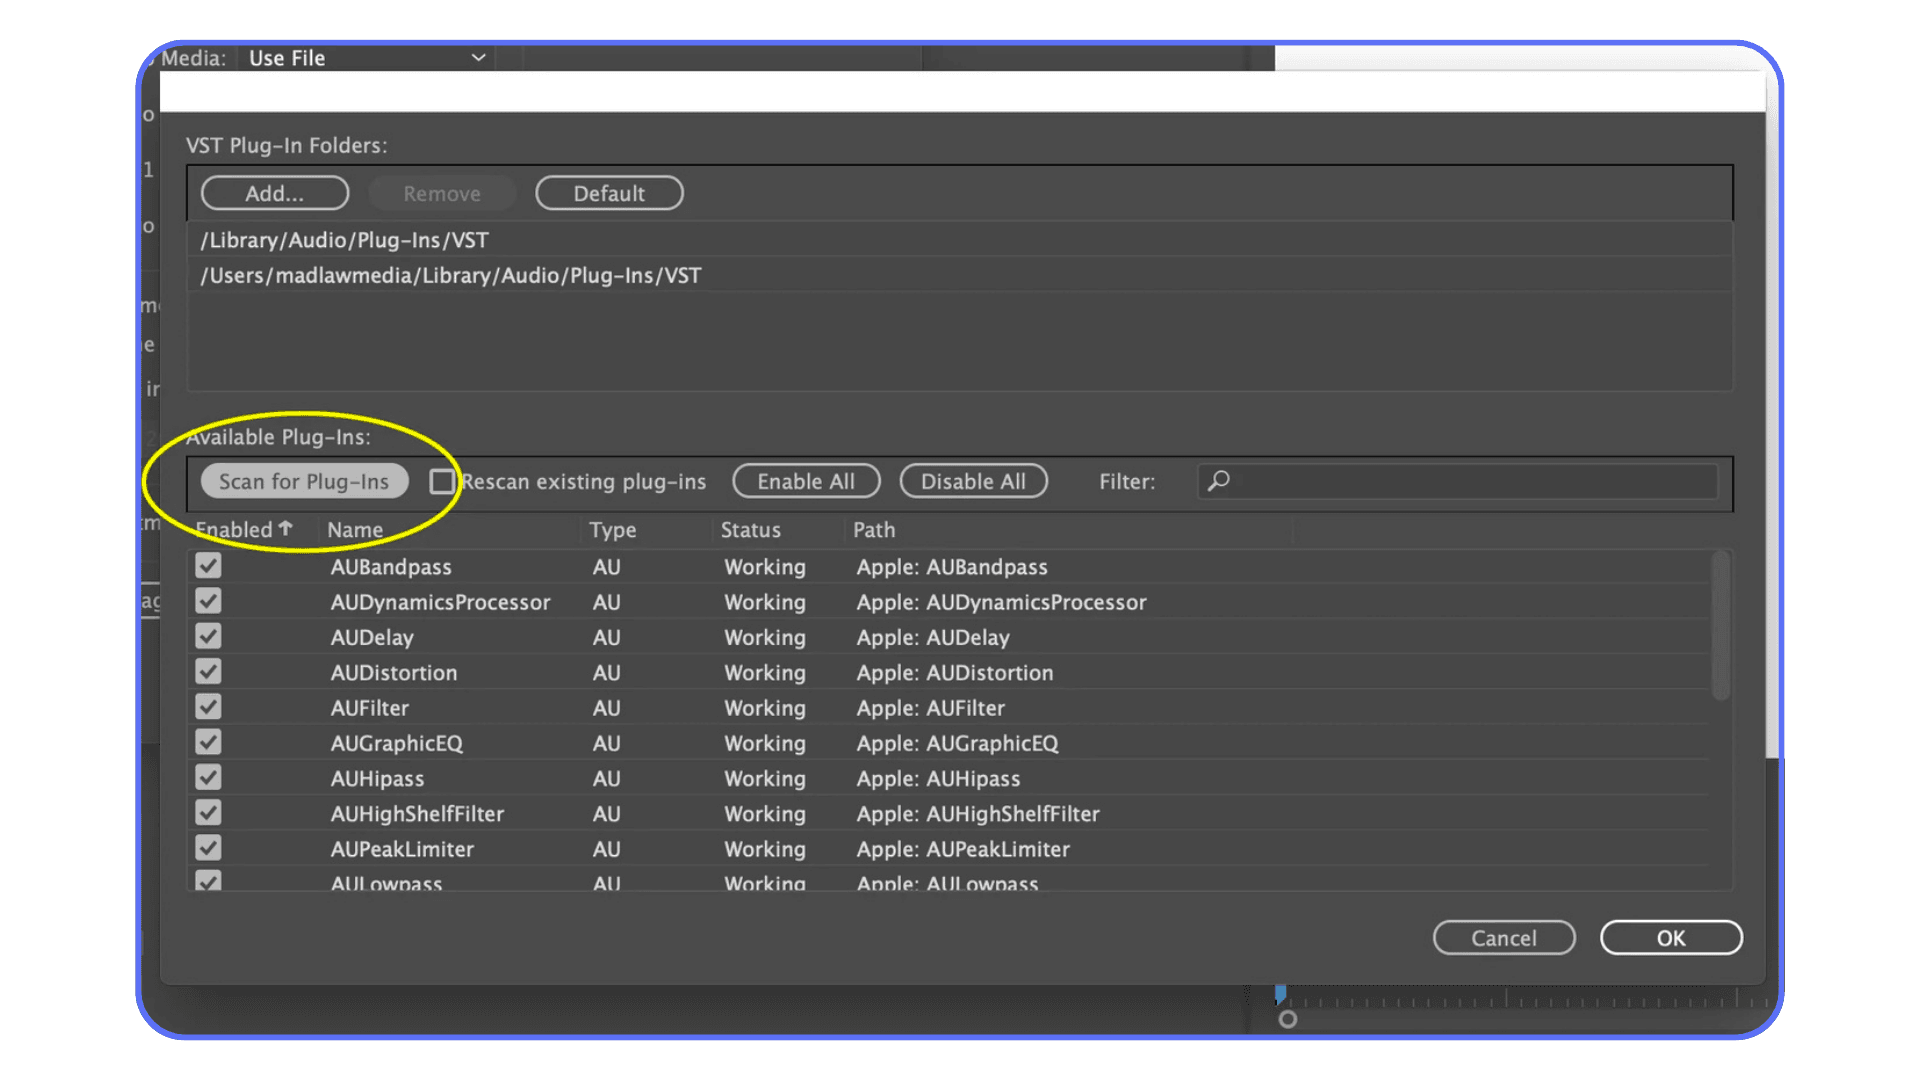
A better approach is isolation. Duplicate the project. Disable effects in chunks. Temporarily move plug-ins out of the plug-ins folder and relaunch Premiere. If the crashes stop, you’ve confirmed the category. Then it’s just a matter of narrowing it down.
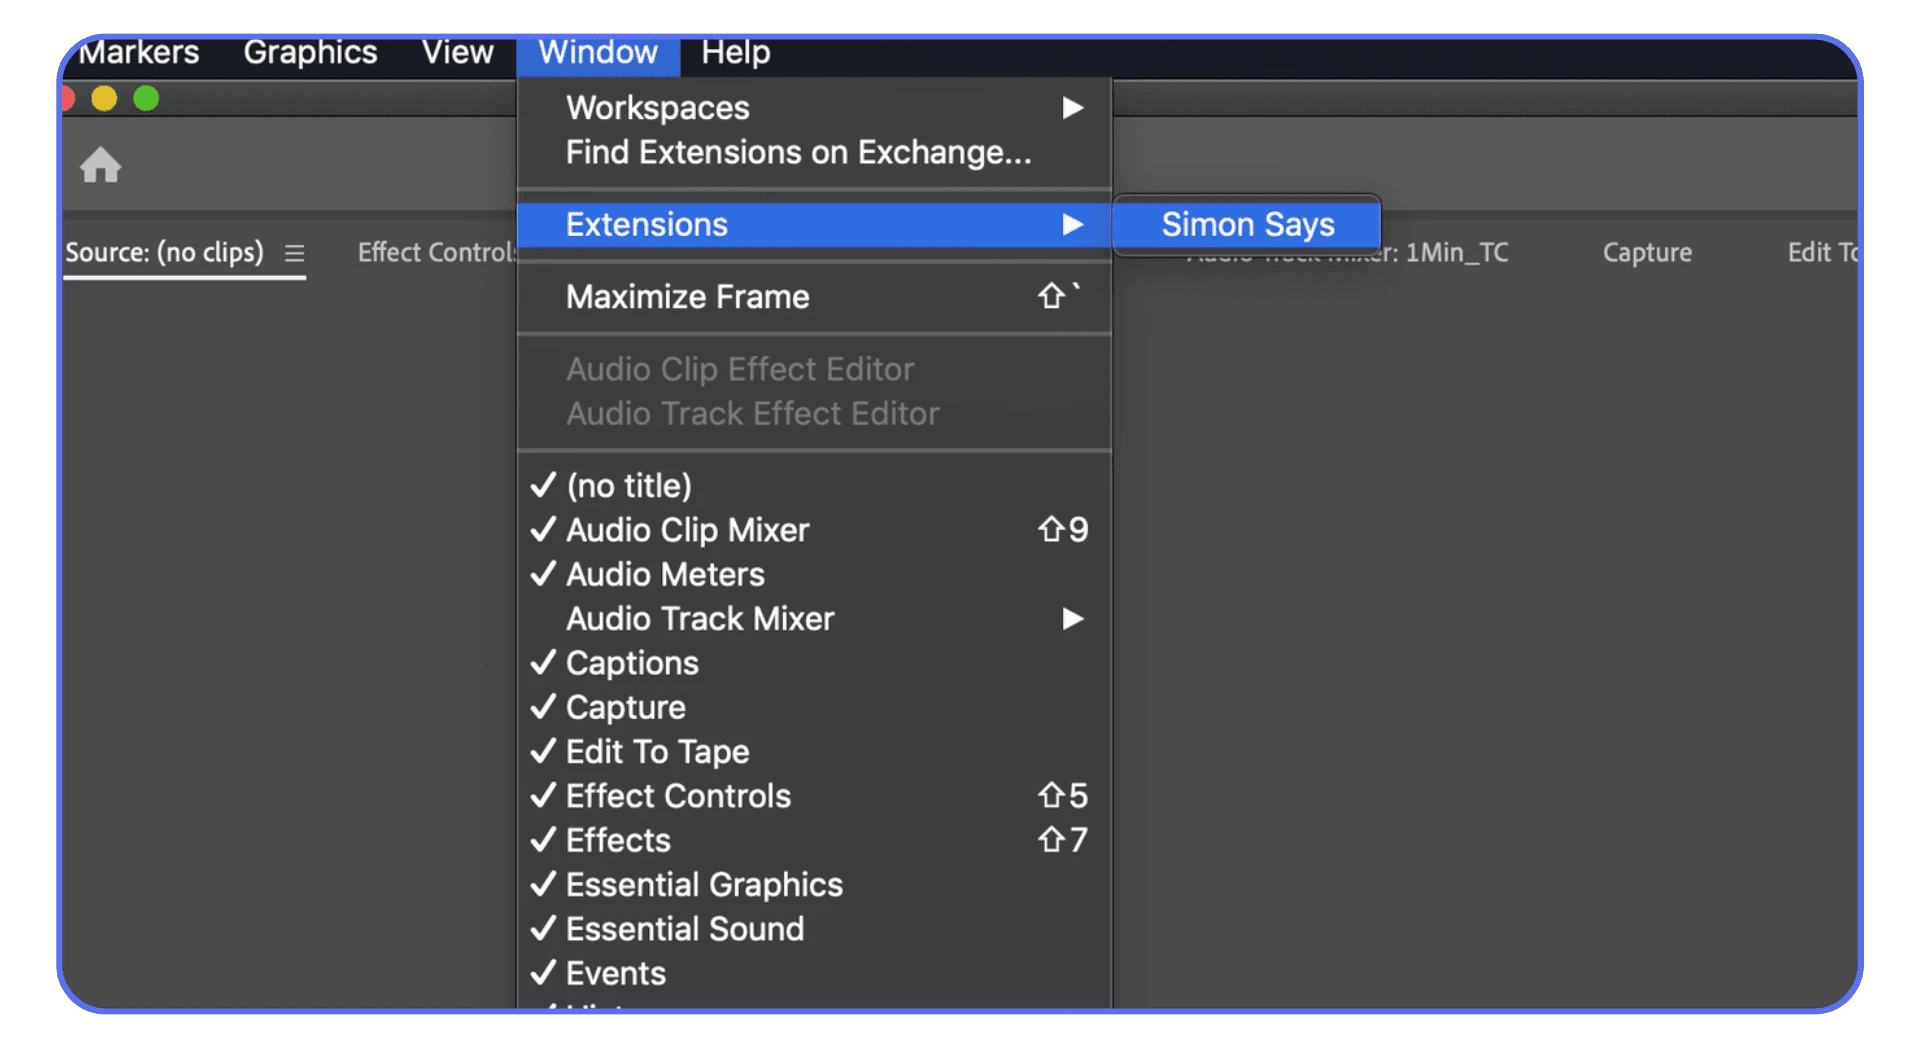
Extensions deserve attention too. Some run constantly in the background, even when you’re not actively using them. Panels that sync assets, manage captions, or connect to online services can quietly drain resources and destabilize Premiere over long sessions.
Less really is more here. The more complex your setup, the more potential failure points you introduce.
If your project becomes stable after disabling a plug-in, you’ve learned something valuable. That tool might still be useful, just not on that system, that version of Premiere, or that type of project.
And if Premiere still crashes even with plug-ins stripped back, there’s one last category that consistently breaks even solid setups. Exports.
If playback feels unstable with high-resolution footage, especially on longer timelines, setting up proxies correctly can reduce strain and make editing feel far more predictable.
#5. Export Crashes and Render Failures
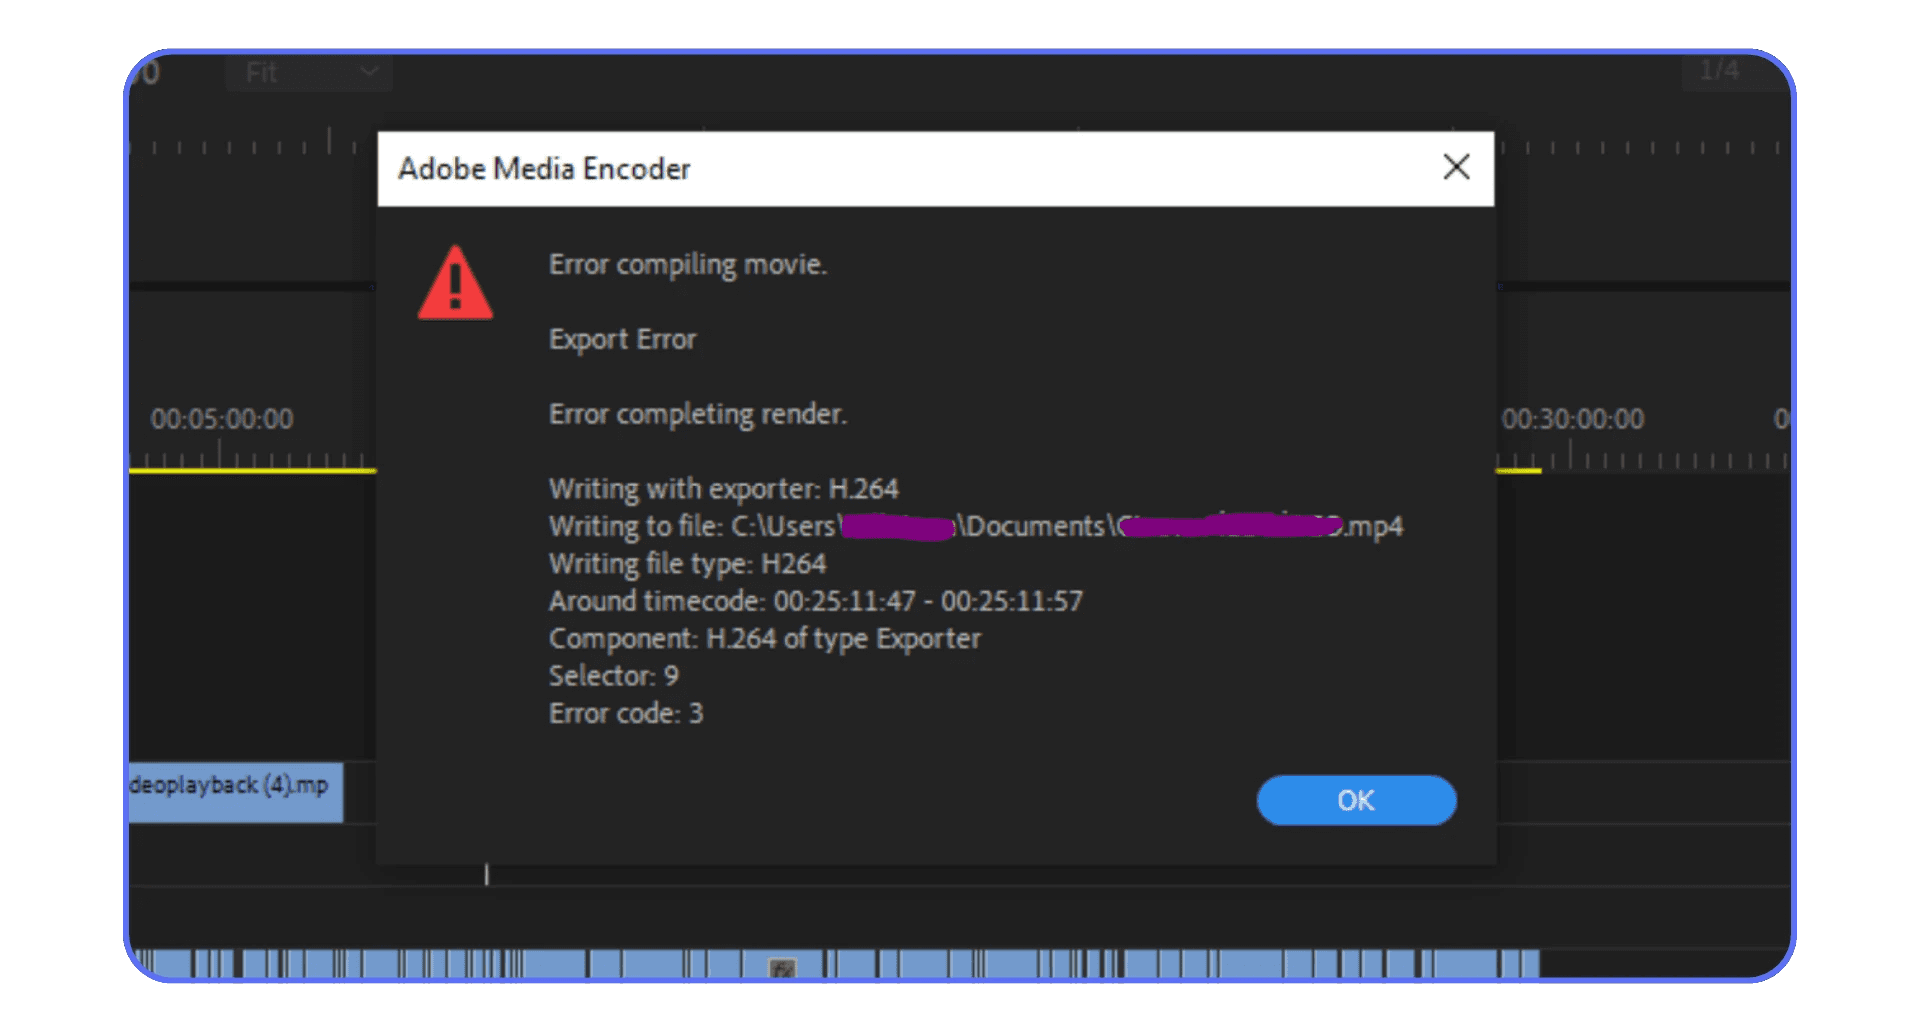
Nothing kills morale like an export crash.
Playback is smooth. The timeline feels solid. You hit export, walk away for a minute, and come back to an error message or, worse, Premiere silently closing itself at 37 percent. You try again. Same spot. Same result.
This usually isn’t random. It just feels that way.
Why Exports Crash When Playback Seems Fine
Exporting stresses Premiere differently than editing. During playback, Premiere only needs to decode and display what’s visible in real time. During export, it has to process everything. Every frame. Every effect. Every pixel. No shortcuts.
That’s why an export can fail even when the timeline plays perfectly.
A single corrupted frame, a misbehaving effect, or a codec that barely holds together during playback can fall apart during export. When crashes happen at the same percentage repeatedly, that’s almost always a clue. Something specific lives at that point in the timeline.
A fast test is to export a small section around the failure point. If it crashes again, you’ve narrowed the problem dramatically.
Encoding Choices and Safer Export Strategies
Hardware encoding sounds great on paper. Faster exports, less CPU usage. In reality, it’s one of the most common export crash triggers, especially on older GPUs or unstable drivers.
If exports keep failing, switch to software encoding. Yes, it’s slower. That’s the tradeoff. But it’s also more predictable. Many “unfixable” export crashes disappear the moment you stop asking the GPU to do everything.
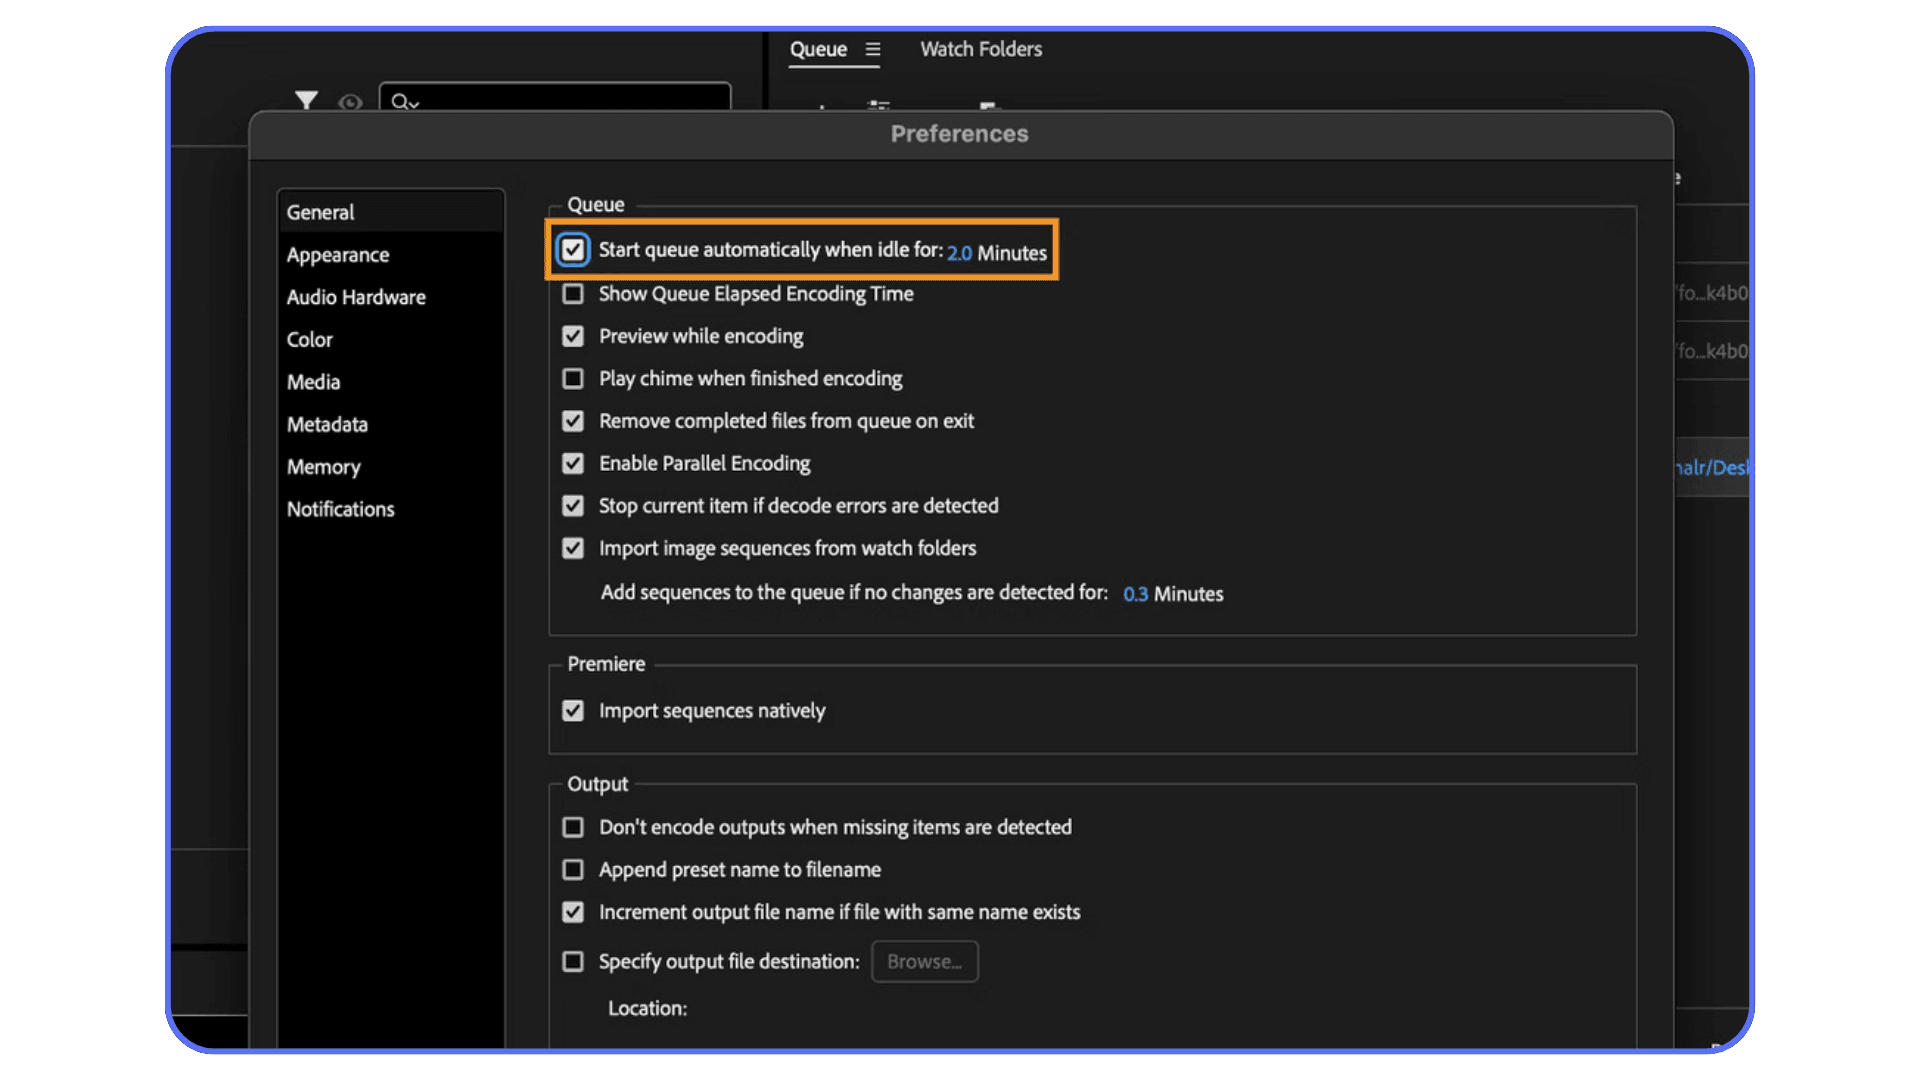
Preview files can help too. If you’ve rendered previews in a stable format, using them during export reduces how much Premiere has to calculate on the fly. Less stress, fewer surprises.
For long or complex timelines, splitting exports into smaller chunks is another underrated tactic. It’s not elegant, but it reduces risk. If one section fails, you haven’t lost the entire export.
Export crashes are frustrating because they show up at the end, when patience is already thin. But they’re often the most diagnosable crashes Premiere has. Once you isolate the trigger, the fix is usually straightforward.
If you’re still seeing crashes after all of this, it’s time to step back and look at the bigger picture. Sometimes the problem isn’t Premiere, the media, or the settings. It’s the machine trying to do all of it at once.
If export crashes tend to show up late in the process, reducing how much Premiere has to calculate during rendering can lower stress on the system and improve reliability.
When Hardware Is the Real Problem
This is usually where troubleshooting stops being productive. You’ve done the right things, but crashes keep sneaking back in.
At this point, it’s rarely a settings issue. It’s a capacity issue.
Common hardware limits that cause instability:
RAM runs out, forcing the system to swap to disk and freeze or crash
GPU memory gets saturated, especially with effects, color work, or AI features
Slow or overloaded storage bottlenecks cache, previews, and autosaves
Laptop thermal throttling kicks in during longer sessions and tanks stability
Premiere will use everything you give it. When there’s no headroom left, it doesn’t always fail gracefully.
That’s the hard limit optimization can’t cross.
Why “Optimizing Settings” Eventually Stops Working
There’s no perfect settings combo that makes Premiere immune to crashes.
You can improve efficiency. You can reduce stress. But you can’t out-optimize a workload that’s too heavy.
Here’s where optimization stops helping:
Higher resolutions and modern codecs demand more decoding power
Layered effects and long timelines multiply processing load
AI features add entirely new performance demands
Turning features off starts to compromise the actual edit
There’s an important distinction most advice skips.
If Premiere is slow but stable, optimization helps
If Premiere crashes under load, that’s a capacity problem
At that point, tweaking settings just delays the wall. It doesn’t remove it.
Once you recognize that, the next step isn’t another checkbox. It’s changing the environment Premiere runs in.
Running Premiere Pro on a More Powerful System Without Buying One
Once you accept that the crashes aren’t coming from bad habits or bad settings, the question changes.
If the workload is the problem, how do you give Premiere more room to breathe without rebuilding your entire setup or dropping serious money on new hardware?
This is where Vagon Cloud Computer comes in.
Vagon lets you run Premiere Pro on a high-end cloud workstation instead of your local machine. Same Premiere. Same project files. Different hardware underneath. More RAM. Stronger GPUs. Faster storage. All streamed to your screen like a normal desktop.
For Premiere, that difference is bigger than most people expect.
Extra RAM alone can remove entire categories of crashes. GPU headroom means stacked effects stop pushing the system over the edge. Fast storage keeps cache, previews, and exports from bottlenecking when things get heavy. You’re not tweaking Premiere to behave better. You’re giving it an environment where it doesn’t have to fight for resources.
The important part is this. Vagon isn’t meant to replace your local machine for everything. It’s a pressure release valve.
Heavy timelines. Tight deadlines. Client projects that crash no matter what you do locally. Those are the moments where moving the work to Vagon can instantly change how stable Premiere feels. Same edit. Same workflow. Far fewer interruptions.
You’re not changing how you edit.
You’re changing what Premiere has access to.
For a lot of editors, that’s the difference between constant firefighting and actually finishing the project without losing momentum.
Final Thoughts
At some point, troubleshooting stops being productive.
Not because you didn’t try hard enough, but because you already tried the right things. You cleaned up media. Simplified timelines. Disabled plug-ins. Adjusted settings. Maybe things improved, but not enough. Crashes still interrupt your work, your focus, your time.
That’s usually the moment worth paying attention to.
There’s a difference between being careful and being stuck. Spending hours chasing the next possible fix can quietly cost more than the crash itself. Momentum disappears. Confidence takes a hit. Editing starts to feel like damage control instead of creative work.
Choosing reliability over frustration isn’t giving up. It’s being practical.
Sometimes that means changing how you structure projects. Sometimes it means avoiding certain formats or tools. And sometimes it means accepting that a project has simply outgrown the machine it’s running on.
Your time matters just as much as your files. Maybe more.
If moving demanding work to a more powerful environment helps you finish faster, stay focused, and stop fighting crashes, that’s not a workaround. That’s a smarter workflow. Whether that’s occasionally using a cloud workstation like Vagon for heavier projects or finding another way to add headroom, the goal is the same.
Spend less time fixing the edit.
Spend more time actually editing.
That’s the win.
FAQs
1. Why does Premiere Pro keep crashing even on a powerful computer?
Because raw power alone doesn’t guarantee stability. Codec choices, GPU drivers, third-party plug-ins, and how a project is built matter just as much. A strong machine can still crash if Premiere runs out of GPU memory, hits a driver conflict, or chokes on problematic media.
2. Does clearing cache really help, or is that just generic advice?
It actually helps more often than people expect. Media cache files get corrupted over time, especially on long or complex projects. Clearing them forces Premiere to rebuild temporary files cleanly. It’s not a cure-all, but it’s one of the highest return fixes you can try.
3. Should I always update Premiere Pro to the latest version?
Not always. Updates fix bugs, but they can also introduce new ones. If you’re mid-project and things are stable, updating just because there’s a new version is risky. If you’re already crashing, updates become a tool worth testing, not a default move.
4. Why do exports crash when playback is perfectly fine?
Playback only processes what you see in real time. Exporting processes everything at full quality. Effects, codecs, and corrupted frames that survive playback often fail during export. If it crashes at the same percentage every time, there’s usually a specific clip or effect causing it.
5. Are phone videos really that bad for Premiere?
They can be. Many phone and screen recordings use variable frame rates, which Premiere struggles with under load. The footage might play fine until effects, color work, or exports push it harder. Transcoding those clips to an edit-friendly format often makes crashes disappear.
6. Do proxies prevent crashes or just improve performance?
Mostly performance. Proxies reduce decoding strain during playback, which can indirectly help stability. But if the original media is corrupt or wildly inconsistent, proxies won’t fix that. They’re helpful, not magical.
7. Why does Premiere crash more on laptops than desktops?
Thermal limits. Laptops throttle performance as they heat up, especially during long editing sessions. When CPU or GPU performance drops suddenly, Premiere can freeze or crash without warning.
8. At what point is hardware the real issue?
When crashes keep happening despite clean media, simplified timelines, disabled plug-ins, and reasonable settings. If Premiere consistently runs out of RAM, GPU memory, or disk speed, no amount of optimization will fully fix that.
9. Can running Premiere on a cloud computer actually reduce crashes?
Yes, in the right situations. Giving Premiere more RAM, GPU headroom, and faster storage removes many stability bottlenecks. It doesn’t fix bad workflows, but it does eliminate hardware limits that cause sudden crashes.
10. Is using a cloud workstation overkill for normal editing?
Not for everything. It makes the most sense for heavy projects, tight deadlines, or machines that can’t reliably handle modern workloads. Many editors use it selectively, not full time.
You’re in the zone. Playback is smooth. Cuts are landing exactly where you want them.
Then everything stops.
Premiere freezes for a second. Maybe two. Then it’s gone. No warning. No error message. Just your desktop staring back at you like nothing happened.
You reopen the project. Autosave helps, sort of. But it didn’t catch the last stretch. The rhythm you had, that quiet momentum where editing feels effortless, is gone. You try to get it back. It’s not the same.
If you’ve edited long enough, you’ve lived this moment more times than you’d like. Premiere Pro crashes are frustrating, disruptive, and weirdly random. But here’s the thing most people don’t hear enough. They’re also usually fixable.
And when they’re not, there’s a reason for that too.
First, Figure Out How Premiere Pro Is Crashing
Before you touch a single setting, pause for a moment.
Not everything that looks like a crash is the same problem.
This is where a lot of editors lose time. Premiere crashes, frustration spikes, and the instinct is to start flipping switches. Clear cache. Reinstall. Restart. Repeat. Sometimes that works. Often it doesn’t.
The difference is in how Premiere fails.
If Premiere crashes on launch, or right after the splash screen, that usually points to corrupted preferences, damaged cache files, or a plug-in Premiere tries to load immediately. This kind of crash often shows up right after an update or after installing something new.
If Premiere opens fine but crashes during playback or scrubbing, you’re probably dealing with media or GPU issues. Heavy codecs. Variable frame rate footage. A driver that doesn’t play nicely with hardware acceleration. This is the classic crash that shows up the moment you start moving fast.
Freezes are a little different. Premiere doesn’t close, but nothing responds. Panels lock up. The spinning cursor appears. Sometimes it recovers. Sometimes you’re forced to quit. This usually means Premiere is waiting on resources your system can’t deliver fast enough. RAM fills up. Disk cache slows down. Everything stalls.
Export crashes are their own kind of pain. Playback looks fine. Timeline previews render. Then the export fails at the same percentage every time. That’s often a single clip, effect, or encoding choice causing the issue, not the entire project.
One last question that matters more than people realize. Does every project crash, or just one?
If only one project is unstable, the problem is likely inside that project. A corrupt clip. A broken sequence. Years of accumulated complexity. If everything crashes, you’re almost certainly dealing with a system-level issue.
This step isn’t exciting. There’s nothing to fix yet. But once you can say, “Premiere crashes when I do this,” instead of “Premiere just crashes,” the rest of the process gets a lot easier.
If you’re noticing crashes the moment you stack effects, work with AI tools, or push color grading harder, chances are the GPU is the real bottleneck, and understanding how Premiere actually uses graphics cards can make a big difference.
#1. The Fast Fixes That Solve More Than Half of Crashes
This is the part most people rush through. Or worse, skip entirely because it sounds too simple to matter. Don’t.
I’ve seen these fixes stabilize Premiere more times than any deep, technical tweak. They’re boring. They’re not clever. And they work far more often than they should.
Reset Preferences and Clear the Cache
Premiere carries a lot of baggage from project to project. Preferences, cache files, previews, database entries. Over time, some of that gets corrupted. Not visibly. Just enough to cause weird behavior and sudden crashes.
Resetting preferences forces Premiere to rebuild its configuration from scratch. Clearing the media cache wipes temporary files Premiere relies on during playback and rendering. When those files go bad, Premiere goes with them.
The key mistake here is doing this halfway. Clearing cache but keeping old preferences. Or resetting preferences without restarting properly. Do both. Then relaunch Premiere and let it rebuild everything clean.
Will you lose custom shortcuts and workspace layouts? Yes. Is that annoying? Absolutely. Is it worth it if it stops daily crashes? Also yes.
Update Premiere Pro and Your GPU Drivers Carefully
Updates are a double-edged sword.
Sometimes an update fixes the exact bug that’s been crashing your project. Other times, it introduces a brand new one you didn’t ask for. Same story with GPU drivers.
If you’re behind several versions, updating Premiere can genuinely improve stability. Especially if you’re dealing with newer codecs or camera formats. But updating mid-project without checking known issues is risky.
GPU drivers deserve even more caution. Newer is not always better. If crashes started right after a driver update, rolling back one version is often smarter than pushing forward. Editors forget this all the time.
My rule is simple. If your system is stable, don’t update out of boredom. If it’s unstable, updates are a tool, not a reflex.
Test GPU Acceleration Instead of Guessing
GPU acceleration is great. Until it isn’t.
Many Premiere crashes trace back to GPU-related features. Effects. Transitions. Playback acceleration. Encoding. Turning GPU acceleration off temporarily is one of the fastest ways to confirm whether the GPU or its driver is involved.
This isn’t a permanent solution. Editing everything on software rendering is slower and defeats the point of modern hardware. But as a test, it’s incredibly useful.
If crashes disappear with GPU acceleration off, you’ve learned something important. Either the driver is unstable, the GPU is struggling, or a specific effect doesn’t behave well with hardware acceleration. From there, you can decide whether to update, roll back, or change how you work.
None of these fixes require deep technical knowledge. That’s the point. They remove variables. They clean up hidden problems. And more often than not, they turn an unusable project back into something you can actually finish.
If Premiere is still crashing after this, it’s time to look at what you’re feeding it.
If you’re trying to stay productive away from your main machine, whether that’s reviewing edits or making changes on the go, there are workflows that make using Premiere Pro from an iPad surprisingly practical.
#2. Media Problems That Quietly Destroy Stability
If Premiere crashes feel random, media is often why.
Not settings. Not bugs. The actual files on your timeline.
This catches a lot of people off guard because the footage plays. It imports fine. It scrubs. Sometimes it even edits smoothly for hours. Then out of nowhere, Premiere falls apart. That’s usually a sign that the footage is technically supported, but practically hostile.
Problem Footage and Unfriendly Codecs
Footage from phones and screen recordings is one of the biggest offenders. Especially anything recorded with a variable frame rate. The frame rate shifts on the fly to save space or battery life. Premiere hates that. It can play it, sure, but under pressure it becomes unstable fast.
Screen recordings are just as bad. They often mix odd frame rates, strange audio sample rates, and nonstandard encoding. Everything works until you stack effects or start scrubbing aggressively.
Delivery codecs make things worse. H.264 and H.265 are designed for playback, not editing. They’re highly compressed and force Premiere to do extra work just to decode every frame. On small projects, that’s manageable. On longer timelines or older machines, it’s a crash waiting to happen.
If your timeline is built mostly from these formats, you’re asking Premiere to juggle too much at once.
Corrupt Clips, Proxies, and Transcoding
Sometimes it’s not the format. It’s the file.
One corrupt clip can destabilize an entire project. The frustrating part is that Premiere won’t tell you which one. You’ll just notice crashes happening at similar points in the timeline or when you scroll past a certain section.
A quick test is to duplicate the sequence and remove chunks of footage until the crashes stop. It’s not elegant, but it works. Once the problem clip is gone, everything suddenly behaves.
Proxies can help, but they’re not magic. They reduce the load during playback, which helps with performance and sometimes stability. But if the original media is fundamentally broken or wildly inconsistent, proxies won’t fix that.
Transcoding does.
Converting problematic footage into an edit-friendly format like ProRes or DNx sounds like extra work. It is. But it also removes an entire category of crashes from your life. Stable frame rates. Predictable decoding. Cleaner playback. Fewer surprises.
This is one of those fixes that feels unnecessary until you try it. Then you wonder why you didn’t do it sooner.
If your media is clean and Premiere still struggles, the next place to look is how your project is built.
If you’ve reached the point where optimization isn’t helping anymore and you’re wondering what kind of hardware Premiere actually needs to stay stable, breaking down the right components can save a lot of guesswork.
#3. Timeline and Project Setup Mistakes
Even with clean media, Premiere can still trip over its own feet.
Usually because the project itself has become heavier and more complicated than it needs to be.
This sneaks up on people. You don’t start a project planning to make it fragile. It just happens over time. More sequences. More nests. More effects. More “I’ll clean this up later.” Premiere remembers all of it.
Inconsistent Sequences and Overbuilt Timelines
Mixed frame rates and resolutions are a quiet source of instability. A 24fps clip here, a 30fps screen recording there, a random 60fps b-roll shot dropped into the same sequence. Premiere will adapt, but it’s doing extra work every second to make that timeline function.
Long timelines make this worse. The longer and denser a sequence gets, the more Premiere has to manage at once. Multicam sequences add another layer of complexity. Everything might play fine until it suddenly doesn’t.
This is why some projects feel cursed while others behave. It’s not the footage alone. It’s the accumulation.
Nesting, Adjustment Layers, and Heavy Effects
Nesting is useful. Adjustment layers are powerful. Used carefully, they’re great. Used everywhere, they become a nightmare.
Deep nests hide problems. A single unstable effect buried three levels down can crash Premiere, and tracking it becomes painful. Adjustment layers stacked with color correction, blurs, sharpening, and AI effects push GPU and memory usage hard, even if playback looks okay.
If crashes happen when you enable or disable layers, or when you scrub past effect-heavy sections, this is a strong signal.
Simplifying doesn’t mean flattening everything immediately. It means being intentional. Fewer nests. Effects applied where they’re actually needed. Pre-rendering heavy sections instead of letting Premiere calculate them endlessly.
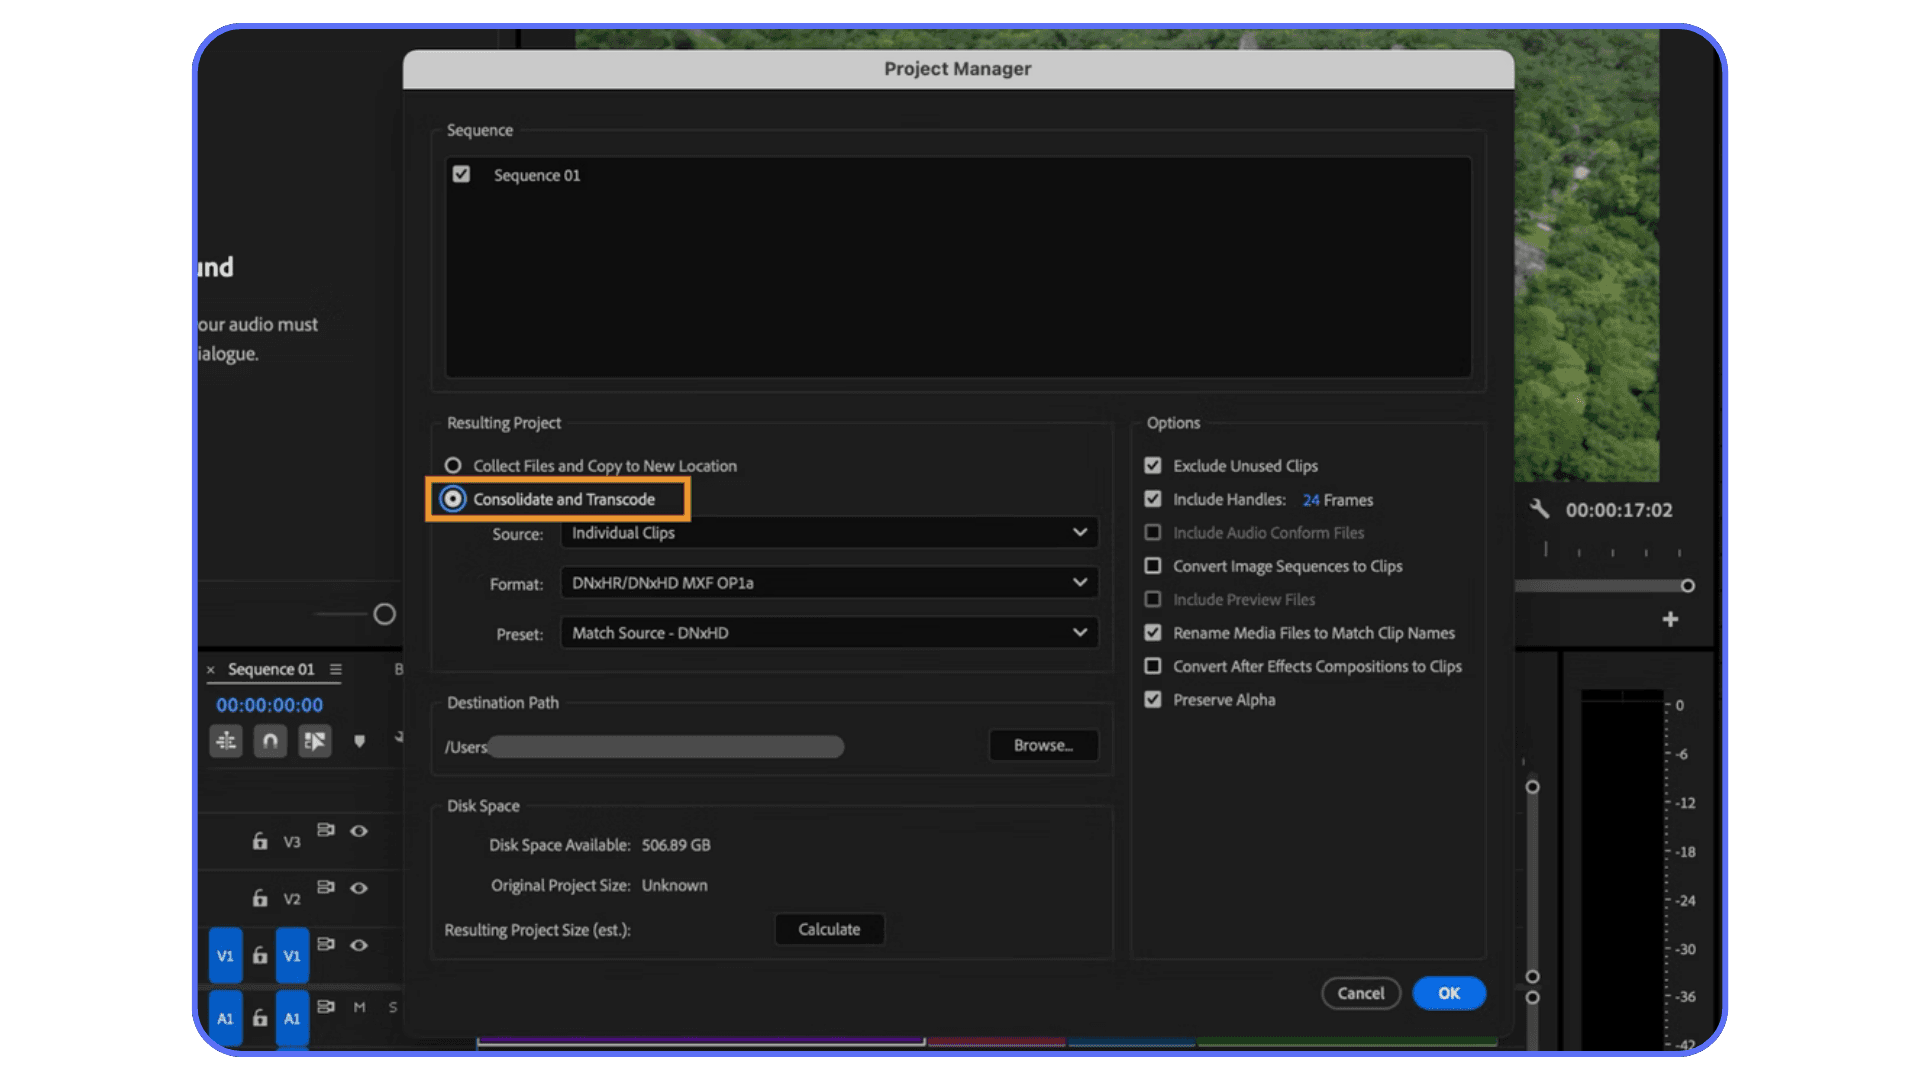
When Rebuilding a Project File Is the Smart Move
This is the part people resist the most. Sometimes the project file itself is the problem.
Old projects accumulate cruft. Broken references. Disabled sequences. Half-deleted assets. Premiere keeps all of it. Over time, that can destabilize even clean media and strong hardware.
Rebuilding sounds drastic, but it doesn’t mean starting from zero. Creating a fresh project and importing only the sequences and assets you actually need can instantly make crashes disappear. I’ve seen projects go from unusable to stable in minutes.
If your timeline is lean and Premiere still crashes, the next suspect is often what you’ve added on top of it. Plug-ins, effects, and extensions.
#4. Plug-Ins, Effects, and Extensions
Plug-ins are one of those things editors love to blame and underestimate at the same time. They’re powerful. They save time. They also crash Premiere more often than most people want to admit.
The tricky part is that plug-in crashes don’t always look like plug-in crashes. Premiere just disappears. No error. No warning. And unless you changed something recently, it’s easy to assume the problem lives somewhere else.
If constant crashes are making you question whether Premiere is the right tool for your workflow at all, it’s worth understanding how other professional editing options compare before committing to a long-term setup.
Third-Party Plug-Ins and Stability Risks
Any plug-in that runs inside Premiere is sharing space with the application itself. When Premiere updates, that relationship can break. Even if the plug-in technically loads, small incompatibilities can cause instability under load.
Color tools, noise reduction, motion effects, AI-powered features. These are some of the biggest offenders, simply because they push the GPU and memory hard. A plug-in might behave fine on a short clip, then crash Premiere the moment you apply it across a full sequence.
Adobe won’t always warn you about this. And plug-in developers can’t always keep up with Premiere’s update cycle. That gap is where crashes live.
Finding the Culprit Without Nuking Your Setup
The mistake most people make is uninstalling everything at once. That’s overkill and usually unnecessary.
A better approach is isolation. Duplicate the project. Disable effects in chunks. Temporarily move plug-ins out of the plug-ins folder and relaunch Premiere. If the crashes stop, you’ve confirmed the category. Then it’s just a matter of narrowing it down.
Extensions deserve attention too. Some run constantly in the background, even when you’re not actively using them. Panels that sync assets, manage captions, or connect to online services can quietly drain resources and destabilize Premiere over long sessions.
Less really is more here. The more complex your setup, the more potential failure points you introduce.
If your project becomes stable after disabling a plug-in, you’ve learned something valuable. That tool might still be useful, just not on that system, that version of Premiere, or that type of project.
And if Premiere still crashes even with plug-ins stripped back, there’s one last category that consistently breaks even solid setups. Exports.
If playback feels unstable with high-resolution footage, especially on longer timelines, setting up proxies correctly can reduce strain and make editing feel far more predictable.
#5. Export Crashes and Render Failures
Nothing kills morale like an export crash.
Playback is smooth. The timeline feels solid. You hit export, walk away for a minute, and come back to an error message or, worse, Premiere silently closing itself at 37 percent. You try again. Same spot. Same result.
This usually isn’t random. It just feels that way.
Why Exports Crash When Playback Seems Fine
Exporting stresses Premiere differently than editing. During playback, Premiere only needs to decode and display what’s visible in real time. During export, it has to process everything. Every frame. Every effect. Every pixel. No shortcuts.
That’s why an export can fail even when the timeline plays perfectly.
A single corrupted frame, a misbehaving effect, or a codec that barely holds together during playback can fall apart during export. When crashes happen at the same percentage repeatedly, that’s almost always a clue. Something specific lives at that point in the timeline.
A fast test is to export a small section around the failure point. If it crashes again, you’ve narrowed the problem dramatically.
Encoding Choices and Safer Export Strategies
Hardware encoding sounds great on paper. Faster exports, less CPU usage. In reality, it’s one of the most common export crash triggers, especially on older GPUs or unstable drivers.
If exports keep failing, switch to software encoding. Yes, it’s slower. That’s the tradeoff. But it’s also more predictable. Many “unfixable” export crashes disappear the moment you stop asking the GPU to do everything.
Preview files can help too. If you’ve rendered previews in a stable format, using them during export reduces how much Premiere has to calculate on the fly. Less stress, fewer surprises.
For long or complex timelines, splitting exports into smaller chunks is another underrated tactic. It’s not elegant, but it reduces risk. If one section fails, you haven’t lost the entire export.
Export crashes are frustrating because they show up at the end, when patience is already thin. But they’re often the most diagnosable crashes Premiere has. Once you isolate the trigger, the fix is usually straightforward.
If you’re still seeing crashes after all of this, it’s time to step back and look at the bigger picture. Sometimes the problem isn’t Premiere, the media, or the settings. It’s the machine trying to do all of it at once.
If export crashes tend to show up late in the process, reducing how much Premiere has to calculate during rendering can lower stress on the system and improve reliability.
When Hardware Is the Real Problem
This is usually where troubleshooting stops being productive. You’ve done the right things, but crashes keep sneaking back in.
At this point, it’s rarely a settings issue. It’s a capacity issue.
Common hardware limits that cause instability:
RAM runs out, forcing the system to swap to disk and freeze or crash
GPU memory gets saturated, especially with effects, color work, or AI features
Slow or overloaded storage bottlenecks cache, previews, and autosaves
Laptop thermal throttling kicks in during longer sessions and tanks stability
Premiere will use everything you give it. When there’s no headroom left, it doesn’t always fail gracefully.
That’s the hard limit optimization can’t cross.
Why “Optimizing Settings” Eventually Stops Working
There’s no perfect settings combo that makes Premiere immune to crashes.
You can improve efficiency. You can reduce stress. But you can’t out-optimize a workload that’s too heavy.
Here’s where optimization stops helping:
Higher resolutions and modern codecs demand more decoding power
Layered effects and long timelines multiply processing load
AI features add entirely new performance demands
Turning features off starts to compromise the actual edit
There’s an important distinction most advice skips.
If Premiere is slow but stable, optimization helps
If Premiere crashes under load, that’s a capacity problem
At that point, tweaking settings just delays the wall. It doesn’t remove it.
Once you recognize that, the next step isn’t another checkbox. It’s changing the environment Premiere runs in.
Running Premiere Pro on a More Powerful System Without Buying One
Once you accept that the crashes aren’t coming from bad habits or bad settings, the question changes.
If the workload is the problem, how do you give Premiere more room to breathe without rebuilding your entire setup or dropping serious money on new hardware?
This is where Vagon Cloud Computer comes in.
Vagon lets you run Premiere Pro on a high-end cloud workstation instead of your local machine. Same Premiere. Same project files. Different hardware underneath. More RAM. Stronger GPUs. Faster storage. All streamed to your screen like a normal desktop.
For Premiere, that difference is bigger than most people expect.
Extra RAM alone can remove entire categories of crashes. GPU headroom means stacked effects stop pushing the system over the edge. Fast storage keeps cache, previews, and exports from bottlenecking when things get heavy. You’re not tweaking Premiere to behave better. You’re giving it an environment where it doesn’t have to fight for resources.
The important part is this. Vagon isn’t meant to replace your local machine for everything. It’s a pressure release valve.
Heavy timelines. Tight deadlines. Client projects that crash no matter what you do locally. Those are the moments where moving the work to Vagon can instantly change how stable Premiere feels. Same edit. Same workflow. Far fewer interruptions.
You’re not changing how you edit.
You’re changing what Premiere has access to.
For a lot of editors, that’s the difference between constant firefighting and actually finishing the project without losing momentum.
Final Thoughts
At some point, troubleshooting stops being productive.
Not because you didn’t try hard enough, but because you already tried the right things. You cleaned up media. Simplified timelines. Disabled plug-ins. Adjusted settings. Maybe things improved, but not enough. Crashes still interrupt your work, your focus, your time.
That’s usually the moment worth paying attention to.
There’s a difference between being careful and being stuck. Spending hours chasing the next possible fix can quietly cost more than the crash itself. Momentum disappears. Confidence takes a hit. Editing starts to feel like damage control instead of creative work.
Choosing reliability over frustration isn’t giving up. It’s being practical.
Sometimes that means changing how you structure projects. Sometimes it means avoiding certain formats or tools. And sometimes it means accepting that a project has simply outgrown the machine it’s running on.
Your time matters just as much as your files. Maybe more.
If moving demanding work to a more powerful environment helps you finish faster, stay focused, and stop fighting crashes, that’s not a workaround. That’s a smarter workflow. Whether that’s occasionally using a cloud workstation like Vagon for heavier projects or finding another way to add headroom, the goal is the same.
Spend less time fixing the edit.
Spend more time actually editing.
That’s the win.
FAQs
1. Why does Premiere Pro keep crashing even on a powerful computer?
Because raw power alone doesn’t guarantee stability. Codec choices, GPU drivers, third-party plug-ins, and how a project is built matter just as much. A strong machine can still crash if Premiere runs out of GPU memory, hits a driver conflict, or chokes on problematic media.
2. Does clearing cache really help, or is that just generic advice?
It actually helps more often than people expect. Media cache files get corrupted over time, especially on long or complex projects. Clearing them forces Premiere to rebuild temporary files cleanly. It’s not a cure-all, but it’s one of the highest return fixes you can try.
3. Should I always update Premiere Pro to the latest version?
Not always. Updates fix bugs, but they can also introduce new ones. If you’re mid-project and things are stable, updating just because there’s a new version is risky. If you’re already crashing, updates become a tool worth testing, not a default move.
4. Why do exports crash when playback is perfectly fine?
Playback only processes what you see in real time. Exporting processes everything at full quality. Effects, codecs, and corrupted frames that survive playback often fail during export. If it crashes at the same percentage every time, there’s usually a specific clip or effect causing it.
5. Are phone videos really that bad for Premiere?
They can be. Many phone and screen recordings use variable frame rates, which Premiere struggles with under load. The footage might play fine until effects, color work, or exports push it harder. Transcoding those clips to an edit-friendly format often makes crashes disappear.
6. Do proxies prevent crashes or just improve performance?
Mostly performance. Proxies reduce decoding strain during playback, which can indirectly help stability. But if the original media is corrupt or wildly inconsistent, proxies won’t fix that. They’re helpful, not magical.
7. Why does Premiere crash more on laptops than desktops?
Thermal limits. Laptops throttle performance as they heat up, especially during long editing sessions. When CPU or GPU performance drops suddenly, Premiere can freeze or crash without warning.
8. At what point is hardware the real issue?
When crashes keep happening despite clean media, simplified timelines, disabled plug-ins, and reasonable settings. If Premiere consistently runs out of RAM, GPU memory, or disk speed, no amount of optimization will fully fix that.
9. Can running Premiere on a cloud computer actually reduce crashes?
Yes, in the right situations. Giving Premiere more RAM, GPU headroom, and faster storage removes many stability bottlenecks. It doesn’t fix bad workflows, but it does eliminate hardware limits that cause sudden crashes.
10. Is using a cloud workstation overkill for normal editing?
Not for everything. It makes the most sense for heavy projects, tight deadlines, or machines that can’t reliably handle modern workloads. Many editors use it selectively, not full time.
Get Beyond Your Computer Performance
Run applications on your cloud computer with the latest generation hardware. No more crashes or lags.

Trial includes 1 hour usage + 7 days of storage.
Summarize with AI

Ready to focus on your creativity?
Vagon gives you the ability to create & render projects, collaborate, and stream applications with the power of the best hardware.

Vagon Blog


Run heavy applications on any device with
your personal computer on the cloud.
San Francisco, California
Solutions
Vagon Teams
Vagon Streams
Use Cases
Resources
Vagon Blog
How to Run Audacity on a Cloud Ubuntu Desktop (2026 Guide)
How to Run Darktable on a Cloud Ubuntu Desktop for RAW Photo Editing (2026 Guide)
How to Run Kdenlive on a Cloud Ubuntu Desktop (2026 Guide)
How to Run DaVinci Resolve on Linux in the Cloud (2026 Guide)
How to Run Inkscape on a Cloud Ubuntu Desktop (2026 Guide)
How to Run Krita on a Cloud Ubuntu Desktop for Digital Painting (2026 Guide)
How to Run GIMP on a Cloud Ubuntu Desktop (2026 Guide)
How to Run Jupyter on a Cloud GPU Linux Desktop (2026 Guide)
Vagon vs GitHub Codespaces: Cloud Dev Environments Compared (2026)
Vagon Blog
Run heavy applications on any device with
your personal computer on the cloud.
San Francisco, California
Solutions
Vagon Teams
Vagon Streams
Use Cases
Resources
Vagon Blog