Instant Connection for Pixel Streaming
— New Feature Automated Setup

Object Mode vs Edit Mode in Blender
Object Mode vs Edit Mode in Blender
DigitalArt
Object Mode vs Edit Mode in Blender
Table of Contents
I once spent an hour trying to rotate a single face on a mesh—only to realize I wasn’t in Edit Mode.
Rookie mistake? Maybe. But let’s be honest—if you’ve used Blender for more than five minutes, you’ve probably done the same. Blender’s mode system is powerful, but it can also be confusing when you’re just starting out.
Why can’t I move this vertex?
Why is everything rotating instead of just the face?
Why does undo feel weird sometimes?
Nine times out of ten, the answer comes down to Object Mode vs Edit Mode.
In this post, I’ll break down what each mode actually does (not just what the tooltip says), when to use one over the other, and a few tips that’ll save you from smashing the keyboard when your model refuses to cooperate.
Let’s clear this up—once and for all.
Understanding the Big Picture
Before we get into shortcuts and mistakes to avoid, let’s clear up one thing:
Blender isn’t one tool—it’s a bunch of tools hidden behind different “modes.” And if you don’t know which mode you’re in, you’re going to have a bad time.
Let’s start with the two you’ll use 95% of the time: Object Mode and Edit Mode.
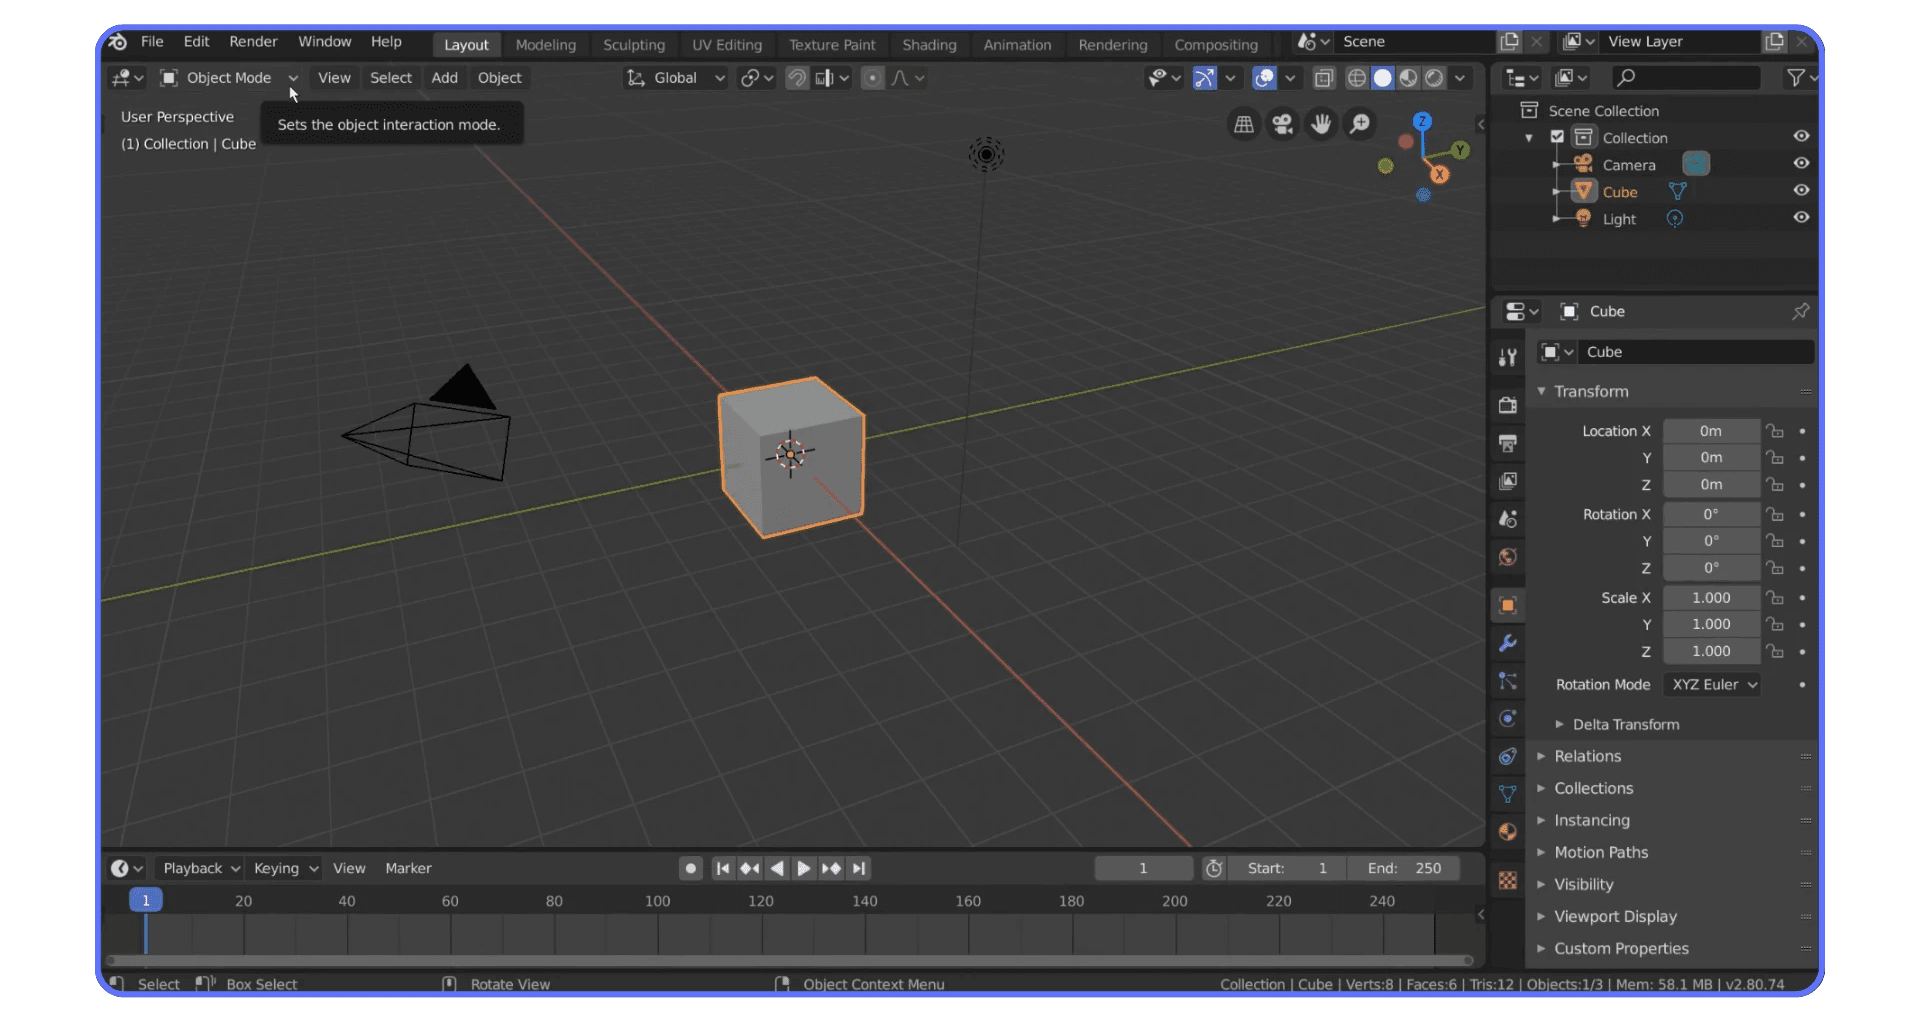
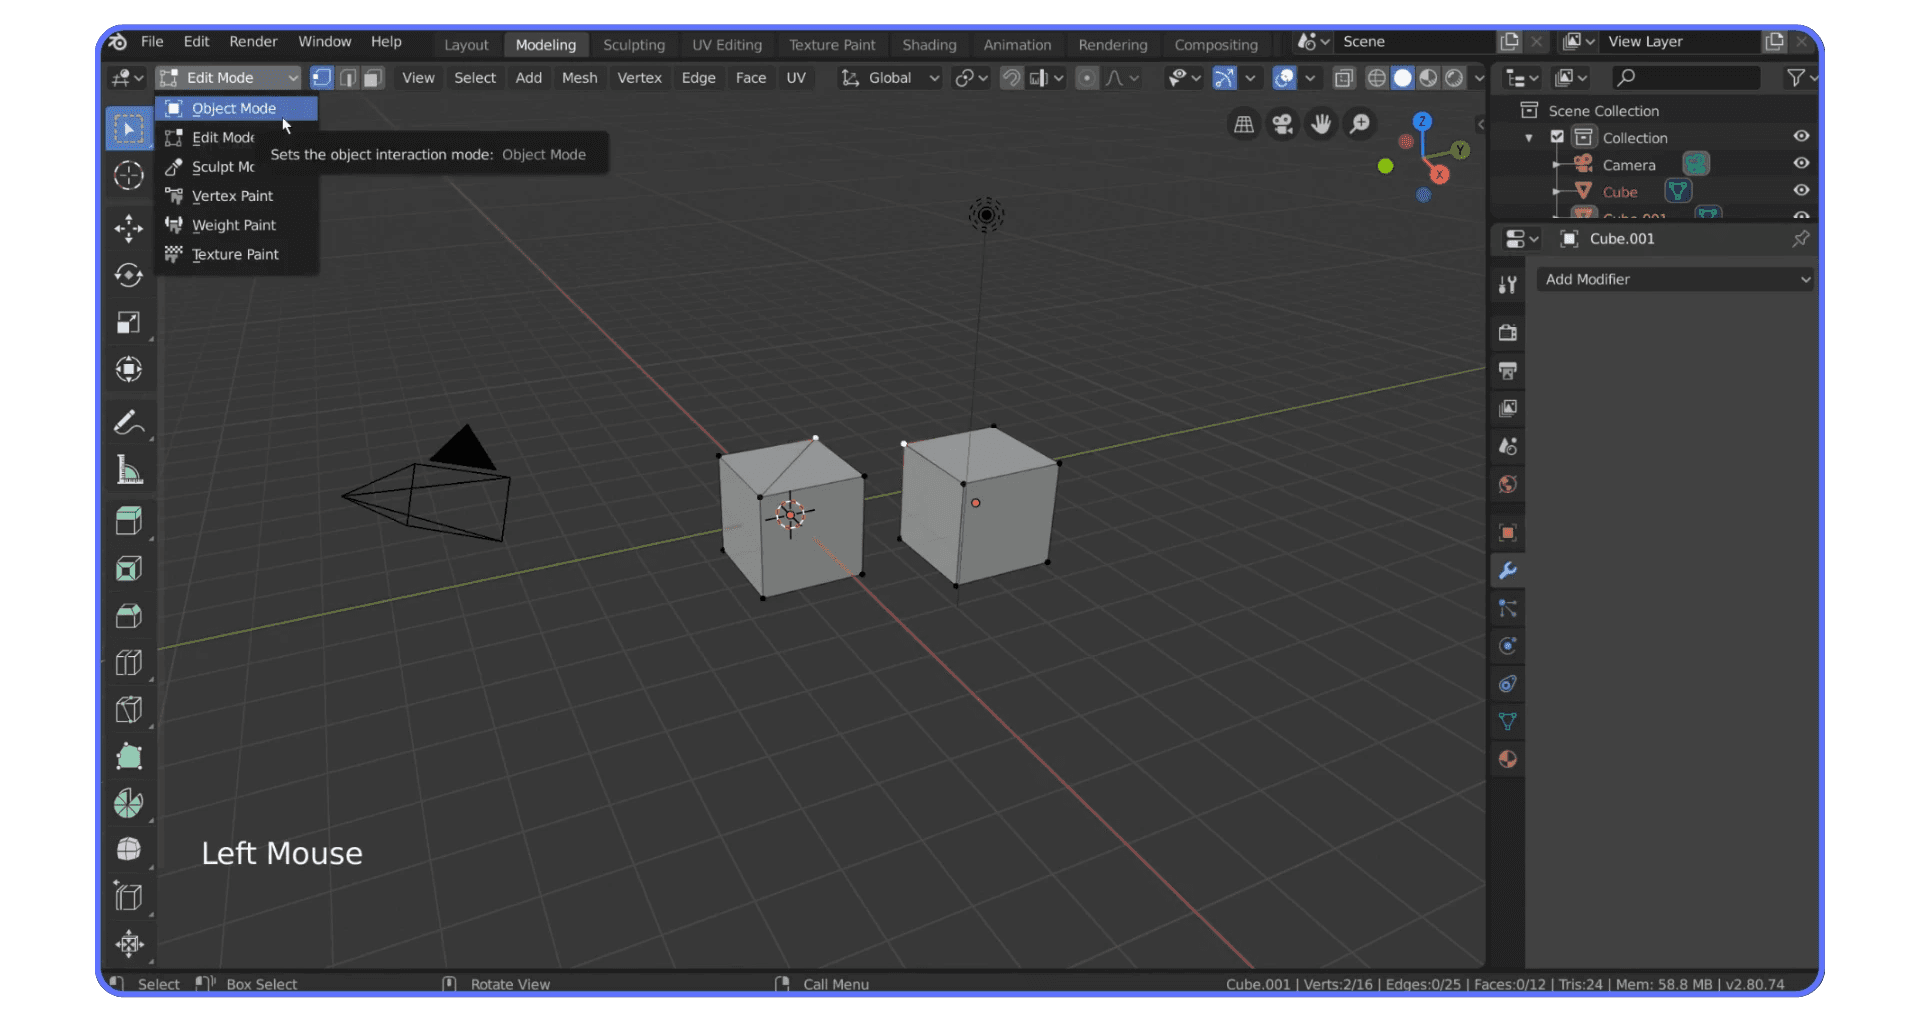
🟢 What is Object Mode?
Object Mode is Blender’s default state—the first thing you see when you open a new file and stare down that lonely cube. In Object Mode, you’re not editing the inside of the object—you’re manipulating the object as a whole.
You can:
Move it
Rotate it
Scale it
Animate it
Duplicate or delete it
Parent it to something else
Think of Object Mode like picking up a toy and moving it around your room. You’re not changing what the toy is made of—you’re just repositioning it in space.
Under the hood, Object Mode deals with object data blocks—essentially, the metadata that tells Blender where this thing lives, how it’s transformed, and what it’s connected to. You can have two objects using the exact same mesh, but with totally different positions and scales. That’s all Object Mode.
But here’s the kicker: Object Mode doesn’t let you touch the geometry itself. If you want to bend, stretch, poke, or sculpt the thing? You’ll need something else.
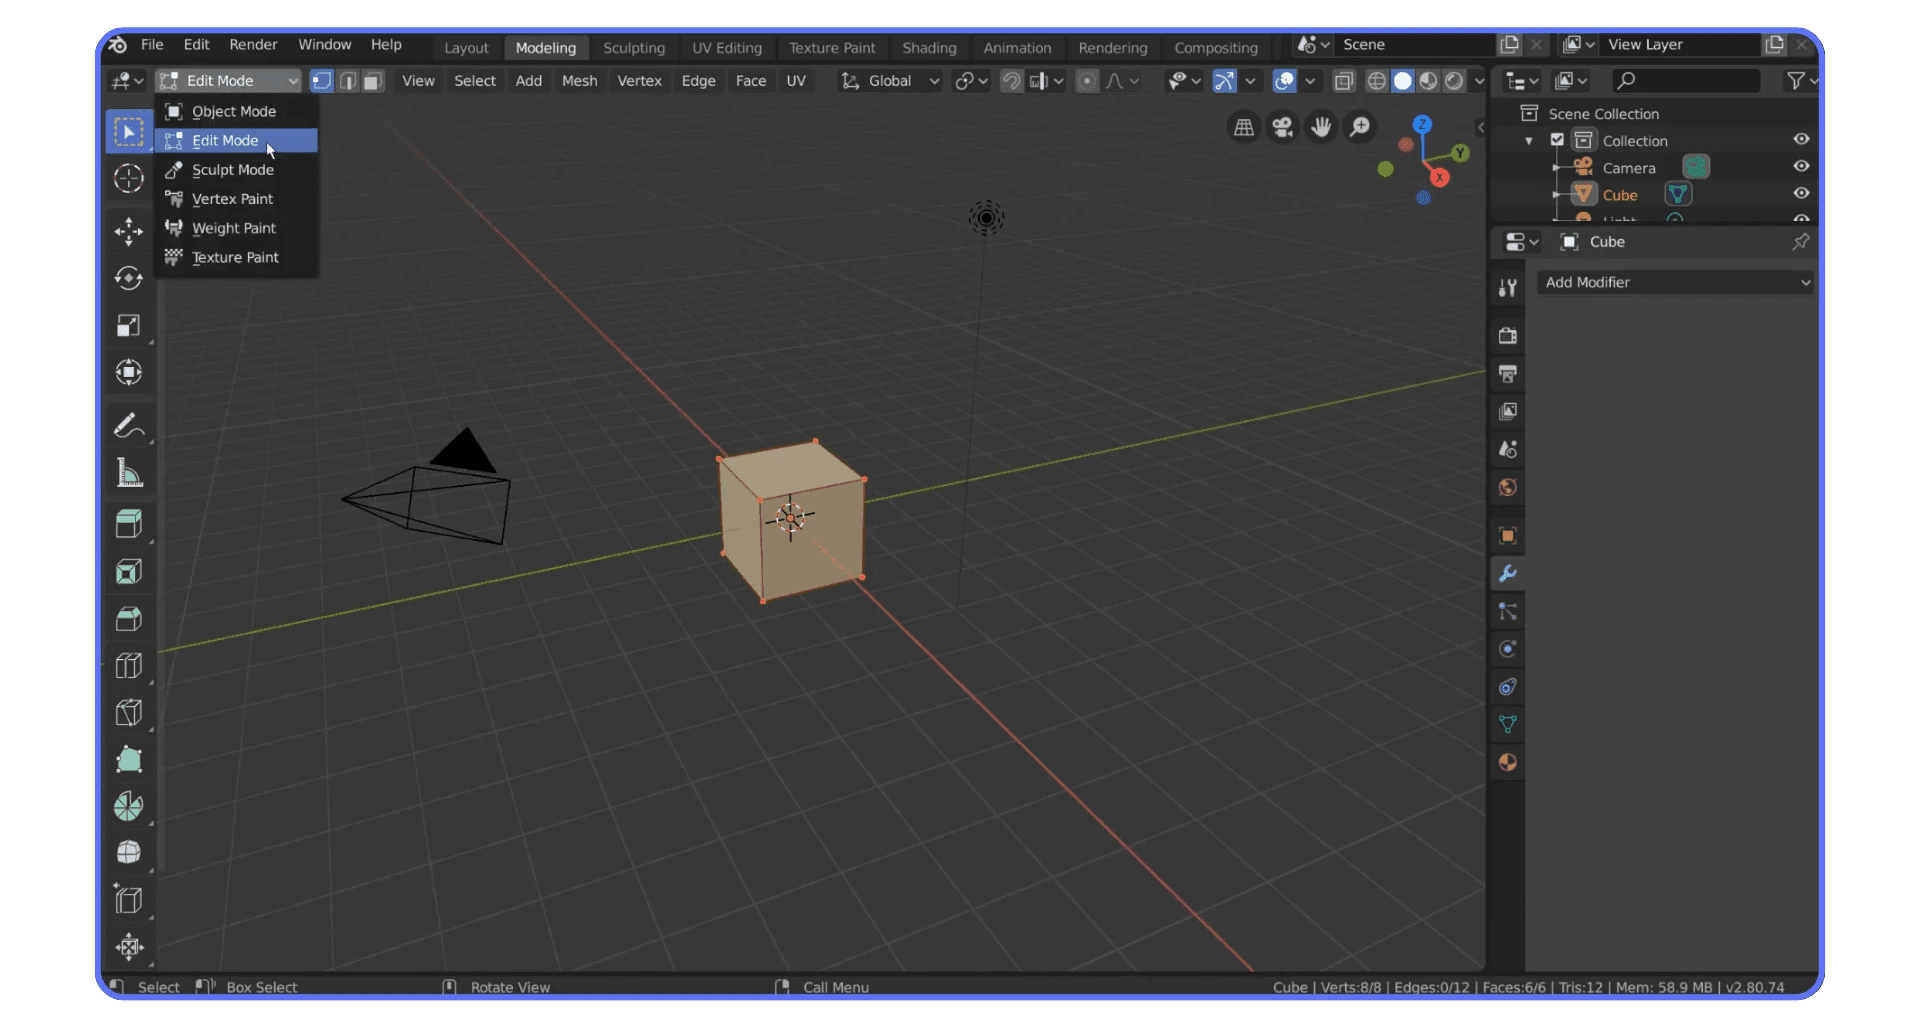
🔵 What is Edit Mode?
Enter Edit Mode.
This is where the real modeling happens. Switch to Edit Mode (hotkey: Tab) and suddenly you can access the guts of your object—its vertices, edges, and faces.
In Edit Mode, you're not just moving an object around the scene. You're reshaping its structure.
You can:
Select and move individual vertices
Extrude faces
Loop cut geometry
Weld edges
Create new topology
It’s kind of like putting that toy under a microscope and tweaking its plastic bones. You’re modifying the mesh data—and these changes affect the object’s appearance no matter where it goes in the scene.
One important note: when you move things in Edit Mode, the object’s origin stays put. That’s why sometimes your object rotates in weird ways after modeling—its pivot point hasn’t changed, even though the mesh has.
That separation—between object transform and mesh data—is a feature, not a bug. But it trips up a lot of users, especially when modifiers get involved (we’ll get to that later).
Why the Difference Actually Matters
It’s tempting to think Object Mode and Edit Mode are just two flavors of the same thing. But once you start building anything more complicated than a cube, that mindset starts breaking stuff.
Here’s why the distinction really matters.
🧭 Transform Confusion: “Why Did My Pivot Go Nuts?”
You move some vertices around in Edit Mode—stretch out one side, flatten the top, maybe pull a face forward. Then you hop into Object Mode and rotate the object... and suddenly it’s spinning from some weird corner instead of the center.
That’s because Edit Mode changes the mesh, not the object origin.
Your pivot point—the little orange dot—hasn’t moved. And Object Mode always uses that dot as the center of rotation, scaling, and other transformations. If your mesh is off-center and you forget to adjust the origin, things get real wonky, real fast.

🌀 Modifier Mayhem
Here’s a classic frustration: you add a Mirror Modifier and expect it to flip your model perfectly… but instead it mirrors off into the void.
Why? Because your object’s transformations haven’t been applied.
When you scale or move an object in Object Mode, Blender tracks that as metadata—sort of like saying, “Hey, this mesh is 150% bigger, but don’t touch the actual geometry.” If you then add a modifier, it applies using the original unscaled version, not what you're seeing.
In Edit Mode, though, every change is real. You move a face or scale a loop? That’s baked into the mesh. No disconnect. That’s why a lot of people prefer modeling adjustments there—less invisible math to trip over.
🔁 Undo Behavior
Another little gotcha: Blender treats switching between modes as part of your undo history.
Let’s say you:
Enter Edit Mode
Make a bunch of changes
Go back to Object Mode
Hit Ctrl+Z…
You won’t just undo the last mesh change—you’ll first snap back into Edit Mode. Then each undo will walk you back through your editing steps. If you didn’t realize that, it can feel like your changes disappeared or didn’t save.
They didn’t. You’re just not in the right mode to see them.
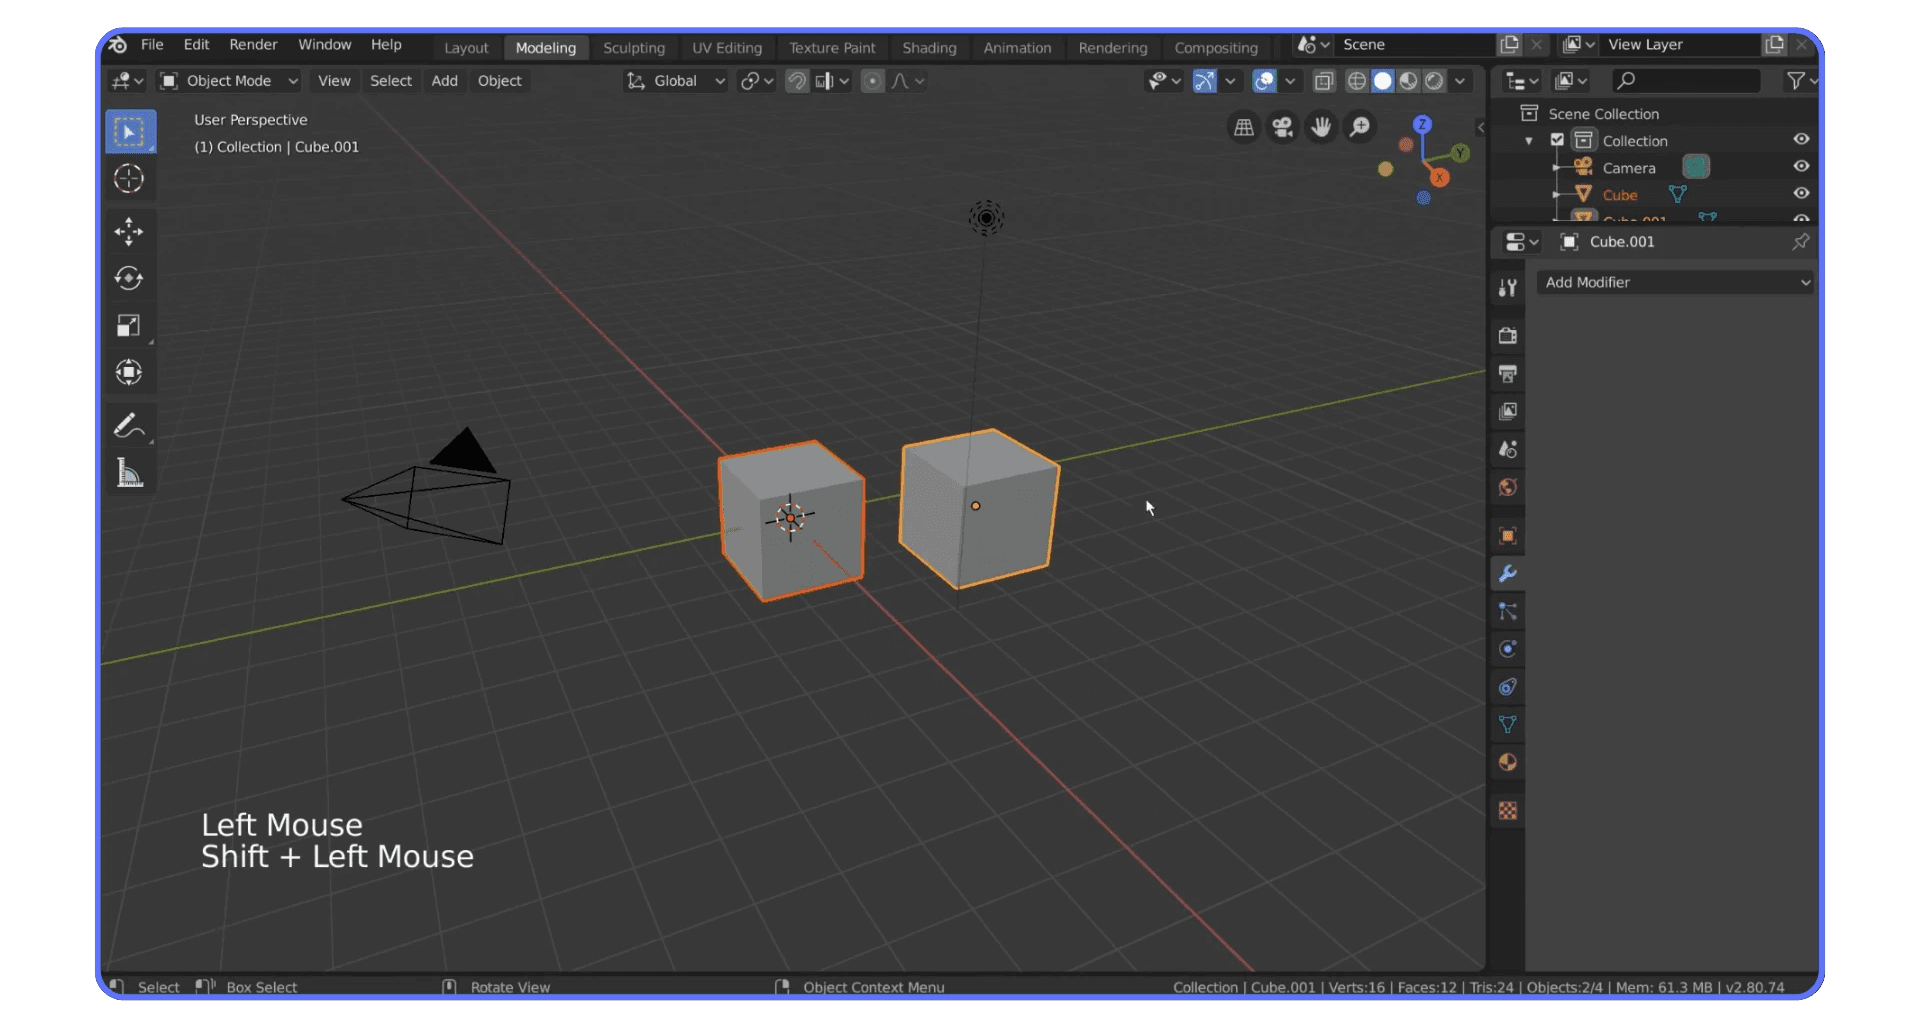
🧩 Can’t Connect Between Objects (Until You Join)
You can select multiple mesh objects, enter Edit Mode, and move vertices around across all of them at once. That’s handy for aligning shapes or editing in bulk.
But you can’t bridge geometry between different objects—no connecting a face from Object A to a vertex on Object B. Blender won’t allow it.
To make those connections, you first need to join the objects in Object Mode (shortcut: Ctrl+J). Then it’s all one mesh, and you can stitch geometry together however you like.
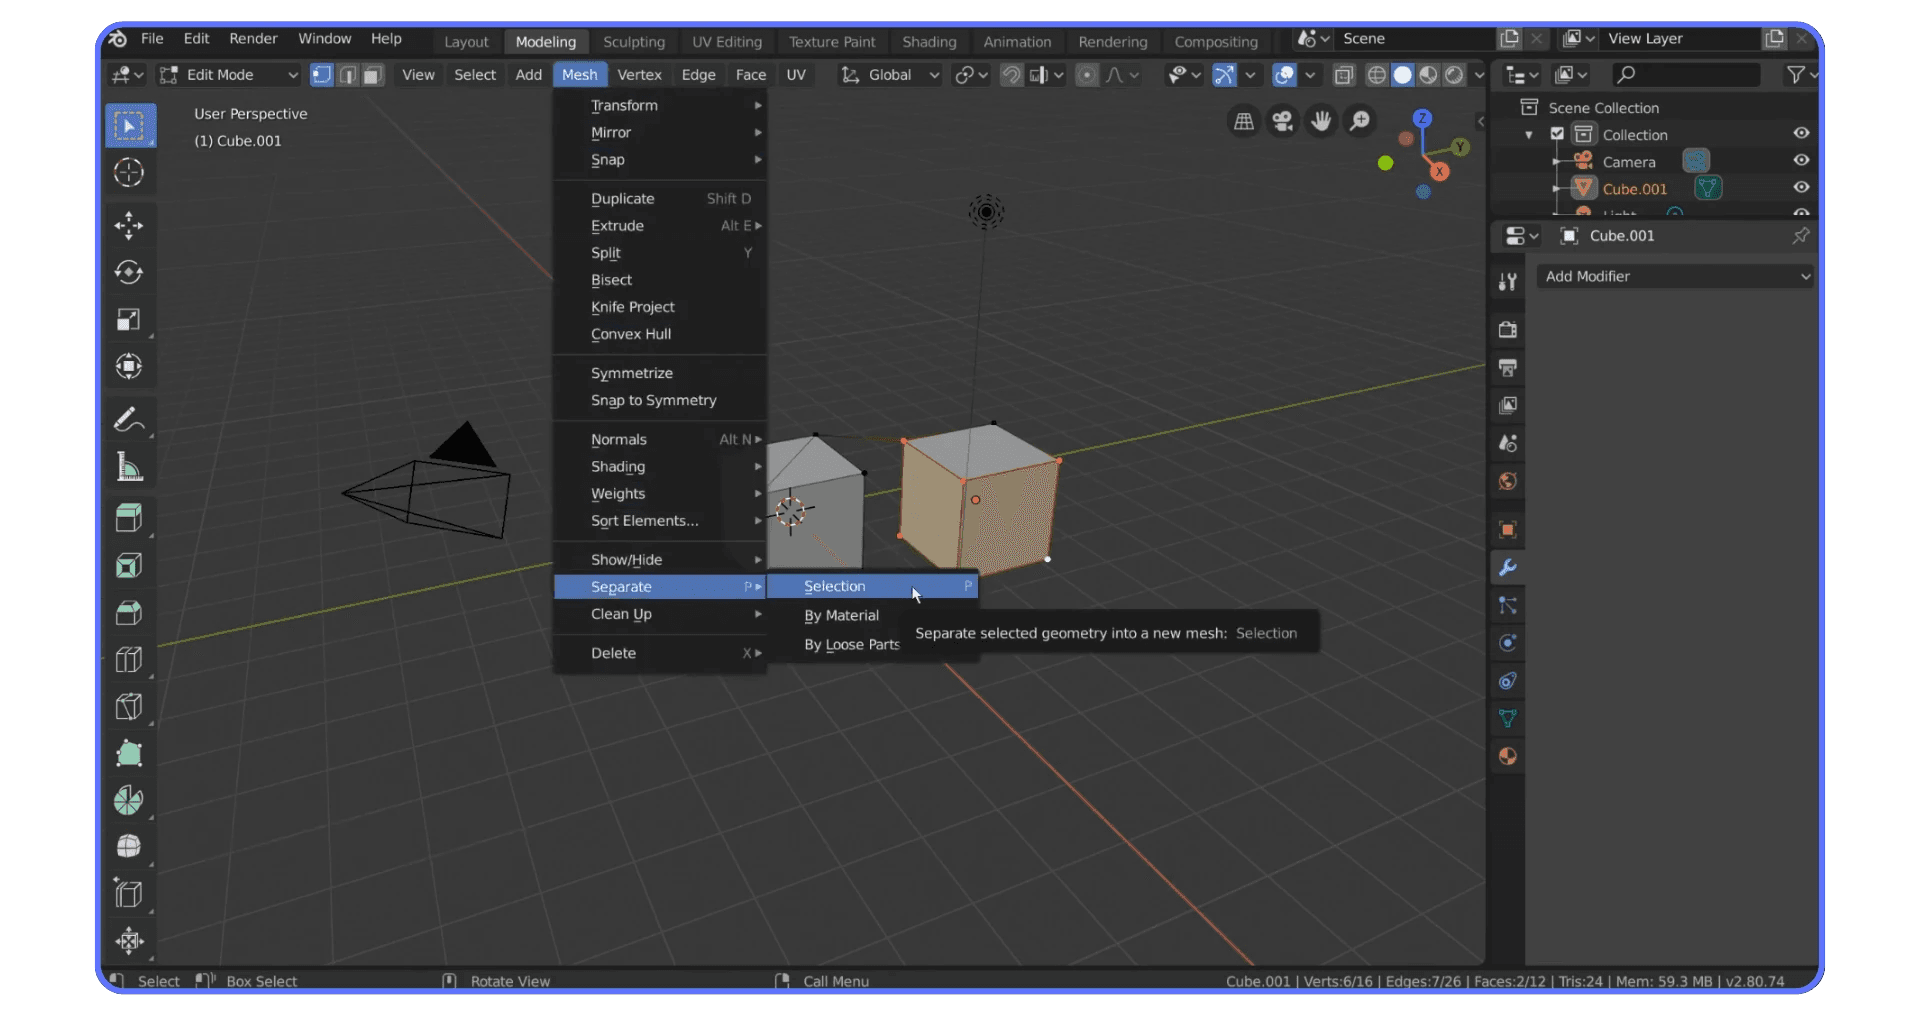
And if you ever want to split them back apart? Go into Edit Mode, select the part you want to isolate, and use Mesh → Separate → Selection. Clean break.
Tips & Best Practices That’ll Save Your Sanity
If you've ever screamed at your screen because something “should be working”—welcome to the club. Understanding the divide between Object and Edit Mode is one thing. Actually working with it day to day? That's where things get messy.
Here’s what I wish someone told me earlier:
🧠 Use Object Mode for Positioning, Edit Mode for Shaping
Sounds obvious, but it’s easy to forget.
Want to move your character across the scene? Object Mode.
Want to move just their nose? Edit Mode.
If you ever find yourself trying to select a face and nothing’s happening—check your mode. Nine times out of ten, that’s the issue.
⌨️ Learn These Shortcuts Early
They’ll speed you up more than any add-on:
Tab — Toggle between Object and Edit Mode
Ctrl+J — Join selected objects into one mesh
P → Selection — Separate part of a mesh into its own object
Ctrl+A → Apply Transforms — Locks in scale, rotation, and position so your modifiers behave correctly
You’ll use those more than you use the spacebar.
🧱 Modifiers Love Clean Transforms
Before you slap a modifier onto your object (Mirror, Array, Solidify—whatever), always apply your transforms in Object Mode. If you scaled something to look right and forgot to apply it, Blender will use the original dimensions when applying the modifier. Which often leads to chaos.
Shortcut: Ctrl + A → Apply Scale (or just “All Transforms” to be safe)
🔄 Undo = Mode Sensitive
We touched on this, but it’s worth repeating: undo follows the mode.
If you made edits in Edit Mode and then left, hitting Ctrl+Z in Object Mode won’t show anything—until you jump back into Edit Mode. Your work is there. You just need to be in the right context to see it.
🪄 Multi-Object Editing Is Great—But Limited
Yes, you can select multiple mesh objects and enter Edit Mode to move their geometry around at the same time.
But no—you can’t connect vertices across them unless you’ve joined them first. Keep that in mind before you spend ten minutes wondering why the F key isn’t filling anything.
🧼 Don’t Forget to Clean Up Origins
If you’ve heavily edited a mesh and it’s now floating miles away from its origin point, fix it.
In Object Mode:
Right click → Set Origin → Origin to Geometry
This will center the object’s pivot based on its mesh. Much easier to work with when rotating or aligning things.
What About the Other Modes?
By now, you’ve got a feel for Object and Edit Mode. But Blender doesn’t stop there. Depending on what you’re working with, you’ll see all kinds of other modes in that dropdown—Pose Mode, Sculpt Mode, Weight Paint, Texture Paint, and more.
Let’s clear something up: these aren’t just tools—they’re full-on contexts. Each one comes with its own rules, its own capabilities, and its own quirks.
🎭 Pose Mode (for Armatures)
This mode lets you animate bones in a rig without messing with the structure. It’s like Edit Mode’s cousin—but instead of reshaping geometry, you’re creating keyframes and movements. You’ll find it when working with skeletons or character rigs.
Pro tip: Always do your rigging tweaks in Edit Mode and animate in Pose Mode. Mixing the two mid-project can break your rig.
✍️ Sculpt Mode (for Organic Modeling)
If Edit Mode feels like modeling with LEGO, Sculpt Mode is more like working with clay. It gives you brushes, symmetry tools, and dynamic topology to mold your mesh—ideal for creating characters or anything with smooth, flowing shapes.
It’s fun. It’s powerful. And it’s hungry. Don’t even try sculpting on a weak laptop unless you like slow viewport lag and overheating fans.
🎨 Paint Modes (Weight, Vertex, Texture)
These let you paint weights for rigging, apply colors to vertices, or directly texture a model. They’re a whole universe of their own, and incredibly useful once you step into rigging, shading, or animation workflows.
Just don’t expect to do any real painting if your object isn’t unwrapped or weighted properly. Blender doesn’t hold your hand here.
📦 Some Objects Don’t Have Edit Mode At All
It’s not just about meshes.
Lights, cameras, empties, force fields? No Edit Mode.
Curves, lattices, armatures? Yes—but their Edit Modes look completely different.
Instead of vertices and faces, you’ll edit control points, bones, or handles. The logic is the same—manipulate the building blocks—but the tools vary depending on what the object is.
This modular approach is what makes Blender flexible—but it’s also what makes it confusing at first. If your tools suddenly disappear or act weird, ask yourself: am I in the right mode for this object type?
That question alone will solve half your modeling problems.
Why All This Matters Even More on Heavier Projects
Learning when to use Object Mode or Edit Mode is one thing.
But once your scenes start growing—think millions of vertices, multiple character rigs, or large architectural models—the stakes get higher. You’ll need not just better habits… but better performance too.
That’s where tools like Vagon Cloud Computer come in.
🚀 When Your Laptop Taps Out
If you’ve ever tried editing a dense mesh or sculpting in real time on a modest machine, you know the pain:
Viewport starts lagging
Undo takes ages
Switching between modes causes stutters
Simple actions (like separating geometry) freeze for seconds
These aren’t Blender issues. They’re hardware limitations. And they show up fast when you're pushing multiple high-poly assets or cycling between modeling modes mid-workflow.
💡 Work Smart with GPU Power You Don’t Own
Vagon gives you instant access to high-performance machines—right from your browser. No setup. No installs. Just log in, open Blender, and get to work.
You can:
Sculpt, model, and edit smoothly at any mesh complexity
Jump between modes without your system choking
Open complex Blender scenes that would crash your local setup
Render directly in the cloud while you continue editing
Whether you’re adjusting fine details in Edit Mode or orbiting massive scenes in Object Mode, performance isn’t a blocker anymore.
📤 And Yes—You Can Share What You Built
Finished sculpting a 3D asset or fine-tuning a scene? You can stream your Blender session to clients, collaborators, or reviewers—no need for them to install anything.
It’s especially useful if you’re working with AI-generated assets or sharing real-time configurators. Just drop a link and they’re in.
That’s the power of Blender + Vagon.
Final Thoughts
Object Mode vs Edit Mode might sound like a small distinction—just a dropdown, just a shortcut.
But that single toggle is one of the biggest mindset shifts in Blender.
Once you understand which mode controls what, everything clicks into place:
Your transformations make sense.
Your modifiers behave.
Your workflow speeds up.
And your frustration levels drop.
So next time Blender “isn’t doing what you want,” don’t fight it. Check your mode.
Oh, and if your machine can’t keep up with your creativity? Give Vagon Cloud Computer a try. Whether you’re sculpting high-poly characters, refining AI-generated assets, or just want to switch modes without lag, it’s like upgrading your rig—without buying a new one.
Happy modeling.
I once spent an hour trying to rotate a single face on a mesh—only to realize I wasn’t in Edit Mode.
Rookie mistake? Maybe. But let’s be honest—if you’ve used Blender for more than five minutes, you’ve probably done the same. Blender’s mode system is powerful, but it can also be confusing when you’re just starting out.
Why can’t I move this vertex?
Why is everything rotating instead of just the face?
Why does undo feel weird sometimes?
Nine times out of ten, the answer comes down to Object Mode vs Edit Mode.
In this post, I’ll break down what each mode actually does (not just what the tooltip says), when to use one over the other, and a few tips that’ll save you from smashing the keyboard when your model refuses to cooperate.
Let’s clear this up—once and for all.
Understanding the Big Picture
Before we get into shortcuts and mistakes to avoid, let’s clear up one thing:
Blender isn’t one tool—it’s a bunch of tools hidden behind different “modes.” And if you don’t know which mode you’re in, you’re going to have a bad time.
Let’s start with the two you’ll use 95% of the time: Object Mode and Edit Mode.
🟢 What is Object Mode?
Object Mode is Blender’s default state—the first thing you see when you open a new file and stare down that lonely cube. In Object Mode, you’re not editing the inside of the object—you’re manipulating the object as a whole.
You can:
Move it
Rotate it
Scale it
Animate it
Duplicate or delete it
Parent it to something else
Think of Object Mode like picking up a toy and moving it around your room. You’re not changing what the toy is made of—you’re just repositioning it in space.
Under the hood, Object Mode deals with object data blocks—essentially, the metadata that tells Blender where this thing lives, how it’s transformed, and what it’s connected to. You can have two objects using the exact same mesh, but with totally different positions and scales. That’s all Object Mode.
But here’s the kicker: Object Mode doesn’t let you touch the geometry itself. If you want to bend, stretch, poke, or sculpt the thing? You’ll need something else.
🔵 What is Edit Mode?
Enter Edit Mode.
This is where the real modeling happens. Switch to Edit Mode (hotkey: Tab) and suddenly you can access the guts of your object—its vertices, edges, and faces.
In Edit Mode, you're not just moving an object around the scene. You're reshaping its structure.
You can:
Select and move individual vertices
Extrude faces
Loop cut geometry
Weld edges
Create new topology
It’s kind of like putting that toy under a microscope and tweaking its plastic bones. You’re modifying the mesh data—and these changes affect the object’s appearance no matter where it goes in the scene.
One important note: when you move things in Edit Mode, the object’s origin stays put. That’s why sometimes your object rotates in weird ways after modeling—its pivot point hasn’t changed, even though the mesh has.
That separation—between object transform and mesh data—is a feature, not a bug. But it trips up a lot of users, especially when modifiers get involved (we’ll get to that later).
Why the Difference Actually Matters
It’s tempting to think Object Mode and Edit Mode are just two flavors of the same thing. But once you start building anything more complicated than a cube, that mindset starts breaking stuff.
Here’s why the distinction really matters.
🧭 Transform Confusion: “Why Did My Pivot Go Nuts?”
You move some vertices around in Edit Mode—stretch out one side, flatten the top, maybe pull a face forward. Then you hop into Object Mode and rotate the object... and suddenly it’s spinning from some weird corner instead of the center.
That’s because Edit Mode changes the mesh, not the object origin.
Your pivot point—the little orange dot—hasn’t moved. And Object Mode always uses that dot as the center of rotation, scaling, and other transformations. If your mesh is off-center and you forget to adjust the origin, things get real wonky, real fast.
🌀 Modifier Mayhem
Here’s a classic frustration: you add a Mirror Modifier and expect it to flip your model perfectly… but instead it mirrors off into the void.
Why? Because your object’s transformations haven’t been applied.
When you scale or move an object in Object Mode, Blender tracks that as metadata—sort of like saying, “Hey, this mesh is 150% bigger, but don’t touch the actual geometry.” If you then add a modifier, it applies using the original unscaled version, not what you're seeing.
In Edit Mode, though, every change is real. You move a face or scale a loop? That’s baked into the mesh. No disconnect. That’s why a lot of people prefer modeling adjustments there—less invisible math to trip over.
🔁 Undo Behavior
Another little gotcha: Blender treats switching between modes as part of your undo history.
Let’s say you:
Enter Edit Mode
Make a bunch of changes
Go back to Object Mode
Hit Ctrl+Z…
You won’t just undo the last mesh change—you’ll first snap back into Edit Mode. Then each undo will walk you back through your editing steps. If you didn’t realize that, it can feel like your changes disappeared or didn’t save.
They didn’t. You’re just not in the right mode to see them.
🧩 Can’t Connect Between Objects (Until You Join)
You can select multiple mesh objects, enter Edit Mode, and move vertices around across all of them at once. That’s handy for aligning shapes or editing in bulk.
But you can’t bridge geometry between different objects—no connecting a face from Object A to a vertex on Object B. Blender won’t allow it.
To make those connections, you first need to join the objects in Object Mode (shortcut: Ctrl+J). Then it’s all one mesh, and you can stitch geometry together however you like.
And if you ever want to split them back apart? Go into Edit Mode, select the part you want to isolate, and use Mesh → Separate → Selection. Clean break.
Tips & Best Practices That’ll Save Your Sanity
If you've ever screamed at your screen because something “should be working”—welcome to the club. Understanding the divide between Object and Edit Mode is one thing. Actually working with it day to day? That's where things get messy.
Here’s what I wish someone told me earlier:
🧠 Use Object Mode for Positioning, Edit Mode for Shaping
Sounds obvious, but it’s easy to forget.
Want to move your character across the scene? Object Mode.
Want to move just their nose? Edit Mode.
If you ever find yourself trying to select a face and nothing’s happening—check your mode. Nine times out of ten, that’s the issue.
⌨️ Learn These Shortcuts Early
They’ll speed you up more than any add-on:
Tab — Toggle between Object and Edit Mode
Ctrl+J — Join selected objects into one mesh
P → Selection — Separate part of a mesh into its own object
Ctrl+A → Apply Transforms — Locks in scale, rotation, and position so your modifiers behave correctly
You’ll use those more than you use the spacebar.
🧱 Modifiers Love Clean Transforms
Before you slap a modifier onto your object (Mirror, Array, Solidify—whatever), always apply your transforms in Object Mode. If you scaled something to look right and forgot to apply it, Blender will use the original dimensions when applying the modifier. Which often leads to chaos.
Shortcut: Ctrl + A → Apply Scale (or just “All Transforms” to be safe)
🔄 Undo = Mode Sensitive
We touched on this, but it’s worth repeating: undo follows the mode.
If you made edits in Edit Mode and then left, hitting Ctrl+Z in Object Mode won’t show anything—until you jump back into Edit Mode. Your work is there. You just need to be in the right context to see it.
🪄 Multi-Object Editing Is Great—But Limited
Yes, you can select multiple mesh objects and enter Edit Mode to move their geometry around at the same time.
But no—you can’t connect vertices across them unless you’ve joined them first. Keep that in mind before you spend ten minutes wondering why the F key isn’t filling anything.
🧼 Don’t Forget to Clean Up Origins
If you’ve heavily edited a mesh and it’s now floating miles away from its origin point, fix it.
In Object Mode:
Right click → Set Origin → Origin to Geometry
This will center the object’s pivot based on its mesh. Much easier to work with when rotating or aligning things.
What About the Other Modes?
By now, you’ve got a feel for Object and Edit Mode. But Blender doesn’t stop there. Depending on what you’re working with, you’ll see all kinds of other modes in that dropdown—Pose Mode, Sculpt Mode, Weight Paint, Texture Paint, and more.
Let’s clear something up: these aren’t just tools—they’re full-on contexts. Each one comes with its own rules, its own capabilities, and its own quirks.
🎭 Pose Mode (for Armatures)
This mode lets you animate bones in a rig without messing with the structure. It’s like Edit Mode’s cousin—but instead of reshaping geometry, you’re creating keyframes and movements. You’ll find it when working with skeletons or character rigs.
Pro tip: Always do your rigging tweaks in Edit Mode and animate in Pose Mode. Mixing the two mid-project can break your rig.
✍️ Sculpt Mode (for Organic Modeling)
If Edit Mode feels like modeling with LEGO, Sculpt Mode is more like working with clay. It gives you brushes, symmetry tools, and dynamic topology to mold your mesh—ideal for creating characters or anything with smooth, flowing shapes.
It’s fun. It’s powerful. And it’s hungry. Don’t even try sculpting on a weak laptop unless you like slow viewport lag and overheating fans.
🎨 Paint Modes (Weight, Vertex, Texture)
These let you paint weights for rigging, apply colors to vertices, or directly texture a model. They’re a whole universe of their own, and incredibly useful once you step into rigging, shading, or animation workflows.
Just don’t expect to do any real painting if your object isn’t unwrapped or weighted properly. Blender doesn’t hold your hand here.
📦 Some Objects Don’t Have Edit Mode At All
It’s not just about meshes.
Lights, cameras, empties, force fields? No Edit Mode.
Curves, lattices, armatures? Yes—but their Edit Modes look completely different.
Instead of vertices and faces, you’ll edit control points, bones, or handles. The logic is the same—manipulate the building blocks—but the tools vary depending on what the object is.
This modular approach is what makes Blender flexible—but it’s also what makes it confusing at first. If your tools suddenly disappear or act weird, ask yourself: am I in the right mode for this object type?
That question alone will solve half your modeling problems.
Why All This Matters Even More on Heavier Projects
Learning when to use Object Mode or Edit Mode is one thing.
But once your scenes start growing—think millions of vertices, multiple character rigs, or large architectural models—the stakes get higher. You’ll need not just better habits… but better performance too.
That’s where tools like Vagon Cloud Computer come in.
🚀 When Your Laptop Taps Out
If you’ve ever tried editing a dense mesh or sculpting in real time on a modest machine, you know the pain:
Viewport starts lagging
Undo takes ages
Switching between modes causes stutters
Simple actions (like separating geometry) freeze for seconds
These aren’t Blender issues. They’re hardware limitations. And they show up fast when you're pushing multiple high-poly assets or cycling between modeling modes mid-workflow.
💡 Work Smart with GPU Power You Don’t Own
Vagon gives you instant access to high-performance machines—right from your browser. No setup. No installs. Just log in, open Blender, and get to work.
You can:
Sculpt, model, and edit smoothly at any mesh complexity
Jump between modes without your system choking
Open complex Blender scenes that would crash your local setup
Render directly in the cloud while you continue editing
Whether you’re adjusting fine details in Edit Mode or orbiting massive scenes in Object Mode, performance isn’t a blocker anymore.
📤 And Yes—You Can Share What You Built
Finished sculpting a 3D asset or fine-tuning a scene? You can stream your Blender session to clients, collaborators, or reviewers—no need for them to install anything.
It’s especially useful if you’re working with AI-generated assets or sharing real-time configurators. Just drop a link and they’re in.
That’s the power of Blender + Vagon.
Final Thoughts
Object Mode vs Edit Mode might sound like a small distinction—just a dropdown, just a shortcut.
But that single toggle is one of the biggest mindset shifts in Blender.
Once you understand which mode controls what, everything clicks into place:
Your transformations make sense.
Your modifiers behave.
Your workflow speeds up.
And your frustration levels drop.
So next time Blender “isn’t doing what you want,” don’t fight it. Check your mode.
Oh, and if your machine can’t keep up with your creativity? Give Vagon Cloud Computer a try. Whether you’re sculpting high-poly characters, refining AI-generated assets, or just want to switch modes without lag, it’s like upgrading your rig—without buying a new one.
Happy modeling.
Get Beyond Your Computer Performance
Run applications on your cloud computer with the latest generation hardware. No more crashes or lags.

Trial includes 1 hour usage + 7 days of storage.
Summarize with AI

Ready to focus on your creativity?
Vagon gives you the ability to create & render projects, collaborate, and stream applications with the power of the best hardware.

Vagon Blog


Run heavy applications on any device with
your personal computer on the cloud.
San Francisco, California
Solutions
Vagon Teams
Vagon Streams
Use Cases
Resources
Vagon Blog
What Slows Down After Effects Projects?
The First 30 Minutes in Blender 3D: A Practical Workflow Guide
What’s New in Godot 4.7? Key Features, Upgrades, and Workflow Improvements
What Slows Down Blender 3D Projects?
What Slows Down Adobe Photoshop Projects?
The First 30 Minutes in Adobe Photoshop: A Practical Workflow Guide
Before You Start in Adobe Photoshop: A Practical Setup Checklist
What’s New in Unreal Engine 5.8? Key Features and Upgrade Advice
How to Run Windows on an iPad: 4 Best Ways (2026)
Vagon Blog
Run heavy applications on any device with
your personal computer on the cloud.
San Francisco, California
Solutions
Vagon Teams
Vagon Streams
Use Cases
Resources
Vagon Blog