Instant Connection for Pixel Streaming
— New Feature Automated Setup

How to Run Blender on Googlebook
DigitalArt
-
How to Run Blender on Googlebook
DigitalArt
How to Run Blender on Googlebook
DigitalArt
-
Table of Contents
The lamp model is ready, but you still need two product images: one with a brushed metal finish and another with a darker body material. Both need convincing lighting, a consistent camera angle, and enough detail for the client’s presentation. You have the .blend file and your Googlebook. The next step is to open the scene and turn those variations into finished renders.
With Vagon Cloud Computer, you can access desktop Blender through your Googlebook’s browser and use the workstation’s resources for editing and rendering. Select Blender during setup, bring in your scene, and work with its materials, lights, and cameras.
Blender also has a Linux version, while Android development is progressing. Their suitability for Googlebook depends on the available software and graphics support. This guide focuses on a cloud workflow that gives you a desktop workspace and access to supported GPU rendering.
You will learn how to transfer the scene and textures, prepare the material variations, enable Cycles GPU rendering, and download the finished images.

Source: Blender Manual
What Are Your Options for Running Blender on Googlebook?
You can use Blender from a Googlebook through several routes. The right choice depends on whether you want to explore the interface, edit an existing scene, or produce demanding renders. Local application support and access to suitable graphics hardware both matter.
Option | What to consider |
|---|---|
Android development builds | Device compatibility and the current development status |
Linux through Googlebook’s Terminal | Processor architecture, Blender version, and graphics support |
Remote access to your own computer | An available computer with Blender and suitable hardware |
Vagon Cloud Computer | A desktop workspace with selectable computing resources |
Android and Linux options
Blender’s Android port is progressing, but its October 2026 development update describes ongoing integration work and Googlebook support targets. A demonstrated Android build does not establish that a finished release supports every Googlebook.
The Googlebook Terminal provides a Debian Linux virtual machine and a way to launch graphical Linux applications. Blender has a Linux version, so this route deserves consideration. However, installing a compatible build also requires graphics support that meets Blender’s requirements.
Google’s current Linux VM roadmap lists GPU/NPU hardware acceleration as future work. You should therefore assess the available environment before relying on it for a particular Blender project, especially one requiring Cycles GPU rendering.
Desktop access for editing and rendering
If you already have a suitable Windows, Mac, or Linux computer, remote access lets you work in its Blender environment from your Googlebook. That computer needs to remain available during the session.
A cloud workstation provides another desktop route. With Vagon, you can open Blender in a Windows workspace and select resources for the scene you are working on. The application processes the scene remotely while your Googlebook displays the desktop and sends your input.
For our lamp images, this gives us a workspace for changing materials, arranging lighting, and rendering both variations. We will use that route in the following steps, beginning with a computer that has Blender installed.
Open Blender on Vagon in Three Steps
You can prepare Blender while creating your cloud computer, then open the application from your Googlebook’s browser. The workspace gives you access to the desktop interface, including modeling tools, the Shader Editor, animation controls, and render settings.
For the lamp project, we will start with Blender ready to use, arrange the interface for editing, and then bring in the scene and its assets.
1. Create your cloud computer and select Blender
Create your Vagon Cloud Computer and choose a location near you. Select a performance option suited to the work you expect to do. For our product images, choose a GPU-equipped configuration so you can use supported Cycles GPU rendering later.
During application selection, choose Blender. The preinstalled application setup installs selected applications automatically while preparing your computer.
Allocate storage for the scene, textures, and finished renders. Projects containing high-resolution images or simulation caches can need considerably more space than the .blend file alone suggests.
Blender itself is free to use, including for commercial work. Your cloud computer usage and any separately purchased add-ons or assets have their own costs.
2. Connect through your Googlebook’s browser
Once the computer is ready, start it and connect from your dashboard. The Windows desktop appears in your browser, giving you access to the installed application and your working files.
Use full-screen view to give Blender’s editors more room. A mouse with a middle button makes orbiting, panning, and zooming convenient. If you use a trackpad or two-button mouse, Blender also provides input preferences for adapting navigation.
Choose display scaling that keeps menus readable without making the Properties editor and Outliner unnecessarily large. You can resize editor areas inside Blender as you work.
Your Googlebook sends input and displays the session. The cloud workstation handles the scene calculations and rendering.
3. Launch Blender and prepare the workspace
Open Blender from the Windows desktop. You can start a new scene immediately or open an existing project once its files have been uploaded.
For the lamp scene, the Layout workspace provides a useful starting point: the 3D Viewport for inspecting the model, the Outliner for selecting objects, and the Properties editor for materials and render settings.
If the project requires a particular Blender release, use that version. You can download an official release from Blender’s download page inside the workstation. Matching the source version is useful when the scene depends on specific add-ons or features.
You now have the application ready. Next, transfer the lamp scene and its textures so both material variations can be edited and rendered in the same workspace.
Bring Your Scene and Textures Through Vagon Files
Before opening the lamp scene, bring its materials and supporting assets into the workspace. A .blend file contains the scene’s objects and settings, but image textures, linked libraries, and other resources may still point to files stored elsewhere.
Preparing those resources together helps the scene retain its appearance when you open it on the cloud computer.
Pack the scene’s resources
On the computer where the scene is currently available, open Blender and choose File > External Data > Pack Resources, then save the .blend file. Blender’s resource packing embeds eligible external files, such as image textures, into the saved project.
If the scene uses objects or collections linked from other .blend files, use Pack Linked Libraries as appropriate and save again.
Some resources need to travel separately. Video files and certain external data cannot be packed into the project. Keep those files in the project folder, together with any simulation caches or other dependencies the scene requires. For a supplied client project, ask for the complete asset folder if it has not already been packaged.
For our lamp images, a packed .blend containing the model, image textures, and lighting resources may cover the transfer. Any add-ons used by the project need to be installed separately in the destination Blender environment.
Upload through Vagon Files
Open Vagon Files from your dashboard and upload the prepared project. You can transfer files while the cloud computer is stopped, allowing you to prepare the assets before starting your editing session.
Once connected, access the uploaded files through the Vagon Files folder inside Windows. If the package is a ZIP archive, extract it into a working folder before opening the scene. Keep the folder structure together so relative file paths can resolve correctly.

Source: Blender Manual
Check the materials before editing
Open the .blend file and switch to Material Preview to inspect the lamp. Check the body finish, any image-based details, and the surrounding scene.
Bright pink surfaces usually indicate a missing image resource. Use File > External Data > Find Missing Files, select the transferred asset folder, and let Blender locate the missing files.
Compare the scene with any supplied reference image. Once the materials appear correctly, save a working copy such as lamp_material_variations.blend. You are ready to prepare the two finishes and arrange their presentation.
Change Materials, Lighting, and Camera Framing
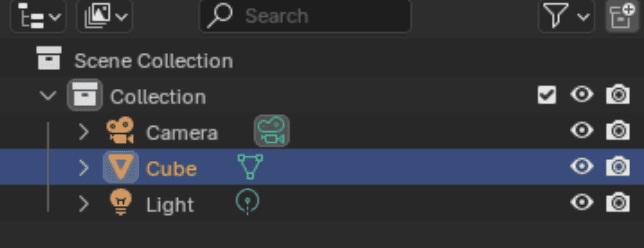
With the lamp scene open, select the body object in the Outliner and inspect its material. We will prepare a brushed metal version and a darker finish, using the same camera and lighting so the client can compare them clearly.
Save a separate project copy for each variation. This gives you two editable scenes with their own material settings and output filenames.
Source: Blender Manual
Prepare the two finishes
Open the Shading workspace and locate the material assigned to the lamp body. If several objects share that material, changing it affects all of them. Click the user-count number beside the material name to create a separate copy when you want to modify only this object’s material.

Source: Blender Manual
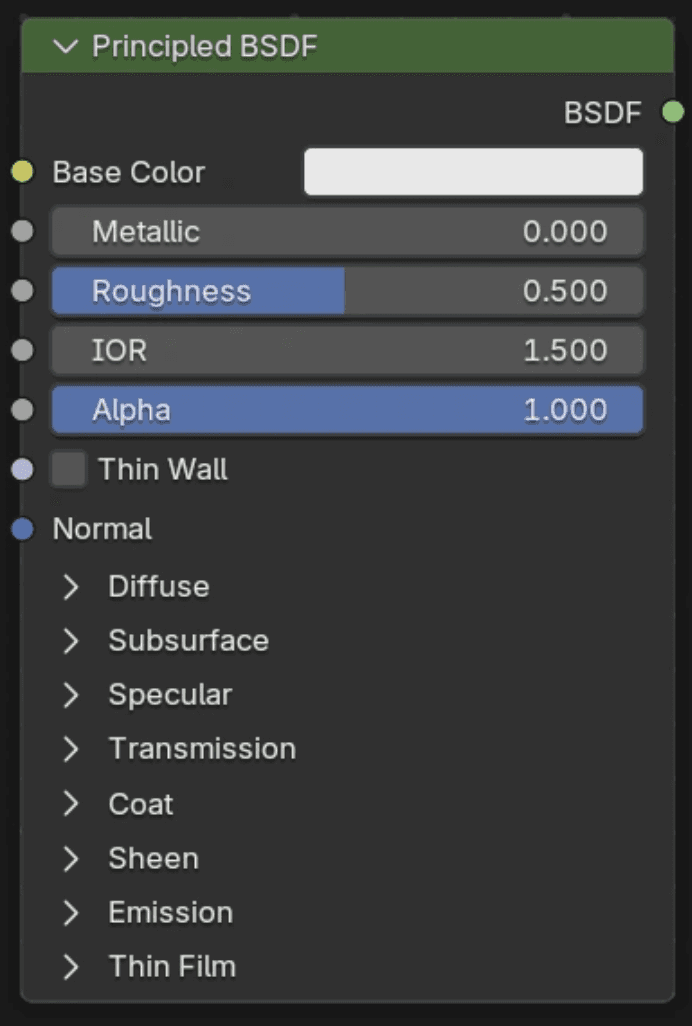
For the metal finish, inspect the shader’s metallic and roughness settings. A brushed appearance also depends on directional surface detail, which may come from existing textures or shader settings. Preserve that detail while adjusting the finish.
For the darker version, change the appropriate color or texture input and review the reflections. If an image texture controls the color, adjusting an unconnected color field will not change the visible result.
Source: Blender Manual
Choose the right viewport mode
Blender’s viewport shading modes help you inspect different parts of the scene:
Mode | Useful for |
|---|---|
Solid | Object placement, geometry, and quick navigation |
Material Preview | Reviewing materials under preview lighting |
Rendered | Checking the scene with its active render engine |
Material Preview normally uses a studio environment. Enable Scene Lights and Scene World when you want it to use the scene’s lighting setup, or switch to Rendered view for a closer assessment of the intended output.
Shape the lighting and camera view
Select the scene’s lights and adjust their position, size, and power to reveal the lamp’s shape. Broad reflections can help communicate a metal surface, while the darker finish needs enough separation from the background to remain readable.
Enter camera view using View > Cameras > Active Camera. Check the crop, perspective, and space around the product. Use the same camera settings for both variants.

Source: Blender Manual
Inspect the lamp’s edges and reflections before rendering. Keep lighting changes consistent across the two files, then save them with clear names such as lamp_metal.blend and lamp_dark.blend. Both scenes are now ready for GPU rendering and a first test image.
Enable Cycles GPU Rendering and Choose Your Performance
Cycles can use a supported GPU to calculate the lamp’s lighting, reflections, and shadows. The GPU belongs to the cloud workstation, so your Googlebook’s local graphics hardware does not determine which Cycles render device is available.
Before rendering, enable the device in Blender and tell the scene to use it. Both settings matter: choosing a GPU-equipped computer does not automatically configure every project for GPU rendering.
Enable the render device
Inside Blender on the Windows desktop:
Open Edit > Preferences > System.
Under Cycles Render Devices, select a supported backend. For a compatible NVIDIA GPU, OptiX or CUDA may be available.
Enable the GPU in the device list.
Open Render Properties and set the render engine to Cycles.
Set Device to GPU Compute.
Blender’s GPU rendering documentation explains the supported hardware and drivers for each backend. OptiX can use hardware ray tracing on supported NVIDIA RTX GPUs.
Open both lamp project files and check their device setting. Save each file after selecting GPU Compute so the scenes retain that choice.

Source: Blender Manual
Match resources to the scene
Rendering is one part of the workload. Blender also needs resources for scene preparation, geometry, textures, and editing.
Resource | What it supports |
|---|---|
GPU | Cycles rendering and graphics processing |
VRAM | Geometry, textures, and other data used during GPU rendering |
RAM | Scene data and working memory |
CPU | Scene preparation, modeling operations, and many simulation tasks |
Blender’s general recommended specifications include 32 GB of RAM and 8 GB of VRAM for Windows and Linux systems. Treat these as a reference. A simple product scene and a detailed environment with large textures can have very different memory requirements.
For our lamp, start with the complete scene and render a representative camera view. That test includes the actual materials and lighting you need to deliver.
Choose more capacity when the work requires it
Vagon’s performance options let you select resources for your project and change the configuration as your needs grow. More capable graphics hardware can help supported Cycles workloads, while additional memory provides room for larger scenes.
VRAM capacity deserves attention alongside processing speed. When the scene exceeds GPU memory, performance can change significantly. Larger textures, dense geometry, and complex scene data all contribute.
Save your project before changing performance. Then reopen Blender, check the available Cycles device, and repeat the same test settings. Compare render time and stability with the same scene, resolution, and samples to decide which configuration suits the job.
Render the Product Images and Download the Results
With GPU rendering enabled, prepare the lamp images for delivery. Open the metal version first and enter the active camera view. Check the composition, then set the required image dimensions in Output Properties. Make sure the resolution percentage is set to the intended value.
Keep the same camera, dimensions, and render settings for both finishes so the comparison remains consistent.

Source: Blender Manual
Start with a test image
Before rendering at full delivery resolution, produce a smaller test. Use a lower resolution percentage and suitable sample settings to check the lighting, reflections, and material detail.
In Render Properties, review the Cycles sampling settings and enable denoising if appropriate. Denoising can reduce visible noise, but inspect fine surface detail to ensure the brushed finish still looks convincing.
Choose Render > Render Image. Review the result for bright reflections, dark areas, unwanted objects, and missing textures. Adjust the scene until the test communicates the product clearly.
Save each finished render
Restore the delivery resolution and render the final image. When it finishes, use Image > Save As in the render result window.
Select the required format and save the file with a clear name, such as:
lamp_brushed_metal.pnglamp_dark_finish.png
A still render is not automatically saved simply because you entered a folder in Output Properties. Save it from the Image Editor unless you have configured another output method, such as a Compositor File Output node.
Repeat the process for the second scene, checking that the camera and output settings match.
If you also need an animation
For a longer animation, Blender’s image sequence workflow saves individual frames as they render. Configure the output folder, format, frame range, and frame rate before choosing Render Animation. Completed frames can then be assembled into a video, with greater flexibility if rendering is interrupted.

Source: Blender Manual
Download and check the deliverables
Place the finished images in Vagon Files and download them to your Googlebook. Check their dimensions, filenames, and appearance in the application you will use for delivery.
Save the two .blend files as well. Keeping the editable scenes alongside the exports makes the next material or lighting revision easier to continue.
Keep the Viewport Responsive and Fix Common Problems
Choose the viewport mode that suits the task. Solid view is useful for positioning objects and navigating the scene. Switch to Material Preview for surface checks, then use Rendered view when assessing the scene’s lighting and reflections.
If navigation becomes slow, inspect the visible geometry and modifiers. Dense meshes, high subdivision levels, and large textures can increase the workload. You can reduce a modifier’s viewport subdivision level while retaining a higher render level, then inspect the final result before delivery.

Source: Blender Manual
Keep the cloud desktop in full-screen view and use a mouse for comfortable navigation. A stable connection and a nearby workstation location help with responsiveness.
Problem | First check |
|---|---|
Materials appear bright pink | Locate missing image files with Find Missing Files. |
Cycles is using the CPU | Check the enabled device in Preferences and select GPU Compute for the scene. |
Viewport navigation is slow | Review shading mode, visible geometry, and modifier settings. |
GPU memory errors occur | Check texture sizes, scene complexity, and available VRAM. |
Mouse input feels delayed | Check connection stability and workstation location. |
Distinguish calculation delays from connection delays. If selecting menus and moving the mouse feel responsive but Rendered view takes time to update, the scene may need more processing time. If the whole desktop responds late, investigate the connection.
For persistent memory problems, review the assets before choosing additional capacity. An unnecessarily large texture or hidden high-density object can consume resources without contributing to the final image.
Save after meaningful edits and keep the cloud computer running until exports finish. Once the deliverables are checked and downloaded, stop the workstation from your dashboard. Your saved scene remains available for the next session.
Final Thoughts
Your Googlebook can be the device you use to edit a Blender scene and deliver finished renders. With a desktop cloud workspace, you can prepare materials, arrange lighting, configure a supported Cycles GPU, and save the outputs.
Start with a scene you want to finish. Create your Vagon Cloud Computer, select Blender during setup, and upload the project through Vagon Files. Choose resources around the scene’s needs, keep the editable files alongside your renders, and return to the workspace when another revision arrives.
FAQs
Can you run Blender on Googlebook?
Yes. You can access desktop Blender through a cloud workstation and control it from your Googlebook’s browser. Local options also deserve consideration: Googlebook provides a Linux environment, and Blender’s Android port is developing. Their suitability depends on device compatibility, graphics support, and the work you need to complete.
Is Blender available for Android?
Blender’s Android port is in development. Its October 2026 project update describes a demonstrated build and ongoing integration work, including Googlebook support targets. Check the latest official release information before relying on an Android build for a project. A demo does not establish support for every device.
Can Googlebook’s Linux Terminal run Blender?
Googlebook’s Terminal provides a Debian virtual machine that can launch graphical Linux applications. A compatible Blender build also needs suitable graphics support. Google currently lists GPU acceleration for the VM as future work, so assess the available environment before planning demanding viewport work or Cycles GPU rendering.
Is Blender preinstalled on Vagon?
Blender is available through Vagon’s application setup. Select it when creating your cloud computer so it is prepared with the workspace. If your project requires a particular release, you can install an official Blender version inside Windows and use it for that project.
Do I need a Blender subscription?
No. Blender is free software and can be used for commercial projects. Cloud computer usage has its own cost, and separately purchased add-ons, textures, models, or services may have additional charges. You do not need a paid Blender subscription to open scenes or render your work.
Can I use Cycles GPU rendering?
Yes, when the workstation provides a GPU and drivers supported by your Blender version. Enable the device under Preferences > System, then select GPU Compute in the scene’s Cycles settings. Check both settings before rendering, particularly when opening a project created on another computer.
Can I install Blender add-ons?
You can install compatible add-ons inside the workstation’s Blender environment. Check support for your Blender version and Windows, especially when an add-on includes external programs or compiled components. Paid add-ons may require activation. Packing the scene’s resources does not install its add-ons on the destination computer.
How do I transfer textures and linked files?
Use Pack Resources and save the project to embed eligible assets. Linked .blend libraries have a separate packing option. Keep resources that cannot be packed in the project folder, then upload the package through Vagon Files. Inspect the scene after opening it to confirm that its assets resolve.
Can I render animations as well as still images?
Yes. Configure the frame range, frame rate, resolution, and output location before rendering. Image sequences are useful for longer jobs because completed frames remain available if rendering is interrupted. You can assemble those frames into a video afterward. Keep the workstation running until the required frames finish.
Can I use this cloud workflow offline?
You need an internet connection to access and control the workstation. Blender itself can work offline on a compatible local computer, but a cloud session requires connectivity. Downloaded images and videos remain available on your Googlebook, and you can reconnect later to continue editing the saved scenes.
The lamp model is ready, but you still need two product images: one with a brushed metal finish and another with a darker body material. Both need convincing lighting, a consistent camera angle, and enough detail for the client’s presentation. You have the .blend file and your Googlebook. The next step is to open the scene and turn those variations into finished renders.
With Vagon Cloud Computer, you can access desktop Blender through your Googlebook’s browser and use the workstation’s resources for editing and rendering. Select Blender during setup, bring in your scene, and work with its materials, lights, and cameras.
Blender also has a Linux version, while Android development is progressing. Their suitability for Googlebook depends on the available software and graphics support. This guide focuses on a cloud workflow that gives you a desktop workspace and access to supported GPU rendering.
You will learn how to transfer the scene and textures, prepare the material variations, enable Cycles GPU rendering, and download the finished images.
Source: Blender Manual
What Are Your Options for Running Blender on Googlebook?
You can use Blender from a Googlebook through several routes. The right choice depends on whether you want to explore the interface, edit an existing scene, or produce demanding renders. Local application support and access to suitable graphics hardware both matter.
Option | What to consider |
|---|---|
Android development builds | Device compatibility and the current development status |
Linux through Googlebook’s Terminal | Processor architecture, Blender version, and graphics support |
Remote access to your own computer | An available computer with Blender and suitable hardware |
Vagon Cloud Computer | A desktop workspace with selectable computing resources |
Android and Linux options
Blender’s Android port is progressing, but its October 2026 development update describes ongoing integration work and Googlebook support targets. A demonstrated Android build does not establish that a finished release supports every Googlebook.
The Googlebook Terminal provides a Debian Linux virtual machine and a way to launch graphical Linux applications. Blender has a Linux version, so this route deserves consideration. However, installing a compatible build also requires graphics support that meets Blender’s requirements.
Google’s current Linux VM roadmap lists GPU/NPU hardware acceleration as future work. You should therefore assess the available environment before relying on it for a particular Blender project, especially one requiring Cycles GPU rendering.
Desktop access for editing and rendering
If you already have a suitable Windows, Mac, or Linux computer, remote access lets you work in its Blender environment from your Googlebook. That computer needs to remain available during the session.
A cloud workstation provides another desktop route. With Vagon, you can open Blender in a Windows workspace and select resources for the scene you are working on. The application processes the scene remotely while your Googlebook displays the desktop and sends your input.
For our lamp images, this gives us a workspace for changing materials, arranging lighting, and rendering both variations. We will use that route in the following steps, beginning with a computer that has Blender installed.
Open Blender on Vagon in Three Steps
You can prepare Blender while creating your cloud computer, then open the application from your Googlebook’s browser. The workspace gives you access to the desktop interface, including modeling tools, the Shader Editor, animation controls, and render settings.
For the lamp project, we will start with Blender ready to use, arrange the interface for editing, and then bring in the scene and its assets.
1. Create your cloud computer and select Blender
Create your Vagon Cloud Computer and choose a location near you. Select a performance option suited to the work you expect to do. For our product images, choose a GPU-equipped configuration so you can use supported Cycles GPU rendering later.
During application selection, choose Blender. The preinstalled application setup installs selected applications automatically while preparing your computer.
Allocate storage for the scene, textures, and finished renders. Projects containing high-resolution images or simulation caches can need considerably more space than the .blend file alone suggests.
Blender itself is free to use, including for commercial work. Your cloud computer usage and any separately purchased add-ons or assets have their own costs.
2. Connect through your Googlebook’s browser
Once the computer is ready, start it and connect from your dashboard. The Windows desktop appears in your browser, giving you access to the installed application and your working files.
Use full-screen view to give Blender’s editors more room. A mouse with a middle button makes orbiting, panning, and zooming convenient. If you use a trackpad or two-button mouse, Blender also provides input preferences for adapting navigation.
Choose display scaling that keeps menus readable without making the Properties editor and Outliner unnecessarily large. You can resize editor areas inside Blender as you work.
Your Googlebook sends input and displays the session. The cloud workstation handles the scene calculations and rendering.
3. Launch Blender and prepare the workspace
Open Blender from the Windows desktop. You can start a new scene immediately or open an existing project once its files have been uploaded.
For the lamp scene, the Layout workspace provides a useful starting point: the 3D Viewport for inspecting the model, the Outliner for selecting objects, and the Properties editor for materials and render settings.
If the project requires a particular Blender release, use that version. You can download an official release from Blender’s download page inside the workstation. Matching the source version is useful when the scene depends on specific add-ons or features.
You now have the application ready. Next, transfer the lamp scene and its textures so both material variations can be edited and rendered in the same workspace.
Bring Your Scene and Textures Through Vagon Files
Before opening the lamp scene, bring its materials and supporting assets into the workspace. A .blend file contains the scene’s objects and settings, but image textures, linked libraries, and other resources may still point to files stored elsewhere.
Preparing those resources together helps the scene retain its appearance when you open it on the cloud computer.
Pack the scene’s resources
On the computer where the scene is currently available, open Blender and choose File > External Data > Pack Resources, then save the .blend file. Blender’s resource packing embeds eligible external files, such as image textures, into the saved project.
If the scene uses objects or collections linked from other .blend files, use Pack Linked Libraries as appropriate and save again.
Some resources need to travel separately. Video files and certain external data cannot be packed into the project. Keep those files in the project folder, together with any simulation caches or other dependencies the scene requires. For a supplied client project, ask for the complete asset folder if it has not already been packaged.
For our lamp images, a packed .blend containing the model, image textures, and lighting resources may cover the transfer. Any add-ons used by the project need to be installed separately in the destination Blender environment.
Upload through Vagon Files
Open Vagon Files from your dashboard and upload the prepared project. You can transfer files while the cloud computer is stopped, allowing you to prepare the assets before starting your editing session.
Once connected, access the uploaded files through the Vagon Files folder inside Windows. If the package is a ZIP archive, extract it into a working folder before opening the scene. Keep the folder structure together so relative file paths can resolve correctly.
Source: Blender Manual
Check the materials before editing
Open the .blend file and switch to Material Preview to inspect the lamp. Check the body finish, any image-based details, and the surrounding scene.
Bright pink surfaces usually indicate a missing image resource. Use File > External Data > Find Missing Files, select the transferred asset folder, and let Blender locate the missing files.
Compare the scene with any supplied reference image. Once the materials appear correctly, save a working copy such as lamp_material_variations.blend. You are ready to prepare the two finishes and arrange their presentation.
Change Materials, Lighting, and Camera Framing
With the lamp scene open, select the body object in the Outliner and inspect its material. We will prepare a brushed metal version and a darker finish, using the same camera and lighting so the client can compare them clearly.
Save a separate project copy for each variation. This gives you two editable scenes with their own material settings and output filenames.
Source: Blender Manual
Prepare the two finishes
Open the Shading workspace and locate the material assigned to the lamp body. If several objects share that material, changing it affects all of them. Click the user-count number beside the material name to create a separate copy when you want to modify only this object’s material.
Source: Blender Manual
For the metal finish, inspect the shader’s metallic and roughness settings. A brushed appearance also depends on directional surface detail, which may come from existing textures or shader settings. Preserve that detail while adjusting the finish.
For the darker version, change the appropriate color or texture input and review the reflections. If an image texture controls the color, adjusting an unconnected color field will not change the visible result.
Source: Blender Manual
Choose the right viewport mode
Blender’s viewport shading modes help you inspect different parts of the scene:
Mode | Useful for |
|---|---|
Solid | Object placement, geometry, and quick navigation |
Material Preview | Reviewing materials under preview lighting |
Rendered | Checking the scene with its active render engine |
Material Preview normally uses a studio environment. Enable Scene Lights and Scene World when you want it to use the scene’s lighting setup, or switch to Rendered view for a closer assessment of the intended output.
Shape the lighting and camera view
Select the scene’s lights and adjust their position, size, and power to reveal the lamp’s shape. Broad reflections can help communicate a metal surface, while the darker finish needs enough separation from the background to remain readable.
Enter camera view using View > Cameras > Active Camera. Check the crop, perspective, and space around the product. Use the same camera settings for both variants.
Source: Blender Manual
Inspect the lamp’s edges and reflections before rendering. Keep lighting changes consistent across the two files, then save them with clear names such as lamp_metal.blend and lamp_dark.blend. Both scenes are now ready for GPU rendering and a first test image.
Enable Cycles GPU Rendering and Choose Your Performance
Cycles can use a supported GPU to calculate the lamp’s lighting, reflections, and shadows. The GPU belongs to the cloud workstation, so your Googlebook’s local graphics hardware does not determine which Cycles render device is available.
Before rendering, enable the device in Blender and tell the scene to use it. Both settings matter: choosing a GPU-equipped computer does not automatically configure every project for GPU rendering.
Enable the render device
Inside Blender on the Windows desktop:
Open Edit > Preferences > System.
Under Cycles Render Devices, select a supported backend. For a compatible NVIDIA GPU, OptiX or CUDA may be available.
Enable the GPU in the device list.
Open Render Properties and set the render engine to Cycles.
Set Device to GPU Compute.
Blender’s GPU rendering documentation explains the supported hardware and drivers for each backend. OptiX can use hardware ray tracing on supported NVIDIA RTX GPUs.
Open both lamp project files and check their device setting. Save each file after selecting GPU Compute so the scenes retain that choice.
Source: Blender Manual
Match resources to the scene
Rendering is one part of the workload. Blender also needs resources for scene preparation, geometry, textures, and editing.
Resource | What it supports |
|---|---|
GPU | Cycles rendering and graphics processing |
VRAM | Geometry, textures, and other data used during GPU rendering |
RAM | Scene data and working memory |
CPU | Scene preparation, modeling operations, and many simulation tasks |
Blender’s general recommended specifications include 32 GB of RAM and 8 GB of VRAM for Windows and Linux systems. Treat these as a reference. A simple product scene and a detailed environment with large textures can have very different memory requirements.
For our lamp, start with the complete scene and render a representative camera view. That test includes the actual materials and lighting you need to deliver.
Choose more capacity when the work requires it
Vagon’s performance options let you select resources for your project and change the configuration as your needs grow. More capable graphics hardware can help supported Cycles workloads, while additional memory provides room for larger scenes.
VRAM capacity deserves attention alongside processing speed. When the scene exceeds GPU memory, performance can change significantly. Larger textures, dense geometry, and complex scene data all contribute.
Save your project before changing performance. Then reopen Blender, check the available Cycles device, and repeat the same test settings. Compare render time and stability with the same scene, resolution, and samples to decide which configuration suits the job.
Render the Product Images and Download the Results
With GPU rendering enabled, prepare the lamp images for delivery. Open the metal version first and enter the active camera view. Check the composition, then set the required image dimensions in Output Properties. Make sure the resolution percentage is set to the intended value.
Keep the same camera, dimensions, and render settings for both finishes so the comparison remains consistent.
Source: Blender Manual
Start with a test image
Before rendering at full delivery resolution, produce a smaller test. Use a lower resolution percentage and suitable sample settings to check the lighting, reflections, and material detail.
In Render Properties, review the Cycles sampling settings and enable denoising if appropriate. Denoising can reduce visible noise, but inspect fine surface detail to ensure the brushed finish still looks convincing.
Choose Render > Render Image. Review the result for bright reflections, dark areas, unwanted objects, and missing textures. Adjust the scene until the test communicates the product clearly.
Save each finished render
Restore the delivery resolution and render the final image. When it finishes, use Image > Save As in the render result window.
Select the required format and save the file with a clear name, such as:
lamp_brushed_metal.pnglamp_dark_finish.png
A still render is not automatically saved simply because you entered a folder in Output Properties. Save it from the Image Editor unless you have configured another output method, such as a Compositor File Output node.
Repeat the process for the second scene, checking that the camera and output settings match.
If you also need an animation
For a longer animation, Blender’s image sequence workflow saves individual frames as they render. Configure the output folder, format, frame range, and frame rate before choosing Render Animation. Completed frames can then be assembled into a video, with greater flexibility if rendering is interrupted.
Source: Blender Manual
Download and check the deliverables
Place the finished images in Vagon Files and download them to your Googlebook. Check their dimensions, filenames, and appearance in the application you will use for delivery.
Save the two .blend files as well. Keeping the editable scenes alongside the exports makes the next material or lighting revision easier to continue.
Keep the Viewport Responsive and Fix Common Problems
Choose the viewport mode that suits the task. Solid view is useful for positioning objects and navigating the scene. Switch to Material Preview for surface checks, then use Rendered view when assessing the scene’s lighting and reflections.
If navigation becomes slow, inspect the visible geometry and modifiers. Dense meshes, high subdivision levels, and large textures can increase the workload. You can reduce a modifier’s viewport subdivision level while retaining a higher render level, then inspect the final result before delivery.
Source: Blender Manual
Keep the cloud desktop in full-screen view and use a mouse for comfortable navigation. A stable connection and a nearby workstation location help with responsiveness.
Problem | First check |
|---|---|
Materials appear bright pink | Locate missing image files with Find Missing Files. |
Cycles is using the CPU | Check the enabled device in Preferences and select GPU Compute for the scene. |
Viewport navigation is slow | Review shading mode, visible geometry, and modifier settings. |
GPU memory errors occur | Check texture sizes, scene complexity, and available VRAM. |
Mouse input feels delayed | Check connection stability and workstation location. |
Distinguish calculation delays from connection delays. If selecting menus and moving the mouse feel responsive but Rendered view takes time to update, the scene may need more processing time. If the whole desktop responds late, investigate the connection.
For persistent memory problems, review the assets before choosing additional capacity. An unnecessarily large texture or hidden high-density object can consume resources without contributing to the final image.
Save after meaningful edits and keep the cloud computer running until exports finish. Once the deliverables are checked and downloaded, stop the workstation from your dashboard. Your saved scene remains available for the next session.
Final Thoughts
Your Googlebook can be the device you use to edit a Blender scene and deliver finished renders. With a desktop cloud workspace, you can prepare materials, arrange lighting, configure a supported Cycles GPU, and save the outputs.
Start with a scene you want to finish. Create your Vagon Cloud Computer, select Blender during setup, and upload the project through Vagon Files. Choose resources around the scene’s needs, keep the editable files alongside your renders, and return to the workspace when another revision arrives.
FAQs
Can you run Blender on Googlebook?
Yes. You can access desktop Blender through a cloud workstation and control it from your Googlebook’s browser. Local options also deserve consideration: Googlebook provides a Linux environment, and Blender’s Android port is developing. Their suitability depends on device compatibility, graphics support, and the work you need to complete.
Is Blender available for Android?
Blender’s Android port is in development. Its October 2026 project update describes a demonstrated build and ongoing integration work, including Googlebook support targets. Check the latest official release information before relying on an Android build for a project. A demo does not establish support for every device.
Can Googlebook’s Linux Terminal run Blender?
Googlebook’s Terminal provides a Debian virtual machine that can launch graphical Linux applications. A compatible Blender build also needs suitable graphics support. Google currently lists GPU acceleration for the VM as future work, so assess the available environment before planning demanding viewport work or Cycles GPU rendering.
Is Blender preinstalled on Vagon?
Blender is available through Vagon’s application setup. Select it when creating your cloud computer so it is prepared with the workspace. If your project requires a particular release, you can install an official Blender version inside Windows and use it for that project.
Do I need a Blender subscription?
No. Blender is free software and can be used for commercial projects. Cloud computer usage has its own cost, and separately purchased add-ons, textures, models, or services may have additional charges. You do not need a paid Blender subscription to open scenes or render your work.
Can I use Cycles GPU rendering?
Yes, when the workstation provides a GPU and drivers supported by your Blender version. Enable the device under Preferences > System, then select GPU Compute in the scene’s Cycles settings. Check both settings before rendering, particularly when opening a project created on another computer.
Can I install Blender add-ons?
You can install compatible add-ons inside the workstation’s Blender environment. Check support for your Blender version and Windows, especially when an add-on includes external programs or compiled components. Paid add-ons may require activation. Packing the scene’s resources does not install its add-ons on the destination computer.
How do I transfer textures and linked files?
Use Pack Resources and save the project to embed eligible assets. Linked .blend libraries have a separate packing option. Keep resources that cannot be packed in the project folder, then upload the package through Vagon Files. Inspect the scene after opening it to confirm that its assets resolve.
Can I render animations as well as still images?
Yes. Configure the frame range, frame rate, resolution, and output location before rendering. Image sequences are useful for longer jobs because completed frames remain available if rendering is interrupted. You can assemble those frames into a video afterward. Keep the workstation running until the required frames finish.
Can I use this cloud workflow offline?
You need an internet connection to access and control the workstation. Blender itself can work offline on a compatible local computer, but a cloud session requires connectivity. Downloaded images and videos remain available on your Googlebook, and you can reconnect later to continue editing the saved scenes.
Get Beyond Your Computer Performance
Run applications on your cloud computer with the latest generation hardware. No more crashes or lags.

Trial includes 1 hour usage + 7 days of storage.
Summarize with AI

Ready to focus on your creativity?
Vagon gives you the ability to create & render projects, collaborate, and stream applications with the power of the best hardware.

Vagon Blog
Run heavy applications on any device with
your personal computer on the cloud.
San Francisco, California
Solutions
Vagon Teams
Vagon Streams
Use Cases
Resources
Vagon Blog
How to Run Blender on Googlebook
How to Run After Effects on Googlebook
How to Use SketchUp With Codex: MCP and Computer Use
How to Use SketchUp With Claude: MCP and Computer Use
How to Use ComfyUI With Codex: MCP and Computer Use
How to Use Godot With Codex: MCP & Computer Use Guide
How to Use Houdini With Codex: MCP, Computer Use & RBD
How to Use Cinema 4D With Codex: MCP & Computer Use
How to Use Higgsfield With Codex: MCP & Computer Use
Vagon Blog
Run heavy applications on any device with
your personal computer on the cloud.
San Francisco, California
Solutions
Vagon Teams
Vagon Streams
Use Cases
Resources
Vagon Blog
How to Run Blender on Googlebook
How to Run After Effects on Googlebook
How to Use SketchUp With Codex: MCP and Computer Use
How to Use SketchUp With Claude: MCP and Computer Use
How to Use ComfyUI With Codex: MCP and Computer Use
How to Use Godot With Codex: MCP & Computer Use Guide
How to Use Houdini With Codex: MCP, Computer Use & RBD
How to Use Cinema 4D With Codex: MCP & Computer Use
How to Use Higgsfield With Codex: MCP & Computer Use
Vagon Blog
Run heavy applications on any device with
your personal computer on the cloud.
San Francisco, California
Solutions
Vagon Teams
Vagon Streams
Use Cases
Resources
Vagon Blog