Instant Connection for Pixel Streaming
— New Feature Automated Setup

How to Run Cinema 4D on Googlebook
DigitalArt
-
How to Run Cinema 4D on Googlebook
DigitalArt
How to Run Cinema 4D on Googlebook
DigitalArt
-
Table of Contents
A product visualization, animated title, or motion graphics sequence needs more than a finished render. You need room to build the scene, explore materials, adjust movement, and compare ideas before committing to an output. Cinema 4D brings modeling, animation, MoGraph, simulation, and rendering into one environment, so those decisions can develop together.
Running Cinema 4D on Googlebook means accessing that production environment remotely. There is no native Googlebook version of the desktop application. With Vagon Cloud Computer, Cinema 4D runs on a Windows workstation in the cloud while your Googlebook provides the screen, keyboard, and mouse interaction.
You can start with an empty scene, create procedural graphics, animate cameras, develop lighting with Redshift, and prepare stills or animation sequences for delivery. Existing projects can use the same workspace, including their textures and compatible plugins.
The key is choosing resources around the scene you intend to build. Modeling, simulation, and GPU rendering have different demands. This guide explains how to set up Cinema 4D, organize a flexible project, and carry it through production without relying on your Googlebook’s local hardware to perform the heavy processing.

Source: Maxon Cinema 4D Documentation
Can You Install Cinema 4D Directly on Googlebook?
Cinema 4D does not currently have a supported native Googlebook release. Maxon provides the desktop application for Windows and macOS, while its Linux support is limited to command-line rendering. That Linux capability is not the complete interactive application you need for modeling, arranging objects, or animating a scene. Cinema 4D’s platform requirements make this distinction important.
Googlebook’s Linux terminal does not change that compatibility situation. Google describes its Linux Terminal Preview as a development-oriented environment, with further desktop integration on its roadmap. It should not be presented as a supported shortcut for installing Cinema 4D’s Windows interface.
For a cloud-based workflow, three components have separate roles:
Component | What it provides |
|---|---|
Googlebook | Displays the remote desktop and sends your keyboard and mouse input |
Vagon Cloud Computer | Runs Windows, Cinema 4D, scene calculations, and rendering |
Maxon account and license | Authorizes access to the Cinema 4D software and included products |
You interact with Cinema 4D through the streamed desktop, but its working files and processing remain on the workstation. A scene does not become a simplified browser model, and the Googlebook does not need to calculate the geometry or render each frame locally.
This also means software compatibility and workstation performance are separate questions. You need a valid Cinema 4D license, compatible application and plugin versions, and sufficient cloud resources for the production. Your connection then determines how responsively you can interact with that environment.
Choose a Workstation for the Scene You Want to Build
Cinema 4D workloads change as a project develops. A simple model may become a dense Cloner arrangement, then acquire high-resolution textures, displacement, and animated effects. Choose your workstation around that progression rather than assuming any configuration that launches the application will suit the finished scene.
Maxon’s system requirements provide a compatibility baseline. The current general minimum includes 16 GB of system memory, while Redshift GPU rendering on Windows with NVIDIA hardware requires at least 8 GB of VRAM and compatible hardware and drivers. These are minimums, not a promise of comfortable performance for complex productions.
Match Resources to the Work
Different parts of Cinema 4D place different demands on the workstation:
Workload | Resources and scene factors to consider |
|---|---|
Modeling and procedural scene building | CPU performance, system memory, object count, and generator complexity |
MoGraph and simulation | Scene evaluation, simulation settings, memory, and cache storage |
Redshift rendering | Compatible GPU resources, VRAM, scene complexity, and render settings |
Large production projects | Storage capacity for textures, assets, caches, and output sequences |
For a small product visualization, you might prioritize responsive modeling and enough GPU capacity for material and lighting previews. A motion graphics sequence with thousands of clones needs attention to scene evaluation and instancing as well as rendering. A simulation-heavy animation can require substantial memory and disk space before final rendering begins.
More GPU power does not automatically make every modeling operation or simulation faster. Likewise, adding system RAM cannot replace the VRAM required by a particular rendering workload.
Leave Room for Production
Plan storage for generated data, not just the .c4d file. Texture libraries, simulation caches, and image sequences can become much larger than the scene itself.
Choose a nearby available region to support responsive interaction, then use Vagon’s scalable performance options as the workload develops. You can adjust resources when moving into heavier production stages instead of treating your initial configuration as permanent.
A representative test scene is more useful than an empty-scene check. Test the kind of geometry, materials, and movement you expect to produce before committing to a long animation.
Set Up Cinema 4D on Vagon in Four Steps
Prepare the workstation once, then use it as your production environment for modeling, animation, look development, and rendering. Application selection, software activation, and project assets each need attention, but they serve different purposes.
1. Create Your Cloud Computer
Create your Vagon account and configure a cloud computer in a nearby available region. Choose computing resources based on the scene requirements discussed above, with enough storage for working assets and generated files.
Once the Windows desktop is available, check that navigation and mouse interaction feel responsive. A stable connection matters when adjusting curves, selecting small interface controls, or moving around a detailed viewport.
2. Select Cinema 4D From the Application Library
During computer creation, find Cinema 4D under Video & Motion in the application library. Maxon App is also listed and can be selected for managing your Maxon software.
After installation, launch Cinema 4D and check the installed release. If you are joining an existing production, use a version compatible with the team’s files and plugins rather than upgrading the project without checking.
For a required release that is not already installed, use Maxon’s official installation tools. Selecting an application for installation does not itself provide a paid software license.
3. Activate Your Software and Check Redshift
Sign in through Maxon’s licensing tools and activate Cinema 4D using your valid entitlement. Your Vagon usage charges and Maxon subscription are separate.
Current Cinema 4D subscriptions include Redshift GPU rendering. Confirm that the installed Cinema 4D and Redshift versions work together, then check that the intended rendering device is available in Redshift’s settings.
Install any required third-party plugins, matching their supported Cinema 4D versions and activation requirements. Avoid assuming that a plugin licensed on another computer will automatically be activated here.
Before building a large scene, render a simple object with a Redshift material and light. This checks more than whether the application opens.
4. Bring Your Assets Into the Workspace
Use Vagon Files to transfer models, textures, HDRIs, reference images, and existing project folders. Preserve folder relationships where possible.
For an existing production, check for missing assets after opening the scene. For a new project, establish a working folder before importing content.
Finish with a representative test: navigate the scene, change a material, play a short animation, and save a rendered frame. You now have a practical baseline for starting production.
Build a Scene That Stays Easy to Change
A flexible scene lets you explore ideas without rebuilding the project whenever the design changes. Start by establishing the project scale, frame rate, and animation duration. Save the scene into a dedicated working folder, then separate reference files, textures, caches, and rendered outputs so each has a clear location.
If you import a product model, check its dimensions before adding lights or animation. Incorrect scale can complicate camera movement, simulation behavior, and material settings later.
Keep the Object Hierarchy Readable
Use the Object Manager to organize the scene around meaningful groups: product geometry, supporting graphics, cameras, and lighting. Give important objects descriptive names instead of leaving dozens of entries called “Cube” or “Null.”

Source: Maxon Cinema 4D Documentation
Parent objects intentionally. Grouping a product beneath a null can make it easier to animate the complete assembly, but moving that parent also affects its children. Check the hierarchy before troubleshooting an unexpected transformation.
Keep procedural tools editable while they remain useful. Splines, Extrude and Sweep generators, deformers, and subdivision surfaces let you change a shape through parameters rather than reconstructing the geometry. Convert objects to editable meshes when the next operation requires it, not simply to make the scene feel finished.
Reuse Assets Without Creating Unnecessary Complexity
For repeated elements, consider instances or appropriate Cloner instance modes instead of duplicating detailed geometry throughout the project. The right approach depends on whether the copies need independent geometry, deformation, or other per-object changes.
The Asset Browser can help you find and reuse content. However, a reusable asset library and a portable project folder are not the same thing. Keep track of external dependencies as you build.

Source: Maxon Cinema 4D Documentation
Before moving into animation, check:
Scale: Imported and newly created objects use sensible dimensions.
Hierarchy: Parenting and object names make transformations predictable.
Assets: Textures and external files resolve correctly.
Camera: A deliberate camera defines the intended composition.
Saving: The project has a clear working location and backup routine.
This preparation keeps the scene manageable as materials, procedural motion, and render variations are added.
Animate With MoGraph, Then Stabilize the Playback
MoGraph lets you build motion through relationships rather than animating every object individually. A Cloner creates repeated elements, effectors modify their properties, and Fields control where and how strongly those changes apply. This makes it practical to explore arrangements and timing while keeping the underlying setup adjustable.
Combine Procedural Motion With Keyframes
Imagine a product surrounded by a ring of graphic elements. Use a Cloner to arrange the elements, then apply a Plain Effector to offset their position or scale. A Linear Field can control the affected area, revealing the elements progressively as it moves through the arrangement.
Animate the Field’s position with keyframes, then refine the acceleration and deceleration in the Timeline’s F-Curve mode. The procedural setup determines which elements respond; the animation curves determine how the movement feels.
Keep camera animation separate enough to review independently. A complex camera move can disguise weak object timing during previews, only to make the finished sequence feel harder to follow. First check the graphic motion from a stable view, then evaluate it through the intended camera.

Source: Maxon Cinema 4D Documentation
Preview Timing Before Increasing Detail
Viewport playback is useful for judging movement, but a demanding scene may not display every frame at the intended speed. That can make a well-timed animation appear slow or uneven.
Reduce unnecessary viewport detail while developing the motion. Where appropriate, hide expensive supporting objects temporarily or lower editor subdivision without changing the final render settings. Generate a preview animation when you need to assess the sequence at its actual frame rate.
Check the movement for:
Clear entrances, transitions, and settling.
Unintended intersections between clones.
Camera framing throughout the sequence.
A suitable beginning and ending for the required duration.
Cache Motion When It Benefits the Workflow
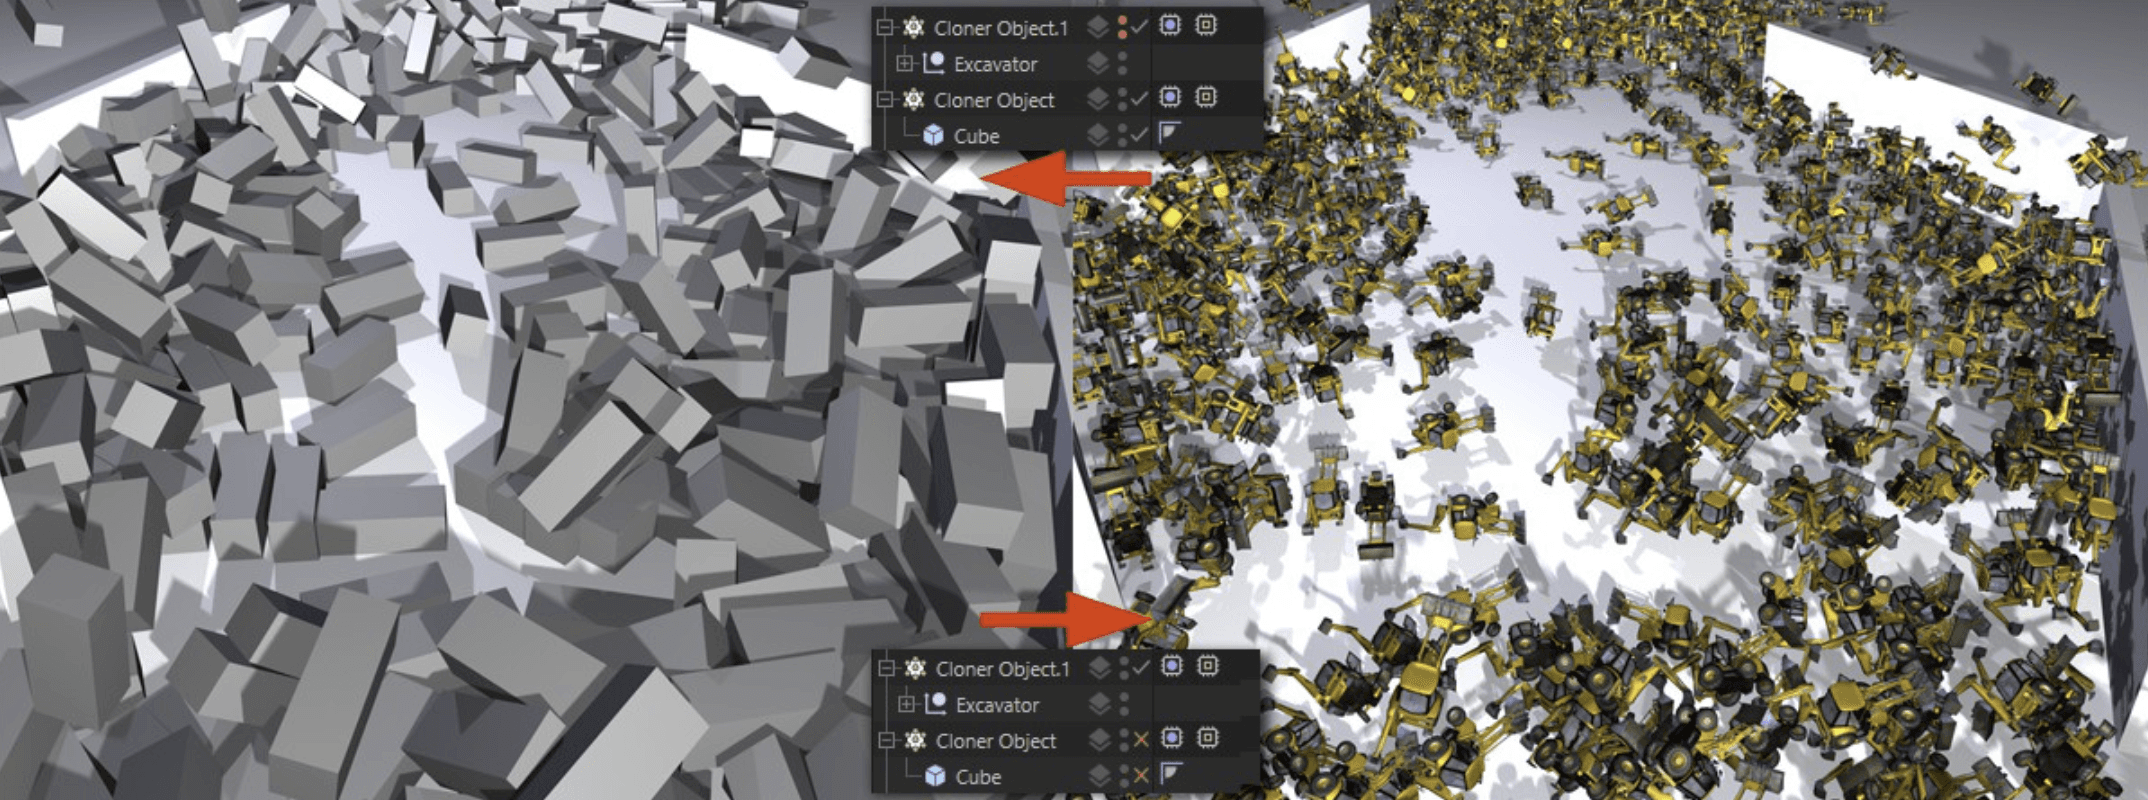
Once a procedural setup is ready, a MoGraph Cache tag can bake supported MoGraph animation for playback and rendering. This can reduce repeated evaluation and help preserve the calculated result.
MoGraph caching is not a universal cache for everything in the scene. Cloth, rigid-body dynamics, particles, and other simulation systems have their own relevant caching controls. Use the appropriate system and confirm where any external cache files are stored.
If you change the underlying animation or simulation, update the affected cache before judging the result. Scrub several frames and render a short test to confirm that the cached motion matches the current scene. Caching should support an approved setup, not conceal an outdated one.
Source: Maxon Cinema 4D Documentation
Develop Materials and Lighting With Redshift
Materials and lighting work together. A surface that looks convincing under a soft studio light may lose its shape under flat illumination, while an attractive reflection can hide an incorrect material setup. Develop both within a simple, controlled scene before adding unnecessary complexity.
Build Materials Around Surface Behavior
Start with a Redshift material and adjust its main properties deliberately. Base color describes the surface color, roughness controls the sharpness of reflections, and metalness distinguishes metallic from nonmetallic behavior.

Source: Maxon Redshift Documentation
Texture inputs have different purposes:
Input | What it contributes |
|---|---|
Base color | Surface color information |
Roughness | Variation in reflection sharpness |
Normal or bump | Shading detail without changing the underlying silhouette |
Displacement | Surface changes that can affect geometry and silhouette |
Do not treat every texture as a color image. Color textures and data maps need appropriate input color-space settings. Incorrect interpretation can change roughness, normal detail, or displacement in ways that are difficult to fix through lighting.
Keep the node graph readable. Label important textures and avoid adding processing nodes unless they contribute to the intended result.
Light for Shape, Then Refine the Mood
Begin with a small number of lights. An area light can establish the main shape, while additional lights or an HDRI provide reflections, separation, and environmental context.
For product work, look at the reflections as carefully as the illuminated surfaces. Moving or resizing a light can communicate an edge more effectively than increasing its intensity.
Use Redshift RenderView’s interactive preview to evaluate changes. Compare material and light adjustments from the intended camera, then check other important angles before approving the setup.

Source: Maxon Redshift Documentation
Keep Preview and Output Consistent
Cinema 4D and Redshift support color-managed workflows, but the project, texture interpretation, display transform, and saved output must agree. A display transform changes how you view an image; it should not be accidentally applied twice during export and compositing.
Review the relevant color-management settings for your installed release rather than copying an older tutorial’s defaults without checking.
For rendering, balance sampling and denoising against the image you need. Test difficult areas such as glossy reflections, fine details, and motion blur. Denoising can reduce visible noise, but it cannot replace missing detail or correct a poorly lit scene.
Use lower-cost previews while exploring, then render representative frames at the final resolution. That gives you a practical quality check before committing the workstation to a complete sequence.

Source: Maxon Redshift Documentation
Create Variations Without Duplicating the Entire Project
A production can need several material options, camera angles, and output formats from the same scene. Saving a separate project for every variation works initially, but shared changes soon become harder to manage. Cinema 4D’s Take System lets you store variations within one project using parameter overrides.
Keep Shared Decisions in the Main Take
Build the common scene in the Main Take, then create additional Takes for controlled differences. A Take inherits settings from its parent unless you override them.
For a product animation, the structure might look like this:
Take | Purpose |
|---|---|
Main | Shared geometry, lighting, and animation |
Finish_B | Alternative material treatment |
Detail | Close-up camera |
Vertical | Camera and render settings for a vertical composition |
The Take System primarily varies properties of existing scene elements. It does not create a completely independent scene, so understand which changes belong in the shared setup and which should remain specific to a variation.

Source: Maxon Cinema 4D Documentation
Make Overrides Deliberate
Create overrides for the settings you intend to change, such as a material assignment or object visibility. If you use Auto Take, review the generated overrides afterward. Otherwise, an experimental adjustment can become part of a variation unintentionally.
You can also assign cameras and render settings to Takes. For a vertical deliverable, check the composition through its assigned camera rather than changing resolution alone. Product placement, motion paths, and space for text may all need adjustment.
Before rendering, switch through the Takes and verify that each produces the intended result. Check inherited settings, camera assignments, output dimensions, and filenames. Use distinct output paths or naming tokens so one variation cannot overwrite another.
Finally, mark the approved Takes for rendering. This keeps alternative versions connected to the main production while making the delivery set easier to review and manage.
Render, Review, and Package the Deliverables
Before starting the final render, confirm the active camera, frame range, resolution, and output location for each approved Take. Check that the scene is saved and that required simulation caches reflect the current animation.
Render representative frames first, including moments with complex geometry, strong reflections, or fast movement. Follow with a short sequence to evaluate motion blur, temporal noise, and animation continuity. A clean still does not guarantee a clean animation.
Choose an Output That Supports Finishing
For animation, an image sequence makes it possible to resume from missing frames without recreating an entire video file. Choose the format around the delivery workflow: a straightforward sequence may use PNG, while compositing can benefit from OpenEXR and appropriate Redshift AOVs.
AOVs provide separate rendering information for downstream adjustments. Include passes that the compositor needs rather than generating every available option.
Use Cinema 4D’s Render Queue to organize approved jobs. Give each Take a distinct output path or filename pattern, with frame numbering for animation. Review the queue before starting so an incorrect camera or shared output path does not affect multiple deliverables.

Source: Maxon Cinema 4D Documentation
Inspect the Saved Files
Open the actual output in the intended finishing application. Check:
Frame count, numbering, and missing frames.
Camera framing and animation timing.
Texture, font, and plugin-dependent elements.
Alpha interpretation and edge quality.
Color consistency with the intended viewing transform.
Do not assume the saved image matches RenderView simply because both look correct independently. Confirm how the finishing application interprets the files.
Preserve the Editable Production
Use Save Project with Assets to collect the scene and supported dependencies into a project folder. Maxon recommends this approach when preparing Cinema 4D projects for rendering, but verify external caches and other dependencies separately. Fonts and plugins also require their own installation and licensing.
Reopen the collected project and test it before treating the package as complete. Keep an independent backup of important source assets, then use Vagon Files to transfer approved outputs and project packages to their delivery destinations.
When the Viewport, Simulation, or Render Slows Down
Slow performance does not always mean the workstation needs a larger GPU. First identify whether the delay comes from scene evaluation, simulation, rendering, file access, or the remote connection. Each needs a different response.
Symptom | What to check first |
|---|---|
Moving or editing objects feels slow | Generator and deformer complexity, subdivisions, and object count |
Timeline playback drops frames | Live simulations, procedural evaluation, and outdated caches |
Redshift rendering takes too long | GPU utilization, memory pressure, sampling, and expensive effects |
Opening the project takes too long | Missing asset paths, large textures, caches, and storage |
Mouse and interface interaction feels delayed | Network stability, connection quality, and workstation region |
Test One Change at a Time
For viewport problems, temporarily reduce editor detail or disable a demanding generator. If interaction improves, you have identified a scene-processing issue rather than a rendering problem.
For animation, compare playback before and after caching the relevant system. Check that Cinema 4D is not recalculating a simulation unnecessarily, and avoid judging timing from playback that skips frames.
For Redshift, examine whether the scene is still preparing or actively rendering. Geometry translation, texture loading, and GPU rendering are different stages. Increasing samples will not solve a preparation delay, while increasing GPU capacity may not resolve missing files.
Adjust workstation resources when the workload needs them, but keep scene optimization part of the process.
Finally, distinguish streaming quality from output quality. A temporarily soft or delayed desktop stream does not necessarily indicate a problem with the rendered files. Inspect saved outputs directly before changing render settings to compensate for a connection issue.
Final Thoughts
Cinema 4D on Googlebook can support a complete production process, from building a procedural scene to animating, developing materials, and delivering finished renders. A well-organized project, appropriate workstation resources, and verified assets make that workflow easier to maintain as the production grows.
With Vagon Cloud Computer, you can access a Windows creative workspace without asking your Googlebook to handle the heavy calculations locally. Set up your licensed tools, test a representative scene, and build from there.
FAQs
Can I install Cinema 4D directly on Googlebook?
There is no supported native Googlebook release. A cloud workstation lets you access the Windows desktop application remotely.
Does Vagon include a Cinema 4D license?
Application installation and licensing are separate. You need a valid Maxon entitlement; Vagon usage charges do not include a Cinema 4D subscription.
Is Redshift included with Cinema 4D?
Current Cinema 4D subscriptions include Redshift GPU rendering. Confirm your entitlement and installed software versions before starting production.
Can I create new projects, not just open existing files?
Yes. You can build scenes from scratch, model objects, create MoGraph animations, develop materials, and render outputs within the cloud workspace.
Can I use third-party Cinema 4D plugins?
You can install compatible plugins, but check their Cinema 4D version requirements, licensing, and support for the workstation environment.
Is a cloud workstation the same as a render farm?
No. A workstation provides an interactive desktop for production. A render farm distributes rendering jobs across machines, with separate setup and licensing considerations.
Will rendering continue after I close the browser?
Only if the workstation and Cinema 4D remain running. Check shutdown and inactivity settings before leaving a render unattended.
A product visualization, animated title, or motion graphics sequence needs more than a finished render. You need room to build the scene, explore materials, adjust movement, and compare ideas before committing to an output. Cinema 4D brings modeling, animation, MoGraph, simulation, and rendering into one environment, so those decisions can develop together.
Running Cinema 4D on Googlebook means accessing that production environment remotely. There is no native Googlebook version of the desktop application. With Vagon Cloud Computer, Cinema 4D runs on a Windows workstation in the cloud while your Googlebook provides the screen, keyboard, and mouse interaction.
You can start with an empty scene, create procedural graphics, animate cameras, develop lighting with Redshift, and prepare stills or animation sequences for delivery. Existing projects can use the same workspace, including their textures and compatible plugins.
The key is choosing resources around the scene you intend to build. Modeling, simulation, and GPU rendering have different demands. This guide explains how to set up Cinema 4D, organize a flexible project, and carry it through production without relying on your Googlebook’s local hardware to perform the heavy processing.
Source: Maxon Cinema 4D Documentation
Can You Install Cinema 4D Directly on Googlebook?
Cinema 4D does not currently have a supported native Googlebook release. Maxon provides the desktop application for Windows and macOS, while its Linux support is limited to command-line rendering. That Linux capability is not the complete interactive application you need for modeling, arranging objects, or animating a scene. Cinema 4D’s platform requirements make this distinction important.
Googlebook’s Linux terminal does not change that compatibility situation. Google describes its Linux Terminal Preview as a development-oriented environment, with further desktop integration on its roadmap. It should not be presented as a supported shortcut for installing Cinema 4D’s Windows interface.
For a cloud-based workflow, three components have separate roles:
Component | What it provides |
|---|---|
Googlebook | Displays the remote desktop and sends your keyboard and mouse input |
Vagon Cloud Computer | Runs Windows, Cinema 4D, scene calculations, and rendering |
Maxon account and license | Authorizes access to the Cinema 4D software and included products |
You interact with Cinema 4D through the streamed desktop, but its working files and processing remain on the workstation. A scene does not become a simplified browser model, and the Googlebook does not need to calculate the geometry or render each frame locally.
This also means software compatibility and workstation performance are separate questions. You need a valid Cinema 4D license, compatible application and plugin versions, and sufficient cloud resources for the production. Your connection then determines how responsively you can interact with that environment.
Choose a Workstation for the Scene You Want to Build
Cinema 4D workloads change as a project develops. A simple model may become a dense Cloner arrangement, then acquire high-resolution textures, displacement, and animated effects. Choose your workstation around that progression rather than assuming any configuration that launches the application will suit the finished scene.
Maxon’s system requirements provide a compatibility baseline. The current general minimum includes 16 GB of system memory, while Redshift GPU rendering on Windows with NVIDIA hardware requires at least 8 GB of VRAM and compatible hardware and drivers. These are minimums, not a promise of comfortable performance for complex productions.
Match Resources to the Work
Different parts of Cinema 4D place different demands on the workstation:
Workload | Resources and scene factors to consider |
|---|---|
Modeling and procedural scene building | CPU performance, system memory, object count, and generator complexity |
MoGraph and simulation | Scene evaluation, simulation settings, memory, and cache storage |
Redshift rendering | Compatible GPU resources, VRAM, scene complexity, and render settings |
Large production projects | Storage capacity for textures, assets, caches, and output sequences |
For a small product visualization, you might prioritize responsive modeling and enough GPU capacity for material and lighting previews. A motion graphics sequence with thousands of clones needs attention to scene evaluation and instancing as well as rendering. A simulation-heavy animation can require substantial memory and disk space before final rendering begins.
More GPU power does not automatically make every modeling operation or simulation faster. Likewise, adding system RAM cannot replace the VRAM required by a particular rendering workload.
Leave Room for Production
Plan storage for generated data, not just the .c4d file. Texture libraries, simulation caches, and image sequences can become much larger than the scene itself.
Choose a nearby available region to support responsive interaction, then use Vagon’s scalable performance options as the workload develops. You can adjust resources when moving into heavier production stages instead of treating your initial configuration as permanent.
A representative test scene is more useful than an empty-scene check. Test the kind of geometry, materials, and movement you expect to produce before committing to a long animation.
Set Up Cinema 4D on Vagon in Four Steps
Prepare the workstation once, then use it as your production environment for modeling, animation, look development, and rendering. Application selection, software activation, and project assets each need attention, but they serve different purposes.
1. Create Your Cloud Computer
Create your Vagon account and configure a cloud computer in a nearby available region. Choose computing resources based on the scene requirements discussed above, with enough storage for working assets and generated files.
Once the Windows desktop is available, check that navigation and mouse interaction feel responsive. A stable connection matters when adjusting curves, selecting small interface controls, or moving around a detailed viewport.
2. Select Cinema 4D From the Application Library
During computer creation, find Cinema 4D under Video & Motion in the application library. Maxon App is also listed and can be selected for managing your Maxon software.
After installation, launch Cinema 4D and check the installed release. If you are joining an existing production, use a version compatible with the team’s files and plugins rather than upgrading the project without checking.
For a required release that is not already installed, use Maxon’s official installation tools. Selecting an application for installation does not itself provide a paid software license.
3. Activate Your Software and Check Redshift
Sign in through Maxon’s licensing tools and activate Cinema 4D using your valid entitlement. Your Vagon usage charges and Maxon subscription are separate.
Current Cinema 4D subscriptions include Redshift GPU rendering. Confirm that the installed Cinema 4D and Redshift versions work together, then check that the intended rendering device is available in Redshift’s settings.
Install any required third-party plugins, matching their supported Cinema 4D versions and activation requirements. Avoid assuming that a plugin licensed on another computer will automatically be activated here.
Before building a large scene, render a simple object with a Redshift material and light. This checks more than whether the application opens.
4. Bring Your Assets Into the Workspace
Use Vagon Files to transfer models, textures, HDRIs, reference images, and existing project folders. Preserve folder relationships where possible.
For an existing production, check for missing assets after opening the scene. For a new project, establish a working folder before importing content.
Finish with a representative test: navigate the scene, change a material, play a short animation, and save a rendered frame. You now have a practical baseline for starting production.
Build a Scene That Stays Easy to Change
A flexible scene lets you explore ideas without rebuilding the project whenever the design changes. Start by establishing the project scale, frame rate, and animation duration. Save the scene into a dedicated working folder, then separate reference files, textures, caches, and rendered outputs so each has a clear location.
If you import a product model, check its dimensions before adding lights or animation. Incorrect scale can complicate camera movement, simulation behavior, and material settings later.
Keep the Object Hierarchy Readable
Use the Object Manager to organize the scene around meaningful groups: product geometry, supporting graphics, cameras, and lighting. Give important objects descriptive names instead of leaving dozens of entries called “Cube” or “Null.”
Source: Maxon Cinema 4D Documentation
Parent objects intentionally. Grouping a product beneath a null can make it easier to animate the complete assembly, but moving that parent also affects its children. Check the hierarchy before troubleshooting an unexpected transformation.
Keep procedural tools editable while they remain useful. Splines, Extrude and Sweep generators, deformers, and subdivision surfaces let you change a shape through parameters rather than reconstructing the geometry. Convert objects to editable meshes when the next operation requires it, not simply to make the scene feel finished.
Reuse Assets Without Creating Unnecessary Complexity
For repeated elements, consider instances or appropriate Cloner instance modes instead of duplicating detailed geometry throughout the project. The right approach depends on whether the copies need independent geometry, deformation, or other per-object changes.
The Asset Browser can help you find and reuse content. However, a reusable asset library and a portable project folder are not the same thing. Keep track of external dependencies as you build.
Source: Maxon Cinema 4D Documentation
Before moving into animation, check:
Scale: Imported and newly created objects use sensible dimensions.
Hierarchy: Parenting and object names make transformations predictable.
Assets: Textures and external files resolve correctly.
Camera: A deliberate camera defines the intended composition.
Saving: The project has a clear working location and backup routine.
This preparation keeps the scene manageable as materials, procedural motion, and render variations are added.
Animate With MoGraph, Then Stabilize the Playback
MoGraph lets you build motion through relationships rather than animating every object individually. A Cloner creates repeated elements, effectors modify their properties, and Fields control where and how strongly those changes apply. This makes it practical to explore arrangements and timing while keeping the underlying setup adjustable.
Combine Procedural Motion With Keyframes
Imagine a product surrounded by a ring of graphic elements. Use a Cloner to arrange the elements, then apply a Plain Effector to offset their position or scale. A Linear Field can control the affected area, revealing the elements progressively as it moves through the arrangement.
Animate the Field’s position with keyframes, then refine the acceleration and deceleration in the Timeline’s F-Curve mode. The procedural setup determines which elements respond; the animation curves determine how the movement feels.
Keep camera animation separate enough to review independently. A complex camera move can disguise weak object timing during previews, only to make the finished sequence feel harder to follow. First check the graphic motion from a stable view, then evaluate it through the intended camera.
Source: Maxon Cinema 4D Documentation
Preview Timing Before Increasing Detail
Viewport playback is useful for judging movement, but a demanding scene may not display every frame at the intended speed. That can make a well-timed animation appear slow or uneven.
Reduce unnecessary viewport detail while developing the motion. Where appropriate, hide expensive supporting objects temporarily or lower editor subdivision without changing the final render settings. Generate a preview animation when you need to assess the sequence at its actual frame rate.
Check the movement for:
Clear entrances, transitions, and settling.
Unintended intersections between clones.
Camera framing throughout the sequence.
A suitable beginning and ending for the required duration.
Cache Motion When It Benefits the Workflow
Once a procedural setup is ready, a MoGraph Cache tag can bake supported MoGraph animation for playback and rendering. This can reduce repeated evaluation and help preserve the calculated result.
MoGraph caching is not a universal cache for everything in the scene. Cloth, rigid-body dynamics, particles, and other simulation systems have their own relevant caching controls. Use the appropriate system and confirm where any external cache files are stored.
If you change the underlying animation or simulation, update the affected cache before judging the result. Scrub several frames and render a short test to confirm that the cached motion matches the current scene. Caching should support an approved setup, not conceal an outdated one.
Source: Maxon Cinema 4D Documentation
Develop Materials and Lighting With Redshift
Materials and lighting work together. A surface that looks convincing under a soft studio light may lose its shape under flat illumination, while an attractive reflection can hide an incorrect material setup. Develop both within a simple, controlled scene before adding unnecessary complexity.
Build Materials Around Surface Behavior
Start with a Redshift material and adjust its main properties deliberately. Base color describes the surface color, roughness controls the sharpness of reflections, and metalness distinguishes metallic from nonmetallic behavior.
Source: Maxon Redshift Documentation
Texture inputs have different purposes:
Input | What it contributes |
|---|---|
Base color | Surface color information |
Roughness | Variation in reflection sharpness |
Normal or bump | Shading detail without changing the underlying silhouette |
Displacement | Surface changes that can affect geometry and silhouette |
Do not treat every texture as a color image. Color textures and data maps need appropriate input color-space settings. Incorrect interpretation can change roughness, normal detail, or displacement in ways that are difficult to fix through lighting.
Keep the node graph readable. Label important textures and avoid adding processing nodes unless they contribute to the intended result.
Light for Shape, Then Refine the Mood
Begin with a small number of lights. An area light can establish the main shape, while additional lights or an HDRI provide reflections, separation, and environmental context.
For product work, look at the reflections as carefully as the illuminated surfaces. Moving or resizing a light can communicate an edge more effectively than increasing its intensity.
Use Redshift RenderView’s interactive preview to evaluate changes. Compare material and light adjustments from the intended camera, then check other important angles before approving the setup.
Source: Maxon Redshift Documentation
Keep Preview and Output Consistent
Cinema 4D and Redshift support color-managed workflows, but the project, texture interpretation, display transform, and saved output must agree. A display transform changes how you view an image; it should not be accidentally applied twice during export and compositing.
Review the relevant color-management settings for your installed release rather than copying an older tutorial’s defaults without checking.
For rendering, balance sampling and denoising against the image you need. Test difficult areas such as glossy reflections, fine details, and motion blur. Denoising can reduce visible noise, but it cannot replace missing detail or correct a poorly lit scene.
Use lower-cost previews while exploring, then render representative frames at the final resolution. That gives you a practical quality check before committing the workstation to a complete sequence.
Source: Maxon Redshift Documentation
Create Variations Without Duplicating the Entire Project
A production can need several material options, camera angles, and output formats from the same scene. Saving a separate project for every variation works initially, but shared changes soon become harder to manage. Cinema 4D’s Take System lets you store variations within one project using parameter overrides.
Keep Shared Decisions in the Main Take
Build the common scene in the Main Take, then create additional Takes for controlled differences. A Take inherits settings from its parent unless you override them.
For a product animation, the structure might look like this:
Take | Purpose |
|---|---|
Main | Shared geometry, lighting, and animation |
Finish_B | Alternative material treatment |
Detail | Close-up camera |
Vertical | Camera and render settings for a vertical composition |
The Take System primarily varies properties of existing scene elements. It does not create a completely independent scene, so understand which changes belong in the shared setup and which should remain specific to a variation.
Source: Maxon Cinema 4D Documentation
Make Overrides Deliberate
Create overrides for the settings you intend to change, such as a material assignment or object visibility. If you use Auto Take, review the generated overrides afterward. Otherwise, an experimental adjustment can become part of a variation unintentionally.
You can also assign cameras and render settings to Takes. For a vertical deliverable, check the composition through its assigned camera rather than changing resolution alone. Product placement, motion paths, and space for text may all need adjustment.
Before rendering, switch through the Takes and verify that each produces the intended result. Check inherited settings, camera assignments, output dimensions, and filenames. Use distinct output paths or naming tokens so one variation cannot overwrite another.
Finally, mark the approved Takes for rendering. This keeps alternative versions connected to the main production while making the delivery set easier to review and manage.
Render, Review, and Package the Deliverables
Before starting the final render, confirm the active camera, frame range, resolution, and output location for each approved Take. Check that the scene is saved and that required simulation caches reflect the current animation.
Render representative frames first, including moments with complex geometry, strong reflections, or fast movement. Follow with a short sequence to evaluate motion blur, temporal noise, and animation continuity. A clean still does not guarantee a clean animation.
Choose an Output That Supports Finishing
For animation, an image sequence makes it possible to resume from missing frames without recreating an entire video file. Choose the format around the delivery workflow: a straightforward sequence may use PNG, while compositing can benefit from OpenEXR and appropriate Redshift AOVs.
AOVs provide separate rendering information for downstream adjustments. Include passes that the compositor needs rather than generating every available option.
Use Cinema 4D’s Render Queue to organize approved jobs. Give each Take a distinct output path or filename pattern, with frame numbering for animation. Review the queue before starting so an incorrect camera or shared output path does not affect multiple deliverables.
Source: Maxon Cinema 4D Documentation
Inspect the Saved Files
Open the actual output in the intended finishing application. Check:
Frame count, numbering, and missing frames.
Camera framing and animation timing.
Texture, font, and plugin-dependent elements.
Alpha interpretation and edge quality.
Color consistency with the intended viewing transform.
Do not assume the saved image matches RenderView simply because both look correct independently. Confirm how the finishing application interprets the files.
Preserve the Editable Production
Use Save Project with Assets to collect the scene and supported dependencies into a project folder. Maxon recommends this approach when preparing Cinema 4D projects for rendering, but verify external caches and other dependencies separately. Fonts and plugins also require their own installation and licensing.
Reopen the collected project and test it before treating the package as complete. Keep an independent backup of important source assets, then use Vagon Files to transfer approved outputs and project packages to their delivery destinations.
When the Viewport, Simulation, or Render Slows Down
Slow performance does not always mean the workstation needs a larger GPU. First identify whether the delay comes from scene evaluation, simulation, rendering, file access, or the remote connection. Each needs a different response.
Symptom | What to check first |
|---|---|
Moving or editing objects feels slow | Generator and deformer complexity, subdivisions, and object count |
Timeline playback drops frames | Live simulations, procedural evaluation, and outdated caches |
Redshift rendering takes too long | GPU utilization, memory pressure, sampling, and expensive effects |
Opening the project takes too long | Missing asset paths, large textures, caches, and storage |
Mouse and interface interaction feels delayed | Network stability, connection quality, and workstation region |
Test One Change at a Time
For viewport problems, temporarily reduce editor detail or disable a demanding generator. If interaction improves, you have identified a scene-processing issue rather than a rendering problem.
For animation, compare playback before and after caching the relevant system. Check that Cinema 4D is not recalculating a simulation unnecessarily, and avoid judging timing from playback that skips frames.
For Redshift, examine whether the scene is still preparing or actively rendering. Geometry translation, texture loading, and GPU rendering are different stages. Increasing samples will not solve a preparation delay, while increasing GPU capacity may not resolve missing files.
Adjust workstation resources when the workload needs them, but keep scene optimization part of the process.
Finally, distinguish streaming quality from output quality. A temporarily soft or delayed desktop stream does not necessarily indicate a problem with the rendered files. Inspect saved outputs directly before changing render settings to compensate for a connection issue.
Final Thoughts
Cinema 4D on Googlebook can support a complete production process, from building a procedural scene to animating, developing materials, and delivering finished renders. A well-organized project, appropriate workstation resources, and verified assets make that workflow easier to maintain as the production grows.
With Vagon Cloud Computer, you can access a Windows creative workspace without asking your Googlebook to handle the heavy calculations locally. Set up your licensed tools, test a representative scene, and build from there.
FAQs
Can I install Cinema 4D directly on Googlebook?
There is no supported native Googlebook release. A cloud workstation lets you access the Windows desktop application remotely.
Does Vagon include a Cinema 4D license?
Application installation and licensing are separate. You need a valid Maxon entitlement; Vagon usage charges do not include a Cinema 4D subscription.
Is Redshift included with Cinema 4D?
Current Cinema 4D subscriptions include Redshift GPU rendering. Confirm your entitlement and installed software versions before starting production.
Can I create new projects, not just open existing files?
Yes. You can build scenes from scratch, model objects, create MoGraph animations, develop materials, and render outputs within the cloud workspace.
Can I use third-party Cinema 4D plugins?
You can install compatible plugins, but check their Cinema 4D version requirements, licensing, and support for the workstation environment.
Is a cloud workstation the same as a render farm?
No. A workstation provides an interactive desktop for production. A render farm distributes rendering jobs across machines, with separate setup and licensing considerations.
Will rendering continue after I close the browser?
Only if the workstation and Cinema 4D remain running. Check shutdown and inactivity settings before leaving a render unattended.
Get Beyond Your Computer Performance
Run applications on your cloud computer with the latest generation hardware. No more crashes or lags.

Trial includes 1 hour usage + 7 days of storage.
Summarize with AI

Ready to focus on your creativity?
Vagon gives you the ability to create & render projects, collaborate, and stream applications with the power of the best hardware.

Vagon Blog
Run heavy applications on any device with
your personal computer on the cloud.
San Francisco, California
Solutions
Vagon Teams
Vagon Streams
Use Cases
Resources
Vagon Blog
How to Run Cinema 4D on Googlebook
How to Run DaVinci Resolve on Googlebook
How to Run Godot on Googlebook: Game Development Guide
How to Run Premiere Pro on Googlebook: Editing Guide
How to Run Revit on Googlebook: Complete BIM Guide
How to Run SOLIDWORKS on Googlebook: Complete CAD Guide
How to Run AutoCAD on Googlebook
How to Run Photoshop on Googlebook
How to Run After Effects on Googlebook
Vagon Blog
Run heavy applications on any device with
your personal computer on the cloud.
San Francisco, California
Solutions
Vagon Teams
Vagon Streams
Use Cases
Resources
Vagon Blog
How to Run Cinema 4D on Googlebook
How to Run DaVinci Resolve on Googlebook
How to Run Godot on Googlebook: Game Development Guide
How to Run Premiere Pro on Googlebook: Editing Guide
How to Run Revit on Googlebook: Complete BIM Guide
How to Run SOLIDWORKS on Googlebook: Complete CAD Guide
How to Run AutoCAD on Googlebook
How to Run Photoshop on Googlebook
How to Run After Effects on Googlebook
Vagon Blog
Run heavy applications on any device with
your personal computer on the cloud.
San Francisco, California
Solutions
Vagon Teams
Vagon Streams
Use Cases
Resources
Vagon Blog