Instant Connection for Pixel Streaming
— New Feature Automated Setup

How to Run Godot on Googlebook: Game Development Guide
GameDevelopment
-
How to Run Godot on Googlebook: Game Development Guide
GameDevelopment
How to Run Godot on Googlebook: Game Development Guide
GameDevelopment
-
Table of Contents
Building a game in Godot means more than arranging objects in a scene. You need to connect interactions, inspect runtime behavior, organize assets, and test an exported build. On a Googlebook, the best way to handle that workflow depends on the editor features and development tools your project needs.
Unlike some desktop applications, Godot offers both Android and web editors. These provide genuine development options, although their capabilities differ from the desktop version. You do not necessarily need a cloud computer to begin learning or building with Godot.
For a full desktop workflow, Vagon Cloud Computer gives you a Windows workspace accessible through your Googlebook’s browser. You can develop scenes, write scripts, use debugging tools, and prepare builds alongside external editors and supporting applications. The remote computer handles the processing while your Googlebook provides access.

Source: Godot Engine Documentation
Godot itself is free and open source; the cloud workspace is a separate service. With a stable internet connection and an appropriate configuration, this approach can support ongoing development from the first playable scene through testing and delivery, while preserving the export requirements of each target platform.
Choose Where Godot Should Run
Godot gives Googlebook users more than one starting point. You can explore a local Android installation, use the web editor, or access the desktop editor on a remote computer. Choose according to the project’s tools and target platforms, not simply whether the editor opens.
Option | Useful for | Main considerations |
|---|---|---|
Android editor | Local development on compatible devices | Device support, scripting language, plug-ins, and rendering demands |
Web editor | Trying Godot without installing an application | Limited debugging, rendering, and export capabilities |
Desktop Godot on Vagon | Development with desktop tools and adjustable computing resources | Internet connection, engine version, and platform toolchains |
Consider the Local Android Editor
The Android editor supports creating and developing 2D and 3D projects. Check its availability and behavior on your particular Googlebook rather than assuming every Android application is equally compatible with every device.
Its documented limitations include no C# support and no external script editor integration. Forward+ is available but not recommended because of performance issues.
Exporting is not categorically unavailable. The Godot Android Build Environment, or GABE, now supports Gradle-based Android builds on compatible devices. A desktop computer is therefore not automatically required just to produce an APK or AAB.
Understand the Web Editor’s Role
The web editor provides an accessible way to experiment, but it is not equivalent to desktop Godot. Current limitations include no C#, GDExtension, debugger/profiler integration, or direct project export.
Projects are stored in browser-managed storage. Download source copies deliberately rather than treating the browser as your only backup.
Googlebook’s Linux terminal is another separate environment, not a ready-made desktop Godot installation. Its current preview should not be confused with established Chromebook Linux GUI workflows.
Choose Desktop Godot for a Broader Toolset
With Vagon, Godot runs inside Windows alongside tools such as Git, external code editors, and the appropriate .NET SDK when needed.
This is different from running a web-exported game locally. The remote desktop streams the Windows workspace to your Googlebook; a web build runs the exported game in your Googlebook’s browser. That distinction matters when testing performance and preparing releases.
Prepare Your Godot Workspace on Vagon
Start with the engine version and supporting tools your project needs. Once configured, the Windows workspace can hold your editor, source files, assets, and build tools together.
1. Choose Your Cloud Computer
Create a Vagon Cloud Computer and select an available region near your location to help reduce connection latency.
Match resources to the project rather than assuming every Godot game needs a large GPU. A lightweight 2D game and a detailed 3D environment have different demands. Godot’s system requirements distinguish editor requirements from the requirements of exported games, with additional differences between renderers.
Allow storage for source assets, imported resources, development tools, and exported builds.
2. Select Godot During Application Setup
Godot is listed under Game Design in Vagon’s preinstalled application library. Select it during computer creation, then check the installed engine version when you open the workspace.
The catalog entry does not establish which release or editor build your project requires. If necessary, obtain the appropriate version from the official Godot download page.
For an existing project, use the team’s agreed engine version. Keep a backup or create a version-control branch before opening it in a newer release that may convert project data.
3. Add Your Development Tools
The standard Godot editor supports GDScript without a separate language installation. For C#, use the .NET-enabled editor and the SDK required by that release’s C# setup instructions.
Add an external code editor and Git if your workflow uses them. Install platform-specific build tools only when needed, such as the Android SDK and appropriate JDK for Android exports.
Export templates must match the engine version. Native extensions also need compatible binaries for the Windows editor and each intended export target.
4. Create or Bring In a Project
Create a new project in an organized folder on the Windows disk. Choose its renderer according to the intended features and target hardware, not simply the cloud computer’s available GPU.
For existing work, clone the repository or use Vagon Files to transfer the complete source project. The project.godot file contains project configuration; it does not contain all your scenes, scripts, and assets.
Import the project through the Project Manager, allow resource imports to complete, and check for missing dependencies. Finish by creating or opening a small scene, running it, and confirming that input and sound work before beginning a longer development session.
Build a Small Playable Scene, Not Just an Empty Project
An empty project confirms that Godot launches. A small playable scene confirms that your development workflow works. Start with a contained interaction: a player approaches a switch, activates it, and opens a gate leading to an exit.
Keep the visuals simple while you establish the behavior.
Give Each Scene a Clear Responsibility
Create separate scenes for the player, switch, and gate, then instance them into a test level. This makes each component easier to inspect and reuse.
A basic structure could look like this:
Use CharacterBody3D for a script-controlled player and provide suitable collision shapes for the floor, walls, and gate. Visible geometry alone does not establish physical boundaries.
Keep the gate’s appearance and collision behavior coordinated. An opening animation is not sufficient if an invisible collider still blocks the passage.

Source: Godot Engine Documentation
Connect Input to an Interaction
Add an interact action in Project Settings > Input Map and assign a suitable key. Reference the action in code rather than hard-coding the physical key throughout the project.
Give the switch an Area3D with a collision shape to detect a nearby player. Configure its collision mask to detect the player’s collision layer. Entering the area can enable interaction; leaving it should clear that opportunity.

Source: Godot Engine Documentation
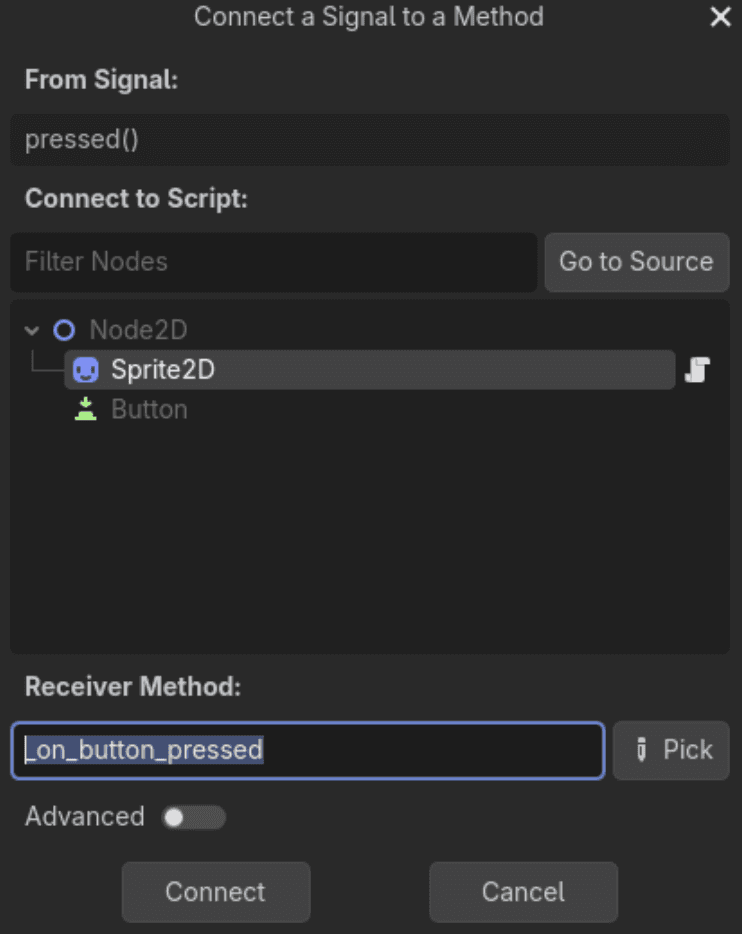
When the player presses the action within range, have the switch emit a signal. Connect that signal to the gate’s opening behavior. Godot’s signals let components communicate without requiring every object to know the internal structure of another scene.
Decide what repeated activation should do. For this prototype, the switch might open the gate once and ignore further presses.
Source: Godot Engine Documentation
Complete the Loop With Feedback and Restart
Add enough feedback to make the interaction understandable: a prompt near the switch, a sound on activation, and visible gate movement. An exit trigger can display a completion message.
Then test the complete sequence:
Start with the gate closed.
Approach the switch and confirm the prompt appears.
Leave its range and verify interaction is unavailable.
Return, activate it, and pass through the opening.
Restart and confirm the initial state is restored.
Save the test level as the main scene. Use Run Current Scene when checking an individual component and Run Project when validating the complete loop.
At this stage, success means predictable behavior from start to finish. Detailed models, lighting, and effects can follow once that foundation is reliable.
Debug the Behavior You Actually See
Suppose the switch responds, but the gate stays closed. Before rewriting the interaction, identify where the expected sequence stops: input detection, player proximity, signal emission, or gate behavior.
Reproduce the problem consistently. Test from the same starting state and change one thing at a time so you can tell which adjustment affects the result.
Check Which Scene Is Running
Run Current Scene tests the scene being edited. Run Project starts the configured main scene. If a switch depends on connections established in the level, running the switch scene alone may not reproduce its behavior in the complete game.
Also confirm that you are editing the scene or instance actually used by the test level. Two similar gate instances can make a correct script appear ineffective when you are inspecting the wrong object.
Follow Execution With the Debugger
Check the Output panel for diagnostic messages and the Debugger for reported errors. A temporary message can confirm that a function executes, but a breakpoint provides more context.
Place a breakpoint inside the interaction function, run the game, and activate the switch. When execution pauses, inspect the relevant variables and call stack using Godot’s debugging tools.
Check whether the player is considered in range, whether the gate reference is valid, and whether an “already activated” flag prevents the action. If execution never reaches the breakpoint, investigate the input and detection path first.

Source: Godot Engine Documentation
Inspect the Running Scene, Not Just the Saved One
Switch the Scene dock to Remote while the project runs. This shows the live scene tree rather than only the scene being edited.
Inspect the active gate instance and its properties. Runtime values may differ from the Inspector values you saw before pressing Play.
Symptom | First check |
|---|---|
Interaction key does nothing | Input action name, focus, and input handling |
Switch activates but gate does not respond | Signal connection and target instance |
Gate moves but passage remains blocked | Collision geometry and its update |
Behavior changes after restart | Initialization and persistent state |
Use visible collision shapes when investigating physical boundaries.

Source: Godot Engine Documentation
Verify the Fix Across a Complete Restart
Restart the project after correcting the issue. Test entering and leaving the interaction area, pressing the action repeatedly, and completing the level twice.
If state lives in an Autoload, reloading the level does not necessarily reset it. Define the intended reset behavior explicitly.
Once the sequence works, remove unnecessary diagnostic output and save the changes. The desktop workspace gives you inspection tools; a repeatable test establishes whether the behavior is actually fixed.
Add Assets and UI Without Breaking the Project
Once the interaction works, replace placeholder geometry and add presentation elements in small steps. Keep a playable version available so an asset change does not obscure a gameplay problem.
Import Assets With Their Dependencies
Place models, textures, and audio inside the project folder and allow Godot to finish importing them. For 3D assets, inspect scale, orientation, materials, and animation before introducing them throughout the level.
A detailed mesh does not automatically provide suitable collision. Keep collision geometry appropriate for gameplay rather than assuming every visible surface needs an equally complex physical representation.
Where possible, place imported models inside a reusable scene that contains your gameplay scripts and supporting nodes. This separates the imported asset from the behavior you maintain.
Keep Resource References Intact
Use Godot’s FileSystem dock when moving or renaming project resources. This lets the editor update references where supported.
Check the result afterward, especially when scripts construct paths as strings or plug-ins maintain their own references. Keep associated .uid files with their resources rather than treating them as disposable clutter.
If replacing a model changes its node hierarchy, verify any animation tracks and script references that depend on that structure.

Source: Godot Engine Documentation
Build UI for More Than One Window Size
Add a simple interaction prompt, pause menu, and completion message. Use Control nodes, anchors, and containers to establish predictable layouts instead of positioning every element with fixed offsets.
Test a narrower window and a different aspect ratio. Confirm that:
Prompts remain readable and do not overlap important action.
Buttons remain accessible.
Keyboard focus behaves sensibly.
Pausing stops the intended gameplay while leaving the menu usable.
Test the exported target later as well. A layout that looks correct in the remote Windows window may behave differently on your Googlebook’s display.

Source: Godot Engine Documentation
Check Plug-ins and Asset Licenses
Before adding a GDExtension, confirm that it includes compatible binaries for the Windows editor and your intended export platforms. A working editor integration does not prove every target is supported.
Record asset licenses and required attribution alongside the project. Godot’s open-source license does not automatically cover third-party models, music, fonts, or plug-ins.
Separate Game Performance From Connection Lag
When a test feels sluggish, determine whether the game is producing frames slowly or the remote connection is delaying what you see. These are separate problems.
Godot runs on the cloud computer, so its profiler measures work performed there. Your Googlebook receives the resulting desktop stream. The game can report a stable frame rate while mouse movement still feels delayed by the connection.
Symptom | What to investigate |
|---|---|
Frame time rises in complex areas | Visible geometry, lighting, effects, and rendering cost |
Gameplay slows during repeated actions | Scripts, physics, allocations, and scene changes |
Input feels delayed across the whole desktop | Network stability, region, and streaming settings |
Cloud performance is good but a local build struggles | Target-device limitations and platform differences |
Measure Before Changing Resources
Use Godot’s profiler to investigate expensive frames rather than guessing from the scene’s appearance. Compare the same test area before and after a change.
Check whether the bottleneck is scripting, physics, or rendering. A stronger GPU will not necessarily fix a costly loop running every frame.

Source: Godot Engine Documentation
Choose a Renderer for the Target
Forward+, Mobile, and Compatibility serve different needs. Choose according to required features and target hardware, not simply the most capable renderer available on the workstation.
Compatibility is the required rendering method for current Godot 4 web exports. Changing renderers can affect appearance and feature availability, so test the project rather than treating the switch as a guaranteed optimization.
Vagon’s scalable resources can provide additional development capacity as scenes grow. They do not establish your game’s minimum hardware requirements.
Finally, test on representative target devices. A smooth Windows build on a cloud GPU does not prove that the same project will run smoothly as an Android or browser build on Googlebook.
Export a Build and Test It Outside the Editor
A project working in the editor is an important checkpoint, not a finished release. Exporting tests whether the game includes its required resources and behaves correctly without the editor’s development environment.
Start by installing export templates that match your Godot version. Then create a preset for the intended platform and review its settings.
Target | What to prepare |
|---|---|
Windows | Matching templates, export preset, and any required native libraries |
Web | Compatibility renderer, suitable hosting, and browser testing |
Android | Appropriate SDK/JDK, export configuration, and signing credentials |
iOS | A separate macOS environment with Xcode |

Source: Godot Engine Documentation
Create a Build for the Intended Player
For an early Windows test, export a debug build and launch it independently of the editor. Confirm the main scene starts correctly and that assets, input actions, and save paths work.
Before distributing a release, review resource inclusion, application identity, icons, and platform-specific dependencies. Keep signing credentials and other secrets out of public repositories.
Do not assume that a native extension working inside the Windows editor also includes binaries for Android or the web.
Test a Web Build on Your Googlebook
A web export provides a useful way to test the game locally on Googlebook rather than streaming its Windows version.
Follow Godot’s web export requirements. Serve the exported files through an appropriate web server or hosting service instead of simply double-clicking the HTML file. Keep the generated files together, and configure any headers required by the selected threading or extension options.
Current official Godot 4 documentation does not support exporting C# projects to the web. Choosing a cloud workstation does not remove that engine limitation.
Once hosted, open the build in your Googlebook’s browser. Check:
Keyboard input, focus, and any mouse capture.
Audio after the required user interaction.
UI at different window sizes.
Save/load behavior across sessions.
Loading time and performance during demanding gameplay.
Respect Mobile Toolchain Requirements
For Android, configure the required development tools and export settings, then test the APK on a compatible device. Store delivery may require an AAB and additional signing and policy steps.
An iOS export requires macOS and Xcode. A Windows cloud computer is not a substitute for that toolchain.
Keep debug and release outputs clearly separated. Most importantly, test the artifact you intend to distribute. Running the project remotely, running a Windows export, and playing a web or Android build on Googlebook validate different environments.
Keep Source, Builds, and Backups Separate
An exported game is a delivery artifact, not an editable project backup. Keep the scenes, scripts, source assets, and configuration needed to continue development separately from Windows, web, or Android builds.
Use Git or another version-control system to record meaningful changes. Commit a working baseline before substantial engine upgrades, plug-in additions, or scene restructuring. Small, descriptive commits make it easier to identify when a behavior changed.
Follow Godot’s version-control guidance for your engine release. Generated data in the .godot directory is generally excluded, while required resource identifiers such as .uid files should remain with the source. Do not apply an old ignore template without checking its assumptions.
A simple separation could be:
Keep signing keys, passwords, and other secrets out of shared source history.
Use Vagon Files for transferring project packages and checked builds, not as a replacement for revision history. Maintain an independent backup of irreplaceable assets and source work. Before removing a workspace or reorganizing storage, verify that the backup can restore an editable project, not merely launch the latest game.
Final Thoughts
Googlebook users can begin developing with Godot through local Android or web options, but some projects benefit from a complete desktop toolset. The right choice depends on your scripting language, extensions, rendering needs, and export targets.
Vagon Cloud Computer brings the Windows editor and supporting tools into one workspace accessible from your Googlebook. Use it to build, debug, and prepare releases, then validate those releases on the hardware and platforms your players will actually use.
FAQs
Can Godot run locally on a Googlebook?
The Android editor is a local option on compatible devices. The web editor is another route. Check compatibility on your particular Googlebook rather than assuming identical support across models.
Is Godot’s Android editor the same as its desktop editor?
It supports substantial development work, but has limitations. Current documentation lists no C# or external script editor support and advises against Forward+ because of performance issues.
Can the Android editor export games?
Yes. Supported workflows include Android exports, with GABE providing Gradle-based APK and AAB builds on compatible devices. Older claims that Android users always need a PC to export are outdated.
Do you need a paid Godot license on Vagon?
No. Godot is free and open source. Vagon’s computing service and any paid third-party tools or assets are separate costs.
Can you use C# in this setup?
Yes, with Godot’s .NET-enabled Windows editor and the appropriate SDK. Export support still depends on the target platform; current official Godot 4 web exports do not support C#.
Can you export a game that runs locally on Googlebook?
Potentially through a compatible Android or web build. Test the actual export on your device. A Windows executable does not run natively on Googlebook.
Can a Windows cloud computer export an iOS game?
Not through Godot’s supported iOS workflow, which requires macOS and Xcode.
Can you use the cloud workspace offline?
No. Interactive access requires an internet connection. Local Android editing is a separate workflow with different connectivity requirements.
Building a game in Godot means more than arranging objects in a scene. You need to connect interactions, inspect runtime behavior, organize assets, and test an exported build. On a Googlebook, the best way to handle that workflow depends on the editor features and development tools your project needs.
Unlike some desktop applications, Godot offers both Android and web editors. These provide genuine development options, although their capabilities differ from the desktop version. You do not necessarily need a cloud computer to begin learning or building with Godot.
For a full desktop workflow, Vagon Cloud Computer gives you a Windows workspace accessible through your Googlebook’s browser. You can develop scenes, write scripts, use debugging tools, and prepare builds alongside external editors and supporting applications. The remote computer handles the processing while your Googlebook provides access.
Source: Godot Engine Documentation
Godot itself is free and open source; the cloud workspace is a separate service. With a stable internet connection and an appropriate configuration, this approach can support ongoing development from the first playable scene through testing and delivery, while preserving the export requirements of each target platform.
Choose Where Godot Should Run
Godot gives Googlebook users more than one starting point. You can explore a local Android installation, use the web editor, or access the desktop editor on a remote computer. Choose according to the project’s tools and target platforms, not simply whether the editor opens.
Option | Useful for | Main considerations |
|---|---|---|
Android editor | Local development on compatible devices | Device support, scripting language, plug-ins, and rendering demands |
Web editor | Trying Godot without installing an application | Limited debugging, rendering, and export capabilities |
Desktop Godot on Vagon | Development with desktop tools and adjustable computing resources | Internet connection, engine version, and platform toolchains |
Consider the Local Android Editor
The Android editor supports creating and developing 2D and 3D projects. Check its availability and behavior on your particular Googlebook rather than assuming every Android application is equally compatible with every device.
Its documented limitations include no C# support and no external script editor integration. Forward+ is available but not recommended because of performance issues.
Exporting is not categorically unavailable. The Godot Android Build Environment, or GABE, now supports Gradle-based Android builds on compatible devices. A desktop computer is therefore not automatically required just to produce an APK or AAB.
Understand the Web Editor’s Role
The web editor provides an accessible way to experiment, but it is not equivalent to desktop Godot. Current limitations include no C#, GDExtension, debugger/profiler integration, or direct project export.
Projects are stored in browser-managed storage. Download source copies deliberately rather than treating the browser as your only backup.
Googlebook’s Linux terminal is another separate environment, not a ready-made desktop Godot installation. Its current preview should not be confused with established Chromebook Linux GUI workflows.
Choose Desktop Godot for a Broader Toolset
With Vagon, Godot runs inside Windows alongside tools such as Git, external code editors, and the appropriate .NET SDK when needed.
This is different from running a web-exported game locally. The remote desktop streams the Windows workspace to your Googlebook; a web build runs the exported game in your Googlebook’s browser. That distinction matters when testing performance and preparing releases.
Prepare Your Godot Workspace on Vagon
Start with the engine version and supporting tools your project needs. Once configured, the Windows workspace can hold your editor, source files, assets, and build tools together.
1. Choose Your Cloud Computer
Create a Vagon Cloud Computer and select an available region near your location to help reduce connection latency.
Match resources to the project rather than assuming every Godot game needs a large GPU. A lightweight 2D game and a detailed 3D environment have different demands. Godot’s system requirements distinguish editor requirements from the requirements of exported games, with additional differences between renderers.
Allow storage for source assets, imported resources, development tools, and exported builds.
2. Select Godot During Application Setup
Godot is listed under Game Design in Vagon’s preinstalled application library. Select it during computer creation, then check the installed engine version when you open the workspace.
The catalog entry does not establish which release or editor build your project requires. If necessary, obtain the appropriate version from the official Godot download page.
For an existing project, use the team’s agreed engine version. Keep a backup or create a version-control branch before opening it in a newer release that may convert project data.
3. Add Your Development Tools
The standard Godot editor supports GDScript without a separate language installation. For C#, use the .NET-enabled editor and the SDK required by that release’s C# setup instructions.
Add an external code editor and Git if your workflow uses them. Install platform-specific build tools only when needed, such as the Android SDK and appropriate JDK for Android exports.
Export templates must match the engine version. Native extensions also need compatible binaries for the Windows editor and each intended export target.
4. Create or Bring In a Project
Create a new project in an organized folder on the Windows disk. Choose its renderer according to the intended features and target hardware, not simply the cloud computer’s available GPU.
For existing work, clone the repository or use Vagon Files to transfer the complete source project. The project.godot file contains project configuration; it does not contain all your scenes, scripts, and assets.
Import the project through the Project Manager, allow resource imports to complete, and check for missing dependencies. Finish by creating or opening a small scene, running it, and confirming that input and sound work before beginning a longer development session.
Build a Small Playable Scene, Not Just an Empty Project
An empty project confirms that Godot launches. A small playable scene confirms that your development workflow works. Start with a contained interaction: a player approaches a switch, activates it, and opens a gate leading to an exit.
Keep the visuals simple while you establish the behavior.
Give Each Scene a Clear Responsibility
Create separate scenes for the player, switch, and gate, then instance them into a test level. This makes each component easier to inspect and reuse.
A basic structure could look like this:
Use CharacterBody3D for a script-controlled player and provide suitable collision shapes for the floor, walls, and gate. Visible geometry alone does not establish physical boundaries.
Keep the gate’s appearance and collision behavior coordinated. An opening animation is not sufficient if an invisible collider still blocks the passage.
Source: Godot Engine Documentation
Connect Input to an Interaction
Add an interact action in Project Settings > Input Map and assign a suitable key. Reference the action in code rather than hard-coding the physical key throughout the project.
Give the switch an Area3D with a collision shape to detect a nearby player. Configure its collision mask to detect the player’s collision layer. Entering the area can enable interaction; leaving it should clear that opportunity.
Source: Godot Engine Documentation
When the player presses the action within range, have the switch emit a signal. Connect that signal to the gate’s opening behavior. Godot’s signals let components communicate without requiring every object to know the internal structure of another scene.
Decide what repeated activation should do. For this prototype, the switch might open the gate once and ignore further presses.
Source: Godot Engine Documentation
Complete the Loop With Feedback and Restart
Add enough feedback to make the interaction understandable: a prompt near the switch, a sound on activation, and visible gate movement. An exit trigger can display a completion message.
Then test the complete sequence:
Start with the gate closed.
Approach the switch and confirm the prompt appears.
Leave its range and verify interaction is unavailable.
Return, activate it, and pass through the opening.
Restart and confirm the initial state is restored.
Save the test level as the main scene. Use Run Current Scene when checking an individual component and Run Project when validating the complete loop.
At this stage, success means predictable behavior from start to finish. Detailed models, lighting, and effects can follow once that foundation is reliable.
Debug the Behavior You Actually See
Suppose the switch responds, but the gate stays closed. Before rewriting the interaction, identify where the expected sequence stops: input detection, player proximity, signal emission, or gate behavior.
Reproduce the problem consistently. Test from the same starting state and change one thing at a time so you can tell which adjustment affects the result.
Check Which Scene Is Running
Run Current Scene tests the scene being edited. Run Project starts the configured main scene. If a switch depends on connections established in the level, running the switch scene alone may not reproduce its behavior in the complete game.
Also confirm that you are editing the scene or instance actually used by the test level. Two similar gate instances can make a correct script appear ineffective when you are inspecting the wrong object.
Follow Execution With the Debugger
Check the Output panel for diagnostic messages and the Debugger for reported errors. A temporary message can confirm that a function executes, but a breakpoint provides more context.
Place a breakpoint inside the interaction function, run the game, and activate the switch. When execution pauses, inspect the relevant variables and call stack using Godot’s debugging tools.
Check whether the player is considered in range, whether the gate reference is valid, and whether an “already activated” flag prevents the action. If execution never reaches the breakpoint, investigate the input and detection path first.
Source: Godot Engine Documentation
Inspect the Running Scene, Not Just the Saved One
Switch the Scene dock to Remote while the project runs. This shows the live scene tree rather than only the scene being edited.
Inspect the active gate instance and its properties. Runtime values may differ from the Inspector values you saw before pressing Play.
Symptom | First check |
|---|---|
Interaction key does nothing | Input action name, focus, and input handling |
Switch activates but gate does not respond | Signal connection and target instance |
Gate moves but passage remains blocked | Collision geometry and its update |
Behavior changes after restart | Initialization and persistent state |
Use visible collision shapes when investigating physical boundaries.
Source: Godot Engine Documentation
Verify the Fix Across a Complete Restart
Restart the project after correcting the issue. Test entering and leaving the interaction area, pressing the action repeatedly, and completing the level twice.
If state lives in an Autoload, reloading the level does not necessarily reset it. Define the intended reset behavior explicitly.
Once the sequence works, remove unnecessary diagnostic output and save the changes. The desktop workspace gives you inspection tools; a repeatable test establishes whether the behavior is actually fixed.
Add Assets and UI Without Breaking the Project
Once the interaction works, replace placeholder geometry and add presentation elements in small steps. Keep a playable version available so an asset change does not obscure a gameplay problem.
Import Assets With Their Dependencies
Place models, textures, and audio inside the project folder and allow Godot to finish importing them. For 3D assets, inspect scale, orientation, materials, and animation before introducing them throughout the level.
A detailed mesh does not automatically provide suitable collision. Keep collision geometry appropriate for gameplay rather than assuming every visible surface needs an equally complex physical representation.
Where possible, place imported models inside a reusable scene that contains your gameplay scripts and supporting nodes. This separates the imported asset from the behavior you maintain.
Keep Resource References Intact
Use Godot’s FileSystem dock when moving or renaming project resources. This lets the editor update references where supported.
Check the result afterward, especially when scripts construct paths as strings or plug-ins maintain their own references. Keep associated .uid files with their resources rather than treating them as disposable clutter.
If replacing a model changes its node hierarchy, verify any animation tracks and script references that depend on that structure.
Source: Godot Engine Documentation
Build UI for More Than One Window Size
Add a simple interaction prompt, pause menu, and completion message. Use Control nodes, anchors, and containers to establish predictable layouts instead of positioning every element with fixed offsets.
Test a narrower window and a different aspect ratio. Confirm that:
Prompts remain readable and do not overlap important action.
Buttons remain accessible.
Keyboard focus behaves sensibly.
Pausing stops the intended gameplay while leaving the menu usable.
Test the exported target later as well. A layout that looks correct in the remote Windows window may behave differently on your Googlebook’s display.
Source: Godot Engine Documentation
Check Plug-ins and Asset Licenses
Before adding a GDExtension, confirm that it includes compatible binaries for the Windows editor and your intended export platforms. A working editor integration does not prove every target is supported.
Record asset licenses and required attribution alongside the project. Godot’s open-source license does not automatically cover third-party models, music, fonts, or plug-ins.
Separate Game Performance From Connection Lag
When a test feels sluggish, determine whether the game is producing frames slowly or the remote connection is delaying what you see. These are separate problems.
Godot runs on the cloud computer, so its profiler measures work performed there. Your Googlebook receives the resulting desktop stream. The game can report a stable frame rate while mouse movement still feels delayed by the connection.
Symptom | What to investigate |
|---|---|
Frame time rises in complex areas | Visible geometry, lighting, effects, and rendering cost |
Gameplay slows during repeated actions | Scripts, physics, allocations, and scene changes |
Input feels delayed across the whole desktop | Network stability, region, and streaming settings |
Cloud performance is good but a local build struggles | Target-device limitations and platform differences |
Measure Before Changing Resources
Use Godot’s profiler to investigate expensive frames rather than guessing from the scene’s appearance. Compare the same test area before and after a change.
Check whether the bottleneck is scripting, physics, or rendering. A stronger GPU will not necessarily fix a costly loop running every frame.
Source: Godot Engine Documentation
Choose a Renderer for the Target
Forward+, Mobile, and Compatibility serve different needs. Choose according to required features and target hardware, not simply the most capable renderer available on the workstation.
Compatibility is the required rendering method for current Godot 4 web exports. Changing renderers can affect appearance and feature availability, so test the project rather than treating the switch as a guaranteed optimization.
Vagon’s scalable resources can provide additional development capacity as scenes grow. They do not establish your game’s minimum hardware requirements.
Finally, test on representative target devices. A smooth Windows build on a cloud GPU does not prove that the same project will run smoothly as an Android or browser build on Googlebook.
Export a Build and Test It Outside the Editor
A project working in the editor is an important checkpoint, not a finished release. Exporting tests whether the game includes its required resources and behaves correctly without the editor’s development environment.
Start by installing export templates that match your Godot version. Then create a preset for the intended platform and review its settings.
Target | What to prepare |
|---|---|
Windows | Matching templates, export preset, and any required native libraries |
Web | Compatibility renderer, suitable hosting, and browser testing |
Android | Appropriate SDK/JDK, export configuration, and signing credentials |
iOS | A separate macOS environment with Xcode |
Source: Godot Engine Documentation
Create a Build for the Intended Player
For an early Windows test, export a debug build and launch it independently of the editor. Confirm the main scene starts correctly and that assets, input actions, and save paths work.
Before distributing a release, review resource inclusion, application identity, icons, and platform-specific dependencies. Keep signing credentials and other secrets out of public repositories.
Do not assume that a native extension working inside the Windows editor also includes binaries for Android or the web.
Test a Web Build on Your Googlebook
A web export provides a useful way to test the game locally on Googlebook rather than streaming its Windows version.
Follow Godot’s web export requirements. Serve the exported files through an appropriate web server or hosting service instead of simply double-clicking the HTML file. Keep the generated files together, and configure any headers required by the selected threading or extension options.
Current official Godot 4 documentation does not support exporting C# projects to the web. Choosing a cloud workstation does not remove that engine limitation.
Once hosted, open the build in your Googlebook’s browser. Check:
Keyboard input, focus, and any mouse capture.
Audio after the required user interaction.
UI at different window sizes.
Save/load behavior across sessions.
Loading time and performance during demanding gameplay.
Respect Mobile Toolchain Requirements
For Android, configure the required development tools and export settings, then test the APK on a compatible device. Store delivery may require an AAB and additional signing and policy steps.
An iOS export requires macOS and Xcode. A Windows cloud computer is not a substitute for that toolchain.
Keep debug and release outputs clearly separated. Most importantly, test the artifact you intend to distribute. Running the project remotely, running a Windows export, and playing a web or Android build on Googlebook validate different environments.
Keep Source, Builds, and Backups Separate
An exported game is a delivery artifact, not an editable project backup. Keep the scenes, scripts, source assets, and configuration needed to continue development separately from Windows, web, or Android builds.
Use Git or another version-control system to record meaningful changes. Commit a working baseline before substantial engine upgrades, plug-in additions, or scene restructuring. Small, descriptive commits make it easier to identify when a behavior changed.
Follow Godot’s version-control guidance for your engine release. Generated data in the .godot directory is generally excluded, while required resource identifiers such as .uid files should remain with the source. Do not apply an old ignore template without checking its assumptions.
A simple separation could be:
Keep signing keys, passwords, and other secrets out of shared source history.
Use Vagon Files for transferring project packages and checked builds, not as a replacement for revision history. Maintain an independent backup of irreplaceable assets and source work. Before removing a workspace or reorganizing storage, verify that the backup can restore an editable project, not merely launch the latest game.
Final Thoughts
Googlebook users can begin developing with Godot through local Android or web options, but some projects benefit from a complete desktop toolset. The right choice depends on your scripting language, extensions, rendering needs, and export targets.
Vagon Cloud Computer brings the Windows editor and supporting tools into one workspace accessible from your Googlebook. Use it to build, debug, and prepare releases, then validate those releases on the hardware and platforms your players will actually use.
FAQs
Can Godot run locally on a Googlebook?
The Android editor is a local option on compatible devices. The web editor is another route. Check compatibility on your particular Googlebook rather than assuming identical support across models.
Is Godot’s Android editor the same as its desktop editor?
It supports substantial development work, but has limitations. Current documentation lists no C# or external script editor support and advises against Forward+ because of performance issues.
Can the Android editor export games?
Yes. Supported workflows include Android exports, with GABE providing Gradle-based APK and AAB builds on compatible devices. Older claims that Android users always need a PC to export are outdated.
Do you need a paid Godot license on Vagon?
No. Godot is free and open source. Vagon’s computing service and any paid third-party tools or assets are separate costs.
Can you use C# in this setup?
Yes, with Godot’s .NET-enabled Windows editor and the appropriate SDK. Export support still depends on the target platform; current official Godot 4 web exports do not support C#.
Can you export a game that runs locally on Googlebook?
Potentially through a compatible Android or web build. Test the actual export on your device. A Windows executable does not run natively on Googlebook.
Can a Windows cloud computer export an iOS game?
Not through Godot’s supported iOS workflow, which requires macOS and Xcode.
Can you use the cloud workspace offline?
No. Interactive access requires an internet connection. Local Android editing is a separate workflow with different connectivity requirements.
Get Beyond Your Computer Performance
Run applications on your cloud computer with the latest generation hardware. No more crashes or lags.

Trial includes 1 hour usage + 7 days of storage.
Summarize with AI

Ready to focus on your creativity?
Vagon gives you the ability to create & render projects, collaborate, and stream applications with the power of the best hardware.

Vagon Blog
Run heavy applications on any device with
your personal computer on the cloud.
San Francisco, California
Solutions
Vagon Teams
Vagon Streams
Use Cases
Resources
Vagon Blog
How to Run Godot on Googlebook: Game Development Guide
How to Run Premiere Pro on Googlebook: Editing Guide
How to Run Revit on Googlebook: Complete BIM Guide
How to Run SOLIDWORKS on Googlebook: Complete CAD Guide
How to Run AutoCAD on Googlebook
How to Run Photoshop on Googlebook
How to Use SketchUp With Codex: MCP and Computer Use
How to Use SketchUp With Claude: MCP and Computer Use
How to Use ComfyUI With Codex: MCP and Computer Use
Vagon Blog
Run heavy applications on any device with
your personal computer on the cloud.
San Francisco, California
Solutions
Vagon Teams
Vagon Streams
Use Cases
Resources
Vagon Blog
How to Run Godot on Googlebook: Game Development Guide
How to Run Premiere Pro on Googlebook: Editing Guide
How to Run Revit on Googlebook: Complete BIM Guide
How to Run SOLIDWORKS on Googlebook: Complete CAD Guide
How to Run AutoCAD on Googlebook
How to Run Photoshop on Googlebook
How to Use SketchUp With Codex: MCP and Computer Use
How to Use SketchUp With Claude: MCP and Computer Use
How to Use ComfyUI With Codex: MCP and Computer Use
Vagon Blog
Run heavy applications on any device with
your personal computer on the cloud.
San Francisco, California
Solutions
Vagon Teams
Vagon Streams
Use Cases
Resources
Vagon Blog