Instant Connection for Pixel Streaming
— New Feature Automated Setup

How to Fix Slow & Laggy VMware Experience
How to Fix Slow & Laggy VMware Experience
ComputerPerformance
How to Fix Slow & Laggy VMware Experience
Table of Contents
Picture this: You’ve fired up your VMware virtual machine, ready to tackle a big project, but instead of smooth sailing, you’re stuck watching a spinning cursor crawl across the screen. Sound familiar? If your VMware experience feels more like a sluggish slog than a productivity powerhouse, you’re not alone. Virtual machines are game-changers for developers, designers, and IT pros alike, but when they lag, frustration sets in fast. The good news? You don’t have to settle for a slow ride, there are plenty of ways to get your VMware back up to speed, and we’re here to show you how.
VMware’s virtualization magic lets you run multiple operating systems on a single machine, making it a go-to for testing, development, and remote work. But let’s be real: when performance dips, it’s not just an annoyance, it’s a productivity killer. Whether you’re juggling resource-heavy apps or just trying to boot up without a coffee break’s worth of waiting, a laggy VM can throw a wrench in your workflow. That’s why we’ve put together this guide, to help you pinpoint the culprits and fix them, fast. From quick tweaks to pro-level optimizations, we’ve got your back. And if local fixes aren’t cutting it, we’ll introduce you to a cloud-powered solution from Vagon Teams that’ll leave lag in the dust.
By the end of this post, you’ll have a toolbox full of practical tips to transform your VMware experience from sluggish to seamless. Ready to ditch the delays and get back to work? Let’s dive in and rev up your virtual machine, because you deserve a VM that keeps up with you, not one that holds you back!
Why VMware Feels Slow: Common Problems & Culprits
If your VMware virtual machine is moving at the pace of a sleepy sloth, it’s easy to assume something’s broken. But before you start troubleshooting in a panic, let’s take a step back and unpack the most common reasons why VMware can feel slow. Think of your VM like a car: it needs the right fuel, a tuned engine, and clear roads to run smoothly. When one of those pieces is off, you’ll feel the drag. Below, we’ll dive into the top culprits behind laggy performance, complete with insights to help you spot the issue and get ready to fix it. Don’t worry, we’re keeping this digestible, so whether you’re a virtualization newbie or a seasoned pro, you’ll walk away with a clear picture of what’s slowing you down.
#1: Insufficient Hardware Resources

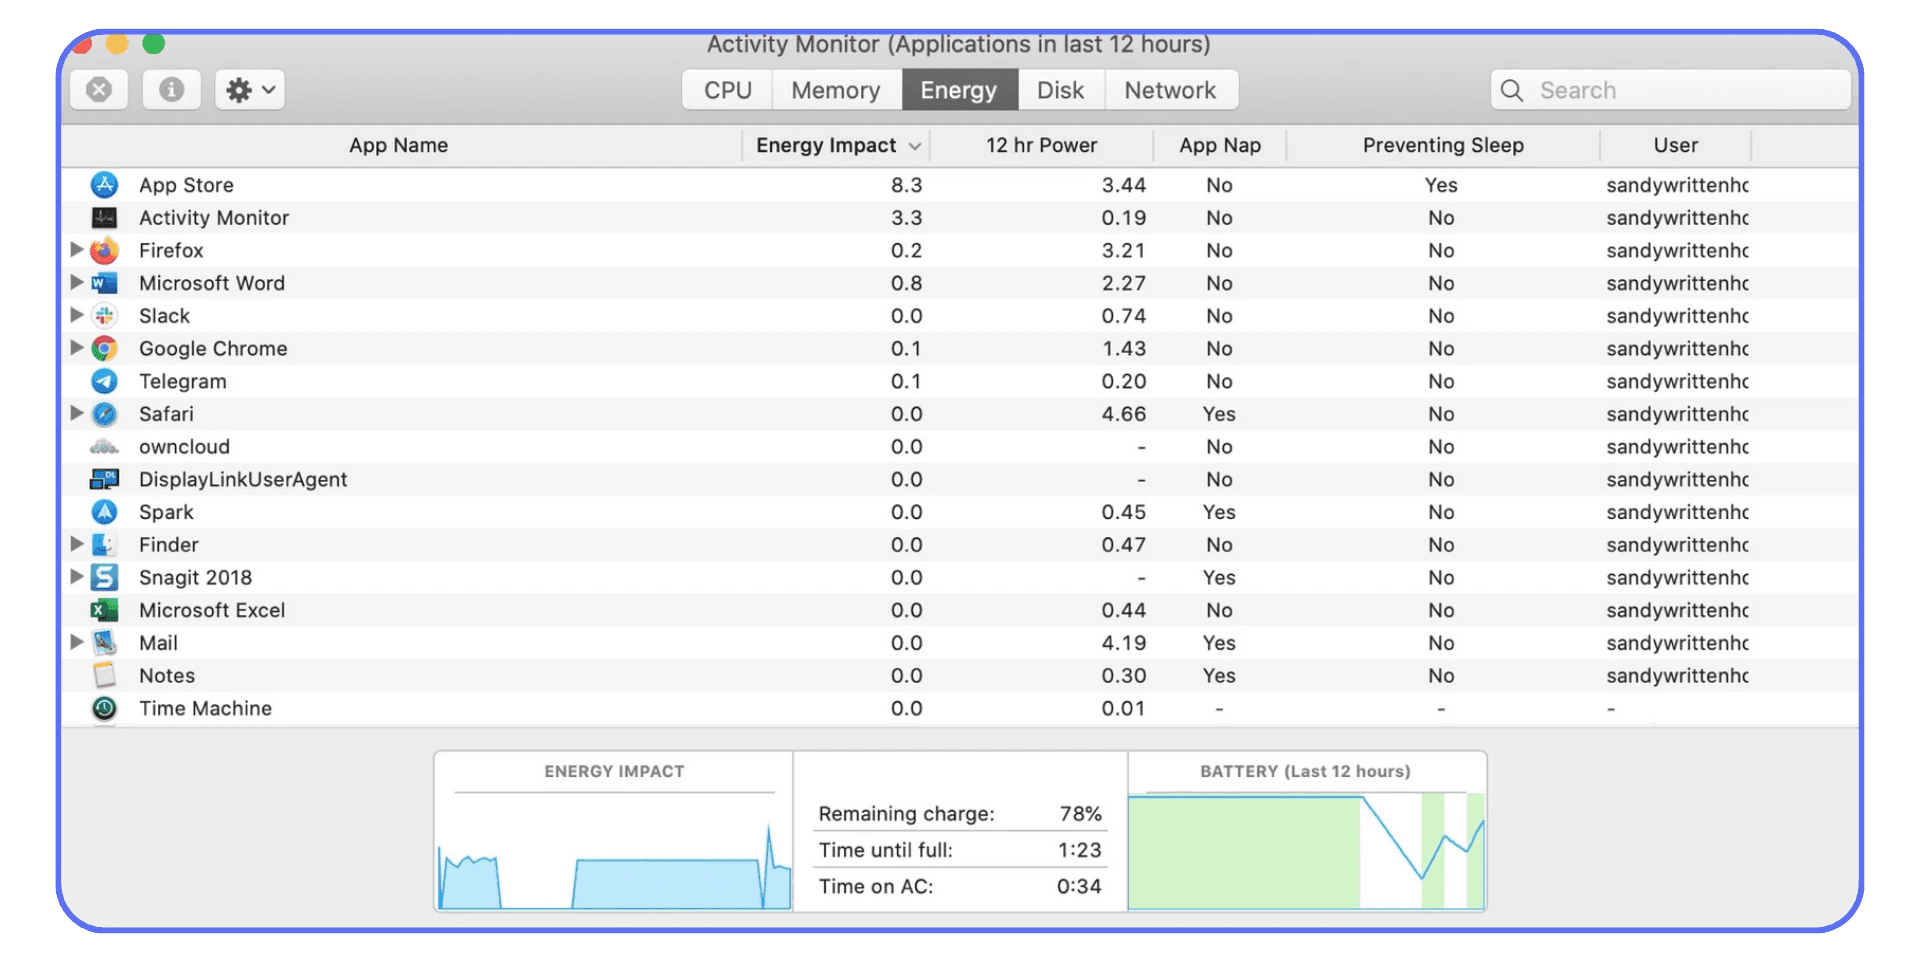
Your VM lives on your host machine, and if that host is running low on horsepower, your virtual machine will sputter. The big three resources, CPU, RAM, and disk I/O, are the lifeblood of VM performance. If your host’s CPU is maxed out from running multiple VMs or background apps, your VMware guest will struggle to get the processing power it needs. Imagine trying to sprint while carrying a backpack full of bricks, it’s not happening! Similarly, if you’ve skimped on RAM allocation, your VM will lean heavily on swap files, which are painfully slow compared to physical memory. Disk I/O is another bottleneck: if your host’s storage is busy juggling other tasks, your VM’s read/write operations will crawl. How do you spot this? Check your host’s resource usage with tools like Task Manager (Windows) or Activity Monitor (Mac). If CPU or RAM is consistently at 90% or higher, or disk activity is pegged, your hardware is likely overstretched. Don’t worry, we’ll cover how to optimize this later, but for now, know that a resource-starved host is a prime suspect for lag.
#2: Poor Configuration Settings
Even with a beefy host, bad VM settings can kneecap performance. VMware is powerful, but it’s not a mind-reader, it needs you to configure it properly. One common misstep is overcommitting resources, like assigning more virtual CPUs or RAM than your host can comfortably spare. This leads to contention, where VMs fight for scraps, slowing everyone down. Another culprit? Outdated or missing VMware Tools. This software suite optimizes how your guest OS talks to the host, handling things like graphics drivers and time sync. Without it, you’re stuck with sluggish visuals and choppy performance. Incorrect VM settings, like using an older virtual hardware version or mismatched guest OS types (e.g., selecting “Other” instead of “Windows 11”), can also cause inefficiencies. To check, open your VM’s settings in VMware Workstation or vSphere and look for red flags like excessive vCPUs or an outdated tools version. A quick audit here can reveal a lot, it’s like checking if your car’s tires are flat before blaming the engine. Misconfigurations are sneaky, but they’re fixable, and we’ll show you how in the next sections.
#3: Network Bottlenecks
If your VM feels fine locally but drags during online tasks, like accessing cloud apps or transferring files, your network might be the choke point. Virtualization adds a layer of complexity to networking, and VMware’s virtual adapters can struggle if not set up right. For example, NAT or bridged networking modes might introduce latency if your host’s network is congested or misconfigured. Slow DNS resolution, low bandwidth, or high packet loss can also make remote operations feel glacial. And if you’re running a VM on a server accessed over a VPN or remote desktop, any hiccup in that connection will hit your VM hard. If you’re exploring ways to improve network performance across your virtual environments, you might find it useful to compare VMware Horizon vs Citrix to see which platform provides better network optimization for your team. To diagnose, try pinging a site like google.com from your guest OS. If response times are over 100ms or you see packet loss, your network needs attention. Don’t forget about virtual network adapters either, older ones like E1000 can be slower than modern options like VMXNET3. Network issues can feel like a mystery, but they’re often behind that “why is everything so laggy?” frustration. Think of it as a traffic jam: clear the road, and your VM will zoom again.
If you're exploring ways to improve network performance across your virtual environments, you might find it useful to compare VMware Horizon vs Citrix to see which platform provides better network optimization for your team.
#4: Disk Performance Issues
Your VM’s storage is like its foundation, if it’s shaky, everything wobbles. Hard disk drives (HDDs) are a notorious bottleneck compared to solid-state drives (SSDs). HDDs have slower read/write speeds, and when your VM is booting up or loading apps, those delays stack up. Disk fragmentation on the host can make things worse, scattering VM files and forcing extra work to piece them together. Even on SSDs, contention, where multiple VMs or host processes compete for disk I/O, can slow things down. Thin-provisioned disks, which grow dynamically, might also stutter if your storage is nearly full. To check, monitor disk activity in your host’s performance tools. If your disk is maxed out or your VM’s virtual disk is on an HDD, you’ve likely found a culprit. Upgrading to an SSD or defragmenting your drive can work wonders, and we’ll walk you through those fixes soon. For now, know that storage speed is a make-or-break factor for VM performance.
By understanding these common culprits, hardware limits, misconfigurations, network woes, and disk struggles, you’re halfway to a faster VMware experience. It’s like diagnosing why your car’s lagging at the starting line. In the next section, we’ll roll up our sleeves with quick fixes to get your VM back in the fast lane, so stick with us!
Quick Fixes to Speed Up VMware
Now that we’ve uncovered why your VMware VM might be lagging, whether it’s starved hardware, wonky settings, or a sluggish network, it’s time to shift gears and fix it! You don’t need to be a tech wizard to see results fast. These quick fixes are like popping the hood and tightening a few bolts, simple tweaks that can get your virtual machine humming again. From resource tweaks to software updates, we’ve got five beginner-friendly steps to boost performance right away. Let’s dive in and get your VM back to peak productivity without breaking a sweat!
Check Resource Allocation
First stop: make sure your VM has enough juice to run smoothly. Open your VM’s settings in VMware Workstation, Fusion, or vSphere, and check the CPU and RAM allocations. A common mistake is either skimping (e.g., 1 vCPU and 2GB RAM for a heavy app) or overdoing it (e.g., 8 vCPUs on a 4-core host), which causes contention. A good rule of thumb? Match resources to your workload, 4GB RAM and 2 vCPUs for light tasks, more for heavy lifting like video editing. Peek at your host’s Task Manager or Activity Monitor while the VM runs. If the host is maxed out, dial back other apps or VMs. Small adjustments here can stop your VM from gasping for air and get it moving again, think of it as giving your engine the right amount of fuel!
Install VMware Tools
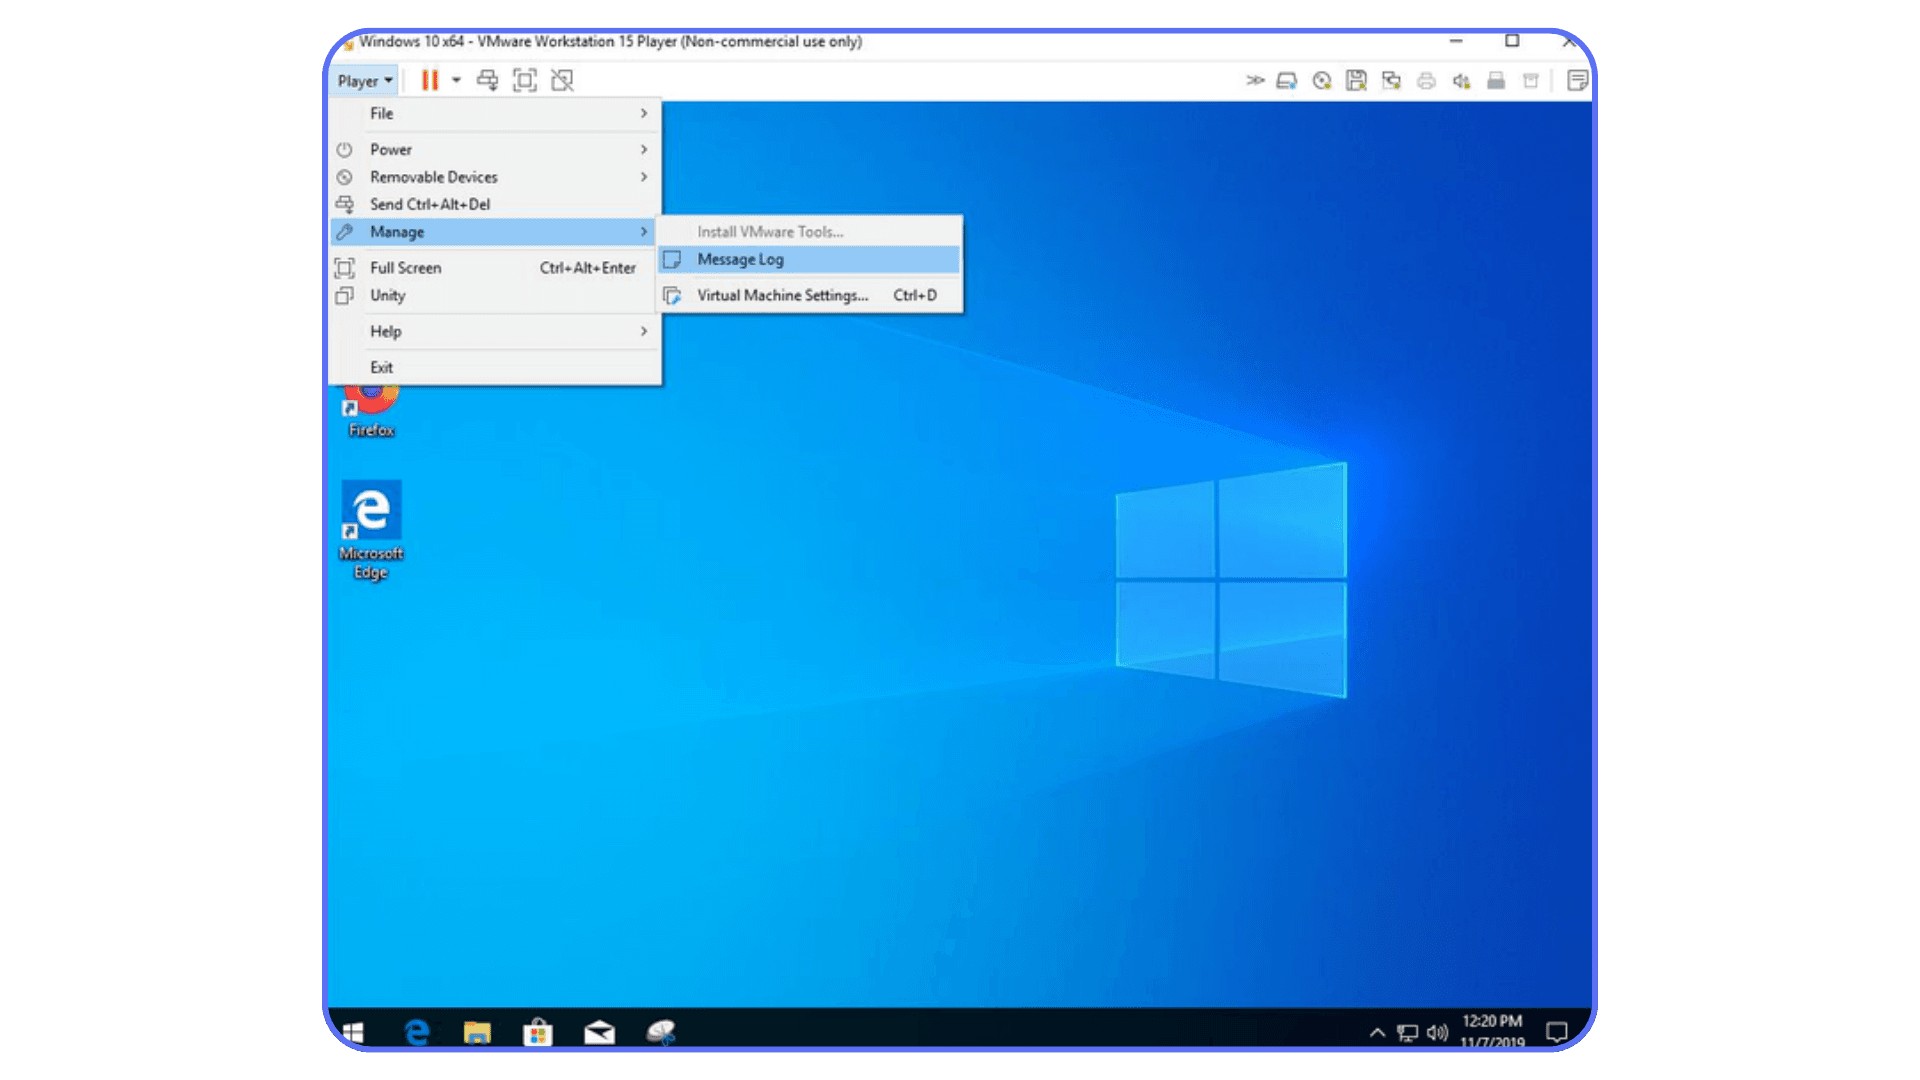
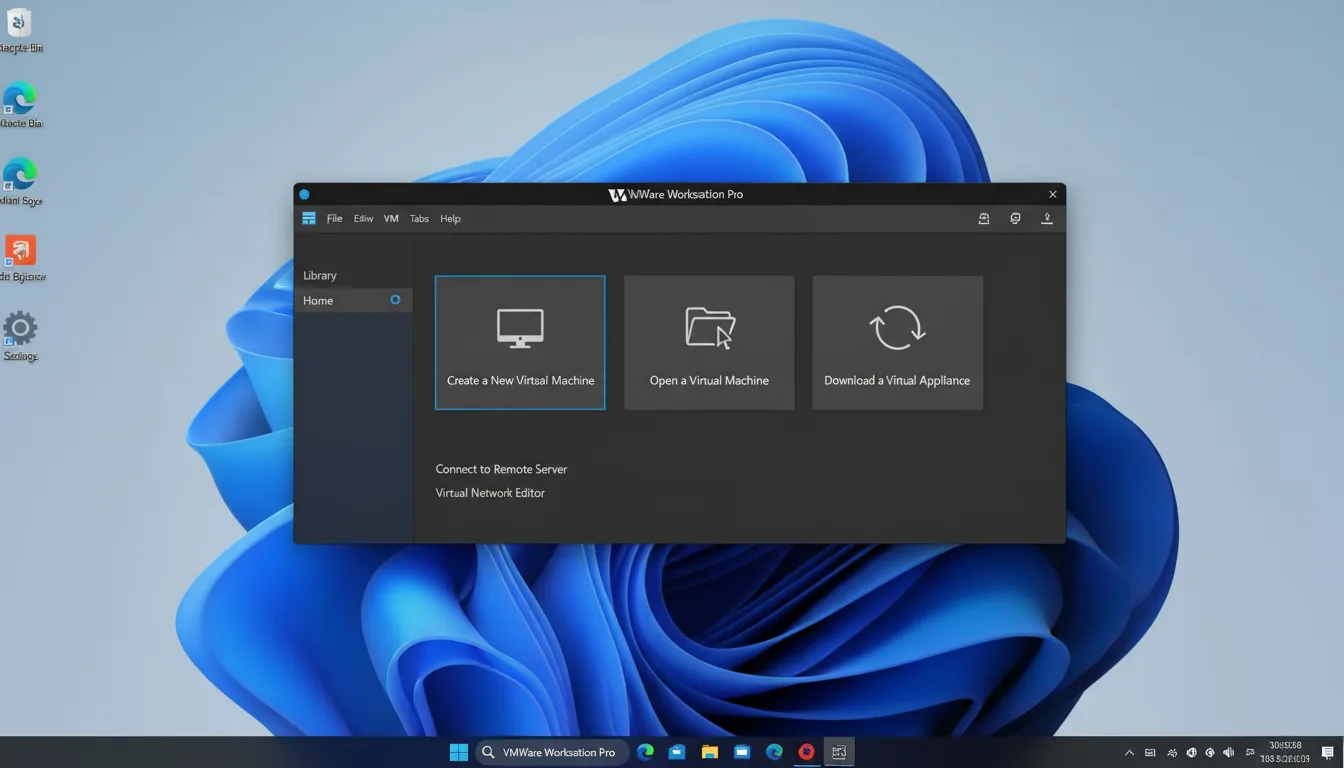
If you haven’t installed VMware Tools yet, you’re missing out on a free performance booster. This handy software suite bridges your guest OS and host, optimizing graphics, mouse movement, and system efficiency. Without it, your VM might feel choppy, like driving with a foggy windshield. To install, power on your VM, go to the VMware menu (e.g., “VM” in Workstation), and select “Install VMware Tools.” A virtual CD mounts in your guest OS, run the setup (e.g., setup.exe for Windows) and follow the prompts. After a reboot, you’ll notice snappier visuals and better responsiveness. It’s a five-minute fix that punches above its weight, so don’t skip it.
Pro Tip: Keep Tools updated by checking for new versions in the same menu, your VM will thank you with smoother performance!
Switch to SSD
Still using a hard disk drive (HDD) for your VM? It’s time to upgrade to a solid-state drive (SSD). HDDs are slowpokes compared to SSDs, which can slash boot times and app loading by half or more. To migrate, copy your VM’s files (e.g., .vmdk) to an SSD on your host, then update the VM’s settings to point to the new location. Not sure how? VMware’s “Migrate” wizard in vSphere or Workstation can handle it. This tweak is like swapping a bicycle for a sports car, your VM will feel the speed instantly. If budget allows, make the switch; it’s a game-changer!
Reduce Visual Effects
Fancy animations in your guest OS might look cool, but they’re secretly hogging resources. To lighten the load, turn them off. In Windows, hit Win + R, type “sysdm.cpl,” go to the “Advanced” tab, and click “Settings” under Performance. Choose “Adjust for best performance” or uncheck flashy options like “Animate windows.” On Linux, tweak desktop environment settings (e.g., GNOME’s animations). This cuts CPU and graphics overhead, making your VM feel zippier, think of it as clearing clutter from your dashboard. It’s a quick win that takes seconds and delivers a noticeably smoother ride, especially on older hardware.
Update VMware
Running an old version of VMware? You might be stuck with bugs or unoptimized code slowing things down. Check your version (e.g., “Help > About” in Workstation) and compare it to the latest release on VMware’s site. Updating is easy, download the installer, run it, and let it upgrade your setup. Newer versions often boost performance, fix laggy drivers, and support modern hardware better. It’s like tuning up your car for a cross-country trip, don’t skip it! After updating, restart your VM and feel the difference. A few minutes of effort can save hours of frustration down the road.
These quick fixes are your fast track to a snappier VMware experience, no PhD in IT required! Try them out, and if you’re still craving more speed, stick around for our advanced tips up next. Your VM’s about to hit the highway, full speed ahead!
Advanced Optimizations for Power Users
If the quick fixes got your VMware purring but you’re hungry for more speed, welcome to the power user’s playground! These advanced optimizations are like swapping out stock parts for racing gear, perfect for those who know their way around a virtual machine and want peak performance. Whether you’re running design software, crunching big data, or managing multiple VMs, these tweaks will push your setup to the next level. Don’t worry, we’ll keep it clear and doable, even if you’re not a full-on IT ninja. Ready to supercharge your VMware experience? Let’s dive into the pro moves that’ll make your VM fly!
Adjust Virtual CPUs
More virtual CPUs (vCPUs) don’t always mean better performance, overdoing it can actually slow you down. Each vCPU you assign needs host resources, and if your host has, say, 4 physical cores, giving a VM 8 vCPUs creates contention. The sweet spot? Match vCPUs to your workload and host capacity. For single-threaded apps (e.g., basic testing), 1-2 vCPUs are plenty. Multi-threaded tasks (e.g., rendering) might justify 4, but check your host’s CPU usage first, keep it under 80% to avoid lag. Edit this in VMware’s settings: power off the VM, go to “Edit Settings,” and tweak “CPU.” Restart and test, your VM will run smoother without choking the host. It’s like balancing a race car’s weight, too much, and you’re stuck in the pits!
Enable 3D Acceleration
Running graphics-heavy apps like CAD or video editors in your VM? Enable 3D acceleration to offload rendering to your host’s GPU. Without it, your VM leans on software rendering, which is slow and clunky, like drawing with crayons instead of a tablet. To activate, shut down your VM, go to “Edit Settings,” and under “Display,” check “Accelerate 3D graphics.” You might need to adjust memory (e.g., 256MB+ for video RAM) based on your app’s needs. Ensure your host GPU supports DirectX or OpenGL, and install VMware Tools for best results. Restart the VM, and watch choppy visuals turn buttery smooth. This tweak’s a must for designers or gamers, it’s like strapping a turbocharger to your graphics engine!
Optimize Disk Settings
Your VM’s virtual disk setup can quietly drag performance if it’s not optimized. By default, VMware might use split or thin-provisioned disks, which grow as needed but stutter under heavy I/O. Switch to a single, pre-allocated disk for speed. Power off your VM, go to “Edit Settings,” select the hard disk, and choose “Convert to thick provision eager zeroed” (vSphere) or clone it to a single file (Workstation). This pre-writes zeros, cutting latency for writes, perfect for databases or big file ops. Place it on an SSD for extra oomph. It’s a bit like laying a solid track before a train race, no delays, just full speed ahead. Disk tweaks take a few minutes but deliver lasting gains for I/O-heavy tasks.
Tune Network Settings
Network lag can cripple remote VMs, but swapping to the VMXNET3 adapter can fix that fast. Older adapters like E1000 emulate physical hardware and cap throughput, while VMXNET3 is paravirtualized, built for virtual speed. To switch, shut down your VM, go to “Edit Settings,” remove the old network adapter, and add a new one, selecting “VMXNET3” from the type dropdown. Install VMware Tools if you haven’t, as it includes the driver. Restart, and you’ll see lower latency and higher bandwidth, great for cloud apps or file transfers. Test it with a ping or speed test; the difference is night and day. Think of it as upgrading from a dirt road to a highway, your data will zip through without a hitch!
Monitor Performance
To keep your VM optimized, watch its vitals like a hawk. VMware’s built-in tools, like vSphere Client’s Performance tab or Workstation’s resource monitor, show CPU, RAM, disk, and network usage in real time. Spot a bottleneck (e.g., 100% disk I/O)? You’ve got a clue to fix. For deeper digs, check the VM’s log file (vmware.log) in its folder, search for errors like “disk latency” or “memory overcommit.” It’s like a dashboard warning light: catch it early, and you avoid bigger slowdowns. Regular monitoring keeps your tweaks effective, ensuring your VM runs lean and mean, ready for any workload you throw at it!
These advanced optimizations are your ticket to a high-octane VMware setup. From CPU tuning to network boosts, you’ve got the tools to banish lag for good. Still hitting snags? Our next section on troubleshooting will dig even deeper, stay tuned to keep your VM roaring!
Still Stuttering? Let's Dive Troubleshooting Persistent Lag
You’ve tried the quick fixes and advanced tweaks, but your VMware VM is still dragging its feet, don’t throw in the towel yet! Persistent lag can feel like a mystery novel, but with a little detective work, we can crack the case. Think of this as your VM’s health check-up: we’ll poke around the host, sift through resources, and even peek at logs to find the culprit. No issue is too tough to tackle, and we’re here to guide you step-by-step. Whether it’s a sneaky hardware bottleneck or a hidden config glitch, this section will arm you with the tools to banish lag for good. Grab your magnifying glass (or just your mouse), and let’s dive into troubleshooting like pros, your smooth-running VM is closer than you think!
Check Host Machine Health
Lag often starts at the source: your host machine. If it’s struggling, your VM doesn’t stand a chance. First, fire up Task Manager (Windows) or Activity Monitor (Mac) while your VM runs. Look at CPU usage, if it’s pinned at 90-100%, your host is overloaded. Too many VMs or background apps (like browsers with 50 tabs) could be hogging cycles. Shut down extras or lower VM resource demands to free up breathing room. Next, check memory, RAM usage near 100% forces swapping to disk, which is glacial. Add more RAM if possible, or reduce allocations across VMs. Disk I/O is trickier: watch the “Active Time” (Windows) or “Disk Usage” (Mac). If it’s maxed, your storage is the bottleneck, especially on HDDs. Test this by copying a big file on the host; if it’s slow, your VM feels it too. Temperature matters too, overheating CPUs throttle performance. Use tools like HWMonitor (Windows) or smcFanControl (Mac) to check. Cool your system with better airflow if needed. A healthy host is like a strong foundation, fix it, and your VM stands tall again.
Resource Contention
Running multiple VMs? They might be fighting over scraps like kids at a candy store. Resource contention happens when your host’s CPU, RAM, or disk can’t keep up with demand. To spot it, open VMware’s resource monitor (Workstation) or vSphere Client’s “Performance” tab. Look at “CPU Ready Time”, if it’s over 5% (e.g., 500ms on a 10-second interval), your VM is waiting for CPU access, causing lag. Memory ballooning or swapping in the logs (check “Edit Settings > Memory”) signals RAM fights. Disk contention shows as high latency, over 20ms is a red flag. Fix this by powering off extra VMs or reducing their vCPUs/RAM, spread the love evenly. If you’re on Workstation, limit concurrent VMs in “Preferences > Priority.” For vSphere, set resource reservations to guarantee each VM a slice of the pie. Test one VM solo; if it’s snappy, contention’s your issue. It’s like thinning a crowded race track, give each runner space, and they’ll hit their stride. Persistent contention might mean your host’s outgrown its workload, more on that later!
Test Network Stability
Network woes can make your VM feel like it’s stuck in molasses, especially for remote tasks. Start simple: from your guest OS, open a command prompt (Windows) or terminal (Linux) and run “ping google.com -t” (or “-c 100” on Linux). Response times over 100ms or dropped packets signal trouble. Next, try “tracert google.com” (Windows) or “traceroute” (Linux) to spot slow hops, laggy VPNs or routers often hide here. On the host, test bandwidth with speedtest.net; if it’s below your ISP’s promise, your network’s congested. Check VMware’s adapter settings, E1000 can lag versus VMXNET3 (swap it if needed, per our last section). Host firewalls or antivirus might throttle traffic too, temporarily disable them to test. If you’re remote (e.g., vSphere over WAN), packet loss above 1% kills performance; contact your IT team or ISP. A stable network is like a clear highway, any roadblock, and your VM stalls. Fix what you can; the rest might need a bigger solution.
Still struggling with lag even after tweaks? Check out our guide to reducing latency in virtual desktops, it dives deeper into techniques that go beyond the usual suspects.
Review Logs
When all else fails, VMware’s logs are your treasure map. Find the vmware.log file in your VM’s folder (e.g., Documents/Virtual Machines on Workstation). Open it in Notepad or a text editor and search for clues. High “disk latency” (e.g., “SCSI latency > 50ms”) points to slow storage, move to an SSD or check host I/O. “Memory overcommit” or “ballooning” means RAM’s tight, reduce VM allocations. “CPU wait” or “ready time” flags contention, trim vCPUs or VMs. Graphics errors (e.g., “SVGA timeout”) suggest 3D issues, ensure acceleration’s on and drivers are current. Not sure what you’re seeing? Search error codes on VMware’s Knowledge Base (kb.vmware.com). Logs can be dense, like reading a mechanic’s notes, but they pinpoint what tools miss. Save a copy before restarting your VM, logs reset each boot. Pair this with performance monitors for the full picture; it’s your last line of defense against lag that just won’t quit.
Troubleshooting persistent lag is like solving a puzzle, each piece (host, resources, network, logs) brings you closer to the fix. Armed with these steps, you can tame even the trickiest slowdowns. But if your local setup’s still chugging, our next section has a cloud-powered ace up its sleeve, stay tuned!
When Is It Time to Stop Fixing VMware and Rethink Your Setup?
There’s a point where tuning VMware stops being productive and starts feeling like diminishing returns. If you’ve been tweaking CPU counts, upgrading disks, disabling effects, and digging through logs, yet performance still feels unpredictable, the problem may no longer be configuration, it may be fit.
So how do you know when you’ve crossed that line?
Here are a few clear signals that local VMware optimization has reached its ceiling.
You’re Constantly Fighting Your Hardware
If every new project begins with closing apps, shutting down other VMs, or checking whether your laptop fan sounds “angrier than usual,” that’s a red flag. Local virtualization works best when you have spare capacity. Once your workflow regularly pushes CPU, RAM, or GPU limits, performance becomes inconsistent by design.
Upgrading hardware can help, but it’s expensive and temporary. Today’s workloads grow faster than most machines.
Performance Changes From Day to Day
One day your VM feels fine. The next, simple actions lag for no obvious reason. That usually points to background contention, thermal throttling, or disk saturation on the host. These issues are notoriously hard to fully eliminate on personal machines, especially laptops.
If performance depends on what else happens to be running that day, reliability is already compromised.
Your Workload Has Outgrown “General Purpose” Machines
Modern workloads aren’t lightweight anymore. Real-time rendering, large codebases, simulation tools, AI-assisted apps, and multi-monitor setups all expect serious GPU and memory bandwidth. VMware can technically run these, but local machines often can’t sustain them comfortably.
At that stage, virtualization isn’t the bottleneck, hardware locality is.
You’re Optimizing Instead of Working
This is the most important sign. If you’re spending noticeable time adjusting settings, restarting VMs, reallocating memory, or troubleshooting lag instead of actually building, designing, or shipping, the tool has started to work against you.
Virtualization should disappear into the background. When it doesn’t, it’s worth stepping back.
A Simple Rule of Thumb
If your VMware setup needs frequent attention to stay usable, it’s probably time to rethink the environment rather than keep tuning it.
That doesn’t mean VMware is bad. It just means local virtualization has limits, and modern workflows increasingly live beyond them.
Which is exactly why the industry has been shifting toward cloud-based desktops and on-demand performance models.
The Shift Toward Cloud VDI: Where the Industry Is Headed
If VMware once symbolized the future of virtualization, the story has evolved. In the last few years, the industry’s been moving fast, away from traditional on-premises VMs and toward cloud-based Virtual Desktop Infrastructure (VDI) and Desktop-as-a-Service (DaaS) solutions. The pandemic years accelerated remote collaboration and GPU-heavy workloads, and suddenly, local machines just couldn’t keep up. According to Gartner, over 70% of new enterprise desktops will be cloud-delivered by 2027, a massive jump from under 20% in 2022.
Looking at different VDI platforms? Our real-world breakdown of Nutanix vs Citrix highlights how they stack up when it comes to performance, cost, and team collaboration.
Why? Flexibility and scalability. Teams no longer want to maintain complex local setups or juggle hardware limitations. They want workspaces that can spin up instantly, scale GPU or CPU power on demand, and be accessed from anywhere, whether it’s a laptop, tablet, or thin client. That’s why companies like NVIDIA, Microsoft, and AWS are all doubling down on virtual desktop infrastructure and GPU streaming ecosystems. Even traditional VMware users are shifting strategies, exploring hybrid or fully cloud-based approaches to reduce maintenance and energy costs while improving global accessibility.
Another major driver is AI. As generative tools, simulation engines, and model training workflows go mainstream, developers and creatives need GPU performance that far exceeds local machines. Running AI-powered apps on a laptop or even a workstation can feel like trying to stream 4K video on dial-up. Cloud VDI eliminates that bottleneck, letting teams use AI tools natively in the cloud without setup nightmares or hardware constraints.
That’s where solutions like Vagon Teams stand out in the new landscape. Instead of thinking of virtualization as a local sandbox, users can now treat it as a global performance network, one that brings together speed, accessibility, and collaboration. You can spin up a GPU-equipped workspace in seconds, run demanding workloads, and share real-time experiences directly with teammates or clients.
The takeaway? Virtualization isn’t just about running another OS anymore, it’s about creating connected, scalable, and intelligent workspaces that adapt to how we actually work today. Cloud VDI is quickly becoming the default, not the exception, and platforms like Vagon Teams are leading that shift from hardware-dependent to performance-on-demand.
Curious which services stand out in today’s DaaS landscape? We broke down the best Desktop-as-a-Service platforms to help you compare features, pricing, and use cases side by side.
And if you’re considering a more permanent shift to virtual desktops, our guide to the top VDI providers can help you find a scalable solution that fits your team’s needs.
When Local Fixes Aren’t Enough: Meet Vagon Teams
You’ve tweaked your resources, optimized your settings, and troubleshooted like a pro, but what if your VMware VM still feels like it’s wading through mud? Sometimes, the issue isn’t your skills; it’s the limits of local hardware. Your host machine can only do so much, aging CPUs, maxed-out RAM, or slow disks might just not cut it for today’s demanding workloads. That’s where the cloud swoops in to save the day, and Vagon Teams is here to take your virtualization game to new heights. Say goodbye to local lag and hello to a seamless, high-performance experience, let’s explore how!
If you’re unfamiliar with Virtual Desktop Infrastructure (VDI) and how it works to centralize desktop management, it might be worth checking out What is Virtual Desktop Infrastructure to understand the foundational technologies that make cloud-based systems like Vagon Teams so powerful.
Why Vagon Teams?
Vagon Teams isn’t just another tool, it’s a powerhouse built to banish VMware lag for good. Imagine trading your creaky old rig for a turbocharged cloud desktop, packed with cutting-edge GPUs and CPUs that laugh in the face of heavy apps. Whether you’re rendering 3D models, coding complex algorithms, or running multiple VMs at once, Vagon Teams delivers the muscle you need, no local upgrades required. Forget juggling resource allocations or praying your SSD holds up, our cloud infrastructure scales dynamically to match your workload, ensuring smooth performance every time.
Setup? Only a few seconds. No more wrestling with VMware configs or hunting for drivers, just log into Vagon Teams from any device, anywhere, and your high-performance workspace is ready to roll. Designers love the GPU boost for tools like Blender or AutoCAD; developers rave about lag-free testing environments; and IT teams adore the centralized control for managing remote workforces. Plus, with top-tier security and reliable uptime, your data’s safe and your projects keep humming. It’s like having a personal supercomputer in your pocket, accessible, powerful, and hassle-free.
The best part? Vagon Teams solves all the local headaches, overheating hosts, network bottlenecks, or disk contention become someone else’s problem (ours, and we’ve got it covered!). You get a tailored, lag-free experience that adapts to your needs, not your hardware’s limits. Curious to see the difference? Test-drive Vagon Teams today and feel the power of cloud performance firsthand. Head to vagon.io/teams, sign up, and kick off your virtualization experience.
FAQs
1. Why is my VMware virtual machine so slow even after optimizing?
Even with proper settings, VMware performance depends heavily on your host machine’s hardware. If your CPU, RAM, or storage is maxed out, you’ll hit a ceiling no matter how many tweaks you apply. At that point, the bottleneck isn’t configuration, it’s capacity. That’s why many teams now offload heavy workloads to cloud-based virtual desktops like VDI or Vagon Teams for consistent, scalable performance.
2. What’s the main difference between VMware and cloud VDI solutions?
VMware runs locally on your machine or private servers, meaning performance is tied to your hardware. Cloud VDI (like Vagon Teams) hosts everything in the cloud, including GPU and CPU resources, so you can stream a full desktop from anywhere without needing a powerful computer. It’s the same virtualization concept, just relocated to more flexible, remote infrastructure.
3. Do I need a fast internet connection to use cloud desktops?
Yes, a stable connection is key. For smooth 1080p or 4K streaming, you’ll want at least 15–25 Mbps of download speed and low latency (under 50 ms). Vagon Teams dynamically adjusts quality to your connection, so even moderate speeds can work surprisingly well.
4. Is cloud VDI secure for professional or enterprise use?
Absolutely. Modern VDI solutions are built with enterprise-grade encryption, data isolation, and access controls. Since files never leave the cloud environment, risks from lost laptops or local malware are reduced. Vagon Teams also offers team-level permissions and secure project sharing to maintain control across your organization.
5. Can I still use VMware if I switch to a cloud-based setup?
Of course. Many professionals run hybrid setups, VMware for isolated local testing and cloud desktops for heavy rendering or AI workloads. Think of it as using the right tool for the job: local VMs for quick experiments, cloud GPUs for serious performance.
Picture this: You’ve fired up your VMware virtual machine, ready to tackle a big project, but instead of smooth sailing, you’re stuck watching a spinning cursor crawl across the screen. Sound familiar? If your VMware experience feels more like a sluggish slog than a productivity powerhouse, you’re not alone. Virtual machines are game-changers for developers, designers, and IT pros alike, but when they lag, frustration sets in fast. The good news? You don’t have to settle for a slow ride, there are plenty of ways to get your VMware back up to speed, and we’re here to show you how.
VMware’s virtualization magic lets you run multiple operating systems on a single machine, making it a go-to for testing, development, and remote work. But let’s be real: when performance dips, it’s not just an annoyance, it’s a productivity killer. Whether you’re juggling resource-heavy apps or just trying to boot up without a coffee break’s worth of waiting, a laggy VM can throw a wrench in your workflow. That’s why we’ve put together this guide, to help you pinpoint the culprits and fix them, fast. From quick tweaks to pro-level optimizations, we’ve got your back. And if local fixes aren’t cutting it, we’ll introduce you to a cloud-powered solution from Vagon Teams that’ll leave lag in the dust.
By the end of this post, you’ll have a toolbox full of practical tips to transform your VMware experience from sluggish to seamless. Ready to ditch the delays and get back to work? Let’s dive in and rev up your virtual machine, because you deserve a VM that keeps up with you, not one that holds you back!
Why VMware Feels Slow: Common Problems & Culprits
If your VMware virtual machine is moving at the pace of a sleepy sloth, it’s easy to assume something’s broken. But before you start troubleshooting in a panic, let’s take a step back and unpack the most common reasons why VMware can feel slow. Think of your VM like a car: it needs the right fuel, a tuned engine, and clear roads to run smoothly. When one of those pieces is off, you’ll feel the drag. Below, we’ll dive into the top culprits behind laggy performance, complete with insights to help you spot the issue and get ready to fix it. Don’t worry, we’re keeping this digestible, so whether you’re a virtualization newbie or a seasoned pro, you’ll walk away with a clear picture of what’s slowing you down.
#1: Insufficient Hardware Resources
Your VM lives on your host machine, and if that host is running low on horsepower, your virtual machine will sputter. The big three resources, CPU, RAM, and disk I/O, are the lifeblood of VM performance. If your host’s CPU is maxed out from running multiple VMs or background apps, your VMware guest will struggle to get the processing power it needs. Imagine trying to sprint while carrying a backpack full of bricks, it’s not happening! Similarly, if you’ve skimped on RAM allocation, your VM will lean heavily on swap files, which are painfully slow compared to physical memory. Disk I/O is another bottleneck: if your host’s storage is busy juggling other tasks, your VM’s read/write operations will crawl. How do you spot this? Check your host’s resource usage with tools like Task Manager (Windows) or Activity Monitor (Mac). If CPU or RAM is consistently at 90% or higher, or disk activity is pegged, your hardware is likely overstretched. Don’t worry, we’ll cover how to optimize this later, but for now, know that a resource-starved host is a prime suspect for lag.
#2: Poor Configuration Settings
Even with a beefy host, bad VM settings can kneecap performance. VMware is powerful, but it’s not a mind-reader, it needs you to configure it properly. One common misstep is overcommitting resources, like assigning more virtual CPUs or RAM than your host can comfortably spare. This leads to contention, where VMs fight for scraps, slowing everyone down. Another culprit? Outdated or missing VMware Tools. This software suite optimizes how your guest OS talks to the host, handling things like graphics drivers and time sync. Without it, you’re stuck with sluggish visuals and choppy performance. Incorrect VM settings, like using an older virtual hardware version or mismatched guest OS types (e.g., selecting “Other” instead of “Windows 11”), can also cause inefficiencies. To check, open your VM’s settings in VMware Workstation or vSphere and look for red flags like excessive vCPUs or an outdated tools version. A quick audit here can reveal a lot, it’s like checking if your car’s tires are flat before blaming the engine. Misconfigurations are sneaky, but they’re fixable, and we’ll show you how in the next sections.
#3: Network Bottlenecks
If your VM feels fine locally but drags during online tasks, like accessing cloud apps or transferring files, your network might be the choke point. Virtualization adds a layer of complexity to networking, and VMware’s virtual adapters can struggle if not set up right. For example, NAT or bridged networking modes might introduce latency if your host’s network is congested or misconfigured. Slow DNS resolution, low bandwidth, or high packet loss can also make remote operations feel glacial. And if you’re running a VM on a server accessed over a VPN or remote desktop, any hiccup in that connection will hit your VM hard. If you’re exploring ways to improve network performance across your virtual environments, you might find it useful to compare VMware Horizon vs Citrix to see which platform provides better network optimization for your team. To diagnose, try pinging a site like google.com from your guest OS. If response times are over 100ms or you see packet loss, your network needs attention. Don’t forget about virtual network adapters either, older ones like E1000 can be slower than modern options like VMXNET3. Network issues can feel like a mystery, but they’re often behind that “why is everything so laggy?” frustration. Think of it as a traffic jam: clear the road, and your VM will zoom again.
If you're exploring ways to improve network performance across your virtual environments, you might find it useful to compare VMware Horizon vs Citrix to see which platform provides better network optimization for your team.
#4: Disk Performance Issues
Your VM’s storage is like its foundation, if it’s shaky, everything wobbles. Hard disk drives (HDDs) are a notorious bottleneck compared to solid-state drives (SSDs). HDDs have slower read/write speeds, and when your VM is booting up or loading apps, those delays stack up. Disk fragmentation on the host can make things worse, scattering VM files and forcing extra work to piece them together. Even on SSDs, contention, where multiple VMs or host processes compete for disk I/O, can slow things down. Thin-provisioned disks, which grow dynamically, might also stutter if your storage is nearly full. To check, monitor disk activity in your host’s performance tools. If your disk is maxed out or your VM’s virtual disk is on an HDD, you’ve likely found a culprit. Upgrading to an SSD or defragmenting your drive can work wonders, and we’ll walk you through those fixes soon. For now, know that storage speed is a make-or-break factor for VM performance.
By understanding these common culprits, hardware limits, misconfigurations, network woes, and disk struggles, you’re halfway to a faster VMware experience. It’s like diagnosing why your car’s lagging at the starting line. In the next section, we’ll roll up our sleeves with quick fixes to get your VM back in the fast lane, so stick with us!
Quick Fixes to Speed Up VMware
Now that we’ve uncovered why your VMware VM might be lagging, whether it’s starved hardware, wonky settings, or a sluggish network, it’s time to shift gears and fix it! You don’t need to be a tech wizard to see results fast. These quick fixes are like popping the hood and tightening a few bolts, simple tweaks that can get your virtual machine humming again. From resource tweaks to software updates, we’ve got five beginner-friendly steps to boost performance right away. Let’s dive in and get your VM back to peak productivity without breaking a sweat!
Check Resource Allocation
First stop: make sure your VM has enough juice to run smoothly. Open your VM’s settings in VMware Workstation, Fusion, or vSphere, and check the CPU and RAM allocations. A common mistake is either skimping (e.g., 1 vCPU and 2GB RAM for a heavy app) or overdoing it (e.g., 8 vCPUs on a 4-core host), which causes contention. A good rule of thumb? Match resources to your workload, 4GB RAM and 2 vCPUs for light tasks, more for heavy lifting like video editing. Peek at your host’s Task Manager or Activity Monitor while the VM runs. If the host is maxed out, dial back other apps or VMs. Small adjustments here can stop your VM from gasping for air and get it moving again, think of it as giving your engine the right amount of fuel!
Install VMware Tools
If you haven’t installed VMware Tools yet, you’re missing out on a free performance booster. This handy software suite bridges your guest OS and host, optimizing graphics, mouse movement, and system efficiency. Without it, your VM might feel choppy, like driving with a foggy windshield. To install, power on your VM, go to the VMware menu (e.g., “VM” in Workstation), and select “Install VMware Tools.” A virtual CD mounts in your guest OS, run the setup (e.g., setup.exe for Windows) and follow the prompts. After a reboot, you’ll notice snappier visuals and better responsiveness. It’s a five-minute fix that punches above its weight, so don’t skip it.
Pro Tip: Keep Tools updated by checking for new versions in the same menu, your VM will thank you with smoother performance!
Switch to SSD
Still using a hard disk drive (HDD) for your VM? It’s time to upgrade to a solid-state drive (SSD). HDDs are slowpokes compared to SSDs, which can slash boot times and app loading by half or more. To migrate, copy your VM’s files (e.g., .vmdk) to an SSD on your host, then update the VM’s settings to point to the new location. Not sure how? VMware’s “Migrate” wizard in vSphere or Workstation can handle it. This tweak is like swapping a bicycle for a sports car, your VM will feel the speed instantly. If budget allows, make the switch; it’s a game-changer!
Reduce Visual Effects
Fancy animations in your guest OS might look cool, but they’re secretly hogging resources. To lighten the load, turn them off. In Windows, hit Win + R, type “sysdm.cpl,” go to the “Advanced” tab, and click “Settings” under Performance. Choose “Adjust for best performance” or uncheck flashy options like “Animate windows.” On Linux, tweak desktop environment settings (e.g., GNOME’s animations). This cuts CPU and graphics overhead, making your VM feel zippier, think of it as clearing clutter from your dashboard. It’s a quick win that takes seconds and delivers a noticeably smoother ride, especially on older hardware.
Update VMware
Running an old version of VMware? You might be stuck with bugs or unoptimized code slowing things down. Check your version (e.g., “Help > About” in Workstation) and compare it to the latest release on VMware’s site. Updating is easy, download the installer, run it, and let it upgrade your setup. Newer versions often boost performance, fix laggy drivers, and support modern hardware better. It’s like tuning up your car for a cross-country trip, don’t skip it! After updating, restart your VM and feel the difference. A few minutes of effort can save hours of frustration down the road.
These quick fixes are your fast track to a snappier VMware experience, no PhD in IT required! Try them out, and if you’re still craving more speed, stick around for our advanced tips up next. Your VM’s about to hit the highway, full speed ahead!
Advanced Optimizations for Power Users
If the quick fixes got your VMware purring but you’re hungry for more speed, welcome to the power user’s playground! These advanced optimizations are like swapping out stock parts for racing gear, perfect for those who know their way around a virtual machine and want peak performance. Whether you’re running design software, crunching big data, or managing multiple VMs, these tweaks will push your setup to the next level. Don’t worry, we’ll keep it clear and doable, even if you’re not a full-on IT ninja. Ready to supercharge your VMware experience? Let’s dive into the pro moves that’ll make your VM fly!
Adjust Virtual CPUs
More virtual CPUs (vCPUs) don’t always mean better performance, overdoing it can actually slow you down. Each vCPU you assign needs host resources, and if your host has, say, 4 physical cores, giving a VM 8 vCPUs creates contention. The sweet spot? Match vCPUs to your workload and host capacity. For single-threaded apps (e.g., basic testing), 1-2 vCPUs are plenty. Multi-threaded tasks (e.g., rendering) might justify 4, but check your host’s CPU usage first, keep it under 80% to avoid lag. Edit this in VMware’s settings: power off the VM, go to “Edit Settings,” and tweak “CPU.” Restart and test, your VM will run smoother without choking the host. It’s like balancing a race car’s weight, too much, and you’re stuck in the pits!
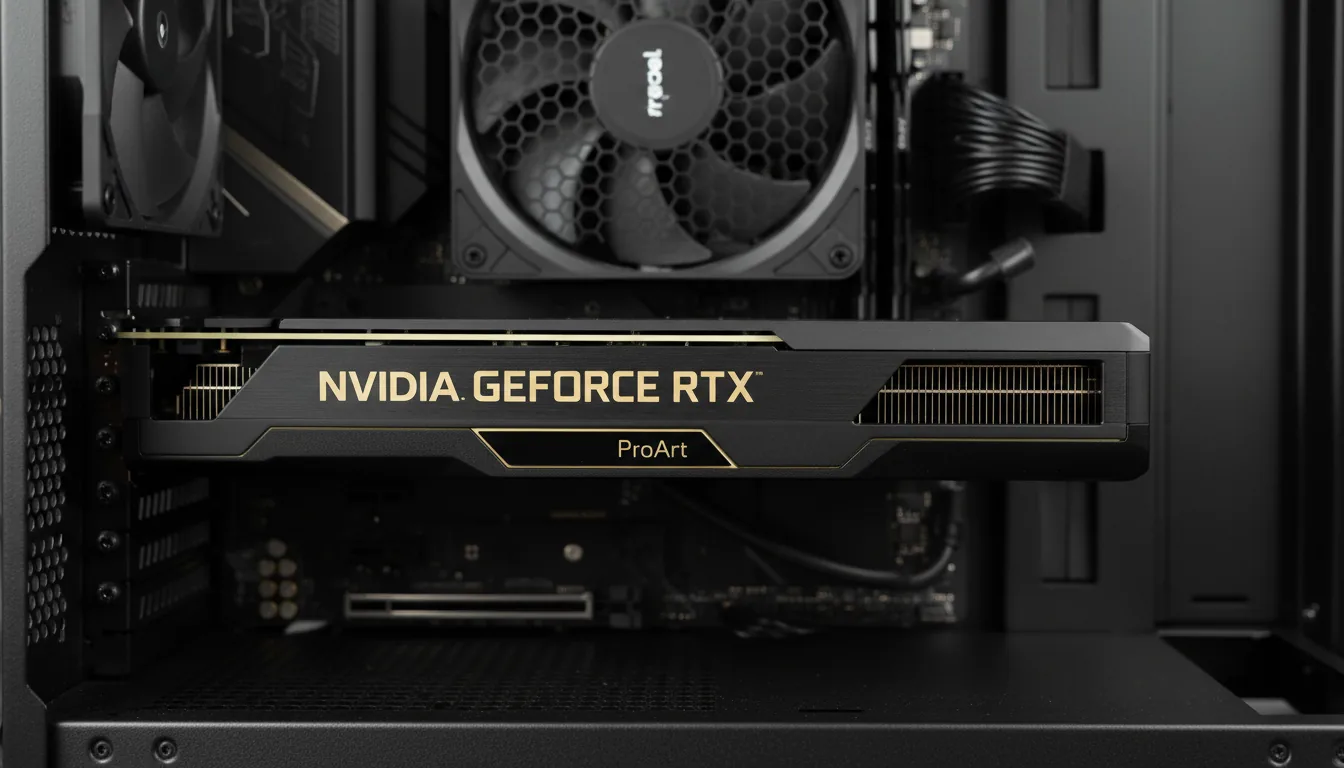
Enable 3D Acceleration
Running graphics-heavy apps like CAD or video editors in your VM? Enable 3D acceleration to offload rendering to your host’s GPU. Without it, your VM leans on software rendering, which is slow and clunky, like drawing with crayons instead of a tablet. To activate, shut down your VM, go to “Edit Settings,” and under “Display,” check “Accelerate 3D graphics.” You might need to adjust memory (e.g., 256MB+ for video RAM) based on your app’s needs. Ensure your host GPU supports DirectX or OpenGL, and install VMware Tools for best results. Restart the VM, and watch choppy visuals turn buttery smooth. This tweak’s a must for designers or gamers, it’s like strapping a turbocharger to your graphics engine!
Optimize Disk Settings
Your VM’s virtual disk setup can quietly drag performance if it’s not optimized. By default, VMware might use split or thin-provisioned disks, which grow as needed but stutter under heavy I/O. Switch to a single, pre-allocated disk for speed. Power off your VM, go to “Edit Settings,” select the hard disk, and choose “Convert to thick provision eager zeroed” (vSphere) or clone it to a single file (Workstation). This pre-writes zeros, cutting latency for writes, perfect for databases or big file ops. Place it on an SSD for extra oomph. It’s a bit like laying a solid track before a train race, no delays, just full speed ahead. Disk tweaks take a few minutes but deliver lasting gains for I/O-heavy tasks.
Tune Network Settings
Network lag can cripple remote VMs, but swapping to the VMXNET3 adapter can fix that fast. Older adapters like E1000 emulate physical hardware and cap throughput, while VMXNET3 is paravirtualized, built for virtual speed. To switch, shut down your VM, go to “Edit Settings,” remove the old network adapter, and add a new one, selecting “VMXNET3” from the type dropdown. Install VMware Tools if you haven’t, as it includes the driver. Restart, and you’ll see lower latency and higher bandwidth, great for cloud apps or file transfers. Test it with a ping or speed test; the difference is night and day. Think of it as upgrading from a dirt road to a highway, your data will zip through without a hitch!
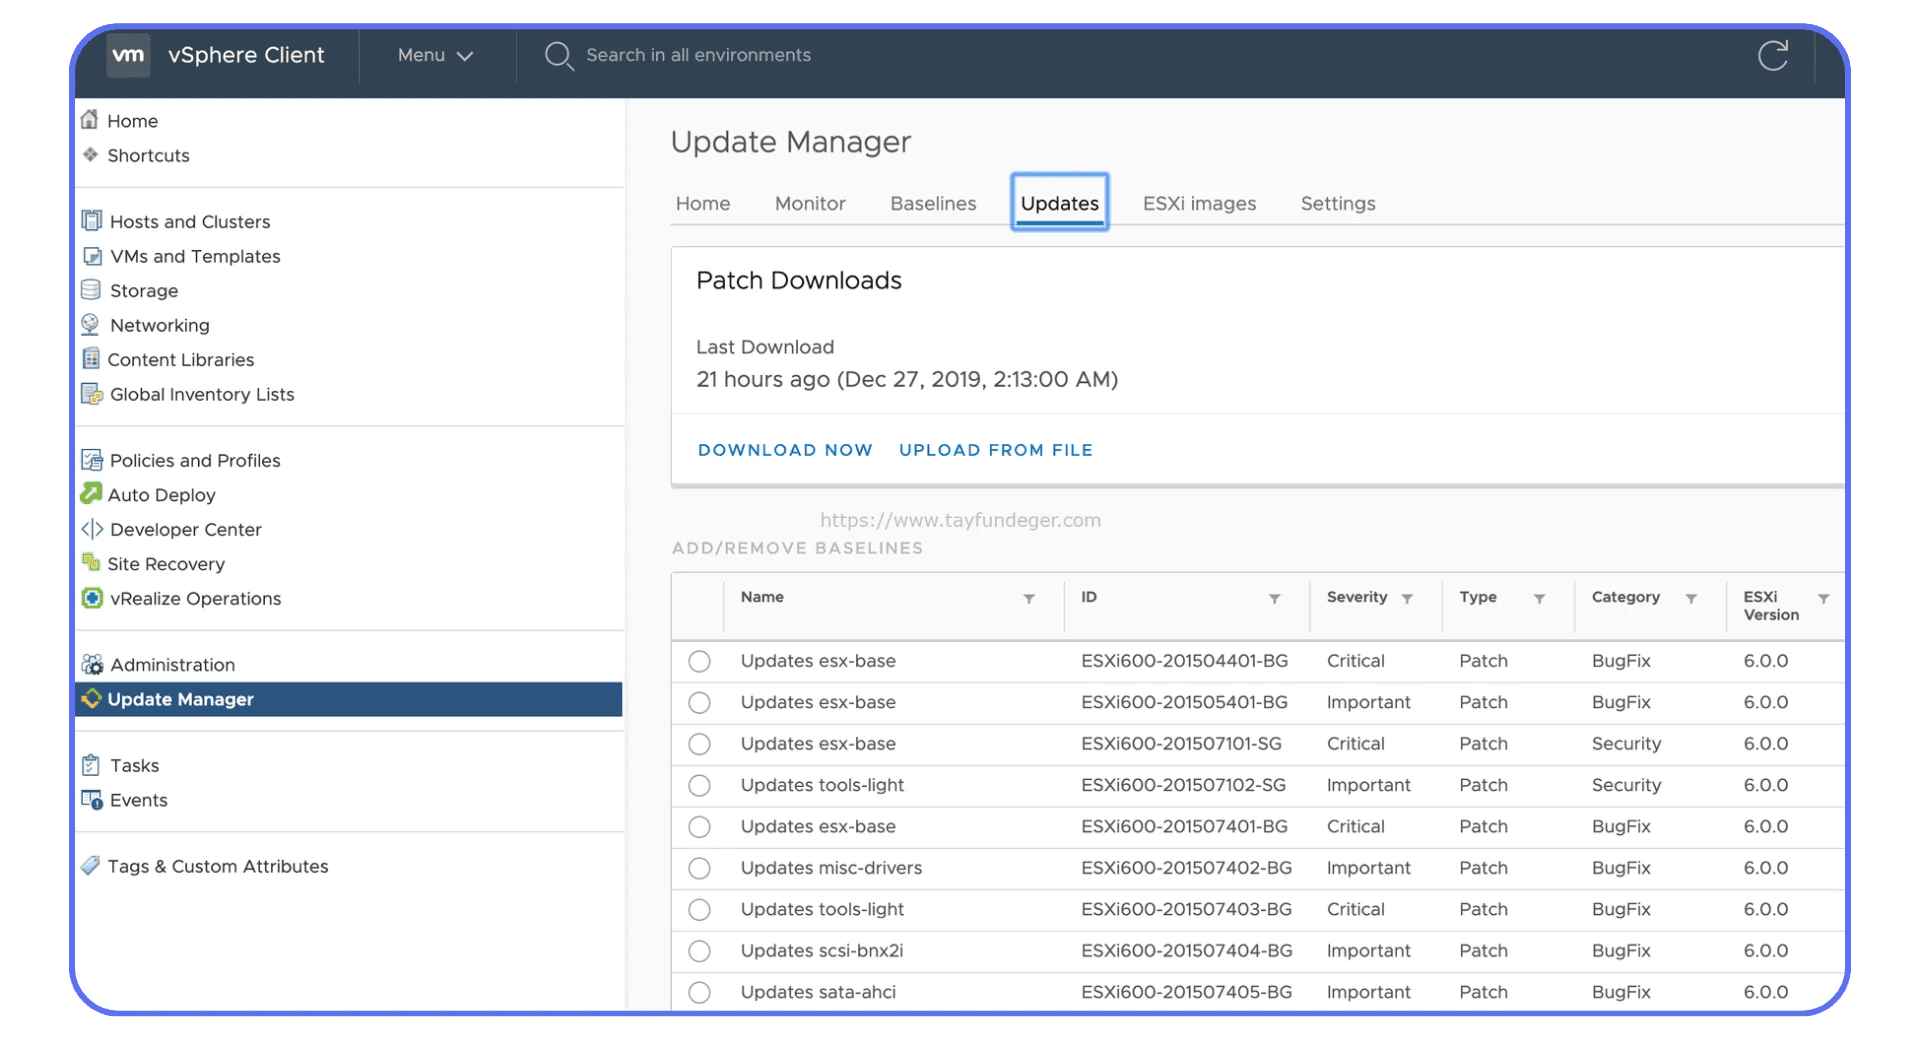
Monitor Performance
To keep your VM optimized, watch its vitals like a hawk. VMware’s built-in tools, like vSphere Client’s Performance tab or Workstation’s resource monitor, show CPU, RAM, disk, and network usage in real time. Spot a bottleneck (e.g., 100% disk I/O)? You’ve got a clue to fix. For deeper digs, check the VM’s log file (vmware.log) in its folder, search for errors like “disk latency” or “memory overcommit.” It’s like a dashboard warning light: catch it early, and you avoid bigger slowdowns. Regular monitoring keeps your tweaks effective, ensuring your VM runs lean and mean, ready for any workload you throw at it!
These advanced optimizations are your ticket to a high-octane VMware setup. From CPU tuning to network boosts, you’ve got the tools to banish lag for good. Still hitting snags? Our next section on troubleshooting will dig even deeper, stay tuned to keep your VM roaring!
Still Stuttering? Let's Dive Troubleshooting Persistent Lag
You’ve tried the quick fixes and advanced tweaks, but your VMware VM is still dragging its feet, don’t throw in the towel yet! Persistent lag can feel like a mystery novel, but with a little detective work, we can crack the case. Think of this as your VM’s health check-up: we’ll poke around the host, sift through resources, and even peek at logs to find the culprit. No issue is too tough to tackle, and we’re here to guide you step-by-step. Whether it’s a sneaky hardware bottleneck or a hidden config glitch, this section will arm you with the tools to banish lag for good. Grab your magnifying glass (or just your mouse), and let’s dive into troubleshooting like pros, your smooth-running VM is closer than you think!
Check Host Machine Health
Lag often starts at the source: your host machine. If it’s struggling, your VM doesn’t stand a chance. First, fire up Task Manager (Windows) or Activity Monitor (Mac) while your VM runs. Look at CPU usage, if it’s pinned at 90-100%, your host is overloaded. Too many VMs or background apps (like browsers with 50 tabs) could be hogging cycles. Shut down extras or lower VM resource demands to free up breathing room. Next, check memory, RAM usage near 100% forces swapping to disk, which is glacial. Add more RAM if possible, or reduce allocations across VMs. Disk I/O is trickier: watch the “Active Time” (Windows) or “Disk Usage” (Mac). If it’s maxed, your storage is the bottleneck, especially on HDDs. Test this by copying a big file on the host; if it’s slow, your VM feels it too. Temperature matters too, overheating CPUs throttle performance. Use tools like HWMonitor (Windows) or smcFanControl (Mac) to check. Cool your system with better airflow if needed. A healthy host is like a strong foundation, fix it, and your VM stands tall again.
Resource Contention
Running multiple VMs? They might be fighting over scraps like kids at a candy store. Resource contention happens when your host’s CPU, RAM, or disk can’t keep up with demand. To spot it, open VMware’s resource monitor (Workstation) or vSphere Client’s “Performance” tab. Look at “CPU Ready Time”, if it’s over 5% (e.g., 500ms on a 10-second interval), your VM is waiting for CPU access, causing lag. Memory ballooning or swapping in the logs (check “Edit Settings > Memory”) signals RAM fights. Disk contention shows as high latency, over 20ms is a red flag. Fix this by powering off extra VMs or reducing their vCPUs/RAM, spread the love evenly. If you’re on Workstation, limit concurrent VMs in “Preferences > Priority.” For vSphere, set resource reservations to guarantee each VM a slice of the pie. Test one VM solo; if it’s snappy, contention’s your issue. It’s like thinning a crowded race track, give each runner space, and they’ll hit their stride. Persistent contention might mean your host’s outgrown its workload, more on that later!
Test Network Stability
Network woes can make your VM feel like it’s stuck in molasses, especially for remote tasks. Start simple: from your guest OS, open a command prompt (Windows) or terminal (Linux) and run “ping google.com -t” (or “-c 100” on Linux). Response times over 100ms or dropped packets signal trouble. Next, try “tracert google.com” (Windows) or “traceroute” (Linux) to spot slow hops, laggy VPNs or routers often hide here. On the host, test bandwidth with speedtest.net; if it’s below your ISP’s promise, your network’s congested. Check VMware’s adapter settings, E1000 can lag versus VMXNET3 (swap it if needed, per our last section). Host firewalls or antivirus might throttle traffic too, temporarily disable them to test. If you’re remote (e.g., vSphere over WAN), packet loss above 1% kills performance; contact your IT team or ISP. A stable network is like a clear highway, any roadblock, and your VM stalls. Fix what you can; the rest might need a bigger solution.
Still struggling with lag even after tweaks? Check out our guide to reducing latency in virtual desktops, it dives deeper into techniques that go beyond the usual suspects.
Review Logs
When all else fails, VMware’s logs are your treasure map. Find the vmware.log file in your VM’s folder (e.g., Documents/Virtual Machines on Workstation). Open it in Notepad or a text editor and search for clues. High “disk latency” (e.g., “SCSI latency > 50ms”) points to slow storage, move to an SSD or check host I/O. “Memory overcommit” or “ballooning” means RAM’s tight, reduce VM allocations. “CPU wait” or “ready time” flags contention, trim vCPUs or VMs. Graphics errors (e.g., “SVGA timeout”) suggest 3D issues, ensure acceleration’s on and drivers are current. Not sure what you’re seeing? Search error codes on VMware’s Knowledge Base (kb.vmware.com). Logs can be dense, like reading a mechanic’s notes, but they pinpoint what tools miss. Save a copy before restarting your VM, logs reset each boot. Pair this with performance monitors for the full picture; it’s your last line of defense against lag that just won’t quit.
Troubleshooting persistent lag is like solving a puzzle, each piece (host, resources, network, logs) brings you closer to the fix. Armed with these steps, you can tame even the trickiest slowdowns. But if your local setup’s still chugging, our next section has a cloud-powered ace up its sleeve, stay tuned!
When Is It Time to Stop Fixing VMware and Rethink Your Setup?
There’s a point where tuning VMware stops being productive and starts feeling like diminishing returns. If you’ve been tweaking CPU counts, upgrading disks, disabling effects, and digging through logs, yet performance still feels unpredictable, the problem may no longer be configuration, it may be fit.
So how do you know when you’ve crossed that line?
Here are a few clear signals that local VMware optimization has reached its ceiling.
You’re Constantly Fighting Your Hardware
If every new project begins with closing apps, shutting down other VMs, or checking whether your laptop fan sounds “angrier than usual,” that’s a red flag. Local virtualization works best when you have spare capacity. Once your workflow regularly pushes CPU, RAM, or GPU limits, performance becomes inconsistent by design.
Upgrading hardware can help, but it’s expensive and temporary. Today’s workloads grow faster than most machines.
Performance Changes From Day to Day
One day your VM feels fine. The next, simple actions lag for no obvious reason. That usually points to background contention, thermal throttling, or disk saturation on the host. These issues are notoriously hard to fully eliminate on personal machines, especially laptops.
If performance depends on what else happens to be running that day, reliability is already compromised.
Your Workload Has Outgrown “General Purpose” Machines
Modern workloads aren’t lightweight anymore. Real-time rendering, large codebases, simulation tools, AI-assisted apps, and multi-monitor setups all expect serious GPU and memory bandwidth. VMware can technically run these, but local machines often can’t sustain them comfortably.
At that stage, virtualization isn’t the bottleneck, hardware locality is.
You’re Optimizing Instead of Working
This is the most important sign. If you’re spending noticeable time adjusting settings, restarting VMs, reallocating memory, or troubleshooting lag instead of actually building, designing, or shipping, the tool has started to work against you.
Virtualization should disappear into the background. When it doesn’t, it’s worth stepping back.
A Simple Rule of Thumb
If your VMware setup needs frequent attention to stay usable, it’s probably time to rethink the environment rather than keep tuning it.
That doesn’t mean VMware is bad. It just means local virtualization has limits, and modern workflows increasingly live beyond them.
Which is exactly why the industry has been shifting toward cloud-based desktops and on-demand performance models.
The Shift Toward Cloud VDI: Where the Industry Is Headed
If VMware once symbolized the future of virtualization, the story has evolved. In the last few years, the industry’s been moving fast, away from traditional on-premises VMs and toward cloud-based Virtual Desktop Infrastructure (VDI) and Desktop-as-a-Service (DaaS) solutions. The pandemic years accelerated remote collaboration and GPU-heavy workloads, and suddenly, local machines just couldn’t keep up. According to Gartner, over 70% of new enterprise desktops will be cloud-delivered by 2027, a massive jump from under 20% in 2022.
Looking at different VDI platforms? Our real-world breakdown of Nutanix vs Citrix highlights how they stack up when it comes to performance, cost, and team collaboration.
Why? Flexibility and scalability. Teams no longer want to maintain complex local setups or juggle hardware limitations. They want workspaces that can spin up instantly, scale GPU or CPU power on demand, and be accessed from anywhere, whether it’s a laptop, tablet, or thin client. That’s why companies like NVIDIA, Microsoft, and AWS are all doubling down on virtual desktop infrastructure and GPU streaming ecosystems. Even traditional VMware users are shifting strategies, exploring hybrid or fully cloud-based approaches to reduce maintenance and energy costs while improving global accessibility.
Another major driver is AI. As generative tools, simulation engines, and model training workflows go mainstream, developers and creatives need GPU performance that far exceeds local machines. Running AI-powered apps on a laptop or even a workstation can feel like trying to stream 4K video on dial-up. Cloud VDI eliminates that bottleneck, letting teams use AI tools natively in the cloud without setup nightmares or hardware constraints.
That’s where solutions like Vagon Teams stand out in the new landscape. Instead of thinking of virtualization as a local sandbox, users can now treat it as a global performance network, one that brings together speed, accessibility, and collaboration. You can spin up a GPU-equipped workspace in seconds, run demanding workloads, and share real-time experiences directly with teammates or clients.
The takeaway? Virtualization isn’t just about running another OS anymore, it’s about creating connected, scalable, and intelligent workspaces that adapt to how we actually work today. Cloud VDI is quickly becoming the default, not the exception, and platforms like Vagon Teams are leading that shift from hardware-dependent to performance-on-demand.
Curious which services stand out in today’s DaaS landscape? We broke down the best Desktop-as-a-Service platforms to help you compare features, pricing, and use cases side by side.
And if you’re considering a more permanent shift to virtual desktops, our guide to the top VDI providers can help you find a scalable solution that fits your team’s needs.
When Local Fixes Aren’t Enough: Meet Vagon Teams
You’ve tweaked your resources, optimized your settings, and troubleshooted like a pro, but what if your VMware VM still feels like it’s wading through mud? Sometimes, the issue isn’t your skills; it’s the limits of local hardware. Your host machine can only do so much, aging CPUs, maxed-out RAM, or slow disks might just not cut it for today’s demanding workloads. That’s where the cloud swoops in to save the day, and Vagon Teams is here to take your virtualization game to new heights. Say goodbye to local lag and hello to a seamless, high-performance experience, let’s explore how!
If you’re unfamiliar with Virtual Desktop Infrastructure (VDI) and how it works to centralize desktop management, it might be worth checking out What is Virtual Desktop Infrastructure to understand the foundational technologies that make cloud-based systems like Vagon Teams so powerful.
Why Vagon Teams?
Vagon Teams isn’t just another tool, it’s a powerhouse built to banish VMware lag for good. Imagine trading your creaky old rig for a turbocharged cloud desktop, packed with cutting-edge GPUs and CPUs that laugh in the face of heavy apps. Whether you’re rendering 3D models, coding complex algorithms, or running multiple VMs at once, Vagon Teams delivers the muscle you need, no local upgrades required. Forget juggling resource allocations or praying your SSD holds up, our cloud infrastructure scales dynamically to match your workload, ensuring smooth performance every time.
Setup? Only a few seconds. No more wrestling with VMware configs or hunting for drivers, just log into Vagon Teams from any device, anywhere, and your high-performance workspace is ready to roll. Designers love the GPU boost for tools like Blender or AutoCAD; developers rave about lag-free testing environments; and IT teams adore the centralized control for managing remote workforces. Plus, with top-tier security and reliable uptime, your data’s safe and your projects keep humming. It’s like having a personal supercomputer in your pocket, accessible, powerful, and hassle-free.
The best part? Vagon Teams solves all the local headaches, overheating hosts, network bottlenecks, or disk contention become someone else’s problem (ours, and we’ve got it covered!). You get a tailored, lag-free experience that adapts to your needs, not your hardware’s limits. Curious to see the difference? Test-drive Vagon Teams today and feel the power of cloud performance firsthand. Head to vagon.io/teams, sign up, and kick off your virtualization experience.
FAQs
1. Why is my VMware virtual machine so slow even after optimizing?
Even with proper settings, VMware performance depends heavily on your host machine’s hardware. If your CPU, RAM, or storage is maxed out, you’ll hit a ceiling no matter how many tweaks you apply. At that point, the bottleneck isn’t configuration, it’s capacity. That’s why many teams now offload heavy workloads to cloud-based virtual desktops like VDI or Vagon Teams for consistent, scalable performance.
2. What’s the main difference between VMware and cloud VDI solutions?
VMware runs locally on your machine or private servers, meaning performance is tied to your hardware. Cloud VDI (like Vagon Teams) hosts everything in the cloud, including GPU and CPU resources, so you can stream a full desktop from anywhere without needing a powerful computer. It’s the same virtualization concept, just relocated to more flexible, remote infrastructure.
3. Do I need a fast internet connection to use cloud desktops?
Yes, a stable connection is key. For smooth 1080p or 4K streaming, you’ll want at least 15–25 Mbps of download speed and low latency (under 50 ms). Vagon Teams dynamically adjusts quality to your connection, so even moderate speeds can work surprisingly well.
4. Is cloud VDI secure for professional or enterprise use?
Absolutely. Modern VDI solutions are built with enterprise-grade encryption, data isolation, and access controls. Since files never leave the cloud environment, risks from lost laptops or local malware are reduced. Vagon Teams also offers team-level permissions and secure project sharing to maintain control across your organization.
5. Can I still use VMware if I switch to a cloud-based setup?
Of course. Many professionals run hybrid setups, VMware for isolated local testing and cloud desktops for heavy rendering or AI workloads. Think of it as using the right tool for the job: local VMs for quick experiments, cloud GPUs for serious performance.
Scalable Remote Desktop for your Team
Create cloud computers for your Team, manage their access & permissions in real-time. Start in minutes & scale.

Trial includes 1 hour usage + 7 days of
storage for first 2 seats.
Scalable Remote Desktop for your Team
Create cloud computers for your Team, manage their access & permissions in real-time. Start in minutes & scale.
Trial includes 1 hour usage + 7 days of
storage for first 2 seats.
Summarize with AI

Ready to focus on your creativity?
Vagon gives you the ability to create & render projects, collaborate, and stream applications with the power of the best hardware.

Vagon Blog


Run heavy applications on any device with
your personal computer on the cloud.
San Francisco, California
Solutions
Vagon Teams
Vagon Streams
Use Cases
Resources
Vagon Blog
What Slows Down After Effects Projects?
The First 30 Minutes in Blender 3D: A Practical Workflow Guide
What’s New in Godot 4.7? Key Features, Upgrades, and Workflow Improvements
What Slows Down Blender 3D Projects?
What Slows Down Adobe Photoshop Projects?
The First 30 Minutes in Adobe Photoshop: A Practical Workflow Guide
Before You Start in Adobe Photoshop: A Practical Setup Checklist
What’s New in Unreal Engine 5.8? Key Features and Upgrade Advice
How to Run Windows on an iPad: 4 Best Ways (2026)
Vagon Blog
Run heavy applications on any device with
your personal computer on the cloud.
San Francisco, California
Solutions
Vagon Teams
Vagon Streams
Use Cases
Resources
Vagon Blog