Instant Connection for Pixel Streaming
— New Feature Automated Setup

How to Use 3ds Max With Codex: MCP & Computer Use
DigitalArt
-
How to Use 3ds Max With Codex: MCP & Computer Use
DigitalArt
How to Use 3ds Max With Codex: MCP & Computer Use
DigitalArt
-
Table of Contents
A client asks for three material options and two camera views from an existing 3ds Max interior scene. The modeling is already finished, but the work is not. You still need to identify the correct objects, preserve shared modifiers, check texture paths, and make sure each render uses the intended settings. Generating a MAXScript routine only solves part of that problem.
Using Codex with 3ds Max becomes more useful when the assistant can inspect the scene it is helping you change. Through a compatible MCP connector, Codex can query scene information, work with objects and materials, and execute supported operations inside a running Max session. This is a third-party connection, not a native Autodesk feature, and its capabilities depend on the installed connector.
Computer Use provides a separate route for tasks that require the interface, such as checking camera framing or navigating a dialog that the connector does not expose. On Windows, this requires access to the active desktop.
The practical approach combines structured scene access with visual verification: inspect first, approve targeted changes, and check the result before committing to final renders. This guide explains that workflow, from connecting Codex to preparing controlled deliverables.

Source: Autodesk 3ds Max Documentation
Choose the Right Kind of Access to Your Scene
Before connecting anything, decide what Codex needs to do. Writing a script, querying an open scene, and operating the interface are different capabilities. Access to one does not automatically provide the others.
Approach | How it works | Best suited to |
|---|---|---|
Code generation | Codex writes code that you review and run in Max. | Reusable scripts and tools. |
MCP | A connector exposes operations inside a running Max session. | Scene inspection and repeatable changes. |
Computer Use | Codex sees and operates an approved application’s interface. | Dialog navigation and visual checks. |
Code generation is useful when the task is predictable. For example, Codex can prepare a MAXScript routine that renames selected objects. Without a connection, however, it cannot verify which objects are selected or whether the routine produced the intended result.
A compatible MCP server can close that gap by returning live scene information and exposing editing tools. The available operations still depend on the connector, installed plugins, and security settings. A tool that captures a viewport image does not necessarily provide mouse and keyboard control.
Computer Use handles a different part of the workflow. It can help inspect an unfamiliar plugin dialog or compare a camera view with a reference. On Windows, the target application must remain visible in the active desktop session while it operates.
Use structured tools for precise, repeatable changes, then use visual checks where appearance or interface state matters. Keep the task scoped: ask Codex to identify the target objects and proposed changes before allowing it to modify them.
Connect Codex to a Running 3ds Max Session
The connection needs two working parts: an MCP server that Codex can communicate with and a bridge that executes supported operations inside 3ds Max. Installing only the server does not give Codex access to an open scene.
For this walkthrough, the community-maintained 3dsmax-mcp project provides the example connection. Other connectors have different installation steps and tool names, so follow one project’s instructions throughout.
Check compatibility before installing
Check the connector’s current requirements against your installed Max version. The project documents native bridge support for 3ds Max 2023–2027 on Windows and lists Codex as a compatible MCP client. That compatibility does not guarantee support for every renderer or plugin in your scene.
Start with a disposable .max file rather than a production project. Keep your original scene, texture folders, and output files outside the test workflow. Review the repository and release instructions before running a third-party installer, since the bridge can perform operations inside Max.
Install the bridge and register the MCP server
The project’s documented installer workflow begins with closing 3ds Max and fully exiting the AI client. Run the installer from the project’s release instructions, select the appropriate client integration, then reopen Max and restart Codex. The installer bundles the bridge and required runtime components.
If you choose a source installation instead, use the repository’s corresponding instructions. Do not combine an installer setup with configuration copied from another connector.
Codex supports local STDIO servers and Streamable HTTP connections through its MCP configuration. The command or URL must match your chosen connector. In the Codex CLI, you can check registered servers with:
Inside an interactive CLI session, /mcp shows active MCP servers. Registration alone is not proof that the Max bridge is responding.
Prove the connection with a read-only request
With your test scene open, ask:
Inspect the current 3ds Max session without changing anything. Report the Max version, current scene file, selected objects, available cameras, and active renderer. Identify any information you cannot retrieve.
The example connector documents get_bridge_status, get_session_context, and get_plugin_capabilities for connection and capability checks. Codex should use the available tools rather than inventing scene details.
Compare the response with Max. If the file or selection is wrong, resolve the connection before permitting edits.
Finally, review execution permissions. The connector distinguishes dedicated tools, MAXScript execution, and Python execution; some operations depend on its safe-mode settings. You do not need unrestricted script execution for an initial scene inspection. Keep access narrow until a specific, reviewed task requires more.
Audit the Scene Before Asking Codex to Fix It
An inherited scene rarely tells you everything through the viewport. Objects may be hidden, materials may reference unavailable textures, and several pieces of furniture may share the same geometry. Before requesting changes, ask Codex to establish what is actually in the file.
A useful audit separates scene facts from potential problems. An object being hidden is a fact. Calling it unnecessary is an interpretation that requires context.
Start with a bounded request:
Audit this scene without modifying it. Report cameras, layers, hidden objects, material assignments, external asset references, and instance relationships. Inspect modifier stacks for the furniture group I selected. Separate confirmed problems from items that need my review, and identify anything your tools cannot inspect.
Through the connector’s scene queries and dependency tools, Codex can build a structured inventory. Avoid requesting a complete property dump of every object immediately. For a large scene, begin with an overview, then investigate the relevant objects or classes.

Source: Autodesk 3ds Max Documentation
The report should be specific enough to support a decision:
Finding | What to verify before changing it |
|---|---|
Several objects have similar names | Their hierarchy, identity, and intended role. |
Chairs share a base object | Whether the requested edit should affect every instance. |
A texture reference appears unresolved | The intended file and its accessible location. |
An object is hidden | Whether it belongs to another camera or deliverable. |
Texture checks need particular care. In Autodesk’s Asset Tracker, network paths are not verified by default. A “Network Path” status is therefore not equivalent to confirmation that the file exists and is accessible. Ask Codex to distinguish reported references from verified files.
Likewise, matching names are not sufficient evidence that two objects are duplicates. Where supported, resolve targets using node handles or hierarchy paths before editing.
Finish the audit with a proposed action list, not an automatic cleanup. Relinking files, removing objects, and changing shared materials can alter the scene’s intended appearance. Approve those decisions individually, then use the inventory as the baseline for checking what changed.
Make Targeted Changes Without Breaking Instances
Suppose the client wants wider seats on the dining chairs but no changes to the matching chairs in the lounge. “Make the dining chairs wider” sounds precise, yet it leaves an important technical question unanswered: do those objects share geometry or modifiers with anything else?
In 3ds Max, an instance can share its underlying object with other nodes. An instanced modifier can also affect multiple objects. Changing one parameter may therefore update more than the selected chair.
Ask Codex to inspect those relationships before choosing an operation:
Identify the selected dining chairs and inspect their instance and modifier dependencies. Determine whether changing their seat width would affect objects outside this selection. Propose the smallest change that preserves the lounge chairs. Do not make anything unique or collapse a stack without approval.
The distinction between changing a node’s transform and changing shared geometry matters. Scaling an individual node is not the same operation as editing dimensions in its shared base object. Neither should be treated as interchangeable without considering the intended shape and downstream effects.

Source: Autodesk 3ds Max Documentation
Preserve the stack, not just the visible result
The modifier stack evaluates from bottom to top. Moving a modifier can change the result even when its parameter values stay identical. Codex should inspect the existing order before adding, removing, or repositioning anything.
Making an object or modifier unique may be appropriate, but it changes the scene’s relationships. Automatically converting every instance into a copy can also make future updates harder to manage. Collapsing the stack removes editable history and should not become a default cleanup step.

Source: Autodesk 3ds Max Documentation
Apply one bounded change and read it back
Once you approve the proposal, have Codex modify a small test subset first. It should report the exact targets, operation, and resulting values. Then compare before-and-after views and confirm that objects outside the approved scope remain unchanged.
A successful tool response proves that an operation completed, not that the design is correct. Preserve the original scene version and expand the change only after both the dependency checks and visual result pass review.
Turn One Scene Into Controlled Material and Camera Variants
Three finish options across two cameras should produce six identifiable previews, not six loosely named files with uncertain settings. Give Codex a small deliverable matrix before asking it to build variations.
For an interior scene, that brief might specify:
Variant | Approved changes | Cameras |
|---|---|---|
Warm oak | Cabinet finish and matching texture set | Kitchen wide, island detail |
Dark walnut | Cabinet finish only | Kitchen wide, island detail |
Painted white | Cabinet surface properties | Kitchen wide, island detail |
Keep lighting, geometry, and camera composition unchanged unless the brief explicitly includes them. Otherwise, differences between previews become difficult to attribute to the material choice.
Duplicate the material before changing it
A material may be assigned to objects outside the requested area. Editing that material directly could change furniture or trim elsewhere in the scene.
Ask Codex to inspect assignments and the material network first. The example MCP connector documents material inspection, replication, and replacement tools, but the exact operation should follow the installed tool’s capabilities.
A useful request is:
Prepare three cabinet finish variants for the approved cabinet objects. Preserve the original materials and inspect shared assignments before making changes. Keep both cameras and all lighting unchanged. Report the new material assignments and request approval before rendering previews.
Duplicating a material does not automatically make every connected map independent. Codex should verify which parts of the network remain shared, especially before changing bitmap paths or procedural settings.

Source: Autodesk 3ds Max Documentation
Choose a variation method that fits the changes
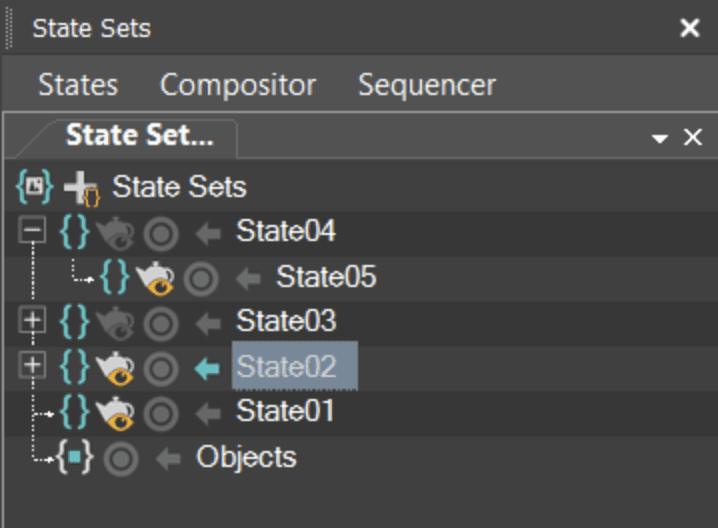
3ds Max provides Scene States and State Sets, but these are different systems. Do not assume that either captures every edit.
Autodesk’s State Sets workflow, for example, explicitly states that object transforms are not recorded and affect all states. A furniture-layout variation therefore needs a different strategy, such as separate versioned scene files.
For material variations, confirm that the chosen mechanism restores the required assignments and settings. If coverage is uncertain, separate scene copies are easier to reason about.
Finally, generate low-resolution previews with filenames that identify the variant and camera. Compare them under matching render settings. Ask Codex to report missing textures, unexpected assignment changes, and composition differences separately from subjective design suggestions. The client’s preferred finish remains a human decision.
Source: Autodesk 3ds Max Documentation
Use Computer Use Where Scene Data Stops Being Enough
MCP can report a camera’s properties, but those values alone do not tell you whether a pendant light blocks the important part of the composition. It can inspect material assignments without showing whether the finish looks convincing in the rendered image. These are useful places to add visual inspection.
Set up Computer Use separately from the Max connector and approve access to the required application. On Windows, 3ds Max must remain visible in the active desktop session. Expect Codex to use the pointer and keyboard while the task runs, so avoid interacting with the same session simultaneously.
Review camera framing against a reference
Give Codex a reference image and a named camera, then ask it to compare specific compositional features: subject placement, cropped furniture, visible floor area, or an obstructed focal point.
For example:
Use Computer Use to inspect the Kitchen_Wide camera against this reference. Check whether the island is fully visible and whether the pendant lights obscure the cabinetry. Suggest adjustments first. Do not move scene objects, change lenses, or save the file without approval.
Where the MCP connector exposes camera controls, use those for precise approved adjustments. Computer Use can then inspect the resulting view. This avoids relying entirely on dragging viewport controls for changes that can be expressed numerically.
A viewport check is still not a final render check. Reflections, displacement, exposure, and other renderer-dependent effects may require a test render.

Source: Autodesk 3ds Max Documentation
Investigate missing assets visually
Computer Use can help navigate the Asset Tracking interface when a reference needs investigation. Have Codex inspect the reported path and relevant folders before proposing a replacement.
If two folders contain wood_diffuse.jpg, the filename alone does not identify the correct texture. Compare available previews, dimensions, and surrounding asset files, then ask for confirmation when the choice remains ambiguous. Do not authorize broad relinking simply because it removes a missing-file warning.
Check renderer and plugin dialogs
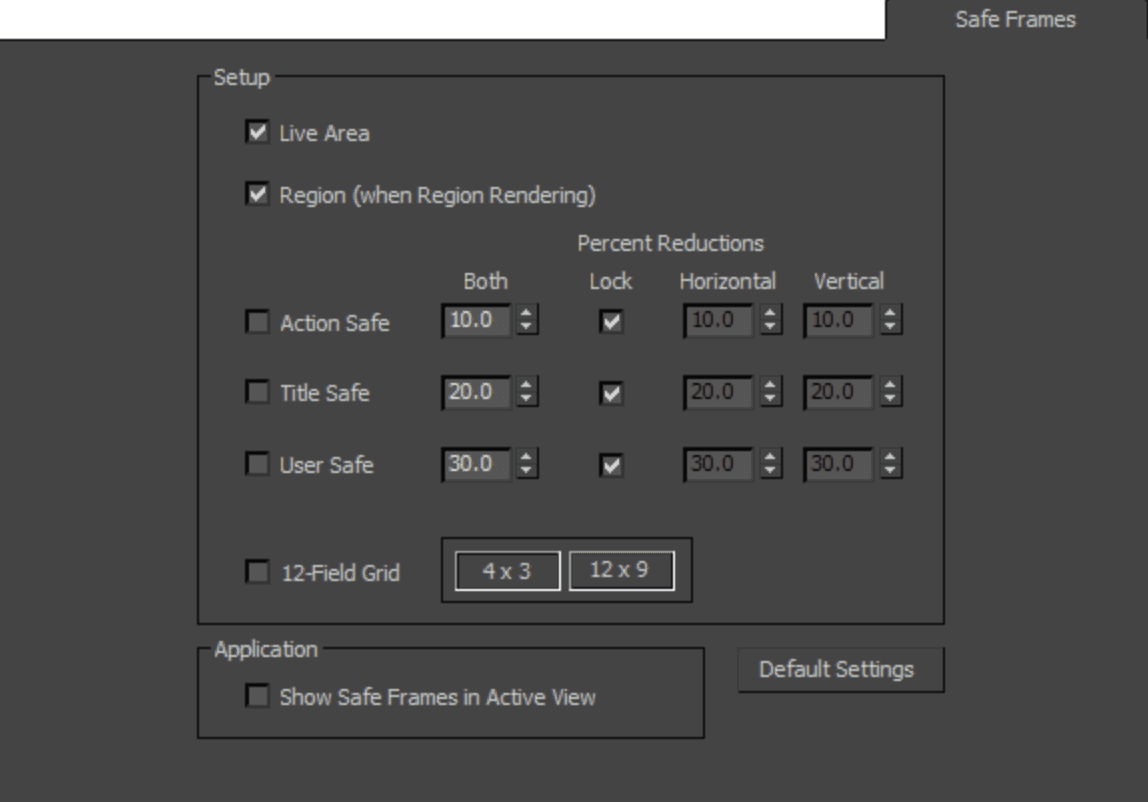
Some settings may be accessible through scripting but absent from the installed connector’s dedicated tools. Computer Use can provide a fallback for inspecting those dialogs, provided the controls are visible and understandable.
Scope the task to particular settings, such as the selected render device or output resolution. Ask Codex to record the original values, propose changes, and verify the resulting interface state.
Do not assume an interface screenshot proves that every setting was applied or that a render will succeed. Follow consequential changes with a small test render and inspect the output. Computer Use supplies another verification path, not a guarantee of technical or artistic correctness.
Source: Autodesk 3ds Max Documentation
Build a Render Queue That Matches the Deliverables
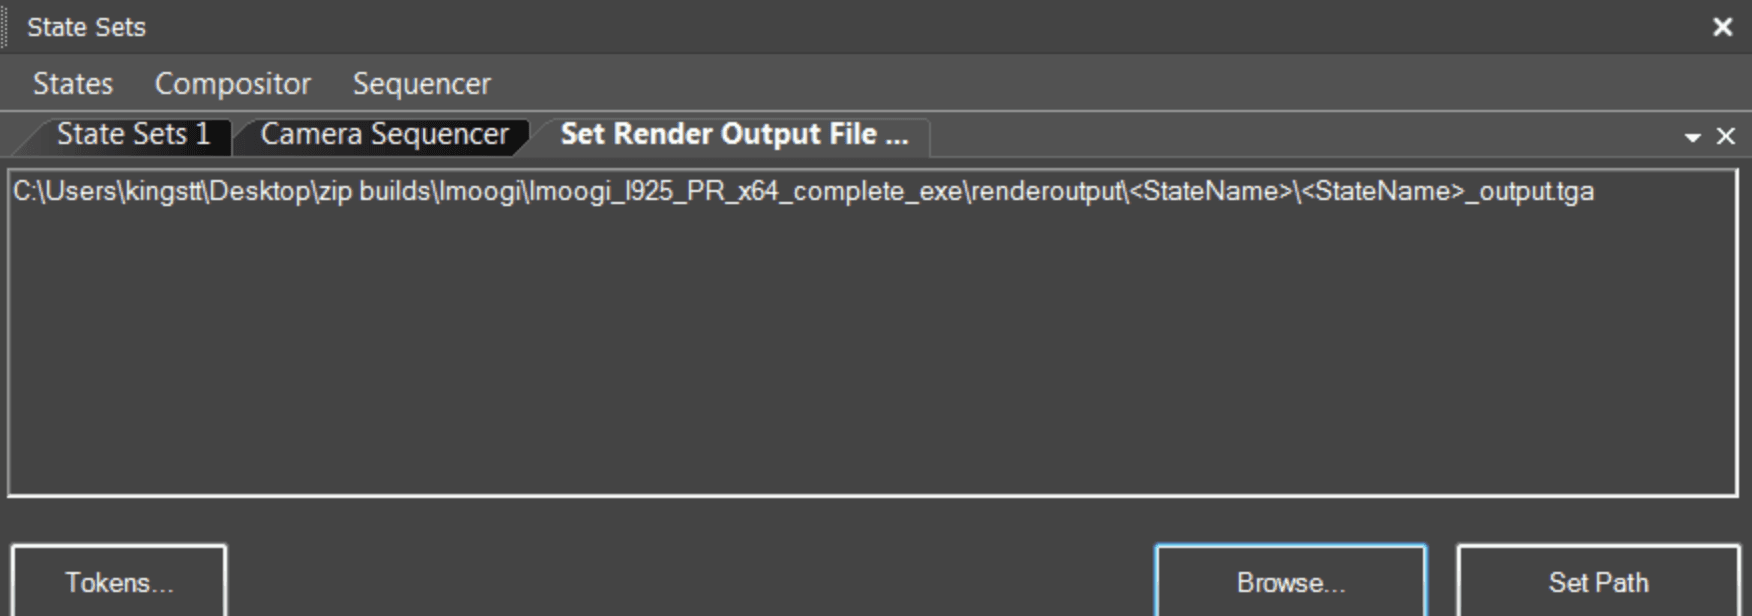
Once the previews are approved, translate the brief into explicit render tasks. “Render all six versions” leaves too much unspecified. Each task needs a camera, variation, resolution, frame or range, and output location.
Ask Codex to prepare a manifest before starting:
Task | Camera | Variant | Output |
|---|---|---|---|
Oak wide | Kitchen_Wide | Warm oak |
|
Oak detail | Island_Detail | Warm oak |
|
Walnut wide | Kitchen_Wide | Dark walnut |
|
Include the remaining combinations and their exact settings. Keep preview and final output folders separate so a test cannot overwrite an approved image.
Source: Autodesk 3ds Max Documentation
Match the queue to the scene structure
The native Batch Render dialog supports tasks with camera assignments, output paths, scene states, and render presets. It is intended for different views or configurations of the same scene.
If your variants live in separate .max files, use an appropriate multi-file rendering workflow instead. Do not assume a camera queue will automatically load those files.
Have Codex inspect existing tasks before adding new ones. Check that each task references the intended camera rather than the active viewport, and that no two tasks share an output filename. Verify variation restoration with previews before submitting the full batch.

Source: Autodesk 3ds Max Documentation
Test the output, not just the command
Run one representative task at reduced resolution first. Confirm the material variant, framing, file format, and output location. For animation, test representative frames rather than relying only on the first frame.
Then request approval for the full queue, including its estimated workload. Codex should distinguish a submitted job from a completed render and identify failures or unavailable completion information.
Finally, compare the produced files against the manifest. A successful command response is not proof that every deliverable exists. Check file presence, dimensions, and visual content before marking the batch complete. Render settings and time estimates remain renderer-dependent, so avoid promising identical behavior across Arnold, V-Ray, Corona, or other installed engines.
Keep Automation Recoverable
A scene operation and a file operation have different recovery paths. Undo may restore an object edit, but it should not be treated as protection against overwritten renders, changed external assets, or arbitrary script side effects.
Save a versioned .max copy before an editing session. Keep approved outputs separate from working previews, and create another checkpoint before broad material replacements or structural changes.
Use explicit approval boundaries:
Deletion: Identify the exact objects and their dependencies before removal.
Relinking: Confirm the replacement files, especially where filenames match.
Stack changes: Approve collapsing, reordering, or making shared modifiers unique.
Rendering: Confirm output paths and workload before starting a long batch.
Review the connector’s permissions as well. Dedicated editing tools and unrestricted script execution are not equivalent. Enable additional execution capabilities only when a specific task requires them.
If a tool fails midway, stop and inspect the current scene before retrying. Repeating an operation can create duplicate objects or apply a transform twice. Ask Codex to report what completed, what remains uncertain, and whether restoring the saved checkpoint is safer than continuing.
Give Your 3ds Max Workflow More Headroom With Vagon
Codex can reduce repetitive scene work, but it does not remove the hardware demands of a detailed interior, large texture library, or final render. When your local machine struggles to keep the scene responsive, automation still has to wait for Max.
Vagon Cloud Computer gives you a Windows workspace with selectable CPU and NVIDIA GPU performance, accessible from your existing device. You can work from a laptop or Mac while running the Windows version of 3ds Max in the cloud, then change performance configurations as your workload grows.
For this workflow, a practical setup is to install 3ds Max, Codex, and the MCP connector in the same cloud Windows environment. That keeps the bridge beside the application it controls. Bring your required plugins, licenses, and project assets, then verify the connection with a test scene.
Choose hardware for your actual renderer. CPU rendering needs suitable CPU capacity and memory; supported GPU rendering also depends on GPU compatibility and available VRAM. Arnold GPU, for example, has its own supported features and requirements.
Start with scene preparation and previews, then select more performance when the approved deliverables demand it. If you also plan to use Computer Use, test access in the cloud desktop session first. Remote desktop behavior and session visibility need verification before relying on UI automation.
FAQs
Can Codex control 3ds Max directly?
With a compatible MCP connector, Codex can invoke tools inside a running Max session. Computer Use provides separate interface access. Without either connection, Codex can generate scripts but cannot independently inspect or verify your live scene.
Is the MCP connector an official Autodesk integration?
The connector used in this guide is a community-maintained project, not an Autodesk product. Check its current compatibility, installation instructions, and security settings before granting it access to production scenes.
Do I need MCP to use Computer Use with 3ds Max?
No. Computer Use requires its own setup and application permissions. MCP adds structured scene access, which is generally better suited to precise queries and repeatable edits than navigating everything through the interface.
Can Codex run MAXScript and Python?
A connector may expose both execution routes. Availability depends on its tools and security configuration. Review scripts before execution, particularly when they modify files, delete objects, or affect shared scene data.
Can Codex work with V-Ray, Corona, or other plugins?
Potentially, through dedicated connector tools, exposed scripting interfaces, or Computer Use. Installed plugin versions and accessible properties determine coverage. Do not assume support for every feature simply because Max recognizes the plugin.
Can I use this workflow from a Mac?
3ds Max needs a compatible Windows environment. You can access a Windows cloud computer from a Mac, with Max and its MCP bridge running in that Windows workspace.
Can Codex render unattended?
It can help prepare and launch supported render tasks, but reliable completion depends on the renderer, assets, licenses, and session conditions. Windows Computer Use requires an active, unlocked desktop. Verify outputs rather than treating submission as completion.
A client asks for three material options and two camera views from an existing 3ds Max interior scene. The modeling is already finished, but the work is not. You still need to identify the correct objects, preserve shared modifiers, check texture paths, and make sure each render uses the intended settings. Generating a MAXScript routine only solves part of that problem.
Using Codex with 3ds Max becomes more useful when the assistant can inspect the scene it is helping you change. Through a compatible MCP connector, Codex can query scene information, work with objects and materials, and execute supported operations inside a running Max session. This is a third-party connection, not a native Autodesk feature, and its capabilities depend on the installed connector.
Computer Use provides a separate route for tasks that require the interface, such as checking camera framing or navigating a dialog that the connector does not expose. On Windows, this requires access to the active desktop.
The practical approach combines structured scene access with visual verification: inspect first, approve targeted changes, and check the result before committing to final renders. This guide explains that workflow, from connecting Codex to preparing controlled deliverables.
Source: Autodesk 3ds Max Documentation
Choose the Right Kind of Access to Your Scene
Before connecting anything, decide what Codex needs to do. Writing a script, querying an open scene, and operating the interface are different capabilities. Access to one does not automatically provide the others.
Approach | How it works | Best suited to |
|---|---|---|
Code generation | Codex writes code that you review and run in Max. | Reusable scripts and tools. |
MCP | A connector exposes operations inside a running Max session. | Scene inspection and repeatable changes. |
Computer Use | Codex sees and operates an approved application’s interface. | Dialog navigation and visual checks. |
Code generation is useful when the task is predictable. For example, Codex can prepare a MAXScript routine that renames selected objects. Without a connection, however, it cannot verify which objects are selected or whether the routine produced the intended result.
A compatible MCP server can close that gap by returning live scene information and exposing editing tools. The available operations still depend on the connector, installed plugins, and security settings. A tool that captures a viewport image does not necessarily provide mouse and keyboard control.
Computer Use handles a different part of the workflow. It can help inspect an unfamiliar plugin dialog or compare a camera view with a reference. On Windows, the target application must remain visible in the active desktop session while it operates.
Use structured tools for precise, repeatable changes, then use visual checks where appearance or interface state matters. Keep the task scoped: ask Codex to identify the target objects and proposed changes before allowing it to modify them.
Connect Codex to a Running 3ds Max Session
The connection needs two working parts: an MCP server that Codex can communicate with and a bridge that executes supported operations inside 3ds Max. Installing only the server does not give Codex access to an open scene.
For this walkthrough, the community-maintained 3dsmax-mcp project provides the example connection. Other connectors have different installation steps and tool names, so follow one project’s instructions throughout.
Check compatibility before installing
Check the connector’s current requirements against your installed Max version. The project documents native bridge support for 3ds Max 2023–2027 on Windows and lists Codex as a compatible MCP client. That compatibility does not guarantee support for every renderer or plugin in your scene.
Start with a disposable .max file rather than a production project. Keep your original scene, texture folders, and output files outside the test workflow. Review the repository and release instructions before running a third-party installer, since the bridge can perform operations inside Max.
Install the bridge and register the MCP server
The project’s documented installer workflow begins with closing 3ds Max and fully exiting the AI client. Run the installer from the project’s release instructions, select the appropriate client integration, then reopen Max and restart Codex. The installer bundles the bridge and required runtime components.
If you choose a source installation instead, use the repository’s corresponding instructions. Do not combine an installer setup with configuration copied from another connector.
Codex supports local STDIO servers and Streamable HTTP connections through its MCP configuration. The command or URL must match your chosen connector. In the Codex CLI, you can check registered servers with:
Inside an interactive CLI session, /mcp shows active MCP servers. Registration alone is not proof that the Max bridge is responding.
Prove the connection with a read-only request
With your test scene open, ask:
Inspect the current 3ds Max session without changing anything. Report the Max version, current scene file, selected objects, available cameras, and active renderer. Identify any information you cannot retrieve.
The example connector documents get_bridge_status, get_session_context, and get_plugin_capabilities for connection and capability checks. Codex should use the available tools rather than inventing scene details.
Compare the response with Max. If the file or selection is wrong, resolve the connection before permitting edits.
Finally, review execution permissions. The connector distinguishes dedicated tools, MAXScript execution, and Python execution; some operations depend on its safe-mode settings. You do not need unrestricted script execution for an initial scene inspection. Keep access narrow until a specific, reviewed task requires more.
Audit the Scene Before Asking Codex to Fix It
An inherited scene rarely tells you everything through the viewport. Objects may be hidden, materials may reference unavailable textures, and several pieces of furniture may share the same geometry. Before requesting changes, ask Codex to establish what is actually in the file.
A useful audit separates scene facts from potential problems. An object being hidden is a fact. Calling it unnecessary is an interpretation that requires context.
Start with a bounded request:
Audit this scene without modifying it. Report cameras, layers, hidden objects, material assignments, external asset references, and instance relationships. Inspect modifier stacks for the furniture group I selected. Separate confirmed problems from items that need my review, and identify anything your tools cannot inspect.
Through the connector’s scene queries and dependency tools, Codex can build a structured inventory. Avoid requesting a complete property dump of every object immediately. For a large scene, begin with an overview, then investigate the relevant objects or classes.
Source: Autodesk 3ds Max Documentation
The report should be specific enough to support a decision:
Finding | What to verify before changing it |
|---|---|
Several objects have similar names | Their hierarchy, identity, and intended role. |
Chairs share a base object | Whether the requested edit should affect every instance. |
A texture reference appears unresolved | The intended file and its accessible location. |
An object is hidden | Whether it belongs to another camera or deliverable. |
Texture checks need particular care. In Autodesk’s Asset Tracker, network paths are not verified by default. A “Network Path” status is therefore not equivalent to confirmation that the file exists and is accessible. Ask Codex to distinguish reported references from verified files.
Likewise, matching names are not sufficient evidence that two objects are duplicates. Where supported, resolve targets using node handles or hierarchy paths before editing.
Finish the audit with a proposed action list, not an automatic cleanup. Relinking files, removing objects, and changing shared materials can alter the scene’s intended appearance. Approve those decisions individually, then use the inventory as the baseline for checking what changed.
Make Targeted Changes Without Breaking Instances
Suppose the client wants wider seats on the dining chairs but no changes to the matching chairs in the lounge. “Make the dining chairs wider” sounds precise, yet it leaves an important technical question unanswered: do those objects share geometry or modifiers with anything else?
In 3ds Max, an instance can share its underlying object with other nodes. An instanced modifier can also affect multiple objects. Changing one parameter may therefore update more than the selected chair.
Ask Codex to inspect those relationships before choosing an operation:
Identify the selected dining chairs and inspect their instance and modifier dependencies. Determine whether changing their seat width would affect objects outside this selection. Propose the smallest change that preserves the lounge chairs. Do not make anything unique or collapse a stack without approval.
The distinction between changing a node’s transform and changing shared geometry matters. Scaling an individual node is not the same operation as editing dimensions in its shared base object. Neither should be treated as interchangeable without considering the intended shape and downstream effects.
Source: Autodesk 3ds Max Documentation
Preserve the stack, not just the visible result
The modifier stack evaluates from bottom to top. Moving a modifier can change the result even when its parameter values stay identical. Codex should inspect the existing order before adding, removing, or repositioning anything.
Making an object or modifier unique may be appropriate, but it changes the scene’s relationships. Automatically converting every instance into a copy can also make future updates harder to manage. Collapsing the stack removes editable history and should not become a default cleanup step.
Source: Autodesk 3ds Max Documentation
Apply one bounded change and read it back
Once you approve the proposal, have Codex modify a small test subset first. It should report the exact targets, operation, and resulting values. Then compare before-and-after views and confirm that objects outside the approved scope remain unchanged.
A successful tool response proves that an operation completed, not that the design is correct. Preserve the original scene version and expand the change only after both the dependency checks and visual result pass review.
Turn One Scene Into Controlled Material and Camera Variants
Three finish options across two cameras should produce six identifiable previews, not six loosely named files with uncertain settings. Give Codex a small deliverable matrix before asking it to build variations.
For an interior scene, that brief might specify:
Variant | Approved changes | Cameras |
|---|---|---|
Warm oak | Cabinet finish and matching texture set | Kitchen wide, island detail |
Dark walnut | Cabinet finish only | Kitchen wide, island detail |
Painted white | Cabinet surface properties | Kitchen wide, island detail |
Keep lighting, geometry, and camera composition unchanged unless the brief explicitly includes them. Otherwise, differences between previews become difficult to attribute to the material choice.
Duplicate the material before changing it
A material may be assigned to objects outside the requested area. Editing that material directly could change furniture or trim elsewhere in the scene.
Ask Codex to inspect assignments and the material network first. The example MCP connector documents material inspection, replication, and replacement tools, but the exact operation should follow the installed tool’s capabilities.
A useful request is:
Prepare three cabinet finish variants for the approved cabinet objects. Preserve the original materials and inspect shared assignments before making changes. Keep both cameras and all lighting unchanged. Report the new material assignments and request approval before rendering previews.
Duplicating a material does not automatically make every connected map independent. Codex should verify which parts of the network remain shared, especially before changing bitmap paths or procedural settings.
Source: Autodesk 3ds Max Documentation
Choose a variation method that fits the changes
3ds Max provides Scene States and State Sets, but these are different systems. Do not assume that either captures every edit.
Autodesk’s State Sets workflow, for example, explicitly states that object transforms are not recorded and affect all states. A furniture-layout variation therefore needs a different strategy, such as separate versioned scene files.
For material variations, confirm that the chosen mechanism restores the required assignments and settings. If coverage is uncertain, separate scene copies are easier to reason about.
Finally, generate low-resolution previews with filenames that identify the variant and camera. Compare them under matching render settings. Ask Codex to report missing textures, unexpected assignment changes, and composition differences separately from subjective design suggestions. The client’s preferred finish remains a human decision.
Source: Autodesk 3ds Max Documentation
Use Computer Use Where Scene Data Stops Being Enough
MCP can report a camera’s properties, but those values alone do not tell you whether a pendant light blocks the important part of the composition. It can inspect material assignments without showing whether the finish looks convincing in the rendered image. These are useful places to add visual inspection.
Set up Computer Use separately from the Max connector and approve access to the required application. On Windows, 3ds Max must remain visible in the active desktop session. Expect Codex to use the pointer and keyboard while the task runs, so avoid interacting with the same session simultaneously.
Review camera framing against a reference
Give Codex a reference image and a named camera, then ask it to compare specific compositional features: subject placement, cropped furniture, visible floor area, or an obstructed focal point.
For example:
Use Computer Use to inspect the Kitchen_Wide camera against this reference. Check whether the island is fully visible and whether the pendant lights obscure the cabinetry. Suggest adjustments first. Do not move scene objects, change lenses, or save the file without approval.
Where the MCP connector exposes camera controls, use those for precise approved adjustments. Computer Use can then inspect the resulting view. This avoids relying entirely on dragging viewport controls for changes that can be expressed numerically.
A viewport check is still not a final render check. Reflections, displacement, exposure, and other renderer-dependent effects may require a test render.
Source: Autodesk 3ds Max Documentation
Investigate missing assets visually
Computer Use can help navigate the Asset Tracking interface when a reference needs investigation. Have Codex inspect the reported path and relevant folders before proposing a replacement.
If two folders contain wood_diffuse.jpg, the filename alone does not identify the correct texture. Compare available previews, dimensions, and surrounding asset files, then ask for confirmation when the choice remains ambiguous. Do not authorize broad relinking simply because it removes a missing-file warning.
Check renderer and plugin dialogs
Some settings may be accessible through scripting but absent from the installed connector’s dedicated tools. Computer Use can provide a fallback for inspecting those dialogs, provided the controls are visible and understandable.
Scope the task to particular settings, such as the selected render device or output resolution. Ask Codex to record the original values, propose changes, and verify the resulting interface state.
Do not assume an interface screenshot proves that every setting was applied or that a render will succeed. Follow consequential changes with a small test render and inspect the output. Computer Use supplies another verification path, not a guarantee of technical or artistic correctness.
Source: Autodesk 3ds Max Documentation
Build a Render Queue That Matches the Deliverables
Once the previews are approved, translate the brief into explicit render tasks. “Render all six versions” leaves too much unspecified. Each task needs a camera, variation, resolution, frame or range, and output location.
Ask Codex to prepare a manifest before starting:
Task | Camera | Variant | Output |
|---|---|---|---|
Oak wide | Kitchen_Wide | Warm oak |
|
Oak detail | Island_Detail | Warm oak |
|
Walnut wide | Kitchen_Wide | Dark walnut |
|
Include the remaining combinations and their exact settings. Keep preview and final output folders separate so a test cannot overwrite an approved image.
Source: Autodesk 3ds Max Documentation
Match the queue to the scene structure
The native Batch Render dialog supports tasks with camera assignments, output paths, scene states, and render presets. It is intended for different views or configurations of the same scene.
If your variants live in separate .max files, use an appropriate multi-file rendering workflow instead. Do not assume a camera queue will automatically load those files.
Have Codex inspect existing tasks before adding new ones. Check that each task references the intended camera rather than the active viewport, and that no two tasks share an output filename. Verify variation restoration with previews before submitting the full batch.
Source: Autodesk 3ds Max Documentation
Test the output, not just the command
Run one representative task at reduced resolution first. Confirm the material variant, framing, file format, and output location. For animation, test representative frames rather than relying only on the first frame.
Then request approval for the full queue, including its estimated workload. Codex should distinguish a submitted job from a completed render and identify failures or unavailable completion information.
Finally, compare the produced files against the manifest. A successful command response is not proof that every deliverable exists. Check file presence, dimensions, and visual content before marking the batch complete. Render settings and time estimates remain renderer-dependent, so avoid promising identical behavior across Arnold, V-Ray, Corona, or other installed engines.
Keep Automation Recoverable
A scene operation and a file operation have different recovery paths. Undo may restore an object edit, but it should not be treated as protection against overwritten renders, changed external assets, or arbitrary script side effects.
Save a versioned .max copy before an editing session. Keep approved outputs separate from working previews, and create another checkpoint before broad material replacements or structural changes.
Use explicit approval boundaries:
Deletion: Identify the exact objects and their dependencies before removal.
Relinking: Confirm the replacement files, especially where filenames match.
Stack changes: Approve collapsing, reordering, or making shared modifiers unique.
Rendering: Confirm output paths and workload before starting a long batch.
Review the connector’s permissions as well. Dedicated editing tools and unrestricted script execution are not equivalent. Enable additional execution capabilities only when a specific task requires them.
If a tool fails midway, stop and inspect the current scene before retrying. Repeating an operation can create duplicate objects or apply a transform twice. Ask Codex to report what completed, what remains uncertain, and whether restoring the saved checkpoint is safer than continuing.
Give Your 3ds Max Workflow More Headroom With Vagon
Codex can reduce repetitive scene work, but it does not remove the hardware demands of a detailed interior, large texture library, or final render. When your local machine struggles to keep the scene responsive, automation still has to wait for Max.
Vagon Cloud Computer gives you a Windows workspace with selectable CPU and NVIDIA GPU performance, accessible from your existing device. You can work from a laptop or Mac while running the Windows version of 3ds Max in the cloud, then change performance configurations as your workload grows.
For this workflow, a practical setup is to install 3ds Max, Codex, and the MCP connector in the same cloud Windows environment. That keeps the bridge beside the application it controls. Bring your required plugins, licenses, and project assets, then verify the connection with a test scene.
Choose hardware for your actual renderer. CPU rendering needs suitable CPU capacity and memory; supported GPU rendering also depends on GPU compatibility and available VRAM. Arnold GPU, for example, has its own supported features and requirements.
Start with scene preparation and previews, then select more performance when the approved deliverables demand it. If you also plan to use Computer Use, test access in the cloud desktop session first. Remote desktop behavior and session visibility need verification before relying on UI automation.
FAQs
Can Codex control 3ds Max directly?
With a compatible MCP connector, Codex can invoke tools inside a running Max session. Computer Use provides separate interface access. Without either connection, Codex can generate scripts but cannot independently inspect or verify your live scene.
Is the MCP connector an official Autodesk integration?
The connector used in this guide is a community-maintained project, not an Autodesk product. Check its current compatibility, installation instructions, and security settings before granting it access to production scenes.
Do I need MCP to use Computer Use with 3ds Max?
No. Computer Use requires its own setup and application permissions. MCP adds structured scene access, which is generally better suited to precise queries and repeatable edits than navigating everything through the interface.
Can Codex run MAXScript and Python?
A connector may expose both execution routes. Availability depends on its tools and security configuration. Review scripts before execution, particularly when they modify files, delete objects, or affect shared scene data.
Can Codex work with V-Ray, Corona, or other plugins?
Potentially, through dedicated connector tools, exposed scripting interfaces, or Computer Use. Installed plugin versions and accessible properties determine coverage. Do not assume support for every feature simply because Max recognizes the plugin.
Can I use this workflow from a Mac?
3ds Max needs a compatible Windows environment. You can access a Windows cloud computer from a Mac, with Max and its MCP bridge running in that Windows workspace.
Can Codex render unattended?
It can help prepare and launch supported render tasks, but reliable completion depends on the renderer, assets, licenses, and session conditions. Windows Computer Use requires an active, unlocked desktop. Verify outputs rather than treating submission as completion.
Get Beyond Your Computer Performance
Run applications on your cloud computer with the latest generation hardware. No more crashes or lags.

Trial includes 1 hour usage + 7 days of storage.
Summarize with AI

Ready to focus on your creativity?
Vagon gives you the ability to create & render projects, collaborate, and stream applications with the power of the best hardware.

Vagon Blog
Run heavy applications on any device with
your personal computer on the cloud.
San Francisco, California
Solutions
Vagon Teams
Vagon Streams
Use Cases
Resources
Vagon Blog
How to Use FreeCAD With Claude: MCP & Computer Use
How to Use 3ds Max With Codex: MCP & Computer Use
How to Use Houdini With Claude: MCP & Computer Use
How to Use Cinema 4D With Claude: MCP & Computer Use
How to Use 3ds Max With Claude: MCP & Computer Use
How to Use DaVinci Resolve With Claude: MCP & Computer Use
How to Use Godot With Claude: MCP & Computer Use
How to Use Unreal Engine With Claude: MCP & Computer Use
How to Use Unity With Claude: MCP & Computer Use Guide
Vagon Blog
Run heavy applications on any device with
your personal computer on the cloud.
San Francisco, California
Solutions
Vagon Teams
Vagon Streams
Use Cases
Resources
Vagon Blog
How to Use FreeCAD With Claude: MCP & Computer Use
How to Use 3ds Max With Codex: MCP & Computer Use
How to Use Houdini With Claude: MCP & Computer Use
How to Use Cinema 4D With Claude: MCP & Computer Use
How to Use 3ds Max With Claude: MCP & Computer Use
How to Use DaVinci Resolve With Claude: MCP & Computer Use
How to Use Godot With Claude: MCP & Computer Use
How to Use Unreal Engine With Claude: MCP & Computer Use
How to Use Unity With Claude: MCP & Computer Use Guide
Vagon Blog
Run heavy applications on any device with
your personal computer on the cloud.
San Francisco, California
Solutions
Vagon Teams
Vagon Streams
Use Cases
Resources
Vagon Blog