Instant Connection for Pixel Streaming
— New Feature Automated Setup

Mastering Final Cut Pro Keyboard Shortcuts: A Guide to Efficient Video Editing
Mastering Final Cut Pro Keyboard Shortcuts: A Guide to Efficient Video Editing
VideoProduction
Mastering Final Cut Pro Keyboard Shortcuts: A Guide to Efficient Video Editing
Table of Contents
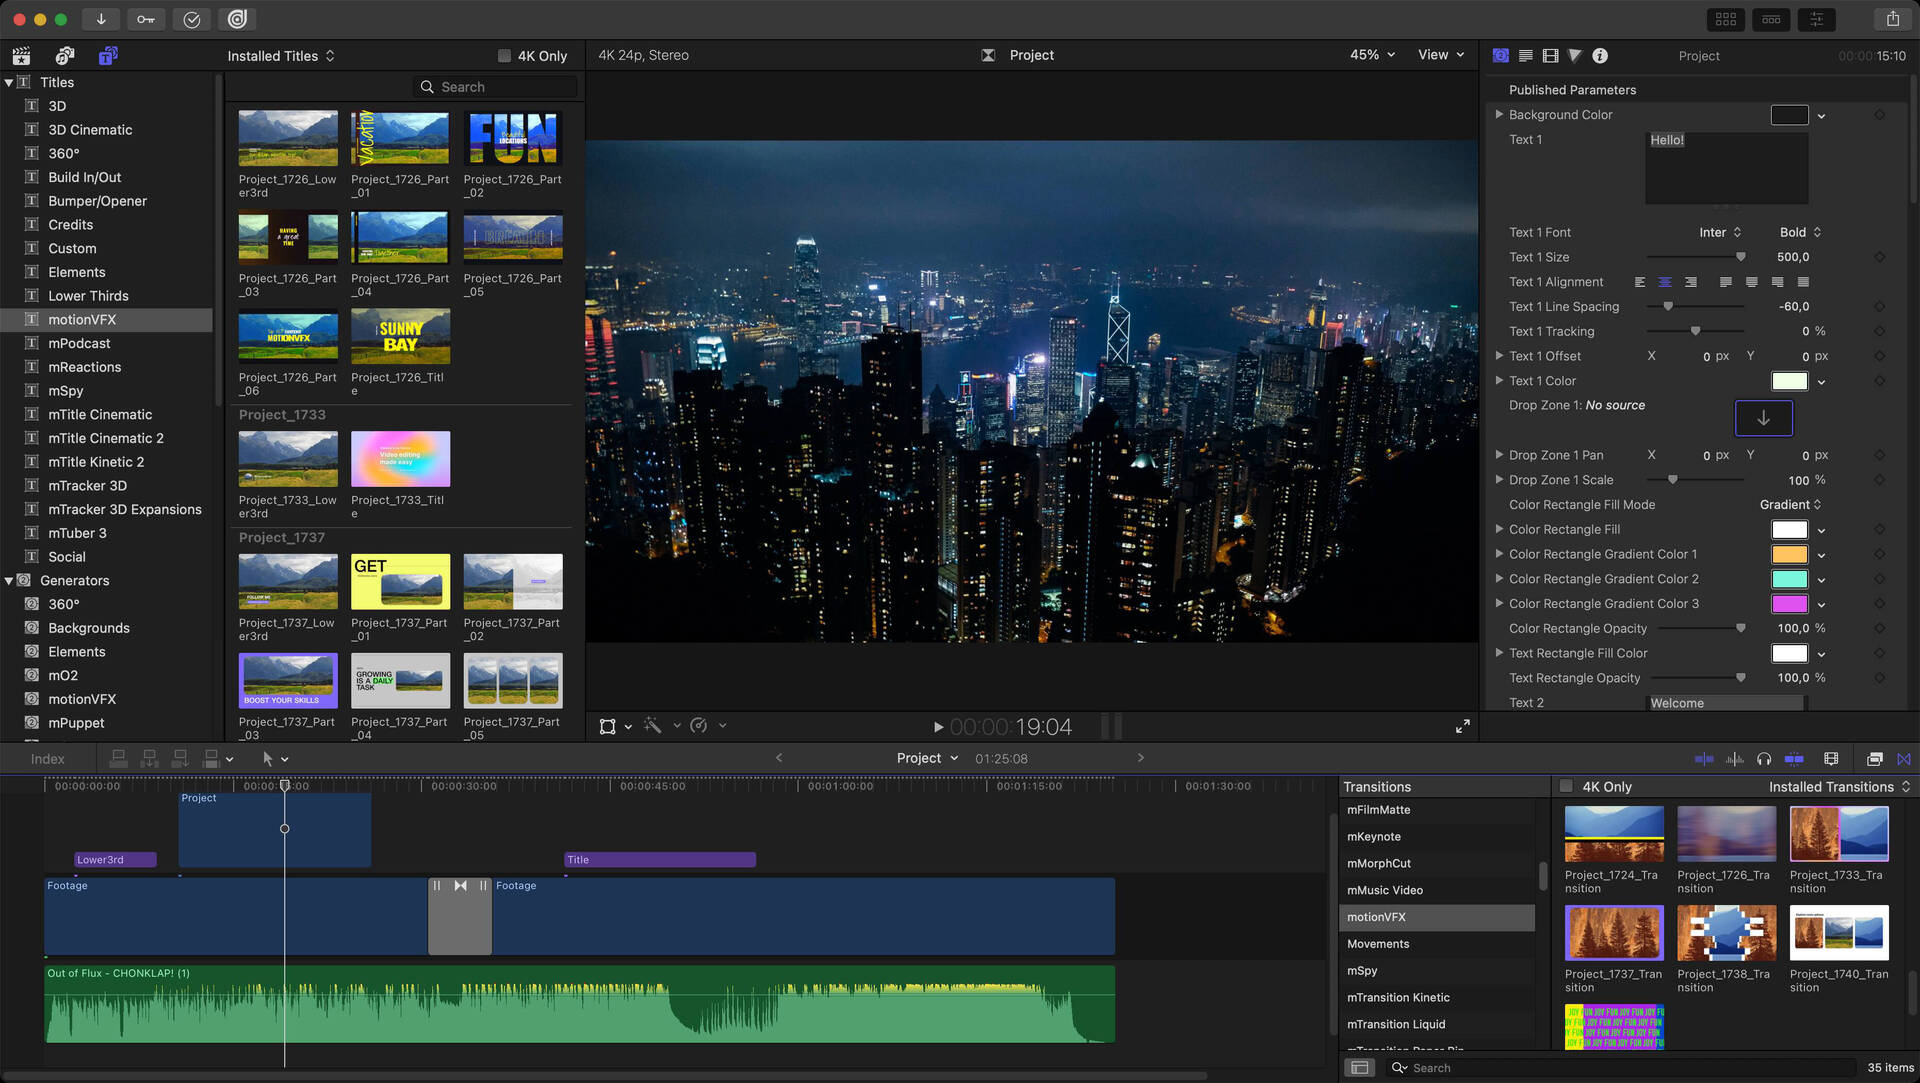
Final Cut Pro is a powerful video editing software used by professionals and enthusiasts alike to create polished, high-quality video content. With its intuitive interface, comprehensive editing tools, and powerful features, Final Cut Pro offers users the ability to produce content with speed and precision. However, like many advanced software applications, mastering Final Cut Pro requires familiarity with its many features and functions. While the software's interface offers easy access to all of its tools, mastering keyboard shortcuts is the key to truly maximizing your workflow.
Keyboard shortcuts in Final Cut Pro are designed to help you streamline your editing process by allowing you to perform tasks more efficiently without needing to navigate through multiple menus or use the mouse. With just a few keystrokes, you can speed up everything from importing media to trimming clips, adding effects, and exporting your project. Whether you're working with complex video timelines, layering effects, or fine-tuning your audio, keyboard shortcuts allow you to stay focused and productive, reducing the time spent on repetitive tasks and increasing the precision of your work.
For many Final Cut Pro users, learning the software's shortcuts can be a game-changer. These shortcuts offer an immediate boost in efficiency, allowing you to make edits more quickly and intuitively. By using shortcuts for common actions, such as cutting clips, moving through the timeline, or adjusting audio levels, you can seamlessly transition between tasks and avoid interrupting the flow of your creative process. More advanced users will find that mastering keyboard shortcuts enables them to dive deeper into Final Cut Pro’s full set of features, giving them greater control over editing decisions and enhancing their ability to produce professional-grade video projects.
This guide provides a comprehensive list of essential Final Cut Pro keyboard shortcuts, ranging from basic navigation to advanced editing techniques. Each section covers specific tasks in detail, from importing and organizing media to editing clips, working with audio, and applying effects. We’ve also included shortcuts for managing your project, using markers, and controlling video playback, so that you can easily navigate your timeline and make the best use of the editing tools at your disposal.
While learning all the shortcuts at once may seem like a daunting task, even mastering a handful of commonly-used ones can significantly enhance your productivity. Start by incorporating the most frequently-used commands into your workflow and gradually build up your skills as you grow more comfortable with Final Cut Pro’s powerful editing environment. Whether you’re an aspiring video editor or an experienced professional, leveraging keyboard shortcuts will help you become more proficient and efficient in your editing process, ultimately saving you valuable time and helping you achieve your creative vision.
General Editing Shortcuts
These shortcuts cover the fundamental actions you’ll perform most often in Final Cut Pro, making your editing process more efficient. Cmd + N helps you quickly create a new project, while Cmd + I allows for easy media imports. Cmd + Sensures that your project is saved, and Cmd + O lets you open an existing project. Cmd + W and Cmd + Q help you close or quit the application respectively when you’re done working.
When editing, Cmd + Z and Shift + Cmd + Z let you undo and redo actions quickly, while Cmd + C, Cmd + V, and Cmd + X are for copying, pasting, and cutting clips. If you need to delete something, simply hit Delete, and for pasting effects or other properties between clips, Option + Cmd + V comes in handy. The Cmd + D shortcut is useful for deselecting clips, and Cmd + F makes it easy to find specific clips or keywords in your project.
These shortcuts save you time by eliminating the need to use the mouse for every task and allow for smoother, faster editing.
General Editing Shortcuts:
Cmd + N: Create a new project
Cmd + I: Import media files
Cmd + S: Save the current project
Cmd + O: Open an existing project
Cmd + W: Close the current project
Cmd + Q: Quit Final Cut Pro
Cmd + Z: Undo the last action
Shift + Cmd + Z: Redo the undone action
Cmd + C: Copy selected clips
Cmd + V: Paste copied clips into the timeline
Cmd + X: Cut selected clips
Delete: Delete selected clip(s) from the timeline
Option + Cmd + V: Paste attributes (useful for pasting effects, transforms, etc., to other clips)
Cmd + Shift + Z: Redo multiple undo actions
Cmd + D: Deselect all clips
Cmd + F: Find specific clips or keywords
Timeline Navigation Shortcuts
Efficient timeline navigation is key to smooth video editing, and these shortcuts will help you quickly move through your project. Spacebar allows you to toggle play and pause, while J and L control playback speed (backward and forward). Pressing K pauses the playback.
For precise control over the playhead, use the Left Arrow and Right Arrow to move it one frame backward or forward. Shift + Left Arrow and Shift + Right Arrow jump the playhead to the previous or next edit point (cuts), helping you navigate through edits quickly.
If you need finer adjustments, Option + Left Arrow and Option + Right Arrow nudge the playhead one frame at a time. Cmd + Left Arrow and Cmd + Right Arrow will jump to the start or end of the timeline, while Home and End allow you to quickly navigate to the beginning or end of your project or clip.
Timeline Navigation Shortcuts:
Spacebar: Play/Pause playback
J: Play backward (press multiple times to increase speed)
K: Pause playback
L: Play forward (press multiple times to increase speed)
Left Arrow: Move the playhead one frame backward
Right Arrow: Move the playhead one frame forward
Shift + Left Arrow: Move the playhead to the previous edit point (cut)
Shift + Right Arrow: Move the playhead to the next edit point
Option + Left Arrow: Nudge the playhead one frame backward
Option + Right Arrow: Nudge the playhead one frame forward
Cmd + Left Arrow: Go to the start of the timeline
Cmd + Right Arrow: Go to the end of the timeline
Home: Go to the beginning of the clip or project
End: Go to the end of the clip or project
Clip Editing and Manipulation Shortcuts
These shortcuts are designed to help you edit and manipulate clips efficiently in Final Cut Pro, giving you greater control over your editing tasks. Cmd + R opens the Retime Editor, allowing you to adjust the speed of your clips, while Cmd + Tadds a default video transition (cross dissolve) between clips. Similarly, Cmd + Shift + T adds a default audio fade transition, making audio edits smoother.
For more specific transitions, Ctrl + T applies a video transition to the selected clip(s). When working with multiple clips, Cmd + Shift + D quickly deselects all clips in the timeline, and Option + W inserts a gap clip at the playhead's current position. If you need to append clips, Option + E adds the clip to the end of the timeline.
For advanced manipulation, Cmd + Shift + R reverses the playback direction of a clip, and the Cmd + 4 through Cmd + 7 shortcuts provide easy access to the Inspector panel, Video Scopes, Audio Meters, and the Timeline Index, respectively. These tools are essential for adjusting clip properties, monitoring video and audio levels, and navigating your project efficiently.
Clip Editing and Manipulation Shortcuts:
Cmd + R: Show/Hide the retime editor (for adjusting clip speed)
Cmd + T: Add a default video transition (cross dissolve)
Cmd + Shift + T: Add a default audio transition (audio fade)
Ctrl + T: Add video transition to selected clip(s)
Cmd + Shift + D: Deselect all clips in the timeline
Option + W: Insert a gap clip at the playhead position
Option + E: Append clip to the end of the timeline
Cmd + Shift + R: Reverse the playback direction of the clip
Cmd + 4: Toggle the Inspector panel (for clip properties)
Cmd + 5: Toggle the Video Scopes window
Cmd + 6: Toggle the Audio Meters window
Cmd + 7: Toggle the Timeline Index panel (for quickly navigating timeline markers, clips, and compound clips)
Clip Trimming and Cutting Shortcuts
When working with clips in Final Cut Pro, precise trimming and cutting are essential for creating a smooth and polished final product. The B key activates the Blade tool, allowing you to cut clips at the playhead position. Cmd + B extends this functionality by allowing you to blade all clips at the playhead, making quick cuts across multiple clips in your timeline.
For trimming, T activates the Trim tool, which lets you fine-tune the in and out points of clips. Cmd + T adds a default transition (cross dissolve) between two clips, and Option + Cmd + T applies a default audio transition to smooth the audio between clips.
To adjust the placement of clips in small increments, use Option + Left Arrow and Option + Right Arrow to nudge the selected clip(s) left or right by one frame. Finally, Shift + Delete is a powerful shortcut for performing a ripple delete, which removes the selected clip and closes the gap, saving you time when editing.
Clip Trimming and Cutting Shortcuts:
B: Activate the Blade tool (to cut clips at the playhead)
Cmd + B: Blade all clips at the playhead position
T: Activate the Trim tool (for trimming clips)
Cmd + T: Apply a default transition between clips
Option + Cmd + T: Apply default transition on audio
Option + Left Arrow: Nudge the selected clip(s) left by one frame
Option + Right Arrow: Nudge the selected clip(s) right by one frame
Shift + Delete: Ripple delete (removes clip and closes the gap)
Audio Editing Shortcuts
Audio editing is a crucial aspect of video production, and these shortcuts will help you manage and adjust audio elements quickly and efficiently. Ctrl + Shift + S opens the audio editor in the timeline, allowing you to make detailed audio adjustments. Cmd + Shift + N adds a new audio track to your project, giving you more space to organize your audio clips.
To better visualize your audio, Option + Cmd + R enables or disables the display of audio waveforms, making it easier to see and edit specific audio sections. Shift + Cmd + A is a toggle that allows you to enable or disable all audio clips, which is especially useful when you need to focus on other elements of your project.
For adjusting audio levels, Cmd + U normalizes the audio levels of the selected clip(s), ensuring they are at a consistent volume. You can fine-tune individual audio clip volume using Option + Cmd + Up Arrow to increase or Option + Cmd + Down Arrow to decrease the volume.
Finally, Cmd + L links selected audio and video clips together, while Cmd + Shift + L unlinks them. This is essential for maintaining proper synchronization or allowing independent editing of audio and video.
Audio Editing Shortcuts:
Ctrl + Shift + S: Open the audio editor in the timeline
Cmd + Shift + N: Add new audio track
Option + Cmd + R: Enable/Disable audio waveform display
Shift + Cmd + A: Enable/Disable all audio clips
Cmd + U: Normalize audio levels of the selected clip(s)
Option + Cmd + Up Arrow: Increase audio clip volume
Option + Cmd + Down Arrow: Decrease audio clip volume
Cmd + L: Link selected audio and video clips
Cmd + Shift + L: Unlink selected audio and video clips
Marker and Media Management Shortcuts
Markers are essential for organizing and navigating your timeline, and these shortcuts help you efficiently manage them. M adds a default marker to the timeline, allowing you to quickly mark important points. Cmd + M enables you to add a customized marker with a description, giving it a specific name for easier identification. If you need to add additional notes or comments, Option + M lets you add a marker with a comment.
Navigating between markers is just as simple with Shift + M to jump to the next marker and Cmd + Shift + M to move to the previous marker, helping you quickly navigate your project based on the markers you’ve set.
In addition to working with markers, Cmd + 1 through Cmd + 9 allow you to toggle various panels, giving you access to essential tools. Cmd + 1 opens or hides the Library panel, where you can browse through clips, events, and projects. Cmd + 2 toggles the Browser panel for managing your media and effects, and Cmd + 3 shows or hides the Inspector panel for editing clip properties and applying effects. Cmd + 9 opens or closes the Titles panel, allowing you to add text to your project.
Marker and Media Management Shortcuts:
M: Add a marker to the timeline (default marker)
Cmd + M: Add a marker with a description (customize marker name)
Option + M: Add a marker with a comment or note
Shift + M: Go to the next marker in the timeline
Cmd + Shift + M: Go to the previous marker in the timeline
Cmd + 1: Show/Hide the Library panel (for browsing clips, events, and projects)
Cmd + 2: Show/Hide the Browser panel (for managing media and effects)
Cmd + 3: Show/Hide the Inspector panel (for editing properties and effects)
Cmd + 9: Show/Hide the Titles panel (for adding text to your project)
Effects and Transitions Shortcuts
Effects and transitions are vital for adding polish and style to your video project, and these shortcuts allow you to quickly access and apply them. Cmd + 5 opens the Effects Browser, where you can find video, audio, and transition effects. Shift + Cmd + 5 toggles the Effects Browser, which is especially useful when searching for specific effects or presets to enhance your clips.
To apply effects directly, Cmd + Shift + F allows you to add a filter to the selected clip(s). For more specific effect applications, Ctrl + Cmd + 1, Ctrl + Cmd + 2, and Ctrl + Cmd + 3 enable you to apply video, audio, or title effects to your clip, respectively.
These shortcuts provide a fast and intuitive way to enhance your project with effects and transitions, allowing for a more efficient editing process.
Effects and Transitions Shortcuts:
Cmd + 5: Show the Effects Browser (for video, audio, and transitions)
Shift + Cmd + 5: Open/close the Effects Browser (for searching effects and presets)
Cmd + Shift + F: Apply a filter to the selected clip(s)
Ctrl + Cmd + 1: Apply a video effect to the clip
Ctrl + Cmd + 2: Apply an audio effect to the clip
Ctrl + Cmd + 3: Apply a title effect to the clip
Project and Timeline Management Shortcuts
Effective project and timeline management is key to maintaining organization and efficiency while editing. Cmd + Shift + N lets you create a new timeline within your project, allowing you to organize different sections or versions of your video. Cmd + Shift + G creates a new compound clip, which is useful for grouping multiple clips into a single, manageable unit.
If you need to rename your current project or timeline, Cmd + Shift + R helps you quickly update the name. Cmd + Rtoggles the Retime Editor, which is essential for making speed adjustments to your clips. For managing clip grouping, Option + G groups selected clips together, while Cmd + G creates a compound clip from the selected clips, making it easier to handle complex edits. If you need to break a compound clip apart, Shift + Cmd + G ungroups it, giving you control over individual clips again.
These shortcuts simplify project and timeline management, allowing for smoother transitions between different sections of your project.
Project and Timeline Management Shortcuts:
Cmd + Shift + N: Create a new timeline
Cmd + Shift + G: Create a new compound clip
Cmd + Shift + R: Rename the current project or timeline
Cmd + R: Show/Hide the Retime Editor (for speed adjustments)
Option + G: Group selected clips together
Cmd + G: Create a compound clip from selected clips
Shift + Cmd + G: Ungroup selected compound clips
Full-Screen Mode Shortcuts
Working in full-screen mode allows you to focus entirely on your project without distractions from other apps or interface elements. Ctrl + Cmd + F toggles the full-screen view of Final Cut Pro, providing a cleaner workspace and maximizing the editing area. This is especially useful when you need to immerse yourself in detailed edits or when you're working with multiple monitors and want to dedicate one screen solely to your editing timeline.
Full-Screen Mode Shortcuts:
Ctrl + Cmd + F: Toggle full-screen view of Final Cut Pro
Unlock Your Full Creative Potential with Vagon’s High-Performance Cloud PCs
Supercharge your video editing workflow and elevate your Final Cut Pro projects with Vagon’s cutting-edge cloud PCs. Whether you’re tackling complex timelines, working with high-resolution footage, or layering multiple effects, Vagon provides the raw power you need to ensure smooth, efficient editing. Equipped with 48 cores, 4 x 24GB RTX-enabled Nvidia GPUs, and 192GB of RAM, Vagon’s cloud infrastructure gives you the processing power of a professional-grade workstation, all accessible directly from your browser.
Gone are the days of waiting for render times or feeling limited by your hardware. With Vagon, you can access your workspace and files instantly from any device, anytime, anywhere. Work on your projects without interruption, collaborate effortlessly, and make every edit with precision and speed. Whether you’re an aspiring content creator or a seasoned video editing professional, Vagon is designed to meet your needs and streamline your workflow.
Experience the future of video editing—powerful, efficient, and always at your fingertips. Try Vagon today and see how our high-performance cloud PCs can revolutionize your Final Cut Pro editing experience.
Conclusion
Mastering Final Cut Pro keyboard shortcuts is one of the most effective ways to enhance your editing workflow and boost productivity. By incorporating these shortcuts into your daily routine, you can significantly reduce the time spent on repetitive tasks, allowing you to focus more on creativity and the quality of your work. Whether you’re a beginner just starting to explore Final Cut Pro or an experienced editor refining your skills, the ability to navigate the software with speed and precision will set you apart in the world of video editing.
Remember, practice makes perfect—so start small, incorporate a few shortcuts at a time, and gradually expand your knowledge. Over time, these shortcuts will become second nature, helping you edit with greater ease and efficiency. To make sure your projects render as quickly as you edit, check out these proven tips to make Final Cut Pro render faster and keep your workflow running smoothly.
And for those looking to take their editing experience to the next level, Vagon’s high-performance cloud PCs offer the power and flexibility you need to tackle even the most demanding Final Cut Pro projects. Experience faster rendering times, smoother playback, and a more efficient workflow today!
FAQs
1. How can I learn Final Cut Pro keyboard shortcuts quickly?
Start by focusing on the most frequently used shortcuts such as copy, paste, undo, and trimming. Gradually incorporate more advanced shortcuts as you become comfortable with the basic ones. Practice regularly, and over time, they will become second nature.
2. Can I customize Final Cut Pro keyboard shortcuts?
Yes, Final Cut Pro allows you to customize keyboard shortcuts. You can modify existing shortcuts or create your own based on your preferences by going to Final Cut Pro > Commands > Customize.
3. Are there keyboard shortcuts for working with audio in Final Cut Pro?
Yes, Final Cut Pro offers several shortcuts specifically for audio editing. For example, you can normalize audio levels with Cmd + U, adjust audio volume using Option + Cmd + Up/Down Arrow, and toggle audio waveforms with Option + Cmd + R.
4. How do I move through my timeline quickly using keyboard shortcuts?
To navigate your timeline, use the Left and Right Arrow keys to move one frame at a time, or Shift + Left/Right Arrow to jump between edit points. You can also jump directly to the beginning or end of the timeline using Cmd + Left Arrow and Cmd + Right Arrow.
5. Is there a way to apply transitions between clips faster?
Yes, you can add transitions quickly using keyboard shortcuts. Cmd + T applies a default video transition (cross dissolve), while Cmd + Shift + T adds a default audio fade. You can also use Ctrl + T to apply specific video transitions.
6. How do I manage clips and markers efficiently in Final Cut Pro?
Final Cut Pro offers shortcuts like M to add a default marker, Cmd + M to add a custom marker with a description, and Shift + M to jump to the next marker. You can also quickly toggle panels such as the Library and Inspector using Cmd + 1 through Cmd + 3 for better organization and navigation.
Get Beyond Your Computer Performance
Run applications on your cloud computer with the latest generation hardware. No more crashes or lags.

Trial includes 1 hour usage + 7 days of storage.
Summarize with AI

Ready to focus on your creativity?
Vagon gives you the ability to create & render projects, collaborate, and stream applications with the power of the best hardware.

Vagon Blog


Run heavy applications on any device with
your personal computer on the cloud.
San Francisco, California
Solutions
Vagon Teams
Vagon Streams
Use Cases
Resources
Vagon Blog
How to Run Audacity on a Cloud Ubuntu Desktop (2026 Guide)
How to Run Darktable on a Cloud Ubuntu Desktop for RAW Photo Editing (2026 Guide)
How to Run Kdenlive on a Cloud Ubuntu Desktop (2026 Guide)
How to Run DaVinci Resolve on Linux in the Cloud (2026 Guide)
How to Run Inkscape on a Cloud Ubuntu Desktop (2026 Guide)
How to Run Krita on a Cloud Ubuntu Desktop for Digital Painting (2026 Guide)
How to Run GIMP on a Cloud Ubuntu Desktop (2026 Guide)
How to Run Jupyter on a Cloud GPU Linux Desktop (2026 Guide)
Vagon vs GitHub Codespaces: Cloud Dev Environments Compared (2026)
Vagon Blog
Run heavy applications on any device with
your personal computer on the cloud.
San Francisco, California
Solutions
Vagon Teams
Vagon Streams
Use Cases
Resources
Vagon Blog