Instant Connection for Pixel Streaming
— New Feature Automated Setup

How to Master the SketchUp to Twinmotion Workflow
How to Master the SketchUp to Twinmotion Workflow
Architecture
How to Master the SketchUp to Twinmotion Workflow
Table of Contents
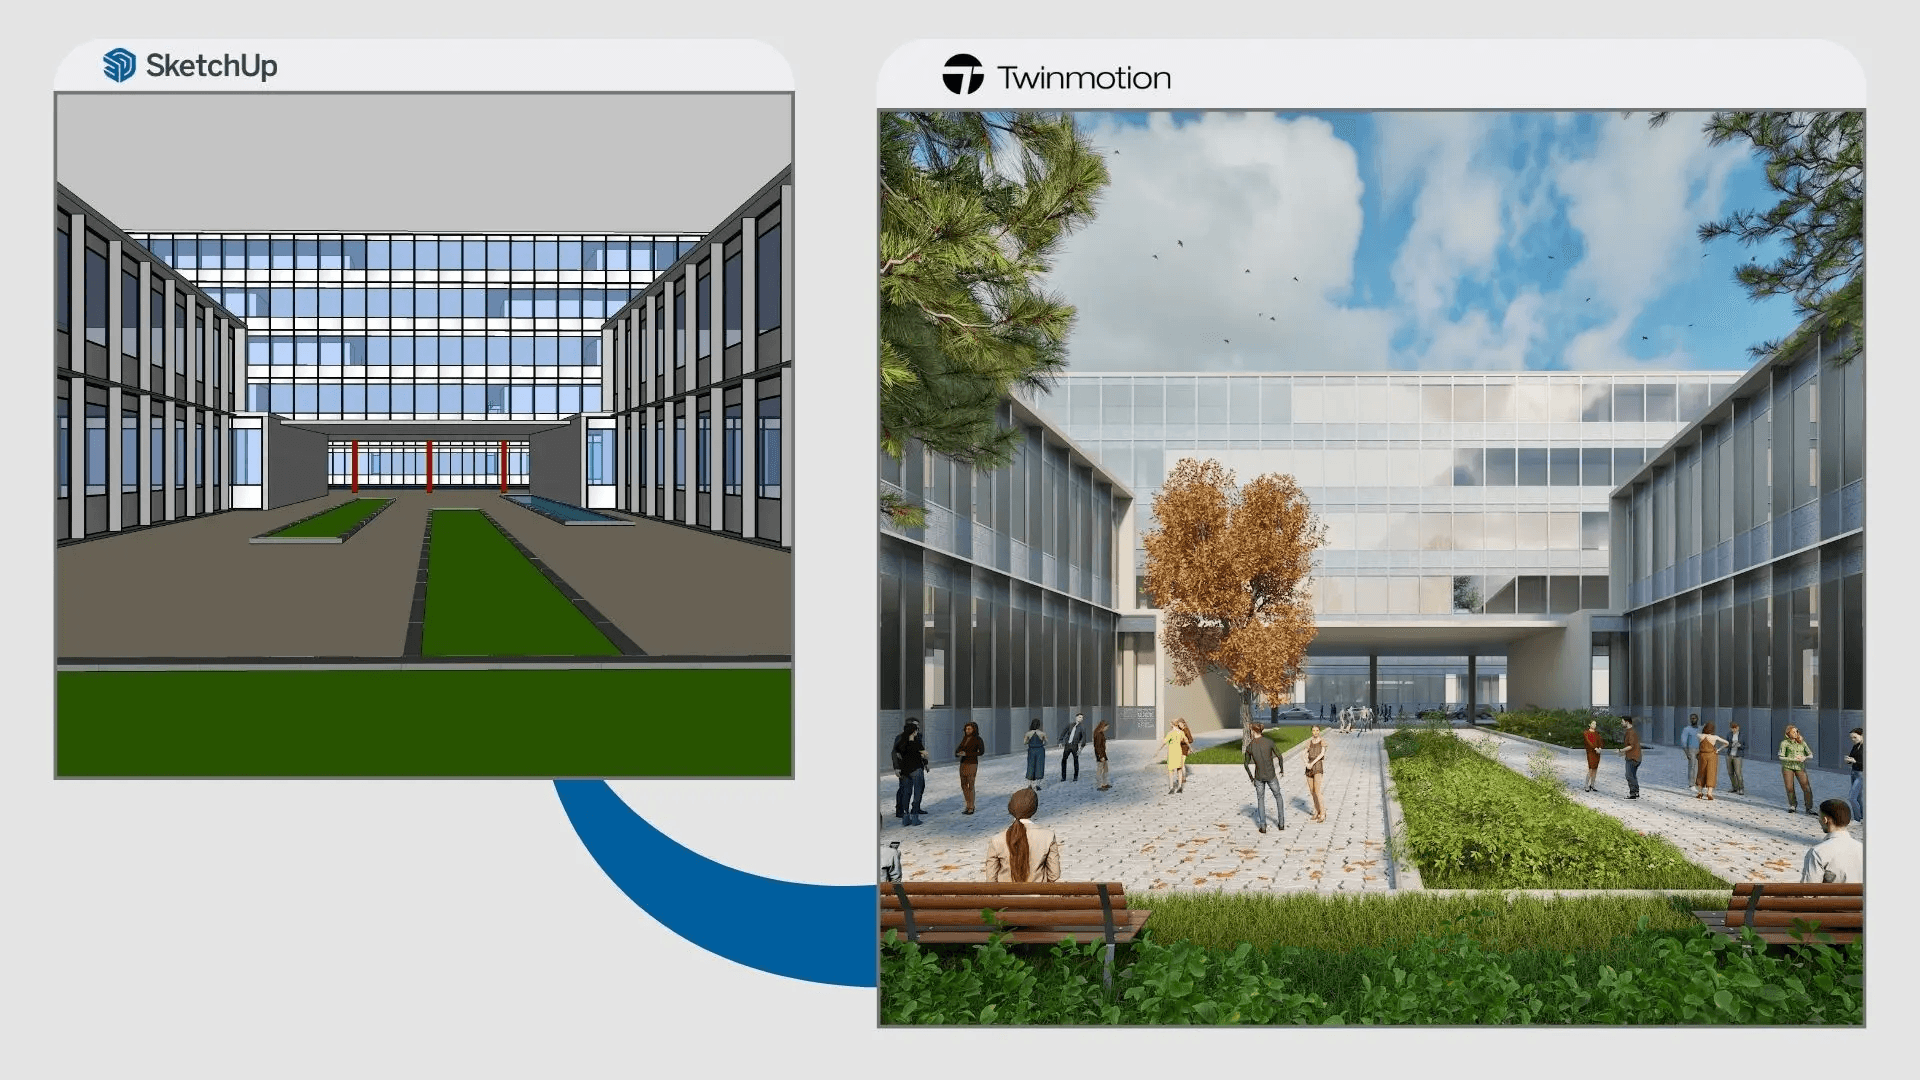
Late nights and looming deadlines are all too familiar in the world of architecture and design. You’ve spent countless hours perfecting every detail of your model in SketchUp, from the texture of the walls to the angle of the windows. The design is finally coming together, but now, it’s time to take that model to the next level. Enter Twinmotion, the real-time visualization tool that promises to turn your static SketchUp model into a stunning, immersive experience with lifelike environments, lighting, and animation. The goal is to present your work in a way that goes beyond still images, offering clients and stakeholders an interactive experience that captures the true essence of your design.
However, as many designers and architects can attest, exporting from SketchUp to Twinmotion can often be a tricky process. Models that look perfect in SketchUp may lose their charm when imported into Twinmotion. Textures misalign, materials don’t display as expected, and the scene may look flat or overly stylized in ways that aren’t true to your vision. It’s frustrating to put hours of effort into a model only to see it fail to translate well into Twinmotion, even after multiple attempts.
But don’t worry, you’re not alone in this struggle. Understanding the key steps involved in exporting from SketchUp to Twinmotion is crucial to avoid these pitfalls. This guide is designed to walk you through the process, from cleaning up your SketchUp model for export to ensuring your materials and textures are correctly applied in Twinmotion. Along the way, we’ll tackle some of the most common challenges faced by designers when moving between these two platforms and show you how to overcome them efficiently. By the end, you’ll have the knowledge and confidence to create beautiful, high-quality renderings and walkthroughs, seamlessly bridging the gap between SketchUp and Twinmotion.
Whether you're an experienced designer or someone just starting to experiment with real-time visualization, this guide will help streamline your workflow and ensure your projects look their best at every stage. Let’s dive into how you can make the most out of the SketchUp-to-Twinmotion export process and transform your designs into something truly exceptional.
Preparing Your SketchUp Model for Twinmotion
To ensure a seamless transition from SketchUp to Twinmotion, meticulous preparation of your SketchUp model is essential. This process involves organizing your model's structure, optimizing geometry, and ensuring that materials are correctly assigned. Here's how you can achieve this:
#1 Organize Your Model's Structure:
Begin by organizing your model's components using layers or tags. This practice not only streamlines the export process but also enhances the management of different elements within Twinmotion. For instance, grouping similar elements together allows for easier manipulation and rendering in Twinmotion.
#2 Simplify Geometry:
Complex geometries can pose challenges during the export. Simplify intricate details without compromising the model's integrity. This simplification reduces the likelihood of errors and ensures that Twinmotion processes your model efficiently.
#3 Assign Materials Thoughtfully:
Assigning materials in SketchUp is crucial for accurate representation in Twinmotion. Ensure that materials are applied consistently and that their properties are appropriately set. This consistency facilitates a smoother import and more accurate rendering outcomes.
#4 Check for Inconsistencies:
Before exporting, thoroughly inspect your model for any inconsistencies such as reversed faces, missing textures, or overlapping geometries. Addressing these issues beforehand prevents potential complications during the import into Twinmotion.
For a comprehensive walkthrough on preparing and exporting your SketchUp model to Twinmotion, you might find this tutorial helpful:
Rendering a SketchUp Model in Twinmotion – COMPLETE BEGINNER TUTORIAL
Choosing the Right Export Method
Selecting the appropriate export method is pivotal for maintaining the integrity of your model and streamlining your workflow. Twinmotion offers several options for importing SketchUp models:
Direct Link via Datasmith Exporter:
The Datasmith Exporter plugin facilitates a direct link between SketchUp and Twinmotion, enabling real-time synchronization of your models. This method is particularly beneficial for iterative design processes where frequent updates are made.
Installation: Ensure that the Datasmith Exporter plugin is installed in your SketchUp environment. This plugin is compatible with SketchUp Pro versions 2019 through 2024. (Twinmotion Datasmith Plugin)
Usage: Once installed, the plugin allows you to synchronize your SketchUp models directly into Twinmotion with a single click, streamlining your workflow and enhancing productivity.
Manual Import:
If you prefer not to use the direct link, you can manually export your SketchUp model as an SKP file and import it into Twinmotion. This method requires re-importing the model each time changes are made, which can be less efficient for dynamic projects.
Alternative Formats:
Exporting your model in formats such as FBX or OBJ is another option. However, these formats may require additional adjustments within Twinmotion, especially concerning materials and textures.
For a detailed discussion on the differences between these methods and their implications on your workflow, you might find this forum thread insightful:
By thoughtfully preparing your SketchUp model and selecting the export method that best aligns with your project needs, you can ensure a smooth and efficient transition to Twinmotion, paving the way for high-quality visualizations.
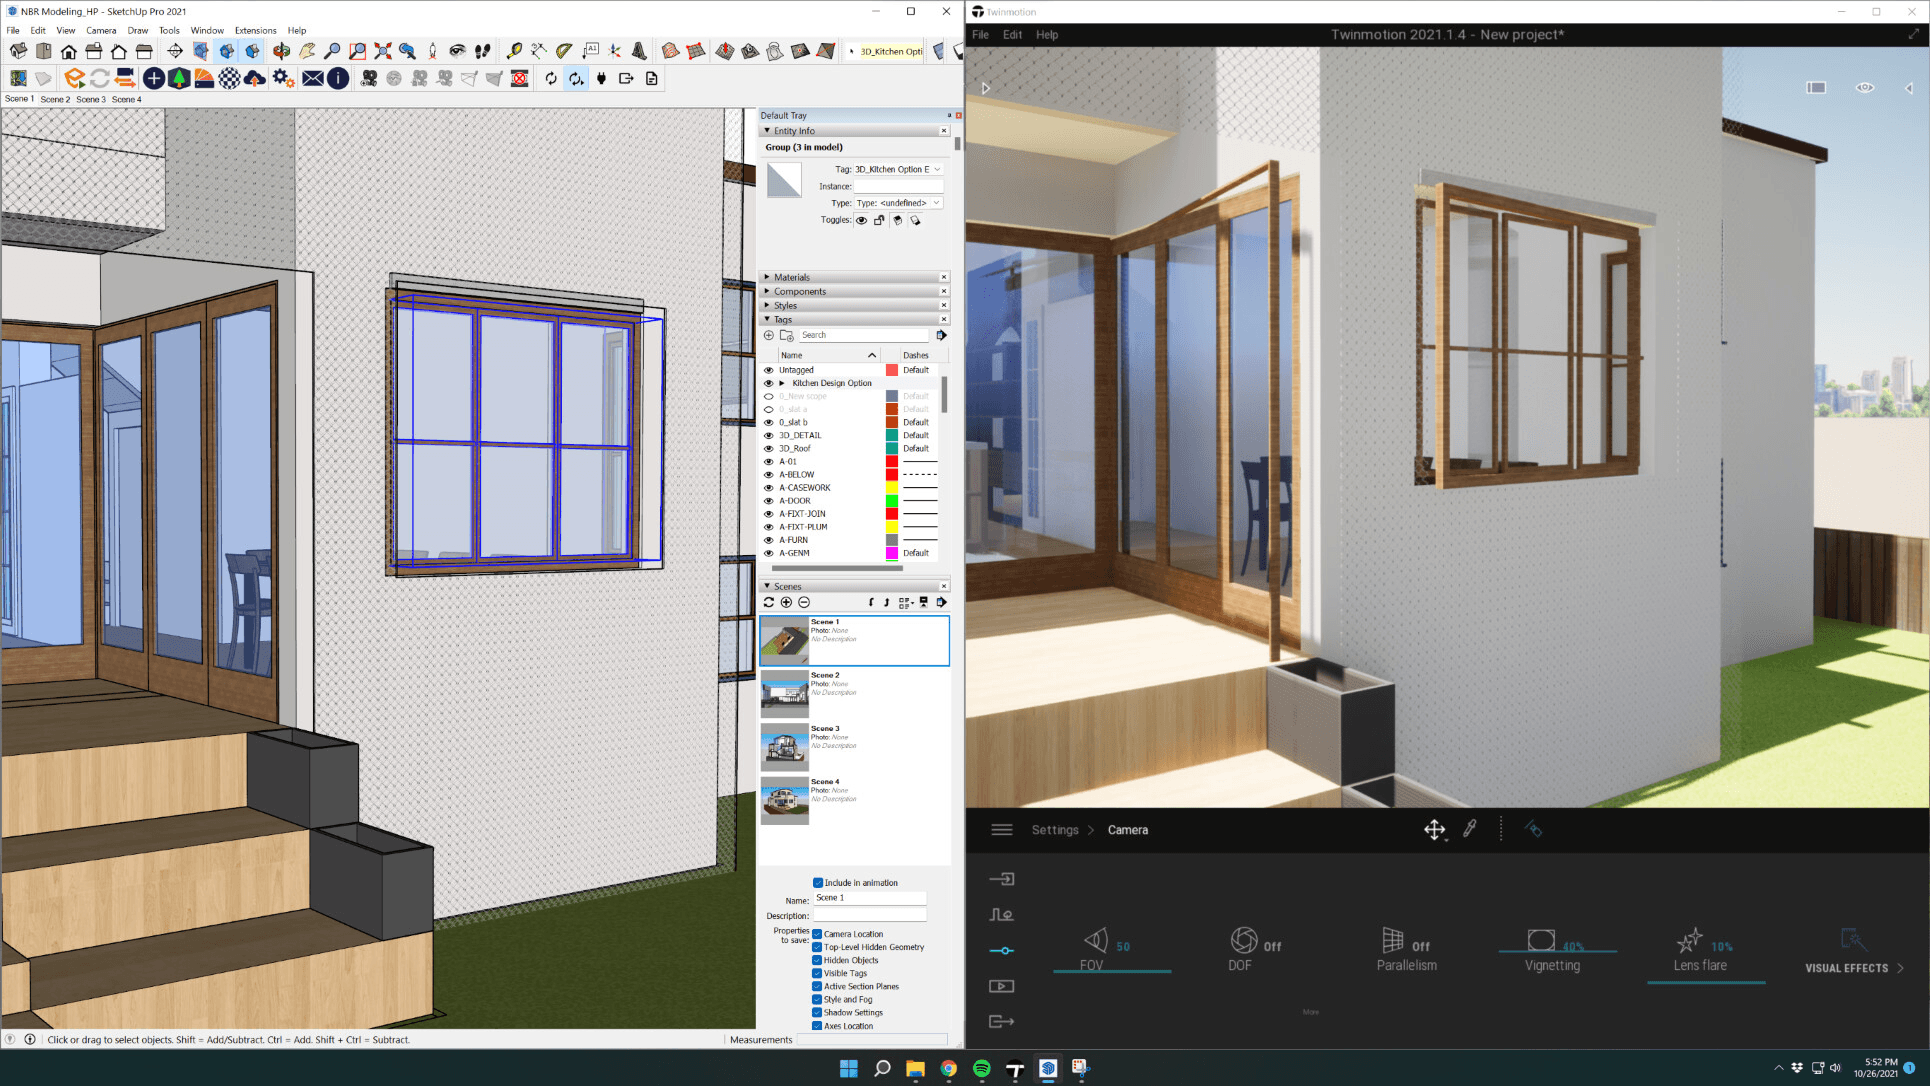
The First Import: Into the World of Twinmotion
Once your SketchUp model is properly prepared and you've selected the right export method, it’s time to bring your model into Twinmotion. While this may seem like the finish line, it’s important to remember that this first import is just the beginning. Twinmotion's powerful features can breathe life into your design, but the import process requires attention to detail to ensure that everything appears as it should.
When you first import your SketchUp model into Twinmotion, you may be greeted by some immediate challenges. It's not uncommon for textures to appear misaligned or materials to look different than they did in SketchUp. In some cases, Twinmotion may interpret certain materials in a way that makes them look overly shiny, flat, or not quite right for your scene. These are common issues, and thankfully, they are solvable with a few adjustments.
Start by checking the materials:
Twinmotion may interpret SketchUp materials in ways that don’t match your expectations. This can include issues like a glossy texture where you intended for a matte finish, or an overly reflective surface in areas that should be more subtle. You can solve this by selecting the material in Twinmotion and adjusting its properties. Look for settings related to glossiness, transparency, and roughness. It’s a good idea to experiment with these settings to get the appearance just right.
Scale and orientation issues:
Another common issue after the import is scale. Sometimes, your model may appear either too large or too small in Twinmotion. This could be due to discrepancies in the unit settings between the two programs. Before you import your model, double-check the units in SketchUp to ensure that they align with Twinmotion’s settings. If issues persist, you can scale the model directly within Twinmotion using the scaling tools to get it to the correct size. Similarly, keep an eye on the orientation of your model. In some cases, models imported from SketchUp may be rotated incorrectly or have their axes flipped. This is easy to fix within Twinmotion by adjusting the orientation settings.
Camera angles and lighting:
When transferring your model, the camera angles and lighting from SketchUp will not automatically transfer to Twinmotion. To create the best possible result, you’ll need to reposition your camera views in Twinmotion. Take advantage of the camera tools in Twinmotion to position your views with more precision and set up new shots that showcase your design. Lighting in Twinmotion is another area that requires tweaking. Twinmotion’s real-time lighting system is one of its strongest features, but it will not match the lighting you had in SketchUp. You’ll need to adjust the time of day, sun intensity, and artificial lights to achieve the right atmosphere for your model.
Test your materials and textures:
To make sure that all your textures are correctly applied and scaled, it’s worth doing a quick walkthrough of your model in Twinmotion after the initial import. This can help identify any textures that may have gone missing or any elements that require reapplication. If you find that certain textures appear incorrectly, consider manually reassigning them or adjusting their mapping in Twinmotion’s material editor.
For a more in-depth look at what you can do after your first import, this video provides a step-by-step approach on how to troubleshoot and tweak imported models:
https://www.youtube.com/watch?v=xT5hPHVv8fY
Fixing Common Import Issues
When you first import your SketchUp model into Twinmotion, you might face other issues, such as missing textures, broken geometry, or overly complex components. Don’t be discouraged—these are common problems, and there are several methods to address them.
If your model has missing textures, the first thing you should check is the relative pathing of your texture files. Twinmotion might struggle to find textures if they were not saved in the right directory or if there were issues with the way SketchUp exported the texture file paths. In this case, you can manually assign textures or use the material replacement tool within Twinmotion to fix these problems.
Broken geometry, especially with complex components, can also occur during the import. Some parts of your model might not import as expected, either because of their complexity or the way they were grouped. A quick fix is to use Twinmotion’s geometry tools to break down complex components into simpler ones or manually edit any areas that didn’t import correctly.
Finally, if you notice that the overall quality of the model seems off, or that the import took too long, it may be because the model is too heavy. You can reduce the polygon count in SketchUp before exporting, or use Twinmotion’s performance tools to optimize the scene and improve rendering times.
By addressing these issues early on and making adjustments as needed, you can start bringing your SketchUp model to life in Twinmotion. The first import is all about getting familiar with how the two programs interact and what changes need to be made to ensure your design is accurately represented.
Breathing Life Into the Scene

Now that you’ve successfully imported your SketchUp model into Twinmotion and have sorted out any material or scale issues, it's time to move on to the fun part: breathing life into the scene. This is where Twinmotion truly shines, transforming your static model into an immersive, dynamic visualization. Whether you’re creating still images, animations, or interactive walkthroughs, this step is all about adding realism and atmosphere to your design.
Lighting Setup:
One of the first things you’ll want to adjust in Twinmotion is the lighting. Twinmotion’s real-time lighting system allows you to quickly and easily modify the mood of your scene by adjusting the sun position, intensity, and sky settings. You can change the time of day, experiment with different lighting scenarios, and see the effects immediately. For indoor scenes, consider adding artificial lights such as spotlights, area lights, or ambient lighting to highlight key elements of your design.
Real-time lighting is incredibly powerful in Twinmotion, so it’s important to take the time to adjust it properly. Play around with the sun’s angle to see how it casts shadows across your model. If your model has windows or glass elements, watch how the light interacts with these materials to ensure a realistic effect. The beauty of Twinmotion’s real-time preview is that you can tweak settings on the fly and immediately see the results.
Vegetation and Assets:
Next, it’s time to populate your scene with vegetation, people, and other assets that help to create a lively and realistic environment. Twinmotion offers a large library of 3D models, including trees, shrubs, furniture, vehicles, and even people. These assets can add depth and life to your scene, making it feel like a true representation of your design in the real world.
For exteriors, carefully select the right types of vegetation that complement your architecture. Choose trees, grass, and shrubs that match the scale and style of your project. For interiors, adding furniture, lighting fixtures, and decorative elements helps make the space feel lived-in. Keep in mind that it’s important to balance detail with performance. While adding a variety of assets can make your scene look richer, too many can slow down performance, especially when working with larger models.
Animating the Scene:
One of the standout features of Twinmotion is its ability to animate objects and cameras, bringing your model to life. Animating people, vehicles, and even the sky can help add realism to your scene and elevate your visualizations. For example, you could animate people walking along pathways, cars driving down streets, or trees swaying in the wind. These dynamic elements can make your renderings feel more like a video game, where users can interact with the scene and get a true sense of movement and scale.
You can also animate camera paths, creating flythroughs and walkthroughs of your design. This is particularly useful for presentations or client reviews, where you want to give a sense of what it would be like to move through the space. Take advantage of the animation tools in Twinmotion to create smooth transitions between different camera angles, offering a detailed look at your project from multiple perspectives.
Atmosphere and Weather Effects:
Adding atmospheric elements like weather effects, fog, and clouds can dramatically change the mood of your scene. Twinmotion allows you to control the time of day, weather conditions, and even the direction of the wind. If you want to showcase how your building interacts with different environmental conditions, this is the step where you can do that.
For example, if you’re designing an outdoor space, you can create a rainy day atmosphere with puddles forming on the ground and reflections appearing in the water. Or, if you want to create a bright and sunny day, you can adjust the sky settings to showcase a clear, cloudless sky. These subtle touches help your scene feel more immersive and realistic.
Refining Materials and Textures:
After adding vegetation, assets, and environmental elements, don’t forget to revisit your materials. Take a moment to adjust the texture settings, roughness, and reflections. Twinmotion’s material editor allows you to refine the look of every surface in your model. For instance, if your flooring looks too shiny or your walls appear too flat, you can adjust the material properties to achieve a more realistic result.
You may also want to check how materials interact with the lighting in your scene. Some materials, such as glass or water, can react to light in complex ways. Twinmotion allows you to fine-tune these interactions to ensure that your materials look their best under different lighting conditions.
By focusing on lighting, assets, animation, atmosphere, and materials, you can breathe life into your SketchUp model and create a realistic, dynamic visualization in Twinmotion. This is where you can make your design feel truly immersive, offering clients and stakeholders a glimpse into the future of the space. With these adjustments, you’re on your way to creating stunning visualizations that showcase your architectural vision in the best possible light.
Exporting from Twinmotion: Final Touches
With your scene fully animated and enriched with lighting, textures, and assets, it’s time to prepare for the final export. Whether you're preparing still images, videos, or panoramic renders for presentation, the export process in Twinmotion is where you fine-tune your project for the highest quality output. Before hitting the export button, make sure to check your settings and optimize them for the intended medium. Here’s how to get the best results.
Choosing the Right Render Settings:
Twinmotion offers several rendering options, and the settings you select depend on what you plan to do with the final output. For still images, you want to ensure your render quality is set to high or ultra-high. This setting controls things like resolution, texture detail, and anti-aliasing to provide a crisp, professional finish. However, higher-quality renders also take longer to process, so be prepared for a longer wait time, especially for complex scenes with lots of detail.
For video exports, you’ll need to decide on frame rates and resolution. A typical video will have a frame rate of 24 or 30 frames per second, but if you plan to create smooth animations with fast camera movements, you might want to bump this up to 60 FPS for a more fluid effect. Likewise, ensure that your resolution is set high enough for your intended medium, whether it’s for a screen display, social media, or large-format presentations.
For panoramic renders, which are great for VR presentations or immersive walkthroughs, make sure you use a high-resolution output, as panoramic images will require more detail to maintain their clarity when viewed in VR headsets.
Optimize Your Scene Before Rendering:
Before hitting export, do a final check of your scene’s performance. If you’re working with large, complex models, rendering can take a significant amount of time. If your scene feels sluggish, consider reducing the polygon count of certain assets or using lower-resolution textures where possible. While high-quality assets and textures will yield a more polished result, they can also make the scene much more demanding for your computer.
You can also take advantage of Twinmotion’s “Optimize for Rendering” tool, which helps to reduce unnecessary detail in your model that might not be visible in the final render. For example, distant objects can be simplified or removed, and layers that aren't crucial for the final image can be hidden.
Leveraging GPU Acceleration for Better Performance:
When working with high-quality renders, it’s crucial to ensure that your GPU is being fully utilized. Twinmotion’s real-time rendering engine is optimized for GPU acceleration, so enabling this can drastically improve both render times and overall performance. If you are using Twinmotion on a local machine and want to take full advantage of GPU power, make sure you enable GPU acceleration in the preferences and keep your drivers up to date. You can find more detailed instructions on how to use GPU on Twinmotion, including the right settings and setup process, in this guide from Vagon: How to Use GPU on Twinmotion.
Rendering in Layers: Another useful option in Twinmotion is the ability to render in layers. By breaking your render into different layers, such as background, foreground, and lighting, you can make post-processing much easier. This is especially useful when working with complex scenes that involve dynamic lighting or multiple animation paths. Post-processing in software like Photoshop or After Effects can significantly improve your render’s quality by adjusting individual layers, adding effects, or refining colors. Twinmotion’s layer-based rendering system gives you more flexibility when making final adjustments after the render.
Exporting for VR and Interactive Walkthroughs:
One of Twinmotion’s most exciting features is its ability to export interactive VR presentations. If you want to provide clients with a fully immersive experience, Twinmotion allows you to export your scene directly for VR devices. This export option creates a fully interactive, navigable walkthrough that can be viewed in real time in a VR headset.
For a more traditional interactive walkthrough, you can export a 360-degree panorama or a high-quality video walkthrough, both of which provide the user with a full understanding of the project space from various perspectives. Interactive panoramas are often used in real estate and architectural visualizations, as they allow potential clients or investors to explore a project from any angle.
Final Export and Presentation:
Once your render settings are optimized and you’re happy with your scene’s performance, it’s time to export. Whether you’re creating stills, animations, or VR experiences, Twinmotion makes it easy to generate high-quality outputs with minimal hassle. After export, you can take your visualizations to the next level by adding them to presentations, websites, or social media to showcase your work.
For a professional touch, consider using post-production software like Photoshop or After Effects to fine-tune colors, contrast, or lighting. This step can add depth and richness to your final images and help bring out the details in your project that might not be as noticeable in the raw render. You can also add elements like titles, annotations, or additional lighting effects to enhance the presentation.
Additional Export Tips:
Always ensure that you’re exporting with the appropriate resolution for your intended platform. Larger resolutions are necessary for high-quality prints, while smaller ones are fine for web use.
If you’re working with videos, make sure to check the output file format and codec. Popular choices include MP4 for web videos or MOV for high-quality presentations.
Before you hit the final export button, take a moment to preview your render with Twinmotion’s "Preview" feature to ensure everything is set up correctly.
By following these tips and optimizing your scene for export, you can ensure that your final output is of the highest quality, ready to impress your clients or colleagues. Whether it’s a still image, an animation, or a full VR experience, Twinmotion gives you the flexibility to showcase your design with stunning realism and clarity.
What Alex Would Do Differently Next Time
Now that you've gone through the whole process of exporting from SketchUp to Twinmotion and creating a detailed, polished visualization, it’s always valuable to take a step back and reflect on what worked well and what could have been improved. Alex, our fictional architect, has learned a lot through the process, and looking back, there are a few things she would do differently the next time she tackles a similar project.
Start With a Clean and Simplified Model:
One of the biggest takeaways from Alex’s experience is the importance of starting with a clean and simplified SketchUp model. Early on, Alex’s model was a bit too complex with lots of unnecessary details that only added to the workload and rendered poorly in Twinmotion. If she were to do it again, she’d spend more time cleaning up her SketchUp model before even starting the export process. Removing unnecessary geometry, purging unused materials, and organizing the model into logical groups would have saved a lot of time down the road, both in Twinmotion and during the export.
In hindsight, she also realized that simplifying textures (such as using lower-res textures for distant objects) could have improved the performance of her Twinmotion scene. By doing this earlier in the process, she could have avoided having to make last-minute fixes to the model in Twinmotion when it came time for rendering.
Utilize the Twinmotion Direct Link Plugin More Effectively:
While Alex initially used the manual export method due to her familiarity with the .SKP and .FBX file types, she found that the Direct Link plugin offered far more advantages in the long run. The ability to synchronize her SketchUp model with Twinmotion in real-time would have saved a lot of time during the iterative design process. Alex had to re-import her model multiple times during the project, which, in hindsight, could have been avoided with the Direct Link.
She also noted that Twinmotion’s live link helps maintain the materials, lighting, and animation settings that she made while adjusting the model. This would have been incredibly useful when making small tweaks after the initial export. Alex now recommends trying out the Direct Link for anyone working on dynamic or complex projects with frequent changes.
Prioritize Scene Organization in Twinmotion
One thing Alex didn’t do early on was organize her Twinmotion scene properly. As the project grew, she realized that organizing objects, materials, and lights into groups or layers inside Twinmotion could have helped her make quicker adjustments later on. When working with vegetation, assets, and dynamic objects, organizing them would have allowed her to manipulate entire sections of the scene without needing to do individual selections, saving time.
Additionally, Alex learned that optimizing her scene by grouping similar assets together allowed her to easily toggle visibility and make adjustments without disturbing other parts of the scene. This simple tip would have sped up her workflow considerably.
Experiment With More Complex Animations
While Alex created a stunning walkthrough for her client, she wished she had experimented more with complex animations. After the initial export, Alex was able to animate a few key elements like moving cars and people, but she didn’t explore the full animation potential of Twinmotion. The software offers tools to animate things like the movement of water, the wind affecting trees, and even more subtle animations like the flickering of lights at night.
In her next project, Alex plans to incorporate more of these subtle animations. The ability to bring the scene to life with small, dynamic elements like blowing leaves, waving grass, and even changing light conditions would give her final renders an even higher level of realism.
Take Full Advantage of Post-Processing
Although Twinmotion offers impressive real-time rendering, Alex found that she could have improved the final images by taking them into post-processing software like Photoshop or After Effects. While Twinmotion allows for some post-processing adjustments, adding a few more tweaks to the final renders could have enhanced the color grading, contrast, and even lighting effects.
For example, Alex could have used Photoshop to adjust the brightness and sharpness or added some final touches to the materials. Taking her final renders into After Effects would also allow her to smooth out any motion blur and add lens flares or other effects that would make the scene feel more polished.
Utilize Vagon for Cloud Rendering
Alex also discovered that working on a complex scene in Twinmotion could sometimes be hindered by her local hardware limitations. Although her computer had enough power to handle SketchUp and Twinmotion for basic tasks, rendering large, high-quality scenes often caused slowdowns and long wait times. To overcome this in the future, she plans to use Vagon’s cloud workstations.
By leveraging the cloud, Alex can access high-performance machines with the necessary GPU power for smooth rendering, eliminating the limitations of her own hardware. Vagon offers a way to run both SketchUp and Twinmotion on powerful virtual machines, which would allow her to focus on the creative side of the project without worrying about hardware constraints.
Quick Checklist for Your Next SketchUp to Twinmotion Export
After reviewing Alex’s process and learning from her experiences, it’s time to create a quick reference guide for your own SketchUp to Twinmotion export. This checklist will help you streamline the process and avoid some of the common pitfalls that arise when transferring models between the two programs. By following this guide, you can ensure that you don’t miss any crucial steps and are fully prepared for a smooth and efficient workflow.
Start by cleaning and simplifying your SketchUp model before exporting. Ensure that the geometry is free of unnecessary details and that the model is well-organized. Remove unused components, purge unnecessary layers, and group similar elements together to make editing easier in Twinmotion. Additionally, check for reversed faces, as these can cause issues during import. Simplifying the model in SketchUp will save you time down the line and ensure smoother performance in Twinmotion.
Next, optimize your textures. High-resolution textures can significantly impact performance, especially for large or complex models. Reduce the resolution of textures used for distant or less important objects. Lower-resolution textures will reduce the file size and ensure that your Twinmotion scene runs more smoothly, especially when working with a large number of assets.
When it comes to choosing the right export method, consider how often you will be making changes to your model. If your model will undergo frequent updates, using the Direct Link plugin between SketchUp and Twinmotion can save a lot of time, as it allows for real-time synchronization. However, if your model is mostly final and won’t require frequent changes, exporting as an SKP or FBX file might be a better choice. Ensure that the export settings align, particularly with units, to avoid discrepancies in Twinmotion.
Once your model is imported into Twinmotion, spend time organizing the scene. Group elements like vegetation, furniture, and dynamic objects into layers to make adjustments easier. Proper organization not only saves time but also makes the scene easier to manage when you need to modify or add new assets. This way, you’ll be able to quickly access and adjust entire sections of the scene without having to select individual elements.
Lighting is one of the most important elements to adjust in Twinmotion, and it plays a major role in creating realism in your scene. Begin by adjusting the sun position and intensity, particularly for exterior scenes. For interior scenes, make sure to add artificial lights to enhance the lighting effect and ensure that the space feels realistic. Also, check that the materials are properly applied, adjusting properties like roughness, glossiness, and transparency to achieve the desired effect. Fine-tuning these aspects will help ensure that your scene looks its best.
Animation is another powerful tool in Twinmotion that can make your visualization stand out. Consider adding animations to dynamic objects like people, cars, or trees to bring the scene to life. Animating camera paths can also add a professional touch, allowing you to simulate walkthroughs or fly-throughs of your design. Adding these dynamic elements will make your visualization feel more immersive and engaging.
Once everything is set up and you’re satisfied with the scene, it’s time to export your final render. Whether you’re exporting still images, videos, or interactive VR experiences, make sure to select the correct settings based on your intended use. Set the resolution and render quality according to the type of output you need, whether it’s for print, screen, or VR. If you’re working on an animation, double-check the frame rate and resolution to ensure that the video looks smooth and clear.
If you’re working on a complex scene and are concerned about hardware limitations, consider using cloud rendering to access high-powered machines for faster performance. Using a service like Vagon for cloud rendering will allow you to run Twinmotion on powerful remote machines, reducing the strain on your local hardware and enabling you to work on demanding projects without lag. This will ensure that your scene runs smoothly, even if you’re working with large models or high-quality renders.
By following these steps, you’ll streamline your SketchUp to Twinmotion workflow and avoid common mistakes. Staying organized, optimizing textures and models, and taking full advantage of Twinmotion’s powerful tools will help you create stunning visualizations with ease.
Additional Resources and Learning Opportunities
As you continue to refine your skills in using SketchUp and Twinmotion together, there are numerous resources available to help you stay ahead of the curve. Whether you are looking for in-depth tutorials, tips on advanced techniques, or solutions to specific issues, the wealth of knowledge available online can support you throughout your design journey.
Online Communities and Forums
One of the best ways to accelerate your learning process is by engaging with other users who share your passion for 3D modeling and visualization. Joining online communities, such as the Twinmotion forums or SketchUp user groups, provides an opportunity to ask questions, share experiences, and learn from others who may have encountered similar challenges. These communities are also great places to find inspiration, hear about new features, and stay informed about upcoming updates.
Some helpful forums and communities include:
Twinmotion Forum: A place to discuss tips, share renders, and find solutions to common problems.
SketchUp Community Forum: A helpful and active space where SketchUp users collaborate, troubleshoot, and share knowledge.
Reddit: Subreddits like r/SketchUp and r/ArchViz are full of helpful discussions and resources for 3D artists.
Video Tutorials and Workshops
Visual learners often benefit from step-by-step tutorials that guide them through specific processes in Twinmotion. YouTube and other video platforms offer countless tutorials on everything from basic model imports to advanced lighting setups and animation techniques. Watching professionals and experienced users walk through their workflows can help you understand how to solve complex problems and improve the quality of your renders.
For those seeking more structured learning, websites like Udemy and LinkedIn Learning offer paid courses that dive deep into both SketchUp and Twinmotion. These courses often come with practical exercises, quizzes, and downloadable project files, making them a great resource if you prefer learning through structured lessons.
A few recommended channels and resources for learning Twinmotion and SketchUp include:
Twinmotion Official YouTube Channel: Offers tutorials directly from the creators of the software.
The SketchUp Essentials: A fantastic YouTube channel for learning SketchUp, covering everything from basic navigation to advanced techniques.
Udemy Courses: Look for detailed Twinmotion and SketchUp courses that cover everything from modeling to rendering.
Books and E-books
While video tutorials are great, some users prefer having a physical or digital reference guide to help them along the way. Books on SketchUp and Twinmotion offer a deeper dive into the theoretical and technical aspects of 3D modeling and visualization. Whether you're learning the fundamentals or looking for tips on optimizing your workflow, books provide a comprehensive approach to the tools.
Some highly recommended books and guides include:
"SketchUp for Dummies": A comprehensive guide to mastering SketchUp, suitable for beginners and intermediate users.
"Mastering Twinmotion": A practical guide focused on harnessing the power of Twinmotion for architectural visualizations.
Staying Updated with New Features
Software like SketchUp and Twinmotion are regularly updated with new features and improvements. Staying up-to-date with the latest updates is crucial to ensuring that your projects are compatible with the newest tools available. Regularly checking the official blogs and release notes for both platforms can help you take advantage of new features, performance enhancements, and bug fixes.
Make sure to follow:
SketchUp Blog: A great place to learn about the latest features, releases, and helpful tips for SketchUp users.
Twinmotion Blog: Regularly updated with articles about new features, case studies, and practical tips for improving your visualizations.
Hands-On Practice:
Ultimately, the best way to learn is through practice. As you work on more projects, you'll refine your workflow and get better at solving challenges on your own. Try experimenting with new techniques and approaches, whether it’s incorporating complex animations, working with different lighting setups, or creating entirely new visual effects. Each new project presents an opportunity to push the boundaries of what you can achieve with Twinmotion and SketchUp.
By taking the time to explore these resources and engage with the community, you'll be able to expand your skills, stay inspired, and keep improving your ability to create stunning visualizations. The more you learn and practice, the more confident you'll become in your ability to deliver high-quality projects, whether you're working for clients or creating portfolio pieces.
As you move forward, remember that 3D modeling and visualization are constantly evolving fields. New techniques, tools, and best practices emerge regularly. By staying curious, seeking out new learning opportunities, and practicing consistently, you'll continue to grow as a designer and create more impactful, engaging work.
Unlock the Power of Cloud Rendering with Vagon
Are you ready to take your Twinmotion projects to the next level without being limited by your hardware? Vagon’s cloud-based workstations give you access to high-performance GPUs, enabling you to render complex scenes quickly and efficiently. With Vagon, you can run both SketchUp and Twinmotion without worrying about hardware constraints, allowing you to focus on your creative process.
Whether you’re working on large-scale architectural designs or need faster rendering times for high-quality animations, Vagon provides the tools you need for professional-grade results. Say goodbye to slow render times and hello to faster, smoother workflows.
Start using Vagon’s cloud workstations today and experience seamless, high-performance rendering for all your projects.
Frequently Asked Questions (FAQs)
Can I use the free version of SketchUp with Twinmotion?
Yes, Twinmotion supports SketchUp Free, but the Pro version offers more advanced features and more control over file exports, making it ideal for professionals. If you're working with larger or more complex models, SketchUp Pro would be the better choice.
How can I optimize my Twinmotion scene to improve performance?
You can improve performance by simplifying your model in SketchUp, using lower-resolution textures for distant objects, and optimizing the scene in Twinmotion by removing unnecessary details. You can also use the "Optimize for Rendering" tool in Twinmotion to reduce excessive polygons.
How can I export my SketchUp model to Twinmotion in real time?
You can use the Twinmotion Direct Link plugin to synchronize your SketchUp model with Twinmotion in real-time. This allows you to make quick updates to your SketchUp model and see the changes instantly in Twinmotion, streamlining your workflow.
Can I render VR-ready content in Twinmotion?
Yes, Twinmotion offers the ability to export your scene as a VR-ready panorama or interactive experience, allowing clients or users to fully explore the space in virtual reality.
Is there a way to speed up my rendering time?
Using cloud-based rendering solutions, like Vagon, can significantly speed up your rendering time. By accessing powerful cloud workstations, you can offload rendering tasks and continue working on your project without performance issues
.
What are some tips for improving my material and texture quality in Twinmotion? Adjusting the roughness, transparency, and reflectivity of your materials in Twinmotion is key to improving their appearance. Consider fine-tuning textures to ensure they interact properly with lighting and ensure that UV maps are correctly set up in SketchUp before exporting.
Late nights and looming deadlines are all too familiar in the world of architecture and design. You’ve spent countless hours perfecting every detail of your model in SketchUp, from the texture of the walls to the angle of the windows. The design is finally coming together, but now, it’s time to take that model to the next level. Enter Twinmotion, the real-time visualization tool that promises to turn your static SketchUp model into a stunning, immersive experience with lifelike environments, lighting, and animation. The goal is to present your work in a way that goes beyond still images, offering clients and stakeholders an interactive experience that captures the true essence of your design.
However, as many designers and architects can attest, exporting from SketchUp to Twinmotion can often be a tricky process. Models that look perfect in SketchUp may lose their charm when imported into Twinmotion. Textures misalign, materials don’t display as expected, and the scene may look flat or overly stylized in ways that aren’t true to your vision. It’s frustrating to put hours of effort into a model only to see it fail to translate well into Twinmotion, even after multiple attempts.
But don’t worry, you’re not alone in this struggle. Understanding the key steps involved in exporting from SketchUp to Twinmotion is crucial to avoid these pitfalls. This guide is designed to walk you through the process, from cleaning up your SketchUp model for export to ensuring your materials and textures are correctly applied in Twinmotion. Along the way, we’ll tackle some of the most common challenges faced by designers when moving between these two platforms and show you how to overcome them efficiently. By the end, you’ll have the knowledge and confidence to create beautiful, high-quality renderings and walkthroughs, seamlessly bridging the gap between SketchUp and Twinmotion.
Whether you're an experienced designer or someone just starting to experiment with real-time visualization, this guide will help streamline your workflow and ensure your projects look their best at every stage. Let’s dive into how you can make the most out of the SketchUp-to-Twinmotion export process and transform your designs into something truly exceptional.
Preparing Your SketchUp Model for Twinmotion
To ensure a seamless transition from SketchUp to Twinmotion, meticulous preparation of your SketchUp model is essential. This process involves organizing your model's structure, optimizing geometry, and ensuring that materials are correctly assigned. Here's how you can achieve this:
#1 Organize Your Model's Structure:
Begin by organizing your model's components using layers or tags. This practice not only streamlines the export process but also enhances the management of different elements within Twinmotion. For instance, grouping similar elements together allows for easier manipulation and rendering in Twinmotion.
#2 Simplify Geometry:
Complex geometries can pose challenges during the export. Simplify intricate details without compromising the model's integrity. This simplification reduces the likelihood of errors and ensures that Twinmotion processes your model efficiently.
#3 Assign Materials Thoughtfully:
Assigning materials in SketchUp is crucial for accurate representation in Twinmotion. Ensure that materials are applied consistently and that their properties are appropriately set. This consistency facilitates a smoother import and more accurate rendering outcomes.
#4 Check for Inconsistencies:
Before exporting, thoroughly inspect your model for any inconsistencies such as reversed faces, missing textures, or overlapping geometries. Addressing these issues beforehand prevents potential complications during the import into Twinmotion.
For a comprehensive walkthrough on preparing and exporting your SketchUp model to Twinmotion, you might find this tutorial helpful:
Rendering a SketchUp Model in Twinmotion – COMPLETE BEGINNER TUTORIAL
Choosing the Right Export Method
Selecting the appropriate export method is pivotal for maintaining the integrity of your model and streamlining your workflow. Twinmotion offers several options for importing SketchUp models:
Direct Link via Datasmith Exporter:
The Datasmith Exporter plugin facilitates a direct link between SketchUp and Twinmotion, enabling real-time synchronization of your models. This method is particularly beneficial for iterative design processes where frequent updates are made.
Installation: Ensure that the Datasmith Exporter plugin is installed in your SketchUp environment. This plugin is compatible with SketchUp Pro versions 2019 through 2024. (Twinmotion Datasmith Plugin)
Usage: Once installed, the plugin allows you to synchronize your SketchUp models directly into Twinmotion with a single click, streamlining your workflow and enhancing productivity.
Manual Import:
If you prefer not to use the direct link, you can manually export your SketchUp model as an SKP file and import it into Twinmotion. This method requires re-importing the model each time changes are made, which can be less efficient for dynamic projects.
Alternative Formats:
Exporting your model in formats such as FBX or OBJ is another option. However, these formats may require additional adjustments within Twinmotion, especially concerning materials and textures.
For a detailed discussion on the differences between these methods and their implications on your workflow, you might find this forum thread insightful:
By thoughtfully preparing your SketchUp model and selecting the export method that best aligns with your project needs, you can ensure a smooth and efficient transition to Twinmotion, paving the way for high-quality visualizations.
The First Import: Into the World of Twinmotion
Once your SketchUp model is properly prepared and you've selected the right export method, it’s time to bring your model into Twinmotion. While this may seem like the finish line, it’s important to remember that this first import is just the beginning. Twinmotion's powerful features can breathe life into your design, but the import process requires attention to detail to ensure that everything appears as it should.
When you first import your SketchUp model into Twinmotion, you may be greeted by some immediate challenges. It's not uncommon for textures to appear misaligned or materials to look different than they did in SketchUp. In some cases, Twinmotion may interpret certain materials in a way that makes them look overly shiny, flat, or not quite right for your scene. These are common issues, and thankfully, they are solvable with a few adjustments.
Start by checking the materials:
Twinmotion may interpret SketchUp materials in ways that don’t match your expectations. This can include issues like a glossy texture where you intended for a matte finish, or an overly reflective surface in areas that should be more subtle. You can solve this by selecting the material in Twinmotion and adjusting its properties. Look for settings related to glossiness, transparency, and roughness. It’s a good idea to experiment with these settings to get the appearance just right.
Scale and orientation issues:
Another common issue after the import is scale. Sometimes, your model may appear either too large or too small in Twinmotion. This could be due to discrepancies in the unit settings between the two programs. Before you import your model, double-check the units in SketchUp to ensure that they align with Twinmotion’s settings. If issues persist, you can scale the model directly within Twinmotion using the scaling tools to get it to the correct size. Similarly, keep an eye on the orientation of your model. In some cases, models imported from SketchUp may be rotated incorrectly or have their axes flipped. This is easy to fix within Twinmotion by adjusting the orientation settings.
Camera angles and lighting:
When transferring your model, the camera angles and lighting from SketchUp will not automatically transfer to Twinmotion. To create the best possible result, you’ll need to reposition your camera views in Twinmotion. Take advantage of the camera tools in Twinmotion to position your views with more precision and set up new shots that showcase your design. Lighting in Twinmotion is another area that requires tweaking. Twinmotion’s real-time lighting system is one of its strongest features, but it will not match the lighting you had in SketchUp. You’ll need to adjust the time of day, sun intensity, and artificial lights to achieve the right atmosphere for your model.
Test your materials and textures:
To make sure that all your textures are correctly applied and scaled, it’s worth doing a quick walkthrough of your model in Twinmotion after the initial import. This can help identify any textures that may have gone missing or any elements that require reapplication. If you find that certain textures appear incorrectly, consider manually reassigning them or adjusting their mapping in Twinmotion’s material editor.
For a more in-depth look at what you can do after your first import, this video provides a step-by-step approach on how to troubleshoot and tweak imported models:
https://www.youtube.com/watch?v=xT5hPHVv8fY
Fixing Common Import Issues
When you first import your SketchUp model into Twinmotion, you might face other issues, such as missing textures, broken geometry, or overly complex components. Don’t be discouraged—these are common problems, and there are several methods to address them.
If your model has missing textures, the first thing you should check is the relative pathing of your texture files. Twinmotion might struggle to find textures if they were not saved in the right directory or if there were issues with the way SketchUp exported the texture file paths. In this case, you can manually assign textures or use the material replacement tool within Twinmotion to fix these problems.
Broken geometry, especially with complex components, can also occur during the import. Some parts of your model might not import as expected, either because of their complexity or the way they were grouped. A quick fix is to use Twinmotion’s geometry tools to break down complex components into simpler ones or manually edit any areas that didn’t import correctly.
Finally, if you notice that the overall quality of the model seems off, or that the import took too long, it may be because the model is too heavy. You can reduce the polygon count in SketchUp before exporting, or use Twinmotion’s performance tools to optimize the scene and improve rendering times.
By addressing these issues early on and making adjustments as needed, you can start bringing your SketchUp model to life in Twinmotion. The first import is all about getting familiar with how the two programs interact and what changes need to be made to ensure your design is accurately represented.
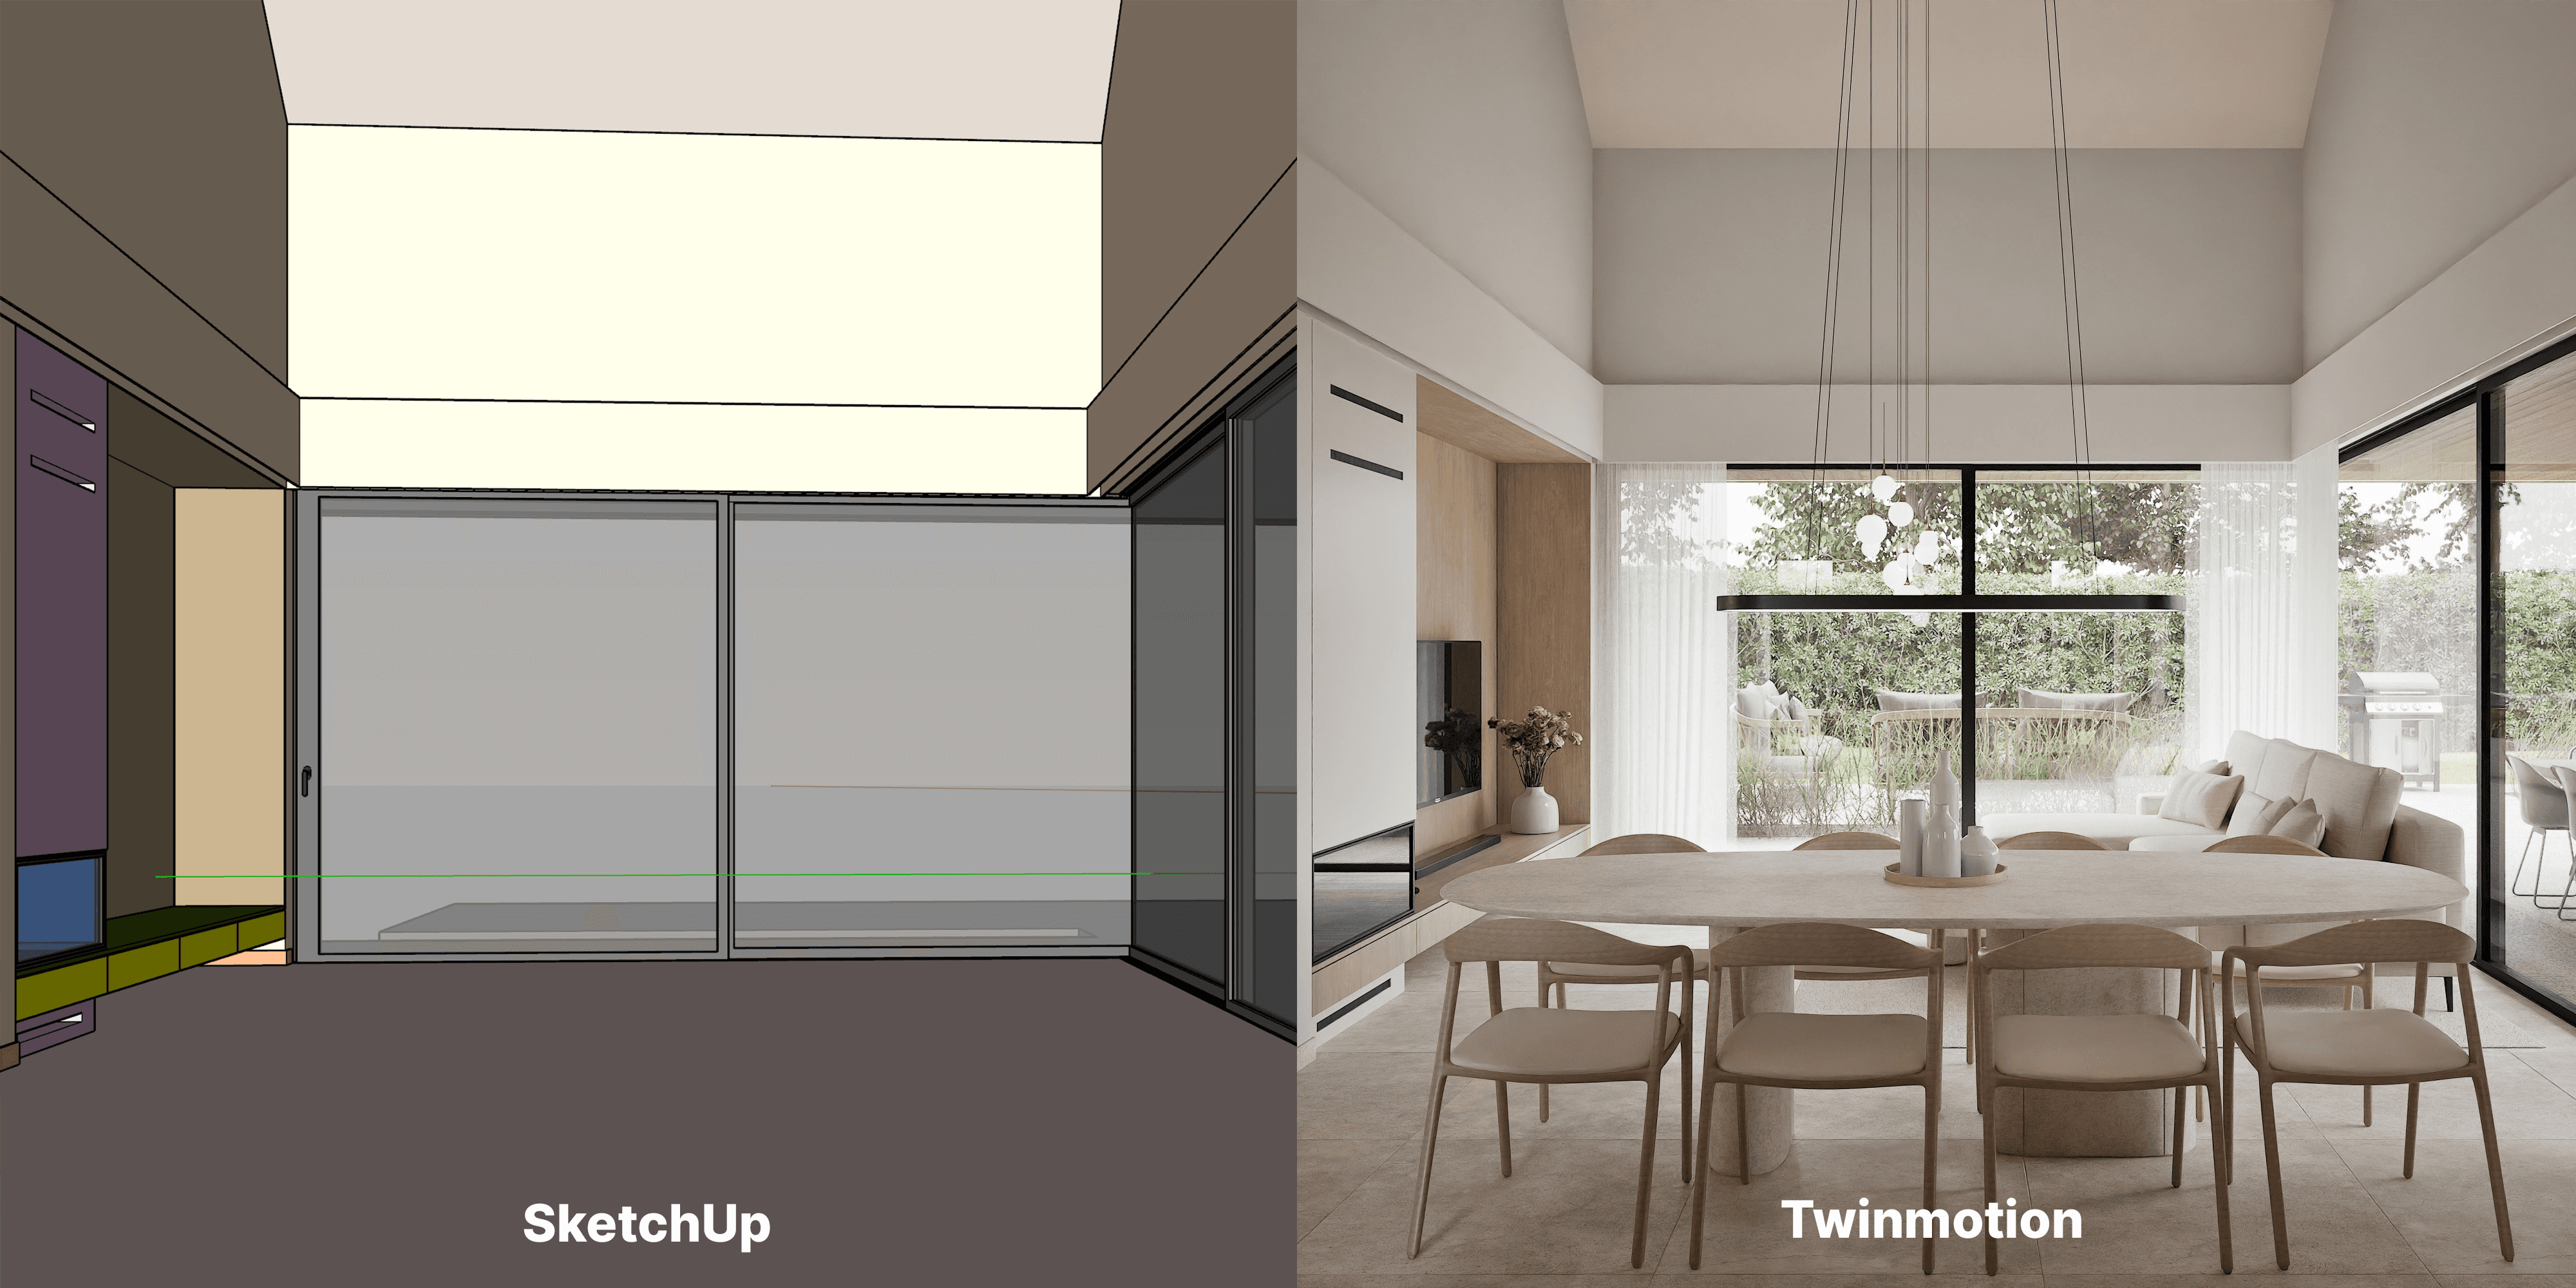
Breathing Life Into the Scene
Now that you’ve successfully imported your SketchUp model into Twinmotion and have sorted out any material or scale issues, it's time to move on to the fun part: breathing life into the scene. This is where Twinmotion truly shines, transforming your static model into an immersive, dynamic visualization. Whether you’re creating still images, animations, or interactive walkthroughs, this step is all about adding realism and atmosphere to your design.
Lighting Setup:
One of the first things you’ll want to adjust in Twinmotion is the lighting. Twinmotion’s real-time lighting system allows you to quickly and easily modify the mood of your scene by adjusting the sun position, intensity, and sky settings. You can change the time of day, experiment with different lighting scenarios, and see the effects immediately. For indoor scenes, consider adding artificial lights such as spotlights, area lights, or ambient lighting to highlight key elements of your design.
Real-time lighting is incredibly powerful in Twinmotion, so it’s important to take the time to adjust it properly. Play around with the sun’s angle to see how it casts shadows across your model. If your model has windows or glass elements, watch how the light interacts with these materials to ensure a realistic effect. The beauty of Twinmotion’s real-time preview is that you can tweak settings on the fly and immediately see the results.
Vegetation and Assets:
Next, it’s time to populate your scene with vegetation, people, and other assets that help to create a lively and realistic environment. Twinmotion offers a large library of 3D models, including trees, shrubs, furniture, vehicles, and even people. These assets can add depth and life to your scene, making it feel like a true representation of your design in the real world.
For exteriors, carefully select the right types of vegetation that complement your architecture. Choose trees, grass, and shrubs that match the scale and style of your project. For interiors, adding furniture, lighting fixtures, and decorative elements helps make the space feel lived-in. Keep in mind that it’s important to balance detail with performance. While adding a variety of assets can make your scene look richer, too many can slow down performance, especially when working with larger models.
Animating the Scene:
One of the standout features of Twinmotion is its ability to animate objects and cameras, bringing your model to life. Animating people, vehicles, and even the sky can help add realism to your scene and elevate your visualizations. For example, you could animate people walking along pathways, cars driving down streets, or trees swaying in the wind. These dynamic elements can make your renderings feel more like a video game, where users can interact with the scene and get a true sense of movement and scale.
You can also animate camera paths, creating flythroughs and walkthroughs of your design. This is particularly useful for presentations or client reviews, where you want to give a sense of what it would be like to move through the space. Take advantage of the animation tools in Twinmotion to create smooth transitions between different camera angles, offering a detailed look at your project from multiple perspectives.
Atmosphere and Weather Effects:
Adding atmospheric elements like weather effects, fog, and clouds can dramatically change the mood of your scene. Twinmotion allows you to control the time of day, weather conditions, and even the direction of the wind. If you want to showcase how your building interacts with different environmental conditions, this is the step where you can do that.
For example, if you’re designing an outdoor space, you can create a rainy day atmosphere with puddles forming on the ground and reflections appearing in the water. Or, if you want to create a bright and sunny day, you can adjust the sky settings to showcase a clear, cloudless sky. These subtle touches help your scene feel more immersive and realistic.
Refining Materials and Textures:
After adding vegetation, assets, and environmental elements, don’t forget to revisit your materials. Take a moment to adjust the texture settings, roughness, and reflections. Twinmotion’s material editor allows you to refine the look of every surface in your model. For instance, if your flooring looks too shiny or your walls appear too flat, you can adjust the material properties to achieve a more realistic result.
You may also want to check how materials interact with the lighting in your scene. Some materials, such as glass or water, can react to light in complex ways. Twinmotion allows you to fine-tune these interactions to ensure that your materials look their best under different lighting conditions.
By focusing on lighting, assets, animation, atmosphere, and materials, you can breathe life into your SketchUp model and create a realistic, dynamic visualization in Twinmotion. This is where you can make your design feel truly immersive, offering clients and stakeholders a glimpse into the future of the space. With these adjustments, you’re on your way to creating stunning visualizations that showcase your architectural vision in the best possible light.
Exporting from Twinmotion: Final Touches
With your scene fully animated and enriched with lighting, textures, and assets, it’s time to prepare for the final export. Whether you're preparing still images, videos, or panoramic renders for presentation, the export process in Twinmotion is where you fine-tune your project for the highest quality output. Before hitting the export button, make sure to check your settings and optimize them for the intended medium. Here’s how to get the best results.
Choosing the Right Render Settings:
Twinmotion offers several rendering options, and the settings you select depend on what you plan to do with the final output. For still images, you want to ensure your render quality is set to high or ultra-high. This setting controls things like resolution, texture detail, and anti-aliasing to provide a crisp, professional finish. However, higher-quality renders also take longer to process, so be prepared for a longer wait time, especially for complex scenes with lots of detail.
For video exports, you’ll need to decide on frame rates and resolution. A typical video will have a frame rate of 24 or 30 frames per second, but if you plan to create smooth animations with fast camera movements, you might want to bump this up to 60 FPS for a more fluid effect. Likewise, ensure that your resolution is set high enough for your intended medium, whether it’s for a screen display, social media, or large-format presentations.
For panoramic renders, which are great for VR presentations or immersive walkthroughs, make sure you use a high-resolution output, as panoramic images will require more detail to maintain their clarity when viewed in VR headsets.
Optimize Your Scene Before Rendering:
Before hitting export, do a final check of your scene’s performance. If you’re working with large, complex models, rendering can take a significant amount of time. If your scene feels sluggish, consider reducing the polygon count of certain assets or using lower-resolution textures where possible. While high-quality assets and textures will yield a more polished result, they can also make the scene much more demanding for your computer.
You can also take advantage of Twinmotion’s “Optimize for Rendering” tool, which helps to reduce unnecessary detail in your model that might not be visible in the final render. For example, distant objects can be simplified or removed, and layers that aren't crucial for the final image can be hidden.
Leveraging GPU Acceleration for Better Performance:
When working with high-quality renders, it’s crucial to ensure that your GPU is being fully utilized. Twinmotion’s real-time rendering engine is optimized for GPU acceleration, so enabling this can drastically improve both render times and overall performance. If you are using Twinmotion on a local machine and want to take full advantage of GPU power, make sure you enable GPU acceleration in the preferences and keep your drivers up to date. You can find more detailed instructions on how to use GPU on Twinmotion, including the right settings and setup process, in this guide from Vagon: How to Use GPU on Twinmotion.
Rendering in Layers: Another useful option in Twinmotion is the ability to render in layers. By breaking your render into different layers, such as background, foreground, and lighting, you can make post-processing much easier. This is especially useful when working with complex scenes that involve dynamic lighting or multiple animation paths. Post-processing in software like Photoshop or After Effects can significantly improve your render’s quality by adjusting individual layers, adding effects, or refining colors. Twinmotion’s layer-based rendering system gives you more flexibility when making final adjustments after the render.
Exporting for VR and Interactive Walkthroughs:
One of Twinmotion’s most exciting features is its ability to export interactive VR presentations. If you want to provide clients with a fully immersive experience, Twinmotion allows you to export your scene directly for VR devices. This export option creates a fully interactive, navigable walkthrough that can be viewed in real time in a VR headset.
For a more traditional interactive walkthrough, you can export a 360-degree panorama or a high-quality video walkthrough, both of which provide the user with a full understanding of the project space from various perspectives. Interactive panoramas are often used in real estate and architectural visualizations, as they allow potential clients or investors to explore a project from any angle.
Final Export and Presentation:
Once your render settings are optimized and you’re happy with your scene’s performance, it’s time to export. Whether you’re creating stills, animations, or VR experiences, Twinmotion makes it easy to generate high-quality outputs with minimal hassle. After export, you can take your visualizations to the next level by adding them to presentations, websites, or social media to showcase your work.
For a professional touch, consider using post-production software like Photoshop or After Effects to fine-tune colors, contrast, or lighting. This step can add depth and richness to your final images and help bring out the details in your project that might not be as noticeable in the raw render. You can also add elements like titles, annotations, or additional lighting effects to enhance the presentation.
Additional Export Tips:
Always ensure that you’re exporting with the appropriate resolution for your intended platform. Larger resolutions are necessary for high-quality prints, while smaller ones are fine for web use.
If you’re working with videos, make sure to check the output file format and codec. Popular choices include MP4 for web videos or MOV for high-quality presentations.
Before you hit the final export button, take a moment to preview your render with Twinmotion’s "Preview" feature to ensure everything is set up correctly.
By following these tips and optimizing your scene for export, you can ensure that your final output is of the highest quality, ready to impress your clients or colleagues. Whether it’s a still image, an animation, or a full VR experience, Twinmotion gives you the flexibility to showcase your design with stunning realism and clarity.
What Alex Would Do Differently Next Time
Now that you've gone through the whole process of exporting from SketchUp to Twinmotion and creating a detailed, polished visualization, it’s always valuable to take a step back and reflect on what worked well and what could have been improved. Alex, our fictional architect, has learned a lot through the process, and looking back, there are a few things she would do differently the next time she tackles a similar project.
Start With a Clean and Simplified Model:
One of the biggest takeaways from Alex’s experience is the importance of starting with a clean and simplified SketchUp model. Early on, Alex’s model was a bit too complex with lots of unnecessary details that only added to the workload and rendered poorly in Twinmotion. If she were to do it again, she’d spend more time cleaning up her SketchUp model before even starting the export process. Removing unnecessary geometry, purging unused materials, and organizing the model into logical groups would have saved a lot of time down the road, both in Twinmotion and during the export.
In hindsight, she also realized that simplifying textures (such as using lower-res textures for distant objects) could have improved the performance of her Twinmotion scene. By doing this earlier in the process, she could have avoided having to make last-minute fixes to the model in Twinmotion when it came time for rendering.
Utilize the Twinmotion Direct Link Plugin More Effectively:
While Alex initially used the manual export method due to her familiarity with the .SKP and .FBX file types, she found that the Direct Link plugin offered far more advantages in the long run. The ability to synchronize her SketchUp model with Twinmotion in real-time would have saved a lot of time during the iterative design process. Alex had to re-import her model multiple times during the project, which, in hindsight, could have been avoided with the Direct Link.
She also noted that Twinmotion’s live link helps maintain the materials, lighting, and animation settings that she made while adjusting the model. This would have been incredibly useful when making small tweaks after the initial export. Alex now recommends trying out the Direct Link for anyone working on dynamic or complex projects with frequent changes.
Prioritize Scene Organization in Twinmotion
One thing Alex didn’t do early on was organize her Twinmotion scene properly. As the project grew, she realized that organizing objects, materials, and lights into groups or layers inside Twinmotion could have helped her make quicker adjustments later on. When working with vegetation, assets, and dynamic objects, organizing them would have allowed her to manipulate entire sections of the scene without needing to do individual selections, saving time.
Additionally, Alex learned that optimizing her scene by grouping similar assets together allowed her to easily toggle visibility and make adjustments without disturbing other parts of the scene. This simple tip would have sped up her workflow considerably.
Experiment With More Complex Animations
While Alex created a stunning walkthrough for her client, she wished she had experimented more with complex animations. After the initial export, Alex was able to animate a few key elements like moving cars and people, but she didn’t explore the full animation potential of Twinmotion. The software offers tools to animate things like the movement of water, the wind affecting trees, and even more subtle animations like the flickering of lights at night.
In her next project, Alex plans to incorporate more of these subtle animations. The ability to bring the scene to life with small, dynamic elements like blowing leaves, waving grass, and even changing light conditions would give her final renders an even higher level of realism.
Take Full Advantage of Post-Processing
Although Twinmotion offers impressive real-time rendering, Alex found that she could have improved the final images by taking them into post-processing software like Photoshop or After Effects. While Twinmotion allows for some post-processing adjustments, adding a few more tweaks to the final renders could have enhanced the color grading, contrast, and even lighting effects.
For example, Alex could have used Photoshop to adjust the brightness and sharpness or added some final touches to the materials. Taking her final renders into After Effects would also allow her to smooth out any motion blur and add lens flares or other effects that would make the scene feel more polished.
Utilize Vagon for Cloud Rendering
Alex also discovered that working on a complex scene in Twinmotion could sometimes be hindered by her local hardware limitations. Although her computer had enough power to handle SketchUp and Twinmotion for basic tasks, rendering large, high-quality scenes often caused slowdowns and long wait times. To overcome this in the future, she plans to use Vagon’s cloud workstations.
By leveraging the cloud, Alex can access high-performance machines with the necessary GPU power for smooth rendering, eliminating the limitations of her own hardware. Vagon offers a way to run both SketchUp and Twinmotion on powerful virtual machines, which would allow her to focus on the creative side of the project without worrying about hardware constraints.
Quick Checklist for Your Next SketchUp to Twinmotion Export
After reviewing Alex’s process and learning from her experiences, it’s time to create a quick reference guide for your own SketchUp to Twinmotion export. This checklist will help you streamline the process and avoid some of the common pitfalls that arise when transferring models between the two programs. By following this guide, you can ensure that you don’t miss any crucial steps and are fully prepared for a smooth and efficient workflow.
Start by cleaning and simplifying your SketchUp model before exporting. Ensure that the geometry is free of unnecessary details and that the model is well-organized. Remove unused components, purge unnecessary layers, and group similar elements together to make editing easier in Twinmotion. Additionally, check for reversed faces, as these can cause issues during import. Simplifying the model in SketchUp will save you time down the line and ensure smoother performance in Twinmotion.
Next, optimize your textures. High-resolution textures can significantly impact performance, especially for large or complex models. Reduce the resolution of textures used for distant or less important objects. Lower-resolution textures will reduce the file size and ensure that your Twinmotion scene runs more smoothly, especially when working with a large number of assets.
When it comes to choosing the right export method, consider how often you will be making changes to your model. If your model will undergo frequent updates, using the Direct Link plugin between SketchUp and Twinmotion can save a lot of time, as it allows for real-time synchronization. However, if your model is mostly final and won’t require frequent changes, exporting as an SKP or FBX file might be a better choice. Ensure that the export settings align, particularly with units, to avoid discrepancies in Twinmotion.
Once your model is imported into Twinmotion, spend time organizing the scene. Group elements like vegetation, furniture, and dynamic objects into layers to make adjustments easier. Proper organization not only saves time but also makes the scene easier to manage when you need to modify or add new assets. This way, you’ll be able to quickly access and adjust entire sections of the scene without having to select individual elements.
Lighting is one of the most important elements to adjust in Twinmotion, and it plays a major role in creating realism in your scene. Begin by adjusting the sun position and intensity, particularly for exterior scenes. For interior scenes, make sure to add artificial lights to enhance the lighting effect and ensure that the space feels realistic. Also, check that the materials are properly applied, adjusting properties like roughness, glossiness, and transparency to achieve the desired effect. Fine-tuning these aspects will help ensure that your scene looks its best.
Animation is another powerful tool in Twinmotion that can make your visualization stand out. Consider adding animations to dynamic objects like people, cars, or trees to bring the scene to life. Animating camera paths can also add a professional touch, allowing you to simulate walkthroughs or fly-throughs of your design. Adding these dynamic elements will make your visualization feel more immersive and engaging.
Once everything is set up and you’re satisfied with the scene, it’s time to export your final render. Whether you’re exporting still images, videos, or interactive VR experiences, make sure to select the correct settings based on your intended use. Set the resolution and render quality according to the type of output you need, whether it’s for print, screen, or VR. If you’re working on an animation, double-check the frame rate and resolution to ensure that the video looks smooth and clear.
If you’re working on a complex scene and are concerned about hardware limitations, consider using cloud rendering to access high-powered machines for faster performance. Using a service like Vagon for cloud rendering will allow you to run Twinmotion on powerful remote machines, reducing the strain on your local hardware and enabling you to work on demanding projects without lag. This will ensure that your scene runs smoothly, even if you’re working with large models or high-quality renders.
By following these steps, you’ll streamline your SketchUp to Twinmotion workflow and avoid common mistakes. Staying organized, optimizing textures and models, and taking full advantage of Twinmotion’s powerful tools will help you create stunning visualizations with ease.
Additional Resources and Learning Opportunities
As you continue to refine your skills in using SketchUp and Twinmotion together, there are numerous resources available to help you stay ahead of the curve. Whether you are looking for in-depth tutorials, tips on advanced techniques, or solutions to specific issues, the wealth of knowledge available online can support you throughout your design journey.
Online Communities and Forums
One of the best ways to accelerate your learning process is by engaging with other users who share your passion for 3D modeling and visualization. Joining online communities, such as the Twinmotion forums or SketchUp user groups, provides an opportunity to ask questions, share experiences, and learn from others who may have encountered similar challenges. These communities are also great places to find inspiration, hear about new features, and stay informed about upcoming updates.
Some helpful forums and communities include:
Twinmotion Forum: A place to discuss tips, share renders, and find solutions to common problems.
SketchUp Community Forum: A helpful and active space where SketchUp users collaborate, troubleshoot, and share knowledge.
Reddit: Subreddits like r/SketchUp and r/ArchViz are full of helpful discussions and resources for 3D artists.
Video Tutorials and Workshops
Visual learners often benefit from step-by-step tutorials that guide them through specific processes in Twinmotion. YouTube and other video platforms offer countless tutorials on everything from basic model imports to advanced lighting setups and animation techniques. Watching professionals and experienced users walk through their workflows can help you understand how to solve complex problems and improve the quality of your renders.
For those seeking more structured learning, websites like Udemy and LinkedIn Learning offer paid courses that dive deep into both SketchUp and Twinmotion. These courses often come with practical exercises, quizzes, and downloadable project files, making them a great resource if you prefer learning through structured lessons.
A few recommended channels and resources for learning Twinmotion and SketchUp include:
Twinmotion Official YouTube Channel: Offers tutorials directly from the creators of the software.
The SketchUp Essentials: A fantastic YouTube channel for learning SketchUp, covering everything from basic navigation to advanced techniques.
Udemy Courses: Look for detailed Twinmotion and SketchUp courses that cover everything from modeling to rendering.
Books and E-books
While video tutorials are great, some users prefer having a physical or digital reference guide to help them along the way. Books on SketchUp and Twinmotion offer a deeper dive into the theoretical and technical aspects of 3D modeling and visualization. Whether you're learning the fundamentals or looking for tips on optimizing your workflow, books provide a comprehensive approach to the tools.
Some highly recommended books and guides include:
"SketchUp for Dummies": A comprehensive guide to mastering SketchUp, suitable for beginners and intermediate users.
"Mastering Twinmotion": A practical guide focused on harnessing the power of Twinmotion for architectural visualizations.
Staying Updated with New Features
Software like SketchUp and Twinmotion are regularly updated with new features and improvements. Staying up-to-date with the latest updates is crucial to ensuring that your projects are compatible with the newest tools available. Regularly checking the official blogs and release notes for both platforms can help you take advantage of new features, performance enhancements, and bug fixes.
Make sure to follow:
SketchUp Blog: A great place to learn about the latest features, releases, and helpful tips for SketchUp users.
Twinmotion Blog: Regularly updated with articles about new features, case studies, and practical tips for improving your visualizations.
Hands-On Practice:
Ultimately, the best way to learn is through practice. As you work on more projects, you'll refine your workflow and get better at solving challenges on your own. Try experimenting with new techniques and approaches, whether it’s incorporating complex animations, working with different lighting setups, or creating entirely new visual effects. Each new project presents an opportunity to push the boundaries of what you can achieve with Twinmotion and SketchUp.
By taking the time to explore these resources and engage with the community, you'll be able to expand your skills, stay inspired, and keep improving your ability to create stunning visualizations. The more you learn and practice, the more confident you'll become in your ability to deliver high-quality projects, whether you're working for clients or creating portfolio pieces.
As you move forward, remember that 3D modeling and visualization are constantly evolving fields. New techniques, tools, and best practices emerge regularly. By staying curious, seeking out new learning opportunities, and practicing consistently, you'll continue to grow as a designer and create more impactful, engaging work.
Unlock the Power of Cloud Rendering with Vagon
Are you ready to take your Twinmotion projects to the next level without being limited by your hardware? Vagon’s cloud-based workstations give you access to high-performance GPUs, enabling you to render complex scenes quickly and efficiently. With Vagon, you can run both SketchUp and Twinmotion without worrying about hardware constraints, allowing you to focus on your creative process.
Whether you’re working on large-scale architectural designs or need faster rendering times for high-quality animations, Vagon provides the tools you need for professional-grade results. Say goodbye to slow render times and hello to faster, smoother workflows.
Start using Vagon’s cloud workstations today and experience seamless, high-performance rendering for all your projects.
Frequently Asked Questions (FAQs)
Can I use the free version of SketchUp with Twinmotion?
Yes, Twinmotion supports SketchUp Free, but the Pro version offers more advanced features and more control over file exports, making it ideal for professionals. If you're working with larger or more complex models, SketchUp Pro would be the better choice.
How can I optimize my Twinmotion scene to improve performance?
You can improve performance by simplifying your model in SketchUp, using lower-resolution textures for distant objects, and optimizing the scene in Twinmotion by removing unnecessary details. You can also use the "Optimize for Rendering" tool in Twinmotion to reduce excessive polygons.
How can I export my SketchUp model to Twinmotion in real time?
You can use the Twinmotion Direct Link plugin to synchronize your SketchUp model with Twinmotion in real-time. This allows you to make quick updates to your SketchUp model and see the changes instantly in Twinmotion, streamlining your workflow.
Can I render VR-ready content in Twinmotion?
Yes, Twinmotion offers the ability to export your scene as a VR-ready panorama or interactive experience, allowing clients or users to fully explore the space in virtual reality.
Is there a way to speed up my rendering time?
Using cloud-based rendering solutions, like Vagon, can significantly speed up your rendering time. By accessing powerful cloud workstations, you can offload rendering tasks and continue working on your project without performance issues
.
What are some tips for improving my material and texture quality in Twinmotion? Adjusting the roughness, transparency, and reflectivity of your materials in Twinmotion is key to improving their appearance. Consider fine-tuning textures to ensure they interact properly with lighting and ensure that UV maps are correctly set up in SketchUp before exporting.
Get Beyond Your Computer Performance
Run applications on your cloud computer with the latest generation hardware. No more crashes or lags.

Trial includes 1 hour usage + 7 days of storage.
Summarize with AI

Ready to focus on your creativity?
Vagon gives you the ability to create & render projects, collaborate, and stream applications with the power of the best hardware.

Vagon Blog


Run heavy applications on any device with
your personal computer on the cloud.
San Francisco, California
Solutions
Vagon Teams
Vagon Streams
Use Cases
Resources
Vagon Blog
How to Run Inkscape on a Cloud Ubuntu Desktop (2026 Guide)
How to Run Krita on a Cloud Ubuntu Desktop for Digital Painting (2026 Guide)
How to Run GIMP on a Cloud Ubuntu Desktop (2026 Guide)
How to Run Jupyter on a Cloud GPU Linux Desktop (2026 Guide)
Vagon vs GitHub Codespaces: Cloud Dev Environments Compared (2026)
Vagon vs RunPod: Which Cloud GPU Is Right for You? (2026 Comparison)
How to Watch Your AI Agent Work on a Cloud Ubuntu Desktop (2026 Guide)
How to Run a Local LLM on Ubuntu in the Cloud (2026 Guide)
How to Run Blender on a Cloud GPU (Ubuntu): The Complete 2026 Guide
Vagon Blog
Run heavy applications on any device with
your personal computer on the cloud.
San Francisco, California
Solutions
Vagon Teams
Vagon Streams
Use Cases
Resources
Vagon Blog