Instant Connection for Pixel Streaming
— New Feature Automated Setup

Reference Image to 3D Scene With GPT-6 Astra & Blender
DigitalArt
Reference Image to 3D Scene With GPT-6 Astra & Blender
DigitalArt
Reference Image to 3D Scene With GPT-6 Astra & Blender
DigitalArt
Table of Contents
GPT-6 Astra can study a reference image, write Blender Python, build an editable scene, render previews, and revise its work. It cannot recover every hidden surface, exact dimension, or physically correct material from a single image, so the useful workflow is not one prompt followed by a finished model. You get better control by approving the camera and blockout first, adding detail in separate passes, and inspecting the result from angles the reference never showed.
This works well for stylized environments, architectural concepts, product displays, and hard-surface blockouts where a plausible editable scene matters more than exact reconstruction. For survey-grade or manufacturing accuracy, use measured CAD data, calibrated photos, or photogrammetry.
What Do You Need Before Astra Can Work With Blender?
The most practical setup uses GPT-6 Astra in Codex, Blender on the same computer, and a project folder that both can access. OpenAI has documented an Astra architectural visualization workflow where Astra created an editable Blender scene through Blender's Python API, bpy. It ran scripts through Blender's executable with the --python option, rendered previews, and inspected both the saved images and the Blender application through Computer Use.
For a similar setup, prepare:
Blender 5.2 LTS
The ChatGPT desktop app with Codex and GPT-6 Astra access
The Computer Use plugin, enabled with permission to operate Blender
Your reference image and proof that you may use it
One known measurement for scale
A project folder for scripts, textures, renders, and
.blendcheckpointsA clear deliverable, such as one hero render plus two inspection views
Blender 5.2 LTS was released in July 2026 and has long-term support through July 2028, making it a sensible baseline for a new production-oriented project.
Before using the real brief, ask Astra to create a cube through Blender Python, save a new .blend file, and render a preview. This checks access without risking the main scene.
Use incremental filenames from the start:
scene_00_setup.blend
scene_01_blockout.blend
scene_02_camera-approved.blend
scene_03_geometry.blend
scene_04_materials.blend
scene_05_final.blend
scene_00_setup.blend
scene_01_blockout.blend
scene_02_camera-approved.blend
scene_03_geometry.blend
scene_04_materials.blend
scene_05_final.blend
Computer Use deserves one practical warning. OpenAI Computer Use on Windows operates the active desktop and needs the target application to remain visible. OpenAI suggests using a Windows virtual machine when you want the agent to work without taking over your main desktop.
If you are comparing Astra with tools that generate standalone meshes, this guide to AI tools for Blender 3D model generation explains where image-to-3D systems fit and why cleanup still matters.
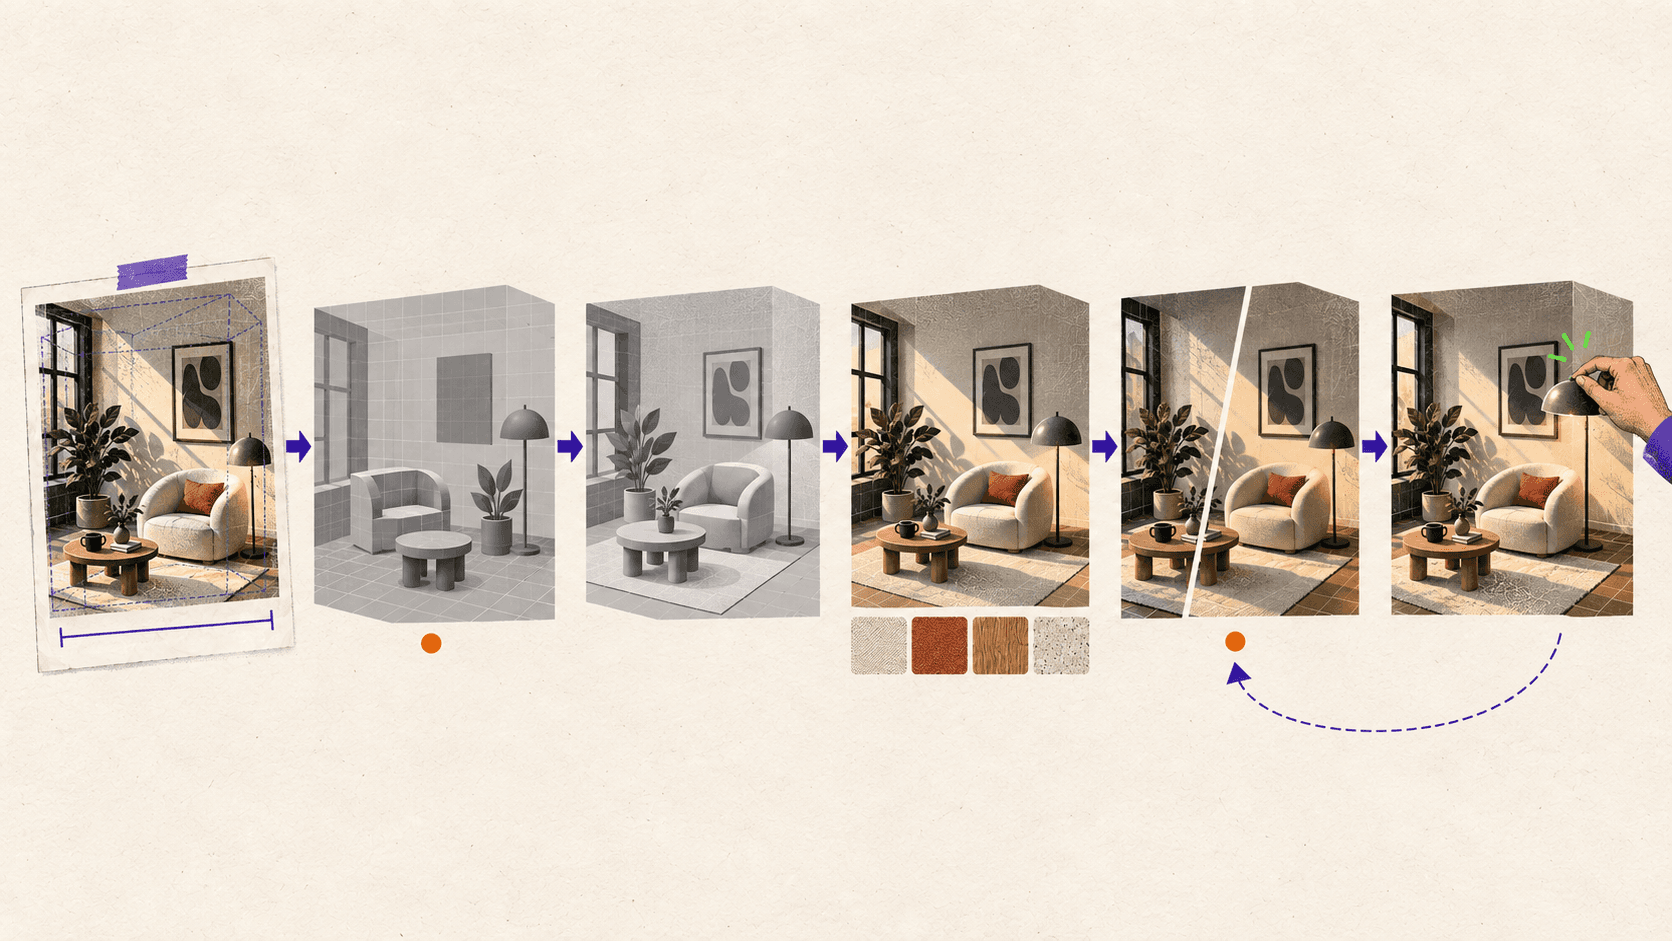
How Should You Prepare the Reference Image?
Astra can only reason from information present in the image and the constraints you provide. A clean reference does not need to be simple, but it should make the important forms readable.
Look for:
A clear subject and silhouette
Visible contact between objects and the floor or supporting surface
Limited blur and image compression
Perspective lines that help estimate the camera
Lighting that reveals form instead of hiding it
Minimal occlusion around important objects
Then add information the image cannot provide. Identify one known dimension, such as a door height, tabletop width, wheel diameter, or product measurement. State whether Astra may design hidden areas or should leave them simple. Define whether the scene only needs to reproduce the original shot or must also support new cameras, animation, or export.
This distinction matters because single-view 3D reconstruction has shape-pose ambiguity. More than one combination of shape, depth, scale, and camera pose can explain the same 2D image. Occluded surfaces must be inferred from prior knowledge or designed from scratch. Research into what single-view 3D reconstruction networks learn describes these hidden-geometry limitations directly.
Place the source image inside Blender as an image empty or camera background. Blender image empties can stay visible in perspective or orthographic views, sit in front of or behind geometry, and use reduced opacity while you model.
Before continuing, create a short constraint sheet:
Target: Editable Blender scene and one 1920 x 1080 hero render
Known scale: Tabletop is 160 cm wide
Hero camera: Match the supplied image
Additional views: Front three-quarter and rear three-quarter
Hidden areas: Astra may design them in the same visual language
Geometry priority: Primary forms and clean silhouette
Material priority: Visually close, with consistent real-world texture scale
Final use: Still images, no deformation or game-engine export
Target: Editable Blender scene and one 1920 x 1080 hero render
Known scale: Tabletop is 160 cm wide
Hero camera: Match the supplied image
Additional views: Front three-quarter and rear three-quarter
Hidden areas: Astra may design them in the same visual language
Geometry priority: Primary forms and clean silhouette
Material priority: Visually close, with consistent real-world texture scale
Final use: Still images, no deformation or game-engine export
If the project must be accurate from every side, stop here and gather more references. A second or third view is more valuable than asking the model to reason harder about information it cannot see.
If repeated lighting and material previews are slowing down the feedback loop, these Blender render optimization techniques can help you iterate faster before the final render.
How Should You Brief Astra Before It Builds Anything?
Do not begin with "make this in Blender." First ask Astra to analyze the image, identify uncertainty, and propose a scene plan. This lets you correct a wrong assumption before it becomes hundreds of objects and materials.
Use a starting prompt like this:
Use the attached image as the visual target for an editable Blender scene.

Before building, analyze the image and give me:
1. the main geometric forms and object hierarchy,
2. the likely camera position, perspective, and focal-length range,
3. the visible materials and lighting direction,
4. every important detail that is hidden, cropped, or ambiguous,
5. the assumptions you need to make.

The known scale reference is [OBJECT] at [MEASUREMENT]. The intended output is [OUTPUT]. Use Blender 5.2 LTS and organize the scene with named objects, materials, and collections.

Build only the large-form blockout and match the camera first. Save it as scene_01_blockout.blend and render a low-sample 16:9 preview. Do not add detailed materials or small props until I approve the silhouette, proportions, and camera match
Use the attached image as the visual target for an editable Blender scene.

Before building, analyze the image and give me:
1. the main geometric forms and object hierarchy,
2. the likely camera position, perspective, and focal-length range,
3. the visible materials and lighting direction,
4. every important detail that is hidden, cropped, or ambiguous,
5. the assumptions you need to make.

The known scale reference is [OBJECT] at [MEASUREMENT]. The intended output is [OUTPUT]. Use Blender 5.2 LTS and organize the scene with named objects, materials, and collections.

Build only the large-form blockout and match the camera first. Save it as scene_01_blockout.blend and render a low-sample 16:9 preview. Do not add detailed materials or small props until I approve the silhouette, proportions, and camera match
Review Astra's proposed object list. Remove details that will not affect the deliverable. Resolve any assumption that changes scale, layout, object count, or the intended off-camera geometry.
This staged brief follows OpenAI's published Astra-to-Blender workflow. The author first approved a creative direction, then reviewed the plan and model before moving into more detailed geometry and an Unreal Engine version. The useful lesson is the approval sequence, not the specific house that was produced.
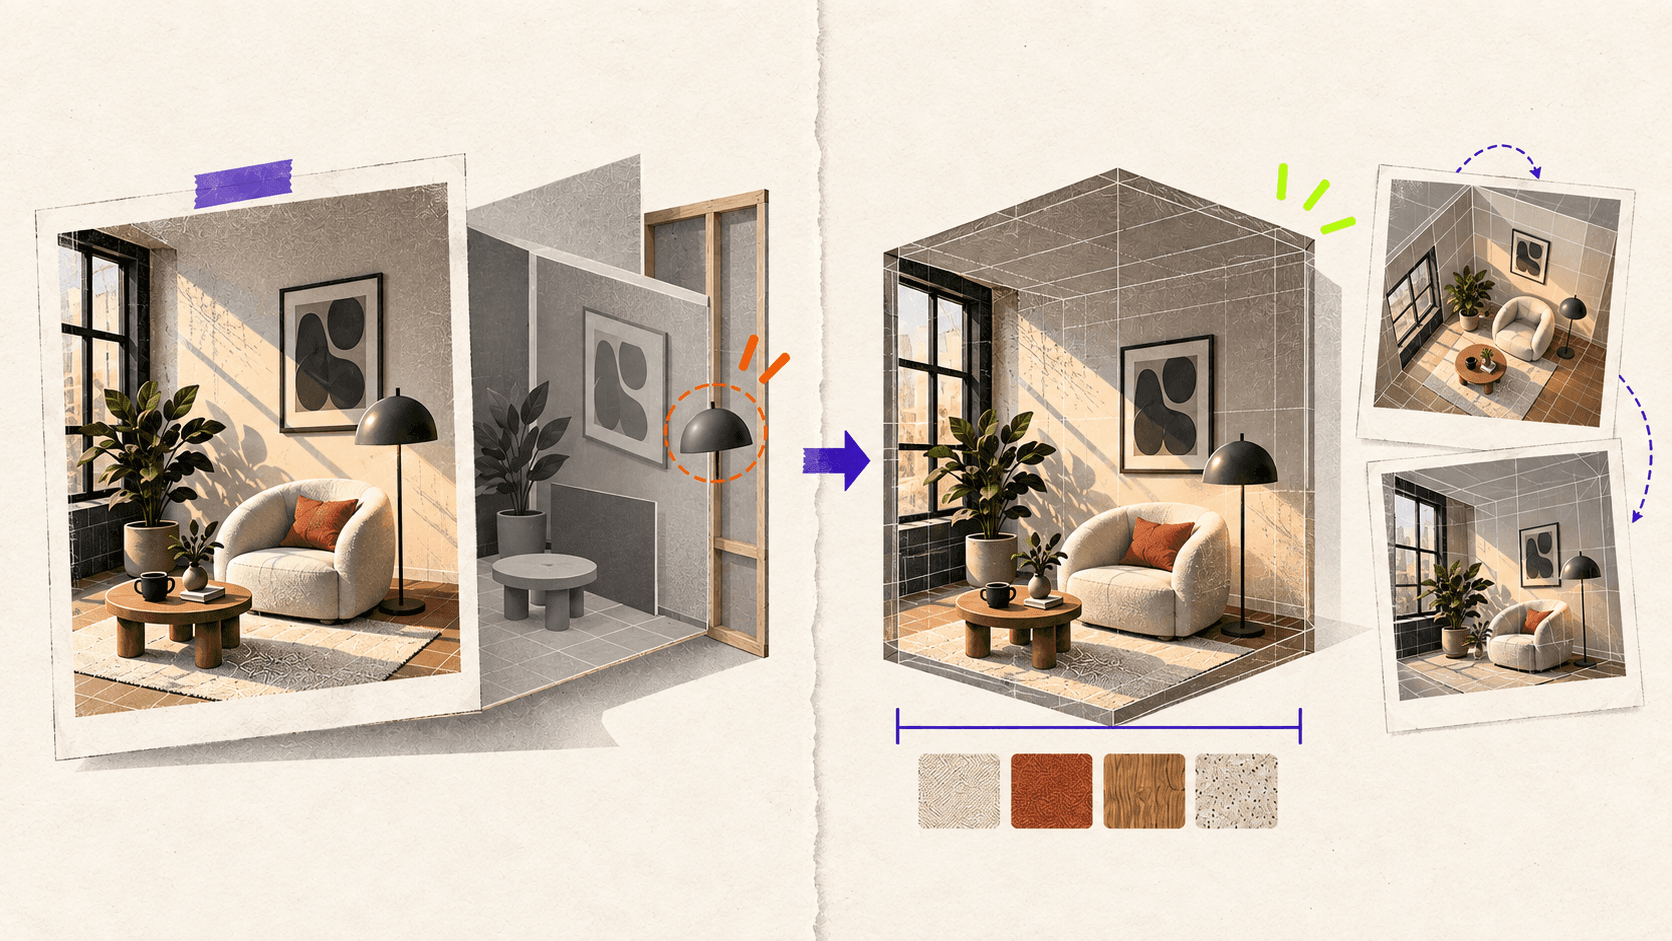
How Do You Build the Blockout and Match the Camera First?
The blockout has one job: prove that the camera, silhouette, proportions, overlaps, and negative space can match the reference. Materials and small details only make a wrong blockout more expensive to change.
Ask Astra to begin with a ground plane, the scale reference, and simple primitives for the largest objects. Keep the scene in solid shading or use plain neutral materials. Match the image aspect ratio and render at low resolution with low samples.
When the first preview arrives, use a focused correction prompt:
Compare the blockout render with the reference. Prioritize camera and large-form accuracy over detail.

Check:
- frame coverage and silhouette,
- perspective and likely focal length,
- relative scale of the main objects,
- spacing and overlaps,
- ground contact,
- objects that appear cropped or occluded.

List the three largest mismatches. Correct only those mismatches, save a new checkpoint, and render the same view again. Do not add materials or secondary details yet
Compare the blockout render with the reference. Prioritize camera and large-form accuracy over detail.

Check:
- frame coverage and silhouette,
- perspective and likely focal length,
- relative scale of the main objects,
- spacing and overlaps,
- ground contact,
- objects that appear cropped or occluded.

List the three largest mismatches. Correct only those mismatches, save a new checkpoint, and render the same view again. Do not add materials or secondary details yet
Camera matching is partly a judgment task. If verticals, object proportions, and overlaps do not align, Astra may need to adjust the camera position, rotation, or focal length. Avoid letting it stretch geometry only to force a match from the hero view.
After the second preview, orbit around the scene. Look for paper-thin objects, floating forms, intersections, or geometry that collapses from another angle. A blockout that only works from the original camera is not ready for camera movement.
Approve the blockout only when:
The silhouette and main perspective feel close
The scale anchor is correct
Objects make believable contact
The major forms remain plausible from the required additional views
Hidden areas are either intentionally designed or clearly marked as unfinished
How Do You Add Geometry, Materials, and Lighting Without Losing Control?
Build the rest of the scene in separate passes. A useful order is secondary geometry, materials, lighting, and only then small props or surface details. Save a checkpoint after each approved stage.
Tell Astra which parts of the blockout are locked. If the camera, dimensions, and object hierarchy are approved, it should not quietly change them while improving a material.
Keep the approved camera, primary dimensions, and collection structure unchanged.

For this pass, add [SECONDARY GEOMETRY OR MATERIALS]. Use editable objects and clearly named materials. Do not add details that will not affect the approved output.

Render:
1. the reference-matching hero view,
2. a three-quarter inspection view,
3. a neutral solid view without materials.

Compare all three views, report intersections, floating objects, shading problems, inconsistent texture scale, and any geometry that works only from the hero camera. Fix only verified issues and save the result as a new checkpoint
Keep the approved camera, primary dimensions, and collection structure unchanged.

For this pass, add [SECONDARY GEOMETRY OR MATERIALS]. Use editable objects and clearly named materials. Do not add details that will not affect the approved output.

Render:
1. the reference-matching hero view,
2. a three-quarter inspection view,
3. a neutral solid view without materials.

Compare all three views, report intersections, floating objects, shading problems, inconsistent texture scale, and any geometry that works only from the hero camera. Fix only verified issues and save the result as a new checkpoint
Licensed assets can be better than procedurally recreating every prop. Record their source and license. In OpenAI's example of using Astra with Blender, Astra combined procedural scene creation with existing Poly Haven assets and textures.
Review more than color. Check texture scale, roughness, and highlights under different light angles. For multiple viewpoints, details affecting silhouette or parallax should exist as geometry rather than a camera-specific trick.
Use diagnostic renders throughout the process. The hero view measures similarity to the reference. A three-quarter view exposes guessed depth and unfinished sides. A solid view removes attractive materials and lighting so you can judge the actual geometry.
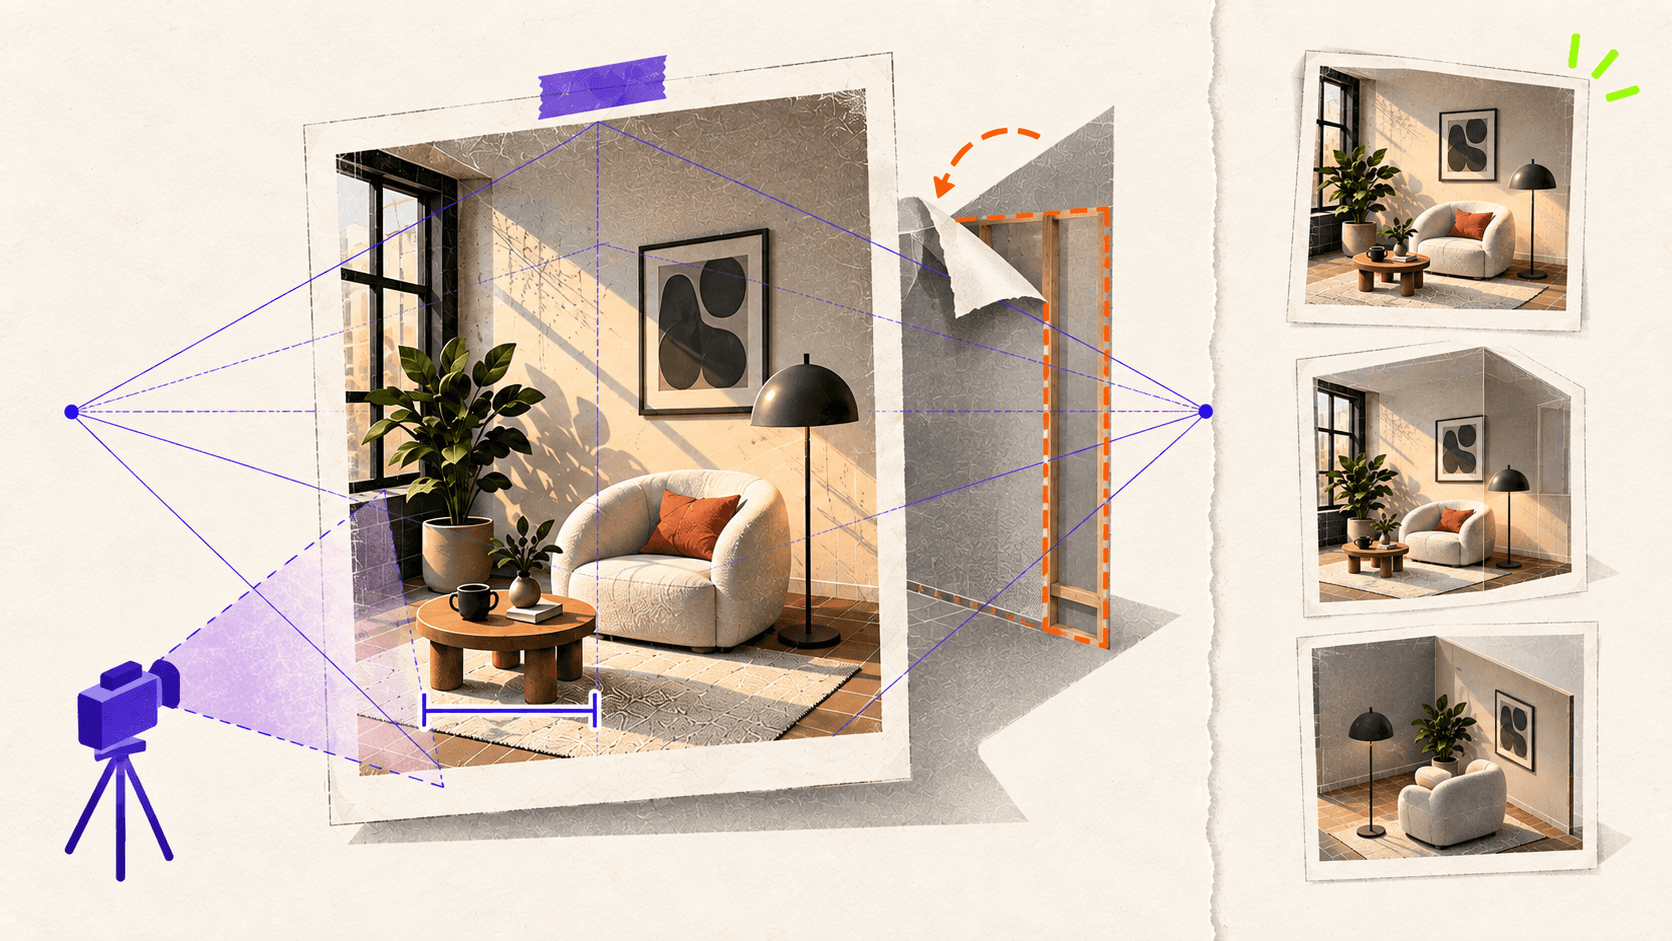
How Do You Check Whether the Scene Is Actually Usable?
An editable .blend file is not automatically production-ready. The required standard depends on what happens next.
Check | Good enough for one hero render | Ready for continued production |
|---|---|---|
Camera | Matches the reference view | Holds up from every required view |
Hidden geometry | May remain simplified | Completed where later shots need it |
Scale | Visually plausible | Uses verified units and dimensions |
Topology | No visible render artifacts | Fits subdivision, deformation, or export needs |
Normals | Looks correct in the hero shot | Checked in solid view and alternate lighting |
UVs and materials | Convincing in the target render | Clean mapping, consistent scale, traceable files |
Transforms | Scene renders correctly | Location, rotation, and scale are intentional |
Organization | Objects can be found | Named objects, materials, and collections |
Performance | Target frame renders | Geometry and texture cost fit the next platform |
Inspect the scene without materials and turn on wireframe or normals overlays where needed. Blender's documentation explains how mesh structure and normals affect shading, while Blender mesh cleanup tools can remove loose elements and reduce unnecessary density.
Check these items before delivery:
Units and the scale anchor remain correct
Transforms are intentional and applied where the next step requires it
No important objects float or intersect
Surface normals shade correctly
UVs and texture scale hold up in close views
External textures and linked assets are included
Hidden geometry matches the promised deliverable
The scene opens cleanly from a fresh Blender launch
Make one routine manual edit. If it breaks the scene, the structure needs more work before handoff.
Finally, label the result honestly. It may be hero-render ready, multi-view ready, animation ready, or export ready. Those are different deliverables.
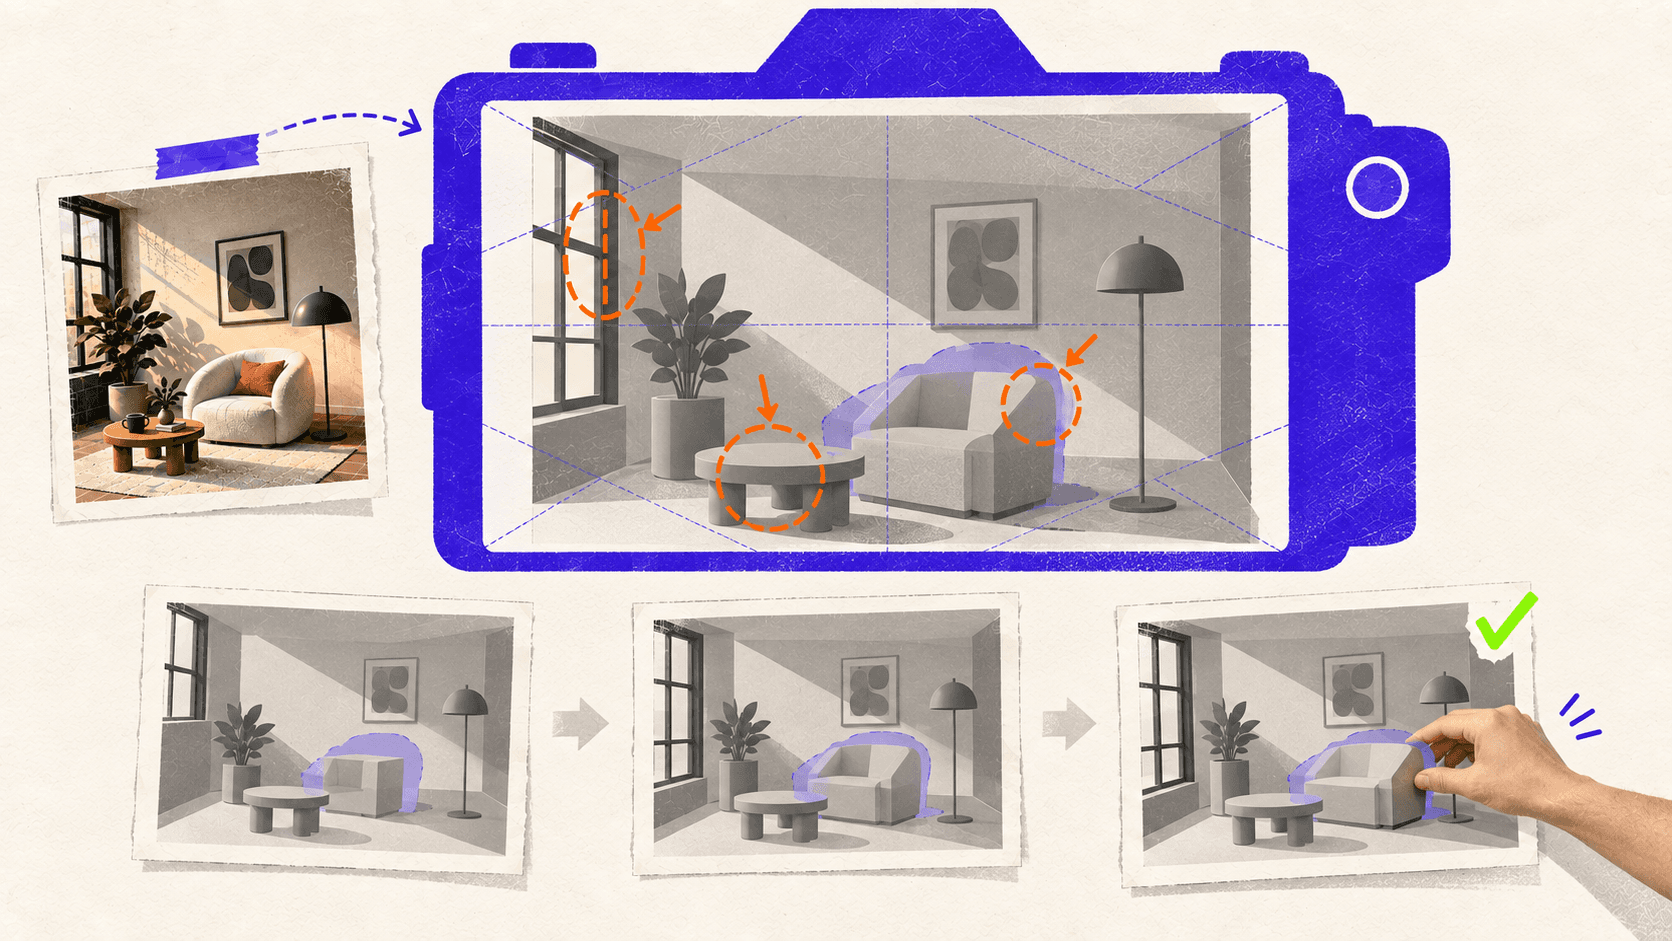
When Does It Make Sense to Run This Workflow on Vagon?
If your workstation handles the scene comfortably and you do not mind Computer Use occupying it, keeping the workflow local is simpler.
Vagon Cloud Computer becomes useful when a laptop lacks the GPU power or memory for repeated Cycles previews, or when you want a separate Windows desktop. It keeps Codex, Blender, scripts, assets, and checkpoints in one persistent workspace.
This is the part Vagon provides: the computer running Blender and holding the creative project. It does not host or accelerate GPT-6 Astra's model inference, improve Astra's accuracy, or increase your ChatGPT allowance.
A separate desktop also makes supervision practical. You can watch the Blender session and take over when the camera, mesh, or material needs direct input. Vagon's guide to watching an AI agent work on a cloud desktop explains this workflow.
Start with the lightest configuration that keeps the blockout responsive. Scale up when dense geometry, large textures, rendered previews, or final frames become the bottleneck. Good scene organization and sensible render settings still matter on faster hardware.
GPT-6 Astra can shorten the distance between a reference and an editable Blender scene, but the artist still defines what "correct" means. Approve the camera before the details, inspect geometry without the final look, and judge the file against its next use rather than a single attractive render.
If you want to give Astra a separate, GPU-powered Blender workspace, create a Vagon Cloud Computer and keep the entire reference-to-render workflow on one accessible desktop.
If your laptop struggles with dense geometry or repeated Cycles previews, a Vagon Cloud Computer gives Blender a separate Windows workspace with selectable CPU and NVIDIA GPU performance.
Frequently Asked Questions
Can GPT-6 Astra turn any reference image into a 3D scene?
Astra can build plausible scenes from clear references, but results depend on visible geometry, perspective, scale, and occlusion. Multiple views and one known measurement reduce uncertainty.
Does Astra create editable Blender geometry?
Yes. Astra can use Blender Python to create objects, materials, cameras, lights, and collections in a .blend file. Check organization, transforms, topology, modifiers, and linked assets before production.
Do I need multiple reference images?
One image can be enough for a matched hero render. Use multiple angles for camera movement, animation, export, or views exposing hidden surfaces. Astra cannot recover information the references never show.
Can an Astra-generated Blender scene be production-ready?
It can after review and cleanup. A convincing render does not prove that scale, topology, UVs, normals, hidden geometry, or performance meet production requirements.
Can I run Astra and Blender on a Vagon Cloud Computer?
Yes. Vagon can provide the Windows workspace and GPU resources for Blender, Codex, scripts, assets, and renders. It does not run Astra inference or increase your ChatGPT allowance.
GPT-6 Astra can study a reference image, write Blender Python, build an editable scene, render previews, and revise its work. It cannot recover every hidden surface, exact dimension, or physically correct material from a single image, so the useful workflow is not one prompt followed by a finished model. You get better control by approving the camera and blockout first, adding detail in separate passes, and inspecting the result from angles the reference never showed.
This works well for stylized environments, architectural concepts, product displays, and hard-surface blockouts where a plausible editable scene matters more than exact reconstruction. For survey-grade or manufacturing accuracy, use measured CAD data, calibrated photos, or photogrammetry.
What Do You Need Before Astra Can Work With Blender?
The most practical setup uses GPT-6 Astra in Codex, Blender on the same computer, and a project folder that both can access. OpenAI has documented an Astra architectural visualization workflow where Astra created an editable Blender scene through Blender's Python API, bpy. It ran scripts through Blender's executable with the --python option, rendered previews, and inspected both the saved images and the Blender application through Computer Use.
For a similar setup, prepare:
Blender 5.2 LTS
The ChatGPT desktop app with Codex and GPT-6 Astra access
The Computer Use plugin, enabled with permission to operate Blender
Your reference image and proof that you may use it
One known measurement for scale
A project folder for scripts, textures, renders, and
.blendcheckpointsA clear deliverable, such as one hero render plus two inspection views
Blender 5.2 LTS was released in July 2026 and has long-term support through July 2028, making it a sensible baseline for a new production-oriented project.
Before using the real brief, ask Astra to create a cube through Blender Python, save a new .blend file, and render a preview. This checks access without risking the main scene.
Use incremental filenames from the start:
scene_00_setup.blend
scene_01_blockout.blend
scene_02_camera-approved.blend
scene_03_geometry.blend
scene_04_materials.blend
scene_05_final.blend
Computer Use deserves one practical warning. OpenAI Computer Use on Windows operates the active desktop and needs the target application to remain visible. OpenAI suggests using a Windows virtual machine when you want the agent to work without taking over your main desktop.
If you are comparing Astra with tools that generate standalone meshes, this guide to AI tools for Blender 3D model generation explains where image-to-3D systems fit and why cleanup still matters.
How Should You Prepare the Reference Image?
Astra can only reason from information present in the image and the constraints you provide. A clean reference does not need to be simple, but it should make the important forms readable.
Look for:
A clear subject and silhouette
Visible contact between objects and the floor or supporting surface
Limited blur and image compression
Perspective lines that help estimate the camera
Lighting that reveals form instead of hiding it
Minimal occlusion around important objects
Then add information the image cannot provide. Identify one known dimension, such as a door height, tabletop width, wheel diameter, or product measurement. State whether Astra may design hidden areas or should leave them simple. Define whether the scene only needs to reproduce the original shot or must also support new cameras, animation, or export.
This distinction matters because single-view 3D reconstruction has shape-pose ambiguity. More than one combination of shape, depth, scale, and camera pose can explain the same 2D image. Occluded surfaces must be inferred from prior knowledge or designed from scratch. Research into what single-view 3D reconstruction networks learn describes these hidden-geometry limitations directly.
Place the source image inside Blender as an image empty or camera background. Blender image empties can stay visible in perspective or orthographic views, sit in front of or behind geometry, and use reduced opacity while you model.
Before continuing, create a short constraint sheet:
Target: Editable Blender scene and one 1920 x 1080 hero render
Known scale: Tabletop is 160 cm wide
Hero camera: Match the supplied image
Additional views: Front three-quarter and rear three-quarter
Hidden areas: Astra may design them in the same visual language
Geometry priority: Primary forms and clean silhouette
Material priority: Visually close, with consistent real-world texture scale
Final use: Still images, no deformation or game-engine export
If the project must be accurate from every side, stop here and gather more references. A second or third view is more valuable than asking the model to reason harder about information it cannot see.
If repeated lighting and material previews are slowing down the feedback loop, these Blender render optimization techniques can help you iterate faster before the final render.
How Should You Brief Astra Before It Builds Anything?
Do not begin with "make this in Blender." First ask Astra to analyze the image, identify uncertainty, and propose a scene plan. This lets you correct a wrong assumption before it becomes hundreds of objects and materials.
Use a starting prompt like this:
Use the attached image as the visual target for an editable Blender scene.

Before building, analyze the image and give me:
1. the main geometric forms and object hierarchy,
2. the likely camera position, perspective, and focal-length range,
3. the visible materials and lighting direction,
4. every important detail that is hidden, cropped, or ambiguous,
5. the assumptions you need to make.

The known scale reference is [OBJECT] at [MEASUREMENT]. The intended output is [OUTPUT]. Use Blender 5.2 LTS and organize the scene with named objects, materials, and collections.

Build only the large-form blockout and match the camera first. Save it as scene_01_blockout.blend and render a low-sample 16:9 preview. Do not add detailed materials or small props until I approve the silhouette, proportions, and camera match
Review Astra's proposed object list. Remove details that will not affect the deliverable. Resolve any assumption that changes scale, layout, object count, or the intended off-camera geometry.
This staged brief follows OpenAI's published Astra-to-Blender workflow. The author first approved a creative direction, then reviewed the plan and model before moving into more detailed geometry and an Unreal Engine version. The useful lesson is the approval sequence, not the specific house that was produced.
How Do You Build the Blockout and Match the Camera First?
The blockout has one job: prove that the camera, silhouette, proportions, overlaps, and negative space can match the reference. Materials and small details only make a wrong blockout more expensive to change.
Ask Astra to begin with a ground plane, the scale reference, and simple primitives for the largest objects. Keep the scene in solid shading or use plain neutral materials. Match the image aspect ratio and render at low resolution with low samples.
When the first preview arrives, use a focused correction prompt:
Compare the blockout render with the reference. Prioritize camera and large-form accuracy over detail.

Check:
- frame coverage and silhouette,
- perspective and likely focal length,
- relative scale of the main objects,
- spacing and overlaps,
- ground contact,
- objects that appear cropped or occluded.

List the three largest mismatches. Correct only those mismatches, save a new checkpoint, and render the same view again. Do not add materials or secondary details yet
Camera matching is partly a judgment task. If verticals, object proportions, and overlaps do not align, Astra may need to adjust the camera position, rotation, or focal length. Avoid letting it stretch geometry only to force a match from the hero view.
After the second preview, orbit around the scene. Look for paper-thin objects, floating forms, intersections, or geometry that collapses from another angle. A blockout that only works from the original camera is not ready for camera movement.
Approve the blockout only when:
The silhouette and main perspective feel close
The scale anchor is correct
Objects make believable contact
The major forms remain plausible from the required additional views
Hidden areas are either intentionally designed or clearly marked as unfinished
How Do You Add Geometry, Materials, and Lighting Without Losing Control?
Build the rest of the scene in separate passes. A useful order is secondary geometry, materials, lighting, and only then small props or surface details. Save a checkpoint after each approved stage.
Tell Astra which parts of the blockout are locked. If the camera, dimensions, and object hierarchy are approved, it should not quietly change them while improving a material.
Keep the approved camera, primary dimensions, and collection structure unchanged.

For this pass, add [SECONDARY GEOMETRY OR MATERIALS]. Use editable objects and clearly named materials. Do not add details that will not affect the approved output.

Render:
1. the reference-matching hero view,
2. a three-quarter inspection view,
3. a neutral solid view without materials.

Compare all three views, report intersections, floating objects, shading problems, inconsistent texture scale, and any geometry that works only from the hero camera. Fix only verified issues and save the result as a new checkpoint
Licensed assets can be better than procedurally recreating every prop. Record their source and license. In OpenAI's example of using Astra with Blender, Astra combined procedural scene creation with existing Poly Haven assets and textures.
Review more than color. Check texture scale, roughness, and highlights under different light angles. For multiple viewpoints, details affecting silhouette or parallax should exist as geometry rather than a camera-specific trick.
Use diagnostic renders throughout the process. The hero view measures similarity to the reference. A three-quarter view exposes guessed depth and unfinished sides. A solid view removes attractive materials and lighting so you can judge the actual geometry.
How Do You Check Whether the Scene Is Actually Usable?
An editable .blend file is not automatically production-ready. The required standard depends on what happens next.
Check | Good enough for one hero render | Ready for continued production |
|---|---|---|
Camera | Matches the reference view | Holds up from every required view |
Hidden geometry | May remain simplified | Completed where later shots need it |
Scale | Visually plausible | Uses verified units and dimensions |
Topology | No visible render artifacts | Fits subdivision, deformation, or export needs |
Normals | Looks correct in the hero shot | Checked in solid view and alternate lighting |
UVs and materials | Convincing in the target render | Clean mapping, consistent scale, traceable files |
Transforms | Scene renders correctly | Location, rotation, and scale are intentional |
Organization | Objects can be found | Named objects, materials, and collections |
Performance | Target frame renders | Geometry and texture cost fit the next platform |
Inspect the scene without materials and turn on wireframe or normals overlays where needed. Blender's documentation explains how mesh structure and normals affect shading, while Blender mesh cleanup tools can remove loose elements and reduce unnecessary density.
Check these items before delivery:
Units and the scale anchor remain correct
Transforms are intentional and applied where the next step requires it
No important objects float or intersect
Surface normals shade correctly
UVs and texture scale hold up in close views
External textures and linked assets are included
Hidden geometry matches the promised deliverable
The scene opens cleanly from a fresh Blender launch
Make one routine manual edit. If it breaks the scene, the structure needs more work before handoff.
Finally, label the result honestly. It may be hero-render ready, multi-view ready, animation ready, or export ready. Those are different deliverables.
When Does It Make Sense to Run This Workflow on Vagon?
If your workstation handles the scene comfortably and you do not mind Computer Use occupying it, keeping the workflow local is simpler.
Vagon Cloud Computer becomes useful when a laptop lacks the GPU power or memory for repeated Cycles previews, or when you want a separate Windows desktop. It keeps Codex, Blender, scripts, assets, and checkpoints in one persistent workspace.
This is the part Vagon provides: the computer running Blender and holding the creative project. It does not host or accelerate GPT-6 Astra's model inference, improve Astra's accuracy, or increase your ChatGPT allowance.
A separate desktop also makes supervision practical. You can watch the Blender session and take over when the camera, mesh, or material needs direct input. Vagon's guide to watching an AI agent work on a cloud desktop explains this workflow.
Start with the lightest configuration that keeps the blockout responsive. Scale up when dense geometry, large textures, rendered previews, or final frames become the bottleneck. Good scene organization and sensible render settings still matter on faster hardware.
GPT-6 Astra can shorten the distance between a reference and an editable Blender scene, but the artist still defines what "correct" means. Approve the camera before the details, inspect geometry without the final look, and judge the file against its next use rather than a single attractive render.
If you want to give Astra a separate, GPU-powered Blender workspace, create a Vagon Cloud Computer and keep the entire reference-to-render workflow on one accessible desktop.
If your laptop struggles with dense geometry or repeated Cycles previews, a Vagon Cloud Computer gives Blender a separate Windows workspace with selectable CPU and NVIDIA GPU performance.
Frequently Asked Questions
Can GPT-6 Astra turn any reference image into a 3D scene?
Astra can build plausible scenes from clear references, but results depend on visible geometry, perspective, scale, and occlusion. Multiple views and one known measurement reduce uncertainty.
Does Astra create editable Blender geometry?
Yes. Astra can use Blender Python to create objects, materials, cameras, lights, and collections in a .blend file. Check organization, transforms, topology, modifiers, and linked assets before production.
Do I need multiple reference images?
One image can be enough for a matched hero render. Use multiple angles for camera movement, animation, export, or views exposing hidden surfaces. Astra cannot recover information the references never show.
Can an Astra-generated Blender scene be production-ready?
It can after review and cleanup. A convincing render does not prove that scale, topology, UVs, normals, hidden geometry, or performance meet production requirements.
Can I run Astra and Blender on a Vagon Cloud Computer?
Yes. Vagon can provide the Windows workspace and GPU resources for Blender, Codex, scripts, assets, and renders. It does not run Astra inference or increase your ChatGPT allowance.
Get Beyond Your Computer Performance
Run applications on your cloud computer with the latest generation hardware. No more crashes or lags.

Trial includes 1 hour usage + 7 days of storage.
Summarize with AI

Ready to focus on your creativity?
Vagon gives you the ability to create & render projects, collaborate, and stream applications with the power of the best hardware.

Run heavy applications on any device with
your personal computer on the cloud.
San Francisco, California
Solutions
Vagon Teams
Vagon Streams
Use Cases
© 2026 Vagon. All rights reserved.
Run heavy applications on any device with
your personal computer on the cloud.
San Francisco, California
Solutions
Vagon Teams
Vagon Streams
Use Cases
© 2026 Vagon. All rights reserved.
Run heavy applications on any device with
your personal computer on the cloud.
San Francisco, California
Solutions
Vagon Teams
Vagon Streams
Use Cases
© 2026 Vagon. All rights reserved.