Instant Connection for Pixel Streaming
— New Feature Automated Setup
The Best Render Settings for Blender 3D
The Best Render Settings for Blender 3D
DigitalArt
The Best Render Settings for Blender 3D
Table of Contents
I once shaved 6 hours off a render just by changing one setting. No new hardware. No magic plugins. Just a tweak in the light path settings that I’d completely ignored before.
Blender’s render settings aren’t just knobs to fiddle with — they decide whether your scene takes minutes or days to finish. And if you’re still using the defaults, you're probably wasting time.
Why Render Settings Actually Matter
Let’s be honest — Blender’s default settings are decent. They’re safe, middle-of-the-road, designed to work for most projects out of the box. But “decent” doesn’t cut it when your deadline’s in 12 hours and your scene’s stuck at 7% after two hours.
I learned that the hard way rendering a product shot on my laptop. Everything looked fine in the viewport. But once I hit render, it was like watching paint dry, literally. Turned out my samples were cranked way too high, denoising was off, and I was using the CPU instead of my GPU. Classic rookie mistakes, and Blender didn’t warn me about any of them.
That’s the thing: Blender gives you power, but it assumes you know how to use it. The right render settings can cut your times in half, fix fireflies, clean up noise, and stop your machine from sounding like it’s launching into orbit.
So let’s break it down, what actually matters, what to skip, and how to stop wasting time on bad renders.
If you're still deciding between tools, this Blender vs. SketchUp comparison breaks down how each handles modeling, rendering, and creative workflows.
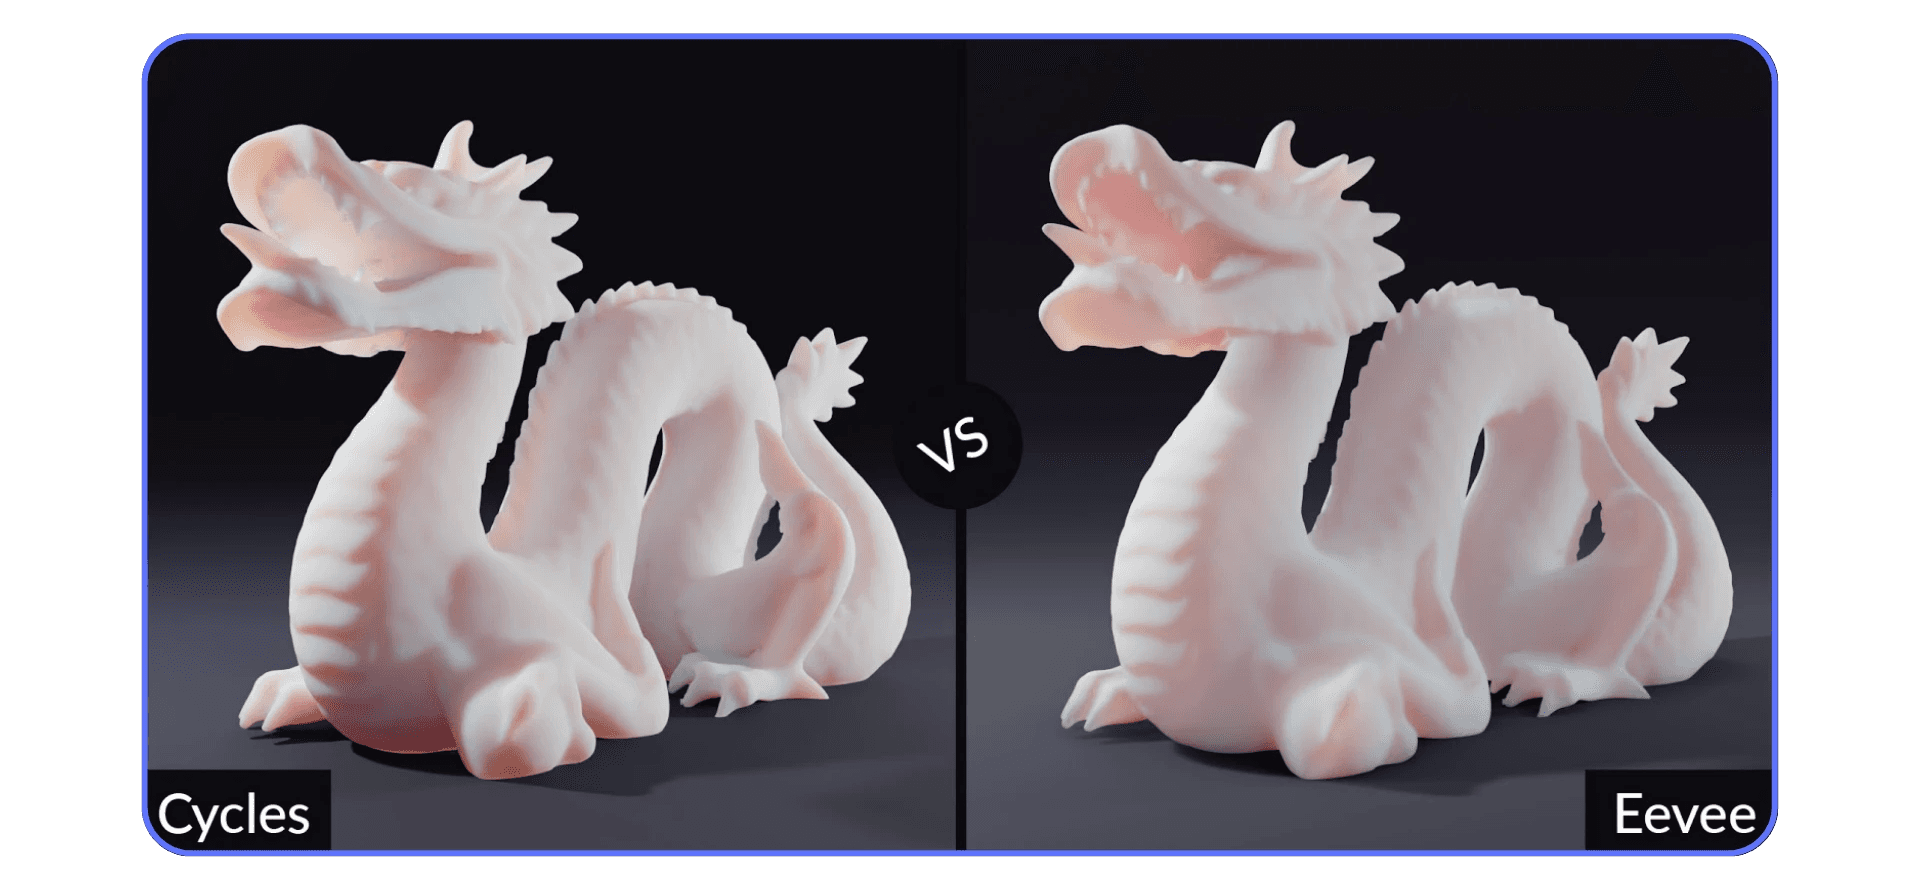
Eevee vs. Cycles
Here’s the deal: Blender has two main render engines, and they’re not interchangeable. I’ve seen people switch from Eevee to Cycles mid-project and suddenly wonder why everything looks wrong, or takes 10x longer.
So, let’s clear it up.
Eevee — Fast, Real-Time, Great for Stylized Looks
Eevee is Blender’s real-time render engine. It’s built for speed. You’ll get quick feedback, snappy previews, and near-instant final renders, even on a laptop. It’s fantastic for:
Animations where realism isn’t critical
Game-style visuals or stylized art
Viewport previews while you work
But — and it’s a big but — Eevee fakes a lot of what Cycles physically simulates. It doesn’t handle indirect lighting, subsurface scattering, or caustics very well. And forget about using emissive materials to light your scene, it won’t behave like you expect.
That said, the upcoming Eevee Next (starting in Blender 4.2) is fixing a lot of these problems. It introduces screen-space global illumination, better soft shadows, and more accurate lighting. But it’s still not Cycles. Not yet.
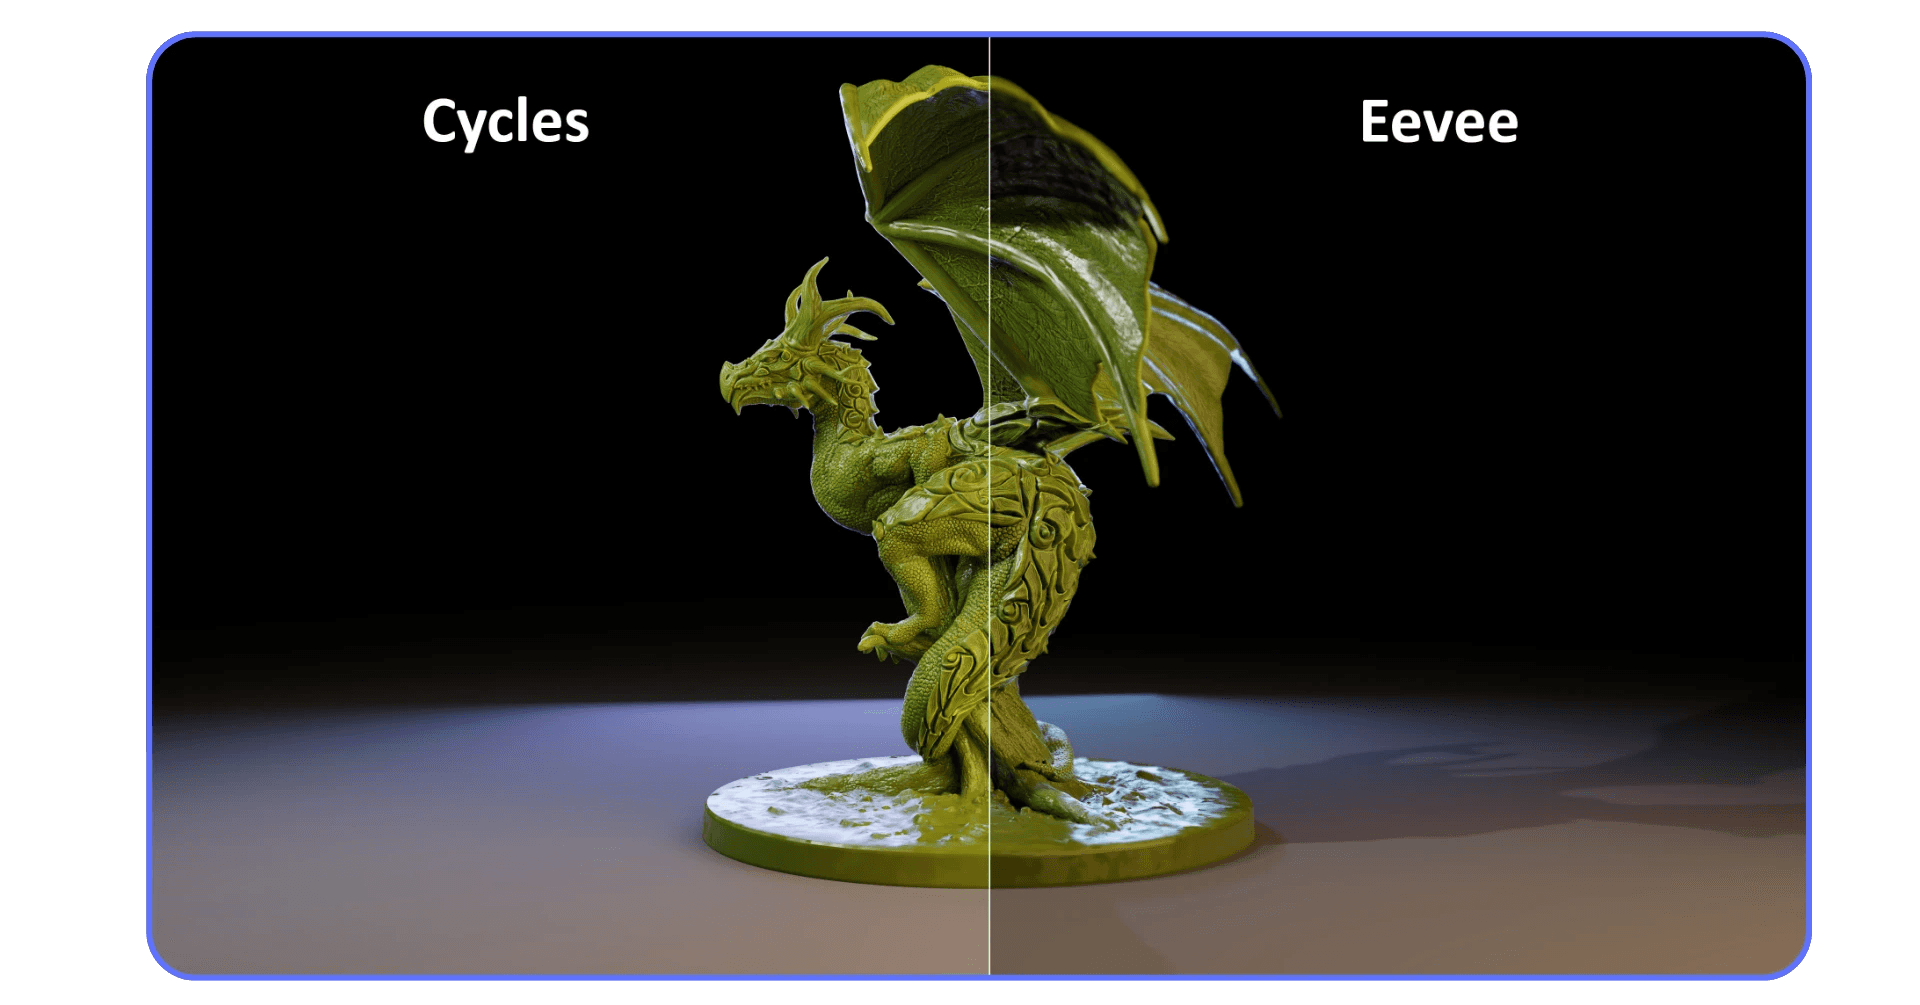
Cycles — Physically Accurate, GPU-Hungry, Worth It
Cycles is the path-tracing engine. It’s slow-ish but gives you realism that’s hard to fake. If you’re working on product renders, photorealistic archviz, VFX, or anything where lighting needs to behave like it does in the real world — Cycles is your friend.
And yes, it’s heavy. But if you switch to GPU rendering (more on that in the next section) and tweak a few key settings, it becomes way more manageable. Especially on modern GPUs or cloud setups.
Quick Rule of Thumb?
Use Eevee when speed > realism
Use Cycles when realism > speed
Still not sure? Here’s what I do: block out and preview in Eevee, final render in Cycles. Best of both worlds.
Cycles Render Settings
If you’re using Cycles and haven’t touched these settings yet — you’re almost definitely over-rendering, under-optimizing, or just waiting way longer than you need to. I’ve gone from noisy, unusable frames to buttery-smooth outputs just by flipping a few switches.
Let’s walk through the key ones.
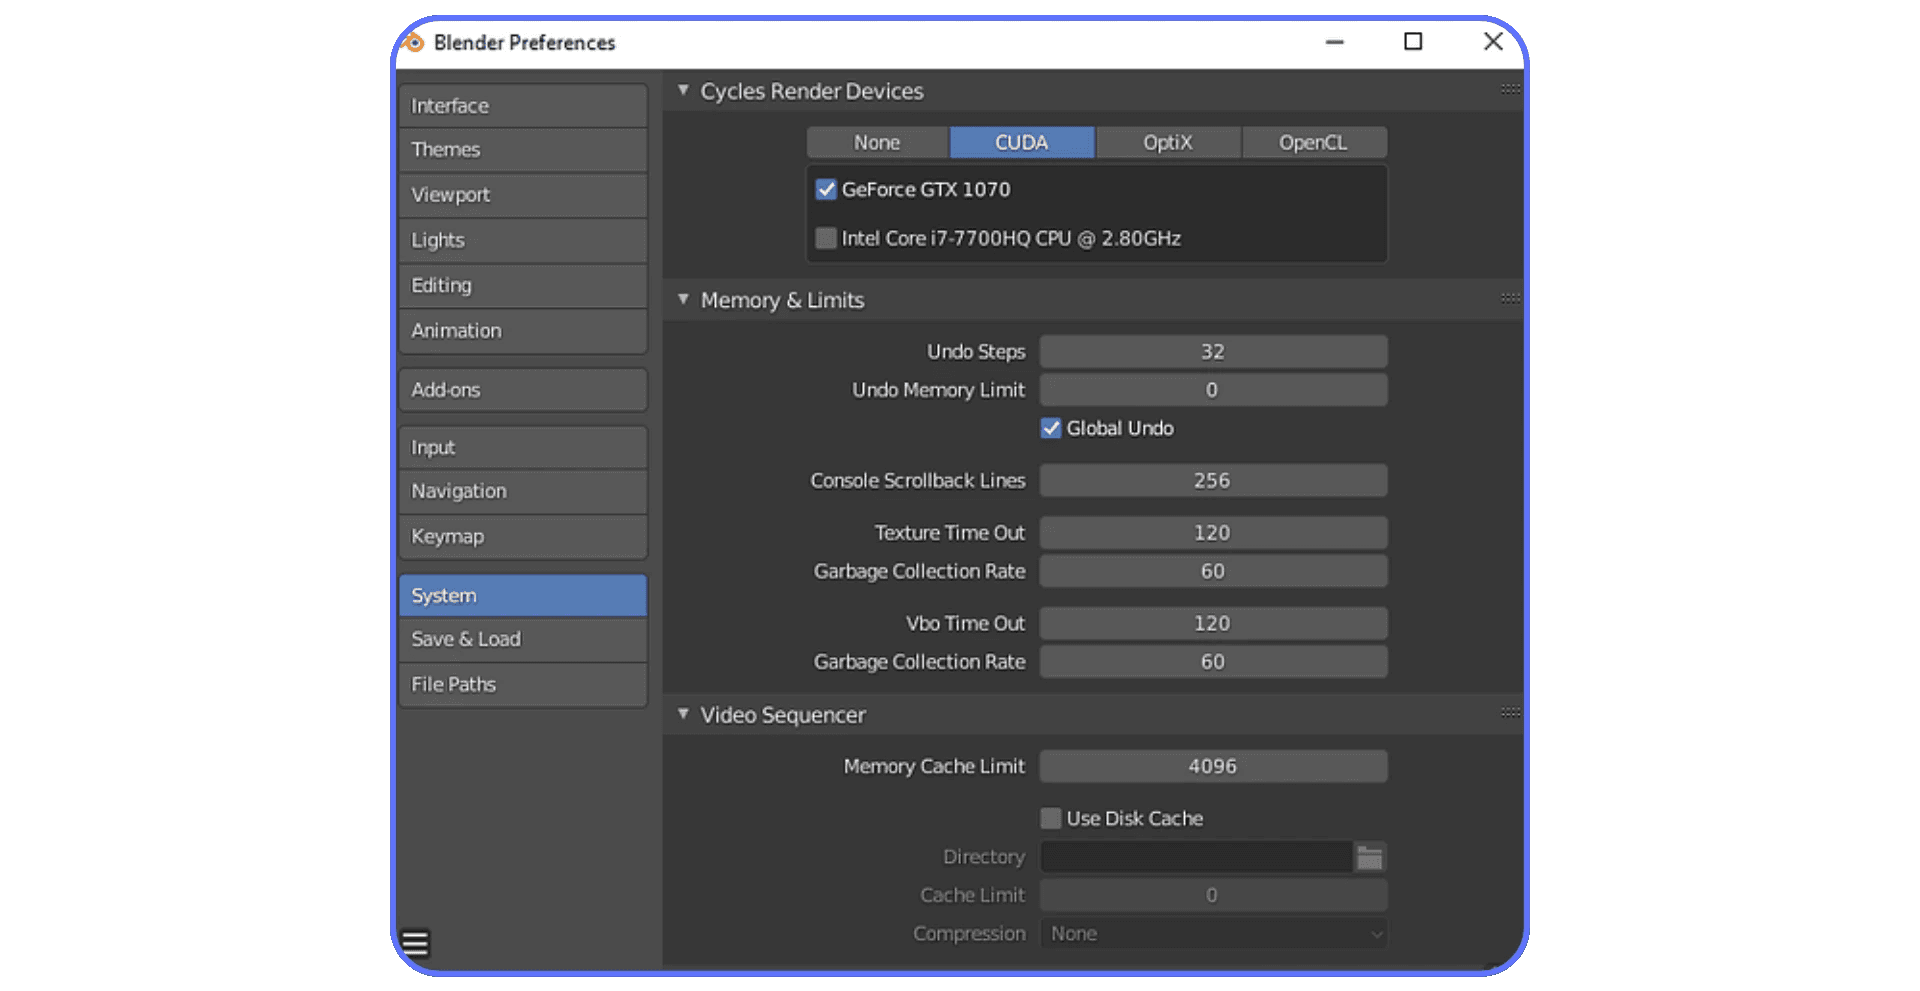
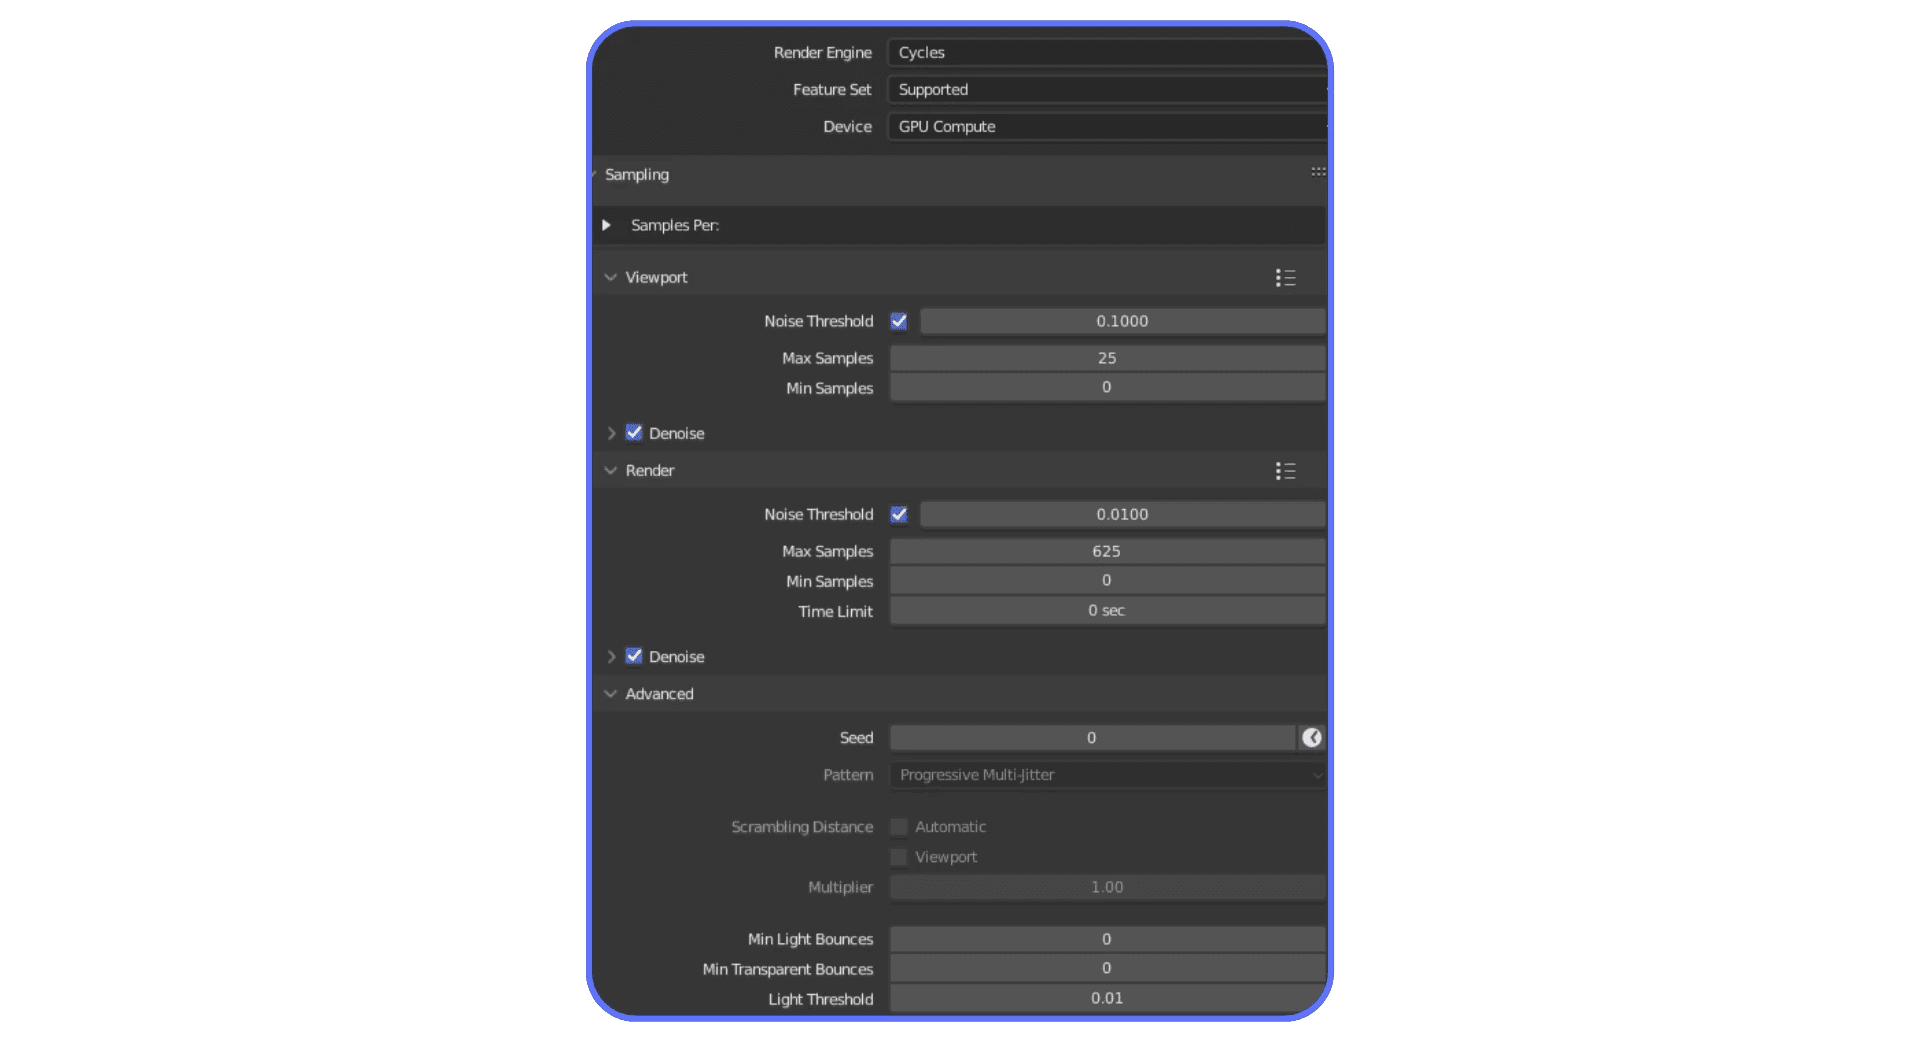
#1. Device: Set It to GPU (Please)
Blender won’t do this for you automatically. Head to Edit > Preferences > System, and make sure your compute device is set to GPU Compute — not CPU. If you’ve got an NVIDIA card, choose OptiX (it’s faster than CUDA for most scenes). AMD? Use HIP. Intel? It’s getting better, but still catching up.
Why it matters: GPU rendering is usually 5–10x faster than CPU. Rendering on CPU when you don’t have to is like trying to mow your lawn with scissors.
#2. Sampling + Noise Threshold: Smarter, Not More
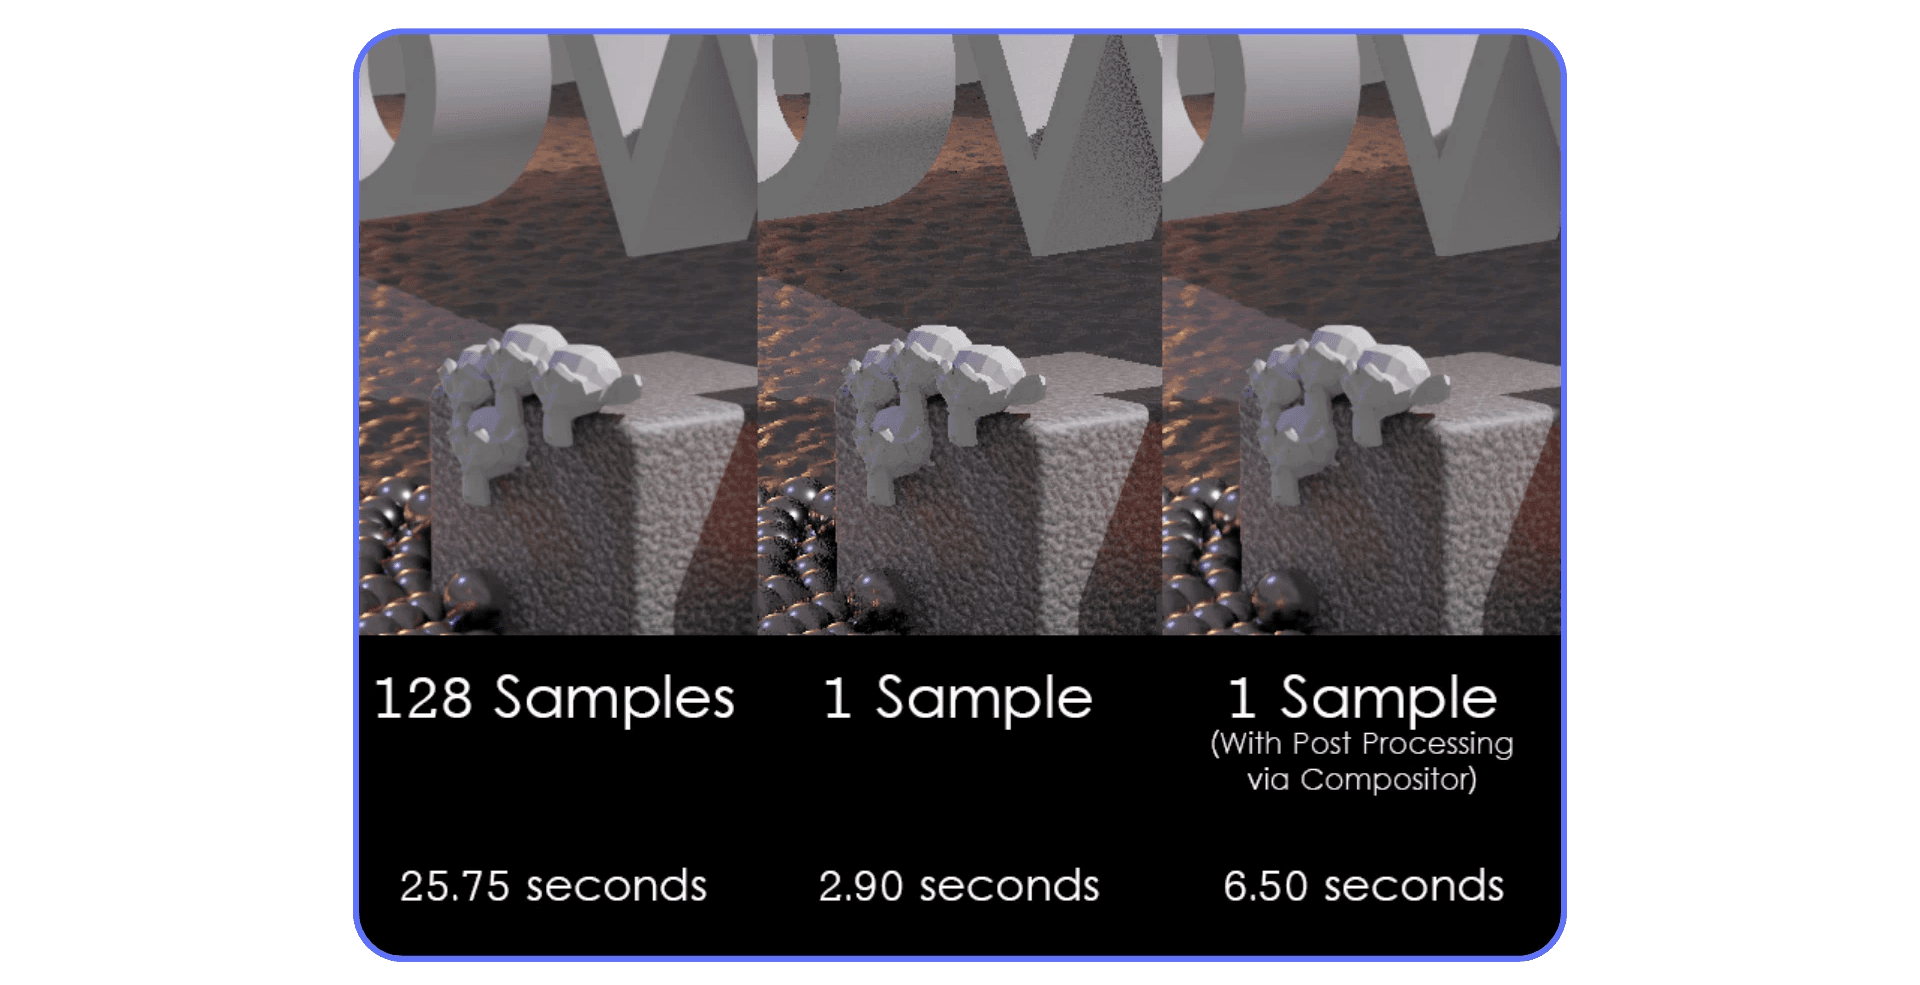
More samples don’t always mean better. They often just mean slower. Instead, set a reasonable number of max samples (200–500 is a good starting point) and turn on Noise Threshold — found under the Sampling tab.
Start with a threshold of 0.1. Drop to 0.05 or 0.075 for cleaner shots. Blender will stop rendering early when the noise drops below that level. It’s like setting a “good enough” bar — and it works incredibly well.
Also, make sure to enable adaptive sampling — it skips areas that don’t need as much detail.
#3. Denoiser: Your Secret Weapon
If you’re not using a denoiser, you’re working too hard. Under the Render Properties > Denoising, use:
OptiX if you're on an NVIDIA GPU (faster, GPU-based)
OpenImageDenoise (OIDN) if you’re on CPU or want slightly softer results
You’ll get clean images with far fewer samples — and less time.

#4. Light Paths: Trim the Fat
Cycles defaults to 12 max bounces. That’s overkill for most scenes. You can usually get great results with:
Total Bounces: 8
Diffuse: 2
Glossy: 2
Transmission: 4
Transparency: 4
Volume: 0–2 (only needed if using volumetrics)
You’ll barely notice a difference in quality — but render times can drop 20–40% depending on the scene.

#5. Performance Tab: Use Persistent Data
If you’re rendering animations or batch frames, enable Persistent Data in the Performance tab. It prevents Blender from clearing and reloading data between frames, which can cut per-frame render time significantly.
Especially useful if your scene uses a lot of geometry, textures, or modifiers.

#6. Output Format: EXR with DWAA
If your final output goes through post-processing (like DaVinci Resolve or After Effects), set your file format to OpenEXR and enable DWAA compression. It’s fast, preserves detail, and avoids massive file sizes. Also speeds up file writing — which weirdly eats more time than you’d expect.

Eevee Render Settings
Eevee gets a bad rap from realism purists, and sure, it’s not Cycles. But with the right settings, it can look really good. I’ve seen entire short films rendered in Eevee that pass for ray-traced at a glance. The trick is knowing what to turn on, and what to leave alone.
Here’s what I recommend if you want fast and decent.
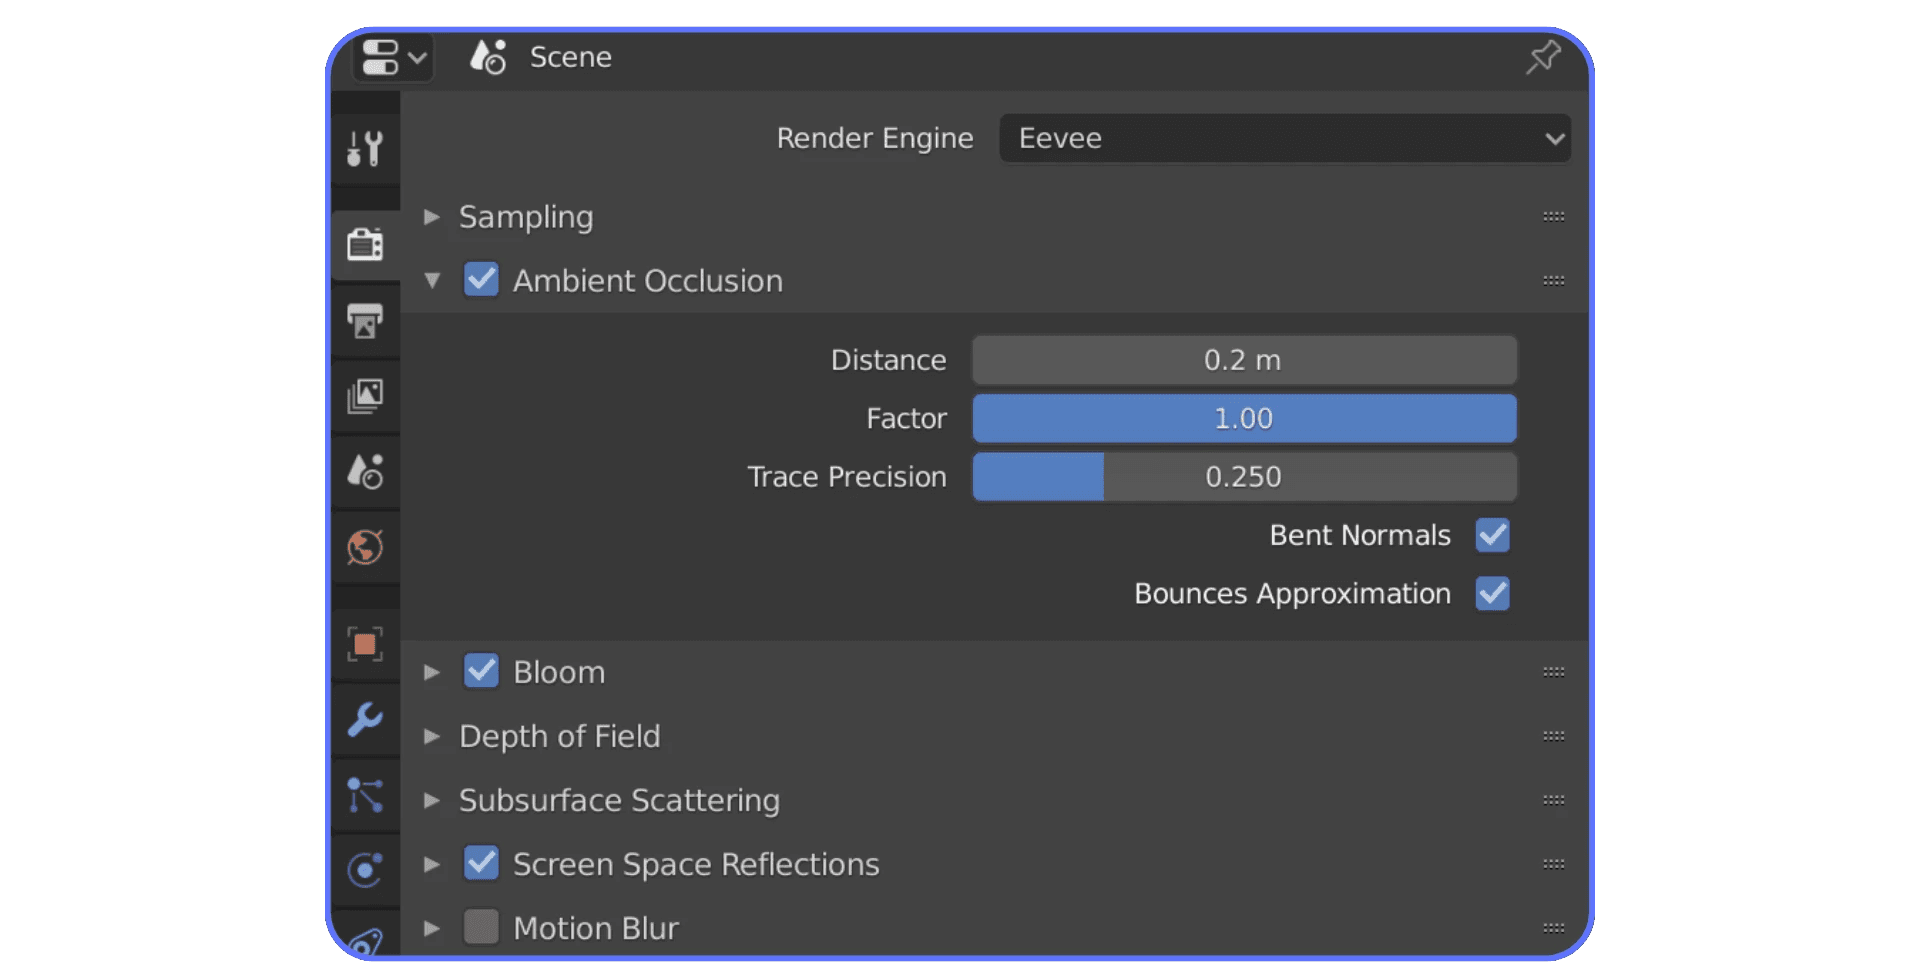
#1. Turn on Ambient Occlusion (AO)
Go to Render Properties > Ambient Occlusion, and check the box.
Then tweak:
Distance: Try 0.5–1.0 for subtle contact shadows
Factor: 1.0 usually looks decent, raise for stronger effect
AO is one of those “cheap tricks” that instantly gives your scene depth, especially in stylized or NPR work. And it costs almost nothing in render time.
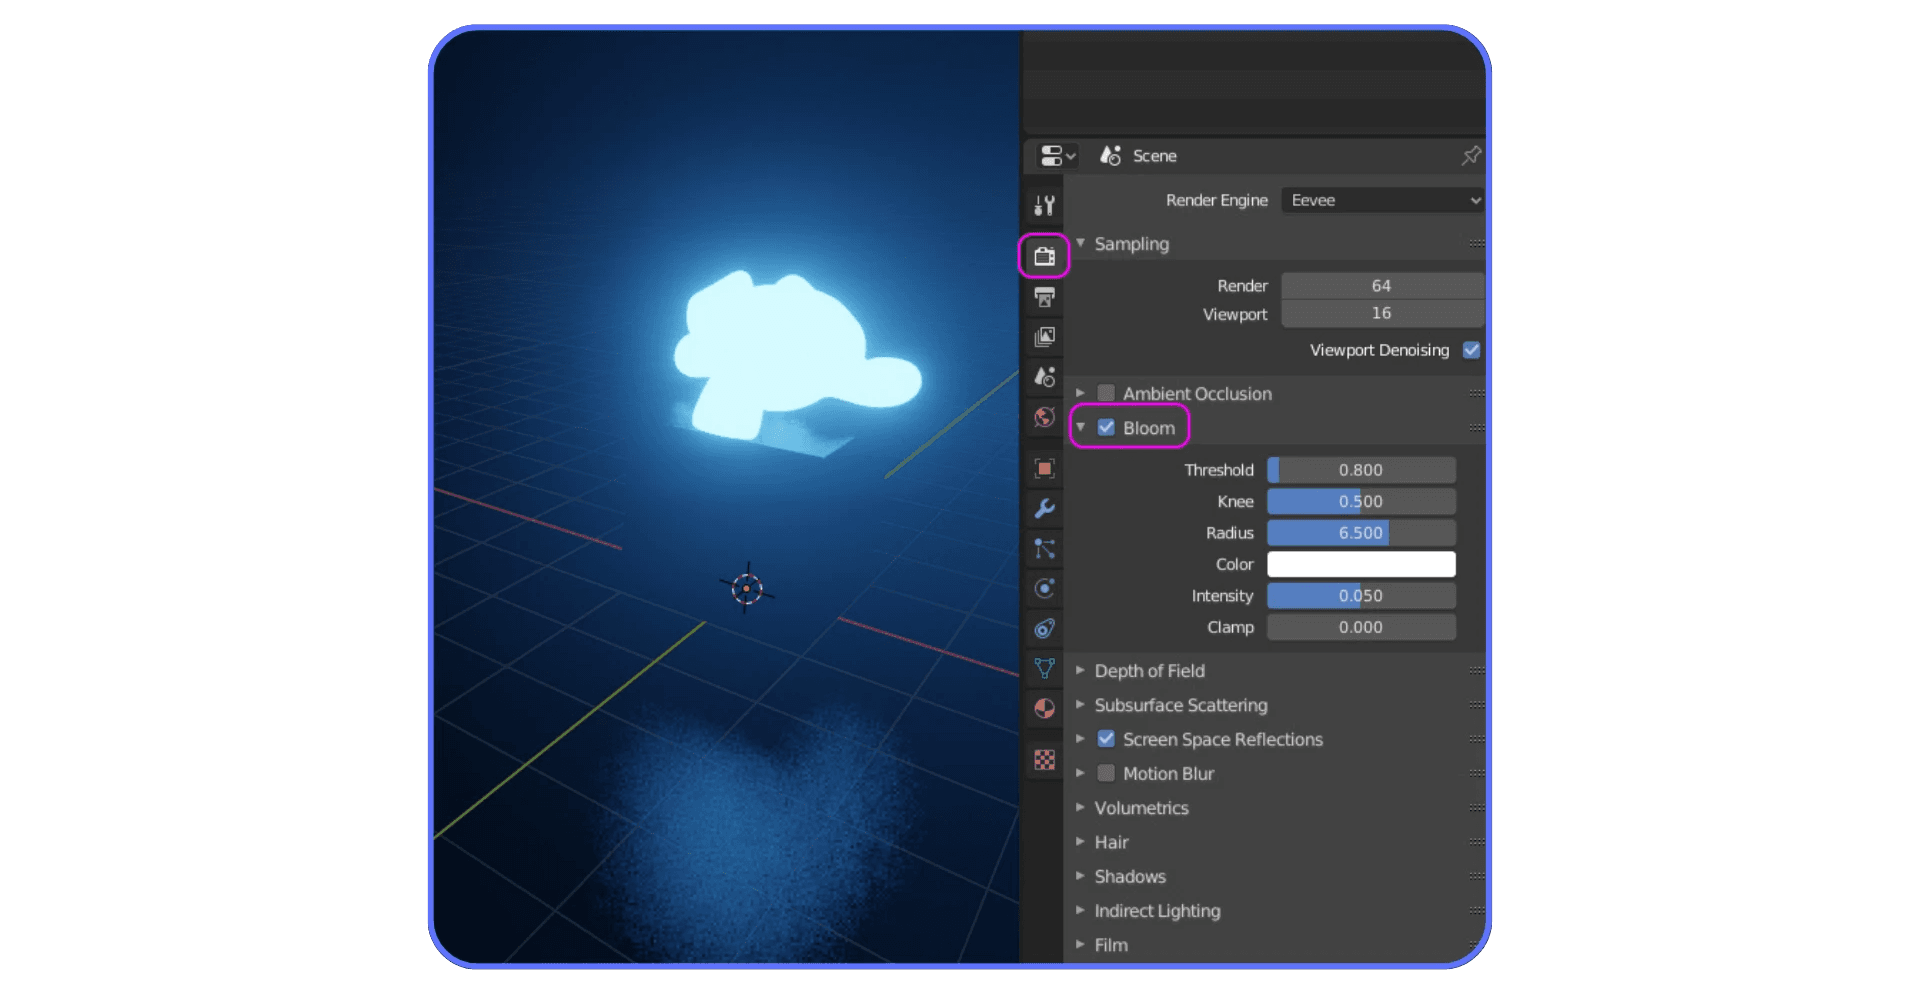
#2. Enable Bloom — But Don’t Overdo It
Bloom adds that glowing softness around bright lights. Turn it on, then dial in:
Threshold: Lower means more things glow. Try 0.8–1.0.
Intensity: 0.05–0.2 is usually enough.
Radius: Depends on your style — cartoonish? Go bigger.
Just… don’t crank everything to 11 unless you want your scene to look like a neon rave underwater.
#3. Use Screen-Space Reflections (SSR)
If you’ve got shiny surfaces, SSR brings them to life. You’ll find it under Render Properties > Screen Space Reflections.
Turn it on, then adjust:
Refraction (if your materials use glass)
Roughness Threshold — helps control how soft reflections look
Half Res Trace — leave OFF for better quality, unless you’re desperate for speed
SSR isn’t perfect, and yes, reflections will disappear at sharp angles — but it does a solid job without tanking performance.

#4. Bump Up Shadow Quality
This one matters more than people think. Under Render Properties > Shadows, increase:
Cube Size (for point lights)
Cascade Size (for sun lamps)
Go from the default 512 to at least 2048 for final renders. You’ll get way cleaner, sharper shadows — no more blocky banding.
Also:
Turn off Soft Shadows if they make things too mushy
Keep Contact Shadows ON for better realism

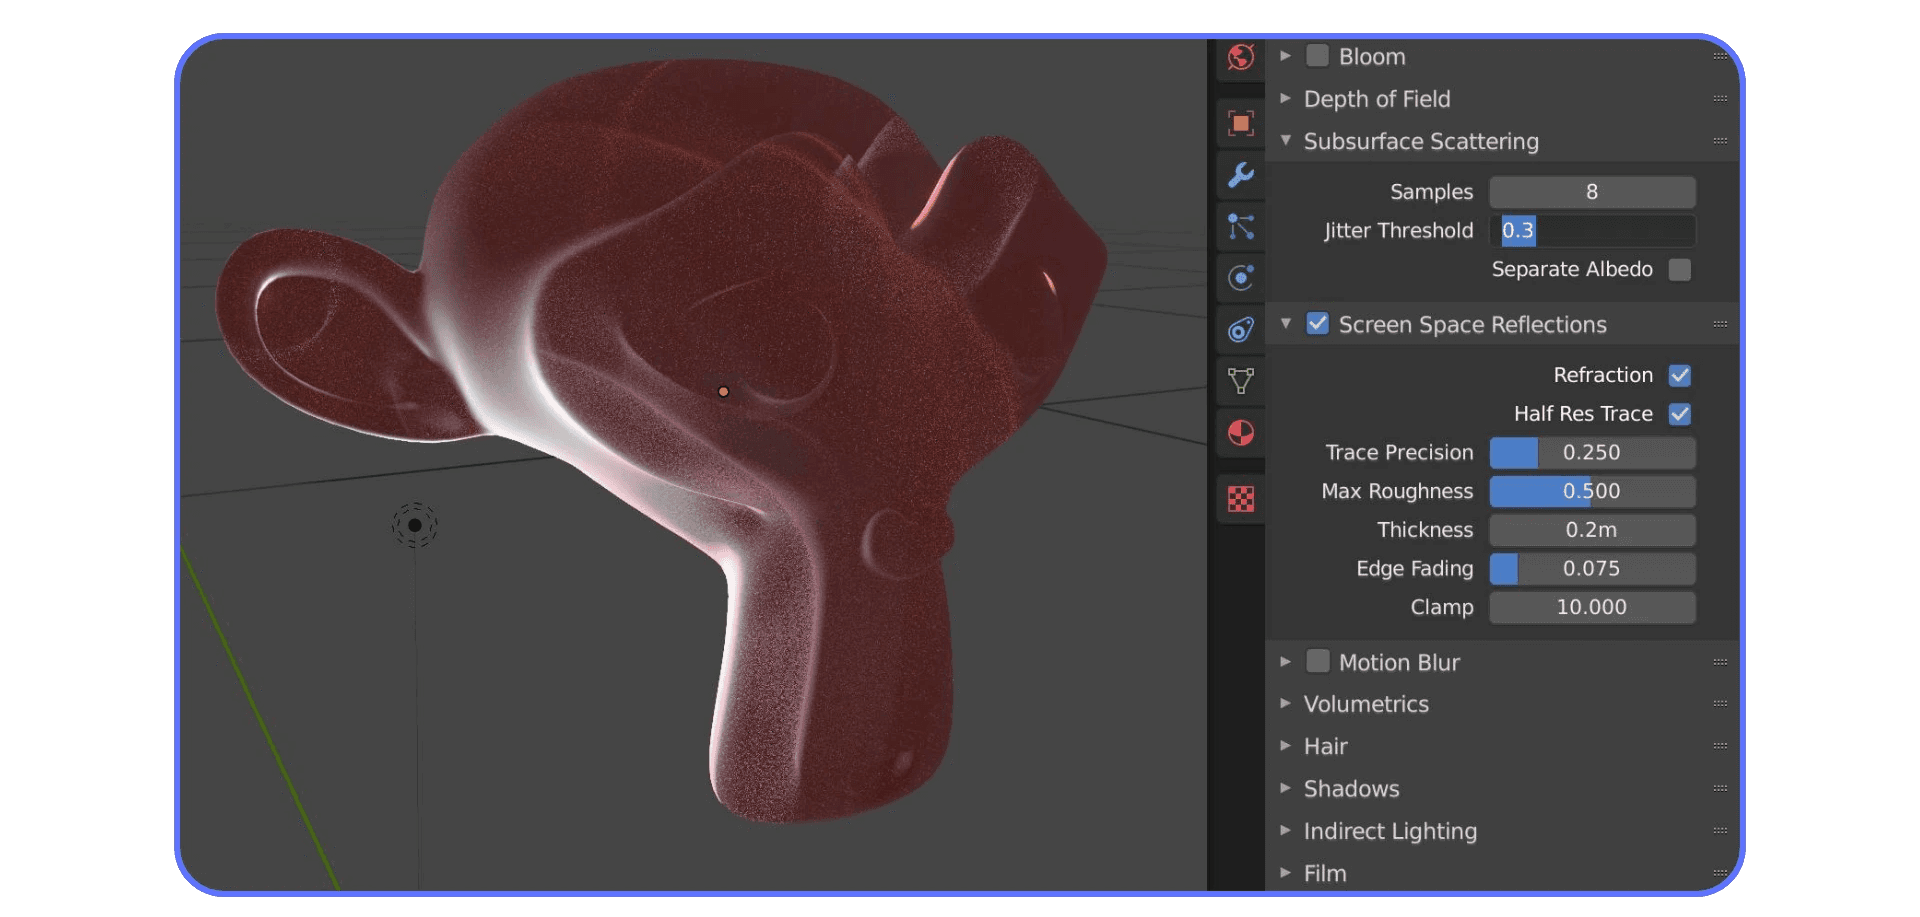
#5. Don’t Forget Subsurface Scattering
Yes, Eevee does SSS. Go to Render Properties > Subsurface Scattering, turn it on, and increase the samples from the default 4 to something like 16–32 for smoother results. Works great on skin, wax, food, and stylized characters.
#6. Viewport ≠ Final Render
Quick tip: what you see in the viewport isn’t always 100% accurate. Eevee renders faster than real-time, but still benefits from Render Samples (increase them under Sampling). Try 64–128 for final outputs.
Eevee is way more powerful than it looks, especially with a few of these toggles flipped. It won’t match Cycles in photorealism, but for stylized work, fast animation, or real-time previews, it’s honestly kind of magic.
When to Use What
There’s no “best” render engine, only the best one for what you’re trying to do. I’ve switched between Eevee and Cycles mid-project more times than I can count, usually after realizing I picked the wrong one to begin with.
So here’s the rule I live by: don’t marry your engine — date it based on the project.
Let’s break it down with some real-world use cases.
Some workflows lean more toward CAD-style tools — if that’s your thing, here’s a quick Rhino vs. SketchUp breakdown that covers a different side of the 3D world.
🎨 Stylized Animation? Go Eevee.
Think cartoon shorts, motion graphics, or game cutscenes. You don’t need physically accurate lighting, you need speed and consistency.
Eevee gives you:
Instant previews that match final render almost 1:1
The ability to iterate quickly without baking light caches
Final renders in minutes, not hours
I once helped a friend render a 90-second stylized short in Eevee. It finished overnight on a mid-tier laptop. Would’ve taken a week in Cycles, minimum.
🏢 Product Shots or Archviz? Use Cycles.
You need realism. You want the light bouncing naturally, materials to behave like they would in real life, and shadows that aren’t just blurred blobs.
Cycles gives you:
Proper global illumination and accurate reflections
Physical materials that look believable
More control over caustics, glass, and transmission
It’s slower, but the results speak for themselves. And with a good GPU (or a cloud machine), it’s no longer painful.
🧪 Previews and Iteration? Eevee First.
This is my go-to workflow: I build my scenes in Eevee, tune lighting, materials, and cameras — then flip to Cycles when I’m happy with everything.
It’s like rough sketching before painting.
You’ll catch issues faster and waste way less time waiting for noisy test renders.
🎞️ Animations with Heavy Scenes? Depends — but Plan Ahead.
If your animation is:
Stylized or game-like → Eevee
Realistic, cinematic → Cycles with Persistent Data, lower samples, and smart denoising
Animations are where render time really starts to hurt. 24 frames per second adds up. Test render a short segment in both engines, compare quality + speed, then decide.
🧮 Rule of Thumb?
If it needs to look real, go Cycles.
If it needs to get done fast, go Eevee.
And if it needs to run on your potato laptop, maybe go outside. 😅
Common Mistakes That Tank Your Renders
Blender doesn’t stop you from shooting yourself in the foot. It hands you a shotgun and smiles. I’ve made every mistake on this list, some more than once. Here’s what to watch for.
🚫 Using CPU When You’ve Got a GPU
This one’s painful. Blender doesn’t default to GPU rendering. So if you forget to switch it in Preferences > System, congratulations, you just slowed your render by 5–10x for no reason.
Fix: Always check your compute device before hitting render. OptiX for NVIDIA, HIP for AMD, oneAPI for Intel (if supported).
🚫 Maxing Samples Instead of Using Noise Threshold
Don’t just crank your render samples to 2000+ and hope for clean output. You’re wasting time. Blender has a Noise Threshold for a reason, it stops rendering when the image is already good enough.
Fix: Use 200–500 samples with a noise threshold of 0.1 or lower. Adaptive sampling helps too.
🚫 Forgetting Denoising (or Misusing It)
A noisy render is usually one checkbox away from looking great. But some users either skip denoising altogether or rely on it too heavily, cranking it until the image looks like melted clay.
Fix: Use the right denoiser for your hardware. OptiX (fast + crisp) for NVIDIA GPUs, OIDN for CPU fallback. Keep samples reasonable, denoisers aren’t miracle workers.
🚫 Leaving Light Bounces at 12+
Cycles defaults to high bounce values to make sure it “looks good” no matter what. But most scenes don’t need that. More bounces = more time = diminishing returns.
Fix: Lower your Max Bounces to 8. Lower glossy/diffuse to 2. If your scene looks the same but renders faster, congrats, you just won the game.
🚫 Rendering in EXR When You Don’t Need To
OpenEXR is awesome for VFX and compositing. But if you’re just making a final render to upload or share, it’s overkill, and it clogs up your drive fast.
Fix: Use PNG or JPEG for final outputs unless you’re planning serious post-processing. If you do use EXR, use DWAA compression to save space.
🚫 Relying Too Much on Eevee’s Viewport
What you see in Eevee’s viewport isn’t always what you get in a final render. Shadows, SSS, and SSR behave differently at full resolution.
Fix: Do quick test renders at your target resolution, not just inside the preview window. Especially for shadows and glow effects.
🚫 Ignoring Output Resolution
Sounds obvious, right? But I’ve rendered entire sequences at 200% scale by accident, or forgot to check the aspect ratio after switching projects. That’s hours of time and gigs of wasted disk space.
Fix: Before rendering, always double-check your output dimensions, frame rate, and compression settings. Especially if you’re working with templates.
Avoiding just a couple of these can save hours. Sometimes days.
And if you’re branching out into other tools, the best SketchUp tutorials can help flatten that learning curve fast.
Real Results From Tiny Tweaks
These aren't theoretical. These are things I (and other Blender users I’ve worked with) have changed that made a real difference. No new GPU. No render farm. Just smarter choices.
🎯 Example 1: From 3 Hours to 26 Minutes — Just by Changing Samples
I rendered a moody interior shot last year. Cycles, 1920×1080, a bunch of glossy surfaces and soft lighting. I had it set to 1500 samples.
It took just over 3 hours on an RTX 3070.
Then I turned on:
Noise Threshold at 0.075
Max Samples down to 500
OptiX denoiser
The result? 26 minutes. Same quality. Literally side-by-side identical unless you zoom in and squint.
🎯 Example 2: Enabling Persistent Data for Animation = Game Changer
On a 120-frame character animation, I was getting ~90 seconds per frame. After turning on Persistent Data, the second frame dropped to 40 seconds. Then 38. Then 35.
Blender was caching the scene geometry and shader info between frames, which it usually purges. By the end, I’d shaved over an hour off the full render time.
🎯 Example 3: Eevee Can Look Amazing — If You Know Where to Push
I helped a friend with a fantasy short film using Eevee. We activated:
Ambient Occlusion
High-res cube shadows (4096)
Subsurface scattering at 32 samples
Slight bloom for atmosphere
He rendered the 2-minute film in a weekend, on a laptop. Could it have looked better in Cycles? Maybe. But it looked stylized, clean, cinematic — and it actually got finished.
🎯 Example 4: Bounces Don’t Need to Be Maxed
A product render I did for a cosmetics brand originally had 12 bounces and looked great… but took forever. Dropping them to 6 barely changed the result visually, but cut the render time by almost 40%.
It was one checkbox. That’s it.
Every Blender user I know has a moment like this, where one checkbox or setting saved their night. The trick is figuring out what your scene really needs, and cutting the rest.
What If Your Scene Still Takes Too Long?
So, you’ve optimized your render settings. You’re using the right engine. Samples are smart, denoiser’s on point, and your shadows are crisp without being ridiculous.
But… your laptop’s still screaming. Fans spinning like jet engines. Render time? Still not viable. Especially for animation, 4K, or complex lighting setups.
Of course, choosing the right PC for 3D work helps too — but sometimes even solid hardware hits its limit.
I’ve been there. That’s when I started using a cloud computer, not as a replacement, but as an extension of my workflow.
With Vagon Cloud Computer, you can run Blender on a high-performance machine in the cloud, stream it right to your browser, and render with power your local setup just can’t match. I’m talking:
NVIDIA A10G GPUs
24 GB VRAM
High-core CPUs
Faster export and render times, even for full sequences
And the best part? You don’t need to install anything locally. You just fire it up, load your .blend file, and render.
It’s not about ditching your machine, it’s about skipping the bottlenecks when your project gets serious. Especially when you’ve already done all the smart local optimization and still feel the drag.
Whether you’re using Blender or SketchUp, running 3D software in the cloud removes the limits of your local machine entirely.
FAQs
1. What’s the best number of samples to use in Cycles?
It depends on your scene, but in most cases, 200–500 samples with a noise threshold of 0.1 or lower gives clean results. Don’t blindly crank it to 2000 — use the denoiser and noise threshold to save time.
2. Should I always use GPU rendering in Blender?
If you have a supported GPU, yes — always. GPU rendering is 5–10x faster than CPU in most scenes. Just make sure it’s enabled in Edit > Preferences > System (OptiX for NVIDIA, HIP for AMD).
3. What’s the point of noise threshold?
Noise threshold tells Blender, “This is clean enough — stop rendering now.” It saves you from wasting render time in areas that are already smooth. Set it to 0.1 for fast renders, or lower (like 0.05–0.075) for cleaner final shots.
4. Is Eevee good enough for animations?
Absolutely — if you don’t need photorealism. Eevee is perfect for stylized animation, previews, motion graphics, and game assets. It’s fast, responsive, and with the right settings (AO, bloom, SSR), can look great.
5. Why do my shadows look blocky in Eevee?
You’re probably using the default 512 shadow resolution. Go to Render Properties > Shadows and increase cube or cascade size to 2048 or 4096. That’ll give you much sharper results.
6. Is OpenEXR always better than PNG or JPEG?
Only if you're doing post-processing or compositing. Otherwise, EXR is overkill and bloats your storage. For web and final image delivery, PNG or JPEG is totally fine.
7. What’s “Persistent Data” and when should I use it?
It’s a performance feature for animations — Blender keeps data like shaders and geometry loaded between frames. Turning it on in the Performance tab can cut per-frame render time by up to 40%, especially for complex scenes.
8. When should I consider using a cloud computer like Vagon?
If you’ve optimized everything but still can’t meet your deadlines — or your local machine just can’t handle big scenes — cloud rendering is a lifesaver. Vagon lets you spin up a powerful Blender environment instantly, without needing to upgrade your hardware.
I once shaved 6 hours off a render just by changing one setting. No new hardware. No magic plugins. Just a tweak in the light path settings that I’d completely ignored before.
Blender’s render settings aren’t just knobs to fiddle with — they decide whether your scene takes minutes or days to finish. And if you’re still using the defaults, you're probably wasting time.
Why Render Settings Actually Matter
Let’s be honest — Blender’s default settings are decent. They’re safe, middle-of-the-road, designed to work for most projects out of the box. But “decent” doesn’t cut it when your deadline’s in 12 hours and your scene’s stuck at 7% after two hours.
I learned that the hard way rendering a product shot on my laptop. Everything looked fine in the viewport. But once I hit render, it was like watching paint dry, literally. Turned out my samples were cranked way too high, denoising was off, and I was using the CPU instead of my GPU. Classic rookie mistakes, and Blender didn’t warn me about any of them.
That’s the thing: Blender gives you power, but it assumes you know how to use it. The right render settings can cut your times in half, fix fireflies, clean up noise, and stop your machine from sounding like it’s launching into orbit.
So let’s break it down, what actually matters, what to skip, and how to stop wasting time on bad renders.
If you're still deciding between tools, this Blender vs. SketchUp comparison breaks down how each handles modeling, rendering, and creative workflows.
Eevee vs. Cycles
Here’s the deal: Blender has two main render engines, and they’re not interchangeable. I’ve seen people switch from Eevee to Cycles mid-project and suddenly wonder why everything looks wrong, or takes 10x longer.
So, let’s clear it up.
Eevee — Fast, Real-Time, Great for Stylized Looks
Eevee is Blender’s real-time render engine. It’s built for speed. You’ll get quick feedback, snappy previews, and near-instant final renders, even on a laptop. It’s fantastic for:
Animations where realism isn’t critical
Game-style visuals or stylized art
Viewport previews while you work
But — and it’s a big but — Eevee fakes a lot of what Cycles physically simulates. It doesn’t handle indirect lighting, subsurface scattering, or caustics very well. And forget about using emissive materials to light your scene, it won’t behave like you expect.
That said, the upcoming Eevee Next (starting in Blender 4.2) is fixing a lot of these problems. It introduces screen-space global illumination, better soft shadows, and more accurate lighting. But it’s still not Cycles. Not yet.
Cycles — Physically Accurate, GPU-Hungry, Worth It
Cycles is the path-tracing engine. It’s slow-ish but gives you realism that’s hard to fake. If you’re working on product renders, photorealistic archviz, VFX, or anything where lighting needs to behave like it does in the real world — Cycles is your friend.
And yes, it’s heavy. But if you switch to GPU rendering (more on that in the next section) and tweak a few key settings, it becomes way more manageable. Especially on modern GPUs or cloud setups.
Quick Rule of Thumb?
Use Eevee when speed > realism
Use Cycles when realism > speed
Still not sure? Here’s what I do: block out and preview in Eevee, final render in Cycles. Best of both worlds.
Cycles Render Settings
If you’re using Cycles and haven’t touched these settings yet — you’re almost definitely over-rendering, under-optimizing, or just waiting way longer than you need to. I’ve gone from noisy, unusable frames to buttery-smooth outputs just by flipping a few switches.
Let’s walk through the key ones.
#1. Device: Set It to GPU (Please)
Blender won’t do this for you automatically. Head to Edit > Preferences > System, and make sure your compute device is set to GPU Compute — not CPU. If you’ve got an NVIDIA card, choose OptiX (it’s faster than CUDA for most scenes). AMD? Use HIP. Intel? It’s getting better, but still catching up.
Why it matters: GPU rendering is usually 5–10x faster than CPU. Rendering on CPU when you don’t have to is like trying to mow your lawn with scissors.
#2. Sampling + Noise Threshold: Smarter, Not More
More samples don’t always mean better. They often just mean slower. Instead, set a reasonable number of max samples (200–500 is a good starting point) and turn on Noise Threshold — found under the Sampling tab.
Start with a threshold of 0.1. Drop to 0.05 or 0.075 for cleaner shots. Blender will stop rendering early when the noise drops below that level. It’s like setting a “good enough” bar — and it works incredibly well.
Also, make sure to enable adaptive sampling — it skips areas that don’t need as much detail.
#3. Denoiser: Your Secret Weapon
If you’re not using a denoiser, you’re working too hard. Under the Render Properties > Denoising, use:
OptiX if you're on an NVIDIA GPU (faster, GPU-based)
OpenImageDenoise (OIDN) if you’re on CPU or want slightly softer results
You’ll get clean images with far fewer samples — and less time.
#4. Light Paths: Trim the Fat
Cycles defaults to 12 max bounces. That’s overkill for most scenes. You can usually get great results with:
Total Bounces: 8
Diffuse: 2
Glossy: 2
Transmission: 4
Transparency: 4
Volume: 0–2 (only needed if using volumetrics)
You’ll barely notice a difference in quality — but render times can drop 20–40% depending on the scene.
#5. Performance Tab: Use Persistent Data
If you’re rendering animations or batch frames, enable Persistent Data in the Performance tab. It prevents Blender from clearing and reloading data between frames, which can cut per-frame render time significantly.
Especially useful if your scene uses a lot of geometry, textures, or modifiers.
#6. Output Format: EXR with DWAA
If your final output goes through post-processing (like DaVinci Resolve or After Effects), set your file format to OpenEXR and enable DWAA compression. It’s fast, preserves detail, and avoids massive file sizes. Also speeds up file writing — which weirdly eats more time than you’d expect.
Eevee Render Settings
Eevee gets a bad rap from realism purists, and sure, it’s not Cycles. But with the right settings, it can look really good. I’ve seen entire short films rendered in Eevee that pass for ray-traced at a glance. The trick is knowing what to turn on, and what to leave alone.
Here’s what I recommend if you want fast and decent.
#1. Turn on Ambient Occlusion (AO)
Go to Render Properties > Ambient Occlusion, and check the box.
Then tweak:
Distance: Try 0.5–1.0 for subtle contact shadows
Factor: 1.0 usually looks decent, raise for stronger effect
AO is one of those “cheap tricks” that instantly gives your scene depth, especially in stylized or NPR work. And it costs almost nothing in render time.
#2. Enable Bloom — But Don’t Overdo It
Bloom adds that glowing softness around bright lights. Turn it on, then dial in:
Threshold: Lower means more things glow. Try 0.8–1.0.
Intensity: 0.05–0.2 is usually enough.
Radius: Depends on your style — cartoonish? Go bigger.
Just… don’t crank everything to 11 unless you want your scene to look like a neon rave underwater.
#3. Use Screen-Space Reflections (SSR)
If you’ve got shiny surfaces, SSR brings them to life. You’ll find it under Render Properties > Screen Space Reflections.
Turn it on, then adjust:
Refraction (if your materials use glass)
Roughness Threshold — helps control how soft reflections look
Half Res Trace — leave OFF for better quality, unless you’re desperate for speed
SSR isn’t perfect, and yes, reflections will disappear at sharp angles — but it does a solid job without tanking performance.
#4. Bump Up Shadow Quality
This one matters more than people think. Under Render Properties > Shadows, increase:
Cube Size (for point lights)
Cascade Size (for sun lamps)
Go from the default 512 to at least 2048 for final renders. You’ll get way cleaner, sharper shadows — no more blocky banding.
Also:
Turn off Soft Shadows if they make things too mushy
Keep Contact Shadows ON for better realism
#5. Don’t Forget Subsurface Scattering
Yes, Eevee does SSS. Go to Render Properties > Subsurface Scattering, turn it on, and increase the samples from the default 4 to something like 16–32 for smoother results. Works great on skin, wax, food, and stylized characters.
#6. Viewport ≠ Final Render
Quick tip: what you see in the viewport isn’t always 100% accurate. Eevee renders faster than real-time, but still benefits from Render Samples (increase them under Sampling). Try 64–128 for final outputs.
Eevee is way more powerful than it looks, especially with a few of these toggles flipped. It won’t match Cycles in photorealism, but for stylized work, fast animation, or real-time previews, it’s honestly kind of magic.
When to Use What
There’s no “best” render engine, only the best one for what you’re trying to do. I’ve switched between Eevee and Cycles mid-project more times than I can count, usually after realizing I picked the wrong one to begin with.
So here’s the rule I live by: don’t marry your engine — date it based on the project.
Let’s break it down with some real-world use cases.
Some workflows lean more toward CAD-style tools — if that’s your thing, here’s a quick Rhino vs. SketchUp breakdown that covers a different side of the 3D world.
🎨 Stylized Animation? Go Eevee.
Think cartoon shorts, motion graphics, or game cutscenes. You don’t need physically accurate lighting, you need speed and consistency.
Eevee gives you:
Instant previews that match final render almost 1:1
The ability to iterate quickly without baking light caches
Final renders in minutes, not hours
I once helped a friend render a 90-second stylized short in Eevee. It finished overnight on a mid-tier laptop. Would’ve taken a week in Cycles, minimum.
🏢 Product Shots or Archviz? Use Cycles.
You need realism. You want the light bouncing naturally, materials to behave like they would in real life, and shadows that aren’t just blurred blobs.
Cycles gives you:
Proper global illumination and accurate reflections
Physical materials that look believable
More control over caustics, glass, and transmission
It’s slower, but the results speak for themselves. And with a good GPU (or a cloud machine), it’s no longer painful.
🧪 Previews and Iteration? Eevee First.
This is my go-to workflow: I build my scenes in Eevee, tune lighting, materials, and cameras — then flip to Cycles when I’m happy with everything.
It’s like rough sketching before painting.
You’ll catch issues faster and waste way less time waiting for noisy test renders.
🎞️ Animations with Heavy Scenes? Depends — but Plan Ahead.
If your animation is:
Stylized or game-like → Eevee
Realistic, cinematic → Cycles with Persistent Data, lower samples, and smart denoising
Animations are where render time really starts to hurt. 24 frames per second adds up. Test render a short segment in both engines, compare quality + speed, then decide.
🧮 Rule of Thumb?
If it needs to look real, go Cycles.
If it needs to get done fast, go Eevee.
And if it needs to run on your potato laptop, maybe go outside. 😅
Common Mistakes That Tank Your Renders
Blender doesn’t stop you from shooting yourself in the foot. It hands you a shotgun and smiles. I’ve made every mistake on this list, some more than once. Here’s what to watch for.
🚫 Using CPU When You’ve Got a GPU
This one’s painful. Blender doesn’t default to GPU rendering. So if you forget to switch it in Preferences > System, congratulations, you just slowed your render by 5–10x for no reason.
Fix: Always check your compute device before hitting render. OptiX for NVIDIA, HIP for AMD, oneAPI for Intel (if supported).
🚫 Maxing Samples Instead of Using Noise Threshold
Don’t just crank your render samples to 2000+ and hope for clean output. You’re wasting time. Blender has a Noise Threshold for a reason, it stops rendering when the image is already good enough.
Fix: Use 200–500 samples with a noise threshold of 0.1 or lower. Adaptive sampling helps too.
🚫 Forgetting Denoising (or Misusing It)
A noisy render is usually one checkbox away from looking great. But some users either skip denoising altogether or rely on it too heavily, cranking it until the image looks like melted clay.
Fix: Use the right denoiser for your hardware. OptiX (fast + crisp) for NVIDIA GPUs, OIDN for CPU fallback. Keep samples reasonable, denoisers aren’t miracle workers.
🚫 Leaving Light Bounces at 12+
Cycles defaults to high bounce values to make sure it “looks good” no matter what. But most scenes don’t need that. More bounces = more time = diminishing returns.
Fix: Lower your Max Bounces to 8. Lower glossy/diffuse to 2. If your scene looks the same but renders faster, congrats, you just won the game.
🚫 Rendering in EXR When You Don’t Need To
OpenEXR is awesome for VFX and compositing. But if you’re just making a final render to upload or share, it’s overkill, and it clogs up your drive fast.
Fix: Use PNG or JPEG for final outputs unless you’re planning serious post-processing. If you do use EXR, use DWAA compression to save space.
🚫 Relying Too Much on Eevee’s Viewport
What you see in Eevee’s viewport isn’t always what you get in a final render. Shadows, SSS, and SSR behave differently at full resolution.
Fix: Do quick test renders at your target resolution, not just inside the preview window. Especially for shadows and glow effects.
🚫 Ignoring Output Resolution
Sounds obvious, right? But I’ve rendered entire sequences at 200% scale by accident, or forgot to check the aspect ratio after switching projects. That’s hours of time and gigs of wasted disk space.
Fix: Before rendering, always double-check your output dimensions, frame rate, and compression settings. Especially if you’re working with templates.
Avoiding just a couple of these can save hours. Sometimes days.
And if you’re branching out into other tools, the best SketchUp tutorials can help flatten that learning curve fast.
Real Results From Tiny Tweaks
These aren't theoretical. These are things I (and other Blender users I’ve worked with) have changed that made a real difference. No new GPU. No render farm. Just smarter choices.
🎯 Example 1: From 3 Hours to 26 Minutes — Just by Changing Samples
I rendered a moody interior shot last year. Cycles, 1920×1080, a bunch of glossy surfaces and soft lighting. I had it set to 1500 samples.
It took just over 3 hours on an RTX 3070.
Then I turned on:
Noise Threshold at 0.075
Max Samples down to 500
OptiX denoiser
The result? 26 minutes. Same quality. Literally side-by-side identical unless you zoom in and squint.
🎯 Example 2: Enabling Persistent Data for Animation = Game Changer
On a 120-frame character animation, I was getting ~90 seconds per frame. After turning on Persistent Data, the second frame dropped to 40 seconds. Then 38. Then 35.
Blender was caching the scene geometry and shader info between frames, which it usually purges. By the end, I’d shaved over an hour off the full render time.
🎯 Example 3: Eevee Can Look Amazing — If You Know Where to Push
I helped a friend with a fantasy short film using Eevee. We activated:
Ambient Occlusion
High-res cube shadows (4096)
Subsurface scattering at 32 samples
Slight bloom for atmosphere
He rendered the 2-minute film in a weekend, on a laptop. Could it have looked better in Cycles? Maybe. But it looked stylized, clean, cinematic — and it actually got finished.
🎯 Example 4: Bounces Don’t Need to Be Maxed
A product render I did for a cosmetics brand originally had 12 bounces and looked great… but took forever. Dropping them to 6 barely changed the result visually, but cut the render time by almost 40%.
It was one checkbox. That’s it.
Every Blender user I know has a moment like this, where one checkbox or setting saved their night. The trick is figuring out what your scene really needs, and cutting the rest.
What If Your Scene Still Takes Too Long?
So, you’ve optimized your render settings. You’re using the right engine. Samples are smart, denoiser’s on point, and your shadows are crisp without being ridiculous.
But… your laptop’s still screaming. Fans spinning like jet engines. Render time? Still not viable. Especially for animation, 4K, or complex lighting setups.
Of course, choosing the right PC for 3D work helps too — but sometimes even solid hardware hits its limit.
I’ve been there. That’s when I started using a cloud computer, not as a replacement, but as an extension of my workflow.
With Vagon Cloud Computer, you can run Blender on a high-performance machine in the cloud, stream it right to your browser, and render with power your local setup just can’t match. I’m talking:
NVIDIA A10G GPUs
24 GB VRAM
High-core CPUs
Faster export and render times, even for full sequences
And the best part? You don’t need to install anything locally. You just fire it up, load your .blend file, and render.
It’s not about ditching your machine, it’s about skipping the bottlenecks when your project gets serious. Especially when you’ve already done all the smart local optimization and still feel the drag.
Whether you’re using Blender or SketchUp, running 3D software in the cloud removes the limits of your local machine entirely.
FAQs
1. What’s the best number of samples to use in Cycles?
It depends on your scene, but in most cases, 200–500 samples with a noise threshold of 0.1 or lower gives clean results. Don’t blindly crank it to 2000 — use the denoiser and noise threshold to save time.
2. Should I always use GPU rendering in Blender?
If you have a supported GPU, yes — always. GPU rendering is 5–10x faster than CPU in most scenes. Just make sure it’s enabled in Edit > Preferences > System (OptiX for NVIDIA, HIP for AMD).
3. What’s the point of noise threshold?
Noise threshold tells Blender, “This is clean enough — stop rendering now.” It saves you from wasting render time in areas that are already smooth. Set it to 0.1 for fast renders, or lower (like 0.05–0.075) for cleaner final shots.
4. Is Eevee good enough for animations?
Absolutely — if you don’t need photorealism. Eevee is perfect for stylized animation, previews, motion graphics, and game assets. It’s fast, responsive, and with the right settings (AO, bloom, SSR), can look great.
5. Why do my shadows look blocky in Eevee?
You’re probably using the default 512 shadow resolution. Go to Render Properties > Shadows and increase cube or cascade size to 2048 or 4096. That’ll give you much sharper results.
6. Is OpenEXR always better than PNG or JPEG?
Only if you're doing post-processing or compositing. Otherwise, EXR is overkill and bloats your storage. For web and final image delivery, PNG or JPEG is totally fine.
7. What’s “Persistent Data” and when should I use it?
It’s a performance feature for animations — Blender keeps data like shaders and geometry loaded between frames. Turning it on in the Performance tab can cut per-frame render time by up to 40%, especially for complex scenes.
8. When should I consider using a cloud computer like Vagon?
If you’ve optimized everything but still can’t meet your deadlines — or your local machine just can’t handle big scenes — cloud rendering is a lifesaver. Vagon lets you spin up a powerful Blender environment instantly, without needing to upgrade your hardware.
Get Beyond Your Computer Performance
Run applications on your cloud computer with the latest generation hardware. No more crashes or lags.

Trial includes 1 hour usage + 7 days of storage.
Summarize with AI

Ready to focus on your creativity?
Vagon gives you the ability to create & render projects, collaborate, and stream applications with the power of the best hardware.

Vagon Blog


Run heavy applications on any device with
your personal computer on the cloud.
San Francisco, California
Solutions
Vagon Teams
Vagon Streams
Use Cases
Resources
Vagon Blog
What Slows Down After Effects Projects?
The First 30 Minutes in Blender 3D: A Practical Workflow Guide
What’s New in Godot 4.7? Key Features, Upgrades, and Workflow Improvements
What Slows Down Blender 3D Projects?
What Slows Down Adobe Photoshop Projects?
The First 30 Minutes in Adobe Photoshop: A Practical Workflow Guide
Before You Start in Adobe Photoshop: A Practical Setup Checklist
What’s New in Unreal Engine 5.8? Key Features and Upgrade Advice
How to Run Windows on an iPad: 4 Best Ways (2026)
Vagon Blog
Run heavy applications on any device with
your personal computer on the cloud.
San Francisco, California
Solutions
Vagon Teams
Vagon Streams
Use Cases
Resources
Vagon Blog