Instant Connection for Pixel Streaming
— New Feature Automated Setup

Your Guide to Best Render Settings on Twinmotion
Your Guide to Best Render Settings on Twinmotion
Architecture
Your Guide to Best Render Settings on Twinmotion
Table of Contents
In the fast-paced world of architectural visualization, Twinmotion stands out as a game-changing tool for real-time rendering. Whether you're an architect, designer, or 3D artist, its seamless integration and intuitive features make it easier than ever to bring your concepts to life.
But here’s the catch: without the right render settings, even the most stunning designs can fall short. Optimizing render settings isn’t just for pros, it’s crucial for beginners too. Mastering these basics can dramatically enhance your workflow, delivering crisper visuals and faster performance.
Let’s explore how you can elevate your Twinmotion projects with smart render settings!
Understanding Twinmotion’s Real-Time Rendering
When it comes to real-time visualization, Twinmotion leads the charge, transforming the way we design. The ability to see your project evolve live, as you make adjustments, is a game-changer for architects and designers. No more waiting for hours, every tweak you make, from lighting to materials, is instantly reflected, allowing for faster decisions and more fluid creativity.
Twinmotion’s intuitive interface takes this further, ensuring that even beginners can hit the ground running. It’s designed to be user-friendly: drag-and-drop functionality, sliders for quick adjustments, and an array of presets mean less time navigating menus and more time creating.
But where Twinmotion truly shines is its seamless integration with CAD and BIM software like Revit, ArchiCAD, and SketchUp. This one-click sync allows you to bring your models into Twinmotion effortlessly and keep them updated as changes are made. No more tedious exports or juggling file formats, just a smooth, connected workflow.
In short, real-time rendering with Twinmotion isn’t just a feature; it’s a tool for unlocking creativity, enhancing collaboration, and delivering projects faster, without compromising on quality.
Want to see the newest tools in action? Take a look at what’s new in Twinmotion 2025 and discover the latest features that can elevate your rendering workflow even further.
Essential Render Settings in Twinmotion
Getting the best results in Twinmotion starts with optimizing the key render settings. Here’s a breakdown of the essentials to ensure every project shines.
Resolution & Output
Choosing the right resolution is crucial. For still images, videos, or panoramas, adjust output settings based on the final use. Are you creating a social media post, a detailed client presentation, or an immersive VR experience? Higher resolutions, such as 4K, deliver crisp details but require more rendering time and power. If speed is a priority, consider scaling down while maintaining clarity for smaller screens.
Tip: Keep the end format in mind, don’t overkill on resolution where it’s not needed.
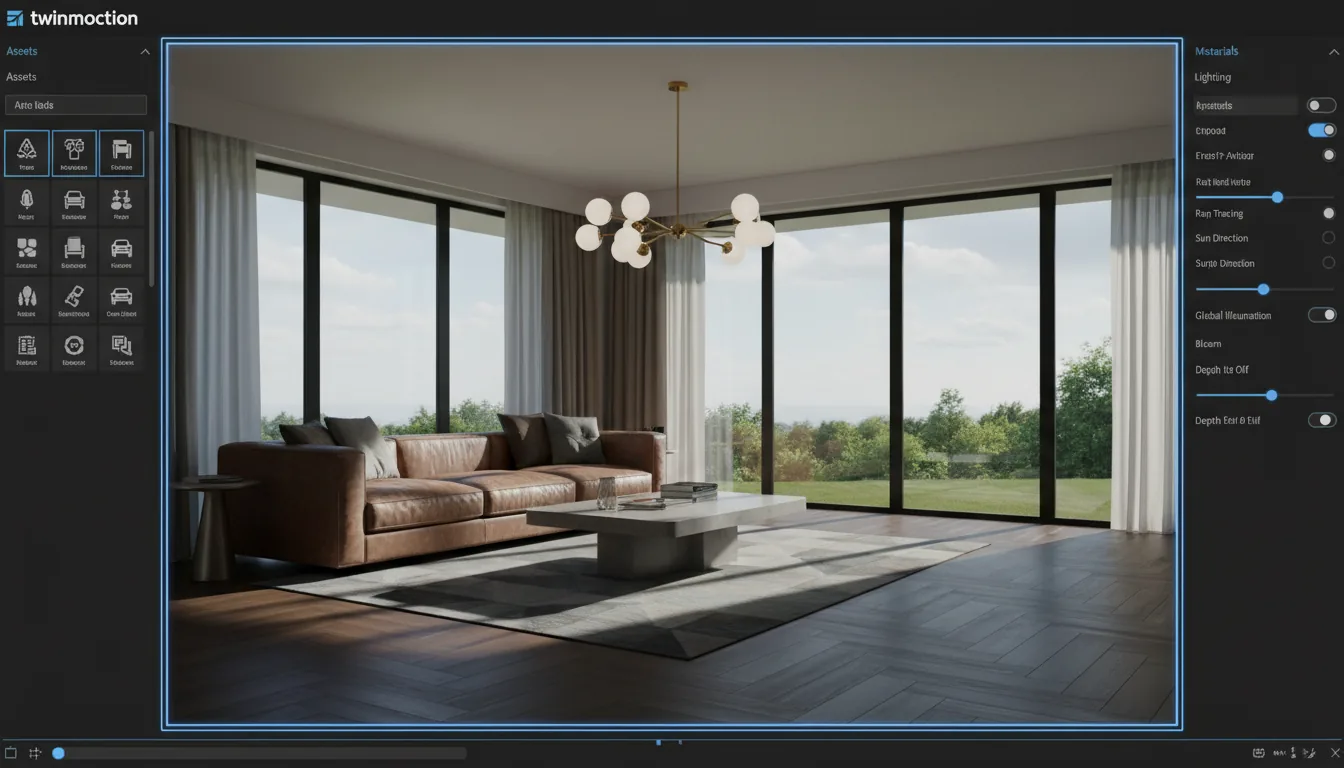
Lighting Settings
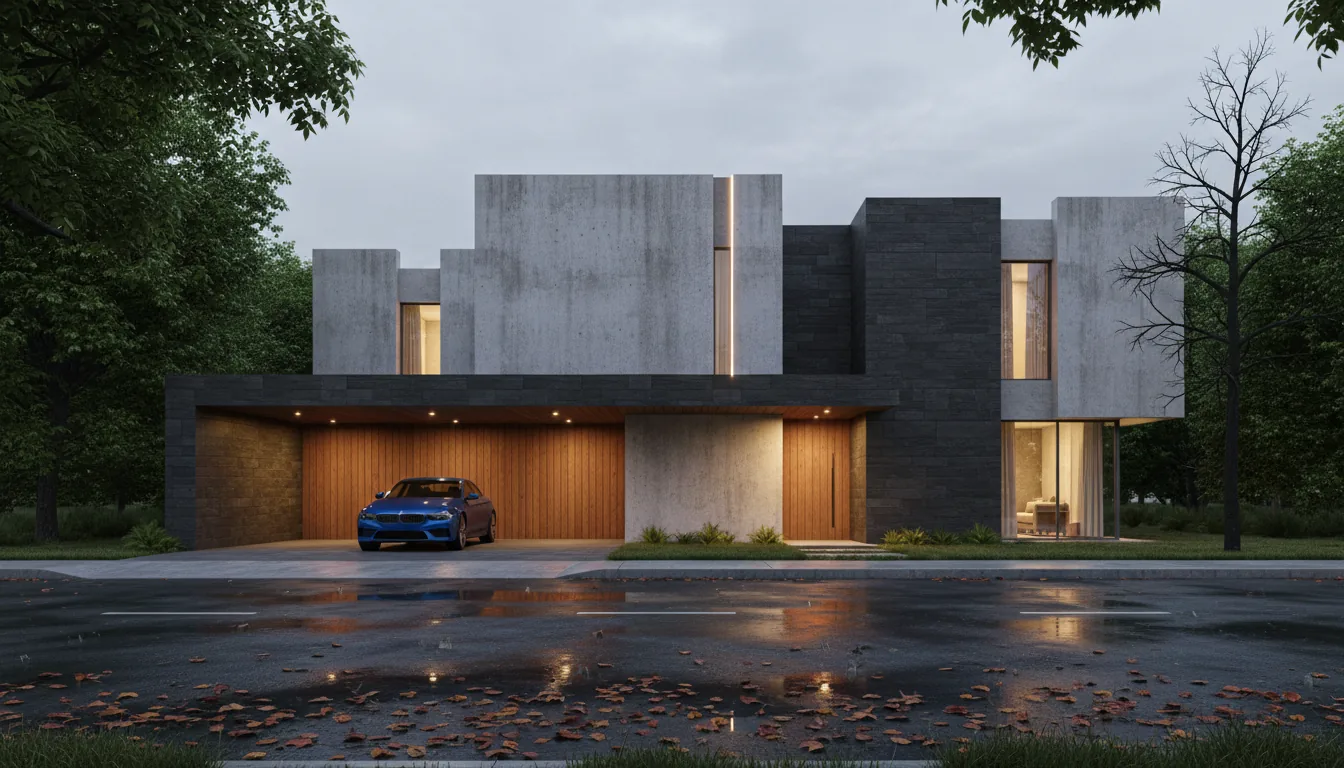
Lighting is the secret sauce to realism. Twinmotion offers powerful tools like global illumination and light probes to create natural, dynamic light behavior. Start by adjusting natural light for day or night scenes and then fine-tune using artificial lighting like spotlights or ambient light for extra depth. Experimenting with angles and shadows can significantly impact how your design is perceived, sometimes even the smallest adjustment makes a world of difference.
“Lighting isn’t just about brightness, it’s about mood and realism.”
Material & Texture Adjustments
High-quality materials and textures make all the difference between a good render and a great one. Twinmotion allows you to fine-tune materials to achieve the exact look you want, whether it's the reflection on glass, the grain of wood, or the sheen of metal. Ensure textures are high-resolution and realistic to avoid any low-quality visuals. The more detailed the materials, the more lifelike the scene becomes.
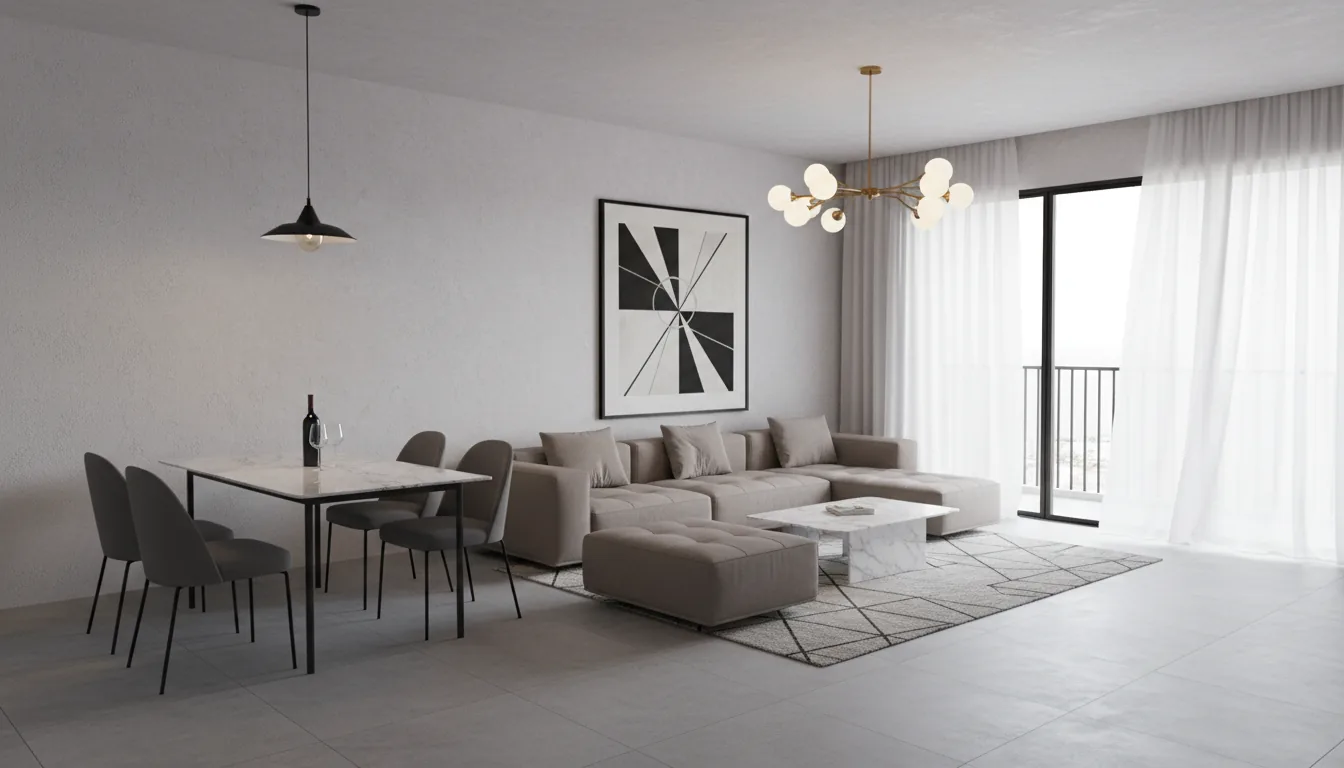
Always opt for high-res textures where they count, details bring renders to life.
Post-Processing Effects
Once the basics are in place, take your render further with post-processing effects. Bloom, depth of field, and motion blur can add cinematic depth and polish. These effects, when applied subtly, enhance the visual storytelling without overpowering the design. Use them to create focus or add movement to your scene for a more dynamic, professional finish.
“Small effects create big impressions, less is more with post-processing.”
By mastering these core settings, you’ll be well on your way to producing stunning, high-quality renders that impress.
Optimizing Performance for Faster Renders
When it comes to rendering in Twinmotion, performance is key. With real-time rendering at its core, ensuring your hardware and settings are optimized can drastically reduce render times while maintaining high-quality visuals. Here are three essential ways to optimize performance for faster, smoother renders.
Hardware & GPU Optimization
Your hardware setup plays a huge role in how fast you can render. Twinmotion thrives on GPU acceleration, meaning your graphics card is doing the heavy lifting. Whether you're using an NVIDIA RTX or AMD card, ensuring the latest drivers are installed is the first step in squeezing out the best performance.
Twinmotion’s real-time engine loves power, so if you have the option, always prioritize using a discrete GPU over integrated graphics. You can adjust settings like anti-aliasing, reflection quality, and shadow detail to get faster results without sacrificing too much visual fidelity. If your hardware is struggling, consider reducing the render quality of reflections and shadows, as these are among the most resource-intensive settings.
Tip: Keep your system cool! Overheating can cause GPUs to throttle performance.
You can also check out our GPU Guide for tips to use GPU, along with speed up and acceleration tips for Twinmotion.
Level of Detail (LOD) Settings
A clever way to boost performance is by adjusting Level of Detail (LOD) settings. LOD is about reducing the complexity of models that are further away from the camera, saving processing power while keeping close-up details crisp and clear. For larger scenes with many objects, lowering the LOD for distant elements significantly reduces strain on the GPU, allowing for faster real-time interaction.
In Twinmotion, this can be particularly useful for projects with intricate environments. For example, trees, buildings, and background details don’t need high-resolution textures or complex geometry if they’re far from view. By using LOD settings, you can simplify these elements while focusing detail where it truly matters, right in front of the viewer.
Adjust LOD settings to focus detail where it counts and improve performance in complex scenes.
Twinmotion Cloud
For those working with clients remotely or on less powerful machines, Twinmotion Cloud is a fantastic solution. This feature allows you to render and share projects without relying on local hardware. By offloading rendering tasks to the cloud, you minimize the strain on your system while still delivering stunning results.
Twinmotion Cloud is also great for collaboration. With a simple web link, stakeholders can view and explore your project in high-quality 3D without needing to install Twinmotion or even use high-powered hardware. This feature not only enhances sharing but also significantly reduces rendering times when working with large, complex projects.
“Twinmotion Cloud lets you present high-quality renders without being tethered to your hardware.”
Additional Tips for Speeding Up Renders
Use efficient file formats: Ensure your models are in formats optimized for real-time rendering, such as FBX or Datasmith. This prevents unnecessary overhead and speeds up both loading and rendering times.
Reduce polygon count: If your scene contains a lot of complex geometry, consider simplifying models where possible, especially for background elements. A lower polygon count equals less work for your hardware, speeding up render times.
Disable unnecessary effects: Post-processing effects like motion blur, depth of field, and lens flares can add dramatic effects to your renders but can also slow things down. Turn off these features during your workflow, then enable them for final renderings.
Use lower resolution during editing: While working, switch to a lower resolution in your viewport. This ensures smooth real-time performance, and you can crank it up when you’re ready for the final output.
By following these optimization strategies, you’ll be able to maintain a balance between speed and quality, ensuring that your Twinmotion renders are not only fast but visually impressive. Whether it’s for real-time collaboration or high-end final outputs, knowing how to tweak performance settings is your key to mastering the art of rendering.
Advanced Rendering Tips for Better Results
Achieving stunning visuals in Twinmotion requires more than just basic settings. Here’s how to take your renders to the next level.
High-Quality Models
Your 3D models are the backbone of your render. The more detailed and optimized your models are, the more realistic your final render will look. High-quality 3D models not only ensure crisp visuals but also reduce the strain on your system. Opt for models that strike the right balance between complexity and optimization. Simplifying elements that won’t be in focus allows you to allocate resources where it matters most.
“Great renders start with great models, don’t compromise on quality, but always optimize for performance.”
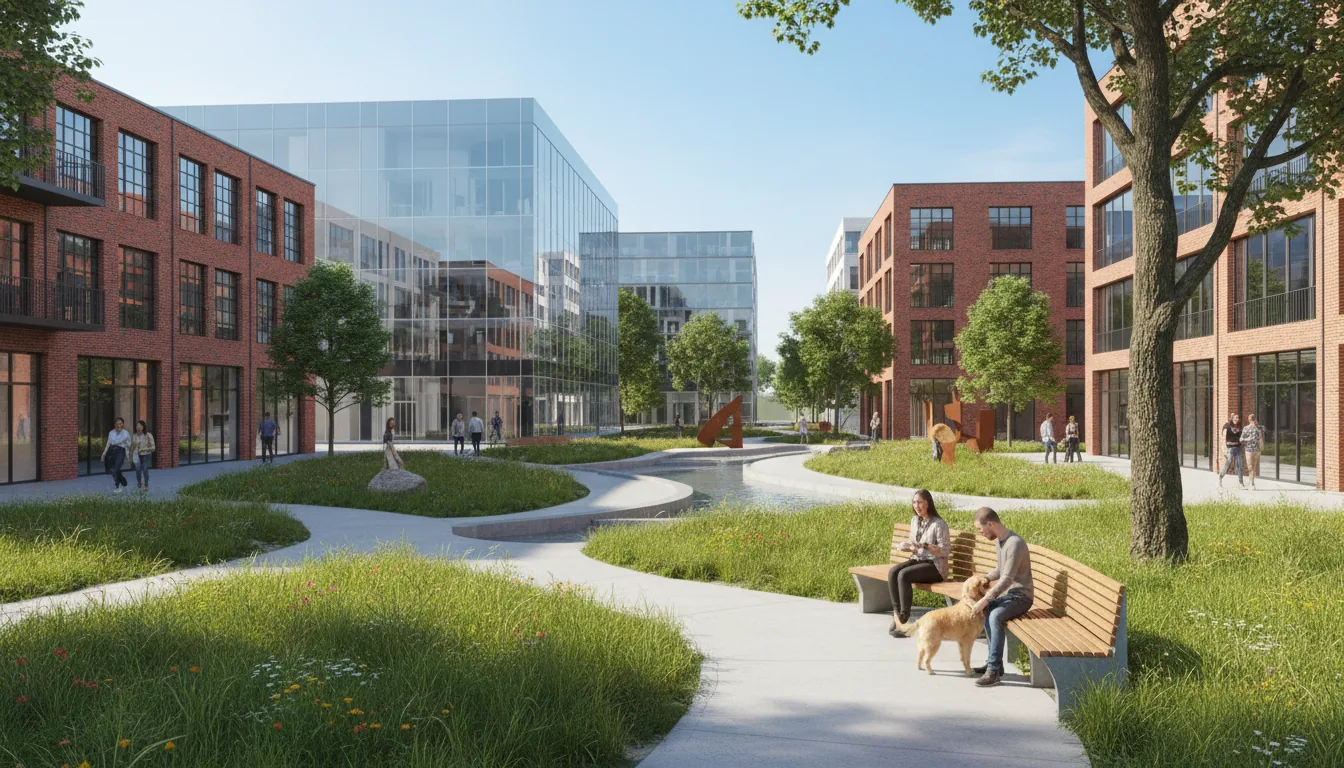
Environment Control
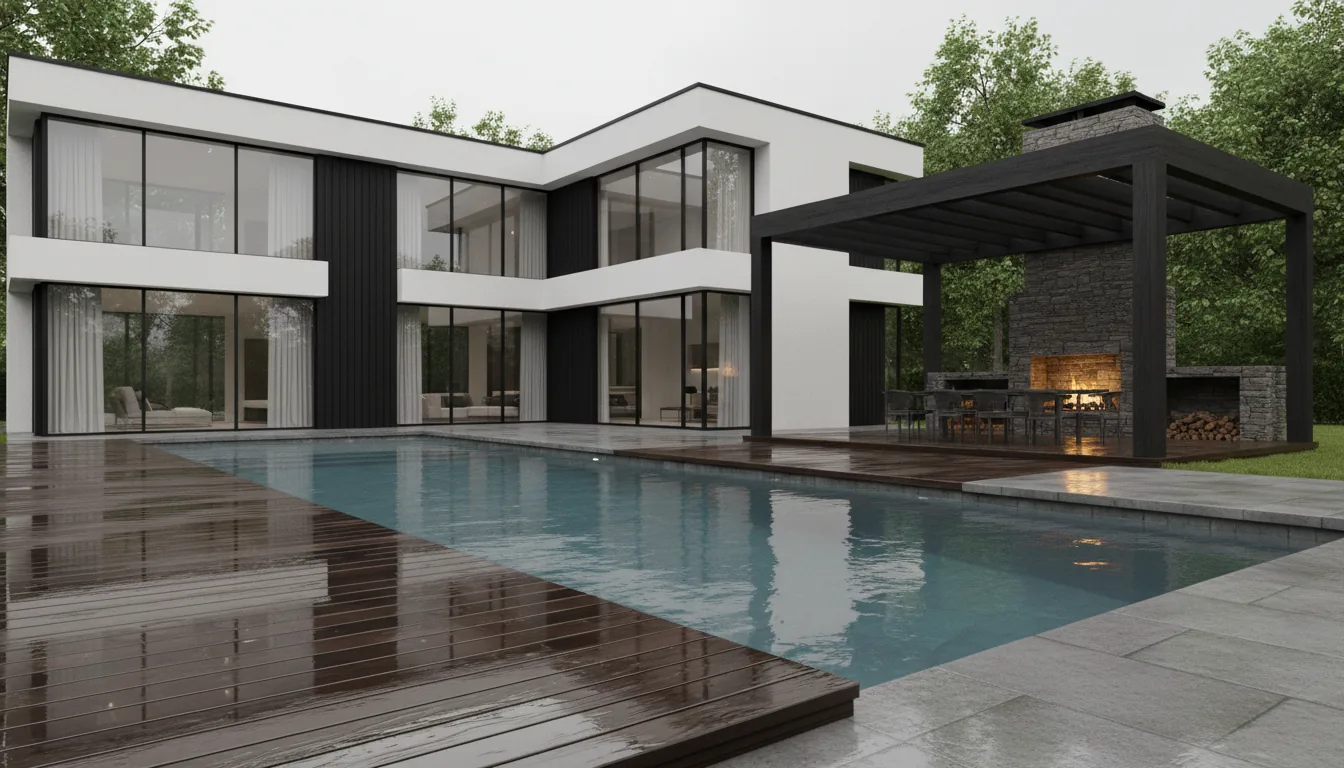
In Twinmotion, the environment is your canvas, and you have full control over the weather, seasons, and lighting. Tweaking these elements can drastically change the mood and tone of your scene. Want a bright summer day? Or maybe a moody, rainy evening? Adjusting the weather and time of day can create entirely different atmospheres. The dynamic lighting system lets you experiment with sun angles, shadows, and even HDRI skies to build a natural, immersive environment.
“Mastering environment control is like painting with light, each setting adds depth and emotion to your scene.”
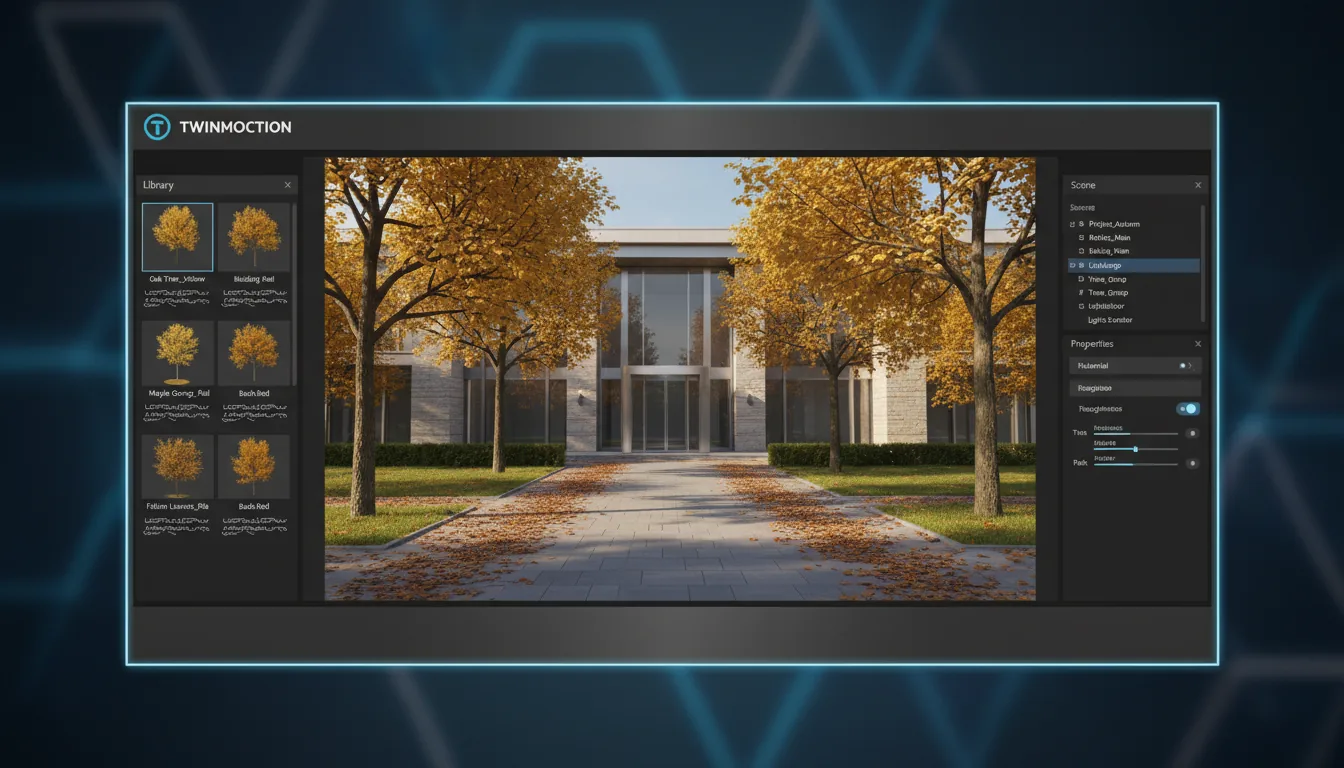
Quixel Megascans Library
Accessing Quixel Megascans directly from within Twinmotion gives you an enormous library of ultra-realistic textures and models. These high-fidelity assets allow you to quickly enhance your renders with lifelike elements, from detailed foliage to rugged surfaces. Using these PBR (Physically Based Rendering) materials adds realism without needing to create complex textures from scratch.
“Realism at your fingertips: Quixel Megascans turns any project into a visual masterpiece.”
With these advanced techniques, you’ll elevate your rendering quality, transforming your designs into visual experiences that truly captivate.
How to Make Twinmotion Renders Look More Realistic
A common frustration with Twinmotion is that scenes can look technically correct but still feel artificial. The good news is that realism rarely comes from maxed-out settings. It comes from a few smart adjustments that work together.
Focus on Contrast, Not Brightness
Many users try to “fix” a dull render by increasing overall brightness. This usually washes out materials and flattens the image.
What works better:
Lower global exposure slightly and build contrast using light placement. Real-world scenes are rarely evenly lit. Shadows and darker zones are what make bright areas feel believable.
Use Imperfection on Purpose
Perfect surfaces scream “CG.” Real environments have wear, variation, and subtle flaws.
Try this:
Slightly vary roughness values on similar materials
Add mild normal maps even to flat surfaces
Avoid perfectly clean glass, walls, or floors
Tiny imperfections add realism without affecting performance.
Match Camera Settings to Real Photography
Default camera settings often feel unnatural because they don’t behave like real lenses.
Adjust these first:
Field of view instead of zooming
Eye-level camera height for interiors
Gentle depth of field only when it serves a purpose
Think like a photographer, not a renderer.
Let Materials React to Light
Materials don’t exist in isolation. Their realism depends on how they interact with light.
Best practice:
After placing lights or adjusting sun position, revisit key materials. A surface that looked right before may suddenly feel wrong once lighting changes. This back-and-forth is normal and essential.
Less Geometry, Better Composition
Adding more objects doesn’t automatically make a scene more realistic. It often just adds noise.
Instead:
Focus on composition. One well-framed focal point with supporting elements feels more realistic than a cluttered scene with no visual hierarchy.
Preview Like a Client Will See It
If you’re working on a powerful machine, it’s easy to forget how the scene feels to others.
Do this:
Regularly preview at target resolution and output format. What looks fine in the viewport might feel very different as a still image, panorama, or video.
The takeaway:
Photorealism in Twinmotion isn’t about pushing sliders to the maximum. It’s about balance. Light, materials, camera, and composition all matter more than raw quality settings.
Best Practices for a Smooth Workflow
A streamlined workflow is essential for maintaining efficiency and preventing costly errors during your project. Here are two critical best practices to keep your Twinmotion workflow smooth and hassle-free:
Syncing with Other Software
Twinmotion is built to integrate seamlessly with Revit, SketchUp, ArchiCAD, and other CAD/BIM tools. With its one-click synchronization feature, your models are automatically updated in real-time, ensuring that your latest changes are reflected in Twinmotion without manual imports or re-exports. This eliminates time-consuming file transfers and ensures you're always working on the most current version of your design. By syncing frequently, you avoid version control issues and maintain consistency across your workflow.
This feature significantly reduces the friction between design and visualization, allowing you to stay in the creative zone. Whether you’re adjusting the structural layout in Revit or tweaking materials in SketchUp, all updates are reflected instantly, cutting down on repetitive tasks and keeping your design process efficient.
Expert Techniques for Photorealistic Renders
Enhancing the photorealism of your Twinmotion renders involves mastering advanced techniques that elevate your projects to professional standards. Below are some strategies to achieve lifelike results:
Utilizing Lumen Global Illumination
Lumen, Twinmotion's advanced dynamic global illumination system, plays a pivotal role in creating realistic lighting conditions by simulating how light interacts with surfaces in real life. To activate Lumen, you need to navigate to the Properties panel and select the Ambience tab. Within the Render settings, choosing Lumen under Global Illumination replaces the standard settings with dynamic lighting capabilities. For best results, ensure that your scene's geometry is free of light leaks, which can disrupt the realism of the render. Updating your graphics drivers is equally crucial, as Lumen’s intricate calculations demand optimal hardware performance. When utilized effectively, Lumen transforms your scenes, delivering depth and atmosphere that emulate real-world lighting conditions.
Fine-Tuning Material Properties
Materials define the visual language of your scene, and achieving lifelike textures hinges on their precise adjustment. Reflectivity and roughness are key attributes to master. Reflectivity dictates how much light bounces off a surface, while roughness influences how diffuse that reflection appears. For example, a polished marble floor will have high reflectivity and a smooth, mirror-like finish, whereas aged wood will exhibit subdued reflections and a more textured surface. Beyond basic settings, applying normal or bump maps can add micro-details to surfaces, simulating scratches, grooves, or uneven textures without increasing the polygon count. This approach ensures that materials not only look realistic but also perform efficiently during rendering.
Advanced Lighting Techniques
Lighting is the cornerstone of photorealistic rendering, shaping mood, depth, and focus within a scene. Incorporating HDRI environments is a powerful way to achieve ambient lighting that feels cohesive and natural. HDRI images simulate real-world lighting by capturing a full spectrum of light intensity, shadows, and reflections, providing your scene with dynamic and nuanced illumination. Custom light profiles, such as IES lights, take this a step further by mimicking specific lighting patterns produced by real-world fixtures. These profiles allow you to create localized lighting effects that add authenticity to indoor and outdoor settings. The interplay of ambient and artificial light, when managed thoughtfully, enhances the believability of your scene.
Camera Settings and Composition
Effective camera settings and thoughtful composition can elevate the visual impact of your renders, guiding the viewer’s eye and enhancing storytelling. Configuring the camera's focal length and aperture determines how depth of field is rendered, blurring out irrelevant details and emphasizing focal points. For instance, a shallow depth of field can draw attention to a central object while softening the background. Composition techniques, such as the rule of thirds, ensure that key elements are placed strategically within the frame. This creates balance and harmony, making your render more engaging. Additionally, adjusting exposure levels and color grading within Twinmotion’s camera settings can add the finishing touches, ensuring the final image captures the intended atmosphere and mood.
Mastering these techniques will not only enhance the photorealism of your Twinmotion renders but also ensure that your projects stand out with professional-quality visuals that captivate and inspire.
Frequent Testing & Backups
Regular testing of your renders is essential to spot issues early and fine-tune the quality of your work. Frequent previewing lets you adjust settings like lighting, textures, and camera angles incrementally, ensuring smooth progress without surprises at the final stage. Testing is particularly crucial when you’re dealing with large files or complex scenes, where minor issues can escalate if left unchecked.
In addition to testing, backups are non-negotiable. With large-scale projects, crashes or unexpected bugs can lead to data loss, costing hours of hard work. Set up automatic backups to capture your progress regularly, or save manual versions at key points. Using structured file naming or a versioning system can help you track changes and restore previous versions quickly, ensuring you never lose vital work.
Optimizing your render settings in Twinmotion is essential for achieving high-quality results and maintaining smooth, efficient workflows. By mastering the basics of real-time rendering, fine-tuning lighting and materials, and leveraging advanced tools like LOD and Twinmotion Cloud, you can transform your projects into visually stunning experiences. The right settings ensure your renders are not only visually appealing but also perform efficiently, delivering results that impress both clients and collaborators.
Whether you’re just starting or looking to push your renders further, Twinmotion offers the flexibility and power to help you achieve your vision.
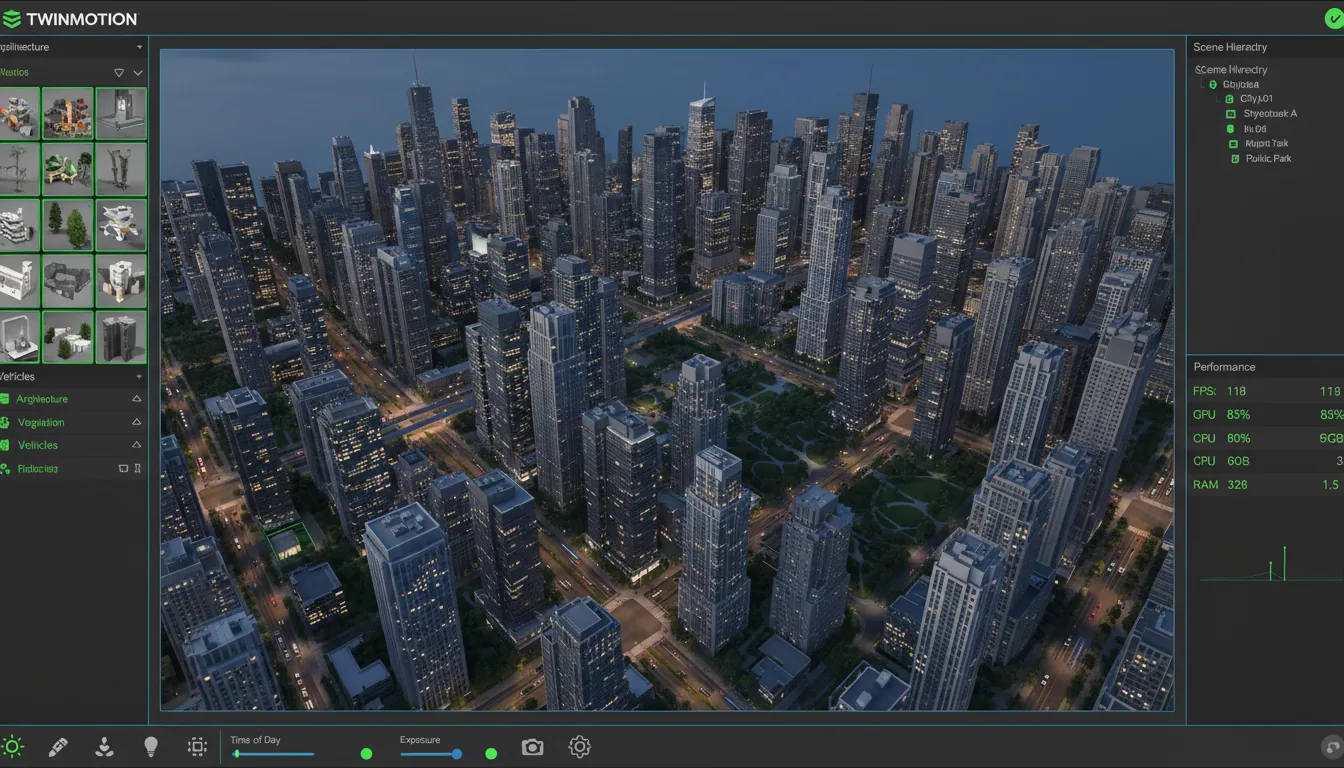
Planning for Tomorrow: Scaling Your ArchViz Workflow
Rendering has come a long way in the past few years. I still remember when a single 4K animation meant leaving my workstation running overnight, and praying it wouldn’t crash halfway through. Today, with scenes easily surpassing hundreds of millions of polygons and materials pushing photorealism to new limits, even the most powerful desktop setups can start to sweat.
That’s why future-proofing your workflow isn’t a luxury anymore. It’s a necessity.
Local Power Meets Cloud Flexibility
Most professionals I know now use a hybrid approach: local for iteration, cloud for heavy lifting. It’s a smart mix. You model, texture, and light your scene on your workstation, maybe an RTX 4070 or 4080 laptop, but when it’s time for final renders, panoramas, or high-fidelity animations, you offload the job to the cloud.
This dual setup isn’t about replacing your hardware; it’s about extending it. Cloud workstations act like a performance booster pack when deadlines get tight or when projects balloon beyond what your GPU can handle. The best part? You only pay for what you use, and you don’t need to plan a full hardware upgrade every couple of years.
Budgeting and Scaling Smart
Render scale grows fast. Double your output resolution from 4K to 8K, and you’re not just doubling, you’re roughly quadrupling the pixel workload. The same goes for VR projects or cinematic animations. As a rule of thumb, if your scenes start hitting more than 20 million polygons or 16 GB VRAM usage, it’s time to plan for extra horsepower, whether through a GPU upgrade or cloud scaling.
Future-proofing isn’t about chasing specs; it’s about knowing when and where you’ll hit your limits.
Cloud-Ready Project Organization
Another underrated piece of the puzzle: project organization. Keeping your scenes modular, naming assets clearly, and maintaining clean links to your CAD or BIM files pays off later when you move to faster hardware or a team-based workflow. A messy local project might “work fine” now, but it becomes a nightmare when you migrate it to a new machine or the cloud.
If you’re thinking ahead, structure your assets as if you’ll need to open them anywhere, on your workstation today, on a cloud computer tomorrow.
Knowing When to Scale Up
How do you know it’s time to upgrade or offload? A few signs are dead giveaways:
You’re waiting longer for previews than you spend adjusting materials.
Your GPU fans sound like a jet engine during every render.
Team members in other locations can’t easily access or review your work.
If any of that sounds familiar, scaling your setup isn’t an expense, it’s an investment in consistency and sanity.
Avoiding Common Pitfalls
It’s tempting to throw money at the newest GPU or workstation, but that’s not always the smartest move. Over-investing early can lock you into aging hardware before you’ve even hit your stride. On the flip side, ignoring performance bottlenecks slows everything down and burns time you can’t bill.
Another trap: underestimating internet speed. Cloud workflows rely on stable, high-bandwidth connections, a slow or inconsistent network can sabotage the whole experience.
The Bigger Picture
Ultimately, scaling isn’t just about power. It’s about freedom. The freedom to take on bigger projects without dreading render times. The freedom to collaborate seamlessly with clients and teammates. And the freedom to create without being limited by your device.
That’s where hybrid setups, combining your local rig with cloud computing, truly shine. They give you flexibility today and scalability tomorrow, ensuring that as your creative ambitions grow, your workflow keeps up effortlessly.
Boost Your Workflow with Vagon Cloud Computer
Looking for a way to speed up your render times and enhance your workflows? Vagon Cloud Computer is here to help. With powerful cloud-based computing, you can render faster and work on complex projects without upgrading your hardware. And with Vagon Streams, you can share and distribute your ArchViz projects or games in real-time with unparalleled performance.
Get started with Vagon today and experience seamless rendering and collaboration!
Frequently Asked Questions (FAQs)
1. What hardware setup is ideal for Twinmotion?
Twinmotion thrives on GPU acceleration, so using a discrete GPU like an NVIDIA RTX or AMD card will significantly improve performance. Ensure your system meets the recommended specifications for smoother rendering.
2. How do I sync Twinmotion with Revit or SketchUp?
Twinmotion offers one-click synchronization with Revit, SketchUp, and other CAD tools. Install the appropriate plugin for your software, and updates to your models will automatically reflect in Twinmotion.
3. What are Level of Detail (LOD) settings in Twinmotion?
LOD settings allow you to simplify distant objects in a scene, reducing the strain on your system while maintaining high detail for close-up elements. This boosts performance without sacrificing visual quality.
4. How can Twinmotion Cloud improve my workflow?
Twinmotion Cloud enables you to render and share projects remotely, reducing dependence on local hardware. This feature is especially useful for working with large, complex projects or collaborating with clients.
5. Can I distribute my ArchViz projects in real-time using Twinmotion?
Yes! With Vagon Streams, you can distribute ArchViz projects, games, and more in real-time with top-tier performance, making it easy to present your work to clients or collaborate on large-scale projects.
In the fast-paced world of architectural visualization, Twinmotion stands out as a game-changing tool for real-time rendering. Whether you're an architect, designer, or 3D artist, its seamless integration and intuitive features make it easier than ever to bring your concepts to life.
But here’s the catch: without the right render settings, even the most stunning designs can fall short. Optimizing render settings isn’t just for pros, it’s crucial for beginners too. Mastering these basics can dramatically enhance your workflow, delivering crisper visuals and faster performance.
Let’s explore how you can elevate your Twinmotion projects with smart render settings!
Understanding Twinmotion’s Real-Time Rendering
When it comes to real-time visualization, Twinmotion leads the charge, transforming the way we design. The ability to see your project evolve live, as you make adjustments, is a game-changer for architects and designers. No more waiting for hours, every tweak you make, from lighting to materials, is instantly reflected, allowing for faster decisions and more fluid creativity.
Twinmotion’s intuitive interface takes this further, ensuring that even beginners can hit the ground running. It’s designed to be user-friendly: drag-and-drop functionality, sliders for quick adjustments, and an array of presets mean less time navigating menus and more time creating.
But where Twinmotion truly shines is its seamless integration with CAD and BIM software like Revit, ArchiCAD, and SketchUp. This one-click sync allows you to bring your models into Twinmotion effortlessly and keep them updated as changes are made. No more tedious exports or juggling file formats, just a smooth, connected workflow.
In short, real-time rendering with Twinmotion isn’t just a feature; it’s a tool for unlocking creativity, enhancing collaboration, and delivering projects faster, without compromising on quality.
Want to see the newest tools in action? Take a look at what’s new in Twinmotion 2025 and discover the latest features that can elevate your rendering workflow even further.
Essential Render Settings in Twinmotion
Getting the best results in Twinmotion starts with optimizing the key render settings. Here’s a breakdown of the essentials to ensure every project shines.
Resolution & Output
Choosing the right resolution is crucial. For still images, videos, or panoramas, adjust output settings based on the final use. Are you creating a social media post, a detailed client presentation, or an immersive VR experience? Higher resolutions, such as 4K, deliver crisp details but require more rendering time and power. If speed is a priority, consider scaling down while maintaining clarity for smaller screens.
Tip: Keep the end format in mind, don’t overkill on resolution where it’s not needed.
Lighting Settings
Lighting is the secret sauce to realism. Twinmotion offers powerful tools like global illumination and light probes to create natural, dynamic light behavior. Start by adjusting natural light for day or night scenes and then fine-tune using artificial lighting like spotlights or ambient light for extra depth. Experimenting with angles and shadows can significantly impact how your design is perceived, sometimes even the smallest adjustment makes a world of difference.
“Lighting isn’t just about brightness, it’s about mood and realism.”
Material & Texture Adjustments
High-quality materials and textures make all the difference between a good render and a great one. Twinmotion allows you to fine-tune materials to achieve the exact look you want, whether it's the reflection on glass, the grain of wood, or the sheen of metal. Ensure textures are high-resolution and realistic to avoid any low-quality visuals. The more detailed the materials, the more lifelike the scene becomes.
Always opt for high-res textures where they count, details bring renders to life.
Post-Processing Effects
Once the basics are in place, take your render further with post-processing effects. Bloom, depth of field, and motion blur can add cinematic depth and polish. These effects, when applied subtly, enhance the visual storytelling without overpowering the design. Use them to create focus or add movement to your scene for a more dynamic, professional finish.
“Small effects create big impressions, less is more with post-processing.”
By mastering these core settings, you’ll be well on your way to producing stunning, high-quality renders that impress.
Optimizing Performance for Faster Renders
When it comes to rendering in Twinmotion, performance is key. With real-time rendering at its core, ensuring your hardware and settings are optimized can drastically reduce render times while maintaining high-quality visuals. Here are three essential ways to optimize performance for faster, smoother renders.
Hardware & GPU Optimization
Your hardware setup plays a huge role in how fast you can render. Twinmotion thrives on GPU acceleration, meaning your graphics card is doing the heavy lifting. Whether you're using an NVIDIA RTX or AMD card, ensuring the latest drivers are installed is the first step in squeezing out the best performance.
Twinmotion’s real-time engine loves power, so if you have the option, always prioritize using a discrete GPU over integrated graphics. You can adjust settings like anti-aliasing, reflection quality, and shadow detail to get faster results without sacrificing too much visual fidelity. If your hardware is struggling, consider reducing the render quality of reflections and shadows, as these are among the most resource-intensive settings.
Tip: Keep your system cool! Overheating can cause GPUs to throttle performance.
You can also check out our GPU Guide for tips to use GPU, along with speed up and acceleration tips for Twinmotion.
Level of Detail (LOD) Settings
A clever way to boost performance is by adjusting Level of Detail (LOD) settings. LOD is about reducing the complexity of models that are further away from the camera, saving processing power while keeping close-up details crisp and clear. For larger scenes with many objects, lowering the LOD for distant elements significantly reduces strain on the GPU, allowing for faster real-time interaction.
In Twinmotion, this can be particularly useful for projects with intricate environments. For example, trees, buildings, and background details don’t need high-resolution textures or complex geometry if they’re far from view. By using LOD settings, you can simplify these elements while focusing detail where it truly matters, right in front of the viewer.
Adjust LOD settings to focus detail where it counts and improve performance in complex scenes.
Twinmotion Cloud
For those working with clients remotely or on less powerful machines, Twinmotion Cloud is a fantastic solution. This feature allows you to render and share projects without relying on local hardware. By offloading rendering tasks to the cloud, you minimize the strain on your system while still delivering stunning results.
Twinmotion Cloud is also great for collaboration. With a simple web link, stakeholders can view and explore your project in high-quality 3D without needing to install Twinmotion or even use high-powered hardware. This feature not only enhances sharing but also significantly reduces rendering times when working with large, complex projects.
“Twinmotion Cloud lets you present high-quality renders without being tethered to your hardware.”
Additional Tips for Speeding Up Renders
Use efficient file formats: Ensure your models are in formats optimized for real-time rendering, such as FBX or Datasmith. This prevents unnecessary overhead and speeds up both loading and rendering times.
Reduce polygon count: If your scene contains a lot of complex geometry, consider simplifying models where possible, especially for background elements. A lower polygon count equals less work for your hardware, speeding up render times.
Disable unnecessary effects: Post-processing effects like motion blur, depth of field, and lens flares can add dramatic effects to your renders but can also slow things down. Turn off these features during your workflow, then enable them for final renderings.
Use lower resolution during editing: While working, switch to a lower resolution in your viewport. This ensures smooth real-time performance, and you can crank it up when you’re ready for the final output.
By following these optimization strategies, you’ll be able to maintain a balance between speed and quality, ensuring that your Twinmotion renders are not only fast but visually impressive. Whether it’s for real-time collaboration or high-end final outputs, knowing how to tweak performance settings is your key to mastering the art of rendering.
Advanced Rendering Tips for Better Results
Achieving stunning visuals in Twinmotion requires more than just basic settings. Here’s how to take your renders to the next level.
High-Quality Models
Your 3D models are the backbone of your render. The more detailed and optimized your models are, the more realistic your final render will look. High-quality 3D models not only ensure crisp visuals but also reduce the strain on your system. Opt for models that strike the right balance between complexity and optimization. Simplifying elements that won’t be in focus allows you to allocate resources where it matters most.
“Great renders start with great models, don’t compromise on quality, but always optimize for performance.”
Environment Control
In Twinmotion, the environment is your canvas, and you have full control over the weather, seasons, and lighting. Tweaking these elements can drastically change the mood and tone of your scene. Want a bright summer day? Or maybe a moody, rainy evening? Adjusting the weather and time of day can create entirely different atmospheres. The dynamic lighting system lets you experiment with sun angles, shadows, and even HDRI skies to build a natural, immersive environment.
“Mastering environment control is like painting with light, each setting adds depth and emotion to your scene.”
Quixel Megascans Library
Accessing Quixel Megascans directly from within Twinmotion gives you an enormous library of ultra-realistic textures and models. These high-fidelity assets allow you to quickly enhance your renders with lifelike elements, from detailed foliage to rugged surfaces. Using these PBR (Physically Based Rendering) materials adds realism without needing to create complex textures from scratch.
“Realism at your fingertips: Quixel Megascans turns any project into a visual masterpiece.”
With these advanced techniques, you’ll elevate your rendering quality, transforming your designs into visual experiences that truly captivate.
How to Make Twinmotion Renders Look More Realistic
A common frustration with Twinmotion is that scenes can look technically correct but still feel artificial. The good news is that realism rarely comes from maxed-out settings. It comes from a few smart adjustments that work together.
Focus on Contrast, Not Brightness
Many users try to “fix” a dull render by increasing overall brightness. This usually washes out materials and flattens the image.
What works better:
Lower global exposure slightly and build contrast using light placement. Real-world scenes are rarely evenly lit. Shadows and darker zones are what make bright areas feel believable.
Use Imperfection on Purpose
Perfect surfaces scream “CG.” Real environments have wear, variation, and subtle flaws.
Try this:
Slightly vary roughness values on similar materials
Add mild normal maps even to flat surfaces
Avoid perfectly clean glass, walls, or floors
Tiny imperfections add realism without affecting performance.
Match Camera Settings to Real Photography
Default camera settings often feel unnatural because they don’t behave like real lenses.
Adjust these first:
Field of view instead of zooming
Eye-level camera height for interiors
Gentle depth of field only when it serves a purpose
Think like a photographer, not a renderer.
Let Materials React to Light
Materials don’t exist in isolation. Their realism depends on how they interact with light.
Best practice:
After placing lights or adjusting sun position, revisit key materials. A surface that looked right before may suddenly feel wrong once lighting changes. This back-and-forth is normal and essential.
Less Geometry, Better Composition
Adding more objects doesn’t automatically make a scene more realistic. It often just adds noise.
Instead:
Focus on composition. One well-framed focal point with supporting elements feels more realistic than a cluttered scene with no visual hierarchy.
Preview Like a Client Will See It
If you’re working on a powerful machine, it’s easy to forget how the scene feels to others.
Do this:
Regularly preview at target resolution and output format. What looks fine in the viewport might feel very different as a still image, panorama, or video.
The takeaway:
Photorealism in Twinmotion isn’t about pushing sliders to the maximum. It’s about balance. Light, materials, camera, and composition all matter more than raw quality settings.
Best Practices for a Smooth Workflow
A streamlined workflow is essential for maintaining efficiency and preventing costly errors during your project. Here are two critical best practices to keep your Twinmotion workflow smooth and hassle-free:
Syncing with Other Software
Twinmotion is built to integrate seamlessly with Revit, SketchUp, ArchiCAD, and other CAD/BIM tools. With its one-click synchronization feature, your models are automatically updated in real-time, ensuring that your latest changes are reflected in Twinmotion without manual imports or re-exports. This eliminates time-consuming file transfers and ensures you're always working on the most current version of your design. By syncing frequently, you avoid version control issues and maintain consistency across your workflow.
This feature significantly reduces the friction between design and visualization, allowing you to stay in the creative zone. Whether you’re adjusting the structural layout in Revit or tweaking materials in SketchUp, all updates are reflected instantly, cutting down on repetitive tasks and keeping your design process efficient.
Expert Techniques for Photorealistic Renders
Enhancing the photorealism of your Twinmotion renders involves mastering advanced techniques that elevate your projects to professional standards. Below are some strategies to achieve lifelike results:
Utilizing Lumen Global Illumination
Lumen, Twinmotion's advanced dynamic global illumination system, plays a pivotal role in creating realistic lighting conditions by simulating how light interacts with surfaces in real life. To activate Lumen, you need to navigate to the Properties panel and select the Ambience tab. Within the Render settings, choosing Lumen under Global Illumination replaces the standard settings with dynamic lighting capabilities. For best results, ensure that your scene's geometry is free of light leaks, which can disrupt the realism of the render. Updating your graphics drivers is equally crucial, as Lumen’s intricate calculations demand optimal hardware performance. When utilized effectively, Lumen transforms your scenes, delivering depth and atmosphere that emulate real-world lighting conditions.
Fine-Tuning Material Properties
Materials define the visual language of your scene, and achieving lifelike textures hinges on their precise adjustment. Reflectivity and roughness are key attributes to master. Reflectivity dictates how much light bounces off a surface, while roughness influences how diffuse that reflection appears. For example, a polished marble floor will have high reflectivity and a smooth, mirror-like finish, whereas aged wood will exhibit subdued reflections and a more textured surface. Beyond basic settings, applying normal or bump maps can add micro-details to surfaces, simulating scratches, grooves, or uneven textures without increasing the polygon count. This approach ensures that materials not only look realistic but also perform efficiently during rendering.
Advanced Lighting Techniques
Lighting is the cornerstone of photorealistic rendering, shaping mood, depth, and focus within a scene. Incorporating HDRI environments is a powerful way to achieve ambient lighting that feels cohesive and natural. HDRI images simulate real-world lighting by capturing a full spectrum of light intensity, shadows, and reflections, providing your scene with dynamic and nuanced illumination. Custom light profiles, such as IES lights, take this a step further by mimicking specific lighting patterns produced by real-world fixtures. These profiles allow you to create localized lighting effects that add authenticity to indoor and outdoor settings. The interplay of ambient and artificial light, when managed thoughtfully, enhances the believability of your scene.
Camera Settings and Composition
Effective camera settings and thoughtful composition can elevate the visual impact of your renders, guiding the viewer’s eye and enhancing storytelling. Configuring the camera's focal length and aperture determines how depth of field is rendered, blurring out irrelevant details and emphasizing focal points. For instance, a shallow depth of field can draw attention to a central object while softening the background. Composition techniques, such as the rule of thirds, ensure that key elements are placed strategically within the frame. This creates balance and harmony, making your render more engaging. Additionally, adjusting exposure levels and color grading within Twinmotion’s camera settings can add the finishing touches, ensuring the final image captures the intended atmosphere and mood.
Mastering these techniques will not only enhance the photorealism of your Twinmotion renders but also ensure that your projects stand out with professional-quality visuals that captivate and inspire.
Frequent Testing & Backups
Regular testing of your renders is essential to spot issues early and fine-tune the quality of your work. Frequent previewing lets you adjust settings like lighting, textures, and camera angles incrementally, ensuring smooth progress without surprises at the final stage. Testing is particularly crucial when you’re dealing with large files or complex scenes, where minor issues can escalate if left unchecked.
In addition to testing, backups are non-negotiable. With large-scale projects, crashes or unexpected bugs can lead to data loss, costing hours of hard work. Set up automatic backups to capture your progress regularly, or save manual versions at key points. Using structured file naming or a versioning system can help you track changes and restore previous versions quickly, ensuring you never lose vital work.
Optimizing your render settings in Twinmotion is essential for achieving high-quality results and maintaining smooth, efficient workflows. By mastering the basics of real-time rendering, fine-tuning lighting and materials, and leveraging advanced tools like LOD and Twinmotion Cloud, you can transform your projects into visually stunning experiences. The right settings ensure your renders are not only visually appealing but also perform efficiently, delivering results that impress both clients and collaborators.
Whether you’re just starting or looking to push your renders further, Twinmotion offers the flexibility and power to help you achieve your vision.
Planning for Tomorrow: Scaling Your ArchViz Workflow
Rendering has come a long way in the past few years. I still remember when a single 4K animation meant leaving my workstation running overnight, and praying it wouldn’t crash halfway through. Today, with scenes easily surpassing hundreds of millions of polygons and materials pushing photorealism to new limits, even the most powerful desktop setups can start to sweat.
That’s why future-proofing your workflow isn’t a luxury anymore. It’s a necessity.
Local Power Meets Cloud Flexibility
Most professionals I know now use a hybrid approach: local for iteration, cloud for heavy lifting. It’s a smart mix. You model, texture, and light your scene on your workstation, maybe an RTX 4070 or 4080 laptop, but when it’s time for final renders, panoramas, or high-fidelity animations, you offload the job to the cloud.
This dual setup isn’t about replacing your hardware; it’s about extending it. Cloud workstations act like a performance booster pack when deadlines get tight or when projects balloon beyond what your GPU can handle. The best part? You only pay for what you use, and you don’t need to plan a full hardware upgrade every couple of years.
Budgeting and Scaling Smart
Render scale grows fast. Double your output resolution from 4K to 8K, and you’re not just doubling, you’re roughly quadrupling the pixel workload. The same goes for VR projects or cinematic animations. As a rule of thumb, if your scenes start hitting more than 20 million polygons or 16 GB VRAM usage, it’s time to plan for extra horsepower, whether through a GPU upgrade or cloud scaling.
Future-proofing isn’t about chasing specs; it’s about knowing when and where you’ll hit your limits.
Cloud-Ready Project Organization
Another underrated piece of the puzzle: project organization. Keeping your scenes modular, naming assets clearly, and maintaining clean links to your CAD or BIM files pays off later when you move to faster hardware or a team-based workflow. A messy local project might “work fine” now, but it becomes a nightmare when you migrate it to a new machine or the cloud.
If you’re thinking ahead, structure your assets as if you’ll need to open them anywhere, on your workstation today, on a cloud computer tomorrow.
Knowing When to Scale Up
How do you know it’s time to upgrade or offload? A few signs are dead giveaways:
You’re waiting longer for previews than you spend adjusting materials.
Your GPU fans sound like a jet engine during every render.
Team members in other locations can’t easily access or review your work.
If any of that sounds familiar, scaling your setup isn’t an expense, it’s an investment in consistency and sanity.
Avoiding Common Pitfalls
It’s tempting to throw money at the newest GPU or workstation, but that’s not always the smartest move. Over-investing early can lock you into aging hardware before you’ve even hit your stride. On the flip side, ignoring performance bottlenecks slows everything down and burns time you can’t bill.
Another trap: underestimating internet speed. Cloud workflows rely on stable, high-bandwidth connections, a slow or inconsistent network can sabotage the whole experience.
The Bigger Picture
Ultimately, scaling isn’t just about power. It’s about freedom. The freedom to take on bigger projects without dreading render times. The freedom to collaborate seamlessly with clients and teammates. And the freedom to create without being limited by your device.
That’s where hybrid setups, combining your local rig with cloud computing, truly shine. They give you flexibility today and scalability tomorrow, ensuring that as your creative ambitions grow, your workflow keeps up effortlessly.
Boost Your Workflow with Vagon Cloud Computer
Looking for a way to speed up your render times and enhance your workflows? Vagon Cloud Computer is here to help. With powerful cloud-based computing, you can render faster and work on complex projects without upgrading your hardware. And with Vagon Streams, you can share and distribute your ArchViz projects or games in real-time with unparalleled performance.
Get started with Vagon today and experience seamless rendering and collaboration!
Frequently Asked Questions (FAQs)
1. What hardware setup is ideal for Twinmotion?
Twinmotion thrives on GPU acceleration, so using a discrete GPU like an NVIDIA RTX or AMD card will significantly improve performance. Ensure your system meets the recommended specifications for smoother rendering.
2. How do I sync Twinmotion with Revit or SketchUp?
Twinmotion offers one-click synchronization with Revit, SketchUp, and other CAD tools. Install the appropriate plugin for your software, and updates to your models will automatically reflect in Twinmotion.
3. What are Level of Detail (LOD) settings in Twinmotion?
LOD settings allow you to simplify distant objects in a scene, reducing the strain on your system while maintaining high detail for close-up elements. This boosts performance without sacrificing visual quality.
4. How can Twinmotion Cloud improve my workflow?
Twinmotion Cloud enables you to render and share projects remotely, reducing dependence on local hardware. This feature is especially useful for working with large, complex projects or collaborating with clients.
5. Can I distribute my ArchViz projects in real-time using Twinmotion?
Yes! With Vagon Streams, you can distribute ArchViz projects, games, and more in real-time with top-tier performance, making it easy to present your work to clients or collaborate on large-scale projects.
Get Beyond Your Computer Performance
Run applications on your cloud computer with the latest generation hardware. No more crashes or lags.

Trial includes 1 hour usage + 7 days of storage.
Summarize with AI

Ready to focus on your creativity?
Vagon gives you the ability to create & render projects, collaborate, and stream applications with the power of the best hardware.

Vagon Blog


Run heavy applications on any device with
your personal computer on the cloud.
San Francisco, California
Solutions
Vagon Teams
Vagon Streams
Use Cases
Resources
Vagon Blog
How to Run Audacity on a Cloud Ubuntu Desktop (2026 Guide)
How to Run Darktable on a Cloud Ubuntu Desktop for RAW Photo Editing (2026 Guide)
How to Run Kdenlive on a Cloud Ubuntu Desktop (2026 Guide)
How to Run DaVinci Resolve on Linux in the Cloud (2026 Guide)
How to Run Inkscape on a Cloud Ubuntu Desktop (2026 Guide)
How to Run Krita on a Cloud Ubuntu Desktop for Digital Painting (2026 Guide)
How to Run GIMP on a Cloud Ubuntu Desktop (2026 Guide)
How to Run Jupyter on a Cloud GPU Linux Desktop (2026 Guide)
Vagon vs GitHub Codespaces: Cloud Dev Environments Compared (2026)
Vagon Blog
Run heavy applications on any device with
your personal computer on the cloud.
San Francisco, California
Solutions
Vagon Teams
Vagon Streams
Use Cases
Resources
Vagon Blog