Instant Connection for Pixel Streaming
— New Feature Automated Setup

How to Reduce Project Processing Time in Pix4Dmapper
How to Reduce Project Processing Time in Pix4Dmapper
Streams
How to Reduce Project Processing Time in Pix4Dmapper
Table of Contents
Last year I ran a Pix4Dmapper project with nearly 8,000 drone images at full resolution. The kind of dataset that makes your workstation sound like it’s about to take off. The first run? It took three and a half days to grind through the dense point cloud stage. Three. And a half. Days.
Out of frustration, I tweaked a few settings, lowered the image scale on step one, cut point cloud density in half, and used a processing area to ignore the parts of the map no one cared about. Same dataset, same machine, but this time the job wrapped in just under 12 hours. From a lost weekend to something I could run overnight.
I’ve heard other users echo the same thing: “I shaved 70% off my processing time just by changing a couple of parameters.” And they’re not exaggerating.
Here’s the truth most people don’t realize: you don’t always need a monster GPU rig to speed things up. Smarter workflows and a few overlooked settings can save you days, literally, without sacrificing the results your clients expect.
Understanding the Bottlenecks in Pix4Dmapper
If you’ve ever stared at Pix4Dmapper’s progress bar and wondered why it’s crawling, you’re not alone. The truth is, different stages of processing stress your hardware in very different ways. Knowing where the slowdown happens is half the battle.
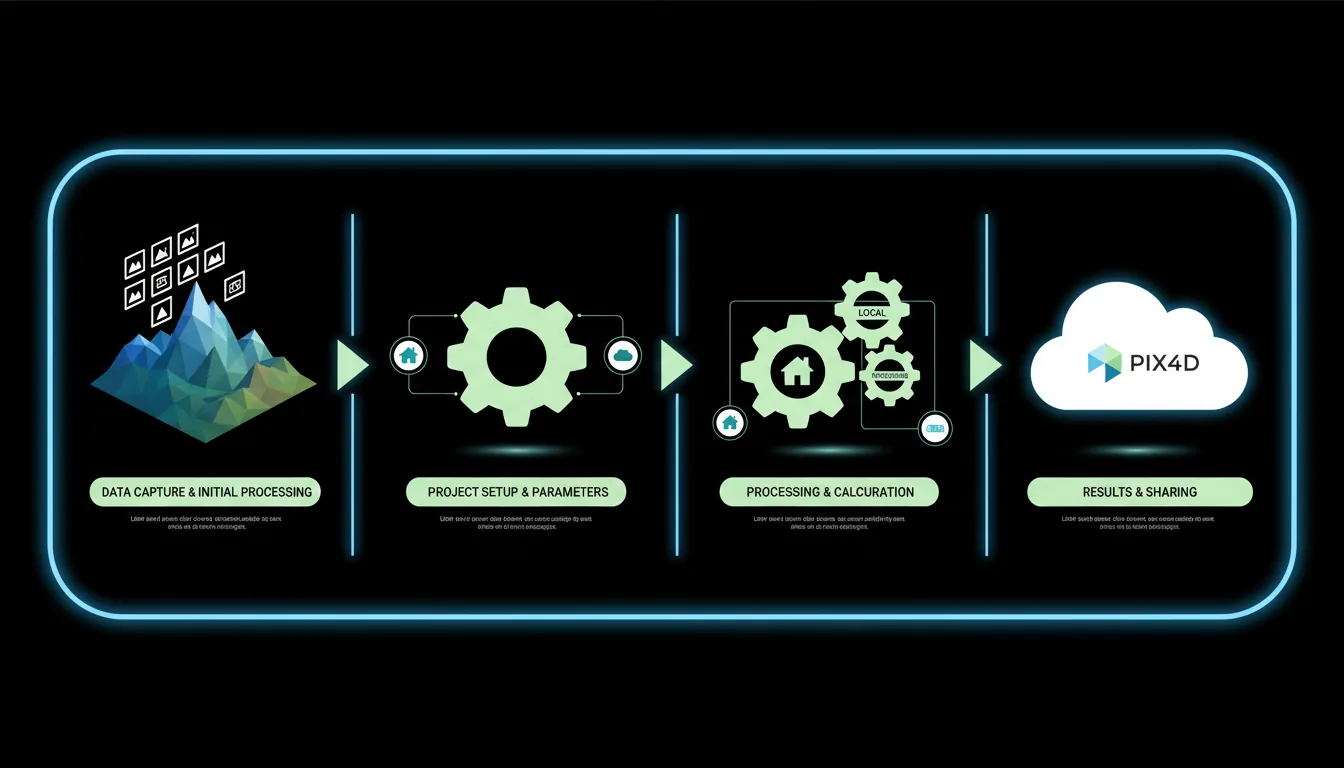
Step 1: Initial Processing
This is where Pix4Dmapper aligns your images, finds tie points, and builds the sparse cloud. It’s CPU-heavy, and while multiple cores help, the software isn’t perfectly parallelized. Translation: throwing 64 cores at it doesn’t mean it’ll run 64x faster. In fact, I’ve noticed that a strong clock speed on fewer cores often beats a giant multicore setup here.
Step 2: Point Cloud and Mesh
This is the real time sink. Generating a dense point cloud can balloon into hours or even days depending on your dataset. RAM and GPU matter here. If you don’t have enough memory, you’ll see bottlenecks or even crashes. And while Pix4D does use the GPU, it’s not as heavily optimized as, say, gaming engines. So yes, an NVIDIA CUDA card helps, but don’t expect miracles.
Step 3: DSM, Orthomosaic, and Textures
By this stage, most people think they’re in the clear. But if you’re generating massive orthomosaics at full resolution, disk speed can become the bottleneck. I once ran Step 3 on a dataset stored on an external HDD, big mistake. The same project on an SSD finished hours faster.
And here’s the kicker: sometimes the slowdown isn’t even hardware. It’s choices like using max image resolution when your deliverable doesn’t need it, or processing an entire area when your client only asked for 10% of it. That’s where the low-hanging fruit for time savings usually hides.
While this post focuses on Pix4Dmapper, if you’re curious how other software compares under pressure, check out this breakdown of 3DF Zephyr vs Agisoft Metashape.
Hardware Tips: What Helps Most, What Helps Less
I’ve lost count of how many people think they just need “a bigger GPU” to make Pix4Dmapper fly. I get it, that’s the advice you hear everywhere. But in my experience, hardware upgrades aren’t one-size-fits-all. Some components give you huge wins, others barely move the needle.

CPU: Clock Speed Beats Core Count
Pix4Dmapper likes fast cores more than dozens of slow ones. Sure, it can use multiple threads, but the scaling isn’t perfect. I’ve seen an 8-core CPU at 4.5 GHz beat a 32-core workstation stuck at lower clock speeds. If you’re choosing between more cores or faster cores, I’d go with speed.
GPU: Helpful, But Don’t Expect Magic
Yes, Pix4D supports CUDA acceleration, but only in certain steps, mainly dense point cloud generation and mesh. That means a solid NVIDIA card (think RTX A4000, A5000, or even a gaming-grade RTX 4070/4080) helps. But don’t blow your entire budget here. You’ll hit diminishing returns if the rest of your system can’t keep up.
RAM: The Silent Workhorse
This is the one that’s easy to underestimate. Large datasets can eat memory alive. I’ve seen projects choke on 32 GB and suddenly sail smoothly with 64 or 128 GB. Rule of thumb? Aim for at least 4 GB per 100 images. If you’re flying thousands of photos, don’t skimp here.
Storage: SSD or Bust
If you’re still processing on a spinning HDD, you’re basically sabotaging yourself. SSDs (preferably NVMe) make a huge difference, especially in Step 3 when massive orthomosaic files are stitched together. Even moving your temp files to SSD can save you hours.
Network: Mostly Irrelevant
Unless you’re running cloud sync or NAS storage in the background, your internet speed won’t change processing time. But I’ll admit — pushing gigabytes of outputs to clients is another story (and a pain if you’re not using a streaming solution).
Bottom line: If you’re tuning your setup, start with CPU speed, RAM, and SSDs. GPU helps, but it’s not the silver bullet everyone thinks it is.
If you’re thinking about a hardware upgrade, check out this guide on the best PCs for reality capture — it’s tailored for photogrammetry workflows just like Pix4Dmapper.
Settings & Workflow Adjustments That Save Time
Here’s where the magic happens. Hardware only gets you so far, but tweaking Pix4Dmapper’s settings? That’s where you can slash processing time without spending a dime.
Use the Right Template
Pix4D comes with different processing templates, “Rapid/Low Resolution,” “3D Maps,” “3D Models,” etc. The Rapid option is gold if you just need a quick preview or aren’t delivering survey-grade results. I’ve seen jobs finish in a quarter of the time compared to High Quality settings.
Reduce Image Scale for Step 1
This one’s underrated. Dropping the image scale to half or even a quarter still gives Pix4D enough data to align your images, but it can cut Step 1 processing by hours on big projects. You can always increase quality later if needed.
Adjust Point Cloud Density
Do you really need “High” density on every project? For most mapping jobs, “Optimal” or even “Low” gets the job done with far less processing. I once cut a project from 20 hours down to 8 just by switching point cloud density to Medium.
And if you’re using Twinmotion alongside Pix4D for presentations, these expert tips to boost Twinmotion performance can help you keep the entire pipeline running smoothly.
Skip What You Don’t Need
Classification, meshing, even generating a DSM, if the client isn’t asking for it, don’t waste time. Too many people run every step “just in case.” That’s like cooking a five-course meal when all someone ordered was a sandwich.
Use Processing Areas
If your dataset covers 500 acres but your client only cares about 40, draw a processing area. You’ll save enormous time in Step 3 (orthomosaic/DSM) by skipping tiles you’ll never deliver anyway.
Downsample Strategically
For really large datasets, some users downsample images before importing. Sure, you lose detail, but if the goal is a general site model rather than centimeter-accuracy, this trick can save days.
The point here isn’t to cut corners, it’s to process smarter. You can always re-run high-quality steps on the subset of the project that really matters.
If you’re still exploring which photogrammetry software to commit to, it’s worth understanding the trade-offs between free and paid tools — especially when it comes to processing control and workflow speed in options like Meshroom and Agisoft Metashape.
Handling Large Projects More Smartly
At some point, no matter how good your settings are, the sheer size of a dataset becomes the enemy. Thousands of 40-megapixel images will push any workstation to its limits. That’s when you need to start thinking less about brute force, and more about strategy.
Split and Conquer
Pix4D actually recommends splitting projects once you pass a couple thousand images. Run Step 1 (Initial Processing) on smaller chunks, say 1,500–2,000 photos at a time, and then merge them. I’ve used this trick on aerial surveys where 8,000 photos would’ve been impossible to process in one go. Breaking them into four subprojects meant each part ran overnight, and the merge only added a few extra hours. Way better than crashing after three days of nonstop processing.
Batch Processing Overnight
It sounds obvious, but setting up jobs to run overnight or over the weekend makes a huge difference psychologically. You’re not sitting there watching the progress bar crawl, the work gets done while you sleep. Some users even run multiple smaller jobs in sequence, so when they wake up, all the Step 1 alignments are ready.
Monitor Quality Reports Early
One of the biggest mistakes I see? People wait until the end to find out their project went wrong. The Quality Report after Step 1 is your early warning system. If the tie points are garbage or the calibration failed, stop there. Fix it before wasting 12 more hours on dense cloud and orthos.
Don’t Be Afraid to Trim
Sometimes we overshoot with flight planning, too much overlap, too many redundant images. If your dataset is bloated, trimming 10–20% of unnecessary photos before processing can save serious time. And no, it usually doesn’t hurt the accuracy if your overlap is already high.
Large projects don’t have to mean painful projects. With the right workflow, you can stay in control instead of letting Pix4Dmapper run your workstation into the ground.
Dealing with project crashes isn’t just a Pix4Dmapper problem — similar frustrations pop up across tools, and there are great strategies for stabilizing workflows when you're working with large datasets in Agisoft Metashape too.
Trade-offs: When Reducing Time Costs You Something
Cutting processing time isn’t free. Every tweak comes with a price, and if you don’t think about the end deliverable, you might save a day only to redo everything later.

Lower Image Scale = Faster Alignment, Less Precision
Dropping image scale works wonders for Step 1 speed, but if you’re working on a project where every centimeter counts, like stockpile volume calculations, that shortcut might come back to bite you. I’ve had to rerun entire projects because the reduced scale missed subtle but important features.
Point Cloud Density = Detail vs Time
Yes, switching from “High” to “Medium” density can shave hours off. But the trade-off is detail in your 3D model. For a general top-down ortho it’s fine. For a client who expects to see pipes, fences, or small features? They’ll notice what’s missing.
Skipping Steps = Missing Deliverables
It’s tempting to skip classification or DSM generation when you’re rushing. But if a client suddenly asks for contour lines, you’ll either scramble or start from scratch. Skipping steps is great when you know exactly what the output needs to be. Dangerous when you don’t.
Downsampling Images = Faster Workflow, Lower Accuracy
Some people batch resize images to half or quarter resolution before importing. That can turn a monster dataset into something manageable. But accuracy drops. If you’re mapping farmland, no problem. If you’re doing structural inspections, you’ve just blurred out the details you needed.
The trick is knowing your project requirements and being honest about them. Speed matters, but delivering the wrong product faster doesn’t make anyone happy.
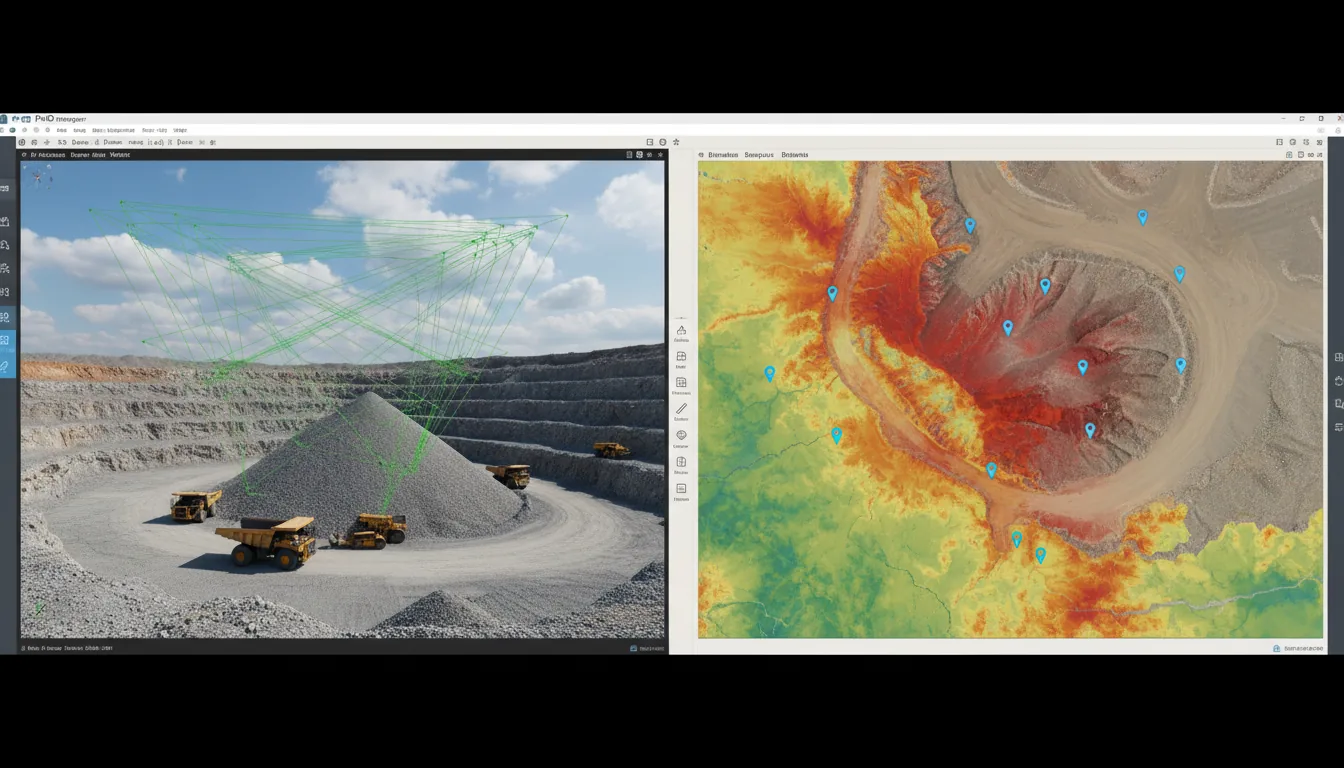
Real Example: Cutting a Project from Days to Hours
A few months ago, I worked on a drone survey of a construction site. The dataset was hefty, about 4,500 images at 42 megapixels each. On my workstation (AMD 12-core CPU, 64 GB RAM, RTX 3070, NVMe SSD), I ran it with the default “3D Maps” template. Processing time? Just under 27 hours. And that was only through Step 2 (dense cloud + mesh).

Out of curiosity, and a bit of desperation, I tried a different approach.
Dropped image scale to 1/2 for Step 1
Switched dense point cloud density from High → Medium
Skipped mesh (the client only needed orthomosaic + DSM)
Drew a processing area to cut out the half of the site they didn’t need
The result? 8 hours, start to finish. Same dataset, same machine.
Now, yes, the dense point cloud wasn’t quite as detailed, and the mesh was missing entirely. But the client didn’t care, their only deliverable was a clean ortho map with accurate contours. And the accuracy check showed less than 3 cm RMS error, which was well within spec.
The takeaway? You don’t always need to throw hardware at the problem. A handful of thoughtful adjustments saved me nearly two days of processing time. And honestly, the client was happier because I delivered ahead of schedule.
For those thinking beyond still exports, Twinmotion vs Unreal Engine dives into performance and flexibility in real-time environments.
How to Share & Leverage Your Results with End Users
Cutting processing time is only half the battle. The other half? Getting those massive outputs in front of the people who actually need them, clients, managers, or teammates. And that’s where I’ve seen a lot of folks hit another wall.
Orthomosaics that weigh in at tens of gigabytes. Dense point clouds so heavy they choke most laptops. You might process them fast, but then you’re stuck sending endless download links or shipping external drives just to share the results. Not exactly efficient.
This is where streaming solutions come into play. Instead of asking clients to download huge files or buy specialized software, you can host the processed project and let them interact with it directly in a browser. No installs, no “my computer can’t open this,” no waiting hours for transfers to finish.
I’ve started using Vagon Streams for exactly this. After I finish a Pix4Dmapper project, I can spin up a cloud session, upload the outputs, and invite clients to explore the model in real time, straight from their browser. They don’t need powerful hardware. They don’t even need Pix4Dmapper installed. It just works.
And here’s the bonus: it doesn’t add extra processing time on my end. I process locally, then use Streams to make the deliverables instantly accessible. Clients love it because they can zoom, pan, or measure without calling me for every small request. I love it because it cuts out the back-and-forth and keeps projects moving.
So yes, reducing project time isn’t only about speeding up Pix4Dmapper. It’s also about making sure that once you have results, they’re easy to share and act on. That’s the part too many workflows forget.
Once you’ve got your 3D data processed, you might want to explore creative ways to make it interactive — like using Twinmotion to build a real-time 3D configurator.
Final Thoughts
If there’s one thing I’ve learned after years of grinding through massive Pix4Dmapper projects, it’s this: faster isn’t always about fancier hardware. Sure, a strong CPU, plenty of RAM, and an SSD make a difference. But the real time savings often come from smarter workflows and knowing when “good enough” is actually perfect for the job.
Shaving 12 hours off a project doesn’t just save electricity, it changes how you work. You stop dreading those multi-day processing runs. You start experimenting more. You feel confident telling a client, “Yeah, I can get that to you tomorrow.”
Of course, every shortcut has trade-offs. Lower density means less detail. Skipping steps can mean missing outputs later. But when you understand the bottlenecks and match your workflow to what the project really needs, you win back time without compromising what matters.
And once the data’s processed, don’t let it sit on your hard drive collecting dust. Share it. Put it in front of clients, stakeholders, or your team in a way they can actually use. Tools like Vagon Streams make that last mile just as smooth as the processing itself.
Bottom line? Stop thinking in terms of brute force. Start thinking strategically. With a few tweaks, you can turn Pix4Dmapper from a marathon into a sprint, and still cross the finish line with deliverables your clients will trust.
Not sure which real-time tool to use for showcasing your model? Here’s a helpful comparison of Twinmotion vs Enscape for presentation and review workflows.
FAQs
Does upgrading my GPU always speed up Pix4Dmapper?
Not always. Pix4D uses the GPU mainly for dense point cloud and mesh generation. Other steps rely more on CPU and RAM. A good GPU helps, but it’s not the magic bullet.How much RAM do I really need?
A safe rule of thumb is about 4 GB of RAM per 100 images. For larger datasets (2,000+ images), 64–128 GB is ideal. Running out of RAM is one of the biggest causes of crashes and slowdowns.Is it okay to reduce image resolution before processing?
Yes, if your project doesn’t demand ultra-high accuracy. Downsampling images can cut processing time drastically, but you’ll lose fine details. Great for general mapping. Risky for inspection-level work.What’s the fastest setting change I can make without hurting accuracy too much?
Reducing point cloud density from “High” to “Medium.” For most projects, the difference in visual quality is minor, but the time savings can be huge.Should I process my entire dataset at once?
Not if you’re dealing with thousands of images. Splitting large projects into chunks (1,500–2,000 images each) and merging later is often faster and safer than running everything in one massive job.My project keeps crashing during Step 2. What can I do?
First, check your RAM, it’s usually the culprit. Second, try lowering point cloud density or reducing image scale. If that still fails, split the dataset into smaller projects.Can I run Pix4Dmapper projects in the cloud instead of on my own PC?
Yes. Some users process directly on cloud workstations, while others prefer to process locally and then share outputs through streaming platforms like Vagon Streams, which makes collaboration easier.
Last year I ran a Pix4Dmapper project with nearly 8,000 drone images at full resolution. The kind of dataset that makes your workstation sound like it’s about to take off. The first run? It took three and a half days to grind through the dense point cloud stage. Three. And a half. Days.
Out of frustration, I tweaked a few settings, lowered the image scale on step one, cut point cloud density in half, and used a processing area to ignore the parts of the map no one cared about. Same dataset, same machine, but this time the job wrapped in just under 12 hours. From a lost weekend to something I could run overnight.
I’ve heard other users echo the same thing: “I shaved 70% off my processing time just by changing a couple of parameters.” And they’re not exaggerating.
Here’s the truth most people don’t realize: you don’t always need a monster GPU rig to speed things up. Smarter workflows and a few overlooked settings can save you days, literally, without sacrificing the results your clients expect.
Understanding the Bottlenecks in Pix4Dmapper
If you’ve ever stared at Pix4Dmapper’s progress bar and wondered why it’s crawling, you’re not alone. The truth is, different stages of processing stress your hardware in very different ways. Knowing where the slowdown happens is half the battle.
Step 1: Initial Processing
This is where Pix4Dmapper aligns your images, finds tie points, and builds the sparse cloud. It’s CPU-heavy, and while multiple cores help, the software isn’t perfectly parallelized. Translation: throwing 64 cores at it doesn’t mean it’ll run 64x faster. In fact, I’ve noticed that a strong clock speed on fewer cores often beats a giant multicore setup here.
Step 2: Point Cloud and Mesh
This is the real time sink. Generating a dense point cloud can balloon into hours or even days depending on your dataset. RAM and GPU matter here. If you don’t have enough memory, you’ll see bottlenecks or even crashes. And while Pix4D does use the GPU, it’s not as heavily optimized as, say, gaming engines. So yes, an NVIDIA CUDA card helps, but don’t expect miracles.
Step 3: DSM, Orthomosaic, and Textures
By this stage, most people think they’re in the clear. But if you’re generating massive orthomosaics at full resolution, disk speed can become the bottleneck. I once ran Step 3 on a dataset stored on an external HDD, big mistake. The same project on an SSD finished hours faster.
And here’s the kicker: sometimes the slowdown isn’t even hardware. It’s choices like using max image resolution when your deliverable doesn’t need it, or processing an entire area when your client only asked for 10% of it. That’s where the low-hanging fruit for time savings usually hides.
While this post focuses on Pix4Dmapper, if you’re curious how other software compares under pressure, check out this breakdown of 3DF Zephyr vs Agisoft Metashape.
Hardware Tips: What Helps Most, What Helps Less
I’ve lost count of how many people think they just need “a bigger GPU” to make Pix4Dmapper fly. I get it, that’s the advice you hear everywhere. But in my experience, hardware upgrades aren’t one-size-fits-all. Some components give you huge wins, others barely move the needle.
CPU: Clock Speed Beats Core Count
Pix4Dmapper likes fast cores more than dozens of slow ones. Sure, it can use multiple threads, but the scaling isn’t perfect. I’ve seen an 8-core CPU at 4.5 GHz beat a 32-core workstation stuck at lower clock speeds. If you’re choosing between more cores or faster cores, I’d go with speed.
GPU: Helpful, But Don’t Expect Magic
Yes, Pix4D supports CUDA acceleration, but only in certain steps, mainly dense point cloud generation and mesh. That means a solid NVIDIA card (think RTX A4000, A5000, or even a gaming-grade RTX 4070/4080) helps. But don’t blow your entire budget here. You’ll hit diminishing returns if the rest of your system can’t keep up.
RAM: The Silent Workhorse
This is the one that’s easy to underestimate. Large datasets can eat memory alive. I’ve seen projects choke on 32 GB and suddenly sail smoothly with 64 or 128 GB. Rule of thumb? Aim for at least 4 GB per 100 images. If you’re flying thousands of photos, don’t skimp here.
Storage: SSD or Bust
If you’re still processing on a spinning HDD, you’re basically sabotaging yourself. SSDs (preferably NVMe) make a huge difference, especially in Step 3 when massive orthomosaic files are stitched together. Even moving your temp files to SSD can save you hours.
Network: Mostly Irrelevant
Unless you’re running cloud sync or NAS storage in the background, your internet speed won’t change processing time. But I’ll admit — pushing gigabytes of outputs to clients is another story (and a pain if you’re not using a streaming solution).
Bottom line: If you’re tuning your setup, start with CPU speed, RAM, and SSDs. GPU helps, but it’s not the silver bullet everyone thinks it is.
If you’re thinking about a hardware upgrade, check out this guide on the best PCs for reality capture — it’s tailored for photogrammetry workflows just like Pix4Dmapper.
Settings & Workflow Adjustments That Save Time
Here’s where the magic happens. Hardware only gets you so far, but tweaking Pix4Dmapper’s settings? That’s where you can slash processing time without spending a dime.
Use the Right Template
Pix4D comes with different processing templates, “Rapid/Low Resolution,” “3D Maps,” “3D Models,” etc. The Rapid option is gold if you just need a quick preview or aren’t delivering survey-grade results. I’ve seen jobs finish in a quarter of the time compared to High Quality settings.
Reduce Image Scale for Step 1
This one’s underrated. Dropping the image scale to half or even a quarter still gives Pix4D enough data to align your images, but it can cut Step 1 processing by hours on big projects. You can always increase quality later if needed.
Adjust Point Cloud Density
Do you really need “High” density on every project? For most mapping jobs, “Optimal” or even “Low” gets the job done with far less processing. I once cut a project from 20 hours down to 8 just by switching point cloud density to Medium.
And if you’re using Twinmotion alongside Pix4D for presentations, these expert tips to boost Twinmotion performance can help you keep the entire pipeline running smoothly.
Skip What You Don’t Need
Classification, meshing, even generating a DSM, if the client isn’t asking for it, don’t waste time. Too many people run every step “just in case.” That’s like cooking a five-course meal when all someone ordered was a sandwich.
Use Processing Areas
If your dataset covers 500 acres but your client only cares about 40, draw a processing area. You’ll save enormous time in Step 3 (orthomosaic/DSM) by skipping tiles you’ll never deliver anyway.
Downsample Strategically
For really large datasets, some users downsample images before importing. Sure, you lose detail, but if the goal is a general site model rather than centimeter-accuracy, this trick can save days.
The point here isn’t to cut corners, it’s to process smarter. You can always re-run high-quality steps on the subset of the project that really matters.
If you’re still exploring which photogrammetry software to commit to, it’s worth understanding the trade-offs between free and paid tools — especially when it comes to processing control and workflow speed in options like Meshroom and Agisoft Metashape.
Handling Large Projects More Smartly
At some point, no matter how good your settings are, the sheer size of a dataset becomes the enemy. Thousands of 40-megapixel images will push any workstation to its limits. That’s when you need to start thinking less about brute force, and more about strategy.
Split and Conquer
Pix4D actually recommends splitting projects once you pass a couple thousand images. Run Step 1 (Initial Processing) on smaller chunks, say 1,500–2,000 photos at a time, and then merge them. I’ve used this trick on aerial surveys where 8,000 photos would’ve been impossible to process in one go. Breaking them into four subprojects meant each part ran overnight, and the merge only added a few extra hours. Way better than crashing after three days of nonstop processing.
Batch Processing Overnight
It sounds obvious, but setting up jobs to run overnight or over the weekend makes a huge difference psychologically. You’re not sitting there watching the progress bar crawl, the work gets done while you sleep. Some users even run multiple smaller jobs in sequence, so when they wake up, all the Step 1 alignments are ready.
Monitor Quality Reports Early
One of the biggest mistakes I see? People wait until the end to find out their project went wrong. The Quality Report after Step 1 is your early warning system. If the tie points are garbage or the calibration failed, stop there. Fix it before wasting 12 more hours on dense cloud and orthos.
Don’t Be Afraid to Trim
Sometimes we overshoot with flight planning, too much overlap, too many redundant images. If your dataset is bloated, trimming 10–20% of unnecessary photos before processing can save serious time. And no, it usually doesn’t hurt the accuracy if your overlap is already high.
Large projects don’t have to mean painful projects. With the right workflow, you can stay in control instead of letting Pix4Dmapper run your workstation into the ground.
Dealing with project crashes isn’t just a Pix4Dmapper problem — similar frustrations pop up across tools, and there are great strategies for stabilizing workflows when you're working with large datasets in Agisoft Metashape too.
Trade-offs: When Reducing Time Costs You Something
Cutting processing time isn’t free. Every tweak comes with a price, and if you don’t think about the end deliverable, you might save a day only to redo everything later.
Lower Image Scale = Faster Alignment, Less Precision
Dropping image scale works wonders for Step 1 speed, but if you’re working on a project where every centimeter counts, like stockpile volume calculations, that shortcut might come back to bite you. I’ve had to rerun entire projects because the reduced scale missed subtle but important features.
Point Cloud Density = Detail vs Time
Yes, switching from “High” to “Medium” density can shave hours off. But the trade-off is detail in your 3D model. For a general top-down ortho it’s fine. For a client who expects to see pipes, fences, or small features? They’ll notice what’s missing.
Skipping Steps = Missing Deliverables
It’s tempting to skip classification or DSM generation when you’re rushing. But if a client suddenly asks for contour lines, you’ll either scramble or start from scratch. Skipping steps is great when you know exactly what the output needs to be. Dangerous when you don’t.
Downsampling Images = Faster Workflow, Lower Accuracy
Some people batch resize images to half or quarter resolution before importing. That can turn a monster dataset into something manageable. But accuracy drops. If you’re mapping farmland, no problem. If you’re doing structural inspections, you’ve just blurred out the details you needed.
The trick is knowing your project requirements and being honest about them. Speed matters, but delivering the wrong product faster doesn’t make anyone happy.
Real Example: Cutting a Project from Days to Hours
A few months ago, I worked on a drone survey of a construction site. The dataset was hefty, about 4,500 images at 42 megapixels each. On my workstation (AMD 12-core CPU, 64 GB RAM, RTX 3070, NVMe SSD), I ran it with the default “3D Maps” template. Processing time? Just under 27 hours. And that was only through Step 2 (dense cloud + mesh).
Out of curiosity, and a bit of desperation, I tried a different approach.
Dropped image scale to 1/2 for Step 1
Switched dense point cloud density from High → Medium
Skipped mesh (the client only needed orthomosaic + DSM)
Drew a processing area to cut out the half of the site they didn’t need
The result? 8 hours, start to finish. Same dataset, same machine.
Now, yes, the dense point cloud wasn’t quite as detailed, and the mesh was missing entirely. But the client didn’t care, their only deliverable was a clean ortho map with accurate contours. And the accuracy check showed less than 3 cm RMS error, which was well within spec.
The takeaway? You don’t always need to throw hardware at the problem. A handful of thoughtful adjustments saved me nearly two days of processing time. And honestly, the client was happier because I delivered ahead of schedule.
For those thinking beyond still exports, Twinmotion vs Unreal Engine dives into performance and flexibility in real-time environments.
How to Share & Leverage Your Results with End Users
Cutting processing time is only half the battle. The other half? Getting those massive outputs in front of the people who actually need them, clients, managers, or teammates. And that’s where I’ve seen a lot of folks hit another wall.
Orthomosaics that weigh in at tens of gigabytes. Dense point clouds so heavy they choke most laptops. You might process them fast, but then you’re stuck sending endless download links or shipping external drives just to share the results. Not exactly efficient.
This is where streaming solutions come into play. Instead of asking clients to download huge files or buy specialized software, you can host the processed project and let them interact with it directly in a browser. No installs, no “my computer can’t open this,” no waiting hours for transfers to finish.
I’ve started using Vagon Streams for exactly this. After I finish a Pix4Dmapper project, I can spin up a cloud session, upload the outputs, and invite clients to explore the model in real time, straight from their browser. They don’t need powerful hardware. They don’t even need Pix4Dmapper installed. It just works.
And here’s the bonus: it doesn’t add extra processing time on my end. I process locally, then use Streams to make the deliverables instantly accessible. Clients love it because they can zoom, pan, or measure without calling me for every small request. I love it because it cuts out the back-and-forth and keeps projects moving.
So yes, reducing project time isn’t only about speeding up Pix4Dmapper. It’s also about making sure that once you have results, they’re easy to share and act on. That’s the part too many workflows forget.
Once you’ve got your 3D data processed, you might want to explore creative ways to make it interactive — like using Twinmotion to build a real-time 3D configurator.
Final Thoughts
If there’s one thing I’ve learned after years of grinding through massive Pix4Dmapper projects, it’s this: faster isn’t always about fancier hardware. Sure, a strong CPU, plenty of RAM, and an SSD make a difference. But the real time savings often come from smarter workflows and knowing when “good enough” is actually perfect for the job.
Shaving 12 hours off a project doesn’t just save electricity, it changes how you work. You stop dreading those multi-day processing runs. You start experimenting more. You feel confident telling a client, “Yeah, I can get that to you tomorrow.”
Of course, every shortcut has trade-offs. Lower density means less detail. Skipping steps can mean missing outputs later. But when you understand the bottlenecks and match your workflow to what the project really needs, you win back time without compromising what matters.
And once the data’s processed, don’t let it sit on your hard drive collecting dust. Share it. Put it in front of clients, stakeholders, or your team in a way they can actually use. Tools like Vagon Streams make that last mile just as smooth as the processing itself.
Bottom line? Stop thinking in terms of brute force. Start thinking strategically. With a few tweaks, you can turn Pix4Dmapper from a marathon into a sprint, and still cross the finish line with deliverables your clients will trust.
Not sure which real-time tool to use for showcasing your model? Here’s a helpful comparison of Twinmotion vs Enscape for presentation and review workflows.
FAQs
Does upgrading my GPU always speed up Pix4Dmapper?
Not always. Pix4D uses the GPU mainly for dense point cloud and mesh generation. Other steps rely more on CPU and RAM. A good GPU helps, but it’s not the magic bullet.How much RAM do I really need?
A safe rule of thumb is about 4 GB of RAM per 100 images. For larger datasets (2,000+ images), 64–128 GB is ideal. Running out of RAM is one of the biggest causes of crashes and slowdowns.Is it okay to reduce image resolution before processing?
Yes, if your project doesn’t demand ultra-high accuracy. Downsampling images can cut processing time drastically, but you’ll lose fine details. Great for general mapping. Risky for inspection-level work.What’s the fastest setting change I can make without hurting accuracy too much?
Reducing point cloud density from “High” to “Medium.” For most projects, the difference in visual quality is minor, but the time savings can be huge.Should I process my entire dataset at once?
Not if you’re dealing with thousands of images. Splitting large projects into chunks (1,500–2,000 images each) and merging later is often faster and safer than running everything in one massive job.My project keeps crashing during Step 2. What can I do?
First, check your RAM, it’s usually the culprit. Second, try lowering point cloud density or reducing image scale. If that still fails, split the dataset into smaller projects.Can I run Pix4Dmapper projects in the cloud instead of on my own PC?
Yes. Some users process directly on cloud workstations, while others prefer to process locally and then share outputs through streaming platforms like Vagon Streams, which makes collaboration easier.
Scalable Pixel and Application Streaming
Run your Unity or Unreal Engine application on any device, share with your clients in minutes, with no coding.

Summarize with AI

Ready to focus on your creativity?
Vagon gives you the ability to create & render projects, collaborate, and stream applications with the power of the best hardware.

Vagon Blog


Run heavy applications on any device with
your personal computer on the cloud.
San Francisco, California
Solutions
Vagon Teams
Vagon Streams
Use Cases
Resources
Vagon Blog
How to Run Inkscape on a Cloud Ubuntu Desktop (2026 Guide)
How to Run Krita on a Cloud Ubuntu Desktop for Digital Painting (2026 Guide)
How to Run GIMP on a Cloud Ubuntu Desktop (2026 Guide)
How to Run Jupyter on a Cloud GPU Linux Desktop (2026 Guide)
Vagon vs GitHub Codespaces: Cloud Dev Environments Compared (2026)
Vagon vs RunPod: Which Cloud GPU Is Right for You? (2026 Comparison)
How to Watch Your AI Agent Work on a Cloud Ubuntu Desktop (2026 Guide)
How to Run a Local LLM on Ubuntu in the Cloud (2026 Guide)
How to Run Blender on a Cloud GPU (Ubuntu): The Complete 2026 Guide
Vagon Blog
Run heavy applications on any device with
your personal computer on the cloud.
San Francisco, California
Solutions
Vagon Teams
Vagon Streams
Use Cases
Resources
Vagon Blog