Instant Connection for Pixel Streaming
— New Feature Automated Setup
Step-by-Step Guide to Building 3D Configurators in Twinmotion
Step-by-Step Guide to Building 3D Configurators in Twinmotion
Streams
Step-by-Step Guide to Building 3D Configurators in Twinmotion
Table of Contents
Did you know that 70% of consumers are more likely to purchase a product if they can customize it in real-time? In an age where personalization is everything, 3D configurators have become game-changers in industries ranging from automotive to furniture design. These interactive tools allow customers to experiment with different colors, materials, and features, making the experience not just engaging, but fun.
The demand for immersive, customizable experiences has never been higher. Whether you're designing a new car model or allowing a client to visualize their dream home, real-time customization is key to standing out. But how do you create an experience that’s seamless, intuitive, and visually stunning?
Enter Twinmotion. Twinmotion’s real-time rendering and intuitive interface make it the perfect tool to bring 3D configurators to life, offering endless possibilities for personalization. Let’s dive into how you can use Twinmotion to create your own interactive configurator.

Why Twinmotion?
When it comes to creating 3D configurators, Twinmotion stands out as a powerful yet user-friendly tool. It’s known for its real-time rendering, which means changes made to your design are instantly reflected in the 3D environment, giving users an interactive and fluid experience. And the best part? You don’t need to be a technical expert to use it.
Twinmotion offers a seamless workflow that integrates smoothly with popular design software like Revit, SketchUp, and Rhino. This compatibility ensures that whether you're starting from scratch or working with existing designs, the transition into Twinmotion is quick and hassle-free. Its drag-and-drop interface allows for simple customization without a steep learning curve, making it an ideal choice for designers, architects, and developers looking to create engaging 3D configurators.
But it's not just about ease of use. Twinmotion’s high-quality rendering ensures that your designs look realistic and polished, whether you’re showing off an architectural model or a product prototype. With its ability to handle complex lighting, textures, and environments in real-time, you’ll have no problem delivering a visually stunning and interactive experience for your clients.
In short, Twinmotion combines the best of both worlds: a high-powered, flexible design tool and an easy-to-use platform that doesn’t sacrifice quality for accessibility.
While Twinmotion excels in usability and real-time capabilities, it’s worth checking how it compares against other tools—this Lumion vs Twinmotion breakdown highlights the strengths of each platform.
Getting Started with Twinmotion
Before you can start creating your 3D configurator in Twinmotion, you need to get everything set up. Fortunately, the installation process is straightforward, and within a few steps, you’ll be ready to dive into the software.
Installation and System Requirements
First, make sure your system meets the minimum requirements to run Twinmotion smoothly. While Twinmotion can work with a range of hardware, having a solid GPU (preferably something from the NVIDIA GTX 1080 or higher) will ensure your projects run without lag, especially when dealing with complex scenes.
Once you’re ready, you can download the software directly from the Epic Games website or via the Twinmotion website. The installation process is simple, and the software is available for both Windows and macOS. After installation, you’ll be prompted to sign in, which allows you to access various online features, assets, and updates.

Having a solid GPU is key, but optimizing how Twinmotion uses it is even better—check out this guide on using your GPU efficiently in Twinmotion to avoid performance bottlenecks.
Exploring the Interface
When you first open Twinmotion, you'll be greeted by its clean, minimal interface. Don’t let the simplicity fool you—under the hood, Twinmotion is packed with powerful features. You'll see the main viewport where you can view and edit your scene, alongside the media dock for managing your assets, materials, and objects.
It’s important to spend some time getting familiar with the interface. Spend a few minutes navigating around, creating basic scenes, and testing out the tools. Twinmotion has a library of assets (like trees, people, furniture, and more), which you can drag and drop directly into your project. You’ll also find real-time lighting and rendering controls that allow you to see the changes to your design as you make them.

If you're aiming to get the most visual impact out of your project, fine-tuning the visuals goes a long way—especially when you're using the best render settings in Twinmotion to elevate lighting, reflections, and realism.
Compatibility with Other Software
Twinmotion integrates seamlessly with major 3D modeling software. If you’re already working with a tool like SketchUp, Revit, or Rhino, you can easily import your models into Twinmotion with just a click. The import process is smooth, and once your models are in the software, you can instantly start customizing and rendering them in real time.
If you're new to Twinmotion, I suggest starting with a simple project. Import a basic model and begin experimenting with materials, lighting, and camera angles. Trust me, getting hands-on right away is one of the best ways to learn.
Just getting started? These beginner tips to master Twinmotion will get you up to speed faster and help you avoid common pitfalls early on.
Creating Configurations in Twinmotion
Now that you’re set up and familiar with Twinmotion’s interface, let’s dive into creating your 3D configurator. This is where the magic happens, allowing users to interact with your design, customize it in real-time, and create something unique to their preferences.

Step-by-Step Guide to Creating Configurations
Access the Media Dock
The Media dock is your central hub for managing assets, materials, and settings. To start creating configurations, go to the configuration icon in the Media dock. This is where you’ll manage all the different states of your design, think of it as a virtual control panel for your configurator.Adding and Naming States
A "state" represents a specific version or variation of your design. You could have one state for a product in red, another in blue, or even one for different configurations of a room or car. To create a state, simply click Add New State, then give it a clear name, like “Red Interior” or “Convertible Roof.”Modifying the Design
Once you’ve created a state, you can make modifications. For example, you could change the color of a car, swap out materials for furniture, or adjust lighting for a more dramatic effect. Every change you make in Twinmotion is automatically saved to the selected state, ensuring each configuration stays distinct.Adding Materials and Properties
Twinmotion offers a vast library of materials, textures, and finishes that you can apply to your design. You can adjust properties such as reflectivity, transparency, and roughness to make sure your configurator looks as realistic as possible. For instance, if you’re designing a car, you could swap out paint colors, change the fabric on the seats, or adjust the car's rims, each as a different state in your configurator.Managing Multiple Configurations
As you add more states, it’s important to keep everything organized. You can easily manage multiple configurations by creating folders within the Media dock. This helps keep track of all the variations you’ve created, especially for larger projects. Plus, with Twinmotion’s real-time rendering, you’ll see the changes live as you tweak your design.
Tips for Managing Configurations
Name your states clearly: This will help you keep track of the various options your users can choose from. For example, use names like “Matte Black” or “Luxury Seats” to help distinguish between different configurations.
Be mindful of performance: While creating detailed and complex configurations is great, keep performance in mind. Too many high-resolution textures or complex models might cause lag, especially on lower-end systems. Keep things balanced to ensure smooth performance for the end-user.
Test each state: Once you’ve created several configurations, test them out. Navigate through each state to ensure everything is working smoothly. Check for any rendering issues or elements that may not be applying correctly.
Creating configurations in Twinmotion is an exciting process that brings your designs to life. By experimenting with different materials, lighting, and object properties, you can craft a fully interactive experience for your users. And best of all, Twinmotion’s intuitive tools make it easy to switch between configurations with minimal effort.
And if you ever run into hiccups during testing, here’s a handy guide to help you fix Twinmotion crashes quickly and keep your workflow moving smoothly.
Enhancing Interactivity with Triggers
To take your 3D configurator to the next level, you'll want to enhance the interactivity for your users. This is where triggers come into play. Triggers allow users to interact with different elements of your design, unlocking new states, revealing hidden objects, or modifying properties in real time.
What Are Triggers?
In simple terms, triggers are events that occur in response to a user’s action, like clicking a button, hovering over an object, or changing a slider value. These events can initiate actions such as swapping out a texture, changing a material, or even turning on and off various parts of your design.
Triggers can be applied to both 2D layers (like buttons or sliders) and 3D objects (like clickable parts of a model). They’re the secret sauce for creating a dynamic, interactive experience.
Types of Triggers
2D Layer Triggers
These are simple triggers applied to the 2D interface, like buttons or menu items. For instance, if you're designing a custom car configurator, clicking a button that says "Change Color" could trigger a series of pre-defined color states in the model.3D Object Triggers
More advanced triggers can be applied directly to the 3D model itself. This could involve clicking on a wheel of a car to change its design or interacting with a slider to adjust the brightness of a room's lighting. These triggers allow for more immersive experiences, as users are interacting directly with the model.
Setting Up Triggers in Twinmotion
Add a Trigger Object
To start, you need to choose what kind of trigger you want to create. If it’s a 2D button or slider, use the UI elements provided in Twinmotion. If it’s a 3D interaction, choose the object in your scene that you want users to interact with.Define the Action
Once your trigger object is selected, the next step is to define what happens when it's triggered. This could be anything from changing the color of a material to toggling the visibility of an object. For example, if you have a 3D chair configurator, clicking on the seat might change its fabric from leather to fabric or vice versa.Fine-Tuning the Trigger Settings
You can also customize the behavior of triggers, such as making an object appear or disappear depending on user input. Twinmotion allows you to set up conditional triggers, meaning certain actions only occur if specific criteria are met. This makes your configurator even more responsive and adaptable to user preferences.Test Your Triggers
Once you’ve set up the triggers, it’s essential to test them. Make sure that when a user clicks a button or object, the correct action is executed in real-time. Ensure that all interactions are smooth and that no triggers cause performance issues.

Best Practices for Using Triggers
Keep it intuitive: Don’t overcomplicate the interaction. Triggers should be easy for the user to understand and control. For example, clicking on a chair should instantly change its color, without any confusing steps in between.
Limit the number of triggers: Too many triggers can overwhelm the user and make the configurator feel cluttered. Focus on key interactions that add value to the experience.
Provide feedback: Users should know when a trigger has been activated. For example, change the button color when it's clicked, or display a visual cue (like a highlight or glow) when a 3D object is interactive.
Triggers are a game-changer when it comes to enhancing interactivity in your 3D configurators. By giving users the ability to customize and manipulate the design, you can create a more engaging and dynamic experience. Whether you’re using simple buttons or more complex 3D object triggers, the goal is to make the interaction feel natural and intuitive.
Best Practices for Effective Configurators
Creating an engaging and seamless 3D configurator goes beyond just adding features and triggers. To ensure your configurator delivers the best experience for your users, you need to follow some essential best practices that focus on usability, performance, and design. Here are a few key strategies to consider when crafting your configurator with Twinmotion:
#1. Design for the User
The most important aspect of any configurator is how user-friendly it is. The goal is to make the customization process as simple and intuitive as possible. Users should feel in control without getting bogged down in complicated menus or settings.
Minimalist Interface: Keep the interface clean and focused. Use simple controls like sliders, toggles, or buttons that clearly indicate what they do. Avoid cluttering the screen with too many options, as this can overwhelm users.
Feedback and Responsiveness: Ensure that the configurator gives users immediate feedback when they make a change. Whether it's a visual change in the 3D model or a color shift on a button, real-time feedback helps users feel confident in their choices.
Clear Instructions: If the configurator is more complex, consider including helpful tooltips, icons, or even a brief tutorial. This helps users quickly understand how to interact with the model without needing to figure everything out themselves.
#2. Optimize Performance
Performance is key, especially when working with high-quality 3D models and real-time rendering. A slow or laggy configurator will frustrate users and may cause them to abandon the experience.
Limit Asset Complexity: While it’s tempting to add highly detailed assets to make the configurator more lifelike, it’s important to balance visual fidelity with performance. High-poly models and large textures can significantly impact load times and frame rates.
Use Simplified Models Where Possible: Consider using lower-polygon models or simplifying objects that don’t require high levels of detail. For example, in a furniture configurator, the inside of a drawer may not need detailed textures or geometry, so keeping it simple can improve overall performance.
Lighting and Shadows: While realistic lighting is essential for showcasing materials, be mindful of the number of light sources in your scene. Excessive lighting or complex shadow calculations can degrade performance, so aim for efficient lighting setups that maintain the visual quality without overloading the system.
Test Across Devices: Since many users will interact with your configurator on different devices, it’s crucial to test across various platforms. Whether it’s a desktop, tablet, or mobile phone, the configurator should function smoothly on all devices. In particular, ensure that mobile versions aren’t too resource-intensive.

#3. Ensure Accessibility Across Devices
The goal is to make your configurator accessible not just on powerful desktop machines, but also on less powerful systems and mobile devices. Here’s how to ensure that everyone can enjoy the experience:
Mobile-Friendly Design: Ensure that your configurator adapts to smaller screens and touch controls. This might mean simplifying the UI for mobile users or offering touch-friendly controls like swiping or tapping instead of clicking.
Cross-Browser Compatibility: Your configurator should work on popular browsers like Chrome, Firefox, Safari, and Edge. Use web standards and test your configurator to avoid browser-specific issues.
Performance on Lower-End Devices: For users with older or lower-end devices, consider optimizing the assets and simplifying interactions. One approach is offering a “lite” version of your configurator that has reduced visual complexity but still offers a smooth experience.
#4. Maintain Visual Consistency
One of the most important aspects of a 3D configurator is the visual appeal. A polished, realistic appearance will make the experience more enjoyable for users and help them better visualize their customization choices.
Consistent Materials: Ensure that materials, textures, and finishes are applied consistently across your model. If you're designing a building, for example, make sure the wood, glass, and metal materials all look coherent together in terms of texture and reflectivity.
Lighting and Environment: Proper lighting is crucial to make your 3D model look realistic. A well-lit scene with accurate shadows and reflections will help users better visualize how the product will look in real life. Consider using HDRI lighting for realistic environmental reflections and accurate shadows.
Camera Views: Set up a range of camera angles to give users different perspectives on the product. If it's a car, allow users to rotate around it, zoom in on details, or switch between interior and exterior views. Giving users control over the camera lets them explore their creation in full detail.

#5. Iterate Based on Feedback
Once your configurator is live, don’t just leave it at that—gather feedback from users and make continuous improvements.
User Testing: Conduct user testing to find out where users struggle or encounter issues. Use this feedback to make your configurator even better, whether it’s simplifying navigation or speeding up performance.
Monitor Analytics: Use analytics to track how users are interacting with the configurator. Which features do they use the most? Where do they spend the most time? This data will help you understand how your users are engaging with the tool and what areas need more attention.
By focusing on simplicity, performance, and visual quality, you can create a 3D configurator in Twinmotion that’s not only powerful but also intuitive and accessible. Following these best practices will help ensure that your configurator provides an engaging experience for users while also being optimized for different devices and platforms.
Case Studies: Real-World Applications
Now that we’ve covered the fundamentals of creating a 3D configurator in Twinmotion, let’s take a look at some real-world applications where this technology has made a significant impact. From automotive design to interior decoration, the ability to create customized, interactive experiences is transforming how businesses engage with their customers.
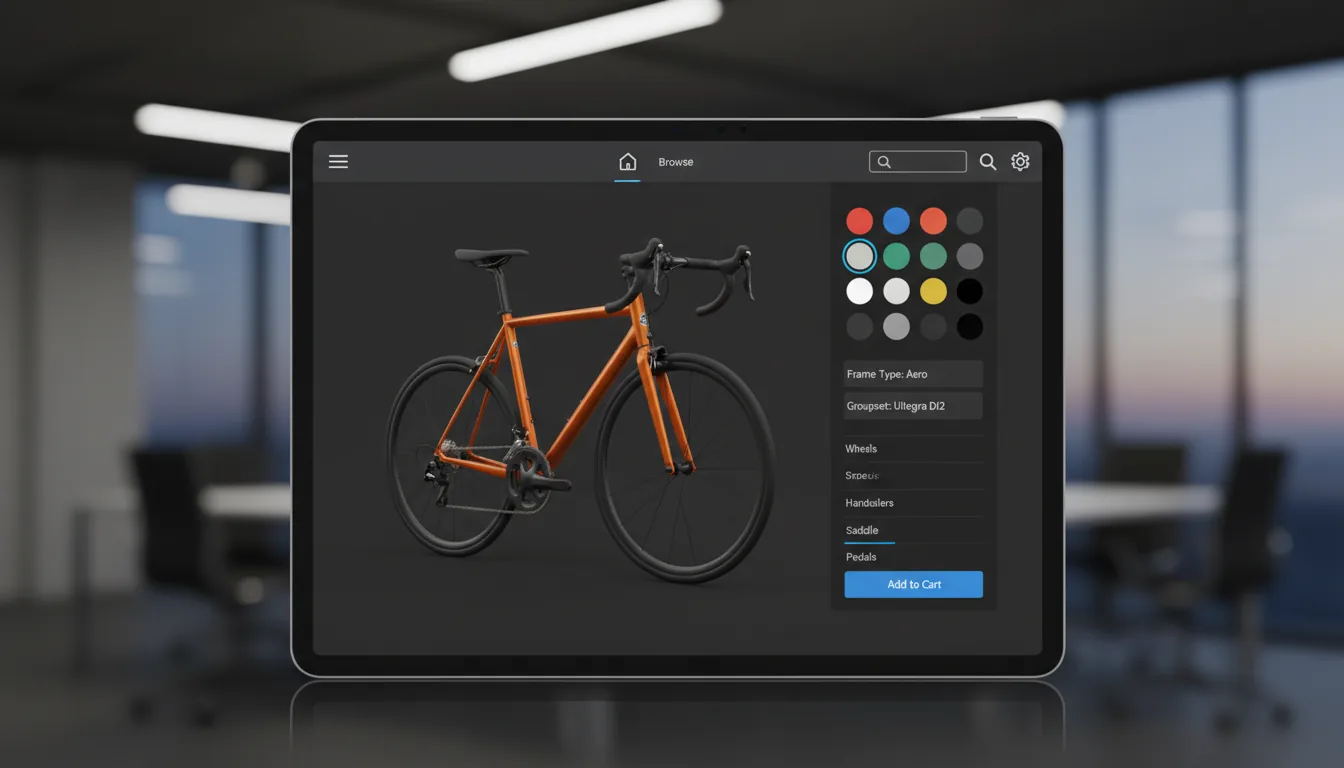
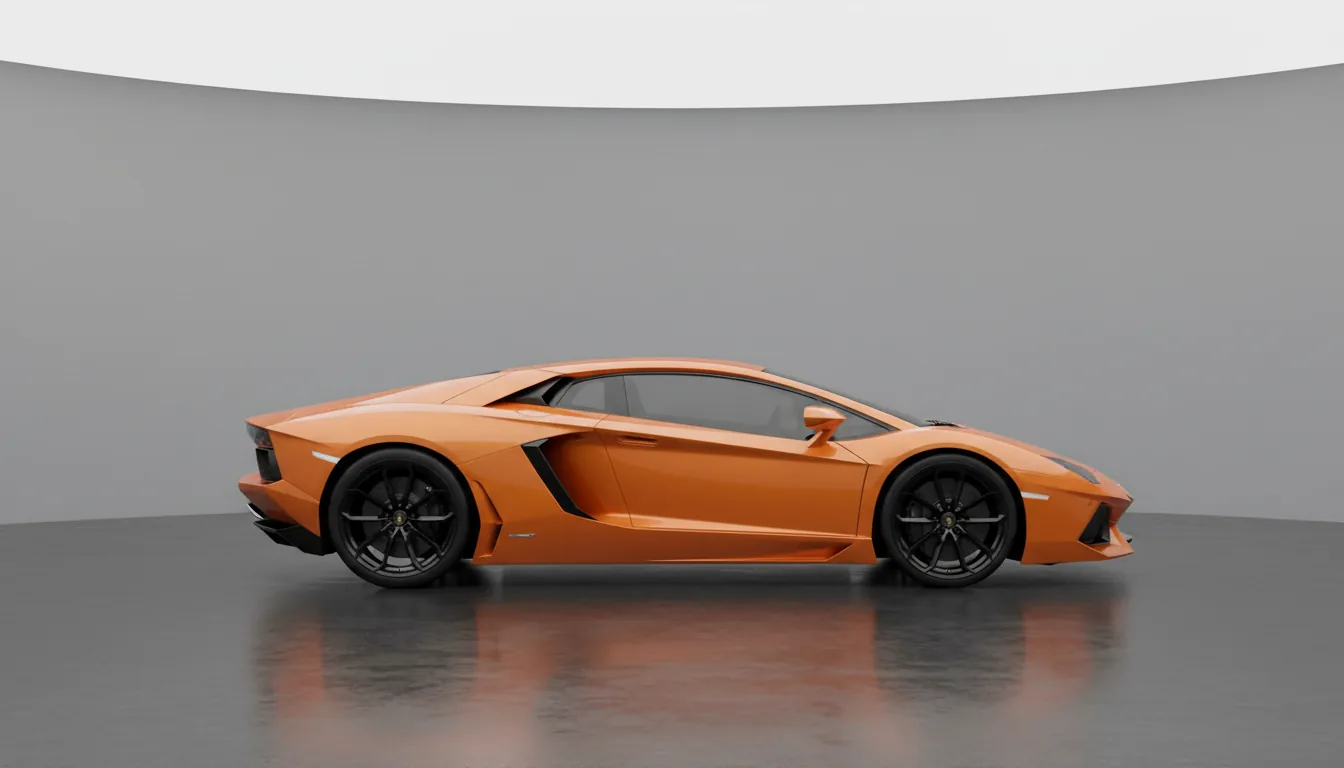
#1. Automotive Industry: Custom Car Configurators
In the automotive industry, 3D configurators are revolutionizing the car-buying experience. A great example of this is BMW’s online car configurator, which allows customers to customize every aspect of a vehicle, from the color of the exterior to the trim of the seats. By using Twinmotion, car manufacturers can create realistic, interactive models of their vehicles that customers can visualize in real-time.
For instance, BMW uses 3D configurators to showcase various customizations, such as exterior colors, wheel types, and interior materials. Twinmotion's real-time rendering helps customers make decisions by giving them a clear picture of how each configuration will look in a variety of lighting conditions, from bright sunlight to dusk. The process is seamless, allowing users to experiment with different configurations without waiting for slow render times.
Impact:
Higher Engagement: Customers are more engaged with the product when they can customize it in real-time, resulting in longer website visits and increased conversion rates.
Increased Sales: By providing a personalized experience, car manufacturers can drive more sales, as customers feel more invested in the product they’ve helped design.
Reduced Buyer’s Remorse: Customers have a better understanding of what they’re purchasing, leading to more informed decisions and fewer returns.
#2. Furniture Industry: Interactive Product Customization
Furniture companies are also using 3D configurators to allow customers to personalize their pieces. A company like IKEA can leverage Twinmotion to enable users to visualize how different fabric choices, sizes, and finishes will look in their homes.
Imagine a user browsing through an online furniture store. They can select a couch, change the upholstery, swap the legs, or adjust the dimensions, all while seeing how the product looks in a virtual room. By using Twinmotion’s integration with software like SketchUp, designers can create highly detailed, interactive product models. Customers can view their selected configuration from different angles, in various lighting conditions, and even try out different room environments before making a purchase.
Impact:
Better Decision Making: Customers can see their designs come to life in a virtual environment, helping them make confident choices before purchasing.
Increased Sales and Reduced Returns: By enabling users to experience a product in detail, companies can reduce the likelihood of returns and increase customer satisfaction.
Seamless Shopping Experience: With an easy-to-use configurator, customers are more likely to stay on the website longer, leading to higher conversion rates.

#3. Architecture and Real Estate: Virtual Tours and Customization
In the world of architecture and real estate, 3D configurators allow potential buyers to customize floor plans, materials, and finishes in a virtual model of a building. Companies are using Twinmotion to create interactive real estate tours that let users explore and modify a property to suit their needs.
Take, for example, a real estate developer offering a new set of apartments. Buyers can use a 3D configurator to select different kitchen layouts, wall colors, and flooring options. Twinmotion’s real-time rendering ensures that users can immediately see how their choices will look, whether they’re selecting kitchen cabinets or choosing the exterior façade.
Impact:
Enhanced Buyer Experience: Buyers can visualize their dream homes or office spaces before committing, increasing trust and satisfaction.
Faster Decision Making: Real-time customization helps users make faster decisions, speeding up the sales cycle and improving the customer experience.
Reduced Project Costs: With a 3D configurator, real estate developers can reduce the need for physical mockups or showroom visits, cutting down on overall project costs.

These case studies highlight the power of 3D configurators in various industries. Whether it's automotive, furniture, or real estate, businesses are seeing significant benefits by offering customers the ability to create personalized, interactive experiences. Twinmotion provides the perfect platform to make this happen, thanks to its real-time rendering capabilities and seamless integration with other design tools.
As the demand for customized products and experiences continues to grow, 3D configurators are becoming more important than ever. They not only improve the customer experience but also drive sales, reduce returns, and foster greater customer loyalty.
Sharing Your Configurator with Clients
Now that you've created an engaging and interactive 3D configurator in Twinmotion, it's time to share it with your clients. Whether you're presenting a new car model, a piece of furniture, or an architectural design, you’ll want to ensure that the process of sharing and interacting with the configurator is seamless, professional, and accessible.
Methods to Export and Share Twinmotion Projects
Twinmotion provides several ways to export and share your 3D configurators with clients, including videos, screenshots, and interactive 3D files. Here’s a breakdown of the most popular export methods:
Exporting Interactive Files
If you want clients to interact with the configurator themselves, you can export it as an interactive file. Twinmotion allows you to export projects as standalone executables for Windows or macOS. These standalone files can be run directly on a client’s machine without requiring the software to be installed. However, this method limits your control over accessibility, as clients must have the file and be able to run it locally.Exporting to the Cloud
For a more versatile approach, Twinmotion supports exporting files to Unreal Engine. This enables you to share your configurator via the cloud, allowing users to interact with it on any device, from a desktop to a tablet or even a mobile phone. This method gives you more flexibility but may require more technical knowledge or additional setup.Videos and Screenshots
If you're not looking for interactive sharing but still want to present your configurator in a polished, professional way, you can export videos or high-quality screenshots. These can be great for marketing materials or a client pitch where full interactivity isn’t necessary. Twinmotion’s cinematic rendering allows for ultra-realistic presentations with smooth camera movement and lighting.
Introducing Vagon Streams for Seamless Sharing
While the export options in Twinmotion are useful, they still have limitations when it comes to accessibility, performance, and scalability. That’s where Vagon Streams comes in. After creating your 3D configurator, you can use Vagon Streams to stream your interactive configurator directly to clients’ browsers, making it accessible anywhere without needing to download or install anything.
Why Vagon Streams?
No-Code Integration: With Vagon Streams, you can stream your 3D configurator to clients in minutes without any coding or complicated setup. It’s designed to be simple and quick, allowing you to focus on the design rather than the technicalities.
Global Accessibility: Vagon Streams ensures that your configurator can be accessed from anywhere, across multiple devices, at the same level of quality. Whether your client is using a high-end PC, a tablet, or even a mobile phone, they’ll experience the configurator as intended, with real-time rendering and smooth interaction.
High-Quality Streaming: Vagon Streams delivers high-quality streaming, so your configurator maintains its visual integrity, no matter the device. Users can interact with the 3D model, make real-time changes, and view the design from all angles, just like they would on a local machine.
Benefits of Using Vagon Streams
Faster Client Feedback: Clients can interact with the configurator as they wish, making it easier for them to give you real-time feedback. No more waiting for downloads or worrying about compatibility issues.
Easier Collaboration: Share your configurator with multiple stakeholders at once, even if they’re on different devices or in different locations. This is especially valuable for teams working remotely or clients with limited technical experience.
Streamlined Presentations: With Vagon Streams, you can easily present your configurator to potential clients during meetings or pitches without needing to worry about exporting files or dealing with complicated software setups.
By using Vagon Streams, you eliminate many of the logistical headaches involved in sharing complex 3D configurators. Your clients get the experience they expect, smooth, interactive, and easy to access, while you maintain control over the quality and consistency of your designs.
In summary, sharing your 3D configurator with clients doesn’t have to be complicated. Whether you choose to export the file directly, present it as a video, or use cloud-based solutions, the key is to make it as easy and accessible as possible for your audience. And when you incorporate Vagon Streams into the process, you streamline everything, ensuring your configurators reach your clients quickly, smoothly, and in high-quality, no matter where they are.
Final Thoughts
Creating a 3D configurator with Twinmotion opens up an exciting world of possibilities for designers, architects, and businesses alike. Whether you're building an interactive model of a car, a customizable piece of furniture, or a virtual real estate tour, Twinmotion’s powerful real-time rendering and ease of use allow you to bring your designs to life in ways that were once unimaginable.
By following the steps outlined in this guide, you can craft a highly interactive and visually stunning configurator that not only showcases your product but also offers users a hands-on, engaging experience. The best part? With Twinmotion's integration with various design tools and its intuitive interface, creating these experiences is now more accessible than ever, even if you don’t have a background in 3D modeling or rendering.
But the power of your configurator doesn’t stop at creation. To truly elevate the user experience and make your configurator accessible on any device, consider using Vagon Streams. With Vagon Streams, you can seamlessly stream your 3D models to clients and users worldwide, giving them access to a high-quality, interactive experience directly through their browser. No downloads, no complicated installations, just smooth, real-time performance, no matter where they are.

As demand for personalized and interactive experiences continues to grow across industries, 3D configurators are becoming an essential tool for engaging customers and driving sales. By combining the power of Twinmotion with the ease of sharing through Vagon Streams, you can ensure that your designs not only stand out but also deliver maximum impact.
So, what’s next? Dive in, experiment with your designs, and start creating configurators that will leave a lasting impression on your clients. The possibilities are limitless, and with the right tools at your disposal, you’ll be able to turn your vision into reality faster than ever.
FAQs
What is a 3D configurator, and why should I use it?
A 3D configurator is an interactive tool that allows users to customize a product in real time. Whether it's selecting colors, materials, or configurations, 3D configurators provide an engaging experience that helps customers visualize their choices before purchasing. Using a configurator can lead to higher engagement, better customer satisfaction, and increased sales, as users can personalize products to fit their exact needs.Can I use Twinmotion for creating product configurators in industries other than architecture?
Absolutely! While Twinmotion is popular in the architectural and real estate industries, it’s also incredibly effective for other industries like automotive, furniture, and consumer products. The software allows you to create high-quality, interactive 3D models that can be customized for various applications, from cars to home goods. The real-time rendering and ease of use make it an ideal tool for product configurators in virtually any field.Is Twinmotion easy to learn for beginners?
Yes! Twinmotion is designed to be user-friendly and accessible, even for those with little to no experience in 3D modeling. Its intuitive interface, drag-and-drop features, and simple controls make it easy for beginners to get started. There’s a bit of a learning curve, especially when you start incorporating more advanced features like triggers and custom materials, but overall, it’s a great tool for those new to 3D design.How do I share my Twinmotion configurator with clients?
You can share your Twinmotion configurator in several ways, such as exporting it as an interactive file or a video. However, for a seamless and scalable solution, using Vagon Streams to stream your configurator to clients is an excellent option. Vagon Streams allows clients to access the configurator directly through their web browser, eliminating the need for downloads or installations. It also ensures that the experience is smooth and high-quality, no matter the device.How does Vagon Streams improve the sharing of 3D configurators?
Vagon Streams makes it easier to share and stream 3D configurators by providing no-code integration, global accessibility, and high-quality streaming. Instead of dealing with the limitations of exporting large files or worrying about device compatibility, Vagon Streams ensures that your configurator is available anywhere, on any device, with consistent performance. It’s the perfect solution for reaching a wider audience and offering a seamless, interactive experience.Can I create complex configurations, like multiple customization options, in Twinmotion?
Yes, Twinmotion excels at handling complex configurations. You can set up multiple customization options, such as color, material, shape, and size, and allow users to interact with these options in real time. Twinmotion’s trigger and state management features enable you to easily set up these options and create a smooth, interactive experience. Whether you're designing a product or a space, you can create multiple layers of customization for your users.What are the system requirements for running Twinmotion?
To run Twinmotion effectively, you'll need a system with a decent GPU (NVIDIA GTX 1080 or higher recommended), 16 GB of RAM, and a fast SSD for optimal performance. Twinmotion is compatible with both Windows and macOS, but the performance will be notably better with a powerful system. If you’re working with very complex scenes or high-resolution textures, a stronger GPU and more RAM are advisable.
Did you know that 70% of consumers are more likely to purchase a product if they can customize it in real-time? In an age where personalization is everything, 3D configurators have become game-changers in industries ranging from automotive to furniture design. These interactive tools allow customers to experiment with different colors, materials, and features, making the experience not just engaging, but fun.
The demand for immersive, customizable experiences has never been higher. Whether you're designing a new car model or allowing a client to visualize their dream home, real-time customization is key to standing out. But how do you create an experience that’s seamless, intuitive, and visually stunning?
Enter Twinmotion. Twinmotion’s real-time rendering and intuitive interface make it the perfect tool to bring 3D configurators to life, offering endless possibilities for personalization. Let’s dive into how you can use Twinmotion to create your own interactive configurator.
Why Twinmotion?
When it comes to creating 3D configurators, Twinmotion stands out as a powerful yet user-friendly tool. It’s known for its real-time rendering, which means changes made to your design are instantly reflected in the 3D environment, giving users an interactive and fluid experience. And the best part? You don’t need to be a technical expert to use it.
Twinmotion offers a seamless workflow that integrates smoothly with popular design software like Revit, SketchUp, and Rhino. This compatibility ensures that whether you're starting from scratch or working with existing designs, the transition into Twinmotion is quick and hassle-free. Its drag-and-drop interface allows for simple customization without a steep learning curve, making it an ideal choice for designers, architects, and developers looking to create engaging 3D configurators.
But it's not just about ease of use. Twinmotion’s high-quality rendering ensures that your designs look realistic and polished, whether you’re showing off an architectural model or a product prototype. With its ability to handle complex lighting, textures, and environments in real-time, you’ll have no problem delivering a visually stunning and interactive experience for your clients.
In short, Twinmotion combines the best of both worlds: a high-powered, flexible design tool and an easy-to-use platform that doesn’t sacrifice quality for accessibility.
While Twinmotion excels in usability and real-time capabilities, it’s worth checking how it compares against other tools—this Lumion vs Twinmotion breakdown highlights the strengths of each platform.
Getting Started with Twinmotion
Before you can start creating your 3D configurator in Twinmotion, you need to get everything set up. Fortunately, the installation process is straightforward, and within a few steps, you’ll be ready to dive into the software.
Installation and System Requirements
First, make sure your system meets the minimum requirements to run Twinmotion smoothly. While Twinmotion can work with a range of hardware, having a solid GPU (preferably something from the NVIDIA GTX 1080 or higher) will ensure your projects run without lag, especially when dealing with complex scenes.
Once you’re ready, you can download the software directly from the Epic Games website or via the Twinmotion website. The installation process is simple, and the software is available for both Windows and macOS. After installation, you’ll be prompted to sign in, which allows you to access various online features, assets, and updates.
Having a solid GPU is key, but optimizing how Twinmotion uses it is even better—check out this guide on using your GPU efficiently in Twinmotion to avoid performance bottlenecks.
Exploring the Interface
When you first open Twinmotion, you'll be greeted by its clean, minimal interface. Don’t let the simplicity fool you—under the hood, Twinmotion is packed with powerful features. You'll see the main viewport where you can view and edit your scene, alongside the media dock for managing your assets, materials, and objects.
It’s important to spend some time getting familiar with the interface. Spend a few minutes navigating around, creating basic scenes, and testing out the tools. Twinmotion has a library of assets (like trees, people, furniture, and more), which you can drag and drop directly into your project. You’ll also find real-time lighting and rendering controls that allow you to see the changes to your design as you make them.
If you're aiming to get the most visual impact out of your project, fine-tuning the visuals goes a long way—especially when you're using the best render settings in Twinmotion to elevate lighting, reflections, and realism.
Compatibility with Other Software
Twinmotion integrates seamlessly with major 3D modeling software. If you’re already working with a tool like SketchUp, Revit, or Rhino, you can easily import your models into Twinmotion with just a click. The import process is smooth, and once your models are in the software, you can instantly start customizing and rendering them in real time.
If you're new to Twinmotion, I suggest starting with a simple project. Import a basic model and begin experimenting with materials, lighting, and camera angles. Trust me, getting hands-on right away is one of the best ways to learn.
Just getting started? These beginner tips to master Twinmotion will get you up to speed faster and help you avoid common pitfalls early on.
Creating Configurations in Twinmotion
Now that you’re set up and familiar with Twinmotion’s interface, let’s dive into creating your 3D configurator. This is where the magic happens, allowing users to interact with your design, customize it in real-time, and create something unique to their preferences.
Step-by-Step Guide to Creating Configurations
Access the Media Dock
The Media dock is your central hub for managing assets, materials, and settings. To start creating configurations, go to the configuration icon in the Media dock. This is where you’ll manage all the different states of your design, think of it as a virtual control panel for your configurator.Adding and Naming States
A "state" represents a specific version or variation of your design. You could have one state for a product in red, another in blue, or even one for different configurations of a room or car. To create a state, simply click Add New State, then give it a clear name, like “Red Interior” or “Convertible Roof.”Modifying the Design
Once you’ve created a state, you can make modifications. For example, you could change the color of a car, swap out materials for furniture, or adjust lighting for a more dramatic effect. Every change you make in Twinmotion is automatically saved to the selected state, ensuring each configuration stays distinct.Adding Materials and Properties
Twinmotion offers a vast library of materials, textures, and finishes that you can apply to your design. You can adjust properties such as reflectivity, transparency, and roughness to make sure your configurator looks as realistic as possible. For instance, if you’re designing a car, you could swap out paint colors, change the fabric on the seats, or adjust the car's rims, each as a different state in your configurator.Managing Multiple Configurations
As you add more states, it’s important to keep everything organized. You can easily manage multiple configurations by creating folders within the Media dock. This helps keep track of all the variations you’ve created, especially for larger projects. Plus, with Twinmotion’s real-time rendering, you’ll see the changes live as you tweak your design.
Tips for Managing Configurations
Name your states clearly: This will help you keep track of the various options your users can choose from. For example, use names like “Matte Black” or “Luxury Seats” to help distinguish between different configurations.
Be mindful of performance: While creating detailed and complex configurations is great, keep performance in mind. Too many high-resolution textures or complex models might cause lag, especially on lower-end systems. Keep things balanced to ensure smooth performance for the end-user.
Test each state: Once you’ve created several configurations, test them out. Navigate through each state to ensure everything is working smoothly. Check for any rendering issues or elements that may not be applying correctly.
Creating configurations in Twinmotion is an exciting process that brings your designs to life. By experimenting with different materials, lighting, and object properties, you can craft a fully interactive experience for your users. And best of all, Twinmotion’s intuitive tools make it easy to switch between configurations with minimal effort.
And if you ever run into hiccups during testing, here’s a handy guide to help you fix Twinmotion crashes quickly and keep your workflow moving smoothly.
Enhancing Interactivity with Triggers
To take your 3D configurator to the next level, you'll want to enhance the interactivity for your users. This is where triggers come into play. Triggers allow users to interact with different elements of your design, unlocking new states, revealing hidden objects, or modifying properties in real time.
What Are Triggers?
In simple terms, triggers are events that occur in response to a user’s action, like clicking a button, hovering over an object, or changing a slider value. These events can initiate actions such as swapping out a texture, changing a material, or even turning on and off various parts of your design.
Triggers can be applied to both 2D layers (like buttons or sliders) and 3D objects (like clickable parts of a model). They’re the secret sauce for creating a dynamic, interactive experience.
Types of Triggers
2D Layer Triggers
These are simple triggers applied to the 2D interface, like buttons or menu items. For instance, if you're designing a custom car configurator, clicking a button that says "Change Color" could trigger a series of pre-defined color states in the model.3D Object Triggers
More advanced triggers can be applied directly to the 3D model itself. This could involve clicking on a wheel of a car to change its design or interacting with a slider to adjust the brightness of a room's lighting. These triggers allow for more immersive experiences, as users are interacting directly with the model.
Setting Up Triggers in Twinmotion
Add a Trigger Object
To start, you need to choose what kind of trigger you want to create. If it’s a 2D button or slider, use the UI elements provided in Twinmotion. If it’s a 3D interaction, choose the object in your scene that you want users to interact with.Define the Action
Once your trigger object is selected, the next step is to define what happens when it's triggered. This could be anything from changing the color of a material to toggling the visibility of an object. For example, if you have a 3D chair configurator, clicking on the seat might change its fabric from leather to fabric or vice versa.Fine-Tuning the Trigger Settings
You can also customize the behavior of triggers, such as making an object appear or disappear depending on user input. Twinmotion allows you to set up conditional triggers, meaning certain actions only occur if specific criteria are met. This makes your configurator even more responsive and adaptable to user preferences.Test Your Triggers
Once you’ve set up the triggers, it’s essential to test them. Make sure that when a user clicks a button or object, the correct action is executed in real-time. Ensure that all interactions are smooth and that no triggers cause performance issues.
Best Practices for Using Triggers
Keep it intuitive: Don’t overcomplicate the interaction. Triggers should be easy for the user to understand and control. For example, clicking on a chair should instantly change its color, without any confusing steps in between.
Limit the number of triggers: Too many triggers can overwhelm the user and make the configurator feel cluttered. Focus on key interactions that add value to the experience.
Provide feedback: Users should know when a trigger has been activated. For example, change the button color when it's clicked, or display a visual cue (like a highlight or glow) when a 3D object is interactive.
Triggers are a game-changer when it comes to enhancing interactivity in your 3D configurators. By giving users the ability to customize and manipulate the design, you can create a more engaging and dynamic experience. Whether you’re using simple buttons or more complex 3D object triggers, the goal is to make the interaction feel natural and intuitive.
Best Practices for Effective Configurators
Creating an engaging and seamless 3D configurator goes beyond just adding features and triggers. To ensure your configurator delivers the best experience for your users, you need to follow some essential best practices that focus on usability, performance, and design. Here are a few key strategies to consider when crafting your configurator with Twinmotion:
#1. Design for the User
The most important aspect of any configurator is how user-friendly it is. The goal is to make the customization process as simple and intuitive as possible. Users should feel in control without getting bogged down in complicated menus or settings.
Minimalist Interface: Keep the interface clean and focused. Use simple controls like sliders, toggles, or buttons that clearly indicate what they do. Avoid cluttering the screen with too many options, as this can overwhelm users.
Feedback and Responsiveness: Ensure that the configurator gives users immediate feedback when they make a change. Whether it's a visual change in the 3D model or a color shift on a button, real-time feedback helps users feel confident in their choices.
Clear Instructions: If the configurator is more complex, consider including helpful tooltips, icons, or even a brief tutorial. This helps users quickly understand how to interact with the model without needing to figure everything out themselves.
#2. Optimize Performance
Performance is key, especially when working with high-quality 3D models and real-time rendering. A slow or laggy configurator will frustrate users and may cause them to abandon the experience.
Limit Asset Complexity: While it’s tempting to add highly detailed assets to make the configurator more lifelike, it’s important to balance visual fidelity with performance. High-poly models and large textures can significantly impact load times and frame rates.
Use Simplified Models Where Possible: Consider using lower-polygon models or simplifying objects that don’t require high levels of detail. For example, in a furniture configurator, the inside of a drawer may not need detailed textures or geometry, so keeping it simple can improve overall performance.
Lighting and Shadows: While realistic lighting is essential for showcasing materials, be mindful of the number of light sources in your scene. Excessive lighting or complex shadow calculations can degrade performance, so aim for efficient lighting setups that maintain the visual quality without overloading the system.
Test Across Devices: Since many users will interact with your configurator on different devices, it’s crucial to test across various platforms. Whether it’s a desktop, tablet, or mobile phone, the configurator should function smoothly on all devices. In particular, ensure that mobile versions aren’t too resource-intensive.
#3. Ensure Accessibility Across Devices
The goal is to make your configurator accessible not just on powerful desktop machines, but also on less powerful systems and mobile devices. Here’s how to ensure that everyone can enjoy the experience:
Mobile-Friendly Design: Ensure that your configurator adapts to smaller screens and touch controls. This might mean simplifying the UI for mobile users or offering touch-friendly controls like swiping or tapping instead of clicking.
Cross-Browser Compatibility: Your configurator should work on popular browsers like Chrome, Firefox, Safari, and Edge. Use web standards and test your configurator to avoid browser-specific issues.
Performance on Lower-End Devices: For users with older or lower-end devices, consider optimizing the assets and simplifying interactions. One approach is offering a “lite” version of your configurator that has reduced visual complexity but still offers a smooth experience.
#4. Maintain Visual Consistency
One of the most important aspects of a 3D configurator is the visual appeal. A polished, realistic appearance will make the experience more enjoyable for users and help them better visualize their customization choices.
Consistent Materials: Ensure that materials, textures, and finishes are applied consistently across your model. If you're designing a building, for example, make sure the wood, glass, and metal materials all look coherent together in terms of texture and reflectivity.
Lighting and Environment: Proper lighting is crucial to make your 3D model look realistic. A well-lit scene with accurate shadows and reflections will help users better visualize how the product will look in real life. Consider using HDRI lighting for realistic environmental reflections and accurate shadows.
Camera Views: Set up a range of camera angles to give users different perspectives on the product. If it's a car, allow users to rotate around it, zoom in on details, or switch between interior and exterior views. Giving users control over the camera lets them explore their creation in full detail.
#5. Iterate Based on Feedback
Once your configurator is live, don’t just leave it at that—gather feedback from users and make continuous improvements.
User Testing: Conduct user testing to find out where users struggle or encounter issues. Use this feedback to make your configurator even better, whether it’s simplifying navigation or speeding up performance.
Monitor Analytics: Use analytics to track how users are interacting with the configurator. Which features do they use the most? Where do they spend the most time? This data will help you understand how your users are engaging with the tool and what areas need more attention.
By focusing on simplicity, performance, and visual quality, you can create a 3D configurator in Twinmotion that’s not only powerful but also intuitive and accessible. Following these best practices will help ensure that your configurator provides an engaging experience for users while also being optimized for different devices and platforms.
Case Studies: Real-World Applications
Now that we’ve covered the fundamentals of creating a 3D configurator in Twinmotion, let’s take a look at some real-world applications where this technology has made a significant impact. From automotive design to interior decoration, the ability to create customized, interactive experiences is transforming how businesses engage with their customers.
#1. Automotive Industry: Custom Car Configurators
In the automotive industry, 3D configurators are revolutionizing the car-buying experience. A great example of this is BMW’s online car configurator, which allows customers to customize every aspect of a vehicle, from the color of the exterior to the trim of the seats. By using Twinmotion, car manufacturers can create realistic, interactive models of their vehicles that customers can visualize in real-time.
For instance, BMW uses 3D configurators to showcase various customizations, such as exterior colors, wheel types, and interior materials. Twinmotion's real-time rendering helps customers make decisions by giving them a clear picture of how each configuration will look in a variety of lighting conditions, from bright sunlight to dusk. The process is seamless, allowing users to experiment with different configurations without waiting for slow render times.
Impact:
Higher Engagement: Customers are more engaged with the product when they can customize it in real-time, resulting in longer website visits and increased conversion rates.
Increased Sales: By providing a personalized experience, car manufacturers can drive more sales, as customers feel more invested in the product they’ve helped design.
Reduced Buyer’s Remorse: Customers have a better understanding of what they’re purchasing, leading to more informed decisions and fewer returns.
#2. Furniture Industry: Interactive Product Customization
Furniture companies are also using 3D configurators to allow customers to personalize their pieces. A company like IKEA can leverage Twinmotion to enable users to visualize how different fabric choices, sizes, and finishes will look in their homes.
Imagine a user browsing through an online furniture store. They can select a couch, change the upholstery, swap the legs, or adjust the dimensions, all while seeing how the product looks in a virtual room. By using Twinmotion’s integration with software like SketchUp, designers can create highly detailed, interactive product models. Customers can view their selected configuration from different angles, in various lighting conditions, and even try out different room environments before making a purchase.
Impact:
Better Decision Making: Customers can see their designs come to life in a virtual environment, helping them make confident choices before purchasing.
Increased Sales and Reduced Returns: By enabling users to experience a product in detail, companies can reduce the likelihood of returns and increase customer satisfaction.
Seamless Shopping Experience: With an easy-to-use configurator, customers are more likely to stay on the website longer, leading to higher conversion rates.
#3. Architecture and Real Estate: Virtual Tours and Customization
In the world of architecture and real estate, 3D configurators allow potential buyers to customize floor plans, materials, and finishes in a virtual model of a building. Companies are using Twinmotion to create interactive real estate tours that let users explore and modify a property to suit their needs.
Take, for example, a real estate developer offering a new set of apartments. Buyers can use a 3D configurator to select different kitchen layouts, wall colors, and flooring options. Twinmotion’s real-time rendering ensures that users can immediately see how their choices will look, whether they’re selecting kitchen cabinets or choosing the exterior façade.
Impact:
Enhanced Buyer Experience: Buyers can visualize their dream homes or office spaces before committing, increasing trust and satisfaction.
Faster Decision Making: Real-time customization helps users make faster decisions, speeding up the sales cycle and improving the customer experience.
Reduced Project Costs: With a 3D configurator, real estate developers can reduce the need for physical mockups or showroom visits, cutting down on overall project costs.
These case studies highlight the power of 3D configurators in various industries. Whether it's automotive, furniture, or real estate, businesses are seeing significant benefits by offering customers the ability to create personalized, interactive experiences. Twinmotion provides the perfect platform to make this happen, thanks to its real-time rendering capabilities and seamless integration with other design tools.
As the demand for customized products and experiences continues to grow, 3D configurators are becoming more important than ever. They not only improve the customer experience but also drive sales, reduce returns, and foster greater customer loyalty.
Sharing Your Configurator with Clients
Now that you've created an engaging and interactive 3D configurator in Twinmotion, it's time to share it with your clients. Whether you're presenting a new car model, a piece of furniture, or an architectural design, you’ll want to ensure that the process of sharing and interacting with the configurator is seamless, professional, and accessible.
Methods to Export and Share Twinmotion Projects
Twinmotion provides several ways to export and share your 3D configurators with clients, including videos, screenshots, and interactive 3D files. Here’s a breakdown of the most popular export methods:
Exporting Interactive Files
If you want clients to interact with the configurator themselves, you can export it as an interactive file. Twinmotion allows you to export projects as standalone executables for Windows or macOS. These standalone files can be run directly on a client’s machine without requiring the software to be installed. However, this method limits your control over accessibility, as clients must have the file and be able to run it locally.Exporting to the Cloud
For a more versatile approach, Twinmotion supports exporting files to Unreal Engine. This enables you to share your configurator via the cloud, allowing users to interact with it on any device, from a desktop to a tablet or even a mobile phone. This method gives you more flexibility but may require more technical knowledge or additional setup.Videos and Screenshots
If you're not looking for interactive sharing but still want to present your configurator in a polished, professional way, you can export videos or high-quality screenshots. These can be great for marketing materials or a client pitch where full interactivity isn’t necessary. Twinmotion’s cinematic rendering allows for ultra-realistic presentations with smooth camera movement and lighting.
Introducing Vagon Streams for Seamless Sharing
While the export options in Twinmotion are useful, they still have limitations when it comes to accessibility, performance, and scalability. That’s where Vagon Streams comes in. After creating your 3D configurator, you can use Vagon Streams to stream your interactive configurator directly to clients’ browsers, making it accessible anywhere without needing to download or install anything.
Why Vagon Streams?
No-Code Integration: With Vagon Streams, you can stream your 3D configurator to clients in minutes without any coding or complicated setup. It’s designed to be simple and quick, allowing you to focus on the design rather than the technicalities.
Global Accessibility: Vagon Streams ensures that your configurator can be accessed from anywhere, across multiple devices, at the same level of quality. Whether your client is using a high-end PC, a tablet, or even a mobile phone, they’ll experience the configurator as intended, with real-time rendering and smooth interaction.
High-Quality Streaming: Vagon Streams delivers high-quality streaming, so your configurator maintains its visual integrity, no matter the device. Users can interact with the 3D model, make real-time changes, and view the design from all angles, just like they would on a local machine.
Benefits of Using Vagon Streams
Faster Client Feedback: Clients can interact with the configurator as they wish, making it easier for them to give you real-time feedback. No more waiting for downloads or worrying about compatibility issues.
Easier Collaboration: Share your configurator with multiple stakeholders at once, even if they’re on different devices or in different locations. This is especially valuable for teams working remotely or clients with limited technical experience.
Streamlined Presentations: With Vagon Streams, you can easily present your configurator to potential clients during meetings or pitches without needing to worry about exporting files or dealing with complicated software setups.
By using Vagon Streams, you eliminate many of the logistical headaches involved in sharing complex 3D configurators. Your clients get the experience they expect, smooth, interactive, and easy to access, while you maintain control over the quality and consistency of your designs.
In summary, sharing your 3D configurator with clients doesn’t have to be complicated. Whether you choose to export the file directly, present it as a video, or use cloud-based solutions, the key is to make it as easy and accessible as possible for your audience. And when you incorporate Vagon Streams into the process, you streamline everything, ensuring your configurators reach your clients quickly, smoothly, and in high-quality, no matter where they are.
Final Thoughts
Creating a 3D configurator with Twinmotion opens up an exciting world of possibilities for designers, architects, and businesses alike. Whether you're building an interactive model of a car, a customizable piece of furniture, or a virtual real estate tour, Twinmotion’s powerful real-time rendering and ease of use allow you to bring your designs to life in ways that were once unimaginable.
By following the steps outlined in this guide, you can craft a highly interactive and visually stunning configurator that not only showcases your product but also offers users a hands-on, engaging experience. The best part? With Twinmotion's integration with various design tools and its intuitive interface, creating these experiences is now more accessible than ever, even if you don’t have a background in 3D modeling or rendering.
But the power of your configurator doesn’t stop at creation. To truly elevate the user experience and make your configurator accessible on any device, consider using Vagon Streams. With Vagon Streams, you can seamlessly stream your 3D models to clients and users worldwide, giving them access to a high-quality, interactive experience directly through their browser. No downloads, no complicated installations, just smooth, real-time performance, no matter where they are.
As demand for personalized and interactive experiences continues to grow across industries, 3D configurators are becoming an essential tool for engaging customers and driving sales. By combining the power of Twinmotion with the ease of sharing through Vagon Streams, you can ensure that your designs not only stand out but also deliver maximum impact.
So, what’s next? Dive in, experiment with your designs, and start creating configurators that will leave a lasting impression on your clients. The possibilities are limitless, and with the right tools at your disposal, you’ll be able to turn your vision into reality faster than ever.
FAQs
What is a 3D configurator, and why should I use it?
A 3D configurator is an interactive tool that allows users to customize a product in real time. Whether it's selecting colors, materials, or configurations, 3D configurators provide an engaging experience that helps customers visualize their choices before purchasing. Using a configurator can lead to higher engagement, better customer satisfaction, and increased sales, as users can personalize products to fit their exact needs.Can I use Twinmotion for creating product configurators in industries other than architecture?
Absolutely! While Twinmotion is popular in the architectural and real estate industries, it’s also incredibly effective for other industries like automotive, furniture, and consumer products. The software allows you to create high-quality, interactive 3D models that can be customized for various applications, from cars to home goods. The real-time rendering and ease of use make it an ideal tool for product configurators in virtually any field.Is Twinmotion easy to learn for beginners?
Yes! Twinmotion is designed to be user-friendly and accessible, even for those with little to no experience in 3D modeling. Its intuitive interface, drag-and-drop features, and simple controls make it easy for beginners to get started. There’s a bit of a learning curve, especially when you start incorporating more advanced features like triggers and custom materials, but overall, it’s a great tool for those new to 3D design.How do I share my Twinmotion configurator with clients?
You can share your Twinmotion configurator in several ways, such as exporting it as an interactive file or a video. However, for a seamless and scalable solution, using Vagon Streams to stream your configurator to clients is an excellent option. Vagon Streams allows clients to access the configurator directly through their web browser, eliminating the need for downloads or installations. It also ensures that the experience is smooth and high-quality, no matter the device.How does Vagon Streams improve the sharing of 3D configurators?
Vagon Streams makes it easier to share and stream 3D configurators by providing no-code integration, global accessibility, and high-quality streaming. Instead of dealing with the limitations of exporting large files or worrying about device compatibility, Vagon Streams ensures that your configurator is available anywhere, on any device, with consistent performance. It’s the perfect solution for reaching a wider audience and offering a seamless, interactive experience.Can I create complex configurations, like multiple customization options, in Twinmotion?
Yes, Twinmotion excels at handling complex configurations. You can set up multiple customization options, such as color, material, shape, and size, and allow users to interact with these options in real time. Twinmotion’s trigger and state management features enable you to easily set up these options and create a smooth, interactive experience. Whether you're designing a product or a space, you can create multiple layers of customization for your users.What are the system requirements for running Twinmotion?
To run Twinmotion effectively, you'll need a system with a decent GPU (NVIDIA GTX 1080 or higher recommended), 16 GB of RAM, and a fast SSD for optimal performance. Twinmotion is compatible with both Windows and macOS, but the performance will be notably better with a powerful system. If you’re working with very complex scenes or high-resolution textures, a stronger GPU and more RAM are advisable.
Scalable Pixel and Application Streaming
Run your Unity or Unreal Engine application on any device, share with your clients in minutes, with no coding.

Summarize with AI

Ready to focus on your creativity?
Vagon gives you the ability to create & render projects, collaborate, and stream applications with the power of the best hardware.

Vagon Blog


Run heavy applications on any device with
your personal computer on the cloud.
San Francisco, California
Solutions
Vagon Teams
Vagon Streams
Use Cases
Resources
Vagon Blog
How to Run Inkscape on a Cloud Ubuntu Desktop (2026 Guide)
How to Run Krita on a Cloud Ubuntu Desktop for Digital Painting (2026 Guide)
How to Run GIMP on a Cloud Ubuntu Desktop (2026 Guide)
How to Run Jupyter on a Cloud GPU Linux Desktop (2026 Guide)
Vagon vs GitHub Codespaces: Cloud Dev Environments Compared (2026)
Vagon vs RunPod: Which Cloud GPU Is Right for You? (2026 Comparison)
How to Watch Your AI Agent Work on a Cloud Ubuntu Desktop (2026 Guide)
How to Run a Local LLM on Ubuntu in the Cloud (2026 Guide)
How to Run Blender on a Cloud GPU (Ubuntu): The Complete 2026 Guide
Vagon Blog
Run heavy applications on any device with
your personal computer on the cloud.
San Francisco, California
Solutions
Vagon Teams
Vagon Streams
Use Cases
Resources
Vagon Blog