Instant Connection for Pixel Streaming
— New Feature Automated Setup

How to Render Faster in Blender 3D
How to Render Faster in Blender 3D
How to Render Faster in Blender 3D
Published on January 21, 2026
Table of Contents
I still remember the render that finally broke my patience. Not because it failed. Because it didn’t. It just kept going. Fans at full speed, Blender crawling through noisy tiles, and I hadn’t even started serious lighting yet. That’s when it clicked. Most slow renders aren’t bad luck. They’re self-inflicted.
If you’ve used Blender for a while, you know the routine. Change one thing, hit render, wait… and wait. Eventually you stop experimenting because every tweak costs time. That’s how good ideas die quietly.
The problem usually isn’t Blender. It’s how we use it. Default settings that favor safety over speed. Samples pushed way past what the eye can see. Features left on “just in case.” And when things get slow, hardware takes the blame.
Sometimes hardware is the limit. Often it isn’t. Not yet.
Rendering faster isn’t about a magic checkbox. It’s about stacking small, unglamorous decisions that add up. Lowering numbers. Turning things off. Accepting that perfect realism is rarely worth double the render time.
If you’ve ever stared at a render progress bar thinking there has to be a better way, you’re not wrong. Let’s talk about the things that actually make Blender render faster.
Tip 1: Choose the Right Render Engine Before Anything Else
This sounds obvious, but I think a lot of people get this wrong early and then spend hours optimizing the wrong engine.
Cycles and Eevee are not just two ways to render the same thing. They’re two completely different mindsets. Cycles is a physically based path tracer. It simulates light bouncing around the scene, which is why it looks great and also why it can be painfully slow. Eevee is a real-time engine. It cheats. Constantly. And that’s not an insult. That’s the point.
If you start every project in Cycles by default, you’re already choosing slower feedback. Sometimes that’s fine. Product shots, close-up realism, heavy global illumination. Cycles earns its keep there. But I’ve seen people render motion graphics, stylized scenes, even simple architectural previews in Cycles just because that’s what they’re used to. That’s wasted time.
Eevee, on the other hand, is insanely fast when you work with it instead of against it. If your scene doesn’t rely on complex indirect lighting, caustics, or ultra-realistic light behavior, Eevee might get you 90 percent of the look in a fraction of the time. Especially for animations, previews, and client iterations.
Here’s a habit that helped me a lot. Start in Eevee by default. Block lighting, materials, and camera there. If the scene clearly needs Cycles later, switch engines once the look is mostly locked. Not before. You’ll iterate faster and make better decisions because you’re not waiting on every change.
Also worth saying. Switching engines late is not a failure. It’s strategy. The fastest render is the one you don’t have to redo.
Before touching samples, bounces, or denoising, ask yourself one simple question. Do I actually need Cycles for this shot? If the answer is “maybe,” start with Eevee. You can always go slower later.
If you’re still unsure which engine fits your project, this breakdown of the best Blender render engines is worth a look before you lock anything in.
Tip 2: Switch to GPU Rendering
This one still surprises me. Every year I meet Blender users who are doing everything right and then quietly rendering on the CPU.
Cycles is built to take advantage of GPUs. Modern GPUs can handle thousands of light calculations in parallel, which is exactly what path tracing needs. CPUs are great at many things. Rendering isn’t one of them. At least not compared to a decent GPU.
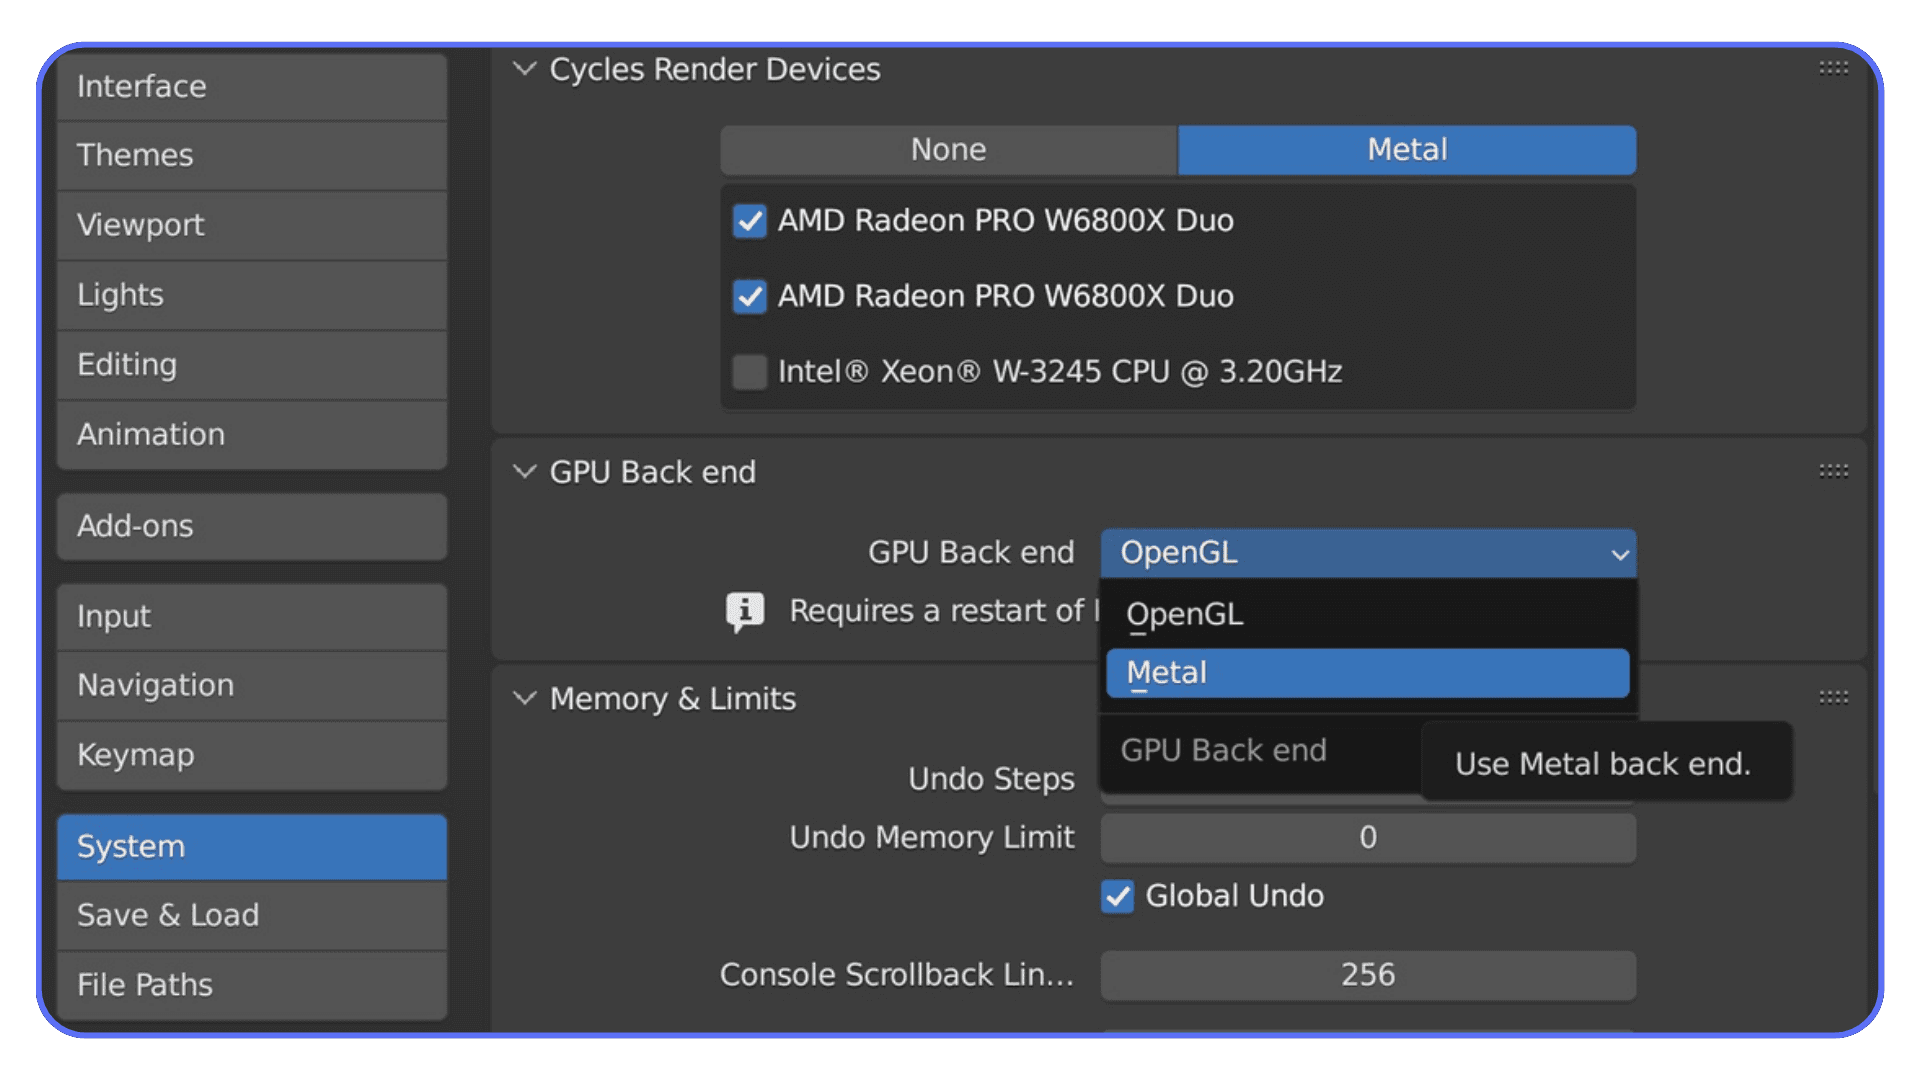
If you’re using Cycles and your renders feel painfully slow, the first thing to check is simple. Go to Preferences, System, and see what’s selected under Cycles Render Devices. If it says CPU, that’s your problem. Switch to GPU and pick the backend that matches your card. CUDA or OptiX for NVIDIA. HIP for AMD. Metal if you’re on a newer Mac.
The difference is not subtle. I’ve seen scenes drop from 20 minutes to under 5 just by switching to GPU. Same scene. Same settings. Completely different experience.
OptiX deserves a quick mention if you’re on NVIDIA. It’s not just about speed. OptiX also enables hardware-accelerated denoising, which can let you get away with even lower samples later. That’s a double win.
There are a couple of caveats. GPU rendering is limited by VRAM. If your scene is huge and blows past your GPU memory, Blender will fall back to slower behavior or fail outright. In those cases, CPU rendering can be more stable. But that’s the exception, not the rule.
My rule of thumb is simple. If your GPU can hold the scene, use it. Only fall back to CPU when you have a clear reason. Rendering on the CPU “just in case” is almost never worth the time you lose.
Before tweaking anything else, make sure Blender is actually using the fastest hardware you already own.
Tip 3: Turn On Denoising Earlier Than You Think
A lot of people treat denoising like a last resort. As if it’s cheating. In my experience, that mindset costs more render time than almost anything else.
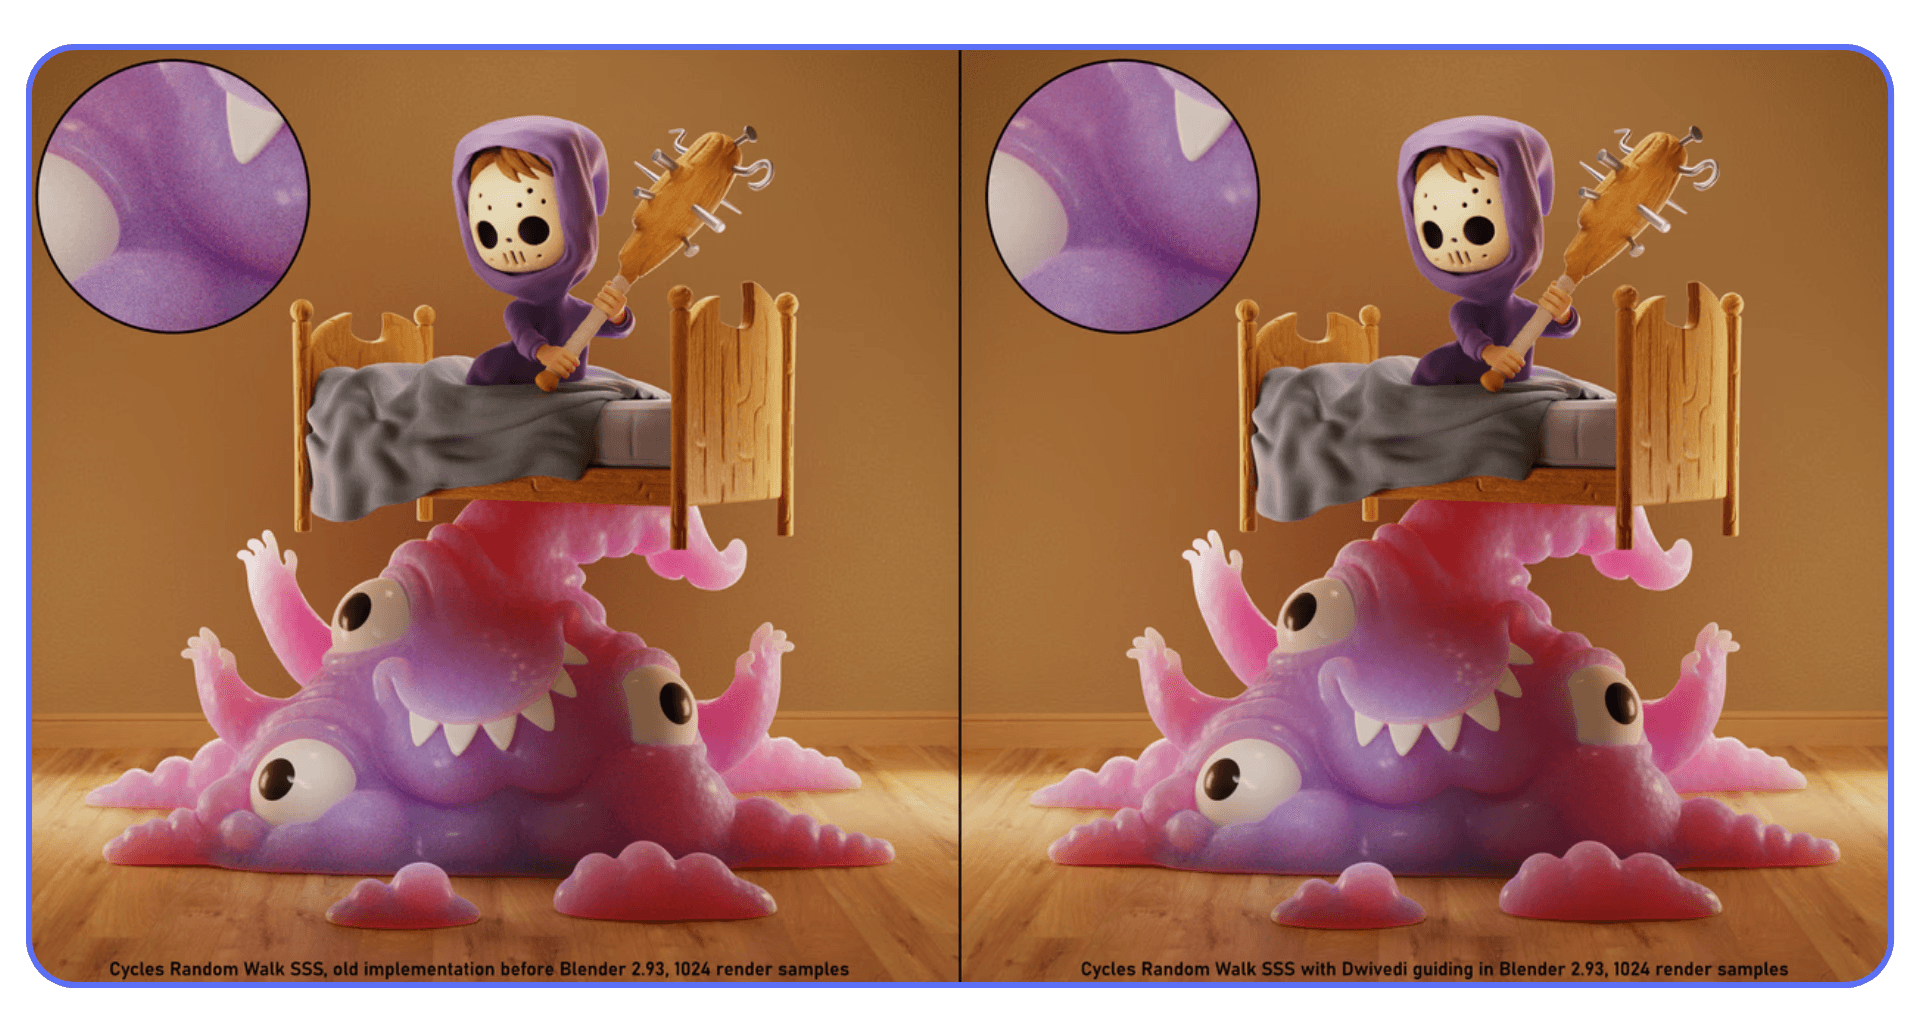
Noise is scary because it feels like a quality problem. So people respond by cranking samples. Two hundred. Five hundred. A thousand. The render gets cleaner, sure, but the time explodes. Meanwhile, most of that extra detail disappears the moment the image leaves Blender.
Modern denoisers are good. Really good. OpenImageDenoise and OptiX can clean up surprisingly rough renders without destroying detail, especially in still images. The trick is to stop thinking of denoising as a fix for bad renders and start thinking of it as part of the pipeline.
Here’s what I usually do. I enable denoising almost immediately, then lower samples until the image starts to fall apart. Once it does, I bump samples back up just enough to give the denoiser something to work with. That number is almost always much lower than people expect.
For stills, you can often get away with 64 to 128 samples with denoising and end up with an image that looks nearly identical to a 500-sample render. For animations, you need to be more careful, but even there, denoising plus moderate samples usually beats brute force.
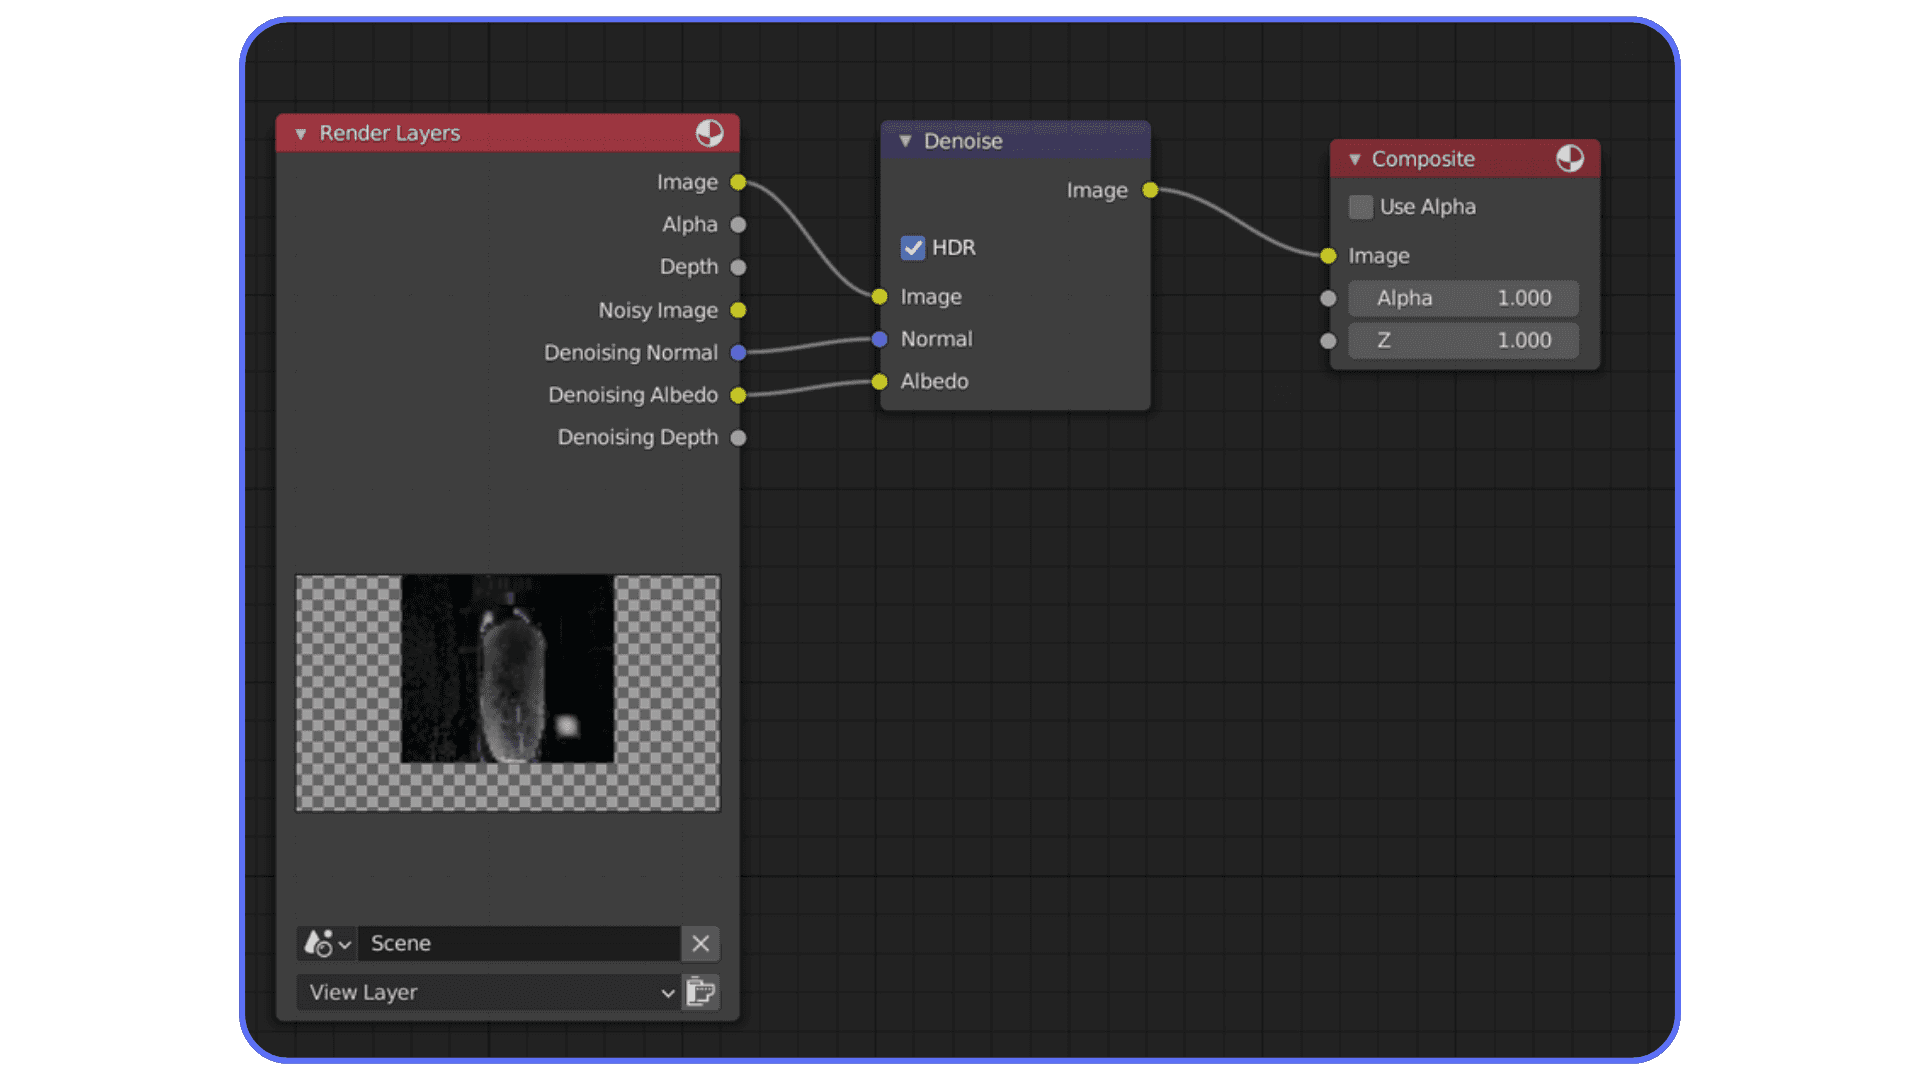
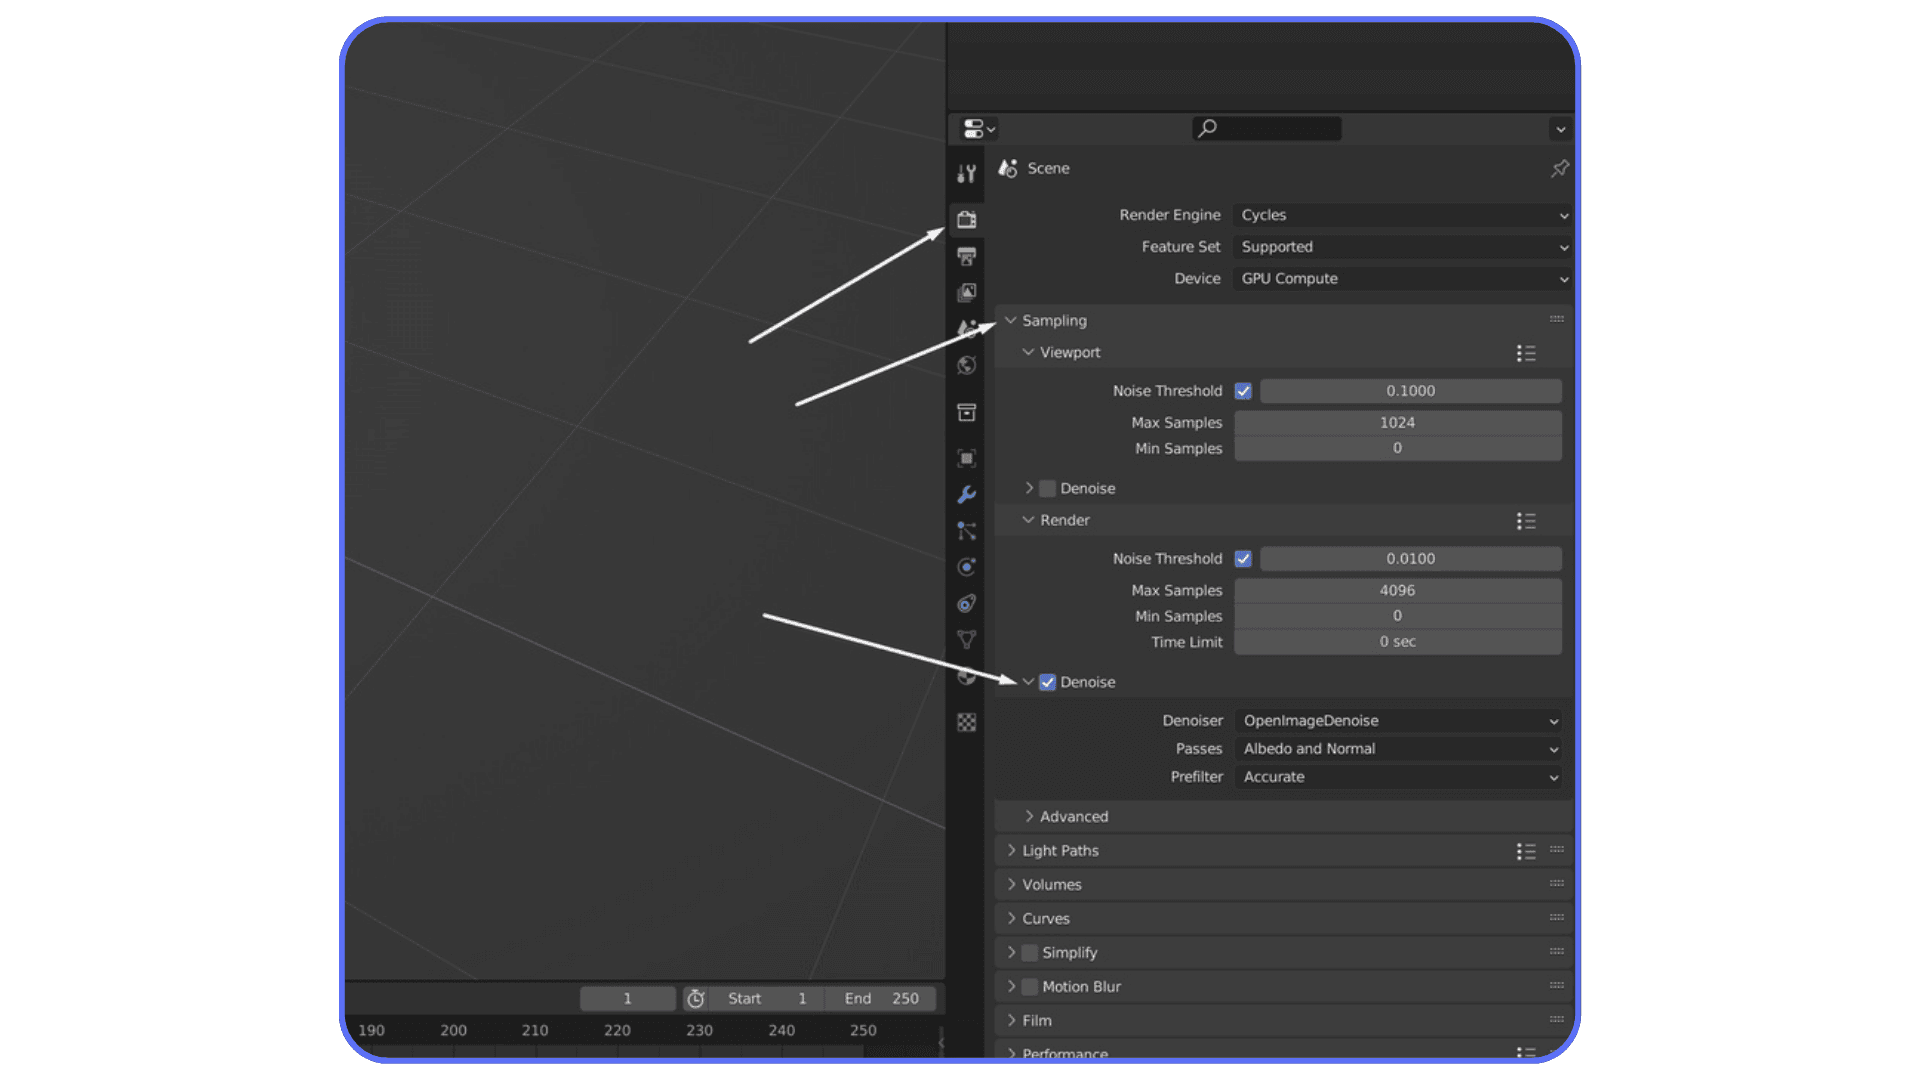
One important detail. Denoising works best when it has clean data. Enable denoising data passes in Cycles. Normal and albedo passes help the denoiser preserve edges and textures instead of smearing everything.
I’ll say it plainly. If denoising is off because you’re chasing “pure” renders, you’re probably wasting time. Use it early. Use it intentionally. Your render times will thank you.
If you want a solid baseline before experimenting, these best render settings for Blender are a good starting point.
Tip 4: Lower Samples Until It Breaks, Then Walk It Back
Most people pick sample values the same way they pick lottery numbers. Randomly. Or worse, by copying someone else’s settings without knowing what kind of scene they were rendering.
Here’s the uncomfortable truth. There is no “correct” sample count. Every scene is different. Lighting, materials, camera angle, even background color all affect how noisy an image actually is.
Instead of guessing, do this. Set your samples way lower than feels reasonable. Something like 32 or 64. Do a test render. It will probably look bad. That’s fine. Now increase samples in small steps until the noise stops being distracting, not until it disappears completely.
The moment where the image looks good enough is usually much earlier than you expect. Past that point, you’re paying a lot of render time for improvements that only you will ever notice.
This matters even more if you’re using denoising. Denoisers don’t need a perfectly clean image. They need a consistent one. Once you hit that threshold, extra samples mostly just slow you down.
I’ve had scenes where 96 samples looked identical to 300 once denoised. Same lighting. Same materials. One just finished three times faster.
If you want to be systematic, render the same frame at different sample counts and compare them side by side. Zoom out. Look at it like a normal person, not like someone hunting pixels. If you can’t tell the difference, neither can anyone else.
Rendering faster is often about knowing when to stop. Lower samples until it breaks. Then walk it back just enough.
Tip 5: Use Adaptive Sampling and Noise Thresholds Properly
Adaptive sampling is one of those features everyone turns on and almost no one thinks about again. Which is a shame, because when it’s set up right, it’s basically free render time.
The idea is simple. Not every part of your image needs the same number of samples. Flat walls, soft gradients, and evenly lit areas clean up quickly. Reflections, shadows, and glossy materials don’t. Adaptive sampling lets Cycles stop working on the easy parts and focus effort where noise actually lives.
The key setting here is the noise threshold. Lower numbers mean cleaner images but longer renders. Higher numbers mean faster renders with more noise. The default is conservative. Safe. And often slower than necessary.
In practice, you can usually raise the noise threshold without visible damage. Try values around 0.03 or even 0.05 for stills. For previews, you can push it higher. Combine that with denoising and suddenly your render times drop hard.
One thing I’ve noticed. Adaptive sampling shines most in scenes with large, simple areas. Product shots, interiors with clean walls, studio lighting. If your scene is all glossy chaos and tiny details, the gains will be smaller. Still worth using. Just don’t expect miracles.
Also, adaptive sampling works best when your maximum samples aren’t absurdly high. If you set max samples to 2000, Cycles will happily chase perfection forever in noisy areas. Keep your limits realistic.
If you haven’t touched noise threshold since installing Blender, you’re leaving speed on the table. It’s not flashy. It just works.
Tip 6: Cut Light Bounces Aggressively
Light bounces are one of those settings that sound harmless until you realize how expensive they are. Every bounce is more math. More paths. More chances for noise. And in most scenes, way more realism than you actually need.
By default, Cycles allows a pretty generous number of bounces. Diffuse, glossy, transmission, transparent. All of them add up. The problem is that after a certain point, extra bounces stop making a visible difference but keep hammering your render time.
Start with diffuse bounces. Unless you’re rendering a white room lit only by indirect light, you can usually lower these without hurting the image. Values around 2 or 3 often look identical to higher numbers. Glossy bounces are another big one. Reflections inside reflections inside reflections sound cool, but most scenes don’t need them.

Transmission bounces matter mainly for glass-heavy scenes. If glass isn’t the star of the shot, reduce them. Transparent bounces can also be lowered unless you’re stacking a lot of transparent materials.
Here’s a practical approach. Drop all bounce values by one or two steps. Render a test. Compare. If you can’t tell what changed, keep the lower values. If something breaks, bring back only the bounce that caused it.
Caustics deserve a mention here too. They’re beautiful. They’re also brutally expensive. Unless you’re specifically showcasing caustic effects, turning them off is almost always the right call.
I think a lot of people leave bounce settings high because they feel “physically correct.” But realism isn’t about maxing numbers. It’s about what the viewer actually sees. And most viewers don’t see bounce counts. They see deadlines.
Tip 7: Kill Expensive Features You Don’t Actually See
Blender is polite. It won’t tell you when you’ve enabled something that’s quietly eating your render time. It’ll just keep working harder.
A lot of scenes carry around expensive features that add little or nothing to the final image. Volumetrics are a classic example. Fog, smoke, atmospheric effects. They look great when they matter. When they don’t, they’re just noise generators with a time tax.
Motion blur is another sneaky one. It’s easy to leave it on from an animation test and forget about it for stills. Same goes for depth of field. If it’s subtle or barely noticeable, consider faking it in compositing instead of rendering it for real.
Light portals used to be a bigger deal in older versions of Cycles. These days, many scenes don’t benefit from them much, but people still add them out of habit. Same story with caustics, especially reflective ones. If you’re not deliberately showcasing them, turn them off.
Here’s a simple test I use. Disable one feature at a time and do a quick render. If you have to squint to see the difference, it’s probably not worth the render cost.
This isn’t about making your scene worse. It’s about being intentional. Every feature you turn on should earn its place in the render. If it doesn’t, it goes.
Blender gives you a lot of power. The fastest scenes are usually the ones where that power is used sparingly.
Tip 8: Simplify Geometry Where It Counts
When people hear “simplify geometry,” they often reach for the Decimate modifier and start nuking polygons everywhere. That’s usually a mistake.
Not all geometry hurts render time equally. A high-poly hero object in the foreground is often fine. A forest of tiny, detailed objects in the background is not. Cycles still traces rays through all of it, even if the camera barely cares.
The biggest wins usually come from background assets, small props, and anything that’s far from the camera or heavily blurred. If an object reads as a shape, not a surface, it probably doesn’t need that much detail. Normal maps and baked detail can do a lot of heavy lifting here.
Instancing is another quiet performance saver. If you’re duplicating the same object over and over, make sure you’re using instances, not real copies. Blender handles instances far more efficiently, both in memory and render time.
Subdivision modifiers are worth double-checking too. It’s easy to forget one is set to render at a higher level than necessary. If you don’t see the extra smoothness at render resolution, you’re just paying for math no one sees.
I try to ask myself one question for each dense object. Is this detail visible at final render size? If the answer is no, simplify it. Carefully. On purpose. Geometry should support the image, not dominate the render time.
This mindset is especially important if you’re using Blender for manufacturing or 3D printing, where unnecessary geometry hurts both render times and real-world results.
Tip 9: Bake What Doesn’t Need to Be Procedural
Procedural textures are one of Blender’s superpowers. They’re flexible, resolution-independent, and fun to tweak. They’re also evaluated every single time you render. Sometimes on every sample. That adds up fast.
If a material looks final and you’re no longer animating its parameters, consider baking it. Especially for complex node setups. Noise stacked on noise, multiple color ramps, math nodes everywhere. Blender has to calculate all of that repeatedly, even if the result never changes.
Baking turns that complexity into a simple image texture. One lookup instead of a whole graph. The visual result can be identical, but the render time difference can be huge, especially in animations.
This applies to lighting too. If you’re working with indirect light that doesn’t change, light baking can dramatically speed things up, particularly in Eevee. Cycles benefits less from light baking, but baked textures and normal maps still help.
There’s a trade-off, of course. Baked assets are less flexible. Change the lighting or scale the object and you may need to rebake. That’s fine. Baking is not something you do at the start of a project. It’s something you do when the look is locked.
If your scene feels slow and you’re staring at a forest of procedural nodes, baking is often the cleanest way to get speed back without touching overall quality.
Tip 10: Optimize Textures and Resolution
Textures are silent killers. They don’t look dangerous, but they eat memory and slow things down without much warning.
A lot of scenes are full of 4K or 8K textures that don’t need to be that big. If an object takes up a small portion of the frame, it physically cannot show that level of detail. Blender still loads the full texture though, and your GPU memory takes the hit.
Start by checking where texture resolution actually matters. Hero objects close to the camera. Faces. Logos. Everything else can usually be lower. Often much lower. Dropping a texture from 4K to 2K or even 1K rarely changes the final image, but it can make a big difference in render stability and speed.
Normal maps deserve special attention. Overly high-resolution normals can cause noise and longer render times without improving surface detail. Make sure they’re scaled appropriately and not just copied at max resolution by default.
Also, watch out for texture color spaces. Using the wrong color space can introduce noise that forces you to use more samples to clean it up. That’s extra render time caused by a setup issue, not image quality.
If your GPU keeps running out of memory or your renders slow down unpredictably, textures are often the culprit. Clean them up, and everything else tends to behave better.
Tip 11: Use Render Regions for Smarter Testing
Full-frame test renders are one of the biggest time sinks in Blender, especially when you’re still figuring things out. You don’t need to re-render the entire image just to check a shadow edge or a material tweak.
Render regions exist for a reason. Use them. When you’re adjusting lighting, materials, or reflections, isolate the part of the frame that actually matters. A face. A product edge. A tricky reflection. Rendering a small region can be dramatically faster and gives you feedback almost immediately.
This is especially useful with Cycles, where noise often shows up in specific areas. Shadows under objects. Glossy highlights. Corners of rooms. Focus your tests there instead of wasting samples on empty background.
I also like to combine render regions with low samples during look development. Fast, slightly ugly renders beat slow, perfect ones when you’re still making decisions. Once things look right, remove the region, raise quality where needed, and do the final pass.
One thing to watch out for. Some effects depend on the full frame, like global illumination or certain reflections. If something looks odd in a region render, don’t panic. Do a full-frame test before assuming it’s broken.
Render regions won’t make your final render faster, but they will save you a ridiculous amount of time getting there. And that’s just as important.
Knowing a few essential Blender shortcuts and hotkeys makes jumping between regions, renders, and viewport modes much faster.
Tip 12: Tune Eevee Instead of Treating It Like “Fast Cycles”
Eevee gets a weird reputation. People either expect it to look exactly like Cycles or assume it’s always fast no matter what. Neither is true.
Eevee can be incredibly fast, but only if you respect how it works. It’s a real-time engine, which means a lot of things are faked using screen-space tricks, shadow maps, and probes. Push those too hard and Eevee slows down fast.
Shadows are usually the first place to look. High shadow resolution on multiple lights adds up quickly. If a shadow is soft or barely visible, lower its resolution. Same goes for contact shadows. They’re nice, but not always necessary.
Reflections are another common culprit. Screen Space Reflections are expensive, especially at high quality settings. If reflections aren’t a key part of the shot, dial them back or turn them off. Reflection cubemaps can often do the job for static scenes at a fraction of the cost.
Samples matter in Eevee too. People forget that. Cranking samples because “it’s real-time anyway” still slows down renders and viewport playback. Start low and only increase when you see actual artifacts.

The biggest mistake I see is trying to force Eevee to behave like Cycles. If you do that, you lose the speed advantage and still won’t get perfect realism. Instead, lean into Eevee’s strengths. Cheat lighting. Fake bounce light. Use emission where it makes sense.
Eevee is fast when you let it be Eevee. Treat it like Cycles-lite and it will punish you for it.
Eevee really shines for motion work, especially if you’re doing Grease Pencil or stylized projects like 2D animation in Blender.
Tip 13: Keep Your Scene and Viewport Clean
Blender doesn’t really care if something is hidden. If it exists in the scene and is enabled for rendering, it can still cost you time and memory. That catches a lot of people off guard.
Old test objects, backup meshes, unused lights, hidden collections. They pile up fast. Especially in long projects. You stop seeing them, but Blender doesn’t forget they’re there.
Get in the habit of disabling things properly. Not just hiding them in the viewport, but turning off their render visibility. If an object isn’t contributing to the final image, it shouldn’t be part of the render calculation at all.
The viewport matters too. A heavy viewport can slow down interaction, which indirectly slows everything else. High subdivision levels, dense geometry, and expensive shaders all make Blender feel sluggish even before you hit render. If the viewport is struggling, the render usually isn’t far behind.
I try to do occasional cleanup passes. Delete what I know I won’t need. Mute modifiers that aren’t final. Collapse collections that are done. It’s boring work, but it pays off.
A clean scene is easier to think about, easier to debug, and usually faster to render. Clutter doesn’t just cost performance. It costs focus.
If you’re working on large scenes, using Python in Blender to automate cleanup, object management, or batch changes can save a surprising amount of time.
Tip 14: Accept When Your Hardware Is the Bottleneck
There’s a point where no amount of clever settings will save you. You’ve lowered samples. You’ve optimized bounces. You’ve cleaned the scene. And the render is still slow. That’s usually when hardware becomes the real limiter.
The most common issue is VRAM. If your GPU is running out of memory, everything slows down or breaks outright. Textures fail to load. Renders fall back to the CPU. Performance becomes unpredictable. At that stage, tweaking settings can feel like fighting gravity.
Thermal throttling is another quiet problem. Long renders heat up GPUs and CPUs, and once temperatures climb too high, hardware slows itself down to survive. You don’t always notice it happening, but render times creep up anyway.
This is where expectations matter. A mid-range GPU will struggle with massive scenes, heavy volumetrics, and high-resolution animations. That doesn’t mean you’re doing something wrong. It just means the workload outgrew the machine.
I think a lot of frustration comes from assuming every slowdown is a Blender issue. Sometimes it’s simply physics and silicon doing what they do. Knowing when you’ve hit that wall is important, because it tells you to stop micro-optimizing and start thinking bigger.
At that point, the question isn’t “what setting did I miss?” It’s “where should this work actually happen?”
If you’re experimenting with AI tools for model generation in Blender, scenes can get heavy fast, which makes hardware limits show up sooner than expected.
Tip 15: When Time Matters, Stop Fighting Your Hardware and Use Vagon Cloud Computer
There’s a point where optimizing stops being productive. You’ve done the smart things. Lower samples. Cleaned the scene. Cut bounces. And the render is still slow because your machine has hit its limit.
This is exactly where Vagon Cloud Computer makes sense.
Instead of upgrading hardware, juggling multiple machines, or letting renders run overnight, you can move your Blender project to a high-performance cloud computer and render it there. More GPU power. More VRAM. No fan noise. No compromises just to get something finished.
The big difference is that Vagon isn’t just a render farm. You’re working inside a full cloud desktop. Same Blender interface, same files, same workflow. You open your scene, hit render, and let serious hardware handle it while your local machine stays free.
This is especially useful for things like:
High-resolution stills that push VRAM limits
Long animations where local rendering would take days
Complex scenes with heavy lighting, hair, or geometry
Deadlines where “I’ll render it overnight” isn’t an option
What I like about this setup is that it doesn’t replace good habits. You still optimize locally. You still work fast and iterate. Vagon just removes the final bottleneck when raw power is what you’re missing.
If Blender feels slow even after doing everything right, that’s not a settings problem anymore. That’s a hardware problem. And at that point, using Vagon Cloud Computer is often faster and cheaper than trying to brute-force your way through on a single machine.
That also opens the door to setups like using Blender on an iPad, where the heavy lifting happens remotely instead of on your local device.
The same idea applies if you’re using Blender on a Chromebook, where local hardware would normally be a hard stop.
Final Thoughts
Rendering faster in Blender isn’t just about saving time. It changes your behavior. When renders are quick, you experiment more. You try weird lighting ideas. You tweak materials instead of settling. Speed buys creative freedom, not just shorter progress bars.
Most of the gains come from unglamorous choices. Lowering samples. Turning features off. Accepting that “good enough” is often visually identical to “perfect.” If you build those habits early, Blender stops feeling heavy and starts feeling responsive again.
And sometimes, even after doing everything right, you still hit a wall. That’s normal. At that point, the smart move isn’t another micro-optimization. It’s changing where the work runs. Using something like Vagon Cloud Computer lets you keep your workflow intact while removing hardware from the equation when it matters most.
Optimize first. Offload when it makes sense. That balance is what keeps Blender fast, flexible, and fun instead of frustrating.
If faster renders let you think less about waiting and more about creating, you’re already winning.
FAQs
1. Why is my Blender render slow even with a good GPU?
Because a good GPU doesn’t cancel out bad settings or heavy scenes. High samples, unnecessary bounces, huge textures, and memory-hungry geometry can overwhelm even strong hardware. VRAM limits are often the real culprit, not raw GPU power.
2. Is Eevee always faster than Cycles?
Usually, yes. Always, no. Eevee is fast when you let it cheat. If you push high shadow resolutions, heavy screen-space reflections, and lots of lights, Eevee can slow down fast. Cycles is slower by nature, but more predictable for realism.
3. How many samples should I use in Cycles?
There’s no universal number. For stills with denoising, many scenes look fine between 64 and 128 samples. Some need less. Some need more. The only reliable method is lowering samples until the image breaks, then raising them slightly.
4. Does denoising ruin image quality?
Bad denoising does. Used properly, modern denoisers are surprisingly clean. Most viewers won’t notice the difference between a high-sample render and a denoised one unless they’re pixel-peeping. The time savings are usually worth it.
5. Why does my render suddenly switch to CPU?
That usually means you ran out of GPU memory. When VRAM is exceeded, Blender may fall back to CPU rendering or fail entirely. Large textures, high subdivision, and dense scenes are common triggers.
6. Is rendering on the CPU ever better?
Yes, but rarely. CPU rendering can handle scenes that don’t fit in GPU memory and is sometimes more stable for extreme cases. For most everyday Blender work, GPU rendering is significantly faster.
7. Do render presets actually help?
They can, but only if they match your scene. Presets are guesses. They don’t know your lighting, materials, or camera. Blindly using them often leads to longer renders than necessary.
8. What slows down renders the most without people realizing it?
High-resolution textures, excessive light bounces, forgotten volumetrics, and heavy procedural materials. These tend to hide in scenes quietly and add up over time.
9. Should I always optimize before using cloud computers?
Yes. Optimization makes everything faster, including cloud renders. Using a cloud computer doesn’t replace good habits. It removes hardware limits once optimization stops helping.
10. When does Vagon Cloud Computer make sense for Blender?
When your scene is optimized but still too heavy for your local machine. High-resolution stills, long animations, VRAM-heavy scenes, or tight deadlines are the usual tipping points.
11. Will faster renders actually improve my work?
In my experience, yes. Faster feedback means more iteration, better decisions, and less hesitation to try ideas. Waiting less usually leads to better results.
I still remember the render that finally broke my patience. Not because it failed. Because it didn’t. It just kept going. Fans at full speed, Blender crawling through noisy tiles, and I hadn’t even started serious lighting yet. That’s when it clicked. Most slow renders aren’t bad luck. They’re self-inflicted.
If you’ve used Blender for a while, you know the routine. Change one thing, hit render, wait… and wait. Eventually you stop experimenting because every tweak costs time. That’s how good ideas die quietly.
The problem usually isn’t Blender. It’s how we use it. Default settings that favor safety over speed. Samples pushed way past what the eye can see. Features left on “just in case.” And when things get slow, hardware takes the blame.
Sometimes hardware is the limit. Often it isn’t. Not yet.
Rendering faster isn’t about a magic checkbox. It’s about stacking small, unglamorous decisions that add up. Lowering numbers. Turning things off. Accepting that perfect realism is rarely worth double the render time.
If you’ve ever stared at a render progress bar thinking there has to be a better way, you’re not wrong. Let’s talk about the things that actually make Blender render faster.
Tip 1: Choose the Right Render Engine Before Anything Else
This sounds obvious, but I think a lot of people get this wrong early and then spend hours optimizing the wrong engine.
Cycles and Eevee are not just two ways to render the same thing. They’re two completely different mindsets. Cycles is a physically based path tracer. It simulates light bouncing around the scene, which is why it looks great and also why it can be painfully slow. Eevee is a real-time engine. It cheats. Constantly. And that’s not an insult. That’s the point.
If you start every project in Cycles by default, you’re already choosing slower feedback. Sometimes that’s fine. Product shots, close-up realism, heavy global illumination. Cycles earns its keep there. But I’ve seen people render motion graphics, stylized scenes, even simple architectural previews in Cycles just because that’s what they’re used to. That’s wasted time.
Eevee, on the other hand, is insanely fast when you work with it instead of against it. If your scene doesn’t rely on complex indirect lighting, caustics, or ultra-realistic light behavior, Eevee might get you 90 percent of the look in a fraction of the time. Especially for animations, previews, and client iterations.
Here’s a habit that helped me a lot. Start in Eevee by default. Block lighting, materials, and camera there. If the scene clearly needs Cycles later, switch engines once the look is mostly locked. Not before. You’ll iterate faster and make better decisions because you’re not waiting on every change.
Also worth saying. Switching engines late is not a failure. It’s strategy. The fastest render is the one you don’t have to redo.
Before touching samples, bounces, or denoising, ask yourself one simple question. Do I actually need Cycles for this shot? If the answer is “maybe,” start with Eevee. You can always go slower later.
If you’re still unsure which engine fits your project, this breakdown of the best Blender render engines is worth a look before you lock anything in.
Tip 2: Switch to GPU Rendering
This one still surprises me. Every year I meet Blender users who are doing everything right and then quietly rendering on the CPU.
Cycles is built to take advantage of GPUs. Modern GPUs can handle thousands of light calculations in parallel, which is exactly what path tracing needs. CPUs are great at many things. Rendering isn’t one of them. At least not compared to a decent GPU.
If you’re using Cycles and your renders feel painfully slow, the first thing to check is simple. Go to Preferences, System, and see what’s selected under Cycles Render Devices. If it says CPU, that’s your problem. Switch to GPU and pick the backend that matches your card. CUDA or OptiX for NVIDIA. HIP for AMD. Metal if you’re on a newer Mac.
The difference is not subtle. I’ve seen scenes drop from 20 minutes to under 5 just by switching to GPU. Same scene. Same settings. Completely different experience.
OptiX deserves a quick mention if you’re on NVIDIA. It’s not just about speed. OptiX also enables hardware-accelerated denoising, which can let you get away with even lower samples later. That’s a double win.
There are a couple of caveats. GPU rendering is limited by VRAM. If your scene is huge and blows past your GPU memory, Blender will fall back to slower behavior or fail outright. In those cases, CPU rendering can be more stable. But that’s the exception, not the rule.
My rule of thumb is simple. If your GPU can hold the scene, use it. Only fall back to CPU when you have a clear reason. Rendering on the CPU “just in case” is almost never worth the time you lose.
Before tweaking anything else, make sure Blender is actually using the fastest hardware you already own.
Tip 3: Turn On Denoising Earlier Than You Think
A lot of people treat denoising like a last resort. As if it’s cheating. In my experience, that mindset costs more render time than almost anything else.
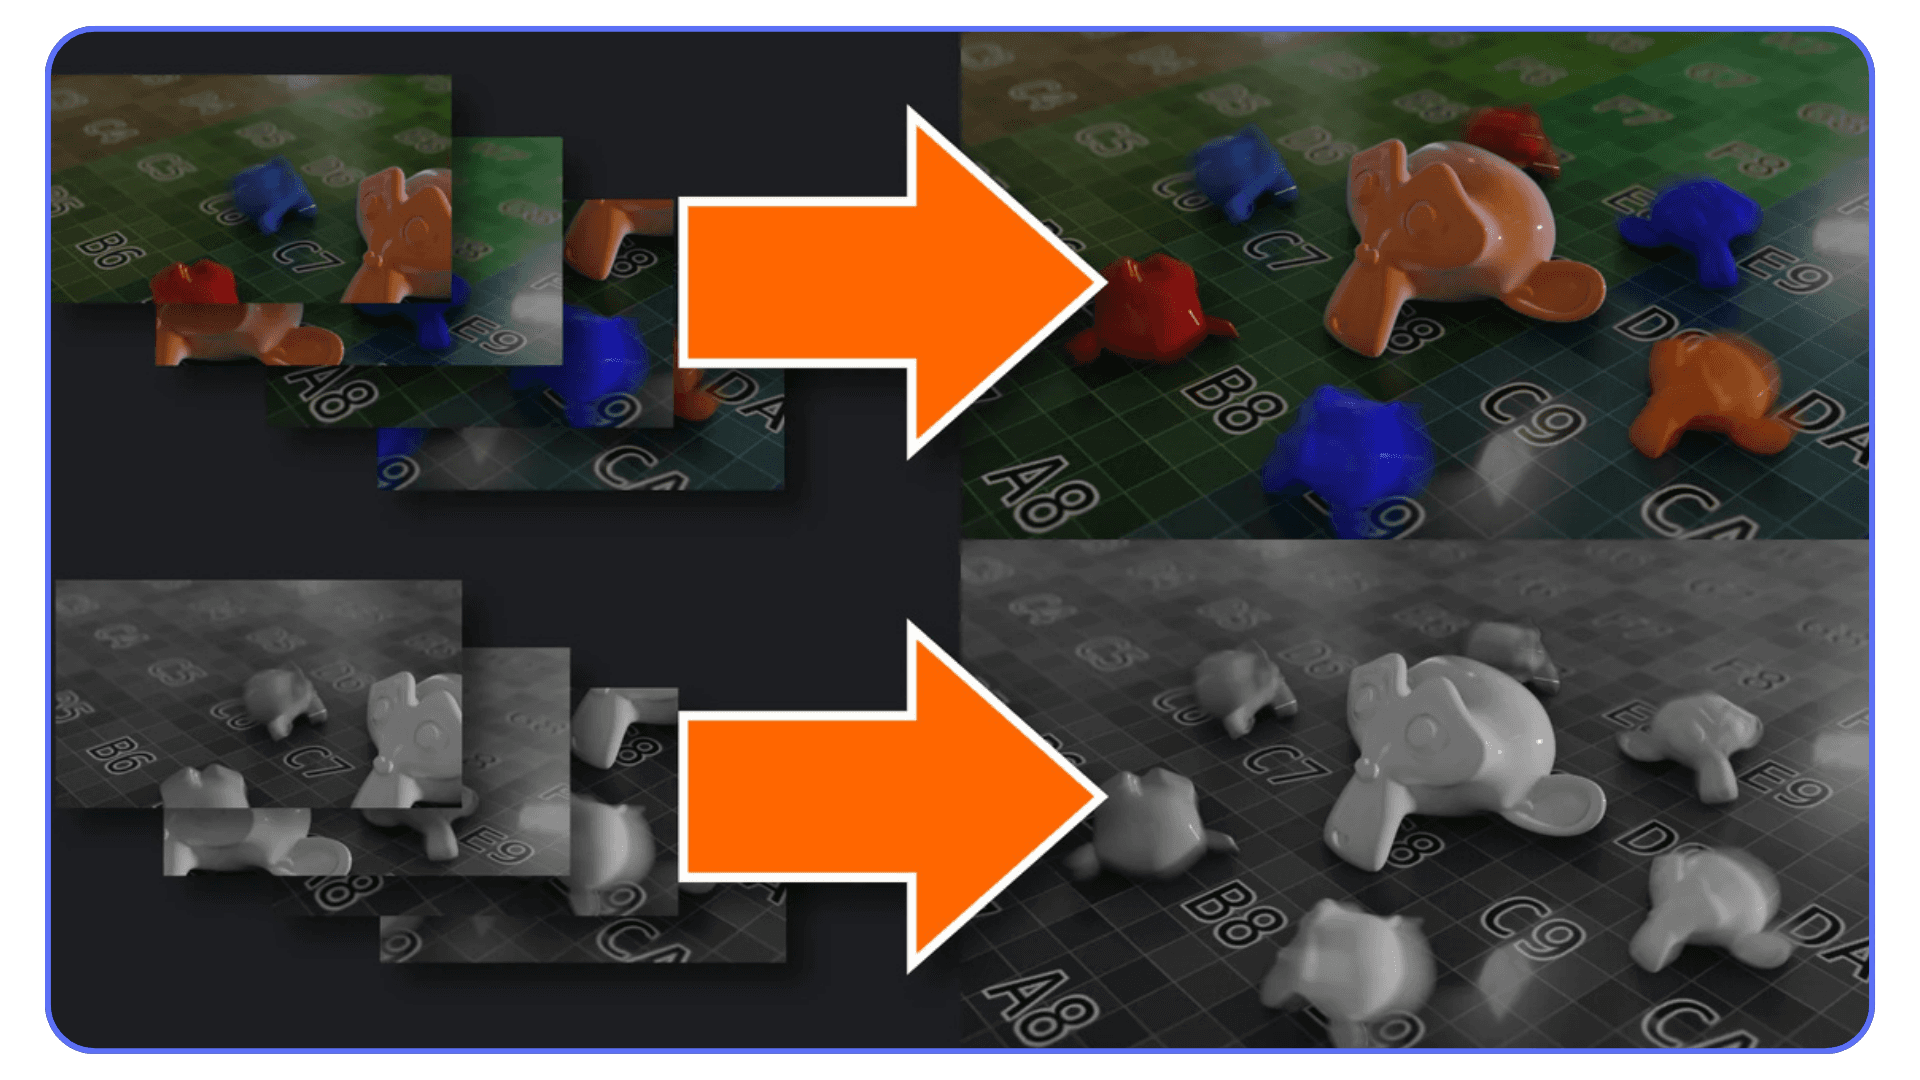
Noise is scary because it feels like a quality problem. So people respond by cranking samples. Two hundred. Five hundred. A thousand. The render gets cleaner, sure, but the time explodes. Meanwhile, most of that extra detail disappears the moment the image leaves Blender.
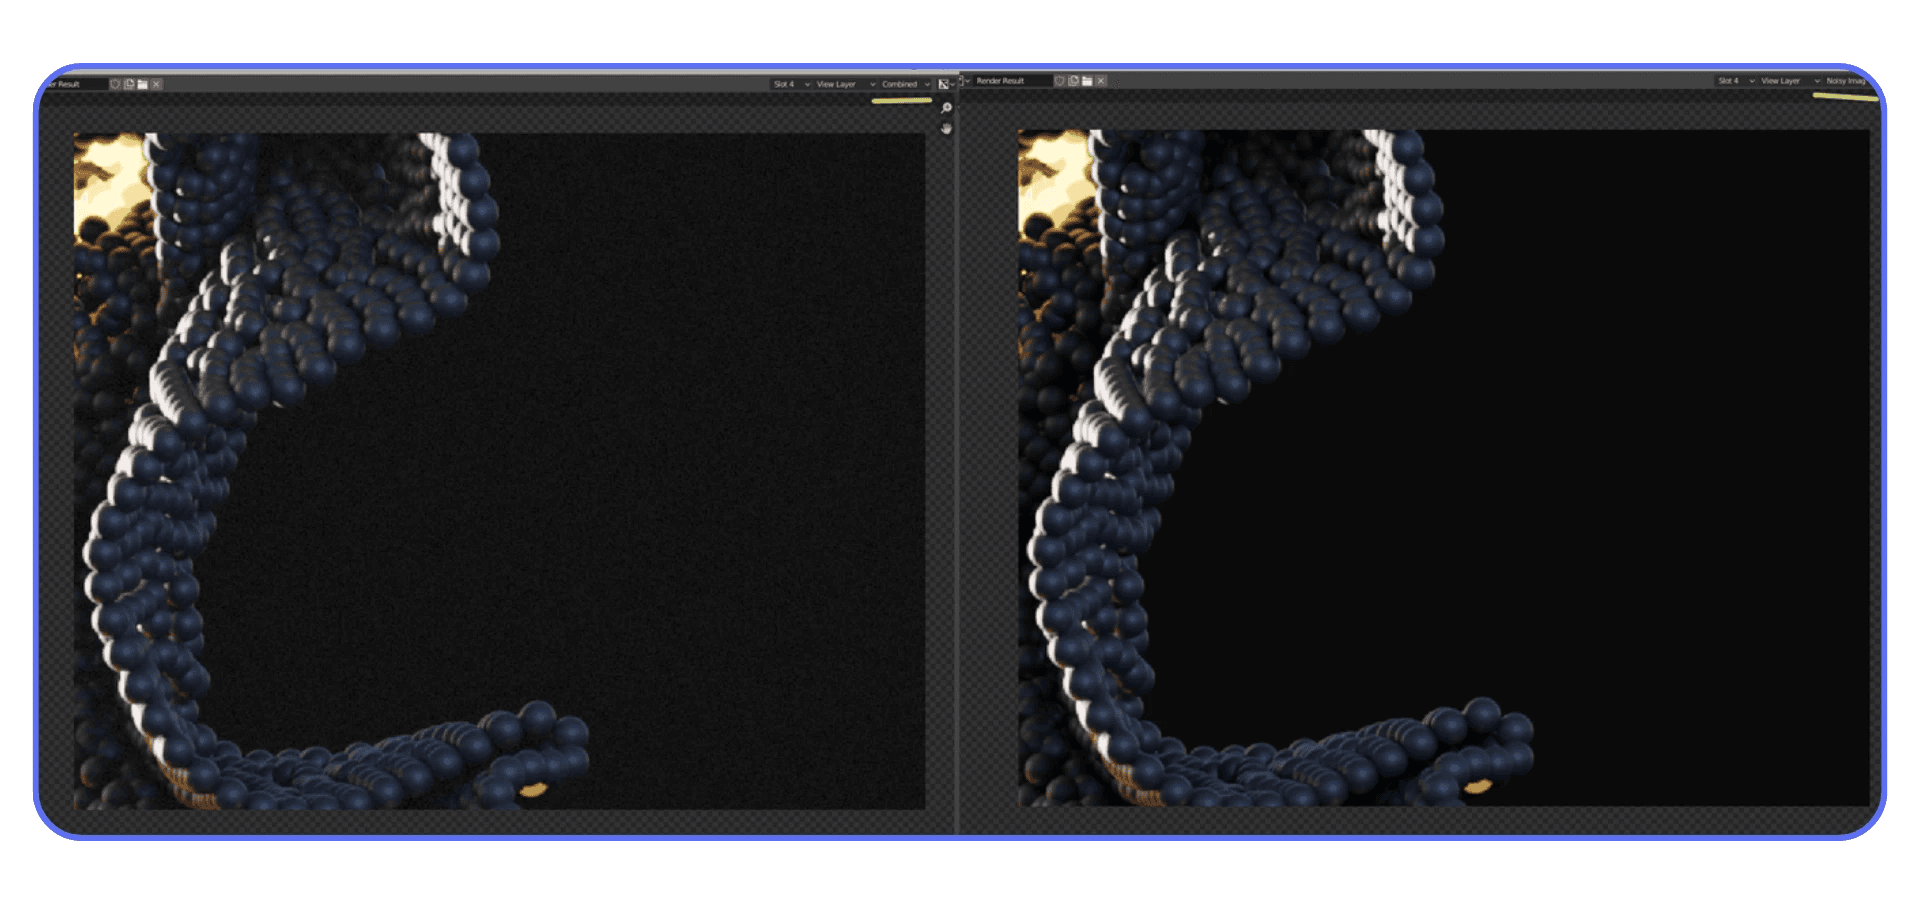
Modern denoisers are good. Really good. OpenImageDenoise and OptiX can clean up surprisingly rough renders without destroying detail, especially in still images. The trick is to stop thinking of denoising as a fix for bad renders and start thinking of it as part of the pipeline.
Here’s what I usually do. I enable denoising almost immediately, then lower samples until the image starts to fall apart. Once it does, I bump samples back up just enough to give the denoiser something to work with. That number is almost always much lower than people expect.
For stills, you can often get away with 64 to 128 samples with denoising and end up with an image that looks nearly identical to a 500-sample render. For animations, you need to be more careful, but even there, denoising plus moderate samples usually beats brute force.
One important detail. Denoising works best when it has clean data. Enable denoising data passes in Cycles. Normal and albedo passes help the denoiser preserve edges and textures instead of smearing everything.
I’ll say it plainly. If denoising is off because you’re chasing “pure” renders, you’re probably wasting time. Use it early. Use it intentionally. Your render times will thank you.
If you want a solid baseline before experimenting, these best render settings for Blender are a good starting point.
Tip 4: Lower Samples Until It Breaks, Then Walk It Back
Most people pick sample values the same way they pick lottery numbers. Randomly. Or worse, by copying someone else’s settings without knowing what kind of scene they were rendering.
Here’s the uncomfortable truth. There is no “correct” sample count. Every scene is different. Lighting, materials, camera angle, even background color all affect how noisy an image actually is.
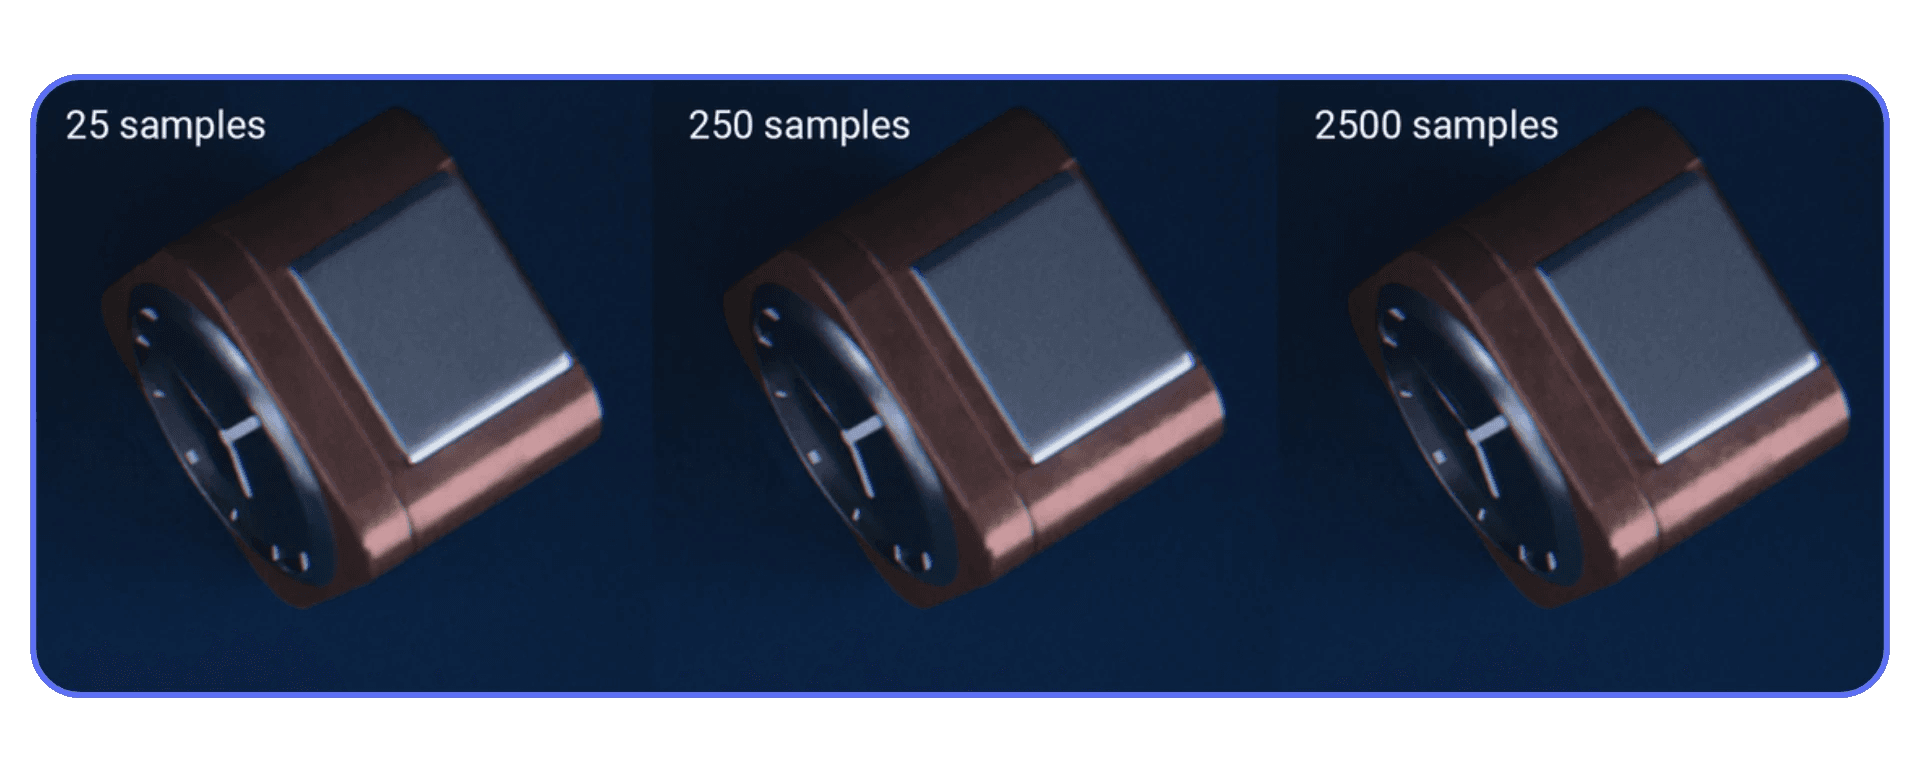
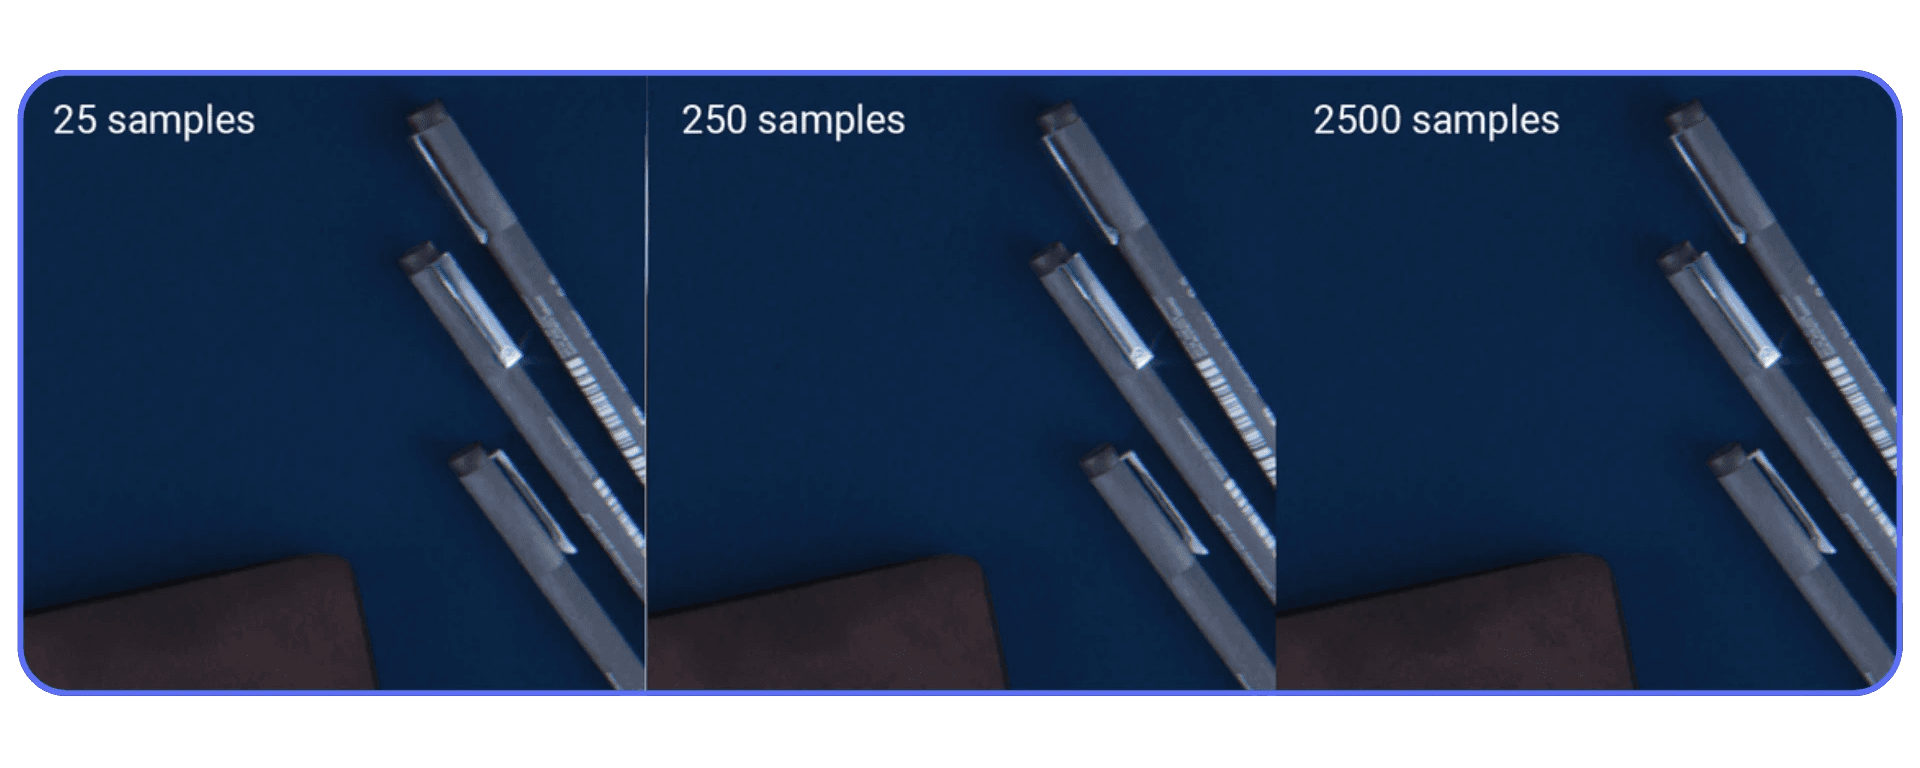
Instead of guessing, do this. Set your samples way lower than feels reasonable. Something like 32 or 64. Do a test render. It will probably look bad. That’s fine. Now increase samples in small steps until the noise stops being distracting, not until it disappears completely.
The moment where the image looks good enough is usually much earlier than you expect. Past that point, you’re paying a lot of render time for improvements that only you will ever notice.
This matters even more if you’re using denoising. Denoisers don’t need a perfectly clean image. They need a consistent one. Once you hit that threshold, extra samples mostly just slow you down.
I’ve had scenes where 96 samples looked identical to 300 once denoised. Same lighting. Same materials. One just finished three times faster.
If you want to be systematic, render the same frame at different sample counts and compare them side by side. Zoom out. Look at it like a normal person, not like someone hunting pixels. If you can’t tell the difference, neither can anyone else.
Rendering faster is often about knowing when to stop. Lower samples until it breaks. Then walk it back just enough.
Tip 5: Use Adaptive Sampling and Noise Thresholds Properly
Adaptive sampling is one of those features everyone turns on and almost no one thinks about again. Which is a shame, because when it’s set up right, it’s basically free render time.
The idea is simple. Not every part of your image needs the same number of samples. Flat walls, soft gradients, and evenly lit areas clean up quickly. Reflections, shadows, and glossy materials don’t. Adaptive sampling lets Cycles stop working on the easy parts and focus effort where noise actually lives.
The key setting here is the noise threshold. Lower numbers mean cleaner images but longer renders. Higher numbers mean faster renders with more noise. The default is conservative. Safe. And often slower than necessary.
In practice, you can usually raise the noise threshold without visible damage. Try values around 0.03 or even 0.05 for stills. For previews, you can push it higher. Combine that with denoising and suddenly your render times drop hard.
One thing I’ve noticed. Adaptive sampling shines most in scenes with large, simple areas. Product shots, interiors with clean walls, studio lighting. If your scene is all glossy chaos and tiny details, the gains will be smaller. Still worth using. Just don’t expect miracles.
Also, adaptive sampling works best when your maximum samples aren’t absurdly high. If you set max samples to 2000, Cycles will happily chase perfection forever in noisy areas. Keep your limits realistic.
If you haven’t touched noise threshold since installing Blender, you’re leaving speed on the table. It’s not flashy. It just works.
Tip 6: Cut Light Bounces Aggressively
Light bounces are one of those settings that sound harmless until you realize how expensive they are. Every bounce is more math. More paths. More chances for noise. And in most scenes, way more realism than you actually need.
By default, Cycles allows a pretty generous number of bounces. Diffuse, glossy, transmission, transparent. All of them add up. The problem is that after a certain point, extra bounces stop making a visible difference but keep hammering your render time.
Start with diffuse bounces. Unless you’re rendering a white room lit only by indirect light, you can usually lower these without hurting the image. Values around 2 or 3 often look identical to higher numbers. Glossy bounces are another big one. Reflections inside reflections inside reflections sound cool, but most scenes don’t need them.
Transmission bounces matter mainly for glass-heavy scenes. If glass isn’t the star of the shot, reduce them. Transparent bounces can also be lowered unless you’re stacking a lot of transparent materials.
Here’s a practical approach. Drop all bounce values by one or two steps. Render a test. Compare. If you can’t tell what changed, keep the lower values. If something breaks, bring back only the bounce that caused it.
Caustics deserve a mention here too. They’re beautiful. They’re also brutally expensive. Unless you’re specifically showcasing caustic effects, turning them off is almost always the right call.
I think a lot of people leave bounce settings high because they feel “physically correct.” But realism isn’t about maxing numbers. It’s about what the viewer actually sees. And most viewers don’t see bounce counts. They see deadlines.
Tip 7: Kill Expensive Features You Don’t Actually See
Blender is polite. It won’t tell you when you’ve enabled something that’s quietly eating your render time. It’ll just keep working harder.
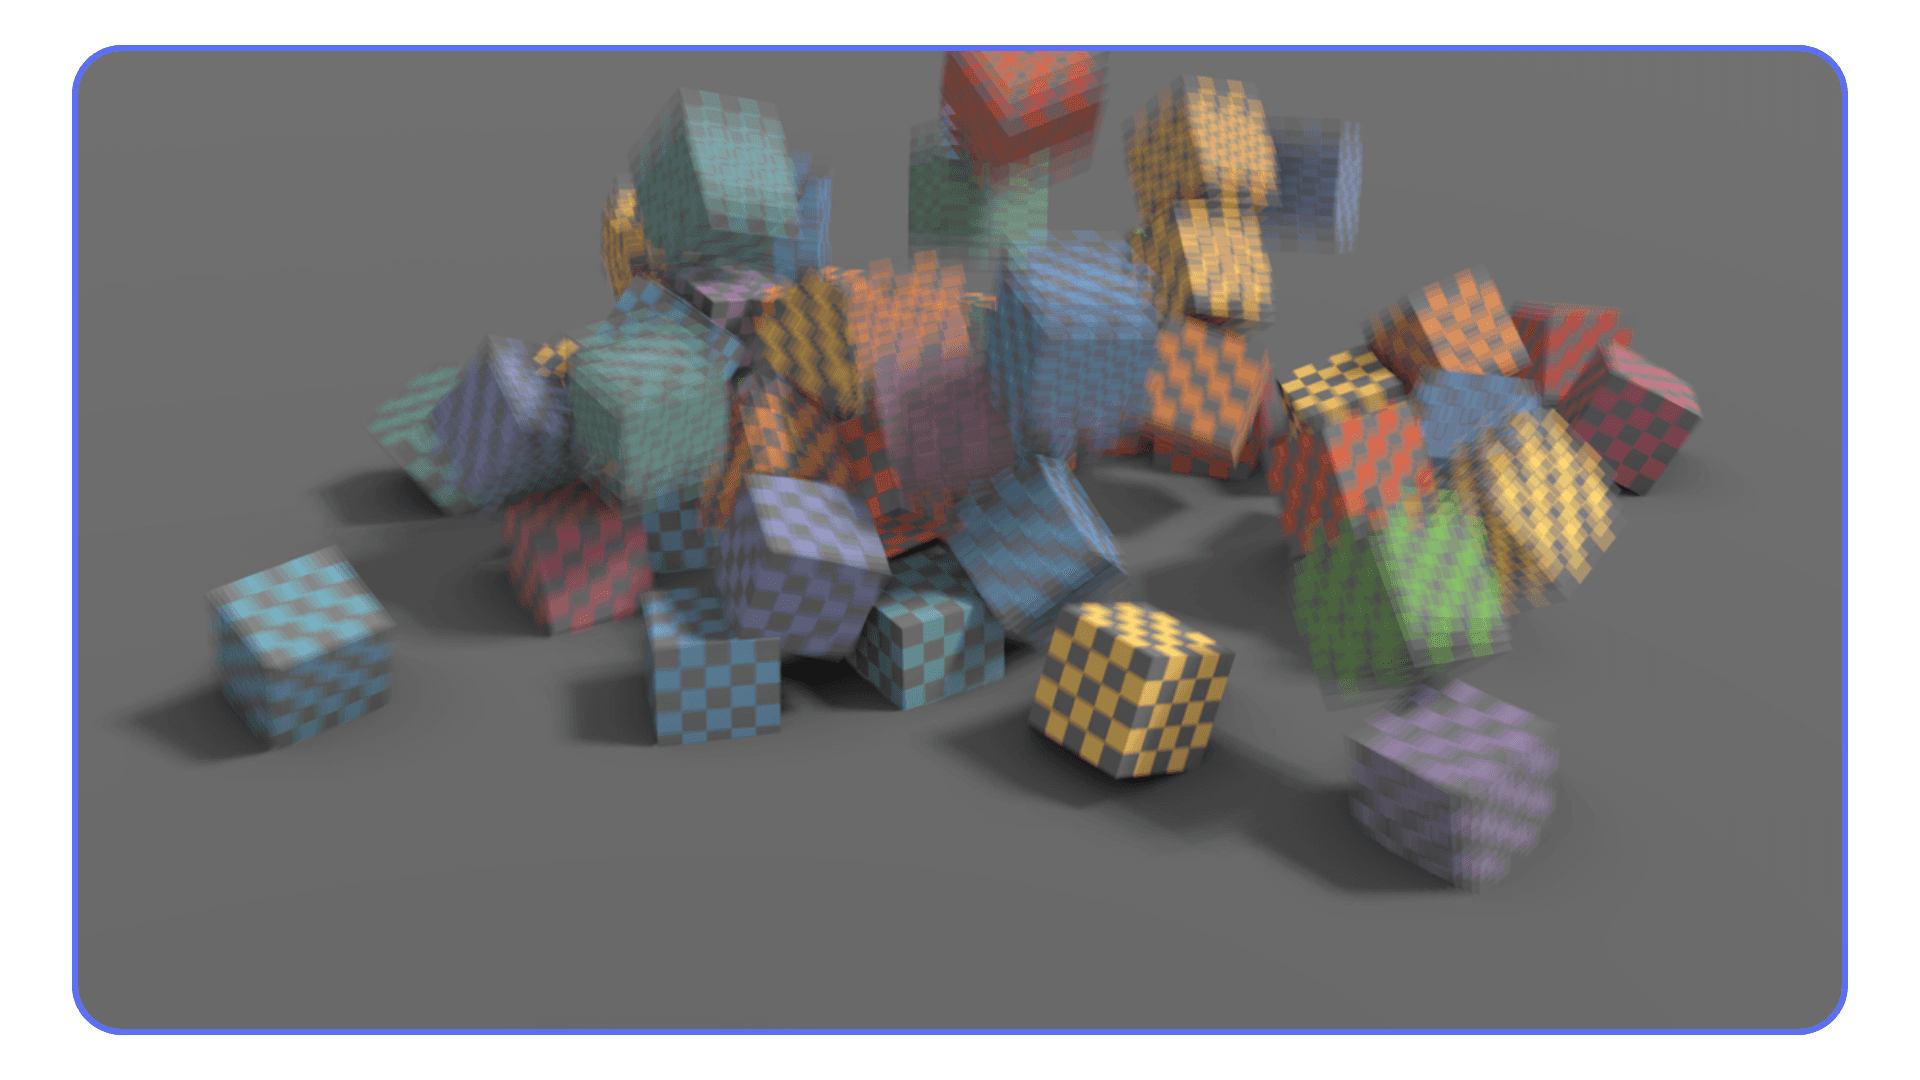
A lot of scenes carry around expensive features that add little or nothing to the final image. Volumetrics are a classic example. Fog, smoke, atmospheric effects. They look great when they matter. When they don’t, they’re just noise generators with a time tax.
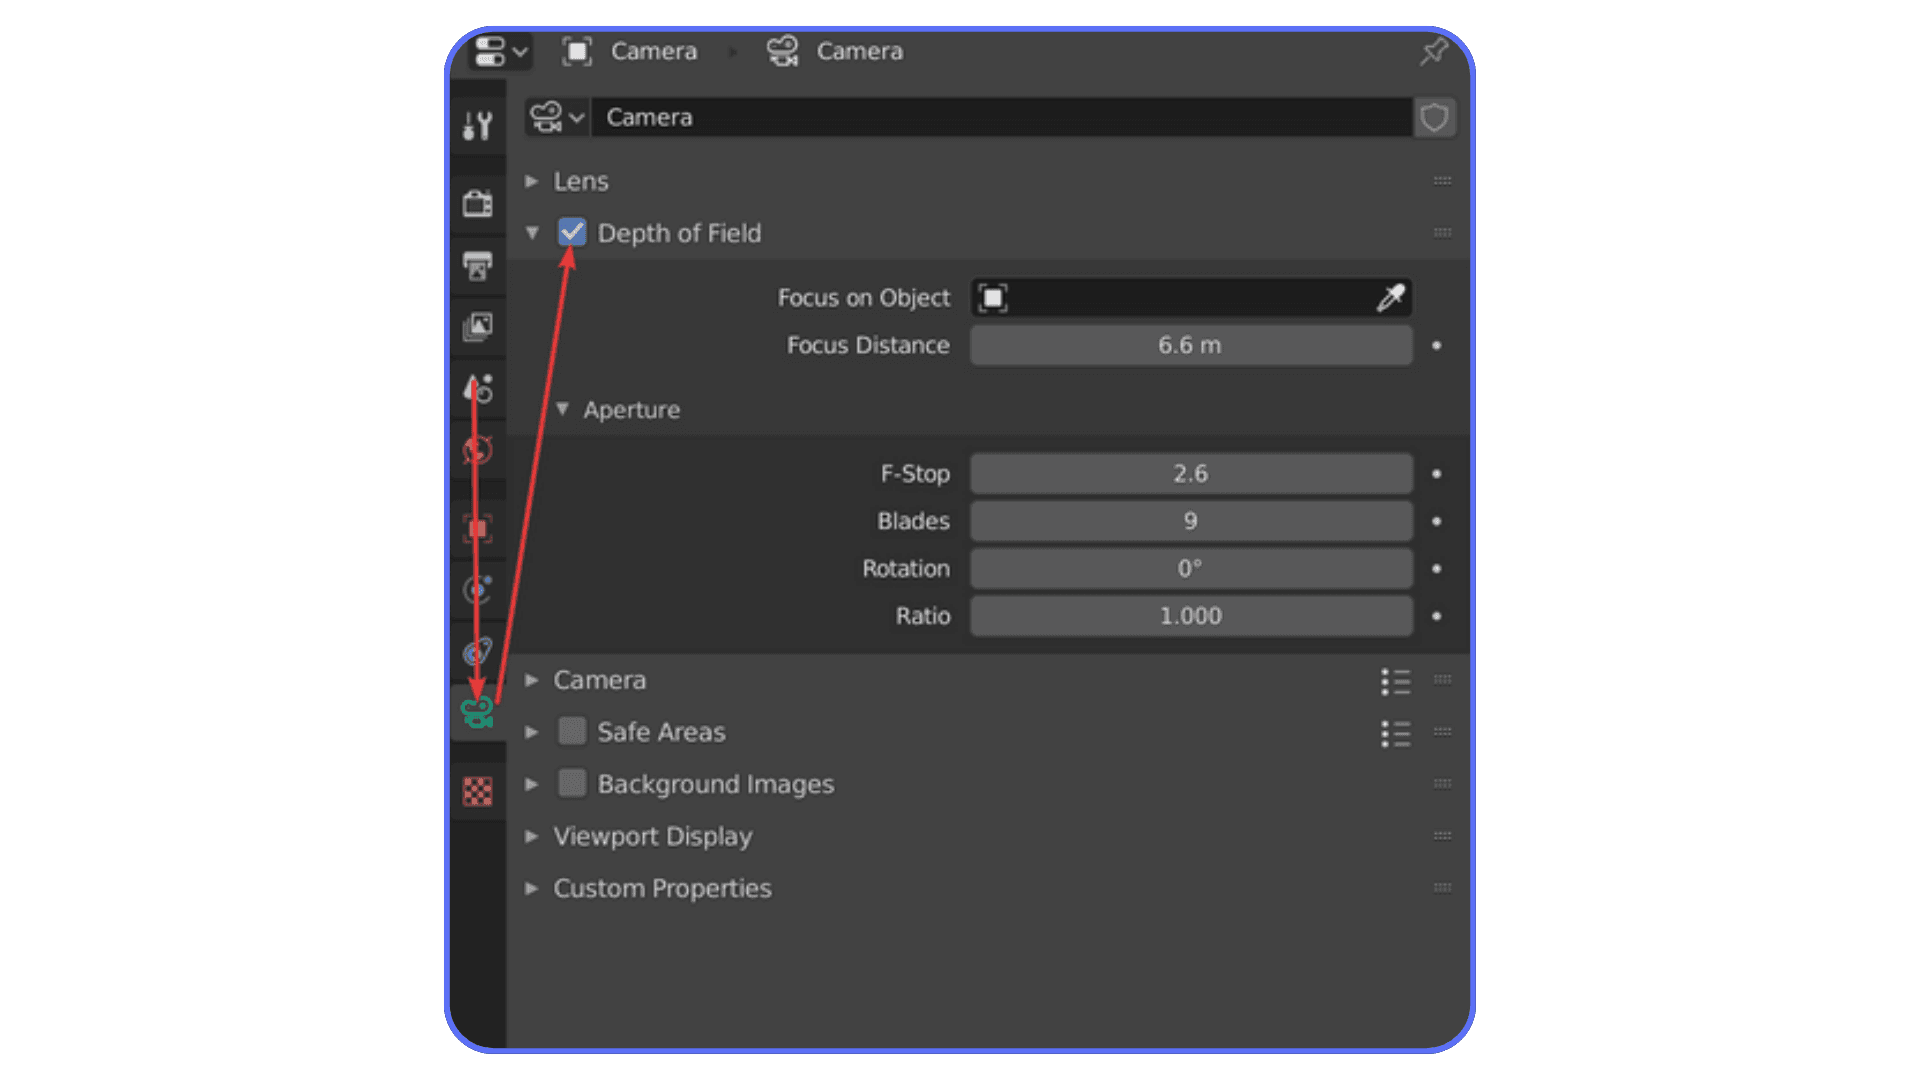
Motion blur is another sneaky one. It’s easy to leave it on from an animation test and forget about it for stills. Same goes for depth of field. If it’s subtle or barely noticeable, consider faking it in compositing instead of rendering it for real.
Light portals used to be a bigger deal in older versions of Cycles. These days, many scenes don’t benefit from them much, but people still add them out of habit. Same story with caustics, especially reflective ones. If you’re not deliberately showcasing them, turn them off.
Here’s a simple test I use. Disable one feature at a time and do a quick render. If you have to squint to see the difference, it’s probably not worth the render cost.
This isn’t about making your scene worse. It’s about being intentional. Every feature you turn on should earn its place in the render. If it doesn’t, it goes.
Blender gives you a lot of power. The fastest scenes are usually the ones where that power is used sparingly.
Tip 8: Simplify Geometry Where It Counts
When people hear “simplify geometry,” they often reach for the Decimate modifier and start nuking polygons everywhere. That’s usually a mistake.
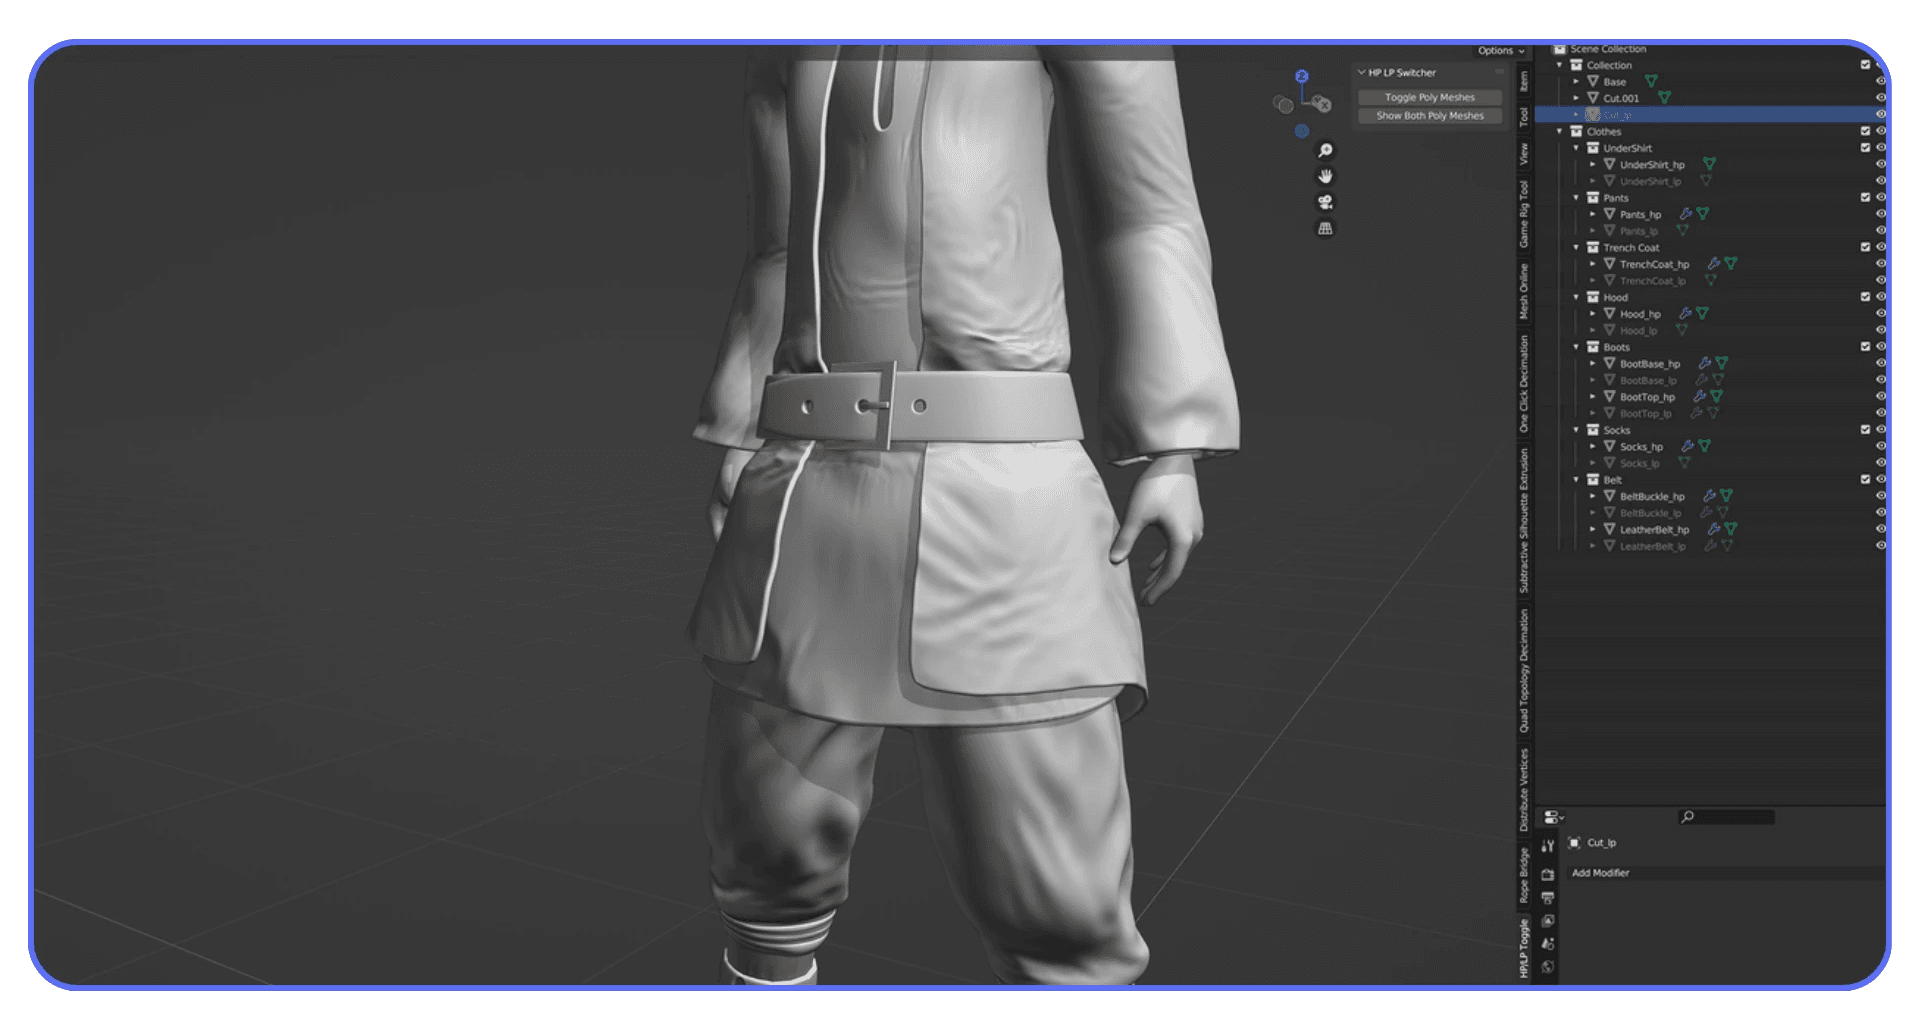
Not all geometry hurts render time equally. A high-poly hero object in the foreground is often fine. A forest of tiny, detailed objects in the background is not. Cycles still traces rays through all of it, even if the camera barely cares.
The biggest wins usually come from background assets, small props, and anything that’s far from the camera or heavily blurred. If an object reads as a shape, not a surface, it probably doesn’t need that much detail. Normal maps and baked detail can do a lot of heavy lifting here.
Instancing is another quiet performance saver. If you’re duplicating the same object over and over, make sure you’re using instances, not real copies. Blender handles instances far more efficiently, both in memory and render time.
Subdivision modifiers are worth double-checking too. It’s easy to forget one is set to render at a higher level than necessary. If you don’t see the extra smoothness at render resolution, you’re just paying for math no one sees.
I try to ask myself one question for each dense object. Is this detail visible at final render size? If the answer is no, simplify it. Carefully. On purpose. Geometry should support the image, not dominate the render time.
This mindset is especially important if you’re using Blender for manufacturing or 3D printing, where unnecessary geometry hurts both render times and real-world results.
Tip 9: Bake What Doesn’t Need to Be Procedural
Procedural textures are one of Blender’s superpowers. They’re flexible, resolution-independent, and fun to tweak. They’re also evaluated every single time you render. Sometimes on every sample. That adds up fast.
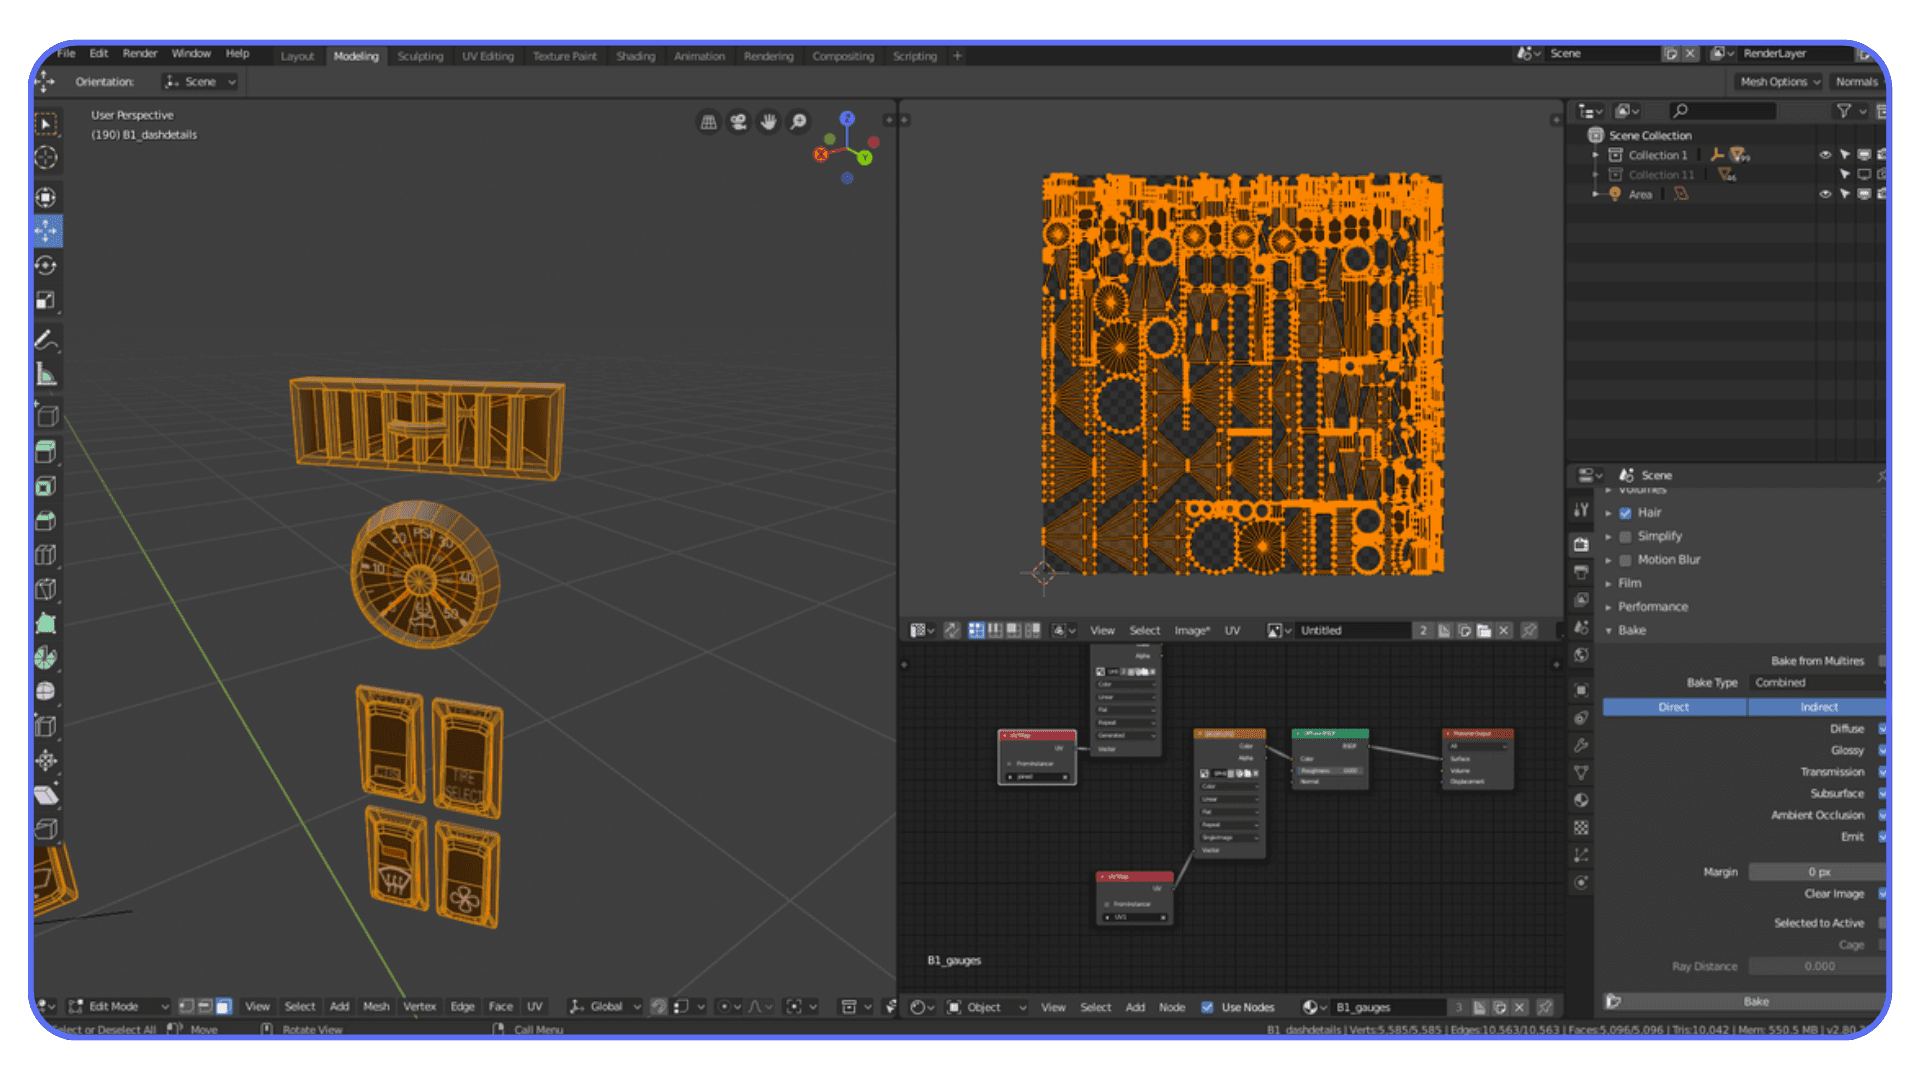
If a material looks final and you’re no longer animating its parameters, consider baking it. Especially for complex node setups. Noise stacked on noise, multiple color ramps, math nodes everywhere. Blender has to calculate all of that repeatedly, even if the result never changes.
Baking turns that complexity into a simple image texture. One lookup instead of a whole graph. The visual result can be identical, but the render time difference can be huge, especially in animations.
This applies to lighting too. If you’re working with indirect light that doesn’t change, light baking can dramatically speed things up, particularly in Eevee. Cycles benefits less from light baking, but baked textures and normal maps still help.
There’s a trade-off, of course. Baked assets are less flexible. Change the lighting or scale the object and you may need to rebake. That’s fine. Baking is not something you do at the start of a project. It’s something you do when the look is locked.
If your scene feels slow and you’re staring at a forest of procedural nodes, baking is often the cleanest way to get speed back without touching overall quality.
Tip 10: Optimize Textures and Resolution
Textures are silent killers. They don’t look dangerous, but they eat memory and slow things down without much warning.
A lot of scenes are full of 4K or 8K textures that don’t need to be that big. If an object takes up a small portion of the frame, it physically cannot show that level of detail. Blender still loads the full texture though, and your GPU memory takes the hit.
Start by checking where texture resolution actually matters. Hero objects close to the camera. Faces. Logos. Everything else can usually be lower. Often much lower. Dropping a texture from 4K to 2K or even 1K rarely changes the final image, but it can make a big difference in render stability and speed.
Normal maps deserve special attention. Overly high-resolution normals can cause noise and longer render times without improving surface detail. Make sure they’re scaled appropriately and not just copied at max resolution by default.
Also, watch out for texture color spaces. Using the wrong color space can introduce noise that forces you to use more samples to clean it up. That’s extra render time caused by a setup issue, not image quality.
If your GPU keeps running out of memory or your renders slow down unpredictably, textures are often the culprit. Clean them up, and everything else tends to behave better.
Tip 11: Use Render Regions for Smarter Testing
Full-frame test renders are one of the biggest time sinks in Blender, especially when you’re still figuring things out. You don’t need to re-render the entire image just to check a shadow edge or a material tweak.
Render regions exist for a reason. Use them. When you’re adjusting lighting, materials, or reflections, isolate the part of the frame that actually matters. A face. A product edge. A tricky reflection. Rendering a small region can be dramatically faster and gives you feedback almost immediately.
This is especially useful with Cycles, where noise often shows up in specific areas. Shadows under objects. Glossy highlights. Corners of rooms. Focus your tests there instead of wasting samples on empty background.
I also like to combine render regions with low samples during look development. Fast, slightly ugly renders beat slow, perfect ones when you’re still making decisions. Once things look right, remove the region, raise quality where needed, and do the final pass.
One thing to watch out for. Some effects depend on the full frame, like global illumination or certain reflections. If something looks odd in a region render, don’t panic. Do a full-frame test before assuming it’s broken.
Render regions won’t make your final render faster, but they will save you a ridiculous amount of time getting there. And that’s just as important.
Knowing a few essential Blender shortcuts and hotkeys makes jumping between regions, renders, and viewport modes much faster.
Tip 12: Tune Eevee Instead of Treating It Like “Fast Cycles”
Eevee gets a weird reputation. People either expect it to look exactly like Cycles or assume it’s always fast no matter what. Neither is true.
Eevee can be incredibly fast, but only if you respect how it works. It’s a real-time engine, which means a lot of things are faked using screen-space tricks, shadow maps, and probes. Push those too hard and Eevee slows down fast.
Shadows are usually the first place to look. High shadow resolution on multiple lights adds up quickly. If a shadow is soft or barely visible, lower its resolution. Same goes for contact shadows. They’re nice, but not always necessary.
Reflections are another common culprit. Screen Space Reflections are expensive, especially at high quality settings. If reflections aren’t a key part of the shot, dial them back or turn them off. Reflection cubemaps can often do the job for static scenes at a fraction of the cost.
Samples matter in Eevee too. People forget that. Cranking samples because “it’s real-time anyway” still slows down renders and viewport playback. Start low and only increase when you see actual artifacts.
The biggest mistake I see is trying to force Eevee to behave like Cycles. If you do that, you lose the speed advantage and still won’t get perfect realism. Instead, lean into Eevee’s strengths. Cheat lighting. Fake bounce light. Use emission where it makes sense.
Eevee is fast when you let it be Eevee. Treat it like Cycles-lite and it will punish you for it.
Eevee really shines for motion work, especially if you’re doing Grease Pencil or stylized projects like 2D animation in Blender.
Tip 13: Keep Your Scene and Viewport Clean
Blender doesn’t really care if something is hidden. If it exists in the scene and is enabled for rendering, it can still cost you time and memory. That catches a lot of people off guard.
Old test objects, backup meshes, unused lights, hidden collections. They pile up fast. Especially in long projects. You stop seeing them, but Blender doesn’t forget they’re there.
Get in the habit of disabling things properly. Not just hiding them in the viewport, but turning off their render visibility. If an object isn’t contributing to the final image, it shouldn’t be part of the render calculation at all.
The viewport matters too. A heavy viewport can slow down interaction, which indirectly slows everything else. High subdivision levels, dense geometry, and expensive shaders all make Blender feel sluggish even before you hit render. If the viewport is struggling, the render usually isn’t far behind.
I try to do occasional cleanup passes. Delete what I know I won’t need. Mute modifiers that aren’t final. Collapse collections that are done. It’s boring work, but it pays off.
A clean scene is easier to think about, easier to debug, and usually faster to render. Clutter doesn’t just cost performance. It costs focus.
If you’re working on large scenes, using Python in Blender to automate cleanup, object management, or batch changes can save a surprising amount of time.
Tip 14: Accept When Your Hardware Is the Bottleneck
There’s a point where no amount of clever settings will save you. You’ve lowered samples. You’ve optimized bounces. You’ve cleaned the scene. And the render is still slow. That’s usually when hardware becomes the real limiter.
The most common issue is VRAM. If your GPU is running out of memory, everything slows down or breaks outright. Textures fail to load. Renders fall back to the CPU. Performance becomes unpredictable. At that stage, tweaking settings can feel like fighting gravity.
Thermal throttling is another quiet problem. Long renders heat up GPUs and CPUs, and once temperatures climb too high, hardware slows itself down to survive. You don’t always notice it happening, but render times creep up anyway.
This is where expectations matter. A mid-range GPU will struggle with massive scenes, heavy volumetrics, and high-resolution animations. That doesn’t mean you’re doing something wrong. It just means the workload outgrew the machine.
I think a lot of frustration comes from assuming every slowdown is a Blender issue. Sometimes it’s simply physics and silicon doing what they do. Knowing when you’ve hit that wall is important, because it tells you to stop micro-optimizing and start thinking bigger.
At that point, the question isn’t “what setting did I miss?” It’s “where should this work actually happen?”
If you’re experimenting with AI tools for model generation in Blender, scenes can get heavy fast, which makes hardware limits show up sooner than expected.
Tip 15: When Time Matters, Stop Fighting Your Hardware and Use Vagon Cloud Computer
There’s a point where optimizing stops being productive. You’ve done the smart things. Lower samples. Cleaned the scene. Cut bounces. And the render is still slow because your machine has hit its limit.
This is exactly where Vagon Cloud Computer makes sense.
Instead of upgrading hardware, juggling multiple machines, or letting renders run overnight, you can move your Blender project to a high-performance cloud computer and render it there. More GPU power. More VRAM. No fan noise. No compromises just to get something finished.
The big difference is that Vagon isn’t just a render farm. You’re working inside a full cloud desktop. Same Blender interface, same files, same workflow. You open your scene, hit render, and let serious hardware handle it while your local machine stays free.
This is especially useful for things like:
High-resolution stills that push VRAM limits
Long animations where local rendering would take days
Complex scenes with heavy lighting, hair, or geometry
Deadlines where “I’ll render it overnight” isn’t an option
What I like about this setup is that it doesn’t replace good habits. You still optimize locally. You still work fast and iterate. Vagon just removes the final bottleneck when raw power is what you’re missing.
If Blender feels slow even after doing everything right, that’s not a settings problem anymore. That’s a hardware problem. And at that point, using Vagon Cloud Computer is often faster and cheaper than trying to brute-force your way through on a single machine.
That also opens the door to setups like using Blender on an iPad, where the heavy lifting happens remotely instead of on your local device.
The same idea applies if you’re using Blender on a Chromebook, where local hardware would normally be a hard stop.
Final Thoughts
Rendering faster in Blender isn’t just about saving time. It changes your behavior. When renders are quick, you experiment more. You try weird lighting ideas. You tweak materials instead of settling. Speed buys creative freedom, not just shorter progress bars.
Most of the gains come from unglamorous choices. Lowering samples. Turning features off. Accepting that “good enough” is often visually identical to “perfect.” If you build those habits early, Blender stops feeling heavy and starts feeling responsive again.
And sometimes, even after doing everything right, you still hit a wall. That’s normal. At that point, the smart move isn’t another micro-optimization. It’s changing where the work runs. Using something like Vagon Cloud Computer lets you keep your workflow intact while removing hardware from the equation when it matters most.
Optimize first. Offload when it makes sense. That balance is what keeps Blender fast, flexible, and fun instead of frustrating.
If faster renders let you think less about waiting and more about creating, you’re already winning.
FAQs
1. Why is my Blender render slow even with a good GPU?
Because a good GPU doesn’t cancel out bad settings or heavy scenes. High samples, unnecessary bounces, huge textures, and memory-hungry geometry can overwhelm even strong hardware. VRAM limits are often the real culprit, not raw GPU power.
2. Is Eevee always faster than Cycles?
Usually, yes. Always, no. Eevee is fast when you let it cheat. If you push high shadow resolutions, heavy screen-space reflections, and lots of lights, Eevee can slow down fast. Cycles is slower by nature, but more predictable for realism.
3. How many samples should I use in Cycles?
There’s no universal number. For stills with denoising, many scenes look fine between 64 and 128 samples. Some need less. Some need more. The only reliable method is lowering samples until the image breaks, then raising them slightly.
4. Does denoising ruin image quality?
Bad denoising does. Used properly, modern denoisers are surprisingly clean. Most viewers won’t notice the difference between a high-sample render and a denoised one unless they’re pixel-peeping. The time savings are usually worth it.
5. Why does my render suddenly switch to CPU?
That usually means you ran out of GPU memory. When VRAM is exceeded, Blender may fall back to CPU rendering or fail entirely. Large textures, high subdivision, and dense scenes are common triggers.
6. Is rendering on the CPU ever better?
Yes, but rarely. CPU rendering can handle scenes that don’t fit in GPU memory and is sometimes more stable for extreme cases. For most everyday Blender work, GPU rendering is significantly faster.
7. Do render presets actually help?
They can, but only if they match your scene. Presets are guesses. They don’t know your lighting, materials, or camera. Blindly using them often leads to longer renders than necessary.
8. What slows down renders the most without people realizing it?
High-resolution textures, excessive light bounces, forgotten volumetrics, and heavy procedural materials. These tend to hide in scenes quietly and add up over time.
9. Should I always optimize before using cloud computers?
Yes. Optimization makes everything faster, including cloud renders. Using a cloud computer doesn’t replace good habits. It removes hardware limits once optimization stops helping.
10. When does Vagon Cloud Computer make sense for Blender?
When your scene is optimized but still too heavy for your local machine. High-resolution stills, long animations, VRAM-heavy scenes, or tight deadlines are the usual tipping points.
11. Will faster renders actually improve my work?
In my experience, yes. Faster feedback means more iteration, better decisions, and less hesitation to try ideas. Waiting less usually leads to better results.
Get Beyond Your Computer Performance
Run applications on your cloud computer with the latest generation hardware. No more crashes or lags.

Trial includes 1 hour usage + 7 days of storage.
Get Beyond Your Computer Performance
Run applications on your cloud computer with the latest generation hardware. No more crashes or lags.
Trial includes 1 hour usage + 7 days of storage.
Get Beyond Your Computer Performance
Run applications on your cloud computer with the latest generation hardware. No more crashes or lags.
Trial includes 1 hour usage + 7 days of storage.
Get Beyond Your Computer Performance
Run applications on your cloud computer with the latest generation hardware. No more crashes or lags.
Trial includes 1 hour usage + 7 days of storage.
Get Beyond Your Computer Performance
Run applications on your cloud computer with the latest generation hardware. No more crashes or lags.
Trial includes 1 hour usage + 7 days of storage.

Ready to focus on your creativity?
Vagon gives you the ability to create & render projects, collaborate, and stream applications with the power of the best hardware.

Vagon Blog


Run heavy applications on any device with
your personal computer on the cloud.
San Francisco, California
Solutions
Vagon Teams
Vagon Streams
Use Cases
Resources
Vagon Blog
Best GPU for Twinmotion in 2026: Real Performance, VRAM, and What Actually Matters
How to Use Blender on an iPad: What Actually Works in 2026
How to Render Faster in Blender 3D
Blender Keyboard Shortcuts Every 3D Artist Should Know
After Effects Keyboard Shortcuts That Actually Save You Hours
Essential Premiere Pro Keyboard Shortcuts That Actually Make You Faster
Best Alternatives to Adobe After Effects in 2026
How to Rasterize in Photoshop Without Losing Editability
How to Improve Render Quality in After Effects with Better Layer Composition
Vagon Blog
Run heavy applications on any device with
your personal computer on the cloud.
San Francisco, California
Solutions
Vagon Teams
Vagon Streams
Use Cases
Resources
Vagon Blog