Instant Connection for Pixel Streaming
— New Feature Automated Setup
How to Create Video Proxies in Premiere Pro to Edit Faster
How to Create Video Proxies in Premiere Pro to Edit Faster
VideoProduction
How to Create Video Proxies in Premiere Pro to Edit Faster
Table of Contents
I still remember the first time this happened to me.
I dropped a batch of shiny 4K clips into Premiere Pro, hit play, and… nothing. The timeline stuttered, audio drifted, and the playhead moved like it was dragging a brick behind it. I honestly thought my computer was dying. Fans spinning. Beach ball vibes. That sinking feeling in your stomach.
Here’s the thing though. The footage was fine. Premiere was fine. My machine wasn’t broken.
It was just trying to edit 4K files like they were lightweight JPEGs. Which they absolutely are not.
This is the moment most editors hit sooner or later. You open high-resolution footage. The timeline freezes. Scrubbing feels like guesswork. You start lowering playback resolution, closing apps, maybe even restarting for no real reason. And then someone casually says, “Why aren’t you using proxies?”
If that word makes you think things just got more complicated, I get it. I avoided proxies longer than I should have. Big mistake.
Because once you understand them, editing stops feeling like a fight.
Why Proxies Matter More Than Most People Admit
Here’s the part nobody tells beginners clearly enough.
Premiere isn’t struggling because it’s badly optimized. It’s struggling because modern video files are heavy, compressed, and not designed for real-time editing. Your camera is built to record efficiently, not to play back smoothly while you scrub, cut, stack effects, and jump around the timeline.
4K, 6K, 10-bit, Long-GOP codecs. Great for image quality. Terrible for editing performance.
A proxy is just a lightweight copy of your footage. Lower resolution. Easier codec. Same timing, same frame rate, same duration. Premiere swaps these in while you edit, then quietly switches back to the original files when you export.
You’re not downgrading your final video. You’re just giving Premiere something it can breathe with.
In my experience, this is where the biggest mindset shift happens. Editing speed has very little to do with how “powerful” your computer feels day to day. You can have a fast CPU and still suffer if you’re forcing it to decode massive files nonstop. Proxies change that equation completely.
Without proxies, Premiere has to decode full-resolution frames every time you hit play, scrub, or stack clips. With proxies, it’s working with files that are often 4 to 10 times lighter. Sometimes more.
The difference is immediate. Timeline playback goes from choppy to smooth. Scrubbing actually tracks your mouse. Multicam stops feeling like a gamble. And weirdly, you stop getting tired as fast, because you’re not waiting on your software all day.
One important thing though. Proxies aren’t a magic fix for everything. If your system is already maxed out with effects, heavy color work, or massive timelines, they won’t save you entirely. But for straight editing? Cutting, trimming, arranging, syncing?
They’re one of the highest impact changes you can make. Full stop.
And once you’ve used them properly, going back feels… painful.
When You Actually Need Proxies
Not every project needs proxies. I want to be clear about that, because some guides make it sound like a mandatory checkbox. It isn’t.
But there are very specific moments where proxies stop being optional and start being a sanity saver.
If you’re working with 4K or higher, you’re already in proxy territory. Even if playback seems fine at first, things usually fall apart once the timeline grows. A few cuts turn into dozens. Add music. Add B-roll. Add adjustment layers. Suddenly your “fast enough” setup isn’t fast anymore.
Long-GOP codecs are another big one. Files like H.264 and H.265 are compressed in a way that’s great for storage and terrible for scrubbing. Premiere has to rebuild frames on the fly just to show you what’s happening. That’s extra work every single time you move the playhead. Proxies dodge that problem entirely.
Multicam editing is a quiet killer too. Two angles might feel okay. Four starts to hurt. Six or eight? Good luck without proxies, especially on a laptop. I’ve noticed multicam timelines are often where editors finally break and ask what they’re doing wrong.
Editing on a laptop is another clear signal. Even a high-end laptop hits thermal limits fast. Proxies reduce the workload enough that your system stays stable instead of throttling halfway through the day.
Now, when don’t you need them?
If you’re cutting short 1080p clips in an edit-friendly codec like ProRes or DNxHR, and your timeline stays simple, proxies might not give you much benefit. Same goes for quick social edits where speed matters more than polish.
But here’s the honest test I use. If you ever hit play and hesitate, waiting to see if it’ll stutter, that’s your answer. If scrubbing feels like a suggestion instead of a command, you’ll benefit from proxies.
How to Create Proxies in Premiere Pro Without Overthinking It
This is the part people expect to be complicated. It isn’t. Premiere’s proxy workflow is one of the few things Adobe has actually made easier over the years.
Still, there are a couple of small decisions here that matter more than the buttons you click.
Start by getting your media in order
Before you create anything, look at your Project panel. If your clips are already imported and scattered across bins with random names, that’s fine. You don’t need to redo your whole structure.
What does matter is knowing where your original media lives on disk. Proxies are linked to those files, not magically floating around. If you move originals later without thinking, things break. Ask me how I know.
If you haven’t imported footage yet, this is the cleanest moment to do proxies. But you can absolutely generate them after the fact too.
The actual proxy creation steps
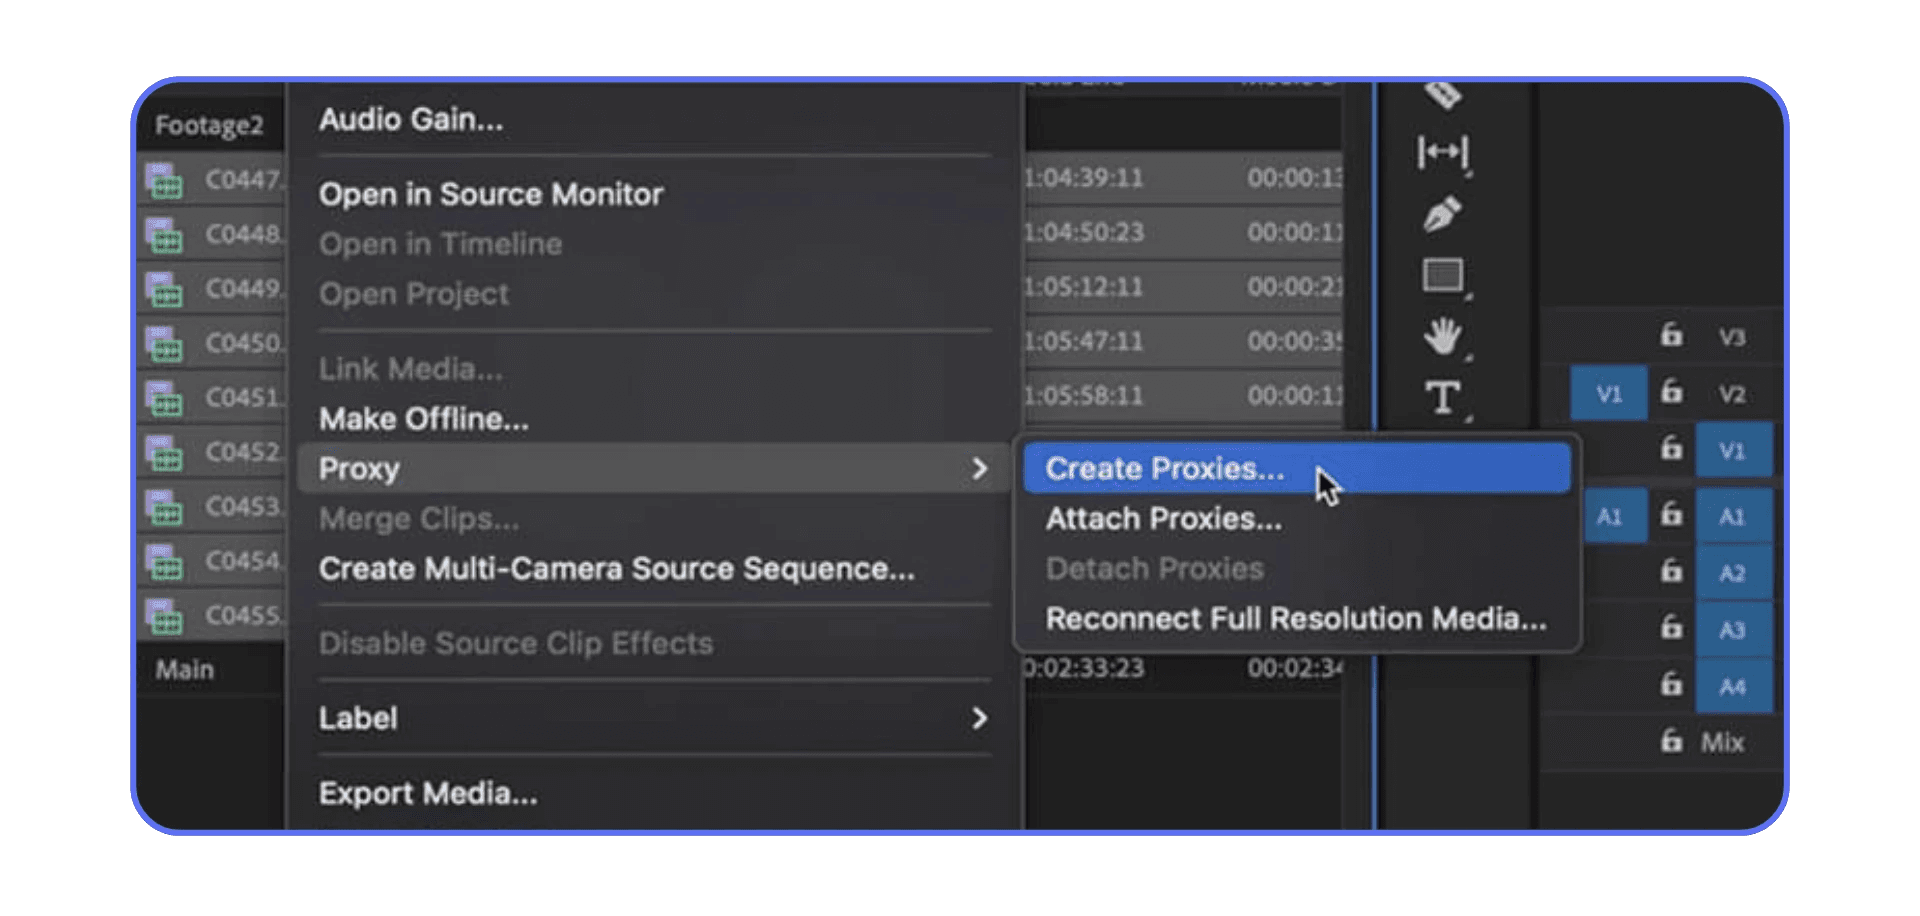
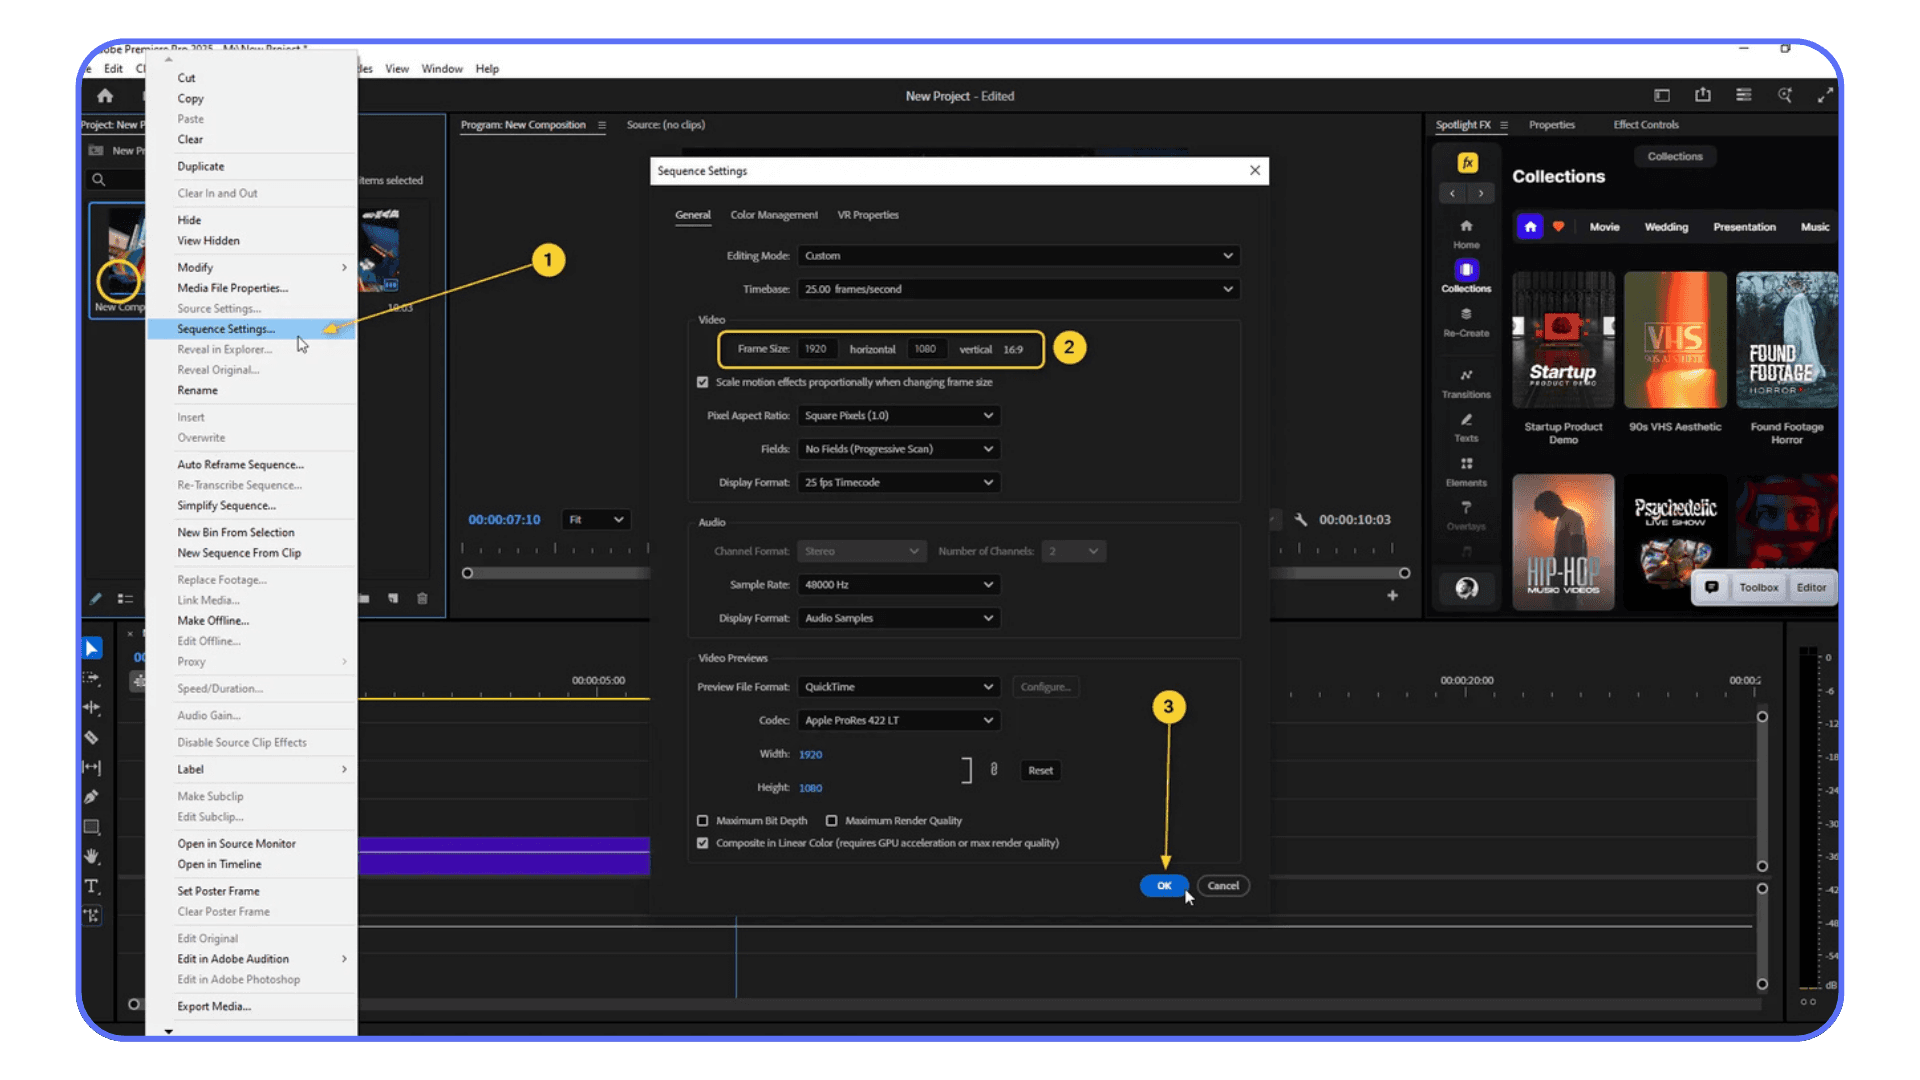
Select the clips you want proxies for in the Project panel. You can select one clip or a hundred. Premiere doesn’t care.
Right-click on the selection.
Choose Proxy > Create Proxies.
That’s it. No hidden menu. No secret checkbox.
A window pops up asking how you want to do this. This is where most people pause and second-guess themselves.
Picking a preset without spiraling
Premiere gives you a list of proxy presets. You’ll see things like ProRes Proxy, CineForm, and H.264 options at different resolutions.
Here’s my blunt take.
If you’re on macOS, ProRes Proxy is a safe, boring, excellent choice. Smooth playback. Minimal headaches.
On Windows, CineForm does a similar job and behaves well across systems.
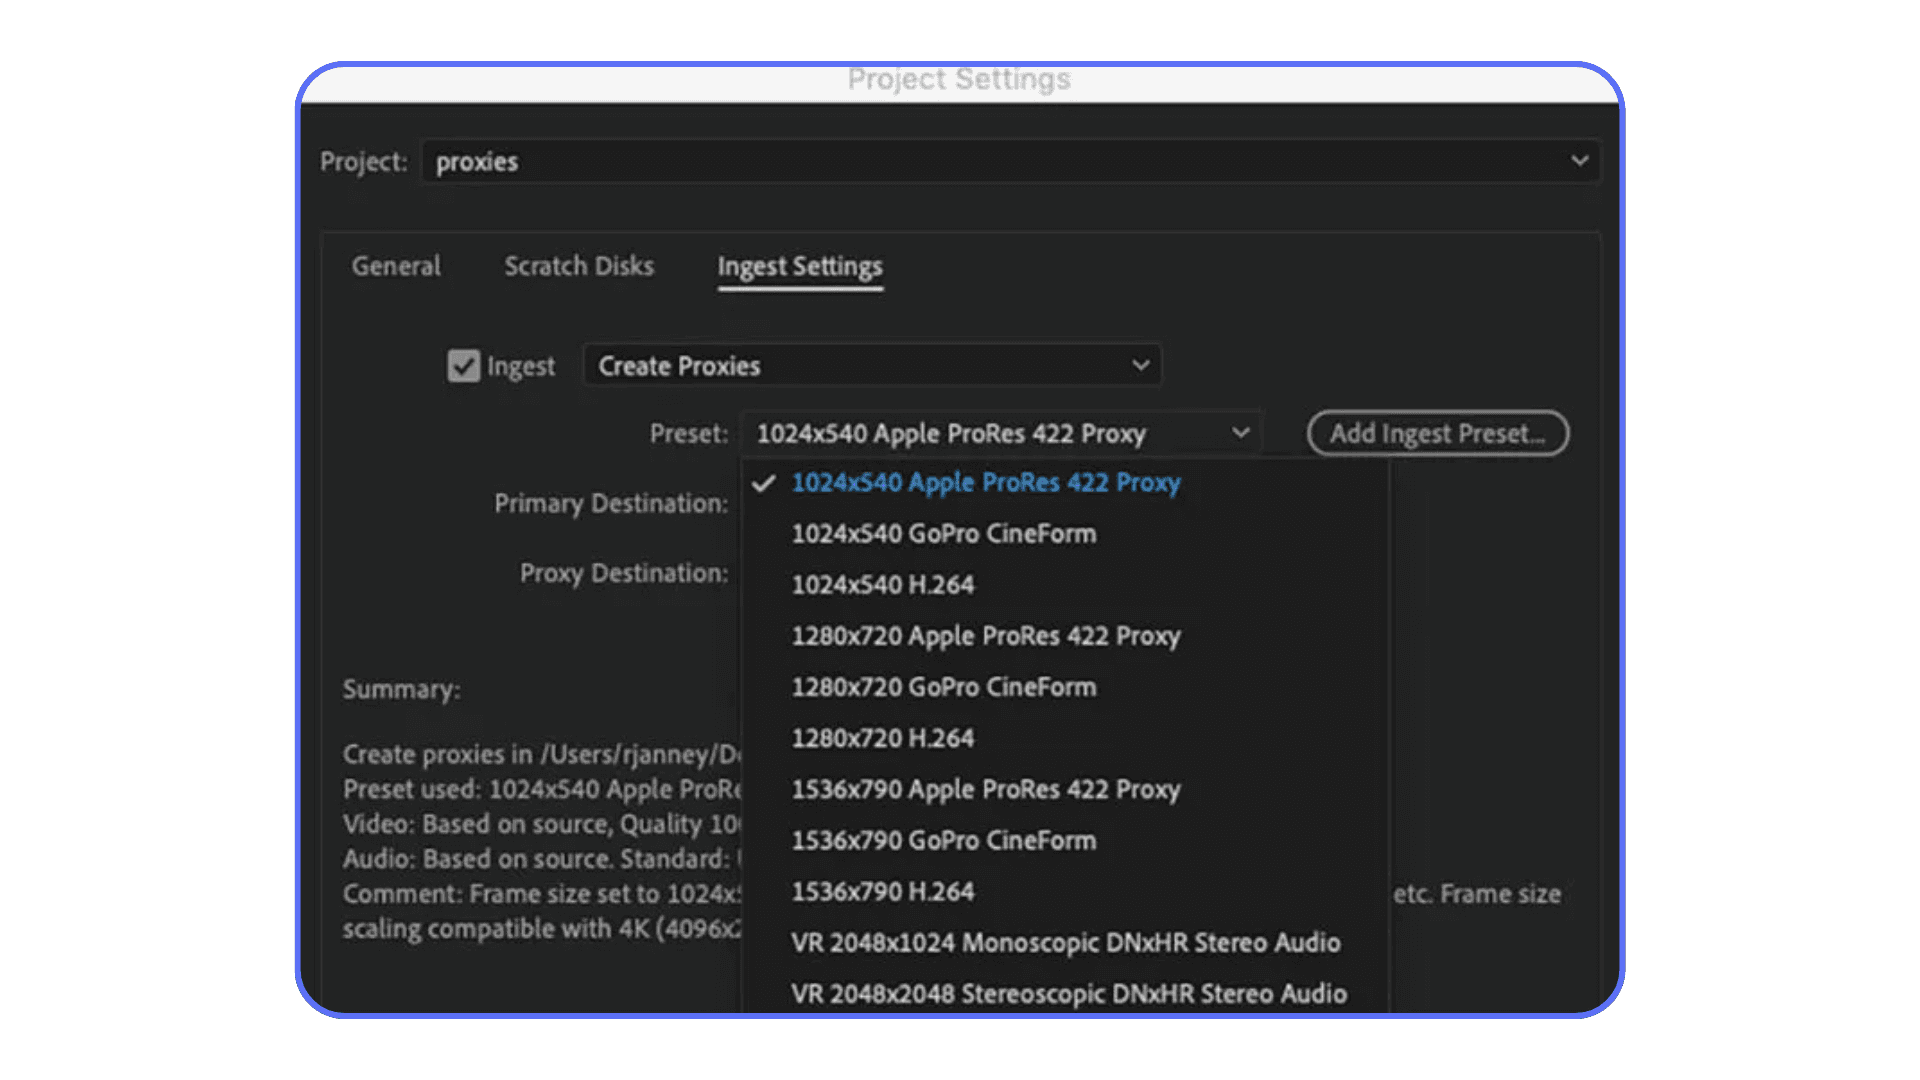
H.264 proxies look tempting because the files are smaller. I’ve used them. They work. But they’re still compressed, and that means more decoding work. If performance is the goal, edit-friendly codecs win almost every time.
For resolution, 1024x540 or 1280x720 is usually enough. You’re not judging fine focus here. You’re cutting.
Once you choose a preset, Premiere sends everything to Adobe Media Encoder in the background. You can keep working while it runs, which still feels like a small miracle.
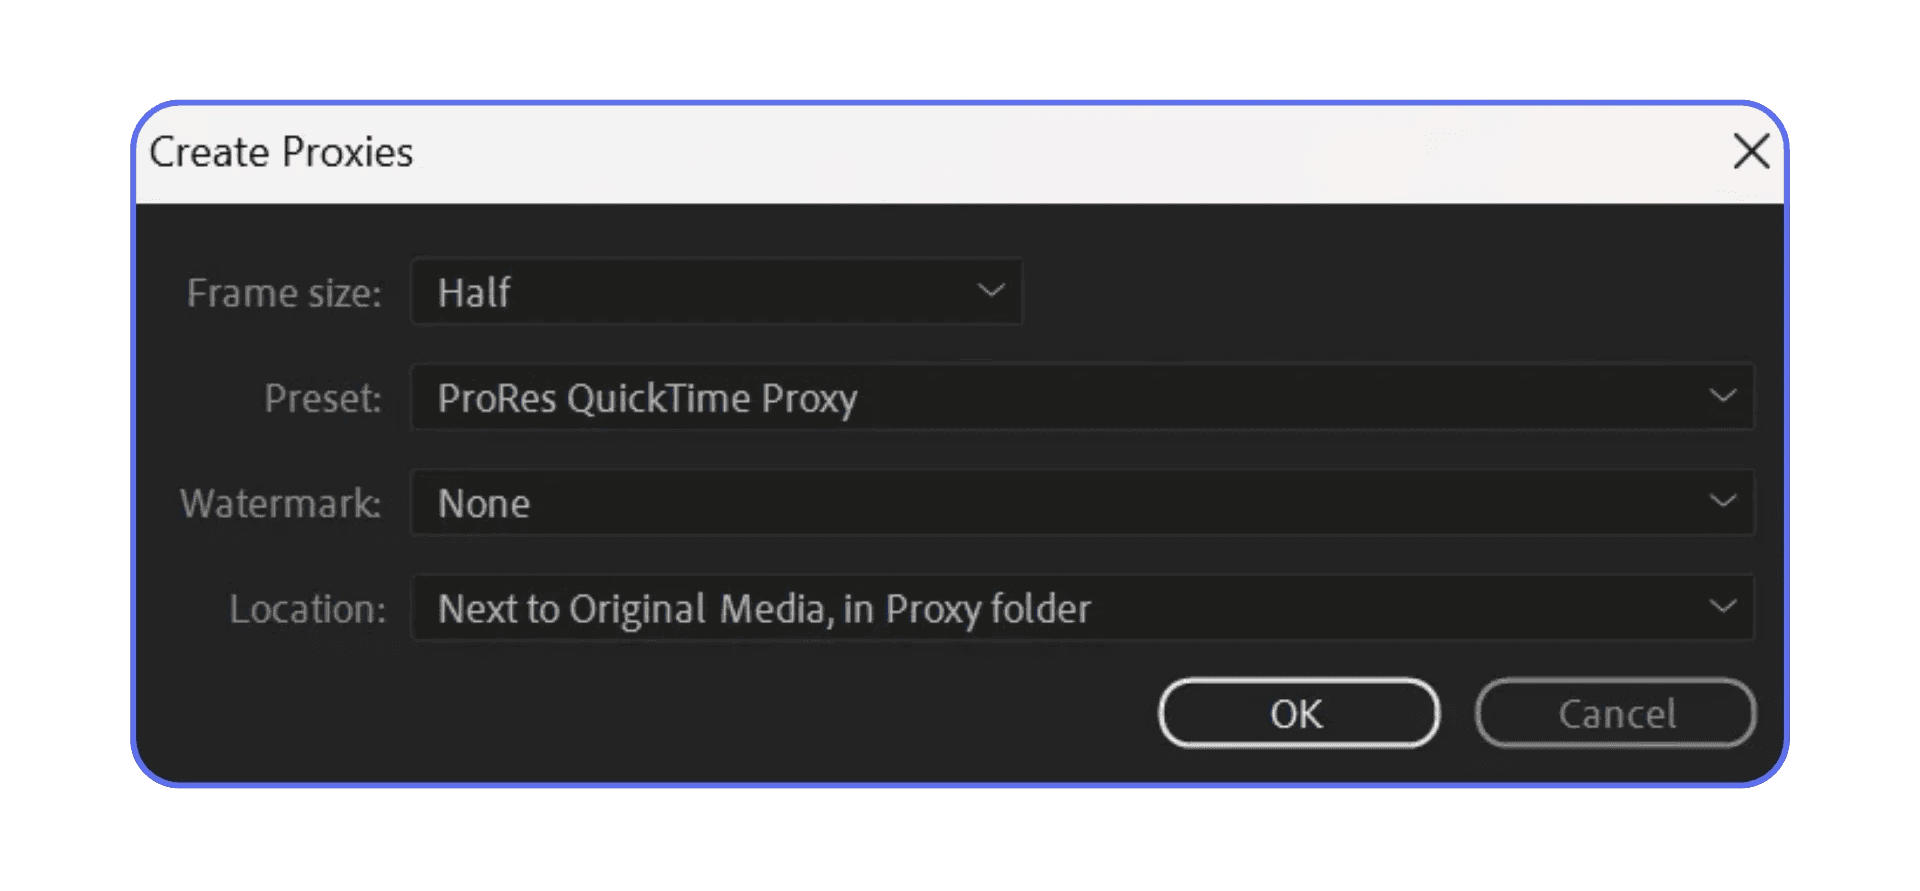
Where your proxies live matters more than you think
Premiere asks where to put the proxy files. You’ll see options like “Next to Original Media” or a custom location.
I strongly prefer keeping proxies in their own folder. Something obvious. Something named “Proxies.” Future you will thank you when storage gets tight or you need to relink things quickly.
If you’re working on shared projects or moving between machines, this step becomes critical. Consistency saves hours.
Knowing when proxies are actually working
Once Media Encoder finishes, Premiere automatically attaches the proxy files. You don’t need to relink anything manually in normal cases.
But here’s the catch. Proxies don’t activate themselves visually unless you tell Premiere to show you.
Go to the Program Monitor. Click the little plus icon to customize buttons. Add Toggle Proxies.
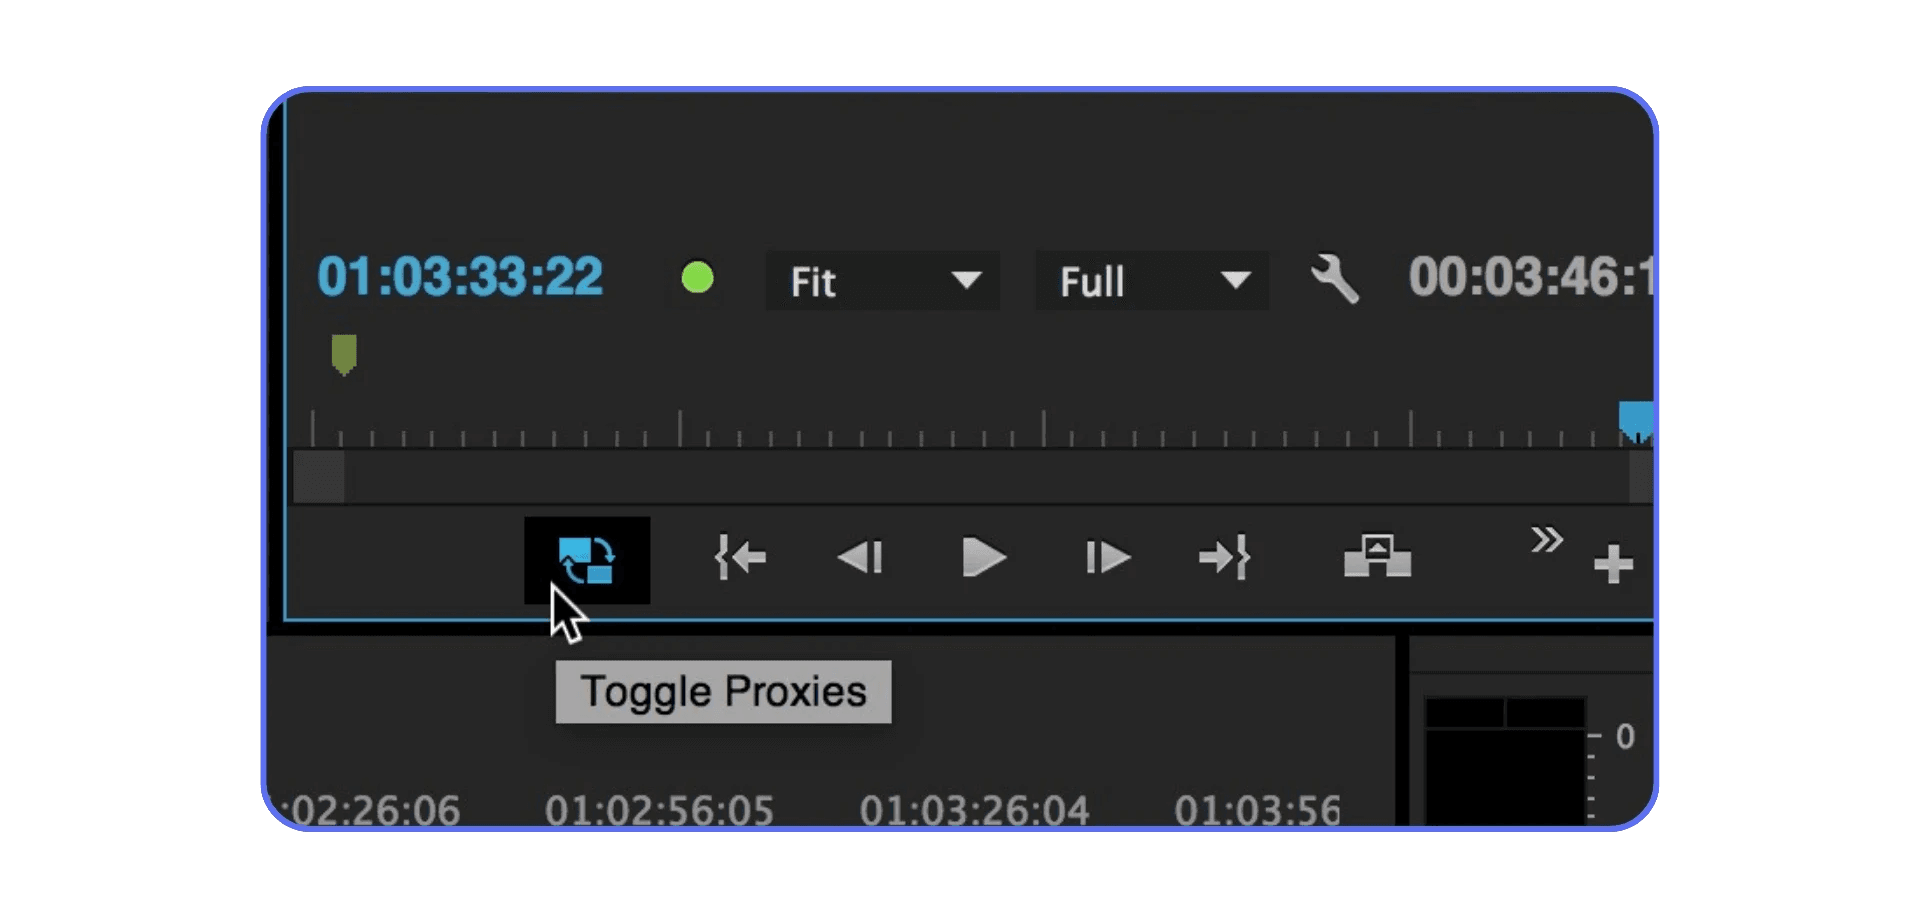
Now you have a switch.
When it’s on, you’re editing proxies. When it’s off, you’re seeing full-resolution footage. One click. No guesswork.
I make a habit of turning proxies on the moment I start cutting, and off when I want to check focus or color quickly. It becomes muscle memory fast.
The Proxy Choices That Quietly Make or Break Your Edit
This is where most tutorials stop too early. They show you how to create proxies, then move on like every proxy behaves the same. They don’t.
A few small decisions here can turn proxies from “nice improvement” into “why didn’t I do this years ago.”
Resolution isn’t about quality. It’s about responsiveness
A lot of people default to 720p proxies because it sounds reasonable. And honestly, it usually is.
But I’ve noticed something over time. If you’re editing dialogue, interviews, or anything where timing matters more than visuals, you can go even lower without pain. 540p looks rough if you stare at it. But for cutting? It’s shockingly usable. And lighter files mean smoother scrubbing.
On the other hand, if you’re cutting fast-paced footage, sports, or handheld material where motion clarity matters, 720p can feel nicer. The point is this. Don’t chase sharpness. Chase responsiveness.
Your final export will never use these files anyway.
Codec choice matters more than people admit
This is the quiet performance killer.
Edit-friendly codecs like ProRes Proxy and CineForm are big. They take up more space. And yes, that scares people at first.
But they’re designed to be decoded quickly. Frame by frame. No guessing. No rebuilding frames in the background. That’s why your timeline suddenly feels glued to your mouse instead of lagging half a second behind it.
I’ve tested H.264 proxies plenty of times. They work. But when a project starts stacking layers, effects, or nested sequences, those compressed proxies start to show their limits. Playback hiccups creep back in.
If storage is cheap and time matters, choose the heavier codec. I rarely regret it.

Frame rate mismatches cause weird pain later
One rule I never break.
Your proxies must match the frame rate of your originals. Always.
Premiere usually handles this correctly if you use built-in presets, but custom presets can bite you. Mismatched frame rates cause subtle drift, audio sync issues, and exports that feel slightly off without obvious errors.
If something feels wrong later and you can’t explain it, frame rate is often the culprit.

Naming and folder discipline saves real hours
This part feels boring until it isn’t.
Clear proxy folders. Predictable paths. No random renaming. Especially if you collaborate or move projects between systems.
I’ve seen editors lose half a day relinking media because proxy folders were renamed during a storage cleanup. Premiere is powerful, but it has zero patience for creative file management.
If you treat proxies like temporary trash files, they will bite back. Treat them like real assets, and they behave.
A quick reality check
Proxies dramatically improve playback and editing flow. They do not speed up exports. They do not magically fix bad timelines. And they won’t save you if your system is choking on heavy effects or color nodes.
Which brings us to the part nobody likes to talk about.
Sometimes proxies aren’t enough.
The Mistakes That Make People Think Proxies “Don’t Work”
I’ve heard this a lot. Someone tries proxies once, shrugs, and decides they’re overrated. Almost every time, it comes down to one of these issues.
Proxies are created, but never actually used
This one is painfully common.
People generate proxies, see Media Encoder finish, and assume Premiere is now magically faster. But unless the Toggle Proxies button is turned on, you’re still editing full-resolution media.
I’ve watched editors struggle for an hour before realizing this. One click later, the timeline suddenly behaves. If nothing feels different after making proxies, check the toggle first.
Proxies that are too heavy defeat the purpose
If your proxy is 4K ProRes, that’s not a proxy. That’s just another problem.
I’ve seen custom presets where people accidentally choose high bitrates or unnecessary resolutions. Premiere will happily create them. Performance will barely improve. Everyone gets confused.
Keep proxies lightweight. Lower resolution. Simple codec. That’s the whole point.
Storage bottlenecks can cancel out all the gains
This one sneaks up on people.
If your proxies live on a slow external drive or a nearly full disk, Premiere still has to wait for data. Fast decoding doesn’t help if the drive can’t keep up.
In practice, I’ve had better results putting proxies on a fast internal SSD, even when originals live elsewhere. The system feels snappier across the board.
Relinking disasters are almost always self-inflicted
Moving proxy folders. Renaming drives. Cleaning storage mid-project. It happens.
Premiere isn’t great at guessing where things went. If proxies go offline, performance tanks and confusion follows. The fix is usually simple, but the time loss isn’t.
Pick a structure and stick to it for the life of the project.
Export panic that shouldn’t exist
This one causes unnecessary stress.
No, Premiere will not export your proxies unless you force it to. As long as your originals are online, Premiere automatically uses them for export. You don’t need to toggle anything before rendering.
If your export looks low-resolution, it means the original media is offline. That’s not a proxy issue. That’s a missing file issue.
Once you understand these pitfalls, proxies stop feeling fragile and start feeling reliable.
But there’s a final reality we need to address.
Even with perfect proxy workflows, some projects still push hardware past its comfort zone. That’s where the conversation shifts from workflow to horsepower.
When Proxies Help, But Vagon Cloud Computer is The Real Unlock
Let’s be direct about it.
Proxies are incredible for editing speed, but they don’t magically turn a mid-range machine into a high-end workstation. They solve decoding and playback issues. They don’t solve raw horsepower limits.
The moment you switch proxies off to check color, motion blur, noise reduction, or layered effects, your local machine is back in charge. Same thing when you render previews or export final masters. If your CPU, GPU, or RAM is already close to its limit, proxies can only take you so far.
This is exactly where Vagon Cloud Computer makes sense. Not as a gimmick. Not as a replacement for proxies. As a continuation of the same idea.
You’re already working with lightweight proxy files. That means you don’t actually need your physical computer to do the heavy lifting anymore. You just need a fast, stable environment that can handle Premiere Pro at full resolution when it matters.
With Vagon, you launch a high-performance cloud machine, open Premiere, and work as if you’re sitting in front of a fully specced workstation. No thermal throttling. No fans ramping up. No compromises when effects stack up.
What I like here is how naturally it fits into a real workflow.
You cut fast using proxies.
You switch to full-res when needed.
You render and export on hardware that doesn’t blink.
And if you’re collaborating, sharing projects, or moving between locations, everything stays in one place. Same environment. Same performance. No “it runs fine on my machine” conversations.
I’ll be honest. I wouldn’t use cloud hardware for quick edits or lightweight social clips. That’s not what it’s for.
But for long-form content, client work, heavy timelines, or deadlines where waiting is not an option, Vagon removes a bottleneck proxies can’t touch. Once you experience Premiere running smoothly under real load, it’s hard not to notice how much friction you were quietly accepting before.
Proxies get you speed.
Vagon gives you headroom.
And knowing when to use both is what separates a smooth editing workflow from a frustrating one.
Final Thoughts
At the end of the day, proxies aren’t a trick or an advanced feature reserved for “serious” editors. They’re just a practical response to how modern video works. High-resolution, highly compressed files look amazing and edit terribly. Proxies fix that disconnect.
Once you start using them consistently, editing stops feeling like a test of patience. You scrub when you want. You cut on instinct. You stay focused on timing and story instead of watching dropped frames. That alone changes how enjoyable Premiere Pro feels.
But it’s also worth being realistic. Proxies solve playback and responsiveness. They don’t replace processing power. When projects grow, deadlines tighten, or collaboration enters the picture, relying on a single local machine can become the weakest link.
That’s why combining a solid proxy workflow with something like Vagon Cloud Computer makes sense. Proxies keep you fast while editing. Cloud horsepower steps in when you need real muscle without upgrading hardware or reworking your entire setup.
Editing doesn’t have to be a fight. When your tools work with you instead of against you, the whole process feels lighter. And honestly, that’s when the best work usually happens.
FAQs
1. Do proxies reduce the quality of my final export?
No. Proxies are only used while you edit. When you export, Premiere automatically switches back to the original media as long as it’s online. If an export looks low quality, it usually means the originals are missing, not that proxies were used incorrectly.
2. Will proxies speed up rendering and exports?
Not really. Proxies help with playback, scrubbing, and general responsiveness while editing. Exports, renders, and heavy effects still rely on your actual hardware and original files. That’s a common misconception.
What’s the best proxy resolution?
There’s no single correct answer, but 720p is a safe default for most projects. If your system is really struggling, 540p can feel even snappier and is still perfectly usable for cutting. Focus on responsiveness, not sharpness.
4. Should I always use ProRes Proxy or CineForm?
If performance is the priority, yes. These codecs are designed for editing and decode much faster than compressed formats. H.264 proxies work, but they often bring back small playback hiccups once timelines get complex.
5. Can I create proxies after I’ve already started editing?
Absolutely. You can generate proxies at any point. Premiere will attach them to the existing clips without breaking your edits. It’s often a relief move halfway through a painful project.
6. Where should I store proxy files?
Ideally on a fast drive with plenty of space. An internal SSD usually gives the best results. Keep them in a clearly named folder and don’t move them mid-project unless you’re ready to relink.
7. Do proxies work with multicam sequences?
Yes, and they help a lot. Multicam is one of the biggest performance killers in Premiere. Proxies can turn an unusable multicam timeline into something that feels stable and predictable.
8. Why does my timeline still lag even with proxies on?
Usually one of three things. The proxies are too heavy, they’re stored on a slow drive, or your timeline is being pushed by effects, color work, or nested sequences. Proxies solve decoding problems, not every performance problem.
9. Should I turn proxies off before exporting?
No need. Premiere handles this automatically. You only need to toggle proxies off if you want to visually check full-resolution focus or color while editing.
10. Are proxies worth the setup time?
In my experience, yes. Especially for long-form projects. The first time you edit a full day without fighting playback, the setup cost feels trivial in hindsight.
I still remember the first time this happened to me.
I dropped a batch of shiny 4K clips into Premiere Pro, hit play, and… nothing. The timeline stuttered, audio drifted, and the playhead moved like it was dragging a brick behind it. I honestly thought my computer was dying. Fans spinning. Beach ball vibes. That sinking feeling in your stomach.
Here’s the thing though. The footage was fine. Premiere was fine. My machine wasn’t broken.
It was just trying to edit 4K files like they were lightweight JPEGs. Which they absolutely are not.
This is the moment most editors hit sooner or later. You open high-resolution footage. The timeline freezes. Scrubbing feels like guesswork. You start lowering playback resolution, closing apps, maybe even restarting for no real reason. And then someone casually says, “Why aren’t you using proxies?”
If that word makes you think things just got more complicated, I get it. I avoided proxies longer than I should have. Big mistake.
Because once you understand them, editing stops feeling like a fight.
Why Proxies Matter More Than Most People Admit
Here’s the part nobody tells beginners clearly enough.
Premiere isn’t struggling because it’s badly optimized. It’s struggling because modern video files are heavy, compressed, and not designed for real-time editing. Your camera is built to record efficiently, not to play back smoothly while you scrub, cut, stack effects, and jump around the timeline.
4K, 6K, 10-bit, Long-GOP codecs. Great for image quality. Terrible for editing performance.
A proxy is just a lightweight copy of your footage. Lower resolution. Easier codec. Same timing, same frame rate, same duration. Premiere swaps these in while you edit, then quietly switches back to the original files when you export.
You’re not downgrading your final video. You’re just giving Premiere something it can breathe with.
In my experience, this is where the biggest mindset shift happens. Editing speed has very little to do with how “powerful” your computer feels day to day. You can have a fast CPU and still suffer if you’re forcing it to decode massive files nonstop. Proxies change that equation completely.
Without proxies, Premiere has to decode full-resolution frames every time you hit play, scrub, or stack clips. With proxies, it’s working with files that are often 4 to 10 times lighter. Sometimes more.
The difference is immediate. Timeline playback goes from choppy to smooth. Scrubbing actually tracks your mouse. Multicam stops feeling like a gamble. And weirdly, you stop getting tired as fast, because you’re not waiting on your software all day.
One important thing though. Proxies aren’t a magic fix for everything. If your system is already maxed out with effects, heavy color work, or massive timelines, they won’t save you entirely. But for straight editing? Cutting, trimming, arranging, syncing?
They’re one of the highest impact changes you can make. Full stop.
And once you’ve used them properly, going back feels… painful.
When You Actually Need Proxies
Not every project needs proxies. I want to be clear about that, because some guides make it sound like a mandatory checkbox. It isn’t.
But there are very specific moments where proxies stop being optional and start being a sanity saver.
If you’re working with 4K or higher, you’re already in proxy territory. Even if playback seems fine at first, things usually fall apart once the timeline grows. A few cuts turn into dozens. Add music. Add B-roll. Add adjustment layers. Suddenly your “fast enough” setup isn’t fast anymore.
Long-GOP codecs are another big one. Files like H.264 and H.265 are compressed in a way that’s great for storage and terrible for scrubbing. Premiere has to rebuild frames on the fly just to show you what’s happening. That’s extra work every single time you move the playhead. Proxies dodge that problem entirely.
Multicam editing is a quiet killer too. Two angles might feel okay. Four starts to hurt. Six or eight? Good luck without proxies, especially on a laptop. I’ve noticed multicam timelines are often where editors finally break and ask what they’re doing wrong.
Editing on a laptop is another clear signal. Even a high-end laptop hits thermal limits fast. Proxies reduce the workload enough that your system stays stable instead of throttling halfway through the day.
Now, when don’t you need them?
If you’re cutting short 1080p clips in an edit-friendly codec like ProRes or DNxHR, and your timeline stays simple, proxies might not give you much benefit. Same goes for quick social edits where speed matters more than polish.
But here’s the honest test I use. If you ever hit play and hesitate, waiting to see if it’ll stutter, that’s your answer. If scrubbing feels like a suggestion instead of a command, you’ll benefit from proxies.
How to Create Proxies in Premiere Pro Without Overthinking It
This is the part people expect to be complicated. It isn’t. Premiere’s proxy workflow is one of the few things Adobe has actually made easier over the years.
Still, there are a couple of small decisions here that matter more than the buttons you click.
Start by getting your media in order
Before you create anything, look at your Project panel. If your clips are already imported and scattered across bins with random names, that’s fine. You don’t need to redo your whole structure.
What does matter is knowing where your original media lives on disk. Proxies are linked to those files, not magically floating around. If you move originals later without thinking, things break. Ask me how I know.
If you haven’t imported footage yet, this is the cleanest moment to do proxies. But you can absolutely generate them after the fact too.
The actual proxy creation steps
Select the clips you want proxies for in the Project panel. You can select one clip or a hundred. Premiere doesn’t care.
Right-click on the selection.
Choose Proxy > Create Proxies.
That’s it. No hidden menu. No secret checkbox.
A window pops up asking how you want to do this. This is where most people pause and second-guess themselves.
Picking a preset without spiraling
Premiere gives you a list of proxy presets. You’ll see things like ProRes Proxy, CineForm, and H.264 options at different resolutions.
Here’s my blunt take.
If you’re on macOS, ProRes Proxy is a safe, boring, excellent choice. Smooth playback. Minimal headaches.
On Windows, CineForm does a similar job and behaves well across systems.
H.264 proxies look tempting because the files are smaller. I’ve used them. They work. But they’re still compressed, and that means more decoding work. If performance is the goal, edit-friendly codecs win almost every time.
For resolution, 1024x540 or 1280x720 is usually enough. You’re not judging fine focus here. You’re cutting.
Once you choose a preset, Premiere sends everything to Adobe Media Encoder in the background. You can keep working while it runs, which still feels like a small miracle.
Where your proxies live matters more than you think
Premiere asks where to put the proxy files. You’ll see options like “Next to Original Media” or a custom location.
I strongly prefer keeping proxies in their own folder. Something obvious. Something named “Proxies.” Future you will thank you when storage gets tight or you need to relink things quickly.
If you’re working on shared projects or moving between machines, this step becomes critical. Consistency saves hours.
Knowing when proxies are actually working
Once Media Encoder finishes, Premiere automatically attaches the proxy files. You don’t need to relink anything manually in normal cases.
But here’s the catch. Proxies don’t activate themselves visually unless you tell Premiere to show you.
Go to the Program Monitor. Click the little plus icon to customize buttons. Add Toggle Proxies.
Now you have a switch.
When it’s on, you’re editing proxies. When it’s off, you’re seeing full-resolution footage. One click. No guesswork.
I make a habit of turning proxies on the moment I start cutting, and off when I want to check focus or color quickly. It becomes muscle memory fast.
The Proxy Choices That Quietly Make or Break Your Edit
This is where most tutorials stop too early. They show you how to create proxies, then move on like every proxy behaves the same. They don’t.
A few small decisions here can turn proxies from “nice improvement” into “why didn’t I do this years ago.”
Resolution isn’t about quality. It’s about responsiveness
A lot of people default to 720p proxies because it sounds reasonable. And honestly, it usually is.
But I’ve noticed something over time. If you’re editing dialogue, interviews, or anything where timing matters more than visuals, you can go even lower without pain. 540p looks rough if you stare at it. But for cutting? It’s shockingly usable. And lighter files mean smoother scrubbing.
On the other hand, if you’re cutting fast-paced footage, sports, or handheld material where motion clarity matters, 720p can feel nicer. The point is this. Don’t chase sharpness. Chase responsiveness.
Your final export will never use these files anyway.
Codec choice matters more than people admit
This is the quiet performance killer.
Edit-friendly codecs like ProRes Proxy and CineForm are big. They take up more space. And yes, that scares people at first.
But they’re designed to be decoded quickly. Frame by frame. No guessing. No rebuilding frames in the background. That’s why your timeline suddenly feels glued to your mouse instead of lagging half a second behind it.
I’ve tested H.264 proxies plenty of times. They work. But when a project starts stacking layers, effects, or nested sequences, those compressed proxies start to show their limits. Playback hiccups creep back in.
If storage is cheap and time matters, choose the heavier codec. I rarely regret it.
Frame rate mismatches cause weird pain later
One rule I never break.
Your proxies must match the frame rate of your originals. Always.
Premiere usually handles this correctly if you use built-in presets, but custom presets can bite you. Mismatched frame rates cause subtle drift, audio sync issues, and exports that feel slightly off without obvious errors.
If something feels wrong later and you can’t explain it, frame rate is often the culprit.
Naming and folder discipline saves real hours
This part feels boring until it isn’t.
Clear proxy folders. Predictable paths. No random renaming. Especially if you collaborate or move projects between systems.
I’ve seen editors lose half a day relinking media because proxy folders were renamed during a storage cleanup. Premiere is powerful, but it has zero patience for creative file management.
If you treat proxies like temporary trash files, they will bite back. Treat them like real assets, and they behave.
A quick reality check
Proxies dramatically improve playback and editing flow. They do not speed up exports. They do not magically fix bad timelines. And they won’t save you if your system is choking on heavy effects or color nodes.
Which brings us to the part nobody likes to talk about.
Sometimes proxies aren’t enough.
The Mistakes That Make People Think Proxies “Don’t Work”
I’ve heard this a lot. Someone tries proxies once, shrugs, and decides they’re overrated. Almost every time, it comes down to one of these issues.
Proxies are created, but never actually used
This one is painfully common.
People generate proxies, see Media Encoder finish, and assume Premiere is now magically faster. But unless the Toggle Proxies button is turned on, you’re still editing full-resolution media.
I’ve watched editors struggle for an hour before realizing this. One click later, the timeline suddenly behaves. If nothing feels different after making proxies, check the toggle first.
Proxies that are too heavy defeat the purpose
If your proxy is 4K ProRes, that’s not a proxy. That’s just another problem.
I’ve seen custom presets where people accidentally choose high bitrates or unnecessary resolutions. Premiere will happily create them. Performance will barely improve. Everyone gets confused.
Keep proxies lightweight. Lower resolution. Simple codec. That’s the whole point.
Storage bottlenecks can cancel out all the gains
This one sneaks up on people.
If your proxies live on a slow external drive or a nearly full disk, Premiere still has to wait for data. Fast decoding doesn’t help if the drive can’t keep up.
In practice, I’ve had better results putting proxies on a fast internal SSD, even when originals live elsewhere. The system feels snappier across the board.
Relinking disasters are almost always self-inflicted
Moving proxy folders. Renaming drives. Cleaning storage mid-project. It happens.
Premiere isn’t great at guessing where things went. If proxies go offline, performance tanks and confusion follows. The fix is usually simple, but the time loss isn’t.
Pick a structure and stick to it for the life of the project.
Export panic that shouldn’t exist
This one causes unnecessary stress.
No, Premiere will not export your proxies unless you force it to. As long as your originals are online, Premiere automatically uses them for export. You don’t need to toggle anything before rendering.
If your export looks low-resolution, it means the original media is offline. That’s not a proxy issue. That’s a missing file issue.
Once you understand these pitfalls, proxies stop feeling fragile and start feeling reliable.
But there’s a final reality we need to address.
Even with perfect proxy workflows, some projects still push hardware past its comfort zone. That’s where the conversation shifts from workflow to horsepower.
When Proxies Help, But Vagon Cloud Computer is The Real Unlock
Let’s be direct about it.
Proxies are incredible for editing speed, but they don’t magically turn a mid-range machine into a high-end workstation. They solve decoding and playback issues. They don’t solve raw horsepower limits.
The moment you switch proxies off to check color, motion blur, noise reduction, or layered effects, your local machine is back in charge. Same thing when you render previews or export final masters. If your CPU, GPU, or RAM is already close to its limit, proxies can only take you so far.
This is exactly where Vagon Cloud Computer makes sense. Not as a gimmick. Not as a replacement for proxies. As a continuation of the same idea.
You’re already working with lightweight proxy files. That means you don’t actually need your physical computer to do the heavy lifting anymore. You just need a fast, stable environment that can handle Premiere Pro at full resolution when it matters.
With Vagon, you launch a high-performance cloud machine, open Premiere, and work as if you’re sitting in front of a fully specced workstation. No thermal throttling. No fans ramping up. No compromises when effects stack up.
What I like here is how naturally it fits into a real workflow.
You cut fast using proxies.
You switch to full-res when needed.
You render and export on hardware that doesn’t blink.
And if you’re collaborating, sharing projects, or moving between locations, everything stays in one place. Same environment. Same performance. No “it runs fine on my machine” conversations.
I’ll be honest. I wouldn’t use cloud hardware for quick edits or lightweight social clips. That’s not what it’s for.
But for long-form content, client work, heavy timelines, or deadlines where waiting is not an option, Vagon removes a bottleneck proxies can’t touch. Once you experience Premiere running smoothly under real load, it’s hard not to notice how much friction you were quietly accepting before.
Proxies get you speed.
Vagon gives you headroom.
And knowing when to use both is what separates a smooth editing workflow from a frustrating one.
Final Thoughts
At the end of the day, proxies aren’t a trick or an advanced feature reserved for “serious” editors. They’re just a practical response to how modern video works. High-resolution, highly compressed files look amazing and edit terribly. Proxies fix that disconnect.
Once you start using them consistently, editing stops feeling like a test of patience. You scrub when you want. You cut on instinct. You stay focused on timing and story instead of watching dropped frames. That alone changes how enjoyable Premiere Pro feels.
But it’s also worth being realistic. Proxies solve playback and responsiveness. They don’t replace processing power. When projects grow, deadlines tighten, or collaboration enters the picture, relying on a single local machine can become the weakest link.
That’s why combining a solid proxy workflow with something like Vagon Cloud Computer makes sense. Proxies keep you fast while editing. Cloud horsepower steps in when you need real muscle without upgrading hardware or reworking your entire setup.
Editing doesn’t have to be a fight. When your tools work with you instead of against you, the whole process feels lighter. And honestly, that’s when the best work usually happens.
FAQs
1. Do proxies reduce the quality of my final export?
No. Proxies are only used while you edit. When you export, Premiere automatically switches back to the original media as long as it’s online. If an export looks low quality, it usually means the originals are missing, not that proxies were used incorrectly.
2. Will proxies speed up rendering and exports?
Not really. Proxies help with playback, scrubbing, and general responsiveness while editing. Exports, renders, and heavy effects still rely on your actual hardware and original files. That’s a common misconception.
What’s the best proxy resolution?
There’s no single correct answer, but 720p is a safe default for most projects. If your system is really struggling, 540p can feel even snappier and is still perfectly usable for cutting. Focus on responsiveness, not sharpness.
4. Should I always use ProRes Proxy or CineForm?
If performance is the priority, yes. These codecs are designed for editing and decode much faster than compressed formats. H.264 proxies work, but they often bring back small playback hiccups once timelines get complex.
5. Can I create proxies after I’ve already started editing?
Absolutely. You can generate proxies at any point. Premiere will attach them to the existing clips without breaking your edits. It’s often a relief move halfway through a painful project.
6. Where should I store proxy files?
Ideally on a fast drive with plenty of space. An internal SSD usually gives the best results. Keep them in a clearly named folder and don’t move them mid-project unless you’re ready to relink.
7. Do proxies work with multicam sequences?
Yes, and they help a lot. Multicam is one of the biggest performance killers in Premiere. Proxies can turn an unusable multicam timeline into something that feels stable and predictable.
8. Why does my timeline still lag even with proxies on?
Usually one of three things. The proxies are too heavy, they’re stored on a slow drive, or your timeline is being pushed by effects, color work, or nested sequences. Proxies solve decoding problems, not every performance problem.
9. Should I turn proxies off before exporting?
No need. Premiere handles this automatically. You only need to toggle proxies off if you want to visually check full-resolution focus or color while editing.
10. Are proxies worth the setup time?
In my experience, yes. Especially for long-form projects. The first time you edit a full day without fighting playback, the setup cost feels trivial in hindsight.
Get Beyond Your Computer Performance
Run applications on your cloud computer with the latest generation hardware. No more crashes or lags.

Trial includes 1 hour usage + 7 days of storage.
Summarize with AI

Ready to focus on your creativity?
Vagon gives you the ability to create & render projects, collaborate, and stream applications with the power of the best hardware.

Vagon Blog


Run heavy applications on any device with
your personal computer on the cloud.
San Francisco, California
Solutions
Vagon Teams
Vagon Streams
Use Cases
Resources
Vagon Blog
How to Run Inkscape on a Cloud Ubuntu Desktop (2026 Guide)
How to Run Krita on a Cloud Ubuntu Desktop for Digital Painting (2026 Guide)
How to Run GIMP on a Cloud Ubuntu Desktop (2026 Guide)
How to Run Jupyter on a Cloud GPU Linux Desktop (2026 Guide)
Vagon vs GitHub Codespaces: Cloud Dev Environments Compared (2026)
Vagon vs RunPod: Which Cloud GPU Is Right for You? (2026 Comparison)
How to Watch Your AI Agent Work on a Cloud Ubuntu Desktop (2026 Guide)
How to Run a Local LLM on Ubuntu in the Cloud (2026 Guide)
How to Run Blender on a Cloud GPU (Ubuntu): The Complete 2026 Guide
Vagon Blog
Run heavy applications on any device with
your personal computer on the cloud.
San Francisco, California
Solutions
Vagon Teams
Vagon Streams
Use Cases
Resources
Vagon Blog