Instant Connection for Pixel Streaming
— New Feature Automated Setup

Bit Depth Explained: 8-bit vs 16-bit vs 32-bit for Video Editing
Bit Depth Explained: 8-bit vs 16-bit vs 32-bit for Video Editing
DigitalArt
Bit Depth Explained: 8-bit vs 16-bit vs 32-bit for Video Editing
Table of Contents
You’ve probably seen it happen. The shot looks fine in camera. Then you start grading, and the sky breaks into visible bands. Skin tones turn patchy. Shadows fall apart the moment you lift them.
I used to blame my grading skills when this happened. Then my monitor. Then the codec. Eventually I realized the footage was never built to be pushed that far in the first place.
That limit is bit depth.
Bit depth decides how much color information your footage actually contains and how much stress it can handle in post. Low bit depth looks fine until you start shaping the image. Once you push it, there’s simply not enough data to hold smooth transitions together.
Banding, broken gradients, and ugly skin tones aren’t usually editing mistakes. They’re signs you’ve hit the ceiling of what the footage can give you.
Bit Depth, Explained Without the Textbook Nonsense
Bit depth sounds technical, but the idea is simple.
It’s just a count. How many tonal steps each color channel gets to describe the image.
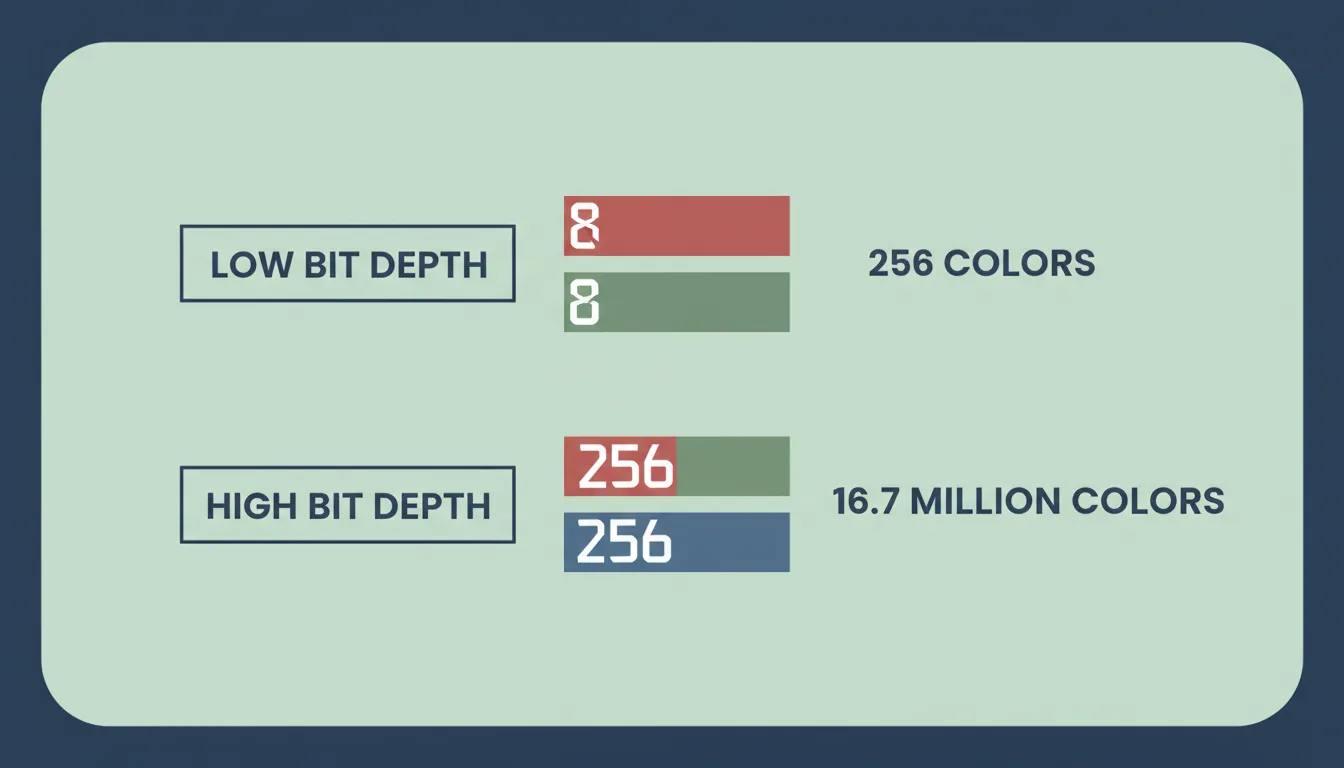
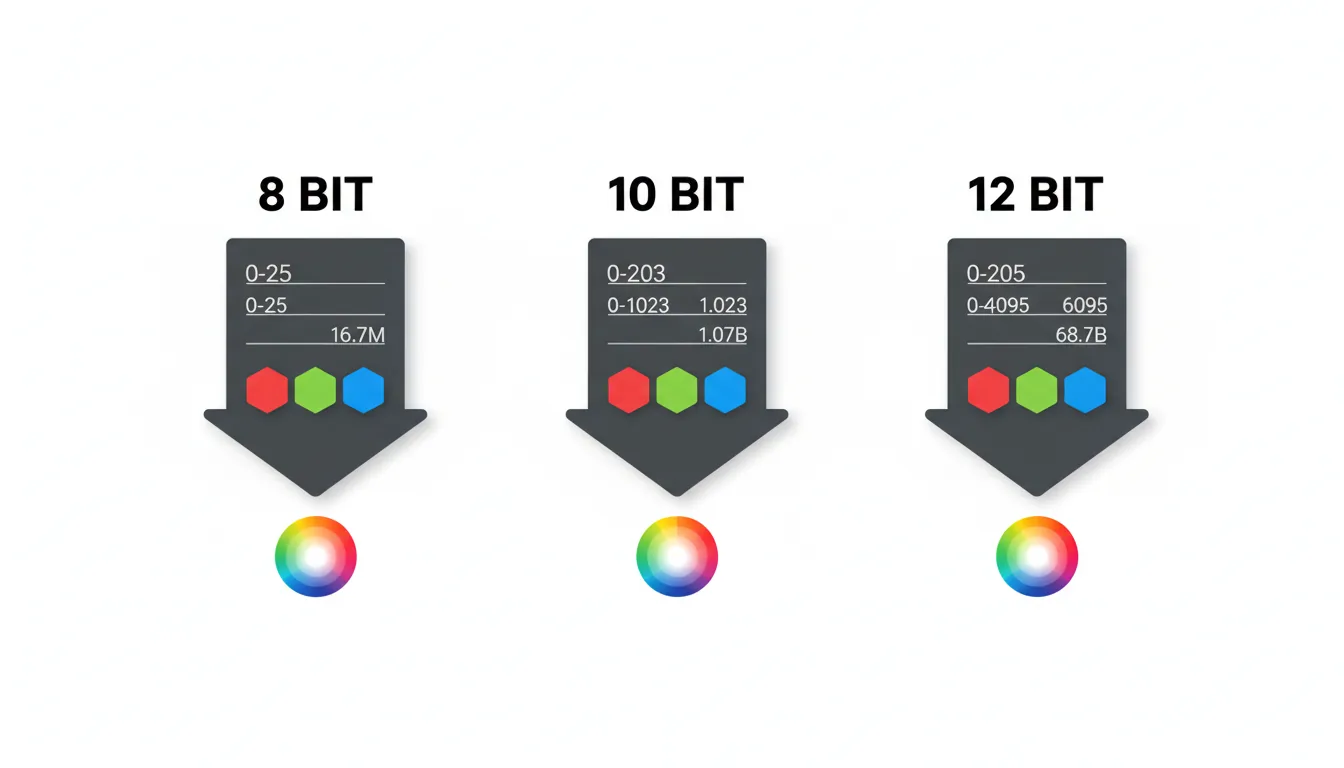
In most video, you’re dealing with red, green, and blue channels. In 8-bit, each of those channels gets 256 possible values. That’s it. When you combine them, you end up with about 16.7 million colors. On paper, that sounds like plenty. In practice, those colors are spread thin across highlights, midtones, and shadows.

Here’s the part people miss. Those 256 steps aren’t reserved for the areas you care about most. They’re shared across the entire range. Bright skies, soft gradients, skin tones, deep shadows. Everything fights for the same limited precision.
Think of it like drawing a smooth curve using only a handful of straight line segments. From a distance, it looks fine. Zoom in or start reshaping it, and the corners appear fast.
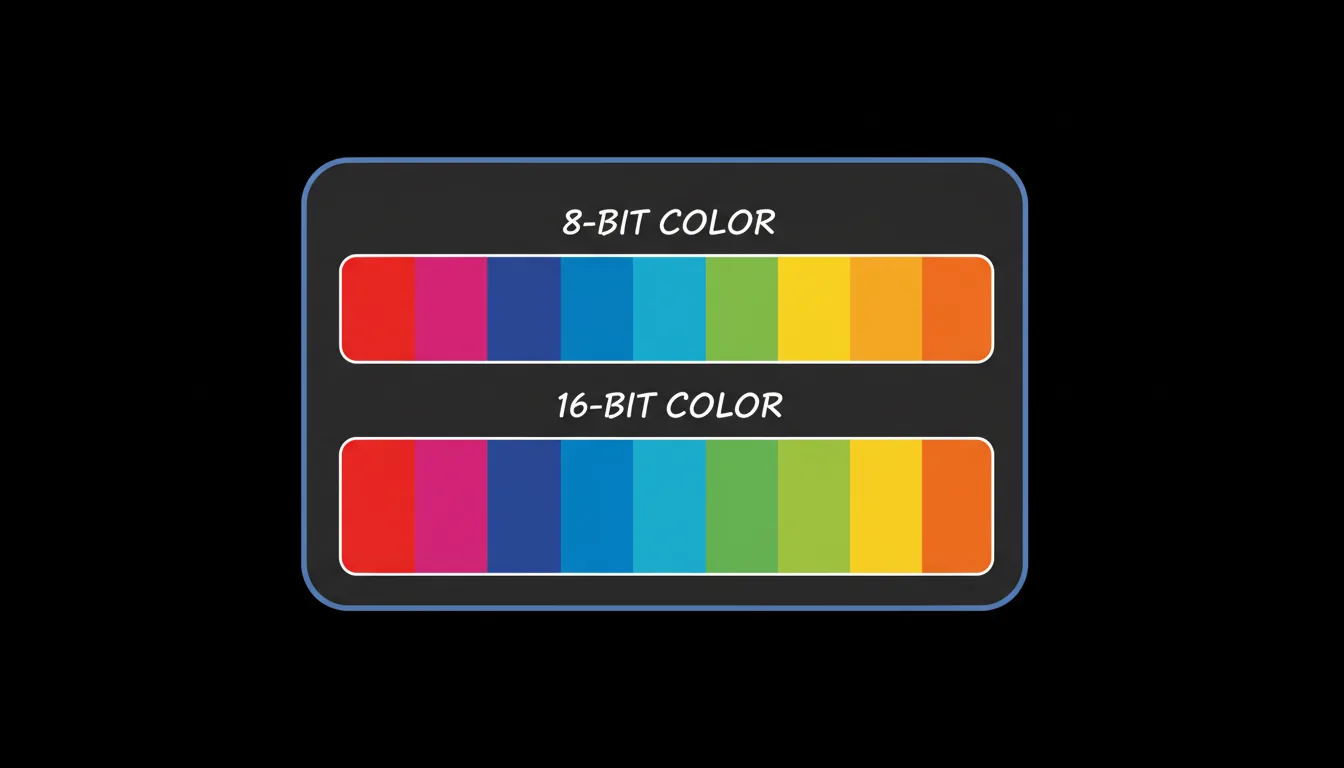
Higher bit depth doesn’t magically make images prettier on its own. What it does is add more steps between values. More room for subtle transitions. More space to push contrast, exposure, and color without the image falling apart.
This is why bit depth matters most once you leave the camera and enter post. Editing and color grading are basically controlled stress tests. Every adjustment stretches the data. With low bit depth, you hit the breaking point quickly. With higher bit depth, the image has more elasticity.
That’s the foundation. Everything else builds on this.
8-bit Video: Fine Until You Push It
8-bit gets a bad reputation, and I don’t think that’s entirely fair.
Most of the video you watch every day is 8-bit. Broadcast, streaming platforms, social media. Even a lot of popular mirrorless cameras still record 8-bit internally. If it were unusable, none of that would work.
The key word is until.
8-bit footage is fine when you treat it gently. Minimal grading. Small contrast tweaks. White balance close to correct. If you nail exposure and lighting on set, 8-bit can look clean and professional.
Problems start the moment you ask it to do more.
Log profiles are a common trap. They’re designed to preserve dynamic range, but in 8-bit, that range is squeezed into very few tonal steps. When you stretch it back out in post, the gaps show up as banding, especially in skies and walls.
Skin tones are another giveaway. Push saturation or shift hue slightly and transitions that should be smooth become blotchy. Shadows don’t lift gracefully either. They crumble, revealing noise and harsh edges instead of detail.
This is why 8-bit feels fragile. It gives you just enough information to work with, but no margin for error. Every adjustment eats into a limited supply of data.
If you’re shooting fast-turnaround content or projects that don’t need heavy grading, 8-bit is perfectly serviceable. Just don’t expect it to survive aggressive looks or rescue jobs. It wasn’t built for that.
16-bit: Where Video Starts to Feel Forgiving
The first time you work seriously with higher bit depth, the difference is subtle but unmistakable.
With 16-bit, each color channel jumps from 256 steps to 65,536. That extra precision doesn’t scream at you when you first open the clip. It shows up when you start pushing the image around and it just… holds.
Gradients stay smooth. Skies don’t fall apart when you add contrast. Skin tones bend without turning blotchy. You can lift shadows and pull highlights back without immediately exposing the seams.
This is why 16-bit workflows feel safer. You’re no longer operating on a knife’s edge. Small mistakes don’t instantly punish you. Color grading becomes less about avoiding damage and more about shaping the image you actually want.
In real-world use, this matters most with log footage, RAW workflows, and anything headed toward HDR. The more dynamic range you capture, the more tonal precision you need to manage it cleanly in post.
There is a cost, of course. Files get bigger. Timelines get heavier. Playback isn’t as forgiving, especially on modest machines. You start noticing dropped frames, longer renders, and fans spinning up faster than you’d like.
Still, if your work involves serious color decisions, 16-bit is often the sweet spot. It gives you room to experiment without constantly worrying about breaking the image. Once you get used to that flexibility, going back to 8-bit feels restrictive in a way that’s hard to ignore.
Once you start working in higher bit depth, GPU performance becomes a real factor, especially in tools like Photoshop where 16-bit and 32-bit color work can push hardware hard. If you’ve ever wondered how much your GPU actually matters there, this breakdown on choosing the best GPU for Photoshop explains it well.
32-bit Isn’t Overkill, But It’s Not Everyday Either
32-bit tends to get misunderstood, mostly because it sounds like the obvious next upgrade. More bits must mean better images, right. Sort of.
In most modern video and VFX tools, 32-bit usually means 32-bit floating point. That’s important. It’s less about adding more visible color steps and more about preserving extreme ranges of brightness and precision during calculations.
This is where 32-bit shines. Heavy visual effects. Complex composites. HDR pipelines where highlights can sit far above what a normal display can show. In these situations, you’re not just grading. You’re constantly transforming the image, stacking effects, and reshaping values in ways that would destroy lower-bit-depth data.
With 32-bit float, values can go way beyond what a screen can display without clipping. You can push exposure hard, pull it back later, and the information is still there. That’s incredibly powerful when you need it.
But most editors don’t need it all the time.
For straightforward edits, even fairly advanced color work, 16-bit already offers plenty of precision. 32-bit becomes useful when things get extreme or technical. Think VFX-heavy projects, green screen work with aggressive keys, or HDR masters that need maximum flexibility.
There’s also the performance hit. 32-bit workflows are demanding. Storage, memory, and processing requirements climb quickly. If your system is already struggling with 16-bit footage, 32-bit will not be kind.
So no, 32-bit isn’t overkill. It’s just specialized. When you’re doing work that truly benefits from it, nothing else compares. When you’re not, it’s often unnecessary weight.
Once you get into After Effects, especially with 32-bit float comps, hardware limits show up fast. This is why system choice matters so much, and why guides like finding the best laptops and prebuilt PCs for Adobe After Effects exist in the first place.
The Bit Depth Myths That Won’t Die
Bit depth attracts a lot of half-truths. Usually repeated with confidence. Often missing the point.
One of the biggest myths is that higher bit depth automatically means better image quality. It doesn’t. If the lighting is flat, the exposure is off, or the lens is soft, no amount of extra color precision will save the shot. Bit depth gives you flexibility, not taste.
Another common one is assuming you’re actually seeing all that extra data. In most cases, you’re not. Many displays still operate effectively at 8-bit. Even when they claim higher support, the viewing pipeline often clamps values somewhere along the way. That doesn’t make higher bit depth useless, but it does mean its biggest benefits happen during editing, not playback.
Then there’s the export confusion. Exporting a file at higher bit depth doesn’t mean your audience sees it that way. Delivery platforms compress aggressively. Most final outputs are still 8-bit. The advantage of working higher up the chain is that you arrive at that 8-bit export with fewer artifacts baked in.
A subtle myth I hear a lot is that bit depth fixes banding. It helps, but only if the entire workflow supports it. Shoot 10-bit or higher, grade in a higher-precision space, and avoid crushing values early. Break any part of that chain and the benefit shrinks fast.
The real takeaway is this. Bit depth isn’t a magic upgrade. It’s a tool. Used correctly, it makes your work more resilient. Used blindly, it just adds complexity without payoff.
This also comes up when people move between devices. Working on an iPad can be great for lighter edits, but bit depth support and performance limits still apply. This guide on how to use Photoshop on iPad does a good job of setting realistic expectations.
How Bit Depth Affects Your Actual Editing Workflow
This is where bit depth stops being theoretical and starts messing with your day.
It shows up first in camera settings. Shooting higher bit depth gives you more room later, but only if you actually keep that data alive. Recording 10-bit or higher and then transcoding to an 8-bit intermediate quietly throws away the advantage. It happens more often than people realize.
Then there’s the timeline itself. Once you stack color corrections, LUTs, masks, and effects, you’re constantly recalculating pixel values. Lower bit depth means rounding errors creep in fast. That’s when gradients snap, noise appears, and subtle color shifts turn ugly.
Proxies deserve a quick mention here. They’re lifesavers for performance, but they can also mislead you. If your proxies are low bit depth, what you see while grading might not reflect the final image. That’s fine for rough cuts. It’s dangerous for color decisions. Knowing when to switch back to full-quality media matters.
Performance is the other half of the equation. Higher bit depth footage hits harder. Decoding takes more CPU or GPU power. RAM usage climbs. Renders slow down. Real-time playback becomes a negotiation instead of a given. This is usually the moment editors start blaming their software.
Most of the time, it’s not the software.
A practical approach helps. Do heavy color work later in the pipeline. Avoid extreme adjustments early. Use gentle curves instead of aggressive sliders. And if banding starts to appear, stop pushing and rethink the approach instead of forcing it.
Bit depth doesn’t change how you edit. It changes how forgiving your workflow is. The more you understand that relationship, the fewer surprises you get when deadlines are tight and revisions stack up.
Once you stack effects and start grading higher bit depth footage, GPU acceleration matters more than most people expect, especially in Premiere Pro. If performance is a constant struggle, this guide on choosing the best GPU for Premiere Pro is worth a look.
Where Vagon Cloud Computer Fits When Bit Depth Starts Hurting Your Machine
At a certain point, bit depth stops being a creative decision and turns into a hardware problem. If you’ve worked with 16-bit timelines or touched 32-bit workflows, you know the signs. Choppy playback. Long renders. A timeline that feels like it’s constantly fighting back.
This is exactly where Vagon Cloud Computer makes sense.
High-bit-depth footage is demanding by nature. More precision means more data, more calculations, and more pressure on your CPU, GPU, and memory. On a local machine, that often forces compromises. You lower playback resolution, avoid heavier grades, or delay creative decisions just to keep things responsive.
Vagon removes that bottleneck by letting you work on a powerful cloud workstation instead of relying solely on your own hardware. The footage stays the same. The bit depth stays the same. What changes is the machine doing the work. You get access to high-end resources when you need them, without committing to a permanent hardware upgrade.
For editors who bounce between lighter projects and color-heavy work, this flexibility matters. You can push 16-bit or 32-bit workflows when the project demands it, then scale back when it doesn’t. No constant upgrades. No trying to make a laptop behave like a grading suite.
Vagon doesn’t replace understanding bit depth. It supports it. It lets you choose the right level of precision for the image instead of choosing based on what your computer can barely handle.
This is also where cloud workflows start to make sense for mobile users. Running demanding tools remotely avoids many local limitations, which is exactly why approaches like the best ways to run Adobe After Effects on iPad have become more common.
Final Thoughts
Bit depth isn’t something you chase for bragging rights. It’s something you choose based on how far you plan to push the image.
If your footage looks good and barely needs adjustment, 8-bit can be enough. If you’re shaping color, rescuing exposure, or building a look that needs finesse, higher bit depth gives you breathing room. And if you’re doing extreme work with HDR, VFX, or heavy compositing, precision stops being optional.
The mistake I see most often isn’t using the wrong bit depth. It’s not understanding the tradeoffs. People either overcomplicate their workflow chasing specs they don’t need, or they undercut their own work by locking themselves into fragile footage they can’t safely touch.
Once you understand what bit depth actually does, those decisions get easier. You stop guessing. You stop fighting your footage. And you start building workflows that support the kind of work you want to deliver.
At the end of the day, bit depth isn’t about perfection. It’s about control. How much freedom you have when the creative decisions really matter.
FAQs
1. Does higher bit depth make my video look better automatically?
No. It makes your video more flexible. Higher bit depth gives you more room to adjust color and exposure without artifacts, but it won’t fix bad lighting, soft focus, or poor composition. Think of it as insurance, not a makeover.
2. Why does my 8-bit footage look fine until I start grading it?
Because most of the damage happens during adjustments. Straight-out-of-camera footage doesn’t stress the data much. Once you push contrast, saturation, or curves, 8-bit runs out of tonal steps fast. That’s when banding and breakup show up.
3. Is 10-bit the same as 16-bit?
Not exactly. 10-bit gives you 1,024 steps per channel, which is a big improvement over 8-bit and very common in modern cameras. 16-bit is usually part of post-production and RAW workflows, offering far more precision during editing and color grading. Both are upgrades, just at different stages of the pipeline.
4. If most platforms deliver in 8-bit, why work in higher bit depth at all?
Because you want the cleanest possible image before compression. Working in higher bit depth reduces artifacts before the final export. You’re not doing it for the viewer’s screen, you’re doing it to protect the image during the process.
5. Does my monitor need to support higher bit depth for this to matter?
Not really. Even if your display is effectively 8-bit, higher bit depth still helps behind the scenes. The benefits show up in smoother grades, cleaner exports, and fewer visible artifacts, even if you can’t directly see every extra step while editing.
6. Should I always choose the highest bit depth available?
No. Higher bit depth means heavier files and higher system demands. Use it when the project needs it. Simple edits don’t benefit much. Color-heavy, HDR, or effects-driven projects absolutely do.
You’ve probably seen it happen. The shot looks fine in camera. Then you start grading, and the sky breaks into visible bands. Skin tones turn patchy. Shadows fall apart the moment you lift them.
I used to blame my grading skills when this happened. Then my monitor. Then the codec. Eventually I realized the footage was never built to be pushed that far in the first place.
That limit is bit depth.
Bit depth decides how much color information your footage actually contains and how much stress it can handle in post. Low bit depth looks fine until you start shaping the image. Once you push it, there’s simply not enough data to hold smooth transitions together.
Banding, broken gradients, and ugly skin tones aren’t usually editing mistakes. They’re signs you’ve hit the ceiling of what the footage can give you.
Bit Depth, Explained Without the Textbook Nonsense
Bit depth sounds technical, but the idea is simple.
It’s just a count. How many tonal steps each color channel gets to describe the image.
In most video, you’re dealing with red, green, and blue channels. In 8-bit, each of those channels gets 256 possible values. That’s it. When you combine them, you end up with about 16.7 million colors. On paper, that sounds like plenty. In practice, those colors are spread thin across highlights, midtones, and shadows.
Here’s the part people miss. Those 256 steps aren’t reserved for the areas you care about most. They’re shared across the entire range. Bright skies, soft gradients, skin tones, deep shadows. Everything fights for the same limited precision.
Think of it like drawing a smooth curve using only a handful of straight line segments. From a distance, it looks fine. Zoom in or start reshaping it, and the corners appear fast.
Higher bit depth doesn’t magically make images prettier on its own. What it does is add more steps between values. More room for subtle transitions. More space to push contrast, exposure, and color without the image falling apart.
This is why bit depth matters most once you leave the camera and enter post. Editing and color grading are basically controlled stress tests. Every adjustment stretches the data. With low bit depth, you hit the breaking point quickly. With higher bit depth, the image has more elasticity.
That’s the foundation. Everything else builds on this.
8-bit Video: Fine Until You Push It
8-bit gets a bad reputation, and I don’t think that’s entirely fair.
Most of the video you watch every day is 8-bit. Broadcast, streaming platforms, social media. Even a lot of popular mirrorless cameras still record 8-bit internally. If it were unusable, none of that would work.
The key word is until.
8-bit footage is fine when you treat it gently. Minimal grading. Small contrast tweaks. White balance close to correct. If you nail exposure and lighting on set, 8-bit can look clean and professional.
Problems start the moment you ask it to do more.
Log profiles are a common trap. They’re designed to preserve dynamic range, but in 8-bit, that range is squeezed into very few tonal steps. When you stretch it back out in post, the gaps show up as banding, especially in skies and walls.
Skin tones are another giveaway. Push saturation or shift hue slightly and transitions that should be smooth become blotchy. Shadows don’t lift gracefully either. They crumble, revealing noise and harsh edges instead of detail.
This is why 8-bit feels fragile. It gives you just enough information to work with, but no margin for error. Every adjustment eats into a limited supply of data.
If you’re shooting fast-turnaround content or projects that don’t need heavy grading, 8-bit is perfectly serviceable. Just don’t expect it to survive aggressive looks or rescue jobs. It wasn’t built for that.
16-bit: Where Video Starts to Feel Forgiving
The first time you work seriously with higher bit depth, the difference is subtle but unmistakable.
With 16-bit, each color channel jumps from 256 steps to 65,536. That extra precision doesn’t scream at you when you first open the clip. It shows up when you start pushing the image around and it just… holds.
Gradients stay smooth. Skies don’t fall apart when you add contrast. Skin tones bend without turning blotchy. You can lift shadows and pull highlights back without immediately exposing the seams.
This is why 16-bit workflows feel safer. You’re no longer operating on a knife’s edge. Small mistakes don’t instantly punish you. Color grading becomes less about avoiding damage and more about shaping the image you actually want.
In real-world use, this matters most with log footage, RAW workflows, and anything headed toward HDR. The more dynamic range you capture, the more tonal precision you need to manage it cleanly in post.
There is a cost, of course. Files get bigger. Timelines get heavier. Playback isn’t as forgiving, especially on modest machines. You start noticing dropped frames, longer renders, and fans spinning up faster than you’d like.
Still, if your work involves serious color decisions, 16-bit is often the sweet spot. It gives you room to experiment without constantly worrying about breaking the image. Once you get used to that flexibility, going back to 8-bit feels restrictive in a way that’s hard to ignore.
Once you start working in higher bit depth, GPU performance becomes a real factor, especially in tools like Photoshop where 16-bit and 32-bit color work can push hardware hard. If you’ve ever wondered how much your GPU actually matters there, this breakdown on choosing the best GPU for Photoshop explains it well.
32-bit Isn’t Overkill, But It’s Not Everyday Either
32-bit tends to get misunderstood, mostly because it sounds like the obvious next upgrade. More bits must mean better images, right. Sort of.
In most modern video and VFX tools, 32-bit usually means 32-bit floating point. That’s important. It’s less about adding more visible color steps and more about preserving extreme ranges of brightness and precision during calculations.
This is where 32-bit shines. Heavy visual effects. Complex composites. HDR pipelines where highlights can sit far above what a normal display can show. In these situations, you’re not just grading. You’re constantly transforming the image, stacking effects, and reshaping values in ways that would destroy lower-bit-depth data.
With 32-bit float, values can go way beyond what a screen can display without clipping. You can push exposure hard, pull it back later, and the information is still there. That’s incredibly powerful when you need it.
But most editors don’t need it all the time.
For straightforward edits, even fairly advanced color work, 16-bit already offers plenty of precision. 32-bit becomes useful when things get extreme or technical. Think VFX-heavy projects, green screen work with aggressive keys, or HDR masters that need maximum flexibility.
There’s also the performance hit. 32-bit workflows are demanding. Storage, memory, and processing requirements climb quickly. If your system is already struggling with 16-bit footage, 32-bit will not be kind.
So no, 32-bit isn’t overkill. It’s just specialized. When you’re doing work that truly benefits from it, nothing else compares. When you’re not, it’s often unnecessary weight.
Once you get into After Effects, especially with 32-bit float comps, hardware limits show up fast. This is why system choice matters so much, and why guides like finding the best laptops and prebuilt PCs for Adobe After Effects exist in the first place.
The Bit Depth Myths That Won’t Die
Bit depth attracts a lot of half-truths. Usually repeated with confidence. Often missing the point.
One of the biggest myths is that higher bit depth automatically means better image quality. It doesn’t. If the lighting is flat, the exposure is off, or the lens is soft, no amount of extra color precision will save the shot. Bit depth gives you flexibility, not taste.
Another common one is assuming you’re actually seeing all that extra data. In most cases, you’re not. Many displays still operate effectively at 8-bit. Even when they claim higher support, the viewing pipeline often clamps values somewhere along the way. That doesn’t make higher bit depth useless, but it does mean its biggest benefits happen during editing, not playback.
Then there’s the export confusion. Exporting a file at higher bit depth doesn’t mean your audience sees it that way. Delivery platforms compress aggressively. Most final outputs are still 8-bit. The advantage of working higher up the chain is that you arrive at that 8-bit export with fewer artifacts baked in.
A subtle myth I hear a lot is that bit depth fixes banding. It helps, but only if the entire workflow supports it. Shoot 10-bit or higher, grade in a higher-precision space, and avoid crushing values early. Break any part of that chain and the benefit shrinks fast.
The real takeaway is this. Bit depth isn’t a magic upgrade. It’s a tool. Used correctly, it makes your work more resilient. Used blindly, it just adds complexity without payoff.
This also comes up when people move between devices. Working on an iPad can be great for lighter edits, but bit depth support and performance limits still apply. This guide on how to use Photoshop on iPad does a good job of setting realistic expectations.
How Bit Depth Affects Your Actual Editing Workflow
This is where bit depth stops being theoretical and starts messing with your day.
It shows up first in camera settings. Shooting higher bit depth gives you more room later, but only if you actually keep that data alive. Recording 10-bit or higher and then transcoding to an 8-bit intermediate quietly throws away the advantage. It happens more often than people realize.
Then there’s the timeline itself. Once you stack color corrections, LUTs, masks, and effects, you’re constantly recalculating pixel values. Lower bit depth means rounding errors creep in fast. That’s when gradients snap, noise appears, and subtle color shifts turn ugly.
Proxies deserve a quick mention here. They’re lifesavers for performance, but they can also mislead you. If your proxies are low bit depth, what you see while grading might not reflect the final image. That’s fine for rough cuts. It’s dangerous for color decisions. Knowing when to switch back to full-quality media matters.
Performance is the other half of the equation. Higher bit depth footage hits harder. Decoding takes more CPU or GPU power. RAM usage climbs. Renders slow down. Real-time playback becomes a negotiation instead of a given. This is usually the moment editors start blaming their software.
Most of the time, it’s not the software.
A practical approach helps. Do heavy color work later in the pipeline. Avoid extreme adjustments early. Use gentle curves instead of aggressive sliders. And if banding starts to appear, stop pushing and rethink the approach instead of forcing it.
Bit depth doesn’t change how you edit. It changes how forgiving your workflow is. The more you understand that relationship, the fewer surprises you get when deadlines are tight and revisions stack up.
Once you stack effects and start grading higher bit depth footage, GPU acceleration matters more than most people expect, especially in Premiere Pro. If performance is a constant struggle, this guide on choosing the best GPU for Premiere Pro is worth a look.
Where Vagon Cloud Computer Fits When Bit Depth Starts Hurting Your Machine
At a certain point, bit depth stops being a creative decision and turns into a hardware problem. If you’ve worked with 16-bit timelines or touched 32-bit workflows, you know the signs. Choppy playback. Long renders. A timeline that feels like it’s constantly fighting back.
This is exactly where Vagon Cloud Computer makes sense.
High-bit-depth footage is demanding by nature. More precision means more data, more calculations, and more pressure on your CPU, GPU, and memory. On a local machine, that often forces compromises. You lower playback resolution, avoid heavier grades, or delay creative decisions just to keep things responsive.
Vagon removes that bottleneck by letting you work on a powerful cloud workstation instead of relying solely on your own hardware. The footage stays the same. The bit depth stays the same. What changes is the machine doing the work. You get access to high-end resources when you need them, without committing to a permanent hardware upgrade.
For editors who bounce between lighter projects and color-heavy work, this flexibility matters. You can push 16-bit or 32-bit workflows when the project demands it, then scale back when it doesn’t. No constant upgrades. No trying to make a laptop behave like a grading suite.
Vagon doesn’t replace understanding bit depth. It supports it. It lets you choose the right level of precision for the image instead of choosing based on what your computer can barely handle.
This is also where cloud workflows start to make sense for mobile users. Running demanding tools remotely avoids many local limitations, which is exactly why approaches like the best ways to run Adobe After Effects on iPad have become more common.
Final Thoughts
Bit depth isn’t something you chase for bragging rights. It’s something you choose based on how far you plan to push the image.
If your footage looks good and barely needs adjustment, 8-bit can be enough. If you’re shaping color, rescuing exposure, or building a look that needs finesse, higher bit depth gives you breathing room. And if you’re doing extreme work with HDR, VFX, or heavy compositing, precision stops being optional.
The mistake I see most often isn’t using the wrong bit depth. It’s not understanding the tradeoffs. People either overcomplicate their workflow chasing specs they don’t need, or they undercut their own work by locking themselves into fragile footage they can’t safely touch.
Once you understand what bit depth actually does, those decisions get easier. You stop guessing. You stop fighting your footage. And you start building workflows that support the kind of work you want to deliver.
At the end of the day, bit depth isn’t about perfection. It’s about control. How much freedom you have when the creative decisions really matter.
FAQs
1. Does higher bit depth make my video look better automatically?
No. It makes your video more flexible. Higher bit depth gives you more room to adjust color and exposure without artifacts, but it won’t fix bad lighting, soft focus, or poor composition. Think of it as insurance, not a makeover.
2. Why does my 8-bit footage look fine until I start grading it?
Because most of the damage happens during adjustments. Straight-out-of-camera footage doesn’t stress the data much. Once you push contrast, saturation, or curves, 8-bit runs out of tonal steps fast. That’s when banding and breakup show up.
3. Is 10-bit the same as 16-bit?
Not exactly. 10-bit gives you 1,024 steps per channel, which is a big improvement over 8-bit and very common in modern cameras. 16-bit is usually part of post-production and RAW workflows, offering far more precision during editing and color grading. Both are upgrades, just at different stages of the pipeline.
4. If most platforms deliver in 8-bit, why work in higher bit depth at all?
Because you want the cleanest possible image before compression. Working in higher bit depth reduces artifacts before the final export. You’re not doing it for the viewer’s screen, you’re doing it to protect the image during the process.
5. Does my monitor need to support higher bit depth for this to matter?
Not really. Even if your display is effectively 8-bit, higher bit depth still helps behind the scenes. The benefits show up in smoother grades, cleaner exports, and fewer visible artifacts, even if you can’t directly see every extra step while editing.
6. Should I always choose the highest bit depth available?
No. Higher bit depth means heavier files and higher system demands. Use it when the project needs it. Simple edits don’t benefit much. Color-heavy, HDR, or effects-driven projects absolutely do.
Get Beyond Your Computer Performance
Run applications on your cloud computer with the latest generation hardware. No more crashes or lags.

Trial includes 1 hour usage + 7 days of storage.
Summarize with AI

Ready to focus on your creativity?
Vagon gives you the ability to create & render projects, collaborate, and stream applications with the power of the best hardware.

Vagon Blog


Run heavy applications on any device with
your personal computer on the cloud.
San Francisco, California
Solutions
Vagon Teams
Vagon Streams
Use Cases
Resources
Vagon Blog
What Slows Down After Effects Projects?
The First 30 Minutes in Blender 3D: A Practical Workflow Guide
What’s New in Godot 4.7? Key Features, Upgrades, and Workflow Improvements
What Slows Down Blender 3D Projects?
What Slows Down Adobe Photoshop Projects?
The First 30 Minutes in Adobe Photoshop: A Practical Workflow Guide
Before You Start in Adobe Photoshop: A Practical Setup Checklist
What’s New in Unreal Engine 5.8? Key Features and Upgrade Advice
How to Run Windows on an iPad: 4 Best Ways (2026)
Vagon Blog
Run heavy applications on any device with
your personal computer on the cloud.
San Francisco, California
Solutions
Vagon Teams
Vagon Streams
Use Cases
Resources
Vagon Blog