Instant Connection for Pixel Streaming
— New Feature Automated Setup

Blender UV Mapping: Tips and Tricks for Beginners
Blender UV Mapping: Tips and Tricks for Beginners
DigitalArt
Blender UV Mapping: Tips and Tricks for Beginners
Table of Contents
Welcome to the exciting world of 3D modeling, where Blender UV mapping is a crucial skill that ensures your digital creations look realistic and detailed by using textures and materials. UV mapping is essential for Blender beginners because it allows for accurate texturing, enabling you to wrap textures around models effectively.
Understanding UV Mapping in Blender
In the intricate world of 3D modeling, UV mapping in Blender is an essential technique that bridges the gap between simplified uniform models and their pulsating, textured counterparts. Properly preparing your model from the start is essential. We’ll provide tips on organizing your model to ensure success as you delve into detailed texturing.

What is UV Mapping, and Why is it Important?
Definition: UV mapping refers to projecting a 2D image texture onto the surface of a 3D model. It is an essential point in the 3D modeling and texturing process.
Adding Details: This method enables you to put details, textures, and colors into 3D models, turning them from simple meshes into complex, real creations.
Realism and Appeal: UV mapping makes the models appear more realistic and aesthetic, creating better-quality digital art.
Control Over Appearance: It gives artists and designers precise control over how textures will behave when they wrap around any model, ensuring that all parts of the model surface behave as intended.
Essential Skill: Improving UV mapping is a crucial element of 3D modeling, as it can positively influence the final look of the work.
The Basics of Blender’s UV Mapping Interface
Blender offers an intuitive surface mapping interface, making it easy for novices to start with UV mapping, including creating UV maps in Blender for more precise texturing. Learn how to operate the UV Editor, which you will use to adjust your texture to align with the model’s surface. If you're just starting out with Blender, you might want to check out our Complete Guide to Blender 3D for Beginners for a comprehensive overview of the basics.
You can also check out our GPU Guide for tips to use GPU, along with speed up and acceleration tips for Blender 3D.
Preparing Your Model for UV Mapping
Before proceeding with UV mapping, it’s crucial to prepare the model correctly. This involves creating a clean mesh and optimizing it for unwrapping. These preparations help eliminate problems and create a solid foundation for UV mapping. For additional information, refer to the Complete Guide to Reducing Rendering Times in Blender, which also touches on issues related to model optimization.
Basic Techniques for UV Mapping in Blender
When you proceed to the hands-on experience with UV mapping, it becomes apparent that a few essential skills can elevate the quality of your work. By mastering these fundamental methods, you can solve numerous texturing problems and create balanced, well-mapped models.
Need to learn Dynamic Paint Brush? Learn its meaning and all other Blender 3D terms in our Blender 3D Glossary.
Simple Unwrapping Methods for Beginners
Beginners can choose from different unwrapping techniques available in Blender. Start with small projects and gradually tackle more advanced models to improve your unwrapping skills. High-quality texturing results from the efficiency and precision of unwrapping, which are crucial when learning how to UV unwrap in Blender. Blender Shortcuts & Hotkeys can be managed to streamline your workflow.
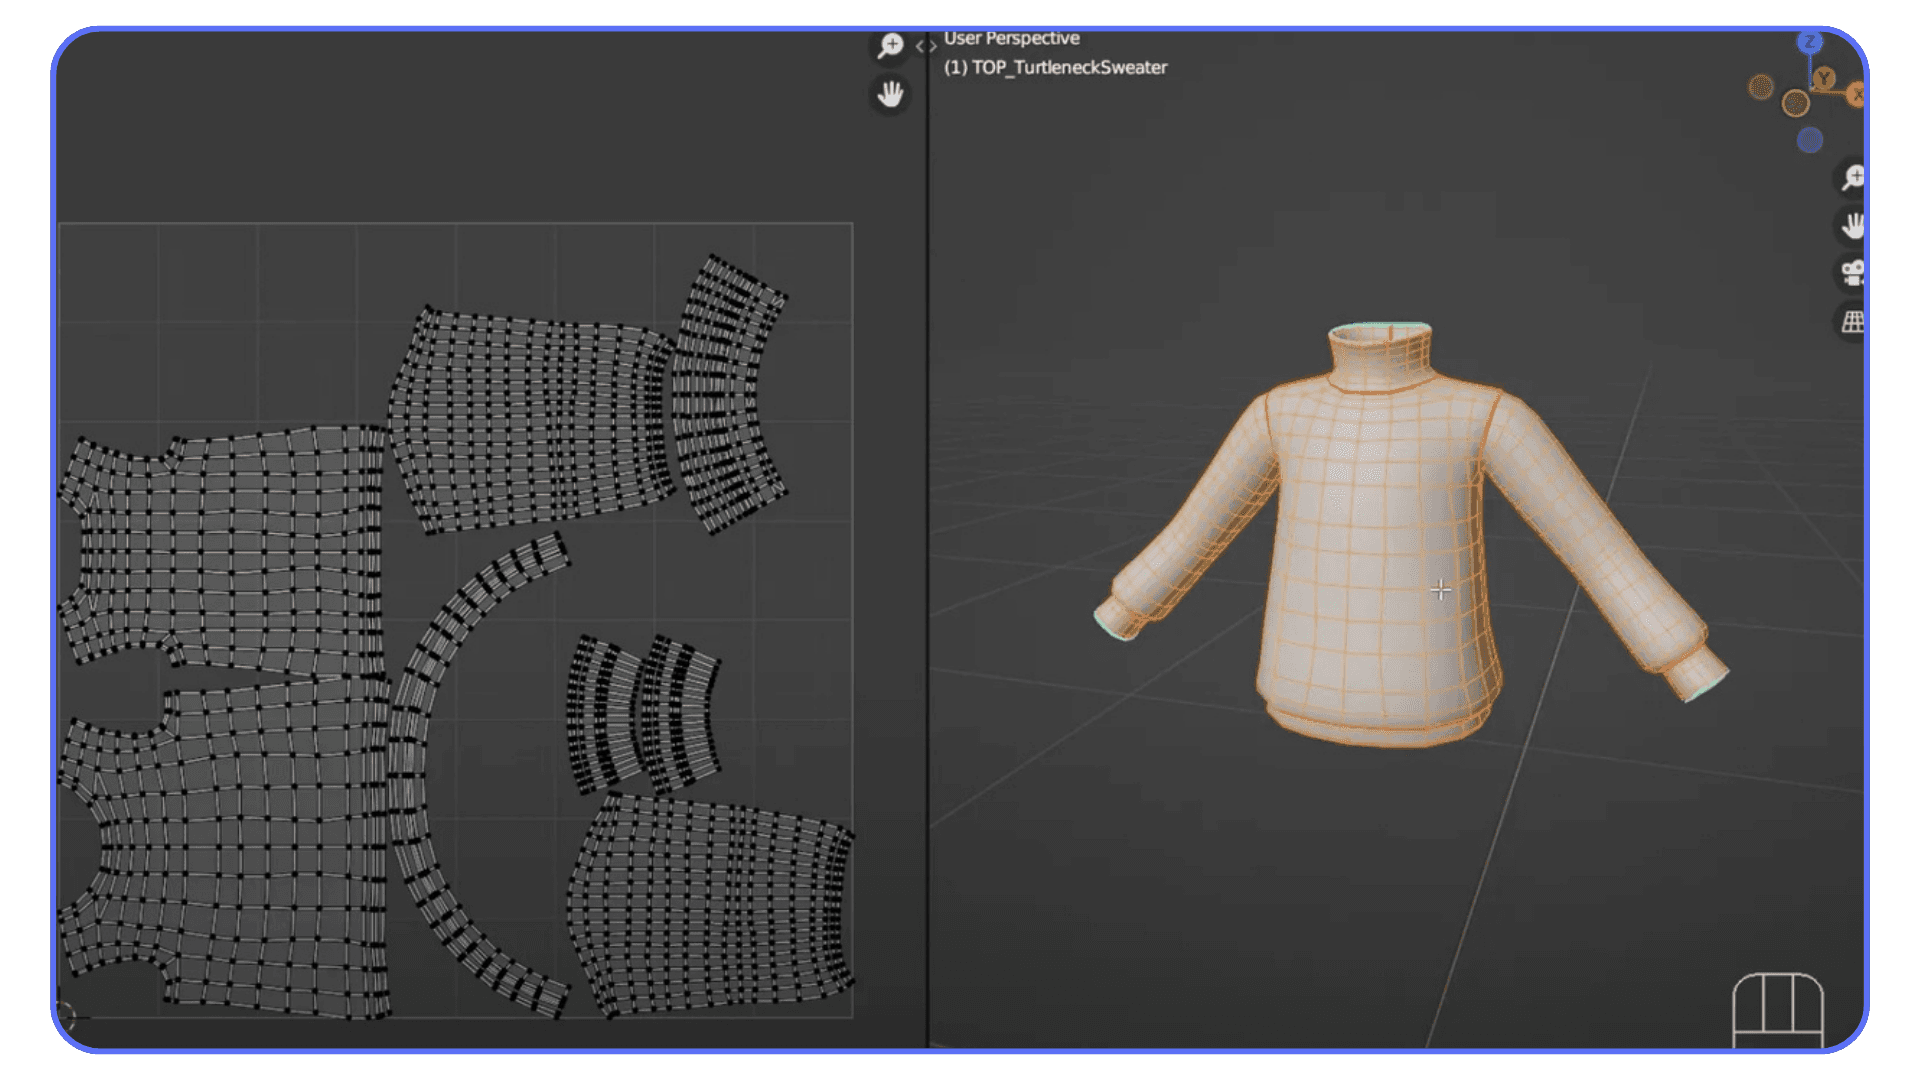
Aligning and Editing UVs in the UV Editor
After unwrapping your model, the next step is to adjust and optimize your UVs using the UV Editor for better Blender UV editing. This step is crucial for accurately placing the texture, ensuring that every aspect fits the 3D model precisely. Understanding how to work with UVs in the UV Editor will give you more control over texturing, allowing you to adjust textures to perfection.
Tips for Efficiently Organizing UV Layouts
Proper organization of your UV layouts is necessary to get the most out of your texture space. A good UV layout allows you to use textures as efficiently as possible, which is beneficial for the final result of your model. For more insights, the Best Blender Assets guide could offer supplementary content for your projects. Apart from providing better visual results, organized UV layouts also ensure textures are applied in the most resource-effective way, which is essential in complex scenes and higher texture resolution.
Texturing and Shading with UV Maps
Moving away from the fundamental components of UV mapping, we enter the world of texturing and shading. At this stage, your 3D models start to come to life. This part is dedicated to applying textures to your UV-mapped models and using Blender’s advanced shader system for realistic or stylized results.
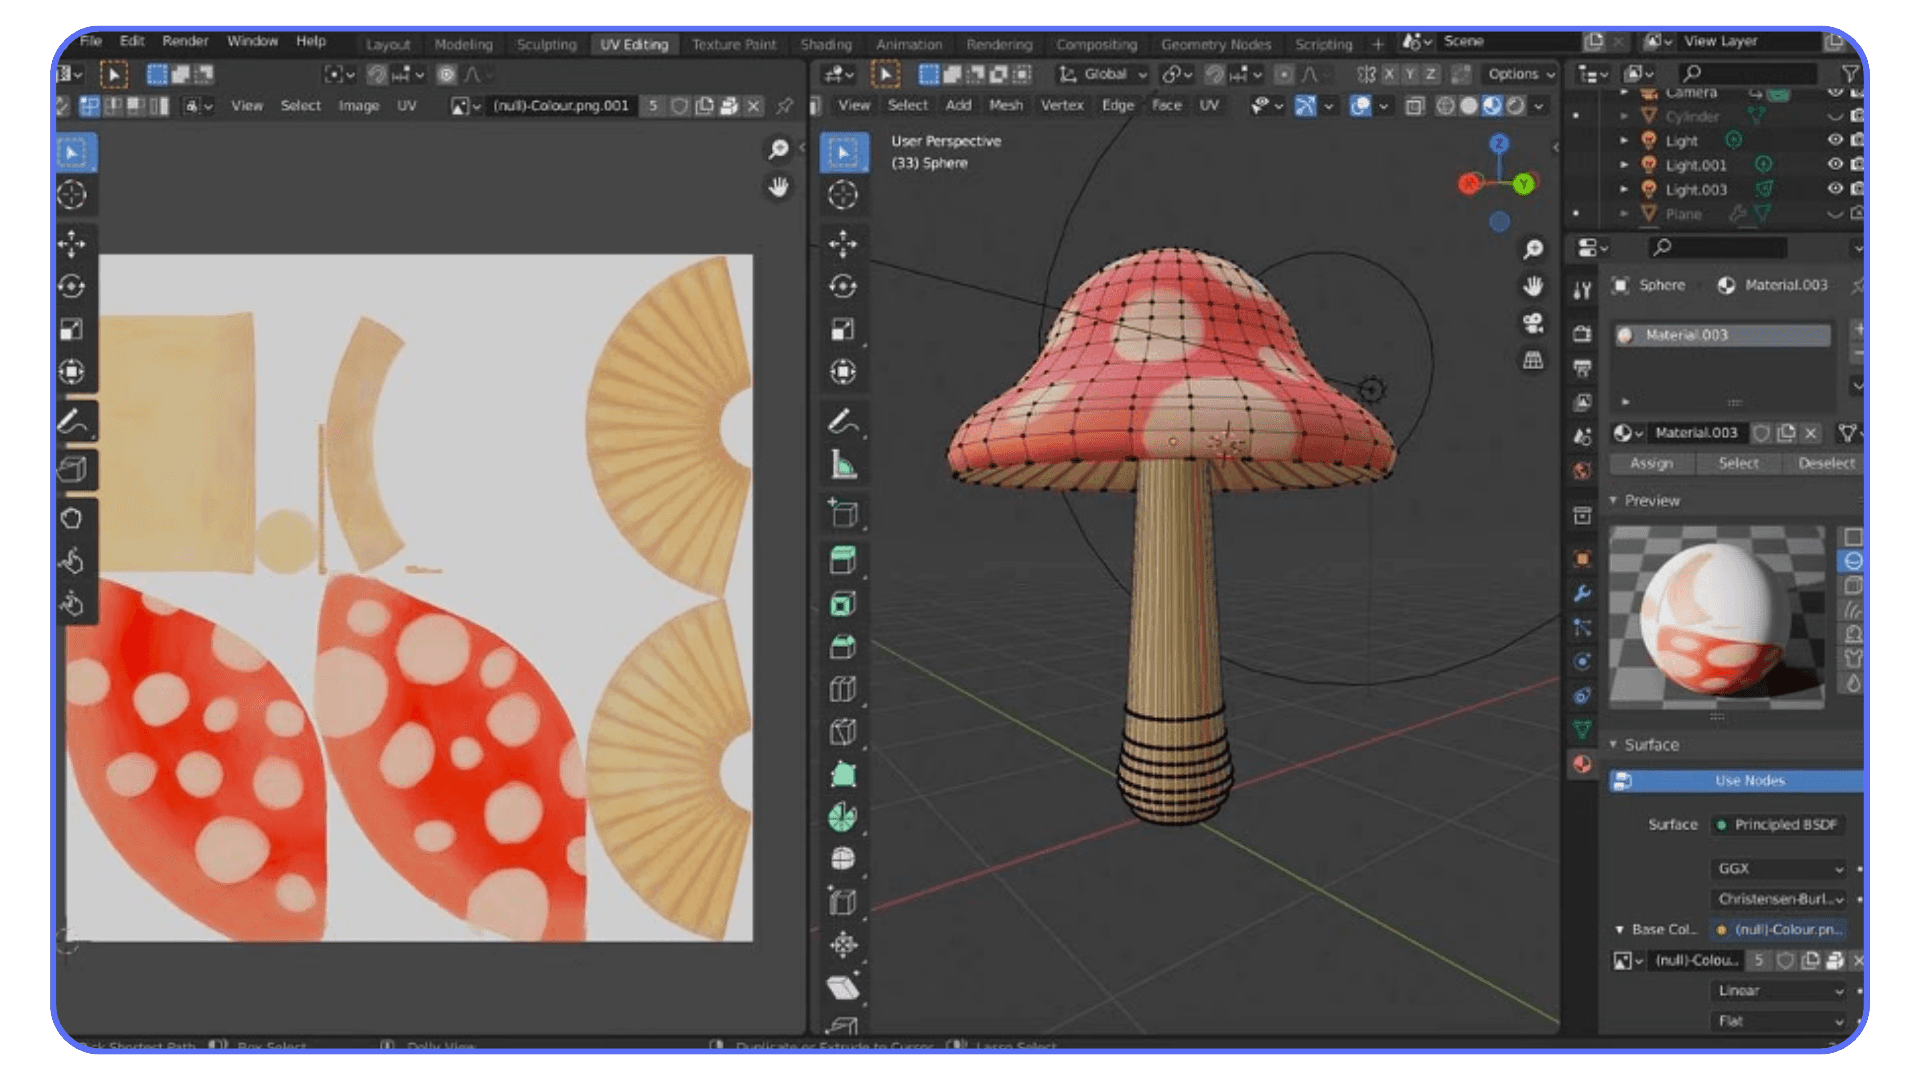
Applying Textures to UV Maps
With your UVs unwrapped and organized, the exciting part begins: UV texturing in Blender. This stage adds color, detail, and realism to your models. Understanding how to apply textures correctly is highly important for any 3D artist to produce compelling 3D art. Selecting the correct textures and ensuring they are applied accurately to the mesh can transform a simple mesh into a visual masterpiece.
Using Blender’s Shaders with UV Mapped Models
Blender’s shader system allows for dynamic and realistic texture effects. You can create many different visual styles and effects using shaders alongside UV maps, from glossy, reflective surfaces to coarse, textured ones. The Top Blender Plugins guide could serve as a supplement to help you enhance your texturing with more tools and features. Shaders are invaluable tools that, when used efficiently, can transform your models, filling them with depth and realism.
Adjusting Textures in the UV Editor for Better Results
In the UV Editor, you can alter textures and notice significant enhancements to your model. Fine-tuning the placement and scaling of textures creates a work unparalleled in detail, helping to build a professional-looking result. Additionally, familiarizing yourself with Blender tips and tricks can provide handy shortcuts to enhance your UV mapping efficiency. To diagnose common issues, see Common Problems of Blender and How to Troubleshoot Them.
Need to know the difference between Extrude and other modeling operations? Learn all Blender 3D terms from our Blender 3D Glossary.
Ready to take your Blender UV mapping skills to the next level?
With Vagon’s high-performance cloud PCs, you can optimize your workflow and handle even the most complex UV texturing and shading tasks with ease. Experience unparalleled power and speed, all accessible from your browser, and elevate your 3D modeling projects. Start your journey with Vagon today and unlock your full creative potential.
Next-Level UV Mapping in Blender (2025): Advanced Workflows and Real-World Performance
Let’s be honest, once you’ve nailed the basics of UV mapping, things can start to feel… repetitive. Smart UV Project here, Unwrap there, tweak a few islands, done. But as your models (and ambitions) grow, you’ll start noticing the limits. Textures stretching where they shouldn’t. Detail that feels blurry no matter how high you crank the resolution. That’s when you know it’s time to level up.
When Basic UVs Hit Their Limits
At some point, Smart UV Project just isn’t smart enough. The more complex your models get, think characters, vehicles, environments, the harder it becomes to manage a single UV map cleanly. You’ll spend more time fixing seams and fighting distortion than actually texturing. That’s your cue to start exploring advanced UV workflows like UDIMs and multi-UV setups.
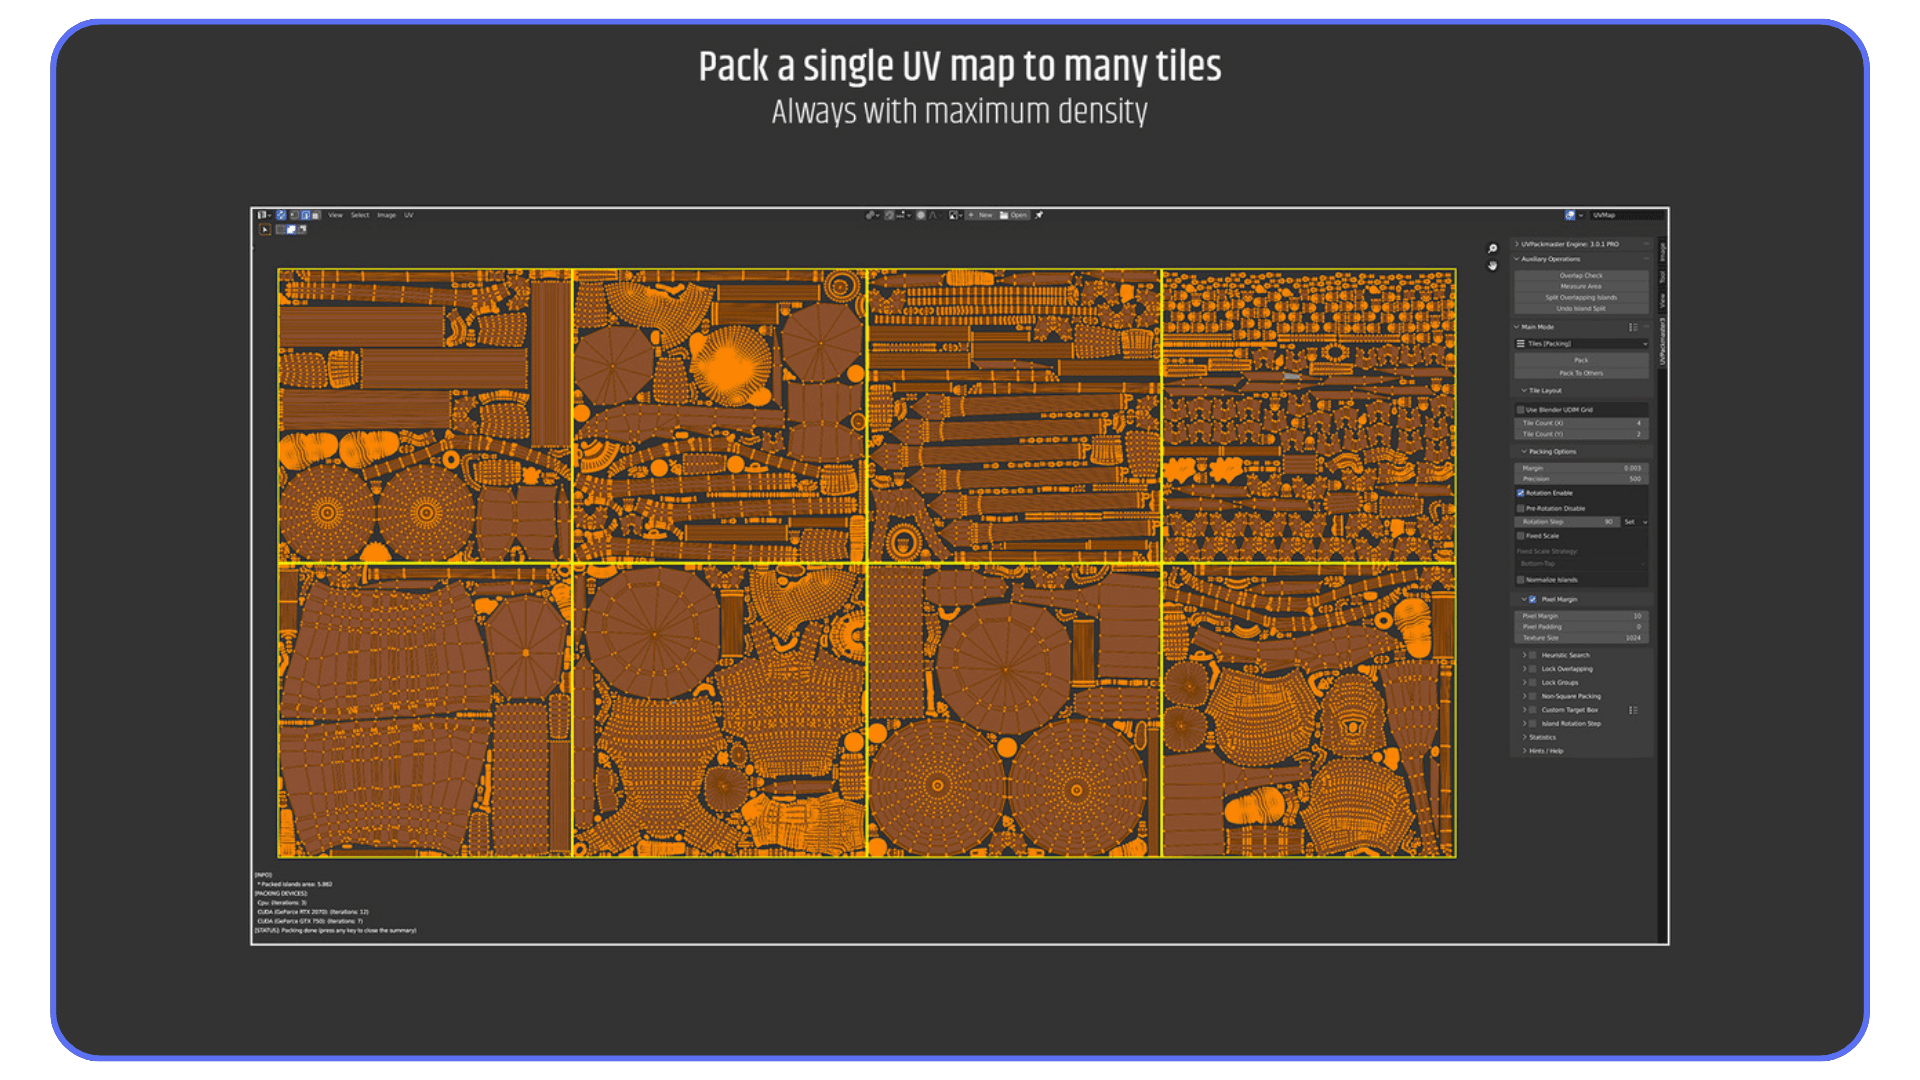
UDIMs, Multiple UV Sets, and Smarter Tools
UDIMs (short for U-Dimensional Tiles) basically let you split a texture into multiple high-resolution tiles instead of squeezing everything into one. It’s a game-changer for anyone working with film-quality assets or 8K textures. You can use separate UV tiles for different parts — face, clothes, accessories — each with its own crisp detail.
Blender’s recent versions have made this workflow much smoother. The UV Editor now feels faster, more accurate, and more intuitive than before. There are also new tools for automatic seam generation, improved packing algorithms, and a growing list of add-ons like Zen UV and UV Packmaster 3 that can automate huge chunks of your layout process.
Optimizing for Performance: From Local to Cloud
Here’s something most tutorials skip: your hardware actually affects how fast and smooth your UV work feels. Unwrapping large meshes or previewing 8K textures can quickly choke mid-range GPUs. Even texture baking, especially when using procedural shaders, can turn your system into a mini space heater.
That’s where using a cloud computer (like Vagon) genuinely changes the game. Instead of waiting minutes for each bake, you can push heavy UV and texture operations to a powerful remote GPU with massive VRAM and bandwidth. No throttling, no crashes, just smooth, uninterrupted texturing. You can work from a lightweight laptop and still handle production-scale UVs and texture baking like you’re on a workstation.
A Real Example
I tried baking a full UDIM character once on my old RTX 2060 laptop, it took almost two hours, and Blender crashed halfway. I ran the same setup on a Vagon Cloud Computer powered by an RTX A6000, and it finished in less than 20 minutes. The difference wasn’t just speed, I could multitask, test shaders, and keep my local machine cool the entire time.
When Advanced UV Workflows Don’t Make Sense
Of course, not every project needs this level of complexity. If you’re building low-poly game assets or simple props, sticking with a single UV map might be faster and easier. UDIMs and multi-UV setups shine when you’re targeting film, animation, or ultra-high-res visualizations.
How to Start Upgrading Your UV Workflow
If you’re ready to step up, here’s a simple roadmap:
Start using the Display Stretch option to spot problem areas early.
Experiment with add-ons like Zen UV for smarter seam marking.
Try UV Packmaster 3 to automate your layout and packing.
Learn about UDIM workflows, even one project will teach you a lot.
When your hardware starts holding you back, consider moving heavy tasks to Vagon Cloud Computer to keep your creative flow uninterrupted.
Conclusion
This beginner’s guide to UV mapping in Blender has covered the basic principles and practices to get you started. Keep in mind that mastering UV mapping requires practice and trial and error. Experiment with various techniques, play with textures, and continue honing your skills.
Having become acquainted with the fundamentals, it’s time to put your knowledge into practice. Start your UV mapping journey with Blender at vagon.io, and watch your 3D modeling skills grow as you explore how to create UV maps in Blender. The journey to achieving stunning textured 3D models is at your fingertips.
FAQs:
1. What is UV mapping in Blender, and why is it important?
UV mapping in Blender is a process where a 2D image is projected onto a 3D model, allowing you to apply textures and details to your model. It is crucial because it gives your model realism and controls how textures appear on the model's surface.
2. How do I create a UV map in Blender?
To create a UV map in Blender, select your model, go to the UV Editor, and choose an unwrapping method. Once unwrapped, the UV map can be adjusted and optimized for texturing.
3. What are the best unwrapping techniques for beginners in Blender?
Beginners can start with simple unwrapping techniques like Smart UV Project or Unwrap, which are user-friendly and suitable for basic models.
4. How can I improve my UV texturing in Blender?
Improve your UV texturing by mastering the UV Editor, practicing different unwrapping techniques, and experimenting with Blender’s shading tools to achieve the desired effects.
5. What are common mistakes to avoid in UV mapping?
Common mistakes include not preparing the model properly, ignoring overlaps in the UV map, and not optimizing the UV layout, which can result in poor texturing.
6. How do I apply textures to a UV map in Blender?
After unwrapping your model and creating the UV map, you can apply textures by importing an image into the UV Editor and aligning it with the map to achieve the desired look.
Welcome to the exciting world of 3D modeling, where Blender UV mapping is a crucial skill that ensures your digital creations look realistic and detailed by using textures and materials. UV mapping is essential for Blender beginners because it allows for accurate texturing, enabling you to wrap textures around models effectively.
Understanding UV Mapping in Blender
In the intricate world of 3D modeling, UV mapping in Blender is an essential technique that bridges the gap between simplified uniform models and their pulsating, textured counterparts. Properly preparing your model from the start is essential. We’ll provide tips on organizing your model to ensure success as you delve into detailed texturing.
What is UV Mapping, and Why is it Important?
Definition: UV mapping refers to projecting a 2D image texture onto the surface of a 3D model. It is an essential point in the 3D modeling and texturing process.
Adding Details: This method enables you to put details, textures, and colors into 3D models, turning them from simple meshes into complex, real creations.
Realism and Appeal: UV mapping makes the models appear more realistic and aesthetic, creating better-quality digital art.
Control Over Appearance: It gives artists and designers precise control over how textures will behave when they wrap around any model, ensuring that all parts of the model surface behave as intended.
Essential Skill: Improving UV mapping is a crucial element of 3D modeling, as it can positively influence the final look of the work.
The Basics of Blender’s UV Mapping Interface
Blender offers an intuitive surface mapping interface, making it easy for novices to start with UV mapping, including creating UV maps in Blender for more precise texturing. Learn how to operate the UV Editor, which you will use to adjust your texture to align with the model’s surface. If you're just starting out with Blender, you might want to check out our Complete Guide to Blender 3D for Beginners for a comprehensive overview of the basics.
You can also check out our GPU Guide for tips to use GPU, along with speed up and acceleration tips for Blender 3D.
Preparing Your Model for UV Mapping
Before proceeding with UV mapping, it’s crucial to prepare the model correctly. This involves creating a clean mesh and optimizing it for unwrapping. These preparations help eliminate problems and create a solid foundation for UV mapping. For additional information, refer to the Complete Guide to Reducing Rendering Times in Blender, which also touches on issues related to model optimization.
Basic Techniques for UV Mapping in Blender
When you proceed to the hands-on experience with UV mapping, it becomes apparent that a few essential skills can elevate the quality of your work. By mastering these fundamental methods, you can solve numerous texturing problems and create balanced, well-mapped models.
Need to learn Dynamic Paint Brush? Learn its meaning and all other Blender 3D terms in our Blender 3D Glossary.
Simple Unwrapping Methods for Beginners
Beginners can choose from different unwrapping techniques available in Blender. Start with small projects and gradually tackle more advanced models to improve your unwrapping skills. High-quality texturing results from the efficiency and precision of unwrapping, which are crucial when learning how to UV unwrap in Blender. Blender Shortcuts & Hotkeys can be managed to streamline your workflow.
Aligning and Editing UVs in the UV Editor
After unwrapping your model, the next step is to adjust and optimize your UVs using the UV Editor for better Blender UV editing. This step is crucial for accurately placing the texture, ensuring that every aspect fits the 3D model precisely. Understanding how to work with UVs in the UV Editor will give you more control over texturing, allowing you to adjust textures to perfection.
Tips for Efficiently Organizing UV Layouts
Proper organization of your UV layouts is necessary to get the most out of your texture space. A good UV layout allows you to use textures as efficiently as possible, which is beneficial for the final result of your model. For more insights, the Best Blender Assets guide could offer supplementary content for your projects. Apart from providing better visual results, organized UV layouts also ensure textures are applied in the most resource-effective way, which is essential in complex scenes and higher texture resolution.
Texturing and Shading with UV Maps
Moving away from the fundamental components of UV mapping, we enter the world of texturing and shading. At this stage, your 3D models start to come to life. This part is dedicated to applying textures to your UV-mapped models and using Blender’s advanced shader system for realistic or stylized results.
Applying Textures to UV Maps
With your UVs unwrapped and organized, the exciting part begins: UV texturing in Blender. This stage adds color, detail, and realism to your models. Understanding how to apply textures correctly is highly important for any 3D artist to produce compelling 3D art. Selecting the correct textures and ensuring they are applied accurately to the mesh can transform a simple mesh into a visual masterpiece.
Using Blender’s Shaders with UV Mapped Models
Blender’s shader system allows for dynamic and realistic texture effects. You can create many different visual styles and effects using shaders alongside UV maps, from glossy, reflective surfaces to coarse, textured ones. The Top Blender Plugins guide could serve as a supplement to help you enhance your texturing with more tools and features. Shaders are invaluable tools that, when used efficiently, can transform your models, filling them with depth and realism.
Adjusting Textures in the UV Editor for Better Results
In the UV Editor, you can alter textures and notice significant enhancements to your model. Fine-tuning the placement and scaling of textures creates a work unparalleled in detail, helping to build a professional-looking result. Additionally, familiarizing yourself with Blender tips and tricks can provide handy shortcuts to enhance your UV mapping efficiency. To diagnose common issues, see Common Problems of Blender and How to Troubleshoot Them.
Need to know the difference between Extrude and other modeling operations? Learn all Blender 3D terms from our Blender 3D Glossary.
Ready to take your Blender UV mapping skills to the next level?
With Vagon’s high-performance cloud PCs, you can optimize your workflow and handle even the most complex UV texturing and shading tasks with ease. Experience unparalleled power and speed, all accessible from your browser, and elevate your 3D modeling projects. Start your journey with Vagon today and unlock your full creative potential.
Next-Level UV Mapping in Blender (2025): Advanced Workflows and Real-World Performance
Let’s be honest, once you’ve nailed the basics of UV mapping, things can start to feel… repetitive. Smart UV Project here, Unwrap there, tweak a few islands, done. But as your models (and ambitions) grow, you’ll start noticing the limits. Textures stretching where they shouldn’t. Detail that feels blurry no matter how high you crank the resolution. That’s when you know it’s time to level up.
When Basic UVs Hit Their Limits
At some point, Smart UV Project just isn’t smart enough. The more complex your models get, think characters, vehicles, environments, the harder it becomes to manage a single UV map cleanly. You’ll spend more time fixing seams and fighting distortion than actually texturing. That’s your cue to start exploring advanced UV workflows like UDIMs and multi-UV setups.
UDIMs, Multiple UV Sets, and Smarter Tools
UDIMs (short for U-Dimensional Tiles) basically let you split a texture into multiple high-resolution tiles instead of squeezing everything into one. It’s a game-changer for anyone working with film-quality assets or 8K textures. You can use separate UV tiles for different parts — face, clothes, accessories — each with its own crisp detail.
Blender’s recent versions have made this workflow much smoother. The UV Editor now feels faster, more accurate, and more intuitive than before. There are also new tools for automatic seam generation, improved packing algorithms, and a growing list of add-ons like Zen UV and UV Packmaster 3 that can automate huge chunks of your layout process.
Optimizing for Performance: From Local to Cloud
Here’s something most tutorials skip: your hardware actually affects how fast and smooth your UV work feels. Unwrapping large meshes or previewing 8K textures can quickly choke mid-range GPUs. Even texture baking, especially when using procedural shaders, can turn your system into a mini space heater.
That’s where using a cloud computer (like Vagon) genuinely changes the game. Instead of waiting minutes for each bake, you can push heavy UV and texture operations to a powerful remote GPU with massive VRAM and bandwidth. No throttling, no crashes, just smooth, uninterrupted texturing. You can work from a lightweight laptop and still handle production-scale UVs and texture baking like you’re on a workstation.
A Real Example
I tried baking a full UDIM character once on my old RTX 2060 laptop, it took almost two hours, and Blender crashed halfway. I ran the same setup on a Vagon Cloud Computer powered by an RTX A6000, and it finished in less than 20 minutes. The difference wasn’t just speed, I could multitask, test shaders, and keep my local machine cool the entire time.
When Advanced UV Workflows Don’t Make Sense
Of course, not every project needs this level of complexity. If you’re building low-poly game assets or simple props, sticking with a single UV map might be faster and easier. UDIMs and multi-UV setups shine when you’re targeting film, animation, or ultra-high-res visualizations.
How to Start Upgrading Your UV Workflow
If you’re ready to step up, here’s a simple roadmap:
Start using the Display Stretch option to spot problem areas early.
Experiment with add-ons like Zen UV for smarter seam marking.
Try UV Packmaster 3 to automate your layout and packing.
Learn about UDIM workflows, even one project will teach you a lot.
When your hardware starts holding you back, consider moving heavy tasks to Vagon Cloud Computer to keep your creative flow uninterrupted.
Conclusion
This beginner’s guide to UV mapping in Blender has covered the basic principles and practices to get you started. Keep in mind that mastering UV mapping requires practice and trial and error. Experiment with various techniques, play with textures, and continue honing your skills.
Having become acquainted with the fundamentals, it’s time to put your knowledge into practice. Start your UV mapping journey with Blender at vagon.io, and watch your 3D modeling skills grow as you explore how to create UV maps in Blender. The journey to achieving stunning textured 3D models is at your fingertips.
FAQs:
1. What is UV mapping in Blender, and why is it important?
UV mapping in Blender is a process where a 2D image is projected onto a 3D model, allowing you to apply textures and details to your model. It is crucial because it gives your model realism and controls how textures appear on the model's surface.
2. How do I create a UV map in Blender?
To create a UV map in Blender, select your model, go to the UV Editor, and choose an unwrapping method. Once unwrapped, the UV map can be adjusted and optimized for texturing.
3. What are the best unwrapping techniques for beginners in Blender?
Beginners can start with simple unwrapping techniques like Smart UV Project or Unwrap, which are user-friendly and suitable for basic models.
4. How can I improve my UV texturing in Blender?
Improve your UV texturing by mastering the UV Editor, practicing different unwrapping techniques, and experimenting with Blender’s shading tools to achieve the desired effects.
5. What are common mistakes to avoid in UV mapping?
Common mistakes include not preparing the model properly, ignoring overlaps in the UV map, and not optimizing the UV layout, which can result in poor texturing.
6. How do I apply textures to a UV map in Blender?
After unwrapping your model and creating the UV map, you can apply textures by importing an image into the UV Editor and aligning it with the map to achieve the desired look.
Get Beyond Your Computer Performance
Run applications on your cloud computer with the latest generation hardware. No more crashes or lags.

Trial includes 1 hour usage + 7 days of storage.
Summarize with AI

Ready to focus on your creativity?
Vagon gives you the ability to create & render projects, collaborate, and stream applications with the power of the best hardware.

Vagon Blog


Run heavy applications on any device with
your personal computer on the cloud.
San Francisco, California
Solutions
Vagon Teams
Vagon Streams
Use Cases
Resources
Vagon Blog
How to Run Inkscape on a Cloud Ubuntu Desktop (2026 Guide)
How to Run Krita on a Cloud Ubuntu Desktop for Digital Painting (2026 Guide)
How to Run GIMP on a Cloud Ubuntu Desktop (2026 Guide)
How to Run Jupyter on a Cloud GPU Linux Desktop (2026 Guide)
Vagon vs GitHub Codespaces: Cloud Dev Environments Compared (2026)
Vagon vs RunPod: Which Cloud GPU Is Right for You? (2026 Comparison)
How to Watch Your AI Agent Work on a Cloud Ubuntu Desktop (2026 Guide)
How to Run a Local LLM on Ubuntu in the Cloud (2026 Guide)
How to Run Blender on a Cloud GPU (Ubuntu): The Complete 2026 Guide
Vagon Blog
Run heavy applications on any device with
your personal computer on the cloud.
San Francisco, California
Solutions
Vagon Teams
Vagon Streams
Use Cases
Resources
Vagon Blog