Instant Connection for Pixel Streaming
— New Feature Automated Setup
How to Add LUTs in Premiere Pro (Step-by-Step for Better Color)
How to Add LUTs in Premiere Pro (Step-by-Step for Better Color)
VideoProduction
How to Add LUTs in Premiere Pro (Step-by-Step for Better Color)
Table of Contents
You drop the clip on the timeline.
Hit play.
And immediately think, “That’s not right.”
Everything looks gray. Flat. Lifeless. The shot looked great on set, but inside Premiere Pro it feels broken. No contrast. No punch. Skin tones gone dull. If you shot in log, this moment probably feels familiar.
This is usually where people discover LUTs.
Not from theory. Not from a color class. From panic.
A quick search, a few clicks, and suddenly the image looks alive again.
Relief.
Followed by confusion.
Why did that work? Why do some LUTs look great and others look awful? And how are you actually supposed to use them without wrecking your footage?
That’s where the real conversation starts.
Understanding LUTs Before You Use Them
A LUT is not magic. It just feels like it when you’re stressed and your footage looks terrible.
LUT stands for Look-Up Table. Which already sounds more complicated than it needs to be. In simple terms, it’s a set of instructions that says, “When you see this color and brightness value, change it to that one.” That’s it. No creativity. No judgment. Just math.
This is where I think people get tripped up.
LUTs don’t understand your footage. They don’t know if your shot is underexposed, badly lit, or perfectly balanced. They don’t care about skin tones. They just apply the transformation they were designed for. If your clip matches the conditions the LUT expects, it can look fantastic. If it doesn’t, things fall apart fast.
This is why some LUTs feel amazing and others feel unusable. A LUT built for a specific camera, color profile, and exposure will shine in that exact scenario. Use it on the wrong footage and you’ll get crushed blacks, blown highlights, or skin that looks slightly… alien.
Another thing people don’t say enough. LUTs are blunt instruments. They’re fast, consistent, and repeatable. That’s their strength. But they’re not flexible. They won’t gently adapt to your shot the way manual color correction can.
In my experience, the healthiest way to think about LUTs is this. They’re starting points. Not finishing touches. Great for getting footage into the right ballpark. Terrible if you expect them to solve everything with one click.
Once you stop treating LUTs like secret sauce and start treating them like tools, they make a lot more sense. And they become way more useful.
Input LUTs vs Creative LUTs
Most LUT confusion comes from this one mistake. People treat all LUTs the same.
They’re not.
Premiere Pro separates LUTs into two categories for a reason. Input LUTs and Creative LUTs do very different jobs, and mixing them up is a fast way to wreck your color.
Input LUTs are technical. Boring. Necessary. Their job is to translate footage from one color space into another. The classic example is log footage to Rec.709. You shoot flat to preserve dynamic range, then an input LUT brings contrast and color back to something usable.
This should usually be your first step.
If you shot in S-Log, C-Log, V-Log, or something similar, an input LUT tells Premiere how that footage is supposed to look on a normal screen. Without it, you’re grading on top of a broken foundation.
Creative LUTs are a different beast.
These are about style. Mood. Vibe. Warm highlights. Cool shadows. That slightly faded cinematic look everyone seems to want. Creative LUTs assume your footage is already in a normal color space. They are not designed to fix flat footage. They’re designed to push it.
And this is where people go wrong.
They slap a creative LUT onto log footage, crank the intensity to 100 percent, and wonder why everything looks crushed and oversaturated. The LUT isn’t bad. The order is.
The clean workflow is simple:
Use an input LUT to normalize the footage.
Do basic exposure and white balance corrections.
Then apply a creative LUT, gently.
Once you separate technical correction from creative styling, LUTs stop feeling unpredictable. You’re no longer guessing. You’re building on purpose.
How to Add LUTs in Premiere Pro
Let’s get practical. No theory. Just how to do it without clicking around blindly.
If you already have your footage on the timeline, you’re most of the way there.
First, switch to the Color workspace. You can find it at the top of Premiere Pro, or go to Window and make sure Lumetri Color is checked. This opens the panel where all color work happens.
Select the clip you want to work on. Nothing happens if the clip isn’t selected. This trips people up more than it should.
#1. Applying an Input LUT
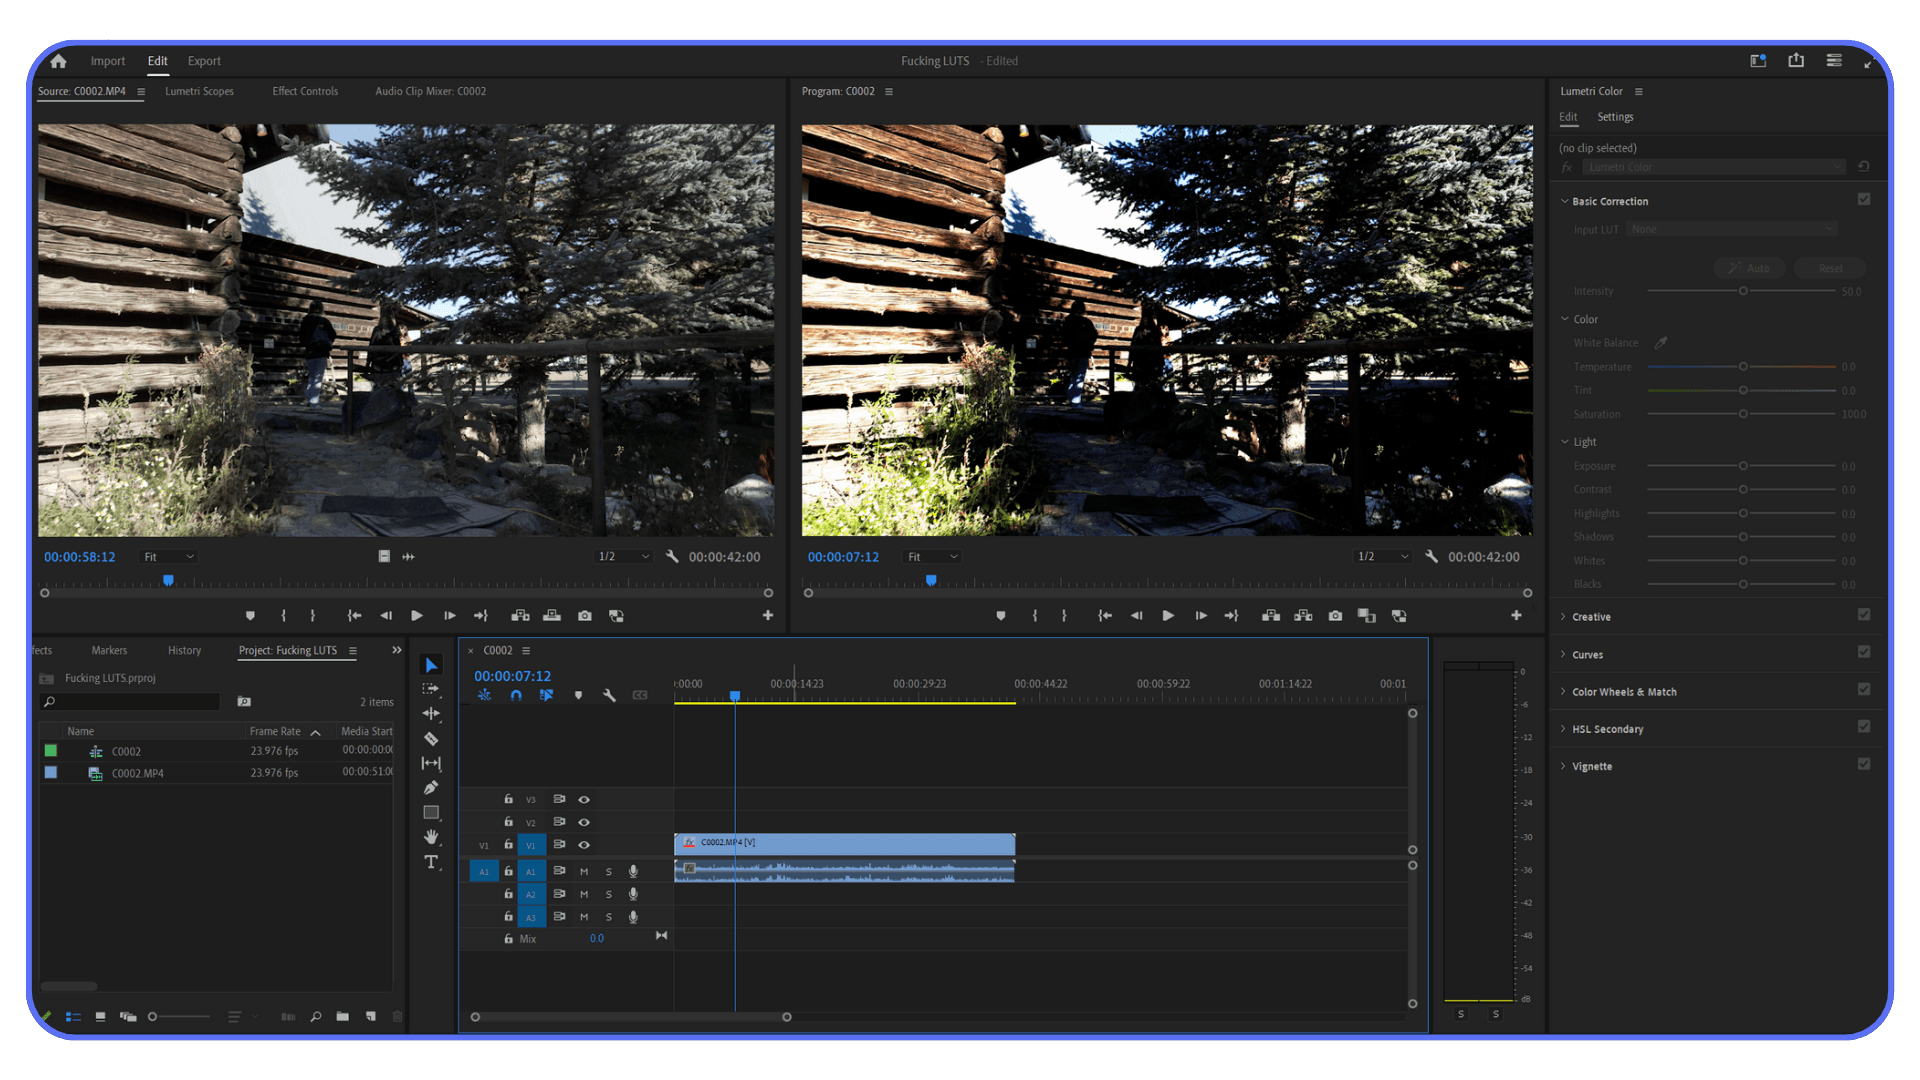
Go to the Basic Correction tab in the Lumetri Color panel. Near the top, you’ll see a dropdown labeled Input LUT.
Click it. Choose Browse. Navigate to your LUT file, usually a .cube file, and select it.
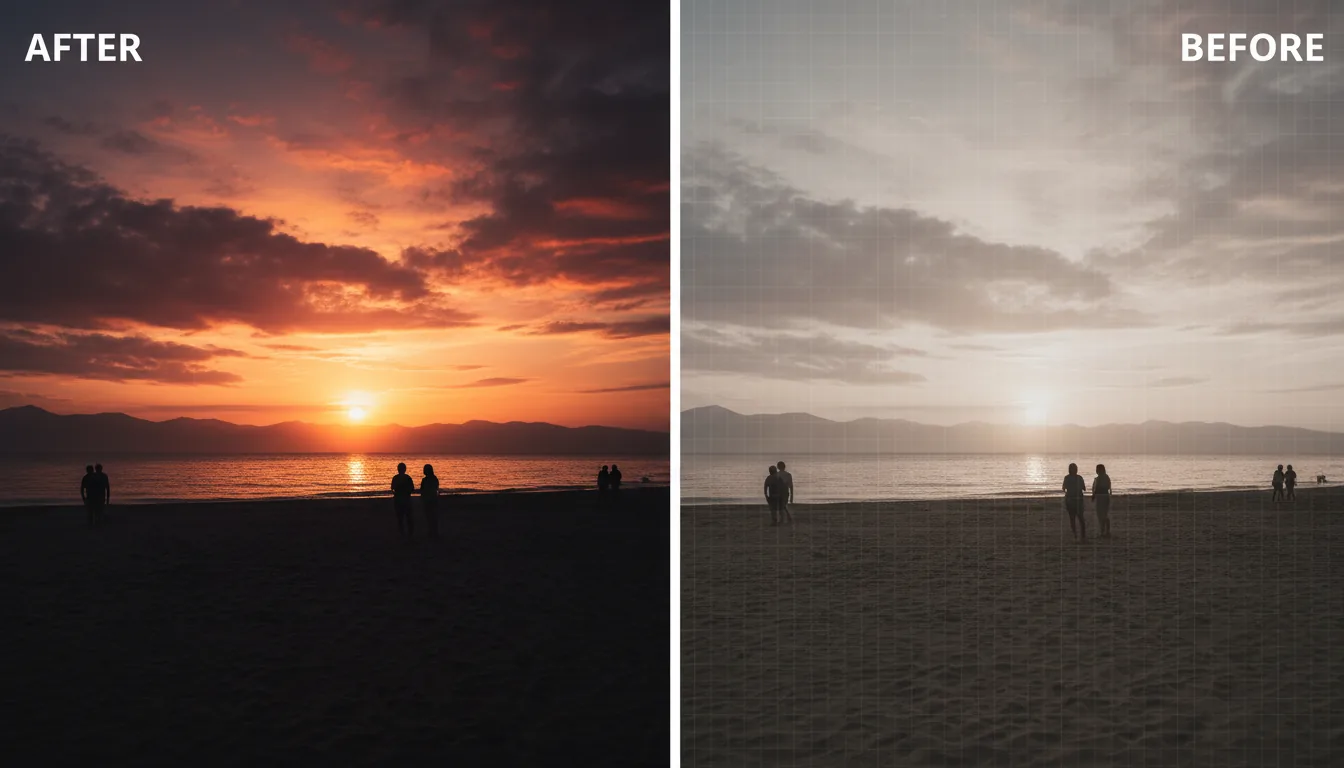
If this is the right LUT for your footage, the image should immediately snap into shape. Contrast comes back. Colors look closer to normal. Not perfect, but usable. That’s the goal here.
If everything suddenly looks too dark or too saturated, don’t panic. That usually means the LUT expects slightly different exposure than what you shot. We’ll fix that in a minute.
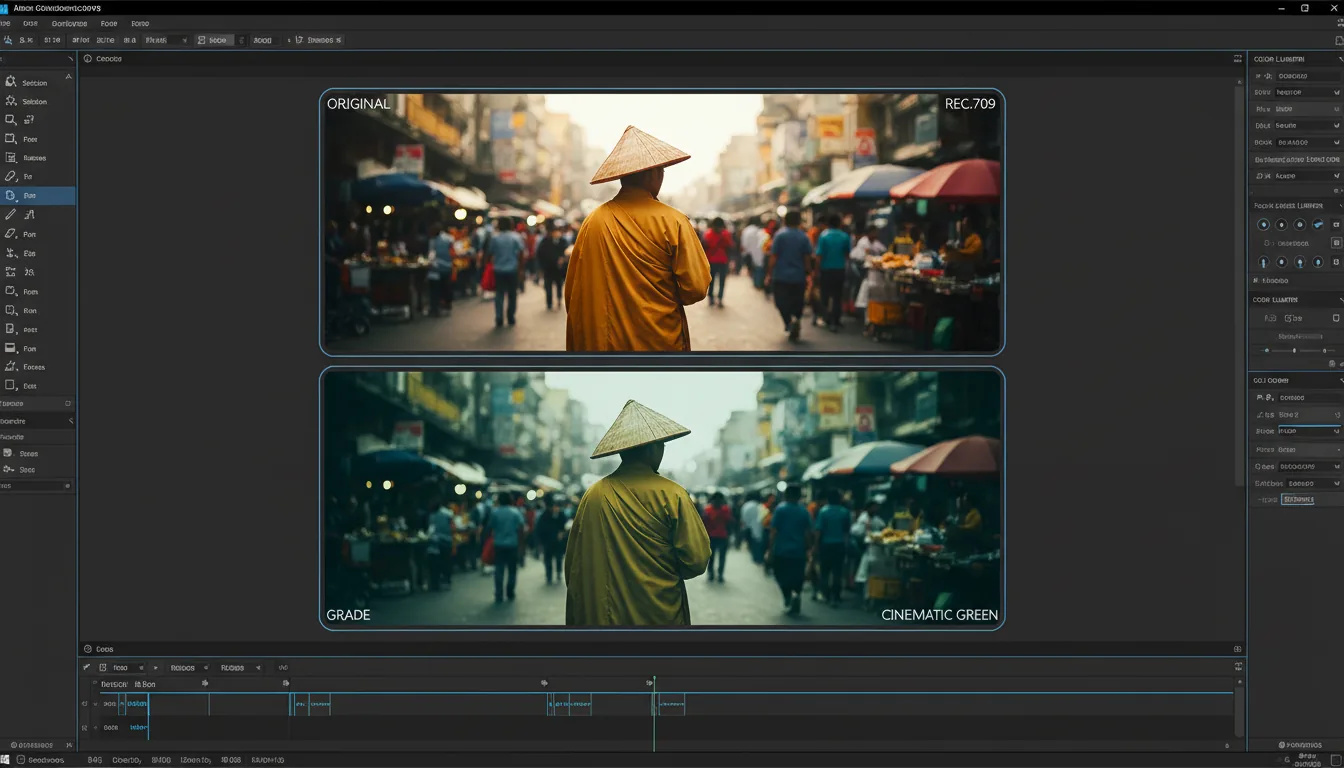
#2. Applying a Creative LUT
Now move down to the Creative tab.
Here you’ll see another dropdown called Look. This is where creative LUTs live. Click Browse and load the LUT you want.
Important detail. Premiere applies creative LUTs at 100 percent by default. In my experience, that’s almost always too much. Start by lowering the Intensity slider. Somewhere between 10 and 40 percent is usually more realistic.
Creative LUTs should enhance, not overpower. If you notice skin tones going weird or highlights clipping, back it off.
Once the LUT is applied, you can still tweak contrast, highlights, shadows, and saturation. A LUT doesn’t lock you in. It just shifts the starting point.
This is the moment where LUTs stop feeling like presets and start feeling like part of a real color workflow.

Installing LUTs So You Don’t Have to Re-Import Them Every Time
If you’re browsing for the same LUT files over and over, you’re doing extra work. Premiere Pro lets you install LUTs so they show up permanently in the dropdown menus. It’s a small setup step that pays off fast.
Here’s how it works.
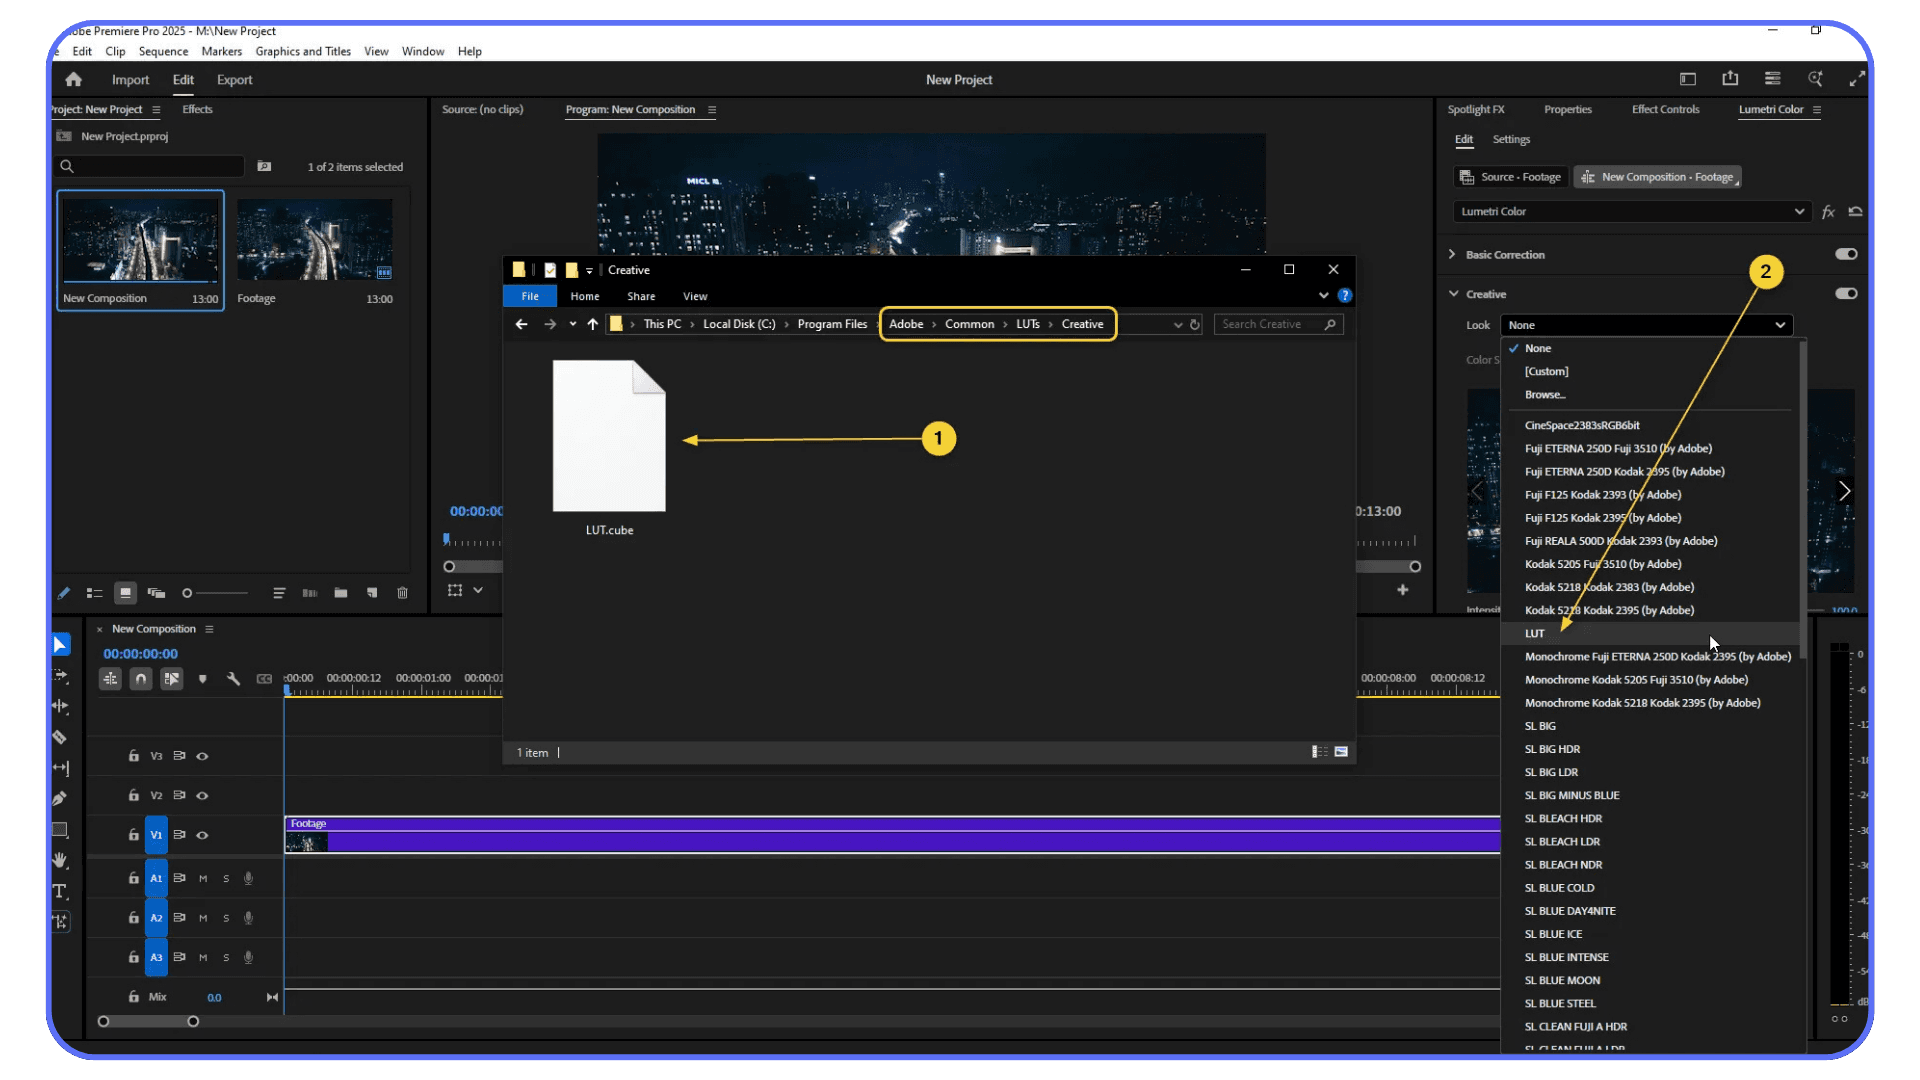
Premiere looks for LUTs in specific folders on your system. Anything placed there will automatically appear under Input LUT or Creative Look inside Lumetri Color.
On Windows, the folders live here:
C:\Program Files\Adobe\Common\LUTs\TechnicalC:\Program Files\Adobe\Common\LUTs\Creative
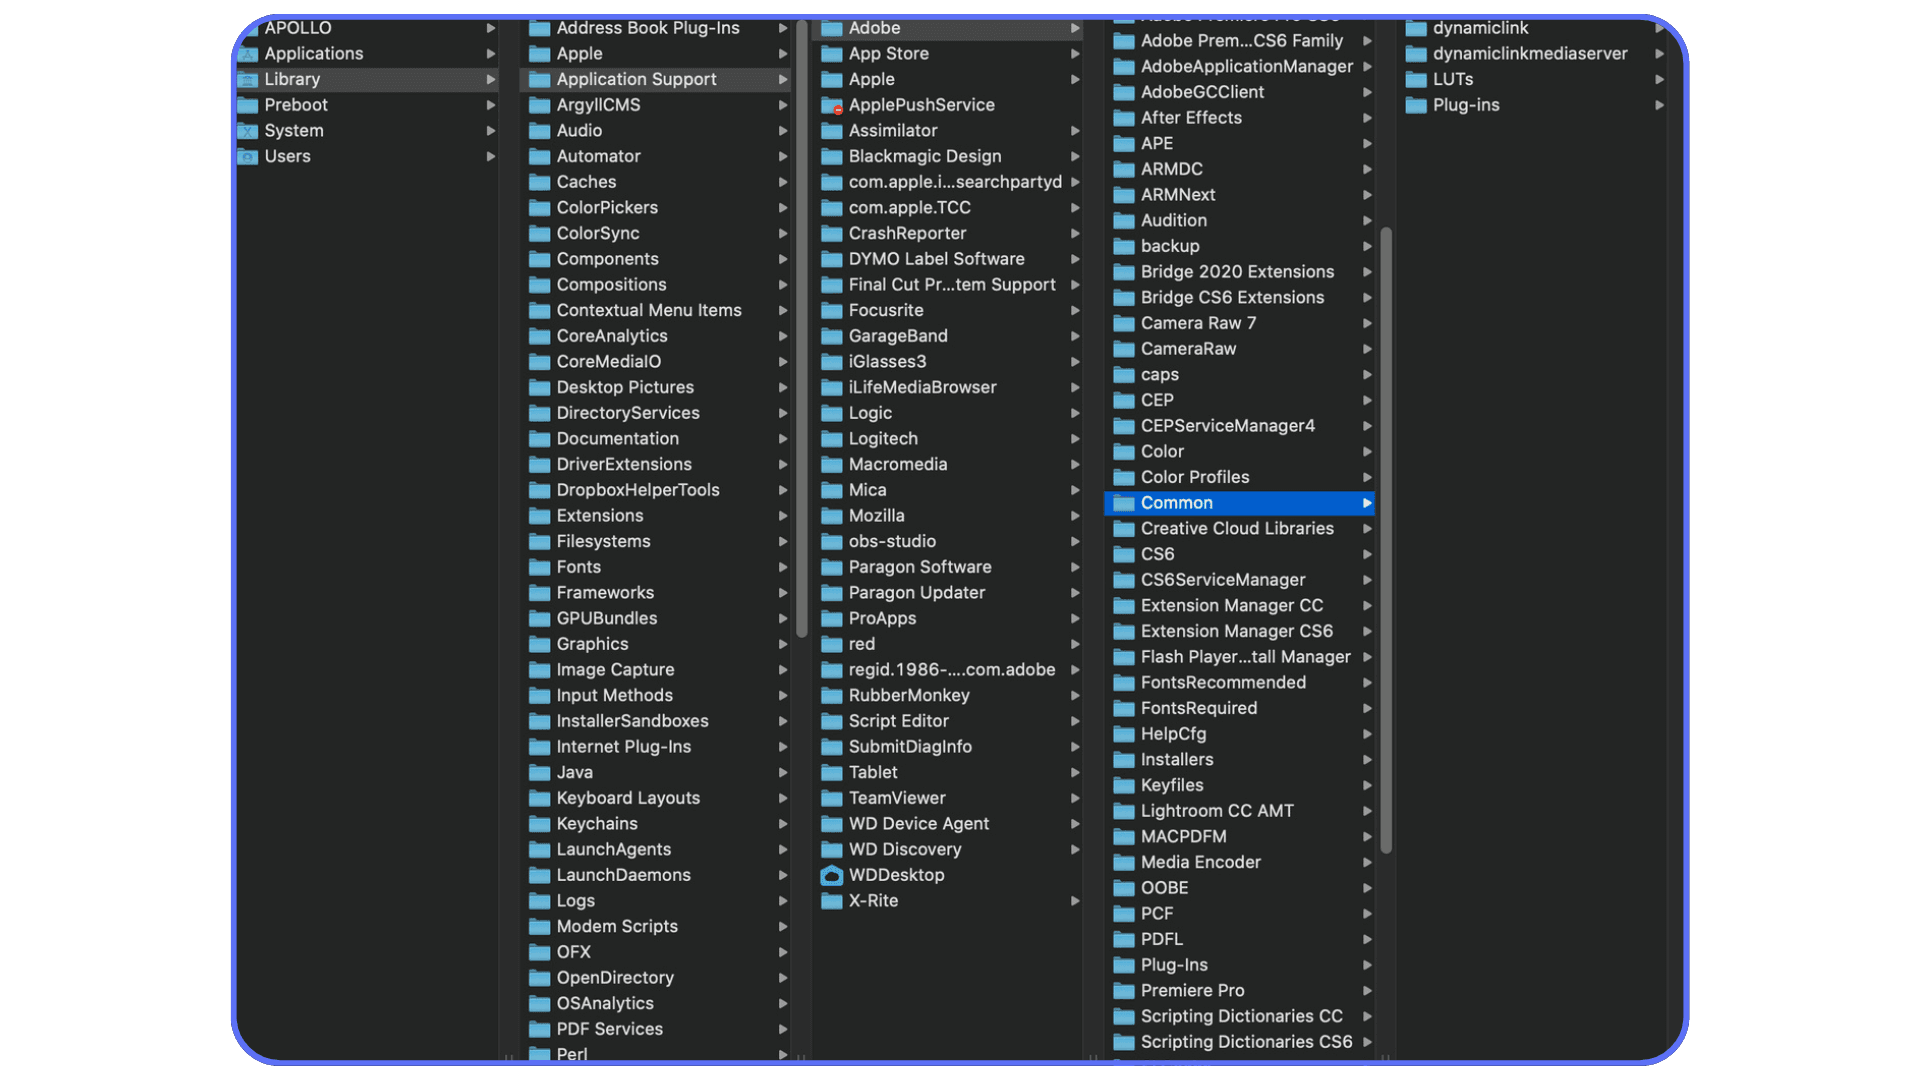
On macOS, look here:
/Library/Application Support/Adobe/Common/LUTs/Technical/Library/Application Support/Adobe/Common/LUTs/Creative
The folder names matter. Technical LUTs go in Technical. Creative ones go in Creative. If you mix them up, Premiere won’t stop you, but your workflow will get messy fast.
Once you copy your .cube files into the right folder, restart Premiere Pro. Open the Lumetri panel again and check the dropdowns. Your LUTs should now be there, ready to go without browsing.
This is especially useful if you use the same camera LUTs on every project or rely on a small set of creative looks you trust. Less friction. Fewer clicks. One less thing to think about when you’re already juggling timelines, revisions, and deadlines.
Using Adjustment Layers for Sanity and Consistency
If you’re applying the same LUT to clip after clip, stop. There’s an easier way.
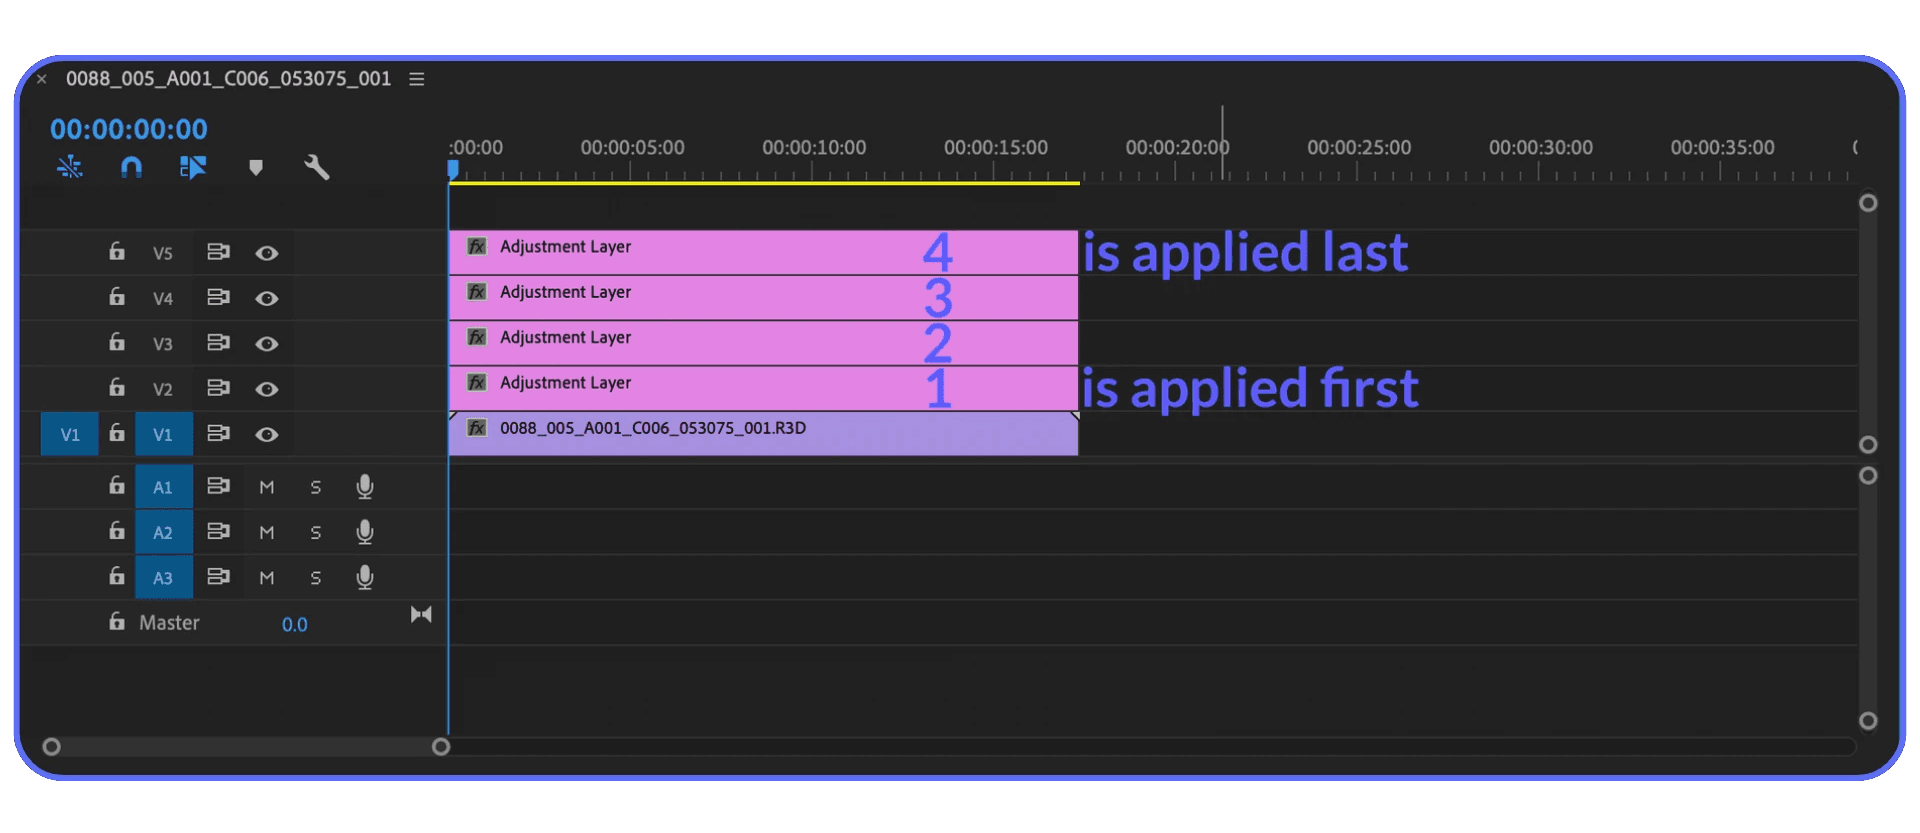
Adjustment layers let you apply color effects once and affect everything underneath. Think of them like a transparent layer that sits on top of your footage. Whatever color work you put there flows down to all the clips below it.
Here’s why this matters.
Say you’ve got an interview cut across ten clips. Same lighting. Same camera. Same look. If you apply a LUT individually, any change later becomes a chore. With an adjustment layer, you tweak it once and you’re done.
To create one, go to File, New, Adjustment Layer. Drag it onto a track above your footage and stretch it to cover the clips you want affected. Then apply your LUT to the adjustment layer instead of the clips.
This is where things start to feel organized.
Creative LUTs work especially well this way. You can keep technical corrections like exposure and white balance on the clips themselves, then use the adjustment layer purely for the look. Cleaner timeline. Easier revisions. Less risk of accidentally messing up a single shot.
One caveat. Adjustment layers aren’t always the answer. If shots vary wildly in exposure or lighting, a single LUT across all of them can cause problems. In those cases, fix the clips individually first, then bring them together with a lighter creative pass on top.
Used right, adjustment layers make LUT workflows feel intentional instead of chaotic. And once you get used to them, it’s hard to go back.
The Most Common LUT Mistakes I See Over and Over
I’ve watched people swear off LUTs entirely because of mistakes that are completely avoidable. The tool gets blamed, but the workflow is usually the real problem.
The first mistake is applying a LUT before fixing exposure and white balance. LUTs assume a certain starting point. If your clip is underexposed or tinted green, the LUT just amplifies the issue. Always normalize first. Even small adjustments make a big difference.
Another classic move is stacking LUTs like filters. One for color. One for contrast. One for mood. Before you know it, highlights are crushed and skin tones look sunburned. More LUTs rarely mean better results. One well-chosen LUT, lightly applied, beats five heavy ones every time.
Then there’s the color space mismatch. Using a LUT built for one camera profile on footage from another. Sometimes you get lucky. Most of the time, you don’t. This is why camera-specific input LUTs exist. They’re not optional if you want consistent color.
I also see people trust the LUT more than their eyes. If something looks off, it probably is. Skin tones are the giveaway. If faces look unnatural, no amount of “cinematic” contrast is worth it.
LUTs are predictable tools. When they go wrong, there’s usually a clear reason. Once you learn to spot these mistakes, fixing them becomes second nature.
A Real-World Color Workflow Example
Let’s put all of this into a situation that actually happens.
You shoot an interview on a mirrorless camera in log. Indoor setup. Soft key light. Decent exposure, but nothing fancy. You bring the footage into Premiere Pro and, predictably, it looks flat and gray.
First move. Input LUT.
In the Basic Correction tab, you apply the camera’s official log-to-Rec.709 LUT. Instantly better. Contrast is back. Colors make sense again. Still a little dull, but now you’re working with something real instead of a foggy placeholder.
Next, basic corrections. Nothing dramatic.
Exposure gets nudged up slightly.
Highlights pulled down just enough to protect skin.
White balance adjusted so faces don’t lean blue.
This part matters more than people think. If you skip it, every creative decision later gets harder.
Now comes the creative LUT.
You apply it in the Creative tab. At 100 percent, it looks like too much. Always does. So you pull the intensity down to around 25 percent. Suddenly it feels intentional. The contrast has character without shouting. Skin still looks natural. Shadows aren’t crushed.
From there, it’s small tweaks. Maybe a touch of saturation. Maybe easing back the blacks. Nothing fancy. The LUT sets the direction. You do the steering.
If this interview has multiple clips, you move the creative LUT to an adjustment layer above the timeline. One look. One change point. Easy revisions later.
That’s it. No magic. No chasing trends. Just a clean, repeatable workflow that holds up when clients ask for changes or when you revisit the project weeks later.
This is where LUTs shine. Not as shortcuts, but as structure.
When LUTs Aren’t Enough And That’s Fine
There’s a point where LUTs stop helping and start getting in the way.
You’ll feel it when the footage fights back. Mixed lighting in the same shot. One camera slightly warmer than the other. Practical lights doing weird things to skin tones. You apply your trusted LUT and something still feels off. No amount of intensity tweaking fixes it.
That’s not failure. That’s reality.
LUTs work best when footage is controlled and consistent. Once variables pile up, manual grading usually wins. Curves, color wheels, selective saturation. Slower, yes. But also more precise.
I’ve noticed a lot of editors hit a ceiling because they rely on LUTs for every look. They get fast results early, then stall when projects demand nuance. At some point, understanding why a shot needs cooler shadows or warmer highlights matters more than which LUT you picked.
This doesn’t mean you should ditch LUTs. It means you should know when to step beyond them. Use LUTs to get into the ballpark. Use manual adjustments to finish the job.
Color grading isn’t about presets. It’s about decisions. And sometimes the right decision is to turn the LUT off and start shaping the image yourself.
If you’re weighing whether to upgrade your machine instead, this PC build and computer buying guide for Premiere Pro is a solid reference before spending money.
Performance Reality: LUTs, Lumetri, and Heavy Projects
Here’s the part people don’t talk about much. Color work is expensive. Not financially. Computationally.
Once you start stacking Lumetri effects, things add up fast. An input LUT. A creative LUT. A few exposure tweaks. Maybe an adjustment layer on top. Then you throw in noise reduction, masks, or one of Premiere’s newer AI tools. Playback stutters. Scrubbing feels mushy. Fans spin up like your machine is about to take off.
Even solid computers hit this wall.
I’ve seen projects that cut smoothly in the early edit suddenly become frustrating once color enters the picture. Same timeline. Same footage. Totally different performance. LUTs themselves aren’t huge, but Lumetri as a whole is not lightweight. Every color decision has to be processed in real time, frame by frame.
Proxies help. Render previews help. Sometimes they’re enough. Sometimes they’re just a bandage.
If you’re not already using proxies, creating lightweight versions of your footage can make a noticeable difference, especially on larger timelines. If you want a full walkthrough, this guide on how to create video proxies in Premiere Pro breaks it down step by step.
This gets especially painful if you’re on a laptop, working remotely, or juggling multiple projects at once. You end up making creative decisions based on what your system can handle instead of what the footage needs. That’s a bad place to be.
Color should be about taste and intent. Not whether playback drops frames every time you touch a slider.
This is usually the moment editors start looking for alternatives. Not because they want new tools, but because they want their workflow to stop fighting them.
Color-heavy timelines also tend to punish export times. If renders start taking longer than expected, there are a few workflow tweaks that can help. This breakdown on reducing rendering times in Premiere Pro covers the biggest wins.
Vagon Cloud Computer: A Smarter Way to Handle LUT-Heavy Projects
This is where tools and reality collide.
If you’ve ever found yourself turning off Lumetri just to get smooth playback, you already know the problem. The creative decisions are there. The footage is ready. The machine just isn’t keeping up.
This is where something like Vagon Cloud Computer starts to make sense.
Instead of pushing your local hardware past its limits, you’re essentially working on a high-performance computer in the cloud. Premiere Pro runs there. Your LUTs, Lumetri stacks, adjustment layers, all of it. Your laptop becomes a window, not the engine.
What I like about this approach is that it doesn’t change how you edit. You’re still using Premiere Pro the same way. Same panels. Same shortcuts. Same workflows. You’re just doing it on hardware that doesn’t choke when you stack color effects or scrub through heavy timelines.
Some editors even combine cloud systems with mobile devices for quick reviews or edits on the go. If that’s your style, this guide on using Adobe Premiere Pro on iPad explores what’s realistic and what’s not.
This can be a game changer if:
You’re editing on a laptop that struggles with color work
You move between locations and devices
You collaborate remotely and need consistent performance
You’re working with LUT-heavy, color-sensitive projects
It’s not about replacing skill or shortcuts. It’s about removing friction. When playback is smooth and exports don’t feel like a gamble, you make better creative decisions. You experiment more. You push looks further instead of settling early.
Vagon isn’t something you need for every project. But when color grading becomes the bottleneck, it’s a practical option that keeps the focus where it belongs. On the image, not the hardware.
Premiere leans heavily on GPU acceleration for color work, and not all GPUs perform the same. If you’re curious why some systems struggle more than others, this guide on choosing the best GPU for Premiere Pro explains it in practical terms.
Final Thoughts
LUTs get a weird reputation. They’re either treated like magic buttons or dismissed as lazy shortcuts. The truth lives somewhere in the middle.
Used well, LUTs are efficient. They give you a starting point. They bring consistency. They save time when deadlines are tight. Used blindly, they create brittle looks that fall apart the second footage changes.
If a LUT looks bad, it’s usually not the LUT. It’s the order. The exposure. The expectations.
The more you understand what’s happening under the hood, the less mysterious color grading feels. And the more confident you become in bending LUTs to your will instead of letting them dictate the look.
Tools like Vagon exist for the same reason LUTs do. To remove friction. Not to replace judgment, taste, or experience. Just to make the process smoother when things get heavy.
At the end of the day, good color isn’t about presets or power. It’s about decisions. And the fewer obstacles between you and those decisions, the better your work tends to be.
And if you ever find yourself questioning whether Premiere Pro is still the right tool for you, there are solid options out there. This overview of the best Premiere Pro alternatives lays out when switching might actually make sense.
FAQs
1. Can I use LUTs on non-log footage?
Yes. You just need to be picky. Input LUTs are usually pointless on standard Rec.709 footage, but creative LUTs can still work if they’re designed for normal color space. Just keep the intensity low and trust your eyes.
2. Why does my footage look worse after applying a LUT?
Most of the time, it’s exposure or white balance. LUTs assume a certain baseline. If your clip is too dark, too bright, or tinted, the LUT will exaggerate the problem. Fix the basics first, then apply the LUT.
3. Should I always use the camera manufacturer’s LUT?
For input LUTs, yes. In most cases, the official log-to-Rec.709 LUT from the camera brand is the safest starting point. Creative LUTs are more subjective. Taste matters more than brand names there.
4. Is it okay to stack LUTs?
Technically, yes. Practically, it’s risky. Stacking LUTs often leads to crushed shadows, clipped highlights, and ugly skin tones. If you feel the need to stack, it’s usually a sign that manual adjustments would work better.
5. Why do LUTs look different on different screens?
Because screens lie. Or at least, they disagree. Monitor calibration, brightness settings, and color profiles all affect how a LUT appears. What looks great on your laptop might look harsh on someone else’s display.
6. Are LUTs better than manual color grading?
Neither is better. They serve different purposes. LUTs are fast and consistent. Manual grading is precise and flexible. Most real-world workflows use both.
7. Do LUTs slow down Premiere Pro?
On their own, not much. But combined with Lumetri effects, adjustment layers, masks, and AI tools, they contribute to heavier processing. That’s when performance can drop, especially on less powerful systems.
8. Should beginners use LUTs or avoid them?
Use them. Just don’t rely on them blindly. LUTs are great learning tools if you pay attention to what they change and why. They’re only a problem when they replace understanding instead of supporting it.
You drop the clip on the timeline.
Hit play.
And immediately think, “That’s not right.”
Everything looks gray. Flat. Lifeless. The shot looked great on set, but inside Premiere Pro it feels broken. No contrast. No punch. Skin tones gone dull. If you shot in log, this moment probably feels familiar.
This is usually where people discover LUTs.
Not from theory. Not from a color class. From panic.
A quick search, a few clicks, and suddenly the image looks alive again.
Relief.
Followed by confusion.
Why did that work? Why do some LUTs look great and others look awful? And how are you actually supposed to use them without wrecking your footage?
That’s where the real conversation starts.
Understanding LUTs Before You Use Them
A LUT is not magic. It just feels like it when you’re stressed and your footage looks terrible.
LUT stands for Look-Up Table. Which already sounds more complicated than it needs to be. In simple terms, it’s a set of instructions that says, “When you see this color and brightness value, change it to that one.” That’s it. No creativity. No judgment. Just math.
This is where I think people get tripped up.
LUTs don’t understand your footage. They don’t know if your shot is underexposed, badly lit, or perfectly balanced. They don’t care about skin tones. They just apply the transformation they were designed for. If your clip matches the conditions the LUT expects, it can look fantastic. If it doesn’t, things fall apart fast.
This is why some LUTs feel amazing and others feel unusable. A LUT built for a specific camera, color profile, and exposure will shine in that exact scenario. Use it on the wrong footage and you’ll get crushed blacks, blown highlights, or skin that looks slightly… alien.
Another thing people don’t say enough. LUTs are blunt instruments. They’re fast, consistent, and repeatable. That’s their strength. But they’re not flexible. They won’t gently adapt to your shot the way manual color correction can.
In my experience, the healthiest way to think about LUTs is this. They’re starting points. Not finishing touches. Great for getting footage into the right ballpark. Terrible if you expect them to solve everything with one click.
Once you stop treating LUTs like secret sauce and start treating them like tools, they make a lot more sense. And they become way more useful.
Input LUTs vs Creative LUTs
Most LUT confusion comes from this one mistake. People treat all LUTs the same.
They’re not.
Premiere Pro separates LUTs into two categories for a reason. Input LUTs and Creative LUTs do very different jobs, and mixing them up is a fast way to wreck your color.
Input LUTs are technical. Boring. Necessary. Their job is to translate footage from one color space into another. The classic example is log footage to Rec.709. You shoot flat to preserve dynamic range, then an input LUT brings contrast and color back to something usable.
This should usually be your first step.
If you shot in S-Log, C-Log, V-Log, or something similar, an input LUT tells Premiere how that footage is supposed to look on a normal screen. Without it, you’re grading on top of a broken foundation.
Creative LUTs are a different beast.
These are about style. Mood. Vibe. Warm highlights. Cool shadows. That slightly faded cinematic look everyone seems to want. Creative LUTs assume your footage is already in a normal color space. They are not designed to fix flat footage. They’re designed to push it.
And this is where people go wrong.
They slap a creative LUT onto log footage, crank the intensity to 100 percent, and wonder why everything looks crushed and oversaturated. The LUT isn’t bad. The order is.
The clean workflow is simple:
Use an input LUT to normalize the footage.
Do basic exposure and white balance corrections.
Then apply a creative LUT, gently.
Once you separate technical correction from creative styling, LUTs stop feeling unpredictable. You’re no longer guessing. You’re building on purpose.
How to Add LUTs in Premiere Pro
Let’s get practical. No theory. Just how to do it without clicking around blindly.
If you already have your footage on the timeline, you’re most of the way there.
First, switch to the Color workspace. You can find it at the top of Premiere Pro, or go to Window and make sure Lumetri Color is checked. This opens the panel where all color work happens.
Select the clip you want to work on. Nothing happens if the clip isn’t selected. This trips people up more than it should.
#1. Applying an Input LUT
Go to the Basic Correction tab in the Lumetri Color panel. Near the top, you’ll see a dropdown labeled Input LUT.
Click it. Choose Browse. Navigate to your LUT file, usually a .cube file, and select it.
If this is the right LUT for your footage, the image should immediately snap into shape. Contrast comes back. Colors look closer to normal. Not perfect, but usable. That’s the goal here.
If everything suddenly looks too dark or too saturated, don’t panic. That usually means the LUT expects slightly different exposure than what you shot. We’ll fix that in a minute.
#2. Applying a Creative LUT
Now move down to the Creative tab.
Here you’ll see another dropdown called Look. This is where creative LUTs live. Click Browse and load the LUT you want.
Important detail. Premiere applies creative LUTs at 100 percent by default. In my experience, that’s almost always too much. Start by lowering the Intensity slider. Somewhere between 10 and 40 percent is usually more realistic.
Creative LUTs should enhance, not overpower. If you notice skin tones going weird or highlights clipping, back it off.
Once the LUT is applied, you can still tweak contrast, highlights, shadows, and saturation. A LUT doesn’t lock you in. It just shifts the starting point.
This is the moment where LUTs stop feeling like presets and start feeling like part of a real color workflow.
Installing LUTs So You Don’t Have to Re-Import Them Every Time
If you’re browsing for the same LUT files over and over, you’re doing extra work. Premiere Pro lets you install LUTs so they show up permanently in the dropdown menus. It’s a small setup step that pays off fast.
Here’s how it works.
Premiere looks for LUTs in specific folders on your system. Anything placed there will automatically appear under Input LUT or Creative Look inside Lumetri Color.
On Windows, the folders live here:
C:\Program Files\Adobe\Common\LUTs\TechnicalC:\Program Files\Adobe\Common\LUTs\Creative
On macOS, look here:
/Library/Application Support/Adobe/Common/LUTs/Technical/Library/Application Support/Adobe/Common/LUTs/Creative
The folder names matter. Technical LUTs go in Technical. Creative ones go in Creative. If you mix them up, Premiere won’t stop you, but your workflow will get messy fast.
Once you copy your .cube files into the right folder, restart Premiere Pro. Open the Lumetri panel again and check the dropdowns. Your LUTs should now be there, ready to go without browsing.
This is especially useful if you use the same camera LUTs on every project or rely on a small set of creative looks you trust. Less friction. Fewer clicks. One less thing to think about when you’re already juggling timelines, revisions, and deadlines.
Using Adjustment Layers for Sanity and Consistency
If you’re applying the same LUT to clip after clip, stop. There’s an easier way.
Adjustment layers let you apply color effects once and affect everything underneath. Think of them like a transparent layer that sits on top of your footage. Whatever color work you put there flows down to all the clips below it.
Here’s why this matters.
Say you’ve got an interview cut across ten clips. Same lighting. Same camera. Same look. If you apply a LUT individually, any change later becomes a chore. With an adjustment layer, you tweak it once and you’re done.
To create one, go to File, New, Adjustment Layer. Drag it onto a track above your footage and stretch it to cover the clips you want affected. Then apply your LUT to the adjustment layer instead of the clips.
This is where things start to feel organized.
Creative LUTs work especially well this way. You can keep technical corrections like exposure and white balance on the clips themselves, then use the adjustment layer purely for the look. Cleaner timeline. Easier revisions. Less risk of accidentally messing up a single shot.
One caveat. Adjustment layers aren’t always the answer. If shots vary wildly in exposure or lighting, a single LUT across all of them can cause problems. In those cases, fix the clips individually first, then bring them together with a lighter creative pass on top.
Used right, adjustment layers make LUT workflows feel intentional instead of chaotic. And once you get used to them, it’s hard to go back.
The Most Common LUT Mistakes I See Over and Over
I’ve watched people swear off LUTs entirely because of mistakes that are completely avoidable. The tool gets blamed, but the workflow is usually the real problem.
The first mistake is applying a LUT before fixing exposure and white balance. LUTs assume a certain starting point. If your clip is underexposed or tinted green, the LUT just amplifies the issue. Always normalize first. Even small adjustments make a big difference.
Another classic move is stacking LUTs like filters. One for color. One for contrast. One for mood. Before you know it, highlights are crushed and skin tones look sunburned. More LUTs rarely mean better results. One well-chosen LUT, lightly applied, beats five heavy ones every time.
Then there’s the color space mismatch. Using a LUT built for one camera profile on footage from another. Sometimes you get lucky. Most of the time, you don’t. This is why camera-specific input LUTs exist. They’re not optional if you want consistent color.
I also see people trust the LUT more than their eyes. If something looks off, it probably is. Skin tones are the giveaway. If faces look unnatural, no amount of “cinematic” contrast is worth it.
LUTs are predictable tools. When they go wrong, there’s usually a clear reason. Once you learn to spot these mistakes, fixing them becomes second nature.
A Real-World Color Workflow Example
Let’s put all of this into a situation that actually happens.
You shoot an interview on a mirrorless camera in log. Indoor setup. Soft key light. Decent exposure, but nothing fancy. You bring the footage into Premiere Pro and, predictably, it looks flat and gray.
First move. Input LUT.
In the Basic Correction tab, you apply the camera’s official log-to-Rec.709 LUT. Instantly better. Contrast is back. Colors make sense again. Still a little dull, but now you’re working with something real instead of a foggy placeholder.
Next, basic corrections. Nothing dramatic.
Exposure gets nudged up slightly.
Highlights pulled down just enough to protect skin.
White balance adjusted so faces don’t lean blue.
This part matters more than people think. If you skip it, every creative decision later gets harder.
Now comes the creative LUT.
You apply it in the Creative tab. At 100 percent, it looks like too much. Always does. So you pull the intensity down to around 25 percent. Suddenly it feels intentional. The contrast has character without shouting. Skin still looks natural. Shadows aren’t crushed.
From there, it’s small tweaks. Maybe a touch of saturation. Maybe easing back the blacks. Nothing fancy. The LUT sets the direction. You do the steering.
If this interview has multiple clips, you move the creative LUT to an adjustment layer above the timeline. One look. One change point. Easy revisions later.
That’s it. No magic. No chasing trends. Just a clean, repeatable workflow that holds up when clients ask for changes or when you revisit the project weeks later.
This is where LUTs shine. Not as shortcuts, but as structure.
When LUTs Aren’t Enough And That’s Fine
There’s a point where LUTs stop helping and start getting in the way.
You’ll feel it when the footage fights back. Mixed lighting in the same shot. One camera slightly warmer than the other. Practical lights doing weird things to skin tones. You apply your trusted LUT and something still feels off. No amount of intensity tweaking fixes it.
That’s not failure. That’s reality.
LUTs work best when footage is controlled and consistent. Once variables pile up, manual grading usually wins. Curves, color wheels, selective saturation. Slower, yes. But also more precise.
I’ve noticed a lot of editors hit a ceiling because they rely on LUTs for every look. They get fast results early, then stall when projects demand nuance. At some point, understanding why a shot needs cooler shadows or warmer highlights matters more than which LUT you picked.
This doesn’t mean you should ditch LUTs. It means you should know when to step beyond them. Use LUTs to get into the ballpark. Use manual adjustments to finish the job.
Color grading isn’t about presets. It’s about decisions. And sometimes the right decision is to turn the LUT off and start shaping the image yourself.
If you’re weighing whether to upgrade your machine instead, this PC build and computer buying guide for Premiere Pro is a solid reference before spending money.
Performance Reality: LUTs, Lumetri, and Heavy Projects
Here’s the part people don’t talk about much. Color work is expensive. Not financially. Computationally.
Once you start stacking Lumetri effects, things add up fast. An input LUT. A creative LUT. A few exposure tweaks. Maybe an adjustment layer on top. Then you throw in noise reduction, masks, or one of Premiere’s newer AI tools. Playback stutters. Scrubbing feels mushy. Fans spin up like your machine is about to take off.
Even solid computers hit this wall.
I’ve seen projects that cut smoothly in the early edit suddenly become frustrating once color enters the picture. Same timeline. Same footage. Totally different performance. LUTs themselves aren’t huge, but Lumetri as a whole is not lightweight. Every color decision has to be processed in real time, frame by frame.
Proxies help. Render previews help. Sometimes they’re enough. Sometimes they’re just a bandage.
If you’re not already using proxies, creating lightweight versions of your footage can make a noticeable difference, especially on larger timelines. If you want a full walkthrough, this guide on how to create video proxies in Premiere Pro breaks it down step by step.
This gets especially painful if you’re on a laptop, working remotely, or juggling multiple projects at once. You end up making creative decisions based on what your system can handle instead of what the footage needs. That’s a bad place to be.
Color should be about taste and intent. Not whether playback drops frames every time you touch a slider.
This is usually the moment editors start looking for alternatives. Not because they want new tools, but because they want their workflow to stop fighting them.
Color-heavy timelines also tend to punish export times. If renders start taking longer than expected, there are a few workflow tweaks that can help. This breakdown on reducing rendering times in Premiere Pro covers the biggest wins.
Vagon Cloud Computer: A Smarter Way to Handle LUT-Heavy Projects
This is where tools and reality collide.
If you’ve ever found yourself turning off Lumetri just to get smooth playback, you already know the problem. The creative decisions are there. The footage is ready. The machine just isn’t keeping up.
This is where something like Vagon Cloud Computer starts to make sense.
Instead of pushing your local hardware past its limits, you’re essentially working on a high-performance computer in the cloud. Premiere Pro runs there. Your LUTs, Lumetri stacks, adjustment layers, all of it. Your laptop becomes a window, not the engine.
What I like about this approach is that it doesn’t change how you edit. You’re still using Premiere Pro the same way. Same panels. Same shortcuts. Same workflows. You’re just doing it on hardware that doesn’t choke when you stack color effects or scrub through heavy timelines.
Some editors even combine cloud systems with mobile devices for quick reviews or edits on the go. If that’s your style, this guide on using Adobe Premiere Pro on iPad explores what’s realistic and what’s not.
This can be a game changer if:
You’re editing on a laptop that struggles with color work
You move between locations and devices
You collaborate remotely and need consistent performance
You’re working with LUT-heavy, color-sensitive projects
It’s not about replacing skill or shortcuts. It’s about removing friction. When playback is smooth and exports don’t feel like a gamble, you make better creative decisions. You experiment more. You push looks further instead of settling early.
Vagon isn’t something you need for every project. But when color grading becomes the bottleneck, it’s a practical option that keeps the focus where it belongs. On the image, not the hardware.
Premiere leans heavily on GPU acceleration for color work, and not all GPUs perform the same. If you’re curious why some systems struggle more than others, this guide on choosing the best GPU for Premiere Pro explains it in practical terms.
Final Thoughts
LUTs get a weird reputation. They’re either treated like magic buttons or dismissed as lazy shortcuts. The truth lives somewhere in the middle.
Used well, LUTs are efficient. They give you a starting point. They bring consistency. They save time when deadlines are tight. Used blindly, they create brittle looks that fall apart the second footage changes.
If a LUT looks bad, it’s usually not the LUT. It’s the order. The exposure. The expectations.
The more you understand what’s happening under the hood, the less mysterious color grading feels. And the more confident you become in bending LUTs to your will instead of letting them dictate the look.
Tools like Vagon exist for the same reason LUTs do. To remove friction. Not to replace judgment, taste, or experience. Just to make the process smoother when things get heavy.
At the end of the day, good color isn’t about presets or power. It’s about decisions. And the fewer obstacles between you and those decisions, the better your work tends to be.
And if you ever find yourself questioning whether Premiere Pro is still the right tool for you, there are solid options out there. This overview of the best Premiere Pro alternatives lays out when switching might actually make sense.
FAQs
1. Can I use LUTs on non-log footage?
Yes. You just need to be picky. Input LUTs are usually pointless on standard Rec.709 footage, but creative LUTs can still work if they’re designed for normal color space. Just keep the intensity low and trust your eyes.
2. Why does my footage look worse after applying a LUT?
Most of the time, it’s exposure or white balance. LUTs assume a certain baseline. If your clip is too dark, too bright, or tinted, the LUT will exaggerate the problem. Fix the basics first, then apply the LUT.
3. Should I always use the camera manufacturer’s LUT?
For input LUTs, yes. In most cases, the official log-to-Rec.709 LUT from the camera brand is the safest starting point. Creative LUTs are more subjective. Taste matters more than brand names there.
4. Is it okay to stack LUTs?
Technically, yes. Practically, it’s risky. Stacking LUTs often leads to crushed shadows, clipped highlights, and ugly skin tones. If you feel the need to stack, it’s usually a sign that manual adjustments would work better.
5. Why do LUTs look different on different screens?
Because screens lie. Or at least, they disagree. Monitor calibration, brightness settings, and color profiles all affect how a LUT appears. What looks great on your laptop might look harsh on someone else’s display.
6. Are LUTs better than manual color grading?
Neither is better. They serve different purposes. LUTs are fast and consistent. Manual grading is precise and flexible. Most real-world workflows use both.
7. Do LUTs slow down Premiere Pro?
On their own, not much. But combined with Lumetri effects, adjustment layers, masks, and AI tools, they contribute to heavier processing. That’s when performance can drop, especially on less powerful systems.
8. Should beginners use LUTs or avoid them?
Use them. Just don’t rely on them blindly. LUTs are great learning tools if you pay attention to what they change and why. They’re only a problem when they replace understanding instead of supporting it.
Get Beyond Your Computer Performance
Run applications on your cloud computer with the latest generation hardware. No more crashes or lags.

Trial includes 1 hour usage + 7 days of storage.
Summarize with AI

Ready to focus on your creativity?
Vagon gives you the ability to create & render projects, collaborate, and stream applications with the power of the best hardware.

Vagon Blog


Run heavy applications on any device with
your personal computer on the cloud.
San Francisco, California
Solutions
Vagon Teams
Vagon Streams
Use Cases
Resources
Vagon Blog
What Slows Down After Effects Projects?
The First 30 Minutes in Blender 3D: A Practical Workflow Guide
What’s New in Godot 4.7? Key Features, Upgrades, and Workflow Improvements
What Slows Down Blender 3D Projects?
What Slows Down Adobe Photoshop Projects?
The First 30 Minutes in Adobe Photoshop: A Practical Workflow Guide
Before You Start in Adobe Photoshop: A Practical Setup Checklist
What’s New in Unreal Engine 5.8? Key Features and Upgrade Advice
How to Run Windows on an iPad: 4 Best Ways (2026)
Vagon Blog
Run heavy applications on any device with
your personal computer on the cloud.
San Francisco, California
Solutions
Vagon Teams
Vagon Streams
Use Cases
Resources
Vagon Blog