Instant Connection for Pixel Streaming
— New Feature Automated Setup

Best Premiere Pro Alternatives in 2026
Best Premiere Pro Alternatives in 2026
VideoProduction
Best Premiere Pro Alternatives in 2026
Table of Contents
I used Premiere Pro for eight years, until I realized I was paying hundreds every year for features I barely touched. Don’t get me wrong, it’s still one of the most capable editors out there. But after a while, I started wondering: am I editing… or just paying rent to Adobe?
So what if there were editors that could match, or even outperform, Premiere, without locking you into a subscription or forcing you to upgrade your hardware every year?
That’s exactly what I wanted to find out.
Let’s talk about the best Premiere Pro alternatives worth trying in 2026, from free tools that surprise you with their power, to professional-grade software that might just make you rethink what “industry standard” really means.
If you’re still committed to Premiere and want to make it run smoother before switching, check out our guide on reducing your rendering times in Premiere Pro.
Why Consider Alternatives
Let’s be honest, Premiere Pro has been around forever, and it’s earned its place. But it’s also become… heavy. Not just in gigabytes, but in cost, updates, and system demands.
When I first started using it, I loved how everything just worked together inside the Adobe ecosystem. But lately? The constant updates, the creeping subscription fees, the random crashes mid-render, it started to feel like the software was working against me instead of for me.

And I’m not alone. Thousands of creators have hit that same wall:
Cost fatigue — paying $20+ every month adds up fast, especially if you’re a freelancer or small team.
Hardware strain — Premiere can chew through RAM and GPU power like it’s nothing, and not everyone’s running a workstation-grade machine.
Workflow friction — long export times, unstable updates, plugins breaking after patches.
Changing needs — most editors today aren’t cutting feature films; they’re making YouTube videos, TikToks, or client reels. That means they need speed and simplicity, not 400 color correction controls buried in a submenu.
Here’s the thing: Premiere Pro isn’t “bad.” It’s just not always the right fit anymore, especially when there are tools out there that do exactly what you need, faster, cheaper, and sometimes even better optimized for your setup.
So, if you’ve ever found yourself waiting for a render, restarting after a crash, or just questioning that monthly charge on your credit card… you’re not crazy. It might just be time to try something new.
2026 Update: What’s actually different this year
A lot of the “Premiere alternatives” conversation in 2026 isn’t about timelines or trimming anymore. It’s about pricing pressure and AI-assisted editing. Two things changed the vibe.
Adobe got more expensive (or at least harder to justify)
Adobe’s pricing has shifted toward Creative Cloud Pro at $69.99/mo (US) for individuals on the annual plan billed monthly.
If you’re already annoyed by subscriptions, this is the kind of number that makes people finally try something else.
DaVinci Resolve is even more of a “why am I paying Adobe?” moment now
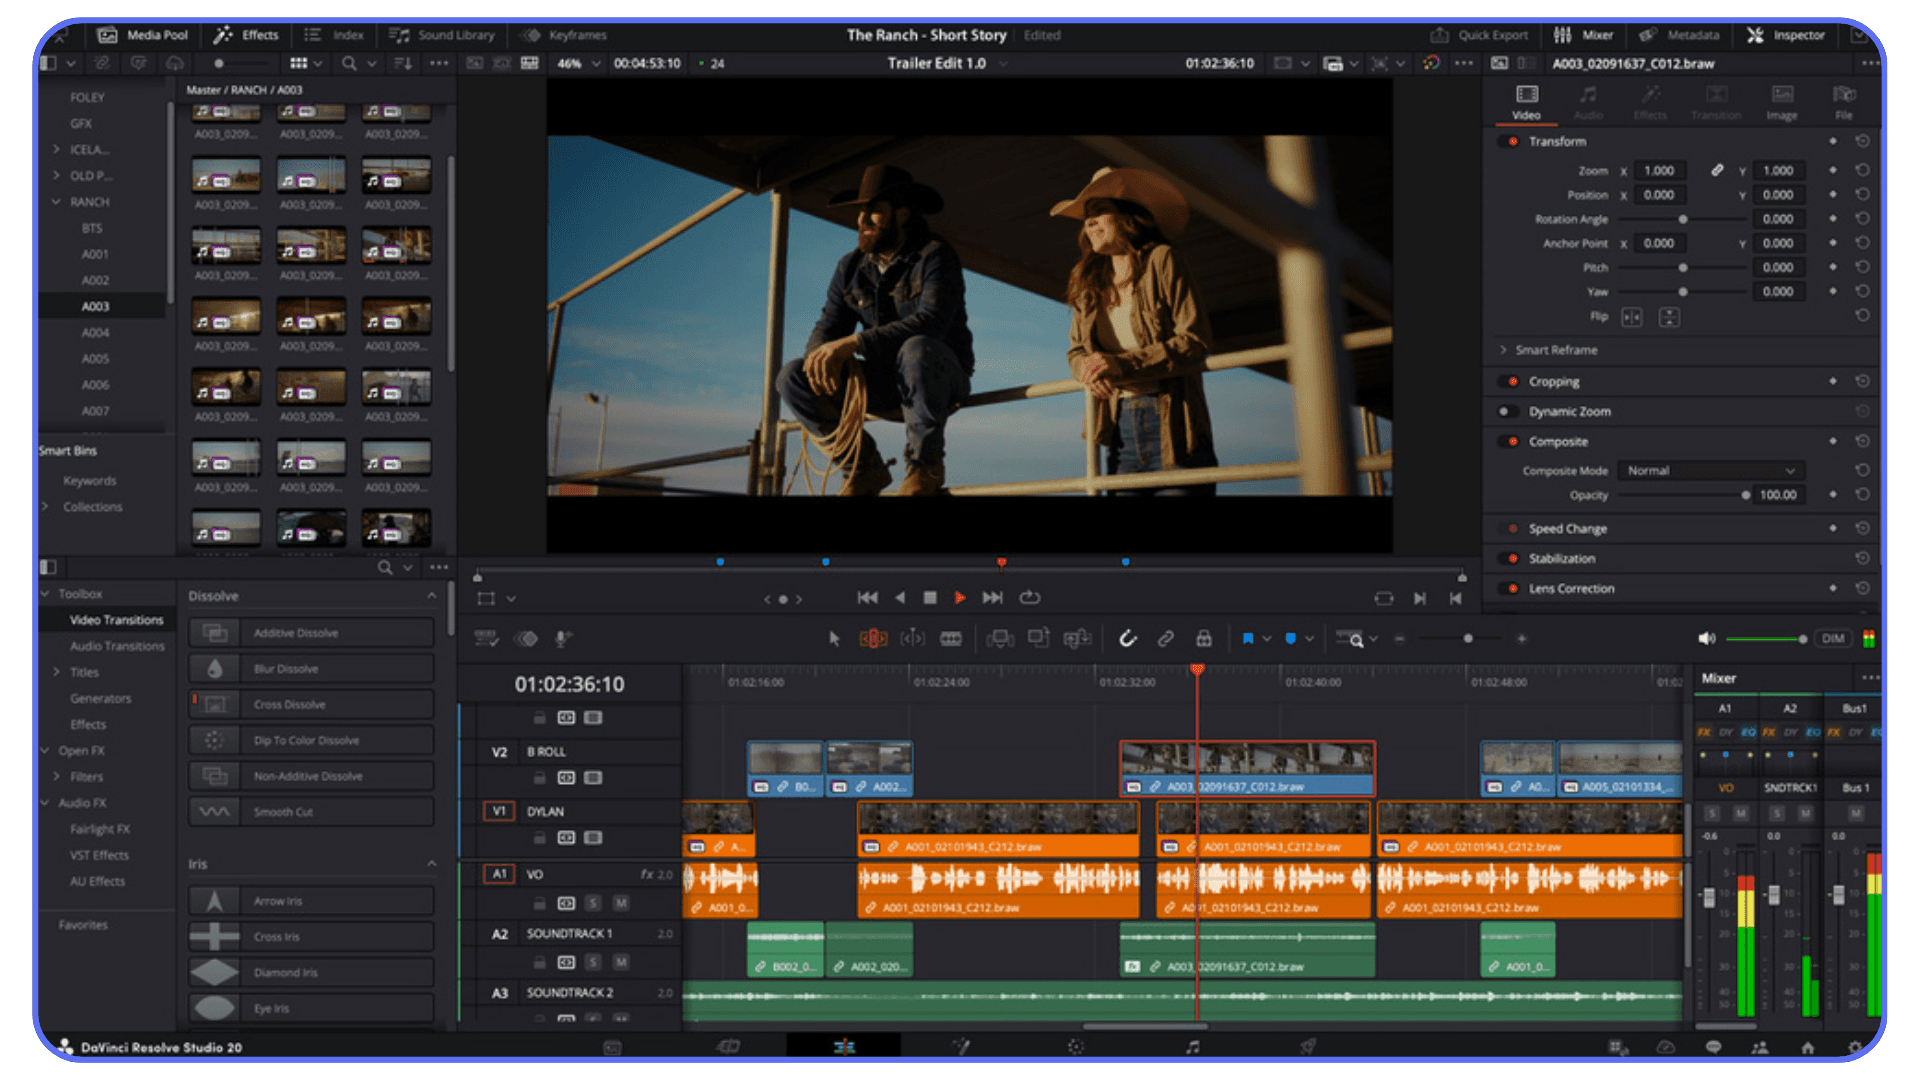
Resolve is still the obvious first stop, but 2026 made it more relevant: Blackmagic is already on DaVinci Resolve 20, and they’re actively shipping updates with real workflow improvements (editing, subtitles, masking, color management).
It’s still not a Premiere clone. But it keeps closing the “I need Adobe for this” gap.
CapCut desktop got more serious (and more AI-first)
CapCut is leaning hard into built-in AI tools (captions, text-to-speech, background removal, enhancements, etc.).
For short-form creators, this matters because it replaces a bunch of plugin-style steps with one-click features. It’s not trying to be Resolve. It’s trying to get you from footage to upload faster than you can overthink it.
Final Cut’s story changed because Apple bundled the ecosystem
Final Cut is still the “fastest-feeling” choice on Apple hardware for a lot of people. But the bigger 2026 change is that Apple is now pushing a bundled creator suite (Final Cut + other pro apps) at a much lower monthly price than Adobe’s all-apps plan.
So the 2026 takeaway is simple:
Resolve is the strongest “leave Adobe without losing power” option.
Final Cut looks even better if you’re all-in on Apple’s ecosystem and pricing bundles.
CapCut is becoming the default for fast social editing because the AI features are built in, not bolted on.
And Premiere is still great, but it’s increasingly a “pay because you’re integrated” situation.
What to Look For Before Switching
If you’ve used Premiere Pro for years, switching editors can feel like learning to walk again. But it doesn’t have to. The goal isn’t to find a clone, it’s to find something that fits the way you work, while fixing the things that have been slowing you down. Here’s what really matters before making the jump.
Familiar Workflow
A new editor shouldn’t feel like landing on another planet. You still want a clear timeline, simple trimming tools, and an interface that doesn’t fight your muscle memory. The closer it feels to Premiere, the faster you’ll adapt.
When I first tried DaVinci Resolve, it took me maybe two days to stop reaching for old shortcuts. After that, I was editing almost as fast as before, sometimes faster, because I wasn’t dealing with lag or random autosaves. Look for that same balance: new, but not foreign.
Performance That Keeps Up
Let’s be real, Premiere Pro can bring even good machines to their knees. You want an editor that runs smoothly on your current hardware, not one that forces you to upgrade your GPU just to play back a timeline.
Test it with your actual footage. Heavy 4K, multi-cam, LUTs, transitions, whatever you normally throw at Premiere. If it holds up without stuttering or overheating your laptop, that’s a good sign.
If you’re curious about upgrading your setup instead of switching editors, here’s our Ultimate PC Build and Computer Buying Guide for Premiere Pro — a detailed breakdown of what actually improves playback and render speed.
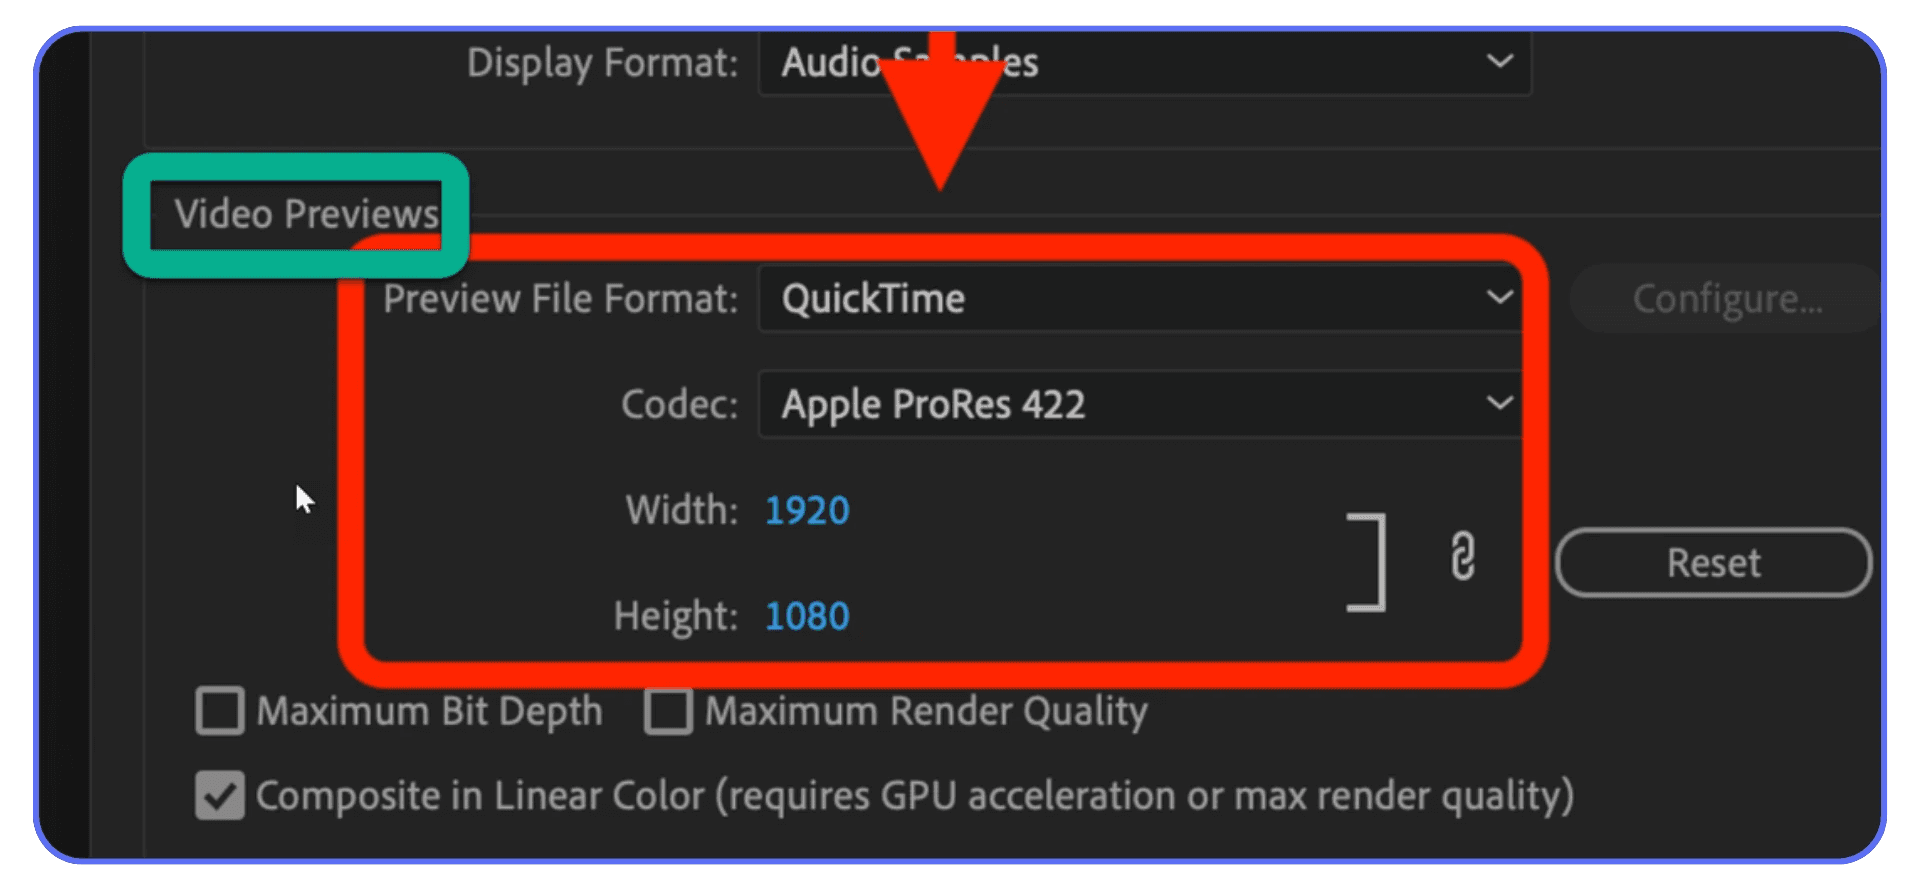
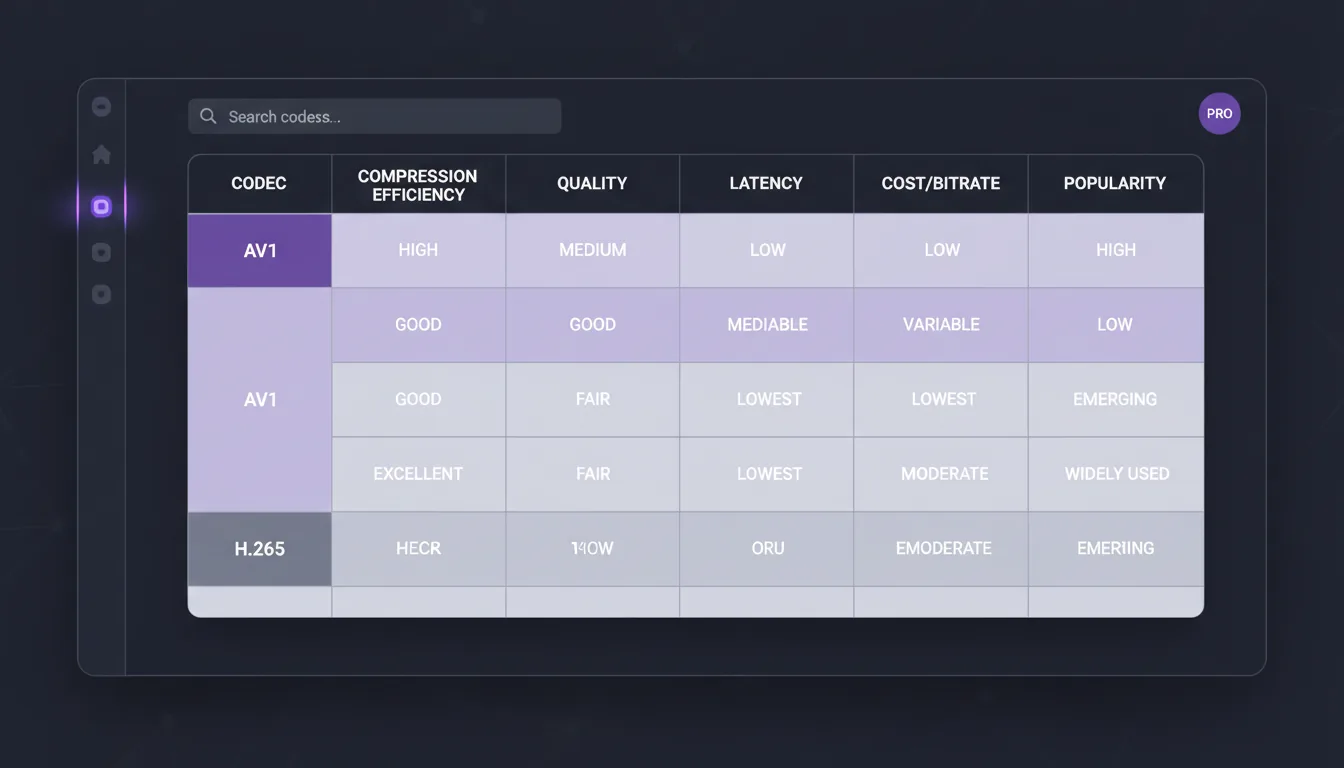
Codec and Format Support
This is the part most people forget, until their new editor refuses to open last week’s client footage. Every camera shoots a little differently: ProRes, HEVC, RAW, H.264… and not every program plays nice with them all.
Before you commit, check what formats your alternative handles natively. It’s not glamorous, but it’s the difference between a smooth export and hours spent converting files that should’ve “just worked.”
Cost and Control
Let’s talk money. Premiere Pro’s subscription looks harmless at first, $20 a month, right? Until you realize that’s $240 a year, and you’ve been doing that for half a decade.
Many alternatives let you buy once and keep the software forever. Others offer generous free tiers that are surprisingly capable (looking at you, Resolve). If you’re not tied to the Creative Cloud ecosystem, there’s no reason to keep paying rent for software.
And if you’d rather optimize your current workflow for now, our Essential Premiere Pro Tips post can help you get more out of your subscription before you move on.
Hardware Compatibility
Not every editor is built the same way. Some depend heavily on GPU power (DaVinci Resolve), while others lean on CPU performance (Lightworks, Kdenlive). Knowing what your system handles best helps you pick a tool that runs smoothly, without needing to upgrade your setup.
If you’re working on a laptop or older desktop, this part matters even more. There’s no point switching to a faster editor if your hardware still bottlenecks the experience.
Plugins and Collaboration
Premiere’s biggest advantage has always been its ecosystem, endless plugins, effects, LUTs, and project sharing tools. Alternatives are catching up fast, but not all of them are built for collaborative workflows yet.
If you rely on third-party transitions, After Effects-style graphics, or share project files with other editors, make sure your new software supports it. Losing that flexibility can break a workflow overnight.
If you often work with large projects or remote teams, learning how to create video proxies in Premiere Pro can drastically speed up your editing sessions.
But if you’re not ready to switch yet, our collection of Premiere Pro tutorials is a great way to sharpen your current workflow before exploring new software.
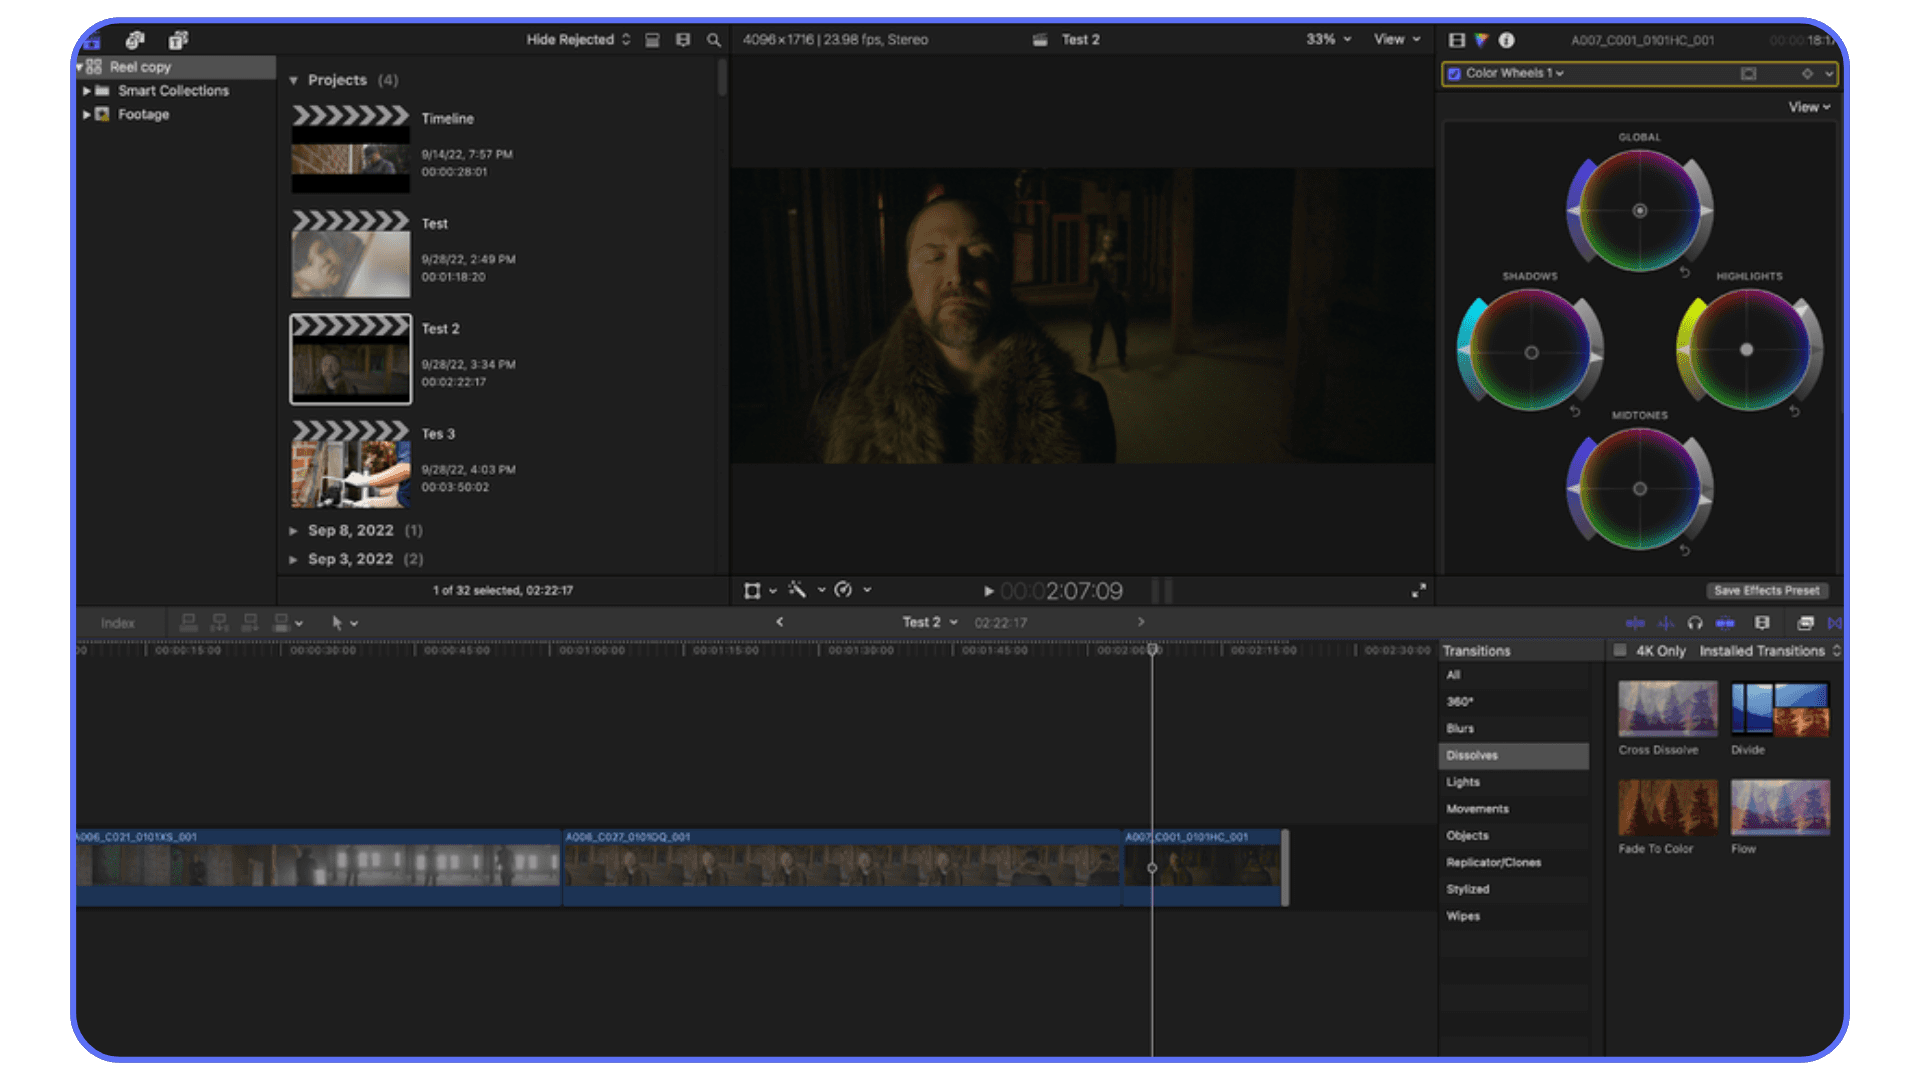
#1. DaVinci Resolve
If there’s one editor that consistently makes Premiere users say, “Wait… this is free?”, it’s DaVinci Resolve.
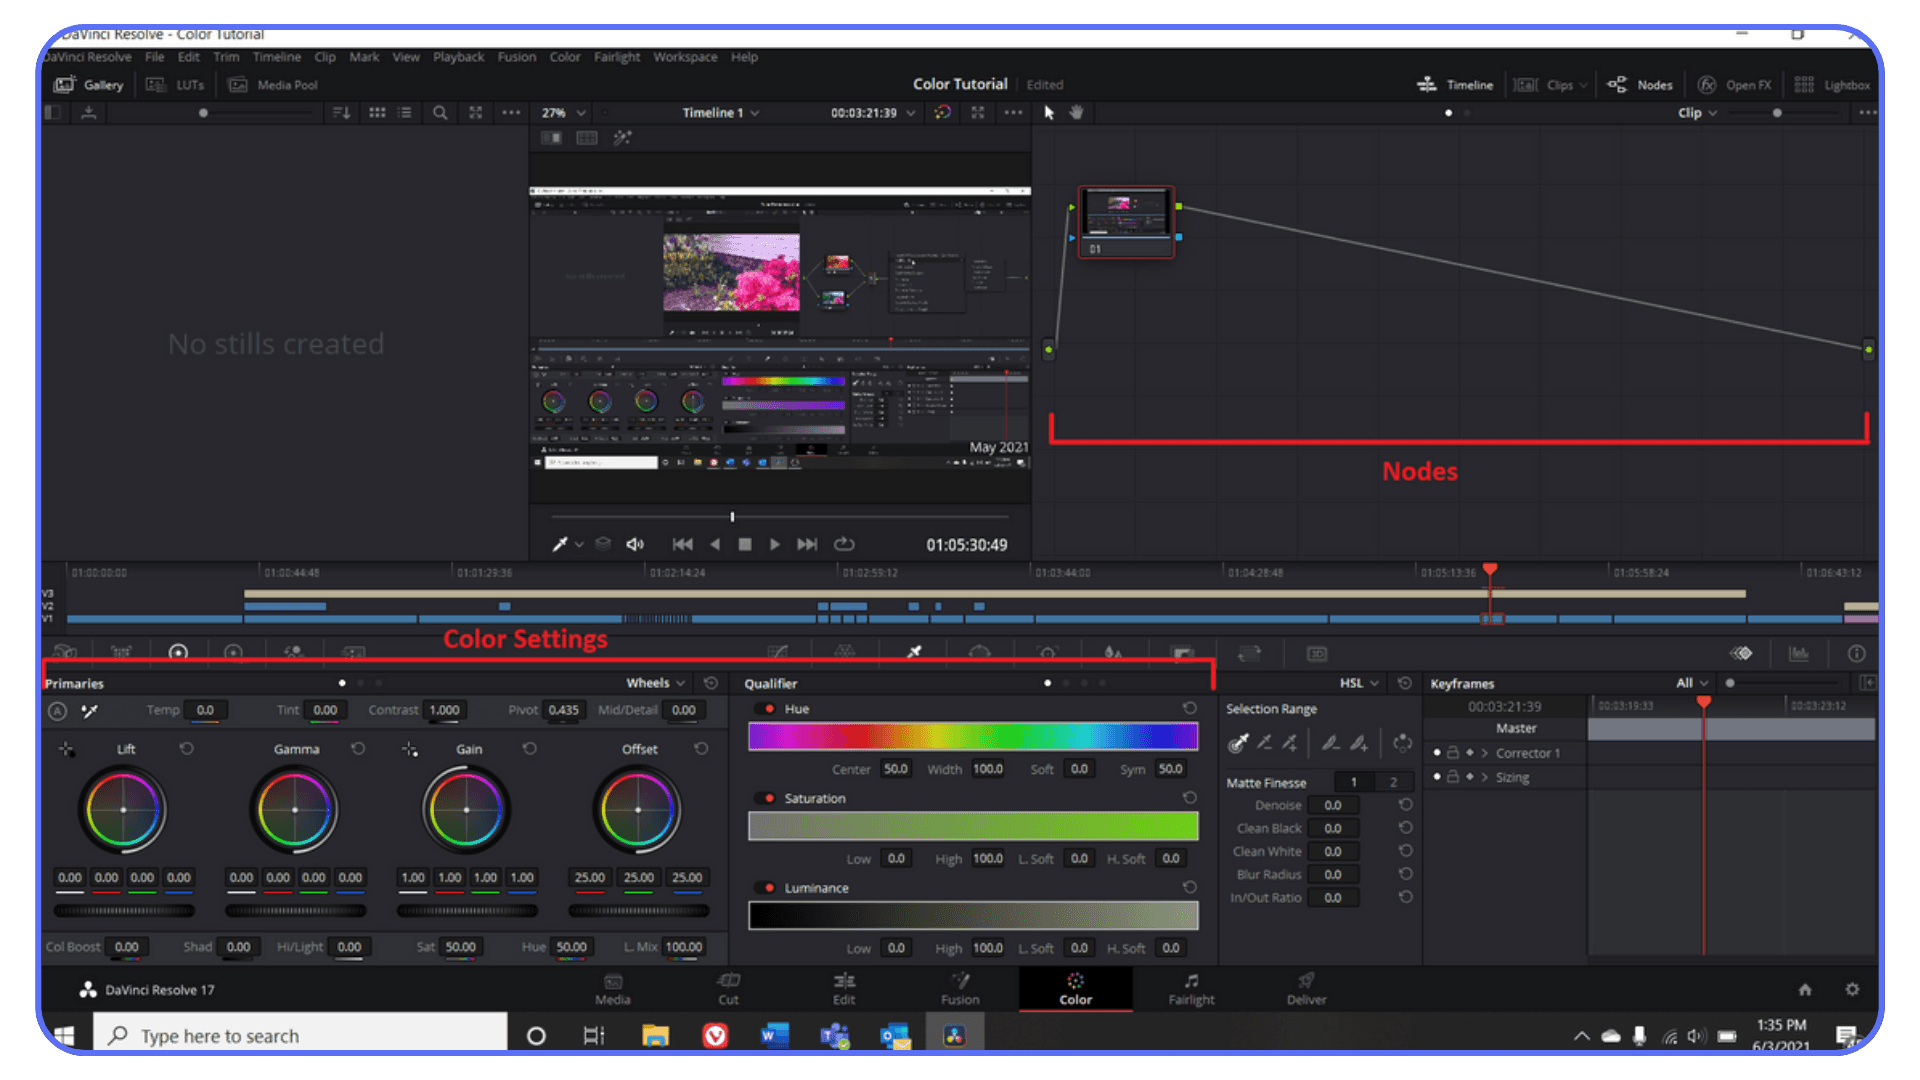
Blackmagic Design built Resolve as a professional color grading suite, but it’s quietly evolved into a full-fledged post-production powerhouse. Editing, color, audio, VFX, all inside one app. And unlike Adobe, you don’t have to pay monthly to access it.
I’ll be honest: the first time I opened Resolve, I was overwhelmed. It looked like the cockpit of a jet. But after a few days, it clicked, because everything inside it has a clear purpose. The Cut page keeps short-form editing lightning fast, the Edit page handles long projects, and the Color page is so powerful it makes Lumetri feel like a toy.
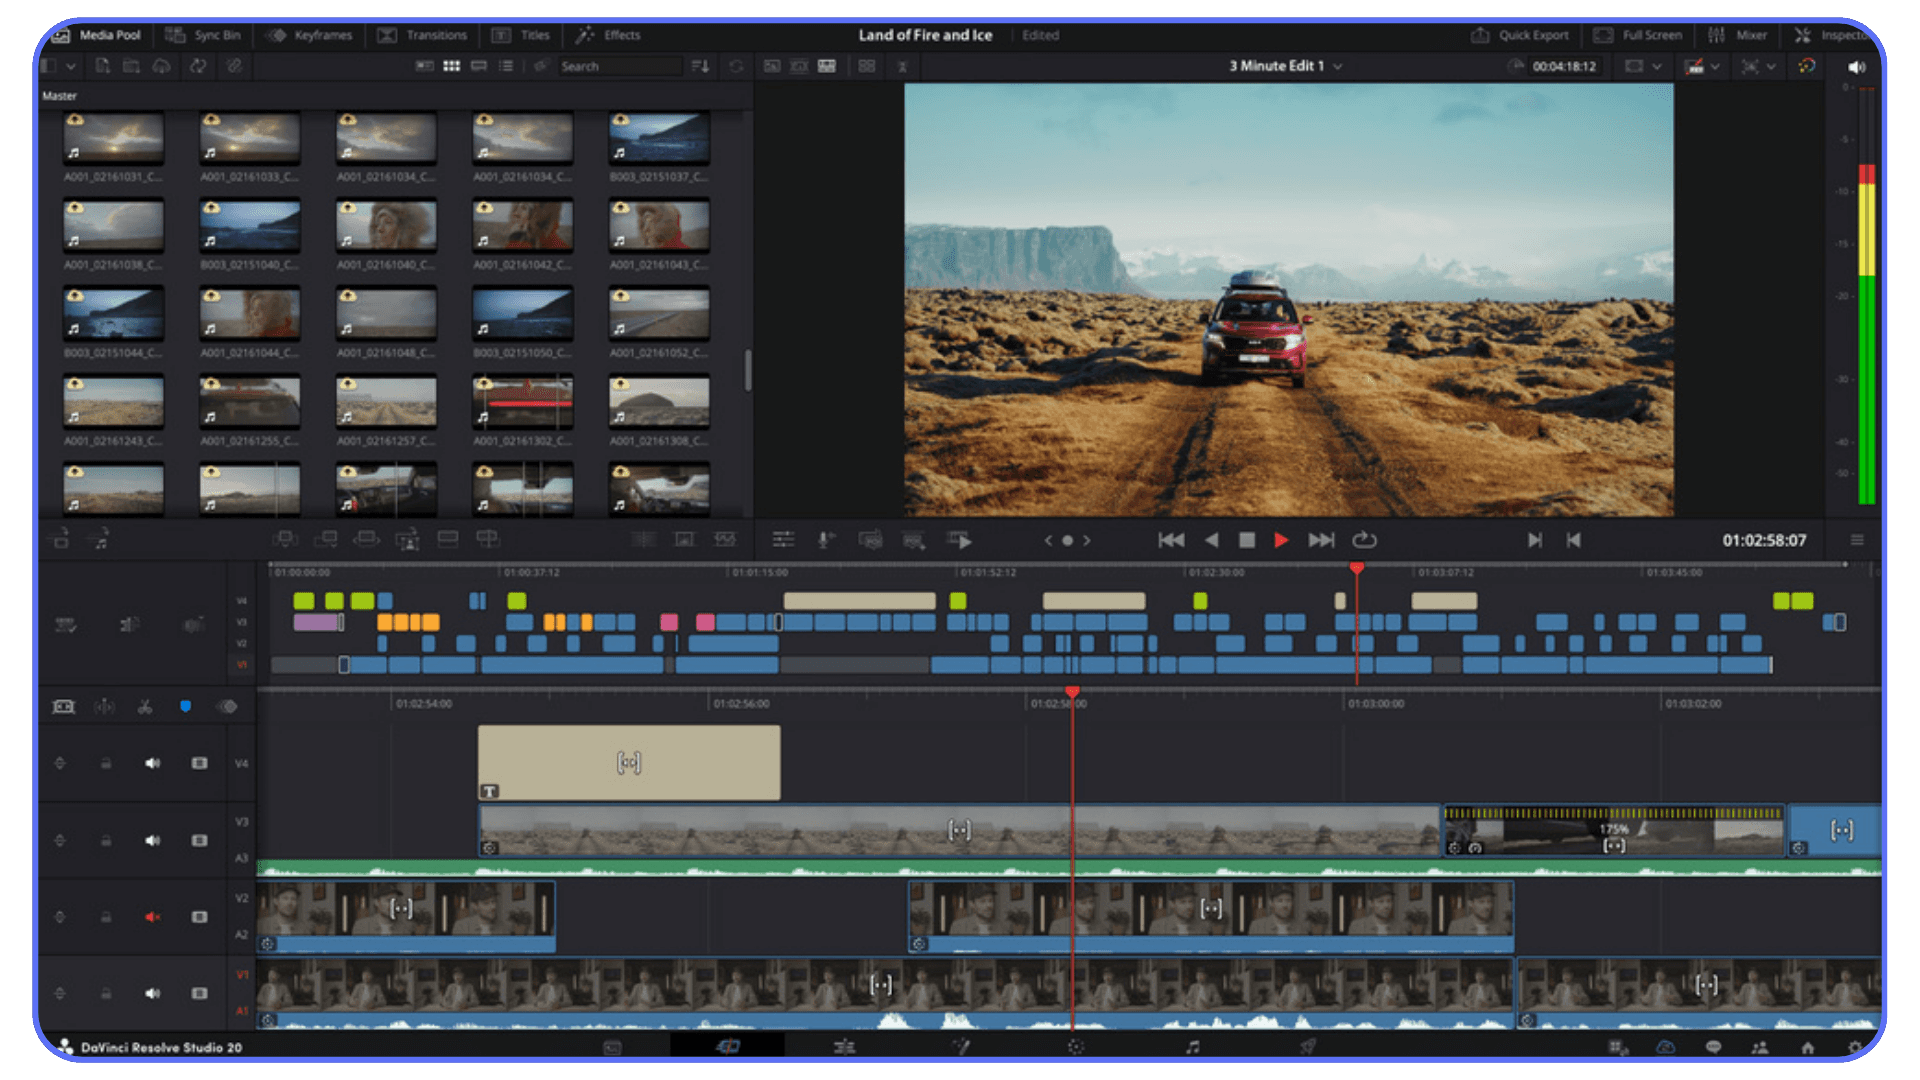
Performance-wise, Resolve absolutely flies when paired with a decent GPU. Even the free version supports GPU acceleration, 4K timelines, and color grading that rivals Hollywood-level output. I’ve edited entire projects on a mid-range laptop through the cloud, and the playback stayed smooth.
Of course, there’s a learning curve. The interface and workflow are different from Premiere, and not all third-party plugins translate directly. But once you map your shortcuts and get familiar with the page-based workflow, it starts to feel… elegant. Like everything’s exactly where it should be.
Why people love it:
Free version is insanely capable, no watermarks, no fake limits.
Powerful color grading and sound tools.
Regular updates from Blackmagic, not endless subscriptions.
Runs beautifully on powerful local or cloud GPUs.
What you might miss:
Built-in motion graphics aren’t as flexible as After Effects.
You’ll need time to get used to the interface.
Project files aren’t cross-compatible with Premiere.
If you’re serious about video work, or just tired of paying Adobe tax, DaVinci Resolve is the natural next step. And if your current machine struggles to keep up with its GPU load, tools like Vagon Cloud Computer let you run Resolve on high-end virtual machines and export like a pro, even from a modest laptop.
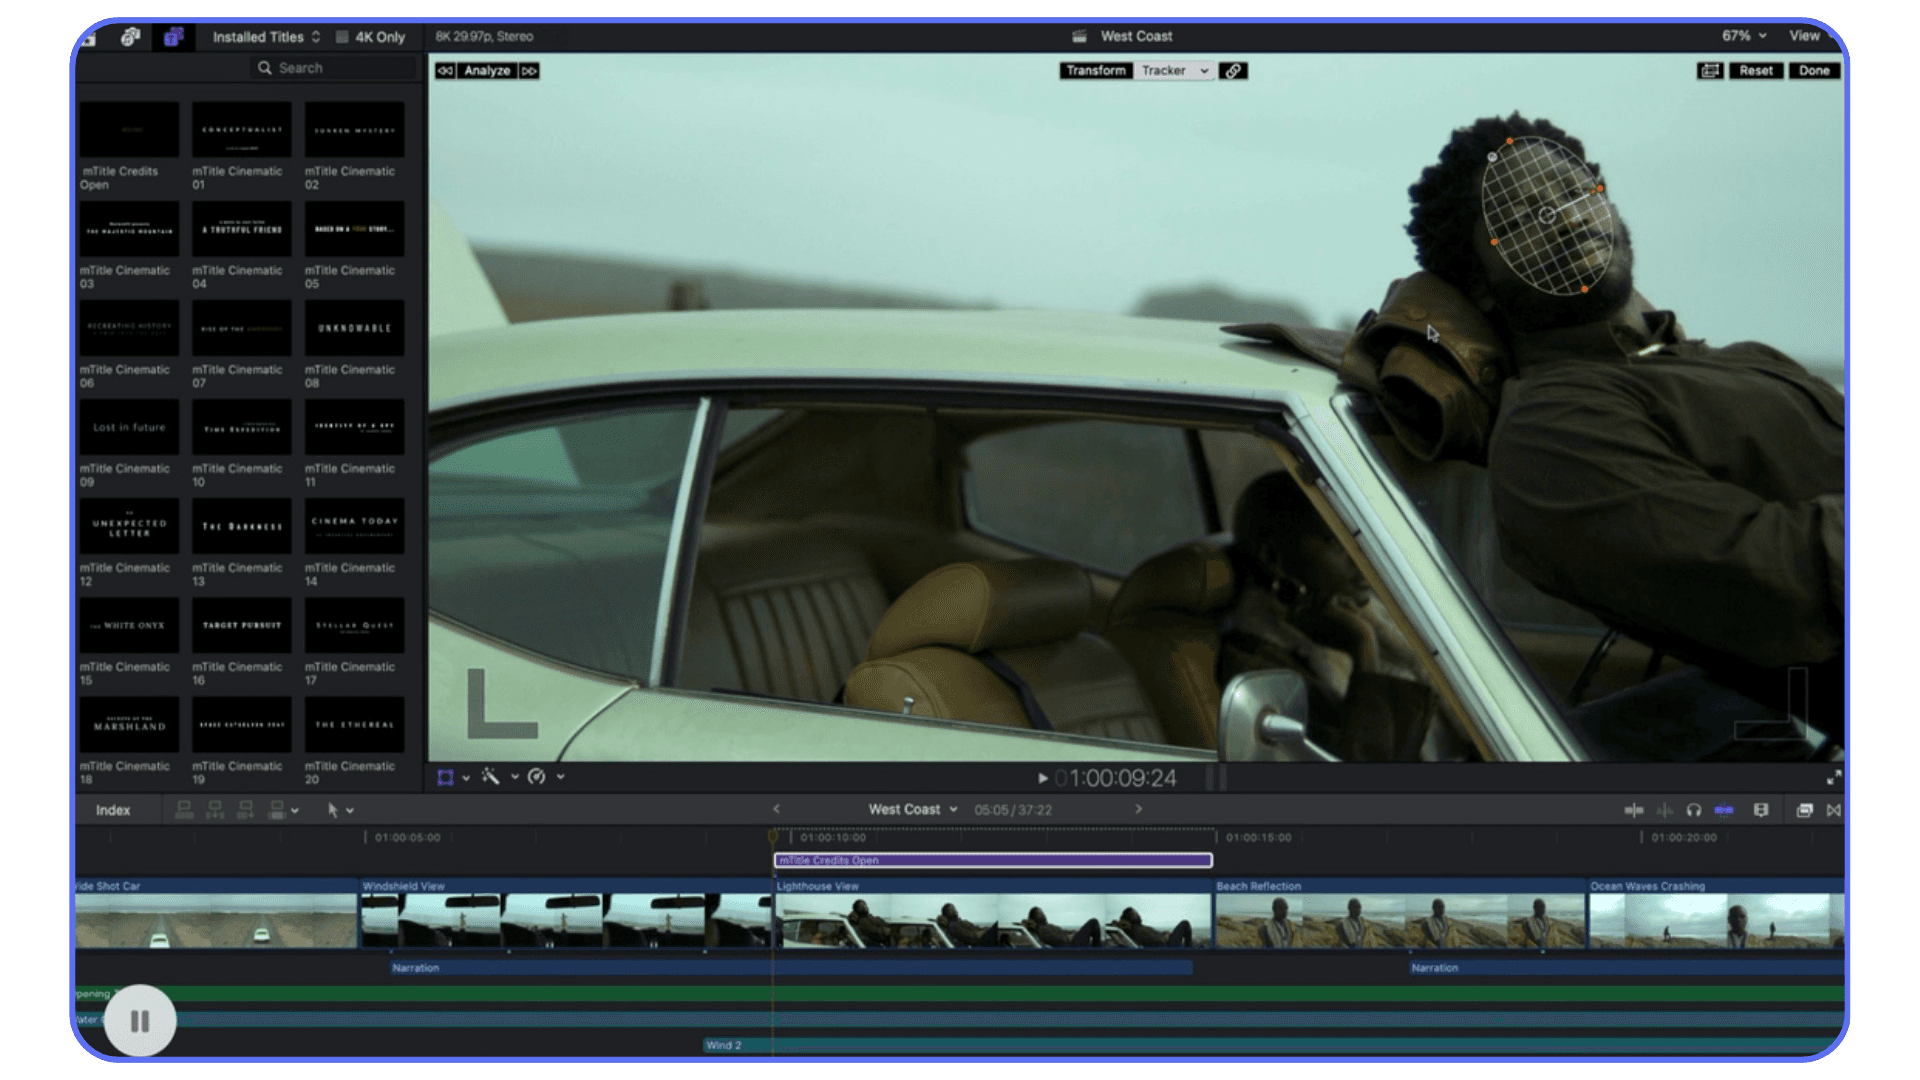
#2. Final Cut Pro
If you’re on a Mac, Final Cut Pro might be the most effortless editing experience out there. It’s fast, clean, and unbelievably stable, like the software actually wants you to finish your project.
Apple built it specifically for its own hardware, and that optimization shows. On an M2 or M3 MacBook, I’ve edited 4K footage with multiple effects layers and still had smooth playback. No dropped frames. No lag. Just fluid editing.
I’ll admit, the magnetic timeline confused me at first. It felt restrictive, clips snapping together like puzzle pieces. But once I got the hang of it, I started to appreciate how much time it saves. No accidental gaps. No audio drifting out of sync. It quietly handles the mess for you.
The one-time purchase model is also a breath of fresh air. You buy it once, it’s yours. No monthly drain, no subscription reminders. It’s simple, and that’s something Premiere hasn’t been for years.
Of course, Final Cut isn’t perfect. It’s Mac-only, so cross-platform teams are out of luck. And while it has its own plugin scene, it’s nowhere near as deep as Adobe’s. Motion graphics rely on Apple Motion, which is fine but not exactly After Effects.
Why people love it:
Runs incredibly fast on Apple Silicon.
Rarely crashes, even under heavy workloads.
Clean, modern interface with smart workflow design.
One-time purchase, no recurring costs.
What you might miss:
Mac-exclusive, no Windows or Linux version.
Limited plugin ecosystem compared to Premiere.
The magnetic timeline takes some getting used to.
If you’re fully in the Apple ecosystem, Final Cut Pro just fits. It’s not trying to be everything, it’s trying to be fast, stable, and focused. And that’s exactly what many editors have been missing.
#3. Wondershare Filmora
Not every editor needs studio-grade tools. Sometimes you just want to cut, color, add music, and post, without feeling like you’re flying a spaceship. That’s exactly where Wondershare Filmora shines.
Filmora is one of those apps that doesn’t try to impress you with complexity. It opens fast, looks clean, and feels built for creators who’d rather tell a story than troubleshoot codecs. The drag-and-drop timeline is straightforward, and effects or transitions take seconds to add.
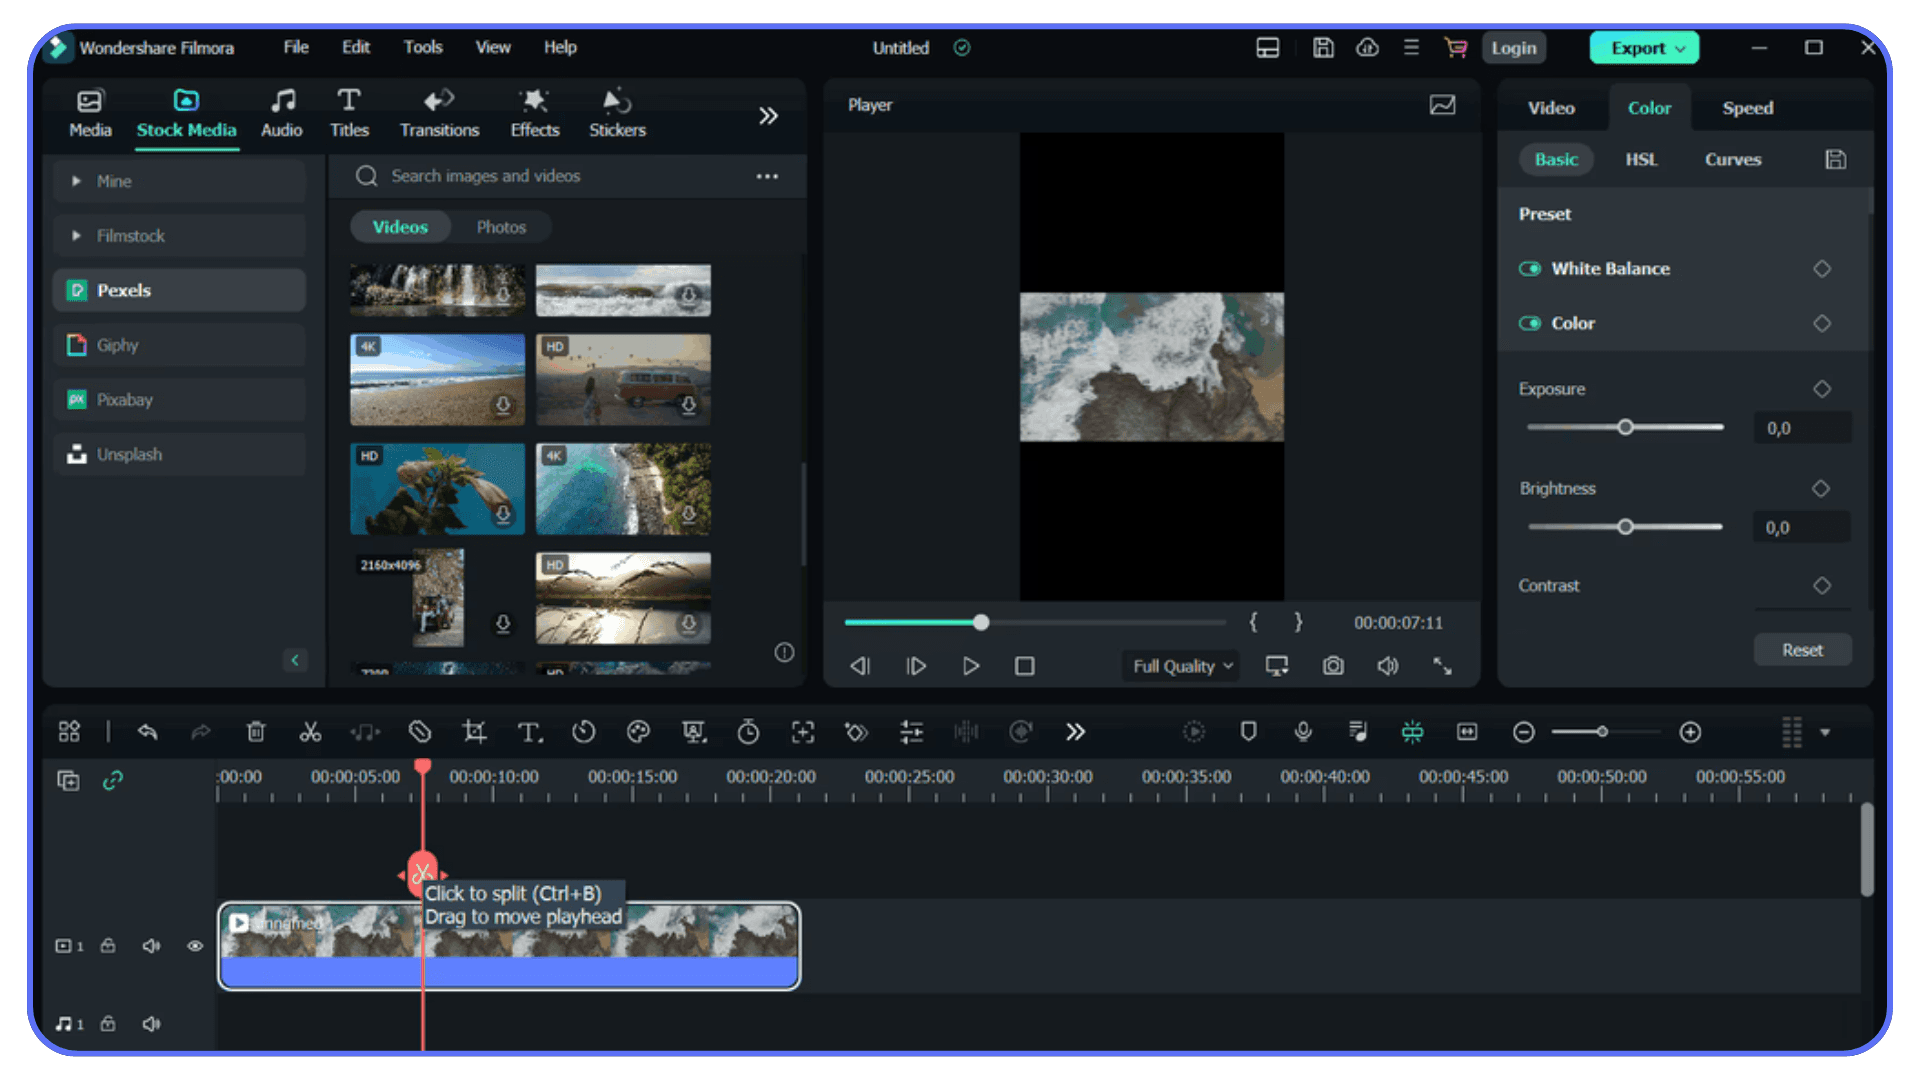
Performance-wise, it’s light on system resources, which makes it great for laptops or mid-range PCs. You won’t get the same raw power as DaVinci Resolve, but for social content, client promos, or YouTube edits, it’s fast enough, and rarely crashes.
Where Filmora really wins is approachability. You can get from first import to final export without reading a manual. That’s a big deal if you’re a solo creator or marketer juggling deadlines.
Why people love it:
Extremely easy to learn and use.
Smooth performance on modest hardware.
Built-in effects, transitions, and templates ready to go.
Affordable one-time or flexible pricing options.
What you might miss:
Limited advanced color grading or audio mixing.
Less control over precision editing compared to Premiere or Resolve.
Not ideal for complex, multi-layer projects.
If you’ve ever opened Premiere just to make a 45-second clip and felt like you were over-equipped for the job, Filmora might be the breath of fresh air you need.
#4. Lightworks
Lightworks is one of those editors that quietly refuses to die, and for good reason. It’s been around for decades, powering everything from indie films to big studio projects. And even after all these years, it still feels surprisingly sharp.
The first thing you notice about Lightworks is that it thinks differently. The interface isn’t a clone of Premiere or Final Cut. It takes a bit of time to get used to its layout and workflow, but once it clicks, it’s fast. Really fast. The trimming tools are some of the best I’ve ever used, and playback stays smooth even when your timeline gets dense.
Lightworks comes in two versions: the free one, which is great for smaller projects, and the Pro version, which unlocks higher export resolutions and more format support. Both versions are light on your hardware and launch quickly, something you appreciate after years of watching Premiere’s loading bar crawl.
It’s not perfect, of course. The UI feels dated, and if you’re coming straight from Adobe’s world, the first few hours might feel like learning to drive on the other side of the road. But under that surface, there’s real editing power, the kind that rewards you for sticking with it.
Why people love it:
Proven reliability in professional environments.
Excellent trimming and timeline tools.
Stable performance even on older systems.
Free version is genuinely usable.
What you might miss:
Slightly old-school interface.
Free plan limits export resolution.
Smaller plugin and effects ecosystem.
If you want a tool that’s built for pure editing, no fluff, no extra menus, Lightworks still holds its ground in 2026. It may not have the flashiest interface, but when it comes to getting the job done, it’s surprisingly hard to beat.
#5. CapCut (Desktop + Pro)
If you’ve ever made a TikTok or Instagram Reel, chances are you’ve already touched CapCut, but the desktop version is a completely different story. It’s grown from a casual mobile app into a full-fledged video editor that’s shockingly capable for its size.
CapCut feels like the kind of tool built for creators who live online. You open it, drag in your clips, and within minutes you’re editing like you’ve done it for years. The timeline is simple, snappy, and doesn’t overwhelm you with endless panels or submenus.
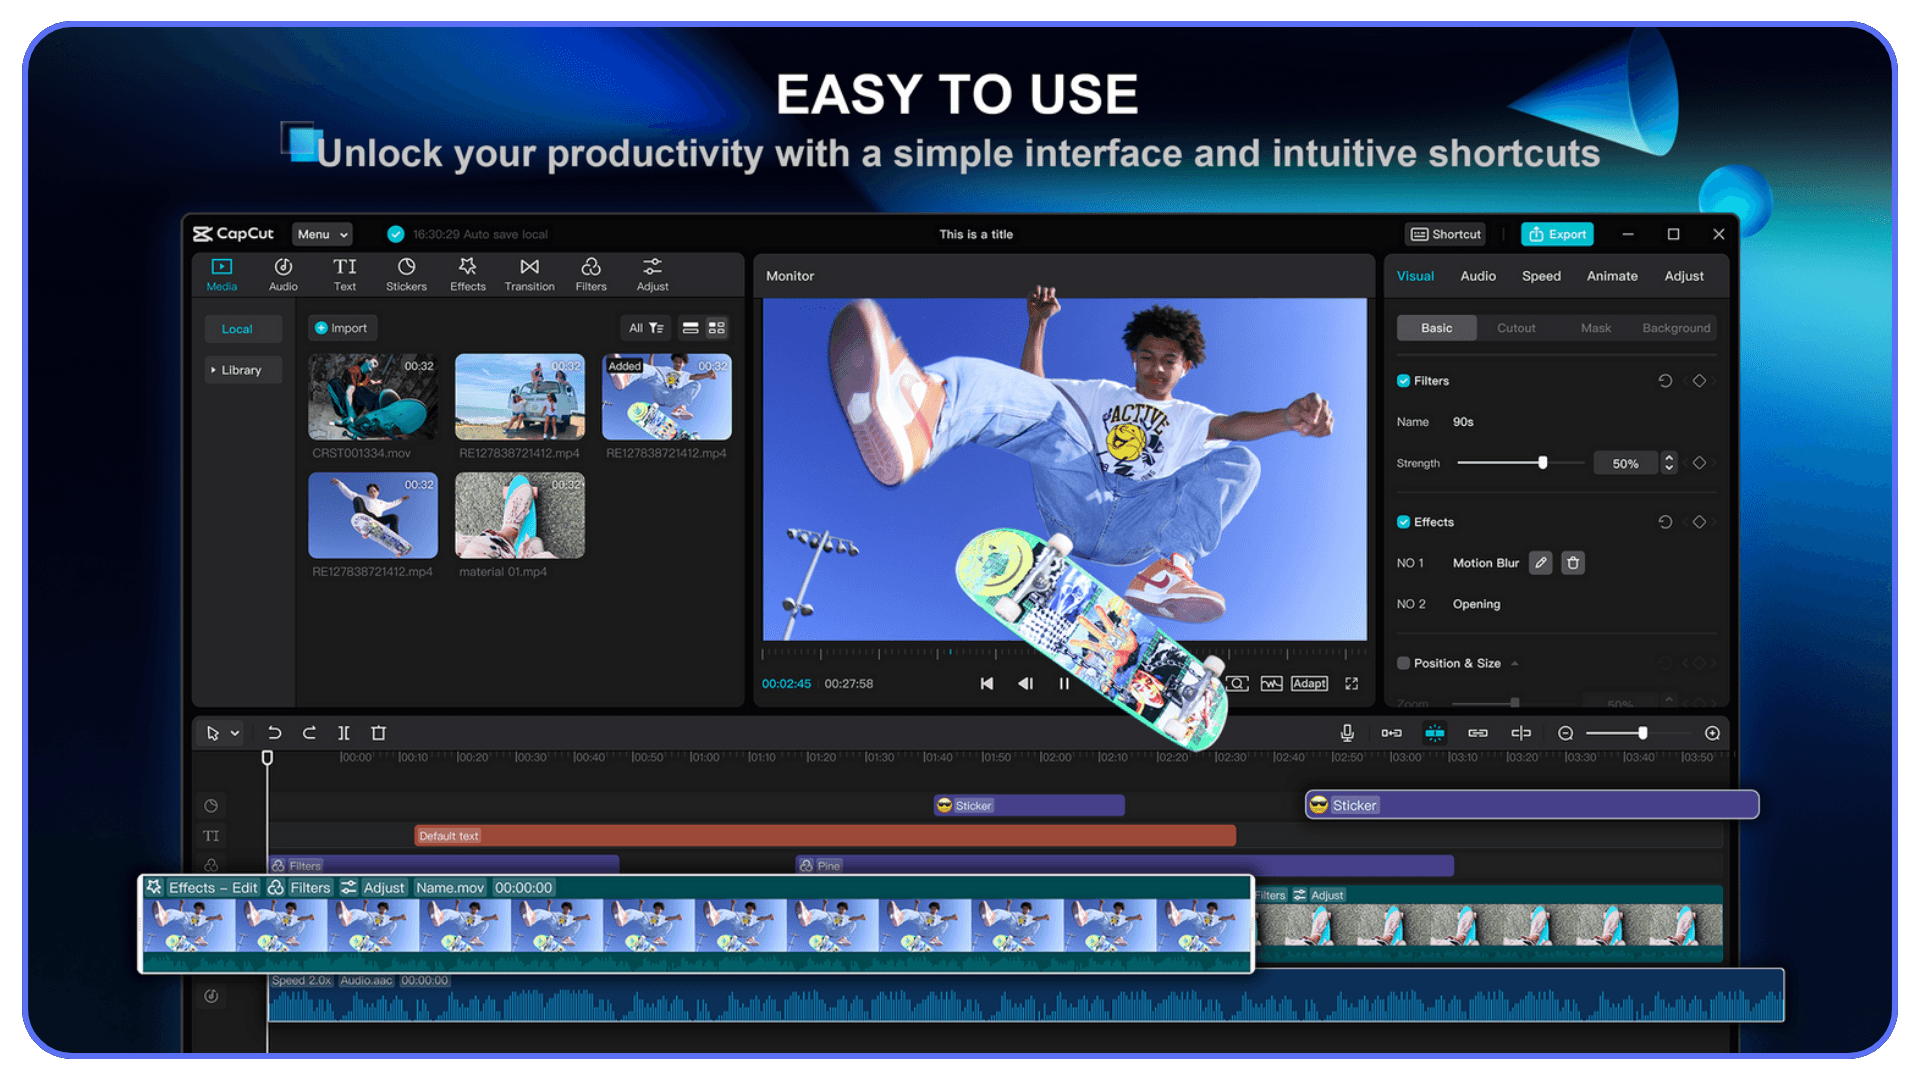
What sets CapCut apart in 2025 are its AI-assisted tools. Auto captions, smart background removal, scene detection, things that used to take plugins or manual labor are now built in and lightning fast. For short-form content especially, it’s almost unfair how quick it is.
Of course, it’s not meant to replace Premiere or Resolve for large productions. CapCut has its limits, color correction is basic, and you won’t find multi-cam or complex compositing options here. But for fast-paced creators, marketers, or social teams who just need polished, on-brand videos in record time, it nails the job.
Why people love it:
Super intuitive and clean interface.
Built-in AI tools that save hours.
Free to use with cross-platform syncing (mobile + desktop).
Perfect for TikTok, Instagram, and YouTube Shorts.
What you might miss:
Limited control for professional color or audio work.
Not ideal for long or complex projects.
Requires a good internet connection for certain cloud-based tools.
CapCut isn’t pretending to be Hollywood software, it’s built for the new wave of creators who care more about publishing speed than traditional editing pipelines. And it’s honestly better at that than most “pro” tools.
#6. Kdenlive
If you’re into open-source software or just like the idea of total control without a price tag, Kdenlive deserves a serious look. It’s been around for years, quietly evolving into one of the most capable free editors out there.
Kdenlive doesn’t have the flashiest interface, but it’s solid where it counts. It supports almost every format you can throw at it, handles multi-track editing with ease, and runs on Windows, macOS, and Linux. That cross-platform flexibility alone makes it a hidden gem, especially if you’re not locked into the Apple or Adobe world.
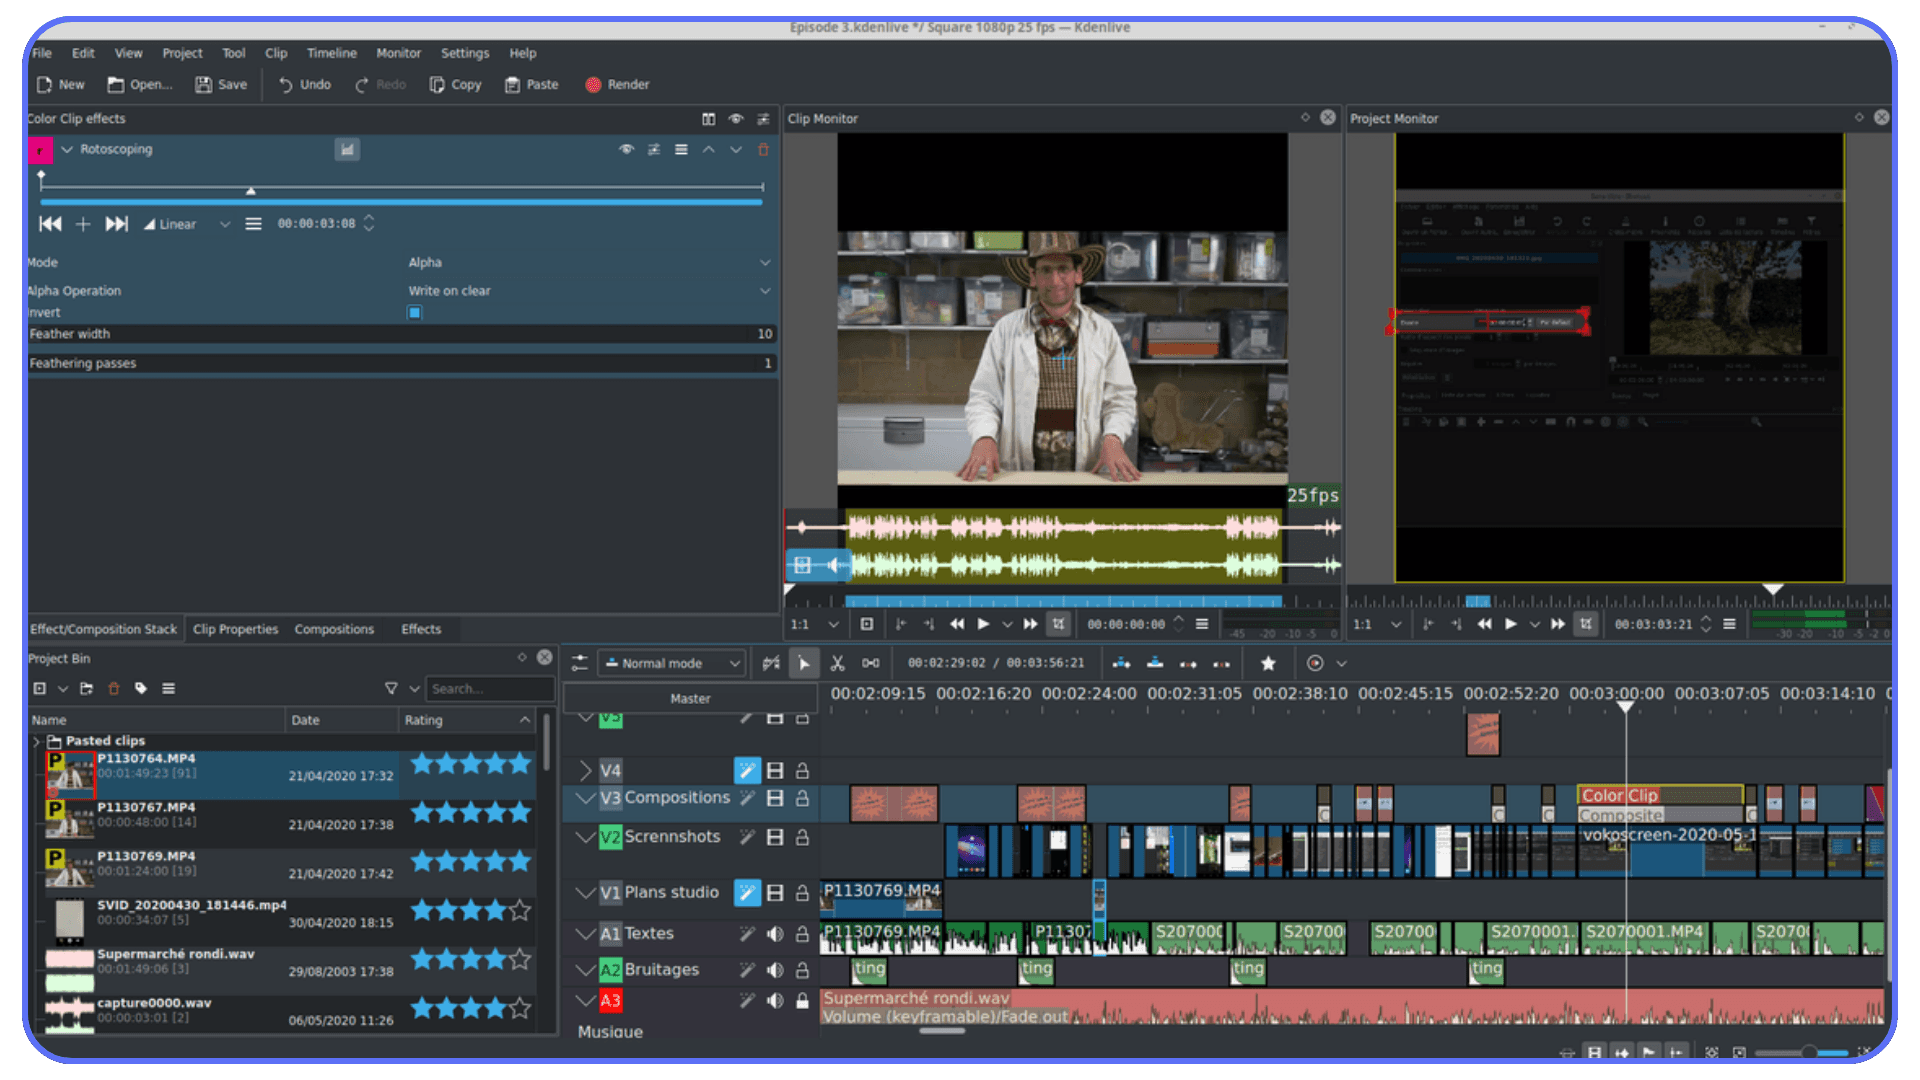
What I’ve always liked about Kdenlive is its reliability. It’s lightweight, starts fast, and doesn’t hog your system resources. You can have multiple projects open, tweak effects, layer transitions, and it rarely crashes. It’s not fancy, but it’s steady, and that’s worth a lot in editing.
Of course, being open-source means it’s missing some of the polish and automation you get with paid editors. There’s no built-in AI helper or fancy motion tracking system (yet). But for editors who enjoy a bit of tinkering, or just want professional-level control without the cost, Kdenlive delivers more than you’d expect.
Why people love it:
100% free and open-source.
Cross-platform support (Windows, macOS, Linux).
Strong performance even on modest hardware.
Frequent community updates and plugin growth.
What you might miss:
Interface feels less refined than paid software.
No official customer support (community-driven).
Some advanced effects and AI tools are still limited.
Kdenlive is the kind of tool that quietly earns your respect. It doesn’t market itself loudly or hide features behind paywalls, it just lets you edit, experiment, and finish projects on your own terms.
How to Test Them Without Losing Your Mind
Switching editors can be exciting… until you realize every program has its own shortcuts, export settings, and learning curve waiting to trip you up. But there’s a smarter way to test without driving yourself crazy.
Start small. Take a project you’ve already finished in Premiere, maybe a 30-second ad, a vlog, or a short clip, and rebuild it in a new editor. Don’t start from scratch or commit to a client project on day one. You’re testing workflow, not loyalty.
Give each editor about a week. That’s usually enough time to see how it feels when you’re editing under real conditions, importing media, cutting, color correcting, exporting. Ask yourself:
How fast can I get to the point where I’m not thinking about the tool?
Does playback stay smooth when I stack effects or adjust color?
Do exports take forever, or does it handle rendering like a champ?
Can I actually enjoy using it for hours?
Keep Premiere installed while you test. Think of this phase as an open relationship, you’re exploring options, not breaking up.
If possible, map your most-used Premiere shortcuts to the new software. You’ll adapt faster, and it feels less like starting over. Then track how much time you spend on routine tasks like trimming, syncing, or rendering. The real winner is the one that saves you time without killing your creativity.
Finally, give yourself permission to mix and match. Some editors use multiple tools, one for color work, one for fast social cuts, one for heavy projects. There’s no rule saying you have to choose just one.
Don’t Let Hardware Hold You Back
Once you start testing new editors, you’ll notice one thing fast, performance makes or breaks the experience. A program can have the slickest interface in the world, but if your machine can’t keep up, the fun ends quickly.
That’s where Vagon Cloud Computer comes in. It lets you run any of these heavy editors, DaVinci Resolve, Final Cut, even Premiere itself, on a high-performance cloud machine, right from your laptop or tablet. Think of it as borrowing a top-tier workstation whenever you need one, without actually owning it.
This becomes especially useful when you’re experimenting. Maybe you want to compare render times in Resolve vs. Filmora, or see how 8K color correction feels on a high-end GPU setup. Instead of waiting for a local upgrade, you can just launch a stronger Vagon machine and test in real time.
It’s also a lifesaver if you’re editing on the go. A thin MacBook Air or Chromebook can feel like a full workstation once connected to a Vagon session. You keep your files in the cloud, your performance consistent, and your exports fast, even when your local hardware would’ve tapped out.
So before you decide which Premiere alternative fits best, make sure your testing setup isn’t the bottleneck. You can’t fairly compare software if your computer’s holding one of them back.
Mistakes to Avoid
Switching to a new editor isn’t just about finding a better tool, it’s about adjusting your habits. And that’s where a lot of editors trip up. Here are some common mistakes I’ve seen (and made) while exploring Premiere Pro alternatives.
#1. Expecting Feature Parity
Every program has its own strengths. DaVinci Resolve isn’t built to replace After Effects, and CapCut isn’t meant for full-length documentaries. Don’t expect an exact clone of Premiere, instead, look for what each tool does better. You might lose one feature but gain five that actually save you time.
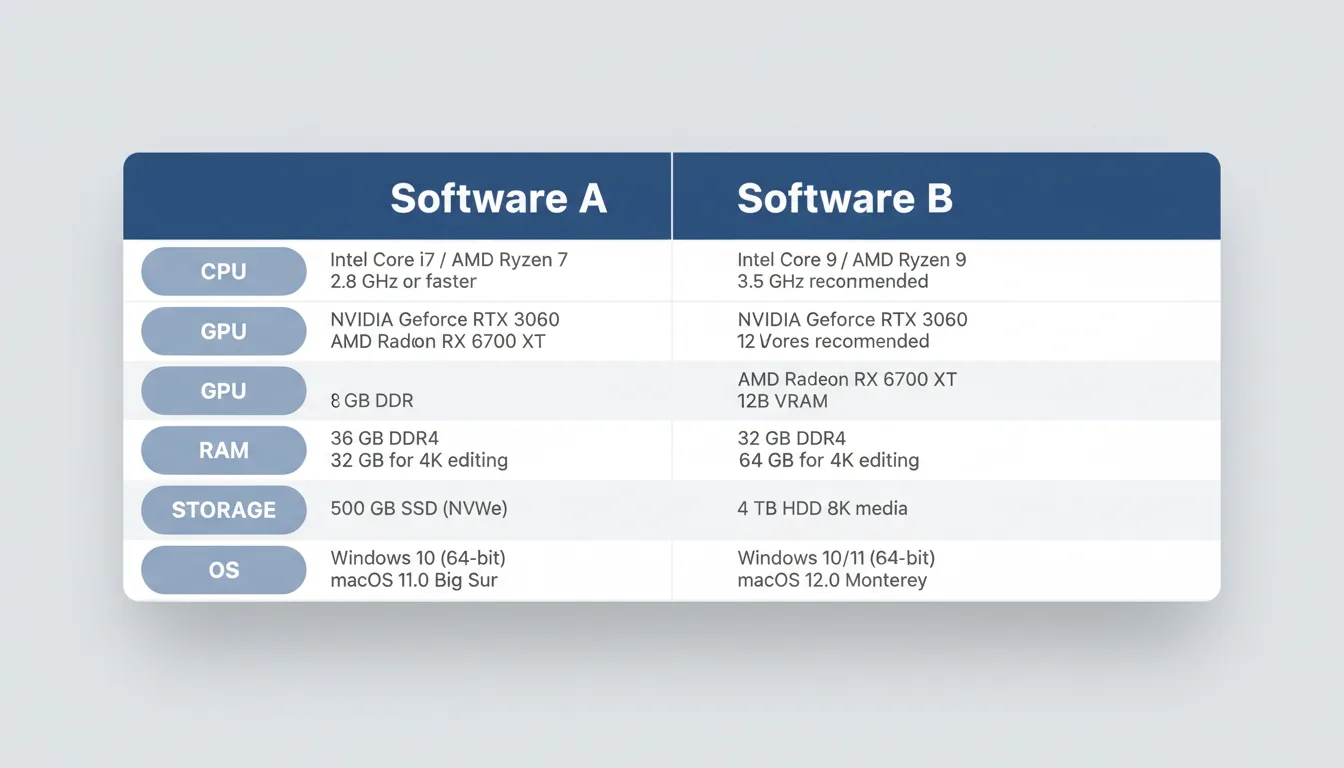
#2. Ignoring Hardware Reality
Even the best software can’t fix weak hardware. If your machine already struggles with Premiere, don’t assume a new editor will magically run smoother. Check system requirements, test your footage, and if possible, run heavy tasks on better hardware before judging performance.
#3. Underestimating the Learning Curve
Muscle memory is real. You’ll instinctively hit old shortcuts and expect old menus. Give yourself time to rewire, it takes a week or two before your brain and fingers adjust. Switching back and forth too quickly just confuses both.
#4. Forgetting Collaboration
If you work with a team, make sure your new editor fits their workflow. Project file compatibility, export settings, and plugin versions all matter. It’s frustrating to fall in love with a new tool only to realize your collaborator can’t open your files.
#5. Choosing the Cheapest Option Blindly
Free doesn’t always mean better value. Sometimes that “budget” editor costs you more in time and frustration. Balance price with what you actually need, stability, plugin support, and features that match your work.
#6. Skipping the Codec Check
This one’s sneaky. You’ll think everything’s fine until your export looks off or refuses to play. Always test your usual camera formats and client deliverables. Missing codec support is one of the fastest ways to regret a switch.
Editing software is like a workspace, if it doesn’t fit how you move, it slows you down. Test smart, be patient, and remember: sometimes the “best” tool on paper isn’t the best one for you.
My Personal Take
After years with Premiere Pro, I’ve learned something simple: there’s no perfect editor. There’s just the one that feels like it gets you.
If I had to start fresh today, I’d probably begin with DaVinci Resolve. It’s powerful, free to start, and feels like the natural evolution of where professional editing is heading. The color tools alone make it worth learning, and once you get used to the workflow, it’s hard to go back.
If I were on a Mac, Final Cut Pro would be an easy pick. It’s ridiculously fast, stable, and somehow manages to stay out of your way. You can just focus on the work instead of waiting for your system to catch up.
For creators who care more about publishing speed than complex timelines, I’d reach for Filmora or CapCut. They’re perfect when your priority is output, not endless settings or render tweaks.
And I’ll always have a soft spot for Lightworks and Kdenlive. They’re proof that you don’t need flashy UI or corporate branding to make real, reliable software. They’re workhorses, not showpieces.
But here’s what I’ve really noticed: once you find a tool that feels good, your creativity expands. You stop thinking about panels and start thinking about rhythm, pacing, and story. The right editor isn’t the one with the most features, it’s the one that disappears while you’re working.
So try them. Play around. Keep Premiere on standby if you need it. The goal isn’t to quit Adobe, it’s to rediscover what makes editing enjoyable again.
Final Thoughts
At the end of the day, switching editors isn’t about chasing trends, it’s about taking control of your workflow again. Premiere Pro is still great, but it’s not the only way to create professional, beautiful videos anymore.
The tools we’ve covered, from DaVinci Resolve and Final Cut Pro to Filmora, Lightworks, CapCut, and Kdenlive, each shine in their own lane. Some are built for full productions, others for fast social cuts. The trick is knowing where your work lives and picking the tool that fits that rhythm.
And here’s the best part: testing them is easier than ever. You don’t need to buy a new workstation or commit to long subscriptions to experiment. Whether you’re editing full-time or just for fun, the right software will make you faster, calmer, and a little more inspired every time you hit “play.”
So try a few. Compare how they feel, not just what they claim to do. Because the real upgrade isn’t switching software, it’s finding a workflow that finally feels effortless.
And if you plan to keep Premiere Pro in your toolkit, check out how to extend your setup with our guide on using Adobe Premiere Pro on iPad — perfect for editing on the go.
FAQs
1. What’s the best free alternative to Premiere Pro?
If you’re looking for a free tool that feels genuinely professional, DaVinci Resolve is the clear winner. Its free version gives you full editing, color grading, and audio control, with no artificial limits or watermarks. The interface takes a few days to learn, but once it clicks, it’s smooth, powerful, and surprisingly stable even on mid-range hardware.
2. Which Premiere Pro alternative works best for Mac users?
Final Cut Pro is practically made for Apple devices. It’s deeply optimized for M-series chips, exports faster than almost anything else, and rarely crashes. It’s also a one-time purchase, so once you buy it, you’re done, no ongoing subscription fees. For creators already in the Apple ecosystem, it’s easily the most seamless option.
3. What’s the easiest software for beginners or casual creators?
If you’re new to editing, Wondershare Filmora and CapCut are ideal. Both are simple, lightweight, and designed for fast results. You get built-in templates, drag-and-drop editing, and instant exports for social platforms like YouTube, TikTok, and Instagram. They don’t have the depth of Resolve or Final Cut, but they make editing approachable, and fun.
4. Can these alternatives handle professional projects?
Absolutely. DaVinci Resolve and Final Cut Pro are used in commercial and film production all over the world. Lightworks, too, has a serious pedigree, it’s been used in major films for years. Even open-source options like Kdenlive can handle full projects if you know your workflow and optimize your setup properly.
5. How difficult is it to switch from Premiere Pro?
Not as hard as most people think. The core editing concepts, cutting, keyframes, transitions, are almost identical across platforms. You’ll just need to relearn where things live and remap a few shortcuts. Give yourself a week to adjust and a simple project to test on, and it’ll start to feel natural surprisingly fast.
6. Do these programs work on low-end or older machines?
Yes, but it depends on which one you choose. Filmora, CapCut, and Kdenlive run well even on modest hardware. Heavyweights like DaVinci Resolve need more GPU power to shine. If you’re testing performance-intensive software on a laptop, you can always use a cloud setup like Vagon Cloud Computer to simulate high-end workstation power without upgrading your device.
I used Premiere Pro for eight years, until I realized I was paying hundreds every year for features I barely touched. Don’t get me wrong, it’s still one of the most capable editors out there. But after a while, I started wondering: am I editing… or just paying rent to Adobe?
So what if there were editors that could match, or even outperform, Premiere, without locking you into a subscription or forcing you to upgrade your hardware every year?
That’s exactly what I wanted to find out.
Let’s talk about the best Premiere Pro alternatives worth trying in 2026, from free tools that surprise you with their power, to professional-grade software that might just make you rethink what “industry standard” really means.
If you’re still committed to Premiere and want to make it run smoother before switching, check out our guide on reducing your rendering times in Premiere Pro.
Why Consider Alternatives
Let’s be honest, Premiere Pro has been around forever, and it’s earned its place. But it’s also become… heavy. Not just in gigabytes, but in cost, updates, and system demands.
When I first started using it, I loved how everything just worked together inside the Adobe ecosystem. But lately? The constant updates, the creeping subscription fees, the random crashes mid-render, it started to feel like the software was working against me instead of for me.
And I’m not alone. Thousands of creators have hit that same wall:
Cost fatigue — paying $20+ every month adds up fast, especially if you’re a freelancer or small team.
Hardware strain — Premiere can chew through RAM and GPU power like it’s nothing, and not everyone’s running a workstation-grade machine.
Workflow friction — long export times, unstable updates, plugins breaking after patches.
Changing needs — most editors today aren’t cutting feature films; they’re making YouTube videos, TikToks, or client reels. That means they need speed and simplicity, not 400 color correction controls buried in a submenu.
Here’s the thing: Premiere Pro isn’t “bad.” It’s just not always the right fit anymore, especially when there are tools out there that do exactly what you need, faster, cheaper, and sometimes even better optimized for your setup.
So, if you’ve ever found yourself waiting for a render, restarting after a crash, or just questioning that monthly charge on your credit card… you’re not crazy. It might just be time to try something new.
2026 Update: What’s actually different this year
A lot of the “Premiere alternatives” conversation in 2026 isn’t about timelines or trimming anymore. It’s about pricing pressure and AI-assisted editing. Two things changed the vibe.
Adobe got more expensive (or at least harder to justify)
Adobe’s pricing has shifted toward Creative Cloud Pro at $69.99/mo (US) for individuals on the annual plan billed monthly.
If you’re already annoyed by subscriptions, this is the kind of number that makes people finally try something else.
DaVinci Resolve is even more of a “why am I paying Adobe?” moment now
Resolve is still the obvious first stop, but 2026 made it more relevant: Blackmagic is already on DaVinci Resolve 20, and they’re actively shipping updates with real workflow improvements (editing, subtitles, masking, color management).
It’s still not a Premiere clone. But it keeps closing the “I need Adobe for this” gap.
CapCut desktop got more serious (and more AI-first)
CapCut is leaning hard into built-in AI tools (captions, text-to-speech, background removal, enhancements, etc.).
For short-form creators, this matters because it replaces a bunch of plugin-style steps with one-click features. It’s not trying to be Resolve. It’s trying to get you from footage to upload faster than you can overthink it.
Final Cut’s story changed because Apple bundled the ecosystem
Final Cut is still the “fastest-feeling” choice on Apple hardware for a lot of people. But the bigger 2026 change is that Apple is now pushing a bundled creator suite (Final Cut + other pro apps) at a much lower monthly price than Adobe’s all-apps plan.
So the 2026 takeaway is simple:
Resolve is the strongest “leave Adobe without losing power” option.
Final Cut looks even better if you’re all-in on Apple’s ecosystem and pricing bundles.
CapCut is becoming the default for fast social editing because the AI features are built in, not bolted on.
And Premiere is still great, but it’s increasingly a “pay because you’re integrated” situation.
What to Look For Before Switching
If you’ve used Premiere Pro for years, switching editors can feel like learning to walk again. But it doesn’t have to. The goal isn’t to find a clone, it’s to find something that fits the way you work, while fixing the things that have been slowing you down. Here’s what really matters before making the jump.
Familiar Workflow
A new editor shouldn’t feel like landing on another planet. You still want a clear timeline, simple trimming tools, and an interface that doesn’t fight your muscle memory. The closer it feels to Premiere, the faster you’ll adapt.
When I first tried DaVinci Resolve, it took me maybe two days to stop reaching for old shortcuts. After that, I was editing almost as fast as before, sometimes faster, because I wasn’t dealing with lag or random autosaves. Look for that same balance: new, but not foreign.
Performance That Keeps Up
Let’s be real, Premiere Pro can bring even good machines to their knees. You want an editor that runs smoothly on your current hardware, not one that forces you to upgrade your GPU just to play back a timeline.
Test it with your actual footage. Heavy 4K, multi-cam, LUTs, transitions, whatever you normally throw at Premiere. If it holds up without stuttering or overheating your laptop, that’s a good sign.
If you’re curious about upgrading your setup instead of switching editors, here’s our Ultimate PC Build and Computer Buying Guide for Premiere Pro — a detailed breakdown of what actually improves playback and render speed.
Codec and Format Support
This is the part most people forget, until their new editor refuses to open last week’s client footage. Every camera shoots a little differently: ProRes, HEVC, RAW, H.264… and not every program plays nice with them all.
Before you commit, check what formats your alternative handles natively. It’s not glamorous, but it’s the difference between a smooth export and hours spent converting files that should’ve “just worked.”
Cost and Control
Let’s talk money. Premiere Pro’s subscription looks harmless at first, $20 a month, right? Until you realize that’s $240 a year, and you’ve been doing that for half a decade.
Many alternatives let you buy once and keep the software forever. Others offer generous free tiers that are surprisingly capable (looking at you, Resolve). If you’re not tied to the Creative Cloud ecosystem, there’s no reason to keep paying rent for software.
And if you’d rather optimize your current workflow for now, our Essential Premiere Pro Tips post can help you get more out of your subscription before you move on.
Hardware Compatibility
Not every editor is built the same way. Some depend heavily on GPU power (DaVinci Resolve), while others lean on CPU performance (Lightworks, Kdenlive). Knowing what your system handles best helps you pick a tool that runs smoothly, without needing to upgrade your setup.
If you’re working on a laptop or older desktop, this part matters even more. There’s no point switching to a faster editor if your hardware still bottlenecks the experience.
Plugins and Collaboration
Premiere’s biggest advantage has always been its ecosystem, endless plugins, effects, LUTs, and project sharing tools. Alternatives are catching up fast, but not all of them are built for collaborative workflows yet.
If you rely on third-party transitions, After Effects-style graphics, or share project files with other editors, make sure your new software supports it. Losing that flexibility can break a workflow overnight.
If you often work with large projects or remote teams, learning how to create video proxies in Premiere Pro can drastically speed up your editing sessions.
But if you’re not ready to switch yet, our collection of Premiere Pro tutorials is a great way to sharpen your current workflow before exploring new software.
#1. DaVinci Resolve
If there’s one editor that consistently makes Premiere users say, “Wait… this is free?”, it’s DaVinci Resolve.
Blackmagic Design built Resolve as a professional color grading suite, but it’s quietly evolved into a full-fledged post-production powerhouse. Editing, color, audio, VFX, all inside one app. And unlike Adobe, you don’t have to pay monthly to access it.
I’ll be honest: the first time I opened Resolve, I was overwhelmed. It looked like the cockpit of a jet. But after a few days, it clicked, because everything inside it has a clear purpose. The Cut page keeps short-form editing lightning fast, the Edit page handles long projects, and the Color page is so powerful it makes Lumetri feel like a toy.
Performance-wise, Resolve absolutely flies when paired with a decent GPU. Even the free version supports GPU acceleration, 4K timelines, and color grading that rivals Hollywood-level output. I’ve edited entire projects on a mid-range laptop through the cloud, and the playback stayed smooth.
Of course, there’s a learning curve. The interface and workflow are different from Premiere, and not all third-party plugins translate directly. But once you map your shortcuts and get familiar with the page-based workflow, it starts to feel… elegant. Like everything’s exactly where it should be.
Why people love it:
Free version is insanely capable, no watermarks, no fake limits.
Powerful color grading and sound tools.
Regular updates from Blackmagic, not endless subscriptions.
Runs beautifully on powerful local or cloud GPUs.
What you might miss:
Built-in motion graphics aren’t as flexible as After Effects.
You’ll need time to get used to the interface.
Project files aren’t cross-compatible with Premiere.
If you’re serious about video work, or just tired of paying Adobe tax, DaVinci Resolve is the natural next step. And if your current machine struggles to keep up with its GPU load, tools like Vagon Cloud Computer let you run Resolve on high-end virtual machines and export like a pro, even from a modest laptop.
#2. Final Cut Pro
If you’re on a Mac, Final Cut Pro might be the most effortless editing experience out there. It’s fast, clean, and unbelievably stable, like the software actually wants you to finish your project.
Apple built it specifically for its own hardware, and that optimization shows. On an M2 or M3 MacBook, I’ve edited 4K footage with multiple effects layers and still had smooth playback. No dropped frames. No lag. Just fluid editing.
I’ll admit, the magnetic timeline confused me at first. It felt restrictive, clips snapping together like puzzle pieces. But once I got the hang of it, I started to appreciate how much time it saves. No accidental gaps. No audio drifting out of sync. It quietly handles the mess for you.
The one-time purchase model is also a breath of fresh air. You buy it once, it’s yours. No monthly drain, no subscription reminders. It’s simple, and that’s something Premiere hasn’t been for years.
Of course, Final Cut isn’t perfect. It’s Mac-only, so cross-platform teams are out of luck. And while it has its own plugin scene, it’s nowhere near as deep as Adobe’s. Motion graphics rely on Apple Motion, which is fine but not exactly After Effects.
Why people love it:
Runs incredibly fast on Apple Silicon.
Rarely crashes, even under heavy workloads.
Clean, modern interface with smart workflow design.
One-time purchase, no recurring costs.
What you might miss:
Mac-exclusive, no Windows or Linux version.
Limited plugin ecosystem compared to Premiere.
The magnetic timeline takes some getting used to.
If you’re fully in the Apple ecosystem, Final Cut Pro just fits. It’s not trying to be everything, it’s trying to be fast, stable, and focused. And that’s exactly what many editors have been missing.
#3. Wondershare Filmora
Not every editor needs studio-grade tools. Sometimes you just want to cut, color, add music, and post, without feeling like you’re flying a spaceship. That’s exactly where Wondershare Filmora shines.
Filmora is one of those apps that doesn’t try to impress you with complexity. It opens fast, looks clean, and feels built for creators who’d rather tell a story than troubleshoot codecs. The drag-and-drop timeline is straightforward, and effects or transitions take seconds to add.
Performance-wise, it’s light on system resources, which makes it great for laptops or mid-range PCs. You won’t get the same raw power as DaVinci Resolve, but for social content, client promos, or YouTube edits, it’s fast enough, and rarely crashes.
Where Filmora really wins is approachability. You can get from first import to final export without reading a manual. That’s a big deal if you’re a solo creator or marketer juggling deadlines.
Why people love it:
Extremely easy to learn and use.
Smooth performance on modest hardware.
Built-in effects, transitions, and templates ready to go.
Affordable one-time or flexible pricing options.
What you might miss:
Limited advanced color grading or audio mixing.
Less control over precision editing compared to Premiere or Resolve.
Not ideal for complex, multi-layer projects.
If you’ve ever opened Premiere just to make a 45-second clip and felt like you were over-equipped for the job, Filmora might be the breath of fresh air you need.
#4. Lightworks
Lightworks is one of those editors that quietly refuses to die, and for good reason. It’s been around for decades, powering everything from indie films to big studio projects. And even after all these years, it still feels surprisingly sharp.
The first thing you notice about Lightworks is that it thinks differently. The interface isn’t a clone of Premiere or Final Cut. It takes a bit of time to get used to its layout and workflow, but once it clicks, it’s fast. Really fast. The trimming tools are some of the best I’ve ever used, and playback stays smooth even when your timeline gets dense.
Lightworks comes in two versions: the free one, which is great for smaller projects, and the Pro version, which unlocks higher export resolutions and more format support. Both versions are light on your hardware and launch quickly, something you appreciate after years of watching Premiere’s loading bar crawl.
It’s not perfect, of course. The UI feels dated, and if you’re coming straight from Adobe’s world, the first few hours might feel like learning to drive on the other side of the road. But under that surface, there’s real editing power, the kind that rewards you for sticking with it.
Why people love it:
Proven reliability in professional environments.
Excellent trimming and timeline tools.
Stable performance even on older systems.
Free version is genuinely usable.
What you might miss:
Slightly old-school interface.
Free plan limits export resolution.
Smaller plugin and effects ecosystem.
If you want a tool that’s built for pure editing, no fluff, no extra menus, Lightworks still holds its ground in 2026. It may not have the flashiest interface, but when it comes to getting the job done, it’s surprisingly hard to beat.
#5. CapCut (Desktop + Pro)
If you’ve ever made a TikTok or Instagram Reel, chances are you’ve already touched CapCut, but the desktop version is a completely different story. It’s grown from a casual mobile app into a full-fledged video editor that’s shockingly capable for its size.
CapCut feels like the kind of tool built for creators who live online. You open it, drag in your clips, and within minutes you’re editing like you’ve done it for years. The timeline is simple, snappy, and doesn’t overwhelm you with endless panels or submenus.
What sets CapCut apart in 2025 are its AI-assisted tools. Auto captions, smart background removal, scene detection, things that used to take plugins or manual labor are now built in and lightning fast. For short-form content especially, it’s almost unfair how quick it is.
Of course, it’s not meant to replace Premiere or Resolve for large productions. CapCut has its limits, color correction is basic, and you won’t find multi-cam or complex compositing options here. But for fast-paced creators, marketers, or social teams who just need polished, on-brand videos in record time, it nails the job.
Why people love it:
Super intuitive and clean interface.
Built-in AI tools that save hours.
Free to use with cross-platform syncing (mobile + desktop).
Perfect for TikTok, Instagram, and YouTube Shorts.
What you might miss:
Limited control for professional color or audio work.
Not ideal for long or complex projects.
Requires a good internet connection for certain cloud-based tools.
CapCut isn’t pretending to be Hollywood software, it’s built for the new wave of creators who care more about publishing speed than traditional editing pipelines. And it’s honestly better at that than most “pro” tools.
#6. Kdenlive
If you’re into open-source software or just like the idea of total control without a price tag, Kdenlive deserves a serious look. It’s been around for years, quietly evolving into one of the most capable free editors out there.
Kdenlive doesn’t have the flashiest interface, but it’s solid where it counts. It supports almost every format you can throw at it, handles multi-track editing with ease, and runs on Windows, macOS, and Linux. That cross-platform flexibility alone makes it a hidden gem, especially if you’re not locked into the Apple or Adobe world.
What I’ve always liked about Kdenlive is its reliability. It’s lightweight, starts fast, and doesn’t hog your system resources. You can have multiple projects open, tweak effects, layer transitions, and it rarely crashes. It’s not fancy, but it’s steady, and that’s worth a lot in editing.
Of course, being open-source means it’s missing some of the polish and automation you get with paid editors. There’s no built-in AI helper or fancy motion tracking system (yet). But for editors who enjoy a bit of tinkering, or just want professional-level control without the cost, Kdenlive delivers more than you’d expect.
Why people love it:
100% free and open-source.
Cross-platform support (Windows, macOS, Linux).
Strong performance even on modest hardware.
Frequent community updates and plugin growth.
What you might miss:
Interface feels less refined than paid software.
No official customer support (community-driven).
Some advanced effects and AI tools are still limited.
Kdenlive is the kind of tool that quietly earns your respect. It doesn’t market itself loudly or hide features behind paywalls, it just lets you edit, experiment, and finish projects on your own terms.
How to Test Them Without Losing Your Mind
Switching editors can be exciting… until you realize every program has its own shortcuts, export settings, and learning curve waiting to trip you up. But there’s a smarter way to test without driving yourself crazy.
Start small. Take a project you’ve already finished in Premiere, maybe a 30-second ad, a vlog, or a short clip, and rebuild it in a new editor. Don’t start from scratch or commit to a client project on day one. You’re testing workflow, not loyalty.
Give each editor about a week. That’s usually enough time to see how it feels when you’re editing under real conditions, importing media, cutting, color correcting, exporting. Ask yourself:
How fast can I get to the point where I’m not thinking about the tool?
Does playback stay smooth when I stack effects or adjust color?
Do exports take forever, or does it handle rendering like a champ?
Can I actually enjoy using it for hours?
Keep Premiere installed while you test. Think of this phase as an open relationship, you’re exploring options, not breaking up.
If possible, map your most-used Premiere shortcuts to the new software. You’ll adapt faster, and it feels less like starting over. Then track how much time you spend on routine tasks like trimming, syncing, or rendering. The real winner is the one that saves you time without killing your creativity.
Finally, give yourself permission to mix and match. Some editors use multiple tools, one for color work, one for fast social cuts, one for heavy projects. There’s no rule saying you have to choose just one.
Don’t Let Hardware Hold You Back
Once you start testing new editors, you’ll notice one thing fast, performance makes or breaks the experience. A program can have the slickest interface in the world, but if your machine can’t keep up, the fun ends quickly.
That’s where Vagon Cloud Computer comes in. It lets you run any of these heavy editors, DaVinci Resolve, Final Cut, even Premiere itself, on a high-performance cloud machine, right from your laptop or tablet. Think of it as borrowing a top-tier workstation whenever you need one, without actually owning it.
This becomes especially useful when you’re experimenting. Maybe you want to compare render times in Resolve vs. Filmora, or see how 8K color correction feels on a high-end GPU setup. Instead of waiting for a local upgrade, you can just launch a stronger Vagon machine and test in real time.
It’s also a lifesaver if you’re editing on the go. A thin MacBook Air or Chromebook can feel like a full workstation once connected to a Vagon session. You keep your files in the cloud, your performance consistent, and your exports fast, even when your local hardware would’ve tapped out.
So before you decide which Premiere alternative fits best, make sure your testing setup isn’t the bottleneck. You can’t fairly compare software if your computer’s holding one of them back.
Mistakes to Avoid
Switching to a new editor isn’t just about finding a better tool, it’s about adjusting your habits. And that’s where a lot of editors trip up. Here are some common mistakes I’ve seen (and made) while exploring Premiere Pro alternatives.
#1. Expecting Feature Parity
Every program has its own strengths. DaVinci Resolve isn’t built to replace After Effects, and CapCut isn’t meant for full-length documentaries. Don’t expect an exact clone of Premiere, instead, look for what each tool does better. You might lose one feature but gain five that actually save you time.
#2. Ignoring Hardware Reality
Even the best software can’t fix weak hardware. If your machine already struggles with Premiere, don’t assume a new editor will magically run smoother. Check system requirements, test your footage, and if possible, run heavy tasks on better hardware before judging performance.
#3. Underestimating the Learning Curve
Muscle memory is real. You’ll instinctively hit old shortcuts and expect old menus. Give yourself time to rewire, it takes a week or two before your brain and fingers adjust. Switching back and forth too quickly just confuses both.
#4. Forgetting Collaboration
If you work with a team, make sure your new editor fits their workflow. Project file compatibility, export settings, and plugin versions all matter. It’s frustrating to fall in love with a new tool only to realize your collaborator can’t open your files.
#5. Choosing the Cheapest Option Blindly
Free doesn’t always mean better value. Sometimes that “budget” editor costs you more in time and frustration. Balance price with what you actually need, stability, plugin support, and features that match your work.
#6. Skipping the Codec Check
This one’s sneaky. You’ll think everything’s fine until your export looks off or refuses to play. Always test your usual camera formats and client deliverables. Missing codec support is one of the fastest ways to regret a switch.
Editing software is like a workspace, if it doesn’t fit how you move, it slows you down. Test smart, be patient, and remember: sometimes the “best” tool on paper isn’t the best one for you.
My Personal Take
After years with Premiere Pro, I’ve learned something simple: there’s no perfect editor. There’s just the one that feels like it gets you.
If I had to start fresh today, I’d probably begin with DaVinci Resolve. It’s powerful, free to start, and feels like the natural evolution of where professional editing is heading. The color tools alone make it worth learning, and once you get used to the workflow, it’s hard to go back.
If I were on a Mac, Final Cut Pro would be an easy pick. It’s ridiculously fast, stable, and somehow manages to stay out of your way. You can just focus on the work instead of waiting for your system to catch up.
For creators who care more about publishing speed than complex timelines, I’d reach for Filmora or CapCut. They’re perfect when your priority is output, not endless settings or render tweaks.
And I’ll always have a soft spot for Lightworks and Kdenlive. They’re proof that you don’t need flashy UI or corporate branding to make real, reliable software. They’re workhorses, not showpieces.
But here’s what I’ve really noticed: once you find a tool that feels good, your creativity expands. You stop thinking about panels and start thinking about rhythm, pacing, and story. The right editor isn’t the one with the most features, it’s the one that disappears while you’re working.
So try them. Play around. Keep Premiere on standby if you need it. The goal isn’t to quit Adobe, it’s to rediscover what makes editing enjoyable again.
Final Thoughts
At the end of the day, switching editors isn’t about chasing trends, it’s about taking control of your workflow again. Premiere Pro is still great, but it’s not the only way to create professional, beautiful videos anymore.
The tools we’ve covered, from DaVinci Resolve and Final Cut Pro to Filmora, Lightworks, CapCut, and Kdenlive, each shine in their own lane. Some are built for full productions, others for fast social cuts. The trick is knowing where your work lives and picking the tool that fits that rhythm.
And here’s the best part: testing them is easier than ever. You don’t need to buy a new workstation or commit to long subscriptions to experiment. Whether you’re editing full-time or just for fun, the right software will make you faster, calmer, and a little more inspired every time you hit “play.”
So try a few. Compare how they feel, not just what they claim to do. Because the real upgrade isn’t switching software, it’s finding a workflow that finally feels effortless.
And if you plan to keep Premiere Pro in your toolkit, check out how to extend your setup with our guide on using Adobe Premiere Pro on iPad — perfect for editing on the go.
FAQs
1. What’s the best free alternative to Premiere Pro?
If you’re looking for a free tool that feels genuinely professional, DaVinci Resolve is the clear winner. Its free version gives you full editing, color grading, and audio control, with no artificial limits or watermarks. The interface takes a few days to learn, but once it clicks, it’s smooth, powerful, and surprisingly stable even on mid-range hardware.
2. Which Premiere Pro alternative works best for Mac users?
Final Cut Pro is practically made for Apple devices. It’s deeply optimized for M-series chips, exports faster than almost anything else, and rarely crashes. It’s also a one-time purchase, so once you buy it, you’re done, no ongoing subscription fees. For creators already in the Apple ecosystem, it’s easily the most seamless option.
3. What’s the easiest software for beginners or casual creators?
If you’re new to editing, Wondershare Filmora and CapCut are ideal. Both are simple, lightweight, and designed for fast results. You get built-in templates, drag-and-drop editing, and instant exports for social platforms like YouTube, TikTok, and Instagram. They don’t have the depth of Resolve or Final Cut, but they make editing approachable, and fun.
4. Can these alternatives handle professional projects?
Absolutely. DaVinci Resolve and Final Cut Pro are used in commercial and film production all over the world. Lightworks, too, has a serious pedigree, it’s been used in major films for years. Even open-source options like Kdenlive can handle full projects if you know your workflow and optimize your setup properly.
5. How difficult is it to switch from Premiere Pro?
Not as hard as most people think. The core editing concepts, cutting, keyframes, transitions, are almost identical across platforms. You’ll just need to relearn where things live and remap a few shortcuts. Give yourself a week to adjust and a simple project to test on, and it’ll start to feel natural surprisingly fast.
6. Do these programs work on low-end or older machines?
Yes, but it depends on which one you choose. Filmora, CapCut, and Kdenlive run well even on modest hardware. Heavyweights like DaVinci Resolve need more GPU power to shine. If you’re testing performance-intensive software on a laptop, you can always use a cloud setup like Vagon Cloud Computer to simulate high-end workstation power without upgrading your device.
Get Beyond Your Computer Performance
Run applications on your cloud computer with the latest generation hardware. No more crashes or lags.

Trial includes 1 hour usage + 7 days of storage.
Summarize with AI

Ready to focus on your creativity?
Vagon gives you the ability to create & render projects, collaborate, and stream applications with the power of the best hardware.

Vagon Blog


Run heavy applications on any device with
your personal computer on the cloud.
San Francisco, California
Solutions
Vagon Teams
Vagon Streams
Use Cases
Resources
Vagon Blog
What Slows Down After Effects Projects?
The First 30 Minutes in Blender 3D: A Practical Workflow Guide
What’s New in Godot 4.7? Key Features, Upgrades, and Workflow Improvements
What Slows Down Blender 3D Projects?
What Slows Down Adobe Photoshop Projects?
The First 30 Minutes in Adobe Photoshop: A Practical Workflow Guide
Before You Start in Adobe Photoshop: A Practical Setup Checklist
What’s New in Unreal Engine 5.8? Key Features and Upgrade Advice
How to Run Windows on an iPad: 4 Best Ways (2026)
Vagon Blog
Run heavy applications on any device with
your personal computer on the cloud.
San Francisco, California
Solutions
Vagon Teams
Vagon Streams
Use Cases
Resources
Vagon Blog