Instant Connection for Pixel Streaming
— New Feature Automated Setup

Beginner Tips for Autodesk Revit: How to Stop Fighting the Software and Start Using It Right
Beginner Tips for Autodesk Revit: How to Stop Fighting the Software and Start Using It Right
Architecture
Beginner Tips for Autodesk Revit: How to Stop Fighting the Software and Start Using It Right
Table of Contents
Most people don’t struggle with Revit because they’re bad at design software. They struggle because the revit programma drops them into the deep end and assumes they already know how to swim.
I’ve seen this again and again. Someone opens Revit for the first time, clicks around confidently for about ten minutes, and then hits a wall. A wall that won’t move. Or worse, a wall that moves and takes half the building with it. At that point, the reaction is almost always the same. Why does this feel so much harder than it should?
The short answer is that Revit isn’t built around buttons. It’s built around logic.
Most beginners try to learn Revit the same way they learned other tools. Memorize commands. Watch tutorials. Follow steps. That approach works in software where actions are isolated. Revit doesn’t work like that. In adsk revit, almost every action is connected to something else. Change a level, and multiple views react. Adjust a wall type, and schedules update. Rename something carelessly, and suddenly your project browser turns into a mess.
That’s why learning buttons alone rarely helps. You can know exactly where the Wall tool is and still feel completely lost. What actually matters is understanding how Revit thinks. Once that clicks, the interface stops feeling hostile and starts feeling predictable. Still strict. But predictable.
For beginners working with autodesk revit bim workflows, expectations matter a lot. Revit is not forgiving software. It doesn’t hold your hand, and it doesn’t warn you before bad habits catch up with you. Small shortcuts taken early almost always turn into big problems later. That’s not because you did something wrong. It’s because BIM tools are designed to scale, not to improvise.
This is why habits and early decisions matter more than speed or confidence. How you set up levels. How you name views. When you decide to add detail. These choices quietly shape everything that comes after. In autodesk revit bim environments, the model is not just geometry. It’s data, relationships, and assumptions layered on top of each other.
So if Revit feels harder than it should right now, that’s normal. You’re not behind. You’re just learning a tool that rewards structure instead of shortcuts. And once you understand that, the learning curve starts to make a lot more sense.
If you’re coming from a more free-form modeling background, this difference becomes even clearer when you compare Revit to tools like Rhino, which we break down in our guide on choosing between Revit and Rhino for different design needs.
Tip 1: The First Time Revit Makes You Feel Lost Is Normal
Almost everyone has the same first reaction to Revit. Confusion, followed by mild panic, followed by the quiet thought that maybe this software just isn’t for them.
You open a new project. You place a wall. It looks fine. Then you try to adjust it. Suddenly the wall snaps somewhere you didn’t expect. A dimension changes. Another view updates itself without asking. Nothing is technically broken, but nothing feels under your control either. That moment hits fast for beginners.
I think this is where a lot of people mentally quit, even if they keep using the software.
What’s important to understand is that this feeling isn’t a sign you’re doing badly. It’s a sign you’ve stepped into a system-based tool for the first time. Revit doesn’t behave like drawing software. It behaves like a rule engine. Every element follows constraints, relationships, and assumptions that aren’t obvious at the beginning.
In adsk revit, the software always assumes intent. When you move a wall, it assumes you want it to stay attached to a level. When you edit a type, it assumes you want every instance to update. When you change a view, it assumes that view has a specific role in documentation. Beginners don’t know these assumptions yet, so the software feels unpredictable.
That unpredictability creates frustration. And frustration creates bad habits. People start forcing geometry. They duplicate views instead of fixing templates. They redraw elements instead of understanding why something moved. I’ve noticed that most long-term problems in Revit don’t start with lack of knowledge. They start with panic-driven decisions made early on.
The key mindset shift here is simple. Feeling lost at the beginning is expected. The goal isn’t to feel confident right away. The goal is to stay curious instead of defensive. When something behaves strangely, don’t fight it immediately. Pause. Ask what rule you just triggered.
If you accept that early confusion is part of learning autodesk revit bim workflows, you give yourself room to improve without rushing. And that patience pays off faster than you’d expect.
Once you stop interpreting confusion as failure, Revit becomes a lot easier to approach. Not easy. But manageable.
Tip 2: Revit Isn’t Difficult, It’s Strict
One mistake beginners make is assuming Revit is complicated because it has too many tools. I don’t think that’s true. In my experience, Revit is strict, not difficult. It expects you to play by its rules from the very beginning.
If you’re coming from AutoCAD or similar tools, this feels jarring. In AutoCAD, you can usually fix things later. Lines don’t care where they came from. You can improvise, clean up, and move on. Revit doesn’t work like that. In a bim revit architecture mindset, decisions are supposed to happen early, not halfway through the project.
Revit wants structure first. Levels before walls. Grids before layout. Types before instances. When you skip these steps, the software doesn’t stop you. It lets you continue and quietly keeps track of every shortcut you take. Then, weeks later, those shortcuts come back as broken views, mismatched schedules, or elements that refuse to behave.
This is where beginners often say things like “Revit is too rigid” or “Revit won’t let me design freely.” I get the frustration, but I don’t fully agree. Revit allows flexibility, just not randomness. Freedom exists, but it lives inside a framework. Once you understand that framework, the strictness starts to feel protective instead of limiting.
I’ve noticed that beginners who struggle the most are usually trying to outsmart the software. They force geometry. They override warnings without reading them. They adjust things visually instead of understanding why Revit is resisting. That usually makes things worse.
The better approach is slower, at least at first. Accept that Revit wants you to decide things in a specific order. When something feels blocked, it’s often because a foundational choice hasn’t been made yet. A level isn’t defined. A type isn’t set up. A constraint is missing.
Once you stop fighting the strictness and start working with it, Revit becomes surprisingly consistent. Not friendly. Not forgiving. But consistent. And consistency is what makes complex projects possible in autodesk revit bim workflows.
Tip 3: Learn How Revit Thinks Before Learning What to Click
This is where most beginner guides quietly fail. They show you where the buttons are, but they never explain why Revit reacts the way it does.
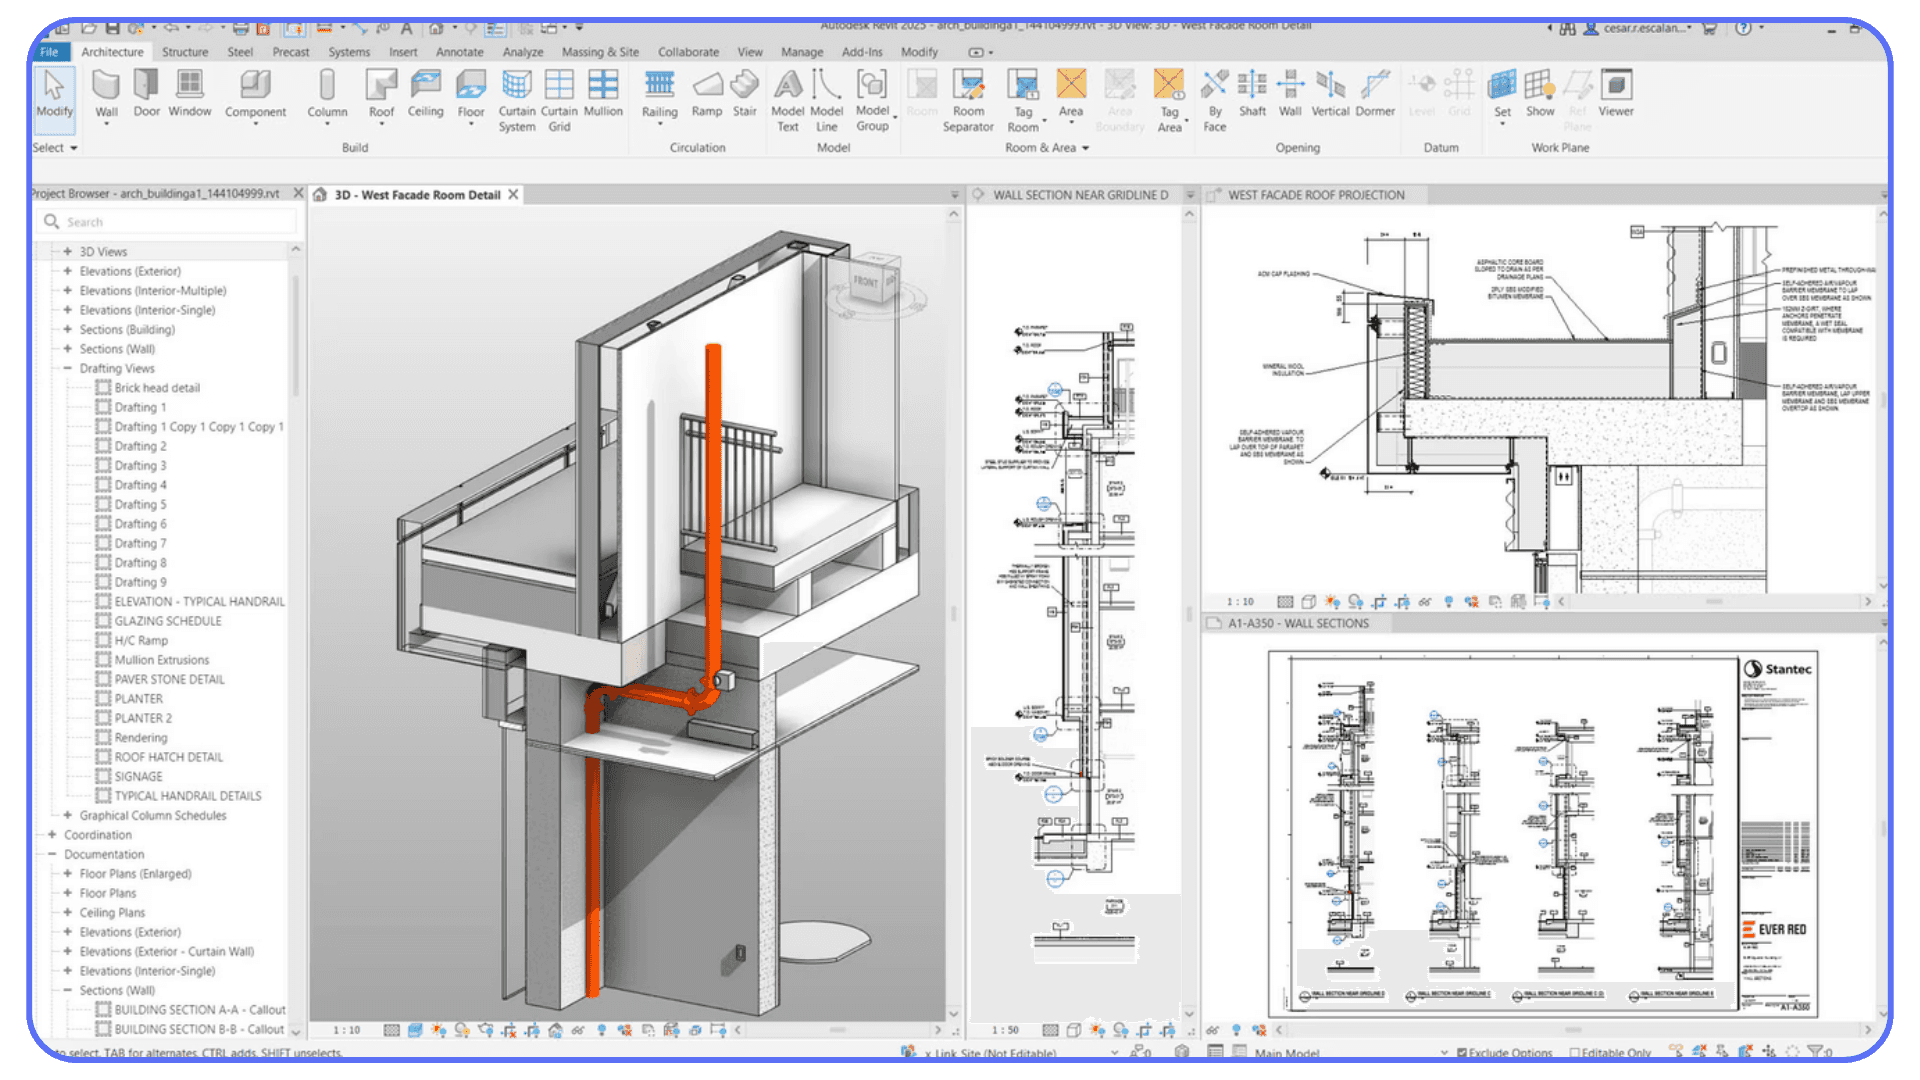
Revit doesn’t think in shapes. It thinks in relationships.
A wall isn’t just a wall. It belongs to a level, has a type, carries parameters, and affects schedules, sections, and elevations at the same time. A view isn’t just something you look at. It’s a rule set that decides what the model is allowed to show and how it’s allowed to show it. Once you realize this, a lot of “random” behavior suddenly makes sense.
Beginners often learn Revit by copying actions. Click here. Place that. Adjust this value. The problem is that copying actions without understanding logic only works until the context changes. And in adsk revit, context changes constantly. Different views. Different phases. Different detail levels. Same buttons, very different results.
I’ve noticed that people who improve fastest usually stop asking “Which tool should I use?” and start asking “What is Revit assuming right now?” Is this element hosted? Is it constrained? Is this a type change or an instance change? Those questions feel abstract at first, but they save you from repeating the same mistakes across every project.
This is especially important in autodesk revit bim workflows, where a single model feeds drawings, quantities, and coordination. If you treat each task as isolated, the model slowly turns against you. If you understand the logic once, the model starts working with you instead.
A practical way to build this mindset is to slow down when something unexpected happens. Don’t immediately undo and try again. Check the Properties panel. Look at constraints. Switch views and see what changed. Revit is usually telling you what it’s doing. It just doesn’t explain it out loud.
Learning Revit’s logic takes longer upfront, but it pays off fast. Instead of memorizing steps, you start predicting outcomes. And that’s the moment Revit stops feeling chaotic and starts feeling structured.
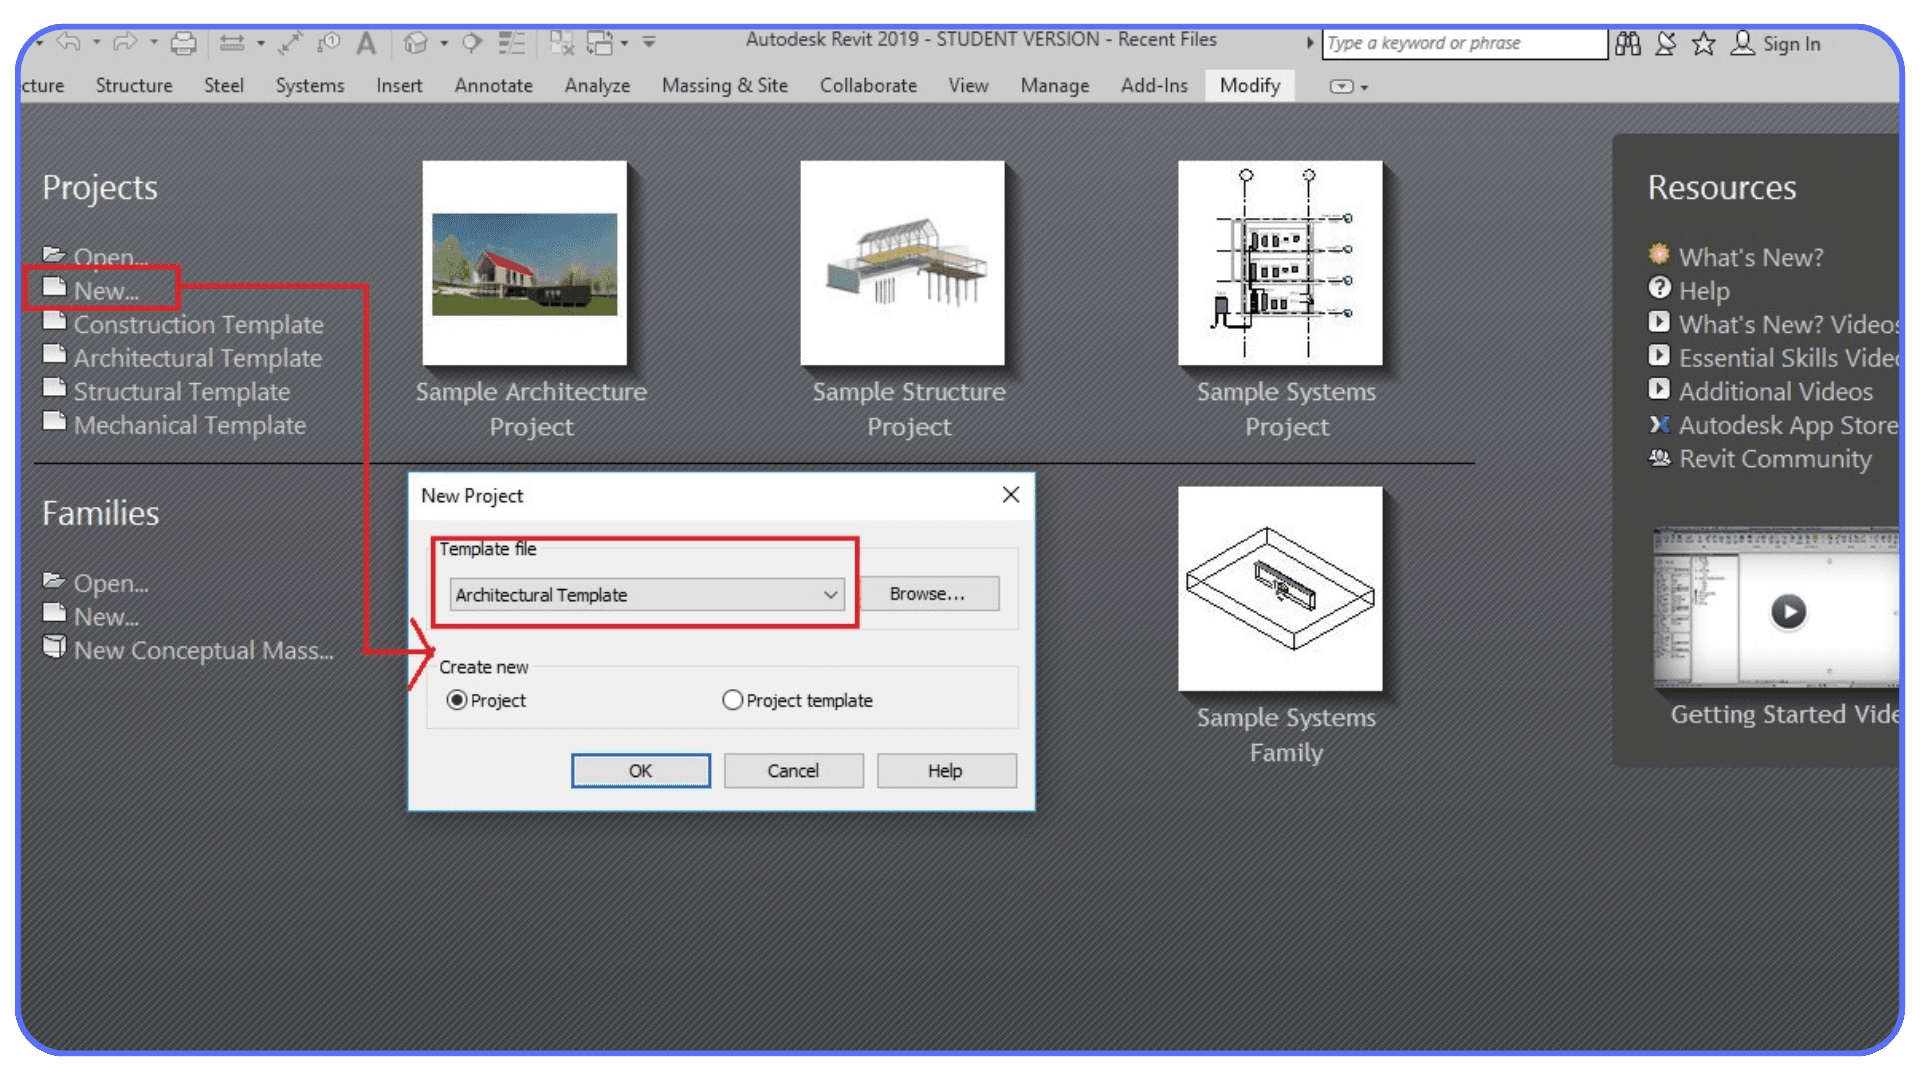
Tip 4: Set Levels, Grids, and Units Before You Draw Anything
This tip sounds boring. It’s also one of the most expensive mistakes beginners make.
When you open a new Revit project, it’s tempting to start drawing immediately. Walls feel productive. Doors feel like progress. Floors make it look real. The problem is that without proper setup, all of that progress sits on shaky ground.
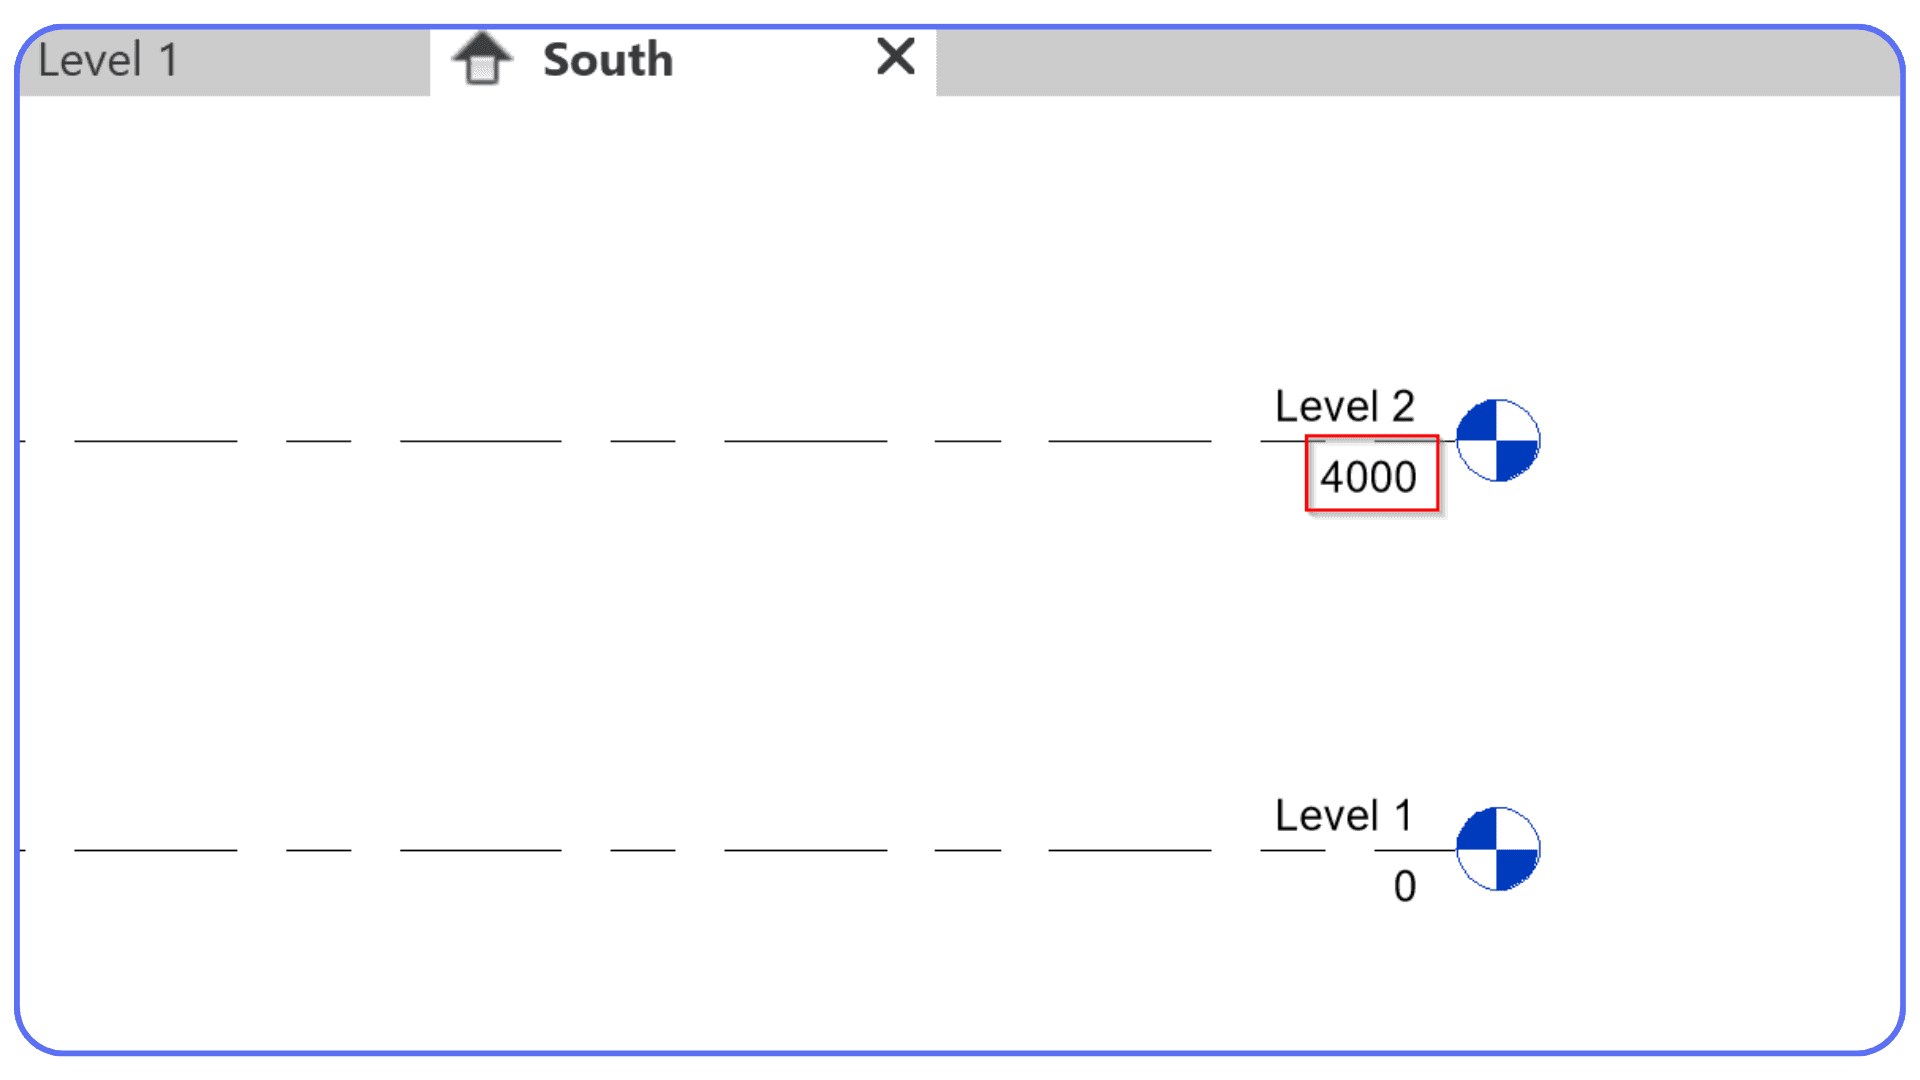
Levels define vertical logic. Grids define horizontal logic. Units define how the entire model interprets numbers. Skip any one of these, and you’re not just making things harder. You’re baking confusion into the file.
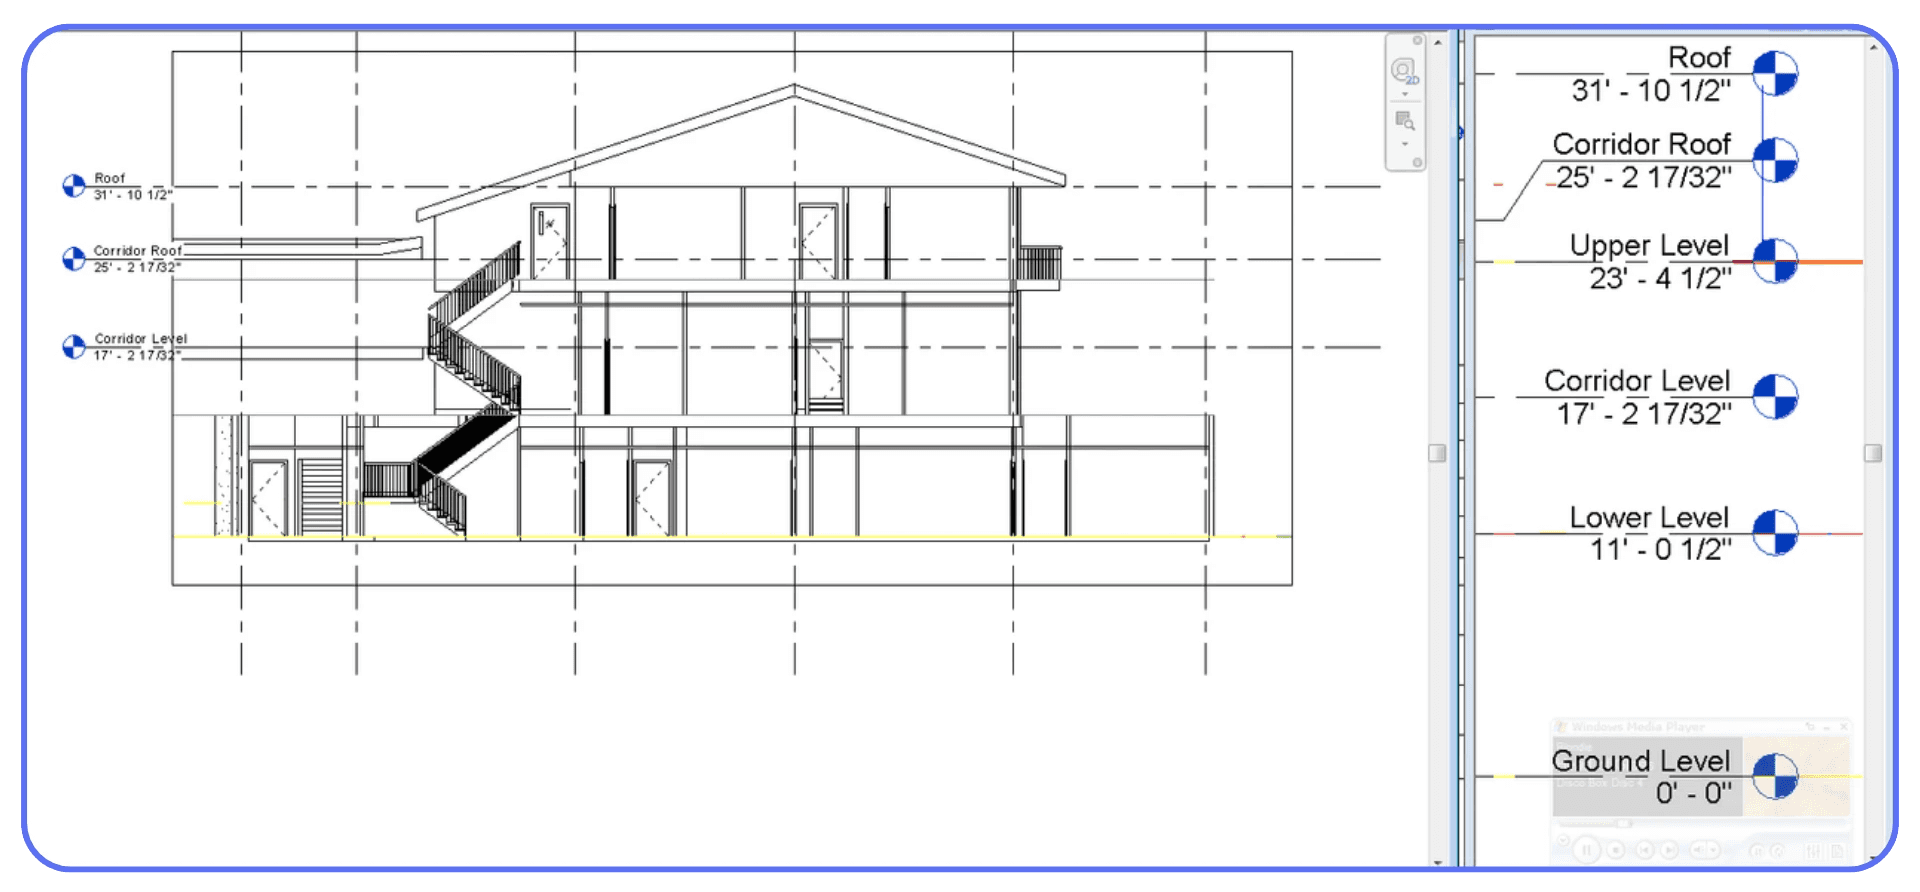
I’ve lost count of how many times I’ve seen a project where levels were adjusted halfway through because someone realized the floor heights were wrong. That single change can ripple through plans, sections, elevations, dimensions, and schedules. Suddenly nothing lines up. Things look “off” but no one can quite explain why.
Grids cause similar pain. Beginners often place them late or treat them as visual guides. In Revit, grids are reference systems. Structural elements want to align to them. Dimensions expect them. Ignoring grids early makes coordination harder than it needs to be, especially as the model grows.
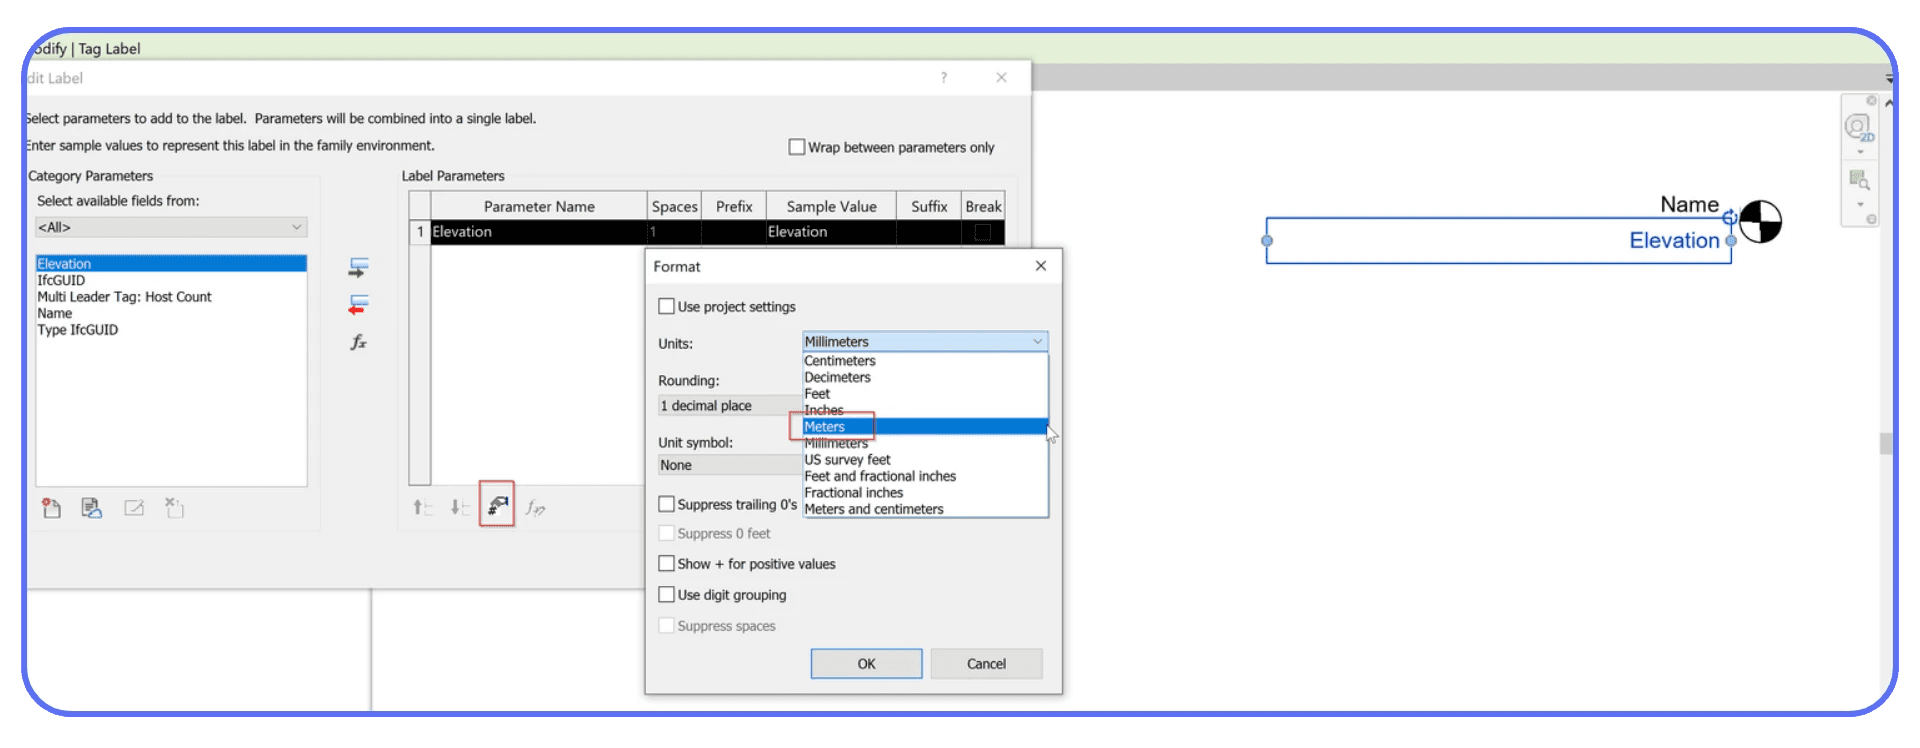
Units are quieter, but just as dangerous. A project set up in the wrong unit system leads to walls that are technically correct but practically wrong. A door that’s 900 millimeters wide behaves very differently from one that’s accidentally interpreted in another unit. These mistakes don’t always scream at you. They wait.
In adsk revit, setup isn’t a formality. It’s the foundation. Spending fifteen minutes defining levels, grids, and units can save days of cleanup later. That tradeoff is always worth it.
If you’re not sure where to start, keep it simple. Define all levels you expect to need, even if you won’t use them immediately. Place grids logically and name them clearly. Confirm units once, then confirm them again. It’s slow. It’s unglamorous. And it’s one of the most professional habits you can build early in autodesk revit bim workflows.
Tip 5: Families Are Powerful, but They’re Not Step One
Families are where a lot of beginners get curious and then get stuck.
You place a door. It doesn’t look right. The handle feels wrong. The dimensions don’t match what you imagined. So you open the family editor, start clicking around, and suddenly you’re twenty parameters deep wondering how you got there. That experience is common.
Families are one of Revit’s biggest strengths, but they’re also one of its easiest traps. They control behavior, not just appearance. Change one parameter and you might affect every instance across the entire project. For someone new to adsk revit, that kind of power can do more harm than good early on.
I think beginners often assume that mastering families is the key to mastering Revit. In reality, families make much more sense once you understand views, types, and constraints. Without that context, family editing feels like guesswork. You’re changing values without fully understanding what they control.
There’s also a timing issue. Early in a project, flexibility matters more than precision. Default families are usually “good enough” for layout, coordination, and early documentation. Spending hours perfecting a custom family too soon often slows learning instead of accelerating it.
That doesn’t mean you should avoid families entirely. You should open them. Explore them. See how parameters relate to geometry. But treat that exploration as study, not production work. Make mistakes in a test file, not in your main model.
A good rule of thumb is this. If you don’t yet feel comfortable explaining the difference between a type change and an instance change, it’s too early to heavily customize families. Build that foundation first.
Once the basics click, families stop feeling mysterious. They start feeling logical. And that’s when they become genuinely useful in autodesk revit bim workflows.
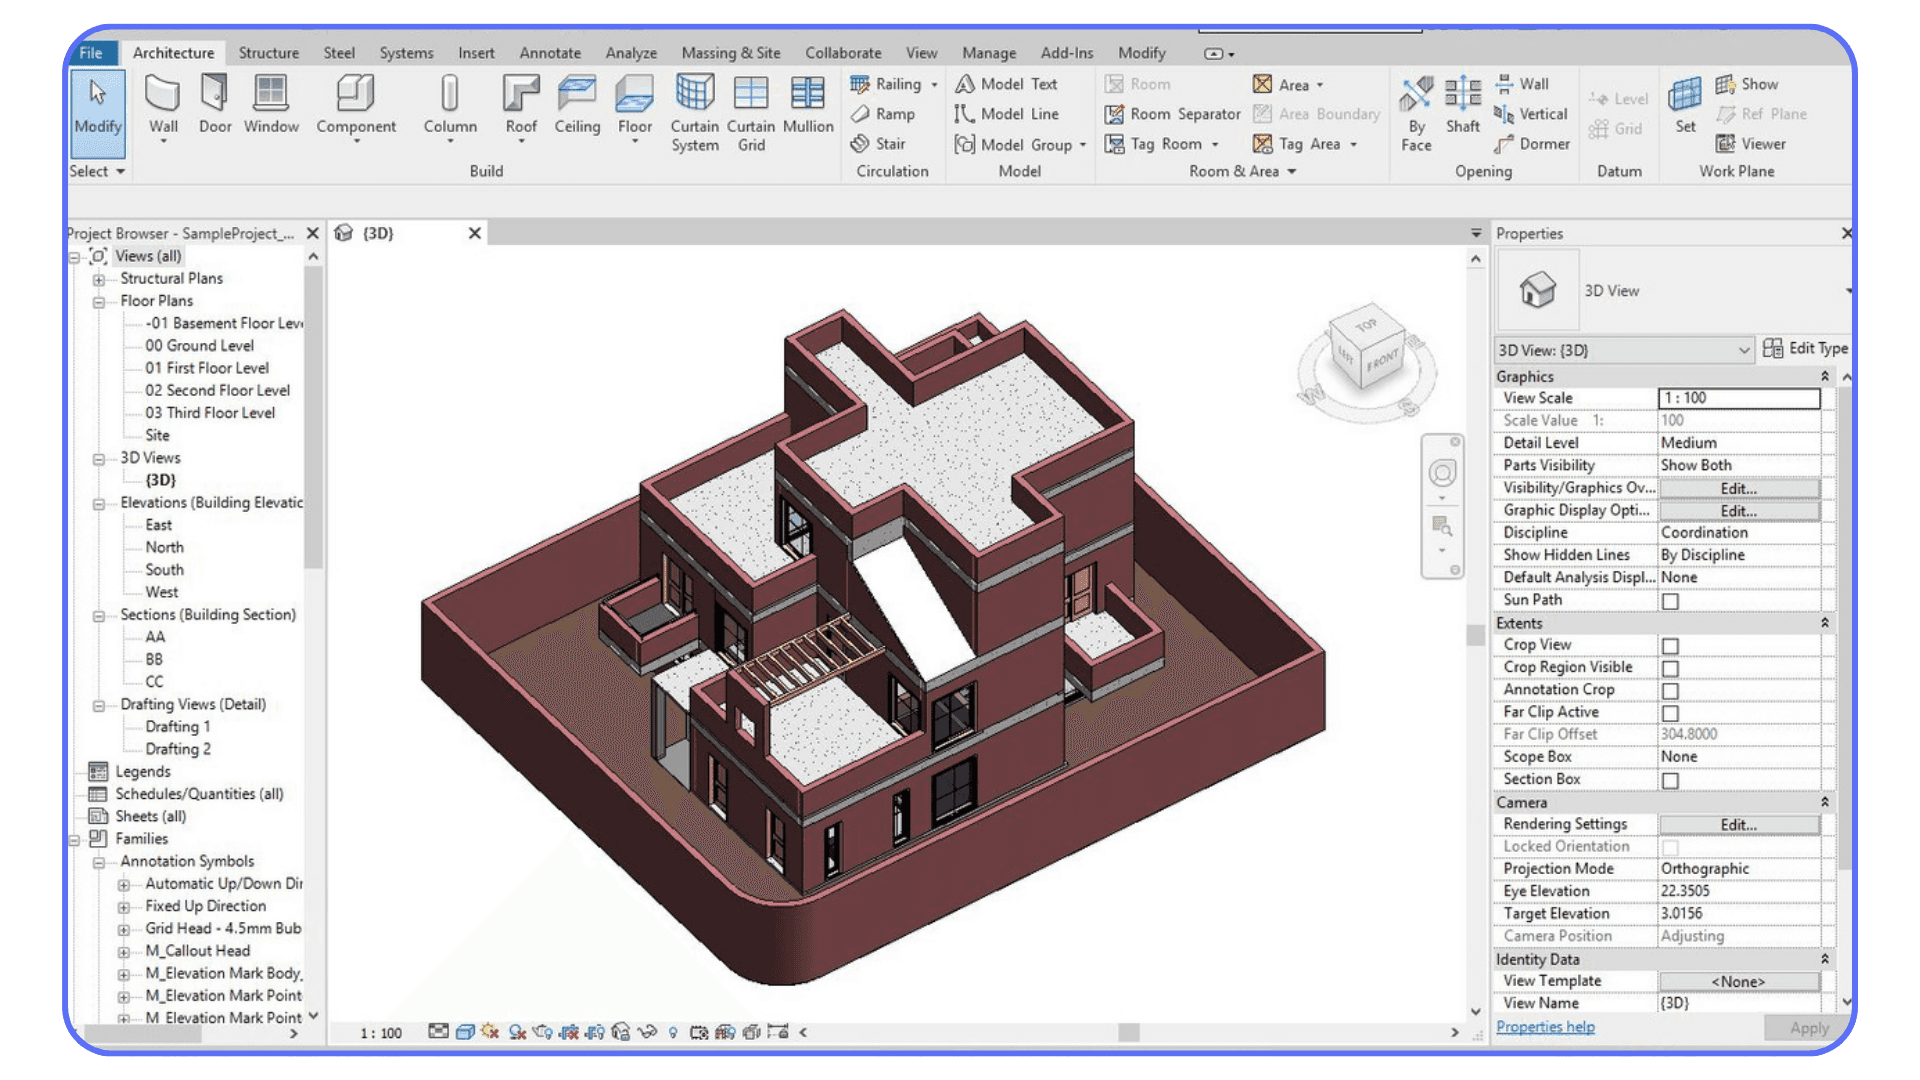
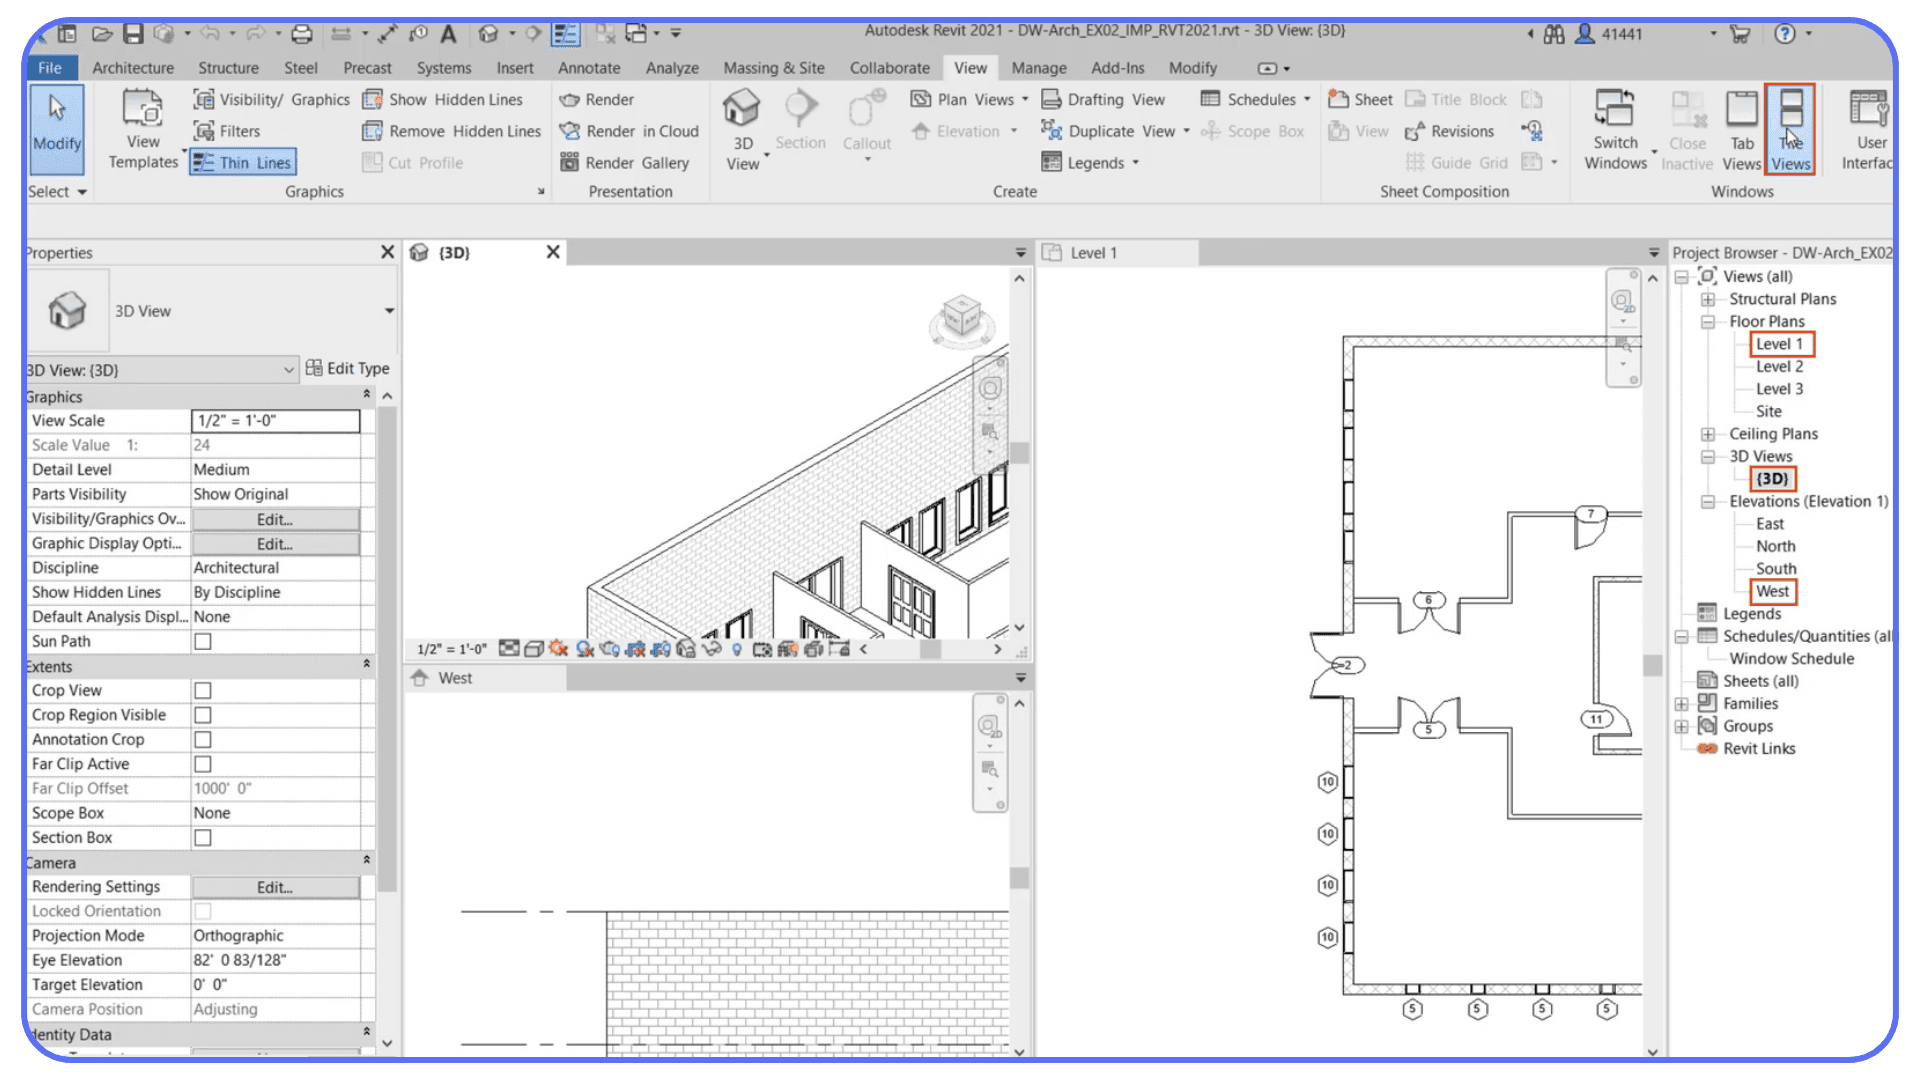
Tip 6: Views Are Not Just Camera Angles
This is one of the biggest mental traps for beginners. It’s easy to assume that views in Revit work like cameras. You look at the model from different angles, and that’s it. In reality, views are more like rule sets than viewpoints.
Every view decides what the model is allowed to show. Detail level. Visibility. Graphics. Scale. Discipline. Change the rules, and the same model suddenly behaves very differently. Beginners often miss this and try to “fix” geometry when the real issue lives entirely inside the view settings.
I’ve noticed that a lot of early frustration comes from editing in the wrong view. Someone adjusts a wall in a coarse plan view and wonders why nothing changes. Or they add detail in a fine view and accidentally overload the model. Revit isn’t being inconsistent here. It’s being precise. The view is doing exactly what it was told to do.
This is also why duplicating views without thinking can quietly wreck a project. Beginners duplicate a plan to make a small change, then duplicate another, and another. Before long, there are dozens of nearly identical views, all slightly different, and no one remembers which one is correct. That confusion spreads fast.
View templates exist to prevent this, but many beginners ignore them at first. That’s understandable. Templates feel abstract until you’ve experienced the chaos they’re meant to prevent. Once you start using them, though, they become one of the most calming parts of the workflow. Consistent graphics. Predictable behavior. Fewer surprises.
A simple habit helps a lot here. Before editing anything, check which view you’re in and what rules it’s applying. Ask yourself what this view is for. Documentation. Coordination. Design. Visualization. When each view has a clear role, the model stays cleaner and easier to manage.
Understanding views this way changes how Revit feels. Instead of fighting visual inconsistencies, you start controlling them. And that’s a big step forward in autodesk revit bim workflows.
Tip 7: Most Performance Problems Come From Modeling Habits
When Revit starts slowing down, beginners usually jump to one conclusion. My computer isn’t strong enough.
Sometimes that’s true. Often, it isn’t.
In my experience, early performance issues are usually self-inflicted. Too much detail too soon. Heavy views left open. Complex geometry modeled where simple placeholders would do the job just fine. Revit doesn’t complain when you do this. It just gets slower and slower until everything feels painful.
One common pattern is over-detailing during early design. People model every layer, every joint, every small element before the layout is even settled. That level of precision feels productive, but it creates unnecessary load. Revit has to process all of that information across every view, schedule, and section. The model grows heavy long before it needs to.
Views play a big role here too. Leaving multiple detailed views open at once quietly eats performance. Editing in a highly detailed 3D view when a simple plan would work is another classic mistake. Revit recalculates constantly, and detailed views demand more from the system every time something changes.
Linked files can cause trouble as well. Beginners often link everything without managing visibility or scope. Large site files, consultant models, or reference geometry stay active in views where they aren’t needed. The result is a model that feels sluggish even on decent hardware.
This is where it helps to separate habits from hardware. If a small project feels slow, the issue is probably workflow, not your machine. Cleaning up views, reducing early detail, and being intentional about what’s loaded and visible can dramatically improve performance.
That said, there is a point where habits aren’t the whole story anymore. As projects grow and coordination increases, even clean models demand more resources. We’ll get to that later. For now, focus on control. Keep things simple early. Let the model breathe.
Before blaming your hardware, it’s worth understanding how much performance you can reclaim just by changing modeling habits, especially if you’re working on low-end devices without a dedicated GPU.
Tip 8: Collaboration Starts Earlier Than You Expect
A lot of beginners treat collaboration as an advanced topic. Something you’ll deal with later, once you’re “good enough.” I think that mindset causes more trouble than it avoids.
Revit is built for teamwork, even when you’re working alone. The moment a project grows beyond a simple exercise, collaboration concepts start creeping in. Central files. Local files. Ownership of elements. Synchronizing changes. You don’t need a big team to feel the effects of these systems. You just need a project that lasts longer than a week.
Beginners often work in single files without understanding what would happen if someone else needed access. That’s fine for learning, but problems appear when projects scale or deadlines tighten. Suddenly files get copied instead of shared. Versions multiply. No one knows which model is current. Small coordination issues turn into big headaches.
Understanding the basics early makes a huge difference. Knowing what a central file is and why local files exist helps you avoid destructive habits. It teaches you to think about ownership and responsibility inside the model. Even if you’re the only person touching the file, those ideas still apply.
This is also where cloud-based collaboration tools come into the picture. Platforms like autodesk bim360 are designed to keep teams aligned and files accessible without endless emailing and version chaos. You don’t need to master them on day one, but you should know why they exist and what problems they’re trying to solve.
I’ve noticed that beginners who learn collaboration early tend to model more carefully. They name things better. They avoid risky shortcuts. They think about how their work affects others, even future versions of themselves. That mindset carries over into every part of autodesk revit bim workflows.
You don’t need a team to start thinking like one. And Revit works best when you do.
Tip 9: The Real Cost of Revit Isn’t the Subscription Price
When people talk about Revit cost, the conversation usually stops at licensing. Monthly fees. Annual plans. Comparisons like autocad revit price versus standalone options. Those numbers matter, sure, especially when you’re just starting out or working independently.
But in practice, the subscription is rarely the most expensive part.
The real cost shows up in time. Time lost fixing avoidable mistakes. Time spent rebuilding views that broke because of early shortcuts. Time wasted waiting for files to open, sync, or recover after something goes wrong. Those hours add up fast, especially in revit architecture cost discussions where deadlines are tight and revisions are constant.
I’ve seen beginners obsess over license pricing while casually burning entire afternoons correcting things that should have taken minutes. That imbalance is common. The software fee is visible and predictable. The cost of inefficient habits is quiet and ongoing.
This is especially true in bim revit architecture workflows, where one decision echoes everywhere. A poorly set up model doesn’t just slow drafting. It affects schedules, quantities, coordination, and communication. Every downstream task becomes heavier than it needs to be.
There’s also a mental cost that’s easy to ignore. Frustration. Hesitation. That constant feeling of being behind. When using autodesk revit bim tools feels like a daily fight, learning slows down. Confidence drops. People start avoiding improvements because they’re afraid of breaking something.
Thinking about cost this way changes priorities. Instead of asking “What does Revit cost?” a better question becomes “What habits are making Revit expensive for me?” Fixing those habits often delivers a better return than any pricing optimization.
This frustration is even more common for Mac users, since Revit isn’t natively supported on macOS, which is why many people look for practical ways to run Revit on a Mac without constantly fighting performance issues.
This is also where comparisons with AutoCAD come up, since the hardware requirements are very different, something we’ve covered when looking at what actually makes a good PC for AutoCAD.
Tip 10: Hardware Eventually Becomes a Learning Bottleneck
There’s a point where good habits stop being enough.
At first, most Revit slowdowns really are caused by workflow issues. Heavy views. Too much detail. Messy files. Clean those up and things usually improve. But as projects get bigger and coordination increases, another limit starts to show up. Your hardware.
You’ll recognize the moment. Files take longer to open than they used to. Syncing feels risky instead of routine. Saving becomes something you brace for. The fans kick in during tasks that used to feel light. None of this means you’re doing something wrong. It usually means your projects have outgrown your machine.
This hits beginners in a frustrating way. You’re finally getting comfortable with adsk revit. You understand views, families, and setup better. You want to try larger models, linked files, or more detailed documentation. And suddenly the software feels slow again, even though your habits are better than ever.
That slowdown has real consequences. Learning stalls because experimenting feels expensive. You hesitate before trying new workflows. You avoid complex views because they take too long to load. Over time, performance issues quietly shape what you’re willing to learn.
I’ve noticed that many users blame themselves at this stage. They assume they’re missing some secret optimization trick. Sometimes there is one. Often, there isn’t. Revit is resource-hungry by design, especially in full autodesk revit bim workflows where multiple disciplines and datasets come together.
The important thing is recognizing this moment for what it is. Not a failure. Not a skill gap. Just a technical ceiling. And once you know that ceiling exists, you can make smarter decisions about how to work around it instead of fighting it every day.
Once projects grow, choosing the right hardware matters more than most beginners expect, especially when you start looking at what actually makes a good PC for Autodesk Revit beyond basic specs.
Tip 11: When It Makes Sense to Use Vagon Cloud Computer
At a certain point, the question stops being how you use Revit and starts being where you use it.
If you’re working with larger models, linked files, or more complex autodesk revit bim workflows, local hardware can quietly become the limiting factor. Not because it’s bad hardware, but because Revit simply demands more as projects grow. Upgrading your machine is one option. Committing to a new workstation just to get through a few heavy phases is another story.
This is where Vagon Cloud Computer fits in.
Instead of pushing your local setup past its limits, Vagon lets you run Revit on a powerful cloud machine when you actually need that extra performance. No permanent hardware upgrades. No moving files back and forth. You open your project, work in a stronger environment, and keep going.
For beginners especially, this can remove a lot of friction. You don’t have to hold back from trying larger models or collaborative workflows just because your laptop struggles. You can test heavier views, work with linked files, or explore more advanced documentation without waiting minutes for every action to respond.
What I like about this approach is that it doesn’t change how you use Revit. It just changes the ceiling. You keep the same habits, the same files, the same workflow. The difference is that performance stops shaping what you’re willing to learn.
Vagon Cloud Computer isn’t something you need on day one. But once your projects start growing and your curiosity outpaces your hardware, it becomes a practical way to keep moving forward without unnecessary compromises.
Some users even explore running Revit remotely on tablets, which opens up options like using Autodesk Revit on an iPad without being tied to a desk or a single machine.
Tip 12: What Actually Helps You Improve Faster in Revit
Most people look for shortcuts when learning Revit. Faster commands. Better tutorials. A secret setting that suddenly makes everything click. I don’t think that’s what actually moves the needle.
What helps most is consistency.
Opening Revit regularly, even for small tasks, builds familiarity faster than binge-watching tutorials. Short sessions where you actually model something, break it, fix it, and understand why it broke tend to stick. Revit rewards repetition more than intensity.
Another big accelerator is finishing projects. Not perfect projects. Finished ones. A small residential model taken all the way to sheets will teach you more than five half-done files full of nice-looking geometry. You start seeing how early decisions affect documentation, schedules, and coordination. That feedback loop is where real learning happens.

I’ve also noticed that people improve faster when they stop trying to use every feature. Revit is huge. You don’t need to touch everything. Focus on a core set of tools and workflows that match what you’re actually trying to build. Master those first. Expand later.
Mistakes matter too. Revit mistakes are uncomfortable because they can feel permanent, but they’re also instructive. A broken model teaches you more about structure than a smooth one ever will. The key is understanding what went wrong instead of just patching the symptom.
Finally, patience plays a bigger role than talent. Revit doesn’t reward rushing. It rewards clear thinking, clean setup, and respect for the system. Once you accept that, progress becomes steadier and far less stressful.
If you keep showing up, keep finishing what you start, and keep adjusting your habits as projects grow, Revit slowly stops feeling like an obstacle. It starts feeling like a tool you can trust.
Once you’re comfortable with the basics, selectively adding the right Revit plugins can speed up workflows significantly, as long as they support your habits instead of adding more complexity.
Final Thoughts
Revit has a reputation for being difficult, and I understand why. It doesn’t feel friendly at first. It doesn’t guide you gently. And it definitely doesn’t reward improvisation. But after spending enough time with it, one thing becomes clear. Revit isn’t trying to trip you up. It’s trying to keep things consistent.
Most frustration comes from treating Revit like a drawing tool instead of what it really is. A system. Once you accept that, the experience changes. You stop forcing things. You start planning a little more. You make fewer decisions in panic and more decisions with intent.
For beginners, that shift is everything.
You don’t need to know every feature. You don’t need to work fast. You don’t need a perfect setup on day one. What you do need is an understanding that early habits matter more than short-term results. In autodesk revit bim workflows, small choices echo forward. That can feel intimidating, but it’s also what makes the software powerful.
There will still be slow days. Files will still misbehave. You’ll still open old projects and wonder what you were thinking. That doesn’t mean you’re bad at Revit. It means you’re learning it the way most people do. By building, breaking, and gradually understanding how the system responds.
If you take anything away from this guide, let it be this. Revit rewards patience, structure, and consistency. Once you stop fighting those qualities and start working with them, the learning curve flattens out more than you’d expect. And the software that once felt overwhelming starts to feel reliable.
Not easy. But reliable.
Understanding how Revit actually uses your GPU can clear up a lot of performance confusion, especially when people assume a stronger graphics card alone will fix everything.
FAQs
1. Is Revit hard to learn for beginners?
Revit feels hard at the beginning, but not because it’s overly complex. It feels hard because it expects structure from the start. The revit programma assumes you understand how levels, views, and elements relate to each other. Once you grasp that logic, learning becomes much smoother.
2. How long does it take to become comfortable with Revit?
In my experience, most beginners start feeling comfortable after a few real projects, not after a certain number of tutorials. If you consistently use adsk revit for small but complete projects, you’ll usually feel more confident within a few months. Mastery takes longer, but basic control comes sooner than people expect.
3. Do I need to know AutoCAD before learning Revit?
No. AutoCAD can help with drafting concepts, but it can also slow you down mentally if you try to apply the same habits. Revit is built around BIM logic, not lines. Many people who start directly with autodesk revit bim workflows adapt just as well, sometimes faster.
4. Why does Revit slow down even on decent computers?
Revit performance depends heavily on modeling habits. Heavy views, too much detail early on, and unmanaged linked files can slow things down quickly. That said, as projects grow, hardware does become a real factor, especially in larger bim revit architecture models.
5. Is Revit only for architects?
No. While many people associate it with architecture, Revit is used across multiple disciplines. Structural engineers, MEP engineers, and construction teams all work inside the same ecosystem. That shared model is one of the biggest strengths of autodesk revit bim.
6. How does Revit pricing compare to AutoCAD?
Autocad revit price comparisons depend on how you work. AutoCAD is generally cheaper and lighter, but it doesn’t offer the same integrated BIM capabilities. Revit costs more upfront, but it replaces multiple disconnected workflows with a single model-based system.
7. Do beginners need cloud tools like Autodesk BIM 360?
You don’t need them immediately, but understanding why tools like autodesk bim360 exist is helpful. They’re designed for collaboration, version control, and shared access. Even solo users benefit from learning the concepts early, especially if they plan to work on team projects later.
8. When does using a cloud computer make sense for Revit?
A cloud computer starts to make sense when your learning or project complexity is limited by your hardware. If larger models, linked files, or complex views slow you down, running Revit on a more powerful environment like Vagon Cloud Computer can remove that bottleneck without forcing a permanent hardware upgrade.
9. What’s the best advice for someone just starting Revit?
Don’t rush. Focus on habits, not speed. Finish small projects. Pay attention to setup. And accept that confusion at the beginning is normal. Revit rewards patience far more than shortcuts.
Most people don’t struggle with Revit because they’re bad at design software. They struggle because the revit programma drops them into the deep end and assumes they already know how to swim.
I’ve seen this again and again. Someone opens Revit for the first time, clicks around confidently for about ten minutes, and then hits a wall. A wall that won’t move. Or worse, a wall that moves and takes half the building with it. At that point, the reaction is almost always the same. Why does this feel so much harder than it should?
The short answer is that Revit isn’t built around buttons. It’s built around logic.
Most beginners try to learn Revit the same way they learned other tools. Memorize commands. Watch tutorials. Follow steps. That approach works in software where actions are isolated. Revit doesn’t work like that. In adsk revit, almost every action is connected to something else. Change a level, and multiple views react. Adjust a wall type, and schedules update. Rename something carelessly, and suddenly your project browser turns into a mess.
That’s why learning buttons alone rarely helps. You can know exactly where the Wall tool is and still feel completely lost. What actually matters is understanding how Revit thinks. Once that clicks, the interface stops feeling hostile and starts feeling predictable. Still strict. But predictable.
For beginners working with autodesk revit bim workflows, expectations matter a lot. Revit is not forgiving software. It doesn’t hold your hand, and it doesn’t warn you before bad habits catch up with you. Small shortcuts taken early almost always turn into big problems later. That’s not because you did something wrong. It’s because BIM tools are designed to scale, not to improvise.
This is why habits and early decisions matter more than speed or confidence. How you set up levels. How you name views. When you decide to add detail. These choices quietly shape everything that comes after. In autodesk revit bim environments, the model is not just geometry. It’s data, relationships, and assumptions layered on top of each other.
So if Revit feels harder than it should right now, that’s normal. You’re not behind. You’re just learning a tool that rewards structure instead of shortcuts. And once you understand that, the learning curve starts to make a lot more sense.
If you’re coming from a more free-form modeling background, this difference becomes even clearer when you compare Revit to tools like Rhino, which we break down in our guide on choosing between Revit and Rhino for different design needs.
Tip 1: The First Time Revit Makes You Feel Lost Is Normal
Almost everyone has the same first reaction to Revit. Confusion, followed by mild panic, followed by the quiet thought that maybe this software just isn’t for them.
You open a new project. You place a wall. It looks fine. Then you try to adjust it. Suddenly the wall snaps somewhere you didn’t expect. A dimension changes. Another view updates itself without asking. Nothing is technically broken, but nothing feels under your control either. That moment hits fast for beginners.
I think this is where a lot of people mentally quit, even if they keep using the software.
What’s important to understand is that this feeling isn’t a sign you’re doing badly. It’s a sign you’ve stepped into a system-based tool for the first time. Revit doesn’t behave like drawing software. It behaves like a rule engine. Every element follows constraints, relationships, and assumptions that aren’t obvious at the beginning.
In adsk revit, the software always assumes intent. When you move a wall, it assumes you want it to stay attached to a level. When you edit a type, it assumes you want every instance to update. When you change a view, it assumes that view has a specific role in documentation. Beginners don’t know these assumptions yet, so the software feels unpredictable.
That unpredictability creates frustration. And frustration creates bad habits. People start forcing geometry. They duplicate views instead of fixing templates. They redraw elements instead of understanding why something moved. I’ve noticed that most long-term problems in Revit don’t start with lack of knowledge. They start with panic-driven decisions made early on.
The key mindset shift here is simple. Feeling lost at the beginning is expected. The goal isn’t to feel confident right away. The goal is to stay curious instead of defensive. When something behaves strangely, don’t fight it immediately. Pause. Ask what rule you just triggered.
If you accept that early confusion is part of learning autodesk revit bim workflows, you give yourself room to improve without rushing. And that patience pays off faster than you’d expect.
Once you stop interpreting confusion as failure, Revit becomes a lot easier to approach. Not easy. But manageable.
Tip 2: Revit Isn’t Difficult, It’s Strict
One mistake beginners make is assuming Revit is complicated because it has too many tools. I don’t think that’s true. In my experience, Revit is strict, not difficult. It expects you to play by its rules from the very beginning.
If you’re coming from AutoCAD or similar tools, this feels jarring. In AutoCAD, you can usually fix things later. Lines don’t care where they came from. You can improvise, clean up, and move on. Revit doesn’t work like that. In a bim revit architecture mindset, decisions are supposed to happen early, not halfway through the project.
Revit wants structure first. Levels before walls. Grids before layout. Types before instances. When you skip these steps, the software doesn’t stop you. It lets you continue and quietly keeps track of every shortcut you take. Then, weeks later, those shortcuts come back as broken views, mismatched schedules, or elements that refuse to behave.
This is where beginners often say things like “Revit is too rigid” or “Revit won’t let me design freely.” I get the frustration, but I don’t fully agree. Revit allows flexibility, just not randomness. Freedom exists, but it lives inside a framework. Once you understand that framework, the strictness starts to feel protective instead of limiting.
I’ve noticed that beginners who struggle the most are usually trying to outsmart the software. They force geometry. They override warnings without reading them. They adjust things visually instead of understanding why Revit is resisting. That usually makes things worse.
The better approach is slower, at least at first. Accept that Revit wants you to decide things in a specific order. When something feels blocked, it’s often because a foundational choice hasn’t been made yet. A level isn’t defined. A type isn’t set up. A constraint is missing.
Once you stop fighting the strictness and start working with it, Revit becomes surprisingly consistent. Not friendly. Not forgiving. But consistent. And consistency is what makes complex projects possible in autodesk revit bim workflows.
Tip 3: Learn How Revit Thinks Before Learning What to Click
This is where most beginner guides quietly fail. They show you where the buttons are, but they never explain why Revit reacts the way it does.
Revit doesn’t think in shapes. It thinks in relationships.
A wall isn’t just a wall. It belongs to a level, has a type, carries parameters, and affects schedules, sections, and elevations at the same time. A view isn’t just something you look at. It’s a rule set that decides what the model is allowed to show and how it’s allowed to show it. Once you realize this, a lot of “random” behavior suddenly makes sense.
Beginners often learn Revit by copying actions. Click here. Place that. Adjust this value. The problem is that copying actions without understanding logic only works until the context changes. And in adsk revit, context changes constantly. Different views. Different phases. Different detail levels. Same buttons, very different results.
I’ve noticed that people who improve fastest usually stop asking “Which tool should I use?” and start asking “What is Revit assuming right now?” Is this element hosted? Is it constrained? Is this a type change or an instance change? Those questions feel abstract at first, but they save you from repeating the same mistakes across every project.
This is especially important in autodesk revit bim workflows, where a single model feeds drawings, quantities, and coordination. If you treat each task as isolated, the model slowly turns against you. If you understand the logic once, the model starts working with you instead.
A practical way to build this mindset is to slow down when something unexpected happens. Don’t immediately undo and try again. Check the Properties panel. Look at constraints. Switch views and see what changed. Revit is usually telling you what it’s doing. It just doesn’t explain it out loud.
Learning Revit’s logic takes longer upfront, but it pays off fast. Instead of memorizing steps, you start predicting outcomes. And that’s the moment Revit stops feeling chaotic and starts feeling structured.
Tip 4: Set Levels, Grids, and Units Before You Draw Anything
This tip sounds boring. It’s also one of the most expensive mistakes beginners make.
When you open a new Revit project, it’s tempting to start drawing immediately. Walls feel productive. Doors feel like progress. Floors make it look real. The problem is that without proper setup, all of that progress sits on shaky ground.
Levels define vertical logic. Grids define horizontal logic. Units define how the entire model interprets numbers. Skip any one of these, and you’re not just making things harder. You’re baking confusion into the file.
I’ve lost count of how many times I’ve seen a project where levels were adjusted halfway through because someone realized the floor heights were wrong. That single change can ripple through plans, sections, elevations, dimensions, and schedules. Suddenly nothing lines up. Things look “off” but no one can quite explain why.
Grids cause similar pain. Beginners often place them late or treat them as visual guides. In Revit, grids are reference systems. Structural elements want to align to them. Dimensions expect them. Ignoring grids early makes coordination harder than it needs to be, especially as the model grows.
Units are quieter, but just as dangerous. A project set up in the wrong unit system leads to walls that are technically correct but practically wrong. A door that’s 900 millimeters wide behaves very differently from one that’s accidentally interpreted in another unit. These mistakes don’t always scream at you. They wait.
In adsk revit, setup isn’t a formality. It’s the foundation. Spending fifteen minutes defining levels, grids, and units can save days of cleanup later. That tradeoff is always worth it.
If you’re not sure where to start, keep it simple. Define all levels you expect to need, even if you won’t use them immediately. Place grids logically and name them clearly. Confirm units once, then confirm them again. It’s slow. It’s unglamorous. And it’s one of the most professional habits you can build early in autodesk revit bim workflows.
Tip 5: Families Are Powerful, but They’re Not Step One
Families are where a lot of beginners get curious and then get stuck.
You place a door. It doesn’t look right. The handle feels wrong. The dimensions don’t match what you imagined. So you open the family editor, start clicking around, and suddenly you’re twenty parameters deep wondering how you got there. That experience is common.
Families are one of Revit’s biggest strengths, but they’re also one of its easiest traps. They control behavior, not just appearance. Change one parameter and you might affect every instance across the entire project. For someone new to adsk revit, that kind of power can do more harm than good early on.
I think beginners often assume that mastering families is the key to mastering Revit. In reality, families make much more sense once you understand views, types, and constraints. Without that context, family editing feels like guesswork. You’re changing values without fully understanding what they control.
There’s also a timing issue. Early in a project, flexibility matters more than precision. Default families are usually “good enough” for layout, coordination, and early documentation. Spending hours perfecting a custom family too soon often slows learning instead of accelerating it.
That doesn’t mean you should avoid families entirely. You should open them. Explore them. See how parameters relate to geometry. But treat that exploration as study, not production work. Make mistakes in a test file, not in your main model.
A good rule of thumb is this. If you don’t yet feel comfortable explaining the difference between a type change and an instance change, it’s too early to heavily customize families. Build that foundation first.
Once the basics click, families stop feeling mysterious. They start feeling logical. And that’s when they become genuinely useful in autodesk revit bim workflows.
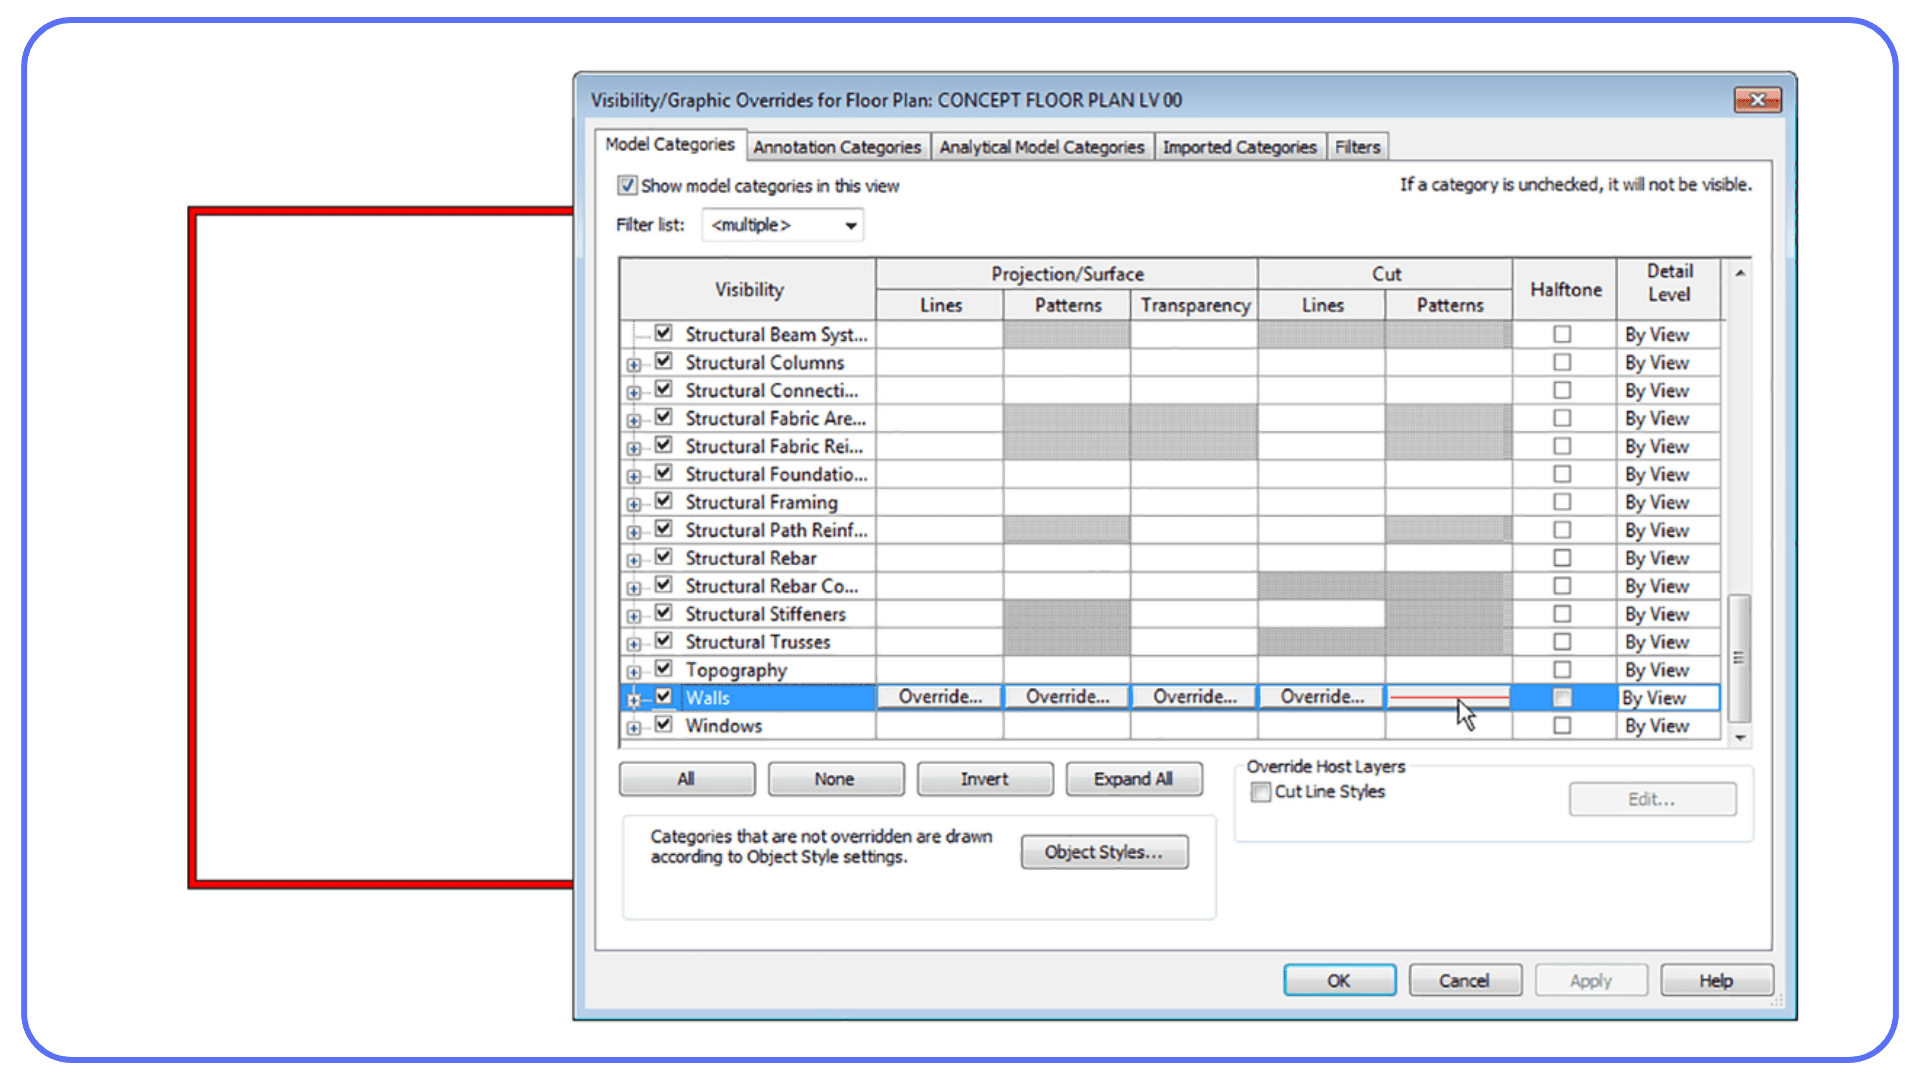
Tip 6: Views Are Not Just Camera Angles
This is one of the biggest mental traps for beginners. It’s easy to assume that views in Revit work like cameras. You look at the model from different angles, and that’s it. In reality, views are more like rule sets than viewpoints.
Every view decides what the model is allowed to show. Detail level. Visibility. Graphics. Scale. Discipline. Change the rules, and the same model suddenly behaves very differently. Beginners often miss this and try to “fix” geometry when the real issue lives entirely inside the view settings.
I’ve noticed that a lot of early frustration comes from editing in the wrong view. Someone adjusts a wall in a coarse plan view and wonders why nothing changes. Or they add detail in a fine view and accidentally overload the model. Revit isn’t being inconsistent here. It’s being precise. The view is doing exactly what it was told to do.
This is also why duplicating views without thinking can quietly wreck a project. Beginners duplicate a plan to make a small change, then duplicate another, and another. Before long, there are dozens of nearly identical views, all slightly different, and no one remembers which one is correct. That confusion spreads fast.
View templates exist to prevent this, but many beginners ignore them at first. That’s understandable. Templates feel abstract until you’ve experienced the chaos they’re meant to prevent. Once you start using them, though, they become one of the most calming parts of the workflow. Consistent graphics. Predictable behavior. Fewer surprises.
A simple habit helps a lot here. Before editing anything, check which view you’re in and what rules it’s applying. Ask yourself what this view is for. Documentation. Coordination. Design. Visualization. When each view has a clear role, the model stays cleaner and easier to manage.
Understanding views this way changes how Revit feels. Instead of fighting visual inconsistencies, you start controlling them. And that’s a big step forward in autodesk revit bim workflows.
Tip 7: Most Performance Problems Come From Modeling Habits
When Revit starts slowing down, beginners usually jump to one conclusion. My computer isn’t strong enough.
Sometimes that’s true. Often, it isn’t.
In my experience, early performance issues are usually self-inflicted. Too much detail too soon. Heavy views left open. Complex geometry modeled where simple placeholders would do the job just fine. Revit doesn’t complain when you do this. It just gets slower and slower until everything feels painful.
One common pattern is over-detailing during early design. People model every layer, every joint, every small element before the layout is even settled. That level of precision feels productive, but it creates unnecessary load. Revit has to process all of that information across every view, schedule, and section. The model grows heavy long before it needs to.
Views play a big role here too. Leaving multiple detailed views open at once quietly eats performance. Editing in a highly detailed 3D view when a simple plan would work is another classic mistake. Revit recalculates constantly, and detailed views demand more from the system every time something changes.
Linked files can cause trouble as well. Beginners often link everything without managing visibility or scope. Large site files, consultant models, or reference geometry stay active in views where they aren’t needed. The result is a model that feels sluggish even on decent hardware.
This is where it helps to separate habits from hardware. If a small project feels slow, the issue is probably workflow, not your machine. Cleaning up views, reducing early detail, and being intentional about what’s loaded and visible can dramatically improve performance.
That said, there is a point where habits aren’t the whole story anymore. As projects grow and coordination increases, even clean models demand more resources. We’ll get to that later. For now, focus on control. Keep things simple early. Let the model breathe.
Before blaming your hardware, it’s worth understanding how much performance you can reclaim just by changing modeling habits, especially if you’re working on low-end devices without a dedicated GPU.
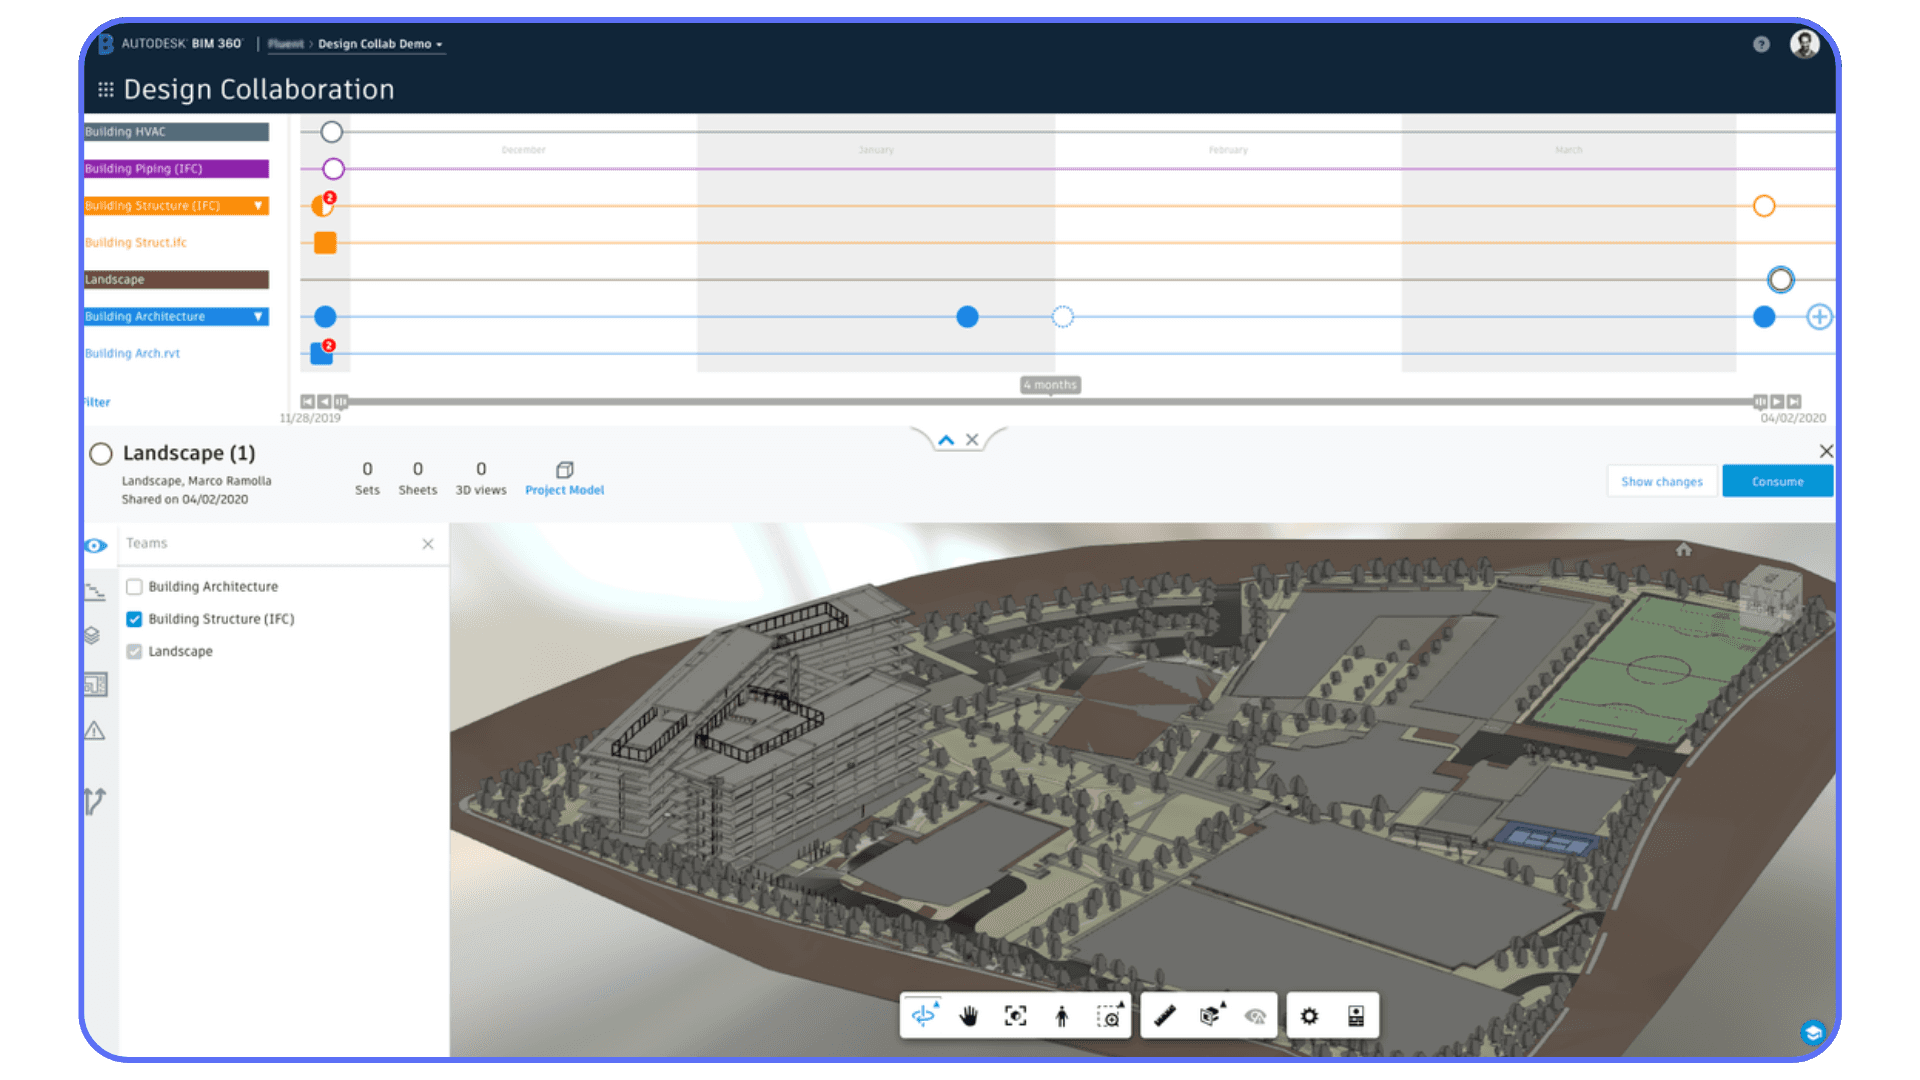
Tip 8: Collaboration Starts Earlier Than You Expect
A lot of beginners treat collaboration as an advanced topic. Something you’ll deal with later, once you’re “good enough.” I think that mindset causes more trouble than it avoids.
Revit is built for teamwork, even when you’re working alone. The moment a project grows beyond a simple exercise, collaboration concepts start creeping in. Central files. Local files. Ownership of elements. Synchronizing changes. You don’t need a big team to feel the effects of these systems. You just need a project that lasts longer than a week.
Beginners often work in single files without understanding what would happen if someone else needed access. That’s fine for learning, but problems appear when projects scale or deadlines tighten. Suddenly files get copied instead of shared. Versions multiply. No one knows which model is current. Small coordination issues turn into big headaches.
Understanding the basics early makes a huge difference. Knowing what a central file is and why local files exist helps you avoid destructive habits. It teaches you to think about ownership and responsibility inside the model. Even if you’re the only person touching the file, those ideas still apply.
This is also where cloud-based collaboration tools come into the picture. Platforms like autodesk bim360 are designed to keep teams aligned and files accessible without endless emailing and version chaos. You don’t need to master them on day one, but you should know why they exist and what problems they’re trying to solve.
I’ve noticed that beginners who learn collaboration early tend to model more carefully. They name things better. They avoid risky shortcuts. They think about how their work affects others, even future versions of themselves. That mindset carries over into every part of autodesk revit bim workflows.
You don’t need a team to start thinking like one. And Revit works best when you do.
Tip 9: The Real Cost of Revit Isn’t the Subscription Price
When people talk about Revit cost, the conversation usually stops at licensing. Monthly fees. Annual plans. Comparisons like autocad revit price versus standalone options. Those numbers matter, sure, especially when you’re just starting out or working independently.
But in practice, the subscription is rarely the most expensive part.
The real cost shows up in time. Time lost fixing avoidable mistakes. Time spent rebuilding views that broke because of early shortcuts. Time wasted waiting for files to open, sync, or recover after something goes wrong. Those hours add up fast, especially in revit architecture cost discussions where deadlines are tight and revisions are constant.
I’ve seen beginners obsess over license pricing while casually burning entire afternoons correcting things that should have taken minutes. That imbalance is common. The software fee is visible and predictable. The cost of inefficient habits is quiet and ongoing.
This is especially true in bim revit architecture workflows, where one decision echoes everywhere. A poorly set up model doesn’t just slow drafting. It affects schedules, quantities, coordination, and communication. Every downstream task becomes heavier than it needs to be.
There’s also a mental cost that’s easy to ignore. Frustration. Hesitation. That constant feeling of being behind. When using autodesk revit bim tools feels like a daily fight, learning slows down. Confidence drops. People start avoiding improvements because they’re afraid of breaking something.
Thinking about cost this way changes priorities. Instead of asking “What does Revit cost?” a better question becomes “What habits are making Revit expensive for me?” Fixing those habits often delivers a better return than any pricing optimization.
This frustration is even more common for Mac users, since Revit isn’t natively supported on macOS, which is why many people look for practical ways to run Revit on a Mac without constantly fighting performance issues.
This is also where comparisons with AutoCAD come up, since the hardware requirements are very different, something we’ve covered when looking at what actually makes a good PC for AutoCAD.
Tip 10: Hardware Eventually Becomes a Learning Bottleneck
There’s a point where good habits stop being enough.
At first, most Revit slowdowns really are caused by workflow issues. Heavy views. Too much detail. Messy files. Clean those up and things usually improve. But as projects get bigger and coordination increases, another limit starts to show up. Your hardware.
You’ll recognize the moment. Files take longer to open than they used to. Syncing feels risky instead of routine. Saving becomes something you brace for. The fans kick in during tasks that used to feel light. None of this means you’re doing something wrong. It usually means your projects have outgrown your machine.
This hits beginners in a frustrating way. You’re finally getting comfortable with adsk revit. You understand views, families, and setup better. You want to try larger models, linked files, or more detailed documentation. And suddenly the software feels slow again, even though your habits are better than ever.
That slowdown has real consequences. Learning stalls because experimenting feels expensive. You hesitate before trying new workflows. You avoid complex views because they take too long to load. Over time, performance issues quietly shape what you’re willing to learn.
I’ve noticed that many users blame themselves at this stage. They assume they’re missing some secret optimization trick. Sometimes there is one. Often, there isn’t. Revit is resource-hungry by design, especially in full autodesk revit bim workflows where multiple disciplines and datasets come together.
The important thing is recognizing this moment for what it is. Not a failure. Not a skill gap. Just a technical ceiling. And once you know that ceiling exists, you can make smarter decisions about how to work around it instead of fighting it every day.
Once projects grow, choosing the right hardware matters more than most beginners expect, especially when you start looking at what actually makes a good PC for Autodesk Revit beyond basic specs.
Tip 11: When It Makes Sense to Use Vagon Cloud Computer
At a certain point, the question stops being how you use Revit and starts being where you use it.
If you’re working with larger models, linked files, or more complex autodesk revit bim workflows, local hardware can quietly become the limiting factor. Not because it’s bad hardware, but because Revit simply demands more as projects grow. Upgrading your machine is one option. Committing to a new workstation just to get through a few heavy phases is another story.
This is where Vagon Cloud Computer fits in.
Instead of pushing your local setup past its limits, Vagon lets you run Revit on a powerful cloud machine when you actually need that extra performance. No permanent hardware upgrades. No moving files back and forth. You open your project, work in a stronger environment, and keep going.
For beginners especially, this can remove a lot of friction. You don’t have to hold back from trying larger models or collaborative workflows just because your laptop struggles. You can test heavier views, work with linked files, or explore more advanced documentation without waiting minutes for every action to respond.
What I like about this approach is that it doesn’t change how you use Revit. It just changes the ceiling. You keep the same habits, the same files, the same workflow. The difference is that performance stops shaping what you’re willing to learn.
Vagon Cloud Computer isn’t something you need on day one. But once your projects start growing and your curiosity outpaces your hardware, it becomes a practical way to keep moving forward without unnecessary compromises.
Some users even explore running Revit remotely on tablets, which opens up options like using Autodesk Revit on an iPad without being tied to a desk or a single machine.
Tip 12: What Actually Helps You Improve Faster in Revit
Most people look for shortcuts when learning Revit. Faster commands. Better tutorials. A secret setting that suddenly makes everything click. I don’t think that’s what actually moves the needle.
What helps most is consistency.
Opening Revit regularly, even for small tasks, builds familiarity faster than binge-watching tutorials. Short sessions where you actually model something, break it, fix it, and understand why it broke tend to stick. Revit rewards repetition more than intensity.
Another big accelerator is finishing projects. Not perfect projects. Finished ones. A small residential model taken all the way to sheets will teach you more than five half-done files full of nice-looking geometry. You start seeing how early decisions affect documentation, schedules, and coordination. That feedback loop is where real learning happens.
I’ve also noticed that people improve faster when they stop trying to use every feature. Revit is huge. You don’t need to touch everything. Focus on a core set of tools and workflows that match what you’re actually trying to build. Master those first. Expand later.
Mistakes matter too. Revit mistakes are uncomfortable because they can feel permanent, but they’re also instructive. A broken model teaches you more about structure than a smooth one ever will. The key is understanding what went wrong instead of just patching the symptom.
Finally, patience plays a bigger role than talent. Revit doesn’t reward rushing. It rewards clear thinking, clean setup, and respect for the system. Once you accept that, progress becomes steadier and far less stressful.
If you keep showing up, keep finishing what you start, and keep adjusting your habits as projects grow, Revit slowly stops feeling like an obstacle. It starts feeling like a tool you can trust.
Once you’re comfortable with the basics, selectively adding the right Revit plugins can speed up workflows significantly, as long as they support your habits instead of adding more complexity.
Final Thoughts
Revit has a reputation for being difficult, and I understand why. It doesn’t feel friendly at first. It doesn’t guide you gently. And it definitely doesn’t reward improvisation. But after spending enough time with it, one thing becomes clear. Revit isn’t trying to trip you up. It’s trying to keep things consistent.
Most frustration comes from treating Revit like a drawing tool instead of what it really is. A system. Once you accept that, the experience changes. You stop forcing things. You start planning a little more. You make fewer decisions in panic and more decisions with intent.
For beginners, that shift is everything.
You don’t need to know every feature. You don’t need to work fast. You don’t need a perfect setup on day one. What you do need is an understanding that early habits matter more than short-term results. In autodesk revit bim workflows, small choices echo forward. That can feel intimidating, but it’s also what makes the software powerful.
There will still be slow days. Files will still misbehave. You’ll still open old projects and wonder what you were thinking. That doesn’t mean you’re bad at Revit. It means you’re learning it the way most people do. By building, breaking, and gradually understanding how the system responds.
If you take anything away from this guide, let it be this. Revit rewards patience, structure, and consistency. Once you stop fighting those qualities and start working with them, the learning curve flattens out more than you’d expect. And the software that once felt overwhelming starts to feel reliable.
Not easy. But reliable.
Understanding how Revit actually uses your GPU can clear up a lot of performance confusion, especially when people assume a stronger graphics card alone will fix everything.
FAQs
1. Is Revit hard to learn for beginners?
Revit feels hard at the beginning, but not because it’s overly complex. It feels hard because it expects structure from the start. The revit programma assumes you understand how levels, views, and elements relate to each other. Once you grasp that logic, learning becomes much smoother.
2. How long does it take to become comfortable with Revit?
In my experience, most beginners start feeling comfortable after a few real projects, not after a certain number of tutorials. If you consistently use adsk revit for small but complete projects, you’ll usually feel more confident within a few months. Mastery takes longer, but basic control comes sooner than people expect.
3. Do I need to know AutoCAD before learning Revit?
No. AutoCAD can help with drafting concepts, but it can also slow you down mentally if you try to apply the same habits. Revit is built around BIM logic, not lines. Many people who start directly with autodesk revit bim workflows adapt just as well, sometimes faster.
4. Why does Revit slow down even on decent computers?
Revit performance depends heavily on modeling habits. Heavy views, too much detail early on, and unmanaged linked files can slow things down quickly. That said, as projects grow, hardware does become a real factor, especially in larger bim revit architecture models.
5. Is Revit only for architects?
No. While many people associate it with architecture, Revit is used across multiple disciplines. Structural engineers, MEP engineers, and construction teams all work inside the same ecosystem. That shared model is one of the biggest strengths of autodesk revit bim.
6. How does Revit pricing compare to AutoCAD?
Autocad revit price comparisons depend on how you work. AutoCAD is generally cheaper and lighter, but it doesn’t offer the same integrated BIM capabilities. Revit costs more upfront, but it replaces multiple disconnected workflows with a single model-based system.
7. Do beginners need cloud tools like Autodesk BIM 360?
You don’t need them immediately, but understanding why tools like autodesk bim360 exist is helpful. They’re designed for collaboration, version control, and shared access. Even solo users benefit from learning the concepts early, especially if they plan to work on team projects later.
8. When does using a cloud computer make sense for Revit?
A cloud computer starts to make sense when your learning or project complexity is limited by your hardware. If larger models, linked files, or complex views slow you down, running Revit on a more powerful environment like Vagon Cloud Computer can remove that bottleneck without forcing a permanent hardware upgrade.
9. What’s the best advice for someone just starting Revit?
Don’t rush. Focus on habits, not speed. Finish small projects. Pay attention to setup. And accept that confusion at the beginning is normal. Revit rewards patience far more than shortcuts.
Get Beyond Your Computer Performance
Run applications on your cloud computer with the latest generation hardware. No more crashes or lags.

Trial includes 1 hour usage + 7 days of storage.
Summarize with AI

Ready to focus on your creativity?
Vagon gives you the ability to create & render projects, collaborate, and stream applications with the power of the best hardware.

Vagon Blog


Run heavy applications on any device with
your personal computer on the cloud.
San Francisco, California
Solutions
Vagon Teams
Vagon Streams
Use Cases
Resources
Vagon Blog
How to Run Inkscape on a Cloud Ubuntu Desktop (2026 Guide)
How to Run Krita on a Cloud Ubuntu Desktop for Digital Painting (2026 Guide)
How to Run GIMP on a Cloud Ubuntu Desktop (2026 Guide)
How to Run Jupyter on a Cloud GPU Linux Desktop (2026 Guide)
Vagon vs GitHub Codespaces: Cloud Dev Environments Compared (2026)
Vagon vs RunPod: Which Cloud GPU Is Right for You? (2026 Comparison)
How to Watch Your AI Agent Work on a Cloud Ubuntu Desktop (2026 Guide)
How to Run a Local LLM on Ubuntu in the Cloud (2026 Guide)
How to Run Blender on a Cloud GPU (Ubuntu): The Complete 2026 Guide
Vagon Blog
Run heavy applications on any device with
your personal computer on the cloud.
San Francisco, California
Solutions
Vagon Teams
Vagon Streams
Use Cases
Resources
Vagon Blog