Instant Connection for Pixel Streaming
— New Feature Automated Setup
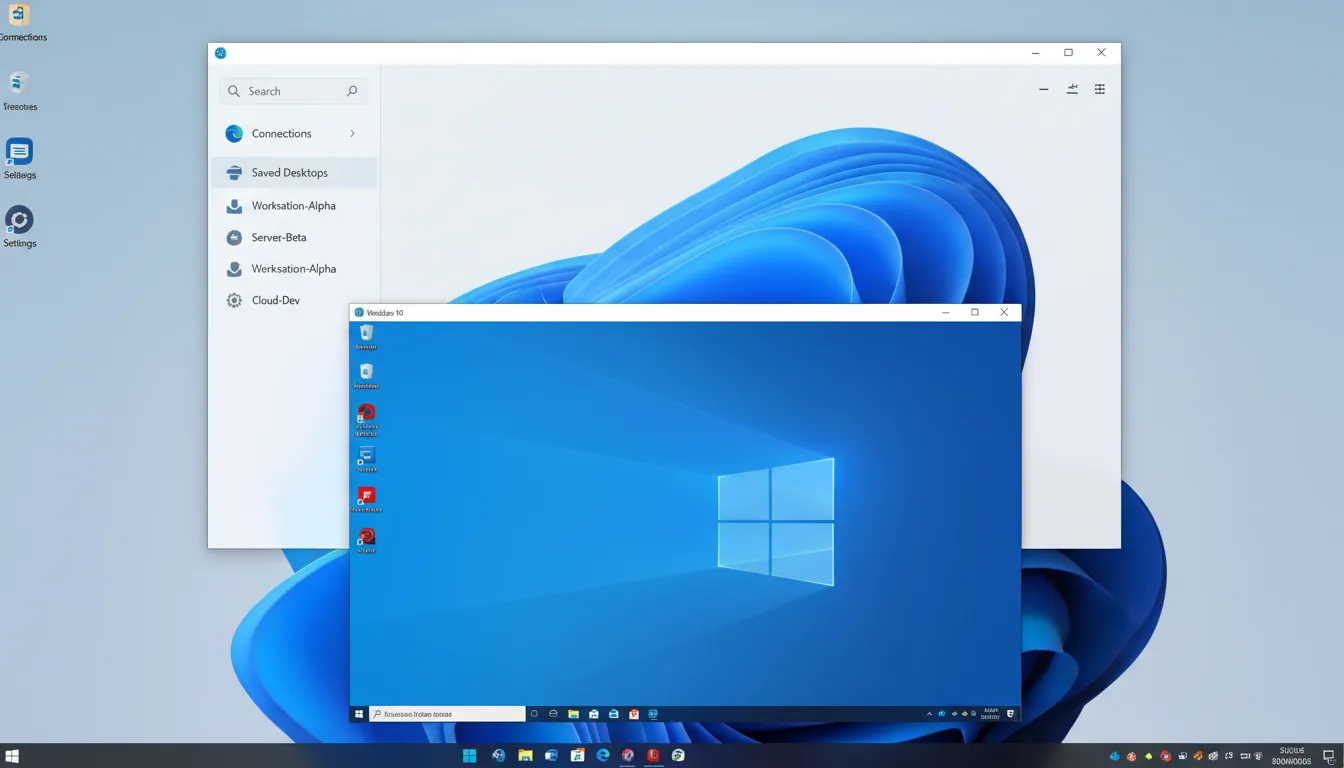
How to Change the RDP Port in Windows
How to Change the RDP Port in Windows
Teams & IT
How to Change the RDP Port in Windows
Table of Contents
By default, Windows’ Remote Desktop Protocol (RDP) listens on port 3389.
That’s like having your front door wide open and painted bright red, everyone knows where it is.
I still remember the first time I checked the logs of a newly set-up Windows Server. Within minutes, it was getting hammered by bots from random IPs across the globe, all trying to brute-force their way in through port 3389. And this was before I’d even finished setting up the rest of the system. That’s when it hit me, leaving RDP on its default port is practically an open invitation.
So I decided to change it. Simple, right? Not quite.
It’s one of those tweaks that sounds straightforward, edit a registry key, restart, done, but it can also lock you out completely if you miss a small step. And truthfully, changing the port doesn’t magically make you invisible. It just makes the noise go away a bit.
In this guide, I’ll show exactly how I changed the RDP port safely, why it matters, and when maybe you shouldn’t bother.
Because sometimes, the smarter move isn’t hiding your door, it’s reinforcing it.
Why You Might Want to Change the RDP Port
Let’s be honest, changing your RDP port isn’t some secret hacker-proof trick.
It’s more like changing the address number on your mailbox. You’re still in the same neighborhood, but now random strangers don’t immediately know where to knock.
That small change can make a surprisingly big difference in practice, though.

The reason is simple: RDP port 3389 is one of the most scanned ports on the internet.
Every single day, automated bots sweep millions of IP addresses, looking for open 3389 connections to attack. Once they find one, they start brute-forcing passwords, over and over, until they get lucky or the server locks them out.
I’ve seen servers log thousands of failed login attempts per hour, all because of that default port.
When you move to a non-standard port, say 49200 or 60111, those bots usually don’t notice you at all. The result? Fewer failed login attempts, cleaner logs, and less stress on your firewall.
But here’s where people get it wrong:
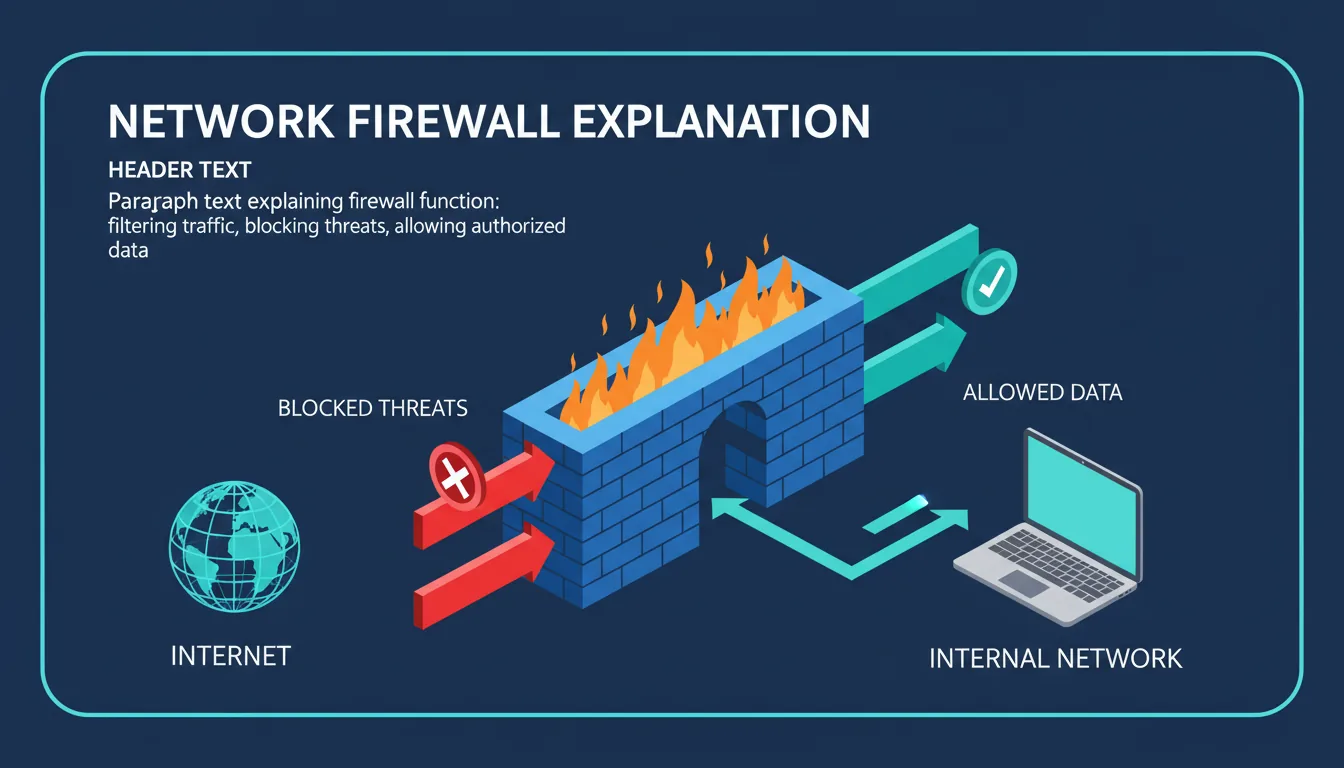
Changing the port does not make your server secure. It’s called security by obscurity, you’re hiding, not protecting. A determined attacker running a full port scan can still find your RDP service in minutes.
That’s why pros use port changes as one layer of a larger defense strategy. Combine it with:
Strong passwords (or better, key-based auth)
Network Level Authentication (NLA)
IP whitelisting or VPN access
Firewall rules that restrict who can connect
Changing your RDP port helps you reduce noise, not eliminate risk. Think of it as putting your nameplate behind a small gate: it won’t stop a burglar, but it’ll stop most of the curious passersby.
If you are experiencing slow or laggy performance on AWS Workspaces, there are some fixes available to optimize your setup.
Preliminary Considerations (and a Few Things You Can Break)
Before you touch anything, let’s slow down for a second.
Changing the RDP port isn’t complicated, but it’s one of those tweaks where one wrong move can lock you out of your own system. I’ve been there, staring at a dead RDP session from miles away, realizing I forgot to open the new port in the firewall. Not fun.
So here’s what you should double-check before making any changes:

#1. Back up your system — or at least the registry.
You’ll be editing the Windows Registry, and while it’s straightforward, it’s also easy to mistype a value or delete the wrong key. Create a restore point or export the registry branch you’ll be editing. Two minutes now can save you hours later.
#2. Make sure you have alternate access.
If this is a remote server and RDP is your only way in, that’s risky. Make sure you have a backup method: console access, a VPN with local login, or someone physically near the machine who can help if RDP stops responding.
#3. Verify your network and firewall setup.
If you’re behind a router or a company firewall, you’ll probably have port forwarding set up for 3389. Once you change the RDP port, you’ll need to update that forwarding rule too. Otherwise, your connection won’t even reach the server.
#4. Pick your new port carefully.
Avoid anything below 1024 (those are system-reserved) and steer clear of ports used by other services. Something between 49152 and 65535 is generally safe. But also, don’t go too high if you’re in a corporate environment where firewall policies block “uncommon” ports.
#5. Remember to include the port when connecting later.
After you change it, you’ll need to connect like this:
mstsc /v:YourServerIP:NewPort
Forgetting that “:NewPort” part is one of the most common mistakes.
It’s the kind of setup task where careful beats quick every time. Once you’ve checked these boxes, you’re ready for the actual change, and that’s where the fun (and registry editing) begins.
If you are working in a Citrix environment, you can follow steps to address performance issues.
Step-by-Step: Change the RDP Port via Registry Editor
Alright, gloves on. This is the part where you actually change the RDP port.
It only takes a few clicks, but precision matters. You’ll be diving into the Windows Registry, so read carefully and don’t rush.
Step 1: Open the Registry Editor
Press Win + R, type regedit, and hit Enter.
If Windows asks for admin permission, click Yes, you’ll need it.
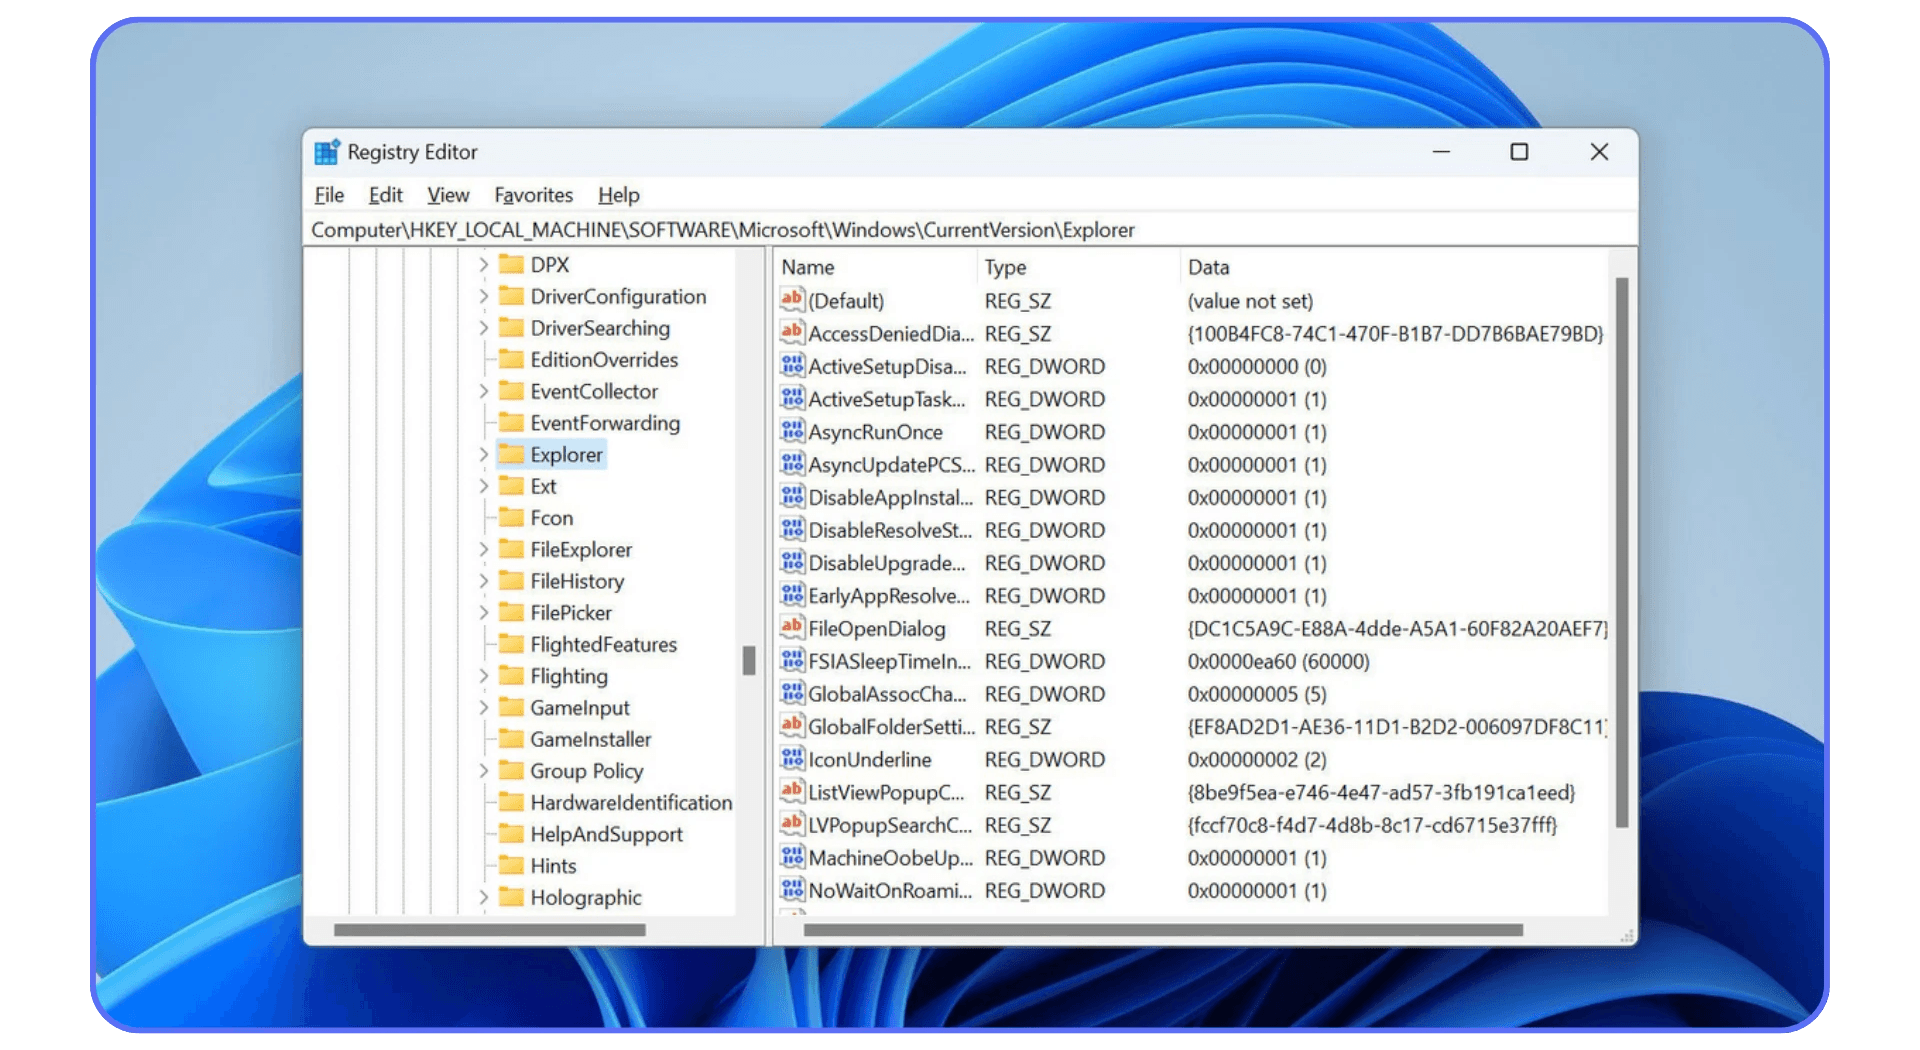
Step 2: Navigate to the RDP Configuration Key
In the left panel, follow this path:
HKEY_LOCAL_MACHINE\SYSTEM\CurrentControlSet\Control\Terminal Server\WinStations\RDP-Tcp
You can also copy and paste that path directly into the Registry Editor’s address bar for speed.
Step 3: Find the “PortNumber” Entry
In the right panel, look for a value called PortNumber.
Double-click it, and a small window will appear with the current value set to 3389 (that’s the default RDP port).
Step 4: Change the Value
In that same window:
Choose Decimal (not Hexadecimal).
Enter your new port number, something like 49200, 52001, or 60111.
Click OK to save.
That’s it. You’ve officially told Windows to use a new RDP port.
Step 5: Close the Registry and Restart the RDP Service
You can either restart the RDP service manually or just reboot the entire system.
Personally, I recommend a reboot, it ensures every dependency reloads cleanly.
If you prefer not to reboot, open Command Prompt as administrator and run:
net stop termservice
net start termservice
Your RDP service should now be listening on the new port.
Step 6: Update the Firewall (Critical)
Before you reconnect, make sure your firewall allows traffic on that new port.
Otherwise, you’ll be locked out the moment you close your session, and yes, that happens more often than you’d think.
We’ll handle this properly in the next section.
After completing these steps, don’t disconnect yet. Keep your current RDP window open until you’ve verified that the new port works. Because once you close it, there’s no going back unless your new rule is already active.
If you are dealing with slow or laggy performance in VMware, there are troubleshooting steps to improve your virtual desktop experience.
Alternative Method: Change the RDP Port Using PowerShell
If you’re more comfortable typing commands than clicking through the Registry Editor, or if you’re managing multiple servers, PowerShell is your friend. It’s faster, cleaner, and scriptable.
Here’s how you can change the RDP port entirely from PowerShell, without even opening the Registry manually.
Step 1: Run PowerShell as Administrator
Click Start, type PowerShell, right-click it, and select Run as administrator.
You’ll need elevated privileges to modify the registry and restart system services.
Step 2: Set the New RDP Port
Use this command (replace 49200 with your chosen port):
Set-ItemProperty -Path 'HKLM:\SYSTEM\CurrentControlSet\Control\Terminal Server\WinStations\RDP-Tcp' -Name 'PortNumber' -Value 49200
That line directly updates the same registry value we edited earlier.
If you want to double-check it worked:
Get-ItemProperty -Path 'HKLM:\SYSTEM\CurrentControlSet\Control\Terminal Server\WinStations\RDP-Tcp' -Name 'PortNumber'
You should see your new port number displayed in the output.
Step 3: Update the Windows Firewall Rule
PowerShell also lets you open the new port and close the old one, in seconds.
# Add a new inbound rule for the new port
New-NetFirewallRule -DisplayName "RDP Custom Port 49200" -Direction Inbound -Protocol TCP -LocalPort 49200 -Action Allow
# (Optional) Disable the default 3389 rule
Disable-NetFirewallRule -DisplayName "Remote Desktop - User Mode (TCP-In)"
That ensures Windows will actually accept connections on your new port and stop exposing the old one.
Step 4: Restart the RDP Service (or Reboot)
Finally, restart the RDP (TermService) service to apply the changes:
Restart-Service -Name TermService -Force
If you’d rather be extra safe, reboot the machine instead:
Restart-Computer
Why Use PowerShell for This?
In my experience, this method shines when you’re dealing with multiple remote servers, especially via automation tools like Ansible, SCCM, or custom scripts. You can push this configuration across several machines in one go, without manually opening regedit each time.
Just remember: always confirm that the firewall rule and NAT mapping (if any) are updated before you close your current RDP session. Otherwise, you’ll be locked out until someone local fixes it.
If you are looking to reduce latency in virtual desktops, there are solutions that can help with responsiveness.
Firewall & Network Rules: Don’t Forget This Step
Here’s the step most people skip, and the one that can instantly lock you out.
After changing the RDP port, Windows won’t automatically allow connections on that new port. You have to tell the firewall it’s okay.
Step 1: Add a New Inbound Rule
If you’re using the Windows Defender Firewall with Advanced Security (the default for most setups), do this:
Open the Start Menu, search for “Windows Defender Firewall with Advanced Security”, and open it.
In the left pane, click Inbound Rules.
On the right-hand side, choose New Rule…
Select Port, then Next.
Choose TCP, and under “Specific local ports,” type your new port (for example, 49200).
Click Next, choose Allow the connection, then Next again.
Check the boxes for Domain, Private, and Public (or select only the ones relevant to your environment).
Give it a name like “RDP Custom Port 49200” and hit Finish.
That’s it, your new port is open and ready to accept connections.
Step 2: Remove or Disable the Old RDP Rule (Optional but Smart)
The default firewall rule for RDP on port 3389 will still be active.
If you’re certain everything’s working, it’s a good idea to disable it:
Find the rule named “Remote Desktop – User Mode (TCP-In)”.
Right-click it → Disable Rule.
This step helps prevent accidental connections to the old port, or worse, attackers still knocking on the open 3389 door.
Step 3: Update Any External Firewall or Router
If your server sits behind a router, cloud firewall (like AWS Security Groups, Azure NSGs, or GCP VPC rules), or corporate edge firewall, you’ll need to forward or open the same new port there too.
Otherwise, traffic won’t even reach Windows, no matter what you do locally.
Step 4: Keep Your Current Session Open
This can’t be overstated. Do not close your RDP session until you’ve:
Added the new rule,
Tested it successfully, and
Confirmed you can reconnect via the new port.
If something fails, you’ll still have your current session to fix it, instead of making a panicked phone call to your data center.
Step 5: (Optional) Restrict Access for Extra Security
While you’re already in the firewall settings, consider tightening access a bit:
Allow RDP only from specific IP ranges or VPN subnets.
Deny all other inbound RDP attempts.
Or, use Network Level Authentication (NLA) to force credential checks before a session is established.
In my experience, this step alone stops 99% of brute-force attempts even if someone does find your port.
Once your firewall’s in sync, you’re safe to test, and that’s what we’ll do next.
If you are struggling with Azure Virtual Desktops, tips are available to enhance their performance.
Testing & Verification: Make Sure It Actually Works
This is the moment of truth, the step where you find out if everything you just did actually worked, or if you accidentally locked yourself out.
The key here is to test before closing your current RDP session. Always.
Step 1: Check If the Port Is Listening
First, verify that Windows is now listening on your new port.
Open Command Prompt (as Administrator) and run:
netstat -an | find "49200"
If you see something like this:
TCP 0.0.0.0:49200 0.0.0.0:0 LISTENING
— congratulations, the system is now accepting connections on your new port.
If not, double-check that you restarted the RDP service or rebooted your machine after changing the registry.
Step 2: Test from Another Device
Now, on another computer in the same network, open the Remote Desktop Connection tool (mstsc).
In the Computer field, type your IP or hostname followed by the port, like this:
192.168.1.50:49200
or
yourserver.example.com:49200
Click Connect, and if everything’s configured correctly, the login window should appear almost instantly.
If it doesn’t, don’t panic. Here’s what to check:
Firewall rule for the new port (enabled and set to allow inbound TCP).
NAT or port-forwarding rules on your router/firewall.
Typo in the port number (both in registry and connection attempt).
RDP service running (services.msc → Remote Desktop Services).
Any antivirus or endpoint protection tools that might be blocking the new port.
Step 3: Test Remote Access (Optional)
If your server is hosted on a cloud platform or accessible from the internet, test external connectivity as well:
Use PowerShell or Command Prompt on a local machine:
Test-NetConnection your.ip.address -Port 49200
You should see a TcpTestSucceeded: True response.
If it says False, your issue is likely with the network firewall or port forwarding, not Windows itself.
Step 4: Watch the Event Logs
Once you’re connected successfully, keep an eye on Event Viewer → Windows Logs → Security or use Get-EventLog in PowerShell.
If your port change worked, you should notice a dramatic drop in failed RDP login attempts compared to the old 3389 port, sometimes from thousands per day to almost zero.
Step 5: Document Everything
This one’s often forgotten.
Write down your new port, firewall rule name, and any NAT settings in your server documentation or internal notes. Because three months from now, when someone else (or future you) tries to connect and can’t figure out why 3389 isn’t working, you’ll thank yourself.
If your connection is stable and your logs look clean, congrats, you’ve just successfully changed your RDP port without breaking anything.
Next, let’s talk about what happens after the change, and a few best practices to keep your setup secure and maintainable.
After the Change: Maintenance & Best Practices
So, your new RDP port is live, the connection works, and your firewall’s happy.
Nice. That’s the technical part done, but keeping it that way takes a bit of ongoing care.
Here’s how to make sure your new setup stays secure and reliable.
#1. Monitor Your Logs Regularly
Changing the port will drastically reduce the number of failed RDP attempts, but it won’t stop all of them.
Every few weeks, check your Windows Event Viewer under Security or use PowerShell to filter failed logins:
Get-EventLog Security | Where-Object {$_.EventID -eq 4625}
If you still see random IPs trying to connect, consider adding IP restrictions or shifting RDP access behind a VPN.
#2. Keep Network Level Authentication (NLA) Enabled
NLA forces users to authenticate before establishing a session, which means attackers can’t even reach the Windows login screen without valid credentials.
It’s easy to miss, but enabling it makes brute-force attacks almost useless.
To check:
Go to System Properties → Remote
Under “Remote Desktop,” make sure “Allow connections only from computers running Remote Desktop with Network Level Authentication” is selected.
#3. Limit Who Can Connect
Under System Properties → Remote Settings → Select Users, remove unnecessary accounts and keep it as tight as possible.
Only admins or specific users who really need access should stay.
You can also set IP restrictions in the Windows Firewall rule you created earlier, allowing connections only from trusted addresses or VPN subnets.
#4. Automate or Script Checks (If You’re Managing Multiple Machines)
If you’re responsible for several servers, write a small PowerShell script to periodically verify RDP port status, firewall rules, and failed login counts.
It can be as simple as running a scheduled task that emails you a summary every week.
#5. Be Careful with Windows Updates
Most updates won’t affect your custom RDP configuration, but major system upgrades (like version migrations or reinstalls) can sometimes reset registry keys or firewall rules.
After every big update, quickly test RDP connectivity and verify your custom port is still in use.
#6. Keep Documentation and Backups
It sounds boring, but it’s vital.
A single text file or internal wiki entry with your RDP settings, port numbers, and access instructions can prevent future downtime.
If another admin takes over the system, they shouldn’t have to reverse-engineer what you did.
#7. Layer, Don’t Rely
Changing the port is one small piece of a broader strategy.
Combine it with:
Strong password policies or MFA (multi-factor authentication).
VPN-only access for remote sessions.
Regular system updates and endpoint protection.
In my experience, this layered approach is what actually keeps systems safe, not just tweaking ports and hoping for the best.
If you’re at this point, you’ve done everything right.
Your RDP service is cleaner, quieter, and a little less visible to the internet’s background noise.
Next, let’s look at when changing the port might not even be necessary, and what alternatives exist if you want an easier way to manage remote access at scale.
When You Might Want a Simpler Alternative
At some point, you realize: all this setup, registry edits, firewall rules, testing, documentation, it’s a lot for what’s basically a single remote desktop connection.
If you’re managing one personal machine, it’s fine. But if you’re dealing with multiple users, projects, or client workstations, constantly juggling ports and firewall exceptions starts to feel like a part-time job.
#1. When Managing Multiple Machines Gets Messy
Imagine five Windows systems, each on a different RDP port, 49200, 49210, 49220, and so on.
Now try explaining that to your teammates or clients.
“Hey, remember to connect to 49210, not 49200, or you’ll log into the wrong environment.”
Yeah, it gets confusing fast.
At that point, changing the RDP port stops being security optimization and starts being administrative overhead.
You’re not really improving safety, you’re just managing more configuration points.
#2. When You’re Sharing Access Across Teams
If your workflow involves designers, developers, or remote editors who need temporary desktop access, juggling local firewall rules and NAT mappings isn’t ideal.
You want something easier, a secure, managed environment where users can log in without you having to expose your RDP port to the public internet at all.
That’s where Vagon Teams fits naturally.
Instead of manually setting up RDP on every workstation, Vagon lets teams spin up powerful cloud computers instantly, share them securely, and collaborate without worrying about ports, IP restrictions, or firewall misconfigurations.
It’s basically RDP without the stress of maintaining it yourself.
You just create a workspace, invite collaborators, and everyone gets access through their browsers with isolated performance environments.
#3. When Simplicity Beats Micromanagement
Changing your RDP port is a great security hygiene move.
But sometimes, the smartest option isn’t “more control”, it’s less friction.
If your end goal is to give people access to high-performance workstations (for design, engineering, or creative tools), platforms like Vagon Teams take care of the boring stuff: encryption, authentication, and resource allocation, so you can focus on actually working, not configuring.
And you can still apply everything you’ve learned here: the mindset of minimizing exposure, maintaining control, and building smarter systems, just with the help of better tools.
Final Thoughts
When you change your RDP port, it feels like nothing happened, the screen looks the same, the system behaves the same. But quietly, things get cleaner. The noise from random scans fades. You didn’t make it bulletproof, you made it intentional.
That’s the real benefit: awareness. You start thinking about visibility, access, and control, moving from “just using Windows” to truly managing it. Small steps like this build habits that scale: backing up before edits, testing after changes, documenting everything. Those habits matter far more than the port number you choose.
So yes, changing the RDP port is worth it. Not because it’s magic, but because it makes you deliberate about security. And if one day managing ports and firewall rules starts slowing you down, that’s when platforms like Vagon Teams step in, giving you secure, high-performance remote access without the maintenance burden.
Because good security isn’t about hiding your doors. It’s about knowing exactly where they are, and who’s allowed to walk through them.
FAQs
1. Is changing the RDP port actually necessary for security?
Not strictly, but it helps. Changing the default port from 3389 doesn’t stop targeted attacks, but it does reduce noise from random bots scanning the internet. Think of it as turning off a bright “I’m open” sign rather than locking the door.
2. What’s the safest range for custom RDP ports?
Pick something between 49152 and 65535. These are dynamic/private ports less likely to conflict with system services. Avoid ports under 1024, those are usually reserved for core functions like HTTP (80) or HTTPS (443).
3. Do I need to restart my PC after changing the port?
You don’t have to, but you should. Restarting ensures that the RDP service and firewall recognize the new configuration cleanly. If you skip it, the change might not apply until the next reboot.
4. Can I use the same method on Windows 10, 11, or Server editions?
Yes, the process is nearly identical across all recent Windows versions. The only difference might be where the Remote Desktop settings are located in the UI, but the registry path and firewall steps are the same.
5. Does changing the port affect Remote Desktop Gateway or NLA?
No. RD Gateway runs on separate configuration layers (usually HTTPS/443), and Network Level Authentication works regardless of the port you use. Just make sure both are properly enabled for extra security.
6. How do I connect to a non-default RDP port from my client?
Use this format:
mstsc /v:yourserverip:portnumber
Example:
mstsc /v:203.0.113.5:49200
Or just type the same in the “Computer” field inside the RDP client window.
7. What if I’m managing multiple users or workstations, is there an easier way?
If you’re managing a team or creative setup where multiple users need desktop access, manually managing RDP ports becomes tedious. That’s where Vagon Teams can simplify your workflow, you get secure browser-based access to cloud computers without configuring ports or firewalls manually.
By default, Windows’ Remote Desktop Protocol (RDP) listens on port 3389.
That’s like having your front door wide open and painted bright red, everyone knows where it is.
I still remember the first time I checked the logs of a newly set-up Windows Server. Within minutes, it was getting hammered by bots from random IPs across the globe, all trying to brute-force their way in through port 3389. And this was before I’d even finished setting up the rest of the system. That’s when it hit me, leaving RDP on its default port is practically an open invitation.
So I decided to change it. Simple, right? Not quite.
It’s one of those tweaks that sounds straightforward, edit a registry key, restart, done, but it can also lock you out completely if you miss a small step. And truthfully, changing the port doesn’t magically make you invisible. It just makes the noise go away a bit.
In this guide, I’ll show exactly how I changed the RDP port safely, why it matters, and when maybe you shouldn’t bother.
Because sometimes, the smarter move isn’t hiding your door, it’s reinforcing it.
Why You Might Want to Change the RDP Port
Let’s be honest, changing your RDP port isn’t some secret hacker-proof trick.
It’s more like changing the address number on your mailbox. You’re still in the same neighborhood, but now random strangers don’t immediately know where to knock.
That small change can make a surprisingly big difference in practice, though.
The reason is simple: RDP port 3389 is one of the most scanned ports on the internet.
Every single day, automated bots sweep millions of IP addresses, looking for open 3389 connections to attack. Once they find one, they start brute-forcing passwords, over and over, until they get lucky or the server locks them out.
I’ve seen servers log thousands of failed login attempts per hour, all because of that default port.
When you move to a non-standard port, say 49200 or 60111, those bots usually don’t notice you at all. The result? Fewer failed login attempts, cleaner logs, and less stress on your firewall.
But here’s where people get it wrong:
Changing the port does not make your server secure. It’s called security by obscurity, you’re hiding, not protecting. A determined attacker running a full port scan can still find your RDP service in minutes.
That’s why pros use port changes as one layer of a larger defense strategy. Combine it with:
Strong passwords (or better, key-based auth)
Network Level Authentication (NLA)
IP whitelisting or VPN access
Firewall rules that restrict who can connect
Changing your RDP port helps you reduce noise, not eliminate risk. Think of it as putting your nameplate behind a small gate: it won’t stop a burglar, but it’ll stop most of the curious passersby.
If you are experiencing slow or laggy performance on AWS Workspaces, there are some fixes available to optimize your setup.
Preliminary Considerations (and a Few Things You Can Break)
Before you touch anything, let’s slow down for a second.
Changing the RDP port isn’t complicated, but it’s one of those tweaks where one wrong move can lock you out of your own system. I’ve been there, staring at a dead RDP session from miles away, realizing I forgot to open the new port in the firewall. Not fun.
So here’s what you should double-check before making any changes:
#1. Back up your system — or at least the registry.
You’ll be editing the Windows Registry, and while it’s straightforward, it’s also easy to mistype a value or delete the wrong key. Create a restore point or export the registry branch you’ll be editing. Two minutes now can save you hours later.
#2. Make sure you have alternate access.
If this is a remote server and RDP is your only way in, that’s risky. Make sure you have a backup method: console access, a VPN with local login, or someone physically near the machine who can help if RDP stops responding.
#3. Verify your network and firewall setup.
If you’re behind a router or a company firewall, you’ll probably have port forwarding set up for 3389. Once you change the RDP port, you’ll need to update that forwarding rule too. Otherwise, your connection won’t even reach the server.
#4. Pick your new port carefully.
Avoid anything below 1024 (those are system-reserved) and steer clear of ports used by other services. Something between 49152 and 65535 is generally safe. But also, don’t go too high if you’re in a corporate environment where firewall policies block “uncommon” ports.
#5. Remember to include the port when connecting later.
After you change it, you’ll need to connect like this:
mstsc /v:YourServerIP:NewPort
Forgetting that “:NewPort” part is one of the most common mistakes.
It’s the kind of setup task where careful beats quick every time. Once you’ve checked these boxes, you’re ready for the actual change, and that’s where the fun (and registry editing) begins.
If you are working in a Citrix environment, you can follow steps to address performance issues.
Step-by-Step: Change the RDP Port via Registry Editor
Alright, gloves on. This is the part where you actually change the RDP port.
It only takes a few clicks, but precision matters. You’ll be diving into the Windows Registry, so read carefully and don’t rush.
Step 1: Open the Registry Editor
Press Win + R, type regedit, and hit Enter.
If Windows asks for admin permission, click Yes, you’ll need it.
Step 2: Navigate to the RDP Configuration Key
In the left panel, follow this path:
HKEY_LOCAL_MACHINE\SYSTEM\CurrentControlSet\Control\Terminal Server\WinStations\RDP-Tcp
You can also copy and paste that path directly into the Registry Editor’s address bar for speed.
Step 3: Find the “PortNumber” Entry
In the right panel, look for a value called PortNumber.
Double-click it, and a small window will appear with the current value set to 3389 (that’s the default RDP port).
Step 4: Change the Value
In that same window:
Choose Decimal (not Hexadecimal).
Enter your new port number, something like 49200, 52001, or 60111.
Click OK to save.
That’s it. You’ve officially told Windows to use a new RDP port.
Step 5: Close the Registry and Restart the RDP Service
You can either restart the RDP service manually or just reboot the entire system.
Personally, I recommend a reboot, it ensures every dependency reloads cleanly.
If you prefer not to reboot, open Command Prompt as administrator and run:
net stop termservice
net start termservice
Your RDP service should now be listening on the new port.
Step 6: Update the Firewall (Critical)
Before you reconnect, make sure your firewall allows traffic on that new port.
Otherwise, you’ll be locked out the moment you close your session, and yes, that happens more often than you’d think.
We’ll handle this properly in the next section.
After completing these steps, don’t disconnect yet. Keep your current RDP window open until you’ve verified that the new port works. Because once you close it, there’s no going back unless your new rule is already active.
If you are dealing with slow or laggy performance in VMware, there are troubleshooting steps to improve your virtual desktop experience.
Alternative Method: Change the RDP Port Using PowerShell
If you’re more comfortable typing commands than clicking through the Registry Editor, or if you’re managing multiple servers, PowerShell is your friend. It’s faster, cleaner, and scriptable.
Here’s how you can change the RDP port entirely from PowerShell, without even opening the Registry manually.
Step 1: Run PowerShell as Administrator
Click Start, type PowerShell, right-click it, and select Run as administrator.
You’ll need elevated privileges to modify the registry and restart system services.
Step 2: Set the New RDP Port
Use this command (replace 49200 with your chosen port):
Set-ItemProperty -Path 'HKLM:\SYSTEM\CurrentControlSet\Control\Terminal Server\WinStations\RDP-Tcp' -Name 'PortNumber' -Value 49200
That line directly updates the same registry value we edited earlier.
If you want to double-check it worked:
Get-ItemProperty -Path 'HKLM:\SYSTEM\CurrentControlSet\Control\Terminal Server\WinStations\RDP-Tcp' -Name 'PortNumber'
You should see your new port number displayed in the output.
Step 3: Update the Windows Firewall Rule
PowerShell also lets you open the new port and close the old one, in seconds.
# Add a new inbound rule for the new port
New-NetFirewallRule -DisplayName "RDP Custom Port 49200" -Direction Inbound -Protocol TCP -LocalPort 49200 -Action Allow
# (Optional) Disable the default 3389 rule
Disable-NetFirewallRule -DisplayName "Remote Desktop - User Mode (TCP-In)"
That ensures Windows will actually accept connections on your new port and stop exposing the old one.
Step 4: Restart the RDP Service (or Reboot)
Finally, restart the RDP (TermService) service to apply the changes:
Restart-Service -Name TermService -Force
If you’d rather be extra safe, reboot the machine instead:
Restart-Computer
Why Use PowerShell for This?
In my experience, this method shines when you’re dealing with multiple remote servers, especially via automation tools like Ansible, SCCM, or custom scripts. You can push this configuration across several machines in one go, without manually opening regedit each time.
Just remember: always confirm that the firewall rule and NAT mapping (if any) are updated before you close your current RDP session. Otherwise, you’ll be locked out until someone local fixes it.
If you are looking to reduce latency in virtual desktops, there are solutions that can help with responsiveness.
Firewall & Network Rules: Don’t Forget This Step
Here’s the step most people skip, and the one that can instantly lock you out.
After changing the RDP port, Windows won’t automatically allow connections on that new port. You have to tell the firewall it’s okay.
Step 1: Add a New Inbound Rule
If you’re using the Windows Defender Firewall with Advanced Security (the default for most setups), do this:
Open the Start Menu, search for “Windows Defender Firewall with Advanced Security”, and open it.
In the left pane, click Inbound Rules.
On the right-hand side, choose New Rule…
Select Port, then Next.
Choose TCP, and under “Specific local ports,” type your new port (for example, 49200).
Click Next, choose Allow the connection, then Next again.
Check the boxes for Domain, Private, and Public (or select only the ones relevant to your environment).
Give it a name like “RDP Custom Port 49200” and hit Finish.
That’s it, your new port is open and ready to accept connections.
Step 2: Remove or Disable the Old RDP Rule (Optional but Smart)
The default firewall rule for RDP on port 3389 will still be active.
If you’re certain everything’s working, it’s a good idea to disable it:
Find the rule named “Remote Desktop – User Mode (TCP-In)”.
Right-click it → Disable Rule.
This step helps prevent accidental connections to the old port, or worse, attackers still knocking on the open 3389 door.
Step 3: Update Any External Firewall or Router
If your server sits behind a router, cloud firewall (like AWS Security Groups, Azure NSGs, or GCP VPC rules), or corporate edge firewall, you’ll need to forward or open the same new port there too.
Otherwise, traffic won’t even reach Windows, no matter what you do locally.
Step 4: Keep Your Current Session Open
This can’t be overstated. Do not close your RDP session until you’ve:
Added the new rule,
Tested it successfully, and
Confirmed you can reconnect via the new port.
If something fails, you’ll still have your current session to fix it, instead of making a panicked phone call to your data center.
Step 5: (Optional) Restrict Access for Extra Security
While you’re already in the firewall settings, consider tightening access a bit:
Allow RDP only from specific IP ranges or VPN subnets.
Deny all other inbound RDP attempts.
Or, use Network Level Authentication (NLA) to force credential checks before a session is established.
In my experience, this step alone stops 99% of brute-force attempts even if someone does find your port.
Once your firewall’s in sync, you’re safe to test, and that’s what we’ll do next.
If you are struggling with Azure Virtual Desktops, tips are available to enhance their performance.
Testing & Verification: Make Sure It Actually Works
This is the moment of truth, the step where you find out if everything you just did actually worked, or if you accidentally locked yourself out.
The key here is to test before closing your current RDP session. Always.
Step 1: Check If the Port Is Listening
First, verify that Windows is now listening on your new port.
Open Command Prompt (as Administrator) and run:
netstat -an | find "49200"
If you see something like this:
TCP 0.0.0.0:49200 0.0.0.0:0 LISTENING
— congratulations, the system is now accepting connections on your new port.
If not, double-check that you restarted the RDP service or rebooted your machine after changing the registry.
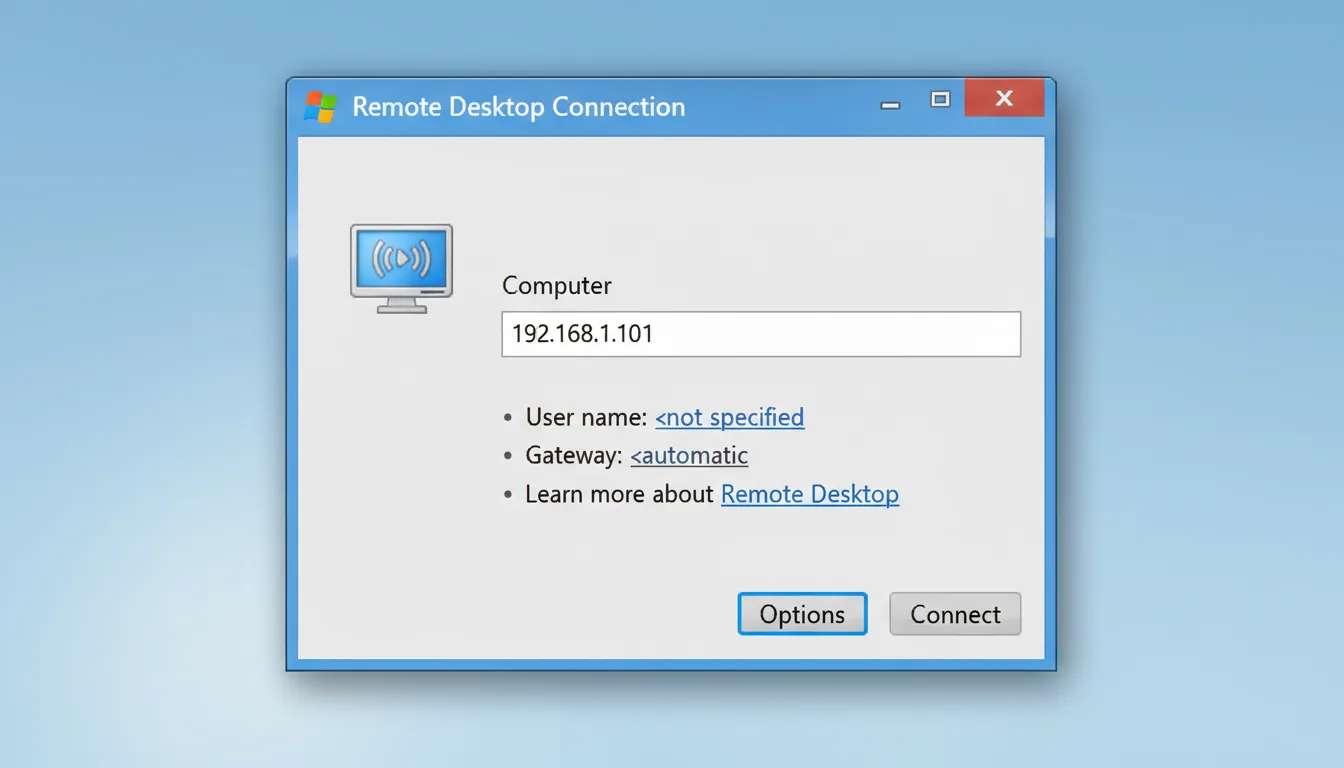
Step 2: Test from Another Device
Now, on another computer in the same network, open the Remote Desktop Connection tool (mstsc).
In the Computer field, type your IP or hostname followed by the port, like this:
192.168.1.50:49200
or
yourserver.example.com:49200
Click Connect, and if everything’s configured correctly, the login window should appear almost instantly.
If it doesn’t, don’t panic. Here’s what to check:
Firewall rule for the new port (enabled and set to allow inbound TCP).
NAT or port-forwarding rules on your router/firewall.
Typo in the port number (both in registry and connection attempt).
RDP service running (services.msc → Remote Desktop Services).
Any antivirus or endpoint protection tools that might be blocking the new port.
Step 3: Test Remote Access (Optional)
If your server is hosted on a cloud platform or accessible from the internet, test external connectivity as well:
Use PowerShell or Command Prompt on a local machine:
Test-NetConnection your.ip.address -Port 49200
You should see a TcpTestSucceeded: True response.
If it says False, your issue is likely with the network firewall or port forwarding, not Windows itself.
Step 4: Watch the Event Logs
Once you’re connected successfully, keep an eye on Event Viewer → Windows Logs → Security or use Get-EventLog in PowerShell.
If your port change worked, you should notice a dramatic drop in failed RDP login attempts compared to the old 3389 port, sometimes from thousands per day to almost zero.
Step 5: Document Everything
This one’s often forgotten.
Write down your new port, firewall rule name, and any NAT settings in your server documentation or internal notes. Because three months from now, when someone else (or future you) tries to connect and can’t figure out why 3389 isn’t working, you’ll thank yourself.
If your connection is stable and your logs look clean, congrats, you’ve just successfully changed your RDP port without breaking anything.
Next, let’s talk about what happens after the change, and a few best practices to keep your setup secure and maintainable.
After the Change: Maintenance & Best Practices
So, your new RDP port is live, the connection works, and your firewall’s happy.
Nice. That’s the technical part done, but keeping it that way takes a bit of ongoing care.
Here’s how to make sure your new setup stays secure and reliable.
#1. Monitor Your Logs Regularly
Changing the port will drastically reduce the number of failed RDP attempts, but it won’t stop all of them.
Every few weeks, check your Windows Event Viewer under Security or use PowerShell to filter failed logins:
Get-EventLog Security | Where-Object {$_.EventID -eq 4625}
If you still see random IPs trying to connect, consider adding IP restrictions or shifting RDP access behind a VPN.
#2. Keep Network Level Authentication (NLA) Enabled
NLA forces users to authenticate before establishing a session, which means attackers can’t even reach the Windows login screen without valid credentials.
It’s easy to miss, but enabling it makes brute-force attacks almost useless.
To check:
Go to System Properties → Remote
Under “Remote Desktop,” make sure “Allow connections only from computers running Remote Desktop with Network Level Authentication” is selected.
#3. Limit Who Can Connect
Under System Properties → Remote Settings → Select Users, remove unnecessary accounts and keep it as tight as possible.
Only admins or specific users who really need access should stay.
You can also set IP restrictions in the Windows Firewall rule you created earlier, allowing connections only from trusted addresses or VPN subnets.
#4. Automate or Script Checks (If You’re Managing Multiple Machines)
If you’re responsible for several servers, write a small PowerShell script to periodically verify RDP port status, firewall rules, and failed login counts.
It can be as simple as running a scheduled task that emails you a summary every week.
#5. Be Careful with Windows Updates
Most updates won’t affect your custom RDP configuration, but major system upgrades (like version migrations or reinstalls) can sometimes reset registry keys or firewall rules.
After every big update, quickly test RDP connectivity and verify your custom port is still in use.
#6. Keep Documentation and Backups
It sounds boring, but it’s vital.
A single text file or internal wiki entry with your RDP settings, port numbers, and access instructions can prevent future downtime.
If another admin takes over the system, they shouldn’t have to reverse-engineer what you did.
#7. Layer, Don’t Rely
Changing the port is one small piece of a broader strategy.
Combine it with:
Strong password policies or MFA (multi-factor authentication).
VPN-only access for remote sessions.
Regular system updates and endpoint protection.
In my experience, this layered approach is what actually keeps systems safe, not just tweaking ports and hoping for the best.
If you’re at this point, you’ve done everything right.
Your RDP service is cleaner, quieter, and a little less visible to the internet’s background noise.
Next, let’s look at when changing the port might not even be necessary, and what alternatives exist if you want an easier way to manage remote access at scale.
When You Might Want a Simpler Alternative
At some point, you realize: all this setup, registry edits, firewall rules, testing, documentation, it’s a lot for what’s basically a single remote desktop connection.
If you’re managing one personal machine, it’s fine. But if you’re dealing with multiple users, projects, or client workstations, constantly juggling ports and firewall exceptions starts to feel like a part-time job.
#1. When Managing Multiple Machines Gets Messy
Imagine five Windows systems, each on a different RDP port, 49200, 49210, 49220, and so on.
Now try explaining that to your teammates or clients.
“Hey, remember to connect to 49210, not 49200, or you’ll log into the wrong environment.”
Yeah, it gets confusing fast.
At that point, changing the RDP port stops being security optimization and starts being administrative overhead.
You’re not really improving safety, you’re just managing more configuration points.
#2. When You’re Sharing Access Across Teams
If your workflow involves designers, developers, or remote editors who need temporary desktop access, juggling local firewall rules and NAT mappings isn’t ideal.
You want something easier, a secure, managed environment where users can log in without you having to expose your RDP port to the public internet at all.
That’s where Vagon Teams fits naturally.
Instead of manually setting up RDP on every workstation, Vagon lets teams spin up powerful cloud computers instantly, share them securely, and collaborate without worrying about ports, IP restrictions, or firewall misconfigurations.
It’s basically RDP without the stress of maintaining it yourself.
You just create a workspace, invite collaborators, and everyone gets access through their browsers with isolated performance environments.
#3. When Simplicity Beats Micromanagement
Changing your RDP port is a great security hygiene move.
But sometimes, the smartest option isn’t “more control”, it’s less friction.
If your end goal is to give people access to high-performance workstations (for design, engineering, or creative tools), platforms like Vagon Teams take care of the boring stuff: encryption, authentication, and resource allocation, so you can focus on actually working, not configuring.
And you can still apply everything you’ve learned here: the mindset of minimizing exposure, maintaining control, and building smarter systems, just with the help of better tools.
Final Thoughts
When you change your RDP port, it feels like nothing happened, the screen looks the same, the system behaves the same. But quietly, things get cleaner. The noise from random scans fades. You didn’t make it bulletproof, you made it intentional.
That’s the real benefit: awareness. You start thinking about visibility, access, and control, moving from “just using Windows” to truly managing it. Small steps like this build habits that scale: backing up before edits, testing after changes, documenting everything. Those habits matter far more than the port number you choose.
So yes, changing the RDP port is worth it. Not because it’s magic, but because it makes you deliberate about security. And if one day managing ports and firewall rules starts slowing you down, that’s when platforms like Vagon Teams step in, giving you secure, high-performance remote access without the maintenance burden.
Because good security isn’t about hiding your doors. It’s about knowing exactly where they are, and who’s allowed to walk through them.
FAQs
1. Is changing the RDP port actually necessary for security?
Not strictly, but it helps. Changing the default port from 3389 doesn’t stop targeted attacks, but it does reduce noise from random bots scanning the internet. Think of it as turning off a bright “I’m open” sign rather than locking the door.
2. What’s the safest range for custom RDP ports?
Pick something between 49152 and 65535. These are dynamic/private ports less likely to conflict with system services. Avoid ports under 1024, those are usually reserved for core functions like HTTP (80) or HTTPS (443).
3. Do I need to restart my PC after changing the port?
You don’t have to, but you should. Restarting ensures that the RDP service and firewall recognize the new configuration cleanly. If you skip it, the change might not apply until the next reboot.
4. Can I use the same method on Windows 10, 11, or Server editions?
Yes, the process is nearly identical across all recent Windows versions. The only difference might be where the Remote Desktop settings are located in the UI, but the registry path and firewall steps are the same.
5. Does changing the port affect Remote Desktop Gateway or NLA?
No. RD Gateway runs on separate configuration layers (usually HTTPS/443), and Network Level Authentication works regardless of the port you use. Just make sure both are properly enabled for extra security.
6. How do I connect to a non-default RDP port from my client?
Use this format:
mstsc /v:yourserverip:portnumber
Example:
mstsc /v:203.0.113.5:49200
Or just type the same in the “Computer” field inside the RDP client window.
7. What if I’m managing multiple users or workstations, is there an easier way?
If you’re managing a team or creative setup where multiple users need desktop access, manually managing RDP ports becomes tedious. That’s where Vagon Teams can simplify your workflow, you get secure browser-based access to cloud computers without configuring ports or firewalls manually.
Scalable Remote Desktop for your Team
Create cloud computers for your Team, manage their access & permissions in real-time. Start in minutes & scale.

Trial includes 1 hour usage + 7 days of
storage for first 2 seats.
Scalable Remote Desktop for your Team
Create cloud computers for your Team, manage their access & permissions in real-time. Start in minutes & scale.
Trial includes 1 hour usage + 7 days of
storage for first 2 seats.
Summarize with AI

Ready to focus on your creativity?
Vagon gives you the ability to create & render projects, collaborate, and stream applications with the power of the best hardware.

Vagon Blog


Run heavy applications on any device with
your personal computer on the cloud.
San Francisco, California
Solutions
Vagon Teams
Vagon Streams
Use Cases
Resources
Vagon Blog
How to Run Inkscape on a Cloud Ubuntu Desktop (2026 Guide)
How to Run Krita on a Cloud Ubuntu Desktop for Digital Painting (2026 Guide)
How to Run GIMP on a Cloud Ubuntu Desktop (2026 Guide)
How to Run Jupyter on a Cloud GPU Linux Desktop (2026 Guide)
Vagon vs GitHub Codespaces: Cloud Dev Environments Compared (2026)
Vagon vs RunPod: Which Cloud GPU Is Right for You? (2026 Comparison)
How to Watch Your AI Agent Work on a Cloud Ubuntu Desktop (2026 Guide)
How to Run a Local LLM on Ubuntu in the Cloud (2026 Guide)
How to Run Blender on a Cloud GPU (Ubuntu): The Complete 2026 Guide
Vagon Blog
Run heavy applications on any device with
your personal computer on the cloud.
San Francisco, California
Solutions
Vagon Teams
Vagon Streams
Use Cases
Resources
Vagon Blog