Instant Connection for Pixel Streaming
— New Feature Automated Setup
How to Manipulate Time in Premiere Pro Without Ruining Your Edit
How to Manipulate Time in Premiere Pro Without Ruining Your Edit
VideoProduction
How to Manipulate Time in Premiere Pro Without Ruining Your Edit
Table of Contents
Ever watch a clip slow down right before impact and think, “Okay… how did they do that?”
Here’s the part most people don’t expect. In Premiere Pro, that effect isn’t magic, and it definitely isn’t reserved for pros with ten-thousand-dollar setups.
What “Manipulating Time” Really Means in Premiere Pro
When people hear “time manipulation,” they usually imagine some wild VFX trick. In reality, it’s much more practical than that. You’re just controlling how fast or slow a clip plays, and sometimes changing that speed inside the same shot.
In Premiere Pro, time manipulation usually falls into four buckets.
Slowing footage down. The classic slow motion moment. Think footsteps hitting the ground, hair moving in the wind, a punch landing.
Speeding footage up. Timelapses, fast walkthroughs, or just trimming the boring parts without cutting away.
Changing speed mid-clip. This is speed ramping. Normal speed, then slow, then fast again. It’s the trick behind most modern action edits and social videos.
Playing footage in reverse. Simple, but surprisingly useful when paired with ramps or transitions.
The important thing to understand is this. These are not separate “effects.” They’re all variations of the same idea: telling Premiere how to stretch or compress time.
And once you see it that way, the tools stop feeling intimidating. They start feeling obvious.
If you’re trying to figure out why speed ramps and Optical Flow feel heavy on your system, this breakdown on choosing the best GPU for Premiere Pro explains what actually matters and what doesn’t.
Basic Speed Changes
Before getting fancy, let’s talk about the tools you’ll reach for 80 percent of the time. These are the ones that get real work done fast.
Speed and Duration
This is the most straightforward way to change time in Premiere Pro. I still use it constantly.
Right-click a clip in the timeline and choose Speed/Duration. You’ll see a percentage field.
100 percent is normal speed.
50 percent is half speed.
200 percent is double speed.
Simple math. No tricks.
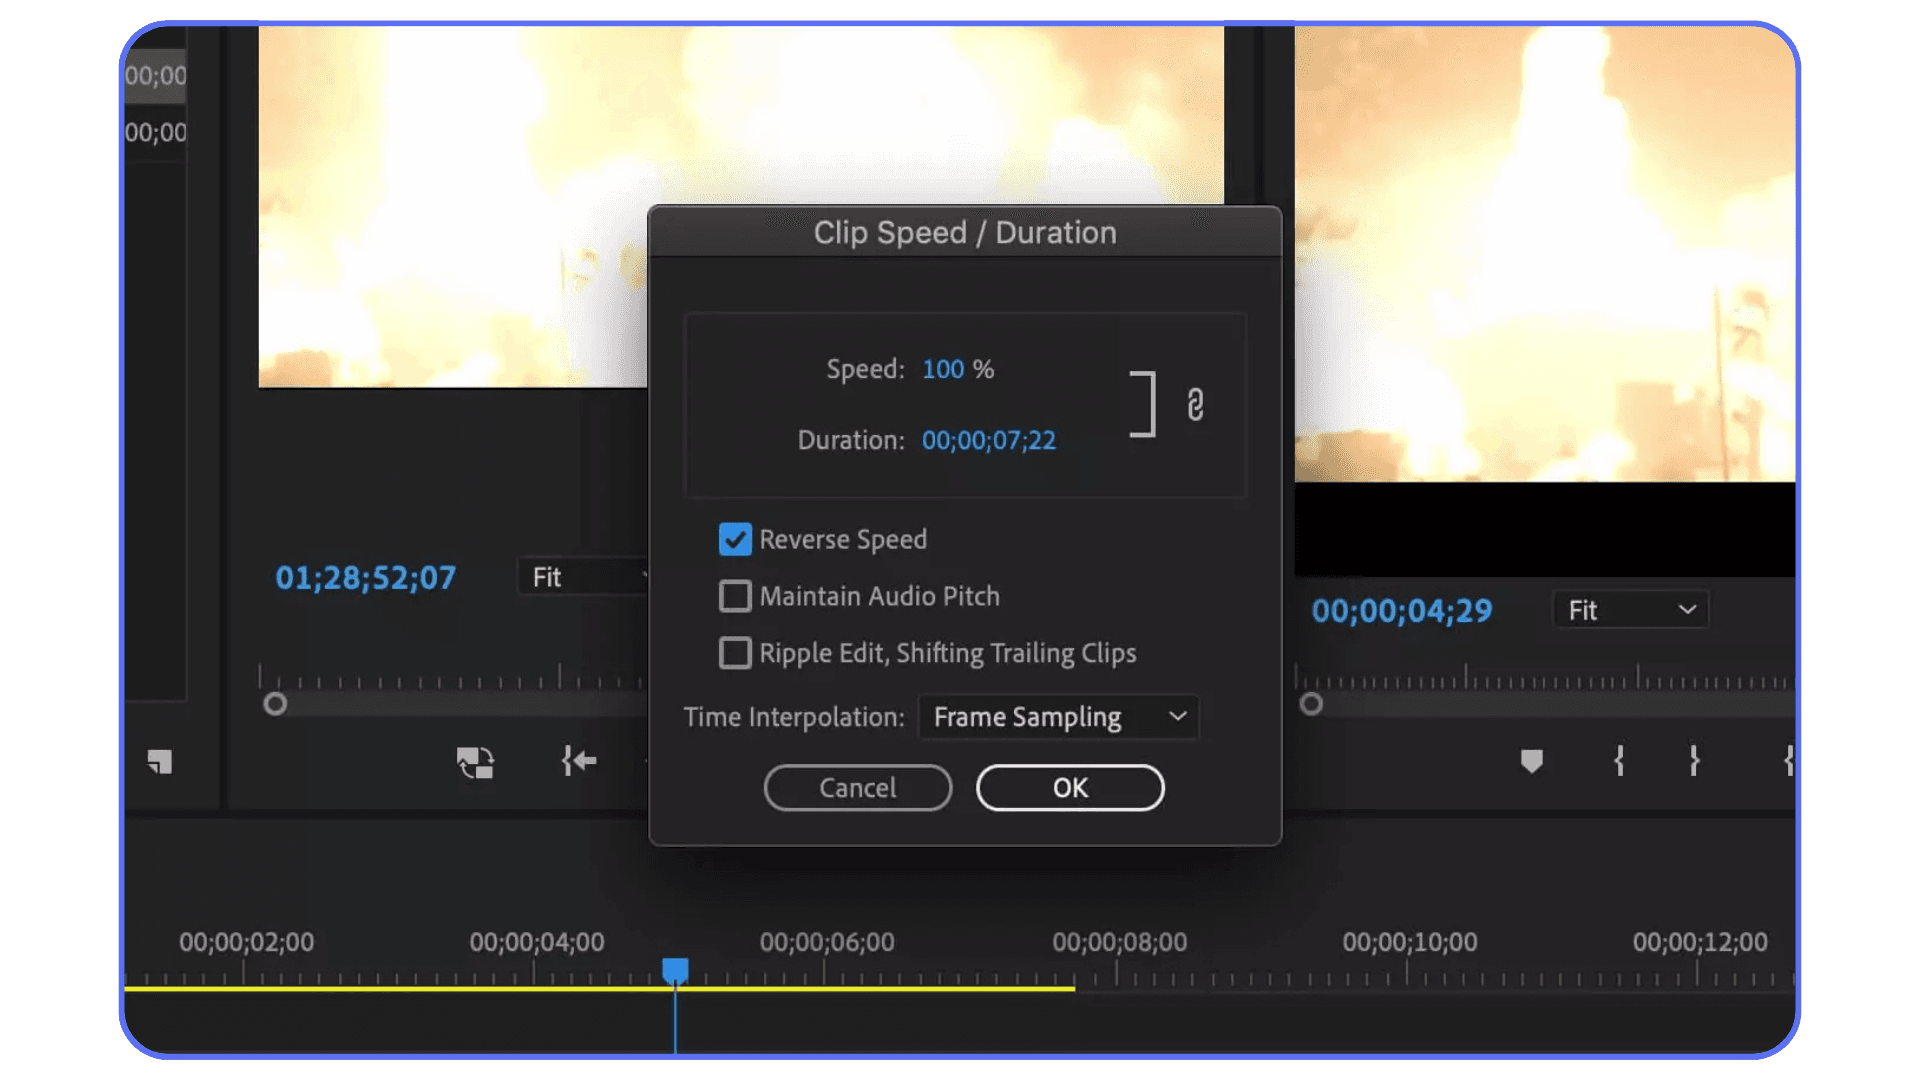
There’s also a checkbox for Reverse Speed, which flips the clip backward. And one more setting people forget about until it’s too late: Maintain Audio Pitch. Turn that on if there’s dialogue or music you care about. Leave it off if you’re going for chaos.
This method is perfect when you already know the speed you want. No ramping. No transitions. Just faster or slower.
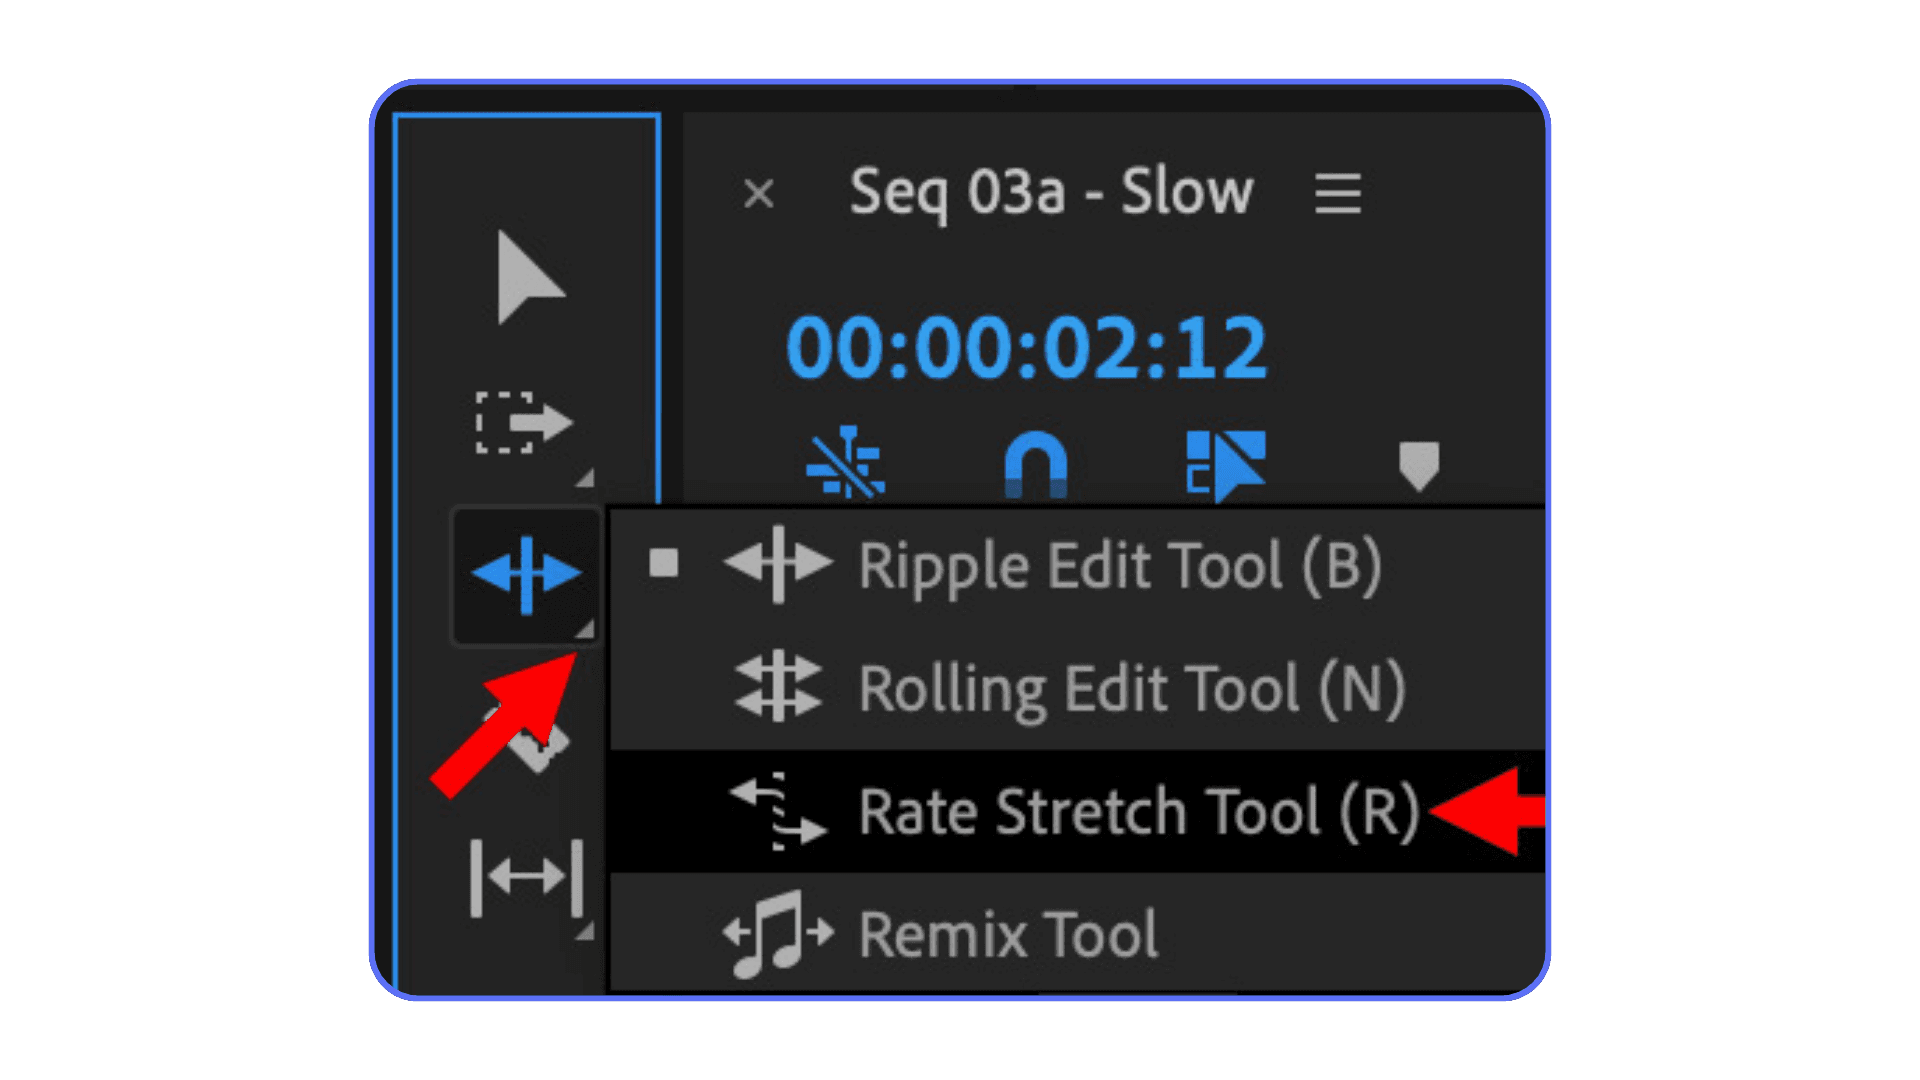
The Rate Stretch Tool
This one feels almost too simple, which is why beginners ignore it.
Hit R on your keyboard. Click the end of a clip. Drag it shorter or longer. Premiere automatically adjusts the speed to fit.
I use this when timing matters more than math. Maybe the clip needs to end exactly on a beat, or line up with a cut. I don’t care if it’s 143 percent speed or 162. I just want it to land right.
One thing to watch out for. Rate Stretch affects speed based on duration, not feel. If precision matters, switch back to Speed/Duration.
These two tools won’t win you style points. But they’re fast, predictable, and they won’t fight you. And honestly, that’s half of editing.
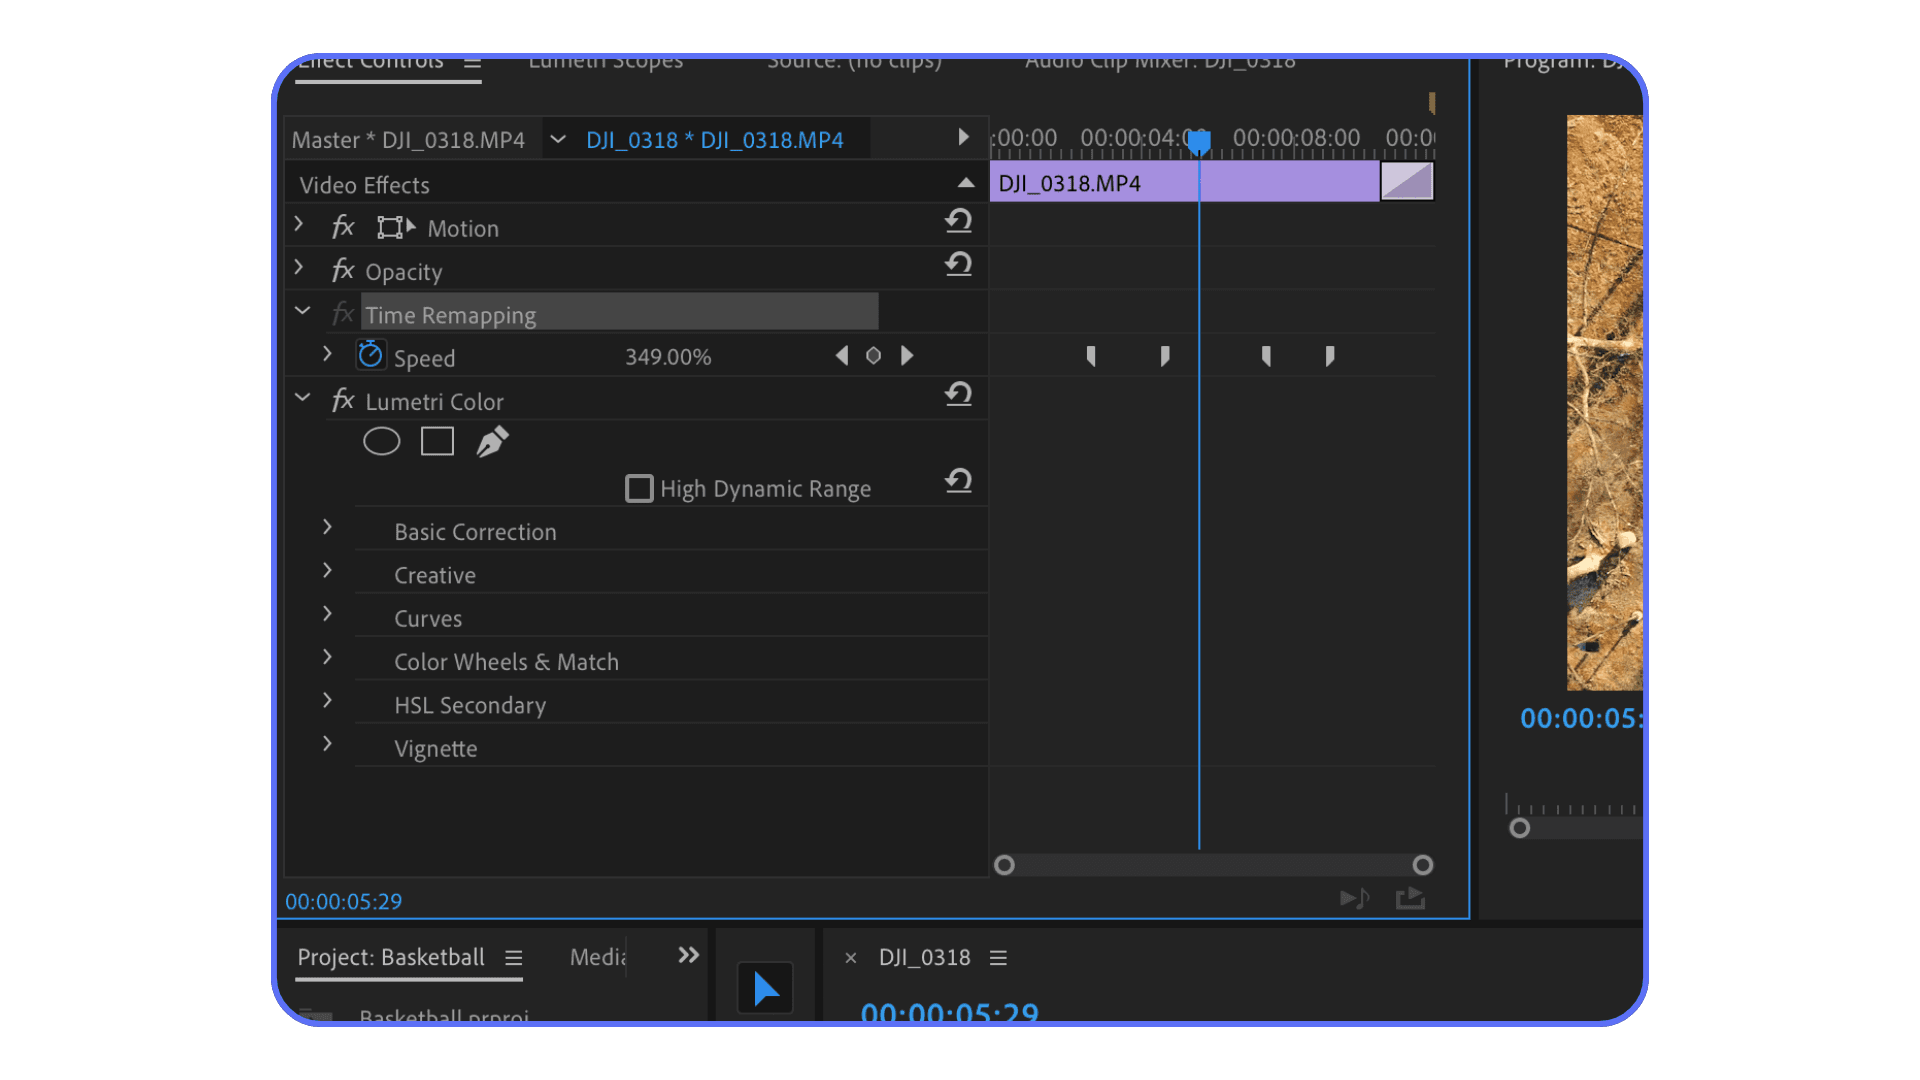
Time Remapping (Where Things Actually Get Interesting)
This is the feature people talk about when they say, “I want that slow-fast-slow effect.”
Time remapping is how it’s done. And no, it’s not as scary as it looks the first time.
By default, Premiere hides this tool. Which I think is a little rude.
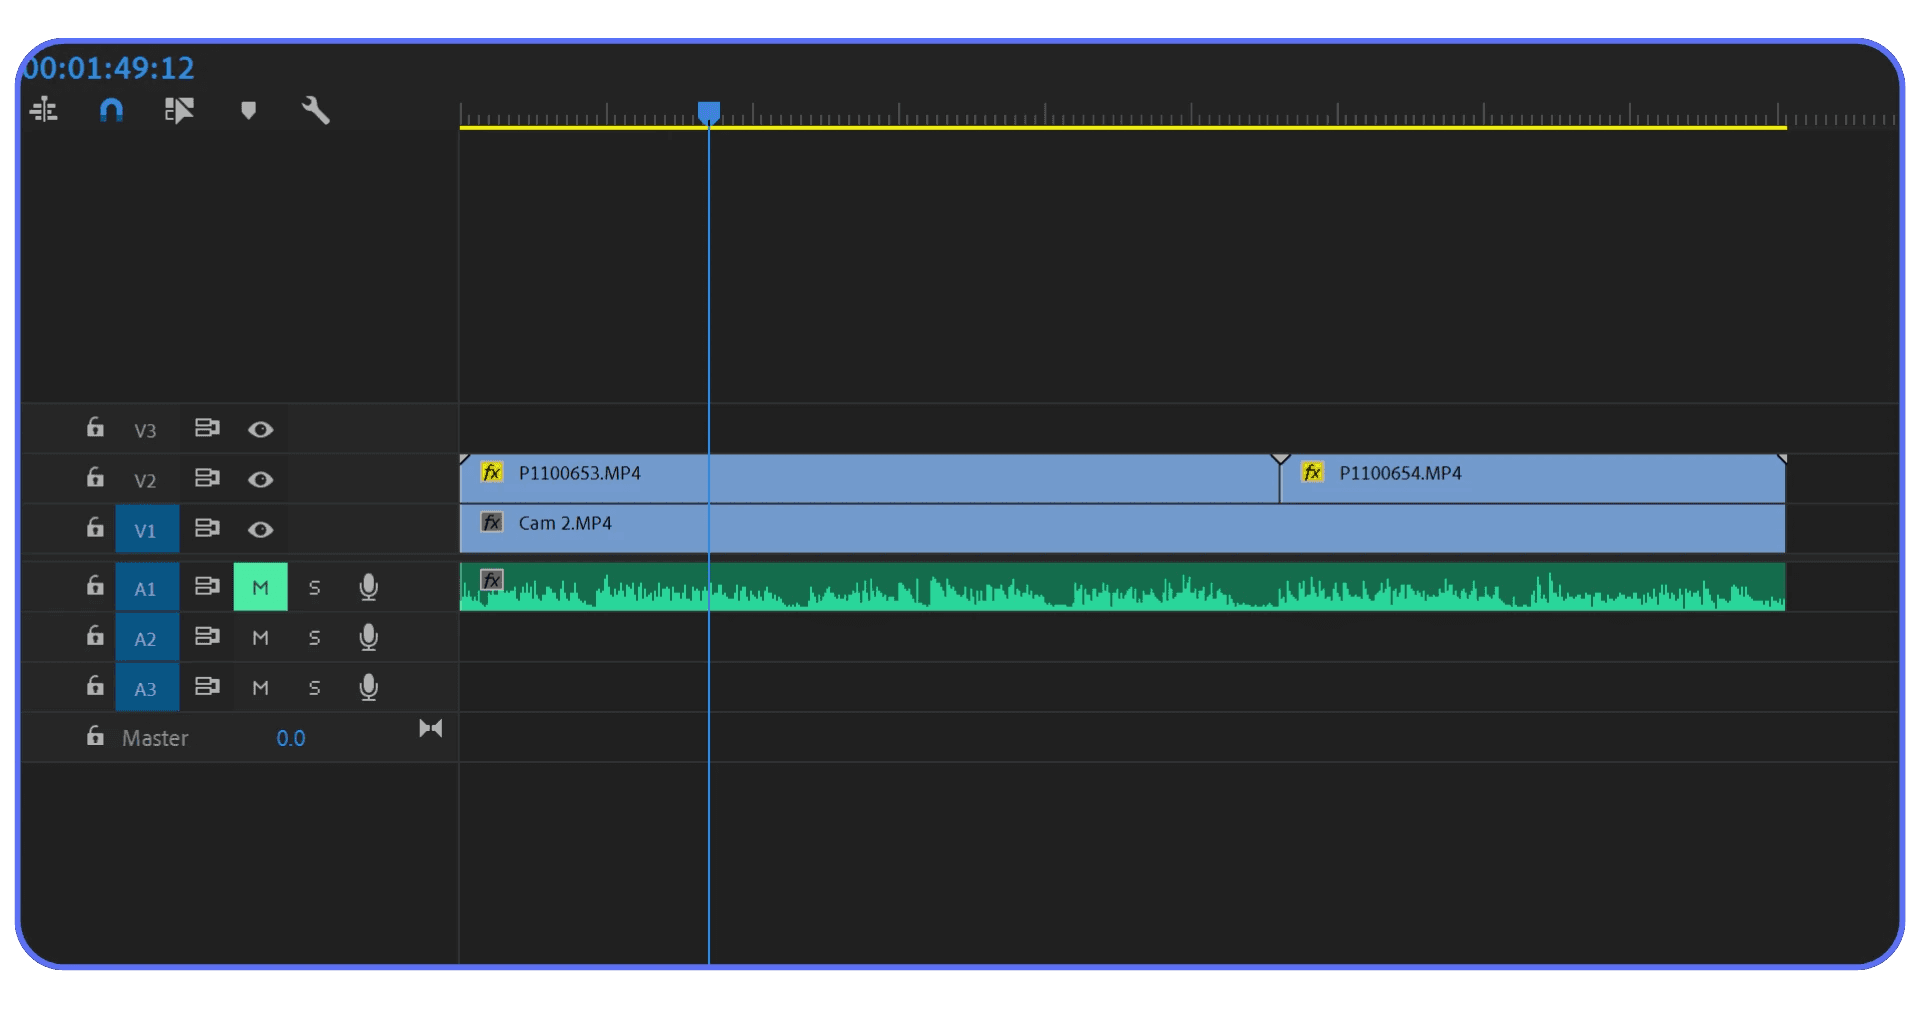
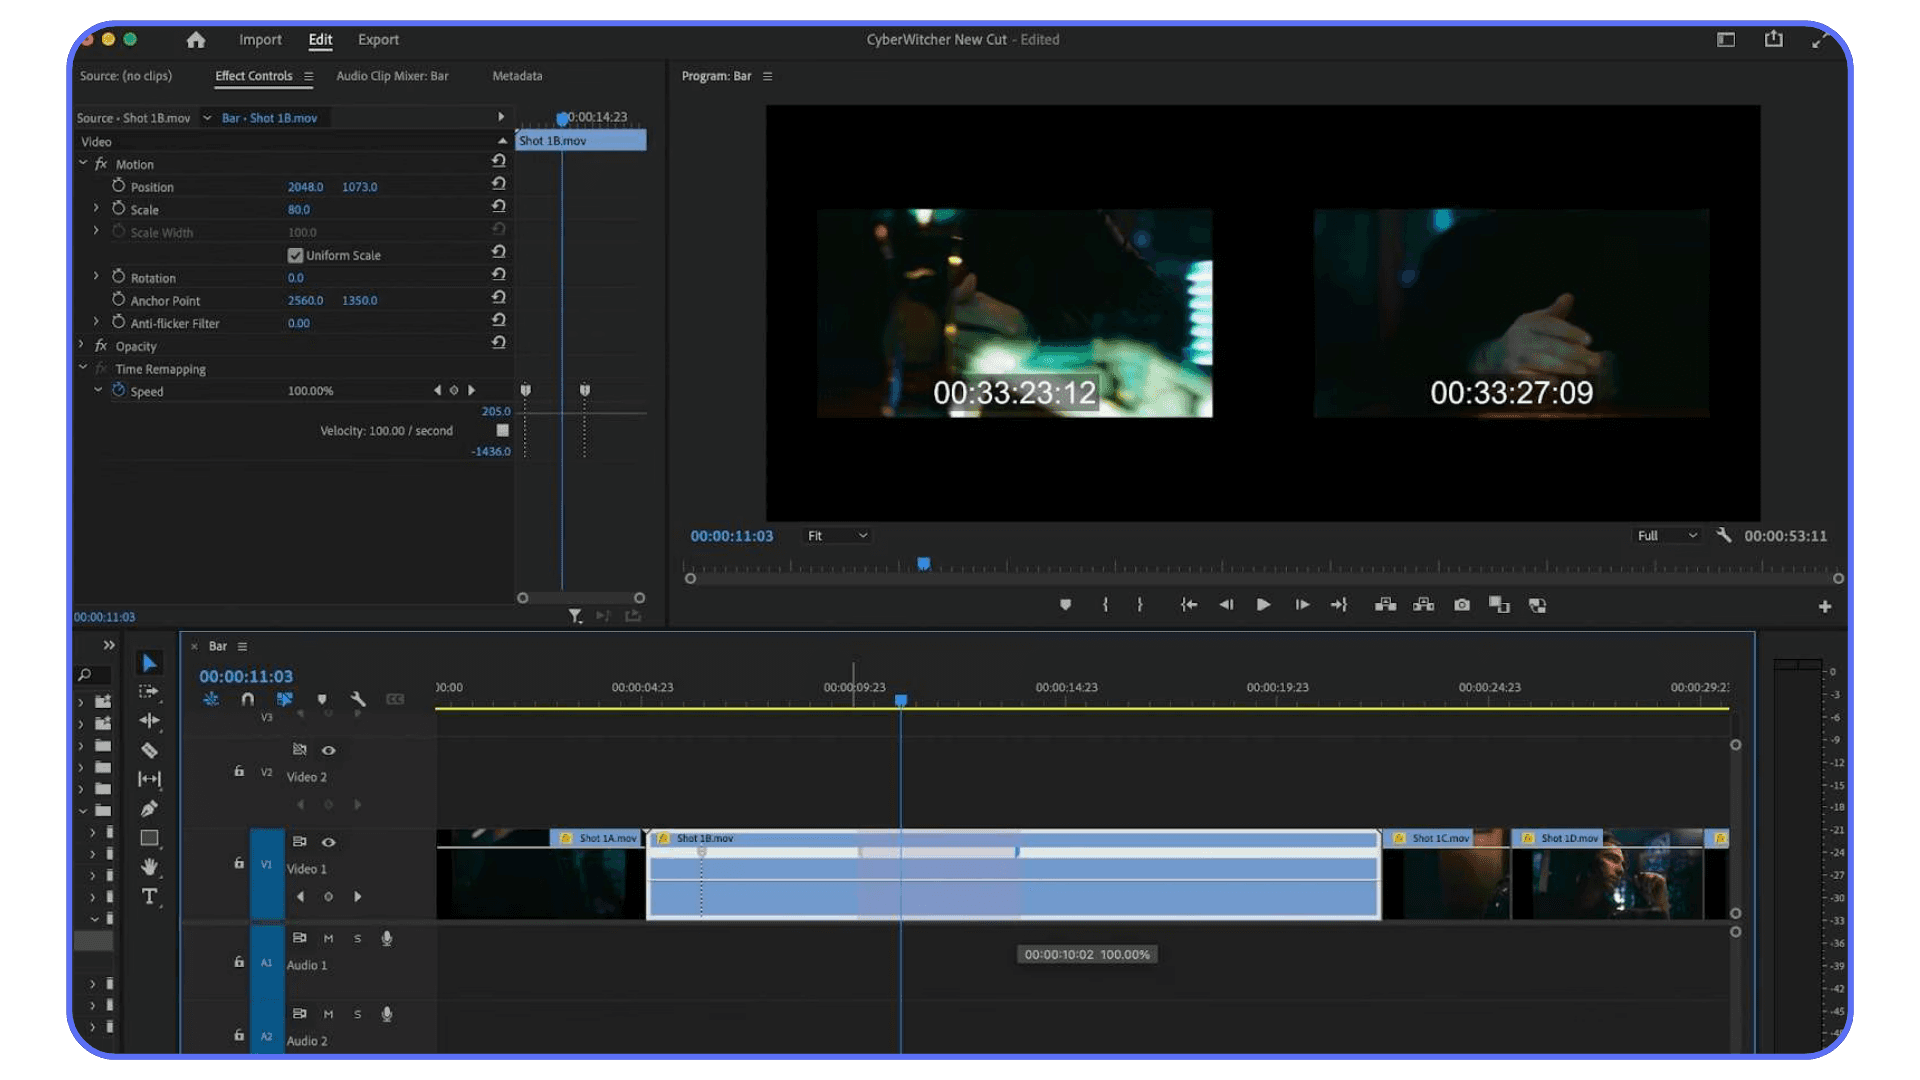
Right-click your clip in the timeline.
Go to Show Clip Keyframes → Time Remapping → Speed.
You’ll see a thin white line appear across the middle of the clip. That line is everything. It represents speed.
Drag the line up, the clip plays faster.
Drag it down, the clip slows down.
Now here’s the key part most tutorials rush past.
Hold Ctrl on Windows or Cmd on Mac and click the line. You’ve just added a speed keyframe. Add another one a little later. Between those two points, Premiere changes speed.
This is how speed ramps are born.
Want a smooth transition instead of a hard jump? Grab the small handles on each side of the keyframe and pull them apart. That creates a gradual ramp instead of a sudden shift. Once you get used to this, you’ll start doing it automatically.
A small but important habit. Zoom into your timeline before you place keyframes. If you don’t, you’ll spend way too long nudging things back and forth, wondering why it feels off.
Time remapping is the difference between “I changed the speed” and “that felt intentional.”
If Premiere Pro isn’t always the right tool for a project, this comparison of the best Premiere Pro alternatives gives a realistic look at when switching actually makes sense.
Reverse Speed and Direction Tricks
Reversing a clip in Premiere Pro is almost boringly easy. Which is probably why people either overthink it or use it in the worst possible way.
Right-click the clip.
Choose Speed/Duration.
Check Reverse Speed.
That’s it. The clip plays backward.
On its own, this is fine for small moments. Someone jumping up, then snapping back down. Smoke pulling inward instead of drifting out. Subtle stuff.
Where it gets interesting is when you combine reverse playback with speed changes. A reversed clip that slowly ramps up to full speed can feel intentional. A reversed clip that suddenly slams into fast motion usually feels like an accident.
Here’s a thing I learned the annoying way. If you try to reverse a clip and also do complex time remapping on it, Premiere can get weird. Keyframes don’t always behave the way you expect. Sometimes ramps feel flipped or delayed.
When that happens, don’t fight it.
Nest the clip first. Right-click, Nest, then apply reverse speed or time remapping to the nested sequence. Premiere treats it like a fresh clip, and suddenly everything behaves again.
One more tip. Reversed audio is almost never useful. Mute it early and move on. Your future self will thank you.
Reverse effects are easy to overuse. But when they’re paired with ramps and used sparingly, they stop feeling gimmicky and start feeling deliberate.
If playback is the thing killing your momentum, creating proxies can help a lot, and this walkthrough on how to create video proxies in Premiere Pro breaks it down step by step.
When Each Technique Actually Makes Sense
Not every speed tool belongs in every edit. This is where a lot of people get frustrated. They know the tools, but they’re using the wrong one for the job.
If you’re cutting short social videos or quick promos, stick with Speed/Duration or the Rate Stretch Tool. You usually already know the outcome you want. Faster intro. Slower moment. Done. Spending ten minutes fine-tuning ramps for a six-second clip is how edits start dragging on forever.
For cinematic work or anything meant to feel polished, time remapping is the move. Speed ramps let you guide attention without cutting away. Slow things down where emotion or impact matters, then push forward again before the viewer gets bored. This is especially effective for action shots, reveals, and movement toward camera.
Reels and hype edits live in their own category. These thrive on contrast. Normal speed into slow motion, then snap back into fast movement. Reverse clips can work here too, but only if they support the rhythm. If the beat drops and the clip reverses for no clear reason, it feels cheap fast.
Action highlights are where timing matters most. The mistake I see all the time is slowing the entire clip. Don’t do that. Let most of it play normally. Slow down only the exact moment of impact. A foot hitting the ground. A ball leaving a hand. A subject locking eyes with the camera. Then ramp out.
Here’s a simple mental timeline that works more often than it should.
Normal speed.
Slow at the moment that matters.
Fast to exit.
Back to normal.
If you ever feel unsure which tool to use, ask yourself one question. Do I need precision or flow? Precision points to Speed/Duration. Flow points to time remapping.
Once you start choosing tools this way, your edits stop feeling random. They start feeling intentional.
Editing doesn’t always mean sitting at a desk, and if you’re curious how people are handling Premiere Pro remotely, this guide on using Adobe Premiere Pro on iPad shows what’s realistically possible.
Mistakes I See All the Time
This part matters more than the tools. Most time manipulation problems aren’t technical. They’re workflow mistakes.
The first one is changing speed too early.
If you start speed ramping before your edit is locked, you’re asking for pain. Every trim shifts your ramps. Every music change breaks your timing. Rough cut first. Lock structure. Then touch time.
Another big one is ignoring frame rate reality. Slowing down 24fps footage to 20 percent and expecting buttery motion is optimistic at best. Premiere can help with frame interpolation, but it can’t invent miracles. If you know you’ll want heavy slow motion, shoot for it upfront.
People also forget to zoom in. I know it sounds basic, but speed keyframes need space. If your timeline is zoomed out, you’re placing ramps blind. You’ll feel something’s wrong, but you won’t know why.
Audio gets abused too. Speed changes can wreck sound fast. Voices stretch. Music warps. Sometimes the right move is to unlink audio completely and rebuild it separately. Not everything needs to stay married to the clip.
And here’s the sneaky one. Overusing ramps.
Speed ramps feel cool, so people add them everywhere. The result is an edit that never settles. No contrast. No rest. When everything is dynamic, nothing is.
Use speed changes to support moments, not replace them. When you do that, the effect stops drawing attention to itself. It just feels right.
If you’ve hit these issues before, good. That means you’re actually editing, not just following tutorials.
If you’re considering upgrading instead of working around limitations, this ultimate PC build and computer buying guide for Premiere Pro lays out realistic options based on actual editing workloads.
Optical Flow and Frame Interpolation
At some point, you’re going to slow a clip down and think, “Why does this feel choppy?”
That’s where frame interpolation comes in.
By default, Premiere just repeats frames when you slow footage down. That works fine for small changes, but once you push things harder, it starts to show. Optical Flow is Premiere’s way of guessing what happens between frames and creating new ones to smooth things out.
You’ll find it inside Speed/Duration under Time Interpolation. Switch it from Frame Sampling to Optical Flow and render the clip.
Sometimes it looks great. Sometimes it looks… strange.
In my experience, Optical Flow shines with natural movement. Walking, drifting camera moves, slow pans. It struggles with fast motion, motion blur, or busy backgrounds. Hair, water, and flashing lights can confuse it fast.
Also, it’s heavy. Optical Flow demands more processing power than almost anything else in this workflow. If your system suddenly sounds like it’s about to take off, that’s why.
Here’s how I treat it. Optical Flow is a fix, not a starting point. If the clip already looks decent slowed down, Optical Flow can polish it. If the clip looks bad at half speed, Optical Flow probably won’t save it.
Use it selectively. Render often. And don’t be afraid to turn it off if it starts inventing frames that don’t belong.
When Premiere Starts Pushing Back
This is the part people don’t love talking about.
Time remapping, Optical Flow, high-resolution footage, multiple layers. All of that stacks up quickly. Premiere can handle a lot, but there’s a point where playback stutters, renders crawl, and experimenting stops being fun.
That’s usually when editors change their behavior. They avoid ramps. They stop testing ideas. They settle for “good enough” because previewing the edit feels painful.
And that’s a shame, because time manipulation is one of the most creative tools in Premiere. It’s supposed to invite experimentation, not shut it down.
There are a few ways people deal with this. Proxies. Pre-renders. Nested sequences. All valid. But there’s also another option that more editors are quietly using now, especially when projects get heavy.
Speed ramps and frame interpolation can slow exports fast, and this guide on reducing rendering times in Premiere Pro covers practical ways to get renders under control.
When Time Effects Start Fighting Your Machine
Here’s the honest part nobody likes admitting.
Time remapping, speed ramps, Optical Flow, high-resolution footage. They’re all processor-hungry. Stack a few of those together and even a decent local machine can start to choke. Playback stutters. Renders slow down. Scrubbing turns into guesswork.
When that happens, most editors change their behavior without realizing it. They stop experimenting. They avoid testing different ramp shapes. They lock edits earlier than they should because previewing changes feels annoying instead of fun.
That’s not a Premiere Pro problem. That’s a hardware bottleneck.
This is where Vagon Cloud Computer fits in very cleanly.
Instead of upgrading your local setup or waiting through heavy renders, you can run Premiere Pro on a high-performance cloud machine that’s already built for this kind of workload. Complex speed ramps. Optical Flow. 4K and higher footage. All running smoothly, without your laptop sounding like it’s about to take off.
What I like about this approach is that it doesn’t force you to change how you edit. Same Premiere interface. Same shortcuts. Same workflow. You just get more headroom to actually use the time manipulation tools the way they’re meant to be used.
And that matters, especially when you’re experimenting. Speed ramps only feel right after a few passes. Optical Flow needs testing. Timing needs nudging. When playback is instant, you push ideas further instead of settling.
You don’t need Vagon Cloud Computer for every project. But if manipulating time is a big part of your edits, and performance is the thing slowing you down, using a cloud computer stops being a luxury and starts being a practical editing decision.
That’s the real value. Not flash. Just fewer limits between an idea and seeing it play back properly.
If you want to go deeper beyond speed ramps and time remapping, this list of the best Premiere Pro tutorials is a solid place to keep learning without wasting time.
Final Thoughts
Manipulating time in Premiere Pro isn’t some advanced trick you unlock after years of editing. It’s a core skill. Once you understand how Speed/Duration, time remapping, and Optical Flow actually work, you start seeing opportunities everywhere. Moments you can stretch. Beats you can hit harder. Boring seconds you can get rid of entirely.
The bigger shift, at least in my experience, is realizing this isn’t about effects. It’s about pacing. Time control is storytelling control. When to slow the viewer down. When to push them forward. When to let a moment breathe just a little longer than feels normal.
Premiere Pro already gives you everything you need to do that. The only thing that sometimes gets in the way is performance. Laggy playback changes how you edit, even if you don’t notice it happening. You play it safe. You stop experimenting. You move on too quickly.
That’s why tools like Vagon Cloud Computer make sense in this specific context. Not as a flashy upgrade. Just as a way to remove friction when you’re working with heavy footage and time-based effects. Same software. Same skills. Fewer compromises.
If you’re new to time manipulation, start small. One ramp. One slowed moment. Get comfortable with how it feels. And if you’re already using these tools but fighting your machine, that’s a workflow problem, not a talent issue.
Either way, once you start shaping time intentionally, it’s hard to go back.
FAQs
1. Why does my slow motion look choppy even when I lower the speed?
Most of the time, it comes down to frame rate. If your footage was shot at 24fps and you slow it down aggressively, Premiere doesn’t have enough frames to work with. Try enabling Optical Flow, but manage expectations. It helps, it doesn’t perform miracles. Shooting at higher frame rates like 60fps or 120fps gives you far more flexibility later.
2. What’s the difference between Speed/Duration and time remapping?
Speed/Duration applies one speed to the entire clip. It’s fast, predictable, and great for simple changes. Time remapping lets you change speed inside the clip using keyframes. That’s how speed ramps work. If you want control over pacing, time remapping is the tool.
3. Can I speed ramp audio the same way as video?
Technically, yes. Practically, you usually shouldn’t. Speed ramps tend to destroy audio quality. Most editors mute the ramped section and rebuild audio separately using music, sound effects, or room tone. It sounds cleaner and gives you more control.
4. Why does Premiere feel slow when I use time remapping and Optical Flow?
Because those features are demanding. Premiere is calculating new frames and adjusting playback in real time. On heavier timelines, this can cause lag, dropped frames, or long render times. That’s when proxies, pre-renders, or running Premiere on a high-performance setup like Vagon Cloud Computer can make a noticeable difference.
5. Is speed ramping overused?
Honestly? Yes. It’s easy to fall into the trap of adding ramps everywhere because they look cool. The best edits use speed changes sparingly, at moments that actually matter. If every clip ramps, none of them feel special.
6. Should I nest clips before time remapping?
If you’re doing something complex like combining reverse playback, multiple ramps, and effects, nesting can help. It simplifies how Premiere treats the clip and avoids weird behavior with keyframes. It’s not mandatory, but it’s a useful problem-solver.
7. Do I need a powerful computer to manipulate time in Premiere Pro?
For basic speed changes, no. For heavy time remapping, Optical Flow, and high-resolution footage, it helps a lot. If your system slows you down or limits experimentation, using a cloud-based option like Vagon Cloud Computer can remove that bottleneck without forcing a hardware upgrade.
Ever watch a clip slow down right before impact and think, “Okay… how did they do that?”
Here’s the part most people don’t expect. In Premiere Pro, that effect isn’t magic, and it definitely isn’t reserved for pros with ten-thousand-dollar setups.
What “Manipulating Time” Really Means in Premiere Pro
When people hear “time manipulation,” they usually imagine some wild VFX trick. In reality, it’s much more practical than that. You’re just controlling how fast or slow a clip plays, and sometimes changing that speed inside the same shot.
In Premiere Pro, time manipulation usually falls into four buckets.
Slowing footage down. The classic slow motion moment. Think footsteps hitting the ground, hair moving in the wind, a punch landing.
Speeding footage up. Timelapses, fast walkthroughs, or just trimming the boring parts without cutting away.
Changing speed mid-clip. This is speed ramping. Normal speed, then slow, then fast again. It’s the trick behind most modern action edits and social videos.
Playing footage in reverse. Simple, but surprisingly useful when paired with ramps or transitions.
The important thing to understand is this. These are not separate “effects.” They’re all variations of the same idea: telling Premiere how to stretch or compress time.
And once you see it that way, the tools stop feeling intimidating. They start feeling obvious.
If you’re trying to figure out why speed ramps and Optical Flow feel heavy on your system, this breakdown on choosing the best GPU for Premiere Pro explains what actually matters and what doesn’t.
Basic Speed Changes
Before getting fancy, let’s talk about the tools you’ll reach for 80 percent of the time. These are the ones that get real work done fast.
Speed and Duration
This is the most straightforward way to change time in Premiere Pro. I still use it constantly.
Right-click a clip in the timeline and choose Speed/Duration. You’ll see a percentage field.
100 percent is normal speed.
50 percent is half speed.
200 percent is double speed.
Simple math. No tricks.
There’s also a checkbox for Reverse Speed, which flips the clip backward. And one more setting people forget about until it’s too late: Maintain Audio Pitch. Turn that on if there’s dialogue or music you care about. Leave it off if you’re going for chaos.
This method is perfect when you already know the speed you want. No ramping. No transitions. Just faster or slower.
The Rate Stretch Tool
This one feels almost too simple, which is why beginners ignore it.
Hit R on your keyboard. Click the end of a clip. Drag it shorter or longer. Premiere automatically adjusts the speed to fit.
I use this when timing matters more than math. Maybe the clip needs to end exactly on a beat, or line up with a cut. I don’t care if it’s 143 percent speed or 162. I just want it to land right.
One thing to watch out for. Rate Stretch affects speed based on duration, not feel. If precision matters, switch back to Speed/Duration.
These two tools won’t win you style points. But they’re fast, predictable, and they won’t fight you. And honestly, that’s half of editing.
Time Remapping (Where Things Actually Get Interesting)
This is the feature people talk about when they say, “I want that slow-fast-slow effect.”
Time remapping is how it’s done. And no, it’s not as scary as it looks the first time.
By default, Premiere hides this tool. Which I think is a little rude.
Right-click your clip in the timeline.
Go to Show Clip Keyframes → Time Remapping → Speed.
You’ll see a thin white line appear across the middle of the clip. That line is everything. It represents speed.
Drag the line up, the clip plays faster.
Drag it down, the clip slows down.
Now here’s the key part most tutorials rush past.
Hold Ctrl on Windows or Cmd on Mac and click the line. You’ve just added a speed keyframe. Add another one a little later. Between those two points, Premiere changes speed.
This is how speed ramps are born.
Want a smooth transition instead of a hard jump? Grab the small handles on each side of the keyframe and pull them apart. That creates a gradual ramp instead of a sudden shift. Once you get used to this, you’ll start doing it automatically.
A small but important habit. Zoom into your timeline before you place keyframes. If you don’t, you’ll spend way too long nudging things back and forth, wondering why it feels off.
Time remapping is the difference between “I changed the speed” and “that felt intentional.”
If Premiere Pro isn’t always the right tool for a project, this comparison of the best Premiere Pro alternatives gives a realistic look at when switching actually makes sense.
Reverse Speed and Direction Tricks
Reversing a clip in Premiere Pro is almost boringly easy. Which is probably why people either overthink it or use it in the worst possible way.
Right-click the clip.
Choose Speed/Duration.
Check Reverse Speed.
That’s it. The clip plays backward.
On its own, this is fine for small moments. Someone jumping up, then snapping back down. Smoke pulling inward instead of drifting out. Subtle stuff.
Where it gets interesting is when you combine reverse playback with speed changes. A reversed clip that slowly ramps up to full speed can feel intentional. A reversed clip that suddenly slams into fast motion usually feels like an accident.
Here’s a thing I learned the annoying way. If you try to reverse a clip and also do complex time remapping on it, Premiere can get weird. Keyframes don’t always behave the way you expect. Sometimes ramps feel flipped or delayed.
When that happens, don’t fight it.
Nest the clip first. Right-click, Nest, then apply reverse speed or time remapping to the nested sequence. Premiere treats it like a fresh clip, and suddenly everything behaves again.
One more tip. Reversed audio is almost never useful. Mute it early and move on. Your future self will thank you.
Reverse effects are easy to overuse. But when they’re paired with ramps and used sparingly, they stop feeling gimmicky and start feeling deliberate.
If playback is the thing killing your momentum, creating proxies can help a lot, and this walkthrough on how to create video proxies in Premiere Pro breaks it down step by step.
When Each Technique Actually Makes Sense
Not every speed tool belongs in every edit. This is where a lot of people get frustrated. They know the tools, but they’re using the wrong one for the job.
If you’re cutting short social videos or quick promos, stick with Speed/Duration or the Rate Stretch Tool. You usually already know the outcome you want. Faster intro. Slower moment. Done. Spending ten minutes fine-tuning ramps for a six-second clip is how edits start dragging on forever.
For cinematic work or anything meant to feel polished, time remapping is the move. Speed ramps let you guide attention without cutting away. Slow things down where emotion or impact matters, then push forward again before the viewer gets bored. This is especially effective for action shots, reveals, and movement toward camera.
Reels and hype edits live in their own category. These thrive on contrast. Normal speed into slow motion, then snap back into fast movement. Reverse clips can work here too, but only if they support the rhythm. If the beat drops and the clip reverses for no clear reason, it feels cheap fast.
Action highlights are where timing matters most. The mistake I see all the time is slowing the entire clip. Don’t do that. Let most of it play normally. Slow down only the exact moment of impact. A foot hitting the ground. A ball leaving a hand. A subject locking eyes with the camera. Then ramp out.
Here’s a simple mental timeline that works more often than it should.
Normal speed.
Slow at the moment that matters.
Fast to exit.
Back to normal.
If you ever feel unsure which tool to use, ask yourself one question. Do I need precision or flow? Precision points to Speed/Duration. Flow points to time remapping.
Once you start choosing tools this way, your edits stop feeling random. They start feeling intentional.
Editing doesn’t always mean sitting at a desk, and if you’re curious how people are handling Premiere Pro remotely, this guide on using Adobe Premiere Pro on iPad shows what’s realistically possible.
Mistakes I See All the Time
This part matters more than the tools. Most time manipulation problems aren’t technical. They’re workflow mistakes.
The first one is changing speed too early.
If you start speed ramping before your edit is locked, you’re asking for pain. Every trim shifts your ramps. Every music change breaks your timing. Rough cut first. Lock structure. Then touch time.
Another big one is ignoring frame rate reality. Slowing down 24fps footage to 20 percent and expecting buttery motion is optimistic at best. Premiere can help with frame interpolation, but it can’t invent miracles. If you know you’ll want heavy slow motion, shoot for it upfront.
People also forget to zoom in. I know it sounds basic, but speed keyframes need space. If your timeline is zoomed out, you’re placing ramps blind. You’ll feel something’s wrong, but you won’t know why.
Audio gets abused too. Speed changes can wreck sound fast. Voices stretch. Music warps. Sometimes the right move is to unlink audio completely and rebuild it separately. Not everything needs to stay married to the clip.
And here’s the sneaky one. Overusing ramps.
Speed ramps feel cool, so people add them everywhere. The result is an edit that never settles. No contrast. No rest. When everything is dynamic, nothing is.
Use speed changes to support moments, not replace them. When you do that, the effect stops drawing attention to itself. It just feels right.
If you’ve hit these issues before, good. That means you’re actually editing, not just following tutorials.
If you’re considering upgrading instead of working around limitations, this ultimate PC build and computer buying guide for Premiere Pro lays out realistic options based on actual editing workloads.
Optical Flow and Frame Interpolation
At some point, you’re going to slow a clip down and think, “Why does this feel choppy?”
That’s where frame interpolation comes in.
By default, Premiere just repeats frames when you slow footage down. That works fine for small changes, but once you push things harder, it starts to show. Optical Flow is Premiere’s way of guessing what happens between frames and creating new ones to smooth things out.
You’ll find it inside Speed/Duration under Time Interpolation. Switch it from Frame Sampling to Optical Flow and render the clip.
Sometimes it looks great. Sometimes it looks… strange.
In my experience, Optical Flow shines with natural movement. Walking, drifting camera moves, slow pans. It struggles with fast motion, motion blur, or busy backgrounds. Hair, water, and flashing lights can confuse it fast.
Also, it’s heavy. Optical Flow demands more processing power than almost anything else in this workflow. If your system suddenly sounds like it’s about to take off, that’s why.
Here’s how I treat it. Optical Flow is a fix, not a starting point. If the clip already looks decent slowed down, Optical Flow can polish it. If the clip looks bad at half speed, Optical Flow probably won’t save it.
Use it selectively. Render often. And don’t be afraid to turn it off if it starts inventing frames that don’t belong.
When Premiere Starts Pushing Back
This is the part people don’t love talking about.
Time remapping, Optical Flow, high-resolution footage, multiple layers. All of that stacks up quickly. Premiere can handle a lot, but there’s a point where playback stutters, renders crawl, and experimenting stops being fun.
That’s usually when editors change their behavior. They avoid ramps. They stop testing ideas. They settle for “good enough” because previewing the edit feels painful.
And that’s a shame, because time manipulation is one of the most creative tools in Premiere. It’s supposed to invite experimentation, not shut it down.
There are a few ways people deal with this. Proxies. Pre-renders. Nested sequences. All valid. But there’s also another option that more editors are quietly using now, especially when projects get heavy.
Speed ramps and frame interpolation can slow exports fast, and this guide on reducing rendering times in Premiere Pro covers practical ways to get renders under control.
When Time Effects Start Fighting Your Machine
Here’s the honest part nobody likes admitting.
Time remapping, speed ramps, Optical Flow, high-resolution footage. They’re all processor-hungry. Stack a few of those together and even a decent local machine can start to choke. Playback stutters. Renders slow down. Scrubbing turns into guesswork.
When that happens, most editors change their behavior without realizing it. They stop experimenting. They avoid testing different ramp shapes. They lock edits earlier than they should because previewing changes feels annoying instead of fun.
That’s not a Premiere Pro problem. That’s a hardware bottleneck.
This is where Vagon Cloud Computer fits in very cleanly.
Instead of upgrading your local setup or waiting through heavy renders, you can run Premiere Pro on a high-performance cloud machine that’s already built for this kind of workload. Complex speed ramps. Optical Flow. 4K and higher footage. All running smoothly, without your laptop sounding like it’s about to take off.
What I like about this approach is that it doesn’t force you to change how you edit. Same Premiere interface. Same shortcuts. Same workflow. You just get more headroom to actually use the time manipulation tools the way they’re meant to be used.
And that matters, especially when you’re experimenting. Speed ramps only feel right after a few passes. Optical Flow needs testing. Timing needs nudging. When playback is instant, you push ideas further instead of settling.
You don’t need Vagon Cloud Computer for every project. But if manipulating time is a big part of your edits, and performance is the thing slowing you down, using a cloud computer stops being a luxury and starts being a practical editing decision.
That’s the real value. Not flash. Just fewer limits between an idea and seeing it play back properly.
If you want to go deeper beyond speed ramps and time remapping, this list of the best Premiere Pro tutorials is a solid place to keep learning without wasting time.
Final Thoughts
Manipulating time in Premiere Pro isn’t some advanced trick you unlock after years of editing. It’s a core skill. Once you understand how Speed/Duration, time remapping, and Optical Flow actually work, you start seeing opportunities everywhere. Moments you can stretch. Beats you can hit harder. Boring seconds you can get rid of entirely.
The bigger shift, at least in my experience, is realizing this isn’t about effects. It’s about pacing. Time control is storytelling control. When to slow the viewer down. When to push them forward. When to let a moment breathe just a little longer than feels normal.
Premiere Pro already gives you everything you need to do that. The only thing that sometimes gets in the way is performance. Laggy playback changes how you edit, even if you don’t notice it happening. You play it safe. You stop experimenting. You move on too quickly.
That’s why tools like Vagon Cloud Computer make sense in this specific context. Not as a flashy upgrade. Just as a way to remove friction when you’re working with heavy footage and time-based effects. Same software. Same skills. Fewer compromises.
If you’re new to time manipulation, start small. One ramp. One slowed moment. Get comfortable with how it feels. And if you’re already using these tools but fighting your machine, that’s a workflow problem, not a talent issue.
Either way, once you start shaping time intentionally, it’s hard to go back.
FAQs
1. Why does my slow motion look choppy even when I lower the speed?
Most of the time, it comes down to frame rate. If your footage was shot at 24fps and you slow it down aggressively, Premiere doesn’t have enough frames to work with. Try enabling Optical Flow, but manage expectations. It helps, it doesn’t perform miracles. Shooting at higher frame rates like 60fps or 120fps gives you far more flexibility later.
2. What’s the difference between Speed/Duration and time remapping?
Speed/Duration applies one speed to the entire clip. It’s fast, predictable, and great for simple changes. Time remapping lets you change speed inside the clip using keyframes. That’s how speed ramps work. If you want control over pacing, time remapping is the tool.
3. Can I speed ramp audio the same way as video?
Technically, yes. Practically, you usually shouldn’t. Speed ramps tend to destroy audio quality. Most editors mute the ramped section and rebuild audio separately using music, sound effects, or room tone. It sounds cleaner and gives you more control.
4. Why does Premiere feel slow when I use time remapping and Optical Flow?
Because those features are demanding. Premiere is calculating new frames and adjusting playback in real time. On heavier timelines, this can cause lag, dropped frames, or long render times. That’s when proxies, pre-renders, or running Premiere on a high-performance setup like Vagon Cloud Computer can make a noticeable difference.
5. Is speed ramping overused?
Honestly? Yes. It’s easy to fall into the trap of adding ramps everywhere because they look cool. The best edits use speed changes sparingly, at moments that actually matter. If every clip ramps, none of them feel special.
6. Should I nest clips before time remapping?
If you’re doing something complex like combining reverse playback, multiple ramps, and effects, nesting can help. It simplifies how Premiere treats the clip and avoids weird behavior with keyframes. It’s not mandatory, but it’s a useful problem-solver.
7. Do I need a powerful computer to manipulate time in Premiere Pro?
For basic speed changes, no. For heavy time remapping, Optical Flow, and high-resolution footage, it helps a lot. If your system slows you down or limits experimentation, using a cloud-based option like Vagon Cloud Computer can remove that bottleneck without forcing a hardware upgrade.
Get Beyond Your Computer Performance
Run applications on your cloud computer with the latest generation hardware. No more crashes or lags.

Trial includes 1 hour usage + 7 days of storage.
Summarize with AI

Ready to focus on your creativity?
Vagon gives you the ability to create & render projects, collaborate, and stream applications with the power of the best hardware.

Vagon Blog


Run heavy applications on any device with
your personal computer on the cloud.
San Francisco, California
Solutions
Vagon Teams
Vagon Streams
Use Cases
Resources
Vagon Blog
What Slows Down After Effects Projects?
The First 30 Minutes in Blender 3D: A Practical Workflow Guide
What’s New in Godot 4.7? Key Features, Upgrades, and Workflow Improvements
What Slows Down Blender 3D Projects?
What Slows Down Adobe Photoshop Projects?
The First 30 Minutes in Adobe Photoshop: A Practical Workflow Guide
Before You Start in Adobe Photoshop: A Practical Setup Checklist
What’s New in Unreal Engine 5.8? Key Features and Upgrade Advice
How to Run Windows on an iPad: 4 Best Ways (2026)
Vagon Blog
Run heavy applications on any device with
your personal computer on the cloud.
San Francisco, California
Solutions
Vagon Teams
Vagon Streams
Use Cases
Resources
Vagon Blog