Instant Connection for Pixel Streaming
— New Feature Automated Setup
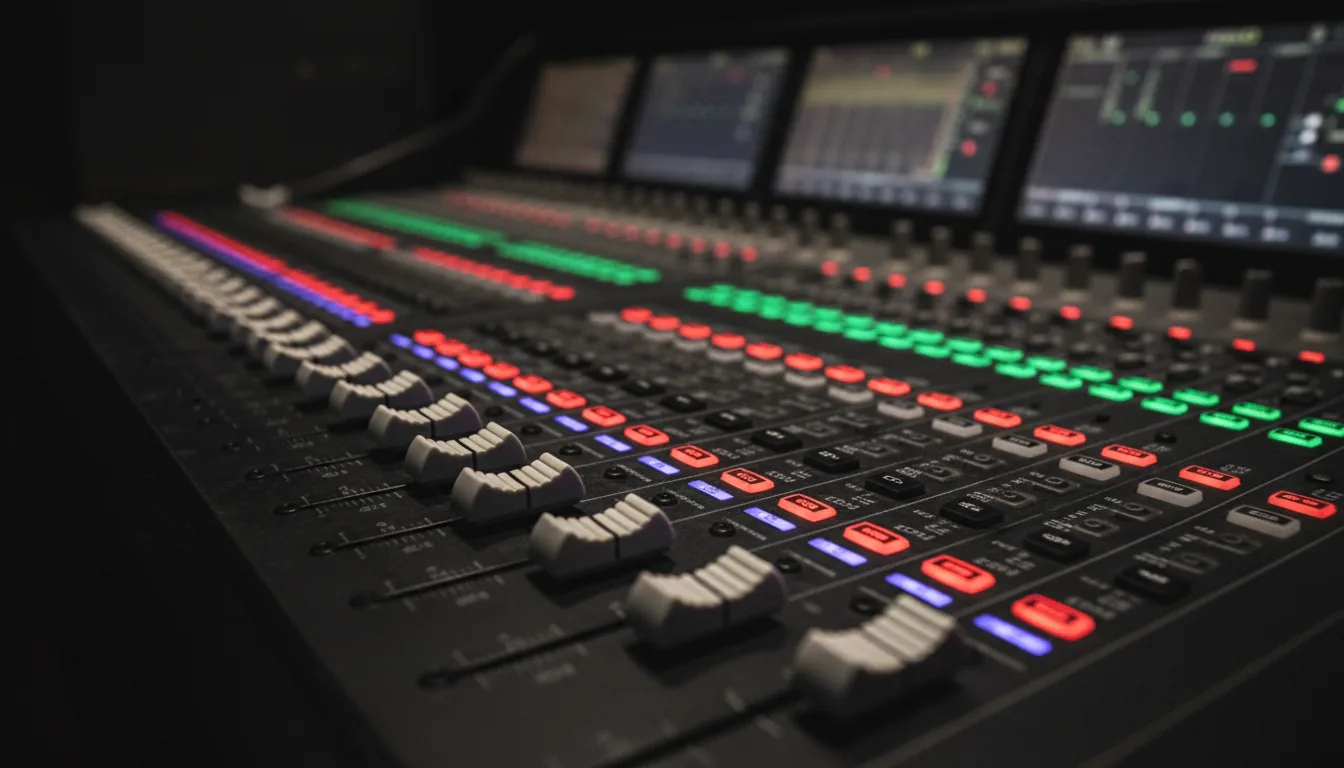
Tips to Improve Your Audio in Premiere Pro
Tips to Improve Your Audio in Premiere Pro
VideoProduction
Tips to Improve Your Audio in Premiere Pro
Table of Contents
I once spent hours polishing a video that looked great. Color, framing, everything. A friend watched a few seconds and said, “I can’t get past the sound.” That was the whole review.
That’s the uncomfortable truth. Viewers will forgive shaky footage or imperfect lighting. Bad audio is different. If dialogue sounds hollow, noisy, or uneven, people leave. Not angrily. Quietly. They just stop watching.
Most audio problems aren’t dramatic. A low hum. Music that’s slightly too loud. Voices that dip at the end of sentences. Small stuff. But stacked together, it makes a video feel amateur fast.
Premiere Pro can help. A lot. But only if audio isn’t treated like a last-minute fix. Once you start taking sound seriously, everything else in your edit suddenly feels stronger.
Fix It at the Source (Before You Touch Premiere)
This part isn’t glamorous, but it matters more than any plugin or preset you’ll ever use. Audio gets decided before you hit record. Premiere Pro can improve things, sure, but it can’t undo bad decisions made on set. I’ve tried. Everyone has.
Let’s start with microphones. The best mic is usually the one closest to the speaker. Not the most expensive one. Not the one with the fanciest specs. Distance matters more than brand. A $100 lav clipped properly will almost always beat a $1,000 shotgun sitting three feet away. Physics doesn’t care about your gear budget.
Room sound is the next silent killer. Hard walls, empty rooms, and bare ceilings create that hollow, echoey tone people hate but can’t always name. You hear it a lot in home offices and kitchens. If a room sounds bad to your ears, it’ll sound worse on playback. Clap your hands once before recording. If you hear a sharp slap followed by a ring, that’s echo. Premiere can soften it, but it won’t disappear.
Background noise deserves respect too. Air conditioners, refrigerators, traffic outside a window. When you’re recording, your brain filters that stuff out. Microphones don’t. They capture everything without mercy. Turning off one appliance or closing a door can save you an hour of cleanup later. Do it. You’ll thank yourself.
Levels matter more than people think. Recording too hot leads to clipping, and clipped audio is basically broken audio. There’s no real fix for that. Aim for dialogue peaking around -6 dB, maybe a little lower. Quiet audio can be boosted. Distorted audio is done.
Here’s the hard truth. “Fix it in post” is mostly a lie we tell ourselves when we’re rushing. Good audio starts with slowing down for thirty seconds before you record. Check the room. Check the mic position. Check the levels. That tiny pause is the cheapest upgrade you’ll ever make.
Once you bring cleaner audio into Premiere Pro, every tool works better. Noise reduction sounds more natural. EQ feels subtle instead of desperate. Mixing stops being a fight. You’re not rescuing audio anymore. You’re shaping it. And that’s where editing starts to feel good.
There’s also a more complete PC build and computer buying guide for Premiere Pro if you’re considering a longer-term hardware investment.
Set Up Your Audio the Right Way in Premiere Pro
This is where a lot of people quietly sabotage themselves. They drop audio into Premiere Pro, start cutting, and hope it somehow sorts itself out later. It won’t. A messy timeline makes audio work harder than it needs to be.
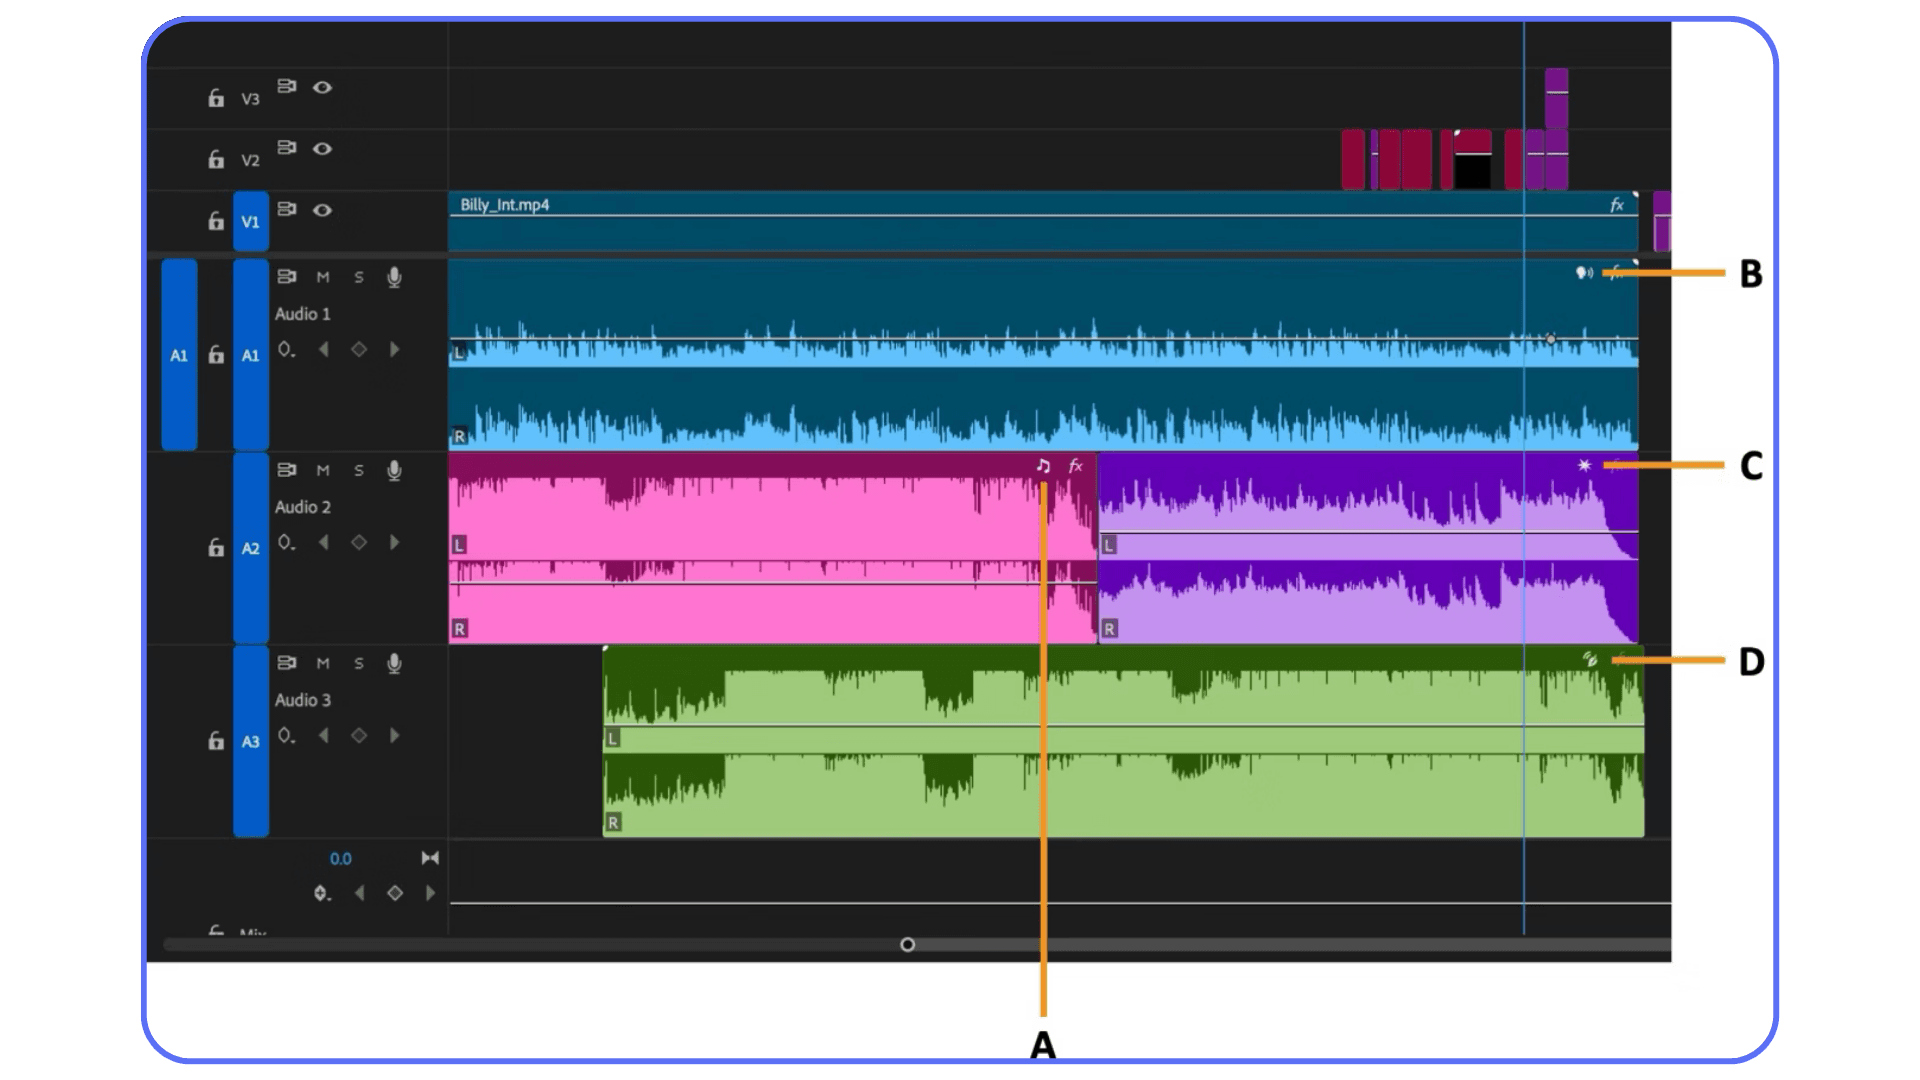
The first thing I do on almost every project is boring. I name my tracks. Dialogue on one set. Music on another. Sound effects on their own lane. Nothing fancy. Just intentional. Once you do this, everything else gets easier. Adjusting levels. Applying effects. Muting things quickly to troubleshoot a problem. It’s the difference between cooking in a clean kitchen and one where every drawer is chaos.
I’ve noticed that editors who struggle with audio usually aren’t bad at audio. They’re overwhelmed by their own timelines. Ten clips stacked across random tracks, music sneaking into dialogue lanes, sound effects hiding where they don’t belong. At that point, even simple fixes feel exhausting.
Use subclips or labels if that’s your thing, but at minimum, keep dialogue consistent. Premiere treats audio tracks differently depending on what you do with them later, especially when you start using track-level effects or automation. Clean structure upfront gives you options later. Sloppy structure takes them away.
Another habit that helps more than people expect is separating clip-level and track-level thinking. Clip effects are great for fixing individual problems. Track effects are better for shaping the overall sound. If you slap noise reduction on every single clip instead of the dialogue track, you’re working harder than necessary. And you’re more likely to create inconsistencies you’ll hear but won’t immediately understand.
This setup step doesn’t take long. Five minutes, maybe ten on a bigger project. But it sets the tone for the entire edit. You stop reacting to problems and start making choices. Audio stops feeling fragile. It starts feeling manageable.
Once your timeline is organized, Premiere’s audio tools finally make sense. Which brings us to the panel almost everyone uses… and almost everyone misuses.
If you’re weighing whether an upgrade is worth it, this breakdown on choosing the best GPU for Premiere Pro helps put performance expectations into perspective.
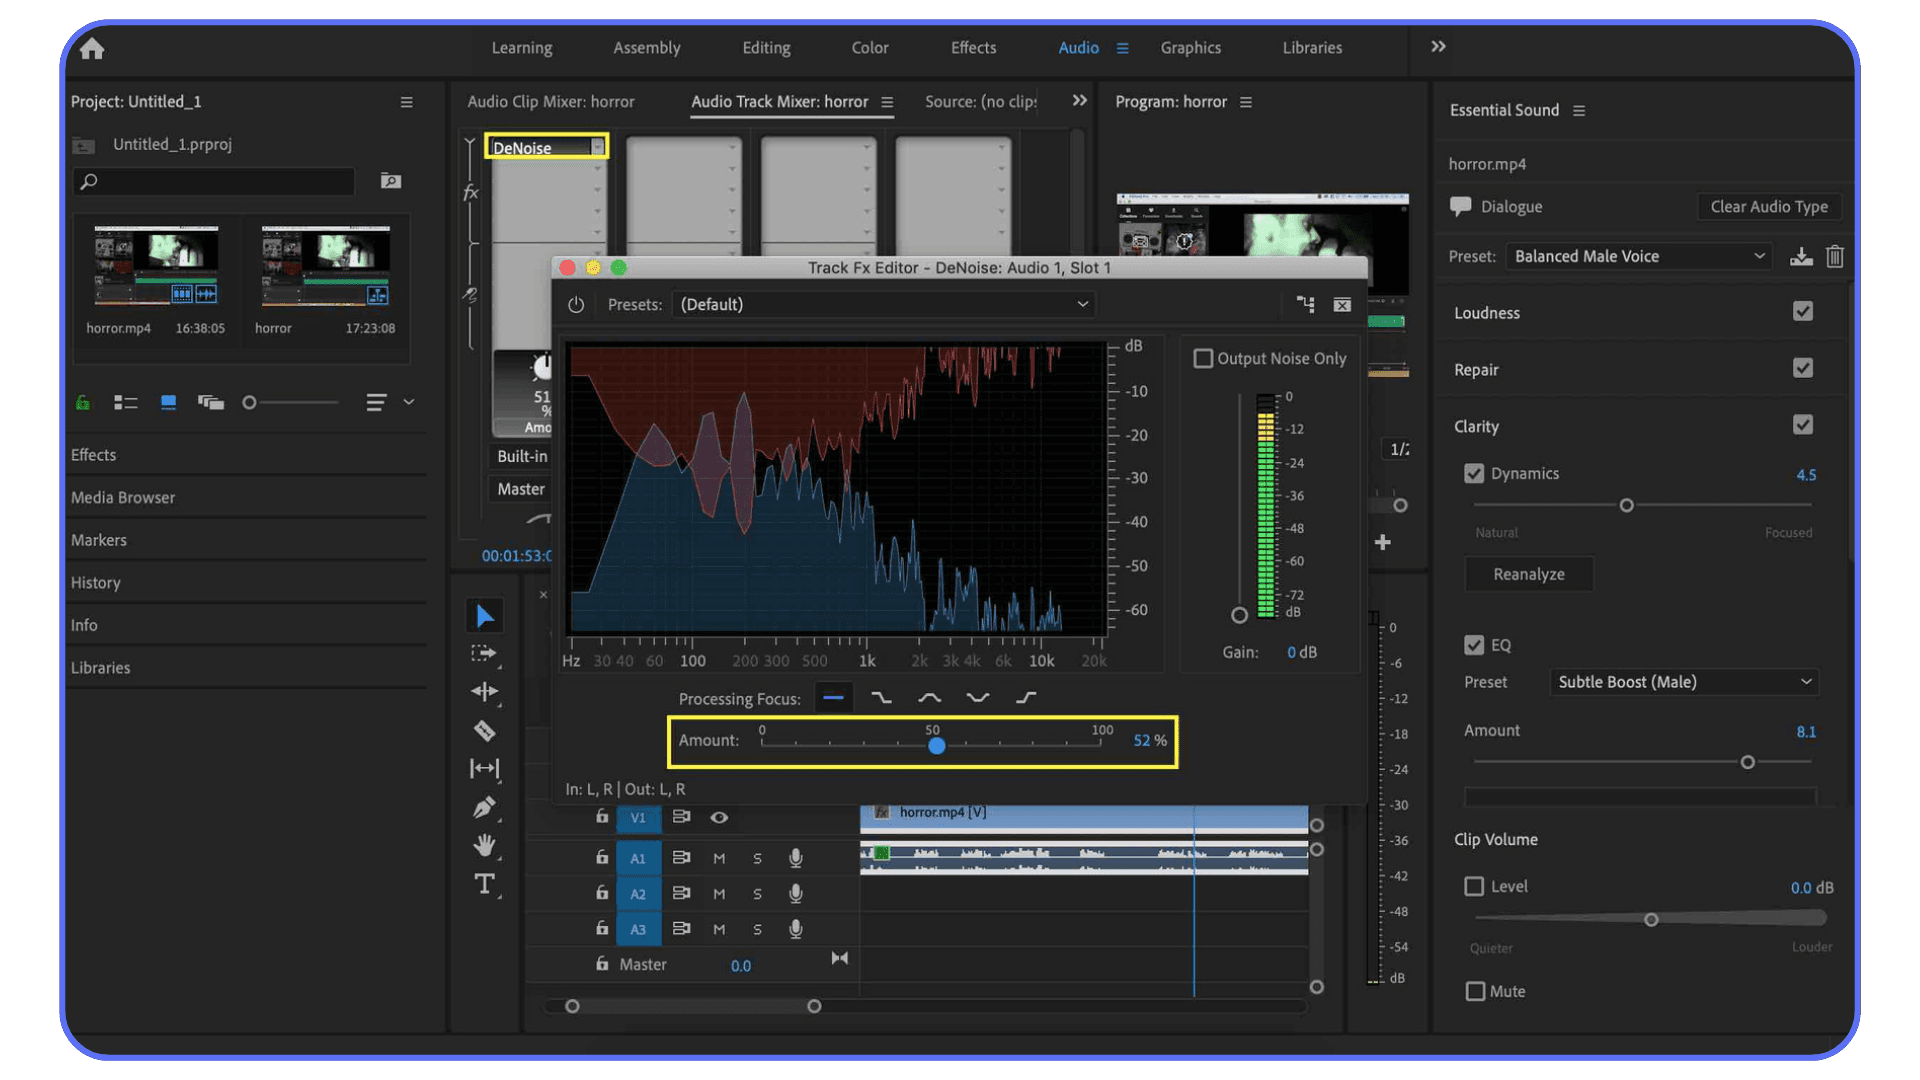
The Essential Sound Panel: Use It, Don’t Worship It
The Essential Sound panel is both a gift and a trap.
On a good day, it can clean up dialogue in minutes. On a bad day, it convinces people they’ve “fixed” audio when they’ve really just buried it under processing. I’ve been on both sides of that.
Here’s the right way to think about it. The Essential Sound panel is a fast assistant, not an audio engineer. It works best when your source audio is already decent and you’re making controlled adjustments. If you throw bad audio at it and crank every slider, it will absolutely fight back.
Start with tagging. Dialogue is dialogue. Music is music. Sound effects are sound effects. This sounds obvious, but I still see people skip it. Premiere needs that context. If you tag dialogue as music or leave clips unassigned, the panel loses half its usefulness.
Enhance Speech is the big one everyone reaches for. Used lightly, it’s impressive. Used aggressively, it can make voices sound brittle and artificial. I usually keep it under 50 percent. Sometimes much lower. If you hear the voice getting sharp or thin, you’ve gone too far. Back it off. Your ears are more reliable than the slider.
Denoise and DeReverb are similar. They’re helpful, but they are not magic erasers. A little noise reduction can clean up hiss or room tone. Too much turns voices metallic fast. Same with reverb. If the room echo is mild, you can tame it. If it sounds like a bathroom, Premiere won’t save you. Accept that early and you’ll make better decisions.
Loudness is where the panel really shines. Auto-matching dialogue levels can save a ton of time, especially with interviews or talking-head videos. Just don’t assume it’s done forever. Check your timeline. Listen through. Sometimes one clip still sticks out, and that’s normal.
The mistake I see most often is stacking everything at once. Enhance Speech, heavy denoise, aggressive EQ, loudness matching. All on the same clip. That’s when audio starts sounding “processed.” Clean audio should feel boring in isolation. No sparkle. No wow factor. Just clear and steady.
Use the Essential Sound panel to get 70 to 80 percent of the way there. Then stop. The last stretch is about restraint, not sliders. And that’s where understanding basic EQ and compression makes a real difference.
When projects get longer and revisions pile up, knowing how to reduce your rendering times in Premiere Pro becomes more than a convenience.
EQ, Compression, and Loudness Without Overthinking
EQ scares people because it looks technical. Sliders. Curves. Numbers everywhere. In reality, you don’t need to think like an audio engineer to get better results. You just need to know what you’re listening for.
Start with EQ. Most dialogue tracks benefit from less low end, not more. Footsteps, desk bumps, air conditioning rumble. None of that helps clarity. A gentle high-pass filter around 80 to 100 Hz cleans up a lot without making voices sound thin. I almost always do this. It’s one of the safest moves you can make.
Next, clarity lives in the mids. Somewhere around 2 to 5 kHz is where speech intelligibility usually sits. If dialogue feels muffled, a small boost here can help. Small is the key word. If you boost until it sounds “exciting,” you’ve probably gone too far. Harshness sneaks up fast.
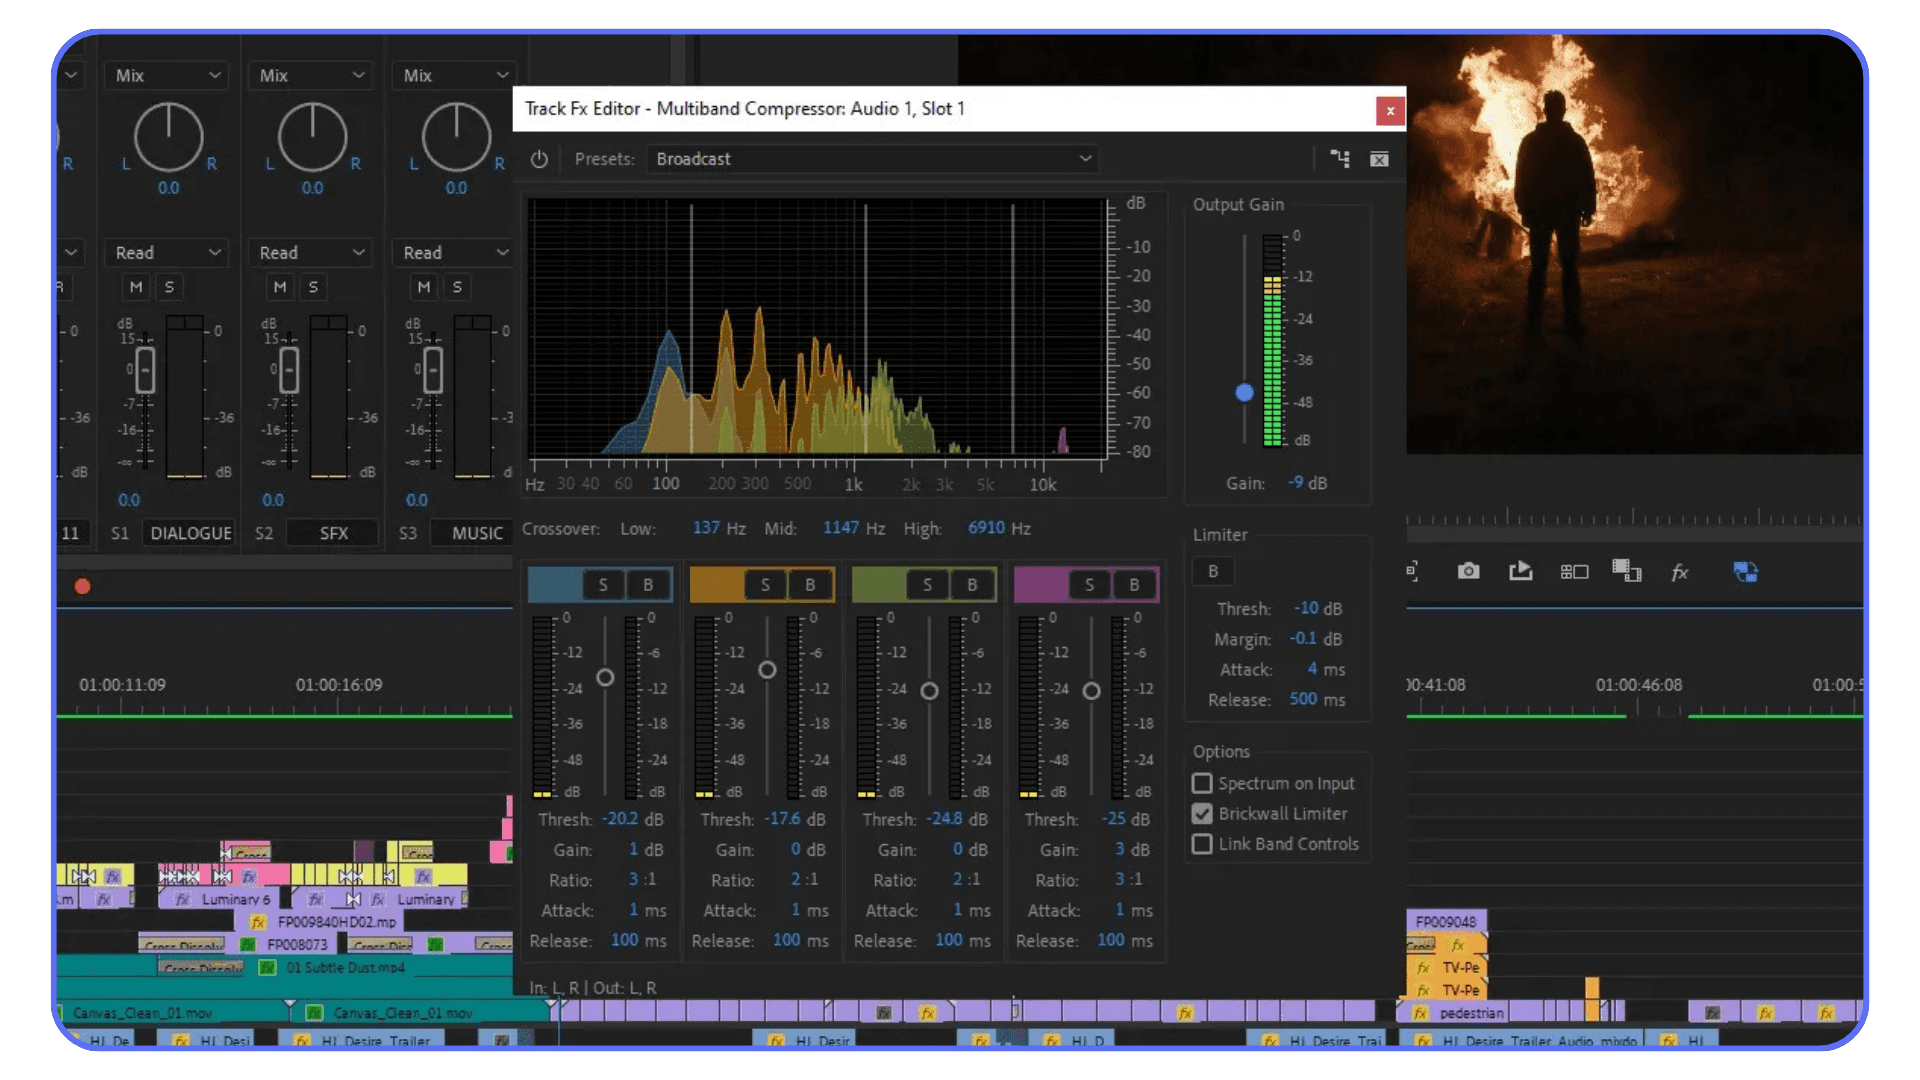
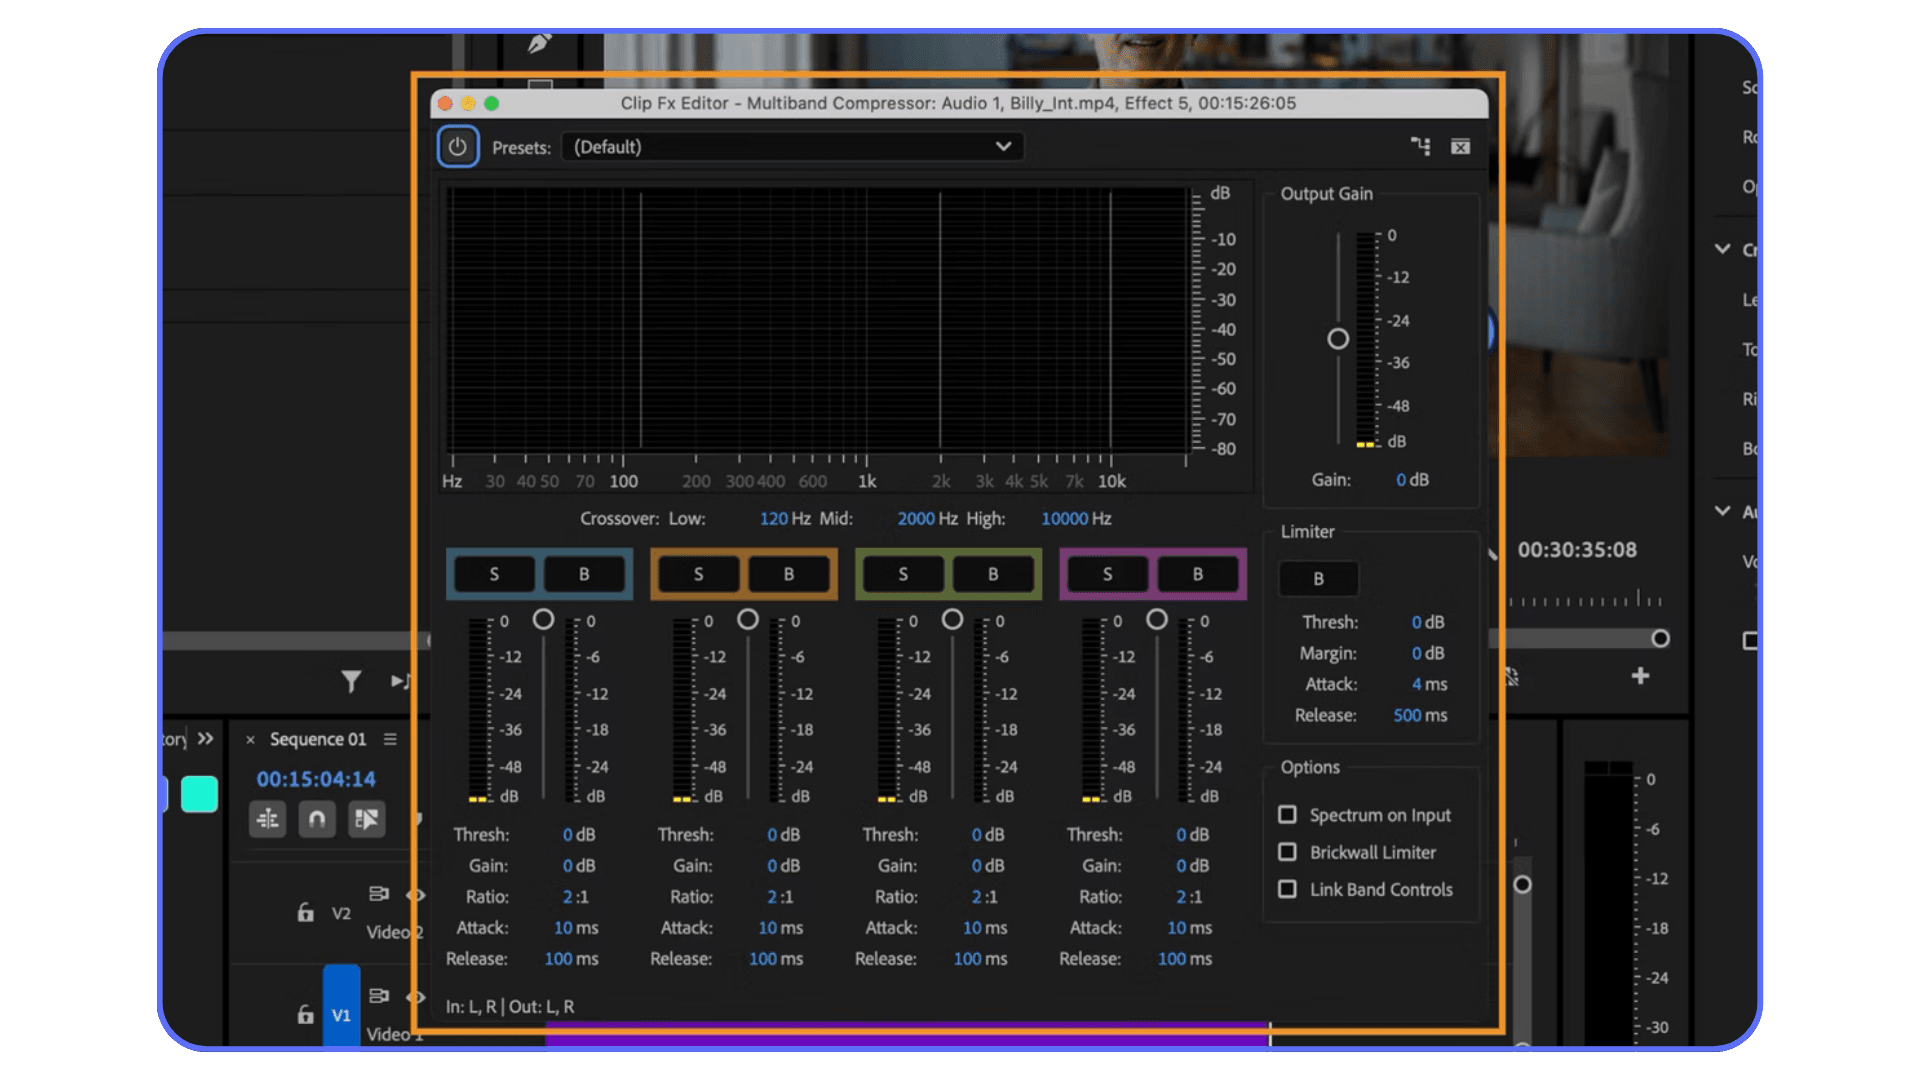
Compression is about control, not volume. People often think compression makes audio louder. It doesn’t. It makes it more even. When someone speaks softly and then suddenly emphasizes a word, compression smooths that jump so the listener doesn’t have to ride the volume knob.
You don’t need aggressive settings. A ratio around 2:1 or 3:1 is usually enough for dialogue. Set the threshold so the compressor only kicks in on louder moments. If you hear pumping or breathing artifacts, something’s wrong. Back off. Compression should feel invisible.
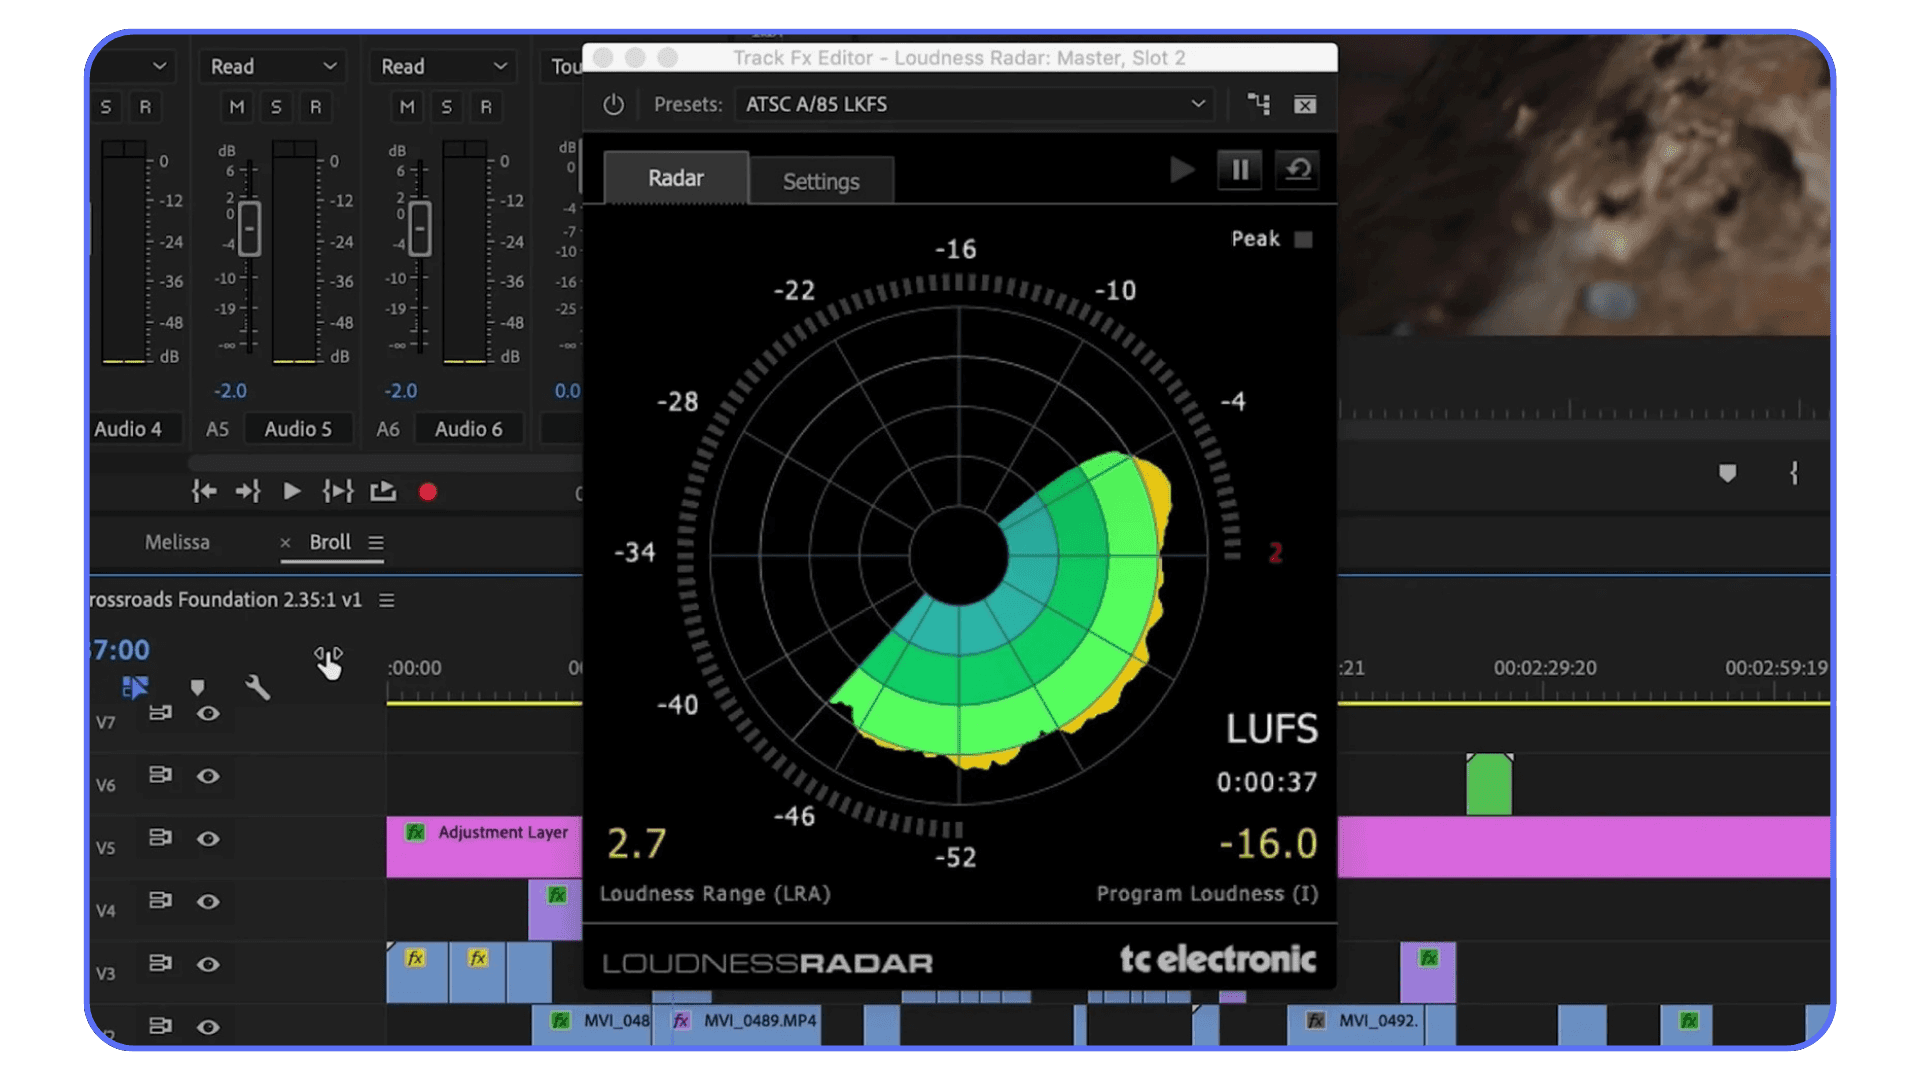
Loudness is the final puzzle piece. Dialogue should sit comfortably above music and effects without feeling shoved in your face. In Premiere, aiming for dialogue around -14 to -16 LUFS for online content is a good starting point. It’s not a law. It’s a reference. Use your ears.
Here’s the mindset shift that helps most. You’re not trying to make audio impressive. You’re trying to make it easy to listen to. When EQ and compression disappear into the experience, you’ve done it right.
Once levels and tone feel solid, you’ll start noticing something else. Background noise. The stuff you ignored earlier suddenly stands out. That’s when noise reduction becomes tempting. And dangerous.
If you want to see how these concepts are applied step by step, structured Premiere Pro tutorials are often faster than guessing your way through sliders.
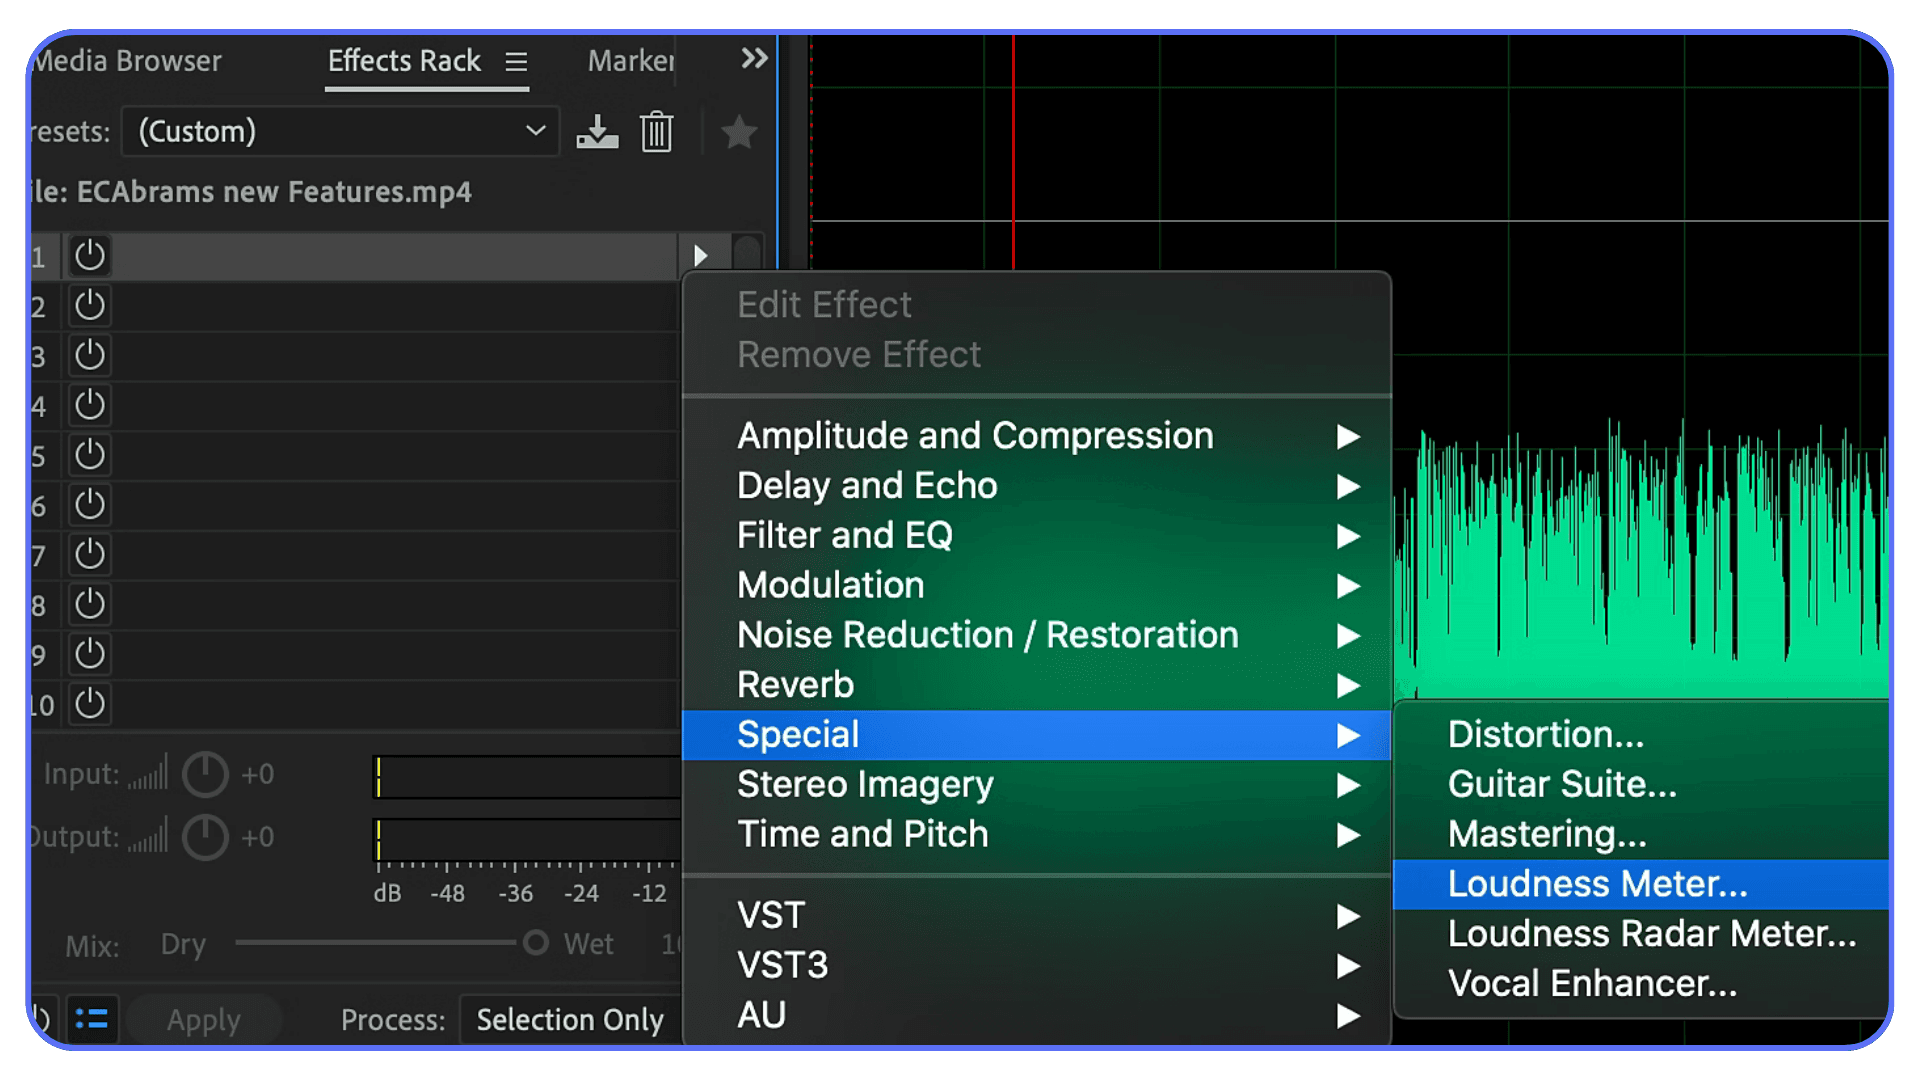
Noise Reduction That Doesn’t Ruin Your Audio
Noise reduction is where good intentions go to die.
You hear a hiss or a hum and think, “I’ll just remove that.” Five seconds later, the voice sounds like it’s coming through a walkie-talkie from 2003. Everyone’s been there. The problem isn’t the tool. It’s how aggressively it gets used.
Premiere’s noise reduction works best when the noise is consistent. Air conditioners, light hums, steady room tone. It struggles with unpredictable sounds like keyboard clicks, dogs barking, or traffic spikes. If the noise changes constantly, the algorithm starts guessing. And guesses sound bad.
Start light. Always. If you think you need 50 percent noise reduction, try 10 first. Then 15. Listen between each change. If the voice starts losing texture or sounding phasey, stop. That’s the ceiling. Anything past that makes things worse, not better.
Adaptive Noise Reduction can help in tricky situations, but it’s not something I throw on by default. It’s heavier, more CPU-intensive, and easier to overdo. Use it when standard denoise isn’t cutting it, and even then, treat it gently.
There’s also a moment when you have to admit defeat. If a recording is buried in noise, no amount of cleanup will make it sound clean. At that point, your goal shifts. Reduce distraction. Keep dialogue understandable. Don’t chase perfection that doesn’t exist.
This is where knowing when to stop becomes a skill. Clean audio still sounds human. You should hear breath, texture, and small imperfections. When those disappear, so does realism.
Once noise is under control, mixing becomes a lot more enjoyable. You’re no longer fighting problems. You’re balancing elements. And that’s where your edit starts to feel intentional instead of patched together.
If your timeline already feels heavy, learning how to create video proxies in Premiere Pro can make a noticeable difference in how responsive everything feels.
Mixing That Feels Invisible (Which Is the Goal)
Good mixing isn’t supposed to announce itself. If someone notices your mix, something probably went wrong.
The main job here is simple. Dialogue first. Everything else supports it. Music, ambience, sound effects. They all exist to make the voice clearer, not compete with it.
Music ducking is one of the easiest wins in Premiere Pro. When dialogue starts, the music should politely step back. Not disappear. Just move out of the way. Automatic ducking in the Essential Sound panel can get you close, but I always listen and tweak manually. Sometimes the dips feel too dramatic. Sometimes not dramatic enough. Trust your ears.
Automation scares people, but it shouldn’t. You don’t need complex curves or constant adjustments. A few keyframes at the start and end of dialogue sections can fix most problems. Think in phrases, not frames. Let the mix breathe.
Panning and stereo width matter more than people realize. Dialogue almost always lives in the center. Music and ambience can spread out. This subtle separation makes everything feel clearer without touching volume at all. It’s an easy trick that feels like magic when you first hear it work.

One habit that helps is mixing at a lower volume. If your dialogue is clear when things are quiet, it’ll usually hold up when played louder. Mixing loud hides problems. Mixing quietly reveals them.
The goal isn’t perfection. It’s comfort. The best mixes feel effortless. Like nothing is fighting for attention. When someone can watch your video without thinking about sound at all, you’ve nailed it.
At this point, your audio should feel solid. But real life recordings are messy, and not every project starts clean. So let’s talk about the kinds of audio people actually bring into Premiere every day.
Heavy audio processing can also increase instability, which is why it helps to know how to stop Premiere Pro from crashing before projects spiral out of control.
Real-World Fixes for Audio People Actually Record
In a perfect world, everyone records in quiet rooms with good mics and unlimited time. In reality, audio shows up in Premiere Pro already compromised. Noisy cafes. Echoey bedrooms. Uneven levels from someone who talks with their hands and their whole body. This is the stuff you actually deal with.
Let’s start with noisy interviews. Think office hum, street noise, or HVAC that never shuts up. The mistake here is trying to erase the noise completely. That almost always makes voices sound thin or robotic. A better approach is controlled reduction. Take the edge off the noise so it fades into the background. Pair light denoise with EQ that focuses on speech clarity, and suddenly the noise matters less because the voice stands out more.
Talking-head and YouTube audio brings a different problem. Inconsistent volume. People lean back, turn their head, get excited, then whisper the next sentence. This is where gentle compression does most of the heavy lifting. Not extreme. Just enough to keep levels predictable. After that, ride the clip gain manually for the worst offenders. It’s boring work, but five minutes of clip gain beats fighting bad loudness for an hour later.
Then there’s flat audio. No noise issues. No distortion. Just dull. This usually comes from cheap mics or poor placement. The fix isn’t throwing effects at it. It’s subtle EQ and presence. Roll off unnecessary low end, add a touch of clarity in the mids, and stop before it starts sounding sharp. Flat audio doesn’t need hype. It needs definition.
One thing I’ve learned the hard way is that every recording has a ceiling. You can make bad audio better. You can’t make it pristine. Chasing a sound that was never captured leads to overprocessing and frustration. The goal is always the same. Make it easy to listen to. Make the message clear.
Once you’ve dealt with these real-world issues, Premiere Pro starts feeling less like a rescue tool and more like a creative one. But there’s another bottleneck people hit around this stage. Performance. Because audio work, especially heavier processing, isn’t free. And sometimes your machine is the thing standing between you and finishing the edit.
A lot of these mistakes show up again and again in beginner and intermediate workflows, which is why curated Premiere Pro tutorials can be more helpful than random YouTube searches.
When Your Machine Starts Holding You Back, Vagon Cloud Computer Steps In
This usually hits right when you’re starting to do better audio work.
Noise reduction here. EQ there. A bit of compression. Loudness matching across multiple dialogue clips. On paper, none of this sounds heavy. In practice, stack it across a timeline and Premiere Pro starts to slow down. Playback stutters. Sliders lag. You make a change and wait a second to hear what it did.
That delay matters more than people admit.
When Premiere stops responding instantly, you stop experimenting. You avoid trying a different EQ move because you don’t want to deal with choppy playback. You leave noise reduction “good enough” instead of dialing it in. Not because you don’t care, but because the machine makes every decision feel costly.
Yes, better hardware fixes this. More CPU power. More RAM. Faster disks. But upgrading a computer just to get through a few heavy projects isn’t always realistic. And a lot of the time, you don’t need permanent power. You need temporary headroom.
That’s exactly where Vagon Cloud Computer fits.
Vagon lets you run Premiere Pro on a high-performance cloud machine without changing how you work. Same interface. Same timeline. Same project files. The difference is that audio-heavy edits stay smooth. Playback doesn’t choke when you stack effects. Adjustments respond instantly. You can actually trust what you’re hearing as you tweak.
This is especially useful when you’re applying the techniques we’ve talked about. Heavier noise reduction. Multiple dialogue tracks with compression and EQ. Music ducking with automation. All the stuff that turns audio from “okay” into professional, and also turns laptops into space heaters.
It also makes collaboration easier. Someone else can open the same project in the same environment without worrying about hardware limitations or inconsistent playback. No exporting reference files. No “it sounds fine on my machine” back-and-forth.
The important thing is that Vagon doesn’t change your workflow. It removes friction from it. When performance stops being the bottleneck, audio work becomes enjoyable again. You try more. You listen longer. You make better calls.
And when audio stops feeling like a technical obstacle, your videos start feeling more confident. More intentional. More watchable. That’s the real upgrade.
Some editors even explore Premiere Pro alternatives when performance or workflow friction becomes a recurring problem.
Final Thoughts
Good audio doesn’t call attention to itself. It just makes everything else feel better. The edit feels smoother. The story lands more clearly. People stay longer without knowing why.
You don’t need perfect recordings or fancy gear to get there. You need awareness, restraint, and a willingness to listen closely. Fix problems early. Organize your timeline. Use Premiere Pro’s tools with intention, not desperation. Stop before you overdo it.
The biggest shift is mental. Once you stop treating audio as an afterthought, your work levels up fast. Not overnight. But project by project. Each one a little cleaner. A little easier to watch.
Trust your ears. Take breaks. Listen again. If it feels good to hear, it probably feels good to watch too.
Cloud workflows also open the door to remote setups, including ways to use Adobe Premiere Pro on iPad without compromising project access.
FAQs
1. Do I really need powerful hardware to get good audio in Premiere Pro?
Not always. Light EQ and basic leveling run fine on most machines. The slowdown usually shows up when you stack noise reduction, compression, loudness matching, and automation across multiple tracks. That’s when performance starts shaping your decisions, not your ears.
2. Why does audio processing slow Premiere Pro down so much?
Audio effects like noise reduction and dynamics processing work in real time. They analyze incoming sound constantly. Multiply that across several dialogue tracks and Premiere has a lot to calculate before it can play anything back smoothly.
3. Can’t I just render previews or bounce audio instead?
You can. And sometimes that’s fine. But rendering breaks your flow. You make a change, wait, listen, repeat. It discourages experimentation. Real-time playback keeps you engaged and helps you make better choices faster.
4. When does a cloud computer actually make sense?
When your local machine starts dictating how much you’re willing to tweak. If you catch yourself avoiding adjustments because playback stutters or effects lag, that’s the moment. You don’t need cloud power for every project. You need it for the heavy ones.
5. Do I have to change my workflow to use Vagon Cloud Computer?
No. That’s the point. With Vagon Cloud Computer, you’re still using Premiere Pro the same way. Same interface. Same shortcuts. Same project structure. You’re just running it on stronger hardware.
6. Is this only useful for audio work?
Not at all. Audio-heavy timelines are just where people notice the benefit first. Color grading, effects, multicam edits, and long timelines all benefit from smoother playback and faster response.
7. Will my audio sound different in the cloud?
No. The processing is the same. What changes is how confidently you can work. When playback is smooth and effects respond instantly, you’re more likely to fine-tune instead of settling.
I once spent hours polishing a video that looked great. Color, framing, everything. A friend watched a few seconds and said, “I can’t get past the sound.” That was the whole review.
That’s the uncomfortable truth. Viewers will forgive shaky footage or imperfect lighting. Bad audio is different. If dialogue sounds hollow, noisy, or uneven, people leave. Not angrily. Quietly. They just stop watching.
Most audio problems aren’t dramatic. A low hum. Music that’s slightly too loud. Voices that dip at the end of sentences. Small stuff. But stacked together, it makes a video feel amateur fast.
Premiere Pro can help. A lot. But only if audio isn’t treated like a last-minute fix. Once you start taking sound seriously, everything else in your edit suddenly feels stronger.
Fix It at the Source (Before You Touch Premiere)
This part isn’t glamorous, but it matters more than any plugin or preset you’ll ever use. Audio gets decided before you hit record. Premiere Pro can improve things, sure, but it can’t undo bad decisions made on set. I’ve tried. Everyone has.
Let’s start with microphones. The best mic is usually the one closest to the speaker. Not the most expensive one. Not the one with the fanciest specs. Distance matters more than brand. A $100 lav clipped properly will almost always beat a $1,000 shotgun sitting three feet away. Physics doesn’t care about your gear budget.
Room sound is the next silent killer. Hard walls, empty rooms, and bare ceilings create that hollow, echoey tone people hate but can’t always name. You hear it a lot in home offices and kitchens. If a room sounds bad to your ears, it’ll sound worse on playback. Clap your hands once before recording. If you hear a sharp slap followed by a ring, that’s echo. Premiere can soften it, but it won’t disappear.
Background noise deserves respect too. Air conditioners, refrigerators, traffic outside a window. When you’re recording, your brain filters that stuff out. Microphones don’t. They capture everything without mercy. Turning off one appliance or closing a door can save you an hour of cleanup later. Do it. You’ll thank yourself.
Levels matter more than people think. Recording too hot leads to clipping, and clipped audio is basically broken audio. There’s no real fix for that. Aim for dialogue peaking around -6 dB, maybe a little lower. Quiet audio can be boosted. Distorted audio is done.
Here’s the hard truth. “Fix it in post” is mostly a lie we tell ourselves when we’re rushing. Good audio starts with slowing down for thirty seconds before you record. Check the room. Check the mic position. Check the levels. That tiny pause is the cheapest upgrade you’ll ever make.
Once you bring cleaner audio into Premiere Pro, every tool works better. Noise reduction sounds more natural. EQ feels subtle instead of desperate. Mixing stops being a fight. You’re not rescuing audio anymore. You’re shaping it. And that’s where editing starts to feel good.
There’s also a more complete PC build and computer buying guide for Premiere Pro if you’re considering a longer-term hardware investment.
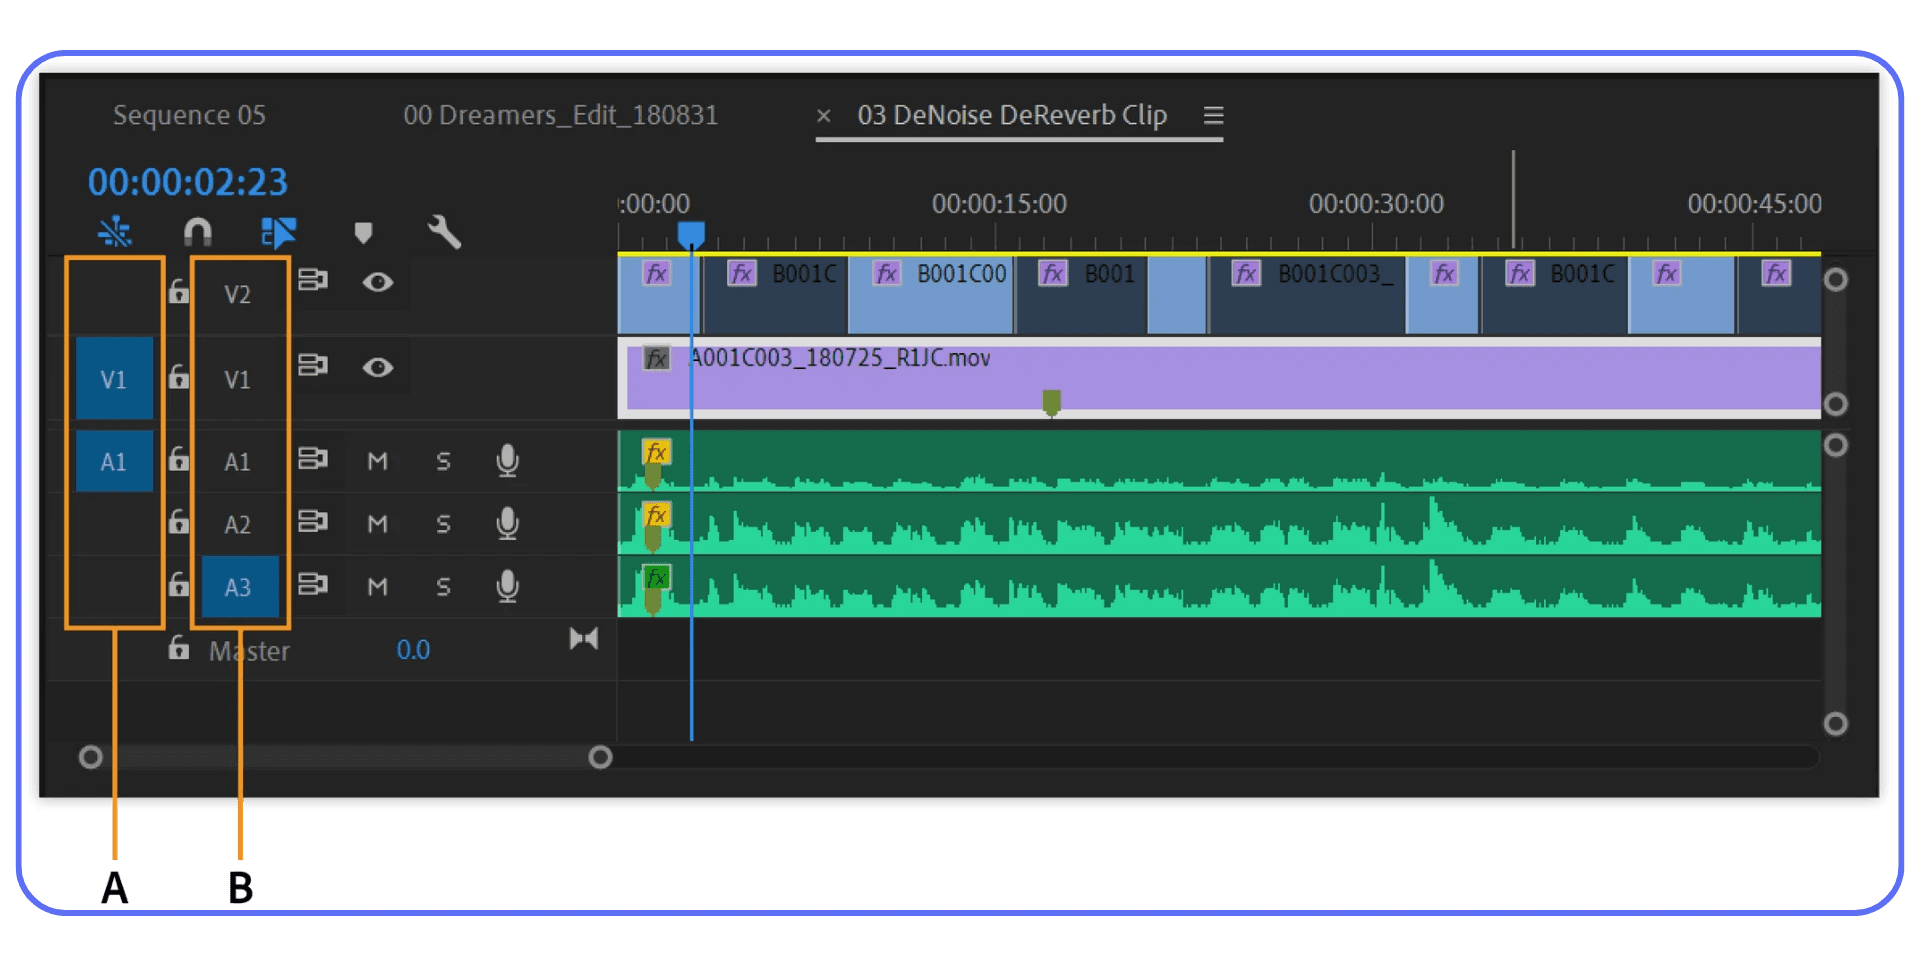
Set Up Your Audio the Right Way in Premiere Pro
This is where a lot of people quietly sabotage themselves. They drop audio into Premiere Pro, start cutting, and hope it somehow sorts itself out later. It won’t. A messy timeline makes audio work harder than it needs to be.
The first thing I do on almost every project is boring. I name my tracks. Dialogue on one set. Music on another. Sound effects on their own lane. Nothing fancy. Just intentional. Once you do this, everything else gets easier. Adjusting levels. Applying effects. Muting things quickly to troubleshoot a problem. It’s the difference between cooking in a clean kitchen and one where every drawer is chaos.
I’ve noticed that editors who struggle with audio usually aren’t bad at audio. They’re overwhelmed by their own timelines. Ten clips stacked across random tracks, music sneaking into dialogue lanes, sound effects hiding where they don’t belong. At that point, even simple fixes feel exhausting.
Use subclips or labels if that’s your thing, but at minimum, keep dialogue consistent. Premiere treats audio tracks differently depending on what you do with them later, especially when you start using track-level effects or automation. Clean structure upfront gives you options later. Sloppy structure takes them away.
Another habit that helps more than people expect is separating clip-level and track-level thinking. Clip effects are great for fixing individual problems. Track effects are better for shaping the overall sound. If you slap noise reduction on every single clip instead of the dialogue track, you’re working harder than necessary. And you’re more likely to create inconsistencies you’ll hear but won’t immediately understand.
This setup step doesn’t take long. Five minutes, maybe ten on a bigger project. But it sets the tone for the entire edit. You stop reacting to problems and start making choices. Audio stops feeling fragile. It starts feeling manageable.
Once your timeline is organized, Premiere’s audio tools finally make sense. Which brings us to the panel almost everyone uses… and almost everyone misuses.
If you’re weighing whether an upgrade is worth it, this breakdown on choosing the best GPU for Premiere Pro helps put performance expectations into perspective.
The Essential Sound Panel: Use It, Don’t Worship It
The Essential Sound panel is both a gift and a trap.
On a good day, it can clean up dialogue in minutes. On a bad day, it convinces people they’ve “fixed” audio when they’ve really just buried it under processing. I’ve been on both sides of that.
Here’s the right way to think about it. The Essential Sound panel is a fast assistant, not an audio engineer. It works best when your source audio is already decent and you’re making controlled adjustments. If you throw bad audio at it and crank every slider, it will absolutely fight back.
Start with tagging. Dialogue is dialogue. Music is music. Sound effects are sound effects. This sounds obvious, but I still see people skip it. Premiere needs that context. If you tag dialogue as music or leave clips unassigned, the panel loses half its usefulness.
Enhance Speech is the big one everyone reaches for. Used lightly, it’s impressive. Used aggressively, it can make voices sound brittle and artificial. I usually keep it under 50 percent. Sometimes much lower. If you hear the voice getting sharp or thin, you’ve gone too far. Back it off. Your ears are more reliable than the slider.
Denoise and DeReverb are similar. They’re helpful, but they are not magic erasers. A little noise reduction can clean up hiss or room tone. Too much turns voices metallic fast. Same with reverb. If the room echo is mild, you can tame it. If it sounds like a bathroom, Premiere won’t save you. Accept that early and you’ll make better decisions.
Loudness is where the panel really shines. Auto-matching dialogue levels can save a ton of time, especially with interviews or talking-head videos. Just don’t assume it’s done forever. Check your timeline. Listen through. Sometimes one clip still sticks out, and that’s normal.
The mistake I see most often is stacking everything at once. Enhance Speech, heavy denoise, aggressive EQ, loudness matching. All on the same clip. That’s when audio starts sounding “processed.” Clean audio should feel boring in isolation. No sparkle. No wow factor. Just clear and steady.
Use the Essential Sound panel to get 70 to 80 percent of the way there. Then stop. The last stretch is about restraint, not sliders. And that’s where understanding basic EQ and compression makes a real difference.
When projects get longer and revisions pile up, knowing how to reduce your rendering times in Premiere Pro becomes more than a convenience.
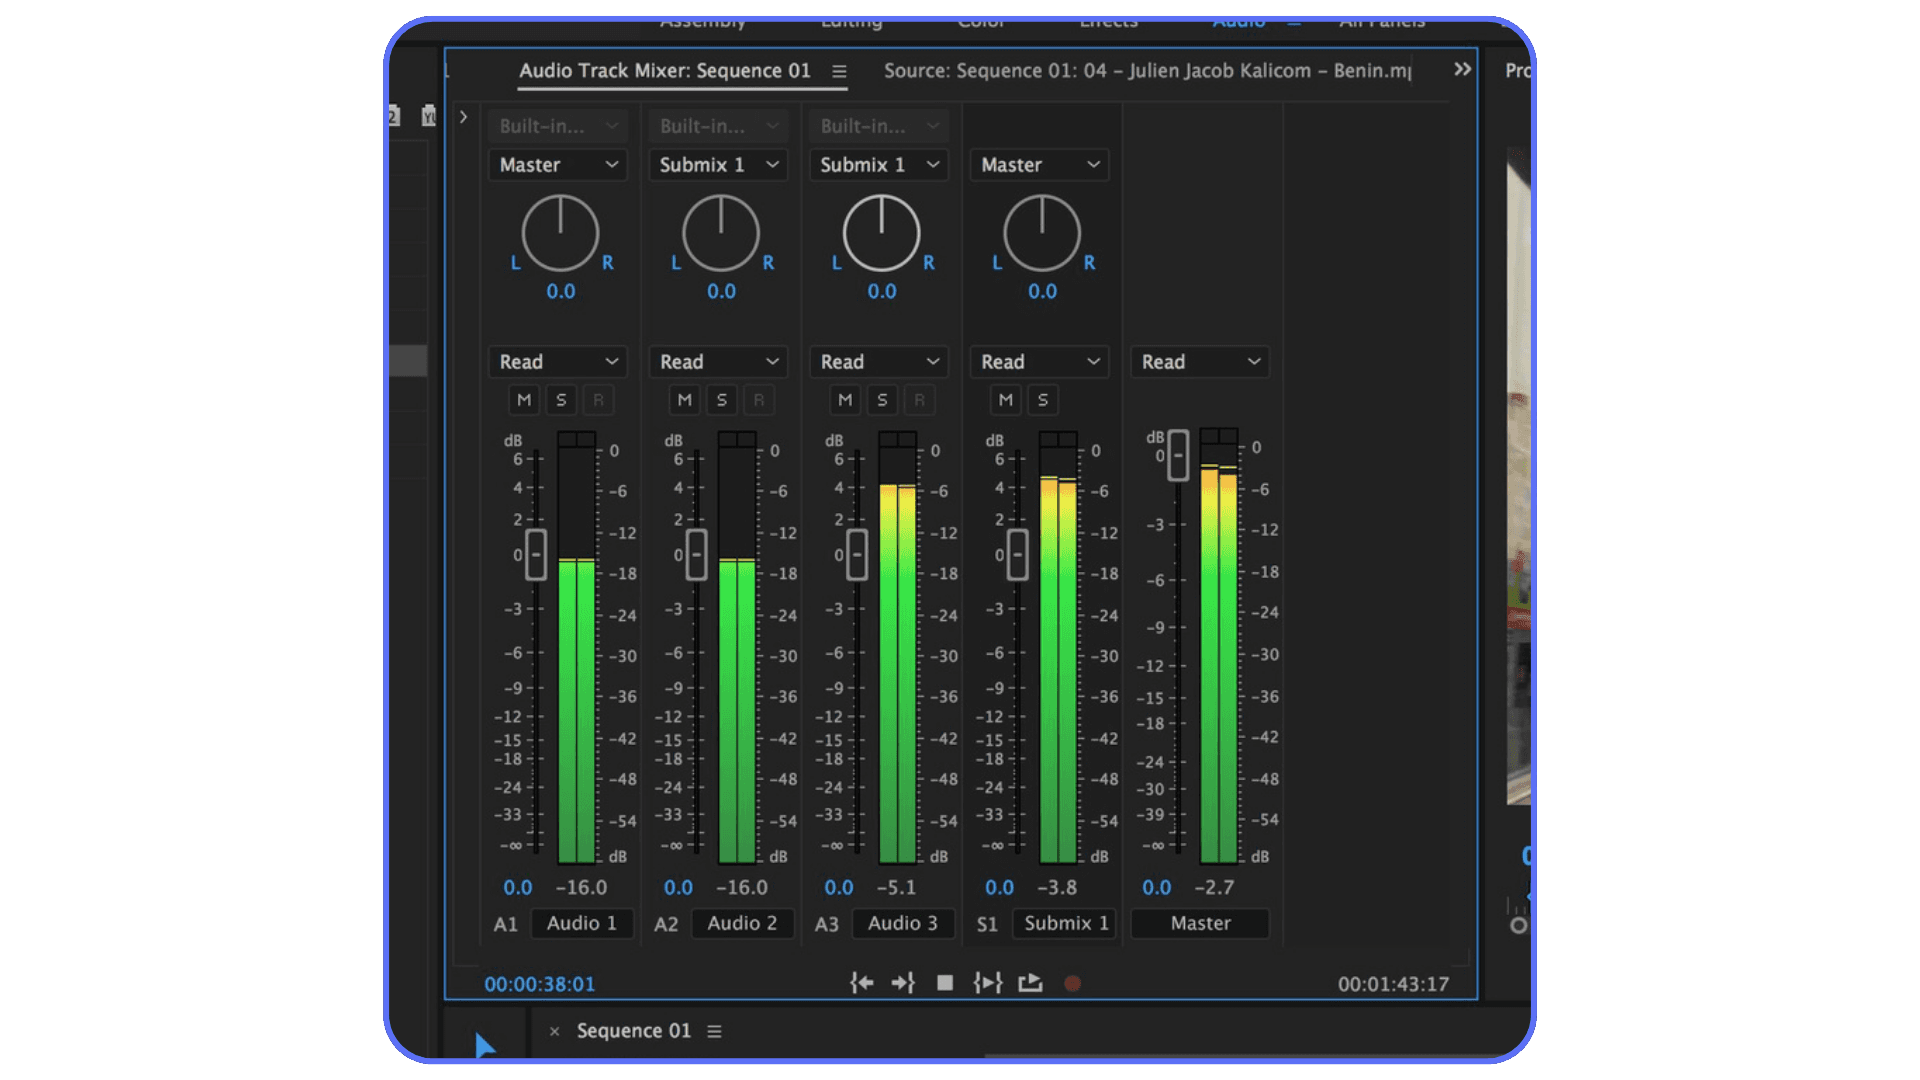
EQ, Compression, and Loudness Without Overthinking
EQ scares people because it looks technical. Sliders. Curves. Numbers everywhere. In reality, you don’t need to think like an audio engineer to get better results. You just need to know what you’re listening for.
Start with EQ. Most dialogue tracks benefit from less low end, not more. Footsteps, desk bumps, air conditioning rumble. None of that helps clarity. A gentle high-pass filter around 80 to 100 Hz cleans up a lot without making voices sound thin. I almost always do this. It’s one of the safest moves you can make.
Next, clarity lives in the mids. Somewhere around 2 to 5 kHz is where speech intelligibility usually sits. If dialogue feels muffled, a small boost here can help. Small is the key word. If you boost until it sounds “exciting,” you’ve probably gone too far. Harshness sneaks up fast.
Compression is about control, not volume. People often think compression makes audio louder. It doesn’t. It makes it more even. When someone speaks softly and then suddenly emphasizes a word, compression smooths that jump so the listener doesn’t have to ride the volume knob.
You don’t need aggressive settings. A ratio around 2:1 or 3:1 is usually enough for dialogue. Set the threshold so the compressor only kicks in on louder moments. If you hear pumping or breathing artifacts, something’s wrong. Back off. Compression should feel invisible.
Loudness is the final puzzle piece. Dialogue should sit comfortably above music and effects without feeling shoved in your face. In Premiere, aiming for dialogue around -14 to -16 LUFS for online content is a good starting point. It’s not a law. It’s a reference. Use your ears.
Here’s the mindset shift that helps most. You’re not trying to make audio impressive. You’re trying to make it easy to listen to. When EQ and compression disappear into the experience, you’ve done it right.
Once levels and tone feel solid, you’ll start noticing something else. Background noise. The stuff you ignored earlier suddenly stands out. That’s when noise reduction becomes tempting. And dangerous.
If you want to see how these concepts are applied step by step, structured Premiere Pro tutorials are often faster than guessing your way through sliders.
Noise Reduction That Doesn’t Ruin Your Audio
Noise reduction is where good intentions go to die.
You hear a hiss or a hum and think, “I’ll just remove that.” Five seconds later, the voice sounds like it’s coming through a walkie-talkie from 2003. Everyone’s been there. The problem isn’t the tool. It’s how aggressively it gets used.
Premiere’s noise reduction works best when the noise is consistent. Air conditioners, light hums, steady room tone. It struggles with unpredictable sounds like keyboard clicks, dogs barking, or traffic spikes. If the noise changes constantly, the algorithm starts guessing. And guesses sound bad.
Start light. Always. If you think you need 50 percent noise reduction, try 10 first. Then 15. Listen between each change. If the voice starts losing texture or sounding phasey, stop. That’s the ceiling. Anything past that makes things worse, not better.
Adaptive Noise Reduction can help in tricky situations, but it’s not something I throw on by default. It’s heavier, more CPU-intensive, and easier to overdo. Use it when standard denoise isn’t cutting it, and even then, treat it gently.
There’s also a moment when you have to admit defeat. If a recording is buried in noise, no amount of cleanup will make it sound clean. At that point, your goal shifts. Reduce distraction. Keep dialogue understandable. Don’t chase perfection that doesn’t exist.
This is where knowing when to stop becomes a skill. Clean audio still sounds human. You should hear breath, texture, and small imperfections. When those disappear, so does realism.
Once noise is under control, mixing becomes a lot more enjoyable. You’re no longer fighting problems. You’re balancing elements. And that’s where your edit starts to feel intentional instead of patched together.
If your timeline already feels heavy, learning how to create video proxies in Premiere Pro can make a noticeable difference in how responsive everything feels.
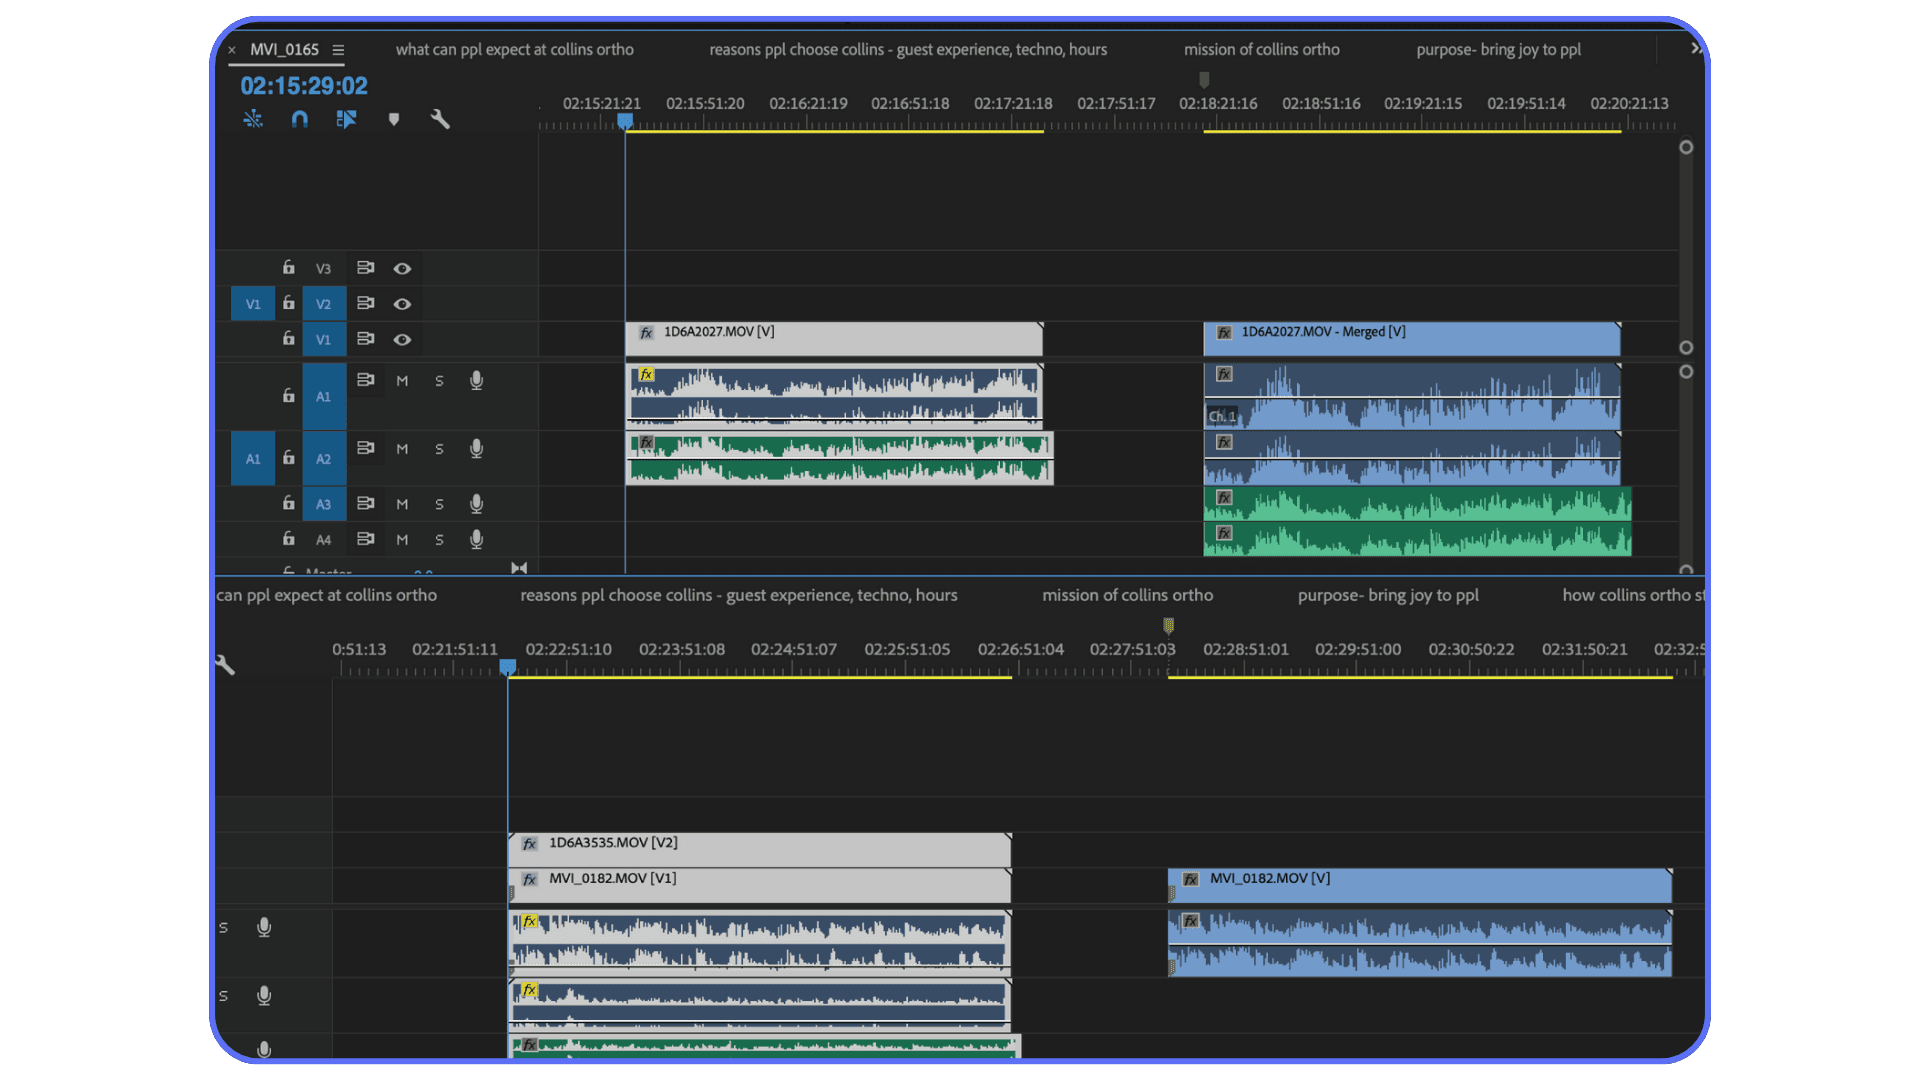
Mixing That Feels Invisible (Which Is the Goal)
Good mixing isn’t supposed to announce itself. If someone notices your mix, something probably went wrong.
The main job here is simple. Dialogue first. Everything else supports it. Music, ambience, sound effects. They all exist to make the voice clearer, not compete with it.
Music ducking is one of the easiest wins in Premiere Pro. When dialogue starts, the music should politely step back. Not disappear. Just move out of the way. Automatic ducking in the Essential Sound panel can get you close, but I always listen and tweak manually. Sometimes the dips feel too dramatic. Sometimes not dramatic enough. Trust your ears.
Automation scares people, but it shouldn’t. You don’t need complex curves or constant adjustments. A few keyframes at the start and end of dialogue sections can fix most problems. Think in phrases, not frames. Let the mix breathe.
Panning and stereo width matter more than people realize. Dialogue almost always lives in the center. Music and ambience can spread out. This subtle separation makes everything feel clearer without touching volume at all. It’s an easy trick that feels like magic when you first hear it work.
One habit that helps is mixing at a lower volume. If your dialogue is clear when things are quiet, it’ll usually hold up when played louder. Mixing loud hides problems. Mixing quietly reveals them.
The goal isn’t perfection. It’s comfort. The best mixes feel effortless. Like nothing is fighting for attention. When someone can watch your video without thinking about sound at all, you’ve nailed it.
At this point, your audio should feel solid. But real life recordings are messy, and not every project starts clean. So let’s talk about the kinds of audio people actually bring into Premiere every day.
Heavy audio processing can also increase instability, which is why it helps to know how to stop Premiere Pro from crashing before projects spiral out of control.
Real-World Fixes for Audio People Actually Record
In a perfect world, everyone records in quiet rooms with good mics and unlimited time. In reality, audio shows up in Premiere Pro already compromised. Noisy cafes. Echoey bedrooms. Uneven levels from someone who talks with their hands and their whole body. This is the stuff you actually deal with.
Let’s start with noisy interviews. Think office hum, street noise, or HVAC that never shuts up. The mistake here is trying to erase the noise completely. That almost always makes voices sound thin or robotic. A better approach is controlled reduction. Take the edge off the noise so it fades into the background. Pair light denoise with EQ that focuses on speech clarity, and suddenly the noise matters less because the voice stands out more.
Talking-head and YouTube audio brings a different problem. Inconsistent volume. People lean back, turn their head, get excited, then whisper the next sentence. This is where gentle compression does most of the heavy lifting. Not extreme. Just enough to keep levels predictable. After that, ride the clip gain manually for the worst offenders. It’s boring work, but five minutes of clip gain beats fighting bad loudness for an hour later.
Then there’s flat audio. No noise issues. No distortion. Just dull. This usually comes from cheap mics or poor placement. The fix isn’t throwing effects at it. It’s subtle EQ and presence. Roll off unnecessary low end, add a touch of clarity in the mids, and stop before it starts sounding sharp. Flat audio doesn’t need hype. It needs definition.
One thing I’ve learned the hard way is that every recording has a ceiling. You can make bad audio better. You can’t make it pristine. Chasing a sound that was never captured leads to overprocessing and frustration. The goal is always the same. Make it easy to listen to. Make the message clear.
Once you’ve dealt with these real-world issues, Premiere Pro starts feeling less like a rescue tool and more like a creative one. But there’s another bottleneck people hit around this stage. Performance. Because audio work, especially heavier processing, isn’t free. And sometimes your machine is the thing standing between you and finishing the edit.
A lot of these mistakes show up again and again in beginner and intermediate workflows, which is why curated Premiere Pro tutorials can be more helpful than random YouTube searches.
When Your Machine Starts Holding You Back, Vagon Cloud Computer Steps In
This usually hits right when you’re starting to do better audio work.
Noise reduction here. EQ there. A bit of compression. Loudness matching across multiple dialogue clips. On paper, none of this sounds heavy. In practice, stack it across a timeline and Premiere Pro starts to slow down. Playback stutters. Sliders lag. You make a change and wait a second to hear what it did.
That delay matters more than people admit.
When Premiere stops responding instantly, you stop experimenting. You avoid trying a different EQ move because you don’t want to deal with choppy playback. You leave noise reduction “good enough” instead of dialing it in. Not because you don’t care, but because the machine makes every decision feel costly.
Yes, better hardware fixes this. More CPU power. More RAM. Faster disks. But upgrading a computer just to get through a few heavy projects isn’t always realistic. And a lot of the time, you don’t need permanent power. You need temporary headroom.
That’s exactly where Vagon Cloud Computer fits.
Vagon lets you run Premiere Pro on a high-performance cloud machine without changing how you work. Same interface. Same timeline. Same project files. The difference is that audio-heavy edits stay smooth. Playback doesn’t choke when you stack effects. Adjustments respond instantly. You can actually trust what you’re hearing as you tweak.
This is especially useful when you’re applying the techniques we’ve talked about. Heavier noise reduction. Multiple dialogue tracks with compression and EQ. Music ducking with automation. All the stuff that turns audio from “okay” into professional, and also turns laptops into space heaters.
It also makes collaboration easier. Someone else can open the same project in the same environment without worrying about hardware limitations or inconsistent playback. No exporting reference files. No “it sounds fine on my machine” back-and-forth.
The important thing is that Vagon doesn’t change your workflow. It removes friction from it. When performance stops being the bottleneck, audio work becomes enjoyable again. You try more. You listen longer. You make better calls.
And when audio stops feeling like a technical obstacle, your videos start feeling more confident. More intentional. More watchable. That’s the real upgrade.
Some editors even explore Premiere Pro alternatives when performance or workflow friction becomes a recurring problem.
Final Thoughts
Good audio doesn’t call attention to itself. It just makes everything else feel better. The edit feels smoother. The story lands more clearly. People stay longer without knowing why.
You don’t need perfect recordings or fancy gear to get there. You need awareness, restraint, and a willingness to listen closely. Fix problems early. Organize your timeline. Use Premiere Pro’s tools with intention, not desperation. Stop before you overdo it.
The biggest shift is mental. Once you stop treating audio as an afterthought, your work levels up fast. Not overnight. But project by project. Each one a little cleaner. A little easier to watch.
Trust your ears. Take breaks. Listen again. If it feels good to hear, it probably feels good to watch too.
Cloud workflows also open the door to remote setups, including ways to use Adobe Premiere Pro on iPad without compromising project access.
FAQs
1. Do I really need powerful hardware to get good audio in Premiere Pro?
Not always. Light EQ and basic leveling run fine on most machines. The slowdown usually shows up when you stack noise reduction, compression, loudness matching, and automation across multiple tracks. That’s when performance starts shaping your decisions, not your ears.
2. Why does audio processing slow Premiere Pro down so much?
Audio effects like noise reduction and dynamics processing work in real time. They analyze incoming sound constantly. Multiply that across several dialogue tracks and Premiere has a lot to calculate before it can play anything back smoothly.
3. Can’t I just render previews or bounce audio instead?
You can. And sometimes that’s fine. But rendering breaks your flow. You make a change, wait, listen, repeat. It discourages experimentation. Real-time playback keeps you engaged and helps you make better choices faster.
4. When does a cloud computer actually make sense?
When your local machine starts dictating how much you’re willing to tweak. If you catch yourself avoiding adjustments because playback stutters or effects lag, that’s the moment. You don’t need cloud power for every project. You need it for the heavy ones.
5. Do I have to change my workflow to use Vagon Cloud Computer?
No. That’s the point. With Vagon Cloud Computer, you’re still using Premiere Pro the same way. Same interface. Same shortcuts. Same project structure. You’re just running it on stronger hardware.
6. Is this only useful for audio work?
Not at all. Audio-heavy timelines are just where people notice the benefit first. Color grading, effects, multicam edits, and long timelines all benefit from smoother playback and faster response.
7. Will my audio sound different in the cloud?
No. The processing is the same. What changes is how confidently you can work. When playback is smooth and effects respond instantly, you’re more likely to fine-tune instead of settling.
Get Beyond Your Computer Performance
Run applications on your cloud computer with the latest generation hardware. No more crashes or lags.

Trial includes 1 hour usage + 7 days of storage.
Summarize with AI

Ready to focus on your creativity?
Vagon gives you the ability to create & render projects, collaborate, and stream applications with the power of the best hardware.

Vagon Blog


Run heavy applications on any device with
your personal computer on the cloud.
San Francisco, California
Solutions
Vagon Teams
Vagon Streams
Use Cases
Resources
Vagon Blog
What Slows Down After Effects Projects?
The First 30 Minutes in Blender 3D: A Practical Workflow Guide
What’s New in Godot 4.7? Key Features, Upgrades, and Workflow Improvements
What Slows Down Blender 3D Projects?
What Slows Down Adobe Photoshop Projects?
The First 30 Minutes in Adobe Photoshop: A Practical Workflow Guide
Before You Start in Adobe Photoshop: A Practical Setup Checklist
What’s New in Unreal Engine 5.8? Key Features and Upgrade Advice
How to Run Windows on an iPad: 4 Best Ways (2026)
Vagon Blog
Run heavy applications on any device with
your personal computer on the cloud.
San Francisco, California
Solutions
Vagon Teams
Vagon Streams
Use Cases
Resources
Vagon Blog