Instant Connection for Pixel Streaming
— New Feature Automated Setup

Blender Eevee Rendering: Basic and Advanced Techniques
Blender Eevee Rendering: Basic and Advanced Techniques
DigitalArt
Blender Eevee Rendering: Basic and Advanced Techniques
Table of Contents
Whether you are a professional 3D artist, a game developer, or someone new to this, this guide will take you through the basics of using Eevee for high-quality results in the least amount of time possible. To reduce the risk of long rendering times, it’s essential to implement a strategy. Check out our article on the Complete Guide for Reducing Rendering Times in Blender.
Getting Started with Eevee in Blender
Eevee’s journey starts with familiarizing yourself with its interface and functions. Understanding how to use Eevee in Blender is essential for achieving high-quality renders quickly and efficiently. To effectively navigate through the vast interface of Blender, one must learn Blender Shortcuts & Hotkeys, which are important for proper navigation through Blender. Using these shortcuts can greatly influence your workflow, allowing you to focus more on your creativity and less on working with the software. If you're just starting out, you might want to check out our Complete Guide to Blender 3D for Beginners for a comprehensive overview of the basics.
Setting Up Eevee for Your First Render
Configuring Blender Eevee render settings is relatively simple and sets new boundaries for exploring the world of imagination. Choose Eevee as your engine under the render properties tab, and you’ll notice that the result in the viewport becomes much quicker to respond and of much higher quality. When configuring Blender Eevee render settings, it’s crucial to choose the right options to maximize both speed and quality.
New to Eevee Renderer? Learn all Blender 3D terms from our Blender 3D Glossary.
Understanding Eevee’s Interface and Basic Features
Understanding the user-friendly interface of Eevee is the first step in utilizing its functionalities fully. Explore essential features like the shading and rendering tabs, which are fundamental to Eevee’s functionality. The Eevee render engine is designed for real-time rendering, making it ideal for projects where speed is a priority. Learning these elements provides a good basis for using Eevee’s real-time rendering capabilities. This includes operating the light and shadow settings and exploring volumetric lighting, which adds a new dimension to your projects.
Simple Eevee Projects for Beginners
Starting with simple projects is a good way for newcomers to familiarize themselves with 3D rendering in Eevee. Enhance your Blender asset library to improve the engagement and visual aspects of these projects. As you embark on simple projects, don't forget to explore some useful Blender tips & tricks to enhance your efficiency and output quality. The quality of models, textures, and lighting setups will make your scenes look perfect. Find curated resources in our Best Blender Assets guide and learn about free and premium resources to enhance your 3D art.
Basic Eevee Techniques for Real-Time Rendering
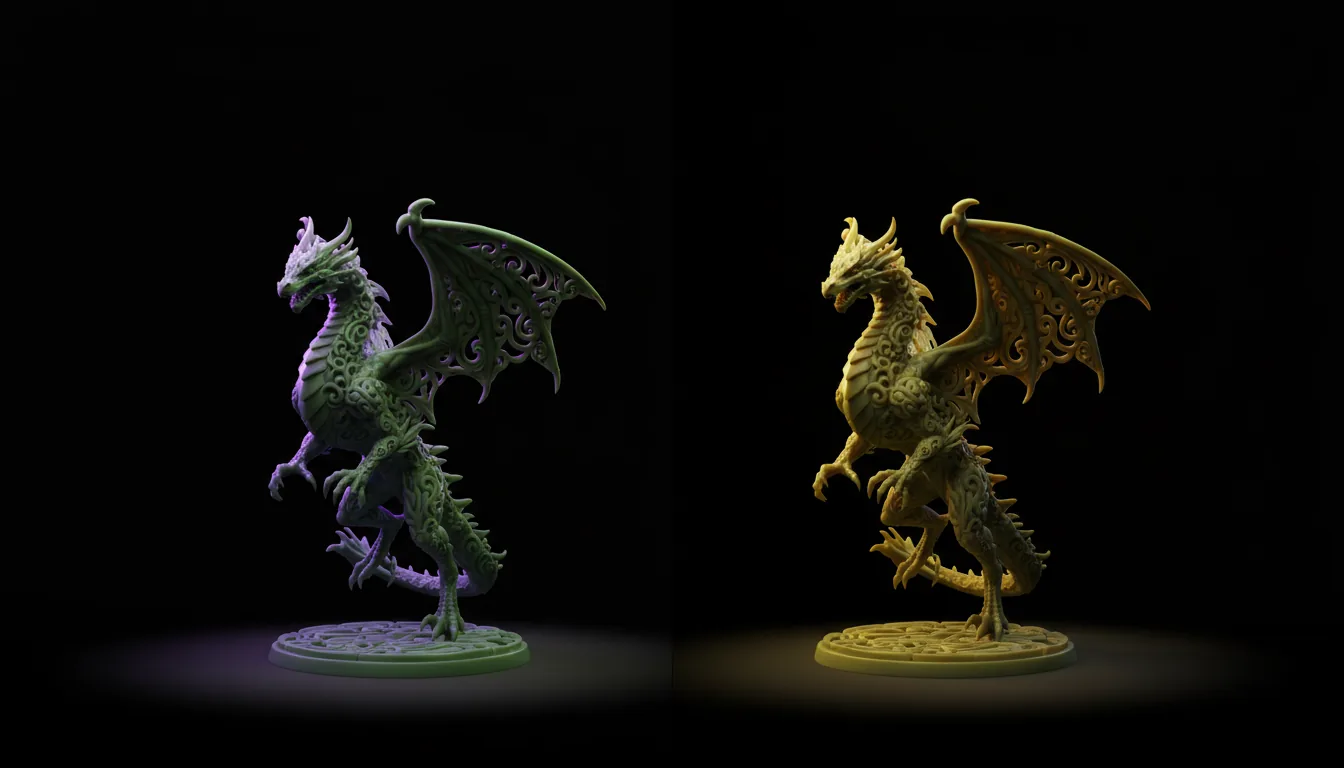
Begin by learning the basic principles of Eevee rendering, which are integral to any successful rendering job. This exploration of materials, surface textures, lighting environments, and animations provides a fundamental perspective for producing impressive results. To achieve a Blender Eevee realistic render, focus on mastering the use of materials, lighting, and textures.
Working with Materials and Textures in Eevee
Eevee’s material and texture options offer unlimited opportunities to break down a scene and expand upon it creatively. Experimenting with Blender Eevee settings can unlock new creative possibilities for materials and textures. Start by browsing the shader editor and creating diffuse, glossy, and specular materials using Eevee’s node system. Whether you follow the physically based rendering (PBR) approach for realism or prefer a stylized look, node manipulation is extremely important.
Basic Lighting Setups in Eevee
Eevee’s real-time light casting allows for spontaneous changes in lighting setups. You can alter your lighting arrangement at will. Start with a three-point lighting setup to emphasize your subject, and experiment with area lights for soft shadows and ambient lights for depth. For environmental lighting, apply HDRI maps for realistic global illumination (GI). Explore the Top Blender Plugins to improve your lighting techniques and easily incorporate more intricate lighting situations.
Creating Simple Animations and Effects
Begin by creating simple keyframe animations as you learn the workings of movement and timing in Blender. Use Eevee’s particle system to generate realistic smoke, fire, and magical sparkles. Simulate soft body and cloth dynamics to bring realism to your animations. Integrate camera movements into dynamic scenes and use Blender’s sequencer to edit your animations directly within Blender.
Optimizing Performance in Eevee
Blender offers a 3D creation process controlled by elements used to optimize the workflow and navigate the 3D environment. Eevee allows you to manage complex scenes in real-time while maintaining quality and performance. For those working on complex scenes, consider using Blender on a cloud computer to leverage more powerful hardware without overloading your local system. Addressing common bottlenecks and issues is key to sustaining a cohesive creative process. Our guide on Common Problems of Blender and Their Solutions can be a very helpful resource.
Balancing Quality and Performance in Real-Time Rendering
Start by balancing texture resolution and quality; detailed high-resolution textures can impact performance, so use them wisely. Shader complexity correlates with rendering time, so consider using a decimate modifier to reduce the number of vertices in models without significantly affecting their appearance. Finding the best Eevee settings in Blender is a balancing act between rendering quality and system performance. LOD (Level of Detail) techniques can also substantially improve performance, especially in large environments. If you're balancing high-quality textures and performance, you might also explore cloud rendering services for Blender users to offload heavy rendering tasks.
Effective Use of Eevee’s Render Settings for Optimization
Optimizing your Blender projects with Eevee’s render engine means taking a dip into many highly configurable settings to establish a good balance between rendering quality and efficiency. Eevee’s adjustability enables many modifications, meaning you obtain a quality end product without overloading the system. Obtain major performance gains without compromising the visual appeal of your scenes by focusing on select areas such as shadows, reflections, and volumetric effects. Below, we’ll explore how to use these settings for optimization effectively:
Shadows provide more consistency and realism to scenes but can burden performance.
On the other hand, soft shadows improve visual veracity but are computationally expensive. Try reducing the shadow’s resolution or altering softness for efficiency.
With correct parameter configuration of clip start and end values, it is possible to prevent unnecessary rendering of shadows, i.e., eliminating the issue that would slow down the performance without compromising the visual quality.
Reflections enrich the realism of reflections but should be treated with caution.
Restrict the use of volumetric to environments that require it for mood or narrative purposes. When deployed, setting sample rate and clipping distances helps to mitigate performance hits.
Through careful tweaking of these settings, you can strike a compromise between rendering visually remarkable outcomes and delivering satisfactory performance in Eevee-enacted records.
Do you know how to work with Dynamic Paint? Learn every Blender 3D term from our Blender 3D Glossary.
Elevate Your Eevee Renders with Vagon’s High-Performance Cloud PCs
As you dive deeper into mastering Eevee in Blender, ensure you have the power to render your projects without limitations. Vagon’s high-performance cloud PCs offer the perfect solution, providing you with top-tier hardware capabilities directly from your browser. Whether you’re tackling complex scenes or aiming for the highest quality in your renders, Vagon’s 48 cores, 4 x 24GB RTX-enabled Nvidia GPUs, and 192GB of RAM will give you the performance edge you need. Start your next Blender project with Vagon and experience faster, more efficient rendering today.
Tips for Managing Large and Complex Scenes
Effectively handling large and complex scenes in Eevee is necessary to ensure consistent performance. Use Blender’s collection and layer methods to separate parts of the scene for focused editing or rendering. Simplify scenes by combining objects that do not need individual animation or using instancing for repetitive objects. Lastly, consider the camera’s field of view and remove objects outside the camera’s frustum to minimize unnecessary rendering.
Conclusion
Eevee offers a very useful real-time render engine within Blender, serving various applications such as game development or visual effects. As you continue to explore Blender Eevee render options, understanding the difference between Eevee and Cycles will help you choose the right engine for your specific project needs. Remember, the journey doesn’t end here—experiment with Eevee to push its limits and discover what it can do for you. Challenge yourself with your next Blender project to see how Eevee can help you create explosive visuals and animations. The world of real-time rendering is here, and with Eevee, you’re ready to face it.
You can also check out our GPU Guide for tips to use GPU, along with speed up and acceleration tips for Blender 3D.
FAQs:
What are the best Eevee render settings in Blender
The best Eevee render settings in Blender depend on your project requirements. For high-quality renders, focus on adjusting the shadows, reflections, and volumetrics. Optimizing these settings can help you achieve a balance between visual quality and performance.
How do I set up Eevee for my first render in Blender?
To set up Eevee for your first render in Blender, start by selecting Eevee as your render engine under the Render Properties tab. Configure essential settings like lighting, materials, and textures to optimize the real-time rendering process.
How can I achieve a realistic render with Blender Eevee?
Achieving a realistic render with Blender Eevee involves mastering material setups, lighting, and environmental settings. Utilizing HDRI maps, refining your material shaders, and experimenting with volumetric lighting can significantly enhance realism.
What is the difference between Eevee and Cycles in Blender?
Eevee and Cycles are both rendering engines in Blender, but they serve different purposes. Eevee is a real-time render engine, optimized for speed, while Cycles is a path-tracing engine designed for physically accurate renders. The choice between the two depends on your project’s needs.
How do I optimize performance in Eevee when working with complex scenes?
To optimize performance in Eevee with complex scenes, use techniques like reducing texture resolution, simplifying shaders, and managing scene complexity through layers and collections. Additionally, consider using Level of Detail (LOD) techniques to maintain performance.
Which is better for my project, Eevee or Cycles?
The choice between Eevee and Cycles depends on your project’s requirements. Eevee is ideal for projects needing fast, real-time feedback, like game development or quick visualizations. Cycles, on the other hand, is better suited for projects requiring photorealistic rendering and more detailed light simulations.
Whether you are a professional 3D artist, a game developer, or someone new to this, this guide will take you through the basics of using Eevee for high-quality results in the least amount of time possible. To reduce the risk of long rendering times, it’s essential to implement a strategy. Check out our article on the Complete Guide for Reducing Rendering Times in Blender.
Getting Started with Eevee in Blender
Eevee’s journey starts with familiarizing yourself with its interface and functions. Understanding how to use Eevee in Blender is essential for achieving high-quality renders quickly and efficiently. To effectively navigate through the vast interface of Blender, one must learn Blender Shortcuts & Hotkeys, which are important for proper navigation through Blender. Using these shortcuts can greatly influence your workflow, allowing you to focus more on your creativity and less on working with the software. If you're just starting out, you might want to check out our Complete Guide to Blender 3D for Beginners for a comprehensive overview of the basics.
Setting Up Eevee for Your First Render
Configuring Blender Eevee render settings is relatively simple and sets new boundaries for exploring the world of imagination. Choose Eevee as your engine under the render properties tab, and you’ll notice that the result in the viewport becomes much quicker to respond and of much higher quality. When configuring Blender Eevee render settings, it’s crucial to choose the right options to maximize both speed and quality.
New to Eevee Renderer? Learn all Blender 3D terms from our Blender 3D Glossary.
Understanding Eevee’s Interface and Basic Features
Understanding the user-friendly interface of Eevee is the first step in utilizing its functionalities fully. Explore essential features like the shading and rendering tabs, which are fundamental to Eevee’s functionality. The Eevee render engine is designed for real-time rendering, making it ideal for projects where speed is a priority. Learning these elements provides a good basis for using Eevee’s real-time rendering capabilities. This includes operating the light and shadow settings and exploring volumetric lighting, which adds a new dimension to your projects.
Simple Eevee Projects for Beginners
Starting with simple projects is a good way for newcomers to familiarize themselves with 3D rendering in Eevee. Enhance your Blender asset library to improve the engagement and visual aspects of these projects. As you embark on simple projects, don't forget to explore some useful Blender tips & tricks to enhance your efficiency and output quality. The quality of models, textures, and lighting setups will make your scenes look perfect. Find curated resources in our Best Blender Assets guide and learn about free and premium resources to enhance your 3D art.
Basic Eevee Techniques for Real-Time Rendering
Begin by learning the basic principles of Eevee rendering, which are integral to any successful rendering job. This exploration of materials, surface textures, lighting environments, and animations provides a fundamental perspective for producing impressive results. To achieve a Blender Eevee realistic render, focus on mastering the use of materials, lighting, and textures.
Working with Materials and Textures in Eevee
Eevee’s material and texture options offer unlimited opportunities to break down a scene and expand upon it creatively. Experimenting with Blender Eevee settings can unlock new creative possibilities for materials and textures. Start by browsing the shader editor and creating diffuse, glossy, and specular materials using Eevee’s node system. Whether you follow the physically based rendering (PBR) approach for realism or prefer a stylized look, node manipulation is extremely important.
Basic Lighting Setups in Eevee
Eevee’s real-time light casting allows for spontaneous changes in lighting setups. You can alter your lighting arrangement at will. Start with a three-point lighting setup to emphasize your subject, and experiment with area lights for soft shadows and ambient lights for depth. For environmental lighting, apply HDRI maps for realistic global illumination (GI). Explore the Top Blender Plugins to improve your lighting techniques and easily incorporate more intricate lighting situations.
Creating Simple Animations and Effects
Begin by creating simple keyframe animations as you learn the workings of movement and timing in Blender. Use Eevee’s particle system to generate realistic smoke, fire, and magical sparkles. Simulate soft body and cloth dynamics to bring realism to your animations. Integrate camera movements into dynamic scenes and use Blender’s sequencer to edit your animations directly within Blender.
Optimizing Performance in Eevee
Blender offers a 3D creation process controlled by elements used to optimize the workflow and navigate the 3D environment. Eevee allows you to manage complex scenes in real-time while maintaining quality and performance. For those working on complex scenes, consider using Blender on a cloud computer to leverage more powerful hardware without overloading your local system. Addressing common bottlenecks and issues is key to sustaining a cohesive creative process. Our guide on Common Problems of Blender and Their Solutions can be a very helpful resource.
Balancing Quality and Performance in Real-Time Rendering
Start by balancing texture resolution and quality; detailed high-resolution textures can impact performance, so use them wisely. Shader complexity correlates with rendering time, so consider using a decimate modifier to reduce the number of vertices in models without significantly affecting their appearance. Finding the best Eevee settings in Blender is a balancing act between rendering quality and system performance. LOD (Level of Detail) techniques can also substantially improve performance, especially in large environments. If you're balancing high-quality textures and performance, you might also explore cloud rendering services for Blender users to offload heavy rendering tasks.
Effective Use of Eevee’s Render Settings for Optimization
Optimizing your Blender projects with Eevee’s render engine means taking a dip into many highly configurable settings to establish a good balance between rendering quality and efficiency. Eevee’s adjustability enables many modifications, meaning you obtain a quality end product without overloading the system. Obtain major performance gains without compromising the visual appeal of your scenes by focusing on select areas such as shadows, reflections, and volumetric effects. Below, we’ll explore how to use these settings for optimization effectively:
Shadows provide more consistency and realism to scenes but can burden performance.
On the other hand, soft shadows improve visual veracity but are computationally expensive. Try reducing the shadow’s resolution or altering softness for efficiency.
With correct parameter configuration of clip start and end values, it is possible to prevent unnecessary rendering of shadows, i.e., eliminating the issue that would slow down the performance without compromising the visual quality.
Reflections enrich the realism of reflections but should be treated with caution.
Restrict the use of volumetric to environments that require it for mood or narrative purposes. When deployed, setting sample rate and clipping distances helps to mitigate performance hits.
Through careful tweaking of these settings, you can strike a compromise between rendering visually remarkable outcomes and delivering satisfactory performance in Eevee-enacted records.
Do you know how to work with Dynamic Paint? Learn every Blender 3D term from our Blender 3D Glossary.
Elevate Your Eevee Renders with Vagon’s High-Performance Cloud PCs
As you dive deeper into mastering Eevee in Blender, ensure you have the power to render your projects without limitations. Vagon’s high-performance cloud PCs offer the perfect solution, providing you with top-tier hardware capabilities directly from your browser. Whether you’re tackling complex scenes or aiming for the highest quality in your renders, Vagon’s 48 cores, 4 x 24GB RTX-enabled Nvidia GPUs, and 192GB of RAM will give you the performance edge you need. Start your next Blender project with Vagon and experience faster, more efficient rendering today.
Tips for Managing Large and Complex Scenes
Effectively handling large and complex scenes in Eevee is necessary to ensure consistent performance. Use Blender’s collection and layer methods to separate parts of the scene for focused editing or rendering. Simplify scenes by combining objects that do not need individual animation or using instancing for repetitive objects. Lastly, consider the camera’s field of view and remove objects outside the camera’s frustum to minimize unnecessary rendering.
Conclusion
Eevee offers a very useful real-time render engine within Blender, serving various applications such as game development or visual effects. As you continue to explore Blender Eevee render options, understanding the difference between Eevee and Cycles will help you choose the right engine for your specific project needs. Remember, the journey doesn’t end here—experiment with Eevee to push its limits and discover what it can do for you. Challenge yourself with your next Blender project to see how Eevee can help you create explosive visuals and animations. The world of real-time rendering is here, and with Eevee, you’re ready to face it.
You can also check out our GPU Guide for tips to use GPU, along with speed up and acceleration tips for Blender 3D.
FAQs:
What are the best Eevee render settings in Blender
The best Eevee render settings in Blender depend on your project requirements. For high-quality renders, focus on adjusting the shadows, reflections, and volumetrics. Optimizing these settings can help you achieve a balance between visual quality and performance.
How do I set up Eevee for my first render in Blender?
To set up Eevee for your first render in Blender, start by selecting Eevee as your render engine under the Render Properties tab. Configure essential settings like lighting, materials, and textures to optimize the real-time rendering process.
How can I achieve a realistic render with Blender Eevee?
Achieving a realistic render with Blender Eevee involves mastering material setups, lighting, and environmental settings. Utilizing HDRI maps, refining your material shaders, and experimenting with volumetric lighting can significantly enhance realism.
What is the difference between Eevee and Cycles in Blender?
Eevee and Cycles are both rendering engines in Blender, but they serve different purposes. Eevee is a real-time render engine, optimized for speed, while Cycles is a path-tracing engine designed for physically accurate renders. The choice between the two depends on your project’s needs.
How do I optimize performance in Eevee when working with complex scenes?
To optimize performance in Eevee with complex scenes, use techniques like reducing texture resolution, simplifying shaders, and managing scene complexity through layers and collections. Additionally, consider using Level of Detail (LOD) techniques to maintain performance.
Which is better for my project, Eevee or Cycles?
The choice between Eevee and Cycles depends on your project’s requirements. Eevee is ideal for projects needing fast, real-time feedback, like game development or quick visualizations. Cycles, on the other hand, is better suited for projects requiring photorealistic rendering and more detailed light simulations.
Get Beyond Your Computer Performance
Run applications on your cloud computer with the latest generation hardware. No more crashes or lags.

Trial includes 1 hour usage + 7 days of storage.
Summarize with AI

Ready to focus on your creativity?
Vagon gives you the ability to create & render projects, collaborate, and stream applications with the power of the best hardware.

Vagon Blog


Run heavy applications on any device with
your personal computer on the cloud.
San Francisco, California
Solutions
Vagon Teams
Vagon Streams
Use Cases
Resources
Vagon Blog
How to Run Inkscape on a Cloud Ubuntu Desktop (2026 Guide)
How to Run Krita on a Cloud Ubuntu Desktop for Digital Painting (2026 Guide)
How to Run GIMP on a Cloud Ubuntu Desktop (2026 Guide)
How to Run Jupyter on a Cloud GPU Linux Desktop (2026 Guide)
Vagon vs GitHub Codespaces: Cloud Dev Environments Compared (2026)
Vagon vs RunPod: Which Cloud GPU Is Right for You? (2026 Comparison)
How to Watch Your AI Agent Work on a Cloud Ubuntu Desktop (2026 Guide)
How to Run a Local LLM on Ubuntu in the Cloud (2026 Guide)
How to Run Blender on a Cloud GPU (Ubuntu): The Complete 2026 Guide
Vagon Blog
Run heavy applications on any device with
your personal computer on the cloud.
San Francisco, California
Solutions
Vagon Teams
Vagon Streams
Use Cases
Resources
Vagon Blog