Instant Connection for Pixel Streaming
— New Feature Automated Setup
Blender Keyboard Shortcuts Every 3D Artist Should Know
Blender Keyboard Shortcuts Every 3D Artist Should Know
DigitalArt
Blender Keyboard Shortcuts Every 3D Artist Should Know
Table of Contents
Ever catch yourself clicking through three menus just to move a cube two centimeters to the left. I have. More times than I’d like to admit. It’s one of those quiet Blender frustrations that creeps up on you when you’re tired, your scene is getting heavy, and your patience is already gone.
Here’s the honest truth. Blender keyboard shortcuts are not a “nice to have.” They’re the difference between feeling in control and feeling like the software is fighting you. I’ve seen people spend five minutes doing something that should take five seconds. Not because they’re bad at Blender. Because they’re still reaching for menus instead of keys.
Once shortcuts click, something shifts. Your hands stop leaving the keyboard. Your eyes stay in the viewport. Modeling feels faster, smoother, almost physical. Like you’re shaping things instead of instructing a computer to do it. And yeah, it saves hours. Not in a motivational-poster way. In a very real, “why did I ever work without this” way.
If you’ve ever thought, “There has to be a faster way to do this,” you’re already in the right mindset. That’s exactly what this guide is for.
Why Keyboard Shortcuts Matter in Blender
This is the part people often underestimate. They think shortcuts are just about speed. Speed is part of it, but it’s not the real benefit.
In my experience, shortcuts are about staying in the flow. Blender is designed for your hands to live on the keyboard and mouse, not bounce between menus. The moment you start clicking everything, your thinking slows down to match your cursor. That’s when modeling starts to feel clunky.
Blender’s default keymap isn’t accidental. G, R, and S sit where they do for a reason. Tab switches modes instantly because Blender expects you to move between Object Mode and Edit Mode constantly. The software assumes confidence and rewards it.
I’ve noticed beginners often think Blender feels awkward because they’re “bad at it.” Usually, they’re just using it like a traditional menu driven app. Blender is closer to an instrument. Muscle memory matters more than memorization.
Shortcuts also keep your focus where it belongs. Your eyes stay on the model, watching edges slide and forms change, instead of hunting for icons. And the payoff grows over time. The same keys you use on day one are the ones you’ll rely on months later, just on heavier, more complex work.
If Blender has ever felt slower than it should, this is usually why. And fixing it doesn’t mean learning everything. Just the right things.
Performance issues become even more noticeable once you start choosing the right Blender render engine for heavier scenes and animations.
The Essentials: Shortcuts You’ll Use Every Single Session
If you only learn one group of shortcuts, make it this one. These are the keys I use every time I open Blender. Not sometimes. Not on big projects. Every session.
You don’t need to memorize a giant cheat sheet right away. Honestly, that backfires. What works is burning a small set of shortcuts into muscle memory until you stop thinking about them at all.
Basic Transformations
Everything in Blender starts here. Movement, shaping, layout. If these don’t feel automatic yet, nothing else will.
G to move.
R to rotate.
S to scale.
That’s it. That’s the trio.
Here’s the part people miss early on. After pressing one of these, you can constrain the movement. Tap X, Y, or Z to lock it to an axis. Press Shift + X to move on everything except X. Same logic applies to rotate and scale.
Once this clicks, you stop fighting the viewport. You stop overshooting placements. Your objects land where you expect them to. It feels precise instead of slippery.
Switching Modes Without Breaking Your Rhythm
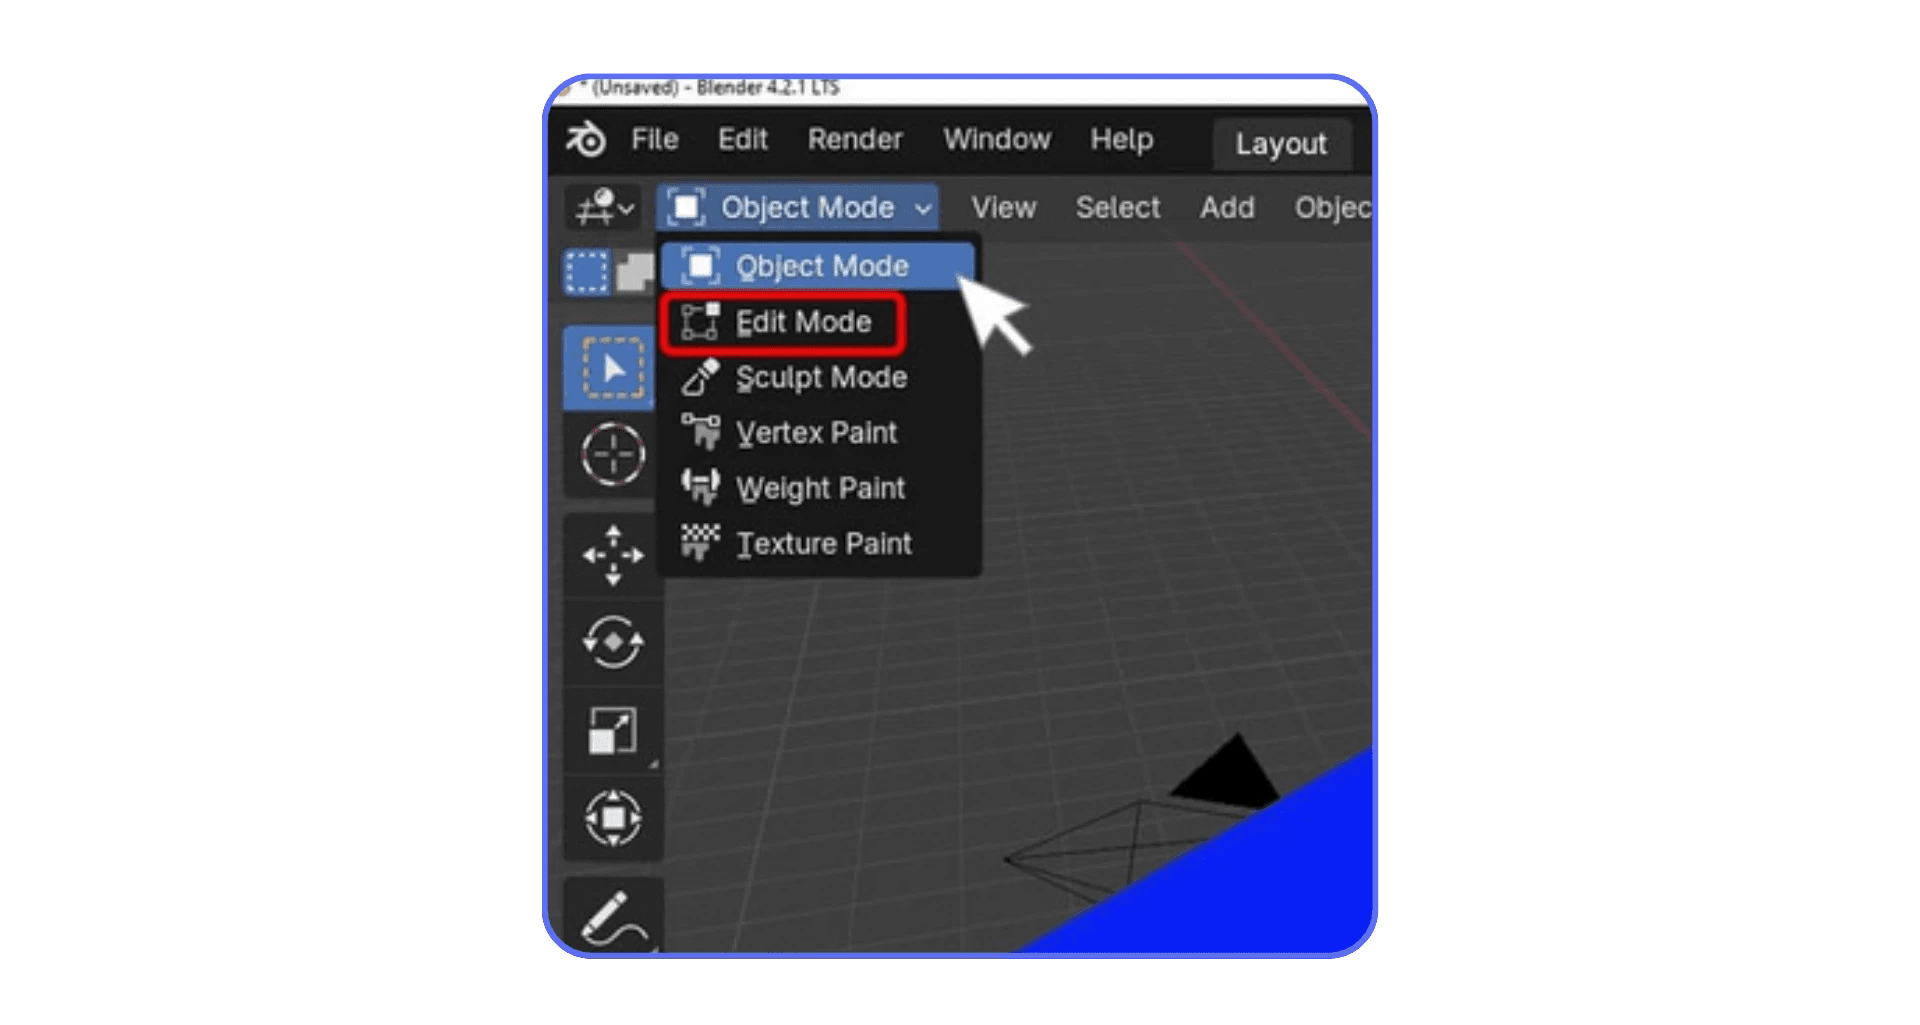
Blender lives in modes. Object Mode, Edit Mode, Sculpt Mode, and a few more depending on what you’re doing. You’ll bounce between them constantly.
Tab switches between Object Mode and Edit Mode.
That’s one of the most important keys in the entire app. If you’re still clicking the dropdown at the top left of the viewport, you’re slowing yourself down every time.
For a bit more control, Ctrl + Tab brings up a quick mode menu. I use this when jumping into Vertex, Edge, or Face select without touching the UI. It’s faster. It keeps your focus where it belongs.
Viewport Navigation
Bad navigation kills momentum. You can have great modeling skills and still feel lost if you can’t move around your scene smoothly.
Here’s the standard setup most Blender users rely on:
Middle Mouse Button drag to orbit
Shift + Middle Mouse to pan
Ctrl + Middle Mouse to zoom
If you use a numpad, even better:
Numpad 1 for front view
Numpad 3 for side view
Numpad 7 for top view
Once you start snapping between views instead of free rotating all the time, alignment work becomes way easier. Cleaner edges. Straighter models. Less guesswork.
Selection and Editing Shortcuts That Add Up Fast
Selection sounds boring until you realize how often you do it.
A selects everything. Press it again to deselect.
B is box select. Click and drag. Simple, fast.
X or Delete removes things without hesitation.
Now for the modeling staples:
E to extrude. Faces, edges, vertices. This one never goes away.
Ctrl + R for loop cuts. Probably the fastest way to add geometry exactly where you need it.
Most modeling workflows are just combinations of these keys. Move, extrude, cut, repeat. When people say Blender “clicked” for them, this is usually the moment they stopped reaching for menus and started chaining these shortcuts together.
If this section feels basic, that’s good. These are the foundations. Get these into your hands, not just your head, and everything else becomes easier to learn.
Workflow Boosters That Don’t Get Enough Love
This is where things start to feel less like “learning shortcuts” and more like cheating time.
These are the keys I didn’t use much in my first few months with Blender. Not because they’re advanced. Because nobody really emphasized how powerful they are. Once I started using them, my pace changed noticeably.
Repeat Last Action
Shift + R repeats your last action.
Sounds minor. It’s not.
Say you add a loop cut. Then another. Then another. Instead of going back to the menu or hitting Ctrl + R again, you just tap Shift + R. Same cut. Same spacing. Same behavior.
I use this constantly when blocking out forms or adding evenly spaced geometry. It keeps your rhythm intact. No interruptions. No rethinking.
If you only steal one shortcut from this section, make it this one.
The Search Menu Is Your Safety Net
You will not remember every shortcut. That’s fine. Nobody does.
Press F3 and start typing what you want. Subdivide. Shade smooth. Merge by distance. It’s all there.
I treat this like a backup brain. When I forget a key, I search once or twice. After a few repetitions, my hands remember it anyway. This is also great for obscure actions you don’t use every day but still need fast.
There’s zero shame in using search. It’s part of the workflow.
The 3D Cursor Is Not Just a Weird Red Dot
A lot of people ignore the 3D cursor for way too long. I did.
Once you understand it, placement and alignment get much easier.
Shift + Right Click places the cursor.
Shift + S opens snapping options.
You can snap the cursor to selected geometry, snap objects to the cursor, or align things precisely without eyeballing it. This becomes incredibly useful for symmetry, pivot points, and precise object placement.
If you’ve ever thought, “Why is this object rotating from such a strange point,” the 3D cursor is usually the answer.

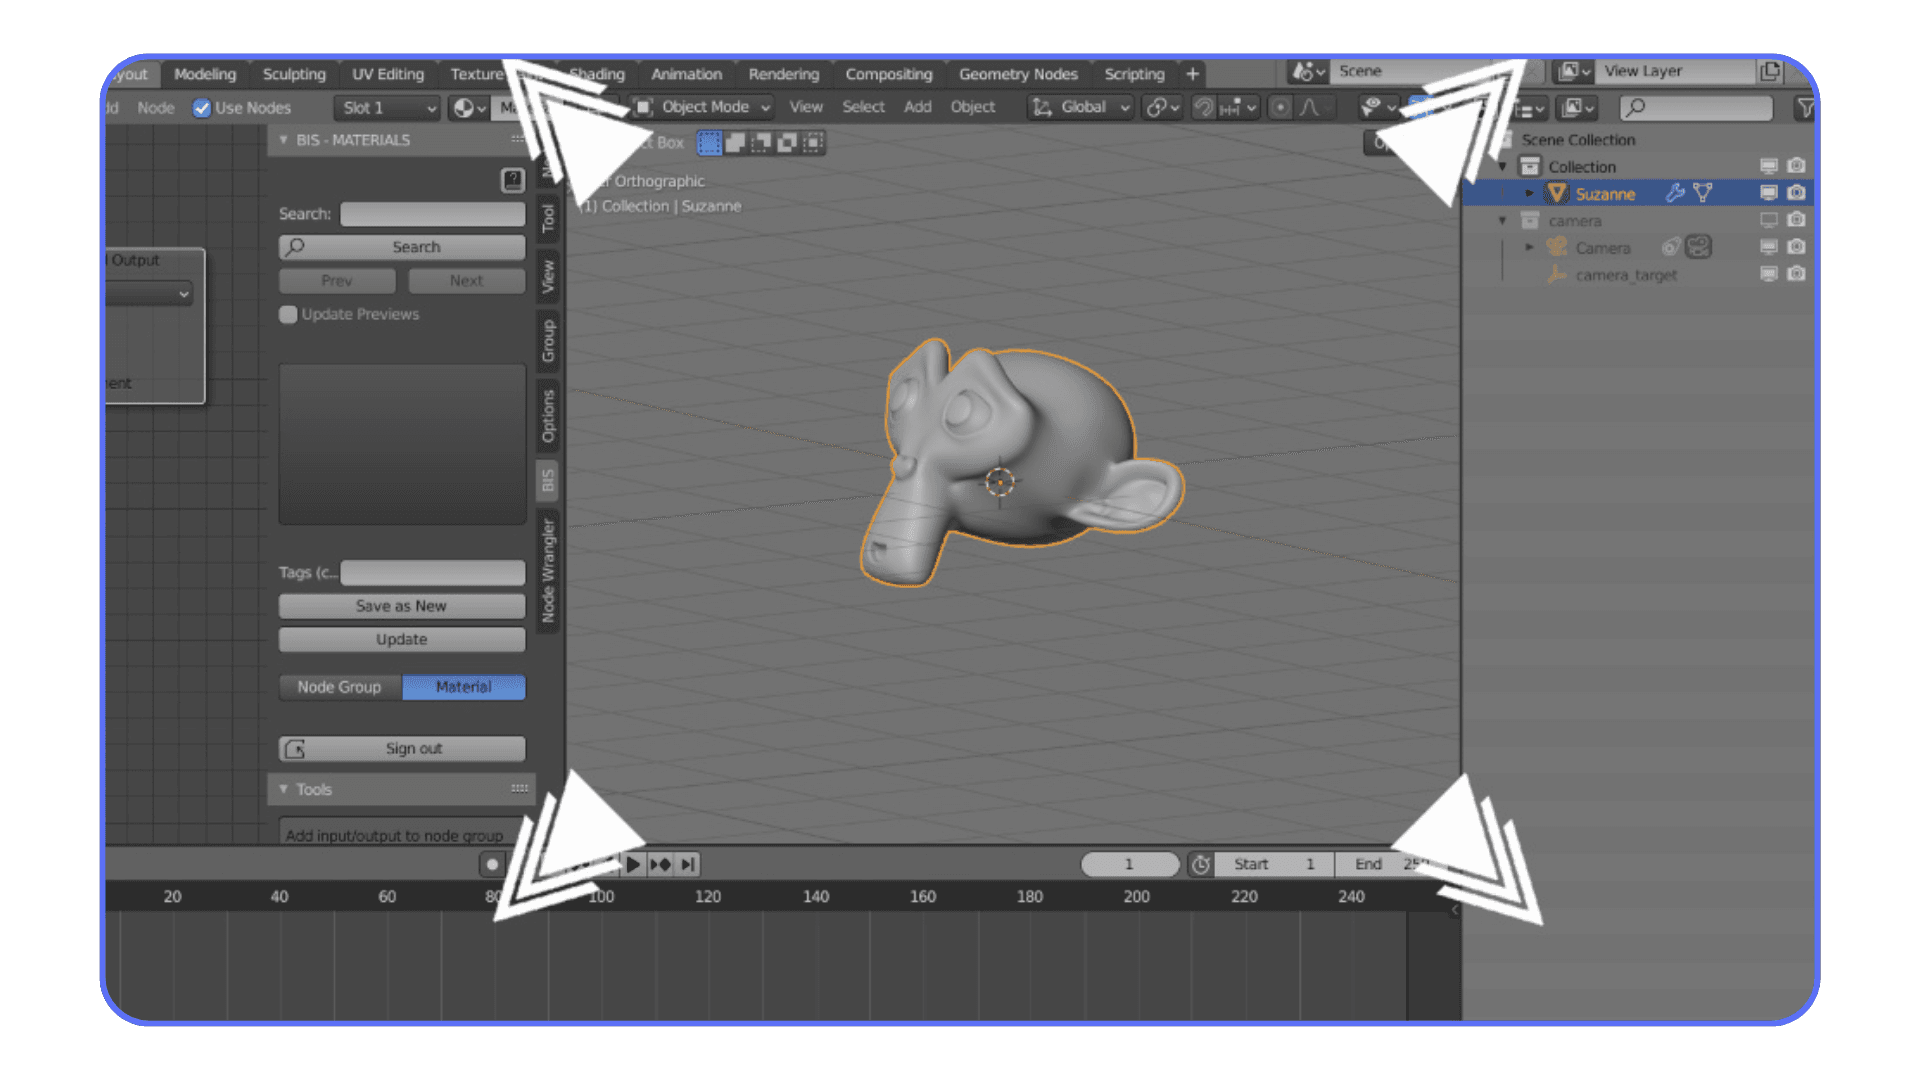
Fullscreen Panels When You Need Focus
Sometimes you just want the viewport. No distractions. No clutter.
Ctrl + Spacebar maximizes the panel under your mouse.
I use this constantly when modeling details or tweaking materials. Then I hit it again and everything snaps back. It’s a small thing, but it helps you stay focused when scenes get busy.
A Quick Reality Check
Here’s the honest part. You don’t need all of these on day one. Trying to force them into your workflow all at once usually backfires.
What works better is noticing friction. When something feels repetitive or slow, that’s your signal. There’s probably a shortcut for it. And once you find it, you’ll wonder how you ever worked without it.
Next up, let’s talk about shortcuts that matter once you move beyond modeling. Animation, playback, and rendering. Different phase. Different priorities.
Animation and Rendering Shortcuts That Change the Pace
Modeling is where most people start. But once you dip into animation or start rendering regularly, the shortcuts that matter shift a bit. The goal stops being shape and placement. It becomes timing, iteration, and feedback.
This is where Blender can feel either painfully slow or surprisingly responsive. The difference is usually a handful of keys.
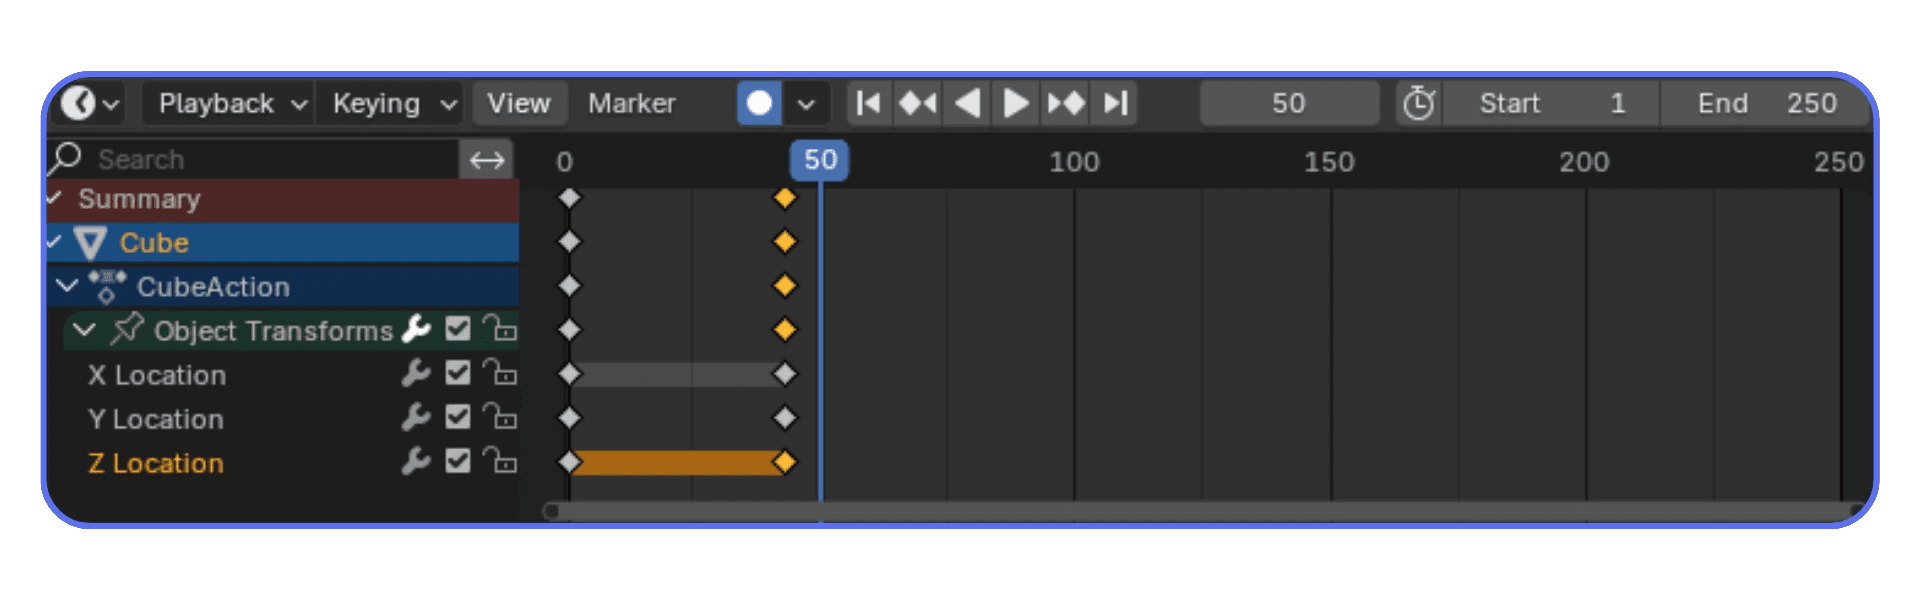
Keyframes Without the Mouse Dance
If you animate in Blender and still use menus to add keyframes, you’re making life harder than it needs to be.
I inserts a keyframe.
That’s it. Press it, choose what you want to keyframe, and move on. Location, rotation, scale, or all of them at once. After a while, it becomes automatic. Move something. Press I. Keep going.
I’ve noticed this is where beginners hesitate. They pause, they think, they check the timeline. Experienced animators don’t. They trust the keys and keep the motion flowing.
Playback That Doesn’t Break Your Focus
Scrubbing and playback are constant during animation work. If you’re stopping to click play every time, it adds up.
Spacebar plays and pauses the timeline.
Simple. Fast. Your eyes stay on the motion, not the UI. This matters more than it sounds, especially when you’re tweaking subtle timing or easing.

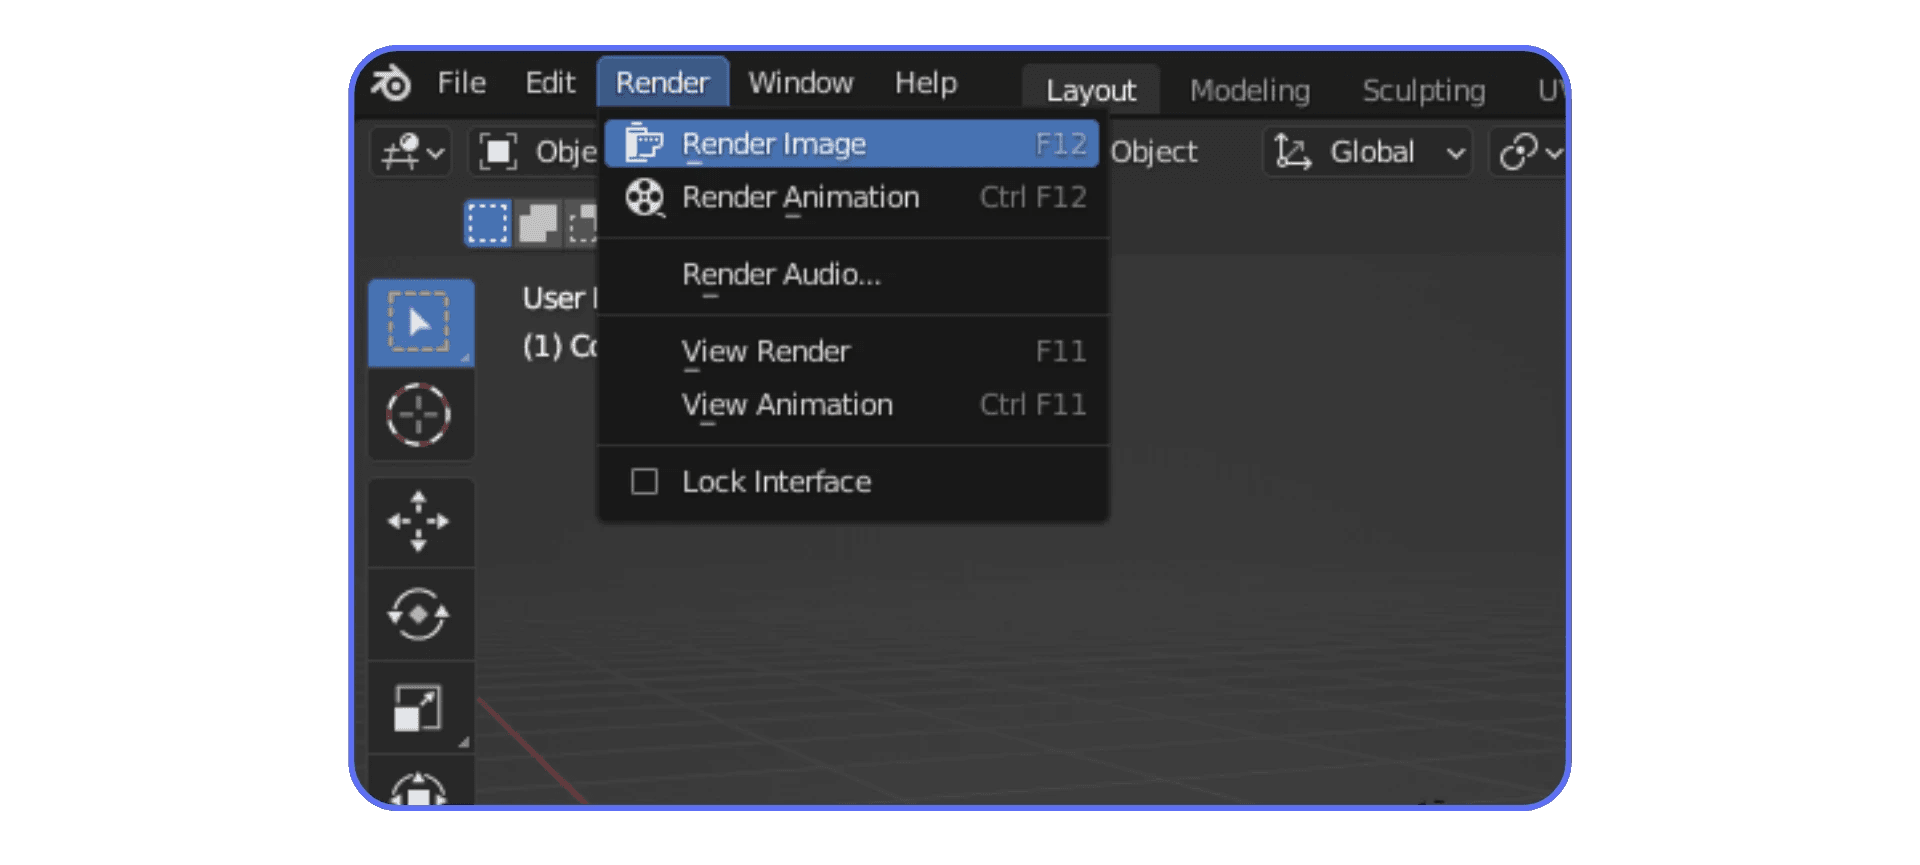
Rendering Without Thinking About It
Rendering should feel like a reflex, not a process.
F12 renders the current frame.
Ctrl + F12 renders the full animation.
I like triggering renders early and often. Even rough ones. It helps catch lighting issues, material problems, or camera mistakes before they snowball. When rendering is one key away, you’re more likely to do that.
Once rendering becomes muscle memory, dialing in the best render settings for Blender matters just as much as how quickly you trigger the render itself.
Why Shortcuts Matter More Here Than Anywhere Else
Animation and rendering punish hesitation. You’re making lots of small adjustments, previewing constantly, and reacting to what you see. Shortcuts reduce the friction between intention and result.
There’s also a performance angle people don’t always connect right away. The faster you can trigger actions, the more obvious slowdowns become. Laggy playback. Stuttering viewports. Long render times. At some point, the bottleneck stops being your workflow and starts being your hardware.
That’s usually when people realize shortcuts alone aren’t enough. They make you faster, but they also expose limits faster too.
Before we talk about that side of things, there’s one more category worth covering. The shortcuts people forget, ignore, or never learn. And they quietly waste time every day because of it.
If you’re leaning more toward Grease Pencil and motion work, many of these shortcuts show up constantly in 2D animation workflows in Blender as well.
Shortcuts People Forget, Ignore, or Learn Way Too Late
These are the shortcuts that don’t look impressive in a list. They don’t sound exciting. But once you start using them, they quietly fix dozens of tiny annoyances you’ve probably accepted as “just how Blender is.”
They’re not flashy. They’re practical. And they save more time than you expect.
Clearing Transforms Instead of Fighting Them
Ever move an object around, rotate it a bit, scale it slightly… then later realize everything feels off? Pivots are weird. Rotations don’t behave. Scaling does strange things.
That’s usually because transforms are stacked up.
Alt + G clears location.
Alt + R clears rotation.
Alt + S clears scale.
I use these constantly, especially when blocking out scenes or importing assets. Resetting transforms gives you a clean baseline without deleting or rebuilding anything. It’s one of those habits that keeps projects from slowly turning into a mess.
Apply Transforms Before Things Get Weird
Closely related, and often misunderstood.
Ctrl + A lets you apply location, rotation, or scale.
This matters more than people realize. Modifiers behave better. Physics behaves better. Parenting behaves better. If something feels off and you can’t explain why, unapplied transforms are often the culprit.
I’ve lost time debugging things that were fixed instantly by applying scale. More than once.
Snapping Without Guesswork
Precision work doesn’t have to mean zooming in until you’re counting pixels.
Shift + Tab toggles snapping.
Then choose what you want to snap to: vertices, edges, faces, grid.
This is huge for hard surface work, alignment, and anything that needs to look intentional instead of eyeballed. Once snapping is part of your muscle memory, you stop nudging things back and forth trying to make them line up.
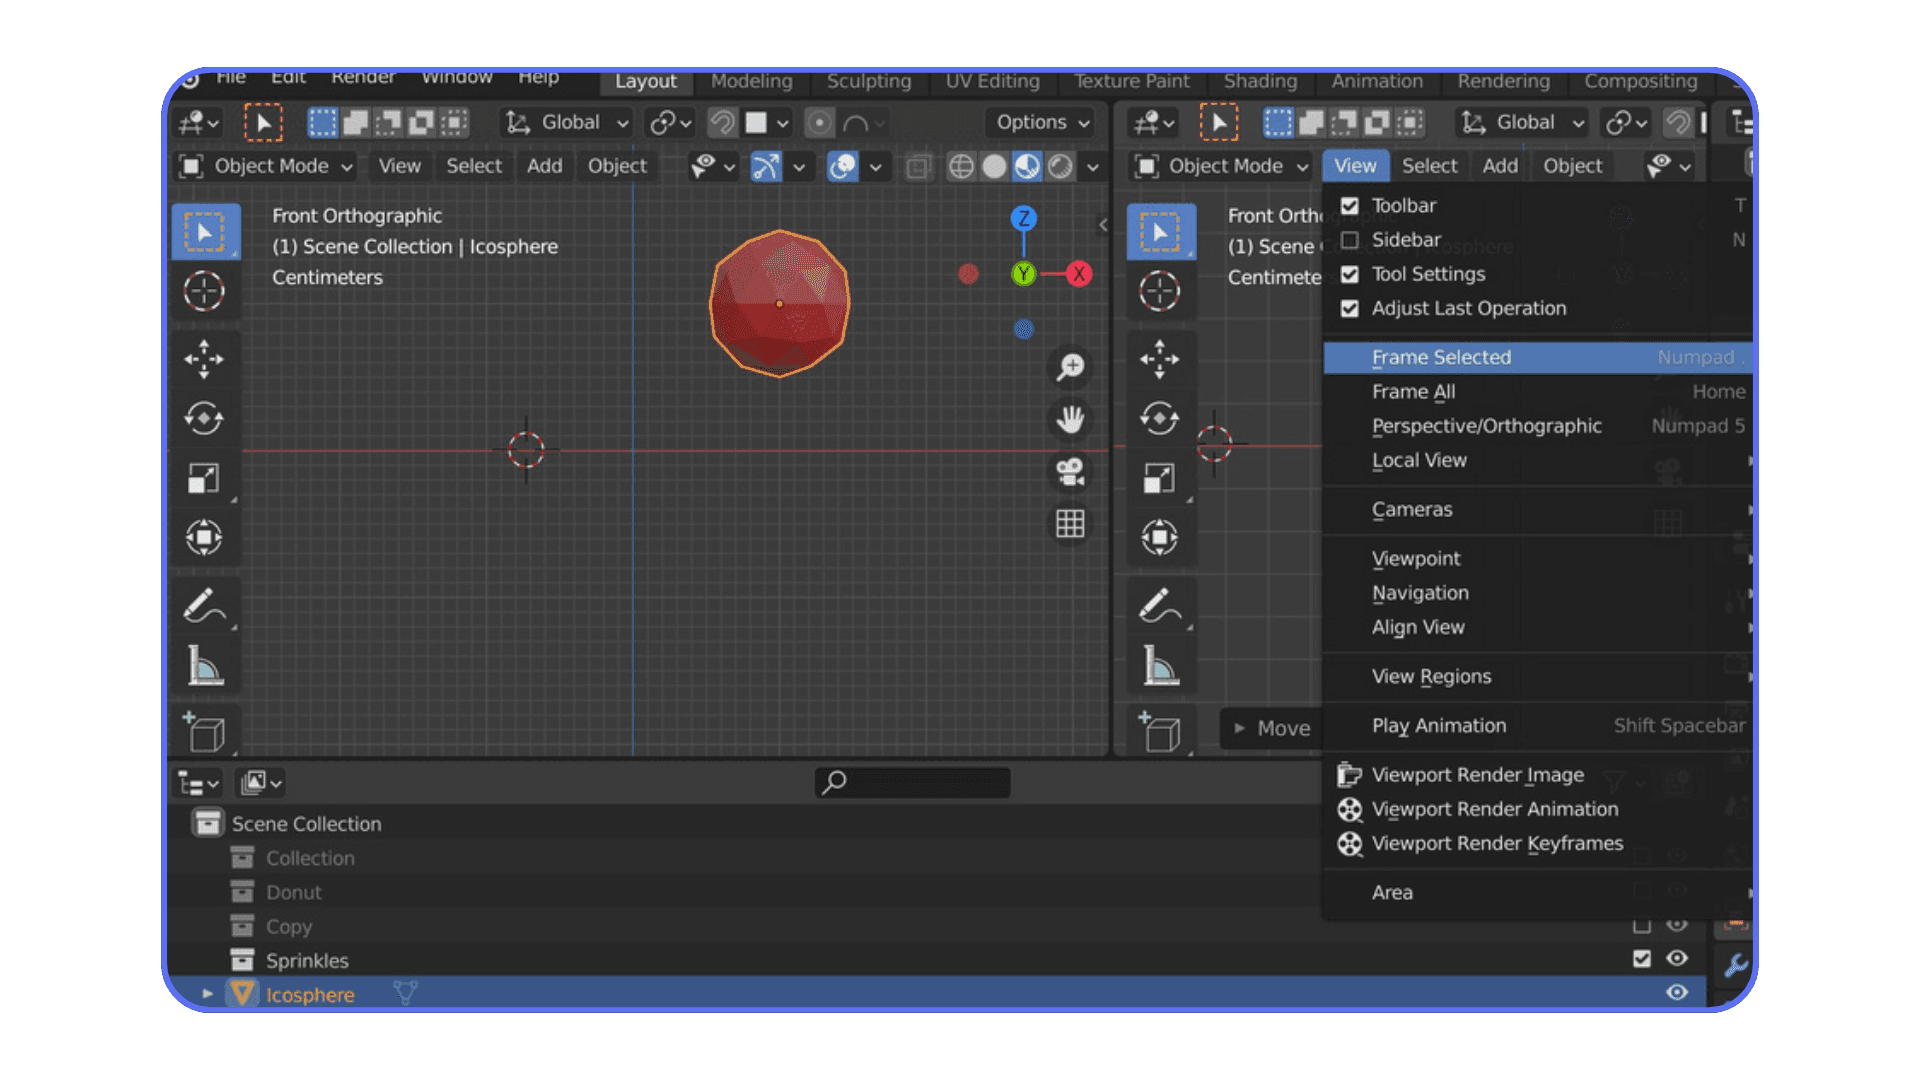
Frame What You’re Working On, Instantly
If you ever feel lost in your own scene, this helps.
Numpad . frames the selected object.
No scrolling. No orbiting into space. Just focus on what you’re editing. I hit this constantly when jumping between objects in a crowded scene.
Maximize Focus When Blender Gets Busy
As projects grow, Blender’s UI fills up fast. Panels, editors, properties everywhere.
This one deserves repeating because it’s that useful.
Ctrl + Spacebar toggles fullscreen for the panel under your mouse.
It’s perfect for detail work. Sculpting. Node editing. UVs. Then one keypress and you’re back to your full layout. Clean and reversible.
The Pattern Behind All of This
Here’s the thing I wish someone had told me earlier. Most “Blender frustrations” aren’t big problems. They’re tiny inefficiencies repeated hundreds of times.
Clearing transforms instead of fixing mistakes manually. Framing objects instead of hunting for them. Snapping instead of nudging. These don’t feel like speed hacks. They feel like relief.
And once you start using them, you notice something interesting. Blender stops feeling heavy. It feels responsive. Almost cooperative.
Which brings us to the uncomfortable part. When your shortcuts are dialed in and Blender still feels slow, laggy, or choppy, the issue usually isn’t your workflow anymore.
It’s your machine.
That’s where things like cloud setups start to make sense. Not as a gimmick. As a way to keep up with how fast you’re actually working now.
When Shortcuts Aren’t the Bottleneck Anymore
Eventually, shortcuts stop being the thing that makes you faster.
You’ve learned them. You use them without thinking. Your hands stay on the keyboard, your eyes stay on the model, and Blender feels responsive in a way it didn’t before. Modeling, navigation, and iteration all speed up. That part works.
Then the slowdowns show up anyway.
Viewport playback starts dropping frames. Sculpting dense meshes feels uneven. Shader previews take a moment longer than they should. Renders interrupt your rhythm more often. At that point, your workflow isn’t the issue anymore. You’ve already removed that friction. The limitation is the machine running Blender.
This is where Vagon Cloud Computer fits in, in a very practical sense. You don’t change how you work or relearn anything. You keep the same shortcuts, the same Blender setup, the same habits. The difference is that Blender runs on a high-performance cloud computer instead of your local device.
That shift matters once scenes get heavier. AI-generated assets, higher resolution textures, dense geometry, and frequent test renders all push hardware harder. With Vagon, you don’t have to work around those limits by lowering quality or avoiding certain tools just to keep things smooth.
Vagon isn’t meant to make you learn Blender faster. It’s meant to support a workflow that’s already fast. When shortcuts are dialed in and performance becomes the only thing holding you back, moving the workload to the cloud is a straightforward next step.
For some users, that shift even opens up options like using Blender on an iPad, especially when Blender itself runs on a high-performance cloud machine rather than locally.
That’s also what makes setups like using Blender on a Chromebook viable once the heavy lifting happens in the cloud instead of on the device itself.
Final Thoughts
Blender shortcuts aren’t something you master all at once. They sneak up on you. One key at a time. One less click. One less pause to think about where a tool lives.
At some point, you realize you’re not really “using” Blender anymore. You’re just working. Your hands move, your eyes stay on the model, and the software stops getting in the way. That’s the real goal.
If things still feel slow, that’s okay. Speed comes in layers. First you learn what to do. Then you learn how to do it faster. Eventually, the limits you notice aren’t about workflow at all, they’re about performance. And when that happens, it’s useful to know options like Vagon Cloud Computer exist, ready when your projects outgrow your local setup.
For now, keep it simple. Pick a few shortcuts. Use them every day. Let muscle memory do its thing. Blender rewards patience more than pressure.
And once it clicks, you’ll wonder how you ever worked any other way.
FAQs
1. Do I really need to memorize all Blender shortcuts?
No. And trying to usually backfires. Most experienced Blender users rely on a relatively small set of shortcuts they use constantly. The rest come up occasionally and are often accessed through F3 search. Focus on shortcuts that remove friction from what you already do, not on memorizing a full keymap.
2. How long does it take for shortcuts to feel natural?
In my experience, a few days for basic ones, a few weeks for real muscle memory. Keys like G, R, S, Tab, and E tend to stick fast because you use them constantly. Others take longer and that’s fine. If you’re still thinking about which key to press, you’re learning. If you’re not thinking at all, it’s working.
3. Should beginners use shortcuts or stick to menus first?
Beginners should use shortcuts early, but selectively. Start with transforms, mode switching, and basic navigation. Those form the backbone of Blender. You don’t need advanced shortcuts right away, but avoiding shortcuts entirely slows learning more than it helps.
4. Can I customize Blender shortcuts?
Yes. Blender’s keymap is fully customizable. That said, I usually recommend sticking with the default setup at first. Most tutorials, documentation, and community help assume default shortcuts. Customization makes more sense once you know exactly what you want to change and why.
5. Why does Blender still feel slow even when I use shortcuts?
Because shortcuts improve workflow speed, not system performance. Once your hands get faster, lag becomes more noticeable. Heavy geometry, high resolution textures, AI generated assets, and complex scenes can push local hardware hard. That’s often when performance, not skill, becomes the limiting factor.
6. Is using Blender on a cloud computer actually practical?
It can be, especially for heavier projects. With a setup like Vagon Cloud Computer, Blender runs on a high performance machine in the cloud while you work from your own device. Your shortcuts and workflow stay the same, but performance stays consistent even as scenes get more complex. It’s not necessary for everyone, but it’s a solid option once hardware limits start getting in the way of how you work.
Ever catch yourself clicking through three menus just to move a cube two centimeters to the left. I have. More times than I’d like to admit. It’s one of those quiet Blender frustrations that creeps up on you when you’re tired, your scene is getting heavy, and your patience is already gone.
Here’s the honest truth. Blender keyboard shortcuts are not a “nice to have.” They’re the difference between feeling in control and feeling like the software is fighting you. I’ve seen people spend five minutes doing something that should take five seconds. Not because they’re bad at Blender. Because they’re still reaching for menus instead of keys.
Once shortcuts click, something shifts. Your hands stop leaving the keyboard. Your eyes stay in the viewport. Modeling feels faster, smoother, almost physical. Like you’re shaping things instead of instructing a computer to do it. And yeah, it saves hours. Not in a motivational-poster way. In a very real, “why did I ever work without this” way.
If you’ve ever thought, “There has to be a faster way to do this,” you’re already in the right mindset. That’s exactly what this guide is for.
Why Keyboard Shortcuts Matter in Blender
This is the part people often underestimate. They think shortcuts are just about speed. Speed is part of it, but it’s not the real benefit.
In my experience, shortcuts are about staying in the flow. Blender is designed for your hands to live on the keyboard and mouse, not bounce between menus. The moment you start clicking everything, your thinking slows down to match your cursor. That’s when modeling starts to feel clunky.
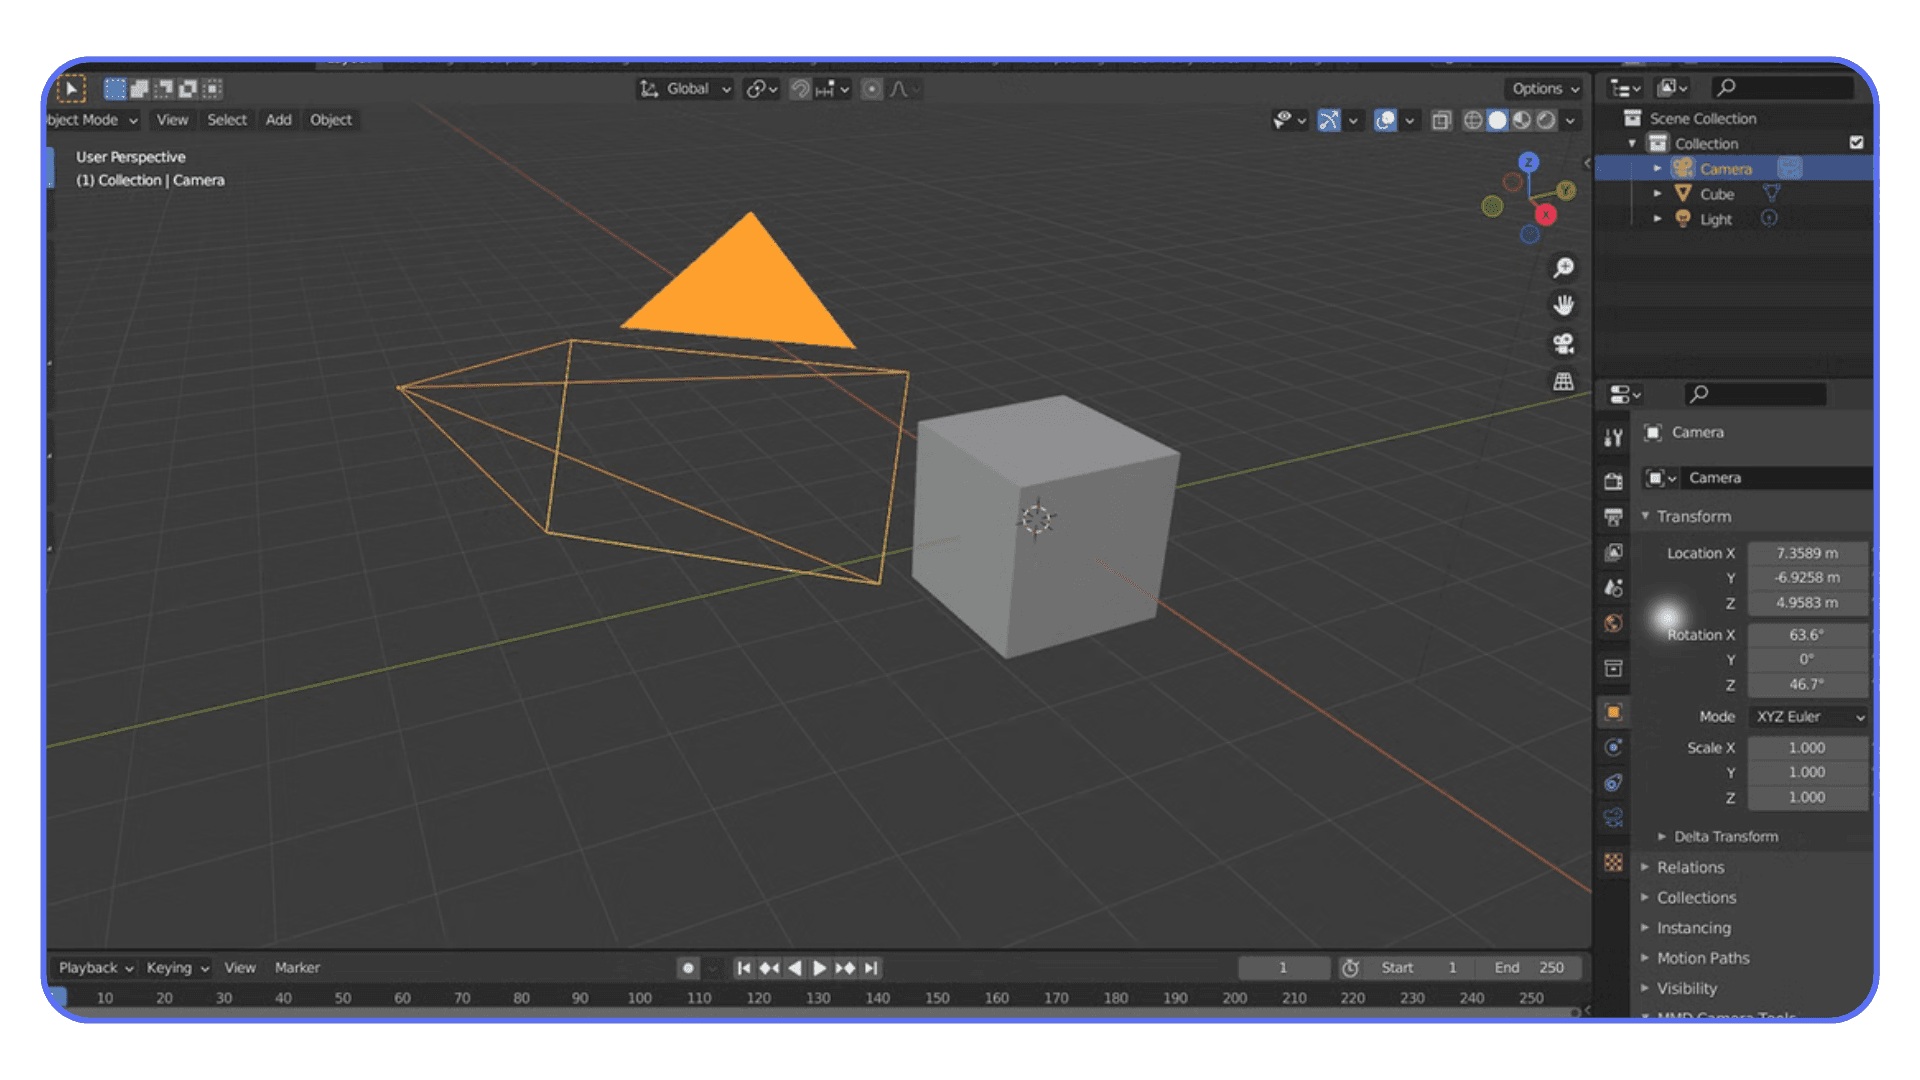
Blender’s default keymap isn’t accidental. G, R, and S sit where they do for a reason. Tab switches modes instantly because Blender expects you to move between Object Mode and Edit Mode constantly. The software assumes confidence and rewards it.
I’ve noticed beginners often think Blender feels awkward because they’re “bad at it.” Usually, they’re just using it like a traditional menu driven app. Blender is closer to an instrument. Muscle memory matters more than memorization.
Shortcuts also keep your focus where it belongs. Your eyes stay on the model, watching edges slide and forms change, instead of hunting for icons. And the payoff grows over time. The same keys you use on day one are the ones you’ll rely on months later, just on heavier, more complex work.
If Blender has ever felt slower than it should, this is usually why. And fixing it doesn’t mean learning everything. Just the right things.
Performance issues become even more noticeable once you start choosing the right Blender render engine for heavier scenes and animations.
The Essentials: Shortcuts You’ll Use Every Single Session
If you only learn one group of shortcuts, make it this one. These are the keys I use every time I open Blender. Not sometimes. Not on big projects. Every session.
You don’t need to memorize a giant cheat sheet right away. Honestly, that backfires. What works is burning a small set of shortcuts into muscle memory until you stop thinking about them at all.
Basic Transformations
Everything in Blender starts here. Movement, shaping, layout. If these don’t feel automatic yet, nothing else will.
G to move.
R to rotate.
S to scale.
That’s it. That’s the trio.
Here’s the part people miss early on. After pressing one of these, you can constrain the movement. Tap X, Y, or Z to lock it to an axis. Press Shift + X to move on everything except X. Same logic applies to rotate and scale.
Once this clicks, you stop fighting the viewport. You stop overshooting placements. Your objects land where you expect them to. It feels precise instead of slippery.
Switching Modes Without Breaking Your Rhythm
Blender lives in modes. Object Mode, Edit Mode, Sculpt Mode, and a few more depending on what you’re doing. You’ll bounce between them constantly.
Tab switches between Object Mode and Edit Mode.
That’s one of the most important keys in the entire app. If you’re still clicking the dropdown at the top left of the viewport, you’re slowing yourself down every time.
For a bit more control, Ctrl + Tab brings up a quick mode menu. I use this when jumping into Vertex, Edge, or Face select without touching the UI. It’s faster. It keeps your focus where it belongs.
Viewport Navigation
Bad navigation kills momentum. You can have great modeling skills and still feel lost if you can’t move around your scene smoothly.
Here’s the standard setup most Blender users rely on:
Middle Mouse Button drag to orbit
Shift + Middle Mouse to pan
Ctrl + Middle Mouse to zoom
If you use a numpad, even better:
Numpad 1 for front view
Numpad 3 for side view
Numpad 7 for top view
Once you start snapping between views instead of free rotating all the time, alignment work becomes way easier. Cleaner edges. Straighter models. Less guesswork.
Selection and Editing Shortcuts That Add Up Fast
Selection sounds boring until you realize how often you do it.
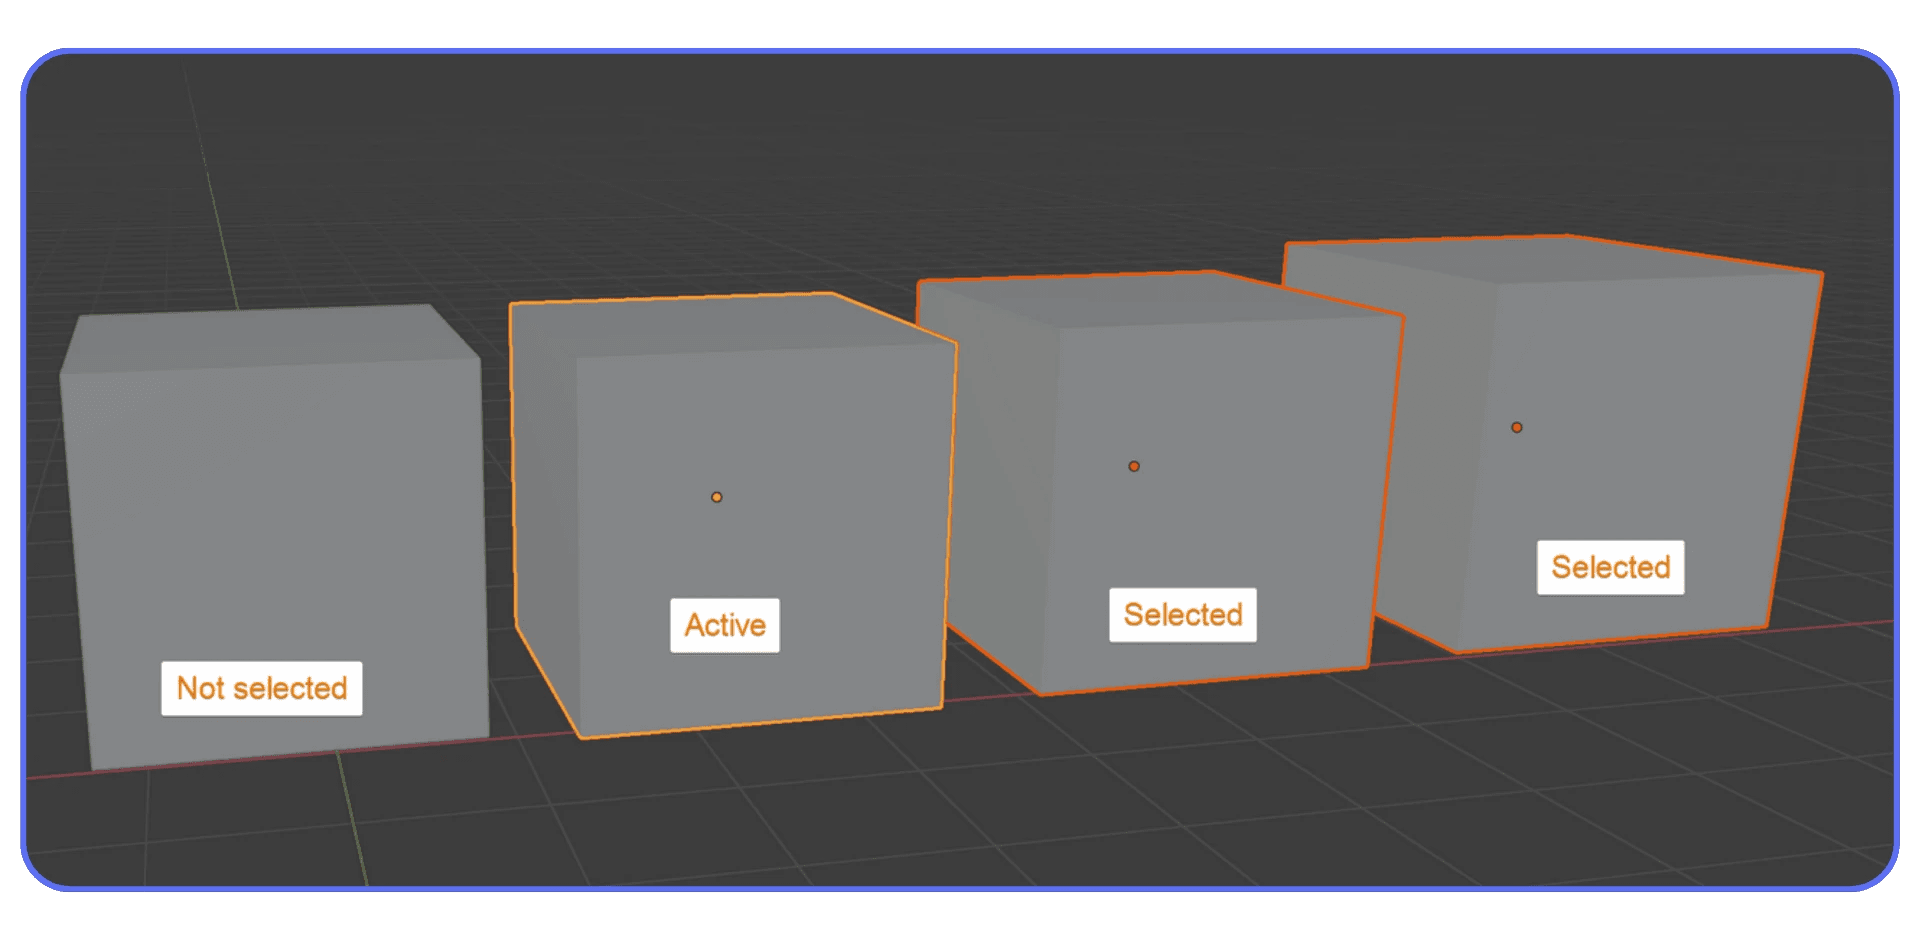
A selects everything. Press it again to deselect.
B is box select. Click and drag. Simple, fast.
X or Delete removes things without hesitation.
Now for the modeling staples:
E to extrude. Faces, edges, vertices. This one never goes away.
Ctrl + R for loop cuts. Probably the fastest way to add geometry exactly where you need it.
Most modeling workflows are just combinations of these keys. Move, extrude, cut, repeat. When people say Blender “clicked” for them, this is usually the moment they stopped reaching for menus and started chaining these shortcuts together.
If this section feels basic, that’s good. These are the foundations. Get these into your hands, not just your head, and everything else becomes easier to learn.
Workflow Boosters That Don’t Get Enough Love
This is where things start to feel less like “learning shortcuts” and more like cheating time.
These are the keys I didn’t use much in my first few months with Blender. Not because they’re advanced. Because nobody really emphasized how powerful they are. Once I started using them, my pace changed noticeably.
Repeat Last Action
Shift + R repeats your last action.
Sounds minor. It’s not.
Say you add a loop cut. Then another. Then another. Instead of going back to the menu or hitting Ctrl + R again, you just tap Shift + R. Same cut. Same spacing. Same behavior.
I use this constantly when blocking out forms or adding evenly spaced geometry. It keeps your rhythm intact. No interruptions. No rethinking.
If you only steal one shortcut from this section, make it this one.
The Search Menu Is Your Safety Net
You will not remember every shortcut. That’s fine. Nobody does.
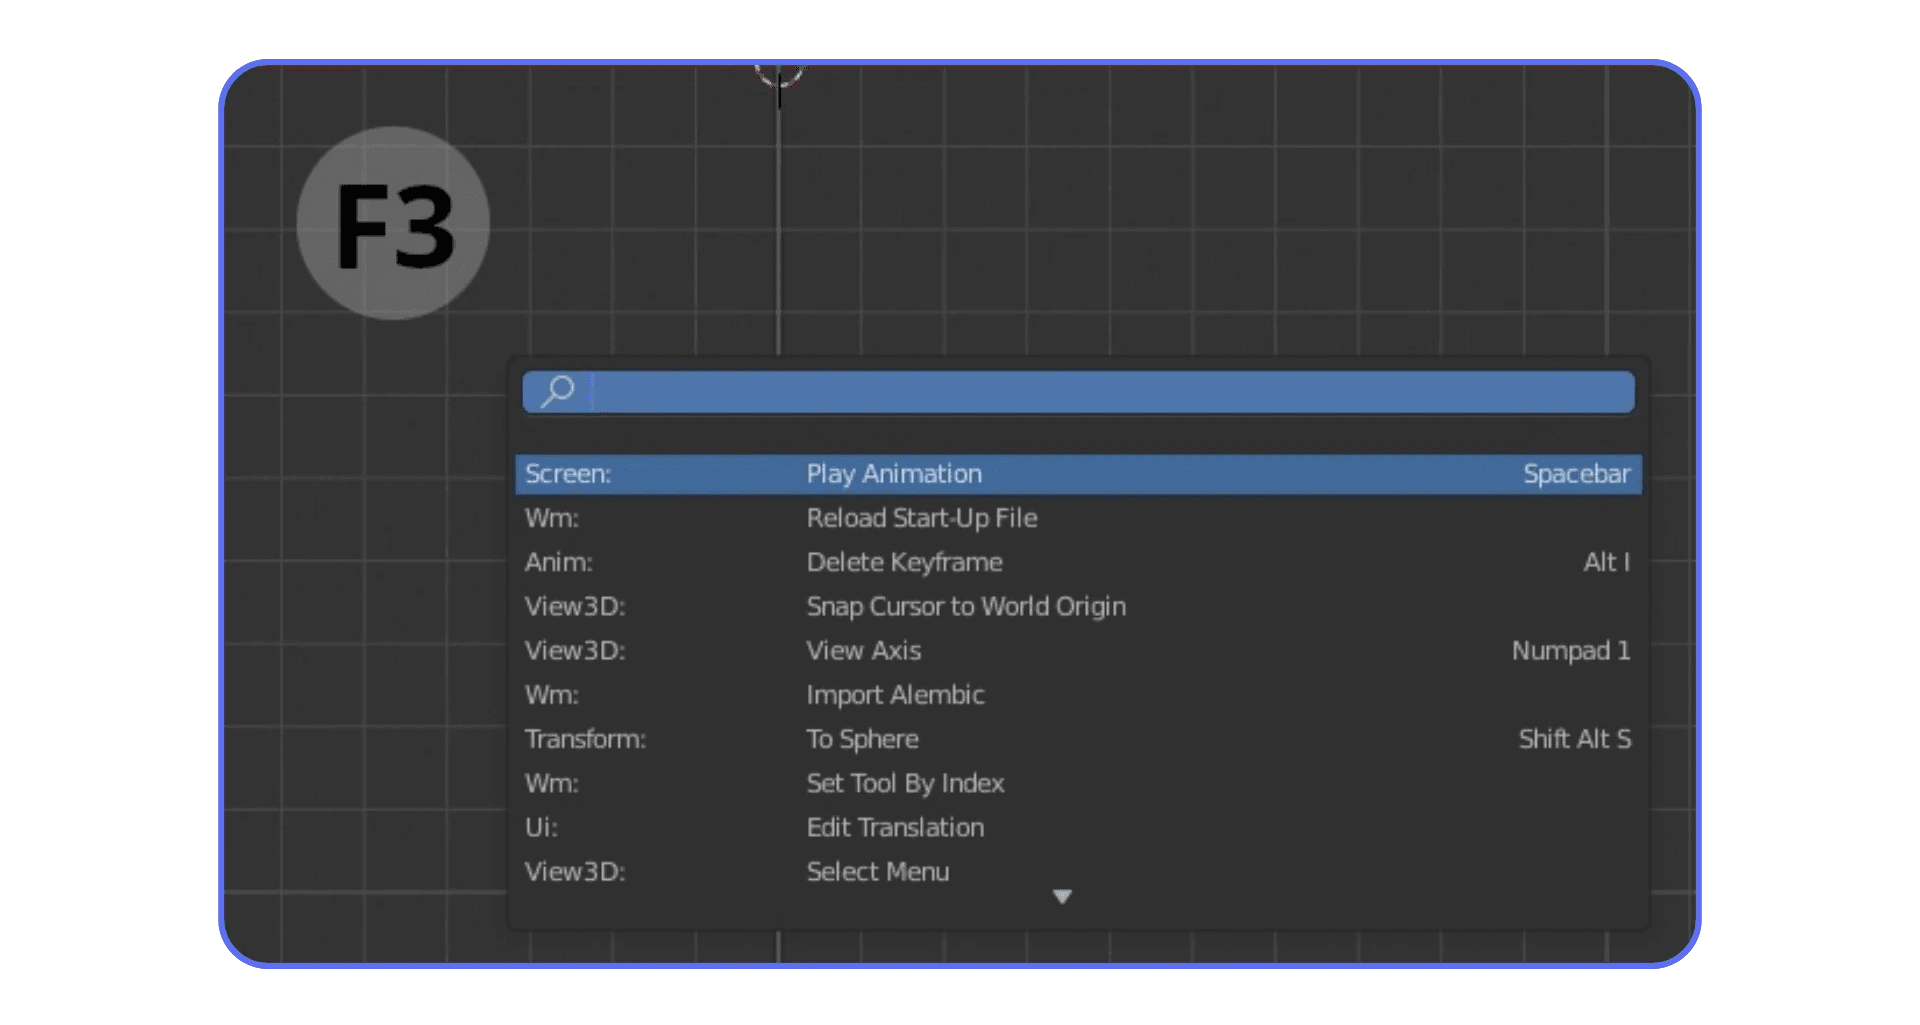
Press F3 and start typing what you want. Subdivide. Shade smooth. Merge by distance. It’s all there.
I treat this like a backup brain. When I forget a key, I search once or twice. After a few repetitions, my hands remember it anyway. This is also great for obscure actions you don’t use every day but still need fast.
There’s zero shame in using search. It’s part of the workflow.
The 3D Cursor Is Not Just a Weird Red Dot
A lot of people ignore the 3D cursor for way too long. I did.
Once you understand it, placement and alignment get much easier.
Shift + Right Click places the cursor.
Shift + S opens snapping options.
You can snap the cursor to selected geometry, snap objects to the cursor, or align things precisely without eyeballing it. This becomes incredibly useful for symmetry, pivot points, and precise object placement.
If you’ve ever thought, “Why is this object rotating from such a strange point,” the 3D cursor is usually the answer.
Fullscreen Panels When You Need Focus
Sometimes you just want the viewport. No distractions. No clutter.
Ctrl + Spacebar maximizes the panel under your mouse.
I use this constantly when modeling details or tweaking materials. Then I hit it again and everything snaps back. It’s a small thing, but it helps you stay focused when scenes get busy.
A Quick Reality Check
Here’s the honest part. You don’t need all of these on day one. Trying to force them into your workflow all at once usually backfires.
What works better is noticing friction. When something feels repetitive or slow, that’s your signal. There’s probably a shortcut for it. And once you find it, you’ll wonder how you ever worked without it.
Next up, let’s talk about shortcuts that matter once you move beyond modeling. Animation, playback, and rendering. Different phase. Different priorities.
Animation and Rendering Shortcuts That Change the Pace
Modeling is where most people start. But once you dip into animation or start rendering regularly, the shortcuts that matter shift a bit. The goal stops being shape and placement. It becomes timing, iteration, and feedback.
This is where Blender can feel either painfully slow or surprisingly responsive. The difference is usually a handful of keys.
Keyframes Without the Mouse Dance
If you animate in Blender and still use menus to add keyframes, you’re making life harder than it needs to be.
I inserts a keyframe.
That’s it. Press it, choose what you want to keyframe, and move on. Location, rotation, scale, or all of them at once. After a while, it becomes automatic. Move something. Press I. Keep going.
I’ve noticed this is where beginners hesitate. They pause, they think, they check the timeline. Experienced animators don’t. They trust the keys and keep the motion flowing.
Playback That Doesn’t Break Your Focus
Scrubbing and playback are constant during animation work. If you’re stopping to click play every time, it adds up.
Spacebar plays and pauses the timeline.
Simple. Fast. Your eyes stay on the motion, not the UI. This matters more than it sounds, especially when you’re tweaking subtle timing or easing.
Rendering Without Thinking About It
Rendering should feel like a reflex, not a process.
F12 renders the current frame.
Ctrl + F12 renders the full animation.
I like triggering renders early and often. Even rough ones. It helps catch lighting issues, material problems, or camera mistakes before they snowball. When rendering is one key away, you’re more likely to do that.
Once rendering becomes muscle memory, dialing in the best render settings for Blender matters just as much as how quickly you trigger the render itself.
Why Shortcuts Matter More Here Than Anywhere Else
Animation and rendering punish hesitation. You’re making lots of small adjustments, previewing constantly, and reacting to what you see. Shortcuts reduce the friction between intention and result.
There’s also a performance angle people don’t always connect right away. The faster you can trigger actions, the more obvious slowdowns become. Laggy playback. Stuttering viewports. Long render times. At some point, the bottleneck stops being your workflow and starts being your hardware.
That’s usually when people realize shortcuts alone aren’t enough. They make you faster, but they also expose limits faster too.
Before we talk about that side of things, there’s one more category worth covering. The shortcuts people forget, ignore, or never learn. And they quietly waste time every day because of it.
If you’re leaning more toward Grease Pencil and motion work, many of these shortcuts show up constantly in 2D animation workflows in Blender as well.
Shortcuts People Forget, Ignore, or Learn Way Too Late
These are the shortcuts that don’t look impressive in a list. They don’t sound exciting. But once you start using them, they quietly fix dozens of tiny annoyances you’ve probably accepted as “just how Blender is.”
They’re not flashy. They’re practical. And they save more time than you expect.
Clearing Transforms Instead of Fighting Them
Ever move an object around, rotate it a bit, scale it slightly… then later realize everything feels off? Pivots are weird. Rotations don’t behave. Scaling does strange things.
That’s usually because transforms are stacked up.
Alt + G clears location.
Alt + R clears rotation.
Alt + S clears scale.
I use these constantly, especially when blocking out scenes or importing assets. Resetting transforms gives you a clean baseline without deleting or rebuilding anything. It’s one of those habits that keeps projects from slowly turning into a mess.
Apply Transforms Before Things Get Weird
Closely related, and often misunderstood.
Ctrl + A lets you apply location, rotation, or scale.
This matters more than people realize. Modifiers behave better. Physics behaves better. Parenting behaves better. If something feels off and you can’t explain why, unapplied transforms are often the culprit.
I’ve lost time debugging things that were fixed instantly by applying scale. More than once.
Snapping Without Guesswork
Precision work doesn’t have to mean zooming in until you’re counting pixels.
Shift + Tab toggles snapping.
Then choose what you want to snap to: vertices, edges, faces, grid.
This is huge for hard surface work, alignment, and anything that needs to look intentional instead of eyeballed. Once snapping is part of your muscle memory, you stop nudging things back and forth trying to make them line up.
Frame What You’re Working On, Instantly
If you ever feel lost in your own scene, this helps.
Numpad . frames the selected object.
No scrolling. No orbiting into space. Just focus on what you’re editing. I hit this constantly when jumping between objects in a crowded scene.
Maximize Focus When Blender Gets Busy
As projects grow, Blender’s UI fills up fast. Panels, editors, properties everywhere.
This one deserves repeating because it’s that useful.
Ctrl + Spacebar toggles fullscreen for the panel under your mouse.
It’s perfect for detail work. Sculpting. Node editing. UVs. Then one keypress and you’re back to your full layout. Clean and reversible.
The Pattern Behind All of This
Here’s the thing I wish someone had told me earlier. Most “Blender frustrations” aren’t big problems. They’re tiny inefficiencies repeated hundreds of times.
Clearing transforms instead of fixing mistakes manually. Framing objects instead of hunting for them. Snapping instead of nudging. These don’t feel like speed hacks. They feel like relief.
And once you start using them, you notice something interesting. Blender stops feeling heavy. It feels responsive. Almost cooperative.
Which brings us to the uncomfortable part. When your shortcuts are dialed in and Blender still feels slow, laggy, or choppy, the issue usually isn’t your workflow anymore.
It’s your machine.
That’s where things like cloud setups start to make sense. Not as a gimmick. As a way to keep up with how fast you’re actually working now.
When Shortcuts Aren’t the Bottleneck Anymore
Eventually, shortcuts stop being the thing that makes you faster.
You’ve learned them. You use them without thinking. Your hands stay on the keyboard, your eyes stay on the model, and Blender feels responsive in a way it didn’t before. Modeling, navigation, and iteration all speed up. That part works.
Then the slowdowns show up anyway.
Viewport playback starts dropping frames. Sculpting dense meshes feels uneven. Shader previews take a moment longer than they should. Renders interrupt your rhythm more often. At that point, your workflow isn’t the issue anymore. You’ve already removed that friction. The limitation is the machine running Blender.
This is where Vagon Cloud Computer fits in, in a very practical sense. You don’t change how you work or relearn anything. You keep the same shortcuts, the same Blender setup, the same habits. The difference is that Blender runs on a high-performance cloud computer instead of your local device.
That shift matters once scenes get heavier. AI-generated assets, higher resolution textures, dense geometry, and frequent test renders all push hardware harder. With Vagon, you don’t have to work around those limits by lowering quality or avoiding certain tools just to keep things smooth.
Vagon isn’t meant to make you learn Blender faster. It’s meant to support a workflow that’s already fast. When shortcuts are dialed in and performance becomes the only thing holding you back, moving the workload to the cloud is a straightforward next step.
For some users, that shift even opens up options like using Blender on an iPad, especially when Blender itself runs on a high-performance cloud machine rather than locally.
That’s also what makes setups like using Blender on a Chromebook viable once the heavy lifting happens in the cloud instead of on the device itself.
Final Thoughts
Blender shortcuts aren’t something you master all at once. They sneak up on you. One key at a time. One less click. One less pause to think about where a tool lives.
At some point, you realize you’re not really “using” Blender anymore. You’re just working. Your hands move, your eyes stay on the model, and the software stops getting in the way. That’s the real goal.
If things still feel slow, that’s okay. Speed comes in layers. First you learn what to do. Then you learn how to do it faster. Eventually, the limits you notice aren’t about workflow at all, they’re about performance. And when that happens, it’s useful to know options like Vagon Cloud Computer exist, ready when your projects outgrow your local setup.
For now, keep it simple. Pick a few shortcuts. Use them every day. Let muscle memory do its thing. Blender rewards patience more than pressure.
And once it clicks, you’ll wonder how you ever worked any other way.
FAQs
1. Do I really need to memorize all Blender shortcuts?
No. And trying to usually backfires. Most experienced Blender users rely on a relatively small set of shortcuts they use constantly. The rest come up occasionally and are often accessed through F3 search. Focus on shortcuts that remove friction from what you already do, not on memorizing a full keymap.
2. How long does it take for shortcuts to feel natural?
In my experience, a few days for basic ones, a few weeks for real muscle memory. Keys like G, R, S, Tab, and E tend to stick fast because you use them constantly. Others take longer and that’s fine. If you’re still thinking about which key to press, you’re learning. If you’re not thinking at all, it’s working.
3. Should beginners use shortcuts or stick to menus first?
Beginners should use shortcuts early, but selectively. Start with transforms, mode switching, and basic navigation. Those form the backbone of Blender. You don’t need advanced shortcuts right away, but avoiding shortcuts entirely slows learning more than it helps.
4. Can I customize Blender shortcuts?
Yes. Blender’s keymap is fully customizable. That said, I usually recommend sticking with the default setup at first. Most tutorials, documentation, and community help assume default shortcuts. Customization makes more sense once you know exactly what you want to change and why.
5. Why does Blender still feel slow even when I use shortcuts?
Because shortcuts improve workflow speed, not system performance. Once your hands get faster, lag becomes more noticeable. Heavy geometry, high resolution textures, AI generated assets, and complex scenes can push local hardware hard. That’s often when performance, not skill, becomes the limiting factor.
6. Is using Blender on a cloud computer actually practical?
It can be, especially for heavier projects. With a setup like Vagon Cloud Computer, Blender runs on a high performance machine in the cloud while you work from your own device. Your shortcuts and workflow stay the same, but performance stays consistent even as scenes get more complex. It’s not necessary for everyone, but it’s a solid option once hardware limits start getting in the way of how you work.
Get Beyond Your Computer Performance
Run applications on your cloud computer with the latest generation hardware. No more crashes or lags.

Trial includes 1 hour usage + 7 days of storage.
Summarize with AI

Ready to focus on your creativity?
Vagon gives you the ability to create & render projects, collaborate, and stream applications with the power of the best hardware.

Vagon Blog


Run heavy applications on any device with
your personal computer on the cloud.
San Francisco, California
Solutions
Vagon Teams
Vagon Streams
Use Cases
Resources
Vagon Blog
How to Run Inkscape on a Cloud Ubuntu Desktop (2026 Guide)
How to Run Krita on a Cloud Ubuntu Desktop for Digital Painting (2026 Guide)
How to Run GIMP on a Cloud Ubuntu Desktop (2026 Guide)
How to Run Jupyter on a Cloud GPU Linux Desktop (2026 Guide)
Vagon vs GitHub Codespaces: Cloud Dev Environments Compared (2026)
Vagon vs RunPod: Which Cloud GPU Is Right for You? (2026 Comparison)
How to Watch Your AI Agent Work on a Cloud Ubuntu Desktop (2026 Guide)
How to Run a Local LLM on Ubuntu in the Cloud (2026 Guide)
How to Run Blender on a Cloud GPU (Ubuntu): The Complete 2026 Guide
Vagon Blog
Run heavy applications on any device with
your personal computer on the cloud.
San Francisco, California
Solutions
Vagon Teams
Vagon Streams
Use Cases
Resources
Vagon Blog