Instant Connection for Pixel Streaming
— New Feature Automated Setup

A Beginner's Guide to 2D Animation on Blender
A Beginner's Guide to 2D Animation on Blender
DigitalArt
A Beginner's Guide to 2D Animation on Blender
Table of Contents
You might frequently hear Blender being referred to as “Blender 3D”. That’s no surprise, as it is an extremely versatile 3D modeling, animation, and rendering tool. You might be asking, can I use Blender 3D for 2D animations? I remember being shocked when I learned the answer is yes, you can.
This guide will walk you through everything regarding Blender and 2D animation, such as why you might want to use it for that purpose, down to how to finish up a 2D animation in the program.
Why Use Blender for 2D Animation?
You might be wondering why you should use Blender for 2D animation instead of some of the other options available and custom-built for that.
The first reason is that Blender is free and open-source, and with that comes a rich community that always offers new tips and tricks to improve your workflow. You also might not be aware of it, but the program comes with a large selection of tools which can come in handy for 2D animation.
Finally, Blender is one app that will make it incredibly easy for you to combine 2D and 3D elements in a scene, which can come in very handy. Some 2D elements might be way too arduous to animate manually, so why not just make them 3D? If you're new to Blender and need a solid foundation before diving into exports, our Complete Guide to Blender 3D for Beginners will help you get started with the basics.
Setting Up Your Workspace for 2D Animation
Now, let’s begin this 2D animation tutorial for Blender. I’m going to start by teaching you how to best set up your workspace for a 2D animation workflow. Quite naturally, quite a few things will need to change since Blender is set by default for 3D workflows.
Here’s how to launch Blender right into the 2D animation workspace. It doesn’t even take that many steps. There are quite a few ways you can access it.
Launch Blender.
Once the application has launched, under the New File section in the landing window, choose “2D Animation”.
This will launch you straight into the 2D animation workspace which looks very different from the 3D one.
If you already have Blender opened, you can click on “File” in the menu bar at the top, “New”, and then “2D Animation. You can also directly access the 2D Animation workspace in any project by clicking the plus icon at the far right of the workspace tabs and choosing any of the 2D Animation options.
You can also check out our GPU Guide for tips to use GPU, along with speed up and acceleration tips for Blender 3D.
Understanding the Grease Pencil Tool
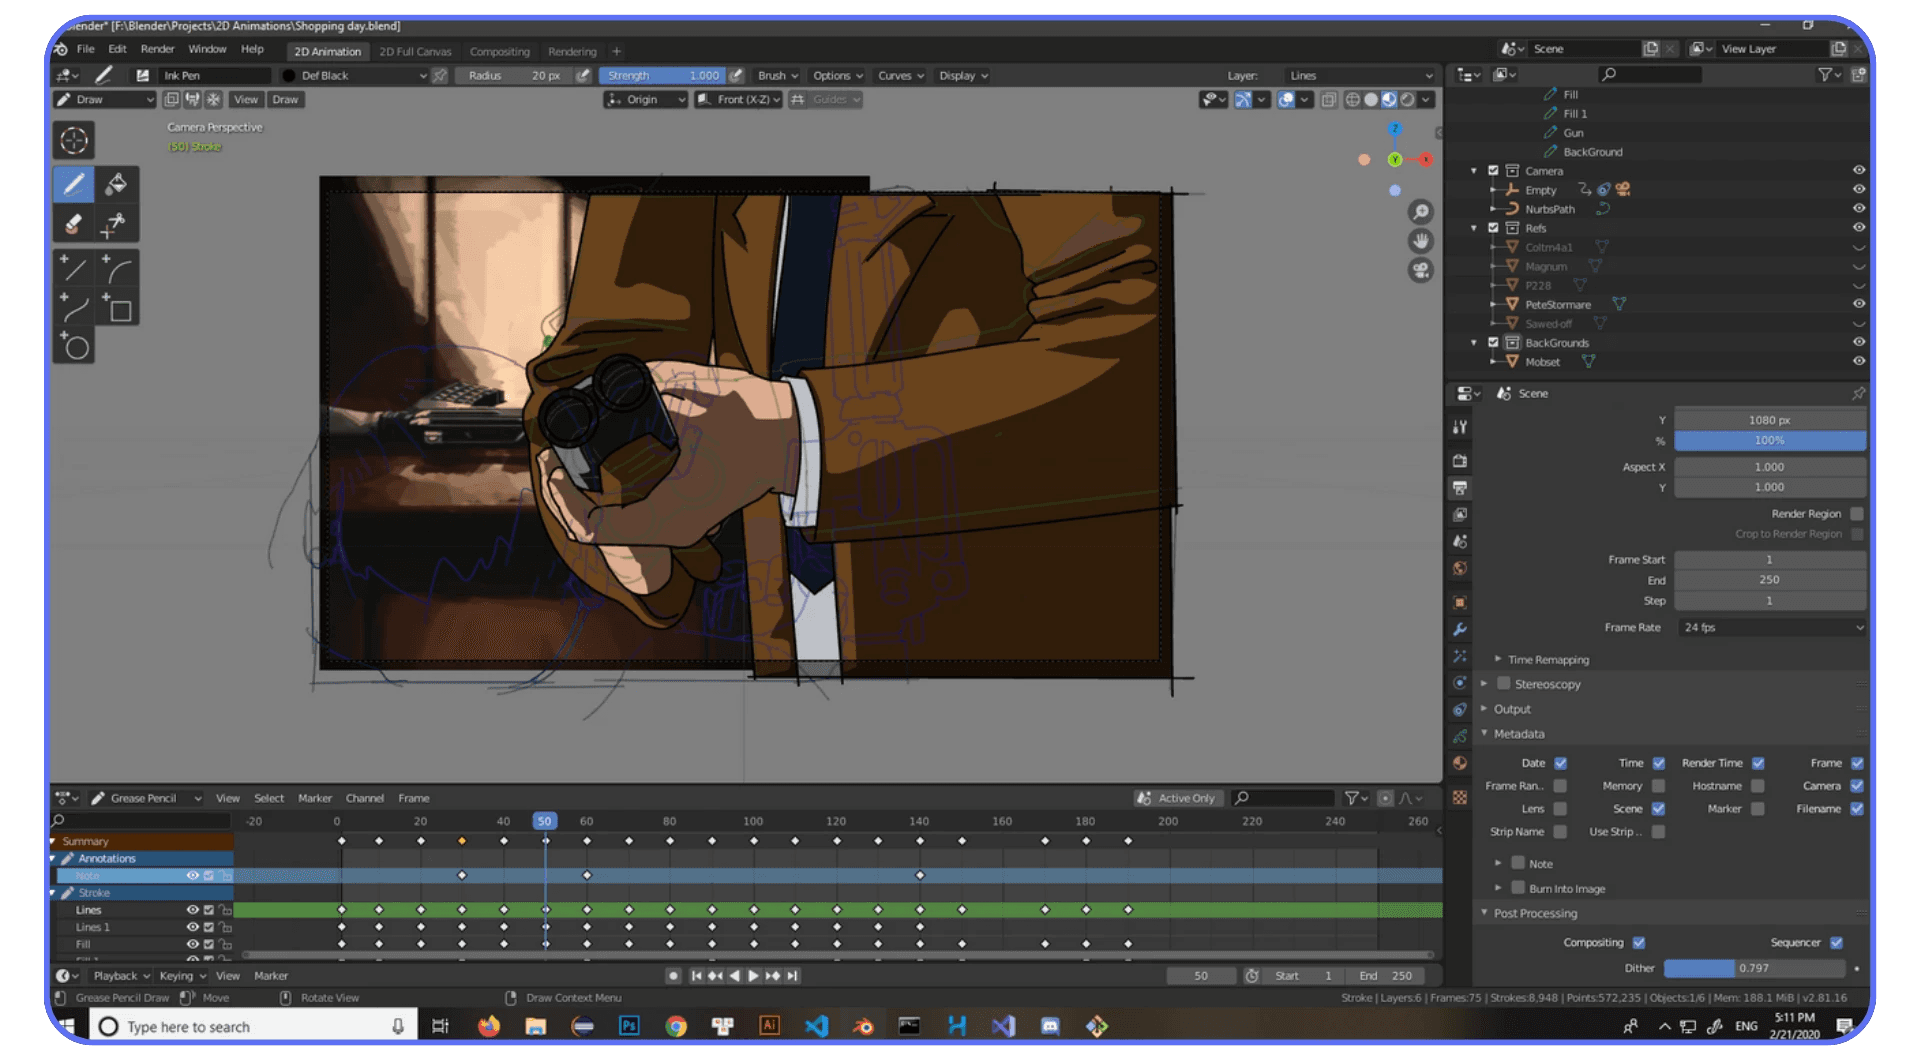
The Grease Pencil is the default drawing tool that Blender equips you with in the 2D animation workspace. You can also use the Grease Pencil to draw directly onto the viewport in 3D workspaces, which is great when paired with the 3D cursor and drawing over a 3D object.
The Grease Pencil is powerful because of all the features it comes with. Apart from being able to draw over both 2D and 3D scenes, you can also organize your drawings into layers (as with most major 2D art programs), change your strokes and brushes, and so much more.
The Grease Pencil tool comes in handy for pure 2D animation, when drawing and animating the movements of characters. However, you can also use it to draw over 3D props and background elements. It also comes in handy for rotoscoping, as well as storyboarding right in the Blender app.
Creating Your First 2D Animation
Now, this part will mostly depend on your pre-existing 2D art and animation skills. However, with a good foundation here, especially with other digital art programs, you should have an easy time.
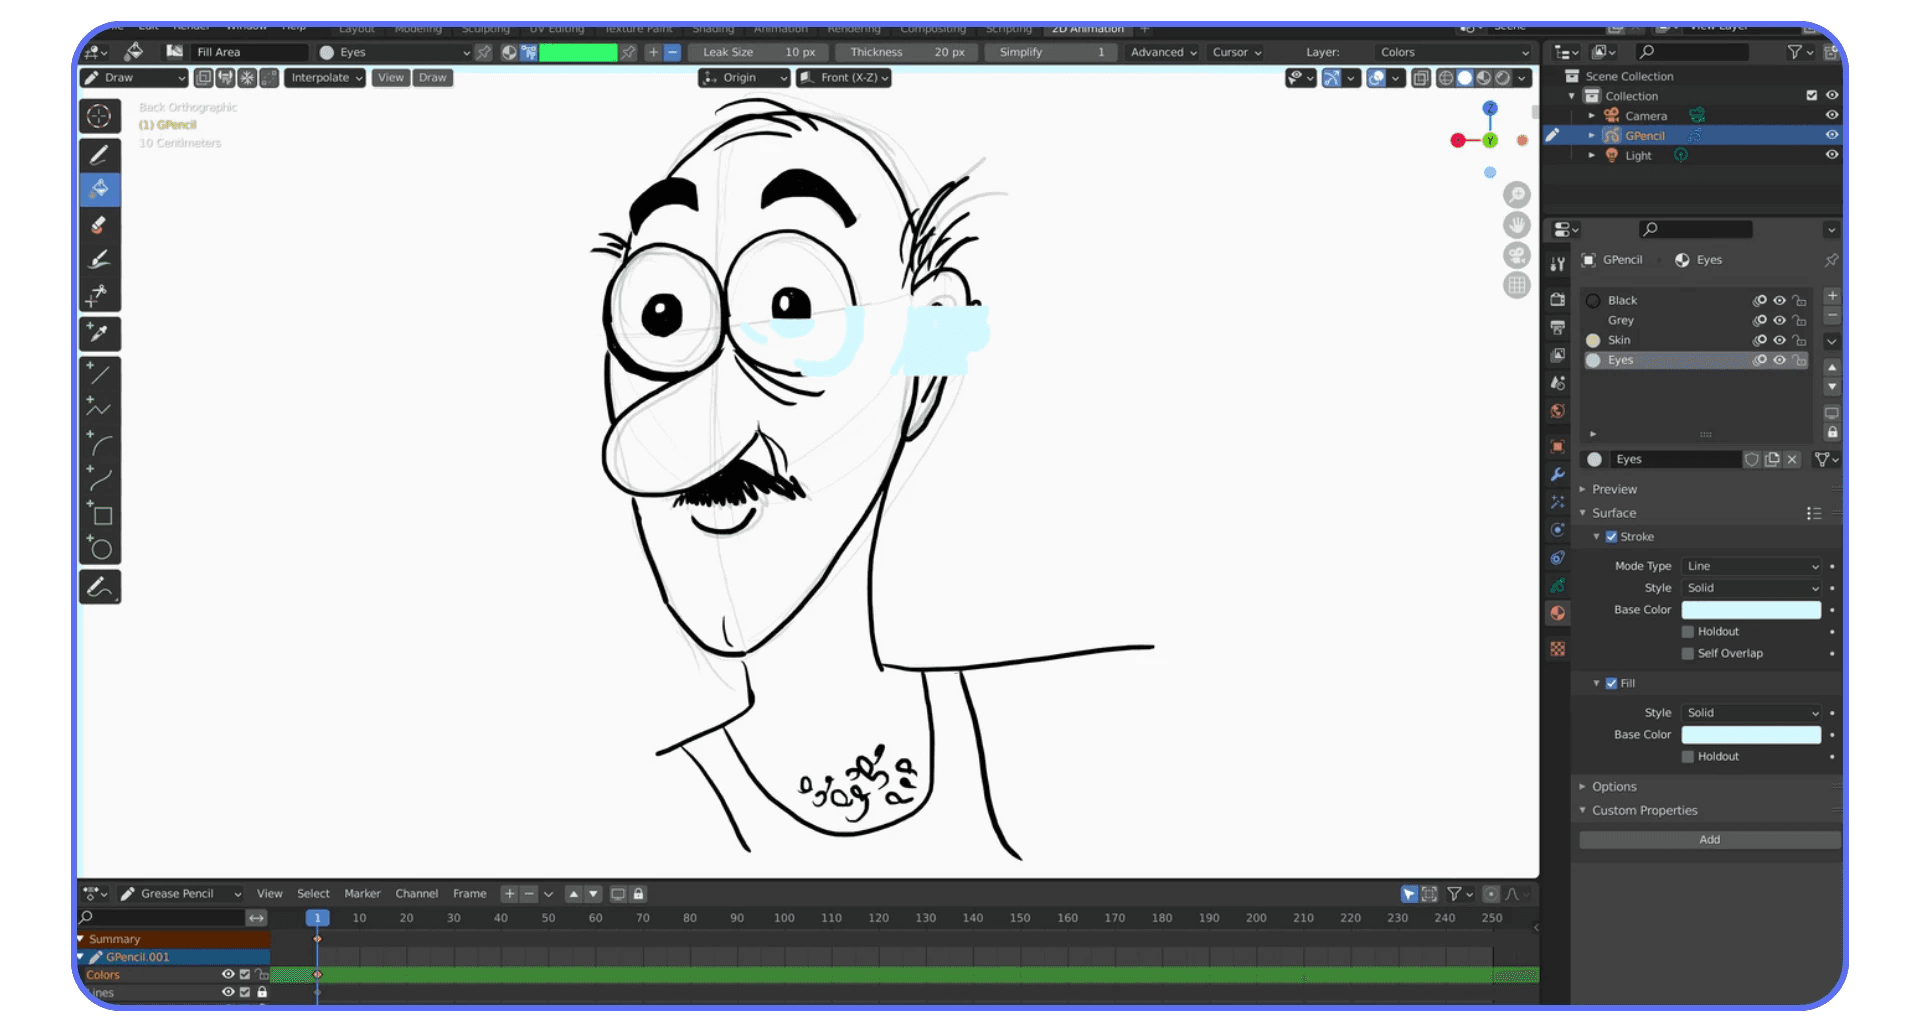
On the 2D animation canvas, you can use the Grease Pencil to draw your character. You can adjust the brush type, thickness, opacity, and so on, as you would in other art programs. It’s best to draw a relatively simple character, as you’re planning to animate it. Once you’re done, press “I” to set a keyframe for the character’s current position. Now, manually move the timeline at the bottom to a new frame.
Now, you can draw the character into another pose, and Blender will even help you by “onion skinning” which shows you a transparent highlight of your previous frame. This will help with keeping things consistent. Once you’ve drawn the new image, press “I” to set another keyframe. Repeat this until you have enough set keyframes.
Press the Play button in the timeline to watch your first 2D animation in Blender!
Adding Color and Final Touches
Now, it is great as it is, but you can add a little of razzle dazzle to your animation. Don’t be afraid to add color to your animation to make it look more lively. There’s a fill bucket tool that you can use to instantly add color to a closed-off shape and you can also change the color of your strokes before you make them. It’s also great to explore different stroke thicknesses and so on.
Don’t be afraid to add shadows that move as your character moves. With simpler 2D animations, a shadow that is generally oval-shaped tends to suffice, but you can use a more detailed shadow for more complex animations. You can also add visual effects like a blur for fast-moving objects to make your animation more polished. If you want, you can even add textures to objects.
Do you know how to use Camera Depth of Field to simulate real-world camera lenses? Check out our Blender 3D Glossary to learn all the Blender 3D terminology.
Exporting Your Animation
The final step is to export your 2D animation so you can share it or continue your editing in another application. Let me quickly take you through the steps of exporting your animation once you’re done.
From the Blender interface, look towards the properties section on the right side and click on the icon that looks like a TV. This will open the Render Properties. Ensure that you’re set to Eevee render engine, though it usually will be by default. There are other render engines available for Blender, but Eevee is what you need for 2D art.
Next, click the icon with the printer with a picture coming out of it. This will open the Output Properties.
The first thing you can do is set the resolution that you desire from the Format tab. It is 1920x1080, which is Full HD, by default. This is great, but if you want to render faster, you can reduce the resolution.
This is a crash course, so let’s skip straight to the Output tab in the Output Properties. The first thing you should do is set where you want the rendered file to save to by clicking the folder icon.
Now, in the File Format section, choose “FFmpeg Video”.
Expand the Encoding tab and select the Container. MPEG-4 is MP4, which I recommend for its compatibility.
Set the Output Quality under the Video tab to “High Quality”. Lower qualities can help speed up your render and will result in a smaller file.
Now, press Ctrl + F12 to start rendering the animation (one of the most useful Blender shortcuts!). Once it is done, you will find it in the location you specified earlier.
When Blender Makes Sense for 2D Animation (and When It Doesn’t)
Blender is a powerful option for 2D animation, but it’s not automatically the right choice for every artist or project. Understanding where it shines, and where it may slow you down, will help you decide if it fits your workflow.
When Blender Is a Great Choice
Blender works especially well if you like flexibility and experimentation. If you’re interested in combining hand-drawn animation with camera movement, lighting, or 3D elements, Blender offers capabilities that most traditional 2D tools simply don’t.
It’s also a strong option if you:
Want a single application for 2D, 3D, compositing, and rendering
Enjoy procedural tools or non-destructive workflows
Plan to mix 2D characters with 3D props or environments
Are already familiar with Blender and want to avoid switching software
For motion graphics, explainer videos, and stylized short films, Blender’s Grease Pencil often feels more flexible than dedicated 2D-only programs.
When Blender Might Not Be Ideal
Blender may not be the best starting point if your goal is purely traditional, hand-drawn animation with a very simple setup. The interface is still more complex than most 2D-only tools, and there is a learning curve if you’re new to Blender.
You may find other software more comfortable if:
You only want classic frame-by-frame animation
You prefer a minimal interface focused solely on drawing
Your workflow depends heavily on traditional animation shortcuts and timelines
That said, many artists still choose Blender despite these drawbacks because of how much control it offers once you’re past the initial learning phase.
Who Benefits Most From Using Blender for 2D
Blender is often a great fit for:
Indie creators and solo artists
Students learning both 2D and 3D animation
YouTubers and educators creating animated content
Artists working on hybrid or experimental projects
Because Blender is free, it’s also easy to test whether it suits your needs without committing to a paid license or subscription.
The Bottom Line
Blender isn’t trying to replace every 2D animation tool. Instead, it fills a unique space where 2D and 3D overlap. If that overlap matters to your work, Blender can be an excellent choice. If not, it may feel like more software than you need.
Understanding this upfront can save you a lot of time and frustration.
What’s New in 2026: Grease Pencil 3.0 and the Future of 2D in Blender
If you haven’t opened Blender in a while, you might be surprised by how much has changed. Over the past year, the Blender team has completely reworked its 2D animation system, and it’s not just a small quality-of-life update. Grease Pencil 3.0 officially arrived as part of the Blender 4.x series, and it’s a massive leap forward for artists working in 2D.
A Whole New Engine for Drawing and Animation
Grease Pencil 3.0 was essentially rebuilt from the ground up. The development team focused on making 2D drawing faster, smoother, and much more scalable. In earlier versions, heavy stroke counts or long frame sequences could slow down performance, but that’s no longer the case. With a new data architecture and multi-threaded processing, animating directly on the canvas now feels buttery smooth, even on complex scenes.
Geometry Nodes Meet 2D
One of the biggest 2026 additions is the integration of Geometry Nodes with Grease Pencil objects. That means you can use procedural effects, like scattering, deformation, or dynamic transformations, on your 2D drawings. It’s a game-changer for motion graphics artists or anyone who loves mixing hand-drawn elements with procedural motion.
For example, you can animate a character’s environment (like falling leaves or floating particles) without redrawing anything, just build a quick Geometry Node setup and let Blender handle the rest.
Smarter Layer Management and Rigging Tools
The new version also introduced layer grouping, advanced onion skin controls, and better cut-out rigging tools. Animators can now group layers, control visibility more efficiently, and build reusable rigs for 2D characters without messy workarounds. If you’ve ever worked with Toon Boom or OpenToonz, you’ll notice Blender closing the gap fast.
Easier Hybrid 2D-3D Workflows
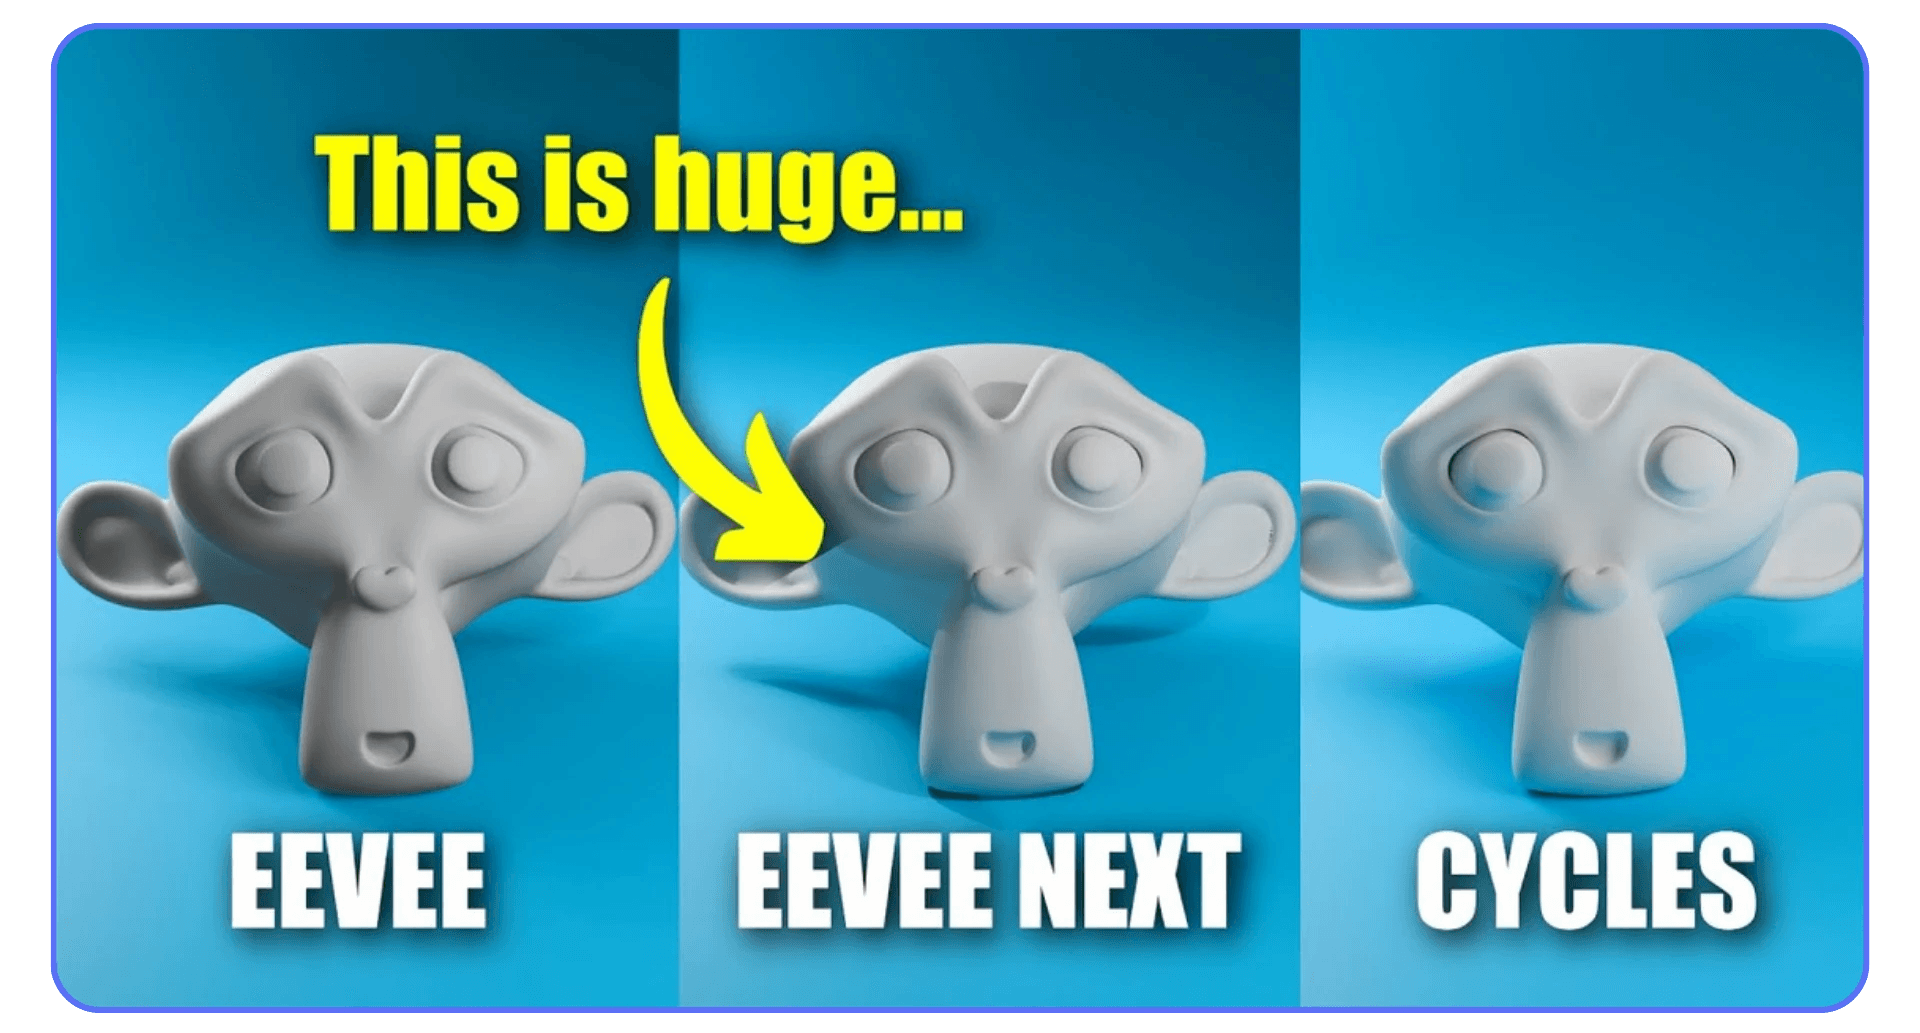
Blender’s long-standing strength has always been its ability to blend 2D and 3D in a single project. With the 2026 updates, this hybrid workflow feels more natural than ever. You can draw Grease Pencil strokes directly on 3D objects, use Depth of Field with Eevee Next for cinematic shots, and even animate camera movement through 2D scenes that live inside a 3D world.
Studios testing these workflows (like the House of Chores short film team) reported huge time savings when combining 2D character animation with 3D props and lighting.
Should You Upgrade?
If you’re a 2D animator who’s been using Blender casually, 2026 is the perfect time to dive deeper. The Grease Pencil 3.0 overhaul makes drawing and animation genuinely production-ready. It’s faster, cleaner, and way more flexible, especially if you plan to experiment with hybrid scenes or procedural effects.
And since Blender remains completely free, there’s really no reason not to give it another shot.
Practical Applications of 2D Animation in Blender
So, a big question you might be asking is, when might you want to actually use 2D animation in Blender? That’s a good question and there are quite a few creative examples.
Storyboarding: This is the technique of planning out how your animation will unfold, represented in concise panels. You can storyboard for both 2D and 3D animations, and being able to do that right in Blender is efficient.
Concept Art: When trying to design characters that you want to model in 3D, you can use the Grease Pencil and 2D canvas to create your concept art.
Hybrid Animation: Some very creative animations combine 2D and 3D elements, and it is known as hybrid animation. Since the Grease Pencil can be used to draw directly on the 3D viewport, it is relatively easy to do this in Blender.
Traditional 2D Animation: Finally, you might simply be used to Blender already and you can use it to create a purely 2D animation without using any of its 3D tools.
Power Your Blender Animations Anywhere with Vagon Cloud Computer
Let’s be real, Blender can push even the best laptops to their breaking point. Once you start layering Grease Pencil effects, complex scenes, or rendering high-res sequences, things can slow down fast. Fans spin, temperatures rise, and your workflow grinds to a halt.
That’s where Vagon Cloud Computer steps in.
Vagon lets you run Blender, including the new Grease Pencil 3.0 and 2026 workflow updates, on a powerful GPU machine in the cloud. You can open a full Windows workspace right in your browser, install Blender, and start animating instantly. Your local device just streams the session, so you get desktop-class performance without the heat or noise.
You only pay for the time you use. No subscriptions, no long-term commitment, just log in, choose your performance tier, and launch. It’s perfect for students, artists, and studios who need workstation-level power on demand.
Whether you’re working on a short 2D animation or testing hybrid 2D-3D projects, Vagon Cloud Computer gives you the performance headroom Blender deserves, anytime, anywhere.
👉 Explore plans and launch your first cloud computer at Vagon.
Conclusion
Creating a 2D animation in Blender starts with setting up the right workspace, learning your way around the Grease Pencil tool, then understanding how to set keyframes, and finally, exporting your finished product. The Grease Pencil is pretty exceptional since you can use it to combine 2D and 3D animation, allowing your creativity to have no limits.
To get better at animating in 2D with Blender, I recommend checking out the Blender community forums or the wealth of free YouTube videos available. These will help you learn more and get past common bugs and issues. While learning, you can test out your new knowledge using Vagon’s cloud-based solutions hosting Blender. You’ll be able to use Blender from anywhere and on any device.
FAQs
1. What is Blender 3D?
Blender 3D is a free and open-source 3D creation suite that supports modeling, animation, rendering, video editing, scripting, and even 2D animation through its Grease Pencil toolset.
2. Can Blender really be used for 2D animation?
Absolutely. With the dedicated 2D Animation workspace and the Grease Pencil tool, you can draw, animate, and composite full 2D scenes directly inside Blender, no external apps required.
3. What changed with Blender in 2026?
The biggest update is Grease Pencil 3.0, a complete rewrite of the 2D engine introduced with Blender 4.x. It’s now faster, more stable, and integrates with Geometry Nodes for procedural animation. You also get better layering, new rigging tools, and easier hybrid 2D/3D workflows.
4. Is Blender 4.x better for 2D animators than older versions?
Yes. The 2025 release makes 2D animation genuinely production-ready. Performance improvements mean smoother drawing and playback, especially in longer scenes or complex stroke setups. If you tried 2D in Blender before and found it laggy, it’s time to give it another shot.
5. What hardware do I need for smooth 2D animation in Blender?
For basic 2D animation, most mid-range laptops are fine. But if you’re working with long timelines, heavy Grease Pencil effects, or high-res rendering, GPU power becomes crucial. That’s why many creators now use Vagon Cloud Computer, which runs Blender on high-performance cloud GPUs without needing local specs.
6. Can I combine 2D and 3D animation in Blender?
Yes, and that’s where Blender really shines. You can draw Grease Pencil strokes on 3D objects, use real lighting, depth of field, and camera movement to create hybrid scenes that mix the best of both worlds.
7. Does Vagon Cloud Computer support Blender 4.x and Grease Pencil 3.0?
Yes. You can install and run the latest version of Blender inside your Vagon workspace just like on a desktop. Since the sessions are powered by RTX-class GPUs, you’ll get smooth performance even when handling large Grease Pencil scenes or rendering animations.
8. Is Vagon Cloud Computer subscription-based?
No, Vagon runs on a pay-as-you-go model. You only pay for the time you use your cloud machine, and you can scale performance up or down depending on your project. It’s ideal for occasional animators or studios with variable workloads.
You might frequently hear Blender being referred to as “Blender 3D”. That’s no surprise, as it is an extremely versatile 3D modeling, animation, and rendering tool. You might be asking, can I use Blender 3D for 2D animations? I remember being shocked when I learned the answer is yes, you can.
This guide will walk you through everything regarding Blender and 2D animation, such as why you might want to use it for that purpose, down to how to finish up a 2D animation in the program.
Why Use Blender for 2D Animation?
You might be wondering why you should use Blender for 2D animation instead of some of the other options available and custom-built for that.
The first reason is that Blender is free and open-source, and with that comes a rich community that always offers new tips and tricks to improve your workflow. You also might not be aware of it, but the program comes with a large selection of tools which can come in handy for 2D animation.
Finally, Blender is one app that will make it incredibly easy for you to combine 2D and 3D elements in a scene, which can come in very handy. Some 2D elements might be way too arduous to animate manually, so why not just make them 3D? If you're new to Blender and need a solid foundation before diving into exports, our Complete Guide to Blender 3D for Beginners will help you get started with the basics.
Setting Up Your Workspace for 2D Animation
Now, let’s begin this 2D animation tutorial for Blender. I’m going to start by teaching you how to best set up your workspace for a 2D animation workflow. Quite naturally, quite a few things will need to change since Blender is set by default for 3D workflows.
Here’s how to launch Blender right into the 2D animation workspace. It doesn’t even take that many steps. There are quite a few ways you can access it.
Launch Blender.
Once the application has launched, under the New File section in the landing window, choose “2D Animation”.
This will launch you straight into the 2D animation workspace which looks very different from the 3D one.
If you already have Blender opened, you can click on “File” in the menu bar at the top, “New”, and then “2D Animation. You can also directly access the 2D Animation workspace in any project by clicking the plus icon at the far right of the workspace tabs and choosing any of the 2D Animation options.
You can also check out our GPU Guide for tips to use GPU, along with speed up and acceleration tips for Blender 3D.
Understanding the Grease Pencil Tool
The Grease Pencil is the default drawing tool that Blender equips you with in the 2D animation workspace. You can also use the Grease Pencil to draw directly onto the viewport in 3D workspaces, which is great when paired with the 3D cursor and drawing over a 3D object.
The Grease Pencil is powerful because of all the features it comes with. Apart from being able to draw over both 2D and 3D scenes, you can also organize your drawings into layers (as with most major 2D art programs), change your strokes and brushes, and so much more.
The Grease Pencil tool comes in handy for pure 2D animation, when drawing and animating the movements of characters. However, you can also use it to draw over 3D props and background elements. It also comes in handy for rotoscoping, as well as storyboarding right in the Blender app.
Creating Your First 2D Animation
Now, this part will mostly depend on your pre-existing 2D art and animation skills. However, with a good foundation here, especially with other digital art programs, you should have an easy time.
On the 2D animation canvas, you can use the Grease Pencil to draw your character. You can adjust the brush type, thickness, opacity, and so on, as you would in other art programs. It’s best to draw a relatively simple character, as you’re planning to animate it. Once you’re done, press “I” to set a keyframe for the character’s current position. Now, manually move the timeline at the bottom to a new frame.
Now, you can draw the character into another pose, and Blender will even help you by “onion skinning” which shows you a transparent highlight of your previous frame. This will help with keeping things consistent. Once you’ve drawn the new image, press “I” to set another keyframe. Repeat this until you have enough set keyframes.
Press the Play button in the timeline to watch your first 2D animation in Blender!
Adding Color and Final Touches
Now, it is great as it is, but you can add a little of razzle dazzle to your animation. Don’t be afraid to add color to your animation to make it look more lively. There’s a fill bucket tool that you can use to instantly add color to a closed-off shape and you can also change the color of your strokes before you make them. It’s also great to explore different stroke thicknesses and so on.
Don’t be afraid to add shadows that move as your character moves. With simpler 2D animations, a shadow that is generally oval-shaped tends to suffice, but you can use a more detailed shadow for more complex animations. You can also add visual effects like a blur for fast-moving objects to make your animation more polished. If you want, you can even add textures to objects.
Do you know how to use Camera Depth of Field to simulate real-world camera lenses? Check out our Blender 3D Glossary to learn all the Blender 3D terminology.
Exporting Your Animation
The final step is to export your 2D animation so you can share it or continue your editing in another application. Let me quickly take you through the steps of exporting your animation once you’re done.
From the Blender interface, look towards the properties section on the right side and click on the icon that looks like a TV. This will open the Render Properties. Ensure that you’re set to Eevee render engine, though it usually will be by default. There are other render engines available for Blender, but Eevee is what you need for 2D art.
Next, click the icon with the printer with a picture coming out of it. This will open the Output Properties.
The first thing you can do is set the resolution that you desire from the Format tab. It is 1920x1080, which is Full HD, by default. This is great, but if you want to render faster, you can reduce the resolution.
This is a crash course, so let’s skip straight to the Output tab in the Output Properties. The first thing you should do is set where you want the rendered file to save to by clicking the folder icon.
Now, in the File Format section, choose “FFmpeg Video”.
Expand the Encoding tab and select the Container. MPEG-4 is MP4, which I recommend for its compatibility.
Set the Output Quality under the Video tab to “High Quality”. Lower qualities can help speed up your render and will result in a smaller file.
Now, press Ctrl + F12 to start rendering the animation (one of the most useful Blender shortcuts!). Once it is done, you will find it in the location you specified earlier.
When Blender Makes Sense for 2D Animation (and When It Doesn’t)
Blender is a powerful option for 2D animation, but it’s not automatically the right choice for every artist or project. Understanding where it shines, and where it may slow you down, will help you decide if it fits your workflow.
When Blender Is a Great Choice
Blender works especially well if you like flexibility and experimentation. If you’re interested in combining hand-drawn animation with camera movement, lighting, or 3D elements, Blender offers capabilities that most traditional 2D tools simply don’t.
It’s also a strong option if you:
Want a single application for 2D, 3D, compositing, and rendering
Enjoy procedural tools or non-destructive workflows
Plan to mix 2D characters with 3D props or environments
Are already familiar with Blender and want to avoid switching software
For motion graphics, explainer videos, and stylized short films, Blender’s Grease Pencil often feels more flexible than dedicated 2D-only programs.
When Blender Might Not Be Ideal
Blender may not be the best starting point if your goal is purely traditional, hand-drawn animation with a very simple setup. The interface is still more complex than most 2D-only tools, and there is a learning curve if you’re new to Blender.
You may find other software more comfortable if:
You only want classic frame-by-frame animation
You prefer a minimal interface focused solely on drawing
Your workflow depends heavily on traditional animation shortcuts and timelines
That said, many artists still choose Blender despite these drawbacks because of how much control it offers once you’re past the initial learning phase.
Who Benefits Most From Using Blender for 2D
Blender is often a great fit for:
Indie creators and solo artists
Students learning both 2D and 3D animation
YouTubers and educators creating animated content
Artists working on hybrid or experimental projects
Because Blender is free, it’s also easy to test whether it suits your needs without committing to a paid license or subscription.
The Bottom Line
Blender isn’t trying to replace every 2D animation tool. Instead, it fills a unique space where 2D and 3D overlap. If that overlap matters to your work, Blender can be an excellent choice. If not, it may feel like more software than you need.
Understanding this upfront can save you a lot of time and frustration.
What’s New in 2026: Grease Pencil 3.0 and the Future of 2D in Blender
If you haven’t opened Blender in a while, you might be surprised by how much has changed. Over the past year, the Blender team has completely reworked its 2D animation system, and it’s not just a small quality-of-life update. Grease Pencil 3.0 officially arrived as part of the Blender 4.x series, and it’s a massive leap forward for artists working in 2D.
A Whole New Engine for Drawing and Animation
Grease Pencil 3.0 was essentially rebuilt from the ground up. The development team focused on making 2D drawing faster, smoother, and much more scalable. In earlier versions, heavy stroke counts or long frame sequences could slow down performance, but that’s no longer the case. With a new data architecture and multi-threaded processing, animating directly on the canvas now feels buttery smooth, even on complex scenes.
Geometry Nodes Meet 2D
One of the biggest 2026 additions is the integration of Geometry Nodes with Grease Pencil objects. That means you can use procedural effects, like scattering, deformation, or dynamic transformations, on your 2D drawings. It’s a game-changer for motion graphics artists or anyone who loves mixing hand-drawn elements with procedural motion.
For example, you can animate a character’s environment (like falling leaves or floating particles) without redrawing anything, just build a quick Geometry Node setup and let Blender handle the rest.
Smarter Layer Management and Rigging Tools
The new version also introduced layer grouping, advanced onion skin controls, and better cut-out rigging tools. Animators can now group layers, control visibility more efficiently, and build reusable rigs for 2D characters without messy workarounds. If you’ve ever worked with Toon Boom or OpenToonz, you’ll notice Blender closing the gap fast.
Easier Hybrid 2D-3D Workflows
Blender’s long-standing strength has always been its ability to blend 2D and 3D in a single project. With the 2026 updates, this hybrid workflow feels more natural than ever. You can draw Grease Pencil strokes directly on 3D objects, use Depth of Field with Eevee Next for cinematic shots, and even animate camera movement through 2D scenes that live inside a 3D world.
Studios testing these workflows (like the House of Chores short film team) reported huge time savings when combining 2D character animation with 3D props and lighting.
Should You Upgrade?
If you’re a 2D animator who’s been using Blender casually, 2026 is the perfect time to dive deeper. The Grease Pencil 3.0 overhaul makes drawing and animation genuinely production-ready. It’s faster, cleaner, and way more flexible, especially if you plan to experiment with hybrid scenes or procedural effects.
And since Blender remains completely free, there’s really no reason not to give it another shot.
Practical Applications of 2D Animation in Blender
So, a big question you might be asking is, when might you want to actually use 2D animation in Blender? That’s a good question and there are quite a few creative examples.
Storyboarding: This is the technique of planning out how your animation will unfold, represented in concise panels. You can storyboard for both 2D and 3D animations, and being able to do that right in Blender is efficient.
Concept Art: When trying to design characters that you want to model in 3D, you can use the Grease Pencil and 2D canvas to create your concept art.
Hybrid Animation: Some very creative animations combine 2D and 3D elements, and it is known as hybrid animation. Since the Grease Pencil can be used to draw directly on the 3D viewport, it is relatively easy to do this in Blender.
Traditional 2D Animation: Finally, you might simply be used to Blender already and you can use it to create a purely 2D animation without using any of its 3D tools.
Power Your Blender Animations Anywhere with Vagon Cloud Computer
Let’s be real, Blender can push even the best laptops to their breaking point. Once you start layering Grease Pencil effects, complex scenes, or rendering high-res sequences, things can slow down fast. Fans spin, temperatures rise, and your workflow grinds to a halt.
That’s where Vagon Cloud Computer steps in.
Vagon lets you run Blender, including the new Grease Pencil 3.0 and 2026 workflow updates, on a powerful GPU machine in the cloud. You can open a full Windows workspace right in your browser, install Blender, and start animating instantly. Your local device just streams the session, so you get desktop-class performance without the heat or noise.
You only pay for the time you use. No subscriptions, no long-term commitment, just log in, choose your performance tier, and launch. It’s perfect for students, artists, and studios who need workstation-level power on demand.
Whether you’re working on a short 2D animation or testing hybrid 2D-3D projects, Vagon Cloud Computer gives you the performance headroom Blender deserves, anytime, anywhere.
👉 Explore plans and launch your first cloud computer at Vagon.
Conclusion
Creating a 2D animation in Blender starts with setting up the right workspace, learning your way around the Grease Pencil tool, then understanding how to set keyframes, and finally, exporting your finished product. The Grease Pencil is pretty exceptional since you can use it to combine 2D and 3D animation, allowing your creativity to have no limits.
To get better at animating in 2D with Blender, I recommend checking out the Blender community forums or the wealth of free YouTube videos available. These will help you learn more and get past common bugs and issues. While learning, you can test out your new knowledge using Vagon’s cloud-based solutions hosting Blender. You’ll be able to use Blender from anywhere and on any device.
FAQs
1. What is Blender 3D?
Blender 3D is a free and open-source 3D creation suite that supports modeling, animation, rendering, video editing, scripting, and even 2D animation through its Grease Pencil toolset.
2. Can Blender really be used for 2D animation?
Absolutely. With the dedicated 2D Animation workspace and the Grease Pencil tool, you can draw, animate, and composite full 2D scenes directly inside Blender, no external apps required.
3. What changed with Blender in 2026?
The biggest update is Grease Pencil 3.0, a complete rewrite of the 2D engine introduced with Blender 4.x. It’s now faster, more stable, and integrates with Geometry Nodes for procedural animation. You also get better layering, new rigging tools, and easier hybrid 2D/3D workflows.
4. Is Blender 4.x better for 2D animators than older versions?
Yes. The 2025 release makes 2D animation genuinely production-ready. Performance improvements mean smoother drawing and playback, especially in longer scenes or complex stroke setups. If you tried 2D in Blender before and found it laggy, it’s time to give it another shot.
5. What hardware do I need for smooth 2D animation in Blender?
For basic 2D animation, most mid-range laptops are fine. But if you’re working with long timelines, heavy Grease Pencil effects, or high-res rendering, GPU power becomes crucial. That’s why many creators now use Vagon Cloud Computer, which runs Blender on high-performance cloud GPUs without needing local specs.
6. Can I combine 2D and 3D animation in Blender?
Yes, and that’s where Blender really shines. You can draw Grease Pencil strokes on 3D objects, use real lighting, depth of field, and camera movement to create hybrid scenes that mix the best of both worlds.
7. Does Vagon Cloud Computer support Blender 4.x and Grease Pencil 3.0?
Yes. You can install and run the latest version of Blender inside your Vagon workspace just like on a desktop. Since the sessions are powered by RTX-class GPUs, you’ll get smooth performance even when handling large Grease Pencil scenes or rendering animations.
8. Is Vagon Cloud Computer subscription-based?
No, Vagon runs on a pay-as-you-go model. You only pay for the time you use your cloud machine, and you can scale performance up or down depending on your project. It’s ideal for occasional animators or studios with variable workloads.
Get Beyond Your Computer Performance
Run applications on your cloud computer with the latest generation hardware. No more crashes or lags.

Trial includes 1 hour usage + 7 days of storage.
Summarize with AI

Ready to focus on your creativity?
Vagon gives you the ability to create & render projects, collaborate, and stream applications with the power of the best hardware.

Vagon Blog


Run heavy applications on any device with
your personal computer on the cloud.
San Francisco, California
Solutions
Vagon Teams
Vagon Streams
Use Cases
Resources
Vagon Blog
What Slows Down After Effects Projects?
The First 30 Minutes in Blender 3D: A Practical Workflow Guide
What’s New in Godot 4.7? Key Features, Upgrades, and Workflow Improvements
What Slows Down Blender 3D Projects?
What Slows Down Adobe Photoshop Projects?
The First 30 Minutes in Adobe Photoshop: A Practical Workflow Guide
Before You Start in Adobe Photoshop: A Practical Setup Checklist
What’s New in Unreal Engine 5.8? Key Features and Upgrade Advice
How to Run Windows on an iPad: 4 Best Ways (2026)
Vagon Blog
Run heavy applications on any device with
your personal computer on the cloud.
San Francisco, California
Solutions
Vagon Teams
Vagon Streams
Use Cases
Resources
Vagon Blog