Instant Connection for Pixel Streaming
— New Feature Automated Setup

How to Animate a Bouncing Cube in Blender (Step-by-Step Beginner Guide)
How to Animate a Bouncing Cube in Blender (Step-by-Step Beginner Guide)
How to Animate a Bouncing Cube in Blender (Step-by-Step Beginner Guide)
Published on July 18, 2025
Table of Contents
Did you know Blender alone powered the Academy Award–winning short film Flow (2024)?
Yeah, I didn’t believe it either—until I saw the credits roll and realized this free 3D tool was behind that level of animation.
But we’re not here to win an Oscar (not yet, anyway). We’re here to make something move. Specifically, a cube. A basic, bouncing, spinning cube that’ll teach you everything you need to know about how animation works in Blender.
No addons. No fluff. Just real steps from a real tutorial you can actually follow.
Why Blender Rules for Animation
Blender’s not just good for animation—it’s ridiculously good. It’s got everything built in:
Keyframes that work across location, rotation, scale, and more
A Timeline and Dope Sheet that make timing edits fast
A Graph Editor that gives you full control over how things move
And it’s 100% free, with no annoying paywalls for “pro features”
That alone makes it worth learning. But what really blew my mind? The fact that this same tool is being used in everything from indie games to Spider‑Man: Across the Spider-Verse (yep, Blender helped out on parts of that too).
And if you’re wondering what else Blender’s been used for lately, just check out these incredible films made with Blender—you might recognize a few.
Still, I’ll be honest—when I first opened the animation workspace, I was lost. The cube wouldn’t move how I expected. The timeline confused me. And don’t get me started on the Graph Editor curves.
In my experience, keyframes are what make Blender click. Once you understand how to set them—and how Blender interprets them—everything else starts to make sense. And that’s why I love how LeeDanielsART breaks it down: simple, visual, no tech jargon.
So let’s do the same. We’re starting with just a cube—but by the end, it’ll bounce, spin, and loop like a pro shot.
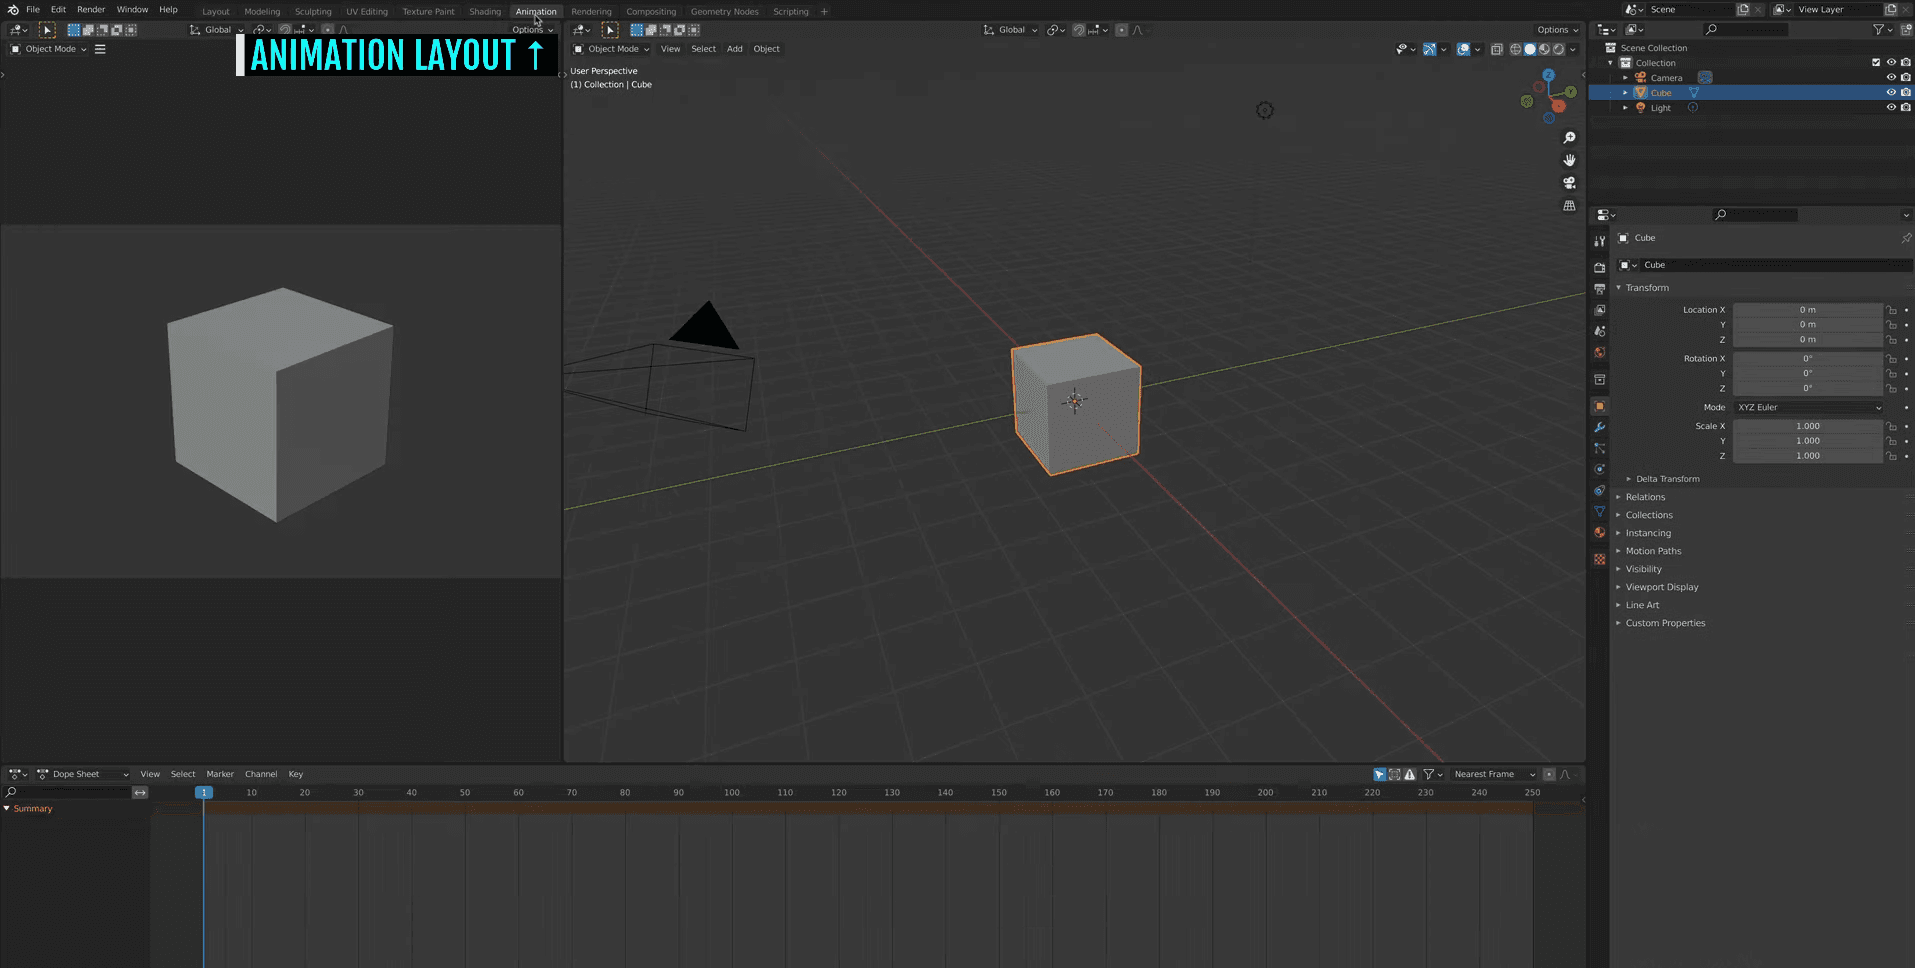
#1. Open the Animation Workspace
Before we start moving anything, let’s get Blender set up so it’s actually easy to animate in.
At the top of the Blender interface, you’ll see a row of tabs. Click on the one that says Animation. This layout is your new best friend—it pulls everything you need into one place:
A big 3D Viewport to move your objects around
A live Camera Preview
And the all-important Dope Sheet Timeline along the bottom
Think of this like your cockpit. You're going to be switching between the 3D Viewport and the Dope Sheet constantly, so having them side by side means less clicking, more animating.
I always start in this layout. Even for quick tests. Even for silly little cubes. It just makes the whole process smoother.
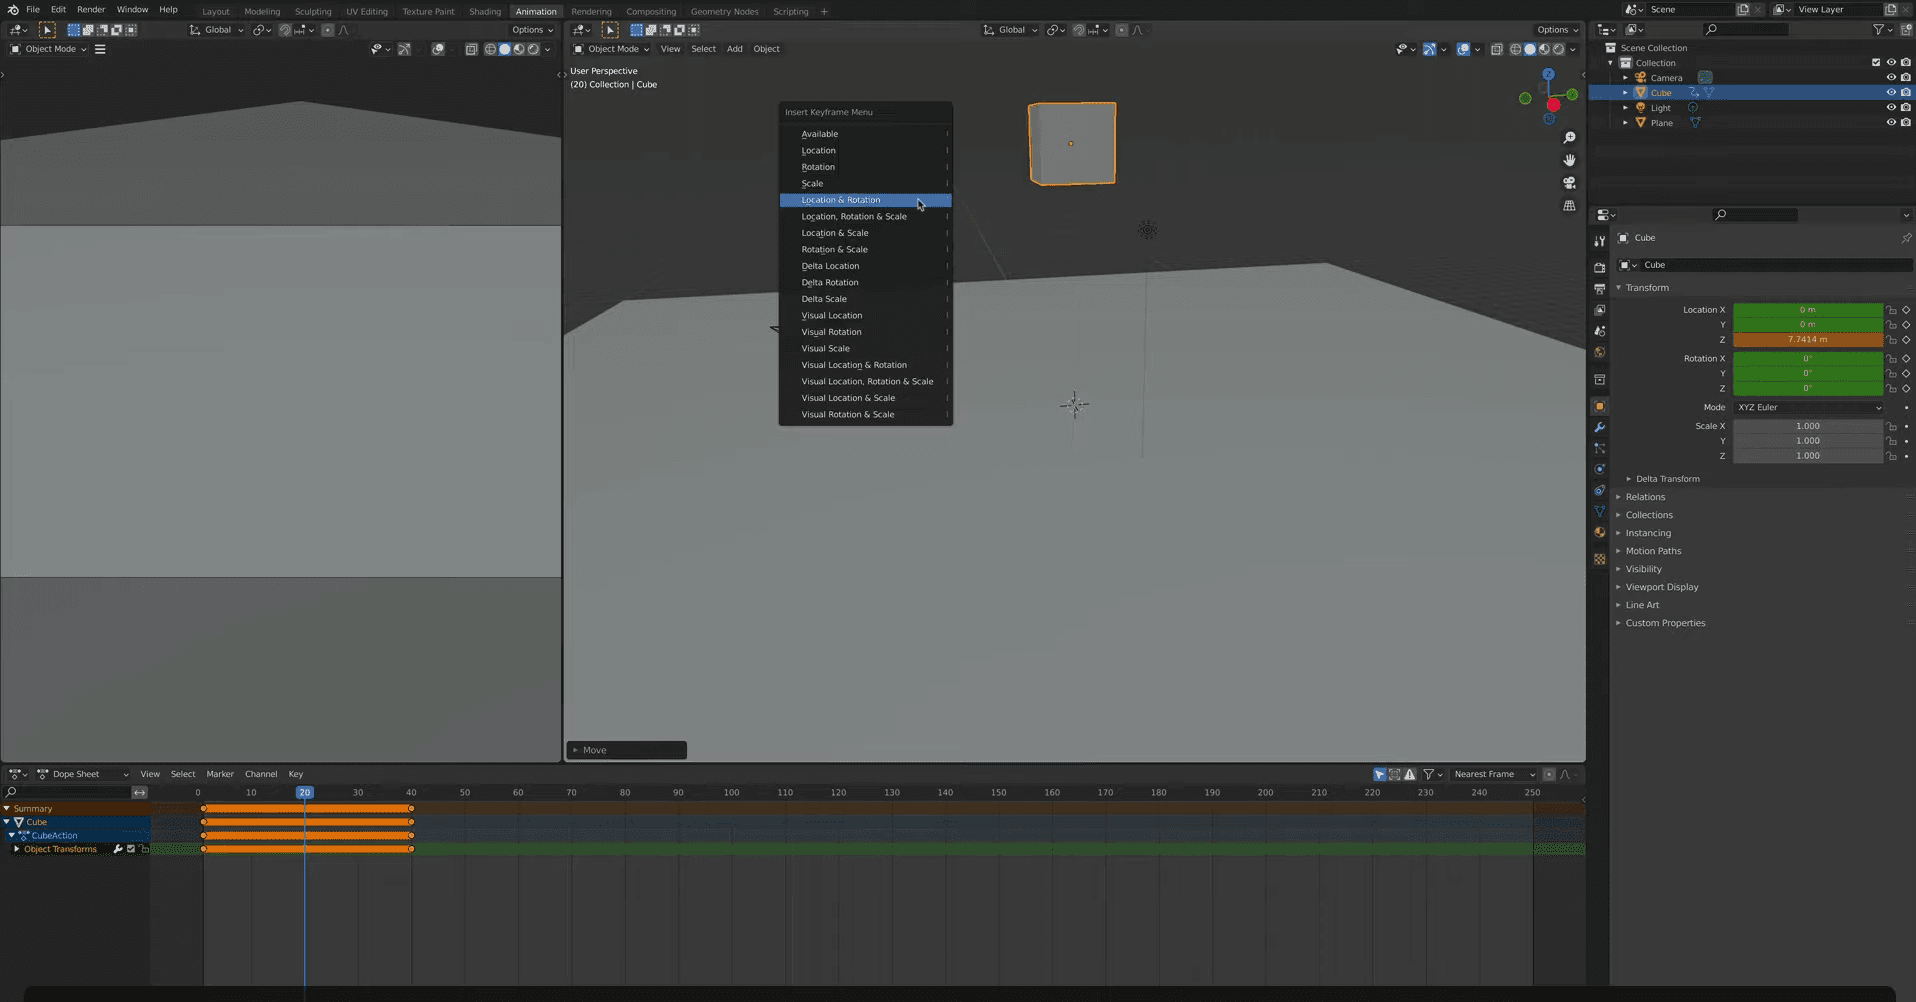
#2. Set Your First Keyframes
This is the moment. Your first actual animation.
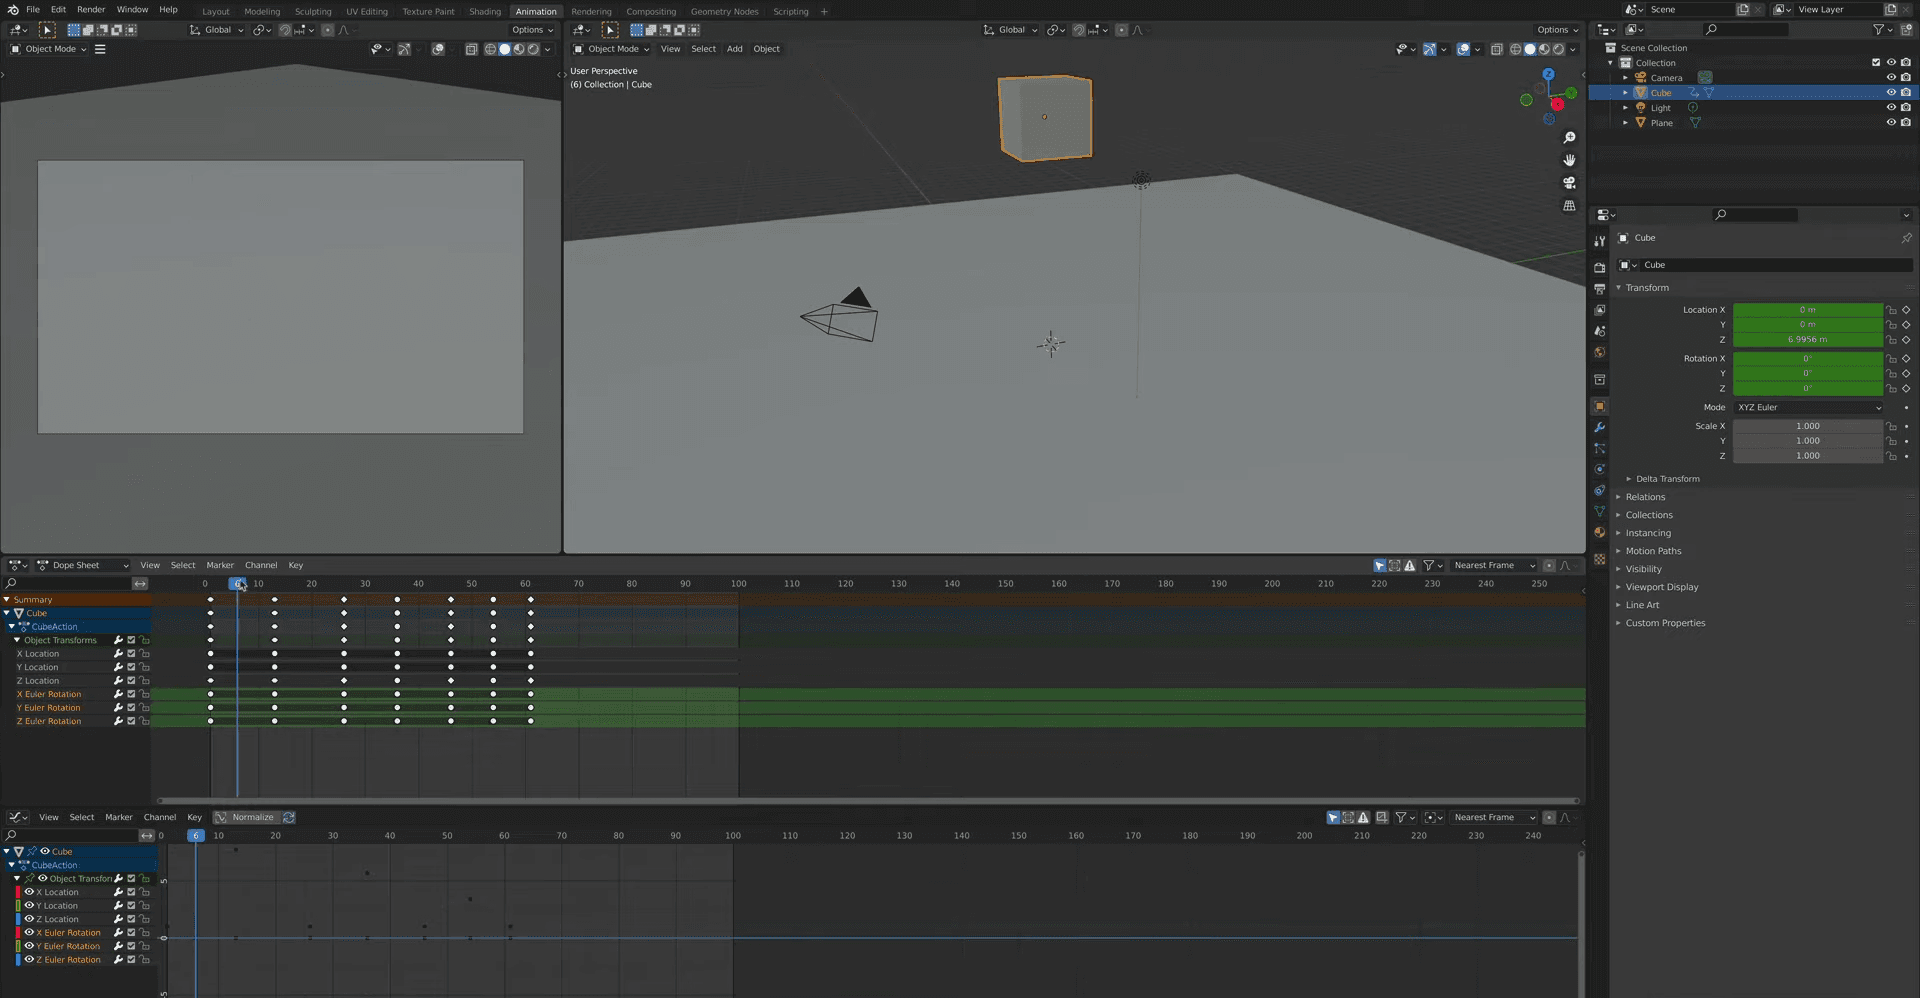
Go to frame 1 on the timeline. Select the cube in the viewport, press G to grab it, and move it to the left side of the screen.
Now hit I. This brings up the keyframe menu. Choose Location & Rotation.
Boom—your first keyframe is set. You’ll see a yellow dot pop up in the Dope Sheet timeline. That dot is Blender’s way of saying: “Cool, I’ll remember that.”

Now jump ahead to frame 40. Move the cube to the right side of the screen (press G again), and press I one more time to insert another Location & Rotation keyframe.
If you drag the timeline back and forth, the cube slides from left to right. Congrats—you just made an object move.
One quick thing to remember: Blender doesn’t “track” motion unless you tell it to. So if you move something without adding a keyframe, it’ll snap back to the last one. Always lock it in with I.
If you're just starting out and find yourself reaching for the mouse too often, learning a few Blender shortcuts and hotkeys can make a world of difference.
#3. Add the Floor & Bounce
Right now, our cube’s just floating through space. Let’s give it some ground to stand on—and something to bounce off of.
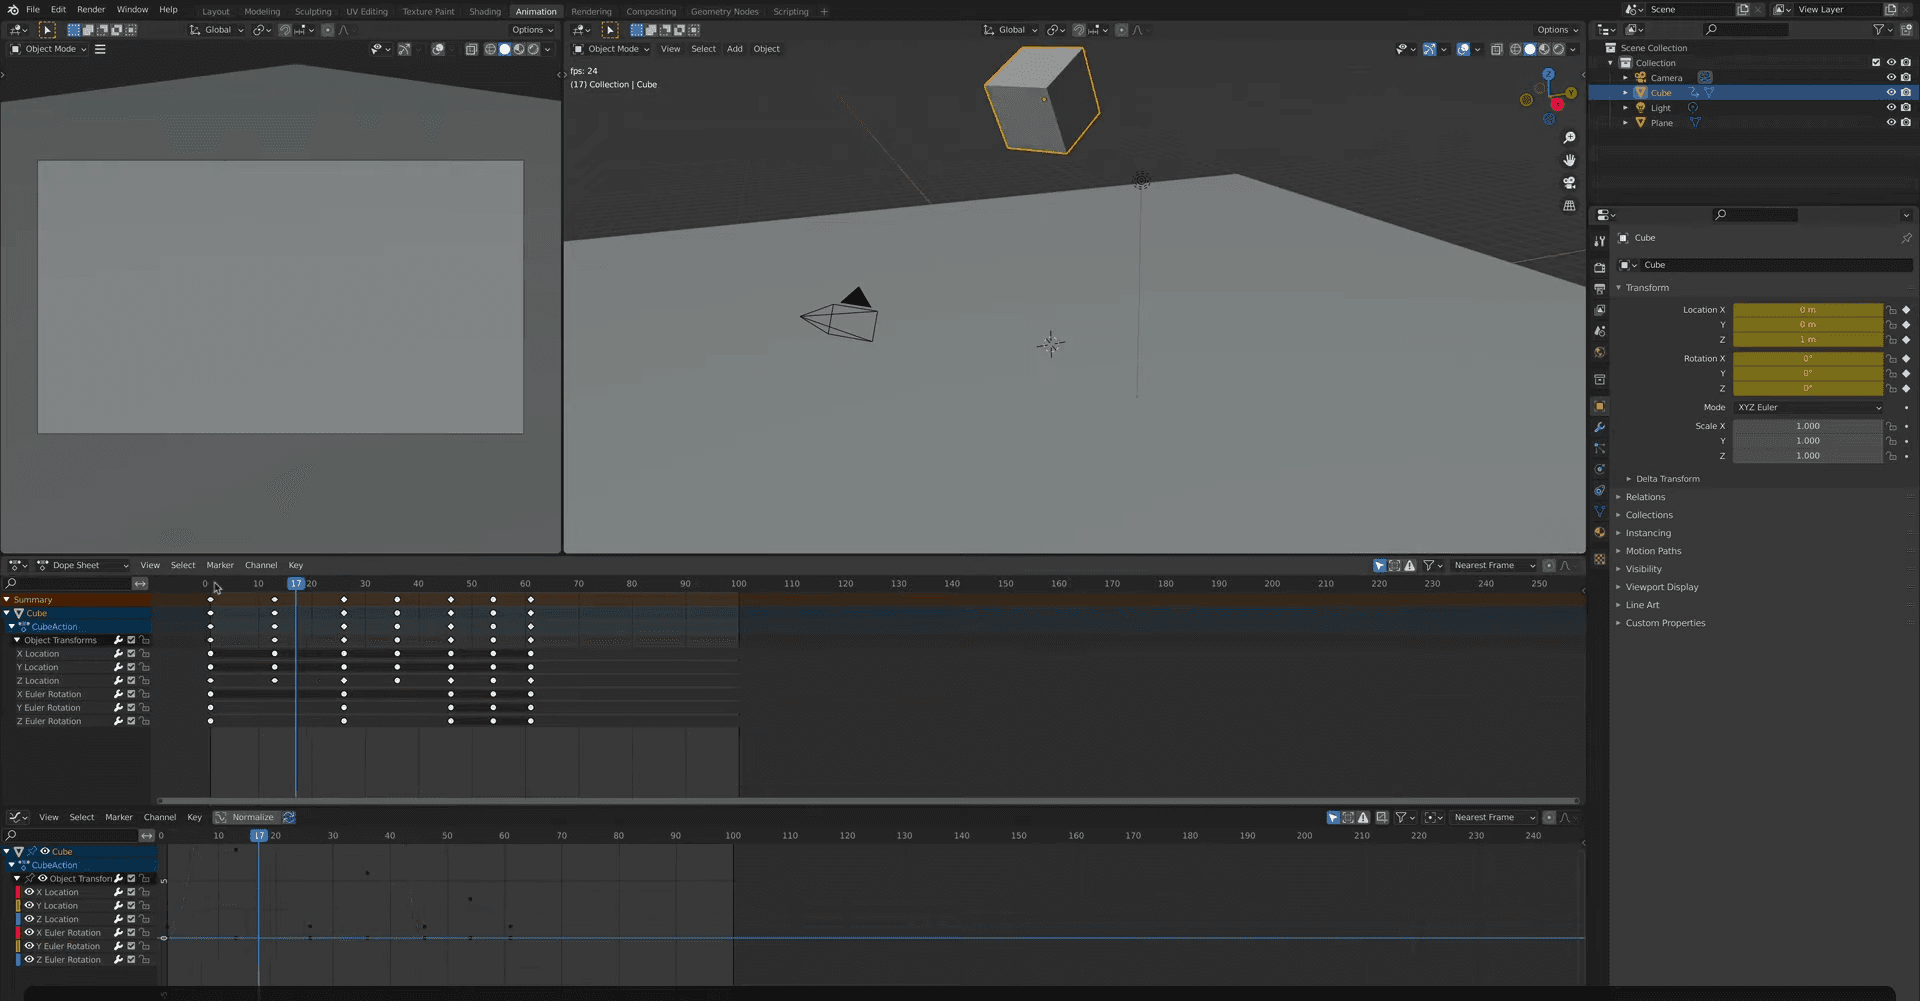
First, select the cube and press G, then Z to move it up slightly. Hold Ctrl while you move to snap it cleanly to Blender’s grid. That way it sits perfectly on the floor we’re about to add.
Now press Shift + A to open the Add menu, and choose Mesh → Plane.
Scale it up by pressing S, then typing 20, and hit Enter.
Boom. Floor created.
Next, go to frame 20—right in between your start and end frames. Select the cube, press G, then Z, and move it up into the air.
This is your bounce peak.
With the cube floating mid-air, hit I again and choose Location & Rotation to lock in that keyframe.
Now scrub through the timeline. You’ll see the cube jump up at frame 20, then land back down at frame 40. We’ve officially got a bounce!
It’s still a little robotic, but don’t worry—we’ll fix that with curves and timing soon. For now, just enjoy the fact that you made something move.
And if you’re serious about giving your models some texture love, these UV mapping tips for Blender will definitely come in handy.
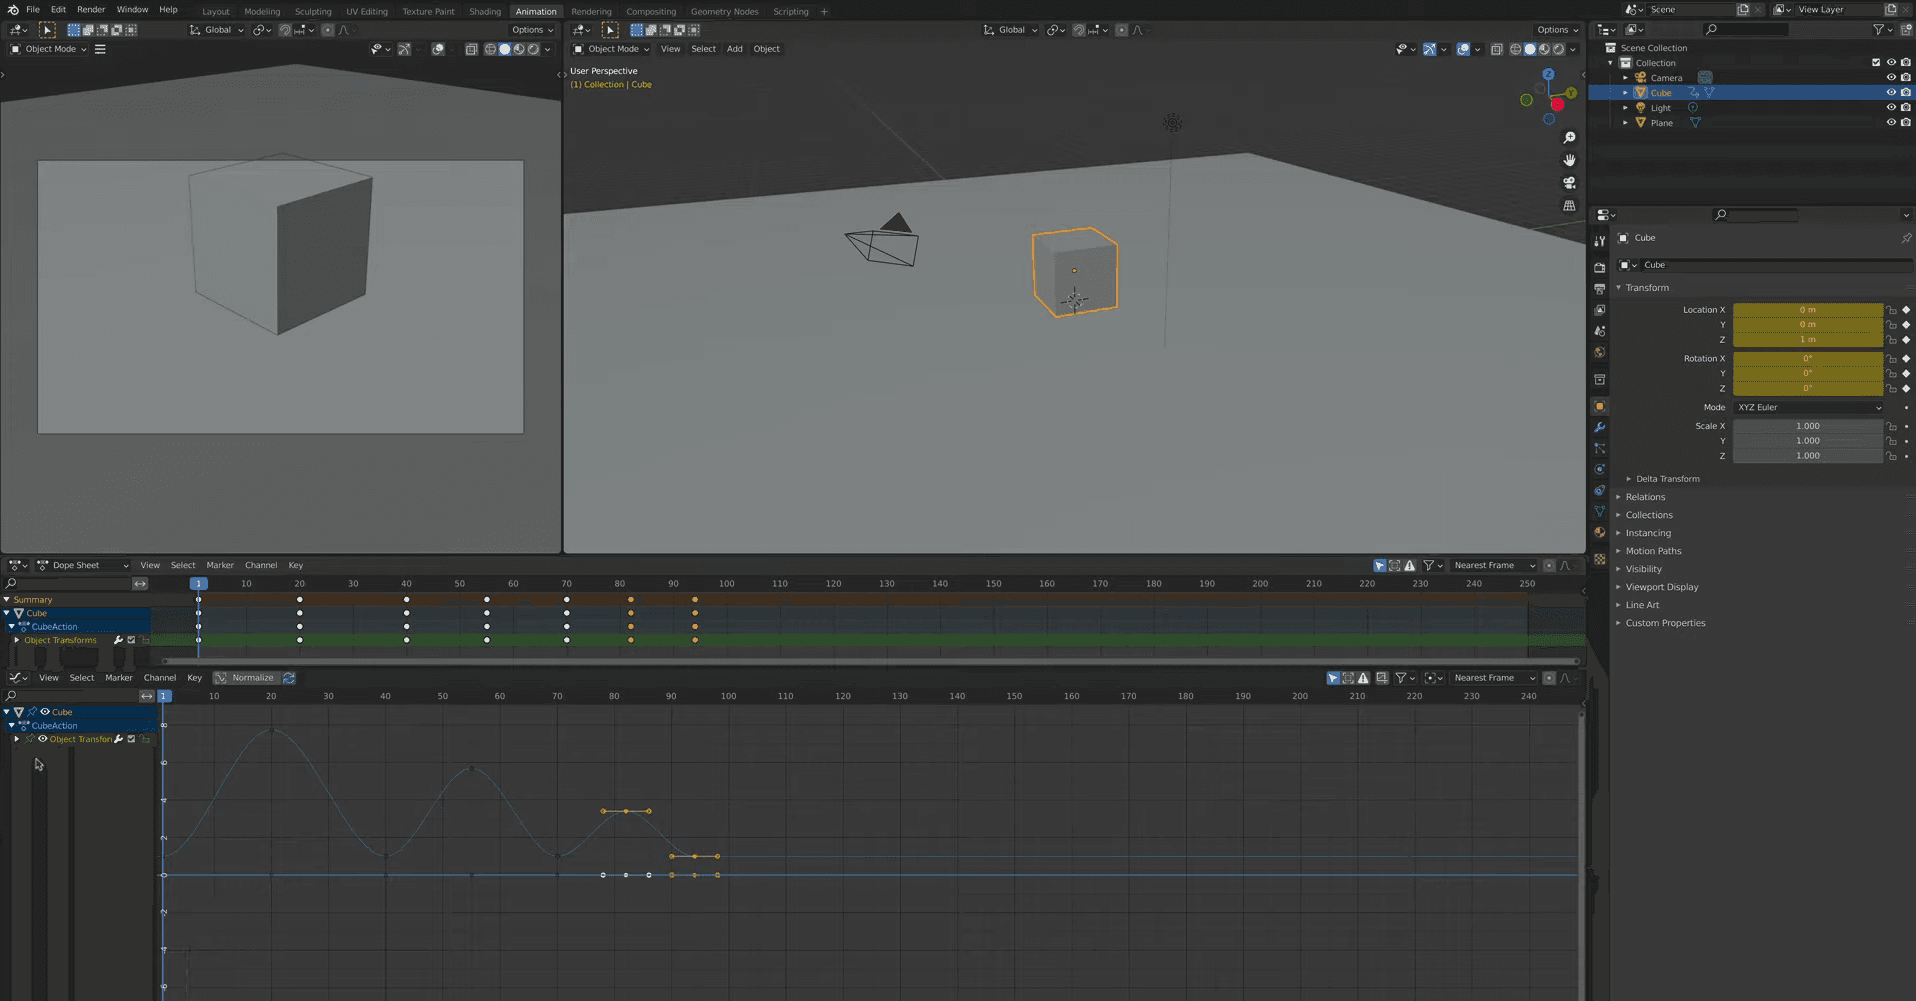
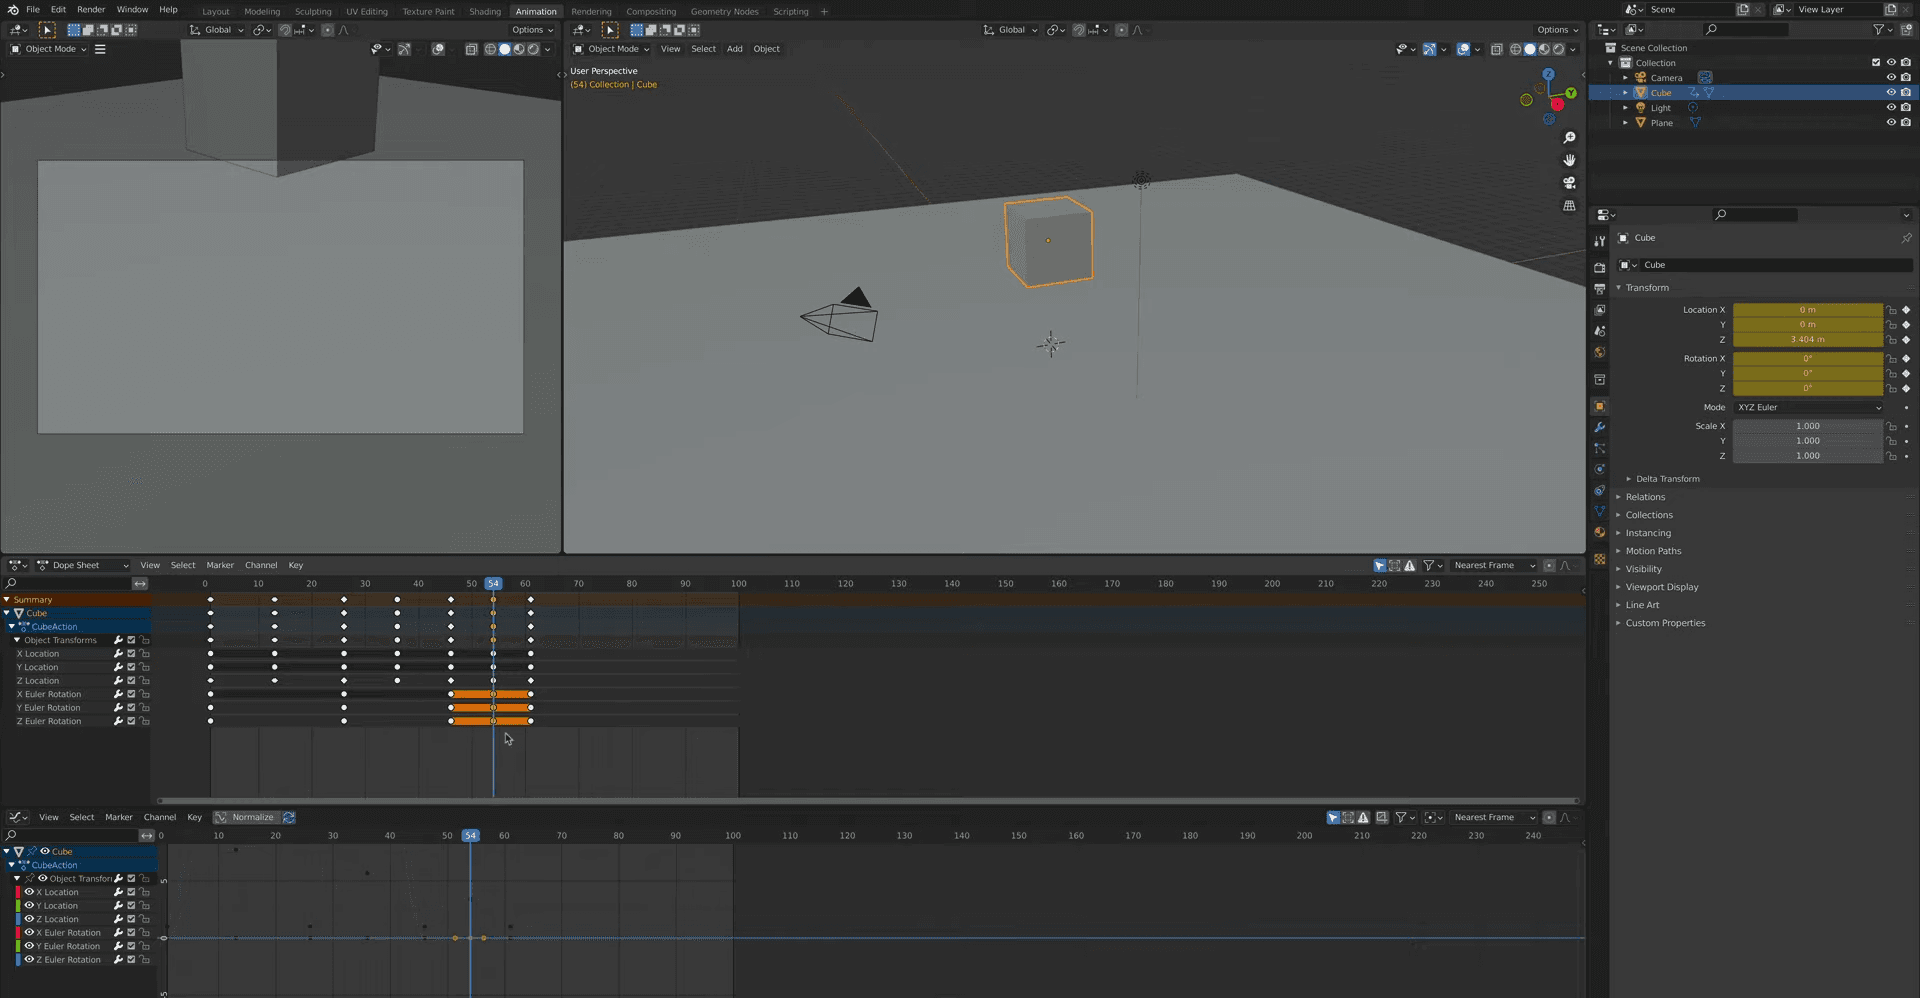
#4. Duplicate Bounces for Rhythm
One bounce is nice. But let’s be honest—it’s barely animation. Let’s give our cube some rhythm.
Here’s the trick: instead of animating every bounce from scratch, we’re going to copy and paste the keyframes.
Jump to frame 70. That’s where your second bounce will end.
In the Dope Sheet, select the group of keyframes that make up the first bounce (from frame 1 to 40). Press Ctrl + C (or Cmd + C on Mac) to copy them. Then move your timeline to frame 70 and press Ctrl + V to paste.
Do it again:
Go to frame 100
Paste again
Now move to the midpoints (e.g., frame 85) and lift the cube again using
G, thenZPress
I→ Location & Rotation to keyframe the peak of that bounce
Feel free to make each bounce a little smaller. Maybe the first bounce goes high, the second medium, and the last one barely leaves the ground. That’s how real physics work—unless you’re animating a magical rubber cube (which, fair enough).
Now when you hit play, you’ve got a rhythm: bounce, bounce, bounce.
Still needs polish. But you’re officially animating.
#5. Tweak Curves in the Graph Editor
Right now, the cube’s bouncing like it’s made of cotton. Soft takeoff, soft landing. No impact.
That’s not how things bounce in real life—and it’s definitely not how we want this animation to feel.
To fix it, we need to dive into Blender’s Graph Editor.
Start by dragging up a new window from the bottom left corner of the viewport, and set that panel to Graph Editor.
In the left sidebar, expand Z Location — that’s the channel controlling the cube’s vertical movement.
You’ll see a smooth, wave-like curve. It’s clean, but it’s too smooth.
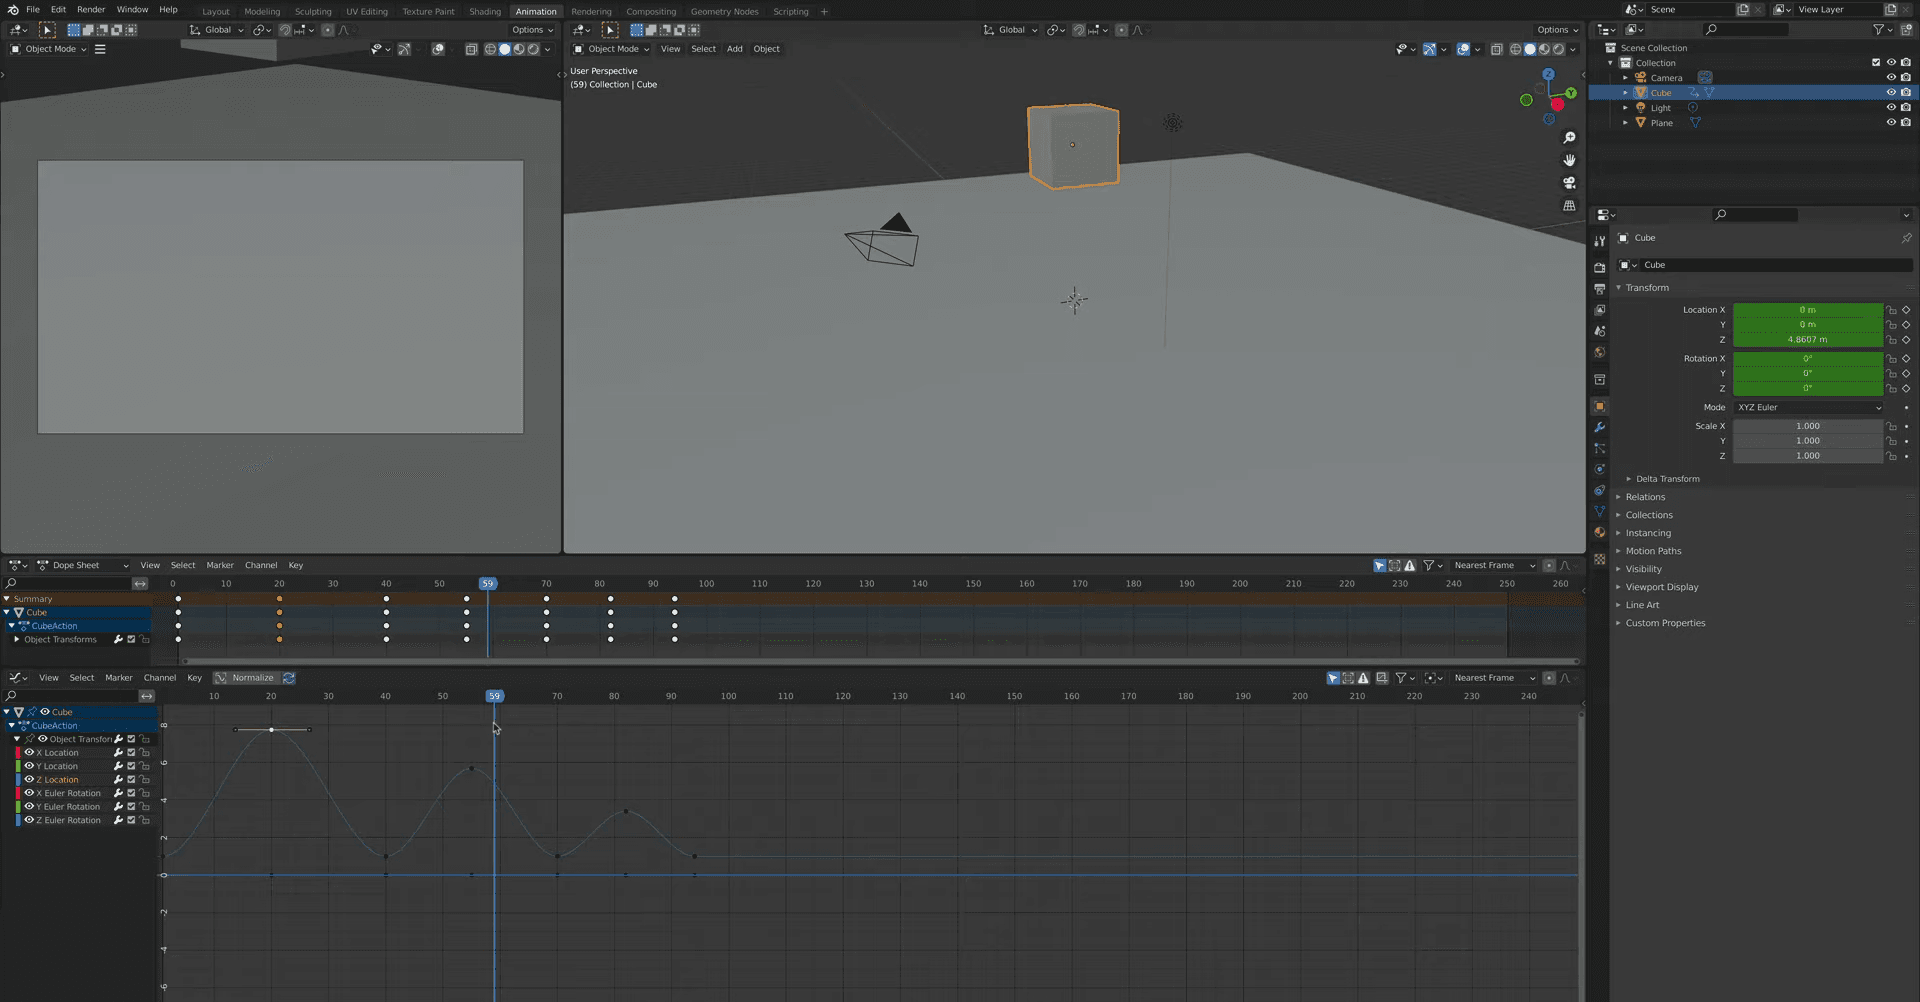
Let’s sharpen the first landing.
Select the bottom point of the first bounce (the impact)
Right-click → Handle Type → Free
Now grab the Bezier handles (those little arms sticking out) with
Gand pull them down sharply
Do the same for the other side of the dip, so the curve forms a sharp “V” instead of a lazy “U”.
Repeat this for the second and third bounce impacts.
Now play your animation.
Feel that? The cube actually bounces. It hits the ground with weight, and shoots back up with purpose. All because of a curve.
Honestly, this is the point where most people fall in love with the Graph Editor. It’s where the animation starts to feel like something you crafted—not just a bunch of keyframes on a timeline.
#6. Adjust Overall Timing with Keyframe Scaling
Okay, the bounce looks good—but how does it feel?
If it’s too slow, it might feel like your cube is underwater. Too fast, and it just looks twitchy. The good news? You don’t have to redo anything. Blender lets you scale your entire animation timing with a few keystrokes.
Here’s how:
In the Dope Sheet, press
Ato select all keyframesMake sure your timeline cursor is sitting at frame 1 — this is your anchor point
Press
Sto scale, and move your mouse left or right
Blender will stretch or compress the keyframe spacing based on your cursor’s position. It’s like adjusting the tempo of your animation without changing the choreography.
Want the animation to feel punchier? Scale it down.
Want more of a floaty, stylized bounce? Scale it up.
Pro Tip: If the timing feels weird after scaling, undo (Ctrl + Z) and try again with a different timeline anchor position. Blender scales relative to where the timeline playhead is—so use that to your advantage.
I’ve used this trick in almost every project, especially during early blocking. It’s fast, flexible, and way better than dragging keyframes around manually.
#7. Add Rotation Spins for Flair
So far, your cube’s bouncing. Cool. But it’s still a bit… stiff. Let’s give it some flair.
Spinning the cube mid-air adds a whole new layer of life to the animation—and it’s dead simple to pull off.
Start with the first bounce. Head to the peak of the jump (around frame 20). In the Dope Sheet or Graph Editor, delete any existing rotation keyframes at that point (just to avoid interpolation weirdness).
Now select the cube, press R, then Z, and type 180. Enter.
The cube is now rotated 180 degrees along the Z-axis.
Press I and choose Rotation to lock in the keyframe.
For the second bounce, do the same thing—but this time rotate it on the Y-axis (R, Y, 90).
And for the third bounce, try X-axis rotation (R, X, 90).
Each time, go to the peak of the jump, apply the spin, and keyframe it.
What you’re doing here is introducing variation—each bounce feels a little different. It’s playful, more natural, and a whole lot more fun to watch.
You’ll also notice Blender handles the rotation between bounces automatically, smoothly transitioning from one spin to the next. It’s kind of magic.
Honestly? This step alone can make your animation go from “meh” to “ohhh.”
#8. Loop the Animation
Now that your cube is bouncing and spinning like a champ, let’s get it to loop cleanly.
Blender’s default timeline runs to frame 250, which is overkill for this kind of animation.
We want our loop to feel intentional and tight—so go down to the bottom timeline controls and change the End frame to 100.
Hit Play. The animation runs from frame 1 to 100, then starts over.
But wait—if the loop feels off, like the cube snaps back to its starting position too hard, here’s what’s probably happening:
Your final keyframe at frame 100 doesn’t perfectly match the first keyframe at frame 1.
Quick fix:
Go to frame 1
Select the cube
Copy the keyframe (
Ctrl + C)Move to frame 100 and paste (
Ctrl + V)
Now the animation ends exactly where it begins. Seamless loop.
This is the kind of polish that matters. Whether you're exporting a GIF, making something for a motion graphics reel, or just showing off your first Blender animation—it’s worth the extra 10 seconds to get the loop right.
Tips, Tricks & Pitfalls
Now that your cube is bouncing and looping, let’s talk about the stuff that makes (or breaks) beginner animations.
🎯 Tip #1: The Graph Editor Is Everything
If there’s one place where animation in Blender really levels up, it’s the Graph Editor.
That’s where you control not just what moves, but how it moves. Slow in, fast out. Sudden drops. Elastic rebounds. All of it lives in those curves.
I think a lot of beginners skip it because it looks intimidating. I did too.
But once you start tweaking handles and seeing the results instantly, it becomes addictive.
⚠️ Pitfall: Copy/Paste Without Tweaking
Copying and pasting bounces? Great.
Leaving them all the exact same height and timing? Not so much.
Real motion has variation. Each bounce should lose a little height, land a little faster, spin a little differently. If every bounce feels cloned, it breaks the illusion—even if the timing is perfect.
💡 Tip: Break Things on Purpose
Want to learn faster? Mess something up on purpose.
Stretch a curve too far. Scale keyframes wildly. Delete rotation keys and re-add them. Blender’s non-destructive nature means you can always undo, but experimenting teaches you why things move the way they do.
Want to dig deeper into the weird little things that make Blender tick? These Blender tips and tricks might just become your secret weapon.
Could This Slow You Down?
Let’s be real for a second.
If you’ve been following along and your animation started lagging, that’s not on you. Blender’s viewport can slow down fast—even with a simple cube—especially if you’re on an older laptop or a lower-spec machine.
I’ve been there. You press play, and instead of a smooth bounce, you get a slideshow.
Frame 1… pause… frame 2… pause… and suddenly you’re animating in slow motion.
Most people assume you need to buy a better computer. But honestly? That’s not your only option.
I saw someone on Reddit say cloud computers only make sense “if you need to scale up and down quickly,” but they’re missing the point. Cloud power isn’t just about scale—it’s about smooth real-time feedback.
When you're animating, waiting for each frame to play out kills your momentum. You want to tweak curves, test timing, adjust spins—and see it happen instantly. That’s where a better machine makes the biggest difference. And if you don’t have one? The cloud gives you that edge without the hardware bill.
Rendering times creeping up on you too? There’s a great guide to reducing Blender rendering times that pairs well with a faster setup like Vagon.
And if you're still debating between upgrading your rig or going cloud-based, here's how to choose the best PC for Blender depending on your workflow.
Meet Vagon Cloud Computer
If you’re the kind of person who loves Blender but hates how your machine starts wheezing every time you hit play—you should know this exists: Vagon Cloud Computer
It’s a browser-based cloud workstation. You pick your power level, fire it up, and boom—you’ve got a high-performance Windows desktop ready to run Blender at full speed. From your laptop. Or your Mac. Or even a tablet if you're feeling bold.
And if you’re curious how far you can push Blender portability, yep—you can even run Blender on an iPad with the right setup.
I don’t use it for everything. But when a scene starts chugging, or I want to test something with real-time playback, it saves me.
Here’s where it shines:
Smooth viewport playback even with heavy scenes
Faster preview renders
No overheating laptop fans screaming like jet engines
You only pay for what you use (no monthly subscription needed unless you want one)
It’s not a replacement for Blender—it’s an upgrade for your setup.
Like adding a turbo button when your hardware just isn’t cutting it.
And yeah, I used it while testing this cube animation. Just to keep things snappy and fun.
Wrap-Up & What’s Next
You did it.
You took a plain old cube and turned it into a bouncing, spinning, looping animation—all inside Blender. Along the way, you learned how to:
Set keyframes that actually stick
Shape motion with the Graph Editor
Adjust timing like a pro
Add mid-air rotation for style
And create a clean loop that feels satisfying to watch
These might seem like small steps, but they’re foundational. Every walk cycle, camera shot, creature rig, or motion graphic you build from here? It’ll use this exact process.
And if you did it on an old machine that struggled along the way—maybe give Vagon Cloud Computer a try next round. It’s not about switching everything to the cloud. It’s about making Blender feel smooth again when you need it most.
What’s next?
Try animating a character. Or a bouncing ball with squash and stretch. Or a camera fly-through. You’ve got the basics now—so start breaking the rules a little.
And hey—if you made something cool with this tutorial (or on Vagon), tag us. We’d love to see your first bounce.
Did you know Blender alone powered the Academy Award–winning short film Flow (2024)?
Yeah, I didn’t believe it either—until I saw the credits roll and realized this free 3D tool was behind that level of animation.
But we’re not here to win an Oscar (not yet, anyway). We’re here to make something move. Specifically, a cube. A basic, bouncing, spinning cube that’ll teach you everything you need to know about how animation works in Blender.
No addons. No fluff. Just real steps from a real tutorial you can actually follow.
Why Blender Rules for Animation
Blender’s not just good for animation—it’s ridiculously good. It’s got everything built in:
Keyframes that work across location, rotation, scale, and more
A Timeline and Dope Sheet that make timing edits fast
A Graph Editor that gives you full control over how things move
And it’s 100% free, with no annoying paywalls for “pro features”
That alone makes it worth learning. But what really blew my mind? The fact that this same tool is being used in everything from indie games to Spider‑Man: Across the Spider-Verse (yep, Blender helped out on parts of that too).
And if you’re wondering what else Blender’s been used for lately, just check out these incredible films made with Blender—you might recognize a few.
Still, I’ll be honest—when I first opened the animation workspace, I was lost. The cube wouldn’t move how I expected. The timeline confused me. And don’t get me started on the Graph Editor curves.
In my experience, keyframes are what make Blender click. Once you understand how to set them—and how Blender interprets them—everything else starts to make sense. And that’s why I love how LeeDanielsART breaks it down: simple, visual, no tech jargon.
So let’s do the same. We’re starting with just a cube—but by the end, it’ll bounce, spin, and loop like a pro shot.
#1. Open the Animation Workspace
Before we start moving anything, let’s get Blender set up so it’s actually easy to animate in.
At the top of the Blender interface, you’ll see a row of tabs. Click on the one that says Animation. This layout is your new best friend—it pulls everything you need into one place:
A big 3D Viewport to move your objects around
A live Camera Preview
And the all-important Dope Sheet Timeline along the bottom
Think of this like your cockpit. You're going to be switching between the 3D Viewport and the Dope Sheet constantly, so having them side by side means less clicking, more animating.
I always start in this layout. Even for quick tests. Even for silly little cubes. It just makes the whole process smoother.
#2. Set Your First Keyframes
This is the moment. Your first actual animation.
Go to frame 1 on the timeline. Select the cube in the viewport, press G to grab it, and move it to the left side of the screen.
Now hit I. This brings up the keyframe menu. Choose Location & Rotation.
Boom—your first keyframe is set. You’ll see a yellow dot pop up in the Dope Sheet timeline. That dot is Blender’s way of saying: “Cool, I’ll remember that.”
Now jump ahead to frame 40. Move the cube to the right side of the screen (press G again), and press I one more time to insert another Location & Rotation keyframe.
If you drag the timeline back and forth, the cube slides from left to right. Congrats—you just made an object move.
One quick thing to remember: Blender doesn’t “track” motion unless you tell it to. So if you move something without adding a keyframe, it’ll snap back to the last one. Always lock it in with I.
If you're just starting out and find yourself reaching for the mouse too often, learning a few Blender shortcuts and hotkeys can make a world of difference.
#3. Add the Floor & Bounce
Right now, our cube’s just floating through space. Let’s give it some ground to stand on—and something to bounce off of.
First, select the cube and press G, then Z to move it up slightly. Hold Ctrl while you move to snap it cleanly to Blender’s grid. That way it sits perfectly on the floor we’re about to add.
Now press Shift + A to open the Add menu, and choose Mesh → Plane.
Scale it up by pressing S, then typing 20, and hit Enter.
Boom. Floor created.
Next, go to frame 20—right in between your start and end frames. Select the cube, press G, then Z, and move it up into the air.
This is your bounce peak.
With the cube floating mid-air, hit I again and choose Location & Rotation to lock in that keyframe.
Now scrub through the timeline. You’ll see the cube jump up at frame 20, then land back down at frame 40. We’ve officially got a bounce!
It’s still a little robotic, but don’t worry—we’ll fix that with curves and timing soon. For now, just enjoy the fact that you made something move.
And if you’re serious about giving your models some texture love, these UV mapping tips for Blender will definitely come in handy.
#4. Duplicate Bounces for Rhythm
One bounce is nice. But let’s be honest—it’s barely animation. Let’s give our cube some rhythm.
Here’s the trick: instead of animating every bounce from scratch, we’re going to copy and paste the keyframes.
Jump to frame 70. That’s where your second bounce will end.
In the Dope Sheet, select the group of keyframes that make up the first bounce (from frame 1 to 40). Press Ctrl + C (or Cmd + C on Mac) to copy them. Then move your timeline to frame 70 and press Ctrl + V to paste.
Do it again:
Go to frame 100
Paste again
Now move to the midpoints (e.g., frame 85) and lift the cube again using
G, thenZPress
I→ Location & Rotation to keyframe the peak of that bounce
Feel free to make each bounce a little smaller. Maybe the first bounce goes high, the second medium, and the last one barely leaves the ground. That’s how real physics work—unless you’re animating a magical rubber cube (which, fair enough).
Now when you hit play, you’ve got a rhythm: bounce, bounce, bounce.
Still needs polish. But you’re officially animating.
#5. Tweak Curves in the Graph Editor
Right now, the cube’s bouncing like it’s made of cotton. Soft takeoff, soft landing. No impact.
That’s not how things bounce in real life—and it’s definitely not how we want this animation to feel.
To fix it, we need to dive into Blender’s Graph Editor.
Start by dragging up a new window from the bottom left corner of the viewport, and set that panel to Graph Editor.
In the left sidebar, expand Z Location — that’s the channel controlling the cube’s vertical movement.
You’ll see a smooth, wave-like curve. It’s clean, but it’s too smooth.
Let’s sharpen the first landing.
Select the bottom point of the first bounce (the impact)
Right-click → Handle Type → Free
Now grab the Bezier handles (those little arms sticking out) with
Gand pull them down sharply
Do the same for the other side of the dip, so the curve forms a sharp “V” instead of a lazy “U”.
Repeat this for the second and third bounce impacts.
Now play your animation.
Feel that? The cube actually bounces. It hits the ground with weight, and shoots back up with purpose. All because of a curve.
Honestly, this is the point where most people fall in love with the Graph Editor. It’s where the animation starts to feel like something you crafted—not just a bunch of keyframes on a timeline.
#6. Adjust Overall Timing with Keyframe Scaling
Okay, the bounce looks good—but how does it feel?
If it’s too slow, it might feel like your cube is underwater. Too fast, and it just looks twitchy. The good news? You don’t have to redo anything. Blender lets you scale your entire animation timing with a few keystrokes.
Here’s how:
In the Dope Sheet, press
Ato select all keyframesMake sure your timeline cursor is sitting at frame 1 — this is your anchor point
Press
Sto scale, and move your mouse left or right
Blender will stretch or compress the keyframe spacing based on your cursor’s position. It’s like adjusting the tempo of your animation without changing the choreography.
Want the animation to feel punchier? Scale it down.
Want more of a floaty, stylized bounce? Scale it up.
Pro Tip: If the timing feels weird after scaling, undo (Ctrl + Z) and try again with a different timeline anchor position. Blender scales relative to where the timeline playhead is—so use that to your advantage.
I’ve used this trick in almost every project, especially during early blocking. It’s fast, flexible, and way better than dragging keyframes around manually.
#7. Add Rotation Spins for Flair
So far, your cube’s bouncing. Cool. But it’s still a bit… stiff. Let’s give it some flair.
Spinning the cube mid-air adds a whole new layer of life to the animation—and it’s dead simple to pull off.
Start with the first bounce. Head to the peak of the jump (around frame 20). In the Dope Sheet or Graph Editor, delete any existing rotation keyframes at that point (just to avoid interpolation weirdness).
Now select the cube, press R, then Z, and type 180. Enter.
The cube is now rotated 180 degrees along the Z-axis.
Press I and choose Rotation to lock in the keyframe.
For the second bounce, do the same thing—but this time rotate it on the Y-axis (R, Y, 90).
And for the third bounce, try X-axis rotation (R, X, 90).
Each time, go to the peak of the jump, apply the spin, and keyframe it.
What you’re doing here is introducing variation—each bounce feels a little different. It’s playful, more natural, and a whole lot more fun to watch.
You’ll also notice Blender handles the rotation between bounces automatically, smoothly transitioning from one spin to the next. It’s kind of magic.
Honestly? This step alone can make your animation go from “meh” to “ohhh.”
#8. Loop the Animation
Now that your cube is bouncing and spinning like a champ, let’s get it to loop cleanly.
Blender’s default timeline runs to frame 250, which is overkill for this kind of animation.
We want our loop to feel intentional and tight—so go down to the bottom timeline controls and change the End frame to 100.
Hit Play. The animation runs from frame 1 to 100, then starts over.
But wait—if the loop feels off, like the cube snaps back to its starting position too hard, here’s what’s probably happening:
Your final keyframe at frame 100 doesn’t perfectly match the first keyframe at frame 1.
Quick fix:
Go to frame 1
Select the cube
Copy the keyframe (
Ctrl + C)Move to frame 100 and paste (
Ctrl + V)
Now the animation ends exactly where it begins. Seamless loop.
This is the kind of polish that matters. Whether you're exporting a GIF, making something for a motion graphics reel, or just showing off your first Blender animation—it’s worth the extra 10 seconds to get the loop right.
Tips, Tricks & Pitfalls
Now that your cube is bouncing and looping, let’s talk about the stuff that makes (or breaks) beginner animations.
🎯 Tip #1: The Graph Editor Is Everything
If there’s one place where animation in Blender really levels up, it’s the Graph Editor.
That’s where you control not just what moves, but how it moves. Slow in, fast out. Sudden drops. Elastic rebounds. All of it lives in those curves.
I think a lot of beginners skip it because it looks intimidating. I did too.
But once you start tweaking handles and seeing the results instantly, it becomes addictive.
⚠️ Pitfall: Copy/Paste Without Tweaking
Copying and pasting bounces? Great.
Leaving them all the exact same height and timing? Not so much.
Real motion has variation. Each bounce should lose a little height, land a little faster, spin a little differently. If every bounce feels cloned, it breaks the illusion—even if the timing is perfect.
💡 Tip: Break Things on Purpose
Want to learn faster? Mess something up on purpose.
Stretch a curve too far. Scale keyframes wildly. Delete rotation keys and re-add them. Blender’s non-destructive nature means you can always undo, but experimenting teaches you why things move the way they do.
Want to dig deeper into the weird little things that make Blender tick? These Blender tips and tricks might just become your secret weapon.
Could This Slow You Down?
Let’s be real for a second.
If you’ve been following along and your animation started lagging, that’s not on you. Blender’s viewport can slow down fast—even with a simple cube—especially if you’re on an older laptop or a lower-spec machine.
I’ve been there. You press play, and instead of a smooth bounce, you get a slideshow.
Frame 1… pause… frame 2… pause… and suddenly you’re animating in slow motion.
Most people assume you need to buy a better computer. But honestly? That’s not your only option.
I saw someone on Reddit say cloud computers only make sense “if you need to scale up and down quickly,” but they’re missing the point. Cloud power isn’t just about scale—it’s about smooth real-time feedback.
When you're animating, waiting for each frame to play out kills your momentum. You want to tweak curves, test timing, adjust spins—and see it happen instantly. That’s where a better machine makes the biggest difference. And if you don’t have one? The cloud gives you that edge without the hardware bill.
Rendering times creeping up on you too? There’s a great guide to reducing Blender rendering times that pairs well with a faster setup like Vagon.
And if you're still debating between upgrading your rig or going cloud-based, here's how to choose the best PC for Blender depending on your workflow.
Meet Vagon Cloud Computer
If you’re the kind of person who loves Blender but hates how your machine starts wheezing every time you hit play—you should know this exists: Vagon Cloud Computer
It’s a browser-based cloud workstation. You pick your power level, fire it up, and boom—you’ve got a high-performance Windows desktop ready to run Blender at full speed. From your laptop. Or your Mac. Or even a tablet if you're feeling bold.
And if you’re curious how far you can push Blender portability, yep—you can even run Blender on an iPad with the right setup.
I don’t use it for everything. But when a scene starts chugging, or I want to test something with real-time playback, it saves me.
Here’s where it shines:
Smooth viewport playback even with heavy scenes
Faster preview renders
No overheating laptop fans screaming like jet engines
You only pay for what you use (no monthly subscription needed unless you want one)
It’s not a replacement for Blender—it’s an upgrade for your setup.
Like adding a turbo button when your hardware just isn’t cutting it.
And yeah, I used it while testing this cube animation. Just to keep things snappy and fun.
Wrap-Up & What’s Next
You did it.
You took a plain old cube and turned it into a bouncing, spinning, looping animation—all inside Blender. Along the way, you learned how to:
Set keyframes that actually stick
Shape motion with the Graph Editor
Adjust timing like a pro
Add mid-air rotation for style
And create a clean loop that feels satisfying to watch
These might seem like small steps, but they’re foundational. Every walk cycle, camera shot, creature rig, or motion graphic you build from here? It’ll use this exact process.
And if you did it on an old machine that struggled along the way—maybe give Vagon Cloud Computer a try next round. It’s not about switching everything to the cloud. It’s about making Blender feel smooth again when you need it most.
What’s next?
Try animating a character. Or a bouncing ball with squash and stretch. Or a camera fly-through. You’ve got the basics now—so start breaking the rules a little.
And hey—if you made something cool with this tutorial (or on Vagon), tag us. We’d love to see your first bounce.
Get Beyond Your Computer Performance
Run applications on your cloud computer with the latest generation hardware. No more crashes or lags.
Trial includes 1 hour usage + 7 days of storage.
Get Beyond Your Computer Performance
Run applications on your cloud computer with the latest generation hardware. No more crashes or lags.
Trial includes 1 hour usage + 7 days of storage.
Get Beyond Your Computer Performance
Run applications on your cloud computer with the latest generation hardware. No more crashes or lags.
Trial includes 1 hour usage + 7 days of storage.
Get Beyond Your Computer Performance
Run applications on your cloud computer with the latest generation hardware. No more crashes or lags.
Trial includes 1 hour usage + 7 days of storage.
Get Beyond Your Computer Performance
Run applications on your cloud computer with the latest generation hardware. No more crashes or lags.
Trial includes 1 hour usage + 7 days of storage.
Ready to focus on your creativity?
Vagon gives you the ability to create & render projects, collaborate, and stream applications with the power of the best hardware.
Vagon Blog


Run heavy applications on any device with
your personal computer on the cloud.
San Francisco, California
Solutions
Vagon Teams
Vagon Streams
Use Cases
Resources
Vagon Blog
Beginner’s Guide to Blender Viewport Navigation
How To Turn 2D Icons into 3D Renders in Blender
How to Animate a Bouncing Cube in Blender (Step-by-Step Beginner Guide)
How to Fix a Slow Azure Virtual Desktop: 9 Proven Solutions
How To Run Revit on Mac
The Best Render Settings for Blender 3D
Arcware vs Vagon Streams: Best Pixel Streaming Alternatives
How To Use FL Studio on a Cloud Computer
Reducing Latency in Virtual Desktops: 11 Fixes That Actually Work
Vagon Blog
Run heavy applications on any device with
your personal computer on the cloud.
San Francisco, California
Solutions
Vagon Teams
Vagon Streams
Use Cases
Resources
Vagon Blog