Instant Connection for Pixel Streaming
— New Feature Automated Setup

How to Fix Lag and Speed Up Final Cut Pro
How to Fix Lag and Speed Up Final Cut Pro
VideoProduction
How to Fix Lag and Speed Up Final Cut Pro
Table of Contents
Laggy timelines, stuttering previews, and slow exports are common—even for experienced editors. In a fast-paced creative world, every second spent waiting on your system to catch up is time lost.
Final Cut Pro is powerful, but it’s not always optimized out of the box. High-res footage, cluttered timelines, and outdated settings can all drag down performance.
The good news? You don’t need a hardware upgrade to fix it.
In this guide, you’ll learn how to make Final Cut render faster by improving your setup, timeline, and workflow, whether you’re editing locally or using cloud solutions like Vagon Computer.
Here’s what we’ll cover:
What causes lag and slow performance in Final Cut Pro
The difference between playback processing and exporting
Common editing habits that slow down your timeline
12 proven techniques to optimize speed and responsiveness
How to clean up media, cache, and project settings for smoother editing
Let’s get started.
What’s Really Going On Behind Final Cut’s Performance Bottlenecks
Final Cut Pro can sometimes feel unpredictable—you make a simple cut or apply an effect, and suddenly your smooth timeline starts to lag. To improve performance, you first need to understand what’s actually happening behind the scenes.
Playback Processing vs. Exporting: What’s the Difference?
Let’s start with the basics. During editing, Final Cut Pro works in the background to process video, effects, transitions, and graphics so they play back smoothly in real time. This internal processing helps your timeline stay responsive as you make changes.
Exporting, on the other hand, is the final step—when Final Cut compiles your entire project into a single, polished video file ready for delivery or upload.
While exporting typically happens once at the end, background processing can occur repeatedly throughout the edit, especially if automatic tasks are enabled. These behind-the-scenes processes can quietly slow everything down—consuming system resources and creating lag—if not managed properly.
What Slows Down Final Cut Pro During Editing?
Not every action in Final Cut Pro will impact performance—but some tasks can trigger significant slowdowns, especially on less powerful machines. These include:
Applying transitions or complex visual effects
Using color correction or motion graphics
Stacking multiple video layers or audio tracks
Editing with high-resolution footage (like 4K or 8K)
Working with heavily compressed or unsupported codecs
Final Cut attempts to handle these tasks quietly in the background, but this automatic processing can bog down your system—leading to lag, dropped frames, and slower responsiveness, especially in larger projects or on lower-end devices.
Some popular Final Cut Pro transitions can add a unique flair to your edits but be aware, they often increase processing demands and can slow down your timeline, especially during playback or exports.
The Hidden Performance Killers
Even if your project settings and workflow seem solid, there are often invisible culprits slowing things down. From automatic background tasks to overloaded timelines, these sneaky issues can quietly derail your editing speed — especially if you’re working on tight deadlines or using limited hardware. Let’s break down the most common hidden performance killers in Final Cut Pro and how to deal with them.
Background Rendering
By default, Final Cut Pro begins rendering in the background a few seconds after you pause your editing. That sounds helpful, but it can actually lead to laggy performance, especially when you’re making rapid edits. It also fills up your system with temporary files that quickly eat storage.
Disabling background rendering and rendering clips manually gives you more control and can significantly improve editing speed.
Unoptimized Footage & Codecs
Footage straight from cameras—especially high-bitrate H.264 or H.265 (HEVC) files—is often compressed in ways that make real-time editing difficult for Final Cut Pro. These codecs are designed for playback efficiency, not for smooth editing.
When Final Cut processes these formats, it has to decode them frame by frame, which puts extra strain on your system. That’s why converting to optimized media (like Apple ProRes) or using proxy files can significantly improve editing performance and playback speed.
Poor codec handling doesn’t just slow things down, it can also cause instability. If your timeline feels fragile, here’s how to prevent Final Cut Pro from crashing during intensive edits.
Timeline Complexity
Final Cut is pretty efficient, but every timeline has a tipping point. Nesting compound clips, syncing multicam footage, adding adjustment layers, or loading up your timeline with effects can create a heavy processing load.
Even simple-seeming edits can cause slowdowns when they’re stacked together. And if your system doesn’t have enough RAM or storage bandwidth, things can get sluggish fast.
Heavily styled Final Cut Pro templates look great, but layering too many can create a domino effect of slow playback and long export times if your hardware isn’t up to it.
Your Hardware Setup
Final Cut Pro runs best on macOS, especially with the newer Apple Silicon chips, but it still depends on the combined strength of your hardware. Your CPU plays a key role in handling timeline responsiveness and background tasks. The GPU helps process effects and accelerates exports. RAM keeps everything running smoothly, especially when juggling multiple clips, layers, or background processes. And your storage—ideally an SSD—affects how quickly media files are read and written. If you’re editing 4K footage with effects on an older Intel MacBook with only 8GB of RAM and a traditional spinning hard drive, you’ll likely run into sluggish performance. But take that same project to an M2 Mac with 16 or 32GB of RAM and a fast SSD, and the experience will feel noticeably faster and more responsive.
Build Your Timeline for Speed, Not Trouble
When your Final Cut Pro timeline starts lagging, the problem isn’t always your hardware or export settings. Often, the real slowdown begins much earlier—with how the project was built. Your timeline structure, media format choices, and editing habits all contribute to how smoothly Final Cut can process your work. Once your timeline is in good shape, the next step is to fine-tune Final Cut Pro itself. Under the hood, Final Cut offers plenty of tools to manage performance, but many editors never look beyond the default settings. By taking control of these preferences, you can unlock faster playback, quicker exports, and a smoother overall editing experience.
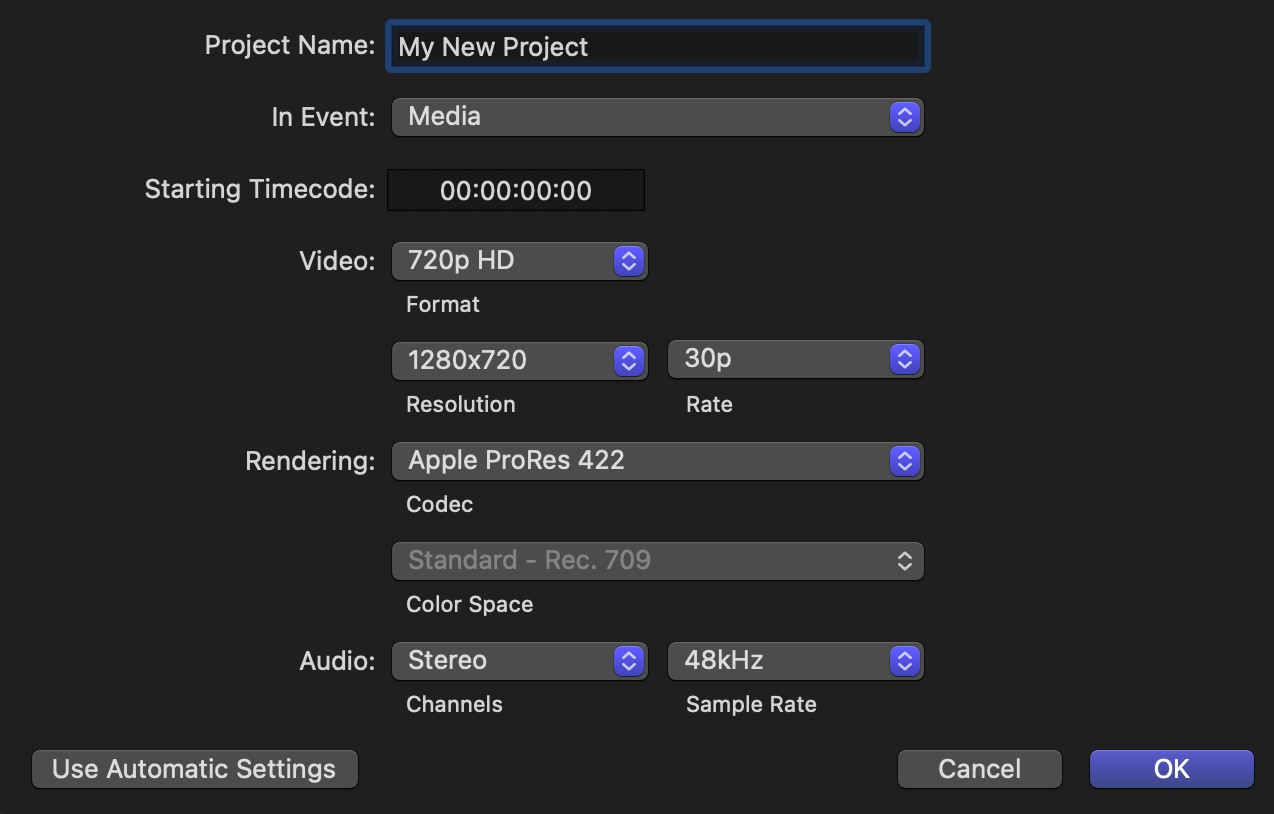
#1. Start With the Right Project Settings
Everything starts with the project preset. If you’re working with 1080p footage but accidentally set your timeline to 4K, Final Cut is forced to upscale your media in real time, adding unnecessary processing load. The same goes for mismatched frame rates. Every mismatch means extra work for your system during playback and export.
Take a moment to create a project that matches the specs of your source footage, unless there’s a specific delivery requirement. You’ll avoid a lot of invisible background processing that Final Cut would otherwise try to handle on the fly.
#2. Use Proxy or Optimized Media Early
Editing directly with compressed footage formats like H.264 or HEVC can put enormous strain on your system. These formats are meant for playback, not editing, which means Final Cut has to decode them frame by frame during every cut, trim, or transition.
To fix this:
Transcode your footage to Optimized Media (Apple ProRes) for smoother performance without losing quality.
Create Proxy Media, low-resolution versions of your clips that are easier for Final Cut to process while editing. These automatically switch back to full resolution during export.

Starting with proxy or optimized files lets you edit faster and reduce the strain on your system, especially on long timelines or slower machines.
#3. Keep Your Timeline Lean
A chaotic timeline isn’t just a creative mess — it’s a technical one. The more layers, tracks, and effects you pile on, the harder your system has to work to process and play back in real time. Even unused media sitting in the timeline can add to the load.
To streamline your timeline:
Avoid stacking too many compound clips, adjustment layers, or nested effects.
Disable or remove clips you’re not using, even if they’re muted or offscreen.
Split long-form projects into sections, then combine them later. This keeps things running smoothly during the editing phase.
Good timeline hygiene speeds everything up without compromising your creative flexibility.
Want to fly through edits without touching your mouse? Mastering a few essential Final Cut keyboard shortcuts can speed things up more than you'd expect.
#4. Hold Off on Effects Until the Cut Is Locked
It’s natural to want to add polish as you go—LUTs, transitions, stylized titles—but those enhancements add complexity. Every effect increases the processing load, and applying them too early can mean your system repeatedly reprocesses the same section every time you make an edit.
Instead, focus first on the rough cut. Lock in the pacing, structure, and sequence. Then add your effects and color grading once you’re confident the timeline won’t change much. This keeps your editing phase light and responsive.
#5. Don’t Rely on Background Rendering
Final Cut’s background rendering feature sounds helpful in theory, it begins rendering clips in the background a few seconds after you stop editing. But in practice, it can slow your workflow by constantly using system resources when you don’t expect it.
Here’s a better approach:
Disable background rendering under Final Cut Pro > Preferences > Playback.
Use “Render Selection” (Option + Command + R) to manually render only the complex sections that really need it.
Render manually when it matters, especially if you’ve just applied a complex effect or graphics animation.

This lets you stay in control of when and how your machine renders, avoiding performance hiccups in the middle of creative work.
#6. Remove What You Don’t Need
Over time, most timelines accumulate clutter—placeholder clips, scratch audio, unused b-roll. Even if these elements aren’t active in the final cut, Final Cut Pro may still process them during playback or export.
Before exporting:
Clean your timeline of unused media, muted clips, and hidden layers.
Delete or disable old compound clips or title placeholders that aren’t part of the final sequence.

The leaner your timeline, the faster and smoother your editing and export process will be.
#7. Store Your Media and Libraries on Fast Drives
Even if your timeline is well-organized, performance can still be slowed down by where your media is stored. Editing directly off SD cards, USB 2.0 drives, or older spinning hard disks is one of the most common causes of lag and sluggish playback.
To keep things moving:
Use fast SSD storage for both your Final Cut library and your media cache.
Avoid editing from external drives unless they’re high-speed (USB 3.1, Thunderbolt, NVMe).
Sometimes, simply relocating your media can save you minutes—or even hours—over the course of a project.
In short, a smooth editing experience starts before you even begin. By building a clean, optimized, and well-managed timeline, you’ll spend less time waiting on your system and more time creating.
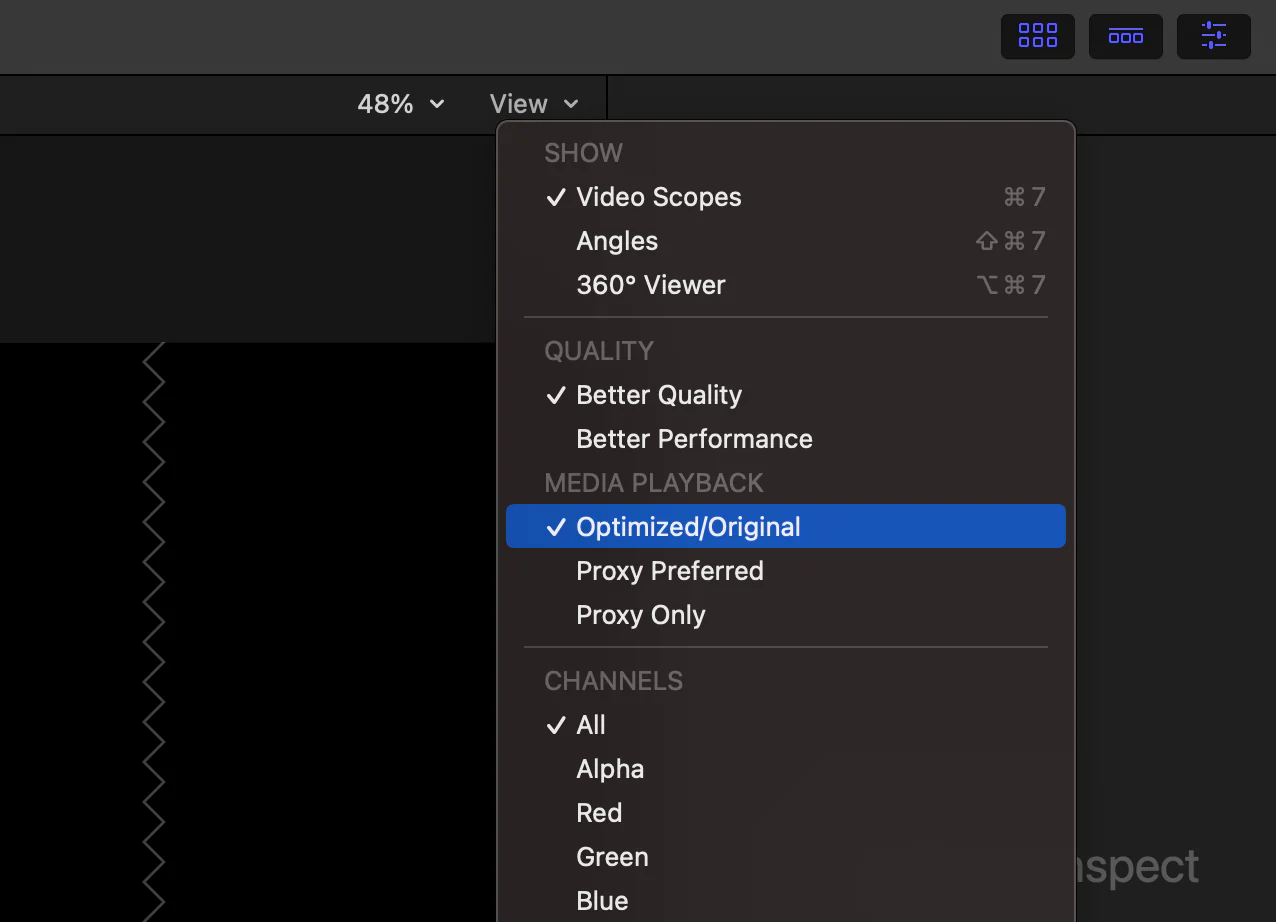
#8. Tweak Playback for Performance, Not Perfection
Final Cut Pro offers two main playback options: Better Performance and Better Quality. By default, it may be set to favor quality, but that comes at the cost of speed. Especially during the edit phase, you don’t need full-resolution previews of every frame. You need responsiveness.
To speed things up:
Go to Preferences > Playback and choose Better Performance.
This lowers preview resolution but drastically improves real-time editing, especially helpful when working with effects or high-res footage.
You can always switch back to full quality before final export if needed.
#9. Manage Your Cache and Temporary Files
Final Cut Pro stores a lot of background data to help with editing, but over time this can add up—especially if you’ve worked on multiple projects using the same drive. These cached files can become outdated or unnecessary, leading to slowdowns and storage bloat.
Make it a habit to clear them out:
In the Library pane, right-click on your project and select Delete Generated Library Files.
You’ll see options to delete:
Cached preview files (recommended before final export)
Optimized media
Proxy media
Removing unused temporary files can free up disk space and help Final Cut run more smoothly—especially on machines with limited storage or memory.

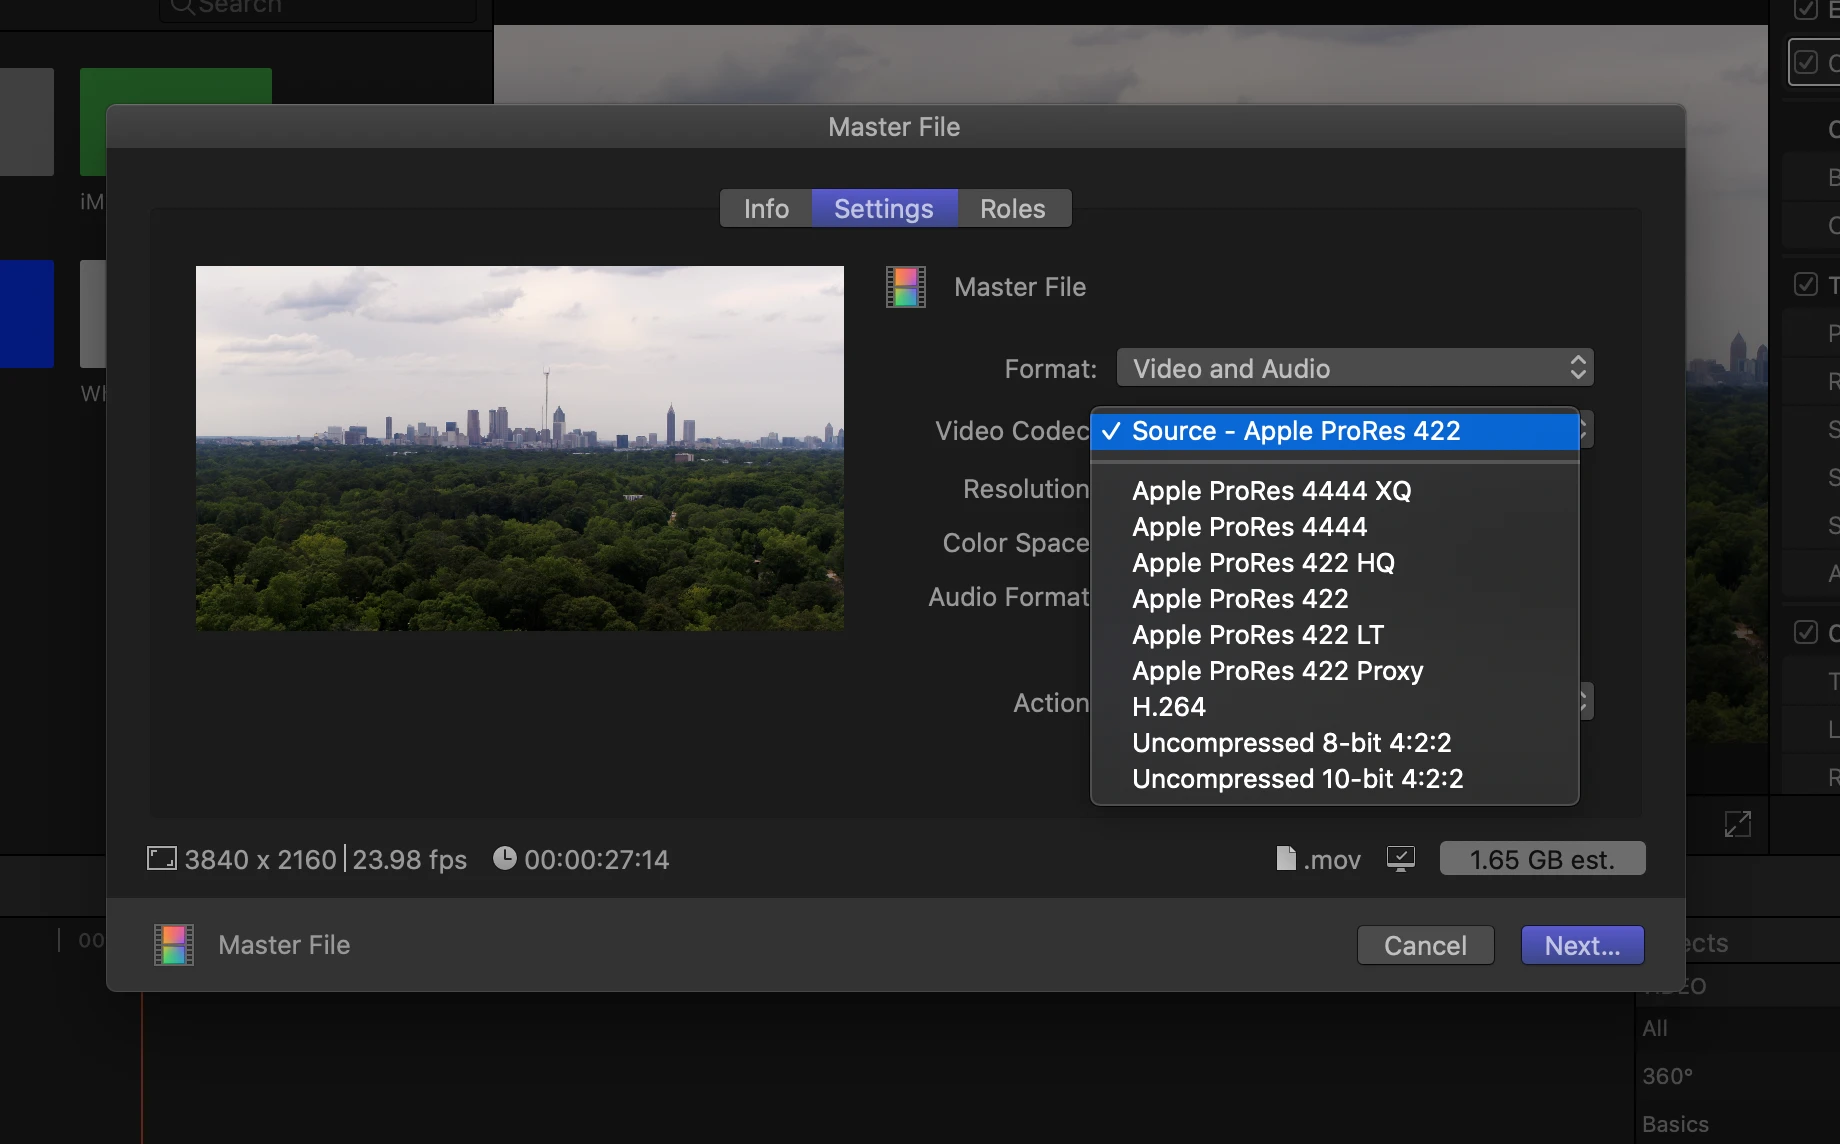
#10. Export Settings: Don’t Overshoot What You Need
It’s easy to assume that using the “highest quality” export options will give you the best results. But if you’re exporting a video for web or social platforms, going overboard can dramatically increase export time without improving visual quality.
To keep your exports fast and sharp:
Use Apple ProRes LT or H.264 for most web content and client previews.
Reserve ProRes 422 HQ or Master files for broadcast or final archive delivery only.
You can customize export presets in Final Cut’s Share menu or use Compressor if you need batch exporting options with more control.
#11. Organize Libraries for Speed
Final Cut Pro stores everything, media, cache, proxies, optimized files, in your Library by default. Over time, that can make the Library bloated and harder to manage. Especially in larger projects, separating out media and cache folders can improve load times and keep your working drive uncluttered.
Here’s a simple optimization:
Open Library Properties (⌘-4)
Set separate folders for:
Media
Cache
Backups
Store these on a fast SSD if possible. By keeping things modular, you speed up file access and make backups or migrations more efficient.
#12. Use Plugins Carefully
Final Cut supports a wide range of third-party plugins, from transitions and titles to advanced motion graphics and color grading tools. But plugins are a double-edged sword. Some are beautifully optimized, others are not, and each one adds processing overhead.
Use these plugins with intention:
Stick to trusted developers known for performance-optimized tools.
Avoid stacking multiple plugins on the same clip, especially dynamic ones like light leaks, distortions, or real-time animation effects.
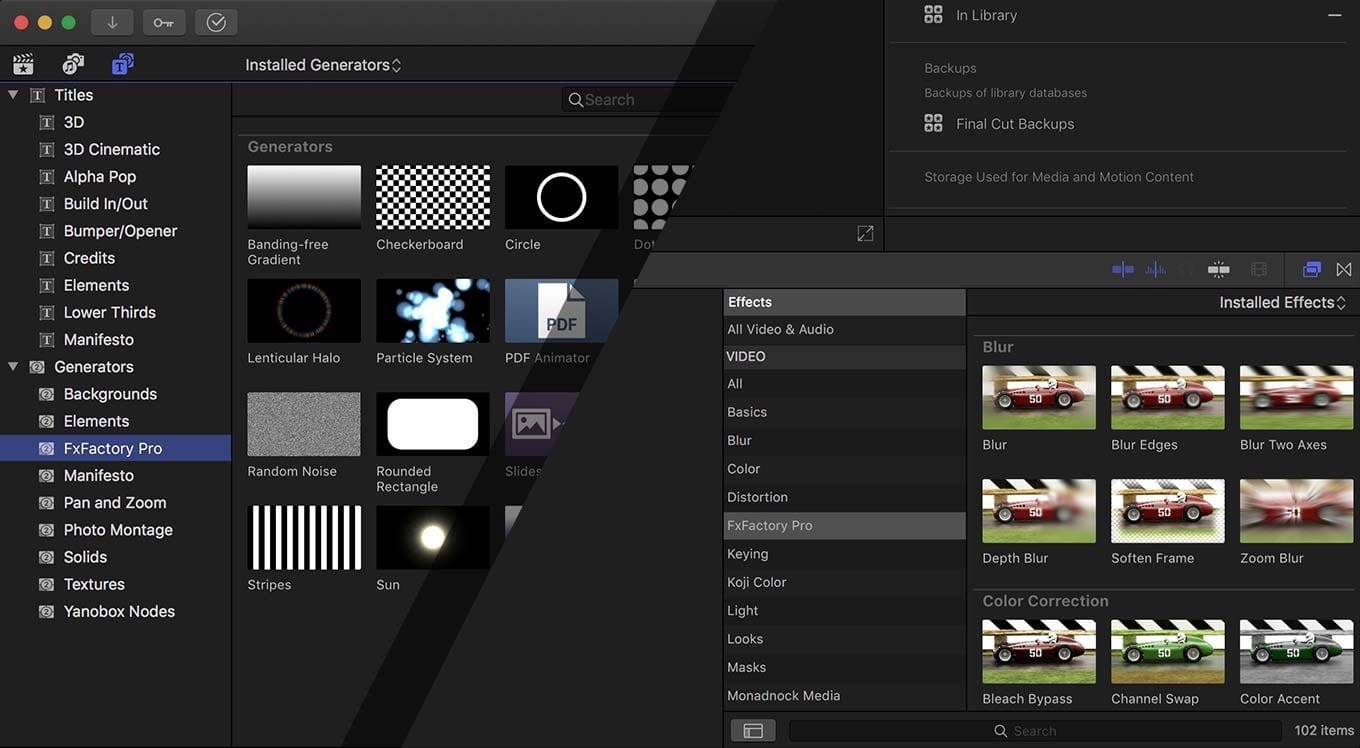
If your timeline is starting to lag after installing a plugin, that’s your first sign it might be worth removing or replacing.
Not all Final Cut Pro plugins are created equal, some are lightweight and fast, others can bring your timeline to a crawl.
Performance in Final Cut Pro isn’t just about brute force, it’s about precision. With the right settings, you can dramatically improve how the software responds to your workflow. From smarter playback options to cleaner libraries and lighter exports, these changes make a measurable impact on your daily edit speed.
When Hardware Hits Its Limit, Cloud Power Picks Up
Even with an optimized workflow, Final Cut Pro can still slow down, especially when handling high-res footage, complex timelines, or stacked effects. At some point, your hardware hits its limit. Final Cut depends on the combined power of your CPU, GPU, RAM, and storage. If any one of them falls short, performance takes a hit.
For most editors, 16GB of RAM and a fast SSD are essential for smooth editing, especially with 4K content. Apple Silicon Macs (M1, M2, M3) perform far better than older models, thanks to their integrated GPU and efficient architecture. But not everyone works on the latest hardware.
If you’re using a base-level MacBook or sharing gear with a team, you’ve likely hit those limits. And while upgrading is an option, it’s not always practical, especially for freelancers, students, or teams that don’t need high-end power every day.
That’s where cloud-based editing offers a smarter alternative.
Vagon Computer: Power Without the Upgrade
Vagon Computer offers a practical and scalable alternative to buying new hardware. Instead of investing in a new Mac just to keep up with rendering demands, you can run Final Cut Pro on a high-performance cloud computer with GPU acceleration, fast storage, and more memory than most laptops can dream of.
It works like this: you connect to your Vagon Computer through a browser, launch a fully-featured macOS desktop, and work inside Final Cut as if it were installed locally. But all the processing, exporting happens in the cloud. Your local device, whether it’s a MacBook Air, an older iMac, or even a lightweight tablet, just streams the experience.
This setup removes friction entirely. You can edit from anywhere, switch devices mid-project, or share cloud access with teammates without worrying about performance inconsistencies. And because Vagon is built specifically for compute-heavy creative software, it’s not just about remote access, it’s about unlocking a level of speed and stability that most local machines can’t deliver.
For editors handling complex timelines or collaborating across locations, this flexibility becomes a huge advantage. You no longer have to sync machines, ship hard drives, or worry about whether your laptop can handle another 6GB title render. Vagon Computer handles the heavy lifting and scales with your needs.
Beyond performance, Vagon also gives you control over how and when you use computing power. You only pay for what you use. Whether you need cloud power for just one big project or want to make it part of your regular workflow, Vagon doesn’t lock you into a long-term investment. It expands your options without shrinking your budget.
So if Final Cut Pro is pushing your machine to its limit and slowing down your momentum, there’s no need to replace everything. With Vagon Computer, you can work faster, scale instantly, and finish projects without compromise, right from the device you already own.
Try Vagon now and experience what it’s like to edit and export without limits.
Conclusion & Key Takeaways
Final Cut Pro is a powerful editor, but like any creative tool, it performs only as well as the environment it runs in. Long processing times, slow exports, and stuttered playback aren’t just part of the job—they’re signs that your workflow needs a tune-up.
Speed in Final Cut isn’t about a single trick. It’s the result of smart decisions made at every stage of the process: choosing the right project settings, organizing your timeline efficiently, optimizing playback preferences, and managing your media storage with intention. Even subtle improvements, like disabling background tasks or using proxy files, can make a noticeable difference.
And when software tweaks and best practices aren’t enough, you don’t have to invest in a whole new setup. With Vagon Computer, you can instantly tap into high-performance cloud machines and work without limits, no matter what device you’re using. It’s a practical, flexible way to unlock speed, power, and creative freedom without overhauling your gear.
Still deciding if Final Cut is the right fit for your workflow? This DaVinci Resolve vs. Final Cut Pro comparison breaks down performance, features, and flexibility.
To recap, here’s how you can speed up your workflow in Final Cut:
Build projects using the right resolution, frame rate, and optimized or proxy media.
Keep your timeline clean, effects minimal until the cut is locked, and media stored on fast SSDs.
Manually control background processes and cache settings for better performance.
Use Final Cut’s built-in export options wisely—don’t overshoot what you need.
And if local hardware holds you back, offload the heavy lifting with Vagon Computer.
Final Cut doesn’t have to feel slow. With the right workflow and the right tools, you can spend less time waiting, and more time creating.
For even more ways to boost your efficiency, check out these pro Final Cut tips that go beyond just fixing lag and improving exports.
Frequently Asked Questions
Why is Final Cut Pro so slow on my Mac?
Final Cut Pro can lag for several reasons, even on newer machines. High-resolution footage, heavy timelines, background tasks, or unoptimized file formats can all overload your system. If your Mac has limited RAM, a slow hard drive, or an older processor, performance dips during editing become more noticeable.
What’s the difference between playback optimization and exporting in Final Cut Pro?
Playback optimization helps Final Cut Pro preview your timeline smoothly while you edit, especially when effects or transitions are involved. Exporting, on the other hand, is the final step—when your project is turned into a shareable video file. One supports the editing process, the other delivers the finished product.
How can I fix lag in Final Cut Pro?
To reduce lag, disable background rendering, convert footage to optimized or proxy media, and clean up your timeline by removing unused clips or effects. Store your files on a fast SSD and adjust playback settings for better performance. These small changes can significantly improve your editing speed.
Does Final Cut Pro run better on M1 or M2 Macs?
Absolutely. Apple Silicon chips like M1 and M2 are built for efficiency and speed. They handle effects, playback, and exports far better than older Intel-based Macs, especially when you're working with 4K video or complex edits.
What are proxy and optimized media in Final Cut Pro?
Optimized media is high-quality footage converted into a format that Final Cut can process more efficiently, like Apple ProRes. Proxy media is a lower-resolution copy of your clips designed to reduce the load on your system during editing. Both are powerful tools for improving editing performance.
Should I turn off background rendering?
In most cases, yes. Background rendering might seem convenient, but it can actually slow your editing session by constantly using CPU and storage resources. Disabling it and rendering manually when necessary gives you more control and improves performance.
Can I delete performance-related files without affecting my project?
Yes. You can safely delete preview or cache files to free up space and speed up Final Cut Pro. This won’t affect your timeline or original footage—it simply removes temporary data used during editing.
What export settings should I use for YouTube or social media?
For most online platforms, exporting in H.264 or Apple ProRes LT will give you great results with fast export times and manageable file sizes. Heavier formats like ProRes 422 HQ are more suitable for broadcast, archival, or professional delivery.
Why does Final Cut Pro lag even after cleaning up my timeline?
If you’ve optimized your project and it still lags, the issue may be hardware-related. Limited RAM, a slow drive, or an older GPU can all cause bottlenecks. Try lowering playback resolution, working with proxy files, or upgrading your setup for smoother results.
What’s the best hardware setup for smooth Final Cut editing?
For smooth editing, aim for at least 16GB of RAM, a fast SSD, and an Apple Silicon chip like M1 or M2. This setup handles complex projects, multiple layers, and 4K video more efficiently, reducing lag and improving responsiveness.
Can I use Final Cut Pro on a low-end device?
Yes, but you’ll need to keep things lean. Use proxy media, avoid stacking effects early, store your files on fast drives, and keep your timeline tidy. For bigger edits or long-form projects, consider using a cloud solution like Vagon Computer to handle the heavy lifting.
How does Vagon Computer help fix Final Cut lag or slow performance?
Vagon Computer gives you access to a high-performance macOS environment in the cloud, with powerful GPUs, ample RAM, and fast storage. You can edit smoothly without worrying about local hardware limitations—it’s ideal for professionals who need more speed without upgrading their Mac.
Laggy timelines, stuttering previews, and slow exports are common—even for experienced editors. In a fast-paced creative world, every second spent waiting on your system to catch up is time lost.
Final Cut Pro is powerful, but it’s not always optimized out of the box. High-res footage, cluttered timelines, and outdated settings can all drag down performance.
The good news? You don’t need a hardware upgrade to fix it.
In this guide, you’ll learn how to make Final Cut render faster by improving your setup, timeline, and workflow, whether you’re editing locally or using cloud solutions like Vagon Computer.
Here’s what we’ll cover:
What causes lag and slow performance in Final Cut Pro
The difference between playback processing and exporting
Common editing habits that slow down your timeline
12 proven techniques to optimize speed and responsiveness
How to clean up media, cache, and project settings for smoother editing
Let’s get started.
What’s Really Going On Behind Final Cut’s Performance Bottlenecks
Final Cut Pro can sometimes feel unpredictable—you make a simple cut or apply an effect, and suddenly your smooth timeline starts to lag. To improve performance, you first need to understand what’s actually happening behind the scenes.
Playback Processing vs. Exporting: What’s the Difference?
Let’s start with the basics. During editing, Final Cut Pro works in the background to process video, effects, transitions, and graphics so they play back smoothly in real time. This internal processing helps your timeline stay responsive as you make changes.
Exporting, on the other hand, is the final step—when Final Cut compiles your entire project into a single, polished video file ready for delivery or upload.
While exporting typically happens once at the end, background processing can occur repeatedly throughout the edit, especially if automatic tasks are enabled. These behind-the-scenes processes can quietly slow everything down—consuming system resources and creating lag—if not managed properly.
What Slows Down Final Cut Pro During Editing?
Not every action in Final Cut Pro will impact performance—but some tasks can trigger significant slowdowns, especially on less powerful machines. These include:
Applying transitions or complex visual effects
Using color correction or motion graphics
Stacking multiple video layers or audio tracks
Editing with high-resolution footage (like 4K or 8K)
Working with heavily compressed or unsupported codecs
Final Cut attempts to handle these tasks quietly in the background, but this automatic processing can bog down your system—leading to lag, dropped frames, and slower responsiveness, especially in larger projects or on lower-end devices.
Some popular Final Cut Pro transitions can add a unique flair to your edits but be aware, they often increase processing demands and can slow down your timeline, especially during playback or exports.
The Hidden Performance Killers
Even if your project settings and workflow seem solid, there are often invisible culprits slowing things down. From automatic background tasks to overloaded timelines, these sneaky issues can quietly derail your editing speed — especially if you’re working on tight deadlines or using limited hardware. Let’s break down the most common hidden performance killers in Final Cut Pro and how to deal with them.
Background Rendering
By default, Final Cut Pro begins rendering in the background a few seconds after you pause your editing. That sounds helpful, but it can actually lead to laggy performance, especially when you’re making rapid edits. It also fills up your system with temporary files that quickly eat storage.
Disabling background rendering and rendering clips manually gives you more control and can significantly improve editing speed.
Unoptimized Footage & Codecs
Footage straight from cameras—especially high-bitrate H.264 or H.265 (HEVC) files—is often compressed in ways that make real-time editing difficult for Final Cut Pro. These codecs are designed for playback efficiency, not for smooth editing.
When Final Cut processes these formats, it has to decode them frame by frame, which puts extra strain on your system. That’s why converting to optimized media (like Apple ProRes) or using proxy files can significantly improve editing performance and playback speed.
Poor codec handling doesn’t just slow things down, it can also cause instability. If your timeline feels fragile, here’s how to prevent Final Cut Pro from crashing during intensive edits.
Timeline Complexity
Final Cut is pretty efficient, but every timeline has a tipping point. Nesting compound clips, syncing multicam footage, adding adjustment layers, or loading up your timeline with effects can create a heavy processing load.
Even simple-seeming edits can cause slowdowns when they’re stacked together. And if your system doesn’t have enough RAM or storage bandwidth, things can get sluggish fast.
Heavily styled Final Cut Pro templates look great, but layering too many can create a domino effect of slow playback and long export times if your hardware isn’t up to it.
Your Hardware Setup
Final Cut Pro runs best on macOS, especially with the newer Apple Silicon chips, but it still depends on the combined strength of your hardware. Your CPU plays a key role in handling timeline responsiveness and background tasks. The GPU helps process effects and accelerates exports. RAM keeps everything running smoothly, especially when juggling multiple clips, layers, or background processes. And your storage—ideally an SSD—affects how quickly media files are read and written. If you’re editing 4K footage with effects on an older Intel MacBook with only 8GB of RAM and a traditional spinning hard drive, you’ll likely run into sluggish performance. But take that same project to an M2 Mac with 16 or 32GB of RAM and a fast SSD, and the experience will feel noticeably faster and more responsive.
Build Your Timeline for Speed, Not Trouble
When your Final Cut Pro timeline starts lagging, the problem isn’t always your hardware or export settings. Often, the real slowdown begins much earlier—with how the project was built. Your timeline structure, media format choices, and editing habits all contribute to how smoothly Final Cut can process your work. Once your timeline is in good shape, the next step is to fine-tune Final Cut Pro itself. Under the hood, Final Cut offers plenty of tools to manage performance, but many editors never look beyond the default settings. By taking control of these preferences, you can unlock faster playback, quicker exports, and a smoother overall editing experience.
#1. Start With the Right Project Settings
Everything starts with the project preset. If you’re working with 1080p footage but accidentally set your timeline to 4K, Final Cut is forced to upscale your media in real time, adding unnecessary processing load. The same goes for mismatched frame rates. Every mismatch means extra work for your system during playback and export.
Take a moment to create a project that matches the specs of your source footage, unless there’s a specific delivery requirement. You’ll avoid a lot of invisible background processing that Final Cut would otherwise try to handle on the fly.
#2. Use Proxy or Optimized Media Early
Editing directly with compressed footage formats like H.264 or HEVC can put enormous strain on your system. These formats are meant for playback, not editing, which means Final Cut has to decode them frame by frame during every cut, trim, or transition.
To fix this:
Transcode your footage to Optimized Media (Apple ProRes) for smoother performance without losing quality.
Create Proxy Media, low-resolution versions of your clips that are easier for Final Cut to process while editing. These automatically switch back to full resolution during export.
Starting with proxy or optimized files lets you edit faster and reduce the strain on your system, especially on long timelines or slower machines.
#3. Keep Your Timeline Lean
A chaotic timeline isn’t just a creative mess — it’s a technical one. The more layers, tracks, and effects you pile on, the harder your system has to work to process and play back in real time. Even unused media sitting in the timeline can add to the load.
To streamline your timeline:
Avoid stacking too many compound clips, adjustment layers, or nested effects.
Disable or remove clips you’re not using, even if they’re muted or offscreen.
Split long-form projects into sections, then combine them later. This keeps things running smoothly during the editing phase.
Good timeline hygiene speeds everything up without compromising your creative flexibility.
Want to fly through edits without touching your mouse? Mastering a few essential Final Cut keyboard shortcuts can speed things up more than you'd expect.
#4. Hold Off on Effects Until the Cut Is Locked
It’s natural to want to add polish as you go—LUTs, transitions, stylized titles—but those enhancements add complexity. Every effect increases the processing load, and applying them too early can mean your system repeatedly reprocesses the same section every time you make an edit.
Instead, focus first on the rough cut. Lock in the pacing, structure, and sequence. Then add your effects and color grading once you’re confident the timeline won’t change much. This keeps your editing phase light and responsive.
#5. Don’t Rely on Background Rendering
Final Cut’s background rendering feature sounds helpful in theory, it begins rendering clips in the background a few seconds after you stop editing. But in practice, it can slow your workflow by constantly using system resources when you don’t expect it.
Here’s a better approach:
Disable background rendering under Final Cut Pro > Preferences > Playback.
Use “Render Selection” (Option + Command + R) to manually render only the complex sections that really need it.
Render manually when it matters, especially if you’ve just applied a complex effect or graphics animation.
This lets you stay in control of when and how your machine renders, avoiding performance hiccups in the middle of creative work.
#6. Remove What You Don’t Need
Over time, most timelines accumulate clutter—placeholder clips, scratch audio, unused b-roll. Even if these elements aren’t active in the final cut, Final Cut Pro may still process them during playback or export.
Before exporting:
Clean your timeline of unused media, muted clips, and hidden layers.
Delete or disable old compound clips or title placeholders that aren’t part of the final sequence.
The leaner your timeline, the faster and smoother your editing and export process will be.
#7. Store Your Media and Libraries on Fast Drives
Even if your timeline is well-organized, performance can still be slowed down by where your media is stored. Editing directly off SD cards, USB 2.0 drives, or older spinning hard disks is one of the most common causes of lag and sluggish playback.
To keep things moving:
Use fast SSD storage for both your Final Cut library and your media cache.
Avoid editing from external drives unless they’re high-speed (USB 3.1, Thunderbolt, NVMe).
Sometimes, simply relocating your media can save you minutes—or even hours—over the course of a project.
In short, a smooth editing experience starts before you even begin. By building a clean, optimized, and well-managed timeline, you’ll spend less time waiting on your system and more time creating.
#8. Tweak Playback for Performance, Not Perfection
Final Cut Pro offers two main playback options: Better Performance and Better Quality. By default, it may be set to favor quality, but that comes at the cost of speed. Especially during the edit phase, you don’t need full-resolution previews of every frame. You need responsiveness.
To speed things up:
Go to Preferences > Playback and choose Better Performance.
This lowers preview resolution but drastically improves real-time editing, especially helpful when working with effects or high-res footage.
You can always switch back to full quality before final export if needed.
#9. Manage Your Cache and Temporary Files
Final Cut Pro stores a lot of background data to help with editing, but over time this can add up—especially if you’ve worked on multiple projects using the same drive. These cached files can become outdated or unnecessary, leading to slowdowns and storage bloat.
Make it a habit to clear them out:
In the Library pane, right-click on your project and select Delete Generated Library Files.
You’ll see options to delete:
Cached preview files (recommended before final export)
Optimized media
Proxy media
Removing unused temporary files can free up disk space and help Final Cut run more smoothly—especially on machines with limited storage or memory.
#10. Export Settings: Don’t Overshoot What You Need
It’s easy to assume that using the “highest quality” export options will give you the best results. But if you’re exporting a video for web or social platforms, going overboard can dramatically increase export time without improving visual quality.
To keep your exports fast and sharp:
Use Apple ProRes LT or H.264 for most web content and client previews.
Reserve ProRes 422 HQ or Master files for broadcast or final archive delivery only.
You can customize export presets in Final Cut’s Share menu or use Compressor if you need batch exporting options with more control.
#11. Organize Libraries for Speed
Final Cut Pro stores everything, media, cache, proxies, optimized files, in your Library by default. Over time, that can make the Library bloated and harder to manage. Especially in larger projects, separating out media and cache folders can improve load times and keep your working drive uncluttered.
Here’s a simple optimization:
Open Library Properties (⌘-4)
Set separate folders for:
Media
Cache
Backups
Store these on a fast SSD if possible. By keeping things modular, you speed up file access and make backups or migrations more efficient.
#12. Use Plugins Carefully
Final Cut supports a wide range of third-party plugins, from transitions and titles to advanced motion graphics and color grading tools. But plugins are a double-edged sword. Some are beautifully optimized, others are not, and each one adds processing overhead.
Use these plugins with intention:
Stick to trusted developers known for performance-optimized tools.
Avoid stacking multiple plugins on the same clip, especially dynamic ones like light leaks, distortions, or real-time animation effects.
If your timeline is starting to lag after installing a plugin, that’s your first sign it might be worth removing or replacing.
Not all Final Cut Pro plugins are created equal, some are lightweight and fast, others can bring your timeline to a crawl.
Performance in Final Cut Pro isn’t just about brute force, it’s about precision. With the right settings, you can dramatically improve how the software responds to your workflow. From smarter playback options to cleaner libraries and lighter exports, these changes make a measurable impact on your daily edit speed.
When Hardware Hits Its Limit, Cloud Power Picks Up
Even with an optimized workflow, Final Cut Pro can still slow down, especially when handling high-res footage, complex timelines, or stacked effects. At some point, your hardware hits its limit. Final Cut depends on the combined power of your CPU, GPU, RAM, and storage. If any one of them falls short, performance takes a hit.
For most editors, 16GB of RAM and a fast SSD are essential for smooth editing, especially with 4K content. Apple Silicon Macs (M1, M2, M3) perform far better than older models, thanks to their integrated GPU and efficient architecture. But not everyone works on the latest hardware.
If you’re using a base-level MacBook or sharing gear with a team, you’ve likely hit those limits. And while upgrading is an option, it’s not always practical, especially for freelancers, students, or teams that don’t need high-end power every day.
That’s where cloud-based editing offers a smarter alternative.
Vagon Computer: Power Without the Upgrade
Vagon Computer offers a practical and scalable alternative to buying new hardware. Instead of investing in a new Mac just to keep up with rendering demands, you can run Final Cut Pro on a high-performance cloud computer with GPU acceleration, fast storage, and more memory than most laptops can dream of.
It works like this: you connect to your Vagon Computer through a browser, launch a fully-featured macOS desktop, and work inside Final Cut as if it were installed locally. But all the processing, exporting happens in the cloud. Your local device, whether it’s a MacBook Air, an older iMac, or even a lightweight tablet, just streams the experience.
This setup removes friction entirely. You can edit from anywhere, switch devices mid-project, or share cloud access with teammates without worrying about performance inconsistencies. And because Vagon is built specifically for compute-heavy creative software, it’s not just about remote access, it’s about unlocking a level of speed and stability that most local machines can’t deliver.
For editors handling complex timelines or collaborating across locations, this flexibility becomes a huge advantage. You no longer have to sync machines, ship hard drives, or worry about whether your laptop can handle another 6GB title render. Vagon Computer handles the heavy lifting and scales with your needs.
Beyond performance, Vagon also gives you control over how and when you use computing power. You only pay for what you use. Whether you need cloud power for just one big project or want to make it part of your regular workflow, Vagon doesn’t lock you into a long-term investment. It expands your options without shrinking your budget.
So if Final Cut Pro is pushing your machine to its limit and slowing down your momentum, there’s no need to replace everything. With Vagon Computer, you can work faster, scale instantly, and finish projects without compromise, right from the device you already own.
Try Vagon now and experience what it’s like to edit and export without limits.
Conclusion & Key Takeaways
Final Cut Pro is a powerful editor, but like any creative tool, it performs only as well as the environment it runs in. Long processing times, slow exports, and stuttered playback aren’t just part of the job—they’re signs that your workflow needs a tune-up.
Speed in Final Cut isn’t about a single trick. It’s the result of smart decisions made at every stage of the process: choosing the right project settings, organizing your timeline efficiently, optimizing playback preferences, and managing your media storage with intention. Even subtle improvements, like disabling background tasks or using proxy files, can make a noticeable difference.
And when software tweaks and best practices aren’t enough, you don’t have to invest in a whole new setup. With Vagon Computer, you can instantly tap into high-performance cloud machines and work without limits, no matter what device you’re using. It’s a practical, flexible way to unlock speed, power, and creative freedom without overhauling your gear.
Still deciding if Final Cut is the right fit for your workflow? This DaVinci Resolve vs. Final Cut Pro comparison breaks down performance, features, and flexibility.
To recap, here’s how you can speed up your workflow in Final Cut:
Build projects using the right resolution, frame rate, and optimized or proxy media.
Keep your timeline clean, effects minimal until the cut is locked, and media stored on fast SSDs.
Manually control background processes and cache settings for better performance.
Use Final Cut’s built-in export options wisely—don’t overshoot what you need.
And if local hardware holds you back, offload the heavy lifting with Vagon Computer.
Final Cut doesn’t have to feel slow. With the right workflow and the right tools, you can spend less time waiting, and more time creating.
For even more ways to boost your efficiency, check out these pro Final Cut tips that go beyond just fixing lag and improving exports.
Frequently Asked Questions
Why is Final Cut Pro so slow on my Mac?
Final Cut Pro can lag for several reasons, even on newer machines. High-resolution footage, heavy timelines, background tasks, or unoptimized file formats can all overload your system. If your Mac has limited RAM, a slow hard drive, or an older processor, performance dips during editing become more noticeable.
What’s the difference between playback optimization and exporting in Final Cut Pro?
Playback optimization helps Final Cut Pro preview your timeline smoothly while you edit, especially when effects or transitions are involved. Exporting, on the other hand, is the final step—when your project is turned into a shareable video file. One supports the editing process, the other delivers the finished product.
How can I fix lag in Final Cut Pro?
To reduce lag, disable background rendering, convert footage to optimized or proxy media, and clean up your timeline by removing unused clips or effects. Store your files on a fast SSD and adjust playback settings for better performance. These small changes can significantly improve your editing speed.
Does Final Cut Pro run better on M1 or M2 Macs?
Absolutely. Apple Silicon chips like M1 and M2 are built for efficiency and speed. They handle effects, playback, and exports far better than older Intel-based Macs, especially when you're working with 4K video or complex edits.
What are proxy and optimized media in Final Cut Pro?
Optimized media is high-quality footage converted into a format that Final Cut can process more efficiently, like Apple ProRes. Proxy media is a lower-resolution copy of your clips designed to reduce the load on your system during editing. Both are powerful tools for improving editing performance.
Should I turn off background rendering?
In most cases, yes. Background rendering might seem convenient, but it can actually slow your editing session by constantly using CPU and storage resources. Disabling it and rendering manually when necessary gives you more control and improves performance.
Can I delete performance-related files without affecting my project?
Yes. You can safely delete preview or cache files to free up space and speed up Final Cut Pro. This won’t affect your timeline or original footage—it simply removes temporary data used during editing.
What export settings should I use for YouTube or social media?
For most online platforms, exporting in H.264 or Apple ProRes LT will give you great results with fast export times and manageable file sizes. Heavier formats like ProRes 422 HQ are more suitable for broadcast, archival, or professional delivery.
Why does Final Cut Pro lag even after cleaning up my timeline?
If you’ve optimized your project and it still lags, the issue may be hardware-related. Limited RAM, a slow drive, or an older GPU can all cause bottlenecks. Try lowering playback resolution, working with proxy files, or upgrading your setup for smoother results.
What’s the best hardware setup for smooth Final Cut editing?
For smooth editing, aim for at least 16GB of RAM, a fast SSD, and an Apple Silicon chip like M1 or M2. This setup handles complex projects, multiple layers, and 4K video more efficiently, reducing lag and improving responsiveness.
Can I use Final Cut Pro on a low-end device?
Yes, but you’ll need to keep things lean. Use proxy media, avoid stacking effects early, store your files on fast drives, and keep your timeline tidy. For bigger edits or long-form projects, consider using a cloud solution like Vagon Computer to handle the heavy lifting.
How does Vagon Computer help fix Final Cut lag or slow performance?
Vagon Computer gives you access to a high-performance macOS environment in the cloud, with powerful GPUs, ample RAM, and fast storage. You can edit smoothly without worrying about local hardware limitations—it’s ideal for professionals who need more speed without upgrading their Mac.
Get Beyond Your Computer Performance
Run applications on your cloud computer with the latest generation hardware. No more crashes or lags.

Trial includes 1 hour usage + 7 days of storage.
Summarize with AI

Ready to focus on your creativity?
Vagon gives you the ability to create & render projects, collaborate, and stream applications with the power of the best hardware.

Vagon Blog


Run heavy applications on any device with
your personal computer on the cloud.
San Francisco, California
Solutions
Vagon Teams
Vagon Streams
Use Cases
Resources
Vagon Blog
How to Run Audacity on a Cloud Ubuntu Desktop (2026 Guide)
How to Run Darktable on a Cloud Ubuntu Desktop for RAW Photo Editing (2026 Guide)
How to Run Kdenlive on a Cloud Ubuntu Desktop (2026 Guide)
How to Run DaVinci Resolve on Linux in the Cloud (2026 Guide)
How to Run Inkscape on a Cloud Ubuntu Desktop (2026 Guide)
How to Run Krita on a Cloud Ubuntu Desktop for Digital Painting (2026 Guide)
How to Run GIMP on a Cloud Ubuntu Desktop (2026 Guide)
How to Run Jupyter on a Cloud GPU Linux Desktop (2026 Guide)
Vagon vs GitHub Codespaces: Cloud Dev Environments Compared (2026)
Vagon Blog
Run heavy applications on any device with
your personal computer on the cloud.
San Francisco, California
Solutions
Vagon Teams
Vagon Streams
Use Cases
Resources
Vagon Blog