Instant Connection for Pixel Streaming
— New Feature Automated Setup
How to Use DaVinci Resolve on a Low-End Computer in 2026
How to Use DaVinci Resolve on a Low-End Computer in 2026
VideoProduction
How to Use DaVinci Resolve on a Low-End Computer in 2026
Table of Contents
It usually hits somewhere between dragging your first clip onto the timeline and pressing play. The video stutters. Audio drifts. You hit space again. Same thing. Fans spin up like your laptop is about to take off.
Laggy playback. Dropped frames. The occasional crash that feels personal.
What makes it worse is the disconnect. You watch tutorials where people stack nodes, scrub 4K footage like it’s nothing, add Fusion effects for fun. Then you try the same thing and Resolve acts like you’ve asked it to do something unreasonable. That gap between what you see online and what your machine can handle is where most people start questioning themselves.
Here’s the truth, and it’s better to say it early. DaVinci Resolve can work on low-end hardware. But not in the way most videos show it. You don’t brute-force it. You don’t just “power through.” You adjust how you work, what you expect, and which battles are worth fighting.
Once you accept that, things get a lot less frustrating. And a lot more manageable.
What “Low-End” Really Means for DaVinci Resolve
“Low-end” is a vague term, and it causes a lot of confusion. For DaVinci Resolve, it doesn’t mean your computer is old or cheap. It means your hardware doesn’t line up with what Resolve quietly assumes you have.
Most people running into trouble are on some version of this setup:
8GB of RAM, maybe 16GB if they’re lucky
Integrated graphics instead of a dedicated GPU
Footage sitting on a slow HDD or a crowded system drive
On paper, that machine can launch Resolve. In practice, it’s already under pressure the moment you hit play.
Resolve leans heavily on the GPU. Color grading, effects, scaling, even basic playback all push graphics hardware hard. Integrated GPUs share memory with the system, which means they’re fighting the CPU for resources before you’ve even added a node. That’s why things feel fine one moment and unusable the next.
RAM is the next silent bottleneck. With 8GB, the system is constantly juggling memory between the OS, Resolve, cache files, and background apps. You might not see an error, but you feel it. Stutters, freezes, random slowdowns that come and go without warning.
Storage speed matters more than most people expect too. Editing off a traditional hard drive or a nearly full system SSD adds delay everywhere. Cache writes slow down. Media loads late. Resolve waits, and so do you.
None of this means you’re doing something wrong. It means Resolve was built for a different baseline. Once you understand that, you stop blaming yourself and start making smarter choices. That’s where the real improvements begin.
Choosing the Right Version of DaVinci Resolve
This part surprises people. Newer isn’t always better. Especially on low-end hardware.
Every major Resolve update adds features, and almost all of them assume stronger GPUs, more memory, and faster storage. That’s great if your system can keep up. If it can’t, those same updates quietly make things heavier. Slower startup times. More background processing. Features you’ll never touch still sitting there, waiting.
If your computer is already struggling, chasing the latest version can actually make performance worse.
In my experience, stability beats novelty on weaker machines. A slightly older, well-tested version of Resolve often runs smoother than the newest release. You lose a few shiny tools, but you gain something far more valuable. Predictability.
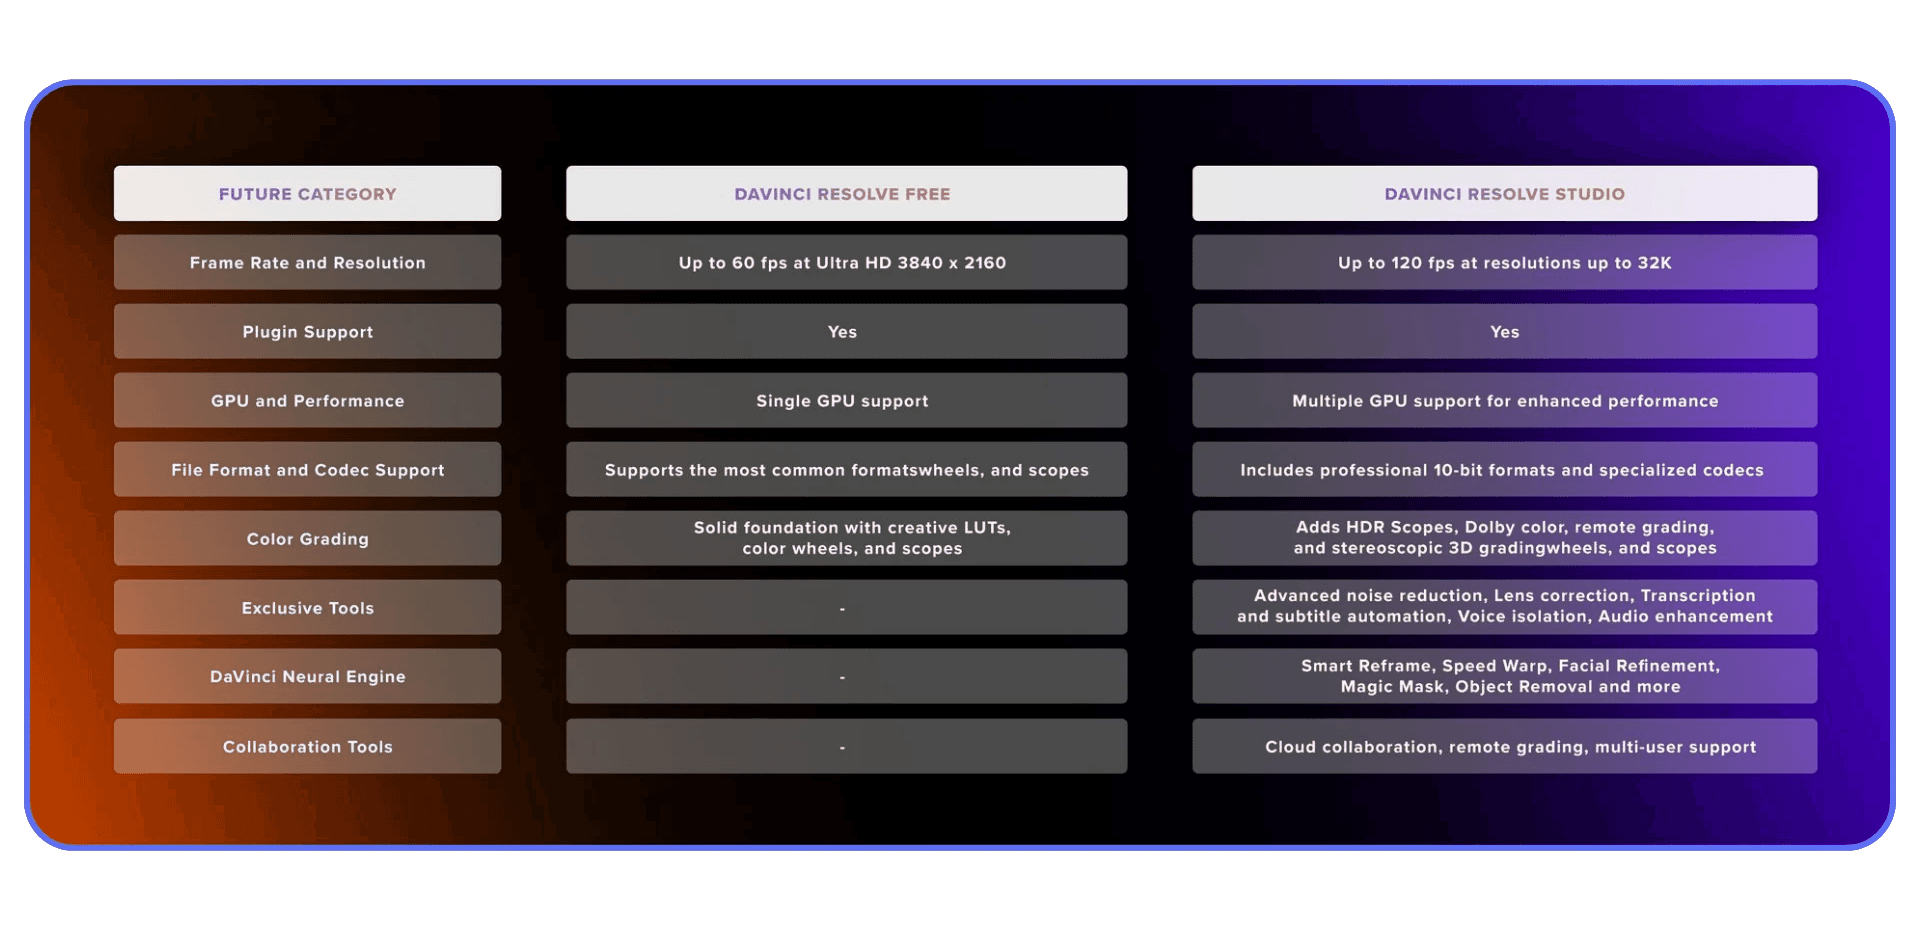
The free version versus Studio is another point of confusion. Studio does offer real performance advantages, mainly through better GPU acceleration and decoding support. On systems with a decent dedicated GPU, that can be a noticeable upgrade. On very low-end machines, especially those with integrated graphics, the difference is smaller than people expect.
That doesn’t mean Studio isn’t worth it. It just means it isn’t a magic fix. If your hardware is the limiting factor, software alone can only do so much.
The goal here isn’t to chase features. It’s to find a version of Resolve that feels stable, responsive, and boring in the best way possible. Once you have that, everything else becomes easier.
If you’re coming from motion graphics and wondering why Fusion feels heavier than expected, this comparison between After Effects and DaVinci Resolve helps explain where the performance differences come from.
Preparing Your System Before You Edit Anything
Before you touch a timeline, it’s worth spending a few minutes setting your system up properly. This part isn’t exciting, but it saves a lot of silent pain later.
Start with background apps. Browsers, launchers, sync tools, chat apps. If it doesn’t help you edit, close it. On low-end machines, every background process is stealing CPU cycles and memory that Resolve badly wants.
Next, check your power settings. Laptops especially love to throttle performance to save battery. Make sure you’re running in a high-performance mode while editing. Otherwise, you’re handicapping yourself before Resolve even opens.
Storage is another quiet culprit. If Resolve is reading footage from one slow drive and writing cache to another slow or nearly full drive, everything drags. If you have an SSD, use it for cache and active projects. Even a modest SSD makes a noticeable difference here.
GPU drivers are worth a quick look too. Outdated drivers can cause instability, random crashes, or weird performance drops. That said, the newest driver isn’t always the safest choice. If Resolve suddenly starts acting up after an update, rolling back can be the smarter move.
None of this turns a weak machine into a powerhouse. But it clears away unnecessary obstacles. And on low-end hardware, removing friction matters just as much as adding power.
If portability matters more than raw local power and you’re working on a tablet, it’s also possible to run DaVinci Resolve on an iPad using cloud workflows instead of native hardware.
The Setting That Matters Most: Timeline Resolution
If there’s one setting that causes more unnecessary pain than any other, it’s timeline resolution.
Most people assume timeline resolution and export resolution are the same thing. They’re not. Timeline resolution controls how hard Resolve works while you’re editing. Export resolution controls what your final video looks like. Mixing those up is how low-end machines get overwhelmed early.
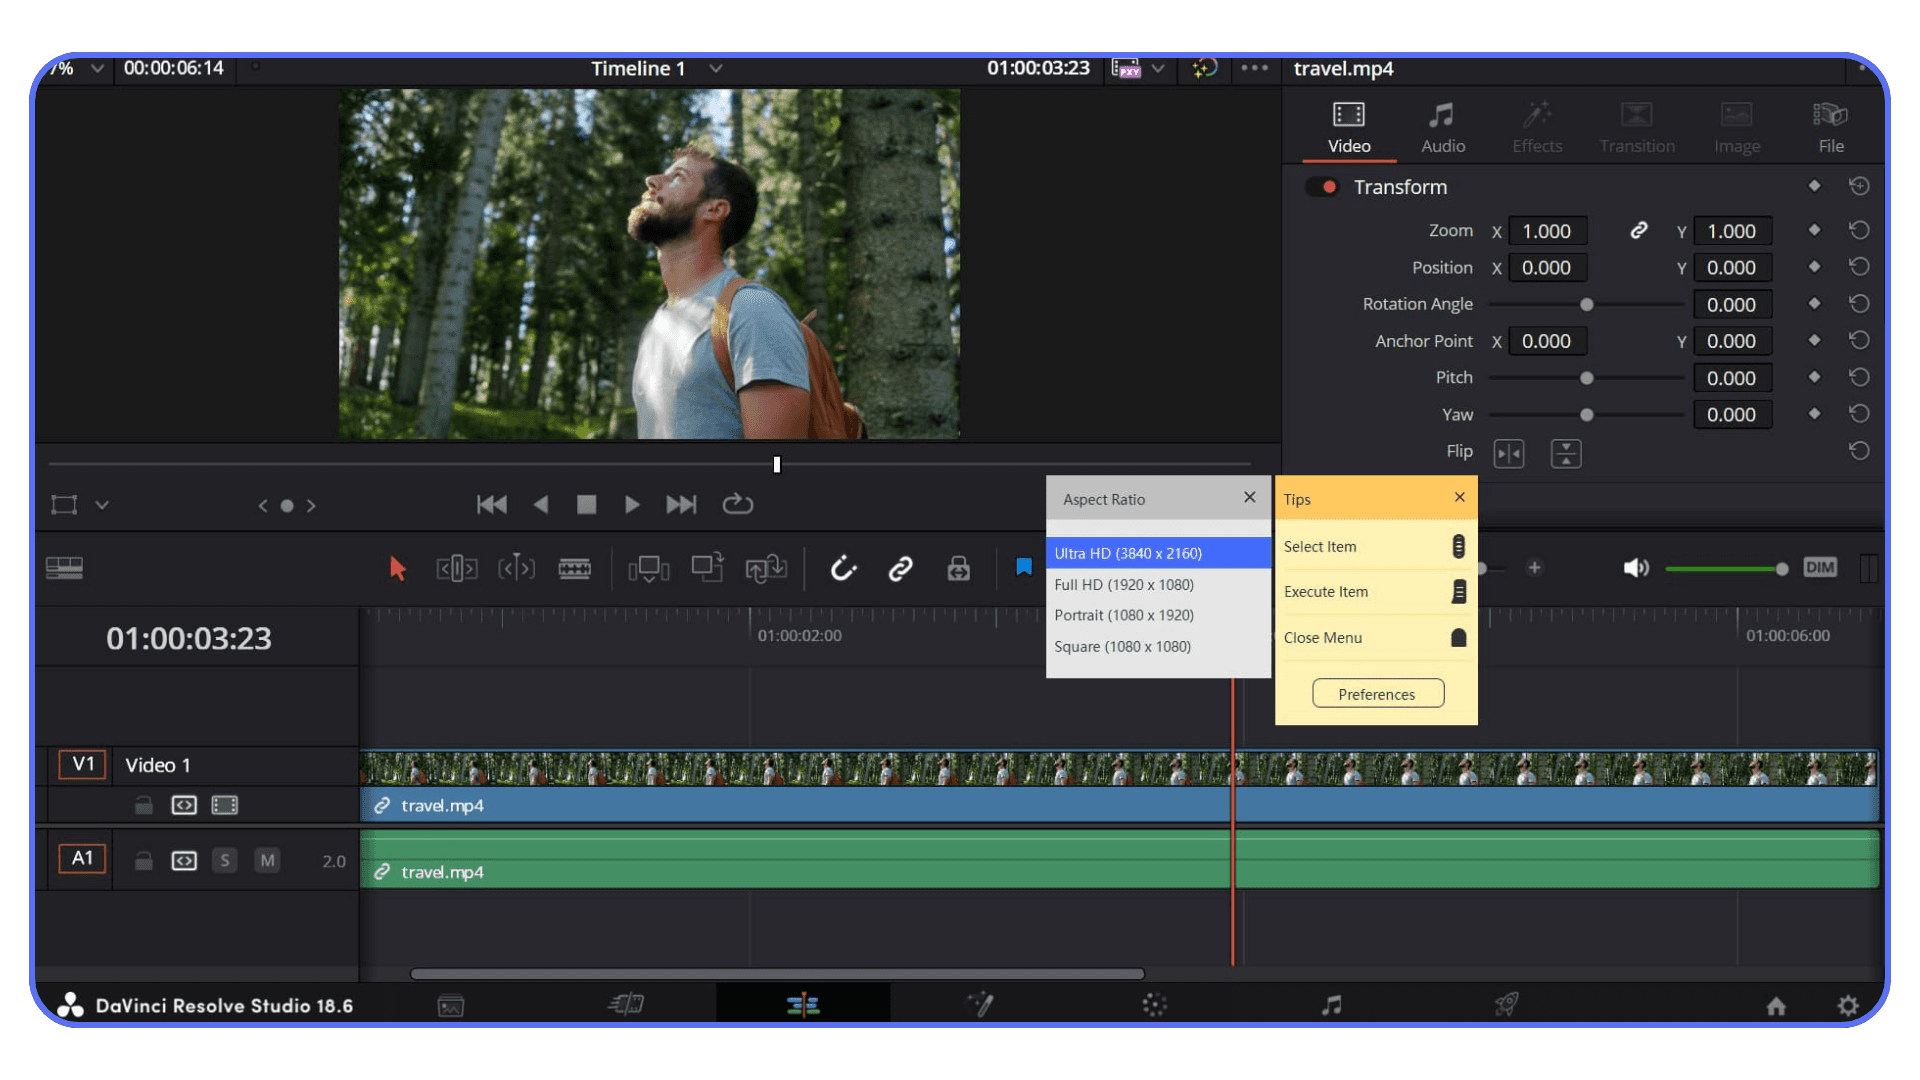
Timeline Resolution vs Export Resolution
Think of timeline resolution as your working canvas. A 4K timeline means Resolve is constantly scaling, decoding, and processing every frame at full resolution, even when you’re just trimming clips. On weak hardware, that’s a losing battle.
Export resolution is separate. You can edit on a 720p or 1080p timeline and still export a clean 4K file later. Resolve handles that conversion at the end, when performance matters less than during real-time playback.
Lower timeline resolution does not ruin your final output. It just makes editing possible.
Why Editing 4K Timelines on Weak Machines Is Self-Sabotage
Editing on a 4K timeline multiplies everything Resolve has to do. More pixels to process. More memory usage. More GPU strain. Even simple cuts become heavier than they need to be.
This is usually the first place low-end systems fall apart. Playback stutters. Skipping frames becomes normal. You start pausing constantly just to see if a cut landed correctly.
None of that helps creativity.
Practical Editing Presets That Actually Work
For most low-end setups, these presets are realistic:
720p timeline for very weak machines
1080p timeline for modest systems with limited GPUs
Export at original resolution when the edit is done
Set this at the start of a project. Changing timeline resolution halfway through is possible, but it’s cleaner when you commit early.
This one adjustment alone saves hours of frustration.
If your local hardware isn’t an option at all and you’re experimenting with cloud-based setups, some editors even run DaVinci Resolve on a Chromebook using remote systems like this.
Proxies and Optimized Media Without the Confusion
Proxies and optimized media are where a lot of people either give up or accidentally make things worse. The concepts are simple. The implementation is where it gets messy.
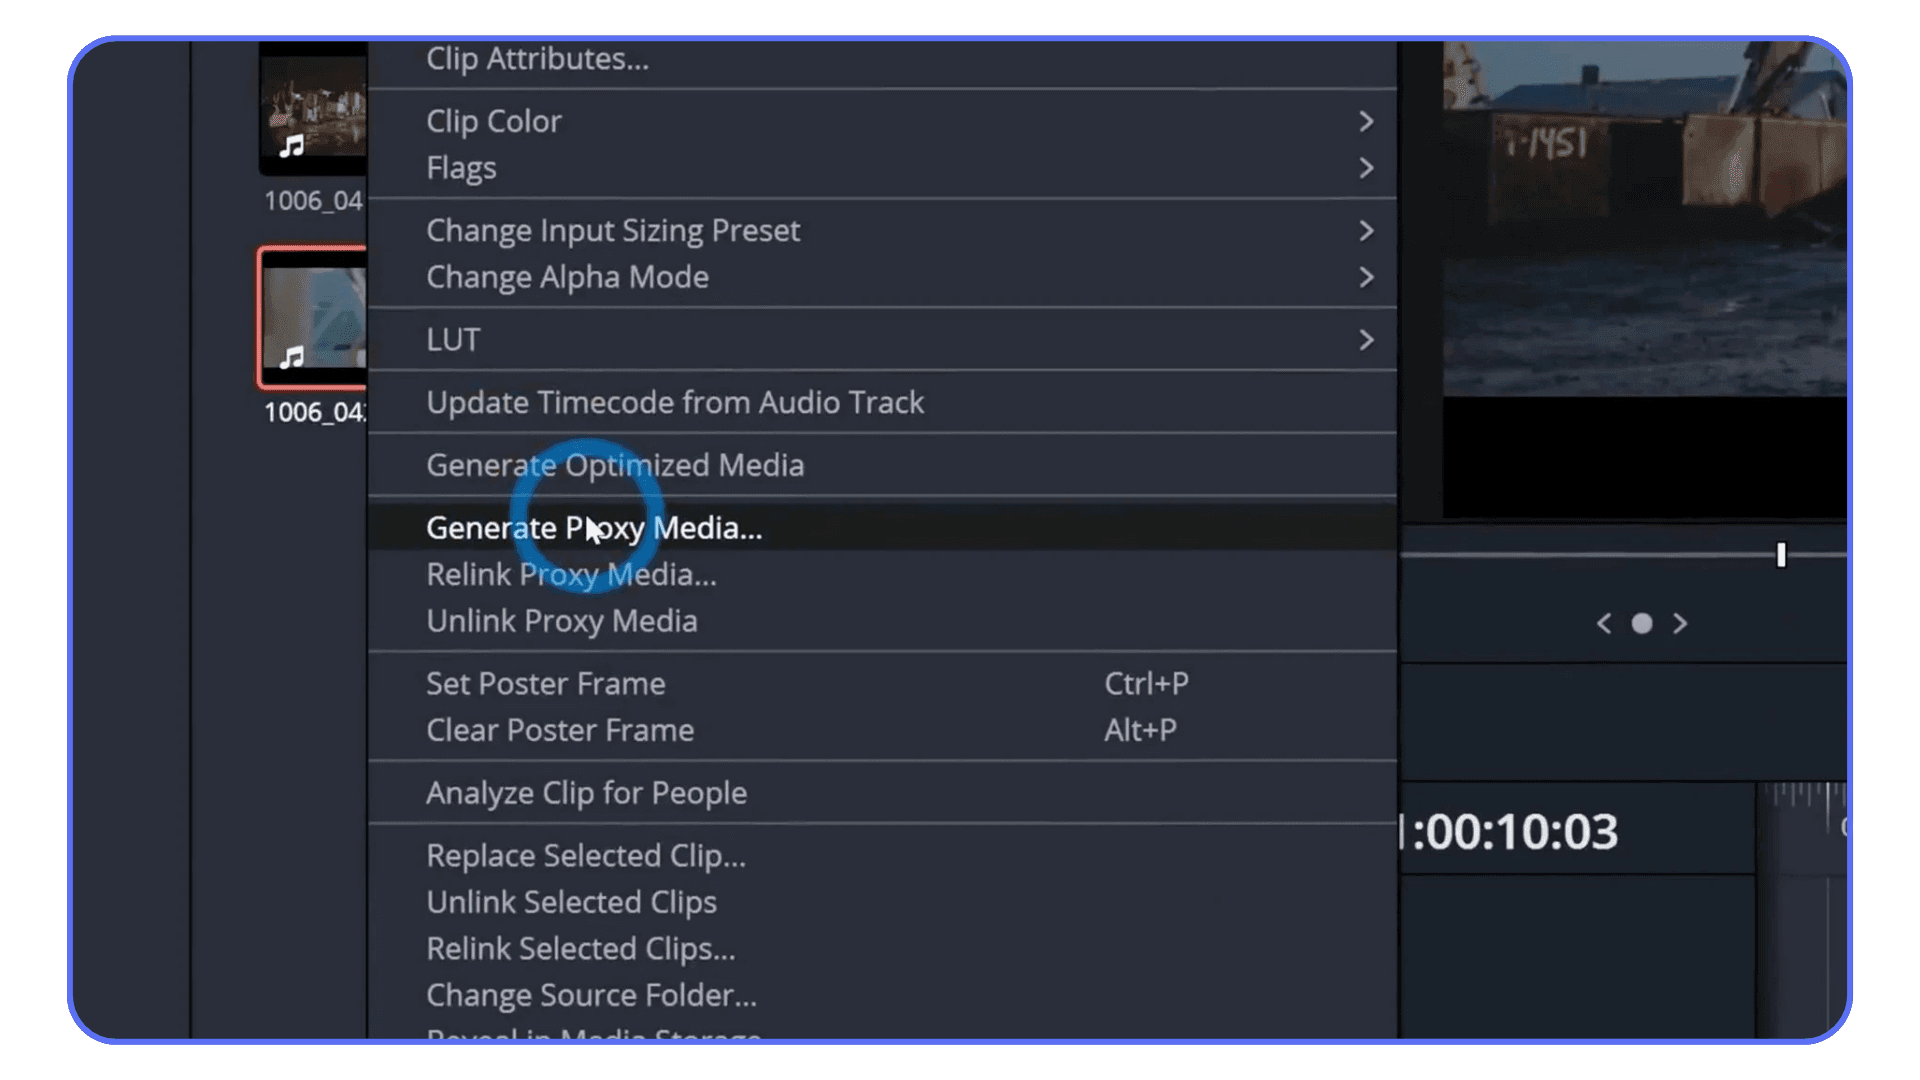
What Proxies Are
Proxies are lower-resolution copies of your original clips. Resolve uses them during editing, then switches back to the original files when you export.
They exist for one reason. Smooth playback.
On weak machines, proxies can be the difference between fighting the timeline and actually editing. Especially with high-resolution footage or heavily compressed files.
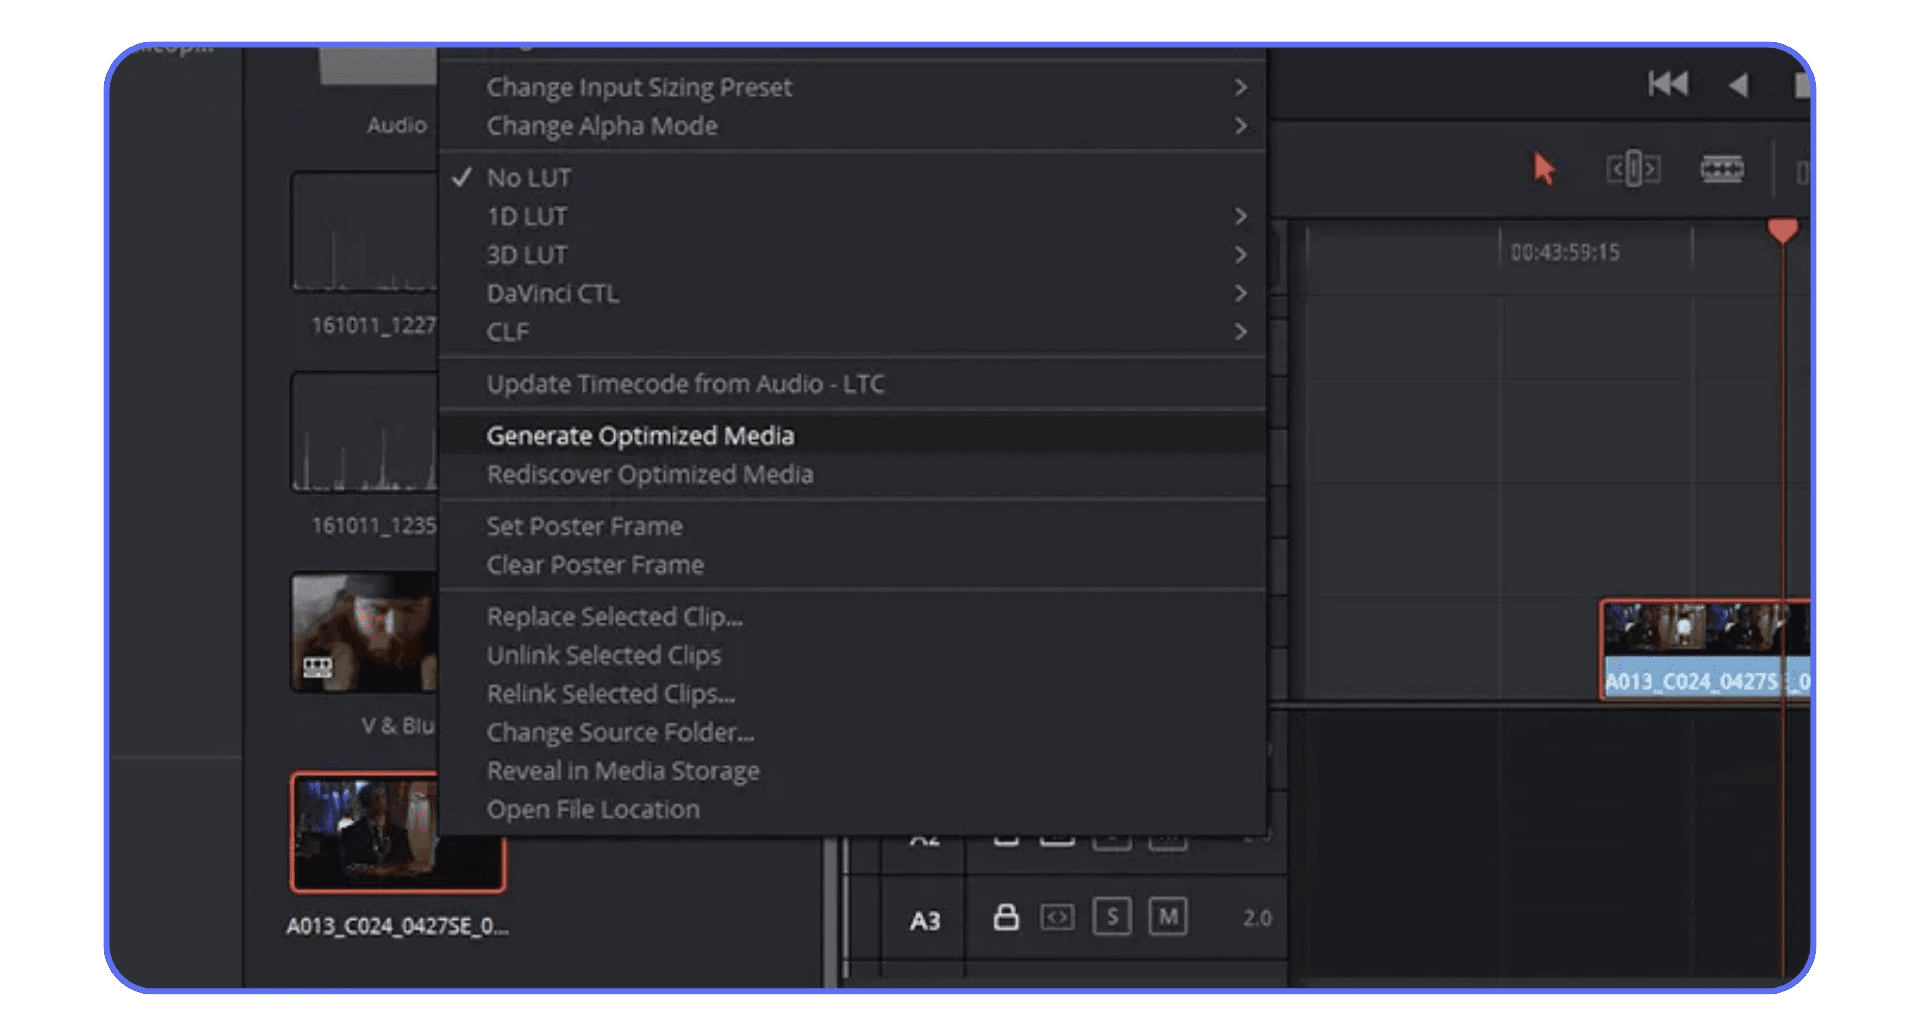
What Optimized Media Is
Optimized media is Resolve’s own intermediate version of your clips. Instead of reducing resolution, it often converts footage into an easier-to-edit format.
The result is similar. Playback improves because your system isn’t constantly decoding complex compression. The difference is where the files come from and how Resolve manages them.
When to Use One or the Other
If your system is really struggling, proxies are usually the safer choice. They lower resolution and lighten the load immediately.
Optimized media makes more sense on slightly stronger machines that just choke on certain codecs. It keeps resolution higher but simplifies decoding.
What rarely makes sense is using both at the same time. That’s how storage disappears and confusion sets in.
Common Mistakes That Waste Time and Storage
A few traps people fall into:
Creating proxies at unnecessarily high resolutions
Forgetting to actually enable proxy playback
Filling slow drives with cache and optimized files
Keep proxy resolutions modest. Store cache on your fastest drive. And remember, the goal isn’t perfection. It’s fluid editing.
If you’re considering upgrading your laptop but don’t want to guess what will actually work, this list of laptops that can smoothly run DaVinci Resolve gives realistic expectations instead of marketing numbers.
Codec Choices That Quietly Kill Performance
This is one of the least obvious problems and one of the most damaging.
You can do everything right with timeline settings and proxies, then drop in the wrong footage and watch Resolve fall apart anyway. The culprit is usually the codec.
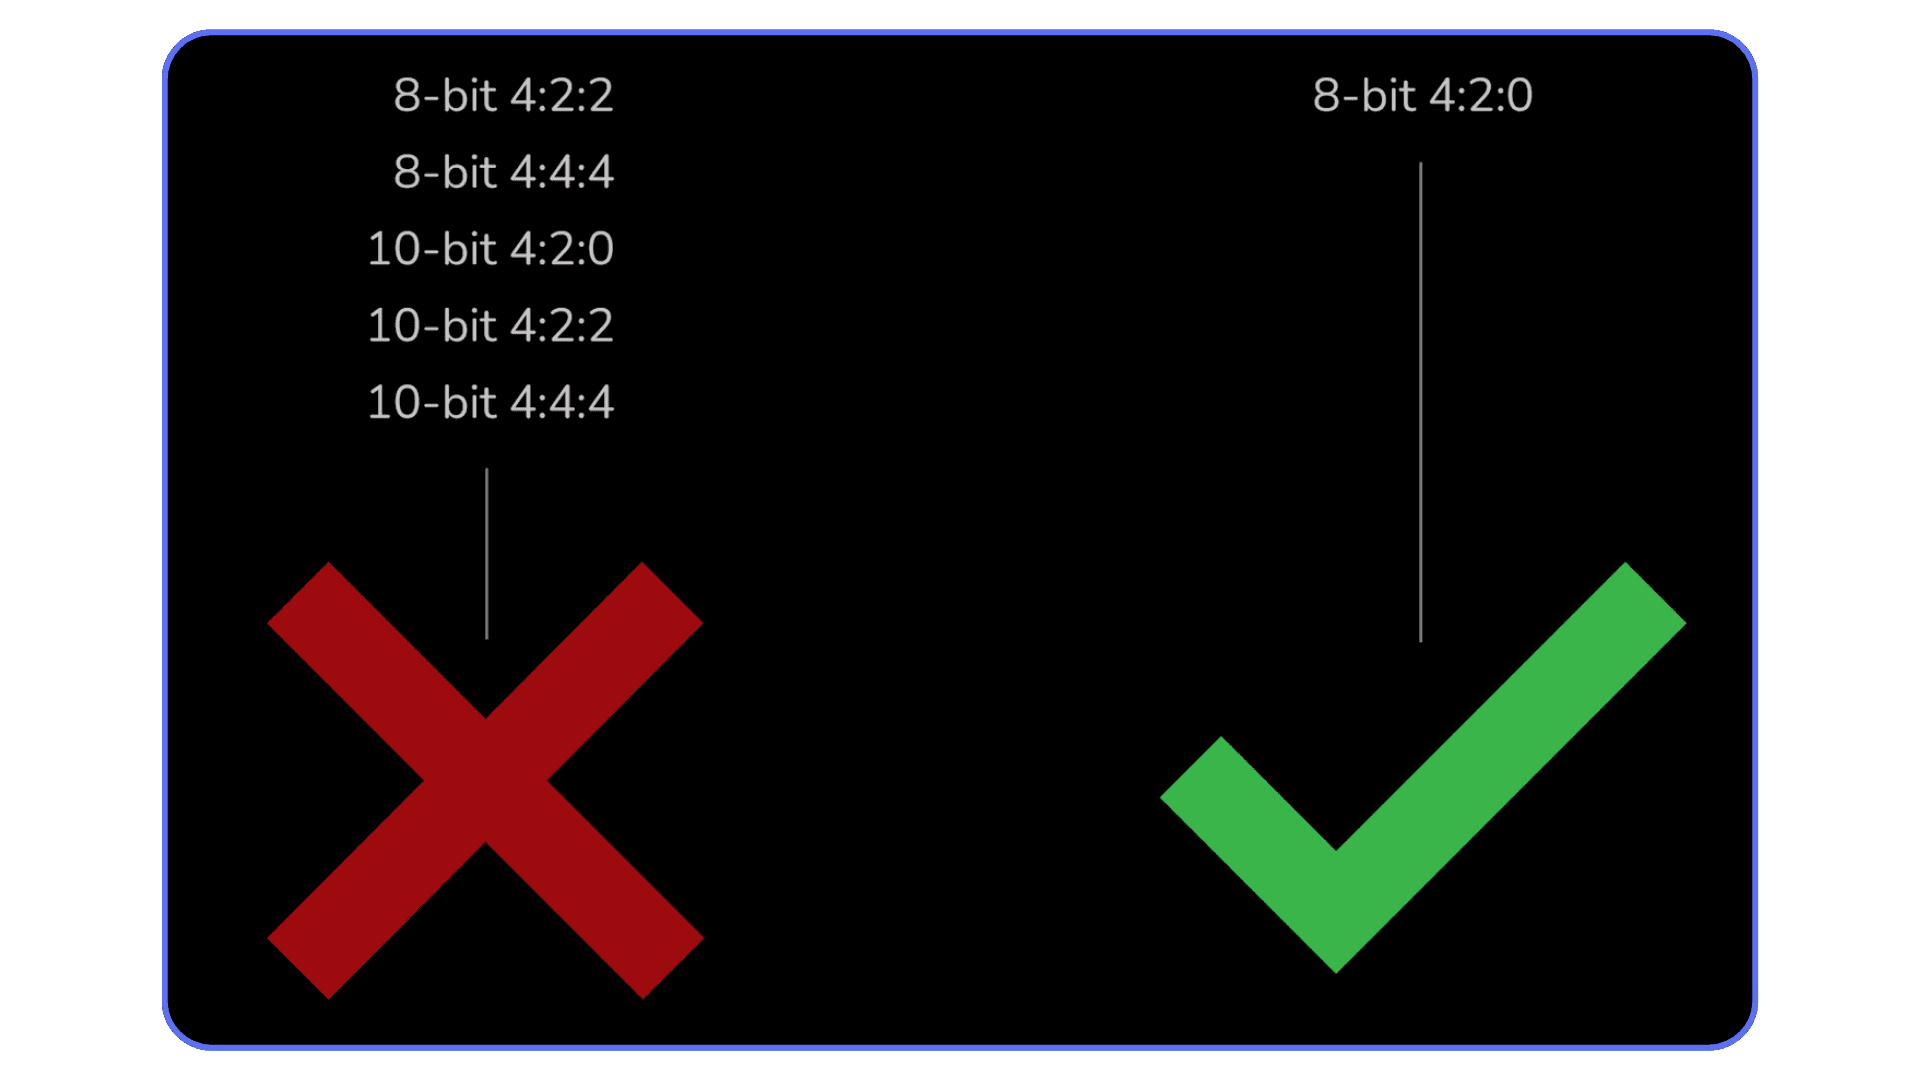
Why H.264 and HEVC Are Hard to Edit
H.264 and HEVC are designed to make files small, not easy to edit. They achieve that by compressing data aggressively and spreading information across frames.
That means your computer has to work harder just to show a single frame. Scrubbing becomes heavy. Playback stutters. Cuts feel delayed. On low-end CPUs, this shows up immediately.
They’re great for delivery. They’re awful for editing.
Why “Small Files” Can Be Worse
Smaller file size feels efficient, but it often means more compression. More compression means more decoding work every time you hit play.
This is why a massive ProRes or DNx file can feel smoother than a tiny phone clip. One is simple to decode. The other is constantly asking your CPU to reconstruct missing information.
When Transcoding Is Worth the Time
Transcoding isn’t glamorous, but it’s often worth it for:
Phone footage
Screen recordings
Long projects with lots of cuts
Yes, it takes time upfront. But it saves you from fighting playback for the rest of the project. And that trade-off usually pays for itself.
Render Cache: Let Resolve Do the Work
Render cache is one of those features people either ignore or misunderstand. On low-end hardware, it can quietly save a project.
The idea is simple. Instead of forcing your computer to process everything in real time, Resolve pre-renders the heavy parts and plays those back smoothly.
Smart Cache vs User Cache
Smart Cache lets Resolve decide what needs caching. When it detects effects or grades that are too heavy for real-time playback, it renders them in the background.
User Cache gives you control. You tell Resolve exactly which clips or nodes to cache. This is useful when you know what’s causing trouble and don’t want Resolve guessing.
On weak machines, Smart Cache is usually the better starting point. Less micromanagement. Fewer mistakes.
When Caching Helps
Render cache shines when you’re dealing with:
Heavy color grading
Noise reduction
Effects that kill playback
Fusion elements
You’ll see blue lines appear over cached sections of the timeline. That’s Resolve saying, “I’ve got this.”
When It Doesn’t
Caching won’t fix everything. It won’t help much with:
Simple cuts
Bad codec choices
Timelines overloaded with unnecessary effects
If playback is bad everywhere, the issue is probably earlier in the chain.
How to Spot When Resolve Needs Time to Breathe
A few signs:
Playback suddenly drops frames after adding an effect
Fans ramp up aggressively
Resolve pauses briefly before playing
When that happens, let cache build. Go make coffee. Let Resolve work so you don’t have to.
If you’re not sure whether Resolve is even using your GPU properly, especially on systems with integrated graphics or older cards, this breakdown on how to use GPU in DaVinci Resolve explains what to check and what actually matters.
Editing Smarter on Weak Hardware
At a certain point, performance stops being about settings and starts being about habits. The way you work matters just as much as the machine you’re on.
#1. Cut First, Color Later
Lock your edit before touching color. Get the timing, structure, and pacing right first. Every color node you add early is something Resolve has to recalculate while you’re still trimming clips. On low-end hardware, that adds up fast.
#2. Treat Fusion as a Final Pass
Fusion is powerful, but it’s also unforgiving. Even simple compositions can tank playback on weaker systems. If you know you’ll need Fusion work, plan for it. Finish the edit, then add Fusion elements near the end instead of experimenting mid-cut.
#3. Keep the Interface Lean
Scopes, extra viewers, and panels all update constantly. On a strong machine, you barely notice. On a weak one, it matters. Keep only what you need open. Close the rest when you’re not actively using them.
#4. Choose Simpler Effects on Purpose
Not every project needs heavy effects or flashy transitions. Simple dissolves, basic transforms, and restrained grades often look better anyway. On low-end hardware, restraint isn’t just aesthetic. It’s a performance strategy.
If you’re dealing with constant freezes or Resolve crashing instead of just slowing down, this guide on DaVinci Resolve crashes and fixes walks through the most common causes and how to stabilize things before changing your workflow.
Common Mistakes That Make Everything Worse
A lot of performance problems don’t come from weak hardware alone. They come from habits that quietly stack the odds against you.
One of the biggest mistakes is editing on a 4K timeline “just in case.” Even if your final export is 4K, there’s rarely a good reason to force your system to process that resolution while you’re still cutting. It adds load everywhere and gives you nothing in return during the edit.
Another common issue is ignoring storage speed. Editing from a slow hard drive, an overstuffed system SSD, or a cheap external drive turns every action into a delay. Cache writes slow down. Media loads late. Resolve waits, and so do you.

People also tend to blame Resolve first. The software gets the reputation for being unstable or “too heavy,” when the real problem is often codec choice, timeline settings, or background apps eating resources. Resolve is demanding, but it’s also predictable once you understand what it wants.
The last big mistake is trying to fix everything at once. Changing versions, settings, codecs, and workflows all in one go makes it hard to know what actually helped. Tweak one thing. Test it. Then move on.
Avoiding these mistakes won’t turn a low-end machine into a powerhouse. But it will stop you from making things harder than they need to be.
When Optimization Stops Being Enough
There’s a point where all the smart settings and careful workflows stop buying you real relief.
You’ve lowered the timeline resolution. You’re using proxies. Render cache is working overtime. And still, every creative decision feels like a negotiation with your hardware. You wait for playback more than you watch it. You hesitate before adding an effect because you know what’s coming.
That’s usually the signal.
Not that you’re doing something wrong. Just that you’ve reached the ceiling of what your machine can reasonably handle.
This is where editing stops feeling playful and starts feeling restrictive. You simplify ideas not because they’re better, but because they’re safer. You avoid tools you actually want to use. Over time, that adds up. Creativity shrinks to fit the hardware.
At this stage, the question changes. It’s no longer “What setting did I miss?” It becomes “Is this worth fighting anymore?”
For some people, that’s when they upgrade their computer. For others, especially laptop users or editors who only need heavy power occasionally, there’s another option. And that’s where cloud-based solutions start to make sense.
Breaking Hardware Limits With Vagon Cloud Computer
When optimization stops helping, the problem usually isn’t DaVinci Resolve. It’s the hardware underneath it.
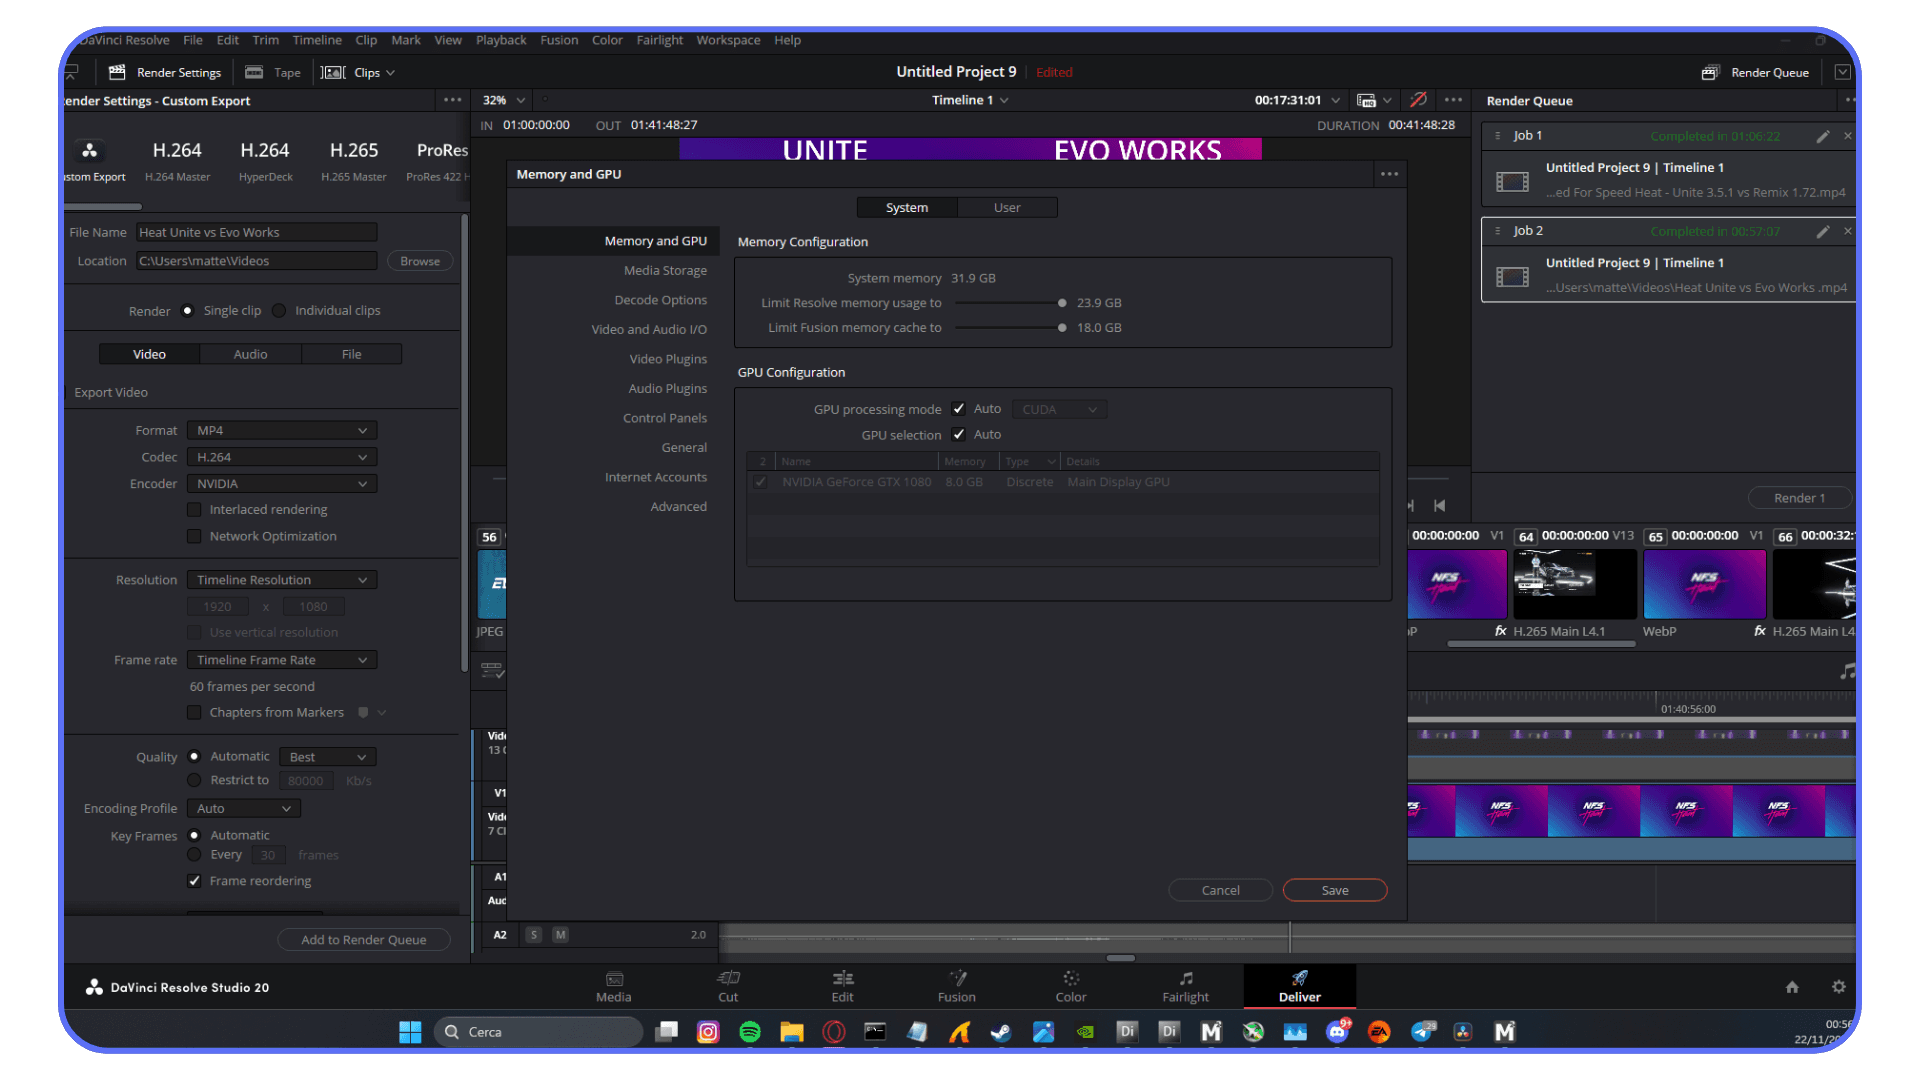
Vagon Cloud Computer gives you access to a full high-performance computer running in the cloud. DaVinci Resolve runs entirely on Vagon’s CPU, GPU, and RAM, not on your local machine. Your laptop or desktop becomes a window. Mouse, keyboard, screen. That’s it.
Because the heavy work happens remotely, even modest or older machines suddenly feel capable again. Resolve no longer fights for limited GPU memory or system RAM. It just runs the way it was designed to.
This shows up immediately in GPU-heavy tasks. Color grading plays smoothly. Noise reduction doesn’t tank playback. Fusion goes from something you avoid to something you can actually use. You don’t change how you edit. You just stop waiting.
One of the biggest advantages is flexibility. Vagon fits into low-end workflows without replacing them. You can still prep footage or do rough cuts locally, then switch to Vagon when the project needs serious power. That makes a lot more sense than upgrading hardware for occasional heavy workloads.
There are limits. You need a stable internet connection, and it won’t fix poor workflows or bad codec choices. But if your creativity is being held back by hardware rather than skill, Vagon Cloud Computer removes that ceiling in a very practical way.
Final Thoughts
Editing shouldn’t feel like a constant negotiation with your computer.
If you’re on a low-end machine, DaVinci Resolve isn’t impossible to use. But it does demand respect. The right settings, the right workflow, and realistic expectations go a long way. Timeline resolution, proxies, codecs, caching. None of these are optional tweaks. They’re how you make Resolve workable instead of painful.
At the same time, there’s a limit to how much optimization can do. When hardware starts shaping your creative decisions, that’s when something needs to change. Sometimes that means simplifying. Sometimes it means rethinking where the work actually runs.
You don’t need the best computer to start editing. You do need an approach that fits the tools you’re using. Once those line up, Resolve stops feeling hostile and starts feeling powerful. And that’s when editing gets fun again.
FAQs
1. Can DaVinci Resolve really run on a low-end computer?
Yes, but not the way most tutorials show it. You’ll need to lower timeline resolution, be careful with codecs, and rely on proxies or optimized media. Basic editing, light color work, and simple effects are realistic. Heavy Fusion work and real-time 4K playback usually aren’t.
2. Is 8GB of RAM enough for DaVinci Resolve?
It can work, but it’s tight. Resolve will run, but you’ll feel the limits quickly. Background apps need to stay closed, render cache becomes essential, and longer projects will slow down over time. If you can upgrade to 16GB, it makes a noticeable difference.
3. Do I have to use proxies, or can I avoid them?
If your footage is 1080p and in an edit-friendly codec, you might be able to skip proxies. If you’re working with 4K, phone footage, screen recordings, or HEVC files, proxies are usually worth it. They reduce frustration more than almost any other setting.
4. What’s the difference between proxies and optimized media?
Proxies lower resolution to improve playback. Optimized media keeps resolution but converts footage into an easier-to-edit format. On very weak machines, proxies are usually more effective. Using both at once is rarely necessary.
5. Does editing on a lower timeline resolution affect export quality?
No. Timeline resolution only affects how smoothly Resolve runs while editing. You can export at your original resolution later without losing quality.
6. Why does my timeline stutter even with powerful-looking specs?
Specs don’t tell the full story. Integrated GPUs, slow storage, and compressed codecs can bottleneck performance even on newer systems. Resolve is especially sensitive to GPU power and storage speed.
7. Is DaVinci Resolve Studio worth it for low-end systems?
Sometimes. Studio adds better GPU acceleration and decoding support, which helps if you have a dedicated GPU. On systems with integrated graphics, the improvement is usually modest. It won’t fix hardware limits on its own.
8. When does using Vagon Cloud Computer make sense?
Vagon makes sense when your workflow is solid but hardware is still holding you back. It’s especially useful for laptop users, occasional heavy projects, color grading, noise reduction, and Fusion work. It’s not necessary for light edits.
9. Do I need a very fast internet connection to use Vagon?
You need a stable one more than a fast one. Editing is forgiving, but frequent dropouts will hurt the experience. A reliable home or office connection is usually enough.
10. Can Vagon replace my local computer completely?
It can, but it doesn’t have to. Many editors use their local machine for prep and rough cuts, then switch to Vagon for heavy work. That hybrid approach is often the most practical.
It usually hits somewhere between dragging your first clip onto the timeline and pressing play. The video stutters. Audio drifts. You hit space again. Same thing. Fans spin up like your laptop is about to take off.
Laggy playback. Dropped frames. The occasional crash that feels personal.
What makes it worse is the disconnect. You watch tutorials where people stack nodes, scrub 4K footage like it’s nothing, add Fusion effects for fun. Then you try the same thing and Resolve acts like you’ve asked it to do something unreasonable. That gap between what you see online and what your machine can handle is where most people start questioning themselves.
Here’s the truth, and it’s better to say it early. DaVinci Resolve can work on low-end hardware. But not in the way most videos show it. You don’t brute-force it. You don’t just “power through.” You adjust how you work, what you expect, and which battles are worth fighting.
Once you accept that, things get a lot less frustrating. And a lot more manageable.
What “Low-End” Really Means for DaVinci Resolve
“Low-end” is a vague term, and it causes a lot of confusion. For DaVinci Resolve, it doesn’t mean your computer is old or cheap. It means your hardware doesn’t line up with what Resolve quietly assumes you have.
Most people running into trouble are on some version of this setup:
8GB of RAM, maybe 16GB if they’re lucky
Integrated graphics instead of a dedicated GPU
Footage sitting on a slow HDD or a crowded system drive
On paper, that machine can launch Resolve. In practice, it’s already under pressure the moment you hit play.
Resolve leans heavily on the GPU. Color grading, effects, scaling, even basic playback all push graphics hardware hard. Integrated GPUs share memory with the system, which means they’re fighting the CPU for resources before you’ve even added a node. That’s why things feel fine one moment and unusable the next.
RAM is the next silent bottleneck. With 8GB, the system is constantly juggling memory between the OS, Resolve, cache files, and background apps. You might not see an error, but you feel it. Stutters, freezes, random slowdowns that come and go without warning.
Storage speed matters more than most people expect too. Editing off a traditional hard drive or a nearly full system SSD adds delay everywhere. Cache writes slow down. Media loads late. Resolve waits, and so do you.
None of this means you’re doing something wrong. It means Resolve was built for a different baseline. Once you understand that, you stop blaming yourself and start making smarter choices. That’s where the real improvements begin.
Choosing the Right Version of DaVinci Resolve
This part surprises people. Newer isn’t always better. Especially on low-end hardware.
Every major Resolve update adds features, and almost all of them assume stronger GPUs, more memory, and faster storage. That’s great if your system can keep up. If it can’t, those same updates quietly make things heavier. Slower startup times. More background processing. Features you’ll never touch still sitting there, waiting.
If your computer is already struggling, chasing the latest version can actually make performance worse.
In my experience, stability beats novelty on weaker machines. A slightly older, well-tested version of Resolve often runs smoother than the newest release. You lose a few shiny tools, but you gain something far more valuable. Predictability.
The free version versus Studio is another point of confusion. Studio does offer real performance advantages, mainly through better GPU acceleration and decoding support. On systems with a decent dedicated GPU, that can be a noticeable upgrade. On very low-end machines, especially those with integrated graphics, the difference is smaller than people expect.
That doesn’t mean Studio isn’t worth it. It just means it isn’t a magic fix. If your hardware is the limiting factor, software alone can only do so much.
The goal here isn’t to chase features. It’s to find a version of Resolve that feels stable, responsive, and boring in the best way possible. Once you have that, everything else becomes easier.
If you’re coming from motion graphics and wondering why Fusion feels heavier than expected, this comparison between After Effects and DaVinci Resolve helps explain where the performance differences come from.
Preparing Your System Before You Edit Anything
Before you touch a timeline, it’s worth spending a few minutes setting your system up properly. This part isn’t exciting, but it saves a lot of silent pain later.
Start with background apps. Browsers, launchers, sync tools, chat apps. If it doesn’t help you edit, close it. On low-end machines, every background process is stealing CPU cycles and memory that Resolve badly wants.
Next, check your power settings. Laptops especially love to throttle performance to save battery. Make sure you’re running in a high-performance mode while editing. Otherwise, you’re handicapping yourself before Resolve even opens.
Storage is another quiet culprit. If Resolve is reading footage from one slow drive and writing cache to another slow or nearly full drive, everything drags. If you have an SSD, use it for cache and active projects. Even a modest SSD makes a noticeable difference here.
GPU drivers are worth a quick look too. Outdated drivers can cause instability, random crashes, or weird performance drops. That said, the newest driver isn’t always the safest choice. If Resolve suddenly starts acting up after an update, rolling back can be the smarter move.
None of this turns a weak machine into a powerhouse. But it clears away unnecessary obstacles. And on low-end hardware, removing friction matters just as much as adding power.
If portability matters more than raw local power and you’re working on a tablet, it’s also possible to run DaVinci Resolve on an iPad using cloud workflows instead of native hardware.
The Setting That Matters Most: Timeline Resolution
If there’s one setting that causes more unnecessary pain than any other, it’s timeline resolution.
Most people assume timeline resolution and export resolution are the same thing. They’re not. Timeline resolution controls how hard Resolve works while you’re editing. Export resolution controls what your final video looks like. Mixing those up is how low-end machines get overwhelmed early.
Timeline Resolution vs Export Resolution
Think of timeline resolution as your working canvas. A 4K timeline means Resolve is constantly scaling, decoding, and processing every frame at full resolution, even when you’re just trimming clips. On weak hardware, that’s a losing battle.
Export resolution is separate. You can edit on a 720p or 1080p timeline and still export a clean 4K file later. Resolve handles that conversion at the end, when performance matters less than during real-time playback.
Lower timeline resolution does not ruin your final output. It just makes editing possible.
Why Editing 4K Timelines on Weak Machines Is Self-Sabotage
Editing on a 4K timeline multiplies everything Resolve has to do. More pixels to process. More memory usage. More GPU strain. Even simple cuts become heavier than they need to be.
This is usually the first place low-end systems fall apart. Playback stutters. Skipping frames becomes normal. You start pausing constantly just to see if a cut landed correctly.
None of that helps creativity.
Practical Editing Presets That Actually Work
For most low-end setups, these presets are realistic:
720p timeline for very weak machines
1080p timeline for modest systems with limited GPUs
Export at original resolution when the edit is done
Set this at the start of a project. Changing timeline resolution halfway through is possible, but it’s cleaner when you commit early.
This one adjustment alone saves hours of frustration.
If your local hardware isn’t an option at all and you’re experimenting with cloud-based setups, some editors even run DaVinci Resolve on a Chromebook using remote systems like this.
Proxies and Optimized Media Without the Confusion
Proxies and optimized media are where a lot of people either give up or accidentally make things worse. The concepts are simple. The implementation is where it gets messy.
What Proxies Are
Proxies are lower-resolution copies of your original clips. Resolve uses them during editing, then switches back to the original files when you export.
They exist for one reason. Smooth playback.
On weak machines, proxies can be the difference between fighting the timeline and actually editing. Especially with high-resolution footage or heavily compressed files.
What Optimized Media Is
Optimized media is Resolve’s own intermediate version of your clips. Instead of reducing resolution, it often converts footage into an easier-to-edit format.
The result is similar. Playback improves because your system isn’t constantly decoding complex compression. The difference is where the files come from and how Resolve manages them.
When to Use One or the Other
If your system is really struggling, proxies are usually the safer choice. They lower resolution and lighten the load immediately.
Optimized media makes more sense on slightly stronger machines that just choke on certain codecs. It keeps resolution higher but simplifies decoding.
What rarely makes sense is using both at the same time. That’s how storage disappears and confusion sets in.
Common Mistakes That Waste Time and Storage
A few traps people fall into:
Creating proxies at unnecessarily high resolutions
Forgetting to actually enable proxy playback
Filling slow drives with cache and optimized files
Keep proxy resolutions modest. Store cache on your fastest drive. And remember, the goal isn’t perfection. It’s fluid editing.
If you’re considering upgrading your laptop but don’t want to guess what will actually work, this list of laptops that can smoothly run DaVinci Resolve gives realistic expectations instead of marketing numbers.
Codec Choices That Quietly Kill Performance
This is one of the least obvious problems and one of the most damaging.
You can do everything right with timeline settings and proxies, then drop in the wrong footage and watch Resolve fall apart anyway. The culprit is usually the codec.
Why H.264 and HEVC Are Hard to Edit
H.264 and HEVC are designed to make files small, not easy to edit. They achieve that by compressing data aggressively and spreading information across frames.
That means your computer has to work harder just to show a single frame. Scrubbing becomes heavy. Playback stutters. Cuts feel delayed. On low-end CPUs, this shows up immediately.
They’re great for delivery. They’re awful for editing.
Why “Small Files” Can Be Worse
Smaller file size feels efficient, but it often means more compression. More compression means more decoding work every time you hit play.
This is why a massive ProRes or DNx file can feel smoother than a tiny phone clip. One is simple to decode. The other is constantly asking your CPU to reconstruct missing information.
When Transcoding Is Worth the Time
Transcoding isn’t glamorous, but it’s often worth it for:
Phone footage
Screen recordings
Long projects with lots of cuts
Yes, it takes time upfront. But it saves you from fighting playback for the rest of the project. And that trade-off usually pays for itself.
Render Cache: Let Resolve Do the Work
Render cache is one of those features people either ignore or misunderstand. On low-end hardware, it can quietly save a project.
The idea is simple. Instead of forcing your computer to process everything in real time, Resolve pre-renders the heavy parts and plays those back smoothly.
Smart Cache vs User Cache
Smart Cache lets Resolve decide what needs caching. When it detects effects or grades that are too heavy for real-time playback, it renders them in the background.
User Cache gives you control. You tell Resolve exactly which clips or nodes to cache. This is useful when you know what’s causing trouble and don’t want Resolve guessing.
On weak machines, Smart Cache is usually the better starting point. Less micromanagement. Fewer mistakes.
When Caching Helps
Render cache shines when you’re dealing with:
Heavy color grading
Noise reduction
Effects that kill playback
Fusion elements
You’ll see blue lines appear over cached sections of the timeline. That’s Resolve saying, “I’ve got this.”
When It Doesn’t
Caching won’t fix everything. It won’t help much with:
Simple cuts
Bad codec choices
Timelines overloaded with unnecessary effects
If playback is bad everywhere, the issue is probably earlier in the chain.
How to Spot When Resolve Needs Time to Breathe
A few signs:
Playback suddenly drops frames after adding an effect
Fans ramp up aggressively
Resolve pauses briefly before playing
When that happens, let cache build. Go make coffee. Let Resolve work so you don’t have to.
If you’re not sure whether Resolve is even using your GPU properly, especially on systems with integrated graphics or older cards, this breakdown on how to use GPU in DaVinci Resolve explains what to check and what actually matters.
Editing Smarter on Weak Hardware
At a certain point, performance stops being about settings and starts being about habits. The way you work matters just as much as the machine you’re on.
#1. Cut First, Color Later
Lock your edit before touching color. Get the timing, structure, and pacing right first. Every color node you add early is something Resolve has to recalculate while you’re still trimming clips. On low-end hardware, that adds up fast.
#2. Treat Fusion as a Final Pass
Fusion is powerful, but it’s also unforgiving. Even simple compositions can tank playback on weaker systems. If you know you’ll need Fusion work, plan for it. Finish the edit, then add Fusion elements near the end instead of experimenting mid-cut.
#3. Keep the Interface Lean
Scopes, extra viewers, and panels all update constantly. On a strong machine, you barely notice. On a weak one, it matters. Keep only what you need open. Close the rest when you’re not actively using them.
#4. Choose Simpler Effects on Purpose
Not every project needs heavy effects or flashy transitions. Simple dissolves, basic transforms, and restrained grades often look better anyway. On low-end hardware, restraint isn’t just aesthetic. It’s a performance strategy.
If you’re dealing with constant freezes or Resolve crashing instead of just slowing down, this guide on DaVinci Resolve crashes and fixes walks through the most common causes and how to stabilize things before changing your workflow.
Common Mistakes That Make Everything Worse
A lot of performance problems don’t come from weak hardware alone. They come from habits that quietly stack the odds against you.
One of the biggest mistakes is editing on a 4K timeline “just in case.” Even if your final export is 4K, there’s rarely a good reason to force your system to process that resolution while you’re still cutting. It adds load everywhere and gives you nothing in return during the edit.
Another common issue is ignoring storage speed. Editing from a slow hard drive, an overstuffed system SSD, or a cheap external drive turns every action into a delay. Cache writes slow down. Media loads late. Resolve waits, and so do you.
People also tend to blame Resolve first. The software gets the reputation for being unstable or “too heavy,” when the real problem is often codec choice, timeline settings, or background apps eating resources. Resolve is demanding, but it’s also predictable once you understand what it wants.
The last big mistake is trying to fix everything at once. Changing versions, settings, codecs, and workflows all in one go makes it hard to know what actually helped. Tweak one thing. Test it. Then move on.
Avoiding these mistakes won’t turn a low-end machine into a powerhouse. But it will stop you from making things harder than they need to be.
When Optimization Stops Being Enough
There’s a point where all the smart settings and careful workflows stop buying you real relief.
You’ve lowered the timeline resolution. You’re using proxies. Render cache is working overtime. And still, every creative decision feels like a negotiation with your hardware. You wait for playback more than you watch it. You hesitate before adding an effect because you know what’s coming.
That’s usually the signal.
Not that you’re doing something wrong. Just that you’ve reached the ceiling of what your machine can reasonably handle.
This is where editing stops feeling playful and starts feeling restrictive. You simplify ideas not because they’re better, but because they’re safer. You avoid tools you actually want to use. Over time, that adds up. Creativity shrinks to fit the hardware.
At this stage, the question changes. It’s no longer “What setting did I miss?” It becomes “Is this worth fighting anymore?”
For some people, that’s when they upgrade their computer. For others, especially laptop users or editors who only need heavy power occasionally, there’s another option. And that’s where cloud-based solutions start to make sense.
Breaking Hardware Limits With Vagon Cloud Computer
When optimization stops helping, the problem usually isn’t DaVinci Resolve. It’s the hardware underneath it.
Vagon Cloud Computer gives you access to a full high-performance computer running in the cloud. DaVinci Resolve runs entirely on Vagon’s CPU, GPU, and RAM, not on your local machine. Your laptop or desktop becomes a window. Mouse, keyboard, screen. That’s it.
Because the heavy work happens remotely, even modest or older machines suddenly feel capable again. Resolve no longer fights for limited GPU memory or system RAM. It just runs the way it was designed to.
This shows up immediately in GPU-heavy tasks. Color grading plays smoothly. Noise reduction doesn’t tank playback. Fusion goes from something you avoid to something you can actually use. You don’t change how you edit. You just stop waiting.
One of the biggest advantages is flexibility. Vagon fits into low-end workflows without replacing them. You can still prep footage or do rough cuts locally, then switch to Vagon when the project needs serious power. That makes a lot more sense than upgrading hardware for occasional heavy workloads.
There are limits. You need a stable internet connection, and it won’t fix poor workflows or bad codec choices. But if your creativity is being held back by hardware rather than skill, Vagon Cloud Computer removes that ceiling in a very practical way.
Final Thoughts
Editing shouldn’t feel like a constant negotiation with your computer.
If you’re on a low-end machine, DaVinci Resolve isn’t impossible to use. But it does demand respect. The right settings, the right workflow, and realistic expectations go a long way. Timeline resolution, proxies, codecs, caching. None of these are optional tweaks. They’re how you make Resolve workable instead of painful.
At the same time, there’s a limit to how much optimization can do. When hardware starts shaping your creative decisions, that’s when something needs to change. Sometimes that means simplifying. Sometimes it means rethinking where the work actually runs.
You don’t need the best computer to start editing. You do need an approach that fits the tools you’re using. Once those line up, Resolve stops feeling hostile and starts feeling powerful. And that’s when editing gets fun again.
FAQs
1. Can DaVinci Resolve really run on a low-end computer?
Yes, but not the way most tutorials show it. You’ll need to lower timeline resolution, be careful with codecs, and rely on proxies or optimized media. Basic editing, light color work, and simple effects are realistic. Heavy Fusion work and real-time 4K playback usually aren’t.
2. Is 8GB of RAM enough for DaVinci Resolve?
It can work, but it’s tight. Resolve will run, but you’ll feel the limits quickly. Background apps need to stay closed, render cache becomes essential, and longer projects will slow down over time. If you can upgrade to 16GB, it makes a noticeable difference.
3. Do I have to use proxies, or can I avoid them?
If your footage is 1080p and in an edit-friendly codec, you might be able to skip proxies. If you’re working with 4K, phone footage, screen recordings, or HEVC files, proxies are usually worth it. They reduce frustration more than almost any other setting.
4. What’s the difference between proxies and optimized media?
Proxies lower resolution to improve playback. Optimized media keeps resolution but converts footage into an easier-to-edit format. On very weak machines, proxies are usually more effective. Using both at once is rarely necessary.
5. Does editing on a lower timeline resolution affect export quality?
No. Timeline resolution only affects how smoothly Resolve runs while editing. You can export at your original resolution later without losing quality.
6. Why does my timeline stutter even with powerful-looking specs?
Specs don’t tell the full story. Integrated GPUs, slow storage, and compressed codecs can bottleneck performance even on newer systems. Resolve is especially sensitive to GPU power and storage speed.
7. Is DaVinci Resolve Studio worth it for low-end systems?
Sometimes. Studio adds better GPU acceleration and decoding support, which helps if you have a dedicated GPU. On systems with integrated graphics, the improvement is usually modest. It won’t fix hardware limits on its own.
8. When does using Vagon Cloud Computer make sense?
Vagon makes sense when your workflow is solid but hardware is still holding you back. It’s especially useful for laptop users, occasional heavy projects, color grading, noise reduction, and Fusion work. It’s not necessary for light edits.
9. Do I need a very fast internet connection to use Vagon?
You need a stable one more than a fast one. Editing is forgiving, but frequent dropouts will hurt the experience. A reliable home or office connection is usually enough.
10. Can Vagon replace my local computer completely?
It can, but it doesn’t have to. Many editors use their local machine for prep and rough cuts, then switch to Vagon for heavy work. That hybrid approach is often the most practical.
Get Beyond Your Computer Performance
Run applications on your cloud computer with the latest generation hardware. No more crashes or lags.

Trial includes 1 hour usage + 7 days of storage.
Summarize with AI

Ready to focus on your creativity?
Vagon gives you the ability to create & render projects, collaborate, and stream applications with the power of the best hardware.

Vagon Blog


Run heavy applications on any device with
your personal computer on the cloud.
San Francisco, California
Solutions
Vagon Teams
Vagon Streams
Use Cases
Resources
Vagon Blog
What Slows Down After Effects Projects?
The First 30 Minutes in Blender 3D: A Practical Workflow Guide
What’s New in Godot 4.7? Key Features, Upgrades, and Workflow Improvements
What Slows Down Blender 3D Projects?
What Slows Down Adobe Photoshop Projects?
The First 30 Minutes in Adobe Photoshop: A Practical Workflow Guide
Before You Start in Adobe Photoshop: A Practical Setup Checklist
What’s New in Unreal Engine 5.8? Key Features and Upgrade Advice
How to Run Windows on an iPad: 4 Best Ways (2026)
Vagon Blog
Run heavy applications on any device with
your personal computer on the cloud.
San Francisco, California
Solutions
Vagon Teams
Vagon Streams
Use Cases
Resources
Vagon Blog