Instant Connection for Pixel Streaming
— New Feature Automated Setup

Photoshop AI: How to Use Generative Fill and Neural Filters Effectively
Photoshop AI: How to Use Generative Fill and Neural Filters Effectively
DigitalArt
Photoshop AI: How to Use Generative Fill and Neural Filters Effectively
Table of Contents
Photoshop AI is finally useful. Not in a gimmicky, one-click-fixes-everything way. In a real, time-saving way. Generative Fill can remove distractions, extend backgrounds, and patch tricky areas fast. Neural Filters can help with retouching and restoration when you use them carefully. Adobe keeps expanding both, which tells you these tools are no side experiment anymore.
But let’s be honest. They still need a human eye.
That’s the part a lot of tutorials skip. They show the clean result, not the warped edge, the strange texture, or the face that looks fine until you look at it for two seconds. Photoshop AI can save a lot of time, but it can also create work for you if you trust it too quickly.
In my experience, the best results come when you treat AI like an assistant, not a replacement. A good selection still matters. A smart prompt still matters. And knowing when to stop matters even more.
So that’s the tone of this guide. Not blind hype, and not the usual anti-AI rant either. Just a practical look at what Photoshop AI does well, where it falls apart, and how to use it without ending up with something that looks technically finished but visually wrong.

What Photoshop AI actually includes
When most people say “Photoshop AI,” they usually mean two things: Generative Fill and Neural Filters. They’re both AI-powered, but they solve different problems.
Generative Fill is for changing the actual content of an image. You can remove objects, add new elements, extend a background, or fill empty areas based on a selection and, if needed, a text prompt. Adobe positions it as a non-destructive workflow, which is a big reason it fits so naturally into real Photoshop projects instead of feeling like a toy.
Neural Filters are more about adjustment than generation. They’re built for tasks like portrait enhancement, colorization, restoration-style edits, and cleanup. In other words, less “create a new object,” more “improve or alter what’s already here.”
That difference matters. A lot.
If you’re trying to remove a trash can from a street photo, Generative Fill is the obvious tool. If you’re restoring an old portrait or softening compression damage, Neural Filters make more sense. People often lump them together because they both sit under Adobe’s AI umbrella, but in practice they behave very differently.
And one quick clarification, because this trips people up more than it should: Roto Brush 3 is not a Photoshop feature. It belongs to After Effects, not Photoshop. So if you came in thinking Photoshop AI includes Roto Brush 3, that’s really an Adobe app mix-up, not a missing tool in Photoshop.
The easiest way to think about it is this: Generative Fill changes image content, Neural Filters change image appearance. That’s a simplification, sure, but it’s a useful one. Once you understand that split, the rest of the workflow starts making a lot more sense.

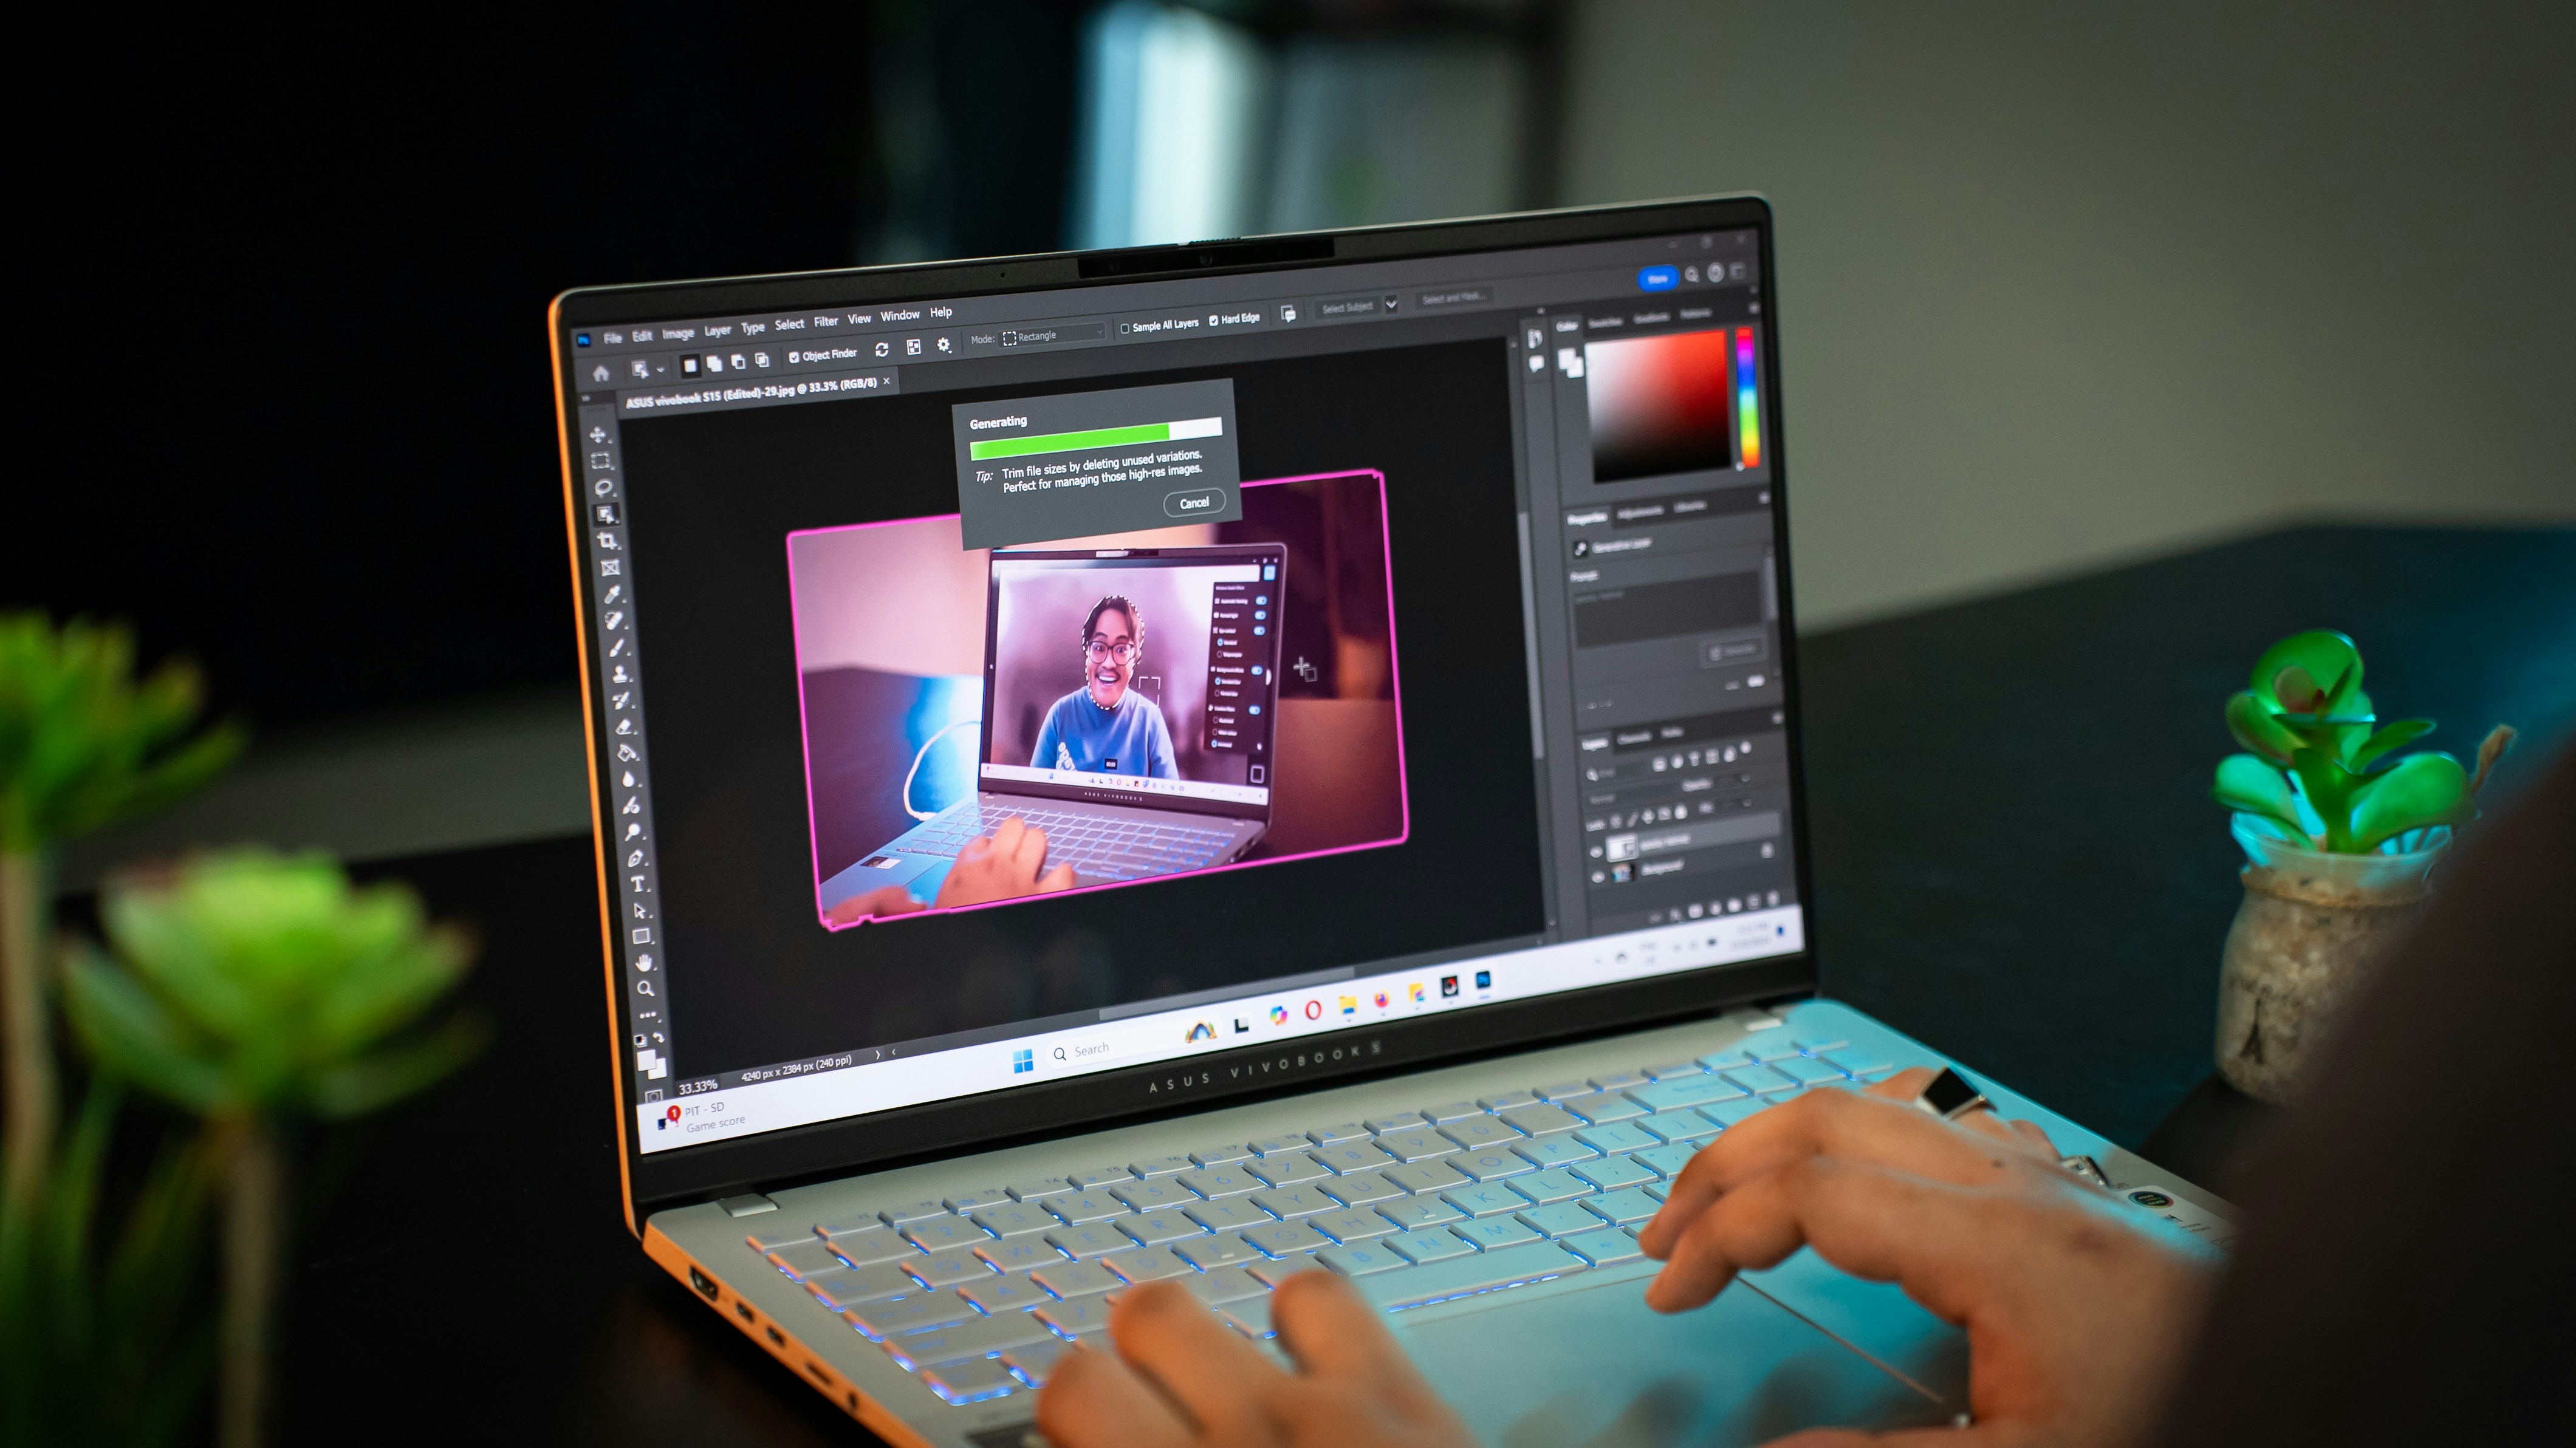
How to use Generative Fill
Generative Fill works best when you keep the job simple. Remove something, extend a background, patch an empty area, add a small object. The more specific and controlled the edit, the better the result usually is.
Start by making a selection around the area you want to change. Don’t hug the object too tightly. Give Photoshop a little breathing room so it has context for textures, edges, and lighting. Then choose Generative Fill from the contextual task bar.
From there, you have two options. You can leave the prompt blank, or type one in. Leaving it blank is often better when you’re removing something and want Photoshop to naturally fill the space. Use a prompt when you want to add or replace content, like “small wooden table” or “soft clouds in the background.”
Photoshop will generate a few variations. Don’t just pick the first one that looks passable in thumbnail view. Zoom in. Check the edges. Check shadows, perspective, and texture. AI often looks fine from far away and strange up close. That’s normal.
The good part is that the workflow is non-destructive, so you can compare versions, mask areas, and clean things up without wrecking the original image.
In practice, the best workflow is usually this: make a smart selection, generate a few options, choose the least broken one, then finish the job manually. A little masking or cleanup after the generation step usually makes the difference between “AI edit” and “convincing edit.”
If you are trying to figure out whether your graphics card is holding Photoshop back, this guide can help.
Generative Fill tricks, best use cases, and common mistakes
Generative Fill is at its best when you use it for boring, annoying edits you’d rather not do by hand. Removing a sign from the background. Extending a wall. Cleaning up an empty corner. Adding a simple object that does not need perfect brand detail. That’s where it feels genuinely useful.
It also helps to prompt less than you think. A short prompt usually works better than an overly detailed one. If you’re removing something, leaving the prompt blank is often the smarter move because Photoshop can just rebuild the space based on the surrounding image.
Where people get in trouble is asking too much from it. Tiny selections, messy edges, impossible perspectives, detailed text, exact logos, realistic hands. That’s where results start getting weird fast. And yes, the first version is often good enough to tempt you. It usually should not be the final one.
One practical thing worth knowing: Adobe says standard Firefly-powered Generative Fill uses 1 credit per generation. So if you’re randomly regenerating ten times because the selection was bad from the start, you’re wasting both time and credits.
My rule is simple: use Generative Fill for structure first, polish second. Let it do the heavy lifting, then step in yourself. If you expect it to finish the whole job cleanly on its own, that’s usually when the edit starts looking fake.
How to use Neural Filters without making photos look fake
Neural Filters are most useful when you treat them like subtle correction tools, not transformation machines. They can help with portrait cleanup, colorization, restoration-style edits, and artifact reduction. Push them too far, though, and things start looking waxy fast.
The smartest way to use them is gently. Open the filter, make small adjustments first, and keep checking the image at full size. What looks impressive zoomed out can look very artificial once you notice the skin texture, eyes, or edges. That’s usually where the fake look shows up.
It also helps to think in parts, not the whole image. If a filter improves one area but hurts another, don’t apply it blindly everywhere. Use masks, compare before and after, and keep the effect where it actually helps. In my experience, that alone makes Neural Filters much more usable.
They work best when they save you time on a rough pass, not when you expect them to finish the image for you. A light touch can be surprisingly effective. Heavy-handed settings usually announce themselves immediately.
If you are editing on the go or want a more flexible setup, this Photoshop on iPad guide is worth checking.
Generative Fill vs. Neural Filters: which one should you use?
The easiest way to choose is to ask one question: are you changing the content of the image, or the look of the image?
If you’re removing an object, adding something new, or extending a background, that’s a Generative Fill job. Adobe’s tool is built for selection-based content generation, so it makes sense when you need Photoshop to create or replace pixels.
If you’re improving a portrait, restoring an old photo, reducing artifacts, or adjusting the overall appearance of what’s already there, that’s where Neural Filters fit better. They’re more about enhancement and interpretation than building new image content.

In real use, the line is pretty simple. Remove a trash can from a street shot? Generative Fill. Clean up an old family portrait? Neural Filters first. Extend a studio backdrop for a wider crop? Generative Fill. Soften compression damage or try quick portrait cleanup? Neural Filters.
And sometimes you use both. That’s pretty normal. You might use Generative Fill to fix the composition, then use Neural Filters lightly to improve the image quality or clean up the subject. The mistake is treating them like interchangeable tools. They’re not. One changes what’s in the frame. The other changes how the frame looks. Once you think of them that way, choosing gets much easier.
If you are not sure whether Photoshop is properly using your GPU, this walkthrough explains it clearly.
Why Photoshop AI can feel slow on the wrong machine
This is the part people often blame on Photoshop, when the real issue is the machine underneath it.
AI features are heavier than basic edits. Once you start working with large PSDs, high-resolution images, multiple layers, and repeated generations, things can slow down fast. Adobe’s current Photoshop requirements still separate minimum specs from recommended specs, and GPU support remains a real factor for performance-sensitive features.
In practice, that usually shows up as lag, slower previews, longer generation times, or a system that technically runs Photoshop but clearly does not enjoy it. Especially on older laptops. Especially when you are multitasking. And definitely when AI stops being an occasional trick and becomes part of your normal workflow.
I’ve noticed this is where the experience starts to split. On a stronger machine, Photoshop AI feels quick and surprisingly practical. On weaker hardware, the exact same tools can feel clumsy enough to make you avoid using them. Same software. Totally different experience.
So if Photoshop AI feels inconsistent or frustrating, it is not always the tool itself. Sometimes it is just asking more from your hardware than your setup can comfortably give.
If you are dealing with freezes, crashes, or random instability, this guide covers common Photoshop crash reasons.
Why Vagon Cloud Computer is worth considering for Photoshop AI
If Photoshop AI has started to feel heavier than your computer can comfortably handle, this is where Vagon Cloud Computer becomes relevant.
Vagon Cloud Computer gives you a high-performance cloud machine you can access remotely, so you’re not limited by the hardware sitting on your desk. Vagon presents it as a way to run demanding creative software, including GPU-heavy workflows, without needing to own a powerful workstation locally.
For Photoshop users, that matters more than it used to. Generative Fill, large PSDs, layered files, and repeated AI edits can turn a decent laptop into a frustrating one pretty quickly. That does not always mean you need to buy a new computer. Sometimes it makes more sense to use stronger hardware through the cloud instead.
You can keep working from a lighter device and still access more serious performance when your project demands it. For freelancers, remote creatives, and teams trying to avoid a full workstation upgrade, that can be a much smarter setup than forcing everything through underpowered local hardware.
And that’s really the key point here. Photoshop AI is helpful on its own, but once AI becomes part of your everyday editing workflow, performance starts shaping the whole experience. Vagon Cloud Computer is worth considering because it helps remove that performance ceiling without making local hardware your only option.
If you are wondering whether your current setup is simply underpowered, this guide compares the best PCs and laptops for Photoshop.
Final Thoughts
Photoshop AI is at its best when you stop expecting magic from it. Generative Fill and Neural Filters are genuinely useful tools, and in the right workflow, they can save a lot of time. But the results still depend on judgment, restraint, and knowing when to step in manually.
That’s really the difference between a quick AI edit and a convincing final image.
And once these tools become part of your regular process, performance starts to matter a lot more than people expect. A smooth setup makes Photoshop AI feel practical. A weak one makes the same features feel slow and frustrating. That’s exactly why tools like Vagon Cloud Computer become worth considering. Not because Photoshop AI cannot work without them, but because better performance changes the whole experience.
If you are done editing and want the final file to look right everywhere, this export settings guide is a good next step.
FAQs
1. Is Generative Fill better than manual retouching?
Not always. It’s usually faster for object removal, background extension, and rough cleanup, but manual retouching still wins when you need precision, brand accuracy, or clean detail. I’d treat Generative Fill as a shortcut, not a replacement for careful editing.
2. Are Neural Filters good enough for professional work?
They can be, if you use them lightly. For quick portrait cleanup, restoration-style edits, and color work, they can save time. Push them too far, though, and the image starts looking fake fast.
3. Does Generative Fill use credits?
Yes. Adobe says standard Firefly-powered Generative Fill uses 1 credit per generation, while some partner AI models may cost more.
4. Is Roto Brush 3 part of Photoshop?
No. Roto Brush 3 is an After Effects feature, not a Photoshop feature. That confusion happens a lot because people lump Adobe’s AI tools together, but they belong to different apps.
5. Why does Photoshop AI feel slow on my computer?
Usually because AI features are heavier than standard edits. Large files, layered PSDs, repeated generations, limited GPU power, and older hardware can all slow things down. Adobe’s current requirements and GPU guidance both point to hardware support as an important part of performance.
6. Can I still use Photoshop AI on a lower-spec laptop?
Yes, but the experience may be inconsistent. For lighter edits, it can be fine. For larger projects or repeated AI-heavy work, the slowdown becomes much more noticeable. That’s the point where stronger hardware, or something like Vagon Cloud Computer, starts to make more sense.
7. When is Vagon Cloud Computer actually worth it?
Usually when your local machine is the bottleneck. If Photoshop AI feels laggy, large files are slowing you down, or you want stronger performance without buying a new workstation, Vagon Cloud Computer is a practical option to consider.
Photoshop AI is finally useful. Not in a gimmicky, one-click-fixes-everything way. In a real, time-saving way. Generative Fill can remove distractions, extend backgrounds, and patch tricky areas fast. Neural Filters can help with retouching and restoration when you use them carefully. Adobe keeps expanding both, which tells you these tools are no side experiment anymore.
But let’s be honest. They still need a human eye.
That’s the part a lot of tutorials skip. They show the clean result, not the warped edge, the strange texture, or the face that looks fine until you look at it for two seconds. Photoshop AI can save a lot of time, but it can also create work for you if you trust it too quickly.
In my experience, the best results come when you treat AI like an assistant, not a replacement. A good selection still matters. A smart prompt still matters. And knowing when to stop matters even more.
So that’s the tone of this guide. Not blind hype, and not the usual anti-AI rant either. Just a practical look at what Photoshop AI does well, where it falls apart, and how to use it without ending up with something that looks technically finished but visually wrong.
What Photoshop AI actually includes
When most people say “Photoshop AI,” they usually mean two things: Generative Fill and Neural Filters. They’re both AI-powered, but they solve different problems.
Generative Fill is for changing the actual content of an image. You can remove objects, add new elements, extend a background, or fill empty areas based on a selection and, if needed, a text prompt. Adobe positions it as a non-destructive workflow, which is a big reason it fits so naturally into real Photoshop projects instead of feeling like a toy.
Neural Filters are more about adjustment than generation. They’re built for tasks like portrait enhancement, colorization, restoration-style edits, and cleanup. In other words, less “create a new object,” more “improve or alter what’s already here.”
That difference matters. A lot.
If you’re trying to remove a trash can from a street photo, Generative Fill is the obvious tool. If you’re restoring an old portrait or softening compression damage, Neural Filters make more sense. People often lump them together because they both sit under Adobe’s AI umbrella, but in practice they behave very differently.
And one quick clarification, because this trips people up more than it should: Roto Brush 3 is not a Photoshop feature. It belongs to After Effects, not Photoshop. So if you came in thinking Photoshop AI includes Roto Brush 3, that’s really an Adobe app mix-up, not a missing tool in Photoshop.
The easiest way to think about it is this: Generative Fill changes image content, Neural Filters change image appearance. That’s a simplification, sure, but it’s a useful one. Once you understand that split, the rest of the workflow starts making a lot more sense.
How to use Generative Fill
Generative Fill works best when you keep the job simple. Remove something, extend a background, patch an empty area, add a small object. The more specific and controlled the edit, the better the result usually is.
Start by making a selection around the area you want to change. Don’t hug the object too tightly. Give Photoshop a little breathing room so it has context for textures, edges, and lighting. Then choose Generative Fill from the contextual task bar.
From there, you have two options. You can leave the prompt blank, or type one in. Leaving it blank is often better when you’re removing something and want Photoshop to naturally fill the space. Use a prompt when you want to add or replace content, like “small wooden table” or “soft clouds in the background.”
Photoshop will generate a few variations. Don’t just pick the first one that looks passable in thumbnail view. Zoom in. Check the edges. Check shadows, perspective, and texture. AI often looks fine from far away and strange up close. That’s normal.
The good part is that the workflow is non-destructive, so you can compare versions, mask areas, and clean things up without wrecking the original image.
In practice, the best workflow is usually this: make a smart selection, generate a few options, choose the least broken one, then finish the job manually. A little masking or cleanup after the generation step usually makes the difference between “AI edit” and “convincing edit.”
If you are trying to figure out whether your graphics card is holding Photoshop back, this guide can help.
Generative Fill tricks, best use cases, and common mistakes
Generative Fill is at its best when you use it for boring, annoying edits you’d rather not do by hand. Removing a sign from the background. Extending a wall. Cleaning up an empty corner. Adding a simple object that does not need perfect brand detail. That’s where it feels genuinely useful.
It also helps to prompt less than you think. A short prompt usually works better than an overly detailed one. If you’re removing something, leaving the prompt blank is often the smarter move because Photoshop can just rebuild the space based on the surrounding image.
Where people get in trouble is asking too much from it. Tiny selections, messy edges, impossible perspectives, detailed text, exact logos, realistic hands. That’s where results start getting weird fast. And yes, the first version is often good enough to tempt you. It usually should not be the final one.
One practical thing worth knowing: Adobe says standard Firefly-powered Generative Fill uses 1 credit per generation. So if you’re randomly regenerating ten times because the selection was bad from the start, you’re wasting both time and credits.
My rule is simple: use Generative Fill for structure first, polish second. Let it do the heavy lifting, then step in yourself. If you expect it to finish the whole job cleanly on its own, that’s usually when the edit starts looking fake.
How to use Neural Filters without making photos look fake
Neural Filters are most useful when you treat them like subtle correction tools, not transformation machines. They can help with portrait cleanup, colorization, restoration-style edits, and artifact reduction. Push them too far, though, and things start looking waxy fast.
The smartest way to use them is gently. Open the filter, make small adjustments first, and keep checking the image at full size. What looks impressive zoomed out can look very artificial once you notice the skin texture, eyes, or edges. That’s usually where the fake look shows up.
It also helps to think in parts, not the whole image. If a filter improves one area but hurts another, don’t apply it blindly everywhere. Use masks, compare before and after, and keep the effect where it actually helps. In my experience, that alone makes Neural Filters much more usable.
They work best when they save you time on a rough pass, not when you expect them to finish the image for you. A light touch can be surprisingly effective. Heavy-handed settings usually announce themselves immediately.
If you are editing on the go or want a more flexible setup, this Photoshop on iPad guide is worth checking.
Generative Fill vs. Neural Filters: which one should you use?
The easiest way to choose is to ask one question: are you changing the content of the image, or the look of the image?
If you’re removing an object, adding something new, or extending a background, that’s a Generative Fill job. Adobe’s tool is built for selection-based content generation, so it makes sense when you need Photoshop to create or replace pixels.
If you’re improving a portrait, restoring an old photo, reducing artifacts, or adjusting the overall appearance of what’s already there, that’s where Neural Filters fit better. They’re more about enhancement and interpretation than building new image content.
In real use, the line is pretty simple. Remove a trash can from a street shot? Generative Fill. Clean up an old family portrait? Neural Filters first. Extend a studio backdrop for a wider crop? Generative Fill. Soften compression damage or try quick portrait cleanup? Neural Filters.
And sometimes you use both. That’s pretty normal. You might use Generative Fill to fix the composition, then use Neural Filters lightly to improve the image quality or clean up the subject. The mistake is treating them like interchangeable tools. They’re not. One changes what’s in the frame. The other changes how the frame looks. Once you think of them that way, choosing gets much easier.
If you are not sure whether Photoshop is properly using your GPU, this walkthrough explains it clearly.
Why Photoshop AI can feel slow on the wrong machine
This is the part people often blame on Photoshop, when the real issue is the machine underneath it.
AI features are heavier than basic edits. Once you start working with large PSDs, high-resolution images, multiple layers, and repeated generations, things can slow down fast. Adobe’s current Photoshop requirements still separate minimum specs from recommended specs, and GPU support remains a real factor for performance-sensitive features.
In practice, that usually shows up as lag, slower previews, longer generation times, or a system that technically runs Photoshop but clearly does not enjoy it. Especially on older laptops. Especially when you are multitasking. And definitely when AI stops being an occasional trick and becomes part of your normal workflow.
I’ve noticed this is where the experience starts to split. On a stronger machine, Photoshop AI feels quick and surprisingly practical. On weaker hardware, the exact same tools can feel clumsy enough to make you avoid using them. Same software. Totally different experience.
So if Photoshop AI feels inconsistent or frustrating, it is not always the tool itself. Sometimes it is just asking more from your hardware than your setup can comfortably give.
If you are dealing with freezes, crashes, or random instability, this guide covers common Photoshop crash reasons.
Why Vagon Cloud Computer is worth considering for Photoshop AI
If Photoshop AI has started to feel heavier than your computer can comfortably handle, this is where Vagon Cloud Computer becomes relevant.
Vagon Cloud Computer gives you a high-performance cloud machine you can access remotely, so you’re not limited by the hardware sitting on your desk. Vagon presents it as a way to run demanding creative software, including GPU-heavy workflows, without needing to own a powerful workstation locally.
For Photoshop users, that matters more than it used to. Generative Fill, large PSDs, layered files, and repeated AI edits can turn a decent laptop into a frustrating one pretty quickly. That does not always mean you need to buy a new computer. Sometimes it makes more sense to use stronger hardware through the cloud instead.
You can keep working from a lighter device and still access more serious performance when your project demands it. For freelancers, remote creatives, and teams trying to avoid a full workstation upgrade, that can be a much smarter setup than forcing everything through underpowered local hardware.
And that’s really the key point here. Photoshop AI is helpful on its own, but once AI becomes part of your everyday editing workflow, performance starts shaping the whole experience. Vagon Cloud Computer is worth considering because it helps remove that performance ceiling without making local hardware your only option.
If you are wondering whether your current setup is simply underpowered, this guide compares the best PCs and laptops for Photoshop.
Final Thoughts
Photoshop AI is at its best when you stop expecting magic from it. Generative Fill and Neural Filters are genuinely useful tools, and in the right workflow, they can save a lot of time. But the results still depend on judgment, restraint, and knowing when to step in manually.
That’s really the difference between a quick AI edit and a convincing final image.
And once these tools become part of your regular process, performance starts to matter a lot more than people expect. A smooth setup makes Photoshop AI feel practical. A weak one makes the same features feel slow and frustrating. That’s exactly why tools like Vagon Cloud Computer become worth considering. Not because Photoshop AI cannot work without them, but because better performance changes the whole experience.
If you are done editing and want the final file to look right everywhere, this export settings guide is a good next step.
FAQs
1. Is Generative Fill better than manual retouching?
Not always. It’s usually faster for object removal, background extension, and rough cleanup, but manual retouching still wins when you need precision, brand accuracy, or clean detail. I’d treat Generative Fill as a shortcut, not a replacement for careful editing.
2. Are Neural Filters good enough for professional work?
They can be, if you use them lightly. For quick portrait cleanup, restoration-style edits, and color work, they can save time. Push them too far, though, and the image starts looking fake fast.
3. Does Generative Fill use credits?
Yes. Adobe says standard Firefly-powered Generative Fill uses 1 credit per generation, while some partner AI models may cost more.
4. Is Roto Brush 3 part of Photoshop?
No. Roto Brush 3 is an After Effects feature, not a Photoshop feature. That confusion happens a lot because people lump Adobe’s AI tools together, but they belong to different apps.
5. Why does Photoshop AI feel slow on my computer?
Usually because AI features are heavier than standard edits. Large files, layered PSDs, repeated generations, limited GPU power, and older hardware can all slow things down. Adobe’s current requirements and GPU guidance both point to hardware support as an important part of performance.
6. Can I still use Photoshop AI on a lower-spec laptop?
Yes, but the experience may be inconsistent. For lighter edits, it can be fine. For larger projects or repeated AI-heavy work, the slowdown becomes much more noticeable. That’s the point where stronger hardware, or something like Vagon Cloud Computer, starts to make more sense.
7. When is Vagon Cloud Computer actually worth it?
Usually when your local machine is the bottleneck. If Photoshop AI feels laggy, large files are slowing you down, or you want stronger performance without buying a new workstation, Vagon Cloud Computer is a practical option to consider.
Get Beyond Your Computer Performance
Run applications on your cloud computer with the latest generation hardware. No more crashes or lags.

Trial includes 1 hour usage + 7 days of storage.
Summarize with AI

Ready to focus on your creativity?
Vagon gives you the ability to create & render projects, collaborate, and stream applications with the power of the best hardware.

Vagon Blog


Run heavy applications on any device with
your personal computer on the cloud.
San Francisco, California
Solutions
Vagon Teams
Vagon Streams
Use Cases
Resources
Vagon Blog
How to Run Inkscape on a Cloud Ubuntu Desktop (2026 Guide)
How to Run Krita on a Cloud Ubuntu Desktop for Digital Painting (2026 Guide)
How to Run GIMP on a Cloud Ubuntu Desktop (2026 Guide)
How to Run Jupyter on a Cloud GPU Linux Desktop (2026 Guide)
Vagon vs GitHub Codespaces: Cloud Dev Environments Compared (2026)
Vagon vs RunPod: Which Cloud GPU Is Right for You? (2026 Comparison)
How to Watch Your AI Agent Work on a Cloud Ubuntu Desktop (2026 Guide)
How to Run a Local LLM on Ubuntu in the Cloud (2026 Guide)
How to Run Blender on a Cloud GPU (Ubuntu): The Complete 2026 Guide
Vagon Blog
Run heavy applications on any device with
your personal computer on the cloud.
San Francisco, California
Solutions
Vagon Teams
Vagon Streams
Use Cases
Resources
Vagon Blog