Instant Connection for Pixel Streaming
— New Feature Automated Setup

Best Export Settings for Photoshop
Best Export Settings for Photoshop
DigitalArt
Best Export Settings for Photoshop
Table of Contents
You know that sinking feeling when you finally upload your work, the one you’ve been perfecting for hours, and it suddenly looks… off? The colors are washed out, the image looks a little blurry, or worse, it’s weirdly pixelated on the client’s website. You check your original PSD, flawless. You check the exported file, a tragic downgrade.
I’ve been there. Honestly, most of us have. I’d bet at least half the designers I know have exported something wrong at least once, only to realize it after the client calls and asks, “Hey, why does it look dull on my screen?”
It’s not about talent. It’s about settings. Photoshop gives you endless export options, file formats, color profiles, compression levels, and a single unchecked box can turn your masterpiece into a muddy mess. That’s why exporting isn’t just the last step of your process; it’s the one that decides how your work actually looks out in the world.
So before you hit “Save” and move on, let’s fix the part nobody talks about enough: getting your export settings right.
If you prefer working on the go, check out our guide on how to use Photoshop on iPad to edit and export files seamlessly across devices.
Why Export Settings Actually Matter
Here’s the thing, Photoshop doesn’t just save your image; it translates it. Every time you export, you’re basically telling Photoshop, “Hey, here’s how I want this file to behave in the real world.” And if you give it the wrong instructions, you’ll get the wrong outcome.
I’ve seen gorgeous edits fall apart just because someone forgot to tick “Convert to sRGB” before exporting. The result? Muted colors that look totally fine in Photoshop but dull everywhere else. Or the classic mistake: saving a 300 ppi print file for web, massive file size, painfully slow load times, and no visible improvement.
Bad export settings don’t just hurt how your work looks, they affect where and how it performs. A 15 MB JPEG might crash your client’s CMS upload. A PNG with the wrong transparency can create ugly halos. Even the smallest error in format or compression can make your work look less sharp, less professional, less you.
Getting your export right isn’t about being a perfectionist, it’s about control. It’s about making sure what you see in Photoshop is what your audience gets everywhere else: on their phones, in their browsers, and on the printed page.
So yeah, export settings matter. A lot more than most people think.
The Core Export Settings to Get Right
Alright, let’s get practical. Exporting in Photoshop isn’t rocket science, but it’s also not something you should do on autopilot. Every choice, format, color, dimensions, quietly changes how your image lives outside of Photoshop. Let’s walk through the settings that actually matter.
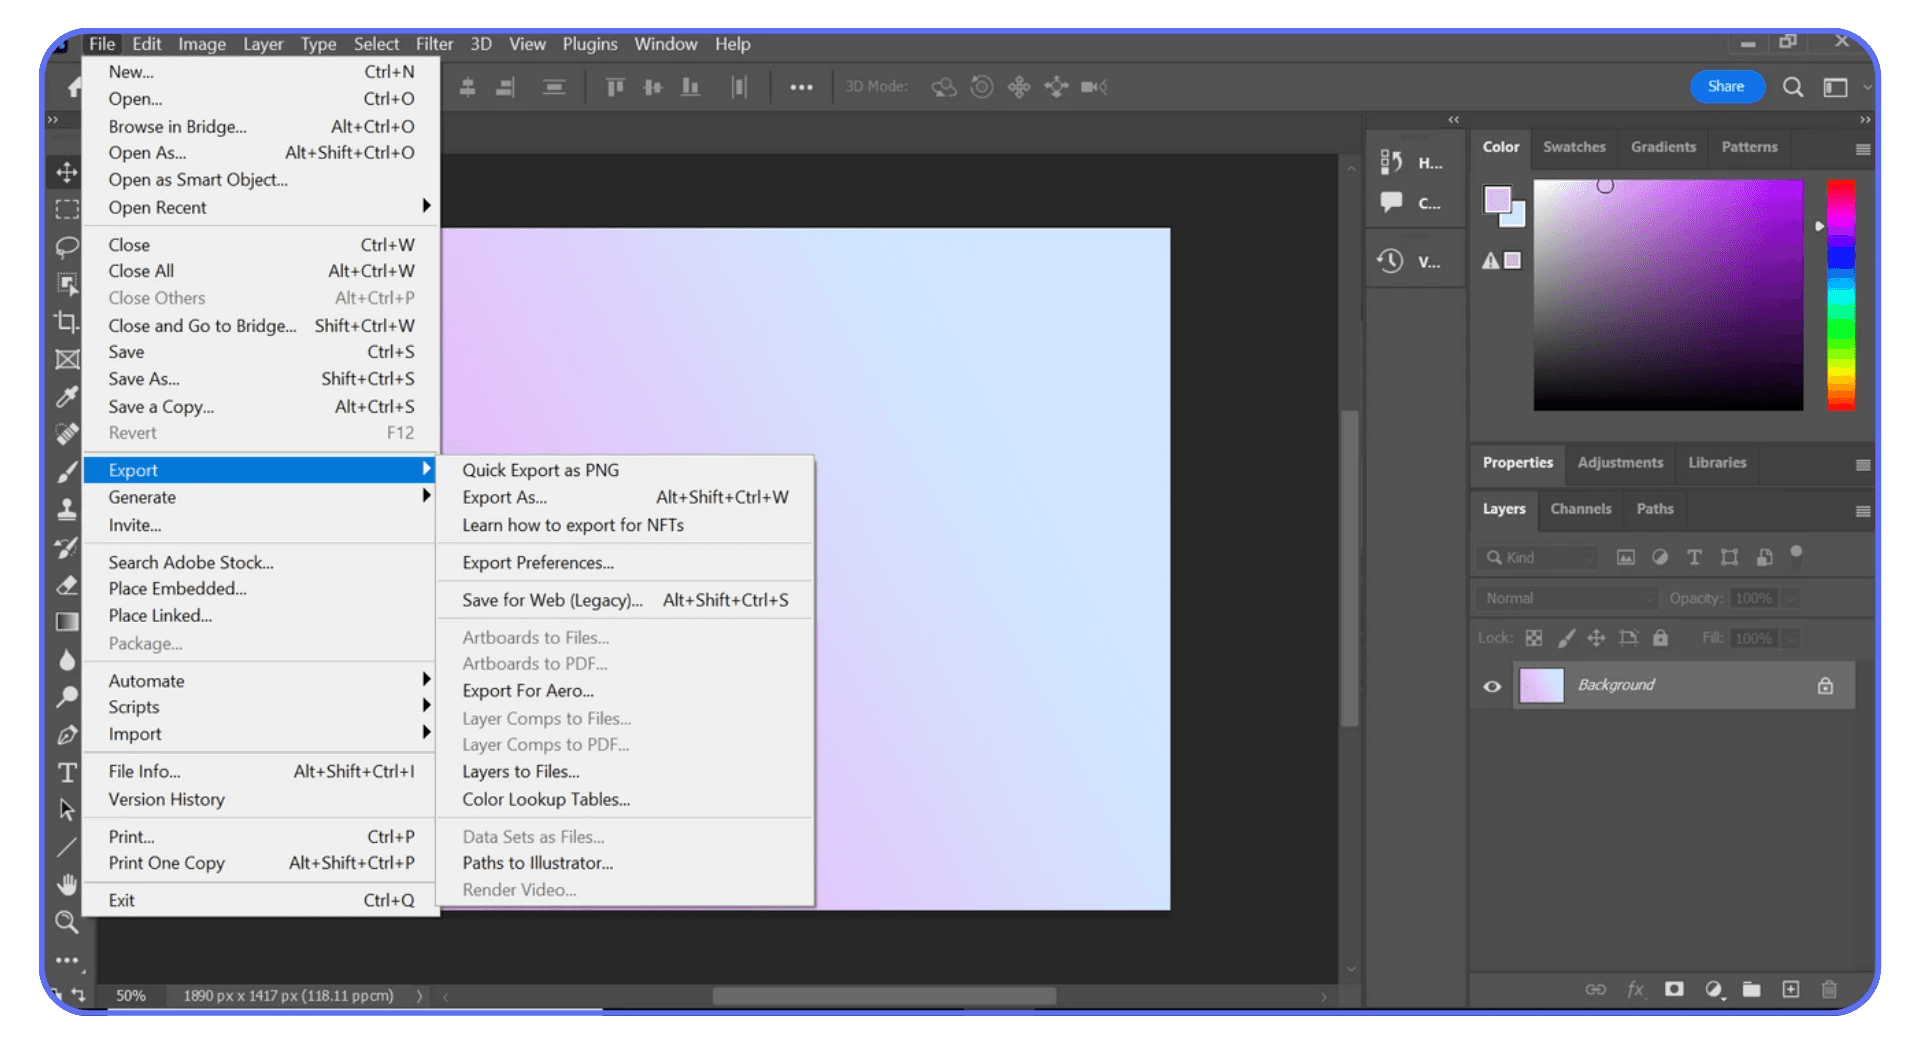
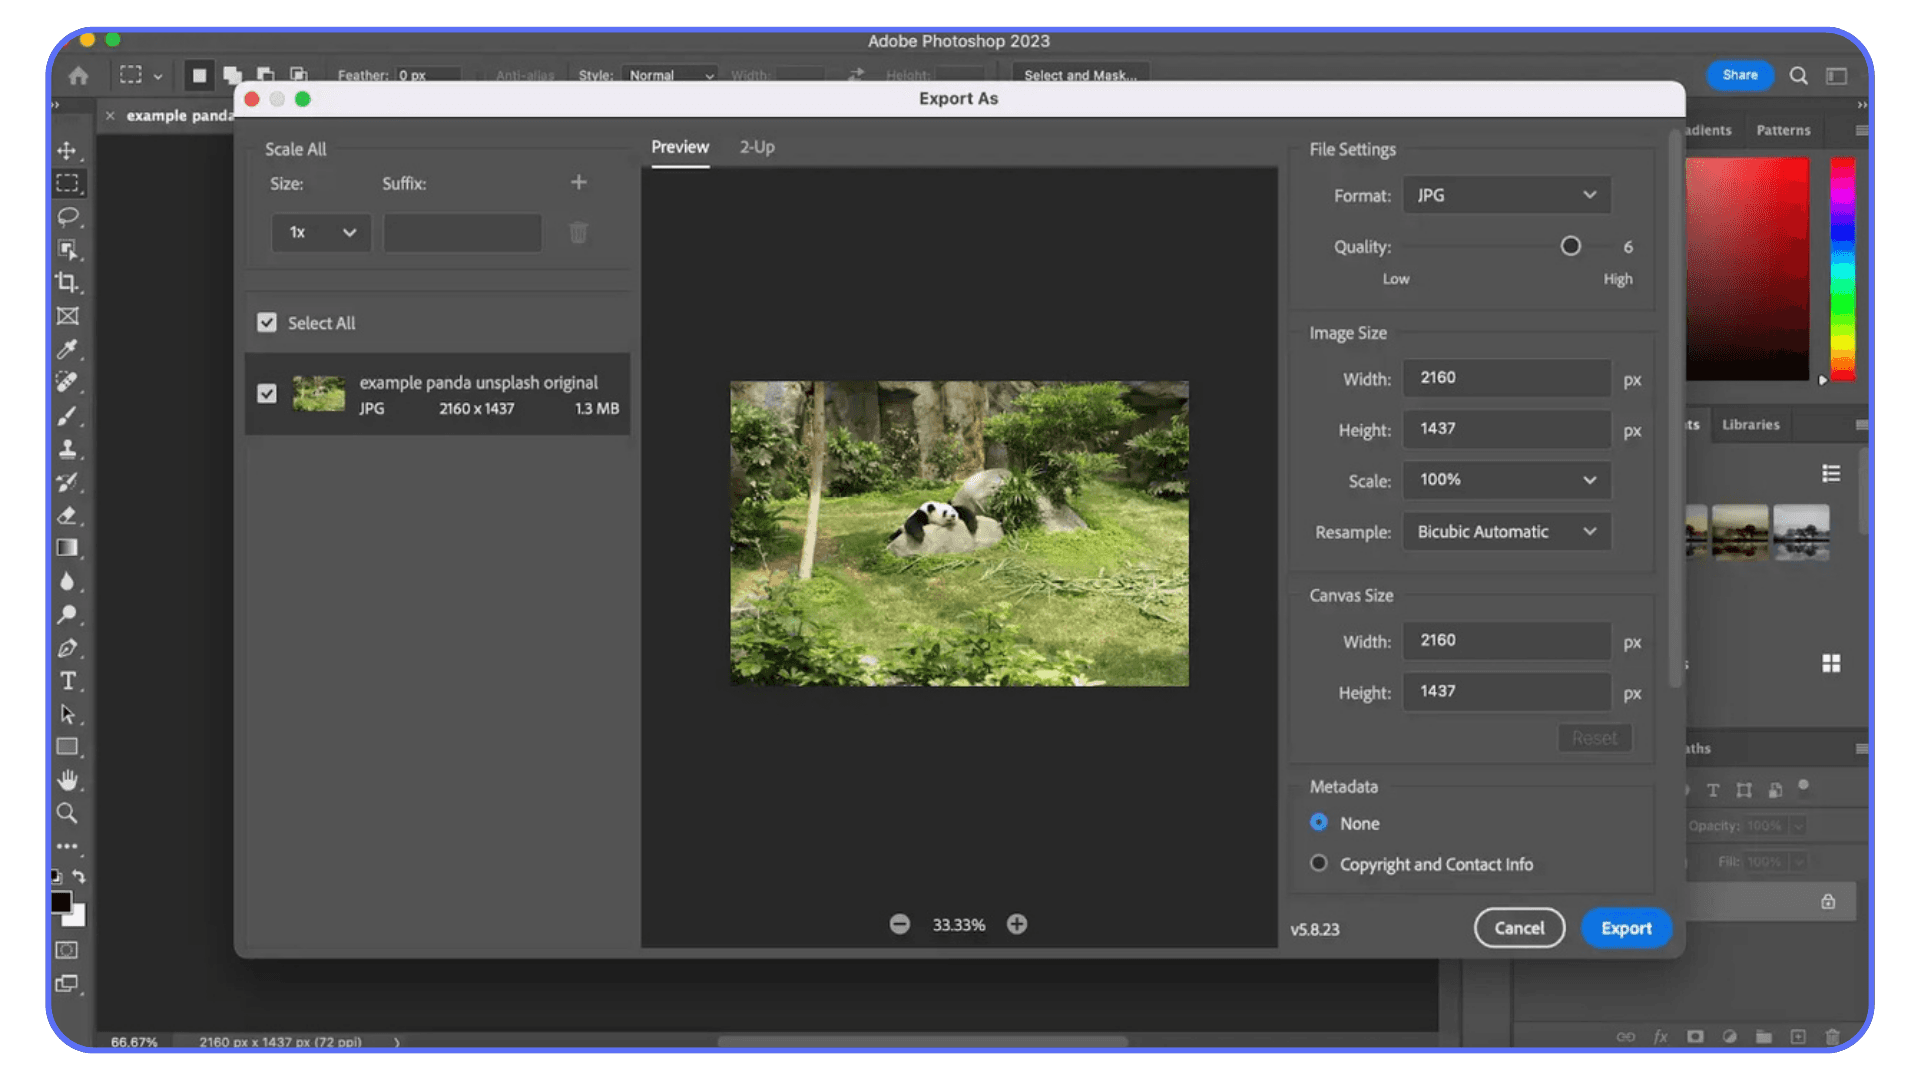
a) File Format — Pick the Right Container for the Job
If I had a dollar for every time someone exported a PNG when they didn’t need transparency, I’d probably have enough to buy the full Adobe suite twice.
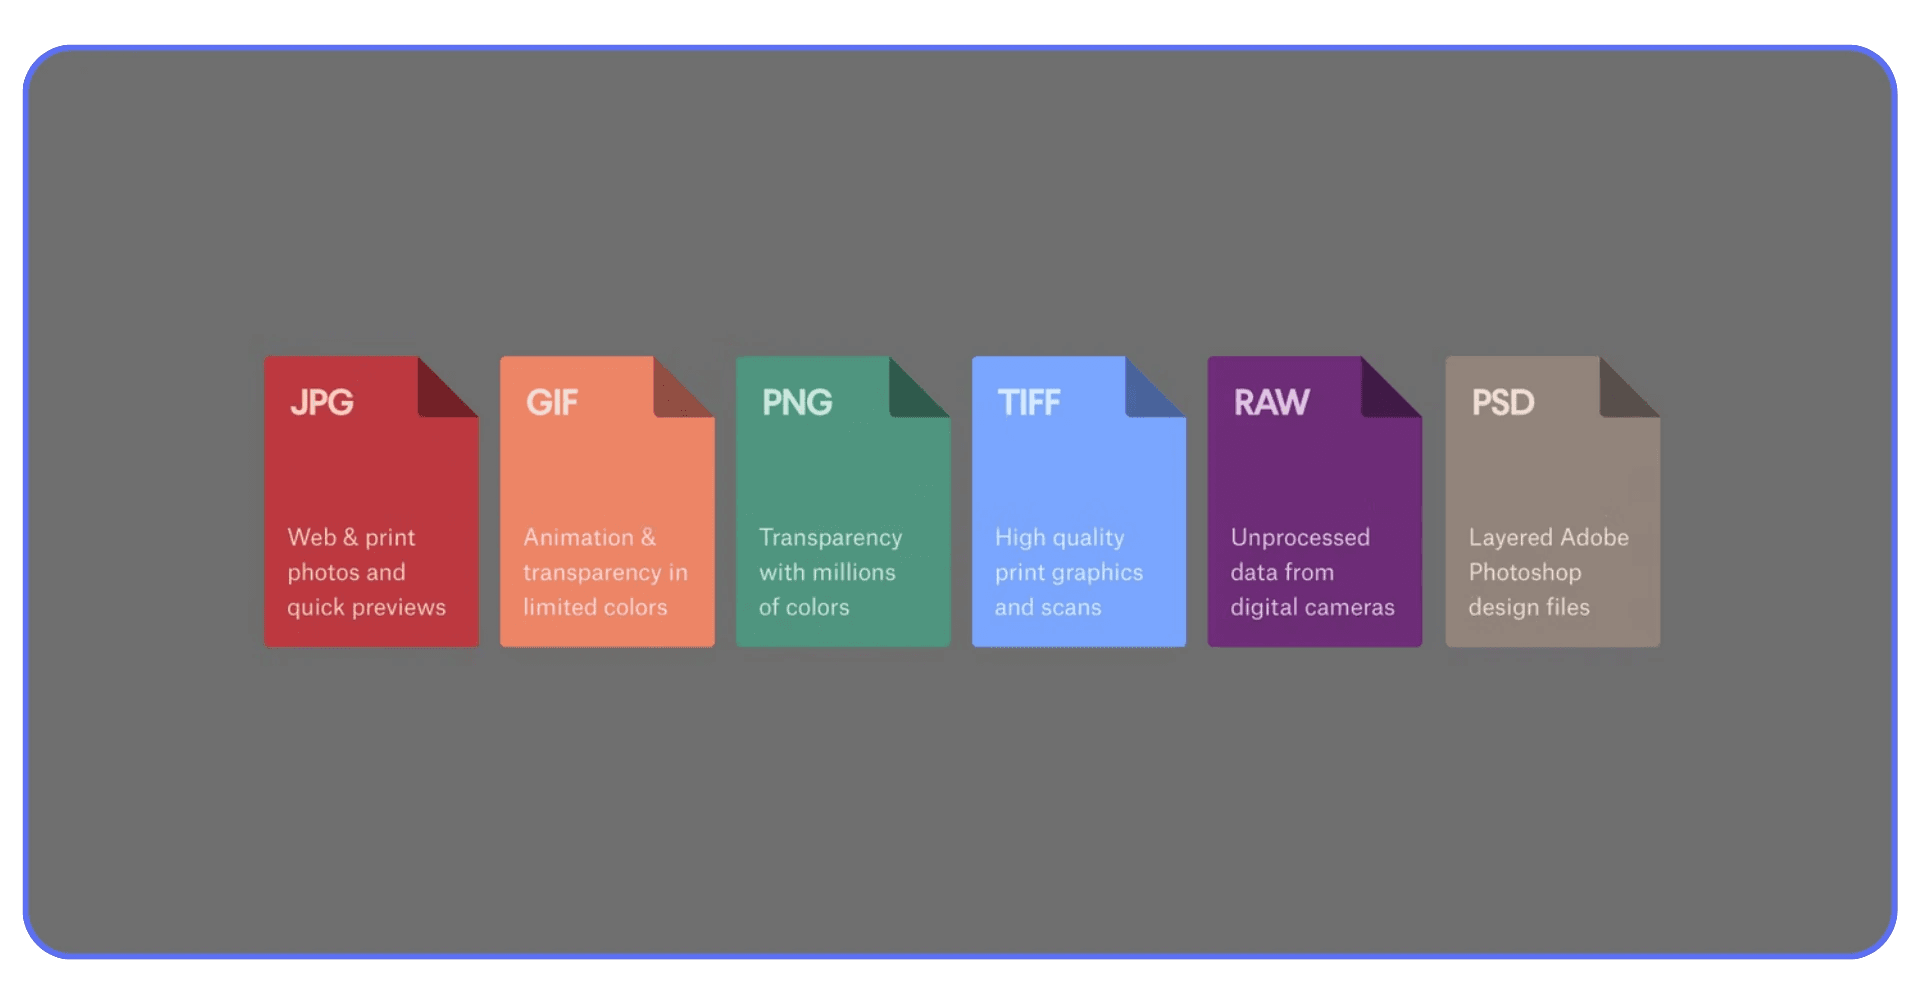
JPEG is your go-to for photography or anything with lots of gradients and color detail. It uses lossy compression, which means smaller file sizes, but some quality loss, especially if you keep opening and re-saving it. Still, for most web work, it’s perfect. I usually keep mine around 80% quality, which gives me crisp detail without ballooning the file size.
PNG, on the other hand, is best for logos, flat graphics, or anything that needs transparency. It’s lossless, so you won’t get compression artifacts, but it’ll give you bigger files. And if you don’t need transparency, save yourself the pain, go JPEG instead.
If you’re working with print or archival files, TIFF or PSD is where you want to be. TIFFs preserve full quality (and can even include layers), while PSDs keep your editable structure intact for future tweaks. And for final print layouts or proofs, exporting as a PDF can be a life-saver, it locks in fonts, colors, and layout consistency.
Bottom line: don’t just pick a format out of habit. Pick it based on where the image’s going.
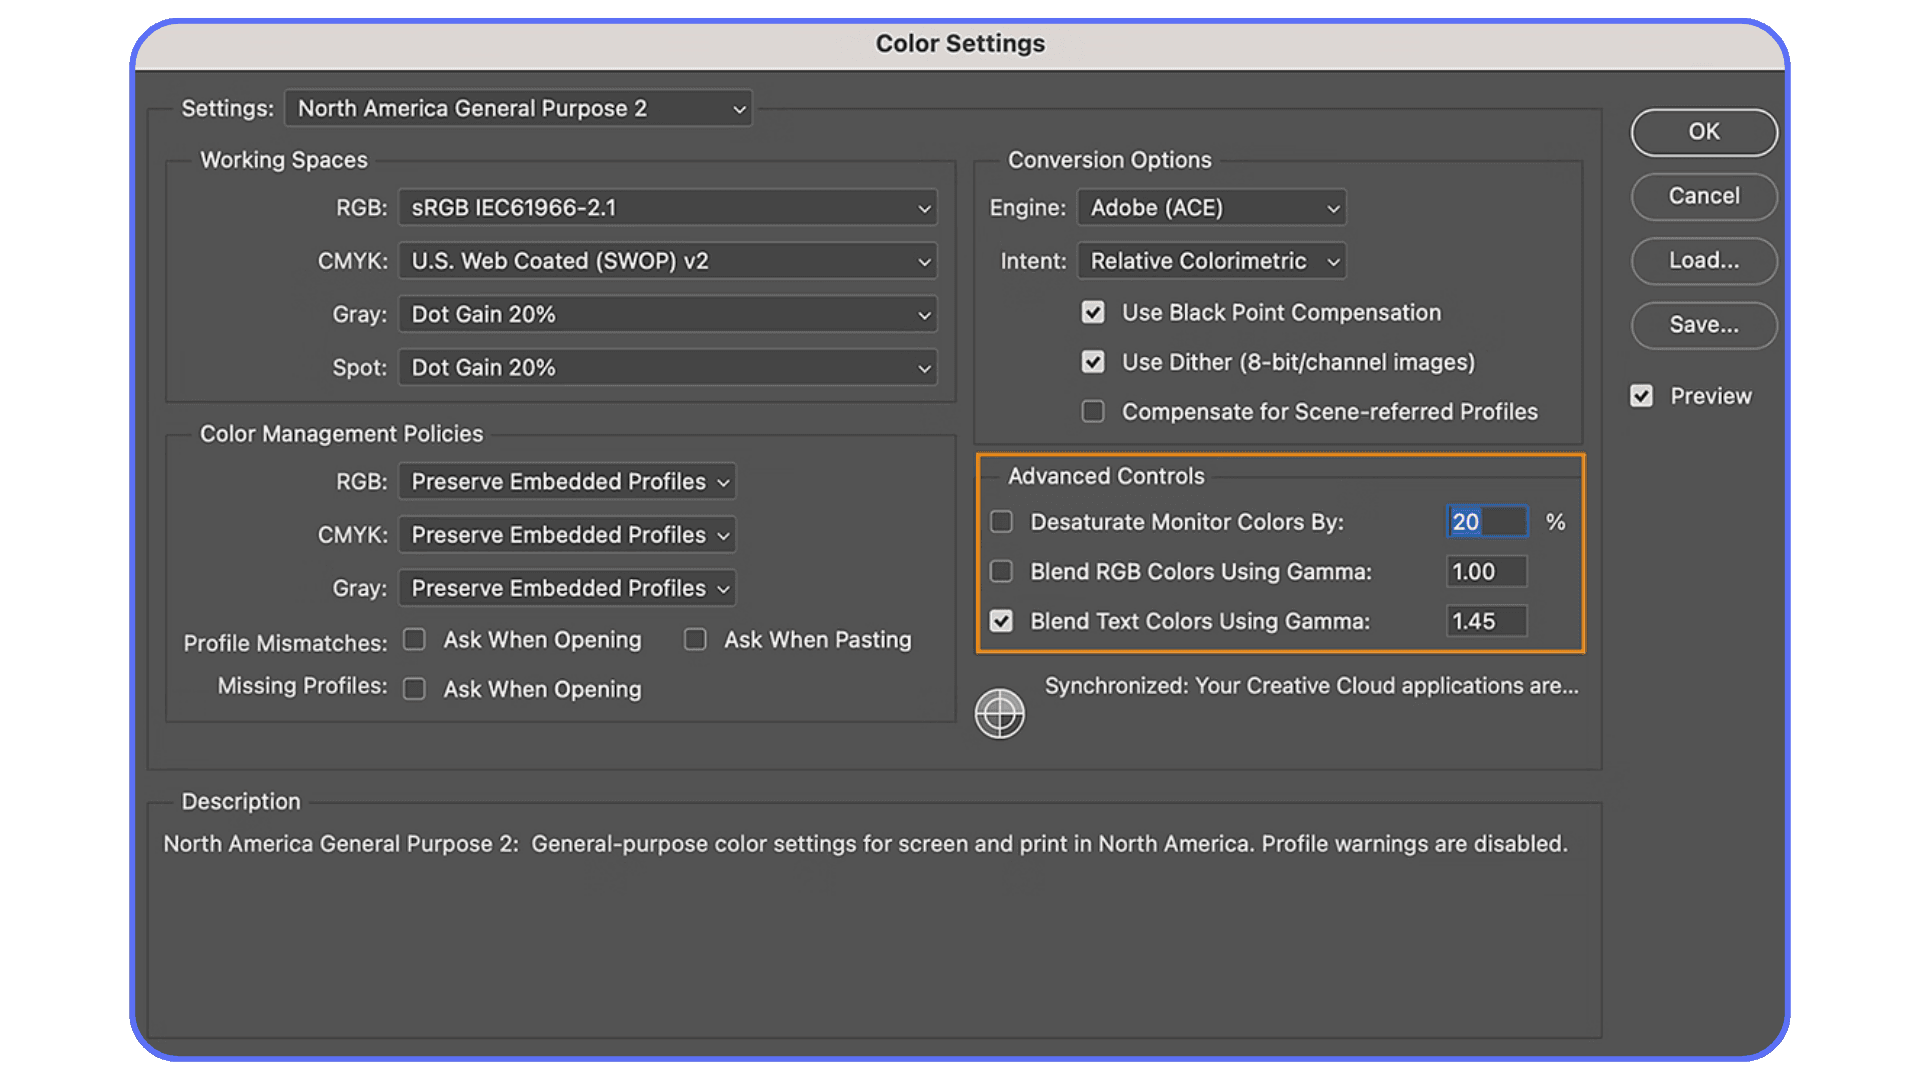
b) Color Space & Profile — Don’t Let Your Colors Betray You
Ever noticed how your image looks amazing in Photoshop but turns flat when you upload it online? That’s a color profile problem.
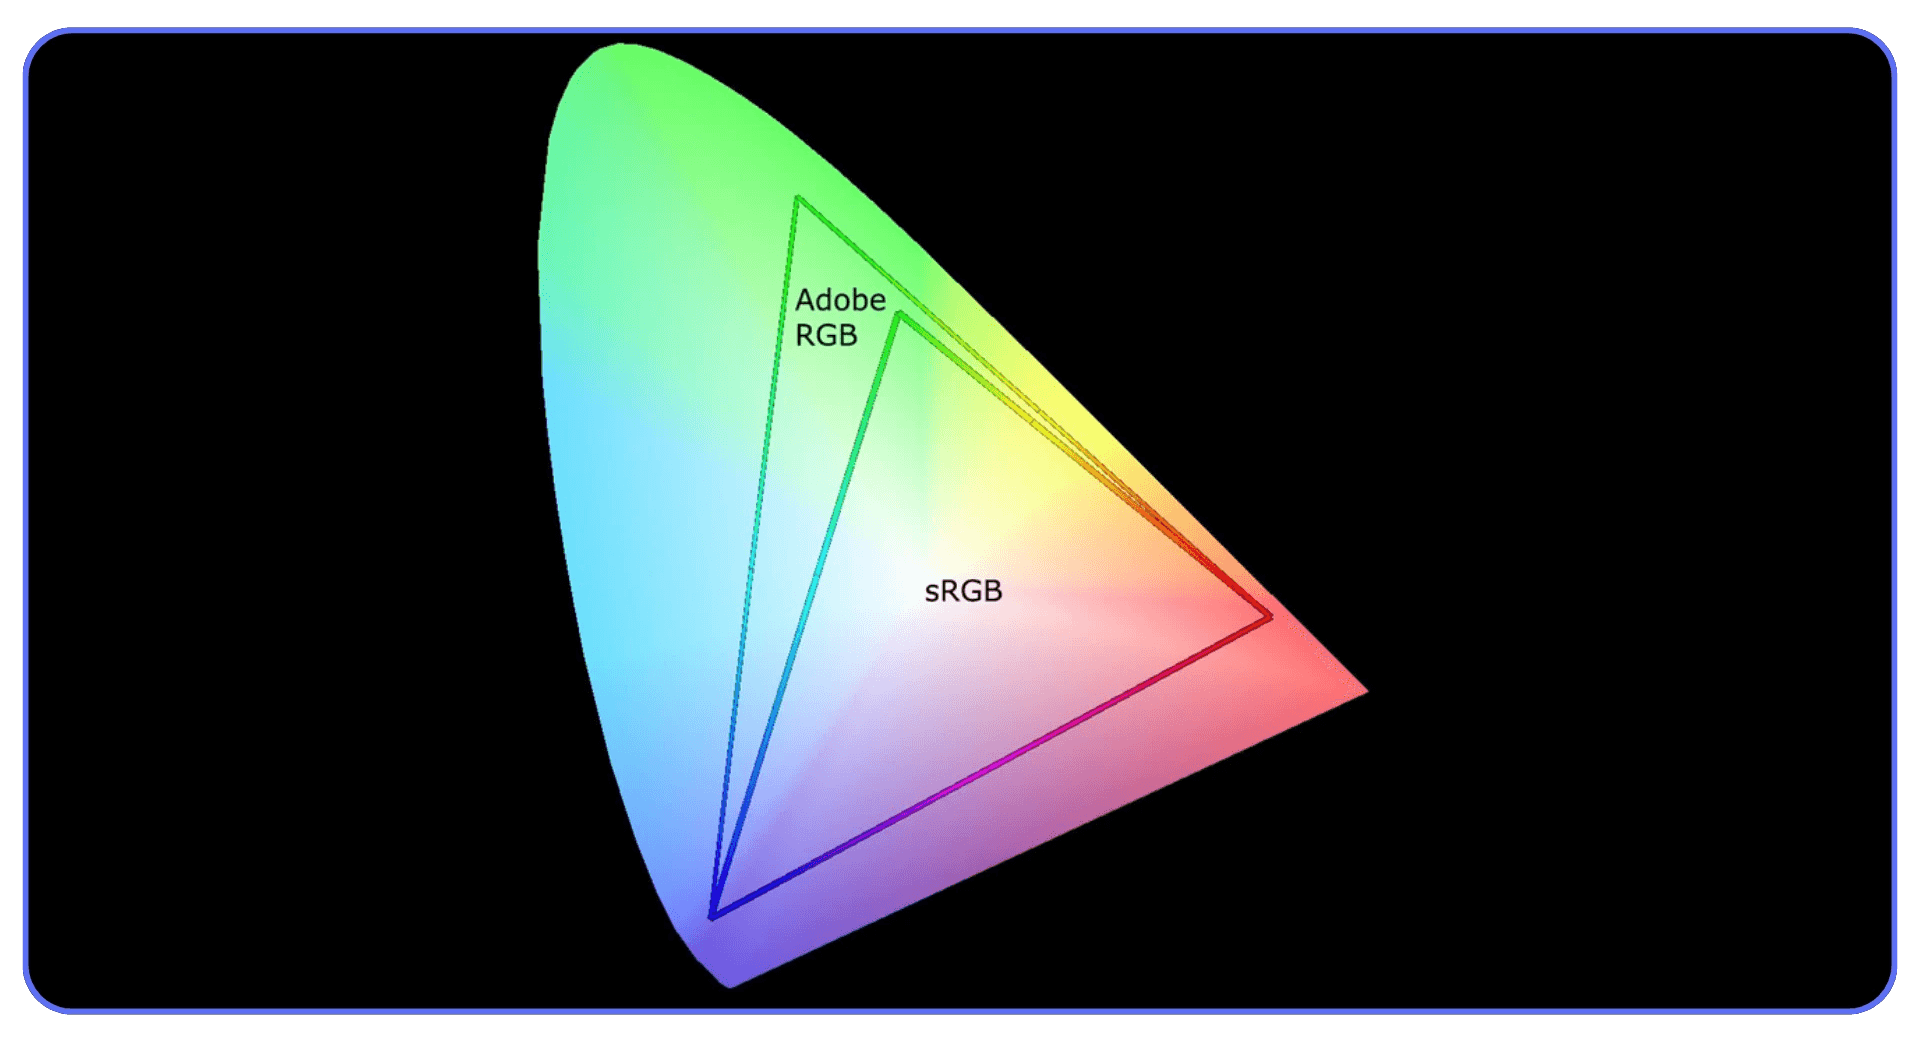
By default, Photoshop often works in Adobe RGB or ProPhoto RGB, both wider gamuts than the average screen can show. But the web runs on sRGB, which is a smaller, standardized color space. If you forget to convert before exporting, your reds and greens can look washed out, and your whole composition can lose vibrancy.
Before you export, open the Export As panel and make sure “Convert to sRGB” is checked. That single step saves so many headaches.
For print, though, it’s a different story. Printers usually expect CMYK, not RGB. Most print houses will even send you their specific ICC color profile, follow it. Otherwise, your beautiful turquoise might end up teal.
In short: web = sRGB, print = CMYK, and always double-check the box that says “Convert to sRGB.” Seriously, it’s worth the second look.
c) Image Dimensions & Resolution — Bigger Isn’t Always Better
This one trips up almost everyone at some point. You’ll hear people throw around “300 ppi” like it’s gospel. But here’s the truth, for screens, ppi doesn’t actually matter.
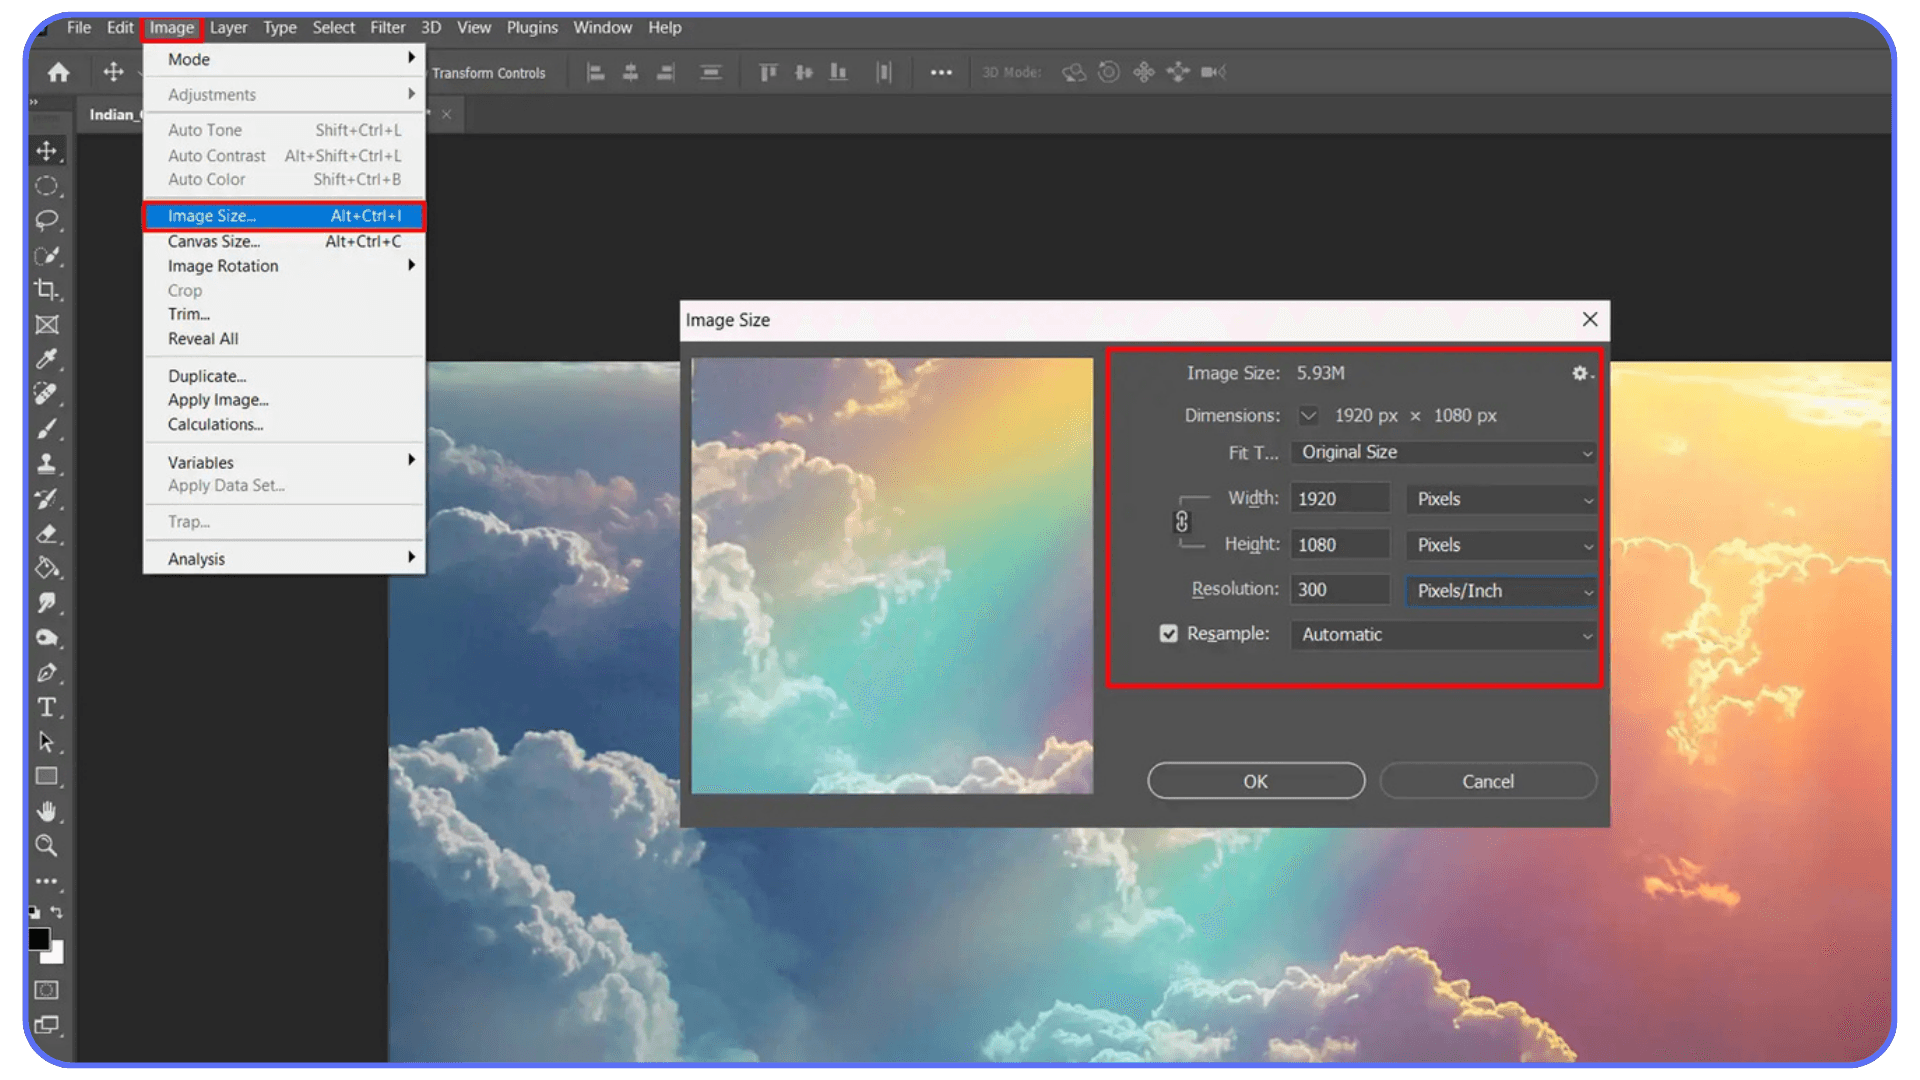
What matters are pixel dimensions, how many pixels wide and tall your image is. For web, you care about width in pixels, not ppi. For instance:
Instagram portrait posts? 1080 × 1350 px.
Website hero banners? Around 1920 px wide usually does the trick.
4K display background? Try 3840 × 2160 px.
“300 ppi” only matters when you’re printing, because it controls how many pixels are packed into each inch of paper. So if you’re making something for print, sure, 300 ppi is a safe bet. But if it’s going on Instagram, that number just bloats your file size for no reason.
My rule of thumb: export exactly at the dimensions of your final destination. Don’t upscale or downscale later, that’s where quality takes a hit.
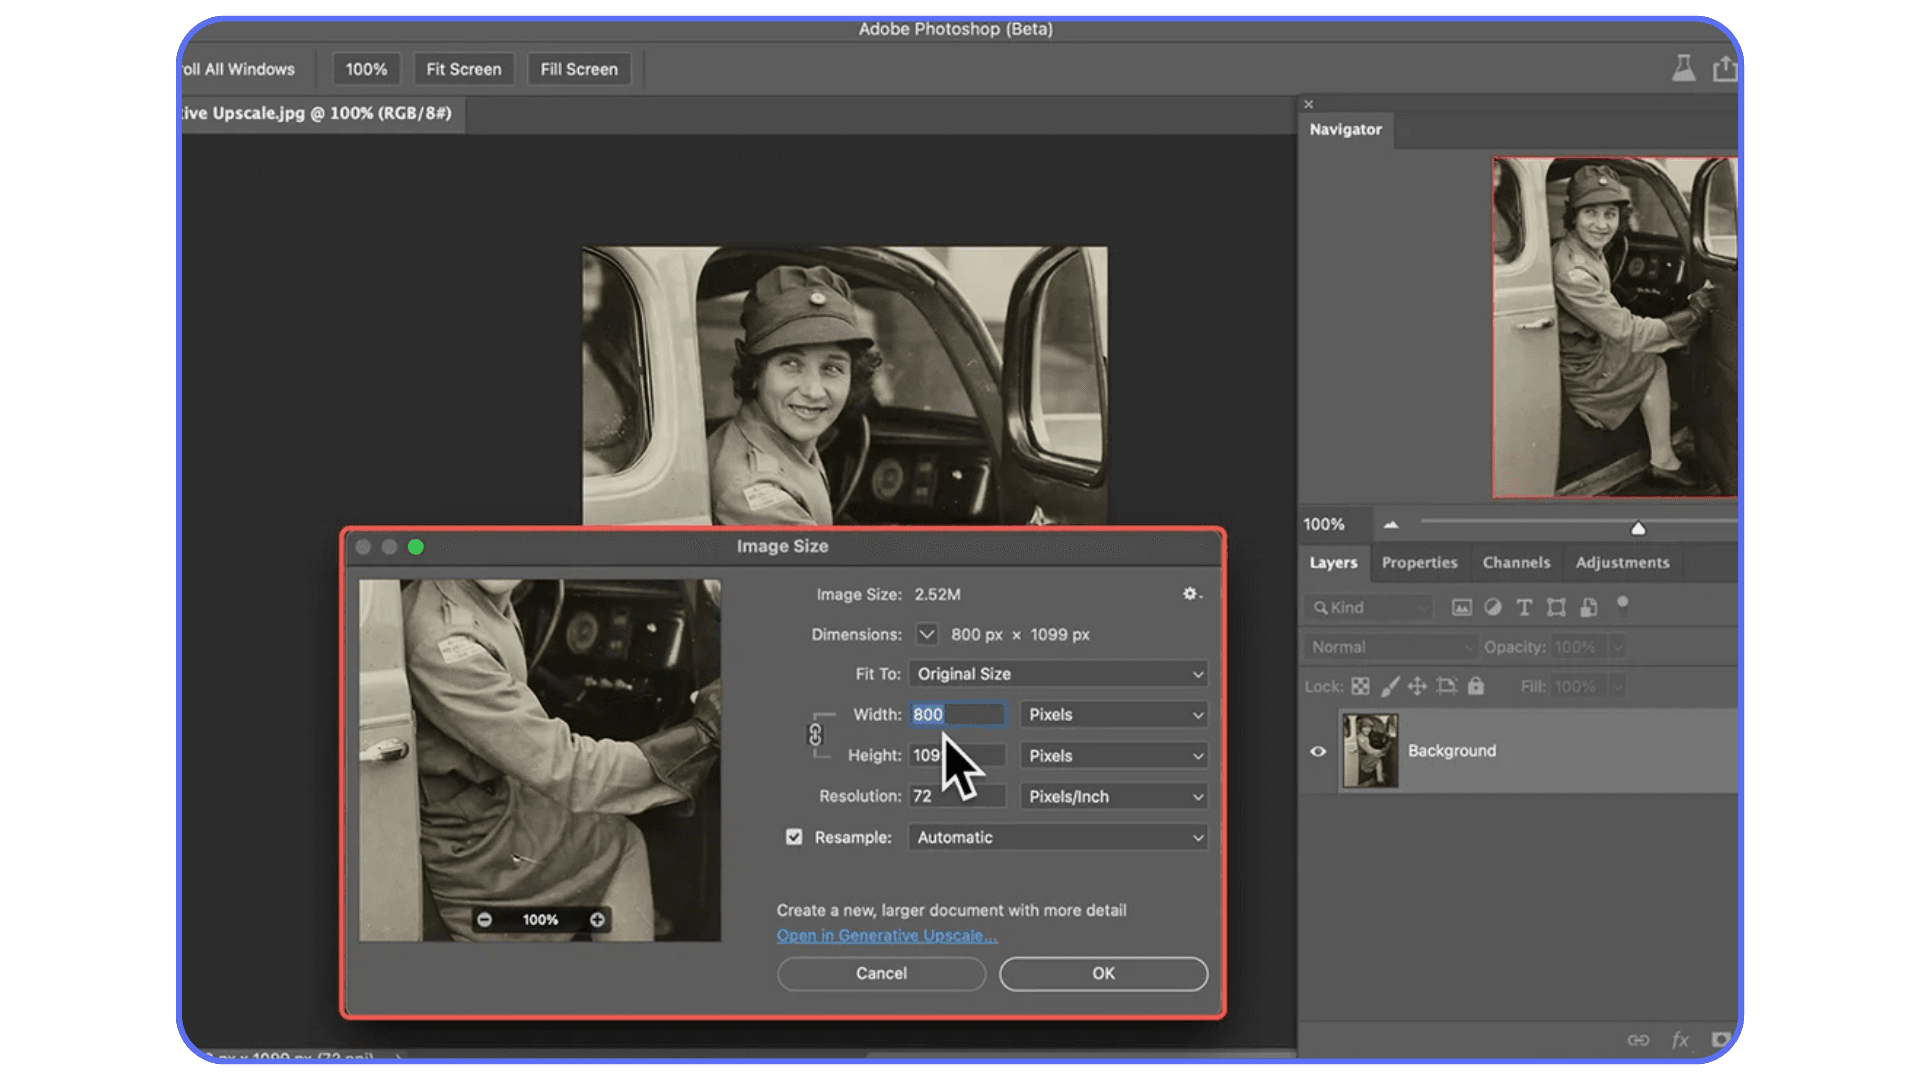
d) Resampling & Sharpness — Let Photoshop Do It Right
When you resize an image during export, Photoshop uses resampling to fill in or remove pixels. Sounds boring, but it’s crucial.
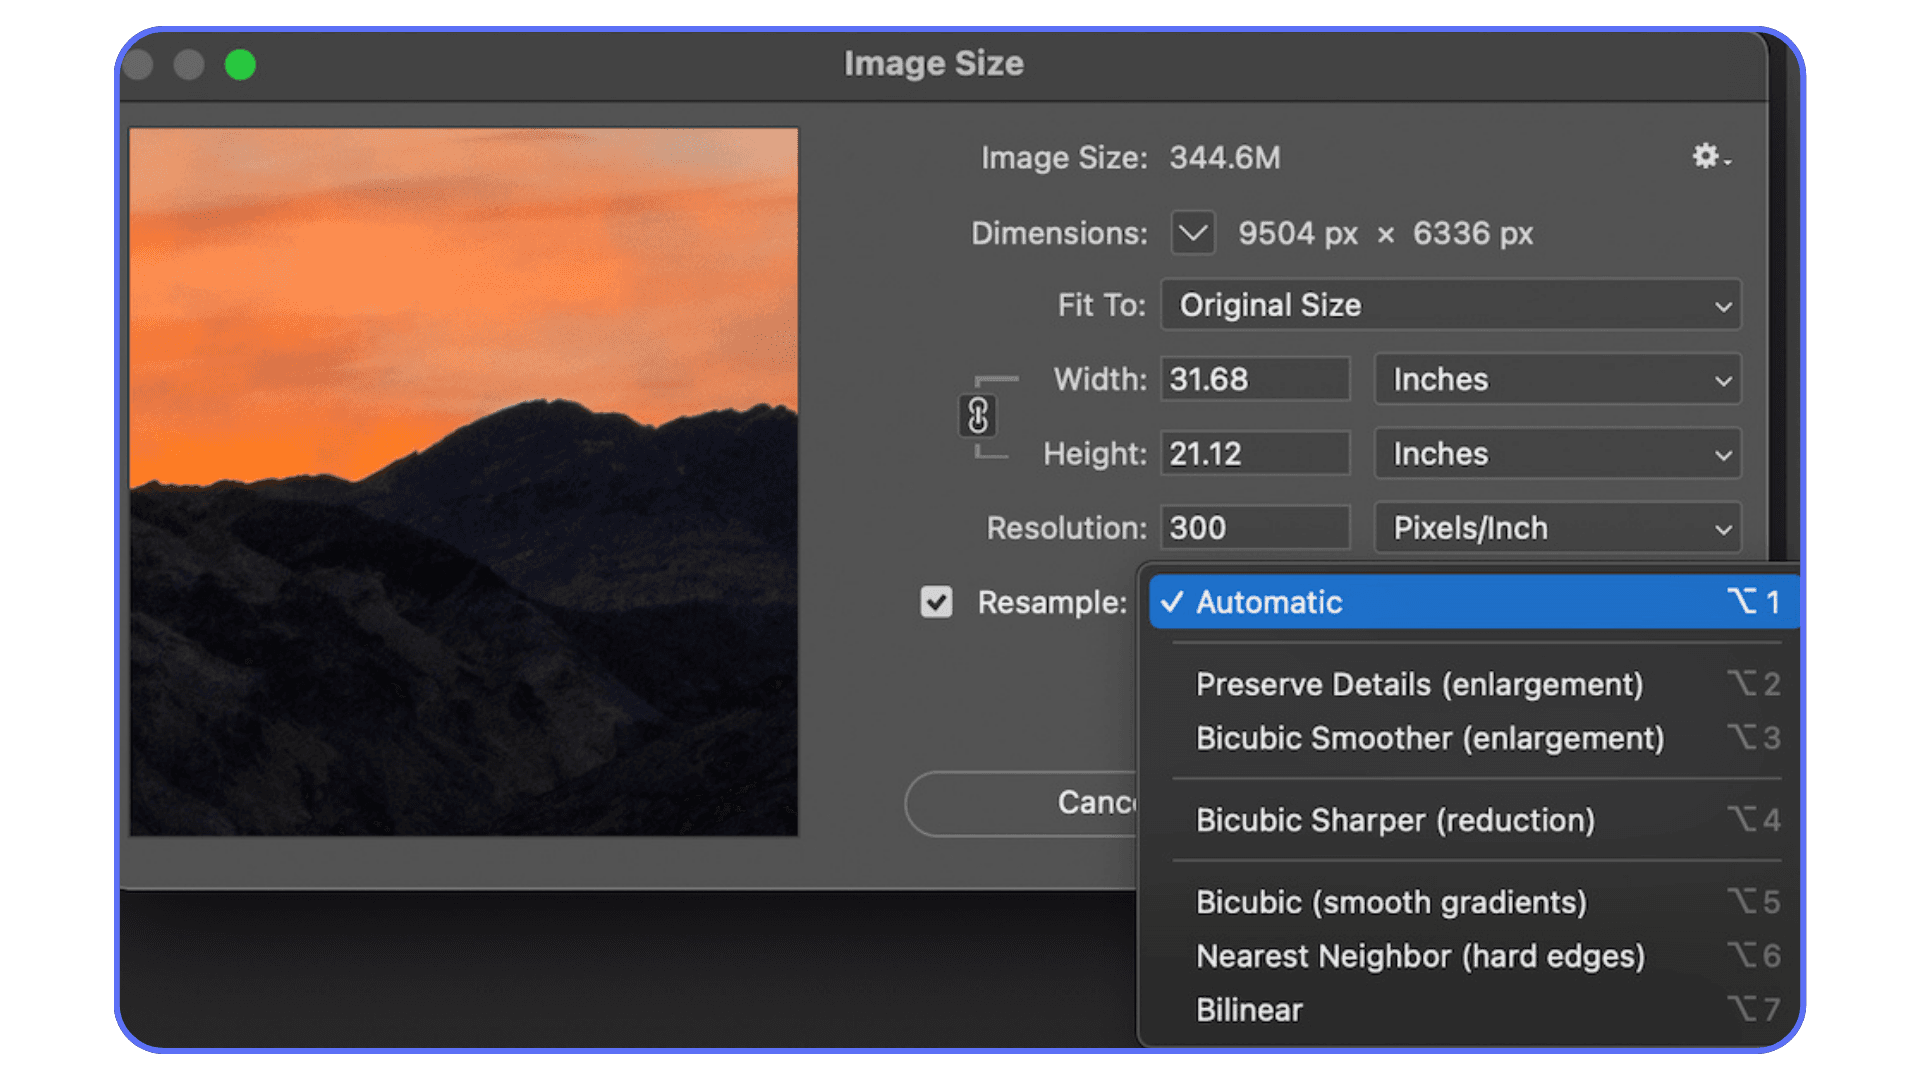
If you’re making your image smaller, pick Bicubic Sharper (reduction). It keeps edges crisp and avoids that muddy look. If you’re enlarging, go for Bicubic Smoother (enlargement) to prevent harsh noise.
A trick I’ve picked up: always zoom into 100% in the Export As preview before hitting “Save.” Sometimes you’ll notice slight halos or noise that you can fix by tweaking the method.
And please, don’t rely on websites or social platforms to resize your work for you. Their algorithms are fast, not good. Let Photoshop handle it first.
e) Compression & Quality Settings — Don’t Obsess, Test
Here’s a truth bomb: most people can’t tell the difference between a JPEG at 90% and one at 75%. But their bandwidth definitely can.
Photoshop’s newer versions use a quality scale of 1–7, while older ones use 1–100. Whichever you have, you don’t need to crank it to the top. Try a few exports side by side, you’ll probably find quality 5–6 (or 75–85%) looks identical and saves half the space.
If you’re exporting for social media or web, smaller is better as long as it still looks good. Test it on your phone, laptop, and browser. If it passes the eye test, it’s good enough.
f) Metadata, Transparency, and Optimization — Clean Files = Fast Files
When you export, Photoshop often keeps metadata like camera info, edit history, or copyright data. That’s great for archiving, but it just adds bloat for web files.
Unless you specifically need that data, toggle “Remove Metadata” or export using the “Smaller File (8-bit)” options when possible.
For images with transparency, stick with PNG-24, but if you don’t need transparency, disable alpha channels. It’ll cut your file size in half.
Little things like that make a huge difference when you’re managing dozens of assets. A clean export isn’t just lighter, it’s faster to load, share, and store.
That’s the technical part handled. Next, let’s make this real, how these settings actually work in different real-world export scenarios.
For smoother performance and faster exports, learn how to use GPU acceleration in Photoshop.
Real-World Scenarios (and What Works Best)
Now that we’ve covered what each setting does, let’s put it all together. Because exporting isn’t theoretical, it’s practical. You’re not choosing settings for fun; you’re doing it because that image is headed somewhere specific. Here’s how I’d set things up in a few common, real-world cases.
Scenario 1: A Web Hero Image That Actually Loads Fast
You’ve spent hours crafting a gorgeous homepage visual. The last thing you want is a 10-megabyte image choking your site speed.
For a web hero image, say, a 1920 px wide banner, I go JPG, sRGB, 80 % quality, and make sure it’s around 150–300 KB.
That’s usually plenty crisp on desktop and mobile.
If the design includes flat colors or sharp edges (like typography or UI components), I’ll test a WebP version too, it often keeps quality with even smaller sizes.
Key idea: optimize for load time, not pixel perfection. No one zooms into your banner at 400 %.
Experiencing random crashes during export? You might want to read about the most common crash reasons for Photoshop and how to fix them.
Scenario 2: An Instagram Post That Doesn’t Get Mangled
Social media platforms are notorious for aggressive recompression. If you upload a 5 MB masterpiece, Instagram will gladly crush it down to a crunchy mess.
So, export at 1080 × 1350 px (portrait ratio), sRGB, JPG 75–80 %.
That size fits Instagram’s native frame perfectly and minimizes extra compression.
If you’ve got text or gradients, test a PNG-24 version, it’ll hold edges better. Just keep the file under 2 MB for smoother uploads.
And here’s a tiny trick I swear by: add a subtle sharpen pass (like 0.3–0.5 radius) before exporting. It compensates for Instagram’s softening.
Scenario 3: High-Resolution Print That Still Looks Polished
Print is a different world. It doesn’t care about pixels; it cares about inches.
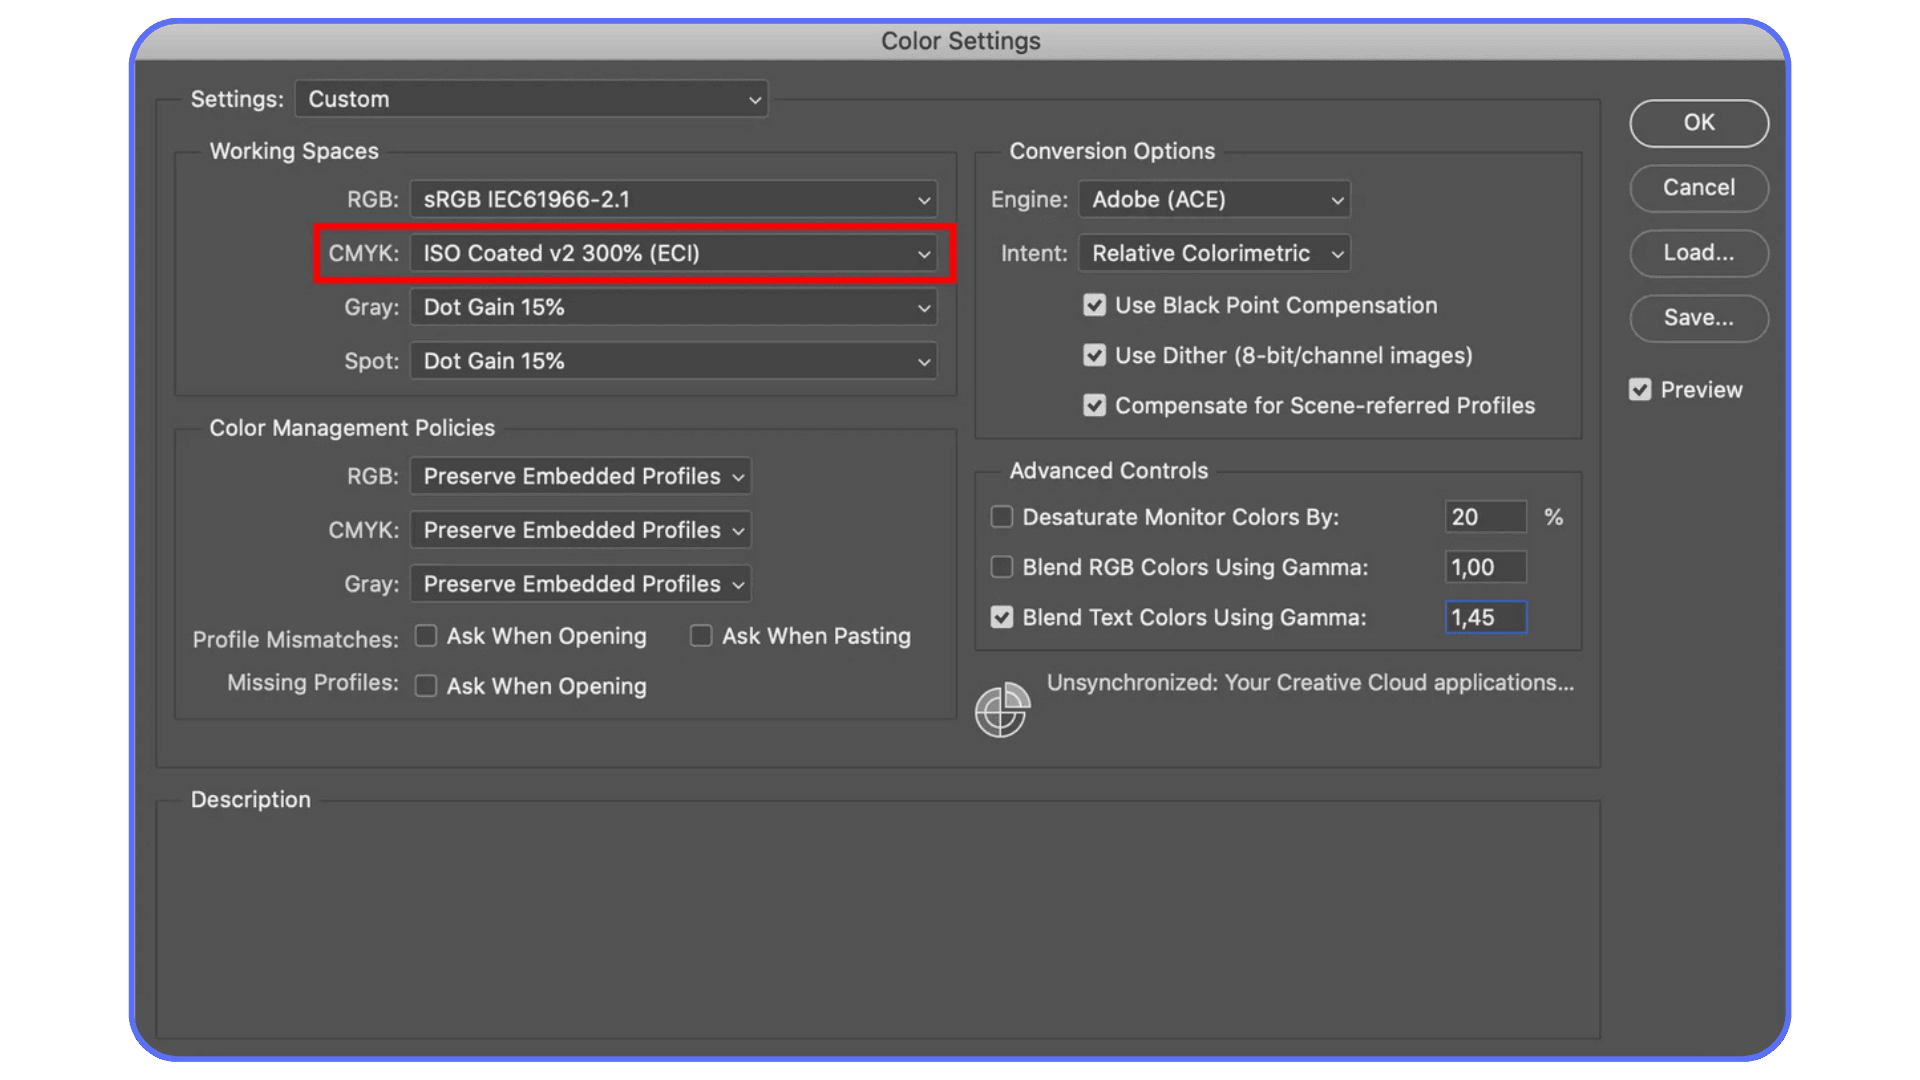
For anything going to print, brochures, posters, magazine spreads, stick with 300 ppi, CMYK, and either TIFF or PDF.
Flatten layers only if your printer requests it, and make sure to embed the color profile (usually the printer will give you one, like “ISO Coated v2”).
If your print includes vector logos or text, PDF is your friend, it preserves sharpness at any scale.
Rule of thumb: print is unforgiving. Always test-print a small proof before the big run.
Scenario 4: Transparent Logo or Overlay Asset
This one’s simple but often botched.
Use PNG-24, sRGB, and make sure transparency is on. Avoid PNG-8 unless you like ugly banding around soft edges.
Keep the dimensions exactly what you need, resizing transparent assets later often leads to blurry edges or matte halos.
And if it’s something you’ll reuse across different designs, export one master at full resolution, then downscale copies per platform.
Each of these scenarios has its own “sweet spot.” Once you find yours, save it as a preset or action, it’ll save hours in the long run.
Now, exporting efficiently is one thing. But what if you could make the whole process faster, especially when you’re dealing with huge Photoshop files that make your laptop wheeze? That’s where the next part comes in.
Even if your system lacks a dedicated GPU, you can still achieve smooth performance. Here’s a guide on how to run Photoshop smoothly without a GPU.
When Your Workflow Deserves a Boost (Vagon Cloud Computer)
Here’s the part nobody likes to admit: exporting can absolutely wreck your computer. I’ve had Photoshop crash mid-batch because my system ran out of RAM while Spotify, Chrome, and After Effects were all begging for mercy. Exporting ten massive PSDs feels like trying to run a marathon with a backpack full of bricks.
That’s when I started using Vagon Cloud Computer, and it honestly changed my workflow.
Instead of running Photoshop locally, I spin it up on Vagon, a high-performance cloud computer that opens right in my browser. No installs, no setup, no overheating fans. I just log in, launch Photoshop, and let a remote machine with a powerful GPU and plenty of RAM handle the heavy lifting.
When I’m exporting huge files, layered composites, high-res textures, or batch exports for an entire campaign, Vagon chews through them effortlessly. I can keep editing, switch between apps, or even browse on my laptop without everything lagging into oblivion.
And the best part? I only use it when I need it. No hardware to maintain, no expensive upgrades, no “scratch disk full” nightmares. Just clean, reliable power when my workflow demands it.
If you’re the kind of creator who works with large PSDs, renders, or AI-enhanced art, Vagon Cloud Computer gives you that extra horsepower exactly when you need it, and frees your local machine to breathe again.
It’s not magic. It’s just smart resource management.
Common Mistakes to Avoid (and Some Unpopular Opinions)
Even seasoned Photoshop users mess up exports more often than they’d admit. It’s not because they don’t know what they’re doing, it’s because Photoshop gives you about 200 ways to do the same thing, and some of them still behave differently depending on the version. Here are a few classic traps I’ve fallen into (and learned to avoid).
Thinking about upgrading your hardware? Discover the best GPUs for Photoshop to enhance speed and rendering performance.
#1. “I’ll Export at Double Resolution — Just to Be Safe”
No. Don’t.
If you’re exporting for the web or social, doubling your dimensions doesn’t make your image sharper; it just makes your file heavier. Platforms like Instagram or Behance will resize it anyway, and not kindly, you’ll end up with softer edges and compression artifacts.
I used to do this thinking “more pixels = better quality.” Turns out, it just meant slower uploads and bigger headaches.
#2. Mixing Up Print and Screen Profiles
I once sent a CMYK export to a web client. It looked perfect in Photoshop, until they opened it in Chrome and everything turned grayish and flat. Web = sRGB. Print = CMYK. If you’re ever unsure, stick with sRGB. At least it’ll look consistent across most devices.
#3. Ignoring File Size Completely
Some designers act like file size is someone else’s problem, until the client emails saying, “The site takes forever to load.” Every kilobyte matters online. Your export might look identical at 75% quality compared to 100%, and it’ll load twice as fast. Don’t overdeliver on pixels no one can see.
#4. Letting Platforms Handle Your Resizing
Never trust social media compression. Facebook, LinkedIn, and Instagram use heavy-handed compression to save bandwidth. Always resize and optimize yourself in Photoshop. It’s the only way to control how the image will actually look once it’s uploaded.
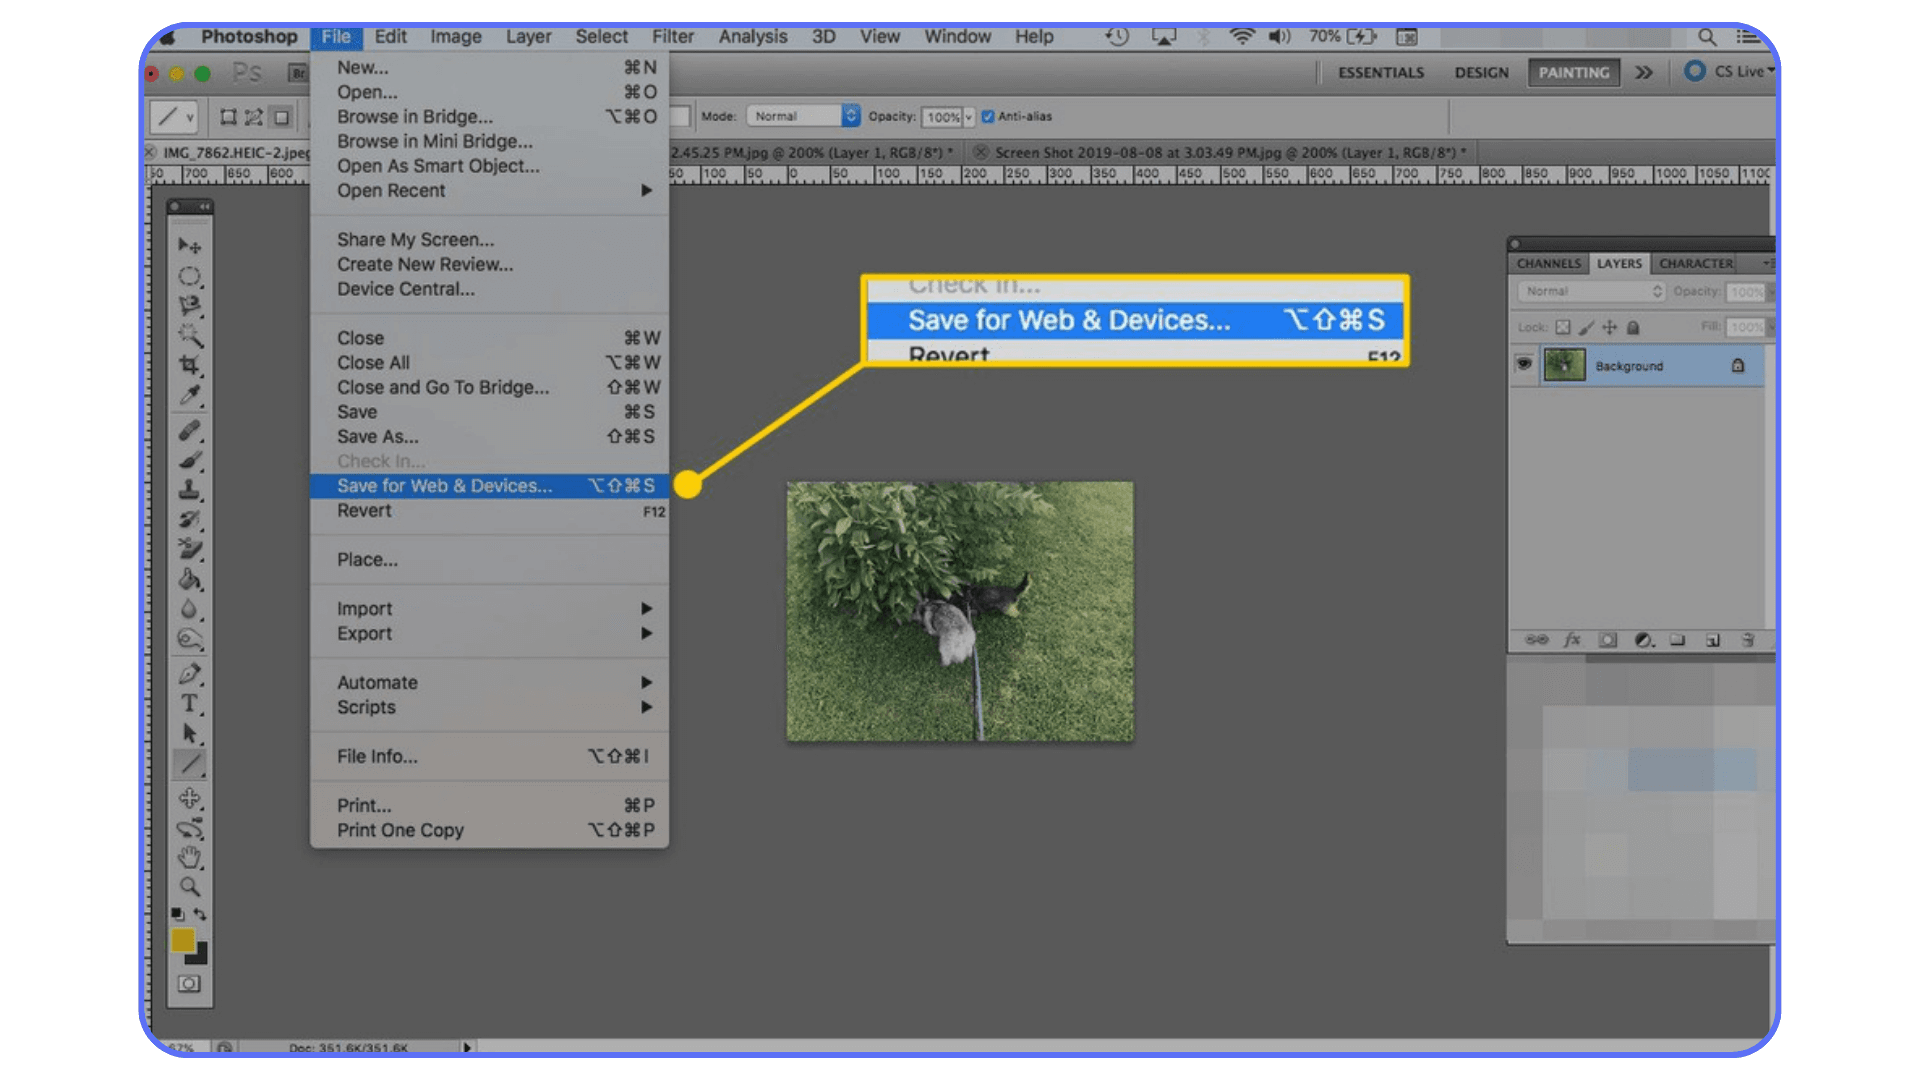
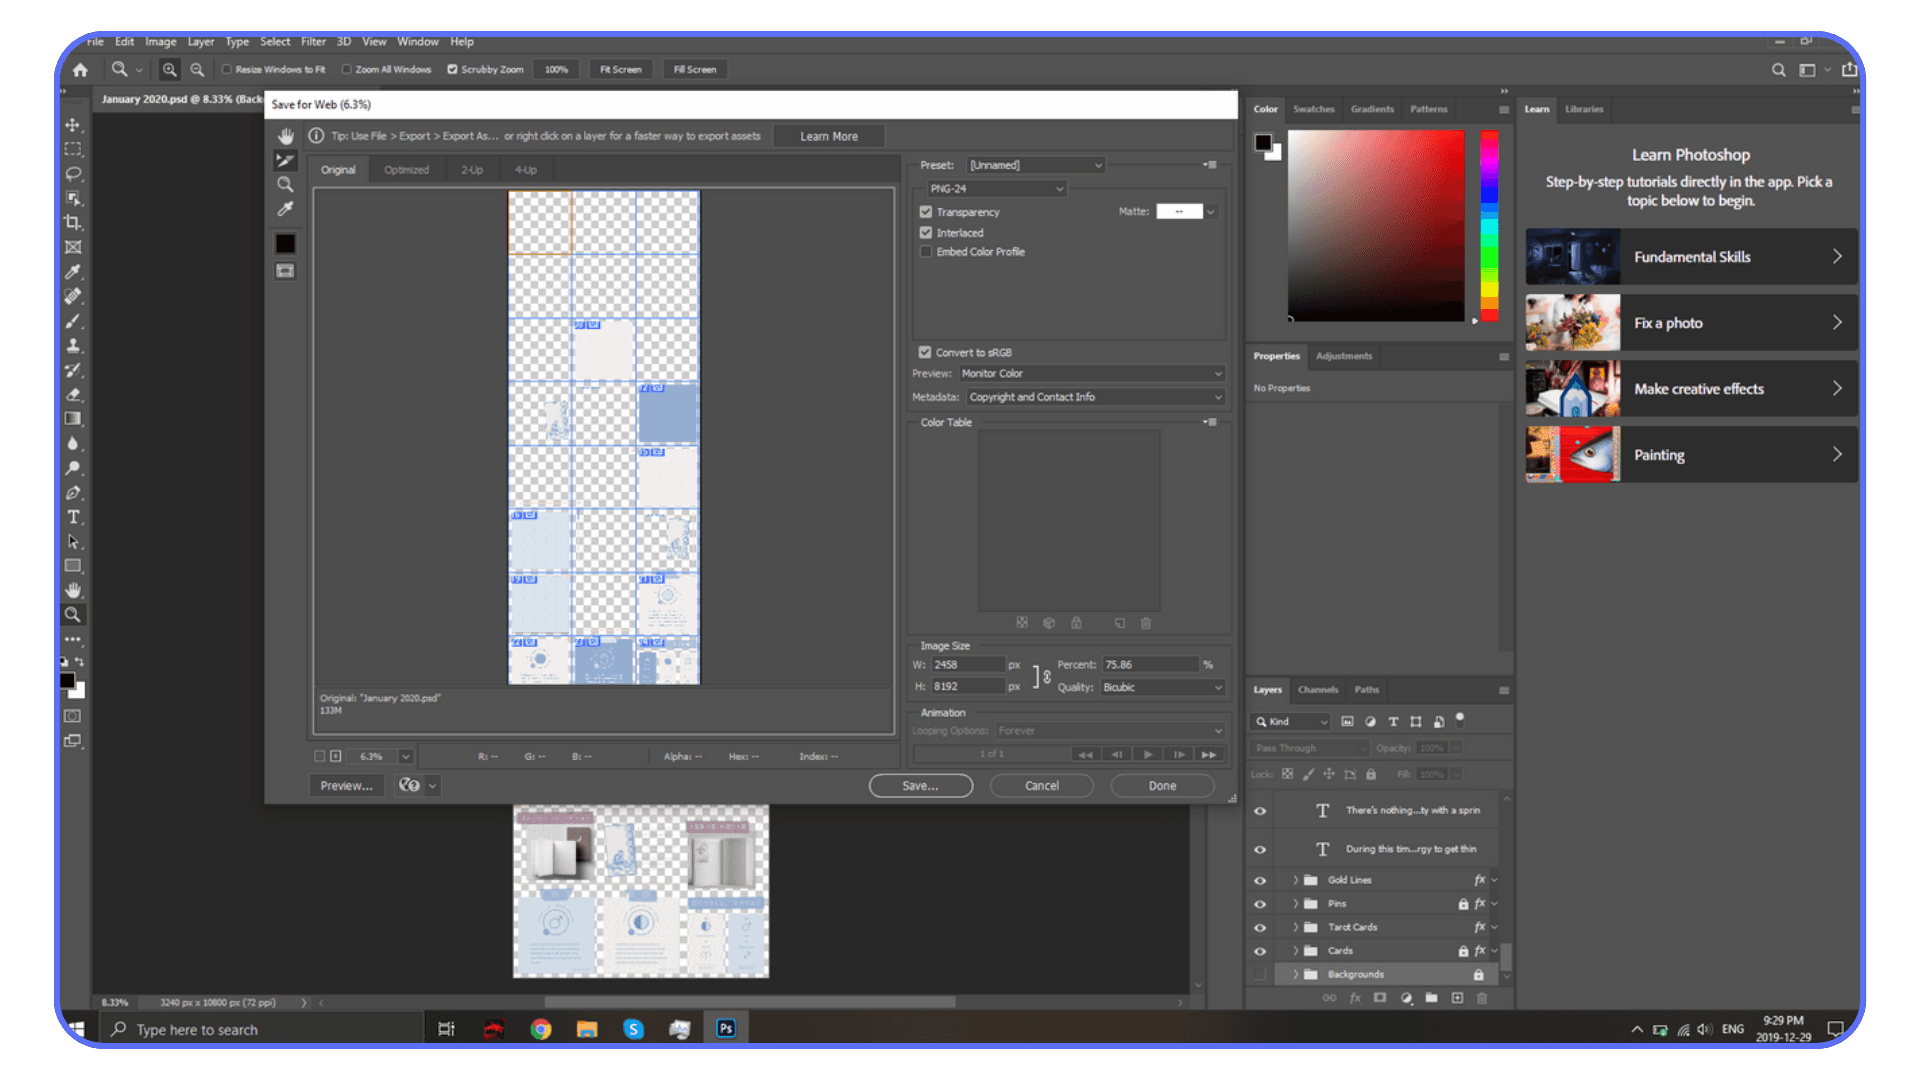
#5. Overreliance on “Export As” (Unpopular Opinion)
Yeah, it’s modern. Yeah, it’s fancy. But I’ll be honest, the old “Save for Web (Legacy)” tool still gets me more predictable results sometimes. It gives more granular control over optimization, color profiles, and metadata stripping. The “Export As” window is cleaner, but not always smarter.
If you’re exporting dozens of assets or slices, Save for Web can still be your best friend. Don’t feel bad about sticking with what works.
#6. Not Testing Your Export Before Sending It Off
This one’s boring, but crucial. Before delivering to a client or uploading anywhere, open your exported file in a browser, on your phone, or in a different viewer. You’ll catch things Photoshop’s preview hides, compression noise, color shifts, weird banding.
A 30-second test can save you a 30-minute apology email.
The takeaway? Exporting isn’t just clicking “save.” It’s about controlling the translation of your work — how it leaves Photoshop and enters the world. A few conscious tweaks here save you countless “why does it look different?” moments later.
Want the ideal setup for heavy editing and exporting? Explore our picks for the best PC and laptop for Photoshop.
Quick Export Checklist Before You Click Save
By this point, you probably know exactly which settings you should use, but when the deadline’s five minutes away, it’s way too easy to forget one tiny thing that ruins the result. So here’s a quick gut-check I run through before hitting Export.
Print it. Stick it to your monitor. Or just mentally recite it like a mantra.
✅ Format: Does the file type actually match the job? (JPG for photos, PNG for graphics, TIFF or PDF for print.)
✅ Color Space: Did you convert to sRGB for web or CMYK for print? If not, do it. Trust me, future-you will thank you.
✅ Dimensions: Sized correctly for its destination? Don’t upload a 5000 px banner to Instagram.
✅ Resampling Method: Using Bicubic Sharper when downsizing? Good. Bicubic Smoother when enlarging? Even better.
✅ Quality Setting: Is your JPEG quality around 75–85%? You’ll save space without losing any visible detail.
✅ Metadata: Stripped out any unnecessary info like camera data, edit history, or GPS tags? No one needs to know that.
✅ Transparency: PNG-24 if you need it, otherwise, ditch it. It just adds weight.
✅ Visual Test: Opened it outside Photoshop? Check it on your phone, your browser, even your client’s platform if you can.
✅ Workflow Power: If your export queue looks like a nightmare (dozens of heavy PSDs, multiple formats), spin up Vagon Cloud Computer, let it handle the heavy lifting while your laptop chills.
Getting exports right isn’t about perfection; it’s about consistency. When you nail this checklist once, you’ll never second-guess what went wrong again.
Wrapping Up: It’s About Control, Not Complexity
Exporting in Photoshop isn’t rocket science, but it’s also not something to phone in. It’s where your work leaves the safety of your screen and steps into the real world, where every pixel counts.
Once you understand what each export setting actually does, the process becomes way less mysterious. You stop guessing, start controlling. You can decide how your colors show up on Instagram, how sharp your banner looks on a Retina display, or how crisp your poster prints on glossy paper.
The trick is to treat exporting like part of the creative process, not the boring last step. A good export makes your work shine the way you intended. A bad one makes it look like you didn’t care.
And if you ever feel like Photoshop is struggling under the weight of all those layers, filters, or exports, remember: you don’t have to fight your hardware. With Vagon Cloud Computer, you can run Photoshop on a powerful cloud machine, finish your exports faster, and actually keep your local device cool and usable. It’s the kind of small workflow upgrade that adds up to hours saved, and far fewer “Not Responding” moments.
In the end, exporting well isn’t about memorizing settings, it’s about owning the outcome. Once you’ve got that, you’ll never look at the Export button the same way again.
FAQs
1. What’s the best export format for Instagram?
Go with JPEG, sized at 1080 × 1350 px (portrait) or 1080 × 1080 px (square), in sRGB color space, and around 75–80% quality. That gives you crisp visuals without Instagram’s compression wrecking them.
2. Why do my exported colors look dull or different from Photoshop?
You probably forgot to check “Convert to sRGB” before exporting. Photoshop often works in Adobe RGB or ProPhoto RGB, which have wider color ranges that most screens can’t display correctly. Converting to sRGB ensures your colors stay accurate everywhere.
3. Should I always export at 300 ppi for better quality?
Only for print. For web or social, pixel dimensions matter, not ppi. A 300 ppi image for Instagram is just a heavier file with no visible improvement. Stick to the platform’s recommended pixel size instead.
4. Is “Save for Web (Legacy)” still better than “Export As”?
In some cases, yes. The old Save for Web tool still gives more granular control over file size, optimization, and metadata. “Export As” is simpler but sometimes inconsistent, depending on the Photoshop version. Try both and see which works better for your workflow.
5. What’s the best way to export transparent images?
Use PNG-24 with transparency turned on. Avoid PNG-8, it causes banding and edge artifacts. If you need lighter files and no transparency, switch to JPG instead.
6. My computer lags or freezes during export. What can I do?
Large PSDs, multiple smart objects, and layered exports can crush your local hardware. Try running Photoshop on Vagon Cloud Computer, it gives you instant access to a high-performance machine in your browser, so you can export faster without your system locking up.
7. How can I reduce file size without losing visible quality?
Lower the JPEG quality slider to 75–80%, enable “Convert to sRGB,” and remove metadata. Test exports visually, most images look identical at half the file size if optimized right.
8. Do I need to change export settings for AI-generated images?
Yes, sometimes. AI tools often create very large, high-resolution images. Resize them before export, use Bicubic Sharper when downsizing, and check that your color profile is sRGB for consistent display across devices.
You know that sinking feeling when you finally upload your work, the one you’ve been perfecting for hours, and it suddenly looks… off? The colors are washed out, the image looks a little blurry, or worse, it’s weirdly pixelated on the client’s website. You check your original PSD, flawless. You check the exported file, a tragic downgrade.
I’ve been there. Honestly, most of us have. I’d bet at least half the designers I know have exported something wrong at least once, only to realize it after the client calls and asks, “Hey, why does it look dull on my screen?”
It’s not about talent. It’s about settings. Photoshop gives you endless export options, file formats, color profiles, compression levels, and a single unchecked box can turn your masterpiece into a muddy mess. That’s why exporting isn’t just the last step of your process; it’s the one that decides how your work actually looks out in the world.
So before you hit “Save” and move on, let’s fix the part nobody talks about enough: getting your export settings right.
If you prefer working on the go, check out our guide on how to use Photoshop on iPad to edit and export files seamlessly across devices.
Why Export Settings Actually Matter
Here’s the thing, Photoshop doesn’t just save your image; it translates it. Every time you export, you’re basically telling Photoshop, “Hey, here’s how I want this file to behave in the real world.” And if you give it the wrong instructions, you’ll get the wrong outcome.
I’ve seen gorgeous edits fall apart just because someone forgot to tick “Convert to sRGB” before exporting. The result? Muted colors that look totally fine in Photoshop but dull everywhere else. Or the classic mistake: saving a 300 ppi print file for web, massive file size, painfully slow load times, and no visible improvement.
Bad export settings don’t just hurt how your work looks, they affect where and how it performs. A 15 MB JPEG might crash your client’s CMS upload. A PNG with the wrong transparency can create ugly halos. Even the smallest error in format or compression can make your work look less sharp, less professional, less you.
Getting your export right isn’t about being a perfectionist, it’s about control. It’s about making sure what you see in Photoshop is what your audience gets everywhere else: on their phones, in their browsers, and on the printed page.
So yeah, export settings matter. A lot more than most people think.
The Core Export Settings to Get Right
Alright, let’s get practical. Exporting in Photoshop isn’t rocket science, but it’s also not something you should do on autopilot. Every choice, format, color, dimensions, quietly changes how your image lives outside of Photoshop. Let’s walk through the settings that actually matter.
a) File Format — Pick the Right Container for the Job
If I had a dollar for every time someone exported a PNG when they didn’t need transparency, I’d probably have enough to buy the full Adobe suite twice.
JPEG is your go-to for photography or anything with lots of gradients and color detail. It uses lossy compression, which means smaller file sizes, but some quality loss, especially if you keep opening and re-saving it. Still, for most web work, it’s perfect. I usually keep mine around 80% quality, which gives me crisp detail without ballooning the file size.
PNG, on the other hand, is best for logos, flat graphics, or anything that needs transparency. It’s lossless, so you won’t get compression artifacts, but it’ll give you bigger files. And if you don’t need transparency, save yourself the pain, go JPEG instead.
If you’re working with print or archival files, TIFF or PSD is where you want to be. TIFFs preserve full quality (and can even include layers), while PSDs keep your editable structure intact for future tweaks. And for final print layouts or proofs, exporting as a PDF can be a life-saver, it locks in fonts, colors, and layout consistency.
Bottom line: don’t just pick a format out of habit. Pick it based on where the image’s going.
b) Color Space & Profile — Don’t Let Your Colors Betray You
Ever noticed how your image looks amazing in Photoshop but turns flat when you upload it online? That’s a color profile problem.
By default, Photoshop often works in Adobe RGB or ProPhoto RGB, both wider gamuts than the average screen can show. But the web runs on sRGB, which is a smaller, standardized color space. If you forget to convert before exporting, your reds and greens can look washed out, and your whole composition can lose vibrancy.
Before you export, open the Export As panel and make sure “Convert to sRGB” is checked. That single step saves so many headaches.
For print, though, it’s a different story. Printers usually expect CMYK, not RGB. Most print houses will even send you their specific ICC color profile, follow it. Otherwise, your beautiful turquoise might end up teal.
In short: web = sRGB, print = CMYK, and always double-check the box that says “Convert to sRGB.” Seriously, it’s worth the second look.
c) Image Dimensions & Resolution — Bigger Isn’t Always Better
This one trips up almost everyone at some point. You’ll hear people throw around “300 ppi” like it’s gospel. But here’s the truth, for screens, ppi doesn’t actually matter.
What matters are pixel dimensions, how many pixels wide and tall your image is. For web, you care about width in pixels, not ppi. For instance:
Instagram portrait posts? 1080 × 1350 px.
Website hero banners? Around 1920 px wide usually does the trick.
4K display background? Try 3840 × 2160 px.
“300 ppi” only matters when you’re printing, because it controls how many pixels are packed into each inch of paper. So if you’re making something for print, sure, 300 ppi is a safe bet. But if it’s going on Instagram, that number just bloats your file size for no reason.
My rule of thumb: export exactly at the dimensions of your final destination. Don’t upscale or downscale later, that’s where quality takes a hit.
d) Resampling & Sharpness — Let Photoshop Do It Right
When you resize an image during export, Photoshop uses resampling to fill in or remove pixels. Sounds boring, but it’s crucial.
If you’re making your image smaller, pick Bicubic Sharper (reduction). It keeps edges crisp and avoids that muddy look. If you’re enlarging, go for Bicubic Smoother (enlargement) to prevent harsh noise.
A trick I’ve picked up: always zoom into 100% in the Export As preview before hitting “Save.” Sometimes you’ll notice slight halos or noise that you can fix by tweaking the method.
And please, don’t rely on websites or social platforms to resize your work for you. Their algorithms are fast, not good. Let Photoshop handle it first.
e) Compression & Quality Settings — Don’t Obsess, Test
Here’s a truth bomb: most people can’t tell the difference between a JPEG at 90% and one at 75%. But their bandwidth definitely can.
Photoshop’s newer versions use a quality scale of 1–7, while older ones use 1–100. Whichever you have, you don’t need to crank it to the top. Try a few exports side by side, you’ll probably find quality 5–6 (or 75–85%) looks identical and saves half the space.
If you’re exporting for social media or web, smaller is better as long as it still looks good. Test it on your phone, laptop, and browser. If it passes the eye test, it’s good enough.
f) Metadata, Transparency, and Optimization — Clean Files = Fast Files
When you export, Photoshop often keeps metadata like camera info, edit history, or copyright data. That’s great for archiving, but it just adds bloat for web files.
Unless you specifically need that data, toggle “Remove Metadata” or export using the “Smaller File (8-bit)” options when possible.
For images with transparency, stick with PNG-24, but if you don’t need transparency, disable alpha channels. It’ll cut your file size in half.
Little things like that make a huge difference when you’re managing dozens of assets. A clean export isn’t just lighter, it’s faster to load, share, and store.
That’s the technical part handled. Next, let’s make this real, how these settings actually work in different real-world export scenarios.
For smoother performance and faster exports, learn how to use GPU acceleration in Photoshop.
Real-World Scenarios (and What Works Best)
Now that we’ve covered what each setting does, let’s put it all together. Because exporting isn’t theoretical, it’s practical. You’re not choosing settings for fun; you’re doing it because that image is headed somewhere specific. Here’s how I’d set things up in a few common, real-world cases.
Scenario 1: A Web Hero Image That Actually Loads Fast
You’ve spent hours crafting a gorgeous homepage visual. The last thing you want is a 10-megabyte image choking your site speed.
For a web hero image, say, a 1920 px wide banner, I go JPG, sRGB, 80 % quality, and make sure it’s around 150–300 KB.
That’s usually plenty crisp on desktop and mobile.
If the design includes flat colors or sharp edges (like typography or UI components), I’ll test a WebP version too, it often keeps quality with even smaller sizes.
Key idea: optimize for load time, not pixel perfection. No one zooms into your banner at 400 %.
Experiencing random crashes during export? You might want to read about the most common crash reasons for Photoshop and how to fix them.
Scenario 2: An Instagram Post That Doesn’t Get Mangled
Social media platforms are notorious for aggressive recompression. If you upload a 5 MB masterpiece, Instagram will gladly crush it down to a crunchy mess.
So, export at 1080 × 1350 px (portrait ratio), sRGB, JPG 75–80 %.
That size fits Instagram’s native frame perfectly and minimizes extra compression.
If you’ve got text or gradients, test a PNG-24 version, it’ll hold edges better. Just keep the file under 2 MB for smoother uploads.
And here’s a tiny trick I swear by: add a subtle sharpen pass (like 0.3–0.5 radius) before exporting. It compensates for Instagram’s softening.
Scenario 3: High-Resolution Print That Still Looks Polished
Print is a different world. It doesn’t care about pixels; it cares about inches.
For anything going to print, brochures, posters, magazine spreads, stick with 300 ppi, CMYK, and either TIFF or PDF.
Flatten layers only if your printer requests it, and make sure to embed the color profile (usually the printer will give you one, like “ISO Coated v2”).
If your print includes vector logos or text, PDF is your friend, it preserves sharpness at any scale.
Rule of thumb: print is unforgiving. Always test-print a small proof before the big run.
Scenario 4: Transparent Logo or Overlay Asset
This one’s simple but often botched.
Use PNG-24, sRGB, and make sure transparency is on. Avoid PNG-8 unless you like ugly banding around soft edges.
Keep the dimensions exactly what you need, resizing transparent assets later often leads to blurry edges or matte halos.
And if it’s something you’ll reuse across different designs, export one master at full resolution, then downscale copies per platform.
Each of these scenarios has its own “sweet spot.” Once you find yours, save it as a preset or action, it’ll save hours in the long run.
Now, exporting efficiently is one thing. But what if you could make the whole process faster, especially when you’re dealing with huge Photoshop files that make your laptop wheeze? That’s where the next part comes in.
Even if your system lacks a dedicated GPU, you can still achieve smooth performance. Here’s a guide on how to run Photoshop smoothly without a GPU.
When Your Workflow Deserves a Boost (Vagon Cloud Computer)
Here’s the part nobody likes to admit: exporting can absolutely wreck your computer. I’ve had Photoshop crash mid-batch because my system ran out of RAM while Spotify, Chrome, and After Effects were all begging for mercy. Exporting ten massive PSDs feels like trying to run a marathon with a backpack full of bricks.
That’s when I started using Vagon Cloud Computer, and it honestly changed my workflow.
Instead of running Photoshop locally, I spin it up on Vagon, a high-performance cloud computer that opens right in my browser. No installs, no setup, no overheating fans. I just log in, launch Photoshop, and let a remote machine with a powerful GPU and plenty of RAM handle the heavy lifting.
When I’m exporting huge files, layered composites, high-res textures, or batch exports for an entire campaign, Vagon chews through them effortlessly. I can keep editing, switch between apps, or even browse on my laptop without everything lagging into oblivion.
And the best part? I only use it when I need it. No hardware to maintain, no expensive upgrades, no “scratch disk full” nightmares. Just clean, reliable power when my workflow demands it.
If you’re the kind of creator who works with large PSDs, renders, or AI-enhanced art, Vagon Cloud Computer gives you that extra horsepower exactly when you need it, and frees your local machine to breathe again.
It’s not magic. It’s just smart resource management.
Common Mistakes to Avoid (and Some Unpopular Opinions)
Even seasoned Photoshop users mess up exports more often than they’d admit. It’s not because they don’t know what they’re doing, it’s because Photoshop gives you about 200 ways to do the same thing, and some of them still behave differently depending on the version. Here are a few classic traps I’ve fallen into (and learned to avoid).
Thinking about upgrading your hardware? Discover the best GPUs for Photoshop to enhance speed and rendering performance.
#1. “I’ll Export at Double Resolution — Just to Be Safe”
No. Don’t.
If you’re exporting for the web or social, doubling your dimensions doesn’t make your image sharper; it just makes your file heavier. Platforms like Instagram or Behance will resize it anyway, and not kindly, you’ll end up with softer edges and compression artifacts.
I used to do this thinking “more pixels = better quality.” Turns out, it just meant slower uploads and bigger headaches.
#2. Mixing Up Print and Screen Profiles
I once sent a CMYK export to a web client. It looked perfect in Photoshop, until they opened it in Chrome and everything turned grayish and flat. Web = sRGB. Print = CMYK. If you’re ever unsure, stick with sRGB. At least it’ll look consistent across most devices.
#3. Ignoring File Size Completely
Some designers act like file size is someone else’s problem, until the client emails saying, “The site takes forever to load.” Every kilobyte matters online. Your export might look identical at 75% quality compared to 100%, and it’ll load twice as fast. Don’t overdeliver on pixels no one can see.
#4. Letting Platforms Handle Your Resizing
Never trust social media compression. Facebook, LinkedIn, and Instagram use heavy-handed compression to save bandwidth. Always resize and optimize yourself in Photoshop. It’s the only way to control how the image will actually look once it’s uploaded.
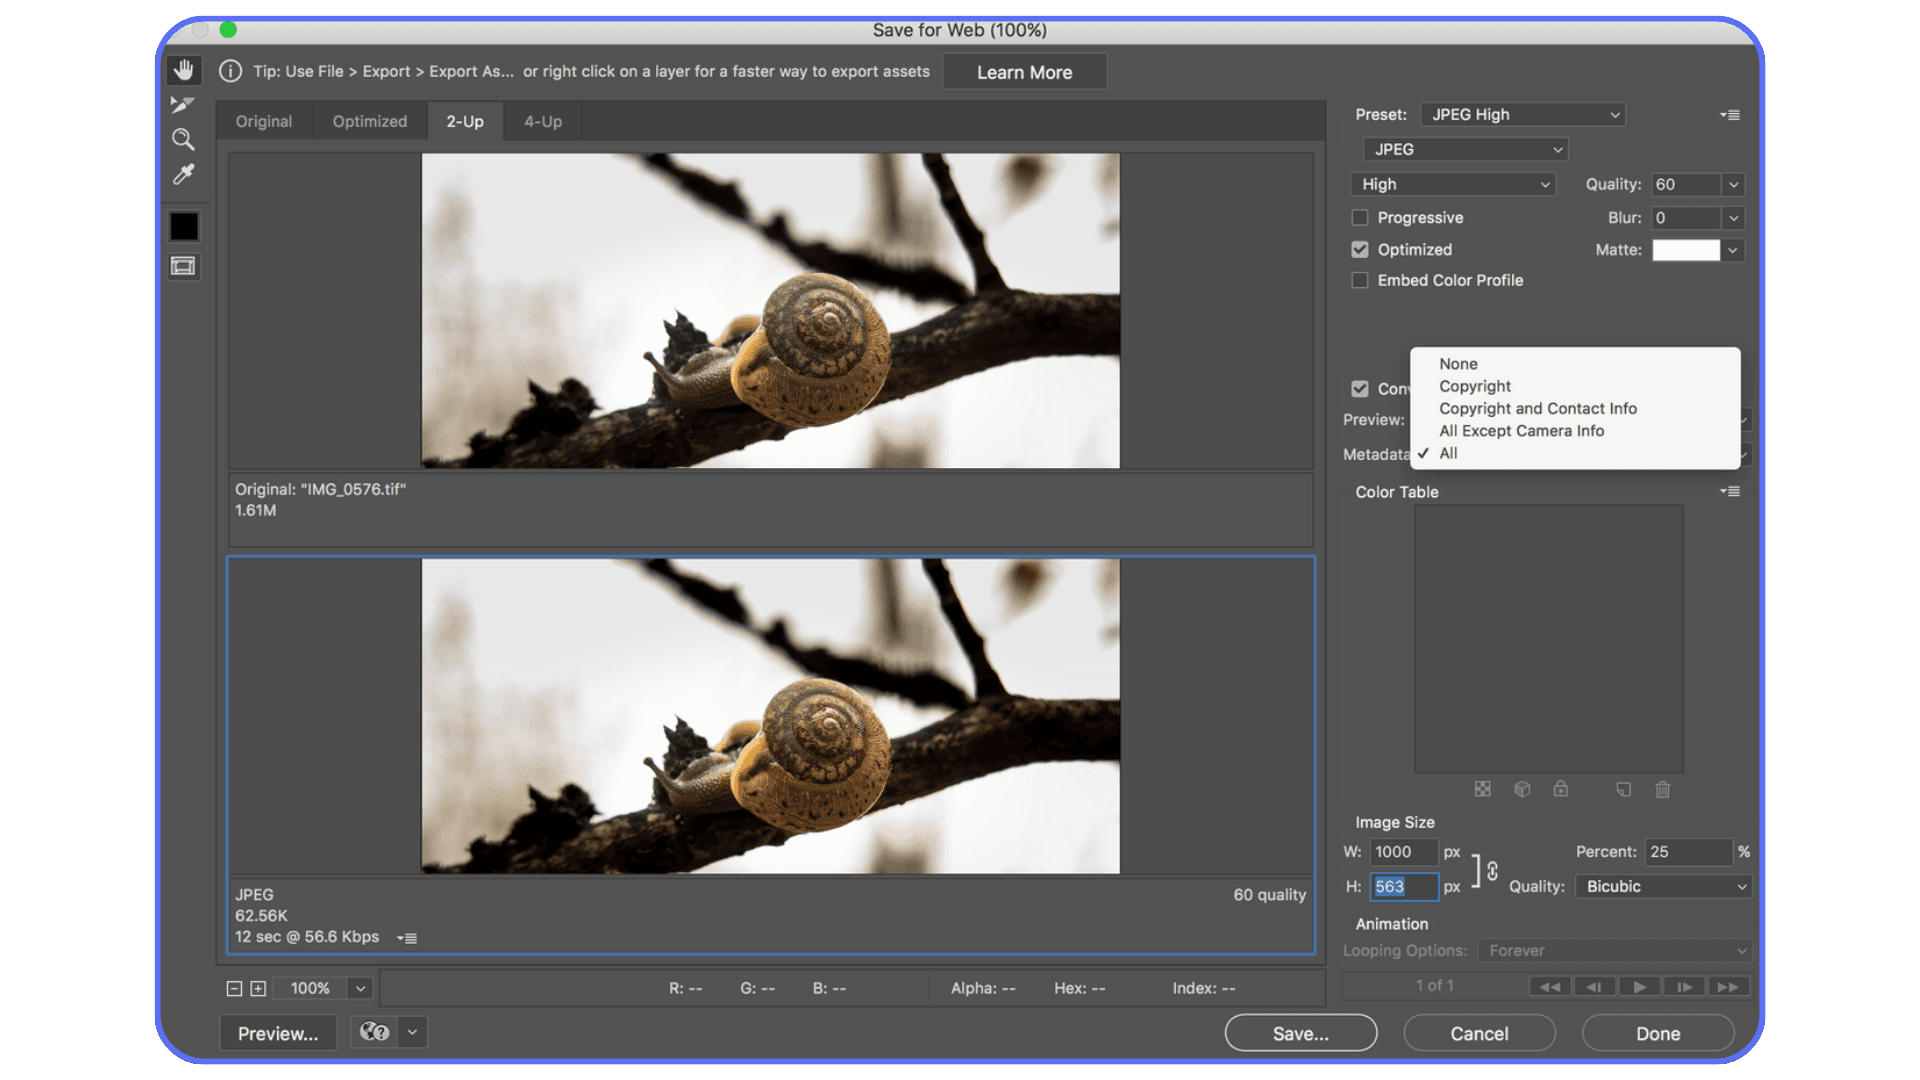
#5. Overreliance on “Export As” (Unpopular Opinion)
Yeah, it’s modern. Yeah, it’s fancy. But I’ll be honest, the old “Save for Web (Legacy)” tool still gets me more predictable results sometimes. It gives more granular control over optimization, color profiles, and metadata stripping. The “Export As” window is cleaner, but not always smarter.
If you’re exporting dozens of assets or slices, Save for Web can still be your best friend. Don’t feel bad about sticking with what works.
#6. Not Testing Your Export Before Sending It Off
This one’s boring, but crucial. Before delivering to a client or uploading anywhere, open your exported file in a browser, on your phone, or in a different viewer. You’ll catch things Photoshop’s preview hides, compression noise, color shifts, weird banding.
A 30-second test can save you a 30-minute apology email.
The takeaway? Exporting isn’t just clicking “save.” It’s about controlling the translation of your work — how it leaves Photoshop and enters the world. A few conscious tweaks here save you countless “why does it look different?” moments later.
Want the ideal setup for heavy editing and exporting? Explore our picks for the best PC and laptop for Photoshop.
Quick Export Checklist Before You Click Save
By this point, you probably know exactly which settings you should use, but when the deadline’s five minutes away, it’s way too easy to forget one tiny thing that ruins the result. So here’s a quick gut-check I run through before hitting Export.
Print it. Stick it to your monitor. Or just mentally recite it like a mantra.
✅ Format: Does the file type actually match the job? (JPG for photos, PNG for graphics, TIFF or PDF for print.)
✅ Color Space: Did you convert to sRGB for web or CMYK for print? If not, do it. Trust me, future-you will thank you.
✅ Dimensions: Sized correctly for its destination? Don’t upload a 5000 px banner to Instagram.
✅ Resampling Method: Using Bicubic Sharper when downsizing? Good. Bicubic Smoother when enlarging? Even better.
✅ Quality Setting: Is your JPEG quality around 75–85%? You’ll save space without losing any visible detail.
✅ Metadata: Stripped out any unnecessary info like camera data, edit history, or GPS tags? No one needs to know that.
✅ Transparency: PNG-24 if you need it, otherwise, ditch it. It just adds weight.
✅ Visual Test: Opened it outside Photoshop? Check it on your phone, your browser, even your client’s platform if you can.
✅ Workflow Power: If your export queue looks like a nightmare (dozens of heavy PSDs, multiple formats), spin up Vagon Cloud Computer, let it handle the heavy lifting while your laptop chills.
Getting exports right isn’t about perfection; it’s about consistency. When you nail this checklist once, you’ll never second-guess what went wrong again.
Wrapping Up: It’s About Control, Not Complexity
Exporting in Photoshop isn’t rocket science, but it’s also not something to phone in. It’s where your work leaves the safety of your screen and steps into the real world, where every pixel counts.
Once you understand what each export setting actually does, the process becomes way less mysterious. You stop guessing, start controlling. You can decide how your colors show up on Instagram, how sharp your banner looks on a Retina display, or how crisp your poster prints on glossy paper.
The trick is to treat exporting like part of the creative process, not the boring last step. A good export makes your work shine the way you intended. A bad one makes it look like you didn’t care.
And if you ever feel like Photoshop is struggling under the weight of all those layers, filters, or exports, remember: you don’t have to fight your hardware. With Vagon Cloud Computer, you can run Photoshop on a powerful cloud machine, finish your exports faster, and actually keep your local device cool and usable. It’s the kind of small workflow upgrade that adds up to hours saved, and far fewer “Not Responding” moments.
In the end, exporting well isn’t about memorizing settings, it’s about owning the outcome. Once you’ve got that, you’ll never look at the Export button the same way again.
FAQs
1. What’s the best export format for Instagram?
Go with JPEG, sized at 1080 × 1350 px (portrait) or 1080 × 1080 px (square), in sRGB color space, and around 75–80% quality. That gives you crisp visuals without Instagram’s compression wrecking them.
2. Why do my exported colors look dull or different from Photoshop?
You probably forgot to check “Convert to sRGB” before exporting. Photoshop often works in Adobe RGB or ProPhoto RGB, which have wider color ranges that most screens can’t display correctly. Converting to sRGB ensures your colors stay accurate everywhere.
3. Should I always export at 300 ppi for better quality?
Only for print. For web or social, pixel dimensions matter, not ppi. A 300 ppi image for Instagram is just a heavier file with no visible improvement. Stick to the platform’s recommended pixel size instead.
4. Is “Save for Web (Legacy)” still better than “Export As”?
In some cases, yes. The old Save for Web tool still gives more granular control over file size, optimization, and metadata. “Export As” is simpler but sometimes inconsistent, depending on the Photoshop version. Try both and see which works better for your workflow.
5. What’s the best way to export transparent images?
Use PNG-24 with transparency turned on. Avoid PNG-8, it causes banding and edge artifacts. If you need lighter files and no transparency, switch to JPG instead.
6. My computer lags or freezes during export. What can I do?
Large PSDs, multiple smart objects, and layered exports can crush your local hardware. Try running Photoshop on Vagon Cloud Computer, it gives you instant access to a high-performance machine in your browser, so you can export faster without your system locking up.
7. How can I reduce file size without losing visible quality?
Lower the JPEG quality slider to 75–80%, enable “Convert to sRGB,” and remove metadata. Test exports visually, most images look identical at half the file size if optimized right.
8. Do I need to change export settings for AI-generated images?
Yes, sometimes. AI tools often create very large, high-resolution images. Resize them before export, use Bicubic Sharper when downsizing, and check that your color profile is sRGB for consistent display across devices.
Get Beyond Your Computer Performance
Run applications on your cloud computer with the latest generation hardware. No more crashes or lags.

Trial includes 1 hour usage + 7 days of storage.
Summarize with AI

Ready to focus on your creativity?
Vagon gives you the ability to create & render projects, collaborate, and stream applications with the power of the best hardware.

Vagon Blog


Run heavy applications on any device with
your personal computer on the cloud.
San Francisco, California
Solutions
Vagon Teams
Vagon Streams
Use Cases
Resources
Vagon Blog
How to Run Ollama in the Cloud on a GPU Ubuntu Desktop (2026 Guide)
How to Run Ubuntu on an iPad (That Actually Works in 2026)
How to Get an Ubuntu Desktop in the Cloud (GPU Optional): The Complete 2026 Guide
What Slows Down After Effects Projects?
The First 30 Minutes in Blender 3D: A Practical Workflow Guide
What’s New in Godot 4.7? Key Features, Upgrades, and Workflow Improvements
What Slows Down Blender 3D Projects?
What Slows Down Adobe Photoshop Projects?
The First 30 Minutes in Adobe Photoshop: A Practical Workflow Guide
Vagon Blog
Run heavy applications on any device with
your personal computer on the cloud.
San Francisco, California
Solutions
Vagon Teams
Vagon Streams
Use Cases
Resources
Vagon Blog