Instant Connection for Pixel Streaming
— New Feature Automated Setup

How to Set Up DLSS for Unreal Engine Projects?
How to Set Up DLSS for Unreal Engine Projects?
GameDev
How to Set Up DLSS for Unreal Engine Projects?
Table of Contents
TL;DR:
DLSS (Deep Learning Super Sampling) is NVIDIA’s AI-powered rendering tech that boosts frame rates and sharpens visuals in Unreal Engine 5. To enable it, you’ll need to install NVIDIA’s DLSS plugin manually, activate it in Unreal’s Plugin Manager, optionally add sample blueprints for quick tuning, then adjust DLSS, DLAA, and Frame Generation settings for your GPU.
Ever built a gorgeous Unreal scene that suddenly tanked your FPS?
Yeah, that moment when your camera pans across a high-poly cityscape and your GPU starts begging for mercy. That’s usually when you wish for a bit of AI magic, and that’s exactly what DLSS delivers. It’s not just another toggle in the settings menu; it’s one of those rare technologies that actually feels like cheating physics.
When you get it right, DLSS lets you render fewer pixels without losing clarity. The result? Smooth frames, crisp edges, and fewer fans screaming in pain.
What is DLSS?
Let’s break the acronym first: Deep Learning Super Sampling.
It’s NVIDIA’s neural-rendering technology designed to make your GPU smarter, not just faster.
Instead of brute-forcing every single pixel like traditional rendering, DLSS uses a trained AI model to predict what a high-resolution frame should look like, based on a lower-resolution input. It’s like having a visual artist who can perfectly fill in the missing detail — at lightning speed.
Here’s how it works in plain English:
The GPU renders your scene at a lower internal resolution.
DLSS runs a neural network trained on ultra-high-res frames to reconstruct the missing detail.
The result is an image that looks like native 4K but costs your GPU roughly half the effort.
The magic is in the AI model. It doesn’t just guess — it uses motion vectors and frame history to predict how objects should move and look between frames. That’s how it maintains crisp edges, even in fast-moving shots or complex lighting scenarios.
Why Developers Actually Care About DLSS?
In Unreal Engine, every millisecond counts.
When you’re trying to keep your frame time under 16.6 ms for a 60 FPS target, DLSS can give you that breathing room to push post-processing, reflections, or ray tracing without tanking performance.
It’s especially helpful when:
You’re working on VR or high-refresh experiences.
Your project relies on Lumen or heavy dynamic lighting.
You’re targeting lower-end hardware or remote devices via streaming.
DLSS doesn’t just help your players — it helps you, the developer, build and iterate faster with higher preview fidelity inside the editor.
I’ve seen people expect DLSS to fix bad optimization. It won’t.
If your project is GPU-bound by shaders or heavy draw calls, DLSS won’t suddenly make that disappear. What it will do is buy you headroom — and in Unreal Engine, that can be the difference between “almost playable” and “feels buttery.”
DLSS Versions Explained: What’s New and What Actually Matters?
DLSS has gone through a wild evolution. What started as an experimental AI upscaler has turned into a full-blown neural rendering pipeline. If you’ve lost track of which DLSS does what, you’re not alone. So here’s a breakdown that actually makes sense — without the marketing noise.
DLSS 1 – The Experimental Era
The original DLSS 1 was more of a tech demo than a practical tool. It used per-game AI models that had to be trained by NVIDIA individually for each title.
The result? Some games looked great; others looked like they’d been run through a watercolor filter.
It worked by rendering frames at a lower resolution (say 1440p → 4K) and then using a trained network to upscale them. But because the model was specific to each game, developers couldn’t easily use or tweak it. Unreal Engine support was also minimal.
Verdict: Historical curiosity. Cool idea, rough execution.
DLSS 2 – The Game-Changer
This is where things got serious. DLSS 2 ditched the per-game model for a generalized AI network that works across all titles — including Unreal Engine projects.
It started using motion vectors (basically data showing how objects move between frames) and temporal feedback, meaning it doesn’t just upscale one frame at a time — it learns from the ones before it. The result was image quality nearly indistinguishable from native resolution, but with massive FPS gains.
If you’re using Unreal Engine 5.2 or later, this is your baseline.
Verdict: Still the go-to version for most projects.
DLSS 3 – Frame Generation Arrives
Now this one blew minds — and caused confusion.
DLSS 3 added Frame Generation, which uses AI to create entirely new frames between rendered ones. Essentially, you get double the frame rate without doubling the GPU load. It relies on optical flow acceleration — a hardware feature in RTX 4000-series GPUs.
Here’s the catch: because those extra frames are “hallucinated” by AI, they don’t reduce input latency by themselves. That’s why DLSS 3 usually pairs with NVIDIA Reflex, which handles latency reduction.
Verdict: Transformative for visual smoothness, especially for streaming or cinematic projects.
DLSS 3.5 – Smarter Ray Tracing with Ray Reconstruction
If you’ve ever turned on ray tracing and seen firefly artifacts (those random bright pixels in reflections), DLSS 3.5 fixes that.
It introduced Ray Reconstruction, which replaces Unreal’s traditional hand-tuned ray-traced denoisers with an AI-driven one. Instead of averaging light samples crudely, DLSS 3.5 predicts how light should behave in motion — leading to far more natural reflections, global illumination, and fewer visual glitches.
The cool part: Ray Reconstruction works even without Frame Generation, so RTX 2000 and 3000 cards can still benefit.
Verdict: Cleaner lighting, smarter denoising, better stability for Lumen-heavy projects.
DLSS 4 – Transformer Brains and Multi-Frame Generation
Now we’re stepping into sci-fi territory.
DLSS 4 introduces Multi-Frame Generation (MFG) — meaning the AI can synthesize up to three new frames per traditionally rendered frame. It’s powered by transformer-based models (yes, the same kind of neural architecture that runs language models like GPT).
This version is exclusive to the RTX 50-series (Blackwell architecture). The new transformers help DLSS 4:
Preserve texture detail better (especially foliage and hair)
Reduce ghosting in fast motion
Use VRAM more efficiently
It’s the first time we’ve seen true multi-frame synthesis at this level — and it makes Unreal cinematics and real-time previews smoother than ever.
Verdict: The future standard for high-end rendering — if you’ve got the hardware.
DLAA – When You Want Quality Over Speed
Finally, there’s DLAA (Deep Learning Anti-Aliasing) — basically DLSS without the “Super Sampling.”
It runs at native resolution, using the same AI model purely for anti-aliasing. Think of it as a super-smooth, neural TAA (Temporal Anti-Aliasing) alternative.
If your project already runs at your target FPS but you want sharper visuals — DLAA is the move.
Verdict: Perfect for cinematic or non-performance-limited Unreal projects.
Up next, we’ll go hands-on: the exact requirements and step-by-step setup to get DLSS working inside your Unreal Engine project — including folder paths, plugin dependencies, and one sneaky setting most people forget to enable.
How to Enable DLSS for Unreal Engine Projects
Alright — now that we’ve covered what DLSS does and which version you should care about, let’s actually set it up inside Unreal Engine.
This isn’t one of those drag-and-drop plugins you grab from the Unreal Marketplace. DLSS comes straight from NVIDIA’s developer site, and getting it running involves a few folder tweaks, plugin toggles, and optional Blueprints if you want control from the UI.
Here’s how to do it right.
Before You Start: System Requirements
You’ll need a few basics locked in before Unreal will even recognize DLSS.
Requirement | Minimum | Notes |
|---|---|---|
Unreal Engine | 5.2 or newer | DLSS officially supported starting from UE 5.2 |
GPU Driver | 470.0+ (Super Resolution), 512.15+ (Frame Generation, Reflex, etc.) | Always update via NVIDIA Control Panel or GeForce Experience |
Operating System | Windows 10 (build 1909 or later) | DLSS Plugin for Linux is still in development |
Hardware | RTX 2000 series or newer | DLSS-FG (Frame Generation) requires RTX 4000+ |
HAGS (Hardware Accelerated GPU Scheduling) | Must be enabled | Needed for Frame Generation to work properly |
Step 1: Download the NVIDIA DLSS Plugin
This is the part that usually trips people up — you don’t install DLSS through Epic’s FAB or the Marketplace.
Instead, go to NVIDIA’s official DLSS plugin page:
👉 https://developer.nvidia.com/rtx/dlss
Select your Unreal Engine version (e.g. 5.3, 5.4).
Download the
DLSSPlugin.zipfile.Unzip it somewhere easy to find — inside you’ll see several plugin folders under
Plugins/Runtime/DLSS/.
Now navigate to your Unreal Engine installation directory, typically something like: C:\Program Files\Epic Games\UE_5.3\Engine\Plugins\Runtime\
Paste the unzipped folders into that location. You should now have: UE_5.3\Engine\Plugins\Runtime\DLSS\

There are usually eight DLSS-related plugin folders inside:
DLSS
DLSS-G
DLSS-FG
DLSS-RR
DLSS-DV (Dynamic Vibrance)
Reflex
NIS (NVIDIA Image Scaling)
Streamline (deprecated)
Don’t worry — we’ll only activate what you actually need in the next step.
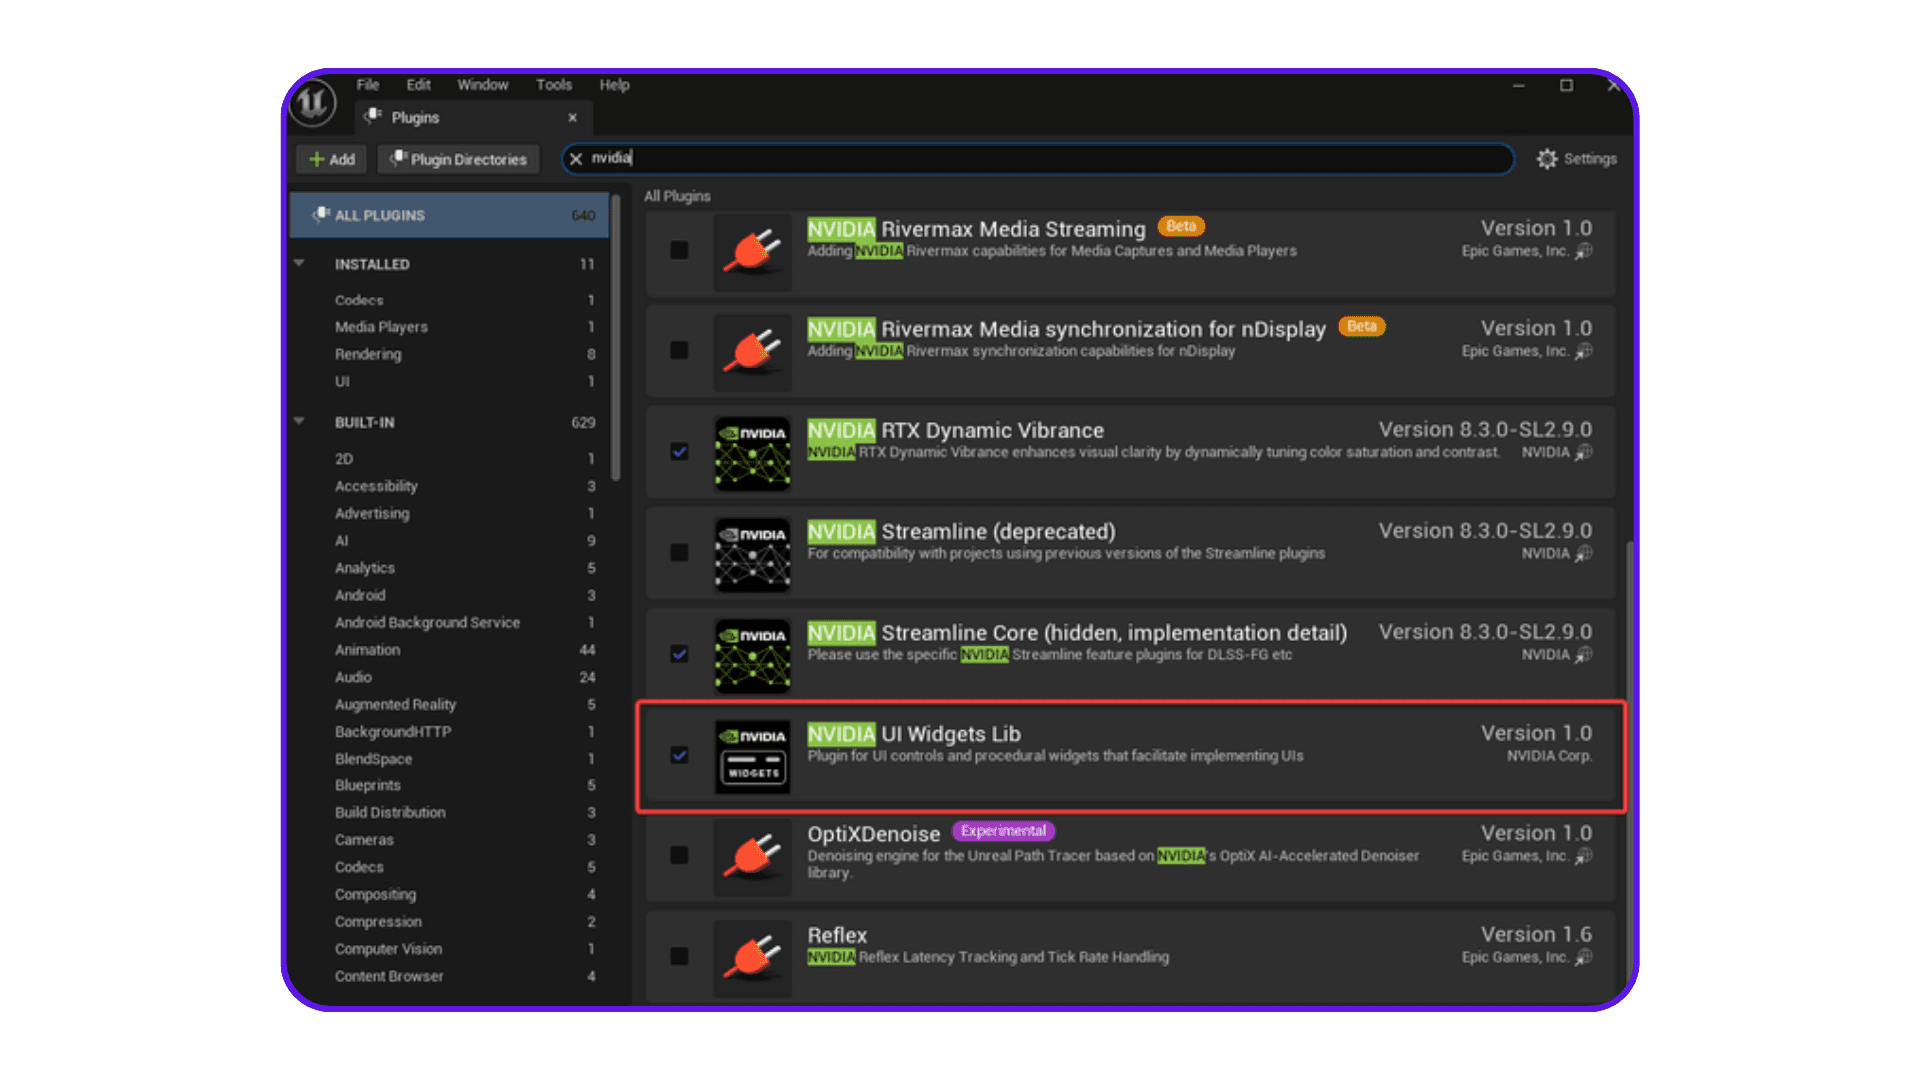
Step 2: Enable DLSS Plugins Inside Unreal Editor
Launch Unreal Engine 5.
Open your project, then from the toolbar go to Edit → Plugins.
In the search bar, type:
NVIDIA | DLSS
You’ll see the full list of DLSS-related options.
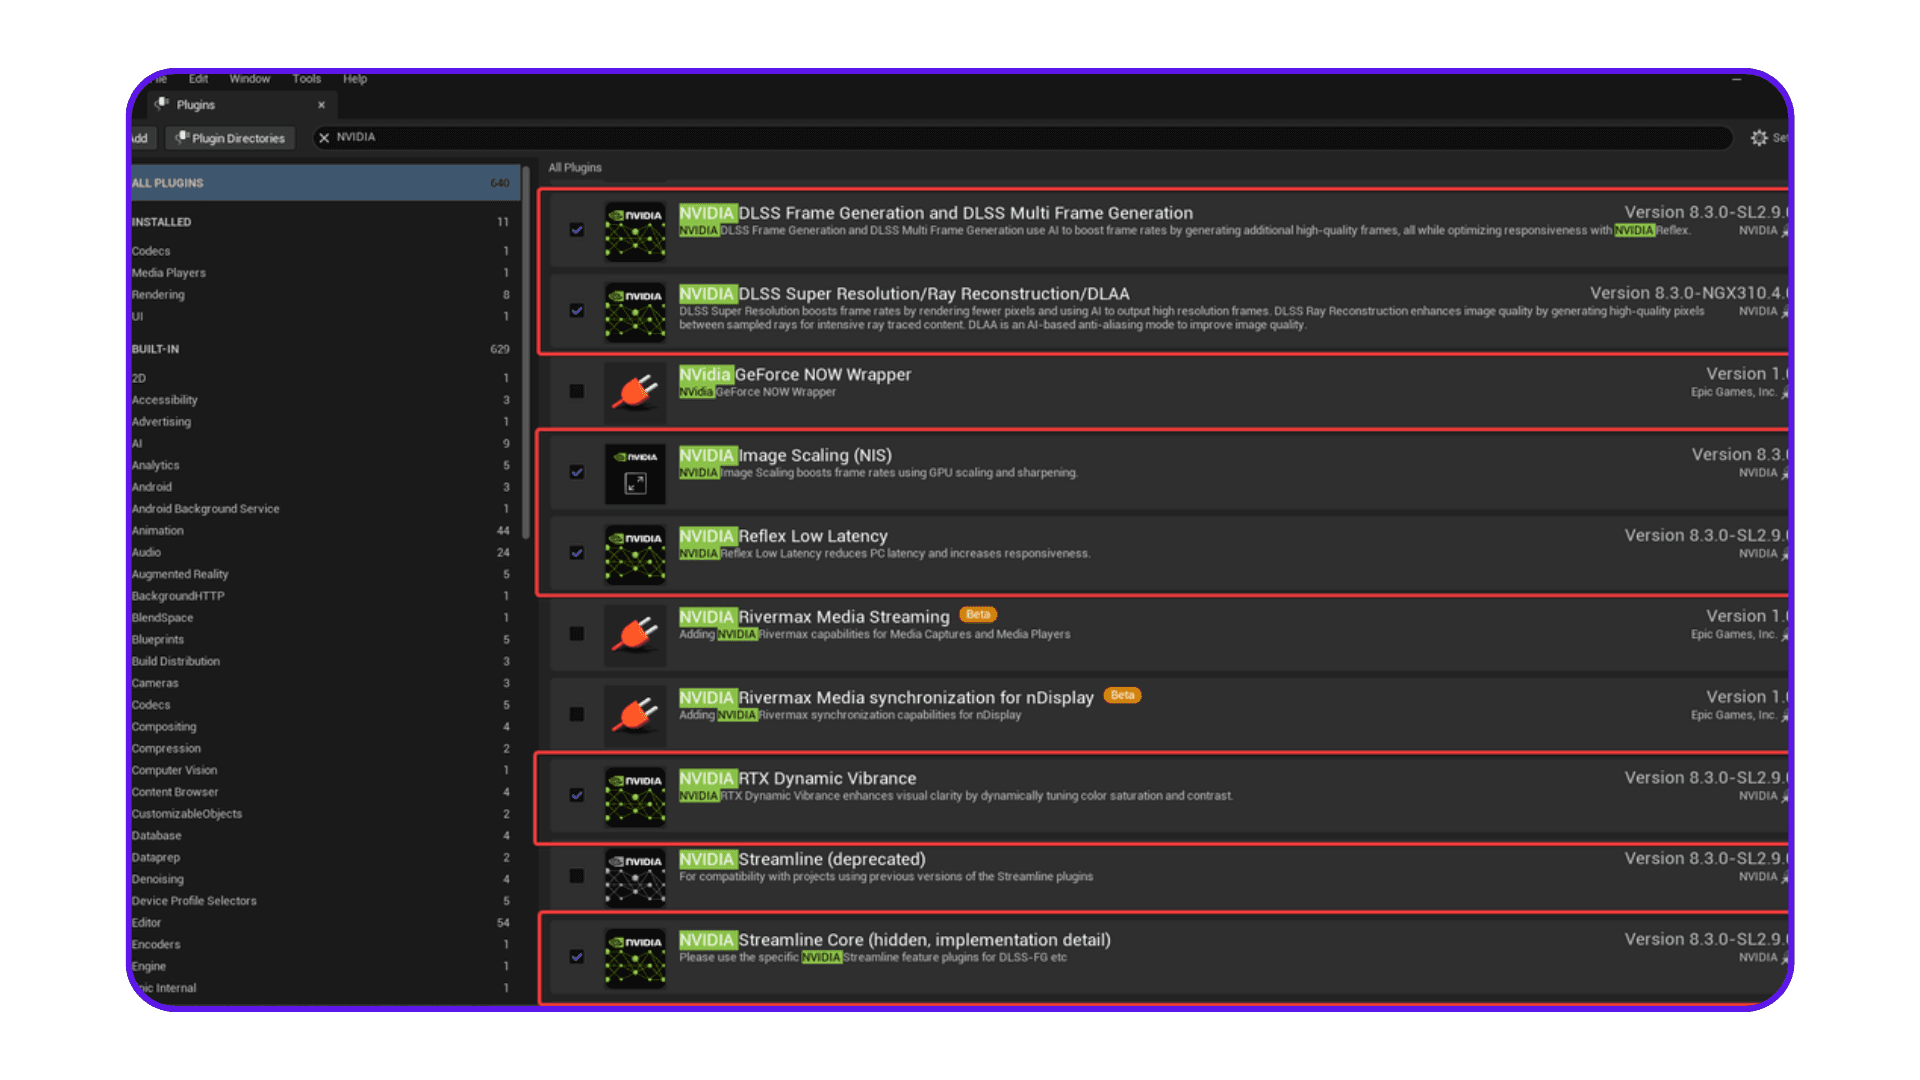
✅ Enable these core ones:
NVIDIA DLSS (required)
NVIDIA DLSS Frame Generation (if you’re on RTX 4000+)
NVIDIA Reflex Low Latency 4
NVIDIA Image Scaling (NIS) — optional, but useful for sharpening
⚙️ Optional:
RTX Dynamic Vibrance — enhances color saturation dynamically
Movie Render Queue DLSS — if you’re rendering cinematic sequences
Streamline (deprecated) — only for legacy project migrations
After enabling, Unreal will show a yellow banner at the bottom asking to restart the editor.
Do that now — DLSS won’t be active until restart.
Step 3: Add NVIDIA’s Sample Blueprints
This step is technically optional, but if you want to expose DLSS settings in your project’s UI or test multiple DLSS modes quickly, it’s absolutely worth it.
Here’s how:
From the unzipped DLSS folder you downloaded earlier, navigate to:
Samples/Plugins/Copy the folder named UIWidgetsLib and paste it into:
UE_5.3\Engine\Plugins\Runtime\DLSS\Next, go to:
Samples/Content/Copy the Blueprints folder and paste it into your project’s:
YourProject/Content/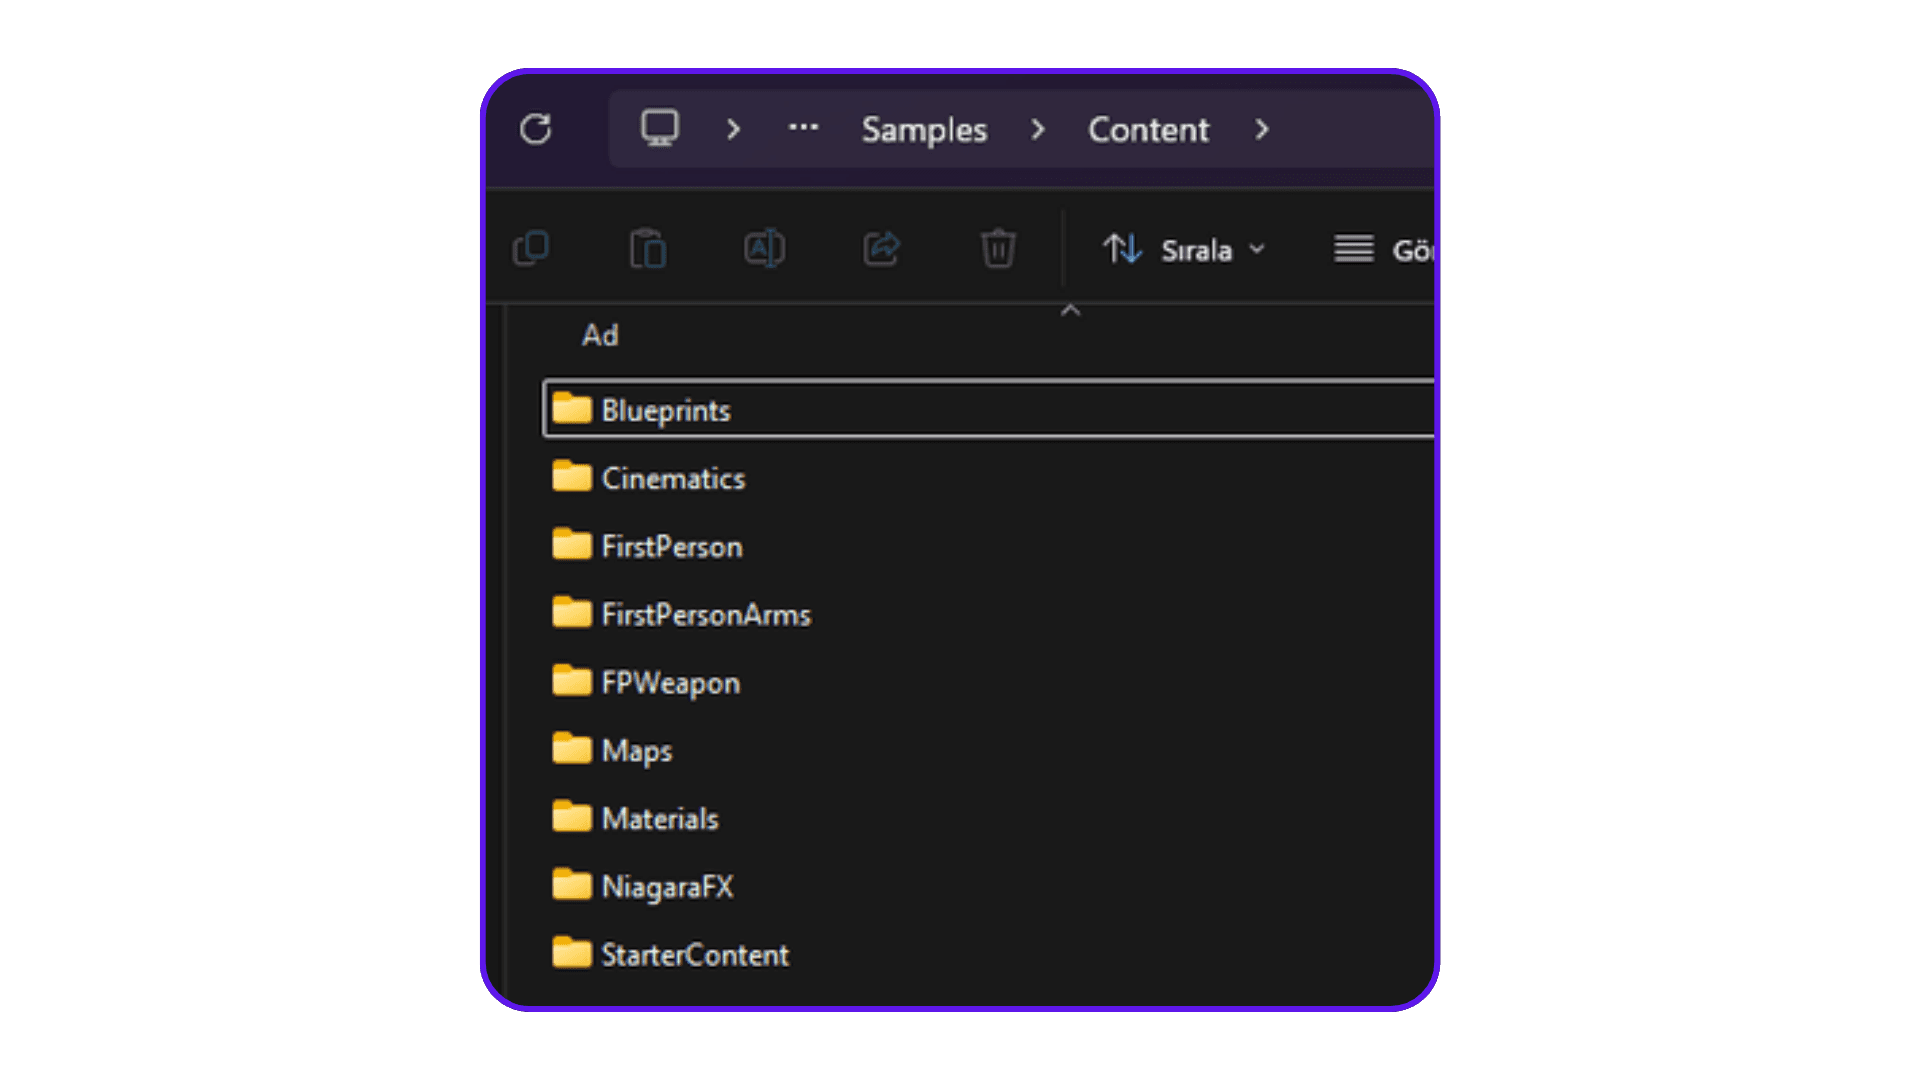
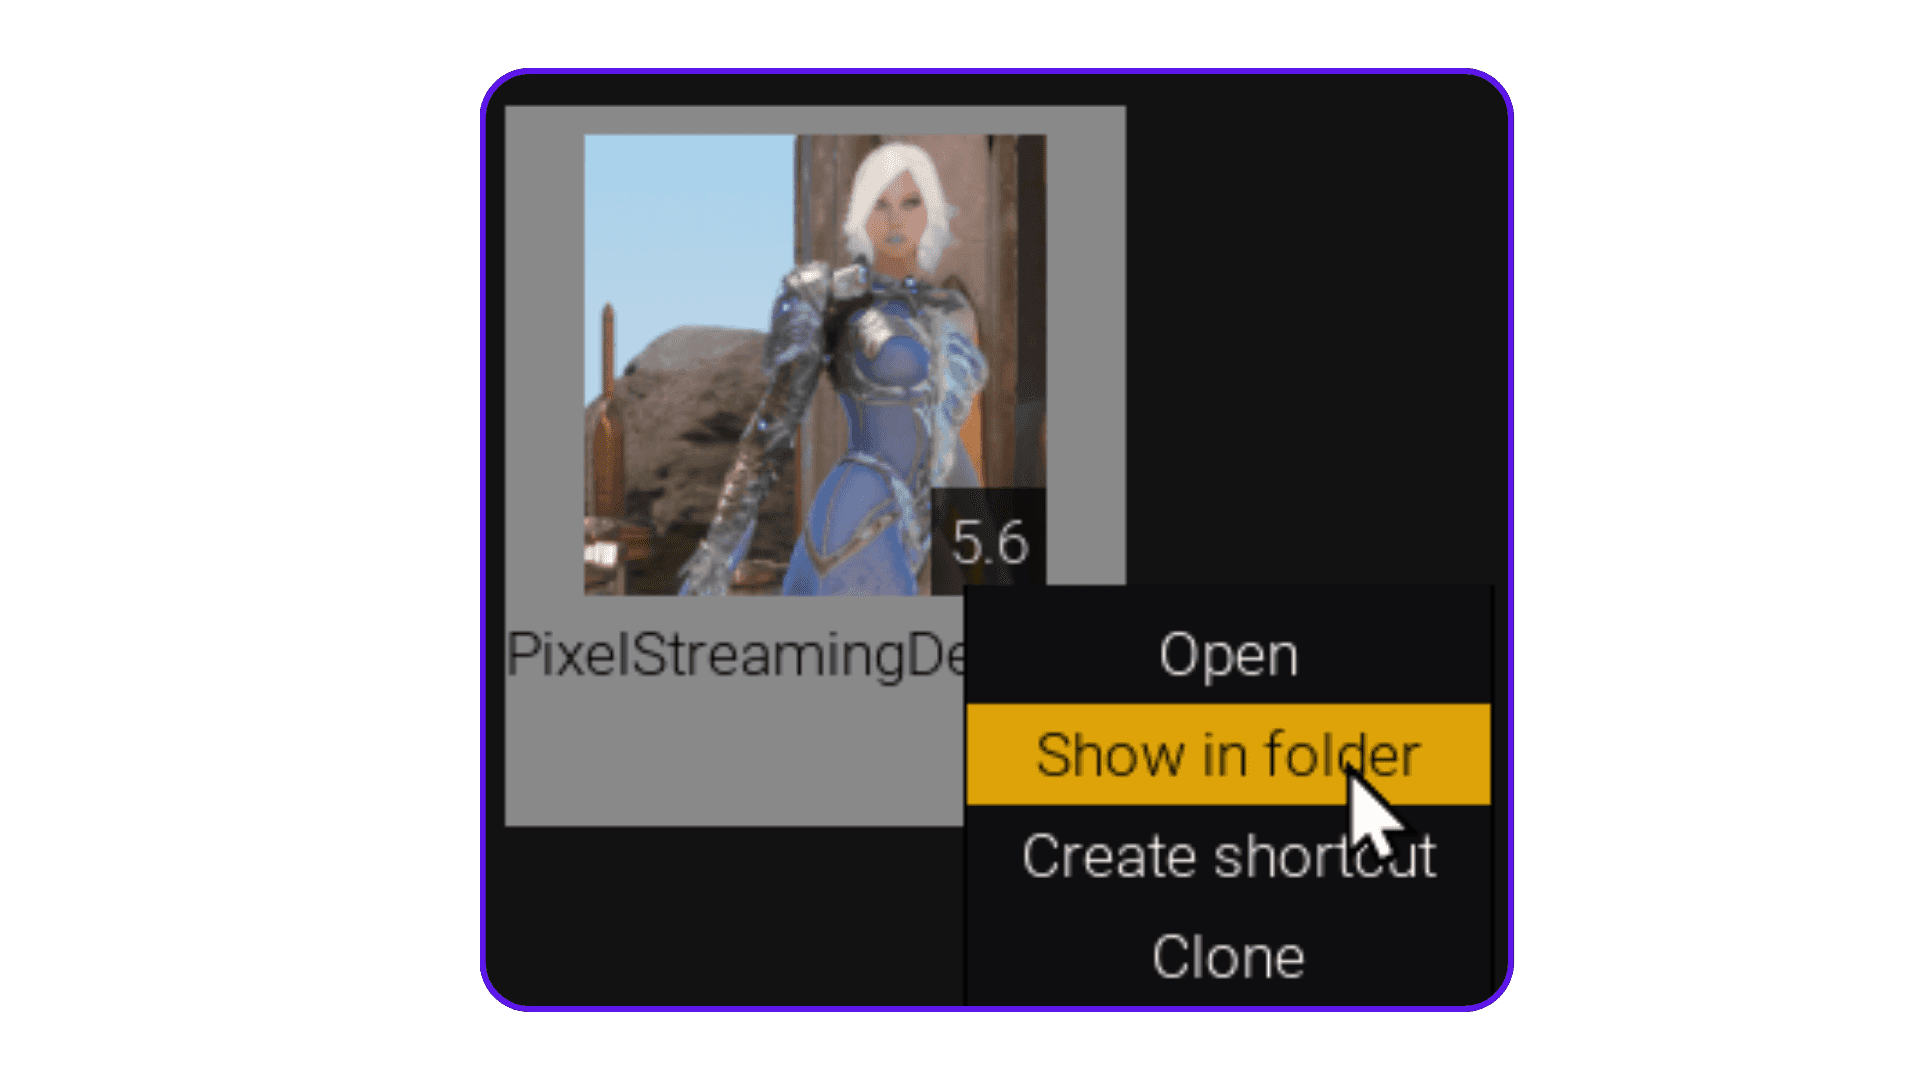
If you’re not sure where your project folder lives:
Open Epic Games Launcher → Library → My Projects → right-click your project → “Show in Folder.”
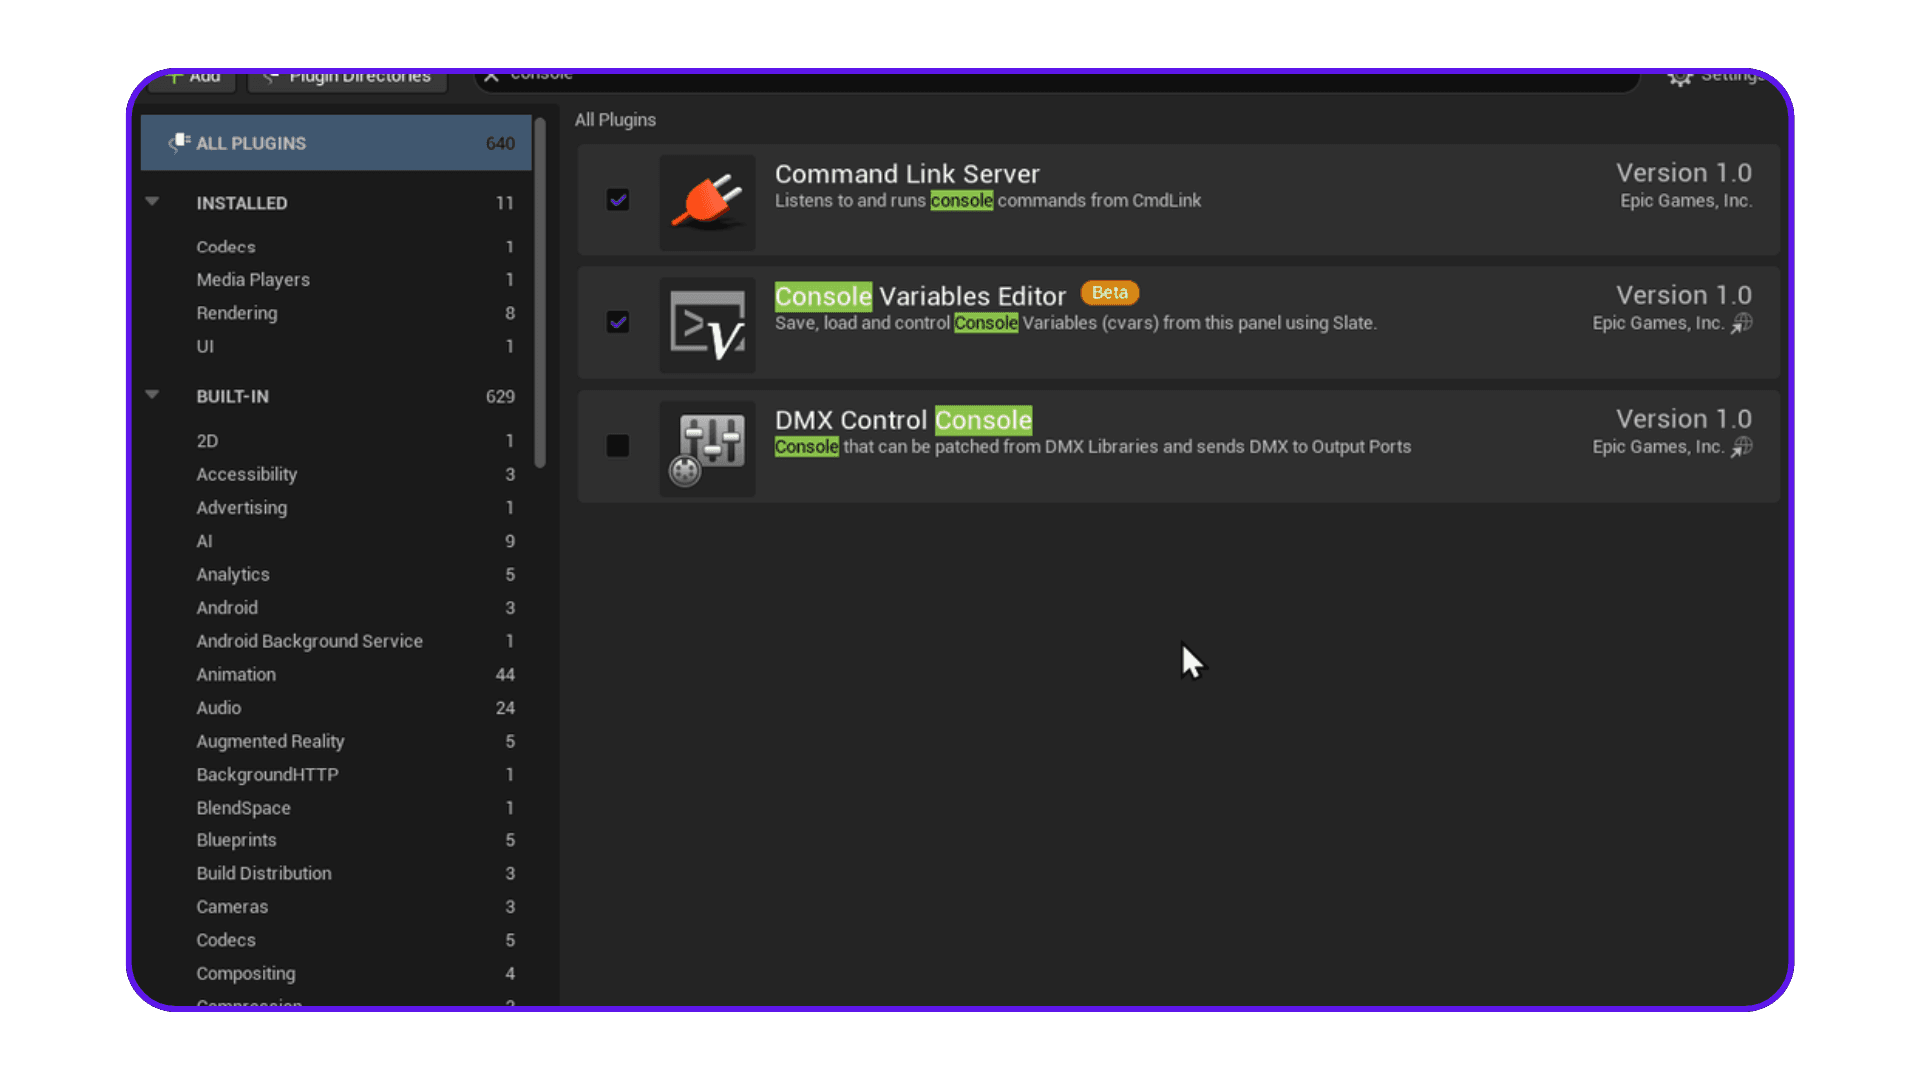
Once pasted:
Enable the Console Variables plugin (so you can tweak DLSS parameters live).
Enable UIWidgetsLib from the Plugins window and restart again.
Now you’ll have a Blueprint class named something like BPW_NGX that lets you toggle DLSS modes (Quality, Balanced, Performance, Ultra Performance) directly inside Unreal.
Step 4: Connect DLSS to Your Blueprint
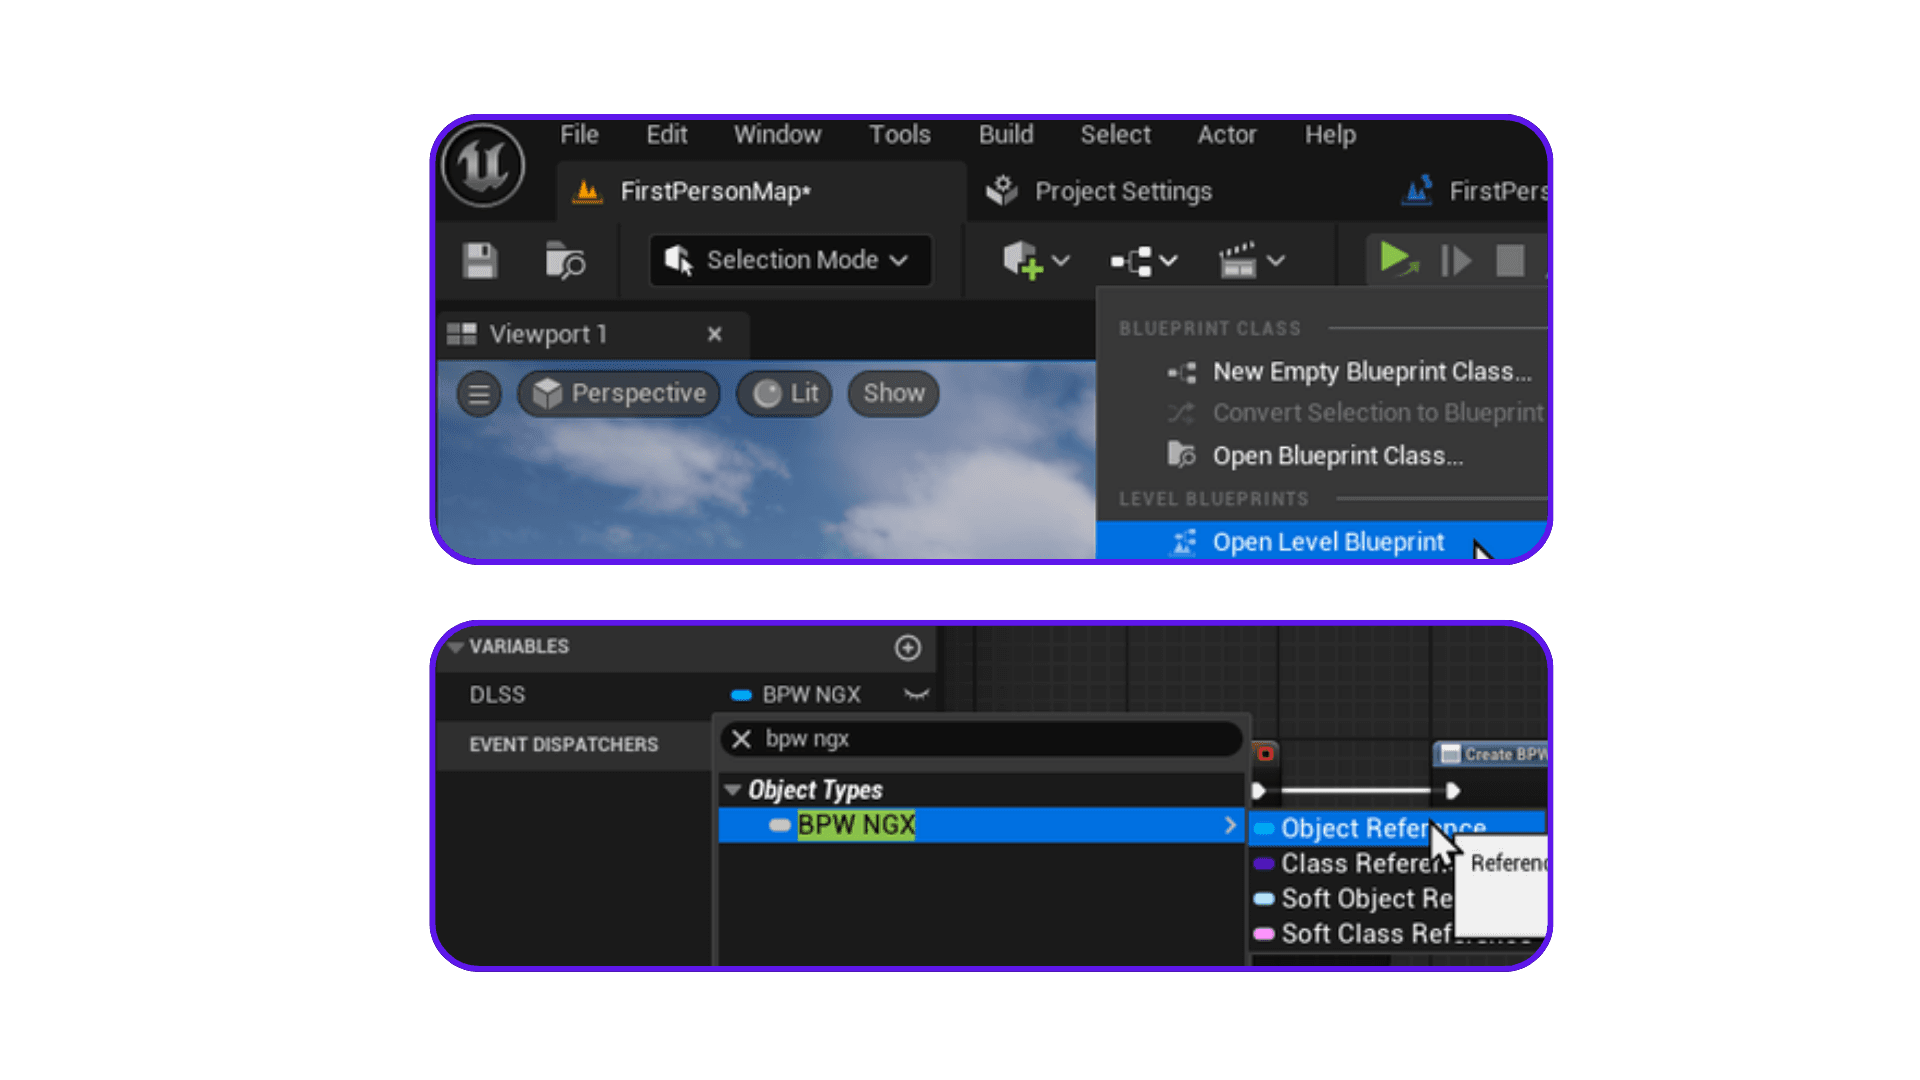
Once you’ve got the UI widgets enabled, you can wire them up easily:
Open your main Level Blueprint.
Create a new variable named
DLSSand set its type to BPW_NGX Object Reference.On the
Event BeginPlay, create the DLSS widget and add it to the viewport.
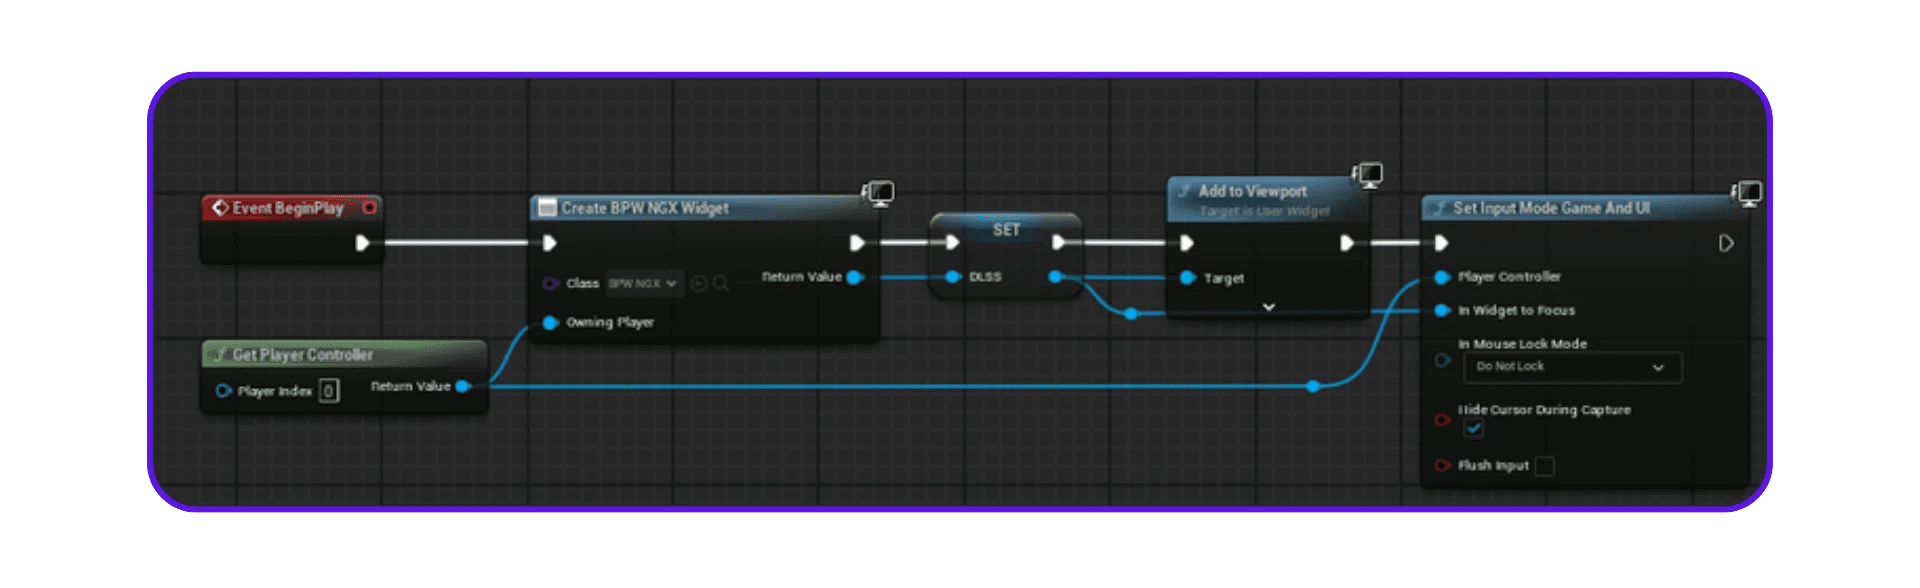
If you already have existing functions on BeginPlay, add a Sequence node and connect both — this ensures DLSS initialization doesn’t overwrite other startup logic.
You’ll now be able to test DLSS in real time from within your scene.
Step 5: Test and Tune DLSS Settings
Now for the fun part.
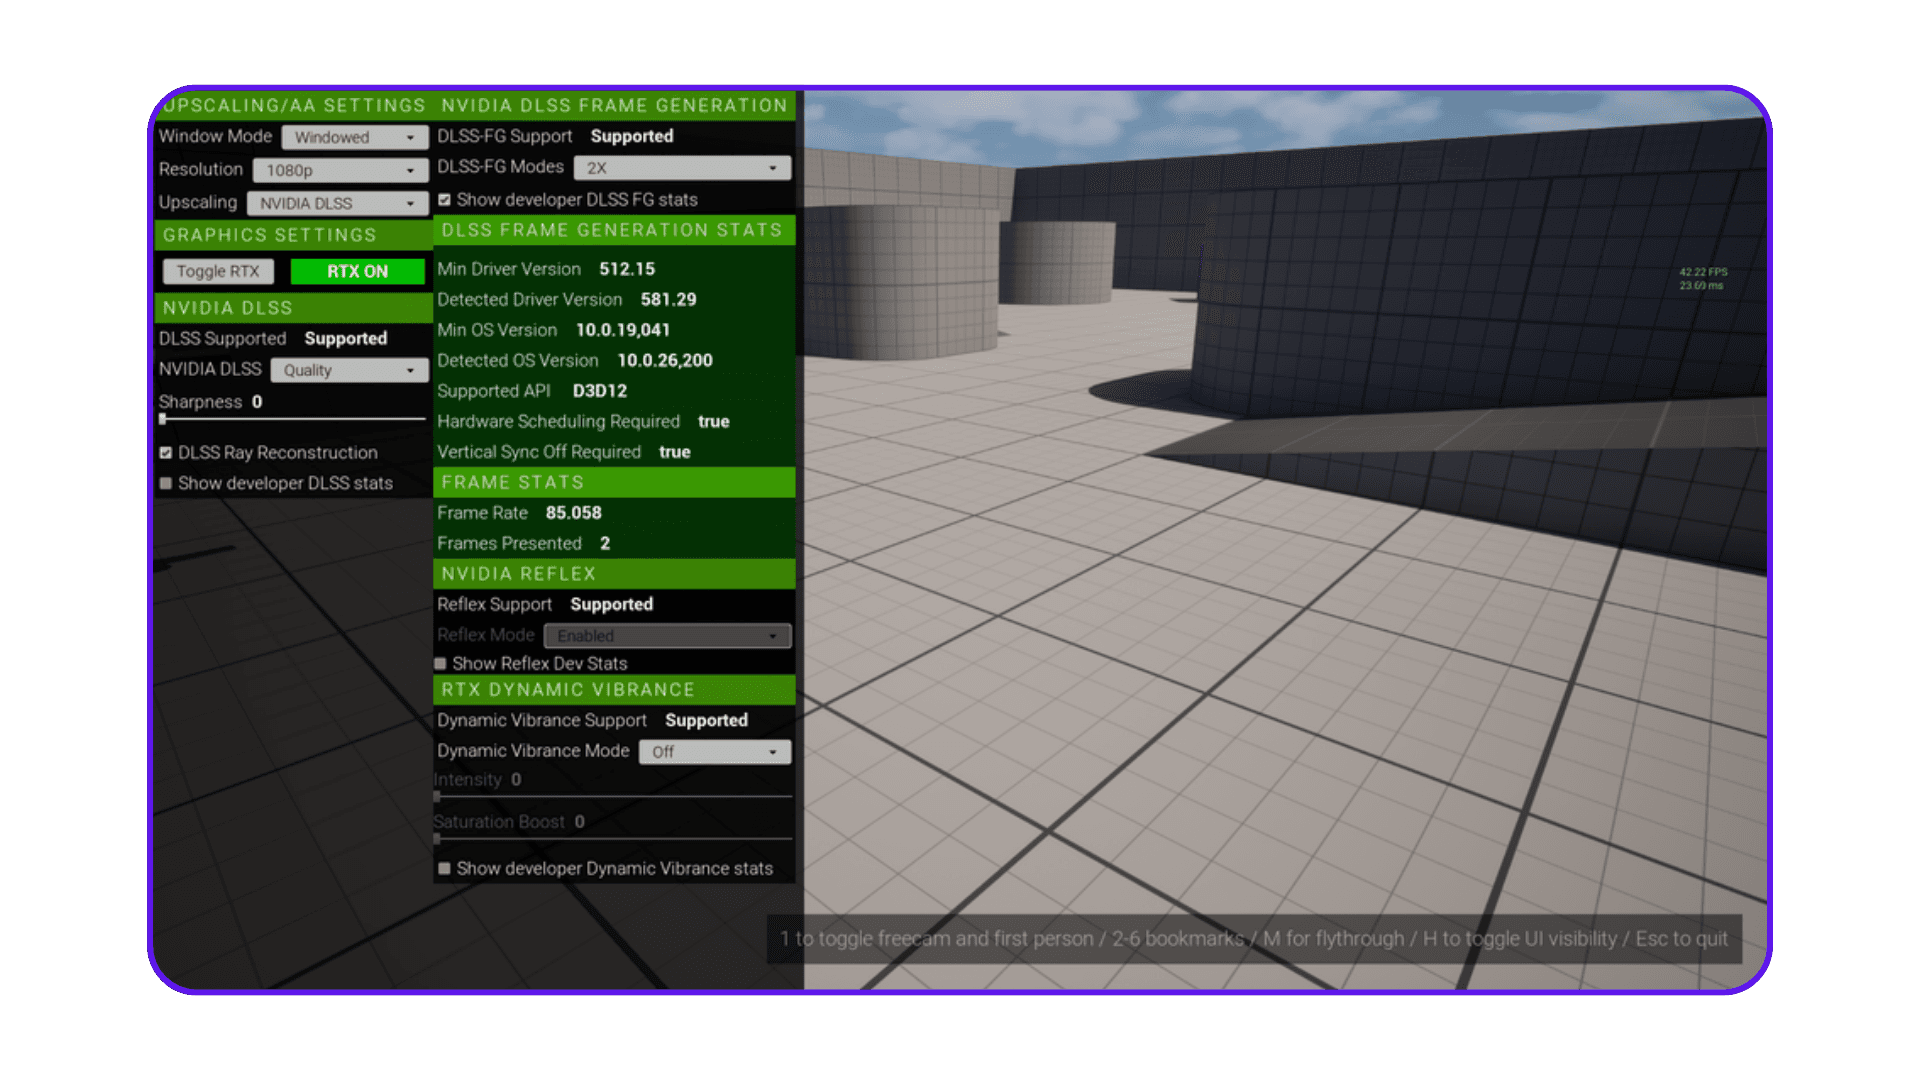
Run your project in Standalone Game Mode (not PIE — Play In Editor).
This ensures DLSS applies its real runtime settings instead of editor approximations.
Here’s what to look for:
Quality vs. Performance: “Quality” gives near-native image fidelity. “Performance” or “Ultra Performance” will boost FPS but might introduce slight texture softness.
DLAA Mode: Try this if you’re after pure visual improvement without FPS gain.
Ray Reconstruction (DLSS 3.5+): Enable it if you see fireflies or noise in Lumen reflections.
Frame Generation (DLSS 3+): This can double your perceived FPS — but only if your GPU supports it and HAGS is on.
🧠 Pro tip: Use stat FPS in Unreal’s console to see the difference before and after enabling Frame Generation. Keep in mind that the engine’s reported FPS will differ from perceived in-game FPS once FG kicks in.
Suggested Starting Setup
Here’s a stable, high-quality baseline for most projects:
Setting | Recommended Mode | Why |
|---|---|---|
DLSS Mode | Quality | Best visual fidelity |
DLAA | Off (enable for cinematics) | Keeps sharpness consistent |
Ray Reconstruction | On (DLSS 3.5+) | Cleaner lighting and reflections |
Frame Generation | On (RTX 4000+) | Significant FPS boost |
NIS Sharpening | 0.3–0.5 | Subtle edge sharpening |
Why Unreal Developers Use Vagon Streams?
By this point, you’ve got DLSS running beautifully inside Unreal Engine.
Your frame rates are climbing, your lighting’s stable, and your GPU fans have stopped sounding like jet engines.
Now comes the real-world question:
How do you share that same buttery-smooth experience with someone else — without them having your hardware?
That’s where Vagon Streams comes in.
What Is Vagon Streams?
Vagon Streams is a browser-based application streaming platform built specifically for high-performance, GPU-heavy workloads like Unreal Engine, Unity, and 3D visualization.
In simple terms:
You host your Unreal project in the cloud, and your users can instantly open it in their browser — no installs, no setup, no downloads.
Everything runs on Vagon’s RTX-powered servers, so even complex, DLSS-enabled builds render with full fidelity, just like they do on your workstation.
Why It’s a Perfect Match for DLSS Projects
DLSS is designed to maximize efficiency between your GPU, AI cores, and rendering pipeline. But when you stream Unreal projects to users worldwide, network latency and hardware differences can ruin that magic.
Vagon solves that by matching the GPU power to your workload, wherever your users are.
Here’s what that means in practice:
1. RTX-Enabled GPUs in the Cloud
Every Vagon session runs on RTX-powered GPUs (A10G, L4, L40, and L40S tiers).
That means you can:
Test DLSS 3.5 and Frame Generation even if your laptop or Mac doesn’t support it.
See how Ray Reconstruction behaves on high-end GPUs without needing to own them.
Run full-quality Unreal builds, complete with ray tracing and DLSS, directly in the browser.
2. Low-Latency Streaming
Unreal devs are notoriously sensitive to lag — because a 50 ms delay can ruin an otherwise perfect experience.
Vagon’s VISPr3 streaming protocol (its latest version) is tuned for sub-50ms round-trip latency, meaning you can:
Move the camera, adjust lighting, and see instant feedback.
Stream live demos that feel like local playback.
Host interactive Unreal previews that clients can control remotely, in real time.
It’s like pixel streaming — but you don’t need to set up signaling servers or AWS instances.
Vagon handles all that under the hood.
3. Worldwide Coverage
Whether your client’s in Tokyo, Paris, or São Paulo — they’ll get consistent performance.
Vagon’s global GPU infrastructure automatically picks the nearest data center to minimize latency.
This is huge for collaborative Unreal teams or studios running worldwide pre-visualization, game testing, or marketing demos.
You can literally say, “Here’s the link — open it in Chrome,” and they’ll experience your DLSS-optimized project at 4K 60 FPS from anywhere.
4. 4K, 60 FPS, DLSS-Ready Streaming
When you stream your build via Vagon, it’s not a compressed recording — it’s a real-time GPU stream.
You can enable:
4K resolution output for cinematic demos
60 FPS interactive performance
Full support for DLSS Super Resolution, Ray Reconstruction, and Frame Generation
That means your audience sees exactly what you built in Unreal — no quality loss, no stutter, no performance mismatch.
5. Fast Iteration and Sharing
If you’ve ever sent a 30 GB build to a client, you know the pain.
With Vagon Streams, you can upload once and share an instant link. That link opens your project as a live Unreal experience in the browser.
Perfect for:
Game testing
Level design reviews
Product demos or pitches
Marketing and wishlist campaigns
And yes — it’s DLSS-compatible out of the box.
Why It Matters for Developers?
The beauty of DLSS is in its scalability — it lets a single GPU render like three.
Vagon takes that same philosophy and extends it to your distribution layer.
You don’t just optimize frames; you optimize how those frames reach people.
Whether you’re a solo developer testing new DLSS builds, a studio showcasing interactive environments, or an enterprise running Unreal-based configurators — Vagon lets you stream at native fidelity, without the infrastructure overhead.
TL;DR:
DLSS gives you performance.
Unreal Engine gives you flexibility.
Vagon Streams gives you reach.
Run your Unreal projects in full fidelity — AI upscaling, Frame Generation, and all — straight through the browser, anywhere on Earth.
Key Takeaways
Getting DLSS working in Unreal Engine isn’t complicated — but it changes everything once it’s up and running.
You’re not just making your project run faster; you’re making it smarter. DLSS 2 and 3 bring serious performance boosts, DLSS 3.5 cleans up ray-traced lighting beautifully, and DLAA gives you razor-sharp images when you don’t need more FPS. The result is a cleaner, smoother Unreal experience without sacrificing detail.
But the real magic happens when you share it.
That’s where Vagon Streams steps in — letting you run your Unreal projects in the browser, in full 4K 60 FPS, powered by RTX GPUs with DLSS fully supported. You get ultra-low latency, global coverage, and the freedom to send a single link instead of a 30 GB build.
So whether you’re testing DLSS 3.5 on cloud GPUs or showing a real-time archviz demo to a client across the world, Vagon makes it feel local — smooth, sharp, instant.
In short: DLSS gives Unreal projects their speed. Vagon Streams gives them their audience.
TL;DR:
DLSS (Deep Learning Super Sampling) is NVIDIA’s AI-powered rendering tech that boosts frame rates and sharpens visuals in Unreal Engine 5. To enable it, you’ll need to install NVIDIA’s DLSS plugin manually, activate it in Unreal’s Plugin Manager, optionally add sample blueprints for quick tuning, then adjust DLSS, DLAA, and Frame Generation settings for your GPU.
Ever built a gorgeous Unreal scene that suddenly tanked your FPS?
Yeah, that moment when your camera pans across a high-poly cityscape and your GPU starts begging for mercy. That’s usually when you wish for a bit of AI magic, and that’s exactly what DLSS delivers. It’s not just another toggle in the settings menu; it’s one of those rare technologies that actually feels like cheating physics.
When you get it right, DLSS lets you render fewer pixels without losing clarity. The result? Smooth frames, crisp edges, and fewer fans screaming in pain.
What is DLSS?
Let’s break the acronym first: Deep Learning Super Sampling.
It’s NVIDIA’s neural-rendering technology designed to make your GPU smarter, not just faster.
Instead of brute-forcing every single pixel like traditional rendering, DLSS uses a trained AI model to predict what a high-resolution frame should look like, based on a lower-resolution input. It’s like having a visual artist who can perfectly fill in the missing detail — at lightning speed.
Here’s how it works in plain English:
The GPU renders your scene at a lower internal resolution.
DLSS runs a neural network trained on ultra-high-res frames to reconstruct the missing detail.
The result is an image that looks like native 4K but costs your GPU roughly half the effort.
The magic is in the AI model. It doesn’t just guess — it uses motion vectors and frame history to predict how objects should move and look between frames. That’s how it maintains crisp edges, even in fast-moving shots or complex lighting scenarios.
Why Developers Actually Care About DLSS?
In Unreal Engine, every millisecond counts.
When you’re trying to keep your frame time under 16.6 ms for a 60 FPS target, DLSS can give you that breathing room to push post-processing, reflections, or ray tracing without tanking performance.
It’s especially helpful when:
You’re working on VR or high-refresh experiences.
Your project relies on Lumen or heavy dynamic lighting.
You’re targeting lower-end hardware or remote devices via streaming.
DLSS doesn’t just help your players — it helps you, the developer, build and iterate faster with higher preview fidelity inside the editor.
I’ve seen people expect DLSS to fix bad optimization. It won’t.
If your project is GPU-bound by shaders or heavy draw calls, DLSS won’t suddenly make that disappear. What it will do is buy you headroom — and in Unreal Engine, that can be the difference between “almost playable” and “feels buttery.”
DLSS Versions Explained: What’s New and What Actually Matters?
DLSS has gone through a wild evolution. What started as an experimental AI upscaler has turned into a full-blown neural rendering pipeline. If you’ve lost track of which DLSS does what, you’re not alone. So here’s a breakdown that actually makes sense — without the marketing noise.
DLSS 1 – The Experimental Era
The original DLSS 1 was more of a tech demo than a practical tool. It used per-game AI models that had to be trained by NVIDIA individually for each title.
The result? Some games looked great; others looked like they’d been run through a watercolor filter.
It worked by rendering frames at a lower resolution (say 1440p → 4K) and then using a trained network to upscale them. But because the model was specific to each game, developers couldn’t easily use or tweak it. Unreal Engine support was also minimal.
Verdict: Historical curiosity. Cool idea, rough execution.
DLSS 2 – The Game-Changer
This is where things got serious. DLSS 2 ditched the per-game model for a generalized AI network that works across all titles — including Unreal Engine projects.
It started using motion vectors (basically data showing how objects move between frames) and temporal feedback, meaning it doesn’t just upscale one frame at a time — it learns from the ones before it. The result was image quality nearly indistinguishable from native resolution, but with massive FPS gains.
If you’re using Unreal Engine 5.2 or later, this is your baseline.
Verdict: Still the go-to version for most projects.
DLSS 3 – Frame Generation Arrives
Now this one blew minds — and caused confusion.
DLSS 3 added Frame Generation, which uses AI to create entirely new frames between rendered ones. Essentially, you get double the frame rate without doubling the GPU load. It relies on optical flow acceleration — a hardware feature in RTX 4000-series GPUs.
Here’s the catch: because those extra frames are “hallucinated” by AI, they don’t reduce input latency by themselves. That’s why DLSS 3 usually pairs with NVIDIA Reflex, which handles latency reduction.
Verdict: Transformative for visual smoothness, especially for streaming or cinematic projects.
DLSS 3.5 – Smarter Ray Tracing with Ray Reconstruction
If you’ve ever turned on ray tracing and seen firefly artifacts (those random bright pixels in reflections), DLSS 3.5 fixes that.
It introduced Ray Reconstruction, which replaces Unreal’s traditional hand-tuned ray-traced denoisers with an AI-driven one. Instead of averaging light samples crudely, DLSS 3.5 predicts how light should behave in motion — leading to far more natural reflections, global illumination, and fewer visual glitches.
The cool part: Ray Reconstruction works even without Frame Generation, so RTX 2000 and 3000 cards can still benefit.
Verdict: Cleaner lighting, smarter denoising, better stability for Lumen-heavy projects.
DLSS 4 – Transformer Brains and Multi-Frame Generation
Now we’re stepping into sci-fi territory.
DLSS 4 introduces Multi-Frame Generation (MFG) — meaning the AI can synthesize up to three new frames per traditionally rendered frame. It’s powered by transformer-based models (yes, the same kind of neural architecture that runs language models like GPT).
This version is exclusive to the RTX 50-series (Blackwell architecture). The new transformers help DLSS 4:
Preserve texture detail better (especially foliage and hair)
Reduce ghosting in fast motion
Use VRAM more efficiently
It’s the first time we’ve seen true multi-frame synthesis at this level — and it makes Unreal cinematics and real-time previews smoother than ever.
Verdict: The future standard for high-end rendering — if you’ve got the hardware.
DLAA – When You Want Quality Over Speed
Finally, there’s DLAA (Deep Learning Anti-Aliasing) — basically DLSS without the “Super Sampling.”
It runs at native resolution, using the same AI model purely for anti-aliasing. Think of it as a super-smooth, neural TAA (Temporal Anti-Aliasing) alternative.
If your project already runs at your target FPS but you want sharper visuals — DLAA is the move.
Verdict: Perfect for cinematic or non-performance-limited Unreal projects.
Up next, we’ll go hands-on: the exact requirements and step-by-step setup to get DLSS working inside your Unreal Engine project — including folder paths, plugin dependencies, and one sneaky setting most people forget to enable.
How to Enable DLSS for Unreal Engine Projects
Alright — now that we’ve covered what DLSS does and which version you should care about, let’s actually set it up inside Unreal Engine.
This isn’t one of those drag-and-drop plugins you grab from the Unreal Marketplace. DLSS comes straight from NVIDIA’s developer site, and getting it running involves a few folder tweaks, plugin toggles, and optional Blueprints if you want control from the UI.
Here’s how to do it right.
Before You Start: System Requirements
You’ll need a few basics locked in before Unreal will even recognize DLSS.
Requirement | Minimum | Notes |
|---|---|---|
Unreal Engine | 5.2 or newer | DLSS officially supported starting from UE 5.2 |
GPU Driver | 470.0+ (Super Resolution), 512.15+ (Frame Generation, Reflex, etc.) | Always update via NVIDIA Control Panel or GeForce Experience |
Operating System | Windows 10 (build 1909 or later) | DLSS Plugin for Linux is still in development |
Hardware | RTX 2000 series or newer | DLSS-FG (Frame Generation) requires RTX 4000+ |
HAGS (Hardware Accelerated GPU Scheduling) | Must be enabled | Needed for Frame Generation to work properly |
Step 1: Download the NVIDIA DLSS Plugin
This is the part that usually trips people up — you don’t install DLSS through Epic’s FAB or the Marketplace.
Instead, go to NVIDIA’s official DLSS plugin page:
👉 https://developer.nvidia.com/rtx/dlss
Select your Unreal Engine version (e.g. 5.3, 5.4).
Download the
DLSSPlugin.zipfile.Unzip it somewhere easy to find — inside you’ll see several plugin folders under
Plugins/Runtime/DLSS/.
Now navigate to your Unreal Engine installation directory, typically something like: C:\Program Files\Epic Games\UE_5.3\Engine\Plugins\Runtime\
Paste the unzipped folders into that location. You should now have: UE_5.3\Engine\Plugins\Runtime\DLSS\
There are usually eight DLSS-related plugin folders inside:
DLSS
DLSS-G
DLSS-FG
DLSS-RR
DLSS-DV (Dynamic Vibrance)
Reflex
NIS (NVIDIA Image Scaling)
Streamline (deprecated)
Don’t worry — we’ll only activate what you actually need in the next step.
Step 2: Enable DLSS Plugins Inside Unreal Editor
Launch Unreal Engine 5.
Open your project, then from the toolbar go to Edit → Plugins.
In the search bar, type:
NVIDIA | DLSS
You’ll see the full list of DLSS-related options.
✅ Enable these core ones:
NVIDIA DLSS (required)
NVIDIA DLSS Frame Generation (if you’re on RTX 4000+)
NVIDIA Reflex Low Latency 4
NVIDIA Image Scaling (NIS) — optional, but useful for sharpening
⚙️ Optional:
RTX Dynamic Vibrance — enhances color saturation dynamically
Movie Render Queue DLSS — if you’re rendering cinematic sequences
Streamline (deprecated) — only for legacy project migrations
After enabling, Unreal will show a yellow banner at the bottom asking to restart the editor.
Do that now — DLSS won’t be active until restart.
Step 3: Add NVIDIA’s Sample Blueprints
This step is technically optional, but if you want to expose DLSS settings in your project’s UI or test multiple DLSS modes quickly, it’s absolutely worth it.
Here’s how:
From the unzipped DLSS folder you downloaded earlier, navigate to:
Samples/Plugins/Copy the folder named UIWidgetsLib and paste it into:
UE_5.3\Engine\Plugins\Runtime\DLSS\Next, go to:
Samples/Content/Copy the Blueprints folder and paste it into your project’s:
YourProject/Content/
If you’re not sure where your project folder lives:
Open Epic Games Launcher → Library → My Projects → right-click your project → “Show in Folder.”
Once pasted:
Enable the Console Variables plugin (so you can tweak DLSS parameters live).
Enable UIWidgetsLib from the Plugins window and restart again.
Now you’ll have a Blueprint class named something like BPW_NGX that lets you toggle DLSS modes (Quality, Balanced, Performance, Ultra Performance) directly inside Unreal.
Step 4: Connect DLSS to Your Blueprint
Once you’ve got the UI widgets enabled, you can wire them up easily:
Open your main Level Blueprint.
Create a new variable named
DLSSand set its type to BPW_NGX Object Reference.On the
Event BeginPlay, create the DLSS widget and add it to the viewport.
If you already have existing functions on BeginPlay, add a Sequence node and connect both — this ensures DLSS initialization doesn’t overwrite other startup logic.
You’ll now be able to test DLSS in real time from within your scene.
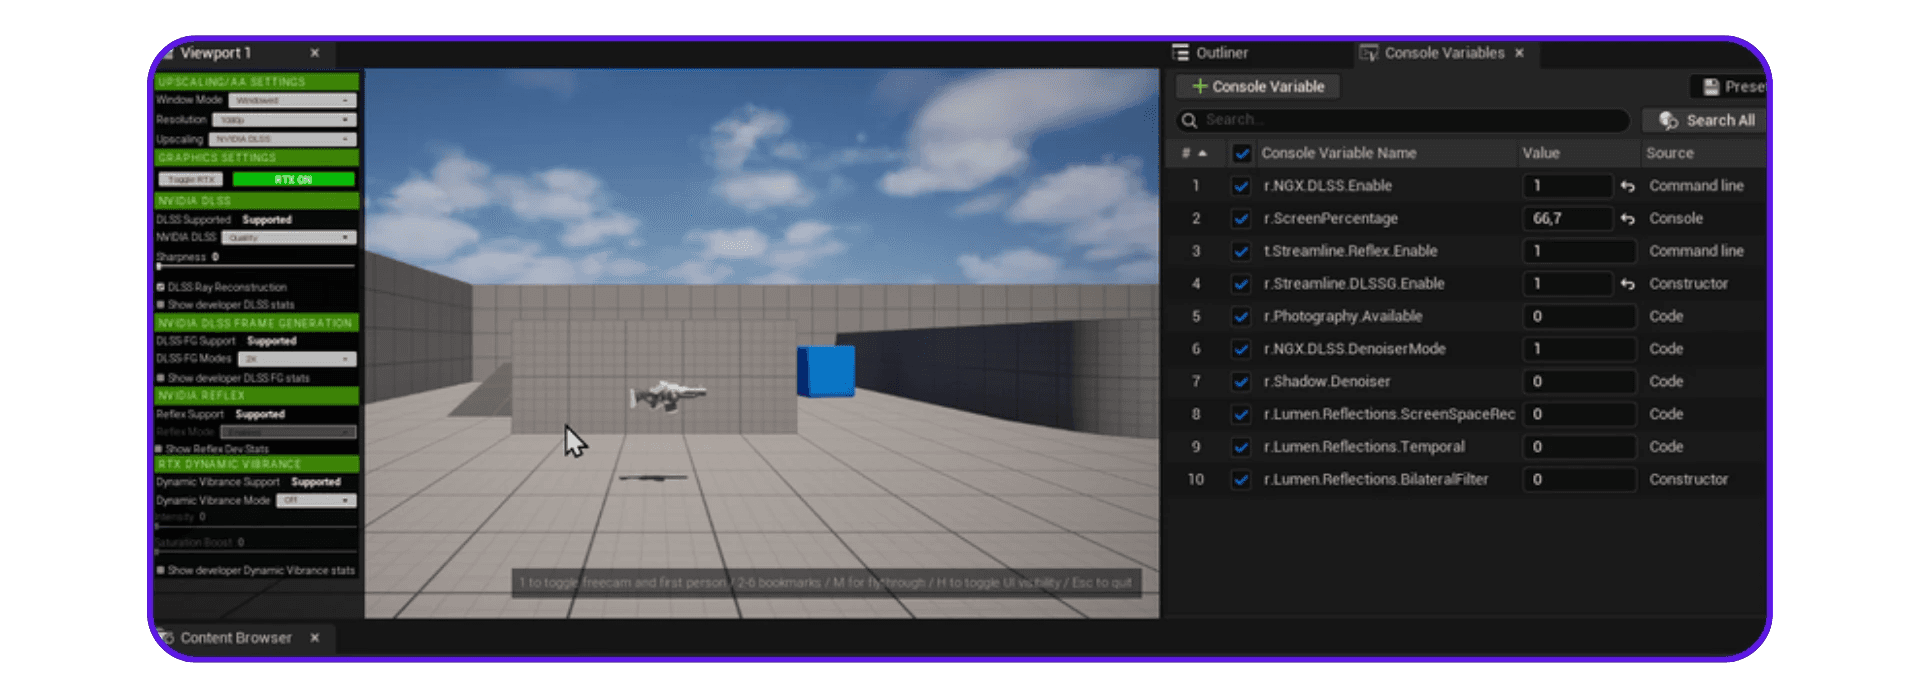
Step 5: Test and Tune DLSS Settings
Now for the fun part.
Run your project in Standalone Game Mode (not PIE — Play In Editor).
This ensures DLSS applies its real runtime settings instead of editor approximations.
Here’s what to look for:
Quality vs. Performance: “Quality” gives near-native image fidelity. “Performance” or “Ultra Performance” will boost FPS but might introduce slight texture softness.
DLAA Mode: Try this if you’re after pure visual improvement without FPS gain.
Ray Reconstruction (DLSS 3.5+): Enable it if you see fireflies or noise in Lumen reflections.
Frame Generation (DLSS 3+): This can double your perceived FPS — but only if your GPU supports it and HAGS is on.
🧠 Pro tip: Use stat FPS in Unreal’s console to see the difference before and after enabling Frame Generation. Keep in mind that the engine’s reported FPS will differ from perceived in-game FPS once FG kicks in.
Suggested Starting Setup
Here’s a stable, high-quality baseline for most projects:
Setting | Recommended Mode | Why |
|---|---|---|
DLSS Mode | Quality | Best visual fidelity |
DLAA | Off (enable for cinematics) | Keeps sharpness consistent |
Ray Reconstruction | On (DLSS 3.5+) | Cleaner lighting and reflections |
Frame Generation | On (RTX 4000+) | Significant FPS boost |
NIS Sharpening | 0.3–0.5 | Subtle edge sharpening |
Why Unreal Developers Use Vagon Streams?
By this point, you’ve got DLSS running beautifully inside Unreal Engine.
Your frame rates are climbing, your lighting’s stable, and your GPU fans have stopped sounding like jet engines.
Now comes the real-world question:
How do you share that same buttery-smooth experience with someone else — without them having your hardware?
That’s where Vagon Streams comes in.
What Is Vagon Streams?
Vagon Streams is a browser-based application streaming platform built specifically for high-performance, GPU-heavy workloads like Unreal Engine, Unity, and 3D visualization.
In simple terms:
You host your Unreal project in the cloud, and your users can instantly open it in their browser — no installs, no setup, no downloads.
Everything runs on Vagon’s RTX-powered servers, so even complex, DLSS-enabled builds render with full fidelity, just like they do on your workstation.
Why It’s a Perfect Match for DLSS Projects
DLSS is designed to maximize efficiency between your GPU, AI cores, and rendering pipeline. But when you stream Unreal projects to users worldwide, network latency and hardware differences can ruin that magic.
Vagon solves that by matching the GPU power to your workload, wherever your users are.
Here’s what that means in practice:
1. RTX-Enabled GPUs in the Cloud
Every Vagon session runs on RTX-powered GPUs (A10G, L4, L40, and L40S tiers).
That means you can:
Test DLSS 3.5 and Frame Generation even if your laptop or Mac doesn’t support it.
See how Ray Reconstruction behaves on high-end GPUs without needing to own them.
Run full-quality Unreal builds, complete with ray tracing and DLSS, directly in the browser.
2. Low-Latency Streaming
Unreal devs are notoriously sensitive to lag — because a 50 ms delay can ruin an otherwise perfect experience.
Vagon’s VISPr3 streaming protocol (its latest version) is tuned for sub-50ms round-trip latency, meaning you can:
Move the camera, adjust lighting, and see instant feedback.
Stream live demos that feel like local playback.
Host interactive Unreal previews that clients can control remotely, in real time.
It’s like pixel streaming — but you don’t need to set up signaling servers or AWS instances.
Vagon handles all that under the hood.
3. Worldwide Coverage
Whether your client’s in Tokyo, Paris, or São Paulo — they’ll get consistent performance.
Vagon’s global GPU infrastructure automatically picks the nearest data center to minimize latency.
This is huge for collaborative Unreal teams or studios running worldwide pre-visualization, game testing, or marketing demos.
You can literally say, “Here’s the link — open it in Chrome,” and they’ll experience your DLSS-optimized project at 4K 60 FPS from anywhere.
4. 4K, 60 FPS, DLSS-Ready Streaming
When you stream your build via Vagon, it’s not a compressed recording — it’s a real-time GPU stream.
You can enable:
4K resolution output for cinematic demos
60 FPS interactive performance
Full support for DLSS Super Resolution, Ray Reconstruction, and Frame Generation
That means your audience sees exactly what you built in Unreal — no quality loss, no stutter, no performance mismatch.
5. Fast Iteration and Sharing
If you’ve ever sent a 30 GB build to a client, you know the pain.
With Vagon Streams, you can upload once and share an instant link. That link opens your project as a live Unreal experience in the browser.
Perfect for:
Game testing
Level design reviews
Product demos or pitches
Marketing and wishlist campaigns
And yes — it’s DLSS-compatible out of the box.
Why It Matters for Developers?
The beauty of DLSS is in its scalability — it lets a single GPU render like three.
Vagon takes that same philosophy and extends it to your distribution layer.
You don’t just optimize frames; you optimize how those frames reach people.
Whether you’re a solo developer testing new DLSS builds, a studio showcasing interactive environments, or an enterprise running Unreal-based configurators — Vagon lets you stream at native fidelity, without the infrastructure overhead.
TL;DR:
DLSS gives you performance.
Unreal Engine gives you flexibility.
Vagon Streams gives you reach.
Run your Unreal projects in full fidelity — AI upscaling, Frame Generation, and all — straight through the browser, anywhere on Earth.
Key Takeaways
Getting DLSS working in Unreal Engine isn’t complicated — but it changes everything once it’s up and running.
You’re not just making your project run faster; you’re making it smarter. DLSS 2 and 3 bring serious performance boosts, DLSS 3.5 cleans up ray-traced lighting beautifully, and DLAA gives you razor-sharp images when you don’t need more FPS. The result is a cleaner, smoother Unreal experience without sacrificing detail.
But the real magic happens when you share it.
That’s where Vagon Streams steps in — letting you run your Unreal projects in the browser, in full 4K 60 FPS, powered by RTX GPUs with DLSS fully supported. You get ultra-low latency, global coverage, and the freedom to send a single link instead of a 30 GB build.
So whether you’re testing DLSS 3.5 on cloud GPUs or showing a real-time archviz demo to a client across the world, Vagon makes it feel local — smooth, sharp, instant.
In short: DLSS gives Unreal projects their speed. Vagon Streams gives them their audience.
Scalable Pixel and Application Streaming
Run your Unity or Unreal Engine application on any device, share with your clients in minutes, with no coding.

Summarize with AI

Ready to focus on your creativity?
Vagon gives you the ability to create & render projects, collaborate, and stream applications with the power of the best hardware.

Vagon Blog


Run heavy applications on any device with
your personal computer on the cloud.
San Francisco, California
Solutions
Vagon Teams
Vagon Streams
Use Cases
Resources
Vagon Blog
How to Run Inkscape on a Cloud Ubuntu Desktop (2026 Guide)
How to Run Krita on a Cloud Ubuntu Desktop for Digital Painting (2026 Guide)
How to Run GIMP on a Cloud Ubuntu Desktop (2026 Guide)
How to Run Jupyter on a Cloud GPU Linux Desktop (2026 Guide)
Vagon vs GitHub Codespaces: Cloud Dev Environments Compared (2026)
Vagon vs RunPod: Which Cloud GPU Is Right for You? (2026 Comparison)
How to Watch Your AI Agent Work on a Cloud Ubuntu Desktop (2026 Guide)
How to Run a Local LLM on Ubuntu in the Cloud (2026 Guide)
How to Run Blender on a Cloud GPU (Ubuntu): The Complete 2026 Guide
Vagon Blog
Run heavy applications on any device with
your personal computer on the cloud.
San Francisco, California
Solutions
Vagon Teams
Vagon Streams
Use Cases
Resources
Vagon Blog