Instant Connection for Pixel Streaming
— New Feature Automated Setup

How to Use the 3D Cursor in Blender
How to Use the 3D Cursor in Blender
DigitalArt
How to Use the 3D Cursor in Blender
Table of Contents
Ever place a primitive and wonder why it didn’t land where you expected? That’s the 3D Cursor talking.
I’ve watched people blame Blender, their mouse, even their GPU before realizing the issue was that little red-and-white crosshair sitting quietly in the viewport. The 3D Cursor. Easy to ignore. Easy to forget. And somehow responsible for half the “why is this happening?” moments in Blender.
Here’s the thing. Blender doesn’t place objects randomly. It’s very intentional. New meshes appear exactly where the 3D Cursor is. Rotations pivot around it if you tell them to. Origins snap to it without asking twice. Once you see that pattern, a lot of Blender’s behavior suddenly makes sense.
Most beginners treat the 3D Cursor like a background decoration. Advanced users quietly rely on it all the time. I think that gap is one of the reasons Blender feels “hard” to new users when it doesn’t have to.
If you get comfortable with the 3D Cursor, really comfortable, Blender starts feeling less chaotic. More predictable. Almost cooperative. And yes, you’ll stop spawning cubes in the middle of nowhere.
What the 3D Cursor Actually Is
Let’s clear up a common misunderstanding right away. The 3D Cursor is not a selection tool. It’s not a gizmo. And it’s definitely not just a spawn point for new objects, even though that’s how most people first encounter it.
The 3D Cursor is a position and orientation reference in 3D space. Think of it as a programmable marker that Blender uses whenever you ask a question like “where should this happen?” or “around what point should this rotate?”
By default, Blender uses it for a few very specific things:
New objects appear exactly at the 3D Cursor’s location
Certain transforms can use it as a pivot point
Object origins can snap to it instantly
Some tools quietly depend on it when no better reference exists
That’s a lot of responsibility for something most people never touch on purpose.
What it isn’t is equally important. The 3D Cursor does not automatically follow your selection. It does not care what object is active unless you explicitly tell it to. Blender won’t “fix” its position for you. In my experience, that’s where frustration starts.
You select a face, add a cube, and suddenly the cube appears three meters off to the side. Blender didn’t mess up. The cursor was already there. You just forgot about it.
There’s also orientation, which almost nobody notices at first. The 3D Cursor has rotation values. That means when you align transforms or set origins based on it, rotation can matter too. Most of the time it’s zeroed out, so you don’t feel it. Until the day it isn’t. That’s a fun one.
Once you stop thinking of the 3D Cursor as a passive marker and start treating it like an active tool, things change. You stop fighting Blender’s behavior and start predicting it. That’s the real unlock.
Placing the 3D Cursor Without Losing Your Mind
This is where most people go wrong. Not because the tools are bad, but because Blender gives you too many ways to move the 3D Cursor and doesn’t explain which ones are reliable.
If you’ve ever tried to place it freehand in perspective view and missed by a mile, you’re not alone. I almost never place the cursor blindly in 3D space anymore. There are better options.
The fast, casual way
Sometimes you just need the cursor roughly in the right spot.
Shift + Right-Click places the 3D Cursor where you click
The Cursor tool in the toolbar does the same thing, just slower
This works fine for blocking out ideas. It’s terrible for precision. Perspective distortion will lie to you every time.
The way that actually works
When accuracy matters, switch views. Always.
Numpad 1, 3, or 7 for front, side, or top view
Place the cursor from an orthographic angle
Repeat from another view if depth matters
Two clicks from two views beats guessing once in perspective. Every time.
The “stop guessing” method
This is the one I rely on most, especially in real production work.
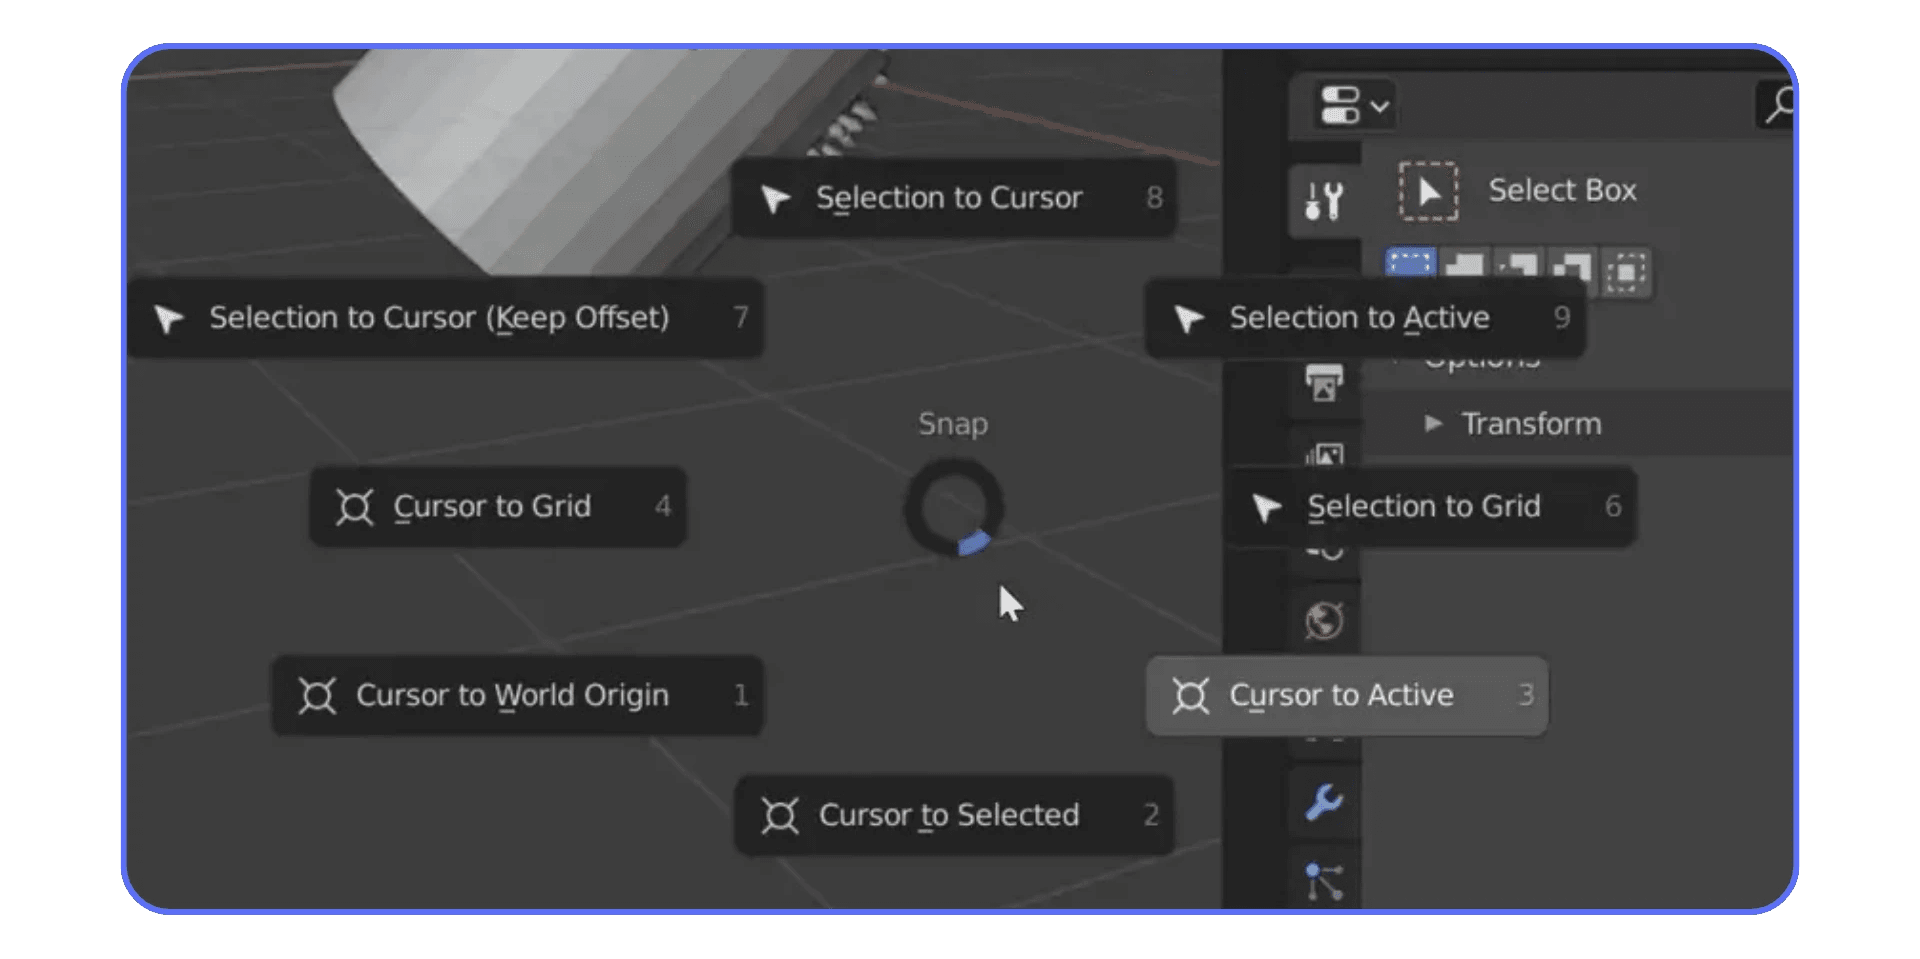
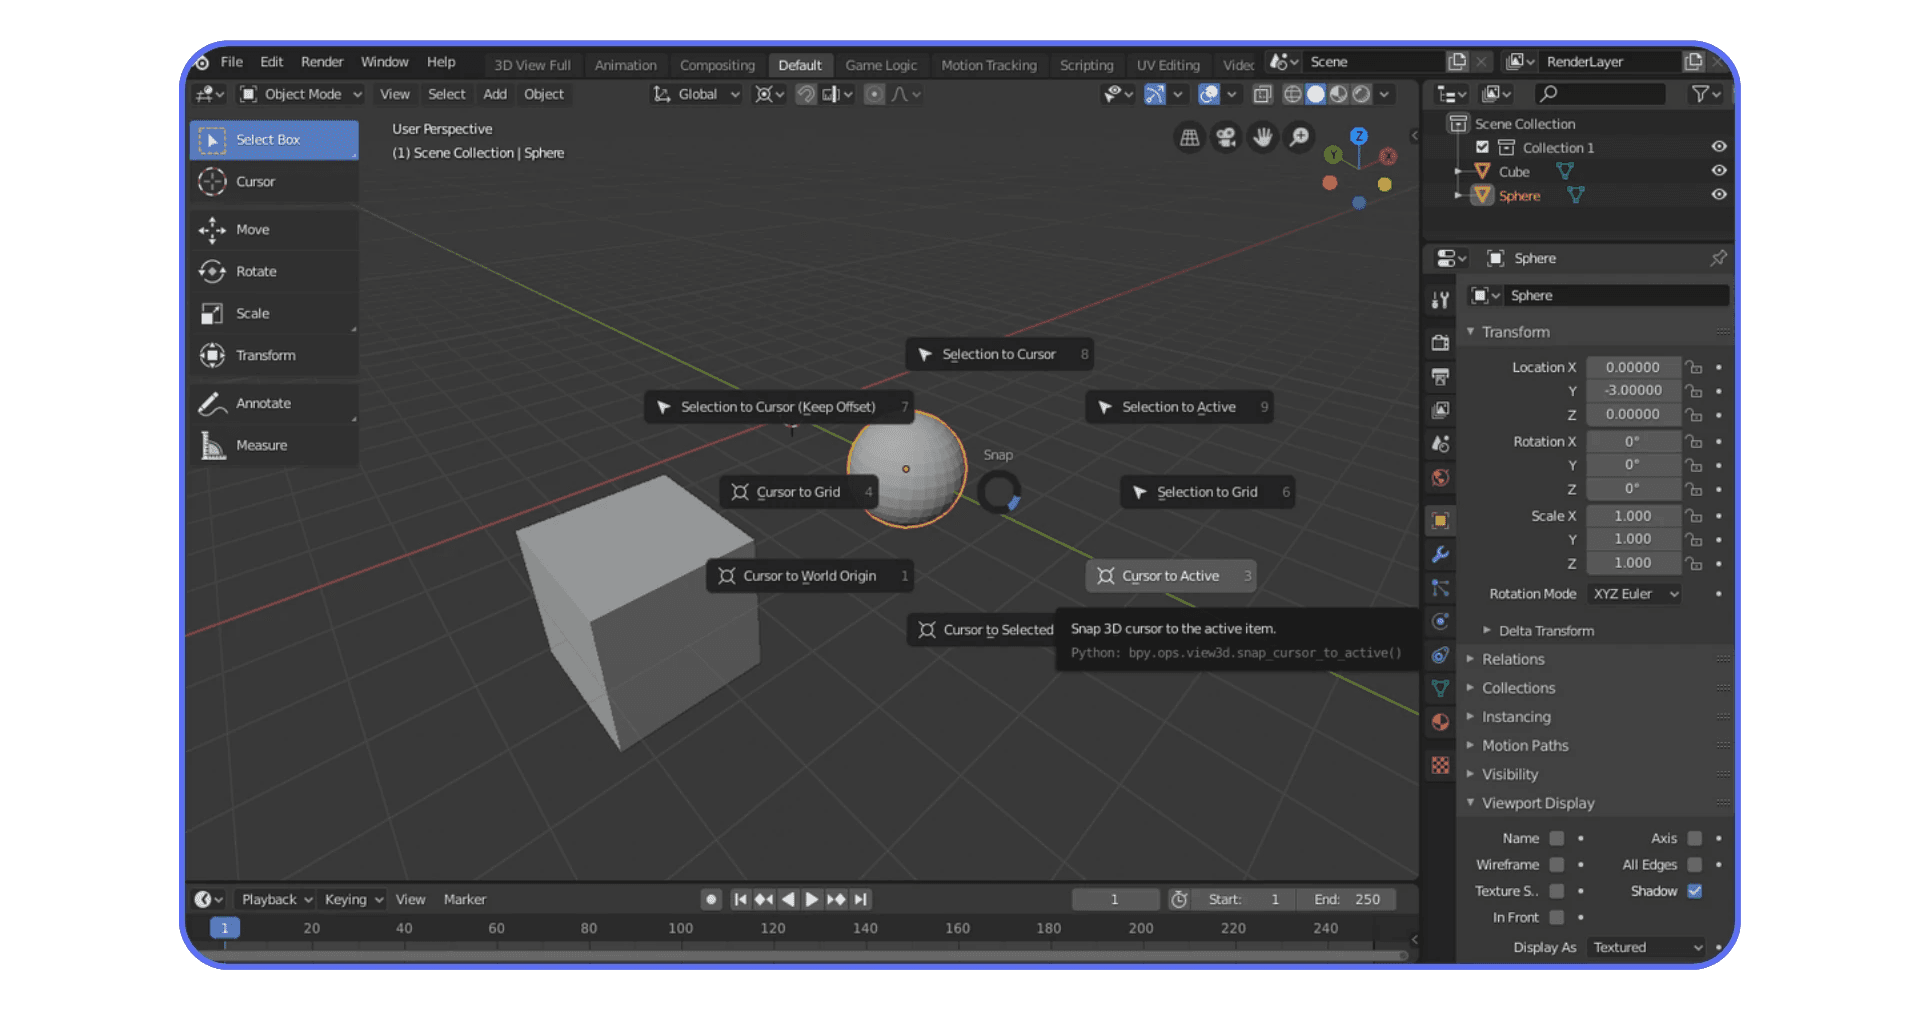
Press Shift + S. This menu is gold.
Cursor to Selected
Cursor to Active
Cursor to World Origin
Cursor to Grid
Instead of placing the cursor by eye, you tell Blender exactly what you want. No surprises. No cleanup.
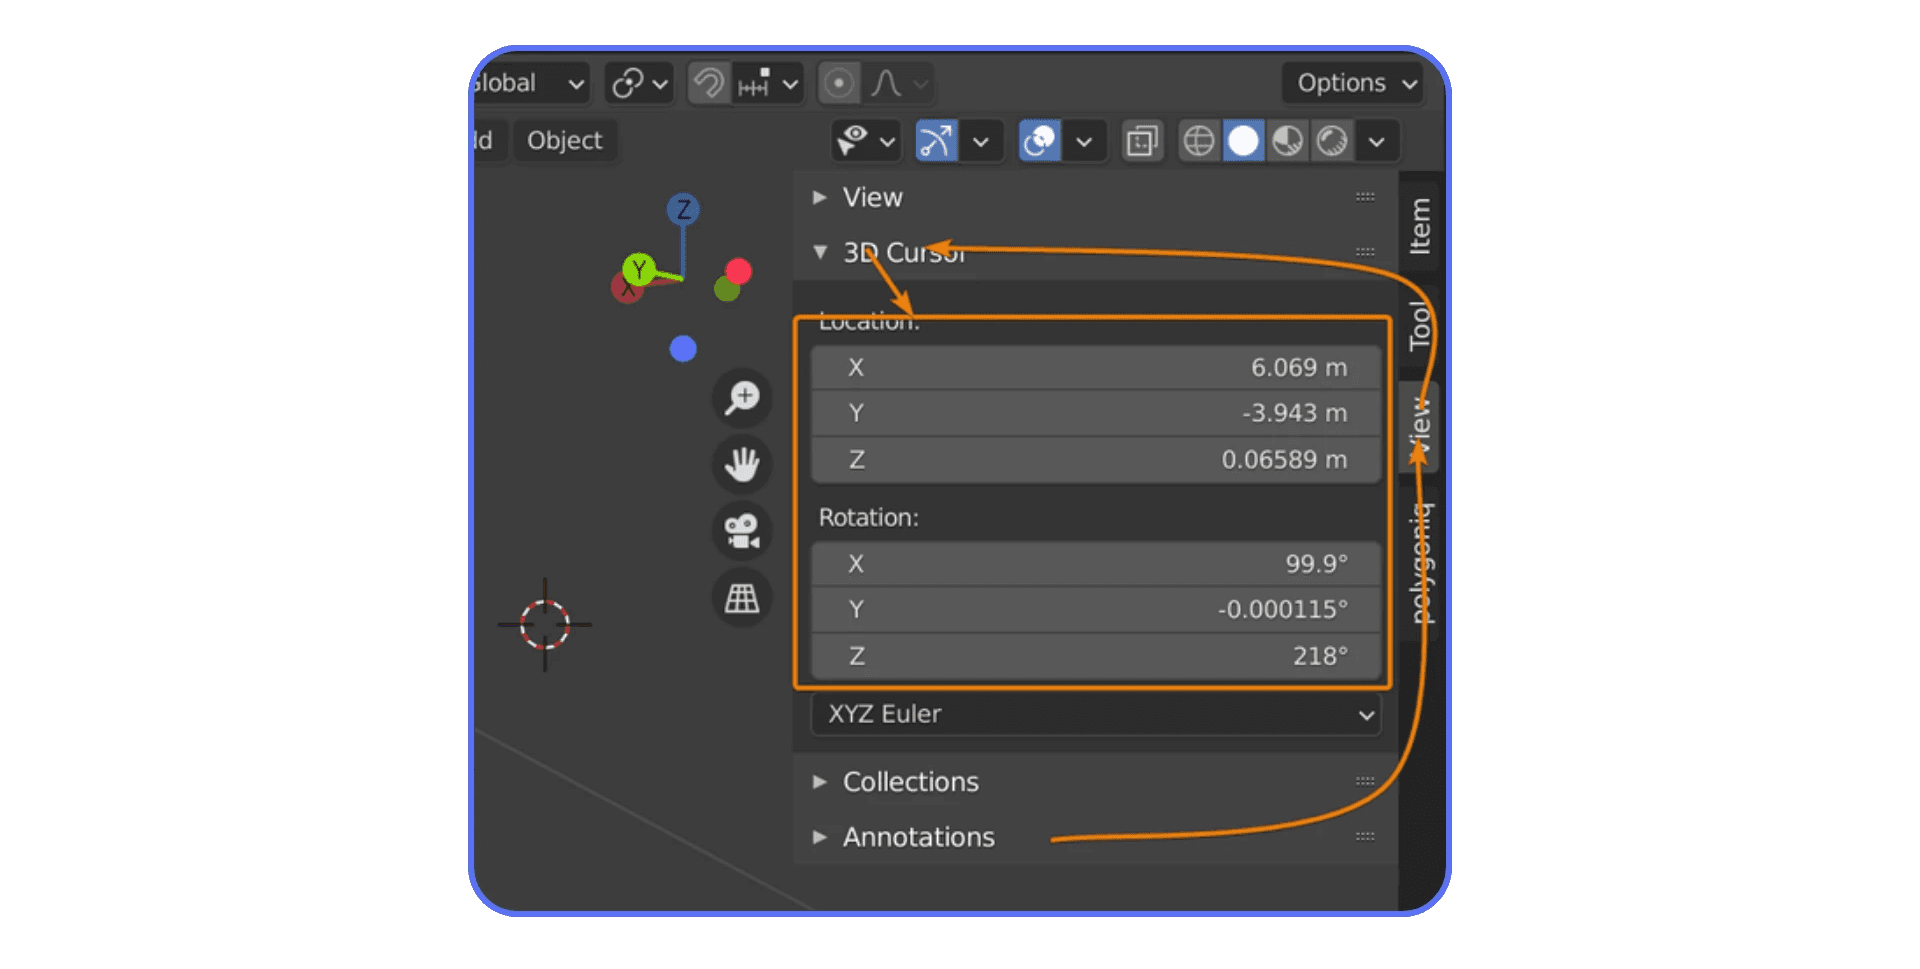
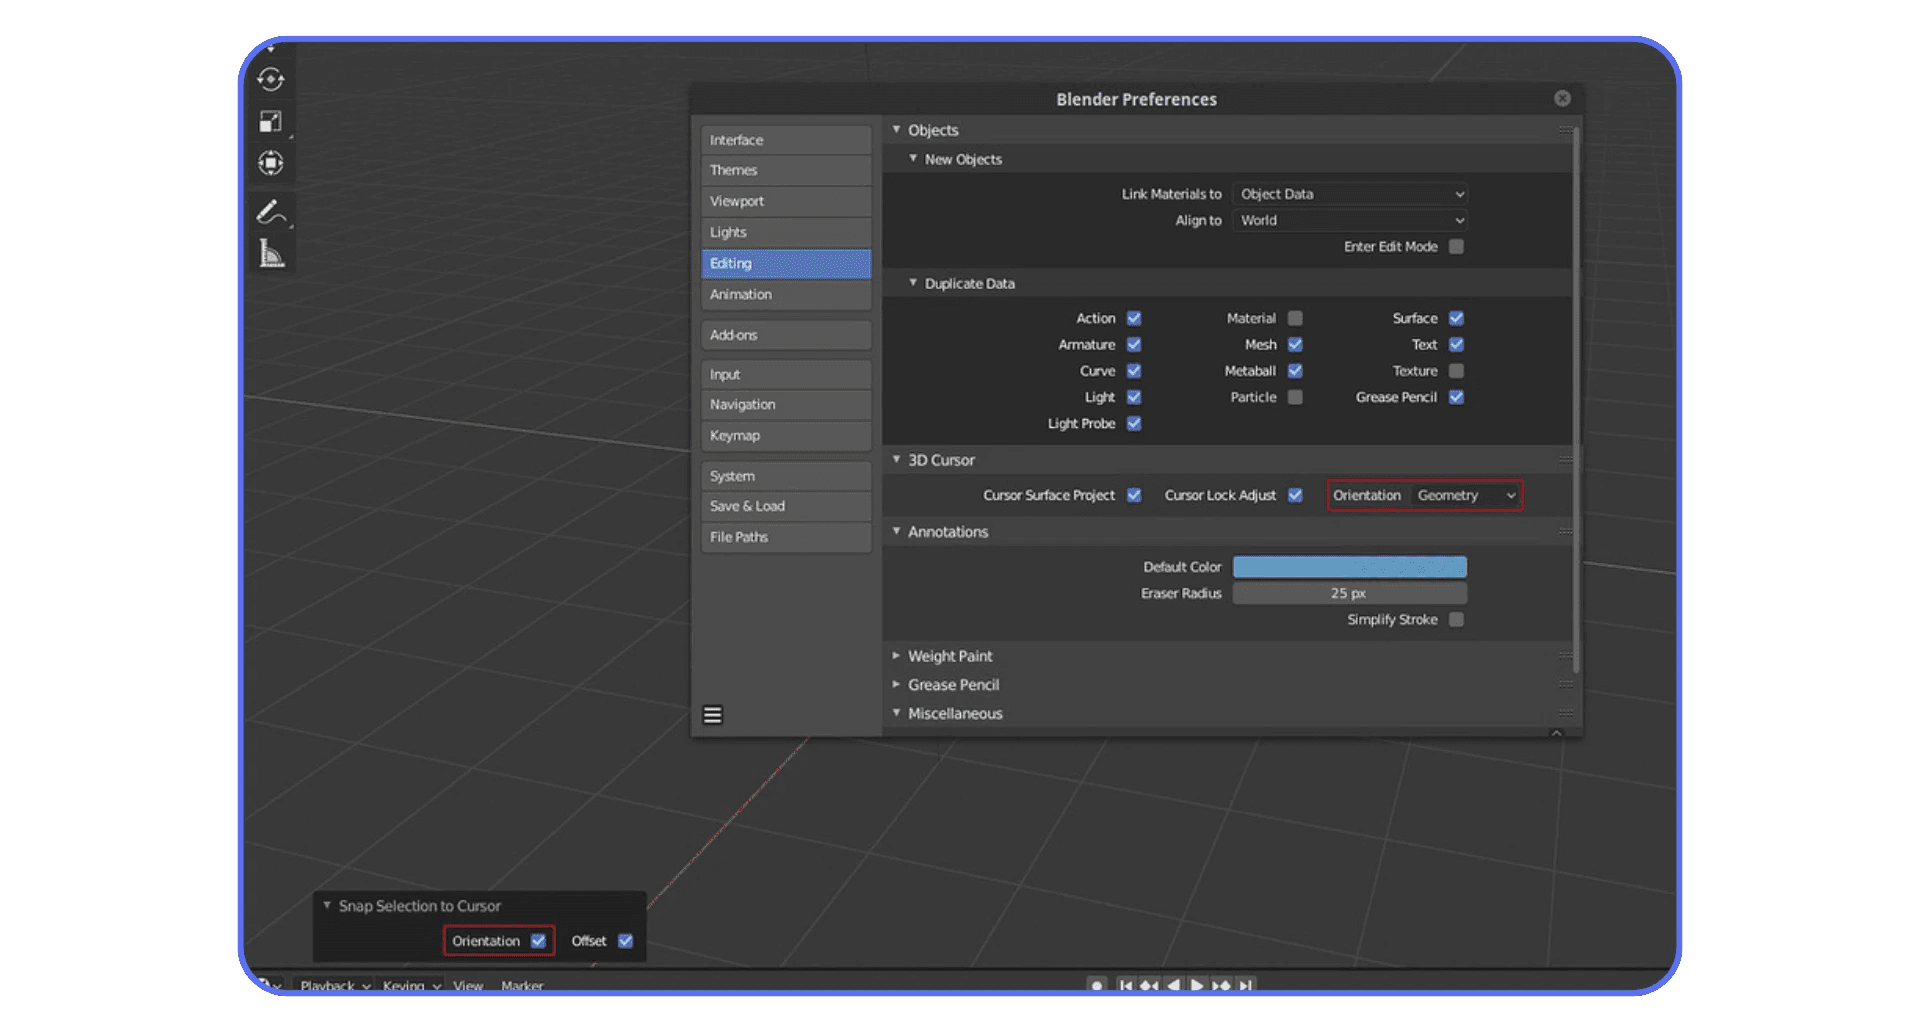
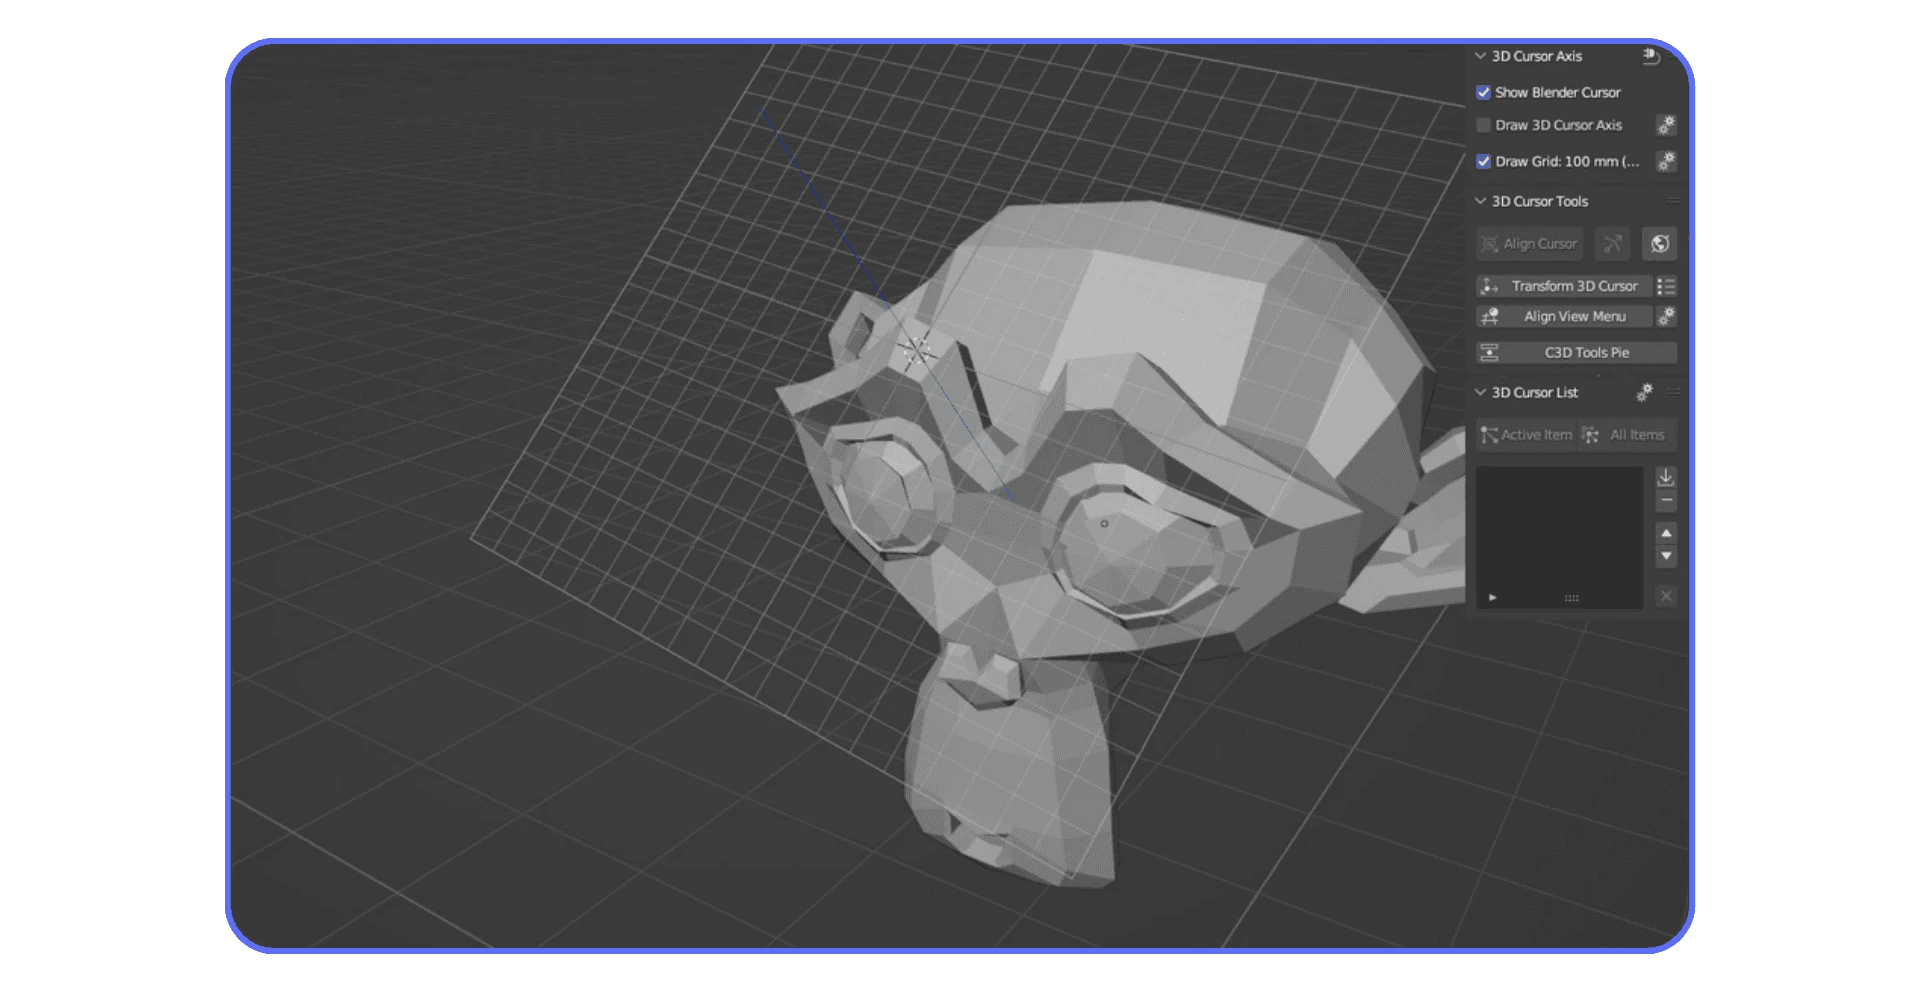
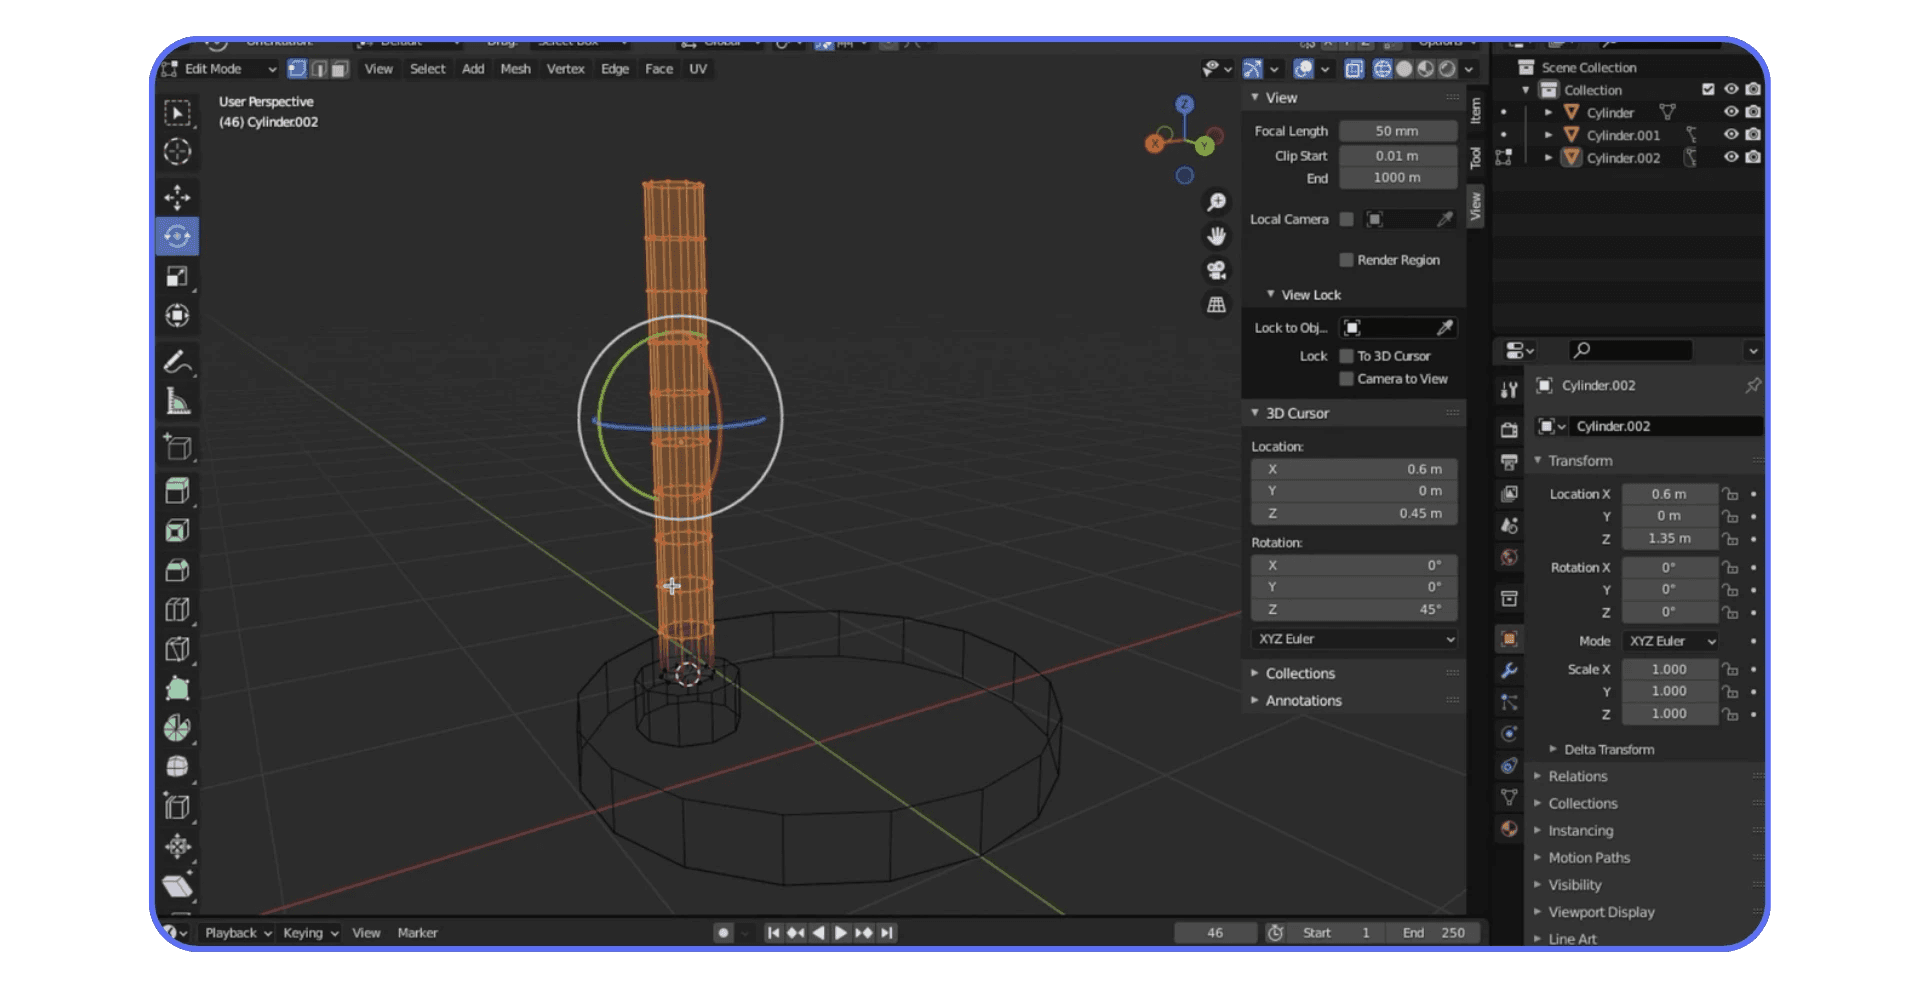
There’s also the Sidebar. Hit N, open the View tab, and you can type exact coordinates for the 3D Cursor. Not exciting, but incredibly useful when working with measurements, modular assets, or anything technical.
One mistake I see all the time is people moving the cursor, forgetting about it, and continuing to model for twenty minutes. Then they add a new object and everything breaks. If something appears in the wrong place, don’t undo immediately. Look at the cursor first. It’s usually the culprit.
If you are still fumbling through menus to move the 3D Cursor, learning a few core shortcuts makes a bigger difference than most people expect, and this breakdown of Blender keyboard shortcuts helps build that muscle memory fast.
Using the 3D Cursor as a Pivot Changes Everything
Most people learn rotation and scaling in Blender using the default median point. That works. It’s fine. But it’s also limiting once your scenes get more complex.
The moment you switch your pivot point to the 3D Cursor, a lot of doors open.
Here’s why I like it. The cursor doesn’t move unless you move it. That makes it predictable. You can park it somewhere intentional and reuse it again and again without Blender second-guessing you.
In the viewport header, change the pivot point to 3D Cursor. Now try rotating or scaling an object.
Suddenly:
Doors rotate perfectly around their hinges
Mechanical parts spin around real-world joints
Asymmetrical objects behave the way you expect
This is especially useful in hard surface modeling. I’ve noticed that people who avoid the 3D Cursor tend to duplicate objects and reposition them manually instead of rotating around a fixed point. It works, but it’s slower and messier.
Scaling is another sleeper feature here. Scaling toward or away from a cursor lets you control direction without weird distortions. It’s subtle, but once you use it intentionally, you miss it when it’s gone.
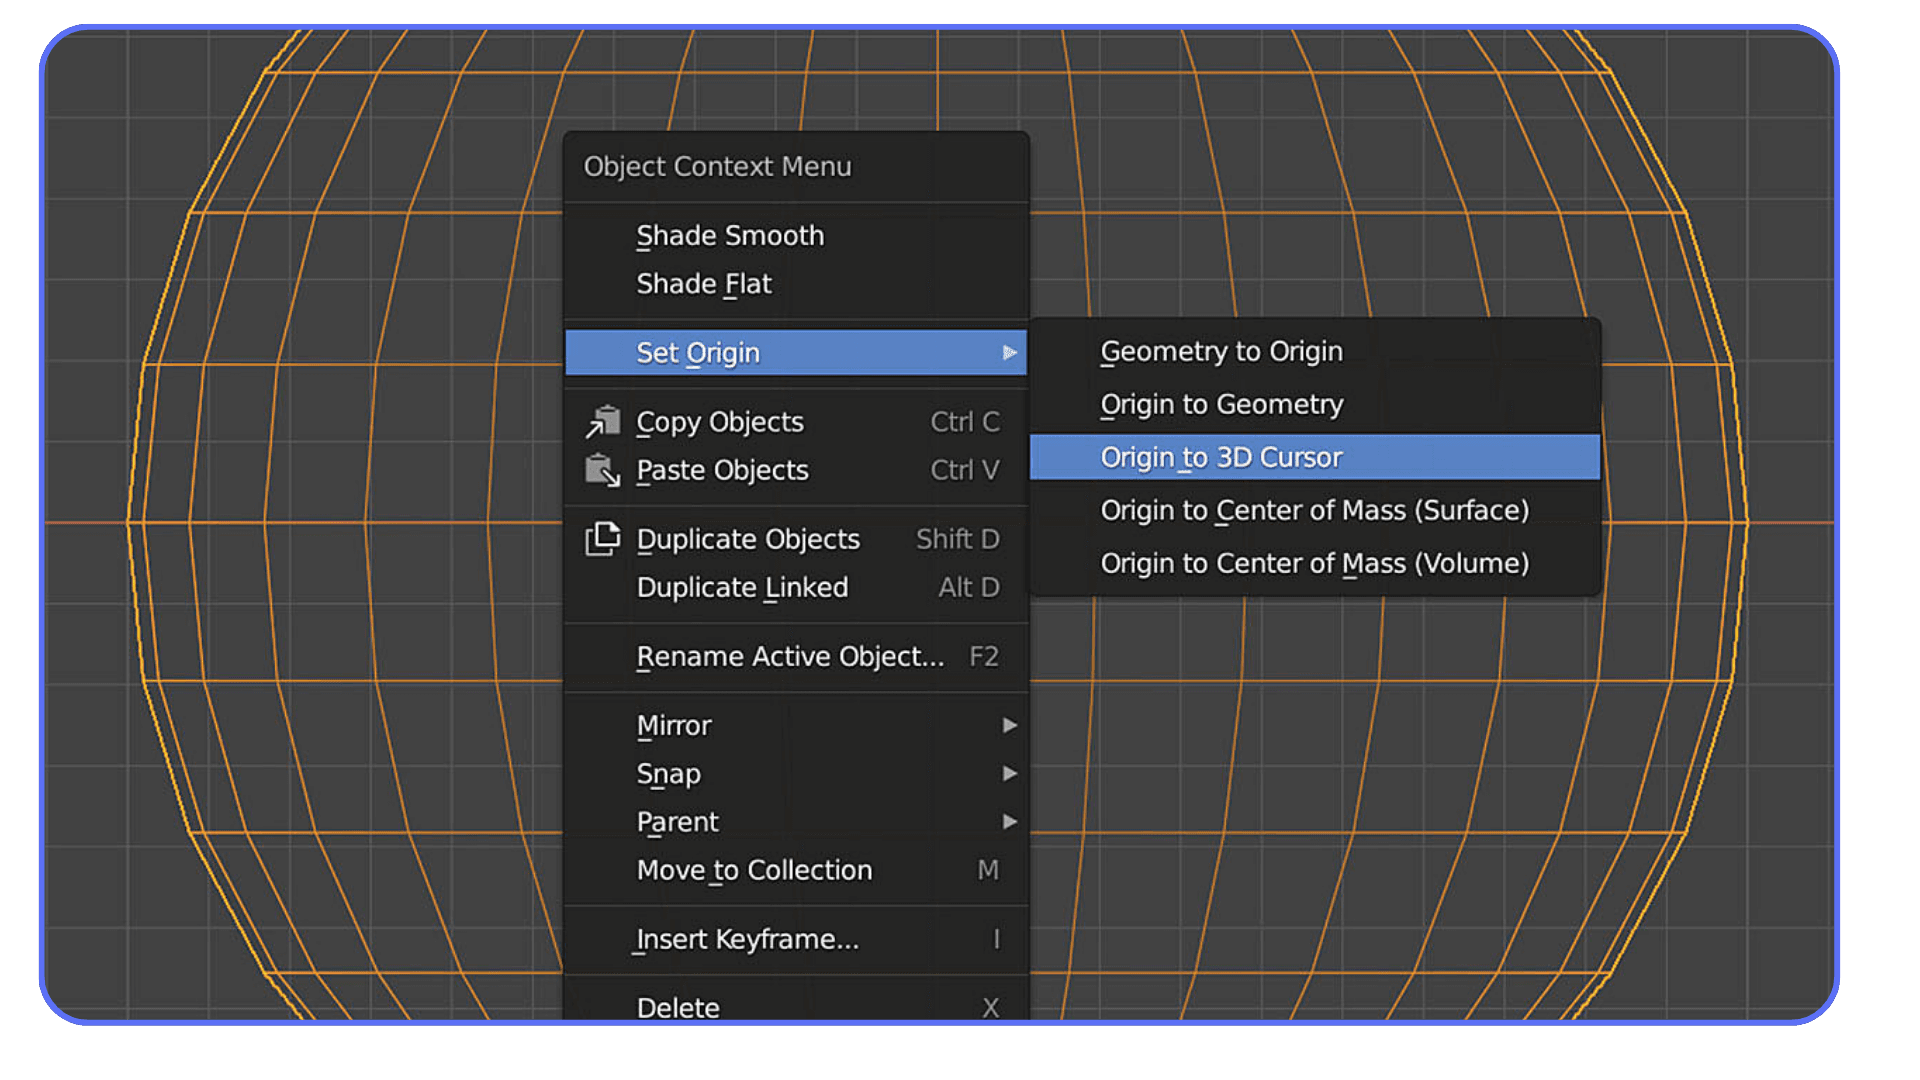
There’s also origin control, which deserves its own mention.
Setting an object’s origin to the 3D Cursor is one of the cleanest ways to fix broken transforms. Object floating oddly? Rotating from a weird corner? Snap the cursor where you want the origin, then:
Object > Set Origin > Origin to 3D Cursor.
Done. No hacks. No modifiers. Just clean math.
One warning though. The cursor has rotation. Most of the time it’s zeroed out, so you forget it exists. But if you ever rotate the cursor and forget about it, transforms can feel cursed. If something starts rotating in a way that makes no sense, check the cursor’s rotation values before blaming Blender.
This is the point where the 3D Cursor stops being a beginner tool and starts acting like a precision instrument. You’re no longer reacting to Blender’s choices. You’re setting the rules.
If you are experimenting with Blender on an iPad, cursor placement becomes even more noticeable, because limited input precision makes intentional pivots and snapping essential.
Snapping With the 3D Cursor Is Faster Than You Think
Snapping gets a bad reputation in Blender. Mostly because people try to eyeball alignment first, get frustrated, then discover snapping when they’re already annoyed. The 3D Cursor flips that workflow around.
Instead of asking Blender to guess what you want to snap to, you define a clear target first. Then everything else follows.
The Shift + S menu does most of the heavy lifting here. If you remember nothing else, remember this menu.
Some combinations I use constantly:
Cursor to Selected, then Selection to Cursor
Cursor to Active, then move multiple objects at once
Cursor to Grid for modular or architectural work
This sounds simple, but the order matters. Moving the cursor first gives you a stable anchor point. You’re not chasing geometry around the scene.
Edit Mode is where this really shines. You can snap the cursor to a vertex, edge midpoint, or face center, then use it as a reference for something completely different. Aligning details, placing bolts, centering cutouts. All cleaner with the cursor involved.
I’ve noticed people often skip this and rely on snapping directly between objects instead. That’s fine until scenes get dense. Once you’ve got dozens or hundreds of elements, snapping directly can feel unpredictable. The cursor acts like a neutral middleman. One reference point. No ambiguity.
There’s also a psychological benefit here. When something is misaligned, you can ask a simple question: “Is the cursor in the right place?” If yes, the rest is easy. If not, fix that first.
This is one of those workflows that feels slower at first because it adds a step. Then, a week later, you realize you’re making fewer mistakes and undoing less. That’s real speed.
If you are working on animation, especially frame-by-frame or Grease Pencil work, understanding how the 3D Cursor affects pivots pairs naturally with 2D animation workflows in Blender.
How This Plays Out in Real Projects
Theory is nice. Production is different. This is where the 3D Cursor quietly earns its keep.
In hard surface modeling, I use the cursor constantly as a temporary anchor. Let’s say I’m building a sci-fi panel with repeating cutouts and hinge-like details. I’ll snap the cursor to a single vertex or edge, rotate a piece around it, then reuse that same cursor position for three or four other operations. No recalculating. No eyeballing. The cursor becomes a fixed reference in a scene that’s otherwise changing fast.
Animation is another big one. Temporary pivots are everything. Imagine rotating a character’s hand around an improvised grip point or adjusting a prop that wasn’t rigged perfectly. Instead of restructuring the rig or adding helpers, I’ll place the 3D Cursor exactly where the motion should originate and rotate around that. Fast fix. Clean result. Nobody watching the final animation knows how improvised it was.

Procedural work benefits too, even though people rarely mention it. When I’m setting up Geometry Nodes or scattering objects manually before handing things off to a system, I’ll often use the cursor as a placement guide. It gives me a spatial checkpoint. Something concrete in a workflow that can otherwise feel abstract.
There’s also scene layout. Large scenes. Multiple assets. Different scales. The cursor helps you stay oriented. When everything feels “off,” snapping the cursor to world origin or a known reference point is like resetting your sense of direction. I do this more often than I’d like to admit.
One thing that surprised me over time is how often the cursor saves work you didn’t plan for. You place it for one task, forget to move it, and later realize it’s still in the perfect spot for the next operation. That only happens if you place it intentionally in the first place.
This is also where hardware starts to matter. Once scenes get heavy, viewport lag makes precise placement harder. Cursor-driven workflows reduce trial and error, which means fewer redraws and less waiting. When you’re working on large assets or dense scenes, running Blender on a high-performance cloud machine can make these workflows feel smoother and more responsive. It’s one of those upgrades you don’t think about until you feel the difference.
If you are setting up complex scenes for final output, careful cursor placement only pays off if your render settings are dialed in properly afterward.
Common Mistakes That Make the 3D Cursor Feel “Broken”
If the 3D Cursor ever feels unpredictable, it’s usually not because Blender is doing something strange. It’s because something small got overlooked. I’ve made every one of these mistakes. More than once.
Let’s get the big one out of the way.
You forget where the cursor is.
That’s it. That’s the mistake. Everything else is a variation of that theme.
A few specific traps to watch for:
Placing the cursor once, then modeling for ten minutes and forgetting it exists
Adding new objects without checking cursor position first
Rotating the cursor accidentally and never resetting its orientation
Trying to place it precisely in perspective view and trusting the result
The rotation issue deserves extra attention. The 3D Cursor has rotation values, and they affect transforms when you use it as a pivot or align origins. If something suddenly rotates at a strange angle, open the Sidebar and check the cursor’s rotation. Resetting it to zero often fixes “mystery” behavior instantly.
Another common issue is depth. Clicking in perspective view feels intuitive, but you’re really placing the cursor somewhere along a ray in 3D space. Blender has to guess the depth. Sometimes it guesses wrong. Orthographic views remove that ambiguity completely.
There’s also the panic undo cycle. You add an object, it appears in the wrong place, you undo, try again, undo again. Instead, pause. Look at the cursor. Move it where you want. Then add the object. It’s a small mental shift, but it breaks a lot of bad habits.
One shortcut worth remembering is Shift + C. It recenters the cursor and the view. When everything feels lost, that shortcut is a reset button for both your scene and your patience.
Once you build the habit of checking the cursor before adding or transforming objects, Blender stops feeling hostile. It starts feeling literal. It does exactly what you tell it to do, even when you didn’t mean to tell it that.
If you are running Blender on a Chromebook or other lightweight hardware, predictable cursor-based workflows help you avoid unnecessary trial and error.
When You Can Mostly Ignore the 3D Cursor
This might sound strange after everything I’ve said so far, but yes, there are plenty of moments where the 3D Cursor barely matters. And pretending otherwise just turns it into some mythical power tool, which it isn’t.
If you’re blocking out a scene, roughing in shapes, or doing quick concept work, you can get pretty far without touching it. Median point transforms work fine. Adding objects at world origin is usually acceptable. For sculpting, especially, the cursor often fades into the background. Your brush and your mesh are doing most of the talking.
I’ve also noticed that beginners who ignore the 3D Cursor entirely can still produce solid work. That’s important to say out loud. Blender doesn’t require mastery of the cursor to be usable. You can model, texture, light, and even animate without thinking about it much.
The problem shows up later.
As soon as you care about precision, repetition, or clean transforms, the cracks appear. Things rotate from weird points. Objects feel slightly misaligned. You start nudging values instead of placing things with intent. That’s when the cursor becomes less optional.
There’s also a mindset shift here. If you treat the 3D Cursor as a reactive tool, something you only notice when it causes trouble, it feels annoying. If you treat it as proactive, something you place on purpose before acting, it becomes invisible in the best way. It just works.
So no, you don’t need to obsess over it in every workflow. But knowing when to use it is the difference between fighting Blender and cooperating with it. And once you feel that difference, it’s hard to go back.
If you are preparing models for 3D printing, the 3D Cursor becomes critical for setting clean origins and alignment before exporting.
Using Vagon Cloud Computer When Blender Starts Pushing Back
At some point, Blender stops being limited by knowledge and starts being limited by hardware. You feel it when scenes get heavier. Viewport interaction slows down. Simple actions like rotating, snapping, or placing objects lose their immediacy.
That friction adds up. Especially when you’re working precisely.
This is where Vagon Cloud Computer fits in cleanly. It gives you access to high-performance machines without changing how you work in Blender. Same interface. Same tools. Just more headroom.
Large scenes stay responsive. Dense geometry doesn’t choke the viewport. Transformations feel immediate instead of delayed. That matters when you’re doing detailed modeling, layout work, or anything that depends on accurate interaction.
Another advantage is flexibility. You’re not tied to a single machine. You can jump into heavy projects from different devices and still get consistent performance. That’s useful when collaborating, testing AI-generated assets, or moving between locations.
It’s not something you need for every file. Lightweight projects still run fine locally. But when Blender starts pushing your system harder than it should, Vagon Cloud Computer gives you a way to keep working without redesigning your workflow around hardware limits.
Final Thoughts
Once you understand the 3D Cursor, Blender stops feeling unpredictable. Objects appear where you expect them to. Rotations make sense. Snapping feels deliberate instead of accidental. None of that comes from memorizing shortcuts. It comes from placing things on purpose.
The cursor isn’t flashy. It doesn’t show up in renders. Nobody compliments it in a final shot. But it quietly shapes how clean your scenes are and how confident your workflow feels.
If Blender has ever felt like it was fighting you, there’s a good chance the 3D Cursor was part of that story. Not because it’s broken, but because it was ignored.
Start paying attention to it. Place it intentionally. Check it before you add things. Use it as a reference instead of a surprise. Over time, it becomes less of a tool and more of a habit.
And that’s usually the moment when Blender starts doing exactly what you ask it to do.
FAQs
1. Why does Blender keep adding objects in weird places?
Because new objects appear exactly where the 3D Cursor is. If something spawns far away, the cursor was already there. Blender is being literal, not random.
2. How do I reset the 3D Cursor quickly?
Use Shift + C. It recenters the cursor and recenters your view. When things feel lost, this shortcut fixes more than you’d expect.
3. Is the 3D Cursor the same as an object’s origin?
No. The cursor is a reference point. An origin belongs to an object. You can snap an origin to the cursor, but they’re not the same thing.
4. Why does rotation feel wrong when using the 3D Cursor as a pivot?
Check the cursor’s rotation. It has orientation values, and if they’re not zero, transforms can behave strangely. This catches even experienced users off guard.
5. Do I need to use the 3D Cursor all the time?
Not at all. For rough modeling, blocking, or sculpting, you can mostly ignore it. It becomes important when you care about precision, repeatability, and clean transforms.
6. What’s the best way to place the cursor accurately?
Avoid guessing in perspective view. Use orthographic views or the Shift + S snapping menu. When precision matters, telling Blender exactly where to put it beats clicking every time.
7. Why do advanced users rely on it so much?
Because it’s predictable. Once placed intentionally, it doesn’t move unless you move it. That makes it ideal for pivots, snapping, and controlled transforms in complex scenes.
Ever place a primitive and wonder why it didn’t land where you expected? That’s the 3D Cursor talking.
I’ve watched people blame Blender, their mouse, even their GPU before realizing the issue was that little red-and-white crosshair sitting quietly in the viewport. The 3D Cursor. Easy to ignore. Easy to forget. And somehow responsible for half the “why is this happening?” moments in Blender.
Here’s the thing. Blender doesn’t place objects randomly. It’s very intentional. New meshes appear exactly where the 3D Cursor is. Rotations pivot around it if you tell them to. Origins snap to it without asking twice. Once you see that pattern, a lot of Blender’s behavior suddenly makes sense.
Most beginners treat the 3D Cursor like a background decoration. Advanced users quietly rely on it all the time. I think that gap is one of the reasons Blender feels “hard” to new users when it doesn’t have to.
If you get comfortable with the 3D Cursor, really comfortable, Blender starts feeling less chaotic. More predictable. Almost cooperative. And yes, you’ll stop spawning cubes in the middle of nowhere.
What the 3D Cursor Actually Is
Let’s clear up a common misunderstanding right away. The 3D Cursor is not a selection tool. It’s not a gizmo. And it’s definitely not just a spawn point for new objects, even though that’s how most people first encounter it.
The 3D Cursor is a position and orientation reference in 3D space. Think of it as a programmable marker that Blender uses whenever you ask a question like “where should this happen?” or “around what point should this rotate?”
By default, Blender uses it for a few very specific things:
New objects appear exactly at the 3D Cursor’s location
Certain transforms can use it as a pivot point
Object origins can snap to it instantly
Some tools quietly depend on it when no better reference exists
That’s a lot of responsibility for something most people never touch on purpose.
What it isn’t is equally important. The 3D Cursor does not automatically follow your selection. It does not care what object is active unless you explicitly tell it to. Blender won’t “fix” its position for you. In my experience, that’s where frustration starts.
You select a face, add a cube, and suddenly the cube appears three meters off to the side. Blender didn’t mess up. The cursor was already there. You just forgot about it.
There’s also orientation, which almost nobody notices at first. The 3D Cursor has rotation values. That means when you align transforms or set origins based on it, rotation can matter too. Most of the time it’s zeroed out, so you don’t feel it. Until the day it isn’t. That’s a fun one.
Once you stop thinking of the 3D Cursor as a passive marker and start treating it like an active tool, things change. You stop fighting Blender’s behavior and start predicting it. That’s the real unlock.
Placing the 3D Cursor Without Losing Your Mind
This is where most people go wrong. Not because the tools are bad, but because Blender gives you too many ways to move the 3D Cursor and doesn’t explain which ones are reliable.
If you’ve ever tried to place it freehand in perspective view and missed by a mile, you’re not alone. I almost never place the cursor blindly in 3D space anymore. There are better options.
The fast, casual way
Sometimes you just need the cursor roughly in the right spot.
Shift + Right-Click places the 3D Cursor where you click
The Cursor tool in the toolbar does the same thing, just slower
This works fine for blocking out ideas. It’s terrible for precision. Perspective distortion will lie to you every time.
The way that actually works
When accuracy matters, switch views. Always.
Numpad 1, 3, or 7 for front, side, or top view
Place the cursor from an orthographic angle
Repeat from another view if depth matters
Two clicks from two views beats guessing once in perspective. Every time.
The “stop guessing” method
This is the one I rely on most, especially in real production work.
Press Shift + S. This menu is gold.
Cursor to Selected
Cursor to Active
Cursor to World Origin
Cursor to Grid
Instead of placing the cursor by eye, you tell Blender exactly what you want. No surprises. No cleanup.
There’s also the Sidebar. Hit N, open the View tab, and you can type exact coordinates for the 3D Cursor. Not exciting, but incredibly useful when working with measurements, modular assets, or anything technical.
One mistake I see all the time is people moving the cursor, forgetting about it, and continuing to model for twenty minutes. Then they add a new object and everything breaks. If something appears in the wrong place, don’t undo immediately. Look at the cursor first. It’s usually the culprit.
If you are still fumbling through menus to move the 3D Cursor, learning a few core shortcuts makes a bigger difference than most people expect, and this breakdown of Blender keyboard shortcuts helps build that muscle memory fast.
Using the 3D Cursor as a Pivot Changes Everything
Most people learn rotation and scaling in Blender using the default median point. That works. It’s fine. But it’s also limiting once your scenes get more complex.
The moment you switch your pivot point to the 3D Cursor, a lot of doors open.
Here’s why I like it. The cursor doesn’t move unless you move it. That makes it predictable. You can park it somewhere intentional and reuse it again and again without Blender second-guessing you.
In the viewport header, change the pivot point to 3D Cursor. Now try rotating or scaling an object.
Suddenly:
Doors rotate perfectly around their hinges
Mechanical parts spin around real-world joints
Asymmetrical objects behave the way you expect
This is especially useful in hard surface modeling. I’ve noticed that people who avoid the 3D Cursor tend to duplicate objects and reposition them manually instead of rotating around a fixed point. It works, but it’s slower and messier.
Scaling is another sleeper feature here. Scaling toward or away from a cursor lets you control direction without weird distortions. It’s subtle, but once you use it intentionally, you miss it when it’s gone.
There’s also origin control, which deserves its own mention.
Setting an object’s origin to the 3D Cursor is one of the cleanest ways to fix broken transforms. Object floating oddly? Rotating from a weird corner? Snap the cursor where you want the origin, then:
Object > Set Origin > Origin to 3D Cursor.
Done. No hacks. No modifiers. Just clean math.
One warning though. The cursor has rotation. Most of the time it’s zeroed out, so you forget it exists. But if you ever rotate the cursor and forget about it, transforms can feel cursed. If something starts rotating in a way that makes no sense, check the cursor’s rotation values before blaming Blender.
This is the point where the 3D Cursor stops being a beginner tool and starts acting like a precision instrument. You’re no longer reacting to Blender’s choices. You’re setting the rules.
If you are experimenting with Blender on an iPad, cursor placement becomes even more noticeable, because limited input precision makes intentional pivots and snapping essential.
Snapping With the 3D Cursor Is Faster Than You Think
Snapping gets a bad reputation in Blender. Mostly because people try to eyeball alignment first, get frustrated, then discover snapping when they’re already annoyed. The 3D Cursor flips that workflow around.
Instead of asking Blender to guess what you want to snap to, you define a clear target first. Then everything else follows.
The Shift + S menu does most of the heavy lifting here. If you remember nothing else, remember this menu.
Some combinations I use constantly:
Cursor to Selected, then Selection to Cursor
Cursor to Active, then move multiple objects at once
Cursor to Grid for modular or architectural work
This sounds simple, but the order matters. Moving the cursor first gives you a stable anchor point. You’re not chasing geometry around the scene.
Edit Mode is where this really shines. You can snap the cursor to a vertex, edge midpoint, or face center, then use it as a reference for something completely different. Aligning details, placing bolts, centering cutouts. All cleaner with the cursor involved.
I’ve noticed people often skip this and rely on snapping directly between objects instead. That’s fine until scenes get dense. Once you’ve got dozens or hundreds of elements, snapping directly can feel unpredictable. The cursor acts like a neutral middleman. One reference point. No ambiguity.
There’s also a psychological benefit here. When something is misaligned, you can ask a simple question: “Is the cursor in the right place?” If yes, the rest is easy. If not, fix that first.
This is one of those workflows that feels slower at first because it adds a step. Then, a week later, you realize you’re making fewer mistakes and undoing less. That’s real speed.
If you are working on animation, especially frame-by-frame or Grease Pencil work, understanding how the 3D Cursor affects pivots pairs naturally with 2D animation workflows in Blender.
How This Plays Out in Real Projects
Theory is nice. Production is different. This is where the 3D Cursor quietly earns its keep.
In hard surface modeling, I use the cursor constantly as a temporary anchor. Let’s say I’m building a sci-fi panel with repeating cutouts and hinge-like details. I’ll snap the cursor to a single vertex or edge, rotate a piece around it, then reuse that same cursor position for three or four other operations. No recalculating. No eyeballing. The cursor becomes a fixed reference in a scene that’s otherwise changing fast.
Animation is another big one. Temporary pivots are everything. Imagine rotating a character’s hand around an improvised grip point or adjusting a prop that wasn’t rigged perfectly. Instead of restructuring the rig or adding helpers, I’ll place the 3D Cursor exactly where the motion should originate and rotate around that. Fast fix. Clean result. Nobody watching the final animation knows how improvised it was.
Procedural work benefits too, even though people rarely mention it. When I’m setting up Geometry Nodes or scattering objects manually before handing things off to a system, I’ll often use the cursor as a placement guide. It gives me a spatial checkpoint. Something concrete in a workflow that can otherwise feel abstract.
There’s also scene layout. Large scenes. Multiple assets. Different scales. The cursor helps you stay oriented. When everything feels “off,” snapping the cursor to world origin or a known reference point is like resetting your sense of direction. I do this more often than I’d like to admit.
One thing that surprised me over time is how often the cursor saves work you didn’t plan for. You place it for one task, forget to move it, and later realize it’s still in the perfect spot for the next operation. That only happens if you place it intentionally in the first place.
This is also where hardware starts to matter. Once scenes get heavy, viewport lag makes precise placement harder. Cursor-driven workflows reduce trial and error, which means fewer redraws and less waiting. When you’re working on large assets or dense scenes, running Blender on a high-performance cloud machine can make these workflows feel smoother and more responsive. It’s one of those upgrades you don’t think about until you feel the difference.
If you are setting up complex scenes for final output, careful cursor placement only pays off if your render settings are dialed in properly afterward.
Common Mistakes That Make the 3D Cursor Feel “Broken”
If the 3D Cursor ever feels unpredictable, it’s usually not because Blender is doing something strange. It’s because something small got overlooked. I’ve made every one of these mistakes. More than once.
Let’s get the big one out of the way.
You forget where the cursor is.
That’s it. That’s the mistake. Everything else is a variation of that theme.
A few specific traps to watch for:
Placing the cursor once, then modeling for ten minutes and forgetting it exists
Adding new objects without checking cursor position first
Rotating the cursor accidentally and never resetting its orientation
Trying to place it precisely in perspective view and trusting the result
The rotation issue deserves extra attention. The 3D Cursor has rotation values, and they affect transforms when you use it as a pivot or align origins. If something suddenly rotates at a strange angle, open the Sidebar and check the cursor’s rotation. Resetting it to zero often fixes “mystery” behavior instantly.
Another common issue is depth. Clicking in perspective view feels intuitive, but you’re really placing the cursor somewhere along a ray in 3D space. Blender has to guess the depth. Sometimes it guesses wrong. Orthographic views remove that ambiguity completely.
There’s also the panic undo cycle. You add an object, it appears in the wrong place, you undo, try again, undo again. Instead, pause. Look at the cursor. Move it where you want. Then add the object. It’s a small mental shift, but it breaks a lot of bad habits.
One shortcut worth remembering is Shift + C. It recenters the cursor and the view. When everything feels lost, that shortcut is a reset button for both your scene and your patience.
Once you build the habit of checking the cursor before adding or transforming objects, Blender stops feeling hostile. It starts feeling literal. It does exactly what you tell it to do, even when you didn’t mean to tell it that.
If you are running Blender on a Chromebook or other lightweight hardware, predictable cursor-based workflows help you avoid unnecessary trial and error.
When You Can Mostly Ignore the 3D Cursor
This might sound strange after everything I’ve said so far, but yes, there are plenty of moments where the 3D Cursor barely matters. And pretending otherwise just turns it into some mythical power tool, which it isn’t.
If you’re blocking out a scene, roughing in shapes, or doing quick concept work, you can get pretty far without touching it. Median point transforms work fine. Adding objects at world origin is usually acceptable. For sculpting, especially, the cursor often fades into the background. Your brush and your mesh are doing most of the talking.
I’ve also noticed that beginners who ignore the 3D Cursor entirely can still produce solid work. That’s important to say out loud. Blender doesn’t require mastery of the cursor to be usable. You can model, texture, light, and even animate without thinking about it much.
The problem shows up later.
As soon as you care about precision, repetition, or clean transforms, the cracks appear. Things rotate from weird points. Objects feel slightly misaligned. You start nudging values instead of placing things with intent. That’s when the cursor becomes less optional.
There’s also a mindset shift here. If you treat the 3D Cursor as a reactive tool, something you only notice when it causes trouble, it feels annoying. If you treat it as proactive, something you place on purpose before acting, it becomes invisible in the best way. It just works.
So no, you don’t need to obsess over it in every workflow. But knowing when to use it is the difference between fighting Blender and cooperating with it. And once you feel that difference, it’s hard to go back.
If you are preparing models for 3D printing, the 3D Cursor becomes critical for setting clean origins and alignment before exporting.
Using Vagon Cloud Computer When Blender Starts Pushing Back
At some point, Blender stops being limited by knowledge and starts being limited by hardware. You feel it when scenes get heavier. Viewport interaction slows down. Simple actions like rotating, snapping, or placing objects lose their immediacy.
That friction adds up. Especially when you’re working precisely.
This is where Vagon Cloud Computer fits in cleanly. It gives you access to high-performance machines without changing how you work in Blender. Same interface. Same tools. Just more headroom.
Large scenes stay responsive. Dense geometry doesn’t choke the viewport. Transformations feel immediate instead of delayed. That matters when you’re doing detailed modeling, layout work, or anything that depends on accurate interaction.
Another advantage is flexibility. You’re not tied to a single machine. You can jump into heavy projects from different devices and still get consistent performance. That’s useful when collaborating, testing AI-generated assets, or moving between locations.
It’s not something you need for every file. Lightweight projects still run fine locally. But when Blender starts pushing your system harder than it should, Vagon Cloud Computer gives you a way to keep working without redesigning your workflow around hardware limits.
Final Thoughts
Once you understand the 3D Cursor, Blender stops feeling unpredictable. Objects appear where you expect them to. Rotations make sense. Snapping feels deliberate instead of accidental. None of that comes from memorizing shortcuts. It comes from placing things on purpose.
The cursor isn’t flashy. It doesn’t show up in renders. Nobody compliments it in a final shot. But it quietly shapes how clean your scenes are and how confident your workflow feels.
If Blender has ever felt like it was fighting you, there’s a good chance the 3D Cursor was part of that story. Not because it’s broken, but because it was ignored.
Start paying attention to it. Place it intentionally. Check it before you add things. Use it as a reference instead of a surprise. Over time, it becomes less of a tool and more of a habit.
And that’s usually the moment when Blender starts doing exactly what you ask it to do.
FAQs
1. Why does Blender keep adding objects in weird places?
Because new objects appear exactly where the 3D Cursor is. If something spawns far away, the cursor was already there. Blender is being literal, not random.
2. How do I reset the 3D Cursor quickly?
Use Shift + C. It recenters the cursor and recenters your view. When things feel lost, this shortcut fixes more than you’d expect.
3. Is the 3D Cursor the same as an object’s origin?
No. The cursor is a reference point. An origin belongs to an object. You can snap an origin to the cursor, but they’re not the same thing.
4. Why does rotation feel wrong when using the 3D Cursor as a pivot?
Check the cursor’s rotation. It has orientation values, and if they’re not zero, transforms can behave strangely. This catches even experienced users off guard.
5. Do I need to use the 3D Cursor all the time?
Not at all. For rough modeling, blocking, or sculpting, you can mostly ignore it. It becomes important when you care about precision, repeatability, and clean transforms.
6. What’s the best way to place the cursor accurately?
Avoid guessing in perspective view. Use orthographic views or the Shift + S snapping menu. When precision matters, telling Blender exactly where to put it beats clicking every time.
7. Why do advanced users rely on it so much?
Because it’s predictable. Once placed intentionally, it doesn’t move unless you move it. That makes it ideal for pivots, snapping, and controlled transforms in complex scenes.
Get Beyond Your Computer Performance
Run applications on your cloud computer with the latest generation hardware. No more crashes or lags.

Trial includes 1 hour usage + 7 days of storage.
Summarize with AI

Ready to focus on your creativity?
Vagon gives you the ability to create & render projects, collaborate, and stream applications with the power of the best hardware.

Vagon Blog


Run heavy applications on any device with
your personal computer on the cloud.
San Francisco, California
Solutions
Vagon Teams
Vagon Streams
Use Cases
Resources
Vagon Blog
What Slows Down After Effects Projects?
The First 30 Minutes in Blender 3D: A Practical Workflow Guide
What’s New in Godot 4.7? Key Features, Upgrades, and Workflow Improvements
What Slows Down Blender 3D Projects?
What Slows Down Adobe Photoshop Projects?
The First 30 Minutes in Adobe Photoshop: A Practical Workflow Guide
Before You Start in Adobe Photoshop: A Practical Setup Checklist
What’s New in Unreal Engine 5.8? Key Features and Upgrade Advice
How to Run Windows on an iPad: 4 Best Ways (2026)
Vagon Blog
Run heavy applications on any device with
your personal computer on the cloud.
San Francisco, California
Solutions
Vagon Teams
Vagon Streams
Use Cases
Resources
Vagon Blog