Instant Connection for Pixel Streaming
— New Feature Automated Setup

How to Use Blender for 3D Printing: A Practical Guide for 2025
How to Use Blender for 3D Printing: A Practical Guide for 2025
DigitalArt
How to Use Blender for 3D Printing: A Practical Guide for 2025
Table of Contents
I remember the first time I tried to print something I built in Blender. I wasn’t confident at all. I exported the STL, threw it into the slicer, hit preview, and waited for it to fall apart. I thought Blender would betray me somewhere. A hole I didn’t see. A face flipped the wrong way. Some tiny mistake hiding in the mesh.
But the print came out fine. Not perfect, but way better than I expected. And that moment made me realize something pretty simple. Blender isn’t just a place to sculpt dragons or build scenes for animation. You can actually use it to make real objects that survive the jump from screen to printer.
So that’s what I’m doing here. I’m not trying to impress anyone or write a polished “ultimate guide.” I’m just walking through what actually works, what usually goes wrong, and what I do now after a few messes, a few surprises, and a couple of prints that made me question my life choices.
If you want a Blender 3D printing tutorial that feels like you’re learning from someone who has already made the dumb mistakes, keep reading.
Why Blender Works for 3D Printing
Most people find Blender because they want to model a character, make an animation, or try sculpting for fun. Not because they want to print something. I was the same. For years I saw it as “the free alternative to the big apps,” nothing more.
Then I started using it for objects I wanted to hold in my hand. Small tools. Stands. Brackets. A strange little cable organizer that only made sense to me. And something clicked. Blender is great for this kind of work, as long as you approach it in a slightly different way than your usual modeling sessions.
Blender gives you a lot of freedom. You can shape anything in any style. Organic forms, sharp edges, smooth curves, rough surfaces. If your goal is to create something personal or visually interesting, Blender is perfect. Many people who look for a using Blender for 3D printing tutorial do it because they want creativity first and rules second.
Of course, that freedom comes with some traps. Blender doesn’t force real world limits. It lets you make surfaces that are too thin, faces pointing the wrong way, floating parts, or geometry that looks fine on screen but impossible to print. Anyone who has touched a CAD program knows those tools stop you before you break something. Blender gives you all the rope you want.
Once you learn to watch for these things, and you follow simple habits that match Blender 3D printing best practices 2025 workflows, it becomes a solid tool for print jobs. You get the freedom to model anything, but you also keep the mesh clean enough for the printer.
So even though Blender isn’t the first name people think of for real objects, it absolutely works. And it works well once you know how to guide it.
#1. Set Your Units and Scale
This is the part everyone skips on their first try. I did too. I modeled something that looked the size of a keychain on my screen, exported it, opened it in the slicer, and it showed up at the size of a small dog. Not ideal.
Before you touch a single vertex, switch Blender to real world measurements. Go to the Scene settings and choose metric or imperial. Most people doing a Blender 3D printing tutorial stick with millimeters since slicers are usually set up that way.
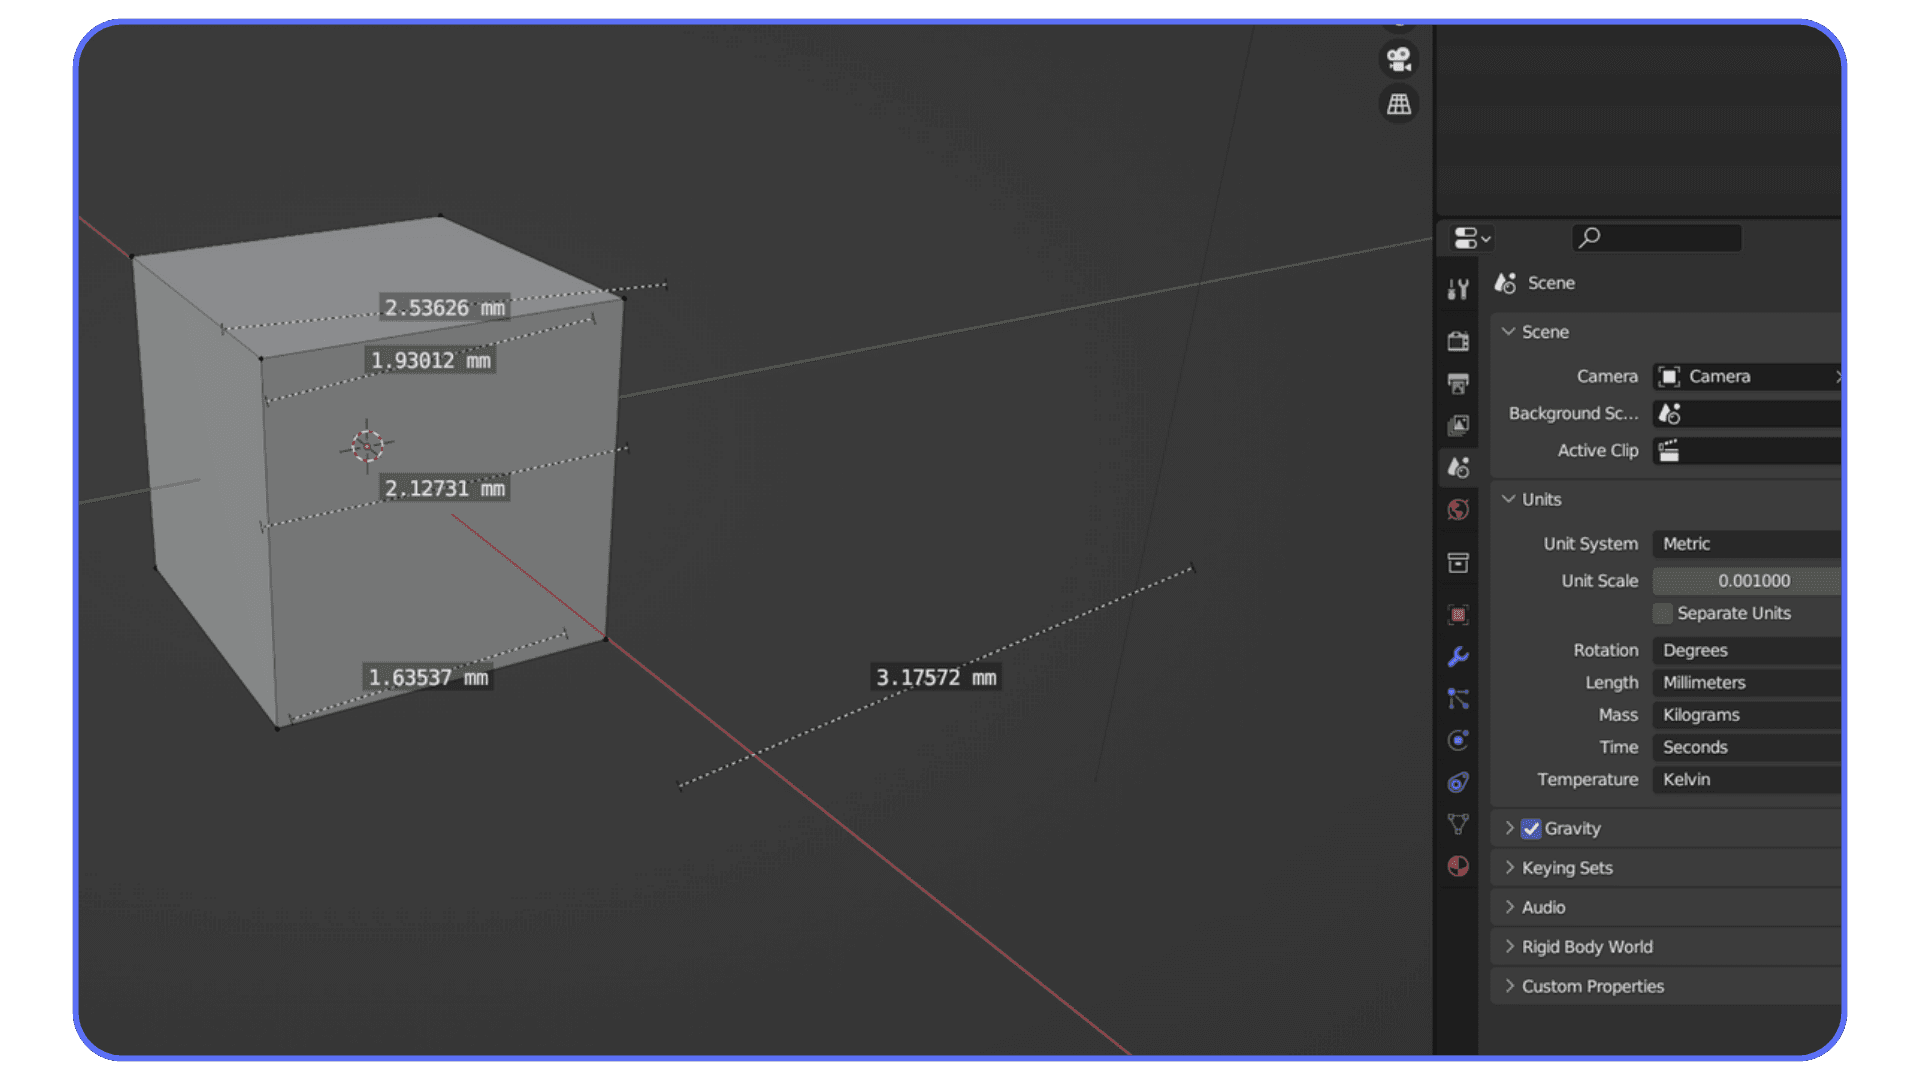
The reason this matters is simple. Blender’s default unit means nothing to a printer. If you model a ring or a small gadget without setting proper units, the printer might read the file as meters or centimeters. That is how you end up with a five meter long phone stand.
Once you pick your unit system, check the scale. Blender should show you the actual size of your object in the viewport. If you want a 40 mm piece, it should literally read 40 mm. When you follow Blender 3D printing workflow best practices, this is always the first step. It saves you from a lot of confusion later.
Getting this right early removes the guesswork. Your STL will open in the slicer at the exact size you planned. No surprises. No drama. And no massive prints that waste half a roll of filament.
#2. Model With Print Constraints in Mind
This is where Blender gives you a lot of freedom, and that freedom can trick you. On screen, a thin wall looks fine. A tiny spike looks fine. A floating detail that barely connects to the rest of the mesh looks fine. Then the printer tries to make it, and suddenly nothing is fine.
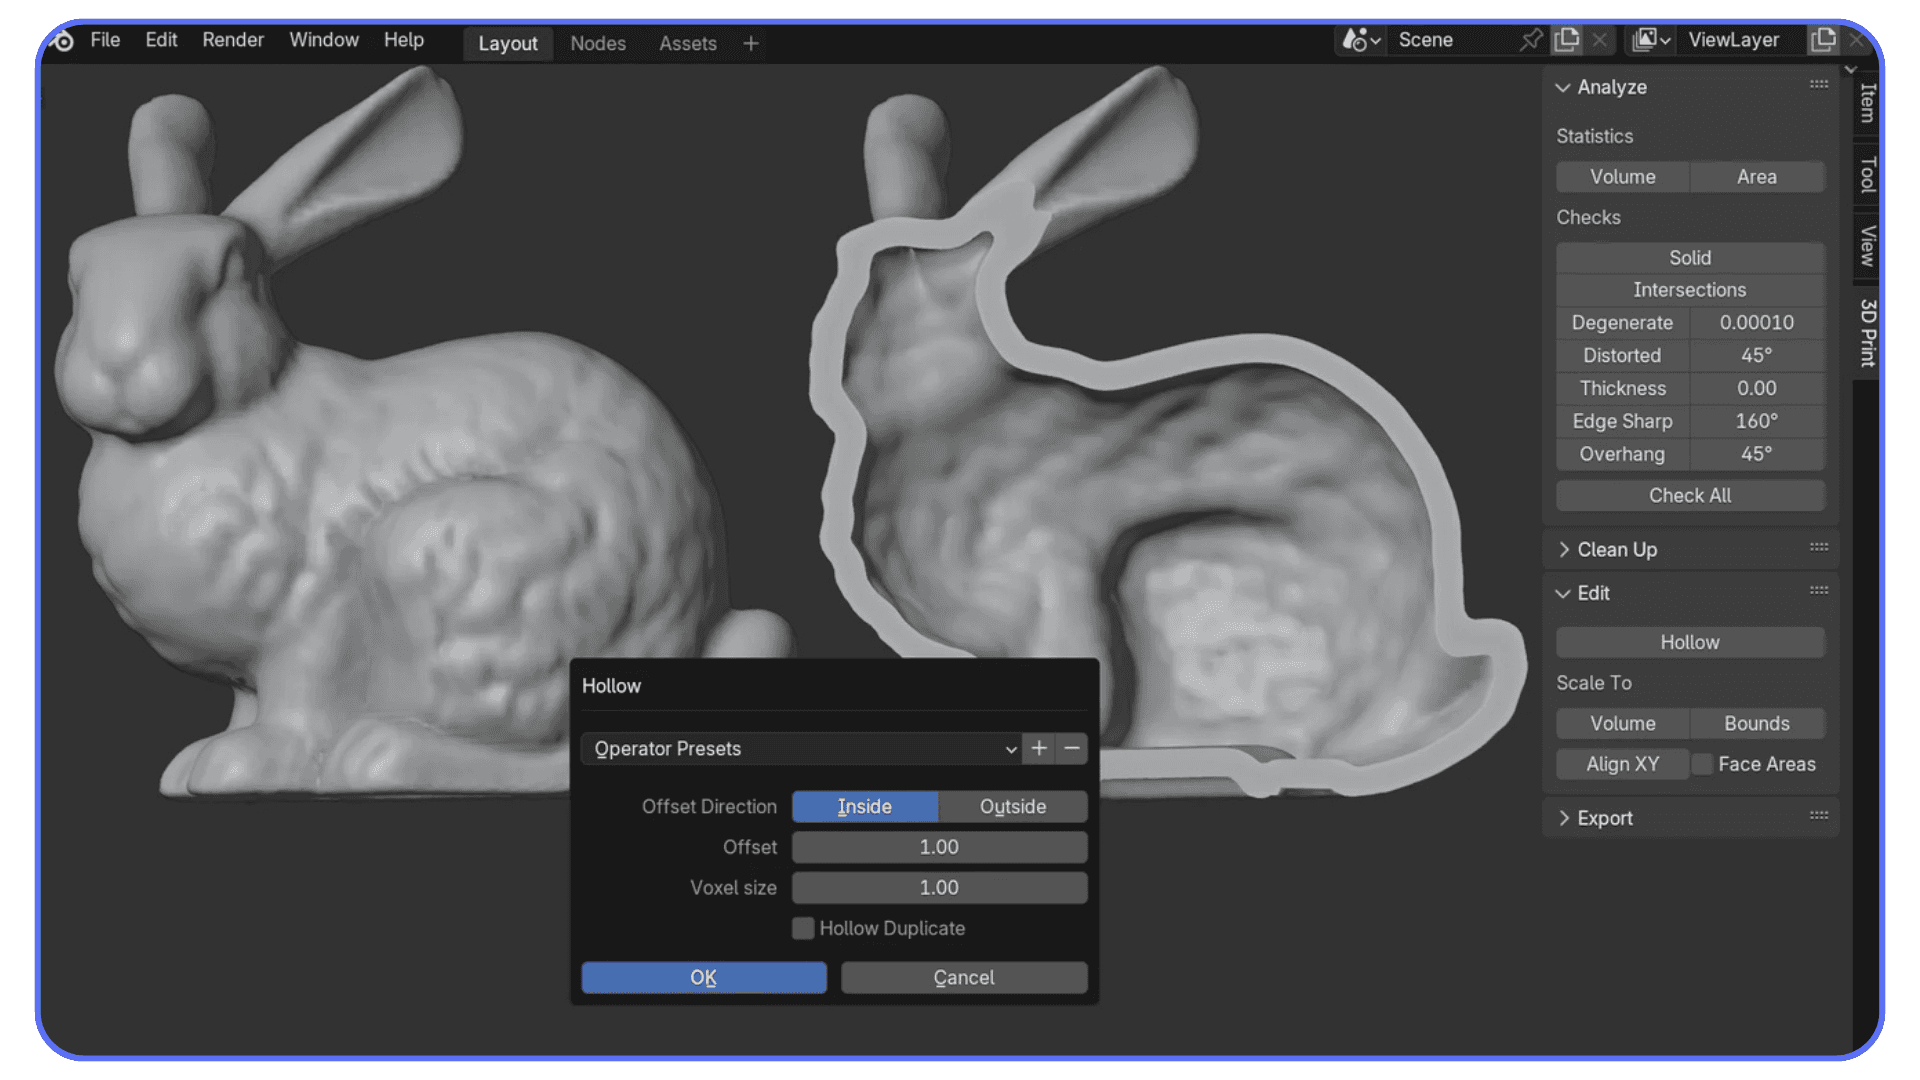
Whether you use FDM or resin, you need to think about real thickness and real strength. A wall that is 0.2 mm might look okay in Blender, but it will snap the moment you touch it. FDM printers usually prefer a few millimeters of thickness for anything structural. Resin can handle smaller details, but it also has its own limits. This is why many people treat this step like a best practices Blender 3D printing mesh preparation checklist.
If something looks fragile in your mind, it is fragile. Add thickness. Add support inside the form. Round out edges so they are less likely to chip. These tiny decisions often decide whether your first print succeeds or becomes a small pile of spaghetti from your FDM machine.
Modifiers can help here. Solidify is great for giving your model real thickness. Remesh can clean up messy shapes. Boolean operations let you cut or join pieces, but make sure you apply them before exporting. If a modifier is still live when you export, your STL might not match what you see.
One more thing. Floating geometry does not survive real life. Everything must connect to the main body in a way that the printer can actually build. If you see a piece that looks as if it is barely touching the model, fix it now instead of hoping the slicer magically solves it.
Once you start thinking in real materials and real forces, Blender becomes a much more reliable tool for printing. This habit also sets you up well for the Blender 3D printing workflow FDM vs resin differences you will deal with later.
#3. Make the Mesh Printable
Once the model looks right, you still need to make sure the mesh behaves like a real object. Blender is great at letting you sculpt or model anything, but it does not warn you when the mesh is broken. And a broken mesh almost always leads to a bad print.
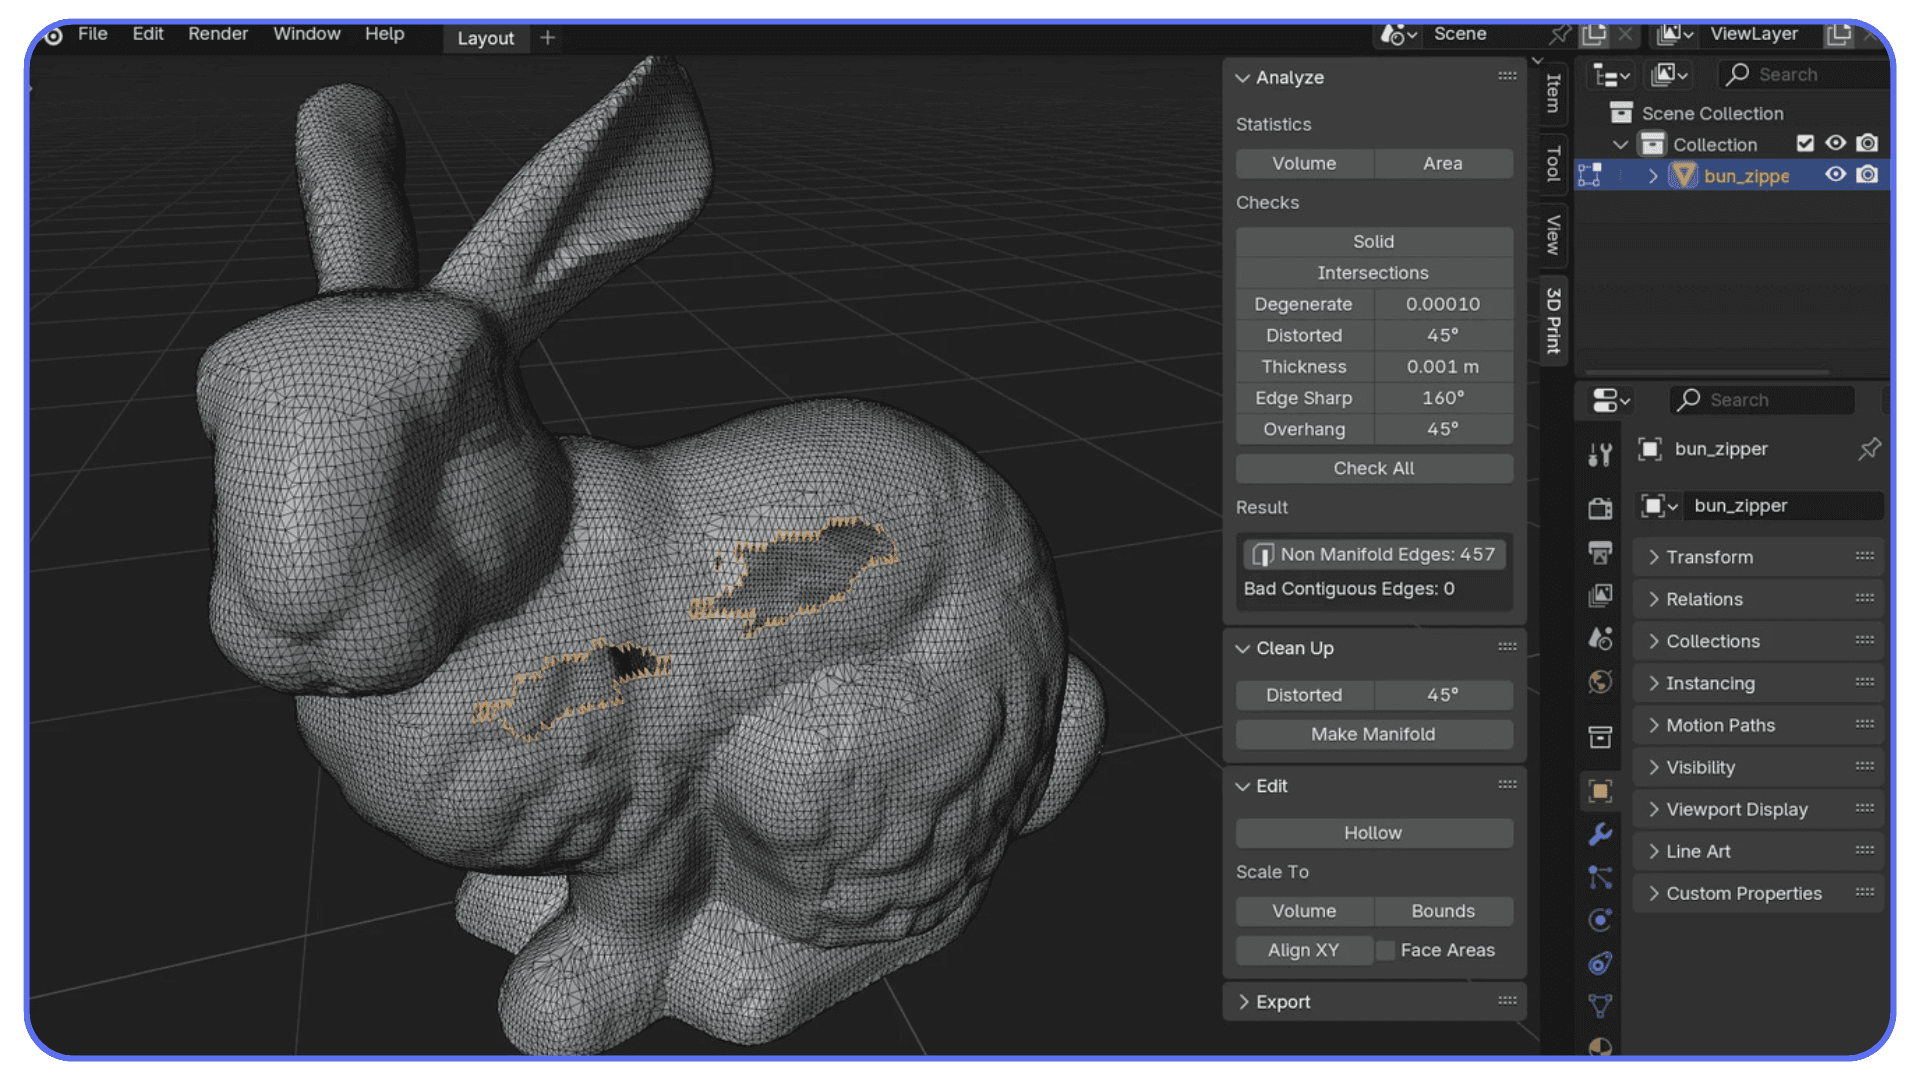
The main thing you want is a watertight object. No holes, no loose edges, no inside out faces, no hidden pieces that should not be there. If the mesh has even one gap, the slicer might guess the wrong shape. Sometimes it fills the hole for you. Sometimes it ignores half the model. You never really know.
There is a simple way to check this. Turn on the 3D Print Toolbox add on. If you have never used it, you can find plenty of Blender 3D Print Toolbox how to use guides online, but the short version is easy. Enable it in the preferences, open the panel, and run the checks. It will point out non manifold edges and other trouble spots. Think of it as your safety net.
Normals matter too. Faces should point outward. If you flip a few by accident, Blender might still show the model correctly, but the slicer could treat those areas as empty space. Select everything, recalc normals, and fix anything that still looks wrong.
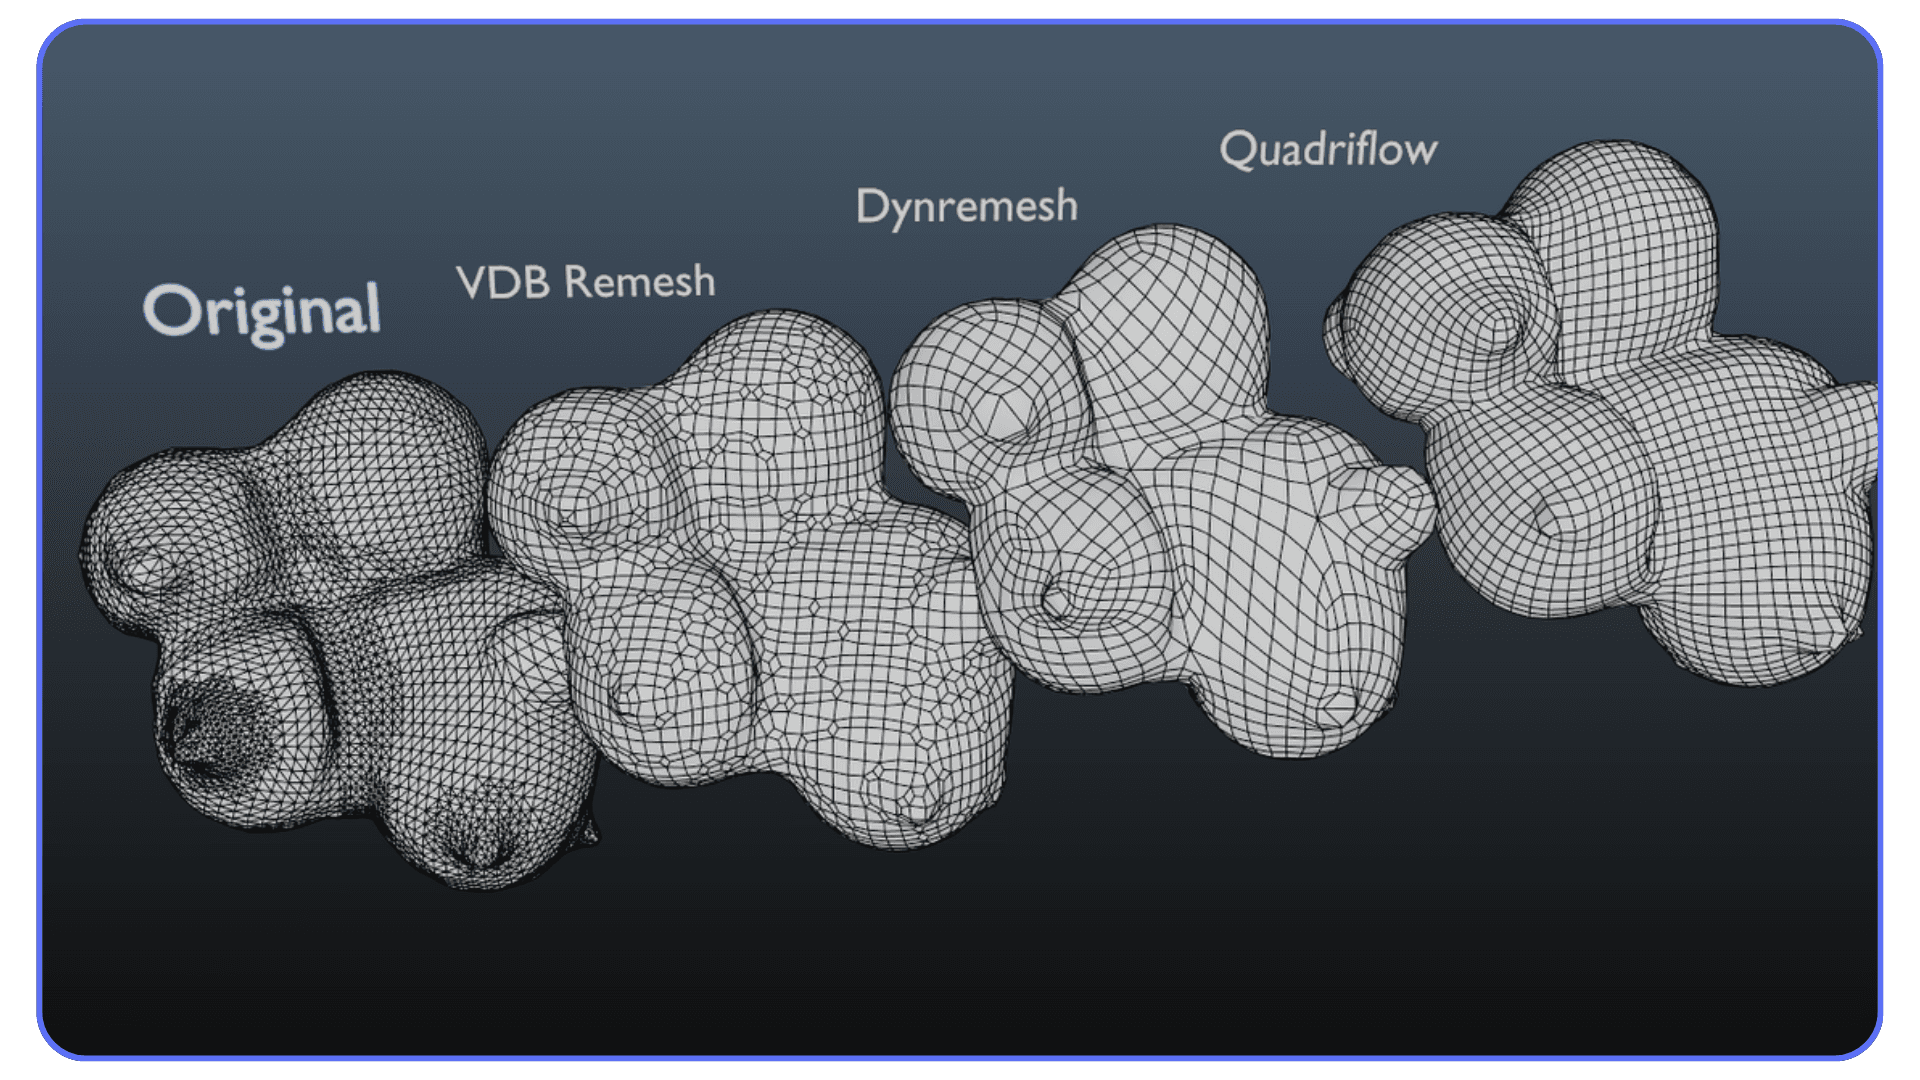
If the mesh is messy from sculpting or lots of booleans, a quick voxel remesh can help. It gives you one solid piece again. After that, clean up stray geometry, remove doubles, and make sure there are no weird internal walls hiding inside the object.
This part is not exciting, but it saves you from a lot of failed prints. It is also one of the big things people miss when following a Blender 3D printing tutorial for the first time. The model can look perfect in the viewport and still be completely unusable until the geometry is cleaned up.
Once everything is solid, you are ready to export.
If you ever need to review or tweak a model on the go, you can check out our guide on how to use Blender on an iPad.
#4. Export for Slicers
Exporting sounds like the easy part, but it is where a lot of Blender users hit strange problems. The model looks correct, you hit export, and then the slicer shows you something that looks nothing like what you built. Usually this happens because something small was forgotten.
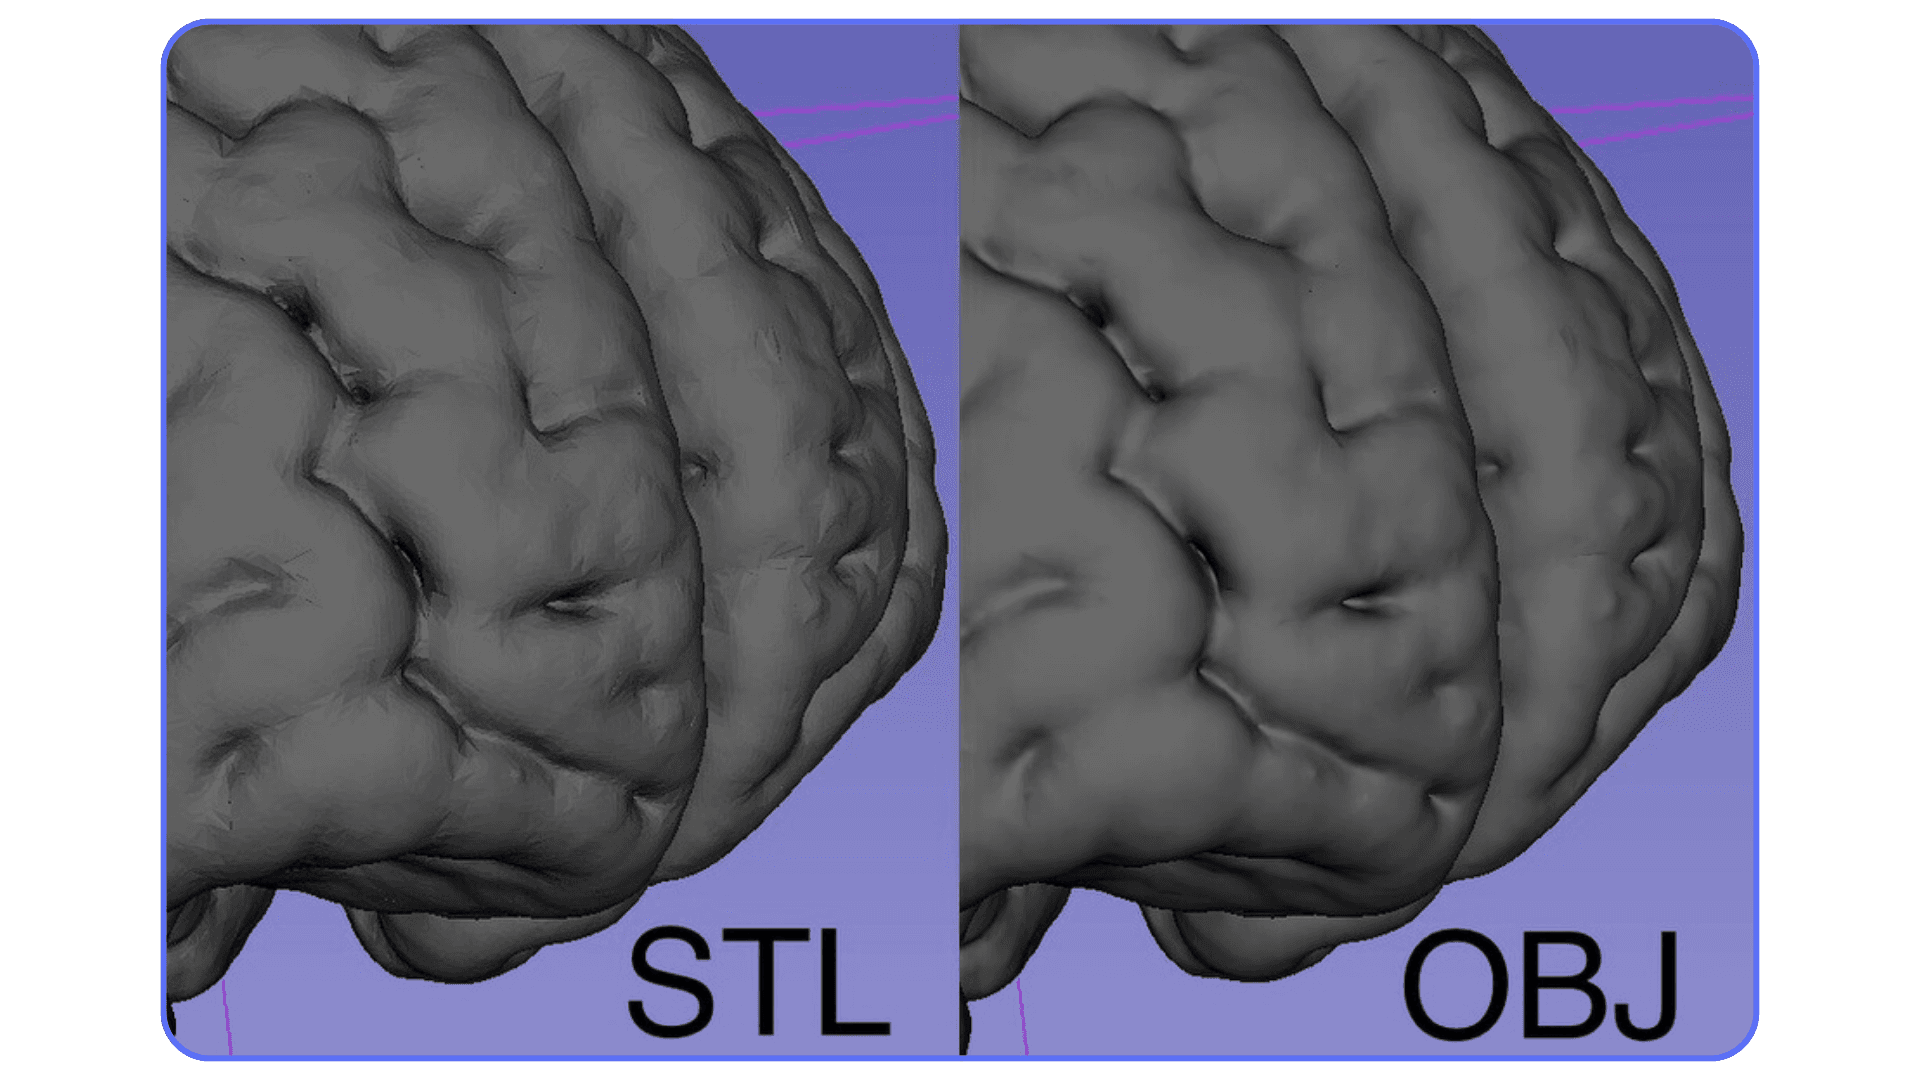
First, pick the right format. For printing, STL is still the standard. OBJ works too, but STL keeps things simple and predictable. When you hit File > Export > STL, pay attention to one small option. There is a box that says Selection Only. Turn it on. If you forget, Blender might export hidden objects or old geometry that you forgot to delete.
Binary STL is usually the better choice. It keeps the file smaller, and slicers read it quickly. ASCII STL works, but it rarely gives you any real advantage.
After exporting, always open the file in your slicer right away. Do not wait until later. This is the moment where you confirm the size, the shape, and the orientation. A lot of Blender 3D printing workflow best practices start with this one rule: check the STL before you commit to a print.
If you see the model lying on its side or standing on a weak point, rotate it. Printers do not care about Blender’s orientation. You get to choose the best side for strength, surface quality, and support usage.
Look for strange flat areas, holes, or missing faces. If the slicer shows unexpected gaps, go back to Blender and fix the mesh. The slicer is brutally honest. If something is wrong, it will show it.
Once everything looks right in the slicer preview, you are ready for supports, infill, layer height choices, and all the usual print settings. At this point, Blender’s job is done.
And if you’re also interested in the drawing side of Blender, here’s a helpful walkthrough on the basics of 2D animation in Blender.
What Blender Does Well
After a few prints, you start to see where Blender really shines. It is not because it behaves like a CAD program. It is the opposite. Blender gives you room to shape things in a way that feels natural. If you want sharp mechanical parts, it can do that. If you want smooth organic shapes, it does that even better.
I’ve used it for small tools, props, figurines, and random objects that only made sense once they were in my hand. When you want something that looks interesting instead of something that follows strict rules, Blender feels like the right place to start. Many people who look up a Blender 3D printing tutorial do it for this exact reason. They want to create something that looks unique, not something that follows the usual engineering style.
Sculpting helps a lot here. Being able to push and pull clay-like forms gives you shapes that would be painful to build in a more rigid program. If you print in resin, the detail you can get is surprisingly good. FDM will soften some curves, but the overall shape still comes through nicely.
Another reason Blender works so well is the modifier stack. Solidify, Bevel, Remesh, and Boolean tools speed up your workflow. They give you structure without forcing you into strict parametric steps. A lot of my favorite prints came from objects that were never meant to be made in the real world, yet they printed just fine.
So while Blender may not be the first tool someone suggests for printing, it brings something different. Freedom. Playfulness. The ability to shape something that feels personal. When you combine that with good mesh checks and steady habits, the results can look surprisingly good on the printer bed.
Speed matters when you’re preparing a model for printing, so keeping Blender’s essential shortcuts and hotkeys nearby can save you a lot of time.
Where Blender Struggles
As much as I like using Blender for prints, there are moments where it feels like the wrong tool. You notice this mostly when you try to make something that needs to fit with other parts. A hinge. A box lid. A mount with exact screw spacing. Anything that depends on tight measurements.
Blender can handle these shapes, but it does not guide you the way a CAD program does. There are no built-in rules to stop you from making a hole slightly crooked or a surface slightly off. And if the size is off by even a millimeter, the print will not behave the way you expect. For simple brackets or decorative pieces, this does not matter. For anything that needs to fit perfectly, it matters a lot.
Another issue shows up with very clean geometric shapes. Blender can do them, but you might spend more time keeping everything straight than actually designing the object. CAD tools snap, align, and measure in ways that Blender simply does not. You can still get the job done, but it takes more effort.
Some people mix tools instead. They build the functional parts in a CAD app, then move the model into Blender to add details, sculpt features, or make the shape more interesting. This mix works surprisingly well when you want a precise base with artistic touches on top.
And sometimes the best choice is to admit that a different program is faster for certain objects. Blender is perfect for creativity, but if you need a part that must lock, snap, slide, or attach, you may spend less time fighting a CAD program than forcing Blender to behave like one.
Blender becomes the right tool again when you shift back to prints that focus on shape, style, or personality. That is where it feels natural.
For anyone who wants to automate repetitive cleanup steps, this guide on using Python inside Blender is a good place to start.
When Your Hardware Starts Holding You Back
If you have ever sculpted a high detail mesh on an everyday laptop, you already know the pain. The viewport starts stuttering, Blender stops keeping up with your brush strokes, and the whole process feels like walking through mud. High poly sculpts, voxel remesh, heavy booleans, and thick modifier stacks ask for more power than most machines can give.
That slowdown is annoying when you are modeling for animation. It is even worse when you are working on a print. You want to test wall thickness, try alternate shapes, adjust support areas, or create small variations of the same object. All of this feels slower on limited hardware.
This is where Vagon Cloud Computer fits in. Instead of pushing your laptop to the edge, you run Blender on a machine that has the power for all the heavy steps. You can turn up subdivision levels without waiting forever. Boolean cuts finish quickly. Sculpting feels smooth again.
It also helps when you want to switch between devices. You can open the same machine from whatever you have in front of you and keep working without moving files around. That makes it easy to check a mesh, run a final remesh, or export another STL without dragging everything through USB drives or cloud folders.
For lighter models, your local machine is fine. But once you start working with dense meshes or prints that need a lot of adjustment, Vagon makes the whole Blender 3D printing workflow feel less stressful.
If you’re working on a lightweight machine, here’s how you can still get Blender running smoothly by using Blender on a Chromebook.
What to Expect
Even if your model is clean and your STL looks perfect, your first print might still surprise you. Blender shows you shapes under ideal conditions. Real printers do not. Plastic shrinks, layers shift, supports leave marks, and some details disappear depending on your machine and settings.
FDM and resin behave very differently too. That is why many people talk about the blender 3d printing workflow FDM vs resin as if they are two completely separate worlds. With FDM you deal with layer lines, stringing, and parts that sometimes warp during cooling. Resin gives you cleaner detail, but you have to deal with supports in a different way and the material can be brittle.
On top of that, slicer settings matter more than people expect. A model that prints perfectly at 0.16 mm layer height might look rough at 0.28. A wall that works in resin might be too thin for FDM. And if you place the model on the bed in a weak orientation, even a perfect mesh will crack.
Expect a bit of trial and error, especially with your early prints. Most people learn faster by making small mistakes instead of reading long guides. The important thing is to treat each attempt like a quick experiment. Adjust one thing, print again, and see what happens.
Once you get used to how your printer behaves, Blender becomes easier to predict. You start modeling with your machine in mind, and the results improve fast.
And once your model is ready and you want to visualize it properly, you can compare your options with our breakdown of the best Blender render engines.
Keep This in Mind
Once you get a few prints behind you, Blender stops feeling like a strange choice for real objects. It becomes a familiar part of the process. You shape something on screen, you check the mesh, you export, you print, and you learn a little more each time. The loop starts to feel normal.
Treat Blender like a place where you can try ideas quickly. Keep your units correct, keep your mesh clean, and pay attention to real thickness. Those small habits save you far more time than any fancy trick. When you want to push dense sculpts or run heavy modifiers, move the work to a stronger machine like Vagon so you do not lose half your day waiting for the viewport to recover.
The rest is practice. You make an object, you print it, you hold it, and you spot the tiny things you want to fix next time. That is the part of 3D printing that never really gets old.
FAQs
1. Can I use Blender for 3D printing if I’m a beginner?
Yes. Blender looks intimidating at first, but you only need a small part of it for printing. If you follow a simple using Blender for 3D printing tutorial and stick to clean mesh habits, you’ll be fine. Most people struggle more with their printer than with Blender.
2. What is the Blender 3D Print Toolbox and how do I use it?
It’s an add on that helps you spot broken geometry. You turn it on in the Add-ons menu, open the panel on the right side of the viewport, and run the checks. It shows non manifold edges, thin walls, overhang problems, and a few other warnings. Think of it as your last safety pass before exporting.
3. Should I use STL or OBJ for exporting?
For almost all prints, STL is the easier choice. OBJ can hold color data, but that doesn’t matter for most printers. Binary STL is small, clean, and every slicer reads it without trouble.
4. Why does my print look different from my Blender model?
Printers don’t behave like Blender. FDM rounds some edges and softens details. Resin keeps fine details but can snap easily if the walls are thin. This is why many people check both sides of the blender 3d printing workflow FDM vs resin before choosing a printer or planning a model.
5. Why did my model import into the slicer at the wrong size?
You probably modeled without setting Blender’s units. Switch to millimeters, set the scale to 1.0, and check the dimensions in the side panel. Scale mistakes are one of the most common problems in any Blender 3D printing tutorial.
6. Do I need a powerful computer for Blender 3D printing?
For simple parts, not really. For high poly sculpts, booleans, and voxel remesh operations, yes. If your computer starts struggling, using a cloud machine like Vagon helps a lot because you can push heavy meshes without slowing down.
7. Why do my prints fail even when the STL looks fine?
The mesh is only half the story. Slicer settings, bed adhesion, supports, material choice, and model orientation can change everything. Even perfect geometry prints poorly if the orientation is weak or if the support pattern doesn’t match the shape.
8. What are the best practices for Blender 3D printing mesh preparation?
Keep walls thick enough, fix non manifold edges, apply modifiers, remove internal faces, check normals, and use the 3D Print Toolbox checks. These steps are part of almost every set of Blender 3D printing workflow best practices because they directly affect whether the slicer understands your model.
9. Is Blender enough for mechanical parts?
It depends. If the part needs tight tolerances, a CAD app is faster. If the part is decorative or organic, Blender is better. Some people mix both. CAD for the base shape, Blender for the style.
I remember the first time I tried to print something I built in Blender. I wasn’t confident at all. I exported the STL, threw it into the slicer, hit preview, and waited for it to fall apart. I thought Blender would betray me somewhere. A hole I didn’t see. A face flipped the wrong way. Some tiny mistake hiding in the mesh.
But the print came out fine. Not perfect, but way better than I expected. And that moment made me realize something pretty simple. Blender isn’t just a place to sculpt dragons or build scenes for animation. You can actually use it to make real objects that survive the jump from screen to printer.
So that’s what I’m doing here. I’m not trying to impress anyone or write a polished “ultimate guide.” I’m just walking through what actually works, what usually goes wrong, and what I do now after a few messes, a few surprises, and a couple of prints that made me question my life choices.
If you want a Blender 3D printing tutorial that feels like you’re learning from someone who has already made the dumb mistakes, keep reading.
Why Blender Works for 3D Printing
Most people find Blender because they want to model a character, make an animation, or try sculpting for fun. Not because they want to print something. I was the same. For years I saw it as “the free alternative to the big apps,” nothing more.
Then I started using it for objects I wanted to hold in my hand. Small tools. Stands. Brackets. A strange little cable organizer that only made sense to me. And something clicked. Blender is great for this kind of work, as long as you approach it in a slightly different way than your usual modeling sessions.
Blender gives you a lot of freedom. You can shape anything in any style. Organic forms, sharp edges, smooth curves, rough surfaces. If your goal is to create something personal or visually interesting, Blender is perfect. Many people who look for a using Blender for 3D printing tutorial do it because they want creativity first and rules second.
Of course, that freedom comes with some traps. Blender doesn’t force real world limits. It lets you make surfaces that are too thin, faces pointing the wrong way, floating parts, or geometry that looks fine on screen but impossible to print. Anyone who has touched a CAD program knows those tools stop you before you break something. Blender gives you all the rope you want.
Once you learn to watch for these things, and you follow simple habits that match Blender 3D printing best practices 2025 workflows, it becomes a solid tool for print jobs. You get the freedom to model anything, but you also keep the mesh clean enough for the printer.
So even though Blender isn’t the first name people think of for real objects, it absolutely works. And it works well once you know how to guide it.
#1. Set Your Units and Scale
This is the part everyone skips on their first try. I did too. I modeled something that looked the size of a keychain on my screen, exported it, opened it in the slicer, and it showed up at the size of a small dog. Not ideal.
Before you touch a single vertex, switch Blender to real world measurements. Go to the Scene settings and choose metric or imperial. Most people doing a Blender 3D printing tutorial stick with millimeters since slicers are usually set up that way.
The reason this matters is simple. Blender’s default unit means nothing to a printer. If you model a ring or a small gadget without setting proper units, the printer might read the file as meters or centimeters. That is how you end up with a five meter long phone stand.
Once you pick your unit system, check the scale. Blender should show you the actual size of your object in the viewport. If you want a 40 mm piece, it should literally read 40 mm. When you follow Blender 3D printing workflow best practices, this is always the first step. It saves you from a lot of confusion later.
Getting this right early removes the guesswork. Your STL will open in the slicer at the exact size you planned. No surprises. No drama. And no massive prints that waste half a roll of filament.
#2. Model With Print Constraints in Mind
This is where Blender gives you a lot of freedom, and that freedom can trick you. On screen, a thin wall looks fine. A tiny spike looks fine. A floating detail that barely connects to the rest of the mesh looks fine. Then the printer tries to make it, and suddenly nothing is fine.
Whether you use FDM or resin, you need to think about real thickness and real strength. A wall that is 0.2 mm might look okay in Blender, but it will snap the moment you touch it. FDM printers usually prefer a few millimeters of thickness for anything structural. Resin can handle smaller details, but it also has its own limits. This is why many people treat this step like a best practices Blender 3D printing mesh preparation checklist.
If something looks fragile in your mind, it is fragile. Add thickness. Add support inside the form. Round out edges so they are less likely to chip. These tiny decisions often decide whether your first print succeeds or becomes a small pile of spaghetti from your FDM machine.
Modifiers can help here. Solidify is great for giving your model real thickness. Remesh can clean up messy shapes. Boolean operations let you cut or join pieces, but make sure you apply them before exporting. If a modifier is still live when you export, your STL might not match what you see.
One more thing. Floating geometry does not survive real life. Everything must connect to the main body in a way that the printer can actually build. If you see a piece that looks as if it is barely touching the model, fix it now instead of hoping the slicer magically solves it.
Once you start thinking in real materials and real forces, Blender becomes a much more reliable tool for printing. This habit also sets you up well for the Blender 3D printing workflow FDM vs resin differences you will deal with later.
#3. Make the Mesh Printable
Once the model looks right, you still need to make sure the mesh behaves like a real object. Blender is great at letting you sculpt or model anything, but it does not warn you when the mesh is broken. And a broken mesh almost always leads to a bad print.
The main thing you want is a watertight object. No holes, no loose edges, no inside out faces, no hidden pieces that should not be there. If the mesh has even one gap, the slicer might guess the wrong shape. Sometimes it fills the hole for you. Sometimes it ignores half the model. You never really know.
There is a simple way to check this. Turn on the 3D Print Toolbox add on. If you have never used it, you can find plenty of Blender 3D Print Toolbox how to use guides online, but the short version is easy. Enable it in the preferences, open the panel, and run the checks. It will point out non manifold edges and other trouble spots. Think of it as your safety net.
Normals matter too. Faces should point outward. If you flip a few by accident, Blender might still show the model correctly, but the slicer could treat those areas as empty space. Select everything, recalc normals, and fix anything that still looks wrong.
If the mesh is messy from sculpting or lots of booleans, a quick voxel remesh can help. It gives you one solid piece again. After that, clean up stray geometry, remove doubles, and make sure there are no weird internal walls hiding inside the object.
This part is not exciting, but it saves you from a lot of failed prints. It is also one of the big things people miss when following a Blender 3D printing tutorial for the first time. The model can look perfect in the viewport and still be completely unusable until the geometry is cleaned up.
Once everything is solid, you are ready to export.
If you ever need to review or tweak a model on the go, you can check out our guide on how to use Blender on an iPad.
#4. Export for Slicers
Exporting sounds like the easy part, but it is where a lot of Blender users hit strange problems. The model looks correct, you hit export, and then the slicer shows you something that looks nothing like what you built. Usually this happens because something small was forgotten.
First, pick the right format. For printing, STL is still the standard. OBJ works too, but STL keeps things simple and predictable. When you hit File > Export > STL, pay attention to one small option. There is a box that says Selection Only. Turn it on. If you forget, Blender might export hidden objects or old geometry that you forgot to delete.
Binary STL is usually the better choice. It keeps the file smaller, and slicers read it quickly. ASCII STL works, but it rarely gives you any real advantage.
After exporting, always open the file in your slicer right away. Do not wait until later. This is the moment where you confirm the size, the shape, and the orientation. A lot of Blender 3D printing workflow best practices start with this one rule: check the STL before you commit to a print.
If you see the model lying on its side or standing on a weak point, rotate it. Printers do not care about Blender’s orientation. You get to choose the best side for strength, surface quality, and support usage.
Look for strange flat areas, holes, or missing faces. If the slicer shows unexpected gaps, go back to Blender and fix the mesh. The slicer is brutally honest. If something is wrong, it will show it.
Once everything looks right in the slicer preview, you are ready for supports, infill, layer height choices, and all the usual print settings. At this point, Blender’s job is done.
And if you’re also interested in the drawing side of Blender, here’s a helpful walkthrough on the basics of 2D animation in Blender.
What Blender Does Well
After a few prints, you start to see where Blender really shines. It is not because it behaves like a CAD program. It is the opposite. Blender gives you room to shape things in a way that feels natural. If you want sharp mechanical parts, it can do that. If you want smooth organic shapes, it does that even better.
I’ve used it for small tools, props, figurines, and random objects that only made sense once they were in my hand. When you want something that looks interesting instead of something that follows strict rules, Blender feels like the right place to start. Many people who look up a Blender 3D printing tutorial do it for this exact reason. They want to create something that looks unique, not something that follows the usual engineering style.
Sculpting helps a lot here. Being able to push and pull clay-like forms gives you shapes that would be painful to build in a more rigid program. If you print in resin, the detail you can get is surprisingly good. FDM will soften some curves, but the overall shape still comes through nicely.
Another reason Blender works so well is the modifier stack. Solidify, Bevel, Remesh, and Boolean tools speed up your workflow. They give you structure without forcing you into strict parametric steps. A lot of my favorite prints came from objects that were never meant to be made in the real world, yet they printed just fine.
So while Blender may not be the first tool someone suggests for printing, it brings something different. Freedom. Playfulness. The ability to shape something that feels personal. When you combine that with good mesh checks and steady habits, the results can look surprisingly good on the printer bed.
Speed matters when you’re preparing a model for printing, so keeping Blender’s essential shortcuts and hotkeys nearby can save you a lot of time.
Where Blender Struggles
As much as I like using Blender for prints, there are moments where it feels like the wrong tool. You notice this mostly when you try to make something that needs to fit with other parts. A hinge. A box lid. A mount with exact screw spacing. Anything that depends on tight measurements.
Blender can handle these shapes, but it does not guide you the way a CAD program does. There are no built-in rules to stop you from making a hole slightly crooked or a surface slightly off. And if the size is off by even a millimeter, the print will not behave the way you expect. For simple brackets or decorative pieces, this does not matter. For anything that needs to fit perfectly, it matters a lot.
Another issue shows up with very clean geometric shapes. Blender can do them, but you might spend more time keeping everything straight than actually designing the object. CAD tools snap, align, and measure in ways that Blender simply does not. You can still get the job done, but it takes more effort.
Some people mix tools instead. They build the functional parts in a CAD app, then move the model into Blender to add details, sculpt features, or make the shape more interesting. This mix works surprisingly well when you want a precise base with artistic touches on top.
And sometimes the best choice is to admit that a different program is faster for certain objects. Blender is perfect for creativity, but if you need a part that must lock, snap, slide, or attach, you may spend less time fighting a CAD program than forcing Blender to behave like one.
Blender becomes the right tool again when you shift back to prints that focus on shape, style, or personality. That is where it feels natural.
For anyone who wants to automate repetitive cleanup steps, this guide on using Python inside Blender is a good place to start.
When Your Hardware Starts Holding You Back
If you have ever sculpted a high detail mesh on an everyday laptop, you already know the pain. The viewport starts stuttering, Blender stops keeping up with your brush strokes, and the whole process feels like walking through mud. High poly sculpts, voxel remesh, heavy booleans, and thick modifier stacks ask for more power than most machines can give.
That slowdown is annoying when you are modeling for animation. It is even worse when you are working on a print. You want to test wall thickness, try alternate shapes, adjust support areas, or create small variations of the same object. All of this feels slower on limited hardware.
This is where Vagon Cloud Computer fits in. Instead of pushing your laptop to the edge, you run Blender on a machine that has the power for all the heavy steps. You can turn up subdivision levels without waiting forever. Boolean cuts finish quickly. Sculpting feels smooth again.
It also helps when you want to switch between devices. You can open the same machine from whatever you have in front of you and keep working without moving files around. That makes it easy to check a mesh, run a final remesh, or export another STL without dragging everything through USB drives or cloud folders.
For lighter models, your local machine is fine. But once you start working with dense meshes or prints that need a lot of adjustment, Vagon makes the whole Blender 3D printing workflow feel less stressful.
If you’re working on a lightweight machine, here’s how you can still get Blender running smoothly by using Blender on a Chromebook.
What to Expect
Even if your model is clean and your STL looks perfect, your first print might still surprise you. Blender shows you shapes under ideal conditions. Real printers do not. Plastic shrinks, layers shift, supports leave marks, and some details disappear depending on your machine and settings.
FDM and resin behave very differently too. That is why many people talk about the blender 3d printing workflow FDM vs resin as if they are two completely separate worlds. With FDM you deal with layer lines, stringing, and parts that sometimes warp during cooling. Resin gives you cleaner detail, but you have to deal with supports in a different way and the material can be brittle.
On top of that, slicer settings matter more than people expect. A model that prints perfectly at 0.16 mm layer height might look rough at 0.28. A wall that works in resin might be too thin for FDM. And if you place the model on the bed in a weak orientation, even a perfect mesh will crack.
Expect a bit of trial and error, especially with your early prints. Most people learn faster by making small mistakes instead of reading long guides. The important thing is to treat each attempt like a quick experiment. Adjust one thing, print again, and see what happens.
Once you get used to how your printer behaves, Blender becomes easier to predict. You start modeling with your machine in mind, and the results improve fast.
And once your model is ready and you want to visualize it properly, you can compare your options with our breakdown of the best Blender render engines.
Keep This in Mind
Once you get a few prints behind you, Blender stops feeling like a strange choice for real objects. It becomes a familiar part of the process. You shape something on screen, you check the mesh, you export, you print, and you learn a little more each time. The loop starts to feel normal.
Treat Blender like a place where you can try ideas quickly. Keep your units correct, keep your mesh clean, and pay attention to real thickness. Those small habits save you far more time than any fancy trick. When you want to push dense sculpts or run heavy modifiers, move the work to a stronger machine like Vagon so you do not lose half your day waiting for the viewport to recover.
The rest is practice. You make an object, you print it, you hold it, and you spot the tiny things you want to fix next time. That is the part of 3D printing that never really gets old.
FAQs
1. Can I use Blender for 3D printing if I’m a beginner?
Yes. Blender looks intimidating at first, but you only need a small part of it for printing. If you follow a simple using Blender for 3D printing tutorial and stick to clean mesh habits, you’ll be fine. Most people struggle more with their printer than with Blender.
2. What is the Blender 3D Print Toolbox and how do I use it?
It’s an add on that helps you spot broken geometry. You turn it on in the Add-ons menu, open the panel on the right side of the viewport, and run the checks. It shows non manifold edges, thin walls, overhang problems, and a few other warnings. Think of it as your last safety pass before exporting.
3. Should I use STL or OBJ for exporting?
For almost all prints, STL is the easier choice. OBJ can hold color data, but that doesn’t matter for most printers. Binary STL is small, clean, and every slicer reads it without trouble.
4. Why does my print look different from my Blender model?
Printers don’t behave like Blender. FDM rounds some edges and softens details. Resin keeps fine details but can snap easily if the walls are thin. This is why many people check both sides of the blender 3d printing workflow FDM vs resin before choosing a printer or planning a model.
5. Why did my model import into the slicer at the wrong size?
You probably modeled without setting Blender’s units. Switch to millimeters, set the scale to 1.0, and check the dimensions in the side panel. Scale mistakes are one of the most common problems in any Blender 3D printing tutorial.
6. Do I need a powerful computer for Blender 3D printing?
For simple parts, not really. For high poly sculpts, booleans, and voxel remesh operations, yes. If your computer starts struggling, using a cloud machine like Vagon helps a lot because you can push heavy meshes without slowing down.
7. Why do my prints fail even when the STL looks fine?
The mesh is only half the story. Slicer settings, bed adhesion, supports, material choice, and model orientation can change everything. Even perfect geometry prints poorly if the orientation is weak or if the support pattern doesn’t match the shape.
8. What are the best practices for Blender 3D printing mesh preparation?
Keep walls thick enough, fix non manifold edges, apply modifiers, remove internal faces, check normals, and use the 3D Print Toolbox checks. These steps are part of almost every set of Blender 3D printing workflow best practices because they directly affect whether the slicer understands your model.
9. Is Blender enough for mechanical parts?
It depends. If the part needs tight tolerances, a CAD app is faster. If the part is decorative or organic, Blender is better. Some people mix both. CAD for the base shape, Blender for the style.
Get Beyond Your Computer Performance
Run applications on your cloud computer with the latest generation hardware. No more crashes or lags.

Trial includes 1 hour usage + 7 days of storage.
Summarize with AI

Ready to focus on your creativity?
Vagon gives you the ability to create & render projects, collaborate, and stream applications with the power of the best hardware.

Vagon Blog


Run heavy applications on any device with
your personal computer on the cloud.
San Francisco, California
Solutions
Vagon Teams
Vagon Streams
Use Cases
Resources
Vagon Blog
How to Run Audacity on a Cloud Ubuntu Desktop (2026 Guide)
How to Run Darktable on a Cloud Ubuntu Desktop for RAW Photo Editing (2026 Guide)
How to Run Kdenlive on a Cloud Ubuntu Desktop (2026 Guide)
How to Run DaVinci Resolve on Linux in the Cloud (2026 Guide)
How to Run Inkscape on a Cloud Ubuntu Desktop (2026 Guide)
How to Run Krita on a Cloud Ubuntu Desktop for Digital Painting (2026 Guide)
How to Run GIMP on a Cloud Ubuntu Desktop (2026 Guide)
How to Run Jupyter on a Cloud GPU Linux Desktop (2026 Guide)
Vagon vs GitHub Codespaces: Cloud Dev Environments Compared (2026)
Vagon Blog
Run heavy applications on any device with
your personal computer on the cloud.
San Francisco, California
Solutions
Vagon Teams
Vagon Streams
Use Cases
Resources
Vagon Blog