Instant Connection for Pixel Streaming
— New Feature Automated Setup

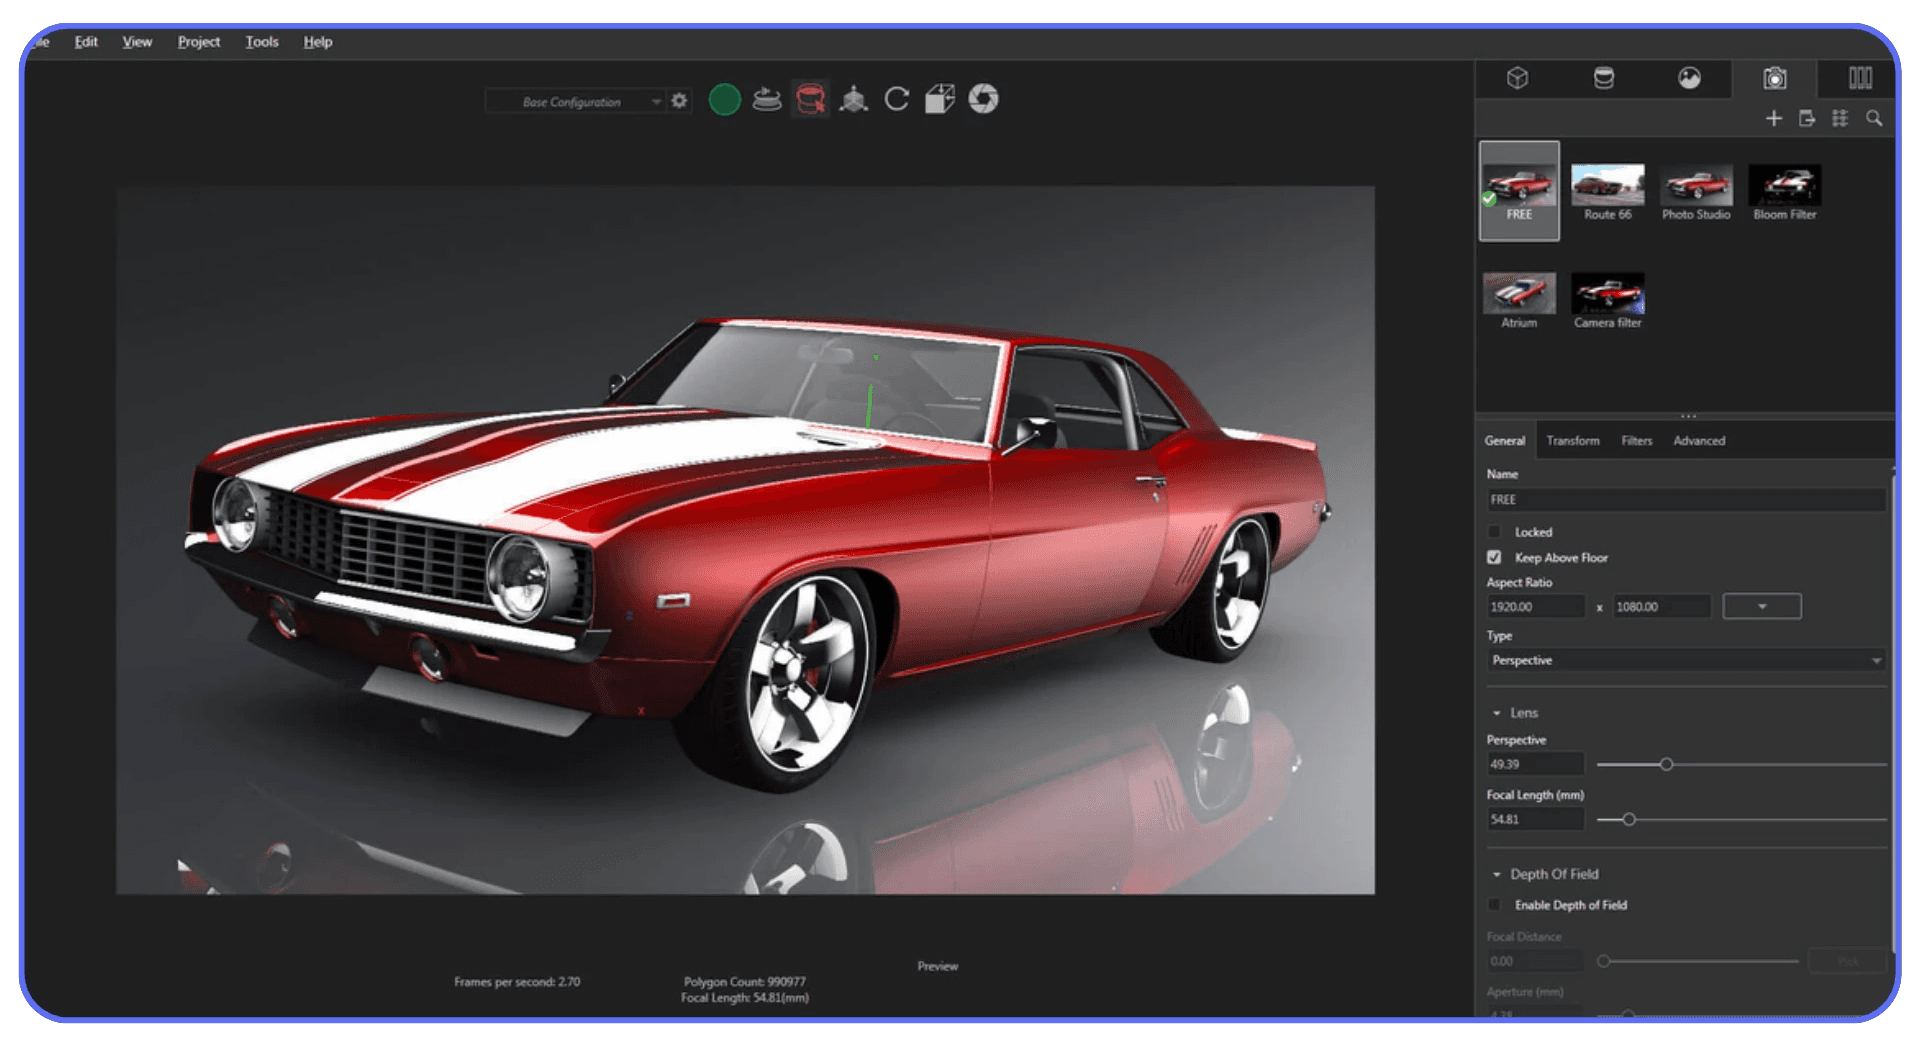
Best Render Settings for SolidWorks
Best Render Settings for SolidWorks
Engineering
Best Render Settings for SolidWorks
Table of Contents
I once waited two full hours for a SolidWorks render that looked almost identical to the 10-minute version.
Same model. Same lighting. Same everything, except I’d cranked every slider to “Maximum” because I thought that’s what pros did. Spoiler: it wasn’t.
That was the day I learned something most new users eventually figure out, render quality in SolidWorks isn’t about going “ultra.” It’s about going smart. The truth is, you can waste hours chasing imperceptible differences if you don’t actually understand what each setting does. And worse, you’ll convince yourself your hardware isn’t powerful enough when the real issue is optimization, not muscle.
Rendering in SolidWorks Visualize (or even Photoview 360) isn’t a test of patience, it’s a test of understanding. Once you figure out which settings matter, you can create stunning, professional-level images in a fraction of the time. And if you ever find yourself waiting around for that progress bar to crawl again, chances are it’s not your GPU’s fault, it’s your settings.
If you’re just getting started with SolidWorks and want to strengthen your fundamentals before tackling rendering, check out this guide to learning SolidWorks online with the best courses and resources.
Why Render Settings Matter
Most people assume that if a render looks bad, the solution is simple: crank everything to max.
Higher quality. More passes. Bigger resolution. Longer render times. Done, right?
Not even close.
Here’s what actually happens, your GPU spends hours calculating microscopic lighting details that no one will ever notice, while your system fan sounds like it’s preparing for takeoff. You waste time, power, and sanity for a 2% visual improvement. And sometimes, you actually make things worse, oversampling reflections or introducing unnecessary noise because you didn’t balance the scene properly.
In my experience, bad renders rarely come from “weak” hardware. They come from inefficient settings. I’ve seen laptops with midrange GPUs beat desktop workstations simply because the person behind the screen knew how to optimize passes, resolution, and lighting. SolidWorks Visualize is powerful, but it’s brutally honest: it only gives you what you tell it to compute.
Render settings matter because they decide how your time translates into image quality. Every slider is a trade-off, between speed, realism, and control. If you understand how those interact, you can produce clean, photorealistic images in minutes instead of hours.
And that’s really the secret most tutorials skip: there’s no magic “best” setup that works for every project. The perfect settings for a glossy product shot will absolutely choke a large assembly with hundreds of parts. The real skill is knowing which knobs to turn and when.
Core Setting Groups & What They Actually Do
Once you stop chasing the mythical “perfect” render setting, SolidWorks becomes a lot more predictable.
Every rendering engine, whether it’s Visualize or Photoview 360, relies on a few main levers. You don’t need to master all of them at once. You just need to know which ones actually matter.
Let’s go through the big ones.
If you’re learning the workflow between modeling and rendering, you can explore SolidWorks tutorials for beginners to see how design choices affect render quality.
a) Quality / Passes / Denoiser
If you’ve ever sat through a render watching the image slowly sharpen over time, you’ve already seen “passes” in action. Each pass is one more refinement, the software recalculates lighting, reflections, and shadows until the noise fades away.
Here’s the catch: doubling your passes doesn’t double your image quality. It just doubles your waiting time.
In my tests, 200–300 passes is usually enough for single parts or simple product renders. Once you hit around 500 passes, the improvements become microscopic. For larger assemblies or scenes with glass and refractions, you might go 800–1000 passes, but rarely more. Anything beyond that, and you’re polishing pixels that no one will ever notice.
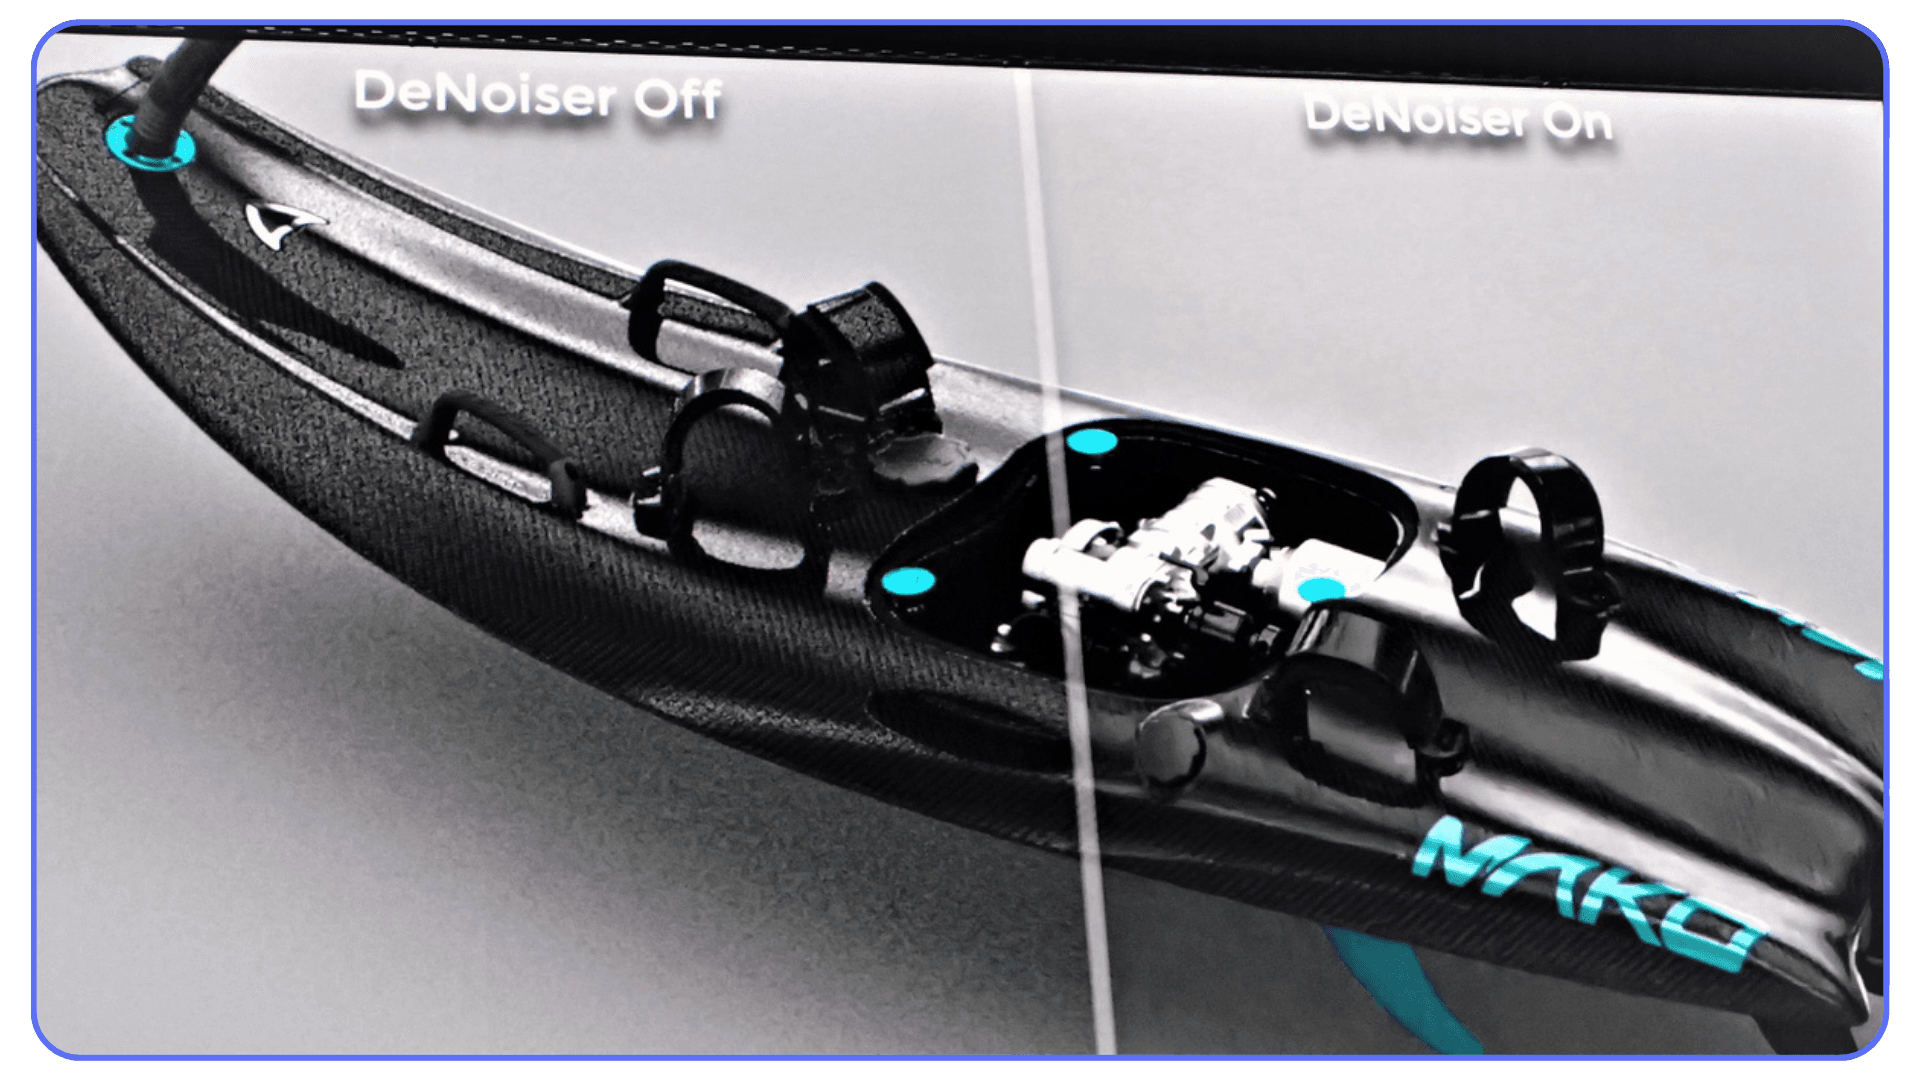
Then there’s the Denoiser, a feature that feels like cheating, but in the best way possible. It uses AI to smooth out noise between passes, letting you stop the render early without losing clarity. Think of it as the modern-day patience saver. With Denoiser enabled, you can often cut your passes in half and still end up with a clean, crisp image.
My rule?
If you’re rendering for internal use, like a concept or quick review, enable Denoiser, stop around 200 passes, and move on.
If it’s for marketing or print, disable it for the final render, but still use it for previews so you’re not wasting time during test shots.
The trick isn’t finding the highest number that works, it’s finding the lowest one that still looks great. That’s what separates people who render smart from people who just render long.
b) Resolution & Pixel Density
If passes determine how detailed your lighting looks, resolution decides how clearly you’ll see it.
And here’s where so many SolidWorks users overdo it.
Everyone loves to click “4K” or “8K” because it sounds professional. But unless you’re printing a billboard or zooming in on microscopic details, that extra resolution is just more pixels your GPU has to fight through. I’ve seen people render 8K images only to compress them into 1080p PowerPoint slides. That’s not quality, that’s waste.
Here’s how I break it down in practice:
1080p (1920x1080) → Great for internal reviews, presentations, and web use. Fast, lightweight, perfectly clear.
2K–4K (2560x1440 / 3840x2160) → Ideal for client deliverables, product catalogs, and social media posts where crispness matters.
6K–8K → Only use for print materials, packaging visuals, or full-screen marketing banners. Anything else is just punishing your GPU for fun.

If you ever plan to print the image, you should also look at pixel density (DPI).
Most renders default to 72 DPI, perfect for screens. For print, bump it to 300 DPI. But remember: increasing DPI without increasing physical image size doesn’t actually add detail; it just changes how tightly the pixels are packed when printed.
Here’s a little mental shortcut I use:
Render at the resolution your audience will actually see, not the one you wish they would.
Your goal isn’t to create the world’s largest image file, it’s to produce something sharp, balanced, and practical for its final use. When you combine smart resolution choices with optimized passes, you’ll find your render time dropping dramatically without sacrificing visual quality.
If you’re still deciding which CAD platform best fits your design or rendering needs, here’s a detailed comparison of AutoCAD vs SolidWorks.
c) Lighting, Environment & Camera
You can have perfect materials, the right passes, and the sharpest resolution, and your render can still look flat and lifeless. Why?
Because lighting makes or breaks everything.
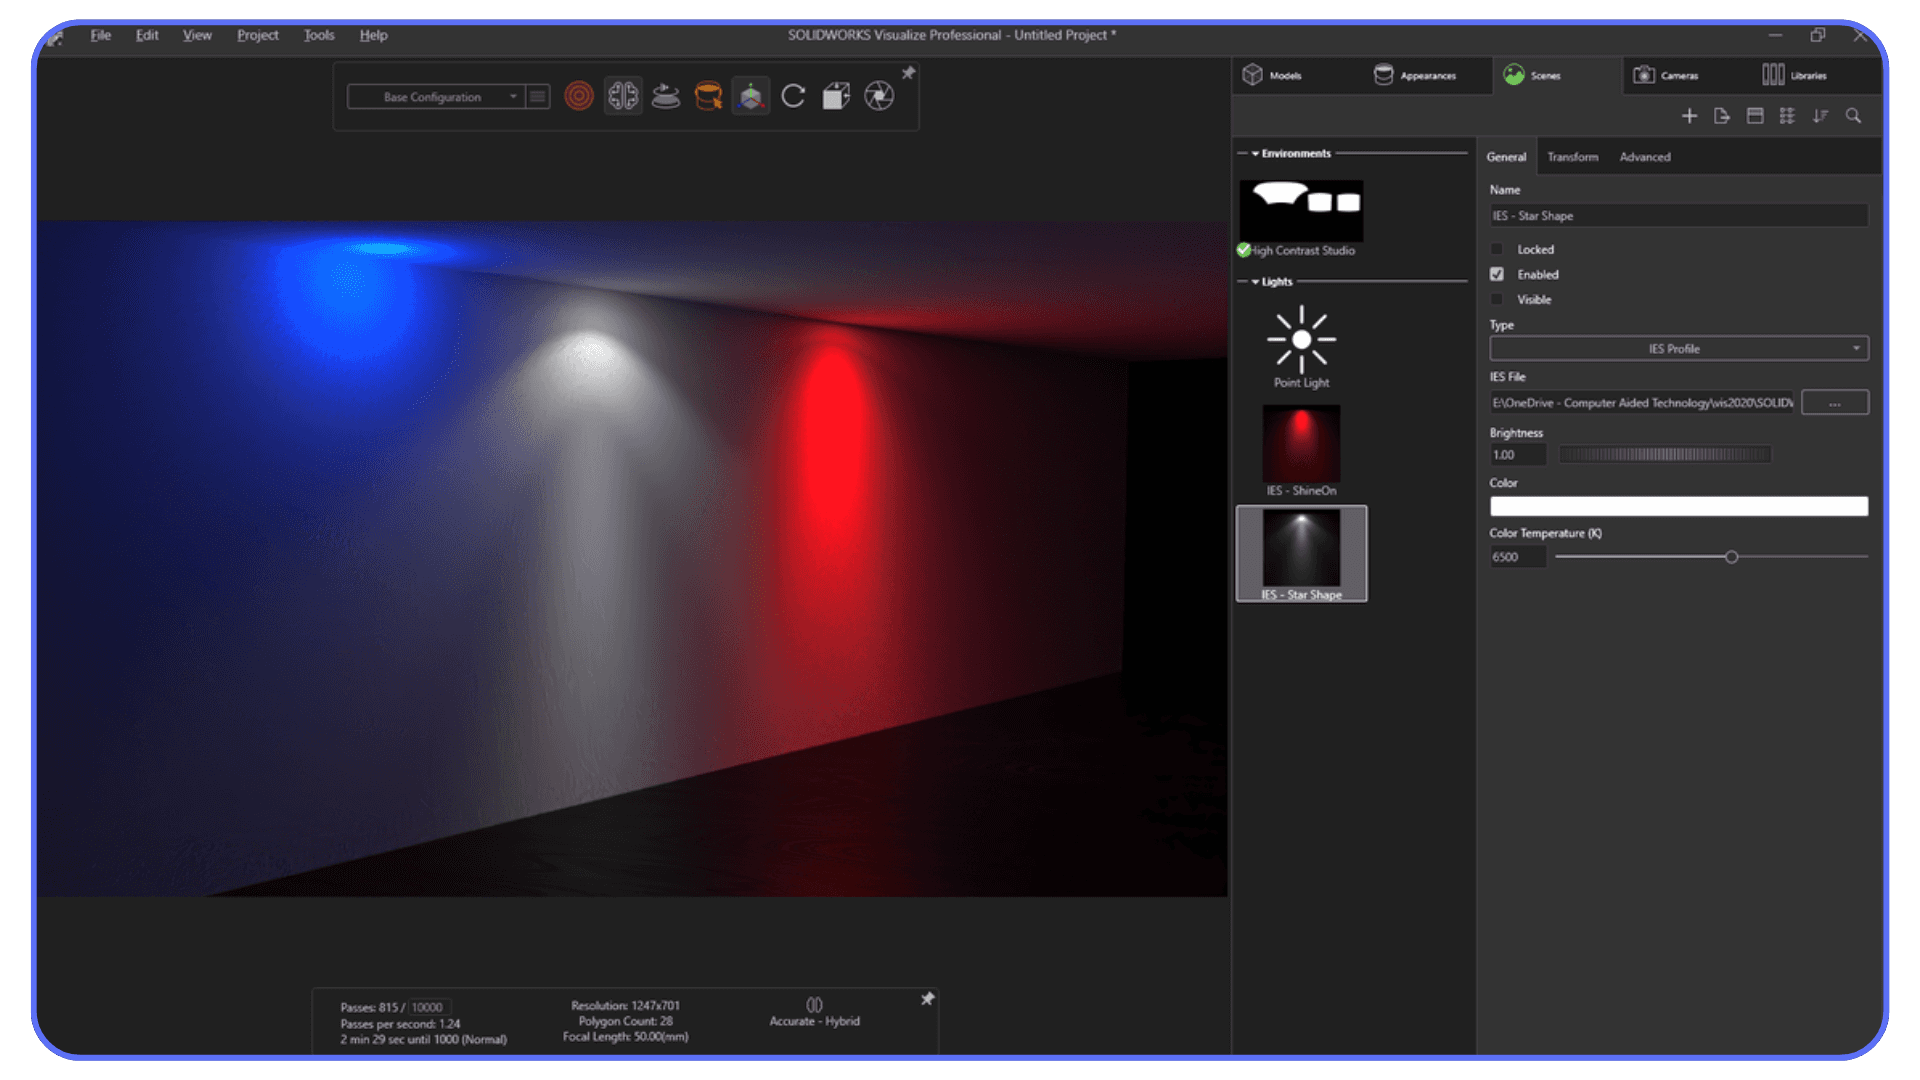
In SolidWorks Visualize, lighting isn’t just a background effect; it’s the entire mood of your image. The software uses HDRI environments (high dynamic range images) to simulate real-world lighting. These panoramic light sources control both brightness and reflection quality. If your scene looks too sterile, it’s usually because your HDRI is dull or unbalanced.
My advice:
Start with environment presets that match your object’s real use. A metallic part under “Sunny Field” HDRI looks odd, it’ll pick up grass-green reflections everywhere. Try “Studio,” “Overcast,” or custom HDRIs designed for product photography. You’ll instantly get cleaner, more realistic highlights.
Then there’s the camera. I’ve seen people spend an hour adjusting materials and forget that their camera’s perspective makes the whole thing look off. Use a longer focal length (around 80–100 mm) for product shots, it reduces distortion and keeps proportions true. For big assemblies, a shorter focal length (30–50 mm) helps capture more context.
And don’t skip Depth of Field (DoF). A subtle blur in the background adds depth and realism, just like a real photo lens would. But keep it subtle, too much, and it starts looking like a toy render.
Finally, check your composition. Place your subject using the rule of thirds, make sure reflections don’t distract, and tilt the camera just enough to feel dynamic without disorienting.
Here’s the honest truth:
If your lighting and camera aren’t working, no amount of render passes will fix it. You’re not rendering reality, you’re crafting it. Get your light and perspective right, and the settings suddenly start working in your favor instead of against you.
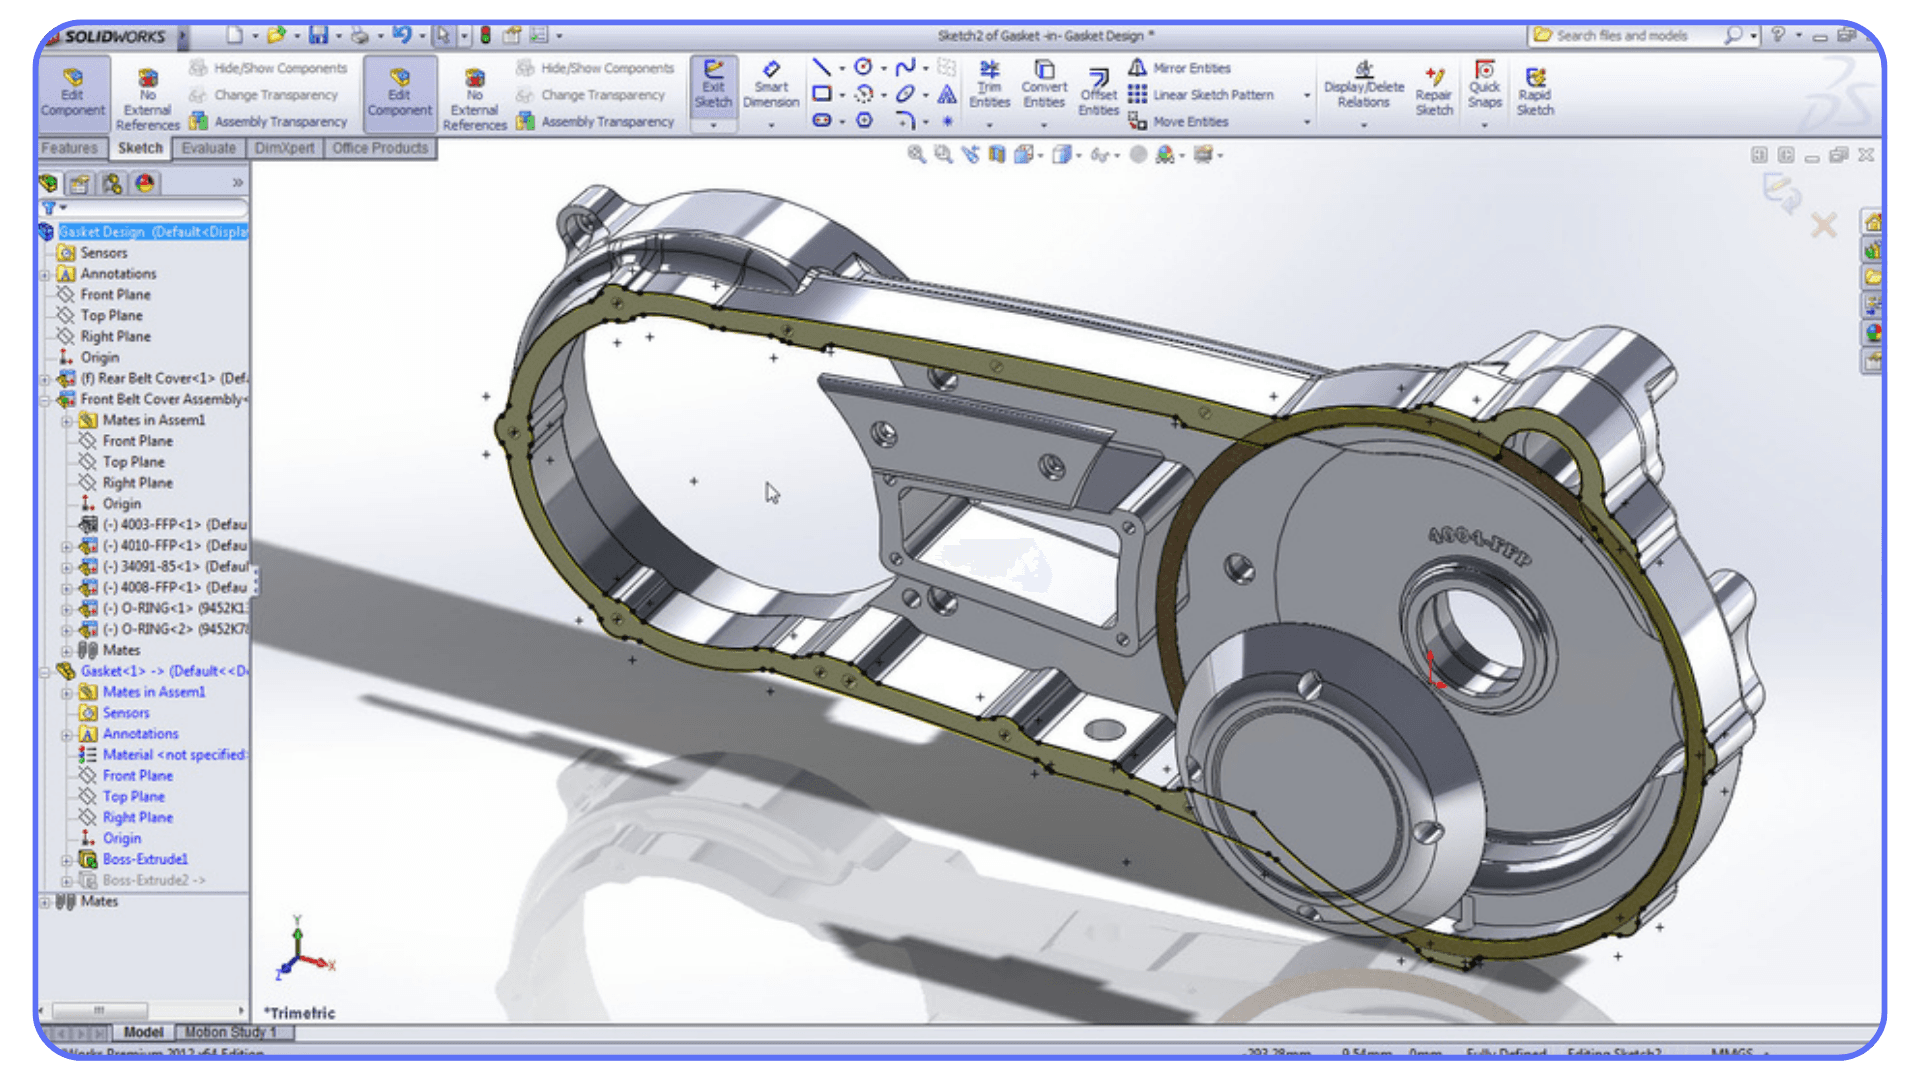
d) Materials & Geometry Clean-Up
Let’s be honest, even the best render settings can’t save bad materials or messy geometry.
If your part looks fake, it’s probably not your passes or your lighting. It’s the way the model itself interacts with light.
Start with materials.
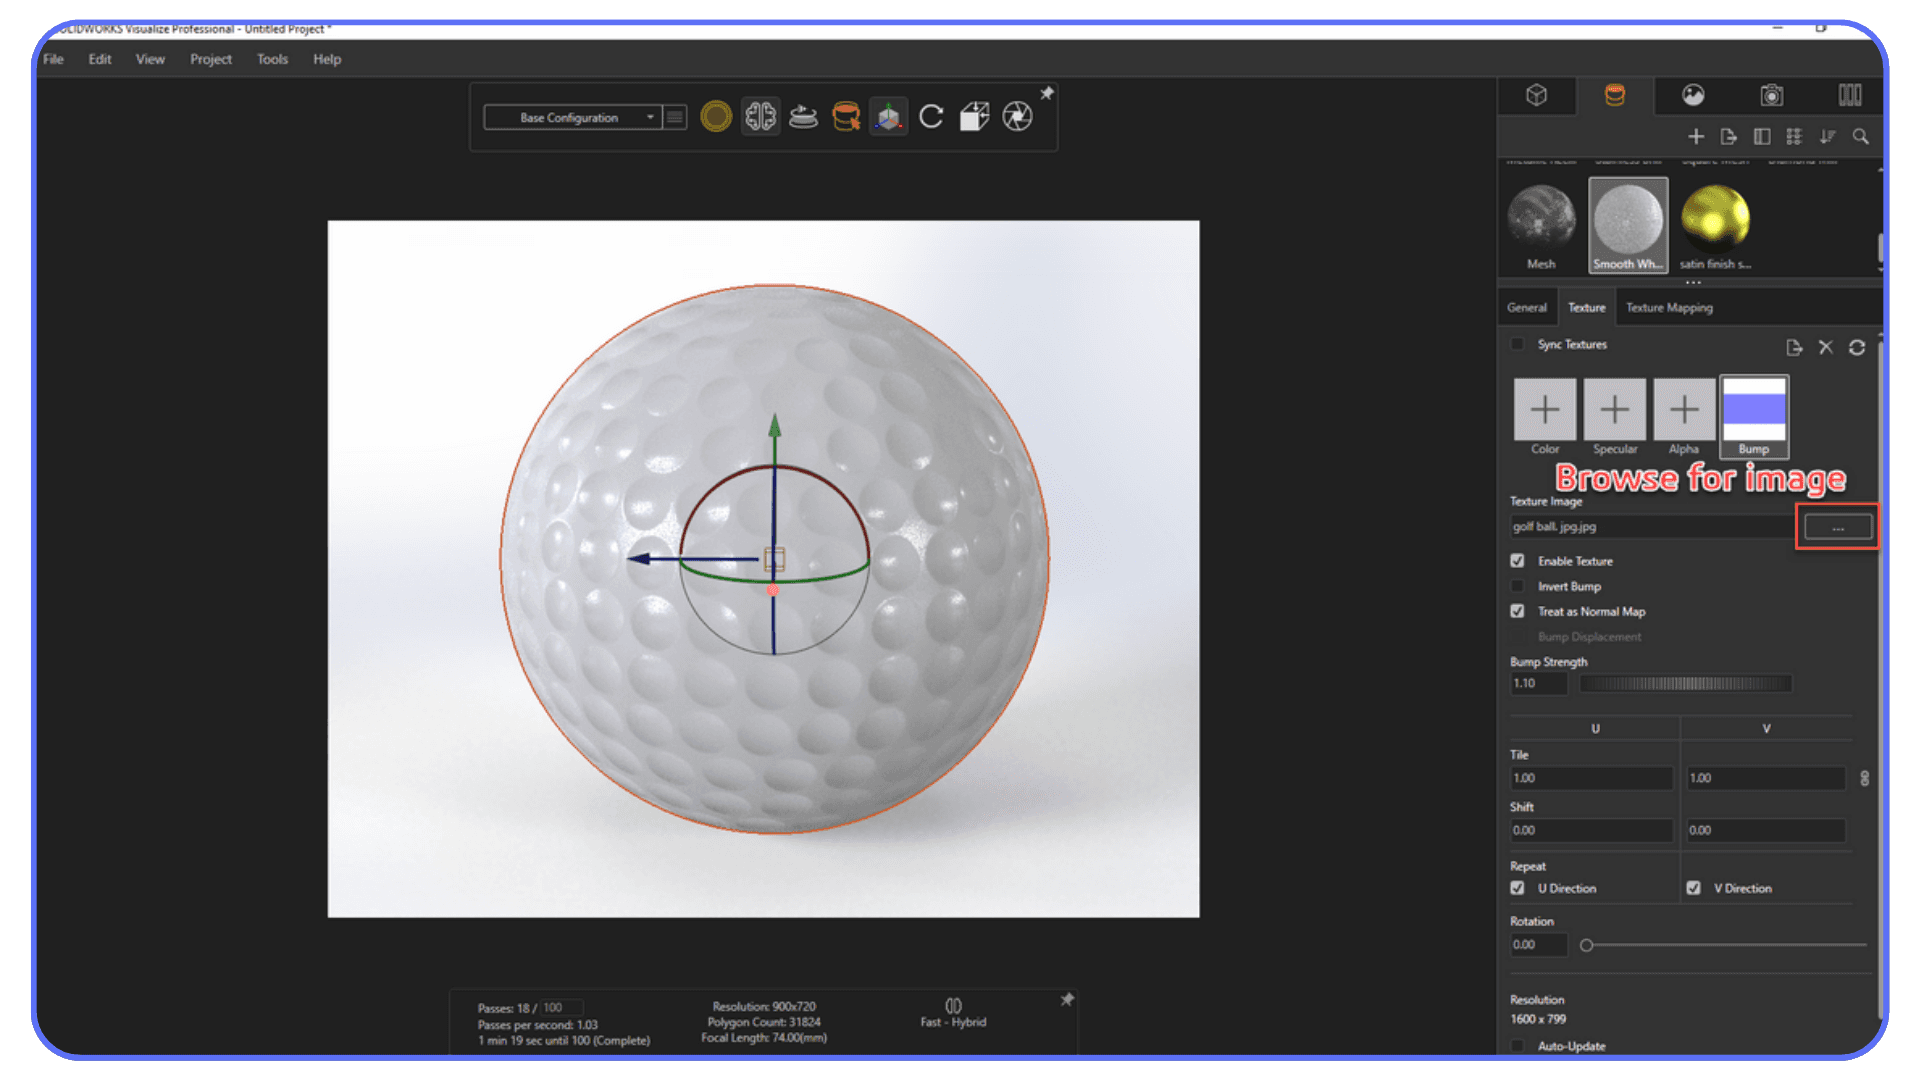
SolidWorks Visualize has a solid library, but don’t just drag and drop and call it done. Real materials have imperfections, tiny scratches, subtle fingerprints, smudges, and uneven reflections.
If everything in your scene looks too perfect, your brain instantly knows it’s CG.
Use bump maps or normal maps to add micro-texture. A brushed aluminum surface should feel directional, not like a chrome mirror. Adjust your specular roughness to control how sharp reflections appear.
And a big one, edge rounding.
No real object has razor-sharp 90° corners. Add small fillets or use “rounded edges” shading in Visualize. It’s amazing how much more believable your render looks when light catches those tiny edges.
Now, onto geometry.
Every extra fillet, screw thread, or hidden feature adds more faces for your GPU to process. You don’t need to render internal parts or unseen bolts unless they’ll show in the final shot. Simplify your model before you export. In huge assemblies, suppress anything invisible from the camera’s angle.
It’s like detailing a car, no one waxes the underside of the chassis before a photo shoot.
Clean geometry also prevents flickering reflections and shadow artifacts, problems that make renders look amateur even with top settings. The cleaner the model, the smoother the final result.
So before you even touch render settings, ask yourself:
“Would this still look real if I turned all the lights off and just examined the material?”
If the answer’s no, fix the materials and geometry first. It’s the foundation every good render rests on.
e) Shadows, Reflections & Refractions
If lighting is the mood of your render, shadows and reflections are its realism. Get them right, and your scene feels grounded. Get them wrong, and it looks like your model is floating in space.
Let’s start with shadows.
SolidWorks Visualize lets you tweak the softness, intensity, and sharpness of your shadows. The trick is to keep them believable. Perfectly crisp shadows make your render look staged, like an object cut out and pasted onto a background. Real-world light spreads and diffuses, especially under soft studio setups. Try slightly softer shadows (around 10–15% blur) for product renders. It adds that natural, photo-like feel.
Then come reflections.
Reflections are what give metal, glass, and polished plastics their punch, but they’re also one of the biggest GPU hogs. Each reflection bounce is another light calculation. If your part isn’t surrounded by reflective surfaces or transparent materials, you don’t need 8–10 bounces. In fact, 2–3 reflection levels are plenty for most product scenes.

And if you’ve ever wondered why your glass parts render like a black hole, that’s refractions misbehaving. Refraction controls how light bends through transparent materials like glass or water. It’s crucial for realism, but it’s also expensive. The rule of thumb:
No glass? Turn it off.
Simple transparent covers or lenses? Limit refraction depth to 3–4.
Complex glass assemblies? Sure, go higher, but expect longer render times.
The point is, these settings should work for your scene, not against it. A product render of a plastic housing doesn’t need heavy refractions. A jewelry render absolutely does.
When in doubt, test extremes: render the same scene with reflections/refractions maxed, then cut in half. If no one can tell the difference, congratulations, you just saved 40% of your render time.
Because the goal isn’t just to make it pretty, it’s to make it efficiently pretty.
My “Go-To” Preset Settings for Different Scenarios
After years of tweaking sliders and staring at half-finished renders at 3 a.m., I’ve realized that you don’t need dozens of custom profiles. You just need a few reliable presets that balance time and quality for different use cases.
These are the settings I actually use, the ones that get real-world results without driving your GPU (or your patience) into the ground.
Use Case | Render Passes | Resolution | Denoiser | Notes |
Quick concept render | 150 | 1080 p | ✅ On | Fast, good enough for internal review or checking materials. |
Client presentation | 300–500 | 2 K–4 K | ✅ On | Balanced between speed and clarity. Great for web or slides. |
Marketing-level still | 800–1200 | 4 K+ | ⚙️ Optional | Turn off Denoiser only if you’re printing large or cropping in. |
Large assembly | 1000+ | 4 K | ✅ On | Simplify geometry and isolate what matters. Patience required. |
Now, these aren’t gospel, they’re starting points.
Every scene behaves differently depending on your lighting, materials, and environment. For example, a matte plastic enclosure might look perfect at 300 passes, while a chrome part needs twice that for clean reflections.
The real trick is learning to read your renders. If the image looks clean and stable by 250 passes, stop. There’s no prize for “Most Passes Completed.” The most skilled SolidWorks renderers aren’t the ones who wait the longest, they’re the ones who know when to call it done.
And if you’re testing different looks, glossy vs. matte, bright HDRI vs. studio lighting, use the Denoiser and low-pass previews to iterate fast. Once you’ve nailed the composition, crank the settings for that final beauty shot.
Rendering is like cooking: you don’t keep turning up the heat hoping the dish will taste better. You learn when it’s perfectly done, and stop there.
Mistakes to Avoid
If there’s one thing SolidWorks teaches you fast, it’s humility. You think you’ve nailed your setup, hit render, and then, boom, three hours later you’ve got a noisy, overexposed mess. I’ve been there. Probably too many times.
So before you burn another evening watching that progress bar crawl, here are the biggest render-setting mistakes I see over and over again:
#1. Maxing Everything Out “Just Because”
This is the classic beginner move. You see options like “Ultra,” “Maximum,” or “Photographic” and assume they’ll automatically make your render better. Spoiler: they won’t.
What they will do is eat your VRAM, slow your system to a crawl, and waste hours calculating invisible details. The real pros rarely max anything. They optimize.

#2. Ignoring the Output Medium
You don’t need a 4K, 1000-pass render for something that’s going to live on a website at 800 pixels wide. Always match your settings to your output. Print? Go high. PowerPoint slide? Keep it light.
This single mindset shift can cut your render time by 70%.
#3. Forgetting Geometry Simplification
I can’t count how many times I’ve seen people render entire assemblies with screws, gears, or internal parts that aren’t even visible. Every hidden fillet and thread slows down the process.
Simplify before rendering. What’s out of frame doesn’t exist.
#4. Neglecting Lighting and Materials
A bad lighting setup can ruin even the most optimized render. You can’t fix dull HDRIs or flat materials by adding more passes, you’ll just get a sharper version of a boring image.
Always check your light and material interaction before going full resolution.
#5. Believing in “The One Best Setting”
There isn’t one.
Every scene behaves differently. What works for a matte injection-molded case won’t work for polished stainless steel. Treat every project as a new experiment, not a preset recipe.
If you take one thing away from this: rendering isn’t about pushing sliders to their limits. It’s about knowing when to stop. Every wasted pass is time you could’ve spent designing, improving, or, let’s be real, actually sleeping.
Rendering Smarter with Vagon Cloud Computer
Even when you’ve nailed your render settings, there’s still one big bottleneck left, your hardware.
You can optimize passes, tweak lighting, balance reflections perfectly… and then sit there, watching your workstation beg for mercy.
That’s when I realized the problem wasn’t my settings anymore. It was my setup.
Enter Vagon Cloud Computer.
If you’ve never tried it, picture this: your full SolidWorks environment running on a top-tier GPU workstation, streamed right through your browser. No installs. No thermal throttling. No background noise from a jet-engine fan trying to keep up. Just pure rendering power, on demand.
The first time I tested Vagon, I ran two renders side-by-side, one locally, one on the cloud. The Vagon render finished faster, looked cleaner, and my laptop stayed cool enough to hold in my lap the whole time. That was the moment it clicked: this isn’t about convenience, it’s about freedom.
When you render on Vagon Cloud Computer, you can:
Experiment freely — crank up passes, try higher resolutions, test lighting setups without worrying about lag or crashes.
Render multiple scenes at once — spin up a new instance for each project.
Collaborate easily — teammates can access the same environment and check your renders in real time.
Save your local machine for design work — let Vagon handle the heavy lifting while you keep working uninterrupted.
And here’s the best part: it’s instant. You can go from idea to high-end render in minutes.
So while good render settings are about efficiency, Vagon Cloud Computer is about removing the ceiling entirely.
It turns SolidWorks rendering from a waiting game into a creative process again. You test, you tweak, you finish, without ever thinking about how many cores or how much VRAM you’ve got.
Rendering smarter doesn’t just mean better settings anymore. It means using the right tools to unlock your best work, and for me, that tool is Vagon.
If you’re a Mac user wondering how to run SolidWorks smoothly without Boot Camp or virtualization, see how you can run SolidWorks on macOS using Vagon Cloud Computer.
Limitations & When This Advice Doesn’t Apply
I know, after reading all this, it’s tempting to think there’s a perfect formula for rendering. But even the best advice has its limits. There are times when you can (and should) break these rules.
If you’re curious which graphics cards actually make a difference in performance, check out our updated list of the best GPUs for SolidWorks.
For example, if you’re rendering a simple single part, maybe a small bracket or an enclosure prototype, you don’t need to fuss over passes, denoisers, or HDRIs. Those renders finish fast no matter what. Spending an hour optimizing settings there is like tuning a race car for a trip to the grocery store.
Or take real-time visualization, VR, AR, or interactive product demos. In those cases, the goal isn’t photorealism; it’s speed. You’ll need a totally different setup, lower sample counts, baked lighting, simplified materials. It’s not about perfection, it’s about responsiveness.
And honestly? Sometimes “perfect realism” isn’t the goal at all.
Engineers and clients often prefer schematic renders, clean, bright, stylized images that clearly show how a part works. No fancy reflections, no soft shadows. Just clarity.
That’s why understanding the purpose of your render matters more than memorizing settings.
If you’re creating marketing visuals, realism is king.
If you’re creating documentation, precision and readability matter more.
And if you’re building quick internal visuals for a meeting? Don’t overthink it, 150 passes and a decent HDRI will do the job just fine.
Even with Vagon Cloud Computer in your toolkit, not every render needs to go nuclear. The beauty of mastering your settings is knowing when not to use them all.
Final Thoughts
Rendering in SolidWorks is a bit like photography, it’s not about owning the most expensive camera, it’s about knowing how to use it.
Once you understand how passes, lighting, materials, and resolution all play together, you start to see rendering less as a technical hurdle and more as an art form. You stop guessing. You start creating.
The funny thing is, most people think render quality is all about power. But the truth? It’s about control. Control over what’s necessary, what’s waste, and where the real difference actually shows.
You don’t need to max out every slider or build a monster workstation to get stunning results. You just need to work smarter, and sometimes, that means letting smarter tools do the heavy lifting for you.
That’s where Vagon Cloud Computer fits perfectly. It takes everything you’ve learned here, all your balanced settings, lighting tweaks, and material work, and lets you push them to their fullest potential. No waiting. No throttling. Just creative momentum.
So here’s my challenge to you:
The next time you hit “Render” in SolidWorks, try something different. Don’t max it out. Don’t settle for defaults. Tune it, test it, and really see what changes. Then, when you’re ready to go beyond your hardware limits, give Vagon Cloud Computer a spin.
You’ll wonder how you ever rendered without it.
FAQs
1. What are the best render settings for SolidWorks Visualize?
There’s no single “perfect” setting for every project, SolidWorks renders behave differently depending on materials, lighting, and the final use of your image. For most product renders, 200–300 passes with the Denoiser enabled and a resolution of 1080p or 2K usually gives sharp, professional results in a short time. If you’re working on complex assemblies, reflective metals, or transparent glass objects, consider increasing to 800–1000 passes and rendering at 4K for marketing or print purposes. The best workflow is to start light, test with lower settings, and only increase passes or resolution when you can clearly see an improvement. Anything beyond that just adds time, not quality.
2. Why do SolidWorks renders take so long, even on powerful computers?
Render time in SolidWorks depends on three main factors: your settings, your scene complexity, and your hardware. Long render times often happen because users max out settings unnecessarily, especially passes, reflection depth, and resolution. Another common reason is unoptimized geometry, such as hidden or internal parts that still get calculated. Lighting setups with multiple HDRIs or reflective environments can also slow things down dramatically. Even if your computer is fast, SolidWorks rendering is GPU-intensive. When local hardware hits its limits, using Vagon Cloud Computer can help, it gives you instant access to top-tier GPUs that can finish renders much faster, while keeping your personal machine free for design work.
3. How do I choose the right number of passes in SolidWorks Visualize?
Think of render passes like layers of clarity. Each one refines noise, shadows, and reflections. However, after a certain point, you get diminishing returns. For most scenes, you’ll see a dramatic improvement up to about 250 passes, a small gain from 300–500, and almost no visible difference beyond 1000. If you use the NVIDIA AI Denoiser, you can stop even earlier, around 150–200 passes, and still get a clean image. The Denoiser uses AI to smooth out unfinished areas, so you don’t waste time waiting for microscopic detail that your audience won’t notice.
4. What’s the difference between 1080p, 4K, and DPI in rendering?
Resolution (1080p, 2K, 4K, etc.) determines how many pixels your render contains. DPI, or dots per inch, matters mostly for print. A 1080p render looks perfect on screens and presentations. A 4K render is ideal for high-quality marketing visuals, large monitors, or social media zoom-ins. For printing, you’ll want 300 DPI and at least 4K or 6K resolution to maintain sharpness. That said, more pixels don’t always mean a better render, they just take longer to process. The smart approach is to match resolution to the viewing medium. A huge image for a small web thumbnail is just wasted GPU time.
5. Should I always turn on the Denoiser in SolidWorks?
Not always. The Denoiser is a lifesaver when you’re iterating fast, it removes noise early in the render, so you can stop much sooner. It’s perfect for concept previews or internal reviews. However, for final, high-detail renders intended for print or close-up marketing materials, you might prefer to disable it. The Denoiser can slightly soften fine texture details, especially in metals, brushed finishes, or surfaces with subtle grain. Many users render drafts with it on, then re-run the final shot without it once they’re happy with the setup.
6. Why do my reflections or transparent materials look strange?
Reflections and refractions are two of the biggest contributors to realism, but also to render time. If your metal parts look too dull or your glass turns black, your reflection or refraction depth may be too low. Increasing it slightly (to 3–4 bounces) helps light travel through transparent surfaces correctly. At the same time, too many reflections or refractions can overcomplicate the render and increase noise. The balance depends on the scene. For simple objects, fewer bounces often look cleaner and render faster. For glass-heavy or glossy projects, higher levels add depth and realism.
7. How can I speed up SolidWorks renders without sacrificing quality?
Start by optimizing your scene. Hide unnecessary components, simplify geometry, and use efficient HDRIs. Limit the number of reflections, and only enable refractions when needed. Adjust passes gradually, using the preview mode to decide when the image is already good enough. Also, make the most of the Denoiser, it can cut render time in half with minimal quality loss. Finally, if you still need more power, use Vagon Cloud Computer to render on high-end GPUs in the cloud. It lets you test multiple versions, use higher settings, or finish large assemblies without slowing your own machine down.
8. What’s the difference between local rendering and cloud rendering with Vagon?
Local rendering ties up your computer, once you hit “Render,” your system slows down until it’s done. With Vagon Cloud Computer, rendering happens on a cloud-based workstation. You can run SolidWorks and Visualize inside your browser, push your settings to the max, and still keep working on your laptop or desktop. It’s especially useful for engineers, freelancers, or teams who don’t own expensive GPU workstations. Vagon lets you access professional hardware instantly, without maintenance, heat, or lag, making it easier to experiment, iterate, and deliver results faster.
9. Do these render settings work for Photoview 360 too?
Mostly, yes, the same logic applies. Photoview 360 doesn’t use a Denoiser, but passes, lighting, and resolution principles still hold true. The key difference is that Visualize is GPU-accelerated while Photoview 360 relies more on CPU. That means optimizing geometry and lighting can have an even bigger impact on render time in Photoview. If you’re doing complex or repeated rendering, Visualize (especially through Vagon) gives you more flexibility and speed overall.
10. When should I use cloud rendering instead of local rendering?
If your renders take hours, or if your workstation slows to a crawl every time you start one, that’s your sign. Cloud rendering with Vagon Cloud Computer is ideal when working with large assemblies, high-resolution marketing images, or projects that demand multiple test versions. You can run SolidWorks directly on the cloud, switch between GPU tiers, and scale performance as needed, all from your browser. It’s faster, more efficient, and eliminates the “render or work” dilemma that every designer knows too well.
I once waited two full hours for a SolidWorks render that looked almost identical to the 10-minute version.
Same model. Same lighting. Same everything, except I’d cranked every slider to “Maximum” because I thought that’s what pros did. Spoiler: it wasn’t.
That was the day I learned something most new users eventually figure out, render quality in SolidWorks isn’t about going “ultra.” It’s about going smart. The truth is, you can waste hours chasing imperceptible differences if you don’t actually understand what each setting does. And worse, you’ll convince yourself your hardware isn’t powerful enough when the real issue is optimization, not muscle.
Rendering in SolidWorks Visualize (or even Photoview 360) isn’t a test of patience, it’s a test of understanding. Once you figure out which settings matter, you can create stunning, professional-level images in a fraction of the time. And if you ever find yourself waiting around for that progress bar to crawl again, chances are it’s not your GPU’s fault, it’s your settings.
If you’re just getting started with SolidWorks and want to strengthen your fundamentals before tackling rendering, check out this guide to learning SolidWorks online with the best courses and resources.
Why Render Settings Matter
Most people assume that if a render looks bad, the solution is simple: crank everything to max.
Higher quality. More passes. Bigger resolution. Longer render times. Done, right?
Not even close.
Here’s what actually happens, your GPU spends hours calculating microscopic lighting details that no one will ever notice, while your system fan sounds like it’s preparing for takeoff. You waste time, power, and sanity for a 2% visual improvement. And sometimes, you actually make things worse, oversampling reflections or introducing unnecessary noise because you didn’t balance the scene properly.
In my experience, bad renders rarely come from “weak” hardware. They come from inefficient settings. I’ve seen laptops with midrange GPUs beat desktop workstations simply because the person behind the screen knew how to optimize passes, resolution, and lighting. SolidWorks Visualize is powerful, but it’s brutally honest: it only gives you what you tell it to compute.
Render settings matter because they decide how your time translates into image quality. Every slider is a trade-off, between speed, realism, and control. If you understand how those interact, you can produce clean, photorealistic images in minutes instead of hours.
And that’s really the secret most tutorials skip: there’s no magic “best” setup that works for every project. The perfect settings for a glossy product shot will absolutely choke a large assembly with hundreds of parts. The real skill is knowing which knobs to turn and when.
Core Setting Groups & What They Actually Do
Once you stop chasing the mythical “perfect” render setting, SolidWorks becomes a lot more predictable.
Every rendering engine, whether it’s Visualize or Photoview 360, relies on a few main levers. You don’t need to master all of them at once. You just need to know which ones actually matter.
Let’s go through the big ones.
If you’re learning the workflow between modeling and rendering, you can explore SolidWorks tutorials for beginners to see how design choices affect render quality.
a) Quality / Passes / Denoiser
If you’ve ever sat through a render watching the image slowly sharpen over time, you’ve already seen “passes” in action. Each pass is one more refinement, the software recalculates lighting, reflections, and shadows until the noise fades away.
Here’s the catch: doubling your passes doesn’t double your image quality. It just doubles your waiting time.
In my tests, 200–300 passes is usually enough for single parts or simple product renders. Once you hit around 500 passes, the improvements become microscopic. For larger assemblies or scenes with glass and refractions, you might go 800–1000 passes, but rarely more. Anything beyond that, and you’re polishing pixels that no one will ever notice.
Then there’s the Denoiser, a feature that feels like cheating, but in the best way possible. It uses AI to smooth out noise between passes, letting you stop the render early without losing clarity. Think of it as the modern-day patience saver. With Denoiser enabled, you can often cut your passes in half and still end up with a clean, crisp image.
My rule?
If you’re rendering for internal use, like a concept or quick review, enable Denoiser, stop around 200 passes, and move on.
If it’s for marketing or print, disable it for the final render, but still use it for previews so you’re not wasting time during test shots.
The trick isn’t finding the highest number that works, it’s finding the lowest one that still looks great. That’s what separates people who render smart from people who just render long.
b) Resolution & Pixel Density
If passes determine how detailed your lighting looks, resolution decides how clearly you’ll see it.
And here’s where so many SolidWorks users overdo it.
Everyone loves to click “4K” or “8K” because it sounds professional. But unless you’re printing a billboard or zooming in on microscopic details, that extra resolution is just more pixels your GPU has to fight through. I’ve seen people render 8K images only to compress them into 1080p PowerPoint slides. That’s not quality, that’s waste.
Here’s how I break it down in practice:
1080p (1920x1080) → Great for internal reviews, presentations, and web use. Fast, lightweight, perfectly clear.
2K–4K (2560x1440 / 3840x2160) → Ideal for client deliverables, product catalogs, and social media posts where crispness matters.
6K–8K → Only use for print materials, packaging visuals, or full-screen marketing banners. Anything else is just punishing your GPU for fun.
If you ever plan to print the image, you should also look at pixel density (DPI).
Most renders default to 72 DPI, perfect for screens. For print, bump it to 300 DPI. But remember: increasing DPI without increasing physical image size doesn’t actually add detail; it just changes how tightly the pixels are packed when printed.
Here’s a little mental shortcut I use:
Render at the resolution your audience will actually see, not the one you wish they would.
Your goal isn’t to create the world’s largest image file, it’s to produce something sharp, balanced, and practical for its final use. When you combine smart resolution choices with optimized passes, you’ll find your render time dropping dramatically without sacrificing visual quality.
If you’re still deciding which CAD platform best fits your design or rendering needs, here’s a detailed comparison of AutoCAD vs SolidWorks.
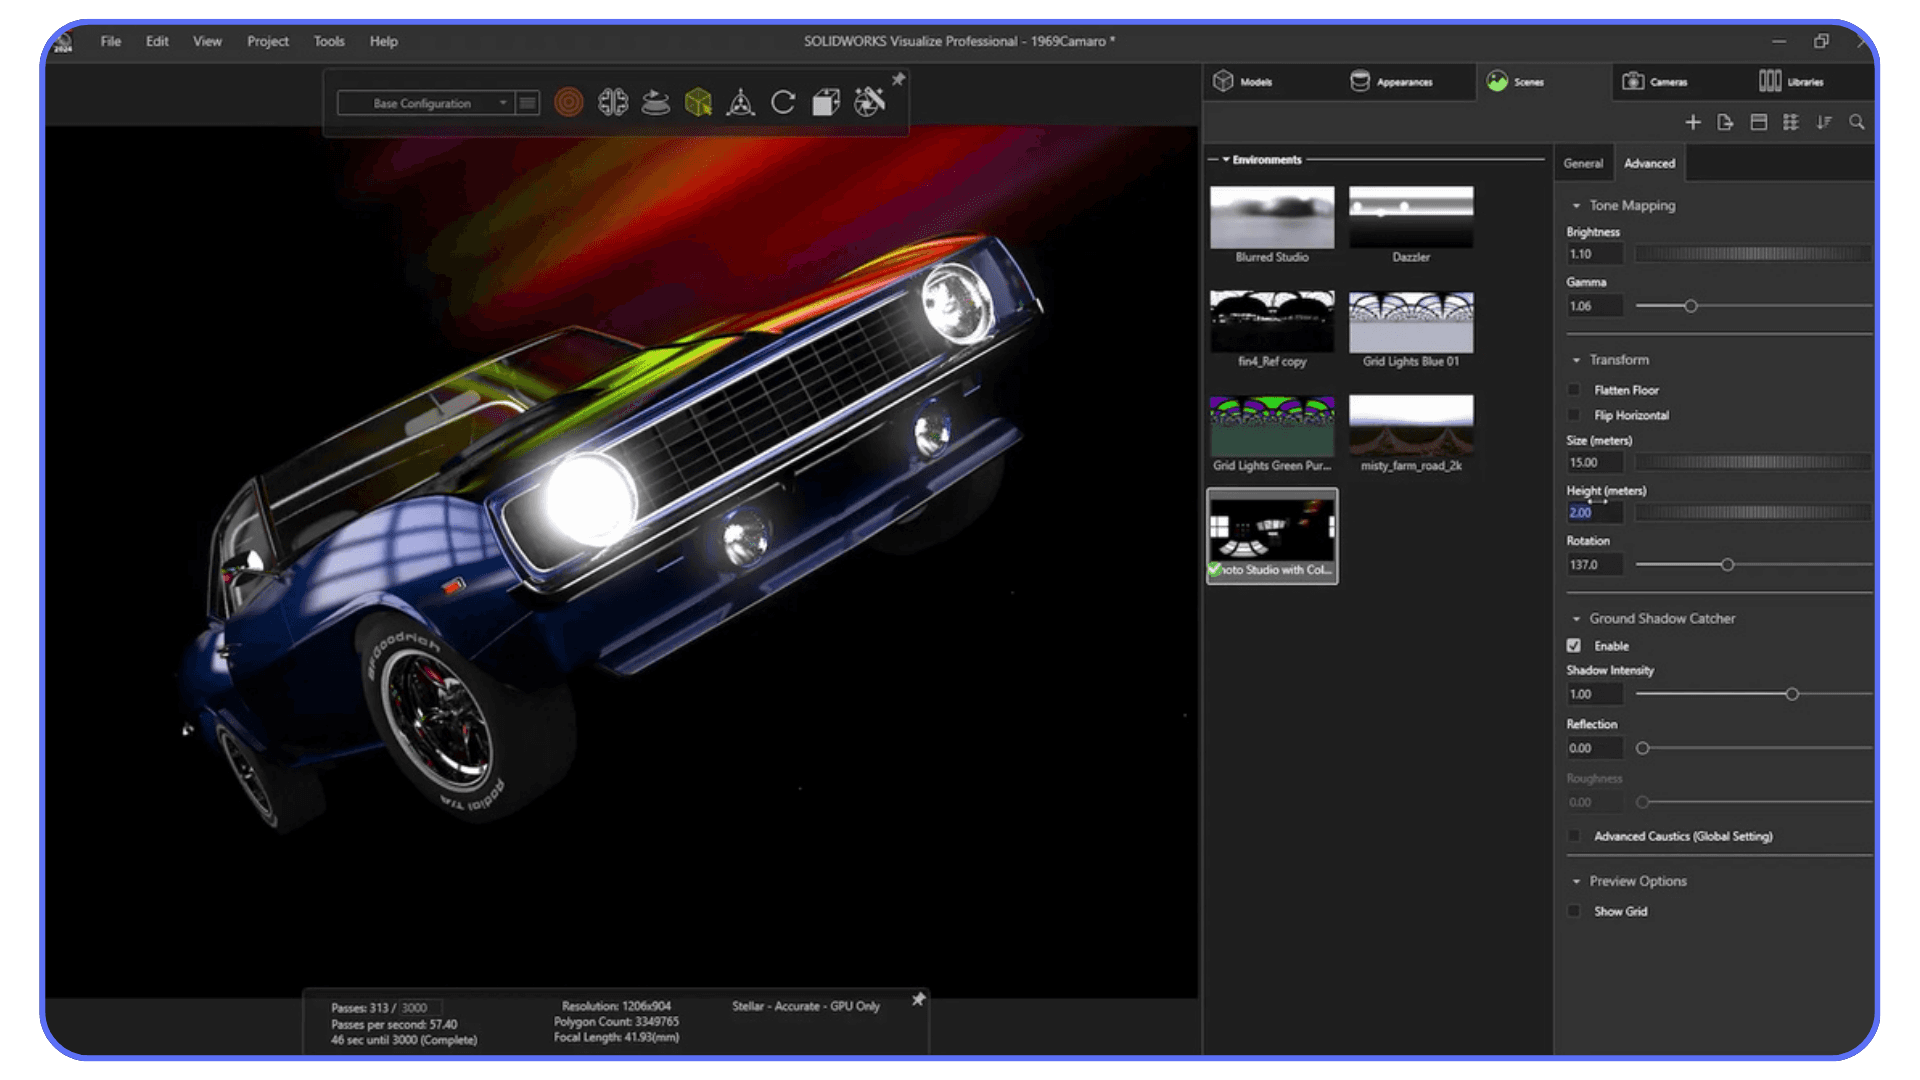
c) Lighting, Environment & Camera
You can have perfect materials, the right passes, and the sharpest resolution, and your render can still look flat and lifeless. Why?
Because lighting makes or breaks everything.
In SolidWorks Visualize, lighting isn’t just a background effect; it’s the entire mood of your image. The software uses HDRI environments (high dynamic range images) to simulate real-world lighting. These panoramic light sources control both brightness and reflection quality. If your scene looks too sterile, it’s usually because your HDRI is dull or unbalanced.
My advice:
Start with environment presets that match your object’s real use. A metallic part under “Sunny Field” HDRI looks odd, it’ll pick up grass-green reflections everywhere. Try “Studio,” “Overcast,” or custom HDRIs designed for product photography. You’ll instantly get cleaner, more realistic highlights.
Then there’s the camera. I’ve seen people spend an hour adjusting materials and forget that their camera’s perspective makes the whole thing look off. Use a longer focal length (around 80–100 mm) for product shots, it reduces distortion and keeps proportions true. For big assemblies, a shorter focal length (30–50 mm) helps capture more context.
And don’t skip Depth of Field (DoF). A subtle blur in the background adds depth and realism, just like a real photo lens would. But keep it subtle, too much, and it starts looking like a toy render.
Finally, check your composition. Place your subject using the rule of thirds, make sure reflections don’t distract, and tilt the camera just enough to feel dynamic without disorienting.
Here’s the honest truth:
If your lighting and camera aren’t working, no amount of render passes will fix it. You’re not rendering reality, you’re crafting it. Get your light and perspective right, and the settings suddenly start working in your favor instead of against you.
d) Materials & Geometry Clean-Up
Let’s be honest, even the best render settings can’t save bad materials or messy geometry.
If your part looks fake, it’s probably not your passes or your lighting. It’s the way the model itself interacts with light.
Start with materials.
SolidWorks Visualize has a solid library, but don’t just drag and drop and call it done. Real materials have imperfections, tiny scratches, subtle fingerprints, smudges, and uneven reflections.
If everything in your scene looks too perfect, your brain instantly knows it’s CG.
Use bump maps or normal maps to add micro-texture. A brushed aluminum surface should feel directional, not like a chrome mirror. Adjust your specular roughness to control how sharp reflections appear.
And a big one, edge rounding.
No real object has razor-sharp 90° corners. Add small fillets or use “rounded edges” shading in Visualize. It’s amazing how much more believable your render looks when light catches those tiny edges.
Now, onto geometry.
Every extra fillet, screw thread, or hidden feature adds more faces for your GPU to process. You don’t need to render internal parts or unseen bolts unless they’ll show in the final shot. Simplify your model before you export. In huge assemblies, suppress anything invisible from the camera’s angle.
It’s like detailing a car, no one waxes the underside of the chassis before a photo shoot.
Clean geometry also prevents flickering reflections and shadow artifacts, problems that make renders look amateur even with top settings. The cleaner the model, the smoother the final result.
So before you even touch render settings, ask yourself:
“Would this still look real if I turned all the lights off and just examined the material?”
If the answer’s no, fix the materials and geometry first. It’s the foundation every good render rests on.
e) Shadows, Reflections & Refractions
If lighting is the mood of your render, shadows and reflections are its realism. Get them right, and your scene feels grounded. Get them wrong, and it looks like your model is floating in space.
Let’s start with shadows.
SolidWorks Visualize lets you tweak the softness, intensity, and sharpness of your shadows. The trick is to keep them believable. Perfectly crisp shadows make your render look staged, like an object cut out and pasted onto a background. Real-world light spreads and diffuses, especially under soft studio setups. Try slightly softer shadows (around 10–15% blur) for product renders. It adds that natural, photo-like feel.
Then come reflections.
Reflections are what give metal, glass, and polished plastics their punch, but they’re also one of the biggest GPU hogs. Each reflection bounce is another light calculation. If your part isn’t surrounded by reflective surfaces or transparent materials, you don’t need 8–10 bounces. In fact, 2–3 reflection levels are plenty for most product scenes.
And if you’ve ever wondered why your glass parts render like a black hole, that’s refractions misbehaving. Refraction controls how light bends through transparent materials like glass or water. It’s crucial for realism, but it’s also expensive. The rule of thumb:
No glass? Turn it off.
Simple transparent covers or lenses? Limit refraction depth to 3–4.
Complex glass assemblies? Sure, go higher, but expect longer render times.
The point is, these settings should work for your scene, not against it. A product render of a plastic housing doesn’t need heavy refractions. A jewelry render absolutely does.
When in doubt, test extremes: render the same scene with reflections/refractions maxed, then cut in half. If no one can tell the difference, congratulations, you just saved 40% of your render time.
Because the goal isn’t just to make it pretty, it’s to make it efficiently pretty.
My “Go-To” Preset Settings for Different Scenarios
After years of tweaking sliders and staring at half-finished renders at 3 a.m., I’ve realized that you don’t need dozens of custom profiles. You just need a few reliable presets that balance time and quality for different use cases.
These are the settings I actually use, the ones that get real-world results without driving your GPU (or your patience) into the ground.
Use Case | Render Passes | Resolution | Denoiser | Notes |
Quick concept render | 150 | 1080 p | ✅ On | Fast, good enough for internal review or checking materials. |
Client presentation | 300–500 | 2 K–4 K | ✅ On | Balanced between speed and clarity. Great for web or slides. |
Marketing-level still | 800–1200 | 4 K+ | ⚙️ Optional | Turn off Denoiser only if you’re printing large or cropping in. |
Large assembly | 1000+ | 4 K | ✅ On | Simplify geometry and isolate what matters. Patience required. |
Now, these aren’t gospel, they’re starting points.
Every scene behaves differently depending on your lighting, materials, and environment. For example, a matte plastic enclosure might look perfect at 300 passes, while a chrome part needs twice that for clean reflections.
The real trick is learning to read your renders. If the image looks clean and stable by 250 passes, stop. There’s no prize for “Most Passes Completed.” The most skilled SolidWorks renderers aren’t the ones who wait the longest, they’re the ones who know when to call it done.
And if you’re testing different looks, glossy vs. matte, bright HDRI vs. studio lighting, use the Denoiser and low-pass previews to iterate fast. Once you’ve nailed the composition, crank the settings for that final beauty shot.
Rendering is like cooking: you don’t keep turning up the heat hoping the dish will taste better. You learn when it’s perfectly done, and stop there.
Mistakes to Avoid
If there’s one thing SolidWorks teaches you fast, it’s humility. You think you’ve nailed your setup, hit render, and then, boom, three hours later you’ve got a noisy, overexposed mess. I’ve been there. Probably too many times.
So before you burn another evening watching that progress bar crawl, here are the biggest render-setting mistakes I see over and over again:
#1. Maxing Everything Out “Just Because”
This is the classic beginner move. You see options like “Ultra,” “Maximum,” or “Photographic” and assume they’ll automatically make your render better. Spoiler: they won’t.
What they will do is eat your VRAM, slow your system to a crawl, and waste hours calculating invisible details. The real pros rarely max anything. They optimize.
#2. Ignoring the Output Medium
You don’t need a 4K, 1000-pass render for something that’s going to live on a website at 800 pixels wide. Always match your settings to your output. Print? Go high. PowerPoint slide? Keep it light.
This single mindset shift can cut your render time by 70%.
#3. Forgetting Geometry Simplification
I can’t count how many times I’ve seen people render entire assemblies with screws, gears, or internal parts that aren’t even visible. Every hidden fillet and thread slows down the process.
Simplify before rendering. What’s out of frame doesn’t exist.
#4. Neglecting Lighting and Materials
A bad lighting setup can ruin even the most optimized render. You can’t fix dull HDRIs or flat materials by adding more passes, you’ll just get a sharper version of a boring image.
Always check your light and material interaction before going full resolution.
#5. Believing in “The One Best Setting”
There isn’t one.
Every scene behaves differently. What works for a matte injection-molded case won’t work for polished stainless steel. Treat every project as a new experiment, not a preset recipe.
If you take one thing away from this: rendering isn’t about pushing sliders to their limits. It’s about knowing when to stop. Every wasted pass is time you could’ve spent designing, improving, or, let’s be real, actually sleeping.
Rendering Smarter with Vagon Cloud Computer
Even when you’ve nailed your render settings, there’s still one big bottleneck left, your hardware.
You can optimize passes, tweak lighting, balance reflections perfectly… and then sit there, watching your workstation beg for mercy.
That’s when I realized the problem wasn’t my settings anymore. It was my setup.
Enter Vagon Cloud Computer.
If you’ve never tried it, picture this: your full SolidWorks environment running on a top-tier GPU workstation, streamed right through your browser. No installs. No thermal throttling. No background noise from a jet-engine fan trying to keep up. Just pure rendering power, on demand.
The first time I tested Vagon, I ran two renders side-by-side, one locally, one on the cloud. The Vagon render finished faster, looked cleaner, and my laptop stayed cool enough to hold in my lap the whole time. That was the moment it clicked: this isn’t about convenience, it’s about freedom.
When you render on Vagon Cloud Computer, you can:
Experiment freely — crank up passes, try higher resolutions, test lighting setups without worrying about lag or crashes.
Render multiple scenes at once — spin up a new instance for each project.
Collaborate easily — teammates can access the same environment and check your renders in real time.
Save your local machine for design work — let Vagon handle the heavy lifting while you keep working uninterrupted.
And here’s the best part: it’s instant. You can go from idea to high-end render in minutes.
So while good render settings are about efficiency, Vagon Cloud Computer is about removing the ceiling entirely.
It turns SolidWorks rendering from a waiting game into a creative process again. You test, you tweak, you finish, without ever thinking about how many cores or how much VRAM you’ve got.
Rendering smarter doesn’t just mean better settings anymore. It means using the right tools to unlock your best work, and for me, that tool is Vagon.
If you’re a Mac user wondering how to run SolidWorks smoothly without Boot Camp or virtualization, see how you can run SolidWorks on macOS using Vagon Cloud Computer.
Limitations & When This Advice Doesn’t Apply
I know, after reading all this, it’s tempting to think there’s a perfect formula for rendering. But even the best advice has its limits. There are times when you can (and should) break these rules.
If you’re curious which graphics cards actually make a difference in performance, check out our updated list of the best GPUs for SolidWorks.
For example, if you’re rendering a simple single part, maybe a small bracket or an enclosure prototype, you don’t need to fuss over passes, denoisers, or HDRIs. Those renders finish fast no matter what. Spending an hour optimizing settings there is like tuning a race car for a trip to the grocery store.
Or take real-time visualization, VR, AR, or interactive product demos. In those cases, the goal isn’t photorealism; it’s speed. You’ll need a totally different setup, lower sample counts, baked lighting, simplified materials. It’s not about perfection, it’s about responsiveness.
And honestly? Sometimes “perfect realism” isn’t the goal at all.
Engineers and clients often prefer schematic renders, clean, bright, stylized images that clearly show how a part works. No fancy reflections, no soft shadows. Just clarity.
That’s why understanding the purpose of your render matters more than memorizing settings.
If you’re creating marketing visuals, realism is king.
If you’re creating documentation, precision and readability matter more.
And if you’re building quick internal visuals for a meeting? Don’t overthink it, 150 passes and a decent HDRI will do the job just fine.
Even with Vagon Cloud Computer in your toolkit, not every render needs to go nuclear. The beauty of mastering your settings is knowing when not to use them all.
Final Thoughts
Rendering in SolidWorks is a bit like photography, it’s not about owning the most expensive camera, it’s about knowing how to use it.
Once you understand how passes, lighting, materials, and resolution all play together, you start to see rendering less as a technical hurdle and more as an art form. You stop guessing. You start creating.
The funny thing is, most people think render quality is all about power. But the truth? It’s about control. Control over what’s necessary, what’s waste, and where the real difference actually shows.
You don’t need to max out every slider or build a monster workstation to get stunning results. You just need to work smarter, and sometimes, that means letting smarter tools do the heavy lifting for you.
That’s where Vagon Cloud Computer fits perfectly. It takes everything you’ve learned here, all your balanced settings, lighting tweaks, and material work, and lets you push them to their fullest potential. No waiting. No throttling. Just creative momentum.
So here’s my challenge to you:
The next time you hit “Render” in SolidWorks, try something different. Don’t max it out. Don’t settle for defaults. Tune it, test it, and really see what changes. Then, when you’re ready to go beyond your hardware limits, give Vagon Cloud Computer a spin.
You’ll wonder how you ever rendered without it.
FAQs
1. What are the best render settings for SolidWorks Visualize?
There’s no single “perfect” setting for every project, SolidWorks renders behave differently depending on materials, lighting, and the final use of your image. For most product renders, 200–300 passes with the Denoiser enabled and a resolution of 1080p or 2K usually gives sharp, professional results in a short time. If you’re working on complex assemblies, reflective metals, or transparent glass objects, consider increasing to 800–1000 passes and rendering at 4K for marketing or print purposes. The best workflow is to start light, test with lower settings, and only increase passes or resolution when you can clearly see an improvement. Anything beyond that just adds time, not quality.
2. Why do SolidWorks renders take so long, even on powerful computers?
Render time in SolidWorks depends on three main factors: your settings, your scene complexity, and your hardware. Long render times often happen because users max out settings unnecessarily, especially passes, reflection depth, and resolution. Another common reason is unoptimized geometry, such as hidden or internal parts that still get calculated. Lighting setups with multiple HDRIs or reflective environments can also slow things down dramatically. Even if your computer is fast, SolidWorks rendering is GPU-intensive. When local hardware hits its limits, using Vagon Cloud Computer can help, it gives you instant access to top-tier GPUs that can finish renders much faster, while keeping your personal machine free for design work.
3. How do I choose the right number of passes in SolidWorks Visualize?
Think of render passes like layers of clarity. Each one refines noise, shadows, and reflections. However, after a certain point, you get diminishing returns. For most scenes, you’ll see a dramatic improvement up to about 250 passes, a small gain from 300–500, and almost no visible difference beyond 1000. If you use the NVIDIA AI Denoiser, you can stop even earlier, around 150–200 passes, and still get a clean image. The Denoiser uses AI to smooth out unfinished areas, so you don’t waste time waiting for microscopic detail that your audience won’t notice.
4. What’s the difference between 1080p, 4K, and DPI in rendering?
Resolution (1080p, 2K, 4K, etc.) determines how many pixels your render contains. DPI, or dots per inch, matters mostly for print. A 1080p render looks perfect on screens and presentations. A 4K render is ideal for high-quality marketing visuals, large monitors, or social media zoom-ins. For printing, you’ll want 300 DPI and at least 4K or 6K resolution to maintain sharpness. That said, more pixels don’t always mean a better render, they just take longer to process. The smart approach is to match resolution to the viewing medium. A huge image for a small web thumbnail is just wasted GPU time.
5. Should I always turn on the Denoiser in SolidWorks?
Not always. The Denoiser is a lifesaver when you’re iterating fast, it removes noise early in the render, so you can stop much sooner. It’s perfect for concept previews or internal reviews. However, for final, high-detail renders intended for print or close-up marketing materials, you might prefer to disable it. The Denoiser can slightly soften fine texture details, especially in metals, brushed finishes, or surfaces with subtle grain. Many users render drafts with it on, then re-run the final shot without it once they’re happy with the setup.
6. Why do my reflections or transparent materials look strange?
Reflections and refractions are two of the biggest contributors to realism, but also to render time. If your metal parts look too dull or your glass turns black, your reflection or refraction depth may be too low. Increasing it slightly (to 3–4 bounces) helps light travel through transparent surfaces correctly. At the same time, too many reflections or refractions can overcomplicate the render and increase noise. The balance depends on the scene. For simple objects, fewer bounces often look cleaner and render faster. For glass-heavy or glossy projects, higher levels add depth and realism.
7. How can I speed up SolidWorks renders without sacrificing quality?
Start by optimizing your scene. Hide unnecessary components, simplify geometry, and use efficient HDRIs. Limit the number of reflections, and only enable refractions when needed. Adjust passes gradually, using the preview mode to decide when the image is already good enough. Also, make the most of the Denoiser, it can cut render time in half with minimal quality loss. Finally, if you still need more power, use Vagon Cloud Computer to render on high-end GPUs in the cloud. It lets you test multiple versions, use higher settings, or finish large assemblies without slowing your own machine down.
8. What’s the difference between local rendering and cloud rendering with Vagon?
Local rendering ties up your computer, once you hit “Render,” your system slows down until it’s done. With Vagon Cloud Computer, rendering happens on a cloud-based workstation. You can run SolidWorks and Visualize inside your browser, push your settings to the max, and still keep working on your laptop or desktop. It’s especially useful for engineers, freelancers, or teams who don’t own expensive GPU workstations. Vagon lets you access professional hardware instantly, without maintenance, heat, or lag, making it easier to experiment, iterate, and deliver results faster.
9. Do these render settings work for Photoview 360 too?
Mostly, yes, the same logic applies. Photoview 360 doesn’t use a Denoiser, but passes, lighting, and resolution principles still hold true. The key difference is that Visualize is GPU-accelerated while Photoview 360 relies more on CPU. That means optimizing geometry and lighting can have an even bigger impact on render time in Photoview. If you’re doing complex or repeated rendering, Visualize (especially through Vagon) gives you more flexibility and speed overall.
10. When should I use cloud rendering instead of local rendering?
If your renders take hours, or if your workstation slows to a crawl every time you start one, that’s your sign. Cloud rendering with Vagon Cloud Computer is ideal when working with large assemblies, high-resolution marketing images, or projects that demand multiple test versions. You can run SolidWorks directly on the cloud, switch between GPU tiers, and scale performance as needed, all from your browser. It’s faster, more efficient, and eliminates the “render or work” dilemma that every designer knows too well.
Get Beyond Your Computer Performance
Run applications on your cloud computer with the latest generation hardware. No more crashes or lags.

Trial includes 1 hour usage + 7 days of storage.
Summarize with AI

Ready to focus on your creativity?
Vagon gives you the ability to create & render projects, collaborate, and stream applications with the power of the best hardware.

Vagon Blog


Run heavy applications on any device with
your personal computer on the cloud.
San Francisco, California
Solutions
Vagon Teams
Vagon Streams
Use Cases
Resources
Vagon Blog
How to Run Audacity on a Cloud Ubuntu Desktop (2026 Guide)
How to Run Darktable on a Cloud Ubuntu Desktop for RAW Photo Editing (2026 Guide)
How to Run Kdenlive on a Cloud Ubuntu Desktop (2026 Guide)
How to Run DaVinci Resolve on Linux in the Cloud (2026 Guide)
How to Run Inkscape on a Cloud Ubuntu Desktop (2026 Guide)
How to Run Krita on a Cloud Ubuntu Desktop for Digital Painting (2026 Guide)
How to Run GIMP on a Cloud Ubuntu Desktop (2026 Guide)
How to Run Jupyter on a Cloud GPU Linux Desktop (2026 Guide)
Vagon vs GitHub Codespaces: Cloud Dev Environments Compared (2026)
Vagon Blog
Run heavy applications on any device with
your personal computer on the cloud.
San Francisco, California
Solutions
Vagon Teams
Vagon Streams
Use Cases
Resources
Vagon Blog