Instant Connection for Pixel Streaming
— New Feature Automated Setup

How to Make Unreal Engine Render Faster: A Practical Guide That Actually Works
How to Make Unreal Engine Render Faster: A Practical Guide That Actually Works
GameDevelopment
How to Make Unreal Engine Render Faster: A Practical Guide That Actually Works
Table of Contents
I still remember the day a simple 12-second Unreal Engine cinematic held me hostage for almost 47 minutes. The render progress bar crawled like it was mocking me, my PC sounded like a jet engine, and I kept asking myself why I ever thought dynamic shadows on twenty-four point lights was a good idea. That was the first time I realized slow renders aren’t just annoying, they break your creative flow. And when Unreal Engine breaks your flow, everything else in your project slows down with it.
If you’ve spent enough time in Unreal, you’ve had your own version of that moment. Maybe it was a forest scene tanking your FPS for no clear reason, or a material tweak that triggered a shader compile session long enough to reconsider your life choices. Whatever it was, the frustration is universal. Unreal Engine is incredibly powerful, but it’s also unforgiving when your scene gets heavier than your hardware, or your workflow, can handle.
This guide isn’t theory. It’s a collection of practical, real-world methods I’ve learned from watching scenes go from unplayable to smooth, and renders go from painfully slow to actually manageable. No vague advice like “optimize your project.” No generic tips you’ve read a thousand times. We’re going straight into what actually speeds up rendering in Unreal Engine, what to look at, what to ignore, what to fix first, and how to make measurable improvements without breaking your project or your schedule.
Let’s get into the stuff that actually makes your renders faster.
If you want a quick reminder of how far Unreal Engine can be pushed, here are some of the top games made with Unreal Engine that show what optimized pipelines can achieve.
Know What’s Actually Slowing You Down
Before you start toggling random settings or deleting half your foliage, you need to know what is actually slowing your scene down. Unreal Engine performance looks complicated from the outside, but diagnosing it is surprisingly straightforward once you understand where to look. And honestly, this step alone separates people who fix performance from people who waste hours guessing.
Most creators jump into optimization blind: they lower resolution, turn off effects, tweak shadows, disable Lumen, then re-enable Lumen, then panic, then blame Nanite. None of it works if you don’t measure. Unreal gives you tools that show exactly where your milliseconds are going, and once you know that, optimization becomes targeted instead of chaotic.
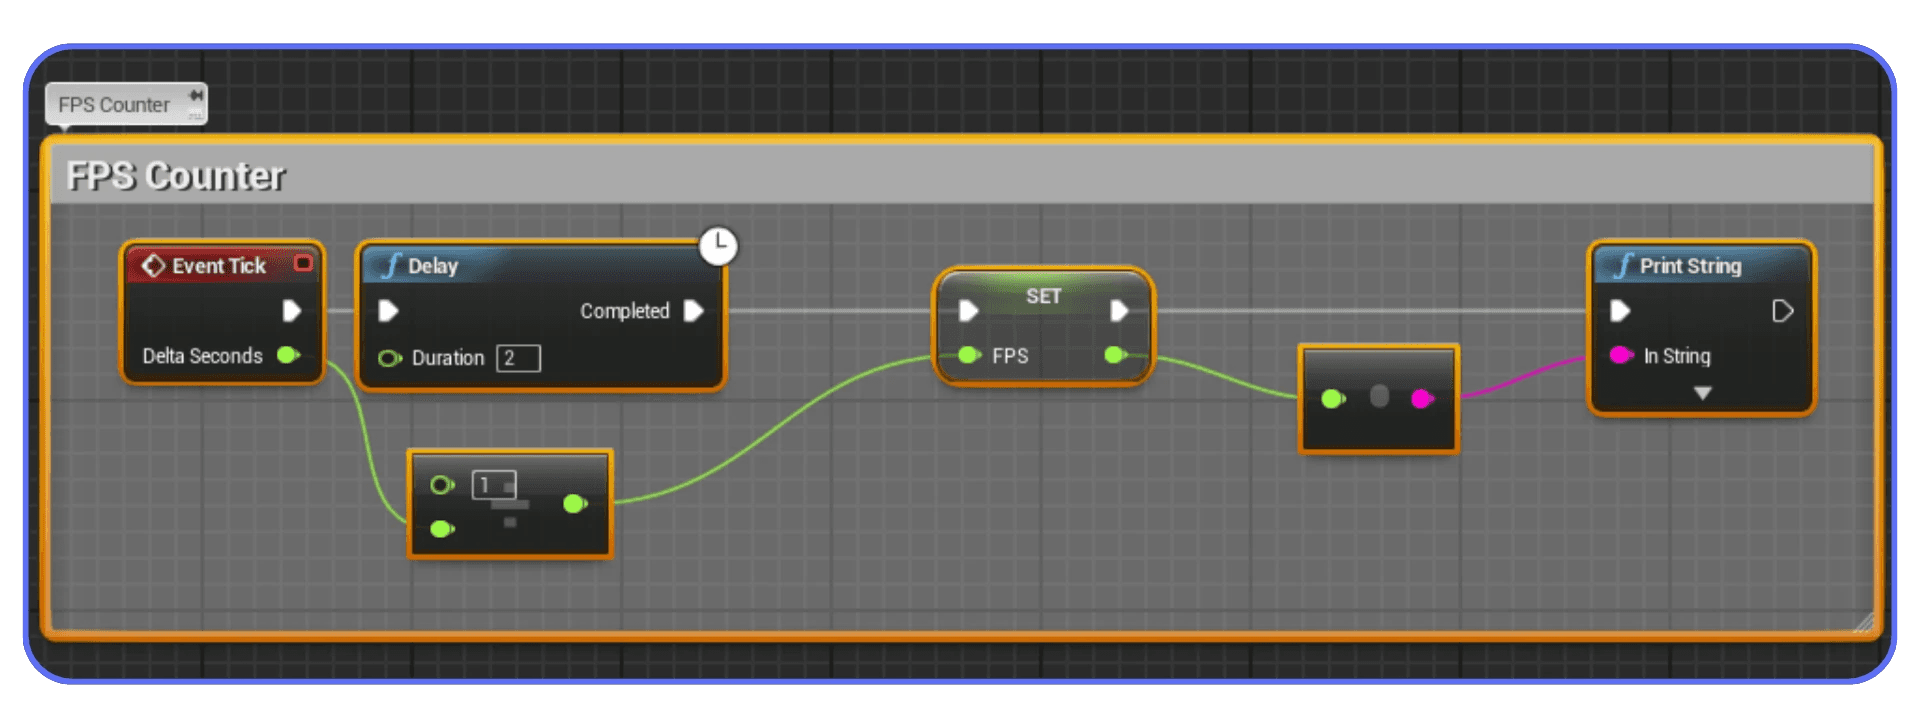
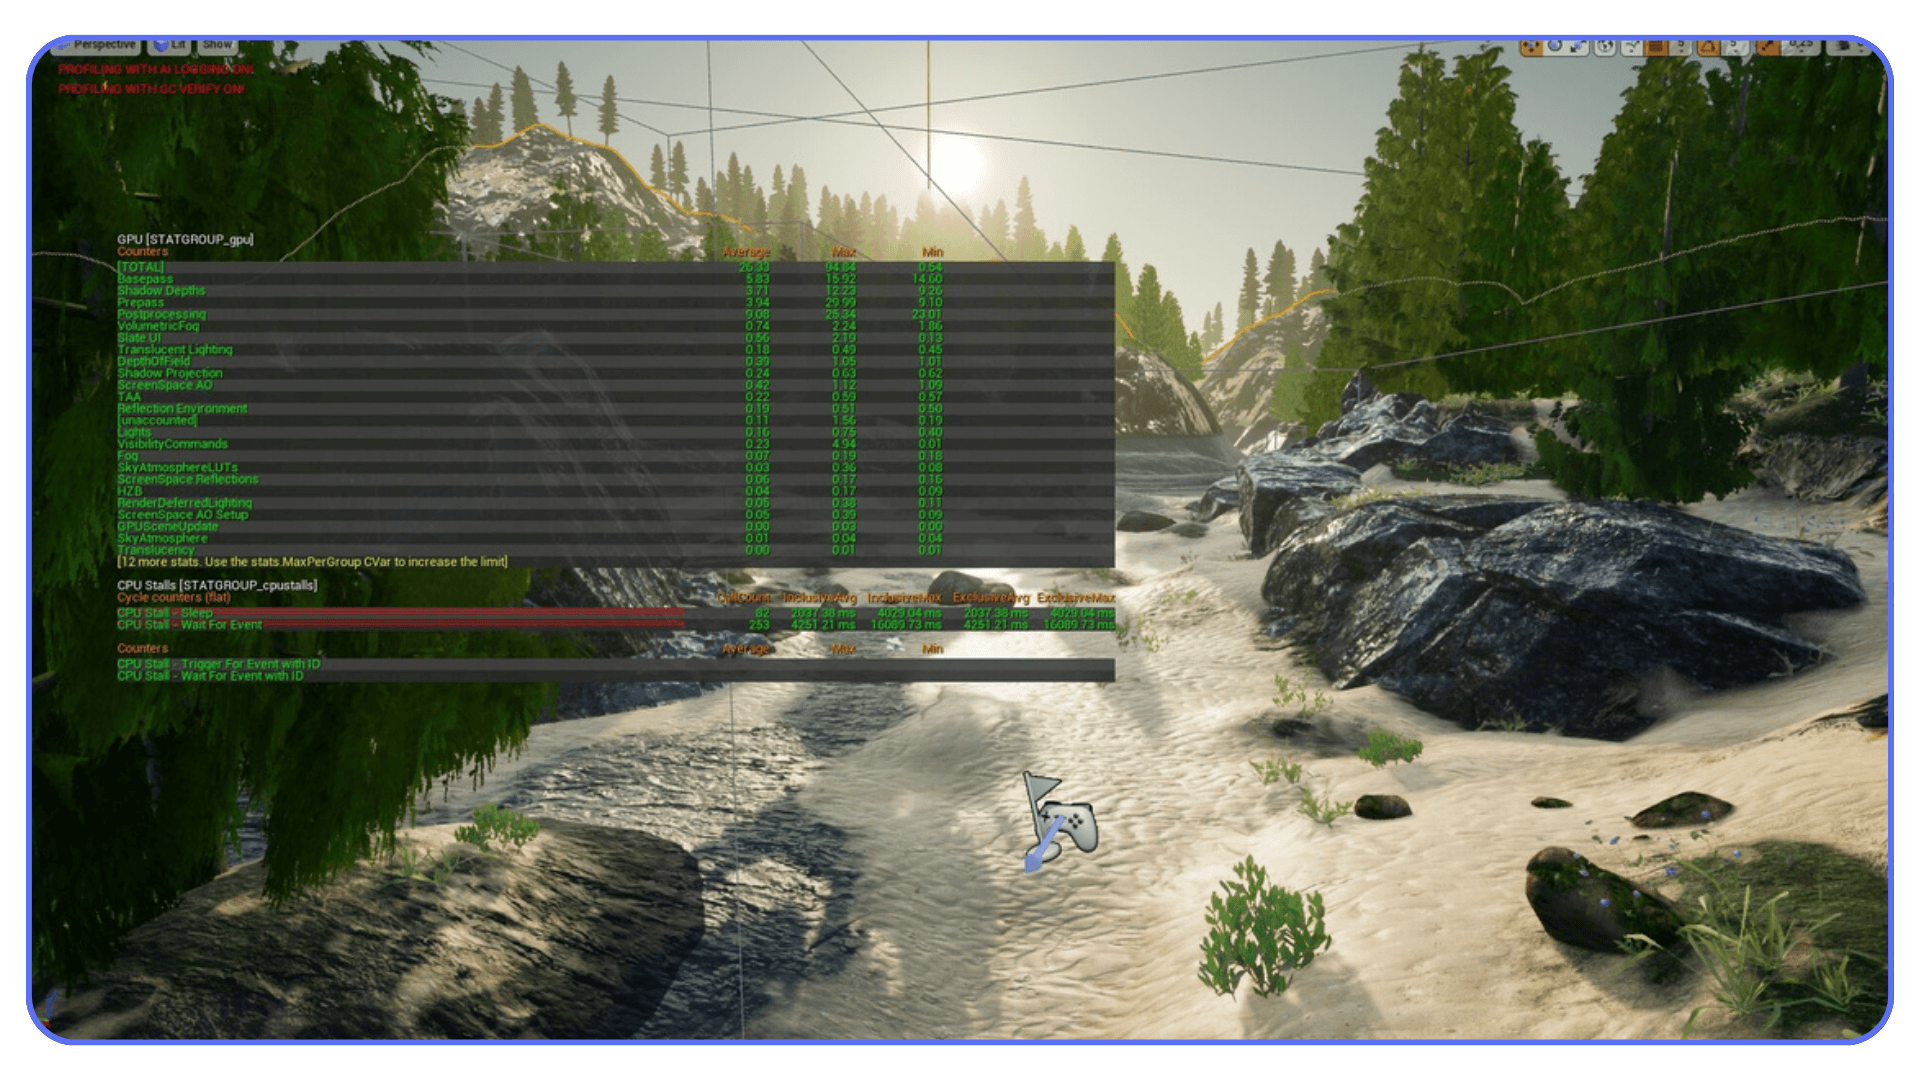
Start with the simplest approach: measure in milliseconds, not FPS. FPS hides the real problem. Milliseconds tell you the truth. Use stat unit and look at three numbers: Game Thread, Draw Thread, and GPU. Whichever is highest is your bottleneck. If GPU is spiking, your scene is too heavy. If Game Thread spikes, it’s probably blueprints, tick events, or complex logic. If Draw Thread stalls, you may have too many draw calls or over-complicated materials.
Then go deeper with stat GPU. This command is the closest thing Unreal has to X-ray vision, shadows, translucency, Lumen reflections, post-processing, Nanite passes, everything is listed with its cost. The first time I ran it on a struggling project, I realized my issue wasn’t Nanite at all, it was 4.8 ms worth of shadow maps coming from lights I didn’t even need.
For a full breakdown, use profileGPU. It captures the entire frame and shows you exactly which render passes are draining performance. I once found a hidden post-process volume that was quietly adding almost 2 ms per frame. Without profiling, I never would’ve noticed it.
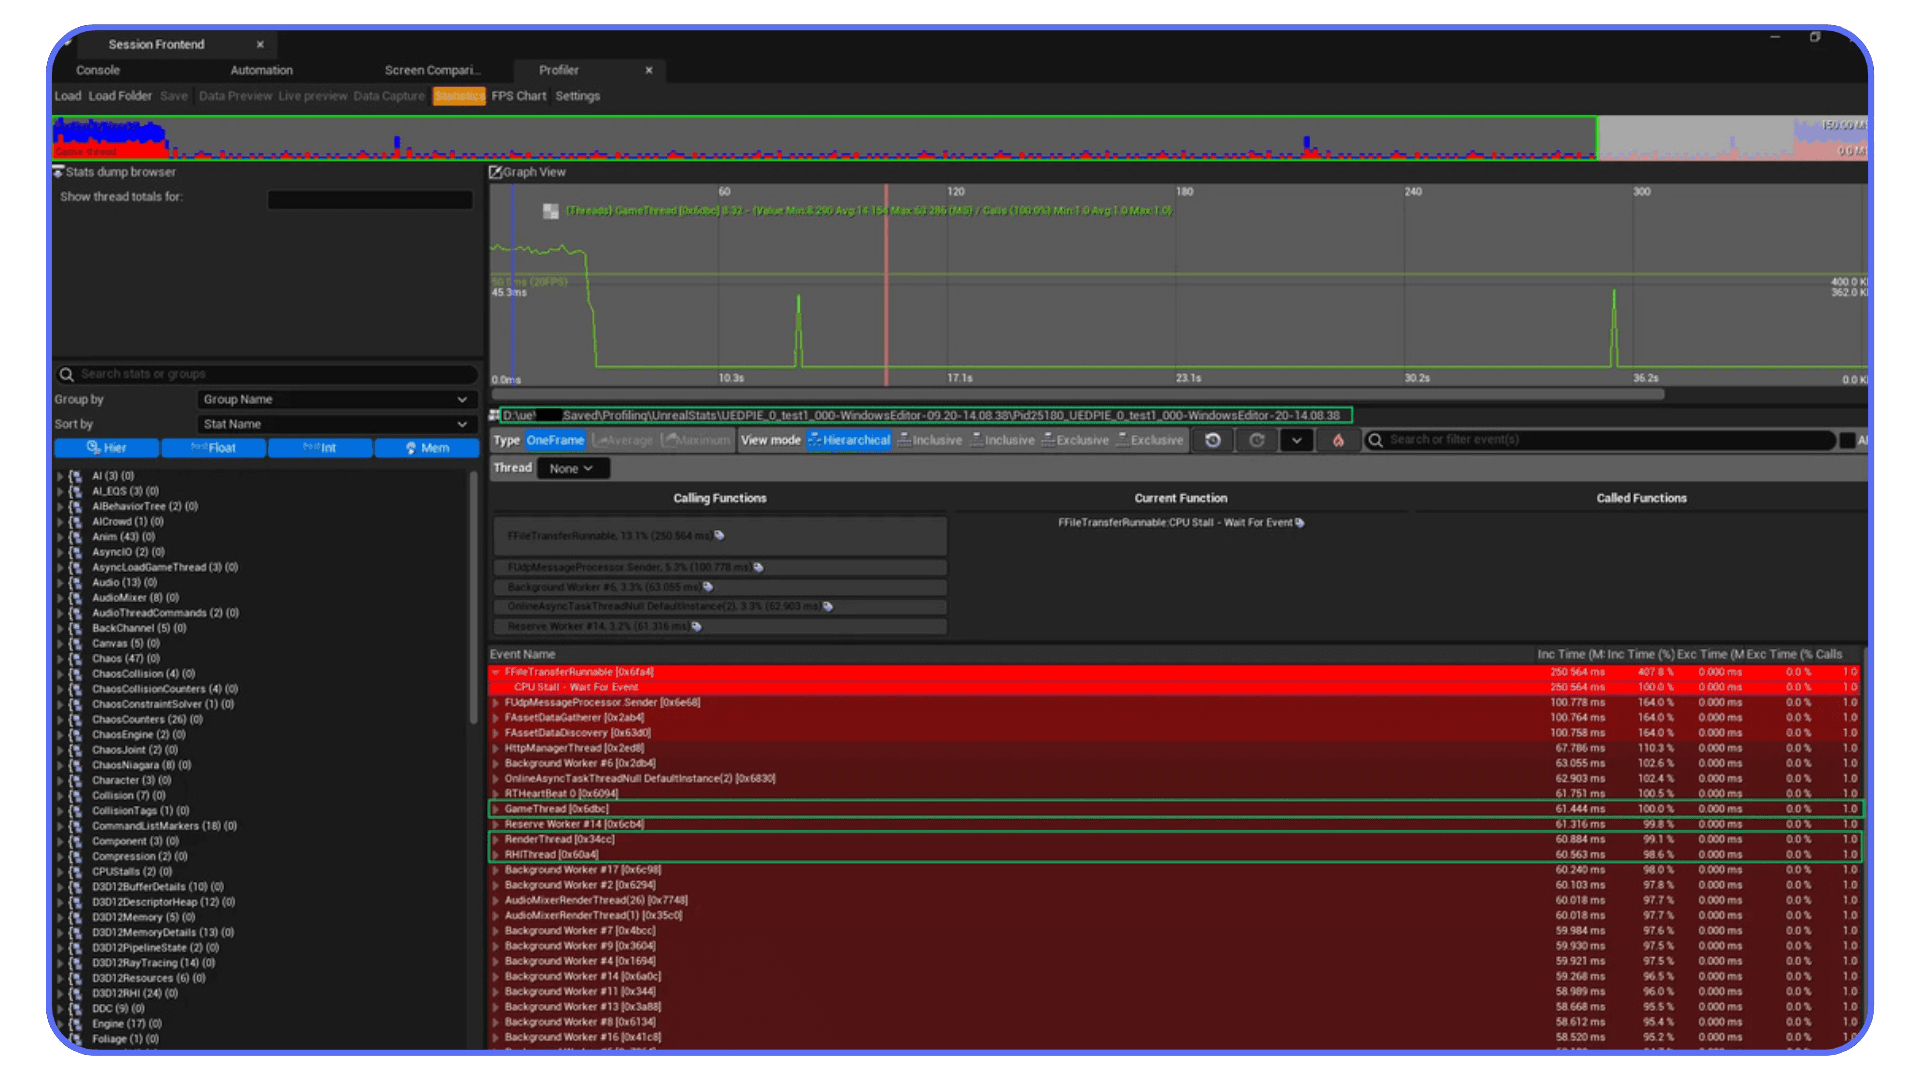
If you’re dealing with stutters, inconsistent frame times, or packaged builds running slower than the editor, open Unreal Insights. It visualizes CPU and GPU timelines, shader compilation stalls, hitch spikes, basically the “why is my project behaving like this?” tool.
The bottom line: if you don’t know where your frame time is going, you can’t fix anything. Profiling is the map. Optimization is the journey. Without the map, you’re just wandering.
The Main Things That Make Unreal Engine Slow
Once you know what’s actually slow in your scene, fixing performance becomes much simpler. Unreal Engine isn’t “mysteriously heavy”; it just punishes certain choices harder than others. Over time, I’ve noticed that 80% of slow renders come from the same handful of issues, and the good news is: all of them are fixable.
#1. Draw Calls & Too Many Unique Meshes/Materials
Draw calls are one of the most common, least understood performance killers. Every mesh, every material, every unique object the engine tells the GPU to render counts as a separate draw call. Too many of them, and your frame time explodes.
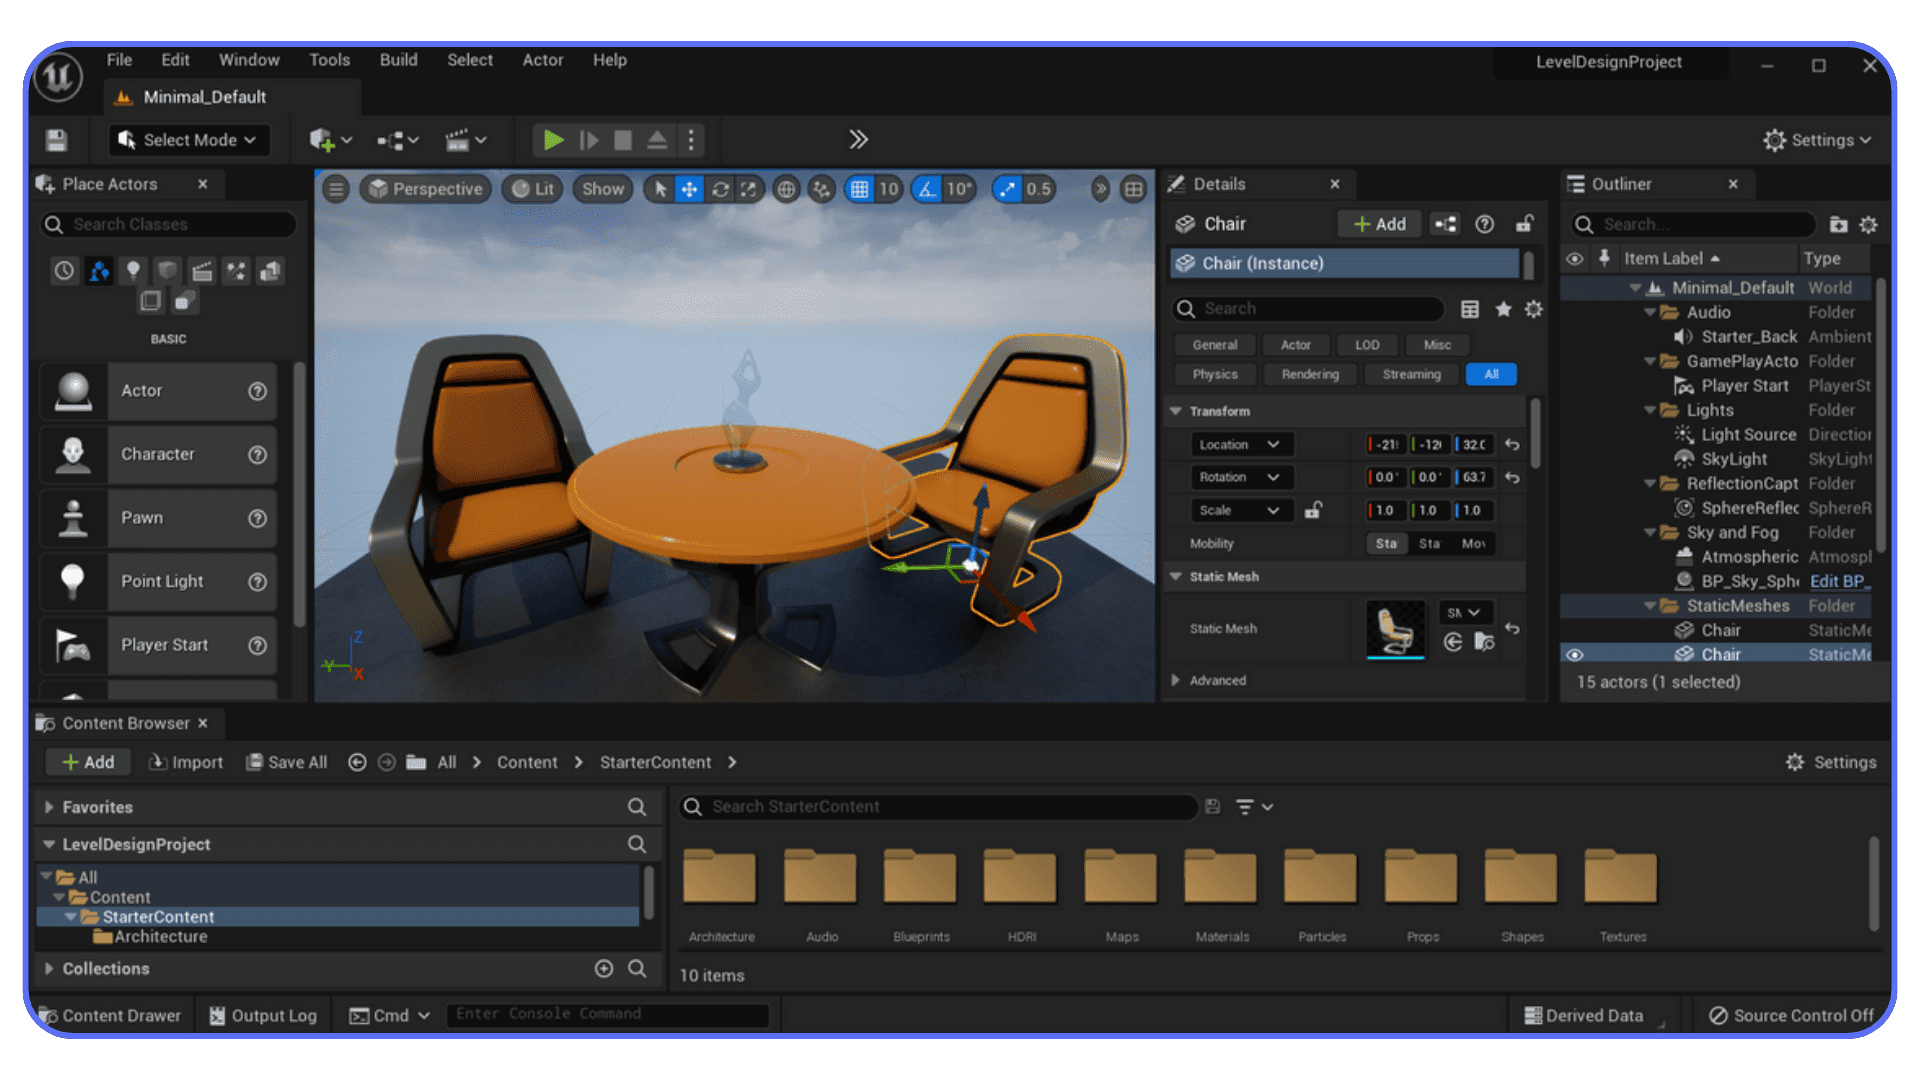
One of my forest scenes once had over 1,200 unique meshes and 300 materials. It looked great, but ran like a slideshow. Merging props into bigger meshes, removing excess material slots, reusing material instances, and enabling HLODs immediately cut the draw calls almost in half and bumped performance significantly. If your draw call count is high, even small changes make a big difference.
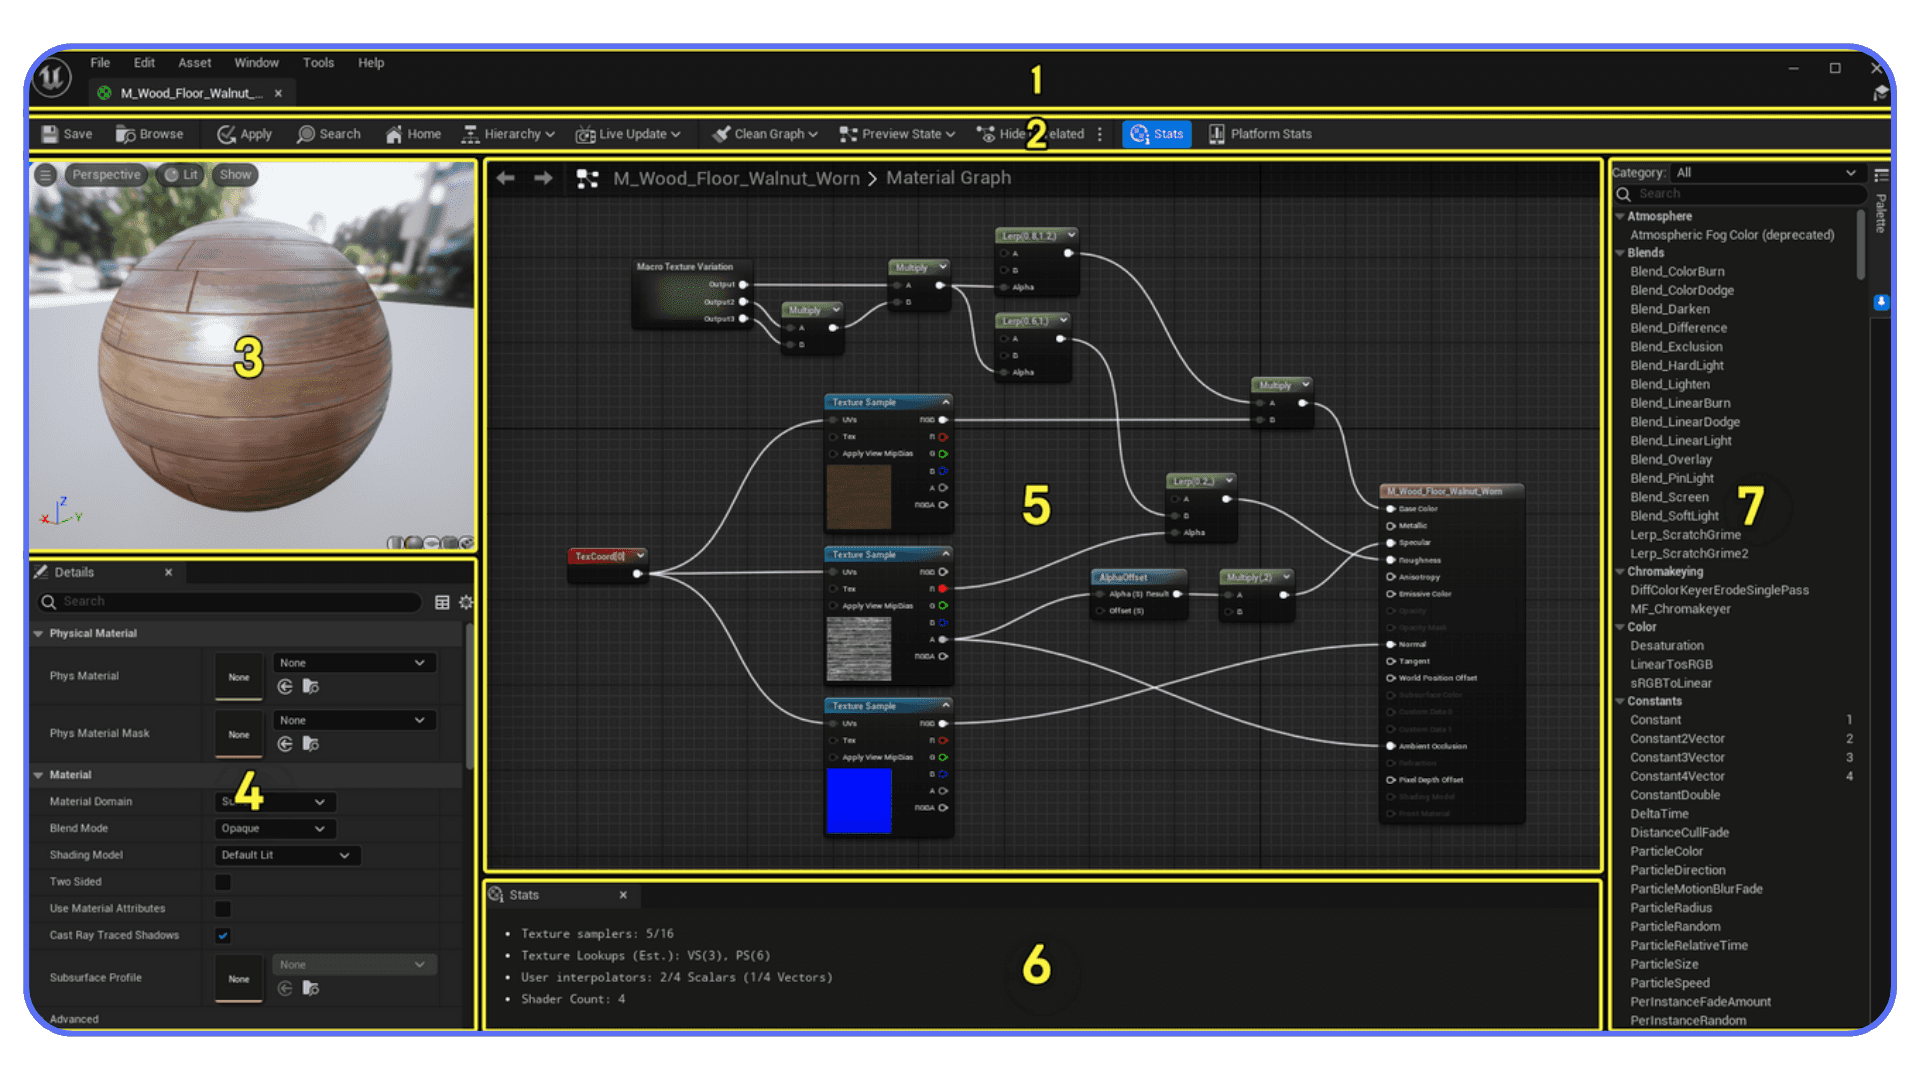
#2. Material Complexity & Shader Cost
Unreal’s material editor is powerful, which makes it easy to overdo things without realizing it. Heavy noise layers, multiple texture coordinates, WPO animation, masked materials, complex translucency, these all add expensive shader instructions.
One of my worst offenders was a translucent grass material with WPO sway, multiple masks, and subsurface scattering layered on top. It cost nearly 4 ms on its own. Simplifying it, switching to opaque, lowering instruction count, reducing unnecessary nodes, dropped its cost to about 1.3 ms with almost no visible quality loss.
If your shader complexity view is full of red and white, that’s your bottleneck.
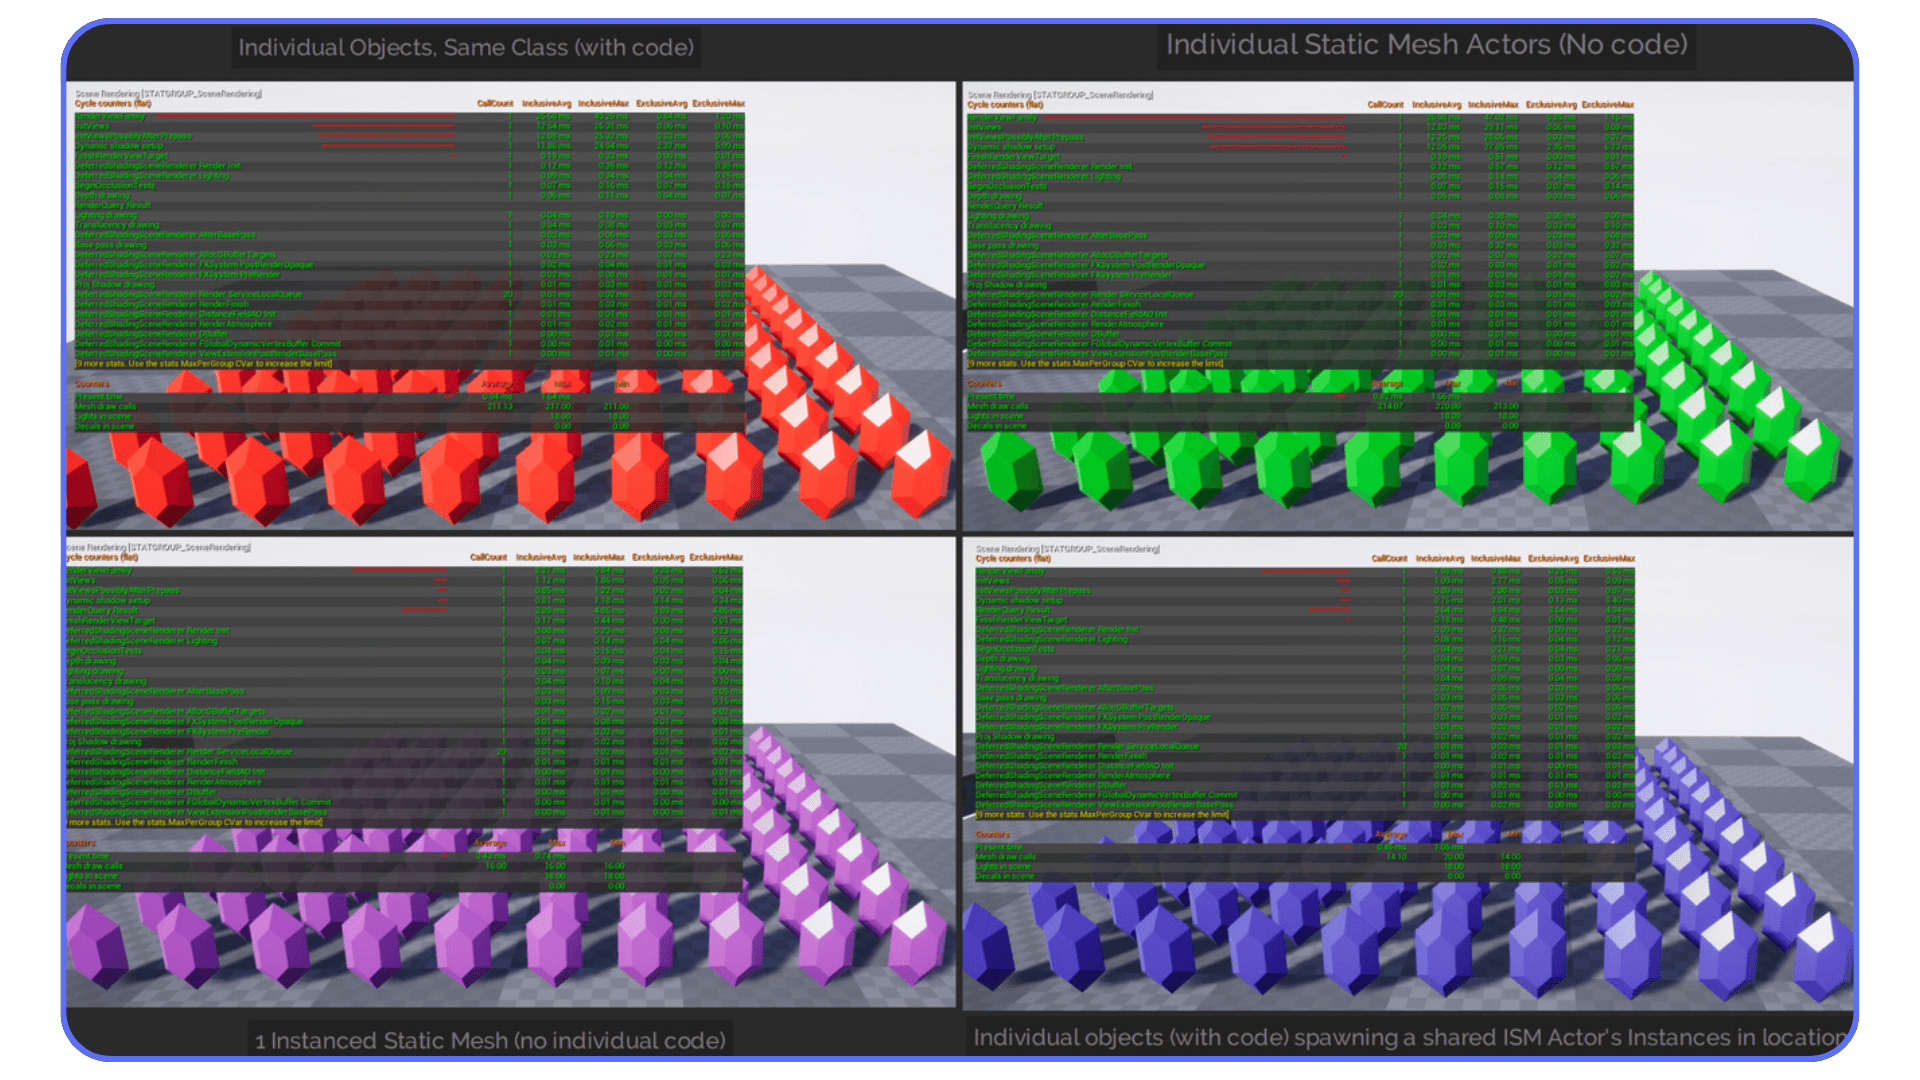
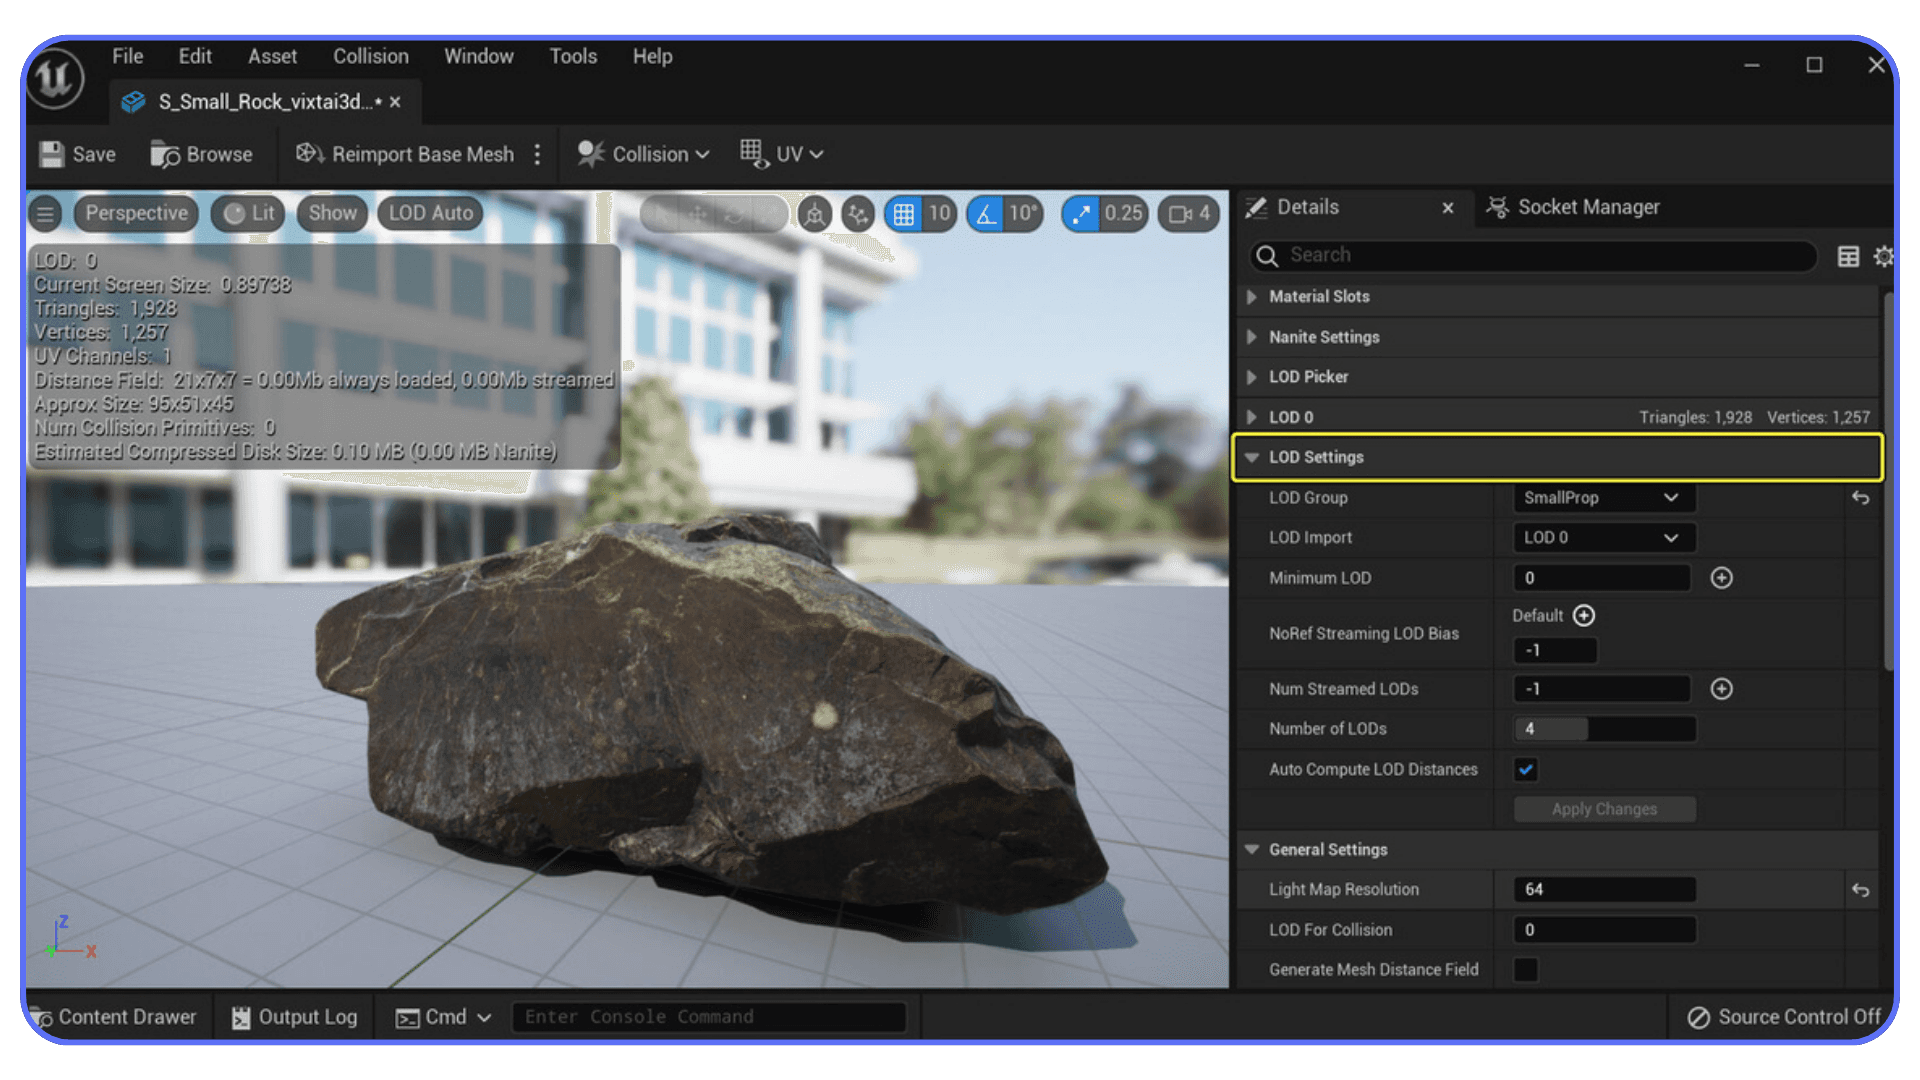
#3. Geometry, LODs & Smart Nanite Usage
Nanite changed everything, but it’s not a miracle button. It handles high poly meshes extremely well, but it can still struggle with fragmented geometry, messy topology, or millions of micro details that don’t matter visually. It also doesn’t solve problems related to overdraw, heavy materials, or lighting.
When I imported a 20M-triangle environment model assuming Nanite would “just handle it,” rasterization cost shot up instead. Cleaning hidden faces, removing microscopic geometry, merging overly fragmented meshes, and verifying Nanite’s raster bins fixed the issue. Nanite is incredible, when you feed it assets it actually likes.

#4. Overdraw, Transparency & Texture Sizes
Overdraw is the silent killer of Unreal performance. Whenever Unreal draws through multiple transparent or masked objects layered over each other, foliage cards, fog planes, particles, UI surfaces, the GPU has to shade the same pixel again and again.
I once had a single fog plane costing almost 2 ms because it overlapped with several layers of foliage. Switching it to a cheaper opaque mesh-based effect fixed the problem instantly.
Texture size matters too: not everything needs to be 8K. In many cases, 2K or even 1K looks identical but saves a ton of memory and bandwidth.
#5. Lighting, Shadows & Post-Processing
Lighting is where people unknowingly destroy performance. Too many movable lights, too many shadow-casting sources, huge shadow map distances, complex post-process volumes, heavy SSR, AO, bloom, the engine has to calculate all of this every frame.
In one of my cinematic interiors, disabling shadow casting on just six small point lights dropped my GPU time by almost 3 ms. Another time, lowering cascaded shadow map resolution gave me more headroom than adjusting any single material. If you use Lumen, even small changes like reducing GI quality or ray budget can make large differences.
Lighting doesn’t just make a scene beautiful, it makes or breaks rendering speed. And it all comes down to thoughtful use instead of “throw a light everywhere until it looks good.”
A Workflow That Actually Improves Render Speed
Here’s the truth most Unreal Engine beginners never hear: making your scene render faster isn’t about finding the perfect setting. It’s about following a repeatable workflow. The people who consistently get great performance aren’t the ones who “know every trick” — they’re the ones who follow a simple, boring, incredibly effective loop:
Measure → Fix → Measure → Fix → Measure.
That’s it. That’s the whole game.
Every time I’ve skipped this process, I’ve paid for it in wasted hours.
Most people try to optimize by changing 12 things at once, reducing texture sizes, disabling shadows, turning off Lumen, reworking materials, and then wonder why the result feels worse. When you change everything, you never know which change actually mattered.
The workflow that actually works is slower at first but far faster overall.
Step 1: Profile First
Run these:
stat unit
stat GPU
profileGPU
Find the big numbers. Not the small ones. Not the distracting ones. The big offenders. Maybe it’s shadows. Maybe it’s translucency. Maybe it’s Nanite rasterization. Maybe it’s material cost. Whatever it is, start with the biggest sink.
Step 2: Fix One Thing at a Time
Pick the heaviest problem and fix just that.
Examples:
Reduce unnecessary shadow-casting lights
Simplify a problematic material
Merge props to reduce draw calls
Replace translucent assets with opaque
Remove a huge 8K texture that doesn’t need to be 8K
Clean up Nanite geometry
Small, focused adjustments always perform better than wild, shotgun-style changes.
Step 3: Measure Again
Run the same profiling commands.
Did you save 0.7 ms? Great.
Did you save 3 ms? Even better.
Did nothing change? Undo the tweak and try another.
This is how you avoid wrecking the quality of your scene for no reason.
Step 4: Repeat Until Your Scene Behaves
After five or six cycles, your scene usually starts feeling dramatically lighter. After ten cycles, it’s not unusual to see a 30–60% improvement depending on how messy things were at the start.
In one of my projects, this exact loop took a scene from ~22 ms GPU time to ~12 ms in under two hours. No magic. No tricks. Just fixing the top offenders one by one.
Why This Workflow Matters
Because Unreal Engine can overwhelm you if you try to fix everything at once. But when you approach performance like a sequence of small, targeted improvements, everything becomes manageable. You get better results, you make fewer mistakes, and you understand your project more deeply.
This workflow is the difference between “I hope this works” and “I know exactly what’s slow and how to fix it.”
Unreal Engine keeps evolving fast — if you haven’t checked what changed recently, here’s what’s new in Unreal Engine 5.6 that impacts performance.
When You Should Use Vagon Cloud Computer
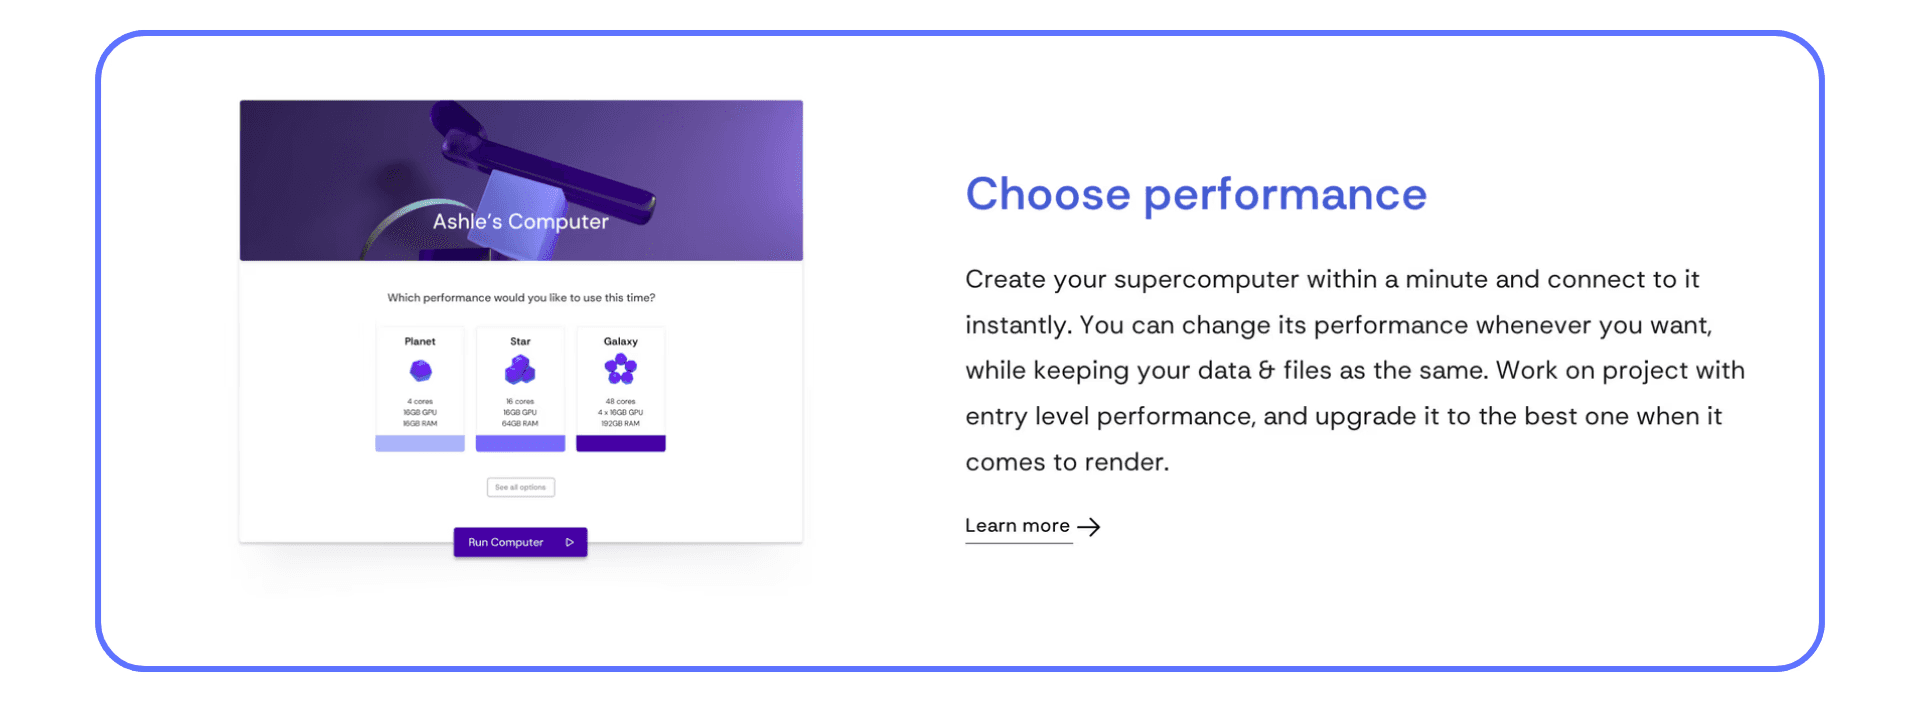
No matter how well you optimize, there comes a point where your hardware becomes the bottleneck. Unreal Engine, especially UE5, demands a lot, VRAM, GPU power, cooling, fast storage, and consistent performance under load. When your machine can’t keep up, progress slows, renders stretch into eternity, and you lose momentum. That’s exactly when using Vagon Cloud Computer makes sense.
The key is understanding why you’re slow. If your project is unoptimized, Vagon won’t magically fix bad shaders or chaotic lighting. But if your project is clean and your hardware simply can’t push it further, that’s when switching to Vagon is the smartest, most time-efficient move.
If your end goal is to deliver your Unreal project through the browser, this breakdown of Pixel Streaming vs WebGL vs WebGPU will help you choose the right deployment method.
#1. When Your GPU VRAM Keeps Maxing Out
Unreal Engine hates running out of VRAM. When it does, textures stream poorly, Lumen gets unstable, viewport responsiveness drops, and the editor begins to stutter. On Vagon, you can instantly jump to a machine with more VRAM than your local PC without buying new hardware or swapping GPUs.
#2. When Shader Compilation Takes Ages
We’ve all made a small tweak to a material and then watched Unreal compile shaders long enough to make lunch. Bigger machines with stronger GPUs and CPUs simply compile shaders faster. If you work with heavy materials or large projects, Vagon’s high-end machines cut this time down in a way that actually changes your workflow.
#3. When Light Baking or High-Quality Renders Drag On
Some tasks are just computationally heavy, path tracing, high-quality cinematic output, Lumen lighting builds, virtual shadow maps, production-level render queues. If your machine cooks itself just trying to render a 4K sequence, running the same task on Vagon can finish significantly faster and without thermal throttling.
#4. When Your Laptop Thermally Throttles
Laptops are convenient for creation but terrible for sustained load. They heat up, downclock, and lose performance halfway through a render. On Vagon, thermal issues disappear entirely since you’re running on hardware built for consistent, high-power output.
#5. When You Need High-End Power Right Now (But Don’t Want to Buy It)
A big advantage of Vagon is immediacy. No waiting weeks for a GPU to arrive, no hunting for a PSU upgrade, no compatibility issues, no driver conflicts. You simply open Vagon and choose a stronger machine. When deadlines are close and your local machine can’t keep up, having instant access to a top-tier GPU is a lifesaver.
But Let’s Be Clear: Vagon Doesn’t Replace Optimization
If your scene is slow because you have 20 shadow-casting lights, 8K textures everywhere, translucent foliage, or messy materials, Vagon will only run that inefficient scene… a little faster. The real performance gains still come from the optimization steps you do locally.
Think of it like this:
Optimization removes waste.
Vagon adds power.
Using both together is where the real speed comes from.

The Workflow That Actually Makes Sense
The best Unreal creators I know follow this pattern:
Build and iterate locally
Optimize methodically
Switch to Vagon when rendering, baking, packaging, or compiling becomes the bottleneck
Return to local work once the heavy lifting is done
This gives you maximum control, maximum speed, and zero dependency on expensive hardware upgrades.
How Much Faster Unreal Engine Can Really Get
One of the biggest misconceptions about Unreal Engine performance is the idea that one setting, one plugin, or one magical checkbox will suddenly unlock 120 FPS or cut render times in half. In reality, the speed improvements you get come in layers, and each layer follows a pattern that every experienced Unreal creator eventually learns.
When you know what to expect, you stop chasing miracles and start building a workflow that delivers consistent results.
The First 30–40%: The Easy Wins
This is the part everyone loves, because the improvements are fast and obvious. Your scene likely has a few heavy offenders, overly complex materials, too many lights with shadows, huge texture sizes, excessive translucency, high draw calls. Fixing these gives you the biggest return with the least effort.
I’ve seen scenes drop from 28 ms to 17 ms (a jump from ~35 to ~58 FPS) in a single afternoon just by cleaning up lighting and materials. If your project hasn’t been optimized before, this stage is where most of your performance gains come from.
The Next 10–20%: The Tuning Phase
After the easy wins, you move into the refinement stage. Here you’re no longer fixing massive problems, you’re improving the results of decent decisions.
This includes things like:
Tweaking shadow cascades
Lowering certain post-process settings
Cleaning up Nanite geometry
Reducing unnecessary WPO in materials
Optimizing foliage density
Reworking a few LOD settings
Each change might only save 0.2–0.7 ms, but these small improvements stack. This is the phase where your project starts to feel “polished” rather than simply “fixed.”
The Final 5–10%: The Hard Part Nobody Mentions
The last bit of performance is where real craftsmanship kicks in. These improvements are subtle and usually require deeper changes, reworking assets, adjusting level layout, reauthoring textures, or reorganizing how your scene is structured.
This stage is only worth pursuing if your project truly needs it (cinematics, large-scale games, client-facing productions). Many scenes don’t require squeezing out that final bit of speed, especially if your target frame time is already stable.
Hardware Helps Only After Optimization
A common mistake is assuming a stronger GPU alone will solve performance issues. It helps, but only after you remove the biggest inefficiencies in your scene. If your lighting or materials are poorly optimized, a better GPU simply struggles at a higher baseline.
Optimized scenes + strong hardware = meaningful gains.
I’ve seen renders go:
From 4 hours → under 90 minutes
From 11 ms locally → 7 ms on a stronger machine
From unstable editor playback → smooth scrubbing even in complex scenes
But all of those improvements were only possible because the project was already clean.
So What’s Realistic?
Here’s the honest summary based on real-world work:
Unoptimized scene: expect 40–60% improvement in a day of focused work.
Partially optimized scene: expect 15–30% improvement with detailed tuning.
Well-optimized scene: expect around 5–10% improvement and likely need stronger hardware for further gains.
Cinematic-heavy scene: optimization helps a lot, but high-end hardware (including Vagon Cloud Computer) becomes essential for render speed.
Performance isn’t magic, it’s math, workflow, and discipline. When you approach it with realistic expectations, every improvement feels like progress instead of frustration.
Why Upgrading Your GPU Isn’t Always the Answer
There’s a classic piece of advice in every Unreal Engine community: “If your render is slow, just buy a better GPU.” It sounds logical. It’s simple. And honestly, it feels good, new hardware always feels like a fresh start. But as someone who has seen poorly optimized scenes bring even high-end cards to their knees, I can confidently say this:
A stronger GPU doesn’t fix the real problem. It just hides it for a little while.
Here’s why this advice falls apart in real production work.
If you want a deeper breakdown of what kind of hardware actually benefits Unreal Engine, I’ve already covered it here: Best Computer for Unreal Engine 5.6.
#1. Bad Optimization Runs Poorly Everywhere
If your scene is burning 10 ms on shadows alone, or if your foliage shader is a tangled mess of masked translucency, even a 4090 will struggle. Sure, it might push a few extra FPS, but the underlying issues remain. Poor lighting setups, excessive transparency, and chaotic materials do not magically become efficient on better hardware.
Upgrading the GPU before fixing your scene is like buying a faster car while ignoring the fact that your tires are flat.
#2. Bigger GPUs Don’t Fix CPU or Game Thread Bottlenecks
If your game thread is at 25 ms because of Blueprint tick events, heavy AI logic, or streaming issues, no GPU on earth can save you. GPU upgrades only help GPU-bound scenes. Unreal Engine performance often depends just as much on CPU efficiency as GPU power.
If the bottleneck isn’t GPU-related, hardware upgrades give you nothing.

And if you’re working on a limited device, here’s how to run Unreal Engine on a low-end machine — even without a GPU.
#3. Throwing Hardware at the Problem Gets Expensive Fast
Even if you want to upgrade, the reality is:
High-end GPUs are expensive
They require bigger power supplies
They need larger cases
They produce more heat
You might need motherboard or PSU upgrades as well
And after all that, you still end up addressing the same optimization issues you could’ve fixed for free.
#4. Good Optimization Scales Much Better Than Hardware
What’s more future-proof?
A scene that’s optimized well
A workflow that detects bottlenecks early
A structure that scales across machines
Assets that behave well in multiple contexts
These improvements last for years and benefit every machine you run your project on, including cloud machines and future hardware you eventually upgrade to.
Hardware becomes a multiplier only after your project is efficient.
#5. “More power” is not the same as “less cost”
Even if a bigger GPU improves performance, it doesn’t help with:
Shader compile speed
Long lighting builds
Thermal throttling
Power draw
System noise
Heat management during long renders
There are plenty of times where compute-heavy tasks scale better on cloud machines like Vagon Cloud Computer than on most personal PCs. But again, this helps only when your project itself is well optimized.

#6. The Creators Who Rely Only on Hardware Lose
The creators who consistently ship polished, efficient Unreal projects aren’t the ones with the biggest GPUs. They’re the ones who understand:
Draw call budgets
Material complexity
Lighting cost
Texture memory
Shadow performance
Lumen behavior
Nanite requirements
They solve the real problems first.
Then they use hardware, local or cloud, as the final boost.
That’s the workflow that lasts.
If you’re trying to decide which GPU actually performs best with Unreal, I’ve tested that too — here’s the best GPU for Unreal Engine, with real numbers.
Your To-Do List for Faster Renders
This isn’t a summary. It’s a practical list you can follow tomorrow morning to make your Unreal Engine scenes render faster, without overthinking, without diving into endless settings menus, and without touching anything that doesn’t need touching. These are the steps that consistently give the biggest returns in the shortest time.
1. Profile your scene before changing anything.
Run stat unit, stat GPU, and profileGPU. Identify the top two or three offenders, not the small stuff.
2. Reduce draw calls where it hurts most.
Merge small props, remove unnecessary material slots, and turn duplicate materials into instances.
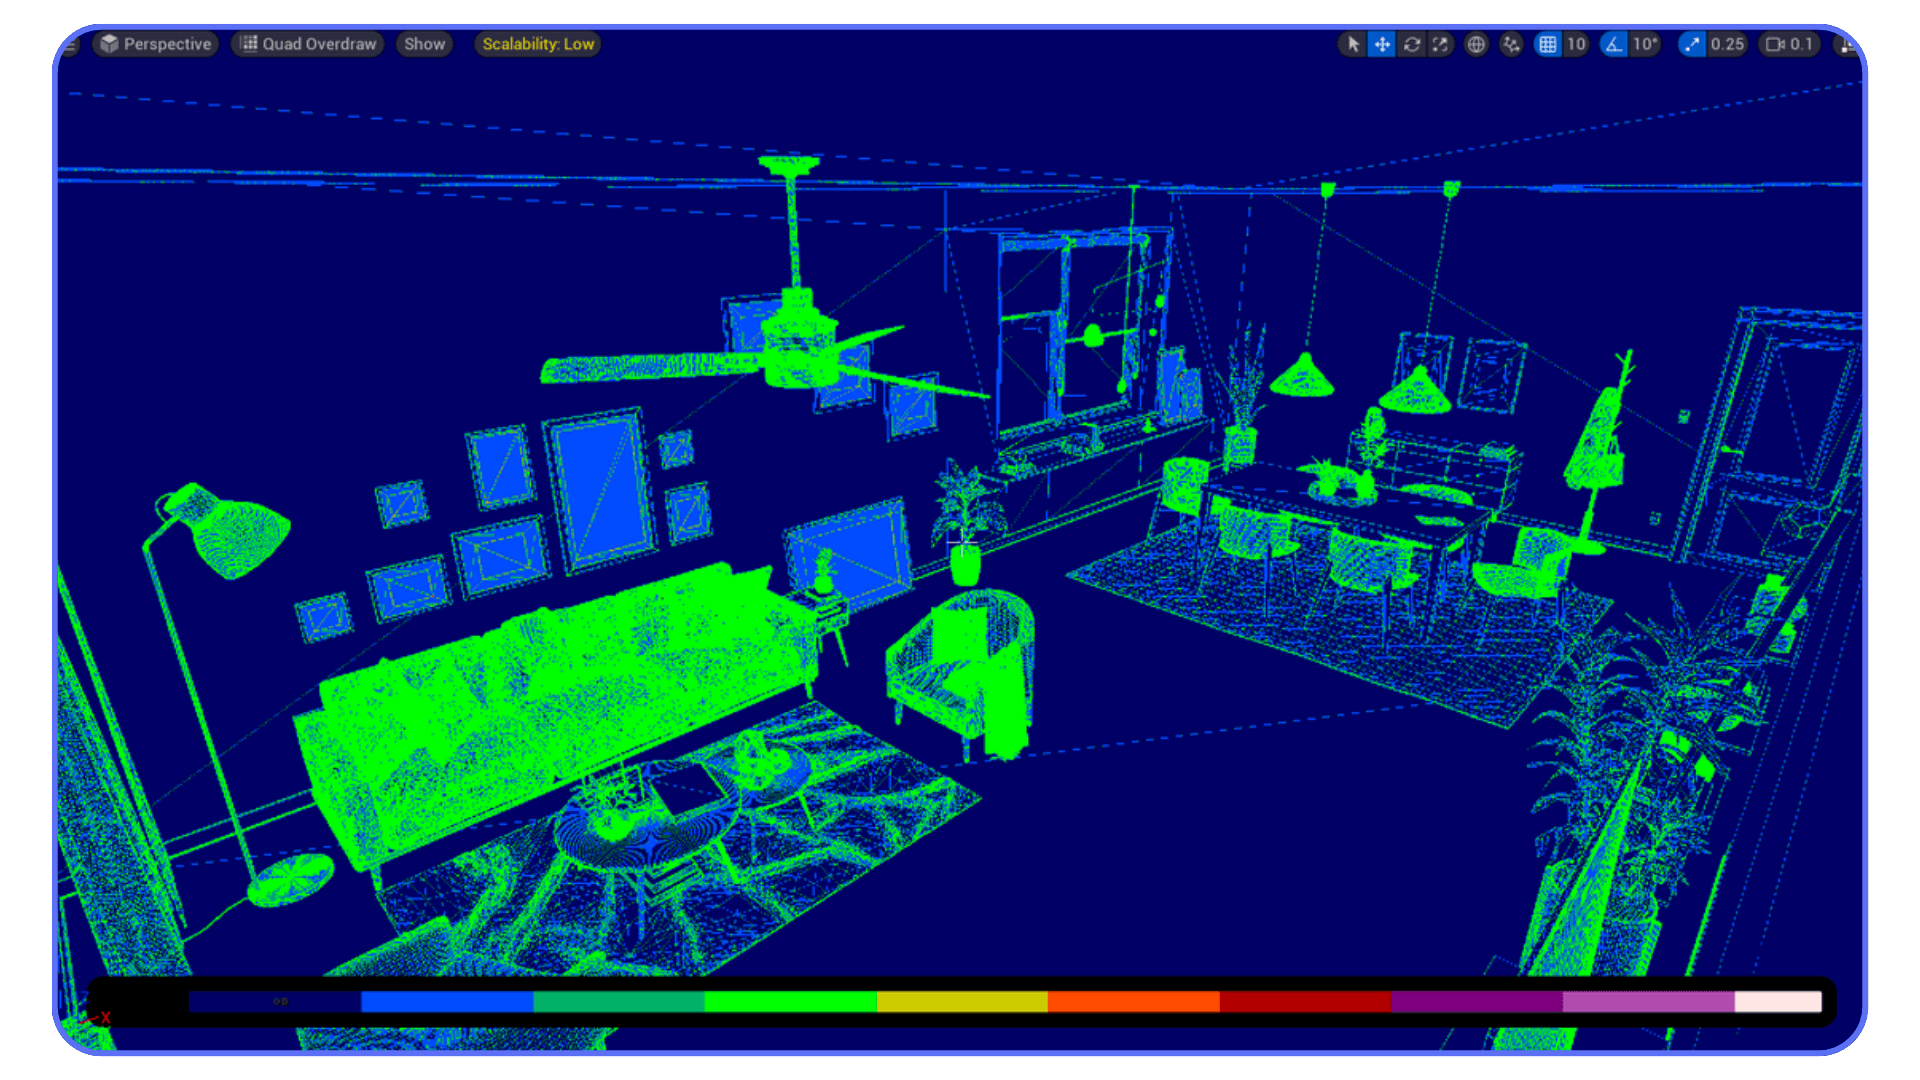
3. Audit your shaders for complexity.
Look at the Shader Complexity view. Simplify materials that show red or white, especially masked or translucent ones.
4. Clean up Nanite and geometry issues.
Delete hidden faces, remove microscopic geometry, fix overly fragmented assets, and inspect raster bins on heavy objects.
5. Lower textures where it makes sense.
Convert unnecessary 4K–8K textures into 1K–2K. You’ll rarely see a visual difference.
6. Fix lighting and shadow costs.
Disable shadow casting on small lights, reduce cascades, lower shadow map resolution, and clean up overlapping light influence.
7. Trim unnecessary post-processing.
Check SSR, AO, bloom, chromatic aberration, and fog. Half of what you enabled early in the project probably isn’t needed anymore.
8. Re-measure after each change.
Don’t move on until you know exactly how much the change helped, or didn’t help.
9. When heavy tasks become unbearable, switch to Vagon Cloud Computer.
Use your local machine for iteration, but offload rendering, baking, packaging, and shader-heavy operations to Vagon when your hardware becomes the bottleneck.
10. Repeat the cycle until your scene feels smooth and predictable.
Performance comes from layering improvements, not from one magic trick.
This checklist looks simple, but following it consistently can turn a sluggish scene into one that responds instantly and renders dramatically faster. The creators who succeed with Unreal aren’t the ones who know every hidden setting, they’re the ones who build a workflow that’s disciplined and predictable.
FAQs
1. Why is Unreal Engine rendering so slow on my machine?
Most slowdowns come from a handful of common issues: too many draw calls, heavy materials, excessive transparency, inefficient lighting, or oversized textures. Rarely is it “Unreal being slow.” Profiling will tell you exactly which one is the real problem.
2. Do I need a powerful GPU to get fast Unreal renders?
A strong GPU helps, but only if your project is already optimized. If your shadows, materials, or transparency are inefficient, a better GPU simply struggles a little less, it doesn’t fix the root cause.
3. Is Nanite always faster?
No. Nanite is excellent for dense geometry, but it doesn’t remove the cost of lighting, materials, translucency, or overdraw. Nanite doesn’t magically fix scenes that are heavy for reasons unrelated to triangle count.
4. Should I bake lighting for better performance?
If your project is static, baked lighting with static lights is usually much faster than using several movable lights. But if your scene is dynamic or you rely on Lumen for GI, baking isn’t always an option.
5. Should I upgrade my CPU, GPU, or RAM first?
If GPU is your bottleneck, upgrade the GPU. If Game Thread is spiking, you need stronger single-core CPU performance. If you’re hitting memory limits or experiencing heavy texture streaming, upgrade RAM. Always check profiling data before spending money.
6. Will Vagon Cloud Computer automatically make my renders faster?
It will make hardware-limited tasks faster, light builds, path-traced renders, packaging, shader compilation, high-res cinematics. But if your project is poorly optimized, Vagon won’t magically solve that. It amplifies a clean scene; it doesn’t fix a broken one.
7. How can I reduce shader compile time?
Use shared material functions, simplify heavy shaders, remove unused shading models, and work on a machine with stronger CPU/GPU hardware when compiling (Vagon helps here). Also avoid making small changes that trigger full recompiles unless necessary.
8. Why does my scene run fine in-editor but slow in packaged build?
Sometimes your packaged build uses different scalability settings, doesn’t have the editor’s debug optimizations, or loads assets differently. Profiling in packaged mode or enabling “Use Fixed Frame Rate” in editor helps you preview more accurate performance.
9. How do I tell what is actually slowing my scene down?
Use stat unit to identify the bottleneck (Game Thread vs Draw Thread vs GPU), then use stat GPU or profileGPU to find the exact pass or system causing spikes. Without profiling, optimization becomes guesswork.
10. Does reducing resolution help?
It helps GPU cost, but if material complexity, shadows, or transparency are causing high ms, lowering resolution won’t fix the real issue. Resolution is a last resort, not a first step.
I still remember the day a simple 12-second Unreal Engine cinematic held me hostage for almost 47 minutes. The render progress bar crawled like it was mocking me, my PC sounded like a jet engine, and I kept asking myself why I ever thought dynamic shadows on twenty-four point lights was a good idea. That was the first time I realized slow renders aren’t just annoying, they break your creative flow. And when Unreal Engine breaks your flow, everything else in your project slows down with it.
If you’ve spent enough time in Unreal, you’ve had your own version of that moment. Maybe it was a forest scene tanking your FPS for no clear reason, or a material tweak that triggered a shader compile session long enough to reconsider your life choices. Whatever it was, the frustration is universal. Unreal Engine is incredibly powerful, but it’s also unforgiving when your scene gets heavier than your hardware, or your workflow, can handle.
This guide isn’t theory. It’s a collection of practical, real-world methods I’ve learned from watching scenes go from unplayable to smooth, and renders go from painfully slow to actually manageable. No vague advice like “optimize your project.” No generic tips you’ve read a thousand times. We’re going straight into what actually speeds up rendering in Unreal Engine, what to look at, what to ignore, what to fix first, and how to make measurable improvements without breaking your project or your schedule.
Let’s get into the stuff that actually makes your renders faster.
If you want a quick reminder of how far Unreal Engine can be pushed, here are some of the top games made with Unreal Engine that show what optimized pipelines can achieve.
Know What’s Actually Slowing You Down
Before you start toggling random settings or deleting half your foliage, you need to know what is actually slowing your scene down. Unreal Engine performance looks complicated from the outside, but diagnosing it is surprisingly straightforward once you understand where to look. And honestly, this step alone separates people who fix performance from people who waste hours guessing.
Most creators jump into optimization blind: they lower resolution, turn off effects, tweak shadows, disable Lumen, then re-enable Lumen, then panic, then blame Nanite. None of it works if you don’t measure. Unreal gives you tools that show exactly where your milliseconds are going, and once you know that, optimization becomes targeted instead of chaotic.
Start with the simplest approach: measure in milliseconds, not FPS. FPS hides the real problem. Milliseconds tell you the truth. Use stat unit and look at three numbers: Game Thread, Draw Thread, and GPU. Whichever is highest is your bottleneck. If GPU is spiking, your scene is too heavy. If Game Thread spikes, it’s probably blueprints, tick events, or complex logic. If Draw Thread stalls, you may have too many draw calls or over-complicated materials.
Then go deeper with stat GPU. This command is the closest thing Unreal has to X-ray vision, shadows, translucency, Lumen reflections, post-processing, Nanite passes, everything is listed with its cost. The first time I ran it on a struggling project, I realized my issue wasn’t Nanite at all, it was 4.8 ms worth of shadow maps coming from lights I didn’t even need.
For a full breakdown, use profileGPU. It captures the entire frame and shows you exactly which render passes are draining performance. I once found a hidden post-process volume that was quietly adding almost 2 ms per frame. Without profiling, I never would’ve noticed it.
If you’re dealing with stutters, inconsistent frame times, or packaged builds running slower than the editor, open Unreal Insights. It visualizes CPU and GPU timelines, shader compilation stalls, hitch spikes, basically the “why is my project behaving like this?” tool.
The bottom line: if you don’t know where your frame time is going, you can’t fix anything. Profiling is the map. Optimization is the journey. Without the map, you’re just wandering.
The Main Things That Make Unreal Engine Slow
Once you know what’s actually slow in your scene, fixing performance becomes much simpler. Unreal Engine isn’t “mysteriously heavy”; it just punishes certain choices harder than others. Over time, I’ve noticed that 80% of slow renders come from the same handful of issues, and the good news is: all of them are fixable.
#1. Draw Calls & Too Many Unique Meshes/Materials
Draw calls are one of the most common, least understood performance killers. Every mesh, every material, every unique object the engine tells the GPU to render counts as a separate draw call. Too many of them, and your frame time explodes.
One of my forest scenes once had over 1,200 unique meshes and 300 materials. It looked great, but ran like a slideshow. Merging props into bigger meshes, removing excess material slots, reusing material instances, and enabling HLODs immediately cut the draw calls almost in half and bumped performance significantly. If your draw call count is high, even small changes make a big difference.
#2. Material Complexity & Shader Cost
Unreal’s material editor is powerful, which makes it easy to overdo things without realizing it. Heavy noise layers, multiple texture coordinates, WPO animation, masked materials, complex translucency, these all add expensive shader instructions.
One of my worst offenders was a translucent grass material with WPO sway, multiple masks, and subsurface scattering layered on top. It cost nearly 4 ms on its own. Simplifying it, switching to opaque, lowering instruction count, reducing unnecessary nodes, dropped its cost to about 1.3 ms with almost no visible quality loss.
If your shader complexity view is full of red and white, that’s your bottleneck.
#3. Geometry, LODs & Smart Nanite Usage
Nanite changed everything, but it’s not a miracle button. It handles high poly meshes extremely well, but it can still struggle with fragmented geometry, messy topology, or millions of micro details that don’t matter visually. It also doesn’t solve problems related to overdraw, heavy materials, or lighting.
When I imported a 20M-triangle environment model assuming Nanite would “just handle it,” rasterization cost shot up instead. Cleaning hidden faces, removing microscopic geometry, merging overly fragmented meshes, and verifying Nanite’s raster bins fixed the issue. Nanite is incredible, when you feed it assets it actually likes.
#4. Overdraw, Transparency & Texture Sizes
Overdraw is the silent killer of Unreal performance. Whenever Unreal draws through multiple transparent or masked objects layered over each other, foliage cards, fog planes, particles, UI surfaces, the GPU has to shade the same pixel again and again.
I once had a single fog plane costing almost 2 ms because it overlapped with several layers of foliage. Switching it to a cheaper opaque mesh-based effect fixed the problem instantly.
Texture size matters too: not everything needs to be 8K. In many cases, 2K or even 1K looks identical but saves a ton of memory and bandwidth.
#5. Lighting, Shadows & Post-Processing
Lighting is where people unknowingly destroy performance. Too many movable lights, too many shadow-casting sources, huge shadow map distances, complex post-process volumes, heavy SSR, AO, bloom, the engine has to calculate all of this every frame.
In one of my cinematic interiors, disabling shadow casting on just six small point lights dropped my GPU time by almost 3 ms. Another time, lowering cascaded shadow map resolution gave me more headroom than adjusting any single material. If you use Lumen, even small changes like reducing GI quality or ray budget can make large differences.
Lighting doesn’t just make a scene beautiful, it makes or breaks rendering speed. And it all comes down to thoughtful use instead of “throw a light everywhere until it looks good.”
A Workflow That Actually Improves Render Speed
Here’s the truth most Unreal Engine beginners never hear: making your scene render faster isn’t about finding the perfect setting. It’s about following a repeatable workflow. The people who consistently get great performance aren’t the ones who “know every trick” — they’re the ones who follow a simple, boring, incredibly effective loop:
Measure → Fix → Measure → Fix → Measure.
That’s it. That’s the whole game.
Every time I’ve skipped this process, I’ve paid for it in wasted hours.
Most people try to optimize by changing 12 things at once, reducing texture sizes, disabling shadows, turning off Lumen, reworking materials, and then wonder why the result feels worse. When you change everything, you never know which change actually mattered.
The workflow that actually works is slower at first but far faster overall.
Step 1: Profile First
Run these:
stat unit
stat GPU
profileGPU
Find the big numbers. Not the small ones. Not the distracting ones. The big offenders. Maybe it’s shadows. Maybe it’s translucency. Maybe it’s Nanite rasterization. Maybe it’s material cost. Whatever it is, start with the biggest sink.
Step 2: Fix One Thing at a Time
Pick the heaviest problem and fix just that.
Examples:
Reduce unnecessary shadow-casting lights
Simplify a problematic material
Merge props to reduce draw calls
Replace translucent assets with opaque
Remove a huge 8K texture that doesn’t need to be 8K
Clean up Nanite geometry
Small, focused adjustments always perform better than wild, shotgun-style changes.
Step 3: Measure Again
Run the same profiling commands.
Did you save 0.7 ms? Great.
Did you save 3 ms? Even better.
Did nothing change? Undo the tweak and try another.
This is how you avoid wrecking the quality of your scene for no reason.
Step 4: Repeat Until Your Scene Behaves
After five or six cycles, your scene usually starts feeling dramatically lighter. After ten cycles, it’s not unusual to see a 30–60% improvement depending on how messy things were at the start.
In one of my projects, this exact loop took a scene from ~22 ms GPU time to ~12 ms in under two hours. No magic. No tricks. Just fixing the top offenders one by one.
Why This Workflow Matters
Because Unreal Engine can overwhelm you if you try to fix everything at once. But when you approach performance like a sequence of small, targeted improvements, everything becomes manageable. You get better results, you make fewer mistakes, and you understand your project more deeply.
This workflow is the difference between “I hope this works” and “I know exactly what’s slow and how to fix it.”
Unreal Engine keeps evolving fast — if you haven’t checked what changed recently, here’s what’s new in Unreal Engine 5.6 that impacts performance.
When You Should Use Vagon Cloud Computer
No matter how well you optimize, there comes a point where your hardware becomes the bottleneck. Unreal Engine, especially UE5, demands a lot, VRAM, GPU power, cooling, fast storage, and consistent performance under load. When your machine can’t keep up, progress slows, renders stretch into eternity, and you lose momentum. That’s exactly when using Vagon Cloud Computer makes sense.
The key is understanding why you’re slow. If your project is unoptimized, Vagon won’t magically fix bad shaders or chaotic lighting. But if your project is clean and your hardware simply can’t push it further, that’s when switching to Vagon is the smartest, most time-efficient move.
If your end goal is to deliver your Unreal project through the browser, this breakdown of Pixel Streaming vs WebGL vs WebGPU will help you choose the right deployment method.
#1. When Your GPU VRAM Keeps Maxing Out
Unreal Engine hates running out of VRAM. When it does, textures stream poorly, Lumen gets unstable, viewport responsiveness drops, and the editor begins to stutter. On Vagon, you can instantly jump to a machine with more VRAM than your local PC without buying new hardware or swapping GPUs.
#2. When Shader Compilation Takes Ages
We’ve all made a small tweak to a material and then watched Unreal compile shaders long enough to make lunch. Bigger machines with stronger GPUs and CPUs simply compile shaders faster. If you work with heavy materials or large projects, Vagon’s high-end machines cut this time down in a way that actually changes your workflow.
#3. When Light Baking or High-Quality Renders Drag On
Some tasks are just computationally heavy, path tracing, high-quality cinematic output, Lumen lighting builds, virtual shadow maps, production-level render queues. If your machine cooks itself just trying to render a 4K sequence, running the same task on Vagon can finish significantly faster and without thermal throttling.
#4. When Your Laptop Thermally Throttles
Laptops are convenient for creation but terrible for sustained load. They heat up, downclock, and lose performance halfway through a render. On Vagon, thermal issues disappear entirely since you’re running on hardware built for consistent, high-power output.
#5. When You Need High-End Power Right Now (But Don’t Want to Buy It)
A big advantage of Vagon is immediacy. No waiting weeks for a GPU to arrive, no hunting for a PSU upgrade, no compatibility issues, no driver conflicts. You simply open Vagon and choose a stronger machine. When deadlines are close and your local machine can’t keep up, having instant access to a top-tier GPU is a lifesaver.
But Let’s Be Clear: Vagon Doesn’t Replace Optimization
If your scene is slow because you have 20 shadow-casting lights, 8K textures everywhere, translucent foliage, or messy materials, Vagon will only run that inefficient scene… a little faster. The real performance gains still come from the optimization steps you do locally.
Think of it like this:
Optimization removes waste.
Vagon adds power.
Using both together is where the real speed comes from.
The Workflow That Actually Makes Sense
The best Unreal creators I know follow this pattern:
Build and iterate locally
Optimize methodically
Switch to Vagon when rendering, baking, packaging, or compiling becomes the bottleneck
Return to local work once the heavy lifting is done
This gives you maximum control, maximum speed, and zero dependency on expensive hardware upgrades.
How Much Faster Unreal Engine Can Really Get
One of the biggest misconceptions about Unreal Engine performance is the idea that one setting, one plugin, or one magical checkbox will suddenly unlock 120 FPS or cut render times in half. In reality, the speed improvements you get come in layers, and each layer follows a pattern that every experienced Unreal creator eventually learns.
When you know what to expect, you stop chasing miracles and start building a workflow that delivers consistent results.
The First 30–40%: The Easy Wins
This is the part everyone loves, because the improvements are fast and obvious. Your scene likely has a few heavy offenders, overly complex materials, too many lights with shadows, huge texture sizes, excessive translucency, high draw calls. Fixing these gives you the biggest return with the least effort.
I’ve seen scenes drop from 28 ms to 17 ms (a jump from ~35 to ~58 FPS) in a single afternoon just by cleaning up lighting and materials. If your project hasn’t been optimized before, this stage is where most of your performance gains come from.
The Next 10–20%: The Tuning Phase
After the easy wins, you move into the refinement stage. Here you’re no longer fixing massive problems, you’re improving the results of decent decisions.
This includes things like:
Tweaking shadow cascades
Lowering certain post-process settings
Cleaning up Nanite geometry
Reducing unnecessary WPO in materials
Optimizing foliage density
Reworking a few LOD settings
Each change might only save 0.2–0.7 ms, but these small improvements stack. This is the phase where your project starts to feel “polished” rather than simply “fixed.”
The Final 5–10%: The Hard Part Nobody Mentions
The last bit of performance is where real craftsmanship kicks in. These improvements are subtle and usually require deeper changes, reworking assets, adjusting level layout, reauthoring textures, or reorganizing how your scene is structured.
This stage is only worth pursuing if your project truly needs it (cinematics, large-scale games, client-facing productions). Many scenes don’t require squeezing out that final bit of speed, especially if your target frame time is already stable.
Hardware Helps Only After Optimization
A common mistake is assuming a stronger GPU alone will solve performance issues. It helps, but only after you remove the biggest inefficiencies in your scene. If your lighting or materials are poorly optimized, a better GPU simply struggles at a higher baseline.
Optimized scenes + strong hardware = meaningful gains.
I’ve seen renders go:
From 4 hours → under 90 minutes
From 11 ms locally → 7 ms on a stronger machine
From unstable editor playback → smooth scrubbing even in complex scenes
But all of those improvements were only possible because the project was already clean.
So What’s Realistic?
Here’s the honest summary based on real-world work:
Unoptimized scene: expect 40–60% improvement in a day of focused work.
Partially optimized scene: expect 15–30% improvement with detailed tuning.
Well-optimized scene: expect around 5–10% improvement and likely need stronger hardware for further gains.
Cinematic-heavy scene: optimization helps a lot, but high-end hardware (including Vagon Cloud Computer) becomes essential for render speed.
Performance isn’t magic, it’s math, workflow, and discipline. When you approach it with realistic expectations, every improvement feels like progress instead of frustration.
Why Upgrading Your GPU Isn’t Always the Answer
There’s a classic piece of advice in every Unreal Engine community: “If your render is slow, just buy a better GPU.” It sounds logical. It’s simple. And honestly, it feels good, new hardware always feels like a fresh start. But as someone who has seen poorly optimized scenes bring even high-end cards to their knees, I can confidently say this:
A stronger GPU doesn’t fix the real problem. It just hides it for a little while.
Here’s why this advice falls apart in real production work.
If you want a deeper breakdown of what kind of hardware actually benefits Unreal Engine, I’ve already covered it here: Best Computer for Unreal Engine 5.6.
#1. Bad Optimization Runs Poorly Everywhere
If your scene is burning 10 ms on shadows alone, or if your foliage shader is a tangled mess of masked translucency, even a 4090 will struggle. Sure, it might push a few extra FPS, but the underlying issues remain. Poor lighting setups, excessive transparency, and chaotic materials do not magically become efficient on better hardware.
Upgrading the GPU before fixing your scene is like buying a faster car while ignoring the fact that your tires are flat.
#2. Bigger GPUs Don’t Fix CPU or Game Thread Bottlenecks
If your game thread is at 25 ms because of Blueprint tick events, heavy AI logic, or streaming issues, no GPU on earth can save you. GPU upgrades only help GPU-bound scenes. Unreal Engine performance often depends just as much on CPU efficiency as GPU power.
If the bottleneck isn’t GPU-related, hardware upgrades give you nothing.
And if you’re working on a limited device, here’s how to run Unreal Engine on a low-end machine — even without a GPU.
#3. Throwing Hardware at the Problem Gets Expensive Fast
Even if you want to upgrade, the reality is:
High-end GPUs are expensive
They require bigger power supplies
They need larger cases
They produce more heat
You might need motherboard or PSU upgrades as well
And after all that, you still end up addressing the same optimization issues you could’ve fixed for free.
#4. Good Optimization Scales Much Better Than Hardware
What’s more future-proof?
A scene that’s optimized well
A workflow that detects bottlenecks early
A structure that scales across machines
Assets that behave well in multiple contexts
These improvements last for years and benefit every machine you run your project on, including cloud machines and future hardware you eventually upgrade to.
Hardware becomes a multiplier only after your project is efficient.
#5. “More power” is not the same as “less cost”
Even if a bigger GPU improves performance, it doesn’t help with:
Shader compile speed
Long lighting builds
Thermal throttling
Power draw
System noise
Heat management during long renders
There are plenty of times where compute-heavy tasks scale better on cloud machines like Vagon Cloud Computer than on most personal PCs. But again, this helps only when your project itself is well optimized.
#6. The Creators Who Rely Only on Hardware Lose
The creators who consistently ship polished, efficient Unreal projects aren’t the ones with the biggest GPUs. They’re the ones who understand:
Draw call budgets
Material complexity
Lighting cost
Texture memory
Shadow performance
Lumen behavior
Nanite requirements
They solve the real problems first.
Then they use hardware, local or cloud, as the final boost.
That’s the workflow that lasts.
If you’re trying to decide which GPU actually performs best with Unreal, I’ve tested that too — here’s the best GPU for Unreal Engine, with real numbers.
Your To-Do List for Faster Renders
This isn’t a summary. It’s a practical list you can follow tomorrow morning to make your Unreal Engine scenes render faster, without overthinking, without diving into endless settings menus, and without touching anything that doesn’t need touching. These are the steps that consistently give the biggest returns in the shortest time.
1. Profile your scene before changing anything.
Run stat unit, stat GPU, and profileGPU. Identify the top two or three offenders, not the small stuff.
2. Reduce draw calls where it hurts most.
Merge small props, remove unnecessary material slots, and turn duplicate materials into instances.
3. Audit your shaders for complexity.
Look at the Shader Complexity view. Simplify materials that show red or white, especially masked or translucent ones.
4. Clean up Nanite and geometry issues.
Delete hidden faces, remove microscopic geometry, fix overly fragmented assets, and inspect raster bins on heavy objects.
5. Lower textures where it makes sense.
Convert unnecessary 4K–8K textures into 1K–2K. You’ll rarely see a visual difference.
6. Fix lighting and shadow costs.
Disable shadow casting on small lights, reduce cascades, lower shadow map resolution, and clean up overlapping light influence.
7. Trim unnecessary post-processing.
Check SSR, AO, bloom, chromatic aberration, and fog. Half of what you enabled early in the project probably isn’t needed anymore.
8. Re-measure after each change.
Don’t move on until you know exactly how much the change helped, or didn’t help.
9. When heavy tasks become unbearable, switch to Vagon Cloud Computer.
Use your local machine for iteration, but offload rendering, baking, packaging, and shader-heavy operations to Vagon when your hardware becomes the bottleneck.
10. Repeat the cycle until your scene feels smooth and predictable.
Performance comes from layering improvements, not from one magic trick.
This checklist looks simple, but following it consistently can turn a sluggish scene into one that responds instantly and renders dramatically faster. The creators who succeed with Unreal aren’t the ones who know every hidden setting, they’re the ones who build a workflow that’s disciplined and predictable.
FAQs
1. Why is Unreal Engine rendering so slow on my machine?
Most slowdowns come from a handful of common issues: too many draw calls, heavy materials, excessive transparency, inefficient lighting, or oversized textures. Rarely is it “Unreal being slow.” Profiling will tell you exactly which one is the real problem.
2. Do I need a powerful GPU to get fast Unreal renders?
A strong GPU helps, but only if your project is already optimized. If your shadows, materials, or transparency are inefficient, a better GPU simply struggles a little less, it doesn’t fix the root cause.
3. Is Nanite always faster?
No. Nanite is excellent for dense geometry, but it doesn’t remove the cost of lighting, materials, translucency, or overdraw. Nanite doesn’t magically fix scenes that are heavy for reasons unrelated to triangle count.
4. Should I bake lighting for better performance?
If your project is static, baked lighting with static lights is usually much faster than using several movable lights. But if your scene is dynamic or you rely on Lumen for GI, baking isn’t always an option.
5. Should I upgrade my CPU, GPU, or RAM first?
If GPU is your bottleneck, upgrade the GPU. If Game Thread is spiking, you need stronger single-core CPU performance. If you’re hitting memory limits or experiencing heavy texture streaming, upgrade RAM. Always check profiling data before spending money.
6. Will Vagon Cloud Computer automatically make my renders faster?
It will make hardware-limited tasks faster, light builds, path-traced renders, packaging, shader compilation, high-res cinematics. But if your project is poorly optimized, Vagon won’t magically solve that. It amplifies a clean scene; it doesn’t fix a broken one.
7. How can I reduce shader compile time?
Use shared material functions, simplify heavy shaders, remove unused shading models, and work on a machine with stronger CPU/GPU hardware when compiling (Vagon helps here). Also avoid making small changes that trigger full recompiles unless necessary.
8. Why does my scene run fine in-editor but slow in packaged build?
Sometimes your packaged build uses different scalability settings, doesn’t have the editor’s debug optimizations, or loads assets differently. Profiling in packaged mode or enabling “Use Fixed Frame Rate” in editor helps you preview more accurate performance.
9. How do I tell what is actually slowing my scene down?
Use stat unit to identify the bottleneck (Game Thread vs Draw Thread vs GPU), then use stat GPU or profileGPU to find the exact pass or system causing spikes. Without profiling, optimization becomes guesswork.
10. Does reducing resolution help?
It helps GPU cost, but if material complexity, shadows, or transparency are causing high ms, lowering resolution won’t fix the real issue. Resolution is a last resort, not a first step.
Get Beyond Your Computer Performance
Run applications on your cloud computer with the latest generation hardware. No more crashes or lags.

Trial includes 1 hour usage + 7 days of storage.
Summarize with AI

Ready to focus on your creativity?
Vagon gives you the ability to create & render projects, collaborate, and stream applications with the power of the best hardware.

Vagon Blog


Run heavy applications on any device with
your personal computer on the cloud.
San Francisco, California
Solutions
Vagon Teams
Vagon Streams
Use Cases
Resources
Vagon Blog
How to Run Inkscape on a Cloud Ubuntu Desktop (2026 Guide)
How to Run Krita on a Cloud Ubuntu Desktop for Digital Painting (2026 Guide)
How to Run GIMP on a Cloud Ubuntu Desktop (2026 Guide)
How to Run Jupyter on a Cloud GPU Linux Desktop (2026 Guide)
Vagon vs GitHub Codespaces: Cloud Dev Environments Compared (2026)
Vagon vs RunPod: Which Cloud GPU Is Right for You? (2026 Comparison)
How to Watch Your AI Agent Work on a Cloud Ubuntu Desktop (2026 Guide)
How to Run a Local LLM on Ubuntu in the Cloud (2026 Guide)
How to Run Blender on a Cloud GPU (Ubuntu): The Complete 2026 Guide
Vagon Blog
Run heavy applications on any device with
your personal computer on the cloud.
San Francisco, California
Solutions
Vagon Teams
Vagon Streams
Use Cases
Resources
Vagon Blog